1. 1
Avalanche Board: (7th grade)
Objectives:
Students will develop an understanding of avalanches as a natural hazard in alpine
environments. They will gain knowledge about issues of snow stability in snowpacks including:
basic crystal differentiation, weak vs. strong bonded layers, and the avalanche triangle. Students
will also design and conduct avalanche experiments using flour, sugar, and mash potatoes to
simulate snowpacks on a board while forming hypotheses and answering in depth questions.
Vocabulary:
Snowpack- Snowpack forms from layers of snow that accumulate in geographic regions and
high altitudes.
Snow Crystals- Fall from the sky in many forms, they can change into other crystal types
overtime.
Weak Layer- Normally contains large, poorly bonded snow crystals, or is a crust.
Strong Layer- Normally contains small, well-bonded snow crystals.
Slope Angle- How steep the terrain is.
Rounds- A type of snow crystal that facilitates strong bonds between one another, a strong layer
in the snowpack
Facets- A triangular shaped snow crystal that forms weak bonds with one another, a weak layer
in the snowpack.
Depth Hoar- Depth hoar are large crystals occurring at the base of a snowpack that form from
when uprising water vapor freezes onto existing snow.
Surface Hoar- The deposition of water vapor from the air as ice crystals on to a cold surface,
think frozen dew.
Crust- A crisp surface on fallen snow, usually formed by the slight melting and refreezing of the
surface snow, can be cause by rain, sun, or ice. Acts as a weak layer once buried by new snow.
Essential Questions:
1. What is the avalanche triangle and why is it useful?
2. What features of a snowpack could be classified as weak or strong and why?
3. What terrain feature affect avalanche occurrence?
Materials:
Avalanche Board
Broom
Dustpan
Tarp
enough flour and sugar, & mash potato flakes
Visual example (crystals and avi materials)
Clinometer or other angles measuring device
White board and markers
Background:
Ask students about their winter recreation activities (skiing, snowshoeing, snow mobiling, etc.)
Have students raise their hands if they recreate in the winter. Explain that 90% of avalanches
involving human subjects are triggered by their victims.
2. 2
Introduce the avalanche triangle by explaining that humans are a major factor in triggering
avalanches, but there are other features that can shed light on why avalanches happen. (Draw
triangle on white board to fill out by questioning students. Avalanche triangle: terrain, weather,
snowpack, and in the center human impact).
Ask students what other features might contribute to avalanche occurrence. (Guide these
questions to the avi triangle: weather, snowpack, and terrain). Make sure to touch on crystal
types, snowpack layers, and what constitutes a weak vs. a strong snow layer.
Guiding Questions & Key Concepts:
“Where do you think different crystal types come from?” or “What makes different crystal types
form?”
“Do you think larger or smaller crystals will form the most stable snow layer? Why?”
“How do you think crystal shape affects the bonding ability of snow?” (Think triangular facets
vs. knobby rounds.) You may want to demonstrate the difference by having the group hold
hands or cluster their hands together in a friendly manner to demonstrate rounds, and then
demonstrate facets by having not-so friendly fists attempt to ‘bond’ with one another, without
much success.
Remember that the more densely packed the crystals can become, the more stable the layer will
be. So, smaller crystals should be more stable than larger crystals. Shape can also affect density
and stability.
Explain to the students that they will be the architects of an avalanche demonstration and each
group will get to complete a given recipe for an avalanche. (If you don’t want to divide your
students into groups, you can still complete the activity for a single group and go through
multiple scenarios.)
Activity:
In order to simulate an avalanche, students must understand the size and shape characteristics
of the substances you use to represent different types of snow. Knowing these characteristics can
help one identify strong and weak layers in a snowpack. Have the students review visual
example of a snow crystal types and their corresponding representation on the avalanche board.
Each visual will contain its own prompt per group (i.e a recipe for a strong or weak snow pack)
that will be chosen in advance by the facilitator.
Before conducting this activity, be sure to consult the corresponding visuals. They will guide
each group through various questions encouraging them to think critically and answer in depth
questions. As a facilitator, you will need to be checking in with each group regarding their
progress and comprehension of the questions. The visual at the end of this document is the
facilitator version of the document students will receive.
3. 3
10th Grade Avalanche Curriculum
Objectives:
Students will further their knowledge of avalanches by diving more in depth with the
concepts of snowpack layers by recreating a current avalanche forecast through the Payette
Avalanche Center’s webpage. This experiment will simulate a real life avalanche forecast and
aims to connect a deeper level of understanding relating to snowpack layers and the
corresponding weather patterns that create them.
Vocabulary:
Slab Avalanche- An avalanche that begins when fracture lines develop in a snowpack and a large
surface plate breaks away, normally the slab will slide across a weak layer.
Essential Questions:
1. What is the current avalanche danger for the McCall region? What led you to that
conclusion?
2. What are the weakest/strongest layers in the snowpack you see when examining the
forecast?
3. What advise would you give to potential skiers or snowmobilers likely to recreate in the
current forecast?
Materials: (in addition to the 7th grade materials)
spray bottle full of water
computer & internet access
Background:
In addition to the 7th grade curriculum above, we suggest for a 10th grade level to recreate a
current avalanche forecast from the Payette Avalanche Center’s website:
http://www.payetteavalanche.org/advisory/
On this website you will find information about current avalanche advisories and snow
conditions. It is normally updated about three times a week. By having the students translate a
current avalanche risk into a simulation it encourages a higher level of thinking as opposed to
the 7th grade curriculum in which the facilitator gives a recipe for an avalanche. You can use
both strategies with this older age group, whereas the 7th grade lesson may be a good
introduction to this more complex assembly of materials.
It is recommended to consult this website prior to the experiment to become familiar with the
information before having students do so. The forecast is normally very detailed, and not all of
the information is relevant to this experiment so it may need to be modified or pared down to fit
within the designated time frame.
Guiding Questions & Key Concepts:
If you begin with the 7th grade curriculum, you can use a transitional statement such as, “Now
that you’ve created a basic snowpack design and tested its stability we will look at an actual
avalanche report which evaluates the snowpack several times a week in the McCall region.”
Recall that each layer in the snowpack represents a different snowstorm with different snow
characteristics. It is the combination of these storms and periodic sun or rain elements that will
4. 4
build a unique snowpack each season.
Activity:
Recreate the current avalanche forecast from the Payette Avalanche Center by clicking on the
link listed above. To do this effectively you will need make sure that each student can see the
screen/projection of the website, or obtain relevant print outs from the website.
In addition to the mashed potatoes, flour, and sugar materials introduce the concept of crusts
that can form do to wind, sun, or ice. These crusts, when buried, can become a weak layer in the
snowpack allowing avalanches to break and slide across this layer. Use a spray bottle to simulate
crust layers by gently spraying any material until its coated in water.
Here is an example of a forecast simulation:
Current forecast from the website (trimmed from its original form):
“We have multiple buried weak layers, crust layers, wind slabs and loads of new snow.
The new snow has piled up over the last week, Brundage Mountain reported 26" inches over the
last 7 days. Snow totals were even higher in the upper elevation areas and variable, strong winds
have piled even more snow.
Winds and temperature fluctuations have left many areas covered with a sensitive 10-12 inch
layer of denser snow above the softer snow below.
In many places the new and wind affected snow has piled up on slopes that are harboring weak
faceted layers, pockets of well preserved surface hoar that formed during our last high pressure.
Pay attention to the bonding between these layers if you are on any slope more than 30 degrees.
The possibility of triggering shallow or deeper avalanches will increase as you move on to slopes
over 35 degrees.”
The re-creation of this scenario may look something like this:
Large layer of new snow (could be represented by flour)
Crust layer (could be represented by water bottle-formed crust)
Weak layer depth hoar (represented by mashed potato flakes)
Softer snow beneath (could be represented by sugar)
Ground (bottom of avalanche board)
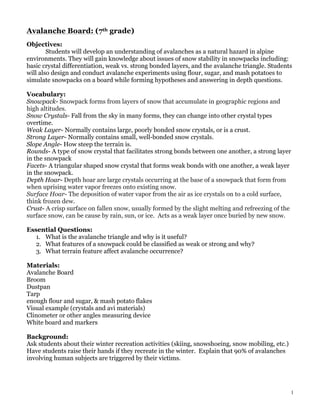
5. 5
Avalanche Board Crystal Visual
Substance
Snow
Classifi
cation
Substance photo
Crystal
Photo
Size
Flour Rounds Small
Sugar Facets Medium
Mash
Potato
Flakes
Hoar
(Depth
or
Surface)
Large
7. 7
Conducting
the
Experiment
1. Construct
your
snowpack
as
follows:
(In
this
diagram
insert
whichever
snow
layers
you’d
like
each
group
to
create.
You
can
list
materials
or
snow
crystal
types.
The
table
below
is
to
give
an
idea
of
snowpack
layers,
which
is
why
it
is
stratified.)
Have
the
students
consult
the
above
picture
of
a
snowpack
to
help
visualize
snowpack
layers
from
the
ground
up.
2. Consider
which
of
these
substances
will
act
as
a
strong
or
weak
layer
in
your
snowpack.
Would
you
play
on
this
snowpack?
Please
form
a
hypothesis
with
your
group
and
record
it
below:
3. Do
you
think
this
will
be
a
strong
or
a
weak
snow
pack?
Why?
4. What
was
the
slope
of
your
avalanche?
5. Did
the
entire
snowpack
avalanche
at
once?
6. Did
only
certain
layers
slide?
If
so
which
ones?
7. Please
explain
which
layers
you
think
are
the
weakest
or
the
strongest
and
why.
Please
explain
how
crystal
types
might
have
affected
your
results.
8. Which
terrain
avalanched
first?
Rocky?
Smooth?
The
same
time?
9. By
observing
the
other
experiments,
which
snowpack
was
the
most
stable,
and
what
features
did
you
observe?
Additional Resources:
http://www.americanavalancheassociation.org
http://utahavalanchecenter.org/know-before-you-go