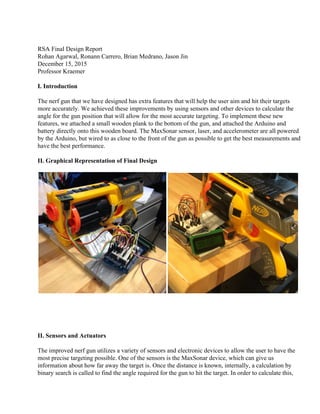
SlideShare a Scribd company logo
1 of 7
Download to read offline
 
RSA Final Design Report 
Rohan Agarwal, Ronann Carrero, Brian Medrano, Jason Jin 
December 15, 2015 
Professor Kraemer 
 
I. Introduction 
The nerf gun that we have designed has extra features that will help the user aim and hit their targets 
more accurately. We achieved these improvements by using sensors and other devices to calculate the 
angle for the gun position that will allow for the most accurate targeting. To implement these new 
features, we attached a small wooden plank to the bottom of the gun, and attached the Arduino and 
battery directly onto this wooden board. The MaxSonar sensor, laser, and accelerometer are all powered 
by the Arduino, but wired to as close to the front of the gun as possible to get the best measurements and 
have the best performance.  
 
II. Graphical Representation of Final Design 


II. Sensors and Actuators 
 
The improved nerf gun utilizes a variety of sensors and electronic devices to allow the user to have the 
most precise targeting possible. One of the sensors is the MaxSonar device, which can give us 
information about how far away the target is. Once the distance is known, internally, a calculation by 
binary search is called to find the angle required for the gun to hit the target. In order to calculate this, 
we first experimentally measured the velocity of the bullets coming out of the gun. The program will 
find the necessary angle, and then display onto the LCD the current angle and the needed angle so the 
user can match the two numbers and then fire away. The accelerometer chip, after calibration on a flat 
surface, will return the angle of the gun. We added a laser pointer on the gun as well so the user knows 
that they can verify that they are aiming in the right direction and informs us that the MaxSonar is 
picking up the correct object and distance. 
 
III. Experimentation 
 
To measure the velocity of the ‘bullets’ coming out of the Nerf gun we performed some 
experimentation. Our experimentation method was clamping our Nerf gun at a fixed height and firing 
the gun. We would then measure the horizontal distance from the gun to where the bullet would land. 
The figure below shows the data that we collected. 
 
 
We then tabulated our results and found the mean range. After finding the mean range we used projectile 
kinematics to find the velocity of the gun. 


IV. The Circuit 
This nerf gun uses a battery powered Arduino to power all of the sensors and other electronic devices. A 
detailed circuit diagram is shown below. 


V. The Program 
The program is what drives all of the sensors and makes everything work. In the setup loop, all of the 
sensors and electronic communication devices are initialized so they can interact. Also in the setup is the 
calibration of the accelerometer. The LCD will display that the gun is calibrating, and will display a 
ready message when it is done. In the main loop, the LCD will first display the current angle and the 
distance of the targeted object. Once the user has decided on the distance, they will press the button on 
the Arduino which is connected to an INPUT_PULLUP pin. This will trigger the interrupt, where the 
distance will be saved, and the necessary angle calculations are performed. To find this angle, the code 
will look for an angle between 0 and 45 degrees that satisfies the kinematic equations based on the 
velocity of the bullet and the distance of the target. The program will do a binary search for the correct 
angle to have better efficiency than trying every possible angle. Then, the LCD will display the 
necessary and current angles so that the user can fire. The commented code is attached. 


VI. Financial Expenses 
 
Shown below is a table of our expenditure and write below that is the summary of our financial 
statement. 
 
Components  Price ($) 
Arduino Uno  22.00 
MaxSonar Sensor  25.00 
Breadboard Shield  2.00 
LCD display  7.00 
Pololu Accelerometer  10.00 
Laser Diode  3.00 
 
Summary: 
 
Total Spent : $69.00 
Budget : $75.00 
Amount Saved: $6.00  


VII. Code 
//Brian Medrano, Ronann Carrero, Rohan Agarwal, Jason Jin 
//RSA Final Project 
//include the libraries of the hardware pieces we use 
 
#include <Wire.h> 
#include <LSM303.h> 
#include <SoftwareSerial.h> 
const int LCD_pin = 12;     //Pin 12 LCD 
SoftwareSerial LCD_Serial = SoftwareSerial(255, LCD_pin); 
//initialize the sensor 
LSM303 sensor; 
int const SWITCH1 = 2; // switch 1 for interrupt 
//variables to hold values for g calculations 
float calibration = 0.0; 
float const vgun = 1368.737; 
float x; 
float gvalue; 
float angle; 
float zaccel; 
//these variables are used inside the interrupt 
//and for the angle calculations 
volatile boolean distcalibrated = false; 
volatile float dist = 0; 
volatile unsigned long lasti = 0; 
volatile float finalangle; 
//setup code before the main operation of the gun 
void setup() { 
  pinMode(SWITCH1, INPUT_PULLUP); 
  attachInterrupt(0, SaveDist, FALLING); 
  pinMode(LCD_pin, OUTPUT); // Initialize the digital pin as an output. 
  digitalWrite(LCD_pin, HIGH); // Set pin to HIGH before beginning serial communication 
  pinMode(8, OUTPUT); //initialize digital pin as output 
  digitalWrite(8, HIGH); //set digital pin to HIGH before serial //communications 
  LCD_Serial.begin(9600); // Begin serial communication. 
  LCD_Serial.write(12); 
  delay(100); // Required delay after starting serial communication 
 
  Wire.begin(); 
  sensor.init(LSM303::device_DLM, LSM303::sa0_low); 
  sensor.enableDefault(); 
  Serial.begin(9600); 
  Serial.println("Please put the Arduino flat on the table."); 
  Serial.println("It will calibrate the accelerometer for the next 5 seconds."); 
  //calibrate the sensor to read in g's 
  LCD_Serial.print("Calibrating..."); 
  for (int x = 0; x < 5; x++) 
  { 
    sensor.read(); 
    calibration += sensor.a.z; 
    delay(1000); 
  } 
  LCD_Serial.write(12); 
  LCD_Serial.write("Ready!"); 
  delay(1000); 
  LCD_Serial.write(12); 
  gvalue = calibration / 5; 
} 
 
void loop() { 
  //this first inner loop will run until we press the button to get the distance we want to fire 
  while (!distcalibrated) { 
    pinMode(A0, INPUT);  // setting analog pin A1 as input 
    x = analogRead(A0);  // reading from A1 (MaxSonar) and storing in a double variable 
    //will read the values 
    sensor.read();  //get the acceleration in g's 
    zaccel = sensor.a.z / gvalue; 
    angle = acos(constrain(zaccel, ­1, 1));  //acos will return the angle in radians 
   
    angle = 180 / 3.14159 * angle; //convert to degrees 
    LCD_Serial.write(12);    // Clear LCD 
    delay(5);      // Required delay after clearing screen 
    //LCD_Serial.write(13);    // Carriage return 
    //we do this if statement here so that we do not print the current values once the button was pressed 
    //once the final distance is set, we then go to the next loop to display the angle needed and the current angle 
    if (distcalibrated) 
    { 
      break; 
    } 
    //display the angle and the distance of the target consistently 
    LCD_Serial.print("Ang:"); 
    LCD_Serial.print(angle); 
    LCD_Serial.write(13); 
    LCD_Serial.print("X:"); 
    //LCD_Serial.write(13);    // Carriage return 
    LCD_Serial.print(x); 
    //LCD_Serial.write(13); 
    delay(250); // delay 
  } 
  delay(1000); 
  //this loop is hit when the final distance is pressed 
  while(true){ 
  //display the necessary angle and the current angle of the gun 
  LCD_Serial.write(12); 
  LCD_Serial.print("need: "); 
  LCD_Serial.print(finalangle); 
  LCD_Serial.write(13); 
  LCD_Serial.print("curr: "); 
  x = analogRead(A0); 
  sensor.read(); 
  zaccel = sensor.a.z / gvalue; 
  angle = acos(constrain(zaccel, ­1, 1)); 
  angle = 180/3.14159* angle; 
  LCD_Serial.print(angle); 
  delay(1000); 
  } 
} 
//the interrupt method 
void SaveDist() 
{ 
  //bounce protection 
  //if it doesnt pass, none of the code will run 
  if ((millis() ­ lasti) > 300) { // check if enough time has passed between 
 
    dist = x; 
    //Serial.println(dist); 
    //variables that we need for the binary search algorithm when trying to find the necessary angle 
    float curr = 22.5; 
    float upper = 45; 
    float lower = 0; 
    boolean done = false; 
    while (!done) 
    { 
      float rad = curr * (3.14159 / 180); //do the necessary angle calculations 
      float vertvel = vgun * sin(rad); 
      //Serial.println(vertvel); 
      float flighttime = vertvel / (980.991) * 2; 
      //Serial.println(flighttime); 
      float horvel = vgun * cos(rad); 
      //Serial.println(horvel); 
      float estdist = horvel * flighttime; 
      //Serial.println(estdist); 
      //Serial.println(dist); 
      //if the angle found is within 1 cm of our desired range, we have finished the angle calculation 
      if (abs(estdist ­ dist) < 1) 
      { 
        //found it 
        //clear the screen, exit the loop 
        LCD_Serial.write(12); 
        done = true; 
        distcalibrated = true; 
        finalangle = curr; 
      } 
      //if the angle found is not correct, we use this code to make the next guess 
      else 
      { 
        //if the distance was too large, change the variables to decrease our next angle guess by half of distance to 
lower 
        if (estdist > dist) 
        { 
          upper = curr; 
          curr = curr ­ ((curr ­ lower)/2); 
        } 
        //if the distance was too small, change the variables to increase the next angle by half of the distance to uper 
        else 
        { 
          lower = curr; 
          curr = curr + ((upper ­ curr)/2); 
        } 
        //keep the number between 0 and 45 
        constrain(curr, 0, 45); 
      } 
    } 
  } 
  lasti = millis(); 
} 


More Related Content

Viewers also liked

Final Year project
Final Year projectFinal Year project
Final Year projectUmair Nasir
 
Reverse engineering
Reverse engineeringReverse engineering
Reverse engineeringkubis7124
 
Reverse engineering
Reverse engineeringReverse engineering
Reverse engineeringdspokale25
 
Mechanical project
Mechanical projectMechanical project
Mechanical projectAbi Nesan
 
Solar Water Purifier Project For Mechanical Engineering
Solar Water Purifier Project For Mechanical EngineeringSolar Water Purifier Project For Mechanical Engineering
Solar Water Purifier Project For Mechanical EngineeringYash Saradva
 
Solid_Modeling_Project_#2_ Reverse engineering of a connecting rod and docume...
Solid_Modeling_Project_#2_ Reverse engineering of a connecting rod and docume...Solid_Modeling_Project_#2_ Reverse engineering of a connecting rod and docume...
Solid_Modeling_Project_#2_ Reverse engineering of a connecting rod and docume...Mehmet Bariskan
 
Driveshaft presentation 03
Driveshaft presentation 03Driveshaft presentation 03
Driveshaft presentation 03Franco Pezza
 
Reverse engineering
Reverse engineeringReverse engineering
Reverse engineeringSaswat Padhi
 
Reverse engineering
Reverse engineeringReverse engineering
Reverse engineeringananya0122
 
Report of design and development of multi purpose mechanical machine
Report of design and development of multi purpose mechanical machine Report of design and development of multi purpose mechanical machine
Report of design and development of multi purpose mechanical machine Jitendra Jha
 
Reverse Engineering
Reverse EngineeringReverse Engineering
Reverse Engineeringdswanson
 
Mechanical Engineering project
Mechanical Engineering projectMechanical Engineering project
Mechanical Engineering projectManpreet Singh
 

Viewers also liked (17)

Final Year project
Final Year projectFinal Year project
Final Year project
 
Reverse engineering
Reverse engineeringReverse engineering
Reverse engineering
 
full report
full reportfull report
full report
 
Reverse engineering
Reverse engineeringReverse engineering
Reverse engineering
 
finalicgt
finalicgtfinalicgt
finalicgt
 
Mechanical project
Mechanical projectMechanical project
Mechanical project
 
Solar Water Purifier Project For Mechanical Engineering
Solar Water Purifier Project For Mechanical EngineeringSolar Water Purifier Project For Mechanical Engineering
Solar Water Purifier Project For Mechanical Engineering
 
Solid_Modeling_Project_#2_ Reverse engineering of a connecting rod and docume...
Solid_Modeling_Project_#2_ Reverse engineering of a connecting rod and docume...Solid_Modeling_Project_#2_ Reverse engineering of a connecting rod and docume...
Solid_Modeling_Project_#2_ Reverse engineering of a connecting rod and docume...
 
Drive shaft by using composite material
Drive shaft by using composite materialDrive shaft by using composite material
Drive shaft by using composite material
 
Driveshaft presentation 03
Driveshaft presentation 03Driveshaft presentation 03
Driveshaft presentation 03
 
Reverse engineering
Reverse engineeringReverse engineering
Reverse engineering
 
Reverse engineering
Reverse engineeringReverse engineering
Reverse engineering
 
Report of design and development of multi purpose mechanical machine
Report of design and development of multi purpose mechanical machine Report of design and development of multi purpose mechanical machine
Report of design and development of multi purpose mechanical machine
 
Reverse Engineering
Reverse EngineeringReverse Engineering
Reverse Engineering
 
MECHANICAL PROJECT
MECHANICAL PROJECTMECHANICAL PROJECT
MECHANICAL PROJECT
 
Mechanical Engineering project
Mechanical Engineering projectMechanical Engineering project
Mechanical Engineering project
 
Final Year Project
Final Year ProjectFinal Year Project
Final Year Project
 

Similar to RSA_Final_Report

Radar Using Arduino
Radar Using ArduinoRadar Using Arduino
Radar Using ArduinoGolu Jain
 
Kinect for Windows SDK - Programming Guide
Kinect for Windows SDK - Programming GuideKinect for Windows SDK - Programming Guide
Kinect for Windows SDK - Programming GuideKatsuhito Okada
 
Final_draft_Practice_School_II_report
Final_draft_Practice_School_II_reportFinal_draft_Practice_School_II_report
Final_draft_Practice_School_II_reportRishikesh Bagwe
 
Characteristics of Different Sensors used for Distance Measurement
Characteristics of Different Sensors used for Distance MeasurementCharacteristics of Different Sensors used for Distance Measurement
Characteristics of Different Sensors used for Distance MeasurementIRJET Journal
 
Top sensors inside the smartphone you want to know
Top sensors inside the smartphone you want to knowTop sensors inside the smartphone you want to know
Top sensors inside the smartphone you want to knowsoniyasag
 
Biometric Identification using Opencv Based on Arduino
Biometric Identification using Opencv Based on ArduinoBiometric Identification using Opencv Based on Arduino
Biometric Identification using Opencv Based on ArduinoIRJET Journal
 
About Distance Meter Device
About Distance Meter DeviceAbout Distance Meter Device
About Distance Meter DeviceTradusway12
 
Spy Sharp Shooter Sensor to Position Military Guns After Intrusion Detection
Spy Sharp Shooter Sensor to Position Military Guns After Intrusion DetectionSpy Sharp Shooter Sensor to Position Military Guns After Intrusion Detection
Spy Sharp Shooter Sensor to Position Military Guns After Intrusion DetectionIRJET Journal
 
IRJET - A Novel Technology for Shooting Sports
IRJET - A Novel Technology for Shooting SportsIRJET - A Novel Technology for Shooting Sports
IRJET - A Novel Technology for Shooting SportsIRJET Journal
 
How laser profilers works
How laser profilers worksHow laser profilers works
How laser profilers worksC-Tec
 
Automatic Object Detection and Target using Ultrasonic Sensor
Automatic Object Detection and Target using Ultrasonic SensorAutomatic Object Detection and Target using Ultrasonic Sensor
Automatic Object Detection and Target using Ultrasonic SensorIRJET Journal
 
Sw2assignment
Sw2assignmentSw2assignment
Sw2assignments1180051
 
Exergaming - Technology and beyond
Exergaming - Technology and beyondExergaming - Technology and beyond
Exergaming - Technology and beyondKaushik Das
 

Similar to RSA_Final_Report (20)

Radar Using Arduino
Radar Using ArduinoRadar Using Arduino
Radar Using Arduino
 
Kinect for Windows SDK - Programming Guide
Kinect for Windows SDK - Programming GuideKinect for Windows SDK - Programming Guide
Kinect for Windows SDK - Programming Guide
 
Final_draft_Practice_School_II_report
Final_draft_Practice_School_II_reportFinal_draft_Practice_School_II_report
Final_draft_Practice_School_II_report
 
input devices By ZAK
input devices By ZAKinput devices By ZAK
input devices By ZAK
 
Characteristics of Different Sensors used for Distance Measurement
Characteristics of Different Sensors used for Distance MeasurementCharacteristics of Different Sensors used for Distance Measurement
Characteristics of Different Sensors used for Distance Measurement
 
Top sensors inside the smartphone you want to know
Top sensors inside the smartphone you want to knowTop sensors inside the smartphone you want to know
Top sensors inside the smartphone you want to know
 
Biometric Identification using Opencv Based on Arduino
Biometric Identification using Opencv Based on ArduinoBiometric Identification using Opencv Based on Arduino
Biometric Identification using Opencv Based on Arduino
 
Scanner
ScannerScanner
Scanner
 
Pdf4
Pdf4Pdf4
Pdf4
 
About Distance Meter Device
About Distance Meter DeviceAbout Distance Meter Device
About Distance Meter Device
 
Spy Sharp Shooter Sensor to Position Military Guns After Intrusion Detection
Spy Sharp Shooter Sensor to Position Military Guns After Intrusion DetectionSpy Sharp Shooter Sensor to Position Military Guns After Intrusion Detection
Spy Sharp Shooter Sensor to Position Military Guns After Intrusion Detection
 
IRJET - A Novel Technology for Shooting Sports
IRJET - A Novel Technology for Shooting SportsIRJET - A Novel Technology for Shooting Sports
IRJET - A Novel Technology for Shooting Sports
 
Week12
Week12Week12
Week12
 
Week12
Week12Week12
Week12
 
How laser profilers works
How laser profilers worksHow laser profilers works
How laser profilers works
 
Automatic Object Detection and Target using Ultrasonic Sensor
Automatic Object Detection and Target using Ultrasonic SensorAutomatic Object Detection and Target using Ultrasonic Sensor
Automatic Object Detection and Target using Ultrasonic Sensor
 
Week12group
Week12groupWeek12group
Week12group
 
Sw2assignment
Sw2assignmentSw2assignment
Sw2assignment
 
DEFENSE.pptx
DEFENSE.pptxDEFENSE.pptx
DEFENSE.pptx
 
Exergaming - Technology and beyond
Exergaming - Technology and beyondExergaming - Technology and beyond
Exergaming - Technology and beyond
 

RSA_Final_Report