
Recommended
Recommended
More Related Content
Recently uploaded
Recently uploaded (20)
Featured
Featured (20)
How to Make an Author's Bible
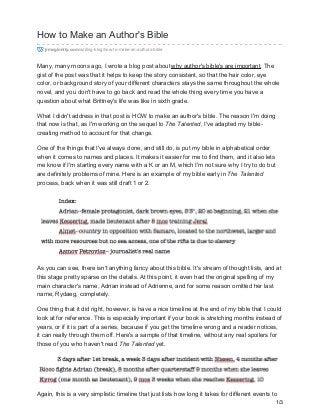
- 1. How to Make an Author's Bible jrmcginnity.com/writing-blog/how-to-make-an-authors-bible Many, many moons ago, I wrote a blog post aboutwhy author's bible's are important. The gist of the post was that it helps to keep the story consistent, so that the hair color, eye color, or background story of your different characters stays the same throughout the whole novel, and you don't have to go back and read the whole thing every time you have a question about what Brittney's life was like in sixth grade. What I didn't address in that post is HOW to make an author's bible. The reason I'm doing that now is that, as I'm working on the sequel to The Talented, I've adapted my bible- creating method to account for that change. One of the things that I've always done, and still do, is put my bible in alphabetical order when it comes to names and places. It makes it easier for me to find them, and it also lets me know if I'm starting every name with a K or an M, which I'm not sure why I try to do but are definitely problems of mine. Here is an example of my bible early in The Talented process, back when it was still draft 1 or 2. As you can see, there isn't anything fancy about this bible. It's stream of thought lists, and at this stage pretty sparse on the details. At this point, it even had the original spelling of my main character's name, Adrian instead of Adrienne, and for some reason omitted her last name, Rydaeg, completely. One thing that it did right, however, is have a nice timeline at the end of my bible that I could look at for reference. This is especially important if your book is stretching months instead of years, or if it is part of a series, because if you get the timeline wrong and a reader notices, it can really through them off. Here's a sample of that timeline, without any real spoilers for those of you who haven't read The Talented yet. Again, this is a very simplistic timeline that just lists how long it takes for different events to 1/3
- 2. happen. As I read through my drafts I would check the time in the novel against the timeline at the back and adjust accordingly to make sure everything measured up. If I was doing this by hand I probably would have drawn a linear timeline, but for me working on the computer this was easier. If the visual of a traditional timeline works for you, I suggest you make that. Anything that makes keeping your story straight easier helps. One change that I made in the bible for the second book was to put anything new inbold. This helps me find new things faster, and also lets me know what can't be changed because it's already included in a published book. Here's a snapshot of what's new this time around: The only downside to putting the new elements in bold is that it has the effect of making the bible look sloppier, not that I care, because for me it's easier to format it that way, and that's the key to an author's bible, it's there to help you. On that note, if you prefer a more polished author's bible, that is entirely up to you. Many books include indices at the back of them to help readers keep track of characters and places as well, and an author's bible can easily be adapted to that purpose, just take out the unimportant (to reader) details like hair length and anything that could spoil the plot or give too much detail too soon, such as a completed timeline. If you want a more personal touch, or something that appeals to your crafty side, you can make your own journal to carry around with you. Here's a picture of an easy(ish) DIY journal, and a picture of one I made myself so that if I'm away from my computer I can plot story ideas in the front and keep track of characters and places in the back. Does anyone else out there keep an author's bible, or any tips on creating a better one? I'm always open to new ideas for streamlining my process, so share what you have in the comments below. 2/3
- 3. 3/3