
Recommended
More Related Content
What's hot
What's hot (12)
Similar to Hướng dẫn làm đồ chơi gỗ cho trẻ em
Similar to Hướng dẫn làm đồ chơi gỗ cho trẻ em (20)
Recently uploaded
Recently uploaded (20)
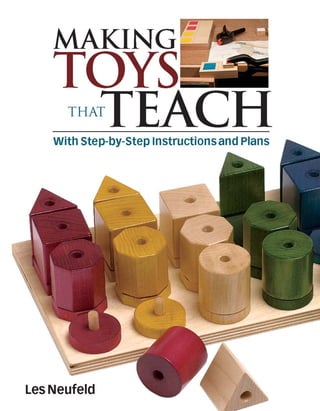
Hướng dẫn làm đồ chơi gỗ cho trẻ em
- 2. M A K I N G TOYS T H A T TEACH
- 4. with Step-by-Step Instructions and Plans Les Neufeld t M A K I N G TOYS T H A T TEACH
- 5. Text © 2003 by Les Neufeld Photographs © 2003 by The Taunton Press, Inc. Illustrations © 2003 by The Taunton Press, Inc. All rights reserved. Pp The Taunton Press, Inc., 63 South Main Street, PO Box 5506, Newtown, CT 06470-5506 e-mail: tp@taunton.com Editor: Stefanie Ramp Jacket/Cover design: Mary McKeon Interior design: Carol Petro Layout: Carol Petro Illustrator: Melanie Powell Photographers: Les Neufeld and Scott Phillips Library of Congress Cataloging-in-Publication Data Neufeld, Les. Making toys that teach : with step-by-step instructions and plans / Les Neufeld. p. cm. Includes bibliographical references. ISBN-13: 978-1-56158-606-6 ISBN-10: 1-56158-606-4 1. Wooden toy making. 2. Educational toys. I. Title. TT174.5.W6 N48 2003 745.592--dc21 2003001363 Printed in the United States of America 10 9 8 7 6 5 4 The following brand names/manufacturers are trademarked: Amana Tool®, Bridgewood®, CMT®, Delta®, DeWalt®, Felder®, Freud®, General®, Gudho®, Grizzly®, Incra®, Jet Equipment & Tools®, Makita®, Porter Cable®, Powermatic®, Q-tip®, Ridgid®, Ryobi®, Shopsmith®, and Tried & True®. Working with wood is inherently dangerous. Using hand or power tools improp- erly or ignoring safety practices can lead to permanent injury or even death. Don’t try to perform operations you learn about here (or elsewhere) unless you’re certain they are safe for you. If something about an operation doesn’t feel right, don’t do it. Look for another way. We want you to enjoy the craft, so please keep safety foremost in your mind whenever you’re in the shop.
- 6. acknowledgments My children have often spurred me on to design, build, and improve a great variety of wooden toys and so deserve credit for these toys being more useful than they might otherwise have been. Thank you Eric, Kevin, and Lisa. Corrinne, I thank you for your constant support. You have been wonderful. There are several fellow educators whom I can always count on for help, advice, and ideas. Thank you Tony, Dave, Mark, Laurie, and Dennis. For their support, I thank the various members of my immediate and extended family. Although I hesitate to single out one person, I must give a special thanks to Roger for his continual interest and encouragement. Tom Clark was instrumental in developing the original concept for this book. Jenny Peters did a lot of the initial running around and communicating. Thank you both. Stefanie Ramp did a great job of editing and improving the manuscript in countless ways. Your work was very much appreciated. Thank you, Stef. Others at Taunton worked on editing, design, photography, and layout. It is a wonderful thing to hand off a rather crude-looking manuscript and have it come out as an attractive book. Thank you all. To my father, Elvin Neufeld, a fine parent, educator, and craftsman
- 7. Introduction . . . . . . . 2 Making Toys That Teach . . . . . . . 4 Fraction Circles . . . . 14 Pattern Blocks . . . . . 22 Big Beads . . . . . . . . 32 Bead Board . . . . . . 40 Attribute Dominoes . . . . . . . 46 contents
- 8. 1 /2" 11 /2" 41 /2" 3 /4" 5" 3 /4" 13 /4" Shape Puzzle Box . . . . . . 54 Stacking Pyramid . . . 62 The Ultimate Building Block Set . . . 72 Puzzle Train . . . . . . 92 Sources . . . . . . . . . . . 130 Further Reading . . . . . . . 135 Bibliography . . . . . . . . . 137
- 9. ew experiences have had as profound an impact on my life as having children. Eric, the first of our three, was a great child and is now a fine young man, though he always did walk to the beat of his own drum. As a toddler, his complete disregard for conventional toys was a great surprise, and although I tried a great variety of shiny, noisy toys, Eric preferred to play with the boxes they came in. I have found out since that, to some extent, many parents have had similar experiences. There were times when Eric, as a toddler, was bored and would amble about not doing much of anything. I was in the middle of working on a master’s degree in education and was all too aware of current research regard- ing the importance of stimulation and activity for young children’s development. As a young parent, I neared panic level and started to make toys that would be more likely to inter- est and challenge Eric. By the time our third child came around, I must confess that I was no longer as intense, but my concern did serve to influence me to start making toys. Some toys did not pass Eric’s standards for interest, and others did not pass the test of time and durability, as they passed through the hands of two more children (Kevin and Lisa). However, some toys endured, and they show up in this book with slight modifica- tions. A few come as ideas from other parents and educators and a few have been traditional favorites for hundreds of years. Many of the most successful toys are the simplest. My father presented Eric with a simple set of wooden blocks in various shapes and made from a variety of woods. Most were cut from scraps gath- ered from his shop floor. My kids played with these for years. Later a friend made a set of oversize pine domino blocks, and I was often called by Kevin and Lisa to “come look” at their many strange and wonderful uses for these domi- noes. The shape puzzle box is an 2 introduction f
- 10. exact copy of the first development toy I made for Eric (during a parental panic)—the only toy that endured unmodified and undamaged to this day, despite much use. Make the toys as carefully as your person- ality dictates. Durability is important, but the educational value does not diminish with a few sanding scratches left in or with a train car that is 1 ⁄8 in. too short. Your satisfaction may be affected, however, so the craftsman- ship required in these projects is up to you. I think the toy should start out as flawless as you are prepared to make it, but keep in mind that these are toys to be used in young hands. 3 Children will dent and scratch them even- tually, so it is a different level of long-term care than might be appropriate with a beau- tiful china cabinet. No project part uses a large amount of wood or takes a large amount of time. Don’t let it worry you if some mistakes are made along the way; you have wasted little time or money and have gained experience. I have heard it said that experience is what you get when you didn’t get what you wanted to get. That is probably true, but in woodworking, experience is a valuable asset all the same. I not only enjoy making these projects for those reasons but also because of the pleasure I see on my children’s faces as they receive and play with the toys. I don’t wonder if the toy is too loud, junky, or somehow detrimen- tal to the child’s development. These toys are just the opposite. Build these toys knowing that your hand- made toys are those most likely to be around for more than one generation and that have a value attached to them that is far above the actual monetary figure.
- 11. 4 O V E R V I E W ll parentswant toys that nurture and develop the creativity and learning ability that children naturally possess.These toys should be fun, but they should also be educational tools that allow us to give children opportunities to grow.As a parent, educator, and woodworker, I had a natural desire to create such toys. I also wanted to encourage beginning woodworkers to tackle toy making.To that end I have attempted to keep the projects in this book free of any roadblocks that might hinder a person who is not highly skilled or does not have expensive machinery—no complex inlays or hand-cut joints here.And accordingly, the shop equipment and space required has been kept modest. It is my hope that beginning woodworkers not only tackle the projects but enjoy them as well; hobbies that cause frustration are rarely pursued, and woodworking is definitely worth pursuing.The layout of the book is organized in such a way as to ensure clarity and to answer as many questions as possible along the way. MakingToys ThatTeach a
- 12. 5 5
- 13. Layout of the Book After nearly 25 years of teaching apprentices, teenagers, and novice adults, I am a firm believer in pictures and drawings as a means of simplifying communication. Wherever possible, photos accom- pany the written instructions. If you glance through a chapter looking only at the photos and drawings, you should have a pretty good idea of how to build the project. The text is there to fill in any gaps and restate what is being demonstrated in a photo in case there is a question about the techni- cal details. Drawings, or “blueprints,” are a necessity. Although all the sizes appear on the drawings, I have often restated the dimensions in the text as a means of ensuring clarity. In many places, I have ignored strict drafting dimension conventions in order to make the drawings clearer. For instance, a given dimension may be repeated on a top view and a side view of a project. Each project also has a cut list. While you could gather this information from the drawings, it is always nicer to have the list in front of you as you start. In some more involved projects, such as the Ultimate Building Block Set, an idea of the total amount of wood required has also been included at the beginning of the chapter. At the beginning of each chapter, you will also find a list of tools you’ll need. This is included to prevent you from reaching some point in a project when you realize you cannot reasonably continue because some key piece of equipment is unavailable. If you know ahead of time that you need a 9 ⁄16-in. drill bit, you can likely beg, borrow, or steal one for a day or two. If nothing else, it will give you an excuse to go to the local tool-supply store and make another purchase. For more specific information on tools and buying tips, see p. 10. In the introduction to each project, you will find a comment about the time involved. This will vary depending on the experience and personality of the reader and to some extent on the equipment avail- able. However, the estimate will give you a decent approximation of the time each project requires. The projects themselves are organized from the least complex and time-consuming to the most complex. The first chapters have projects that require minimal experience and skills, while the lat- ter projects are more elaborate, although still within the ability of any patient and careful woodworker. I have assumed that any chapter is the place you may start, so there is some repetition from toy to toy where procedures are similar. In a few cases, the instructions refer you to another chapter where that particular procedure has already been outlined in detail. A sidebar at the end of each chapter called “Learning through Play” will give you a quick overview of the educational value of each toy. A variety of suggestions are included regarding play and educational opportunities—playtime can become more enjoyable and valuable when it is guided now and then. These suggestions are Making Toys That Teach 6 3 /4" 11 /32" 13 /16" 3 /4" 3 /4" 11 /32" Drill 9 /32" dia. hole; countersink both sides 1 /16" deep. 1 /4" dia. dowel 18LesN.eps
- 14. intended to help point a child in useful directions and maximize the educational benefit of each toy. I am hoping that as you read these suggestions many more ideas will spring to mind, and combined with the child’s imagination, you should have a treasure trove of possibilities. At the start of each “Learning though Play” side- bar, you will also find a note about the approximate age level for each toy. Most toys have a broad range of ages because they can be used one way when a child is very young and in different ways as time passes. I have often given toys to my own children that were too advanced for them, and it took a year or two before they could make good use of them. In my experience it is best to let young children have fun with the simpler toys and not force more com- plicated play on them until they are developmen- tally ready—an age that tends to be different for every child. Teaching through Play The “Learning through Play” sidebar suggests different kinds of play that have various educa- tional goals attached. It is helpful to have a basic understanding of how each type is used by educators, so you’ll be better able to guide your child. Convergent vs. Divergent Play Many toys have predetermined and quite limited types of use—coloring books or wind-up toys, for example. With these toys, there is really only one possible outcome in play, which is called convergent play. Other toys have many outcomes, limited only by imagination; this is divergent play. For most educational and developmental goals, diver- gent (or open-ended) play is preferable. All the toys in this book provide opportunity for diver- gent play. Making Toys That Teach 7
- 15. Fostering Creativity Years ago, when I was young and my son Eric was even younger, he started to play and make things in my shop. At first, I thought this was great, but it didn’t take long until my limited patience was taxed. He made mistakes. He didn’t set my precious tools down the way I thought they should be set down. He sometimes left a mess or spilled some finish. Fortunately, I soon realized that this was the price of encouraging his interest and his creativity. If it cost me a tool or some spilled finish, fine. Creativity naturally exists in children, but to encourage it means allowing some room for error and mess; we all learn through mistakes and messes of various sorts. To put down strict limits on play teaches that creativity has little or negative value. Sometimes parents discourage creativity without even realizing it. A number of educators (see Further Reading on p. 135) have found that straight praise can actually discourage creativity in children because they will repeat whatever they have done in hopes of being praised again. When a child cre- ates something with blocks, for instance, discuss the details of what they’ve made and how and why they made it that way, rather than merely compli- menting them. Then encourage them to create something totally different. It is my hope that the toys in this book, and the play that goes with them, will provide many chances for creativity to grow. With each toy, allow and encourage children to be creative to see what they can invent and discover. Problem Solving Increasing emphasis has been placed on problem solving in recent years, and with good reason. Memorizing an outcome is fine, but being able to work through a problem and reach a logical out- come is a more versatile strategy. Problem solving goes hand in hand with creativity because with open-ended play comes a variety of problems. For example, stacking large blocks on smaller ones cre- ates a tower that will topple quickly. Why? How can it be built higher? There are different strategies that can be used to work through problems, and these toys will pro- vide many opportunities to talk with kids about problem-solving techniques. The educational value is taken a step further if you talk to a child about simple ways to tackle problems in general, not just the one that has arisen through play. What exactly Making Toys That Teach 8
- 16. 9 Making Toys That Teach In 1985, Beth Carter used six standardized tests to measure the usefulness of directed play periods, stress- ing the use of puzzles, blocks, stacking toys, clay, and pounding sets. The preschool-age children who were tested were from economically depressed neighbor- hoods. Using California Achievement Tests, she com- pared these students to those who attended a traditional preschool and found that the children using the manipu- latives performed better than comparable students. In addition, they scored well above grade level in reading, language, and arithmetic. Research on Educational Toys WHILE COMMON SENSE tells us that children benefit from educational, interactive play and that it is all too often ignored in favor of television and video games, a number of studies have proven the point in recent years. While an exhaustive study of all academic research would belabor the point, the highlights are worth a brief summary. For more information, see Further Reading on p. 135. In her Yale University study “Hands-On Science: Using Manipulatives in the Classroom” (1999), Elaine Berk found that simple manipulatives (toys such as blocks or fraction circles) kept elementary-age children involved at high levels of attention and concentration. She also found that manipulatives were beneficial to social interaction, cooperation, harmony, creativity, and self-esteem. In 1991, educator Lydia Werbizky studied a combined grades 1 and 2 classroom. Her qualitative study found that block building enabled a variety of learning experi- ences, including math concepts (e.g., number, size, shape, measurement, fractions, and estimation), science concepts (e.g., balance, gravity, prediction, estimation, and experimentation), and social interaction (e.g., exchanging ideas and understanding another point of view). Block building also encouraged dramatic play, problem solving, familiarity with design and architectur- al forms, and self-esteem. Studying high-school students, Patricia Ernest (1994) evaluated—in part, through students’ self-reports—the effectiveness of math manipulatives (fraction circles, for example). She found that student attitudes, participa- tion, and performance were enhanced by learning with these items. Gina Gresham, Tina Sloan, and Beth Vinson (1997) studied the effects of instructional changes (including real-life problem solving, cooperative learning, and the use of manipulatives) on mathematics anxiety in grade 4 students. The researchers found a significant decrease in anxiety levels after the new strategies were introduced, compared to those levels before testing.
- 17. is the problem? What is the goal? What options exist? What are the pros and cons of the options? Which is the best option? Develop a few steps that are usable and appropriate. Tips and Techniques If you are a beginning woodworker, chances are you’re a bit reluctant to run out and buy one of every tool just in case you might need it someday. Setting up shop can not only be a tricky and expen- sive process but also one that provides a great deal of pleasure. While each chapter includes informa- tion on necessary tools for that project, there are some general guidelines in the following section that may prove useful as you set up your shop. There are also a few general processes referred to throughout the book but discussed in more detail here. The Sources in the back of the book (see p. 130) has a section on tool and machinery sup- pliers, which you may find useful. Machinery Needed Often, as I look through books and magazines, I notice the types of shops that some craftsmen have. “Notice” is not really the correct word—perhaps “envy” is better. The shops I see are spacious and well equipped with 16-in. jointers, 24-in. planers, mortising machines, and too many fine hand tools to mention. As a machinist and a devoted wood- worker, I have hopes and even plans for such a shop. While I have a great appreciation for expensive, precision machinery, the reality is that I don’t really need it, certainly not for making small projects such as the toys in this book. For light or beginning work, an inexpensive drill press and a bandsaw do much of the work. My bandsaw came with a poor Making Toys That Teach 10
- 18. blade, so I immediately purchased a better one. The drill press worked fine as it was. If you can purchase high-quality equipment and have the room for it, by all means do so. If you can- not buy this kind of equipment for monetary or space reasons, don’t let this stop you from purchas- ing a machine that will get the job done. Buy a smaller machine, one that the dealer will stand behind with a reasonable warranty. This approach also has the advantage of letting you use a machine for a few years as you learn which features mean the most to you and your style of woodworking. In his excellent article “My Five Essential Power Tools” (Fine Woodworking 153, Winter 2001/2002), Gary Rogowski lists various considerations, includ- ing why a bandsaw is at the top of his list and a table saw is not on it at all. It is worth reading if you are about to invest in some machinery. For the projects in this book, the bandsaw should be your first purchase. You will also need a drill press. An old machinist once told me that drilling a hole accurately is one of the most difficult operations in machining. Without a drill press, it becomes virtually impossible. Fortunately, a drill press is one of the least expen- sive machines, even for reasonable quality. For these projects, a small- or medium-size disk sander—or, better yet, a disk/belt sander combina- tion machine—will be a time-saver. It’s an easy way to smooth out sawn edges. A miter gauge is an essential addition, even if it is only a simple shop- made one. Some basic hand tools will also be needed. You may well have them on hand, but if you are about to purchase them, allow me to make a couple of suggestions. A combination set—with square head, protractor, and center head—is a versatile and valu- able tool. Don’t get the cheapest set around, although you don’t need the precision of the best machinist’s tools either. Make sure the scale, or Making Toys That Teach 11
- 19. Making Toys That Teach 12 ruler, reads clearly and has engraved markings. A good handplane is also invaluable, and I would sug- gest investing in a reasonably good one (I mean a $50 plane, not a $200 heirloom). Finally, I would suggest a couple of files. For the past 20 years, I have had the same 6-in. double-cut flat smooth file. This small file works extremely well for smoothing rough surfaces, especially on end grain. It allows you to leave a flat, accurate sur- face that needs minimal sanding. My second most commonly used file is a 10-in. double-cut half- round bastard file. It is great for roughing out most flat or rounded surfaces. Gluing and Clamping An excellent woodworker and sculptor teaching at the British Columbia Institute of Technology showed me how to glue awkward parts together by rubbing them in instead of clamping them. I was a little skeptical at first, but when I was roughing out these parts with a mallet and chisel, I found them to be extremely strong. Since then, I have not hesitated to assemble without clamping when it was imprac- tical to clamp. When assembling this way, use a fairly thin layer of white glue (polyvinyl acetate, or PVA) and rub
- 20. Making Toys That Teach 13 the parts with a slight side-to-side motion. With moderate pressure being applied, the glue film will grow thin and even and begin to stick. At that point, leave the glue to harden. If you have any doubt, try it out on a few scrap pieces and then break them apart. It’s unlikely that they will sepa- rate along the glueline. Where you have to close a small gap, you will need to clamp the parts. But with small toy pieces, there are many times when rubbing the part in is a better option than trying to invent some clamping method. Finishing and Coloring When finishing toys, safety, ease of application, and durability are the main concerns. You obviously don’t want any finish that is hazardous when dry. For this reason, I have not used any stains. Urethane and varathane plastic finishes are safe when dry; most factory-made cribs have this type of finish. Some oil finishes are specifically formu- lated for food-contact items, and these, of course, are safe as well. Salad-bowl oil, walnut oil, and pure tung oil are approved for food-contact items. For the toys in this book, I have used a semigloss spray urethane on parts for which I wanted to have some gloss. For most toys, however, I have used Robson’s Tried & True™ Varnish Oil (linseed oil) or Original Wood Finish (linseed oil and beeswax). The linseed oil and linseed/beeswax combination are both nontoxic, with no petroleum distillates or derivatives. They are even reasonably safe to drink, although apparently large quantities may cause nausea. I haven’t tried this. The oil finishes are generally easier to apply to these toys. Oiled toys can be handled when wet, and sanding between coats is not required. Refinishing a damaged block or toy is generally more easily accomplished with an oil finish than a urethane finish. I have also used food coloring for a few projects in this book. I like food coloring because it is safe, readily available in small quantities, and offers bright, appealing colors. The main disadvantage is that it runs and smears when it gets wet, so some form of finish needs to be applied to seal it. When using food coloring, I’ve found that it works best when mixed 50/50 with water. Green can be made by mixing blue and yellow. Adjust the proportions to get the exact color you want. Clear a large area around your project when col- oring. The odd, small splash or spray can easily stray to unfinished wood, and it soaks in quickly and deeply. Where possible, I dipped the small parts into containers of coloring and then set the parts on a rack or clean paper to dry.
- 21. 14 M A K I N G T O Y S T H A T T E A C H any concepts are learned more easily with the use of manipulatives, and this is especially true of fractions. When, at an early age, a child can see and practice manipulating the various parts of a whole, the understanding that develops will be a great help when the more advanced applications are introduced farther down the road. These eight circles use color coding to illustrate common fractions. For this set, I made the halves and the whole out of Baltic birch plywood, the thirds and sixths out of purpleheart, the quarters and eighths out of yellowheart, and the fifths and tenths out of padauk. Other woods of various colors would be just fine, or you could use the same light-colored wood for all the fractions and color them with stain or food coloring. I have also varied the thicknesses of similar-looking fractions to help differ- entiate them. Many woods in 3-in. width by 1 ⁄4-in. or 3 ⁄8-in. thickness are available from hobby and woodworking stores. Accordingly, I have used these measurements as the base for the Fraction Circles. This project does not take long to make nor is it difficult. The angles of each pie-shaped piece need to be precise, but other sizing is not critical. There are 39 pieces in all; each piece is sawn to size and then sanded and finished, but the simple shapes make the process quick and easy— easy to make but a great help to anyone learning or teaching fractions. Fraction Circles m
- 22. 15 Protractor, preferably from a combination set Scale (ruler) Small file (I use a 6-in. double-cut flat smooth file) Bandsaw (a small inexpensive one is adequate) Disk sander (again, a small inexpensive one will do for this project) Tools You Need 15
- 23. Making Toys That Teach 16 R3 R3 R3 R3 R3 R3 2 90° 72° 36° 45° 120° 60° 227 /32 13 /4 219 /32 3 3 R3 R3 3 41 /2 FRACTION CIRCLE LAYOUT 1 1 ⁄4 1 ⁄5 1 ⁄8 1 ⁄6 1 ⁄10 1 ⁄3 1 ⁄2
- 24. Layout You could draw the fractions for layout freehand, but it is easier to make templates and easier still to photocopy the templates on pp. 18 and 19. Use paper as thick as the photocopier will handle. If you must use thin paper for the templates, rub the back with pencil lead, which transforms the template into carbon paper. Make sure you space the pieces about 1 ⁄8 in. apart, enough for the saw cuts and some sanding. 1 1. . Obtain wood the desired thickness and color. The easiest option (and probably the strongest) is to make all the pieces from Baltic birch, but I couldn’t resist the visual appeal of the small strips of exotic woods. In the end, I used a bit of everything. Use whatever is convenient for you. 2 2. . After you decide on a wood and a thickness for each fraction or pair of fractions (e.g., eighths and quarters), trace or lay out the outlines. While grain direction is a consideration, I haven’t had any pieces break, even with grain running across the piece. Locate the parts to allow the most economical use of your wood. This will vary depending on the size of the stock you have available. Fraction Circles 17 Whole circle 6 in. dia. x 1 ⁄4 in. 1 May use 3 ⁄8-in.-thick plywood. Halves 6 in. x 3 in. x 1 ⁄4 in. 2 May use 3 ⁄8-in.-thick plywood. Quarters 3 in. x 3 in. x 1 ⁄4 in. 4 Eighths 3 in. x 2 in. x 1 ⁄4 in. 8 Fifths 3 in. x 227 ⁄32 in. x 3 ⁄8 in. 5 Tenths 3 in. x 13 ⁄4 in. x 3 ⁄8 in. 10 Thirds 4 1/2 in. x 3 in. x 3 ⁄8 in. 3 Sixths 3 in. x 219 ⁄32 in. x 3 ⁄8 in. 6 F FI IN NI IS SH H D DI IM ME EN NS SI IO ON NS S N NO O. . P PA AR RT T N NA AM ME E L L X X W W X X T T R RE EQ Q’ ’D D. . N NO OT TE ES S FRACTION CIRCLES CUT LIST 2 2
- 25. Making Toys That Teach 18 3 /16 undersize FRACTION CIRCLE TEMPLATES 1 ⁄2 1 ⁄4 e 1 ⁄5
- 26. Fraction Circles 19 1 ⁄3 1 ⁄8 1 ⁄4 3 /32 undersize on all 1 ⁄10
- 27. Making Toys That Teach 20 Cutting and Sanding Ideally, you want to saw as close to the layout lines as possible without actually touching them. I tend to leave about 1 ⁄32 in., which gives me just enough leeway for wobbling. When sanding with a disk sander, choose a disk with fine-grit abrasive. This removes the wood a little more slowly so it is easier to keep the parts accurate, and it gives a little better finish. However, some woods burn more easily than others, so you may want to try sanding a scrap piece of each type of wood. 1 1. . Saw out each piece, allowing enough of a margin for sanding later. I have a small, inexpensive band- saw that I use for this operation. A scrollsaw also works well, if you have one handy. I find that a jig- saw chips the wood more than I like, but a patient person could nicely use the humble coping saw. 2 2. . Use the disk sander to smooth the wood down to the line. Use a protractor to check each angle, getting as close as possible to the desired angle. If you don’t have a protractor from a combination set, work to the lines as closely as possible. A smooth file works well here if you don’t have a disk sander handy or find it takes off a little more wood than you like. It is best to bevel the edges slightly before filing to remove the saw marks. This reduces the tendency of the edges to splinter as you file. After filing, finish by hand-sanding (though a good smooth file will leave a surprisingly refined result). 3 3. . Sand the corners to round them slightly. Hand- sand all surfaces to remove machining marks. Finishing The simplest finish for these small parts is a couple of coats of an oil finish. I tend to use tung oil, but other finishing oils work well, too. I have used a spray urethane, but it takes quite a bit of time and work to finish all the surfaces sanding between coats. Also, the smooth plastic finish tends to make small parts slippery and a little hard to manipulate. 1 1 2 2
- 28. using different methods. This would also be a good time to have kids learn how to write these fractions. Follow the same types of ideas with the smaller pieces. Illustrate the fraction 1 ⁄2 using as many different methods as possible (e.g., 2 ⁄4, 3 ⁄6, etc.). Compare the different frac- tion pieces, having children organize them from small- est to largest, and identify them as tenths or fifths as appropriate. With older children, use tenths, fifths, and halves to teach conversion to decimals. You can nicely show how a half is the same as five-tenths and a fifth is the same as two-tenths. As the kids get older, you may want to bring in other fractional or decimal systems and show how they are similar to the Fraction Circles. Money— with its quarters, dimes, and pennies—is great for this, but so is a ruler with its measurement gradations. Learning through Play THESE CIRCLES are an excellent way of introducing fractions. They allow children to understand more easily how to add, subtract, and compare fractions. The different-size fraction pieces provide opportunities for ordering fractions, exploring equality and inequality of fractions, and studying common denominators. Decimals can be introduced using the tenth-size fraction pieces. These Fraction Circles are generally used with children between grades 1 and 7, but I have even used this type of “pie” with students in grades 11 and 12 who were having difficulty working with fractions. Young (preschool-age) kids can start by playing with these circles as puzzles, assembling each circle by choosing the pieces that fit together to make a circle. If you have them count the number of pieces required to make a complete circle, then you can explain the general concept of fractions (e.g., when there are three pieces that make up a whole, we call them “thirds,” etc.). With school-age children, you may want to start with the larger pieces—the whole circle, halves, and quarters. Show how two halves or four quarters make a whole circle and two quarters make a half circle. Demonstrate the concept of numerator and denominator. Have a youngster use quarters and halves to make 3 ⁄4 or 11 ⁄2,
- 29. 22 M A K I N G T O Y S T H A T T E A C H ids love these geometric blocks as creative play toys. They use them to make all sorts of wonderful abstract designs, as well as recognizable faces, animals, and objects. These blocks form a sort of open-ended jigsaw puzzle, where imagination and creativity determine the outcome. However, that’s not what I had in mind when I made the first set. I thought they were a great way to learn about patterning and geometry. That is still true, but children have a lot more fun than I thought and use the blocks in many more ways than I had expected. (Note that these are small parts and not suitable for very young children, as they may pose a choking hazard.) Pattern Blocks are simple to make, but depending on how many you want, it can take a bit of time. This is a fairly large set, and you could start with fewer pieces. The set as described here will likely take the better part of a day to make, plus finishing time. k Pattern Blocks
- 30. 23 23 Protractor, preferably from a combination set Scale (ruler) Small file (I use a 6-in. double-cut flat smooth file) Bandsaw (a small inexpensive one is adequate) Disk sander (again, a small inexpensive one will do for this project) Tools You Need
- 31. Layout Choose a different-colored wood for each block. It is important to have contrast here, as it makes chil- dren’s creations much more visually appealing and fun. As with the Fraction Circles in the previous chapter, you could use a light-colored wood for all the blocks, then color them with water colors or stain. You may want to take a look at the notes on coloring on p. 13. The layout process is a little different for each shape. I will cover the layout of each block sepa- rately but group all the blocks to discuss instruc- tions on sawing and sanding. Hexagon Layout 1 1. . Obtain wood of the desired color. I used yellowheart. 2 2. . Draw a line parallel to a finished edge and 13 ⁄4 in. in from that edge. You will need about a 12-in. length to make five hexagons. Draw another line parallel to this one down the center (7 ⁄8 in. in from the finished edge). Making Toys That Teach 24 7 /8 60° 1 1 7 /8 1 1 /2 1 /2 1 /2 60° Triangle (15) Trapezoid (10) 2 1 1 13 /4 2 1 1 1 1 /2 1 /2 7 /8 1 /2 60° 30 degree (20) and 60 degree (10) diamond (or parallelogram or rhombus Hexagon (5) 1 120° 1 1 /2 1 30° 7 /8 PATTERN BLOCKS LAYOUT Triangle (15) Square (15) Trapezoid (10) Hexagon (5) 30-degree (20) and 60-degree (10) diamond (or parallelogram or rhombus)
- 32. 3 3a a. . Draw two sides of the hexagon, each at 60 degrees to the finished edge, which itself will form a third segment of the hexagon. Start by draw- ing one angled line, then measure over 1 in. along the finished edge, and draw the second angled line. Use a protractor as shown in the photo at top right. b b. . You could also lay out using distances instead of angle measurements. Lay out as described in step 2, then draw a line 2 in. from the end and square to the finished edge. This will give you a rectangle 2 in. long by 13 ⁄4 in. high. Along the 2-in.-long sides, measure 1 ⁄2 in. in from the ends. These marks will be 1 in. apart, centered on the rectangle. These points will become the intersections for the hexagon’s sides (see the photo at bottom right). Pattern Blocks 25 3 3a a 3 3b b Triangles 1 in. x 7 ⁄8 in. x 3 ⁄8 in. 15 Squares 1 in. x 1 in. x 3 ⁄8 in. 15 Trapezoids 2 in. x 7 ⁄8 in. x 3 ⁄8 in. 10 Hexagons 2 in. x 13 ⁄4 in. x 3 ⁄8 in. 5 30-degree diamonds 17 ⁄8 in. x 1 ⁄2 in. x 3 ⁄8 in. 20 60-degree diamonds 11 ⁄2 in. x 7 ⁄8 in. x 3 ⁄8 in. 10 F FI IN NI IS SH H D DI IM ME EN NS SI IO ON NS S N NO O. . P PA AR RT T N NA AM ME E L L X X W W X X T T R RE EQ Q’ ’D D. . PATTERN BLOCKS CUT LIST
- 33. 4 4. . Draw the top half of the hexagon. To do this, draw the two 60-degree angled lines to form the top half of the hexagon, starting where the bottom angle lines intersect with the centerline. 5 5. . Draw four more hexagons, using either the pro- tractor or distance method. Leave enough room between pieces for a saw cut plus about 1 ⁄32 in. on each side for sanding and finishing. Triangle Layout 1 1. . Obtain wood of the desired color. I used bloodwood. 2 2. . Square one end of the wood, and finish one edge by planing or jointing. 3 3. . Draw a line parallel to a finished edge and 7 ⁄8 in. in from that edge. You will need about a 12-in. length to make 15 triangles. 4 4. . On this line, measure in 1 ⁄2 in. from the squared end of the wood and make a small mark. On the finished edge, measure 1 in. in from the same end of the wood and make another small mark. Join these points with lines to form a triangle or use a protractor set to 60 degrees. The protractor is a little faster when doing 15 pieces, but either way is fine. Making Toys That Teach 26 5 5 4 4
- 34. 5 5. . Leave a 1 ⁄8-in. space, and draw another line par- allel to the last angled line. This leaves a little space for a cut, and starts the next (inverted) triangle. 6 6. . Draw a 60-degree line to form the second side of this inverted triangle. If you are not using a pro- tractor, measure over 1 in. along the line that is 7 ⁄8 in. from the finished edge, then draw the line. Each side of the triangle is 1 in. long. 7 7. . Keep drawing triangles, alternating right side up and inverted. Trapezoid Layout 1 1. . Obtain wood of the desired color. I used padauk. It has a wonderful dark orange color, but its oils tend to make finishes dry slowly. Don’t panic if your fin- ish takes two or three times longer to harden than it would with other types of wood. 2 2. . The layout for the trapezoid blocks is similar to the layout for the triangles. Draw a line parallel to a finished edge and 7 ⁄8 in. in from that edge (I’ll call this line “A”). For 10 trapezoids, you’ll need about an 18-in. length. As with the triangles, using a protractor is faster, but laying out by distance measurements is also simple. Follow the drawing on p. 24 and refer to steps 3 and 4 below. 3 3. . Using a protractor (set to 60 degrees) placed against the finished edge of the wood, draw a line to make one end of the trapezoid. Measure over exactly 2 in. along line “A” (drawn in the previous step). Draw a second line from this point angling back (as shown in the photo below) using your protractor (still set to 60 degrees), but flip the pro- tractor over so the line is now 120 degrees to the edge of the wood. 4 4. . Repeat the second line but leave 1 ⁄8 in. for the saw cut—this will be one side of the next (inverted) trapezoid. Measure over 2 in. along the finished edge of the wood, and draw the other side by marking a line angled 120 degrees from the edge of the wood (see photo top p. 28). If you would like to lay out using distance mea- surements instead of angles, complete step 2 above. As with the triangles, the angled lines on the ends are angled over exactly 1 ⁄2 in. from top to bottom. The long side of the trapezoid is 2 in. long, and the short side is 1 in. long (see the drawing on p. 24). Pattern Blocks 27 5 5 3 3
- 35. Starting at the end of your wood, mark out the 2-in.-long distance on line “A.” On the finished edge of the wood, step over 1 ⁄2 in. from the end, then mark out the 1-in.-long side. Joining these points will give you the angled ends of the trapezoid. 5 5. . Keep drawing trapezoids, alternating right side up and inverted. 30-Degree and 60-Degree Parallelogram Layout The layout for these two shapes is similar, so I will describe them together. There will be 20 of the 30-degree parallelograms and 10 of the 60-degree parallelograms. 1 1. . Obtain wood of different types for these parts. I used black walnut for the 30-degree parallelogram and purpleheart for the 60-degree parallelogram. 2 2. . For the 60-degree parallelogram, draw a line parallel to a finished edge and 7 ⁄8 in. in from that edge. You will need about a 13-in. length to make 10 pieces. For the 30-degree parallelogram, draw this line only 1 ⁄2 in. in from the edge; you will need about a 26-in. length (or two 13-in. pieces of wood). 3 3. . Set the protractor to the correct angle (30 degrees or 60 degrees), and draw two lines exactly 1 in. apart. Making Toys That Teach 28 4 4 3 3
- 36. 4 4. . Leave enough space for the saw cut (about 1 ⁄8 in. for the 60-degree parallelograms and, because of the sharper angles, about 3 ⁄16 in. for the 30-degree parallelograms), and draw another parallelogram. Continue until you have 10 of the 60-degree paral- lelograms and 20 of the 30-degree parallelograms. As with the other blocks, you can lay these out using distance measurements if you desire. Follow the drawing on p. 24, and start by drawing the lines as described in step 2. The second block is set beside the first, leaving 1 ⁄8 in. between the blocks to allow for the saw cuts. For the 60-degree parallelogram, this offset is only 1 ⁄2 in., exactly as it is for the trian- gle and trapezoid. For the 30-degree parallelogram, the procedure for laying out the first block is the same, but the angled end lines are offset 7 ⁄8 in. from top to bottom to produce the sharper angle. Square Layout I suppose this doesn’t really need any instructions. Just draw 1-in. squares, leaving about 1 ⁄8 in. between them for cutting. Cutting and Sanding When sawing these parts, cut as close to the line as possible without actually touching it. I leave about 1 ⁄32 in., which gives me a small amount of leeway for variations in the cut. Hand-filing and -sanding is an option, but it takes quite a while with all these small parts, so I use my small disk sander. When sanding with a disk sander, choose a disk with fine-grit abrasive. This removes the wood a little more slowly so it is easier to keep the parts accurate, and it gives a little better finish. However, some woods (such as purpleheart) burn more easily than others, so you may want to try sanding a scrap piece of each type of wood first. 1 1. . Saw out each piece, allowing a small margin for sanding. I use my small bandsaw for this operation. A scrollsaw works fairly well, if you have one handy. A circular saw, such as table saw or miter saw, is not a good tool for this project. It is difficult to work safely with such small parts. Pattern Blocks 29 1 1
- 37. Making Toys That Teach 30 geometric shapes to your children and explain how and why they fit together in different ways. You could mention things like complementary angles (two angles that add up to 90 degrees) and supple- mentary angles (those that add up to 180 degrees). Have children make a parallelogram using two trian- gles, or use different methods to produce a hexa- gon using triangles, parallelograms, and trapezoids. Children could create an object that you suggest (such as a dinosaur), or they could make any object using only certain blocks (using only 15 blocks, or only triangles and squares, for example). After chil- Learning through Play PATTERN BLOCKS are intended for children from preschool to about grade 8. The smaller pieces may present a choking hazard, so very young children should not use them. These blocks make use of children’s natural creativ- ity to introduce geometry and more complex pat- terning. While children are inventing shapes and patterns using these blocks, they will begin to see how common geometric shapes and angles fit together. Pattern Blocks naturally fit together in a variety of ways, and children will learn to create and understand increasingly complex patterns. All of the following types of play will help give children a foundation for math and geometry, and will help to illustrate geometric and mathematical concepts later. To start with, describe the different
- 38. 2 2. . Use the disk sander to smooth the wood down to the line. Check the angles with a protractor; if you don’t have one, just work to the lines as accu- rately as possible. 3 3. . Sand the corners to round them slightly. Hand- sand all surfaces to remove machining marks. Finishing As with the Fraction Circles, the simplest finish for these small parts is a couple of coats of an oil finish. I tend to use tung oil, but other finishing oils work well, too. Pattern Blocks 31 dren create a design, ask them if they can make the same shape using different blocks, tell a story about what they made, or guess the number of blocks they used. The blocks can also be used to build walls by putting them on edge, which improves eye-hand coordination and fine-motor skills. Open-ended cre- ative play and patterning can also be encouraged through this use. To use Pattern Blocks to teach addition, subtrac- tion, multiplication, and division, assign a value to each block. The basic unit is a triangle, with a value of 1. Assign, or have children determine, the value of other blocks, based on how many triangles make up each block. In this way a hexagon has a value of 6 (six triangles make up a hexagon), a large parallelogram has a value of 2, a trapezoid a value of 3, etc. Have children make different combinations of blocks and calculate their value. For example, three parallelograms make up a hexagon, which has a value of 6. Each parallelogram has a value of 2, so 3 x 2 = 6. Any number of creations can be made, and their value calculated using basic math. Take a block away and calculate the new value. Have chil- dren create a design that has a certain value (such as 24) or an approximate value (30 to 40). As children get older, have them calculate the value of the small parallelogram or the square, and use these in designs and calculations. 2 2
- 39. 32 M A K I N G T O Y S T H A T T E A C H idslikestringingbeads, and for such a simple play activity, it contains a lot of learning potential. Patterning (a premath skill) is practiced as these geometric beads are assembled on a string in creative patterns based on color or shape. Counting skills, color recognition, and geometric-shape recognition can also be learned. Making these beads is a straightforward process. The beads start out as strips of wood, each strip a different geometric shape. These strips are then cut up into beads and drilled. I’ll explain how to make the shaped strips for each specific bead and then cover the general processes of cutting and drilling, which are the same for all beads. In the next chapter (see p. 40), you’ll find a project for a Bead Board. The board consists of a simple organizer and rack that incorporates a shape- and color-matching game as the beads are put away. If you plan to do that project as well, make about 3 in. of extra bead material for each shape. I’ll comment on what to do with it as we go along. Construction lumber (11 ⁄2-in.-thick pine) works just fine for this process if you do not want to purchase the more expensive maple (or other hard- wood). You may also want to laminate two pieces of 3 ⁄4-in.-thick wood if you don’t have a 11 ⁄2-in. thickness in the type of wood you want. The beads are designed on the basic unit of 11 ⁄2 in., which allows them to be used as blocks with the Ultimate Building Block Set (see p. 72), as well as Big Beads k
- 40. 33 33 Small file (I use a 6-in. double-cut flat smooth file) Handplane, or jointer if you have one Awl Bench vise Bandsaw (a small one will do) or table saw Disk sander will be convenient (again, a small one will do) Drill press 5 ⁄16-in. drill bit Tools You Need making them easy for young children to manipulate. The beads will be colored during the finishing process. This is a great starter project—easy to do with minimal tools. Slight errors do not affect the function of the beads. You will find this a quick and enjoyable project that is low on the frustration level.
- 41. Square Bead Material The octagonal beads will be made from square stock also, so make enough square bead material to pro- duce the square beads and the octagonal beads (a total of 20 in., or 26 in. if you are planning to make the Bead Board in the next chapter). 1 1. . Cut one 19 ⁄16-in.- wide strip from a 11 ⁄2-in.-thick board. The finish size is 11 ⁄2 in., so you are allowing about 1 ⁄16 in. for planing and smoothing. 2 2. . Plane the sawn edge smooth and to size. Check for square before you are down to the finish size, but keep in mind that being slightly out of square will not dramatically affect the toy. 3 3. . If you need more strips, plane the sawn edge of the board to get a true surface, then cut another 19 ⁄16-in. strip. 4 4. . Sand the strip that is to be used for square beads, rounding the corners slightly. Set the other length aside for the octagonal beads. Making Toys That Teach 34 Triangular beads 11 ⁄2 in. x 11 ⁄2 in. x 15 ⁄16 in. 5 Octagonal beads 11 ⁄2 in. x 11 ⁄2 in. x 11 ⁄2 in. 5 Square beads 11 ⁄2 in. x 11 ⁄2 in. x 11 ⁄2 in. 5 Round beads 11 ⁄2 in. dia. x 11 ⁄2 in. 5 F FI IN NI IS SH H D DI IM ME EN NS SI IO ON NS S N NO O. . P PA AR RT T N NA AM ME E L L X X W W X X T T R RE EQ Q’ ’D D. . BIG BEADS CUT LIST 1 1 2 2 Drill 5 /16 through; countersink 1 /16. 1 /32 radius—all corners 11 /2 11 /2 11 /2 SQUARE BEAD LAYOUT
- 42. Octagonal Bead Material Use the leftover square material that you produced in the previous section. 1 1. . Mark out an octagon on the end of the 11 ⁄2-in. square stock. Each flat will be 5 ⁄8 in. long, so measure a 5 ⁄8-in. flat centered on each side (measure in 7 ⁄16 in. from each edge). Join the marks to create 45-degree bevels on the corners. 2 2. . Put the wood in a vise, having it grip the wood on the corners, and plane the new sur- faces. Measure the width of each new flat to ensure that it remains parallel. 3 3. . Do this for each of the four new flats, end- ing up with an octago- nal cross section. Triangular Bead Material Making the triangular bead stock is the most diffi- cult of the bead material, primarily because this stock is awkward to hold in a vise for planing and finishing the edges. For this reason, I do as much finishing as possible before sawing the wood to the final triangular shape. Big Beads 35 1 1 2 2 Drill 5 /16 through; countersink 1 /16. 11 /2 11 /2 45° 5 /8 5 /8 1 /32 radius—all corners OCTAGONAL BEAD LAYOUT 11 /2 15 /16 60° 60° 60° Drill 5 /16 through; countersink 1 /16. 7 /16 1 /32 radius—all corners 11 /2 TRIANGULAR BEAD LAYOUT
- 43. 5 5. . Plane this surface flat to the line before sawing the second angle (it is much easier to hold in the vise now than it will be when both sides are sawn to 30 degrees). 6 6. . Saw the second 30-degree angle. Cut this one as close to the line as possible because you will no longer be able to hold the part in the vise to plane it; sanding will have to do. 7 7. . Sand each surface, rounding the corners smoothly. Round Bead Material Making the round bead stock couldn’t be easier. Just use 11 ⁄2-in.-dia. dowel. (These beads are actually cylindrical, but the cross section is round.) 1 1. . Saw a 13 ⁄8-in.-wide strip from 11 ⁄2-in.-thick wood (finish width will be 15 ⁄16 in.). You will need a 10-in.-long strip of wood (13 in. if you are making the Bead Board). 2 2. . Plane to 15 ⁄16-in. finish width. 3 3. . Lay out the triangular shape. Mark off a center- line on one of the ends of the strip of wood and then join a line from each of the bottom corners to the top of this centerline. 4 4. . Saw one side of the triangle. Tilt the bandsaw table 30 degrees to suit the layout. Use a spacer (a dowel in the photo below) between the fence and the strip. Without it, the blade would hit the fence at the bottom. Making Toys That Teach 36 4 4 11 /2 11 /2 11 /2 dia. Drill 5 /16 through; countersink 1 /16. 1 /32 radius—all corners ROUND BEAD LAYOUT
- 44. Cutting and Drilling You could saw the beads to length using a table saw or miter saw, but I tend to use the bandsaw. It is safer with the short ends, and there’s less risk of splintering on the edges. Whatever saw you use, check that the blade is exactly square to the table and that the miter gauge is also set exactly square. When drilling, keep the holes as accurate as possi- ble. This does not affect the use at all, but it will make a difference if you make the Bead Board later. 1 1. . Mark the beads out to length (11 ⁄2 in.). If you are planning to make the Bead Board, cut the slices first (3 ⁄8 in. thick), because thin pieces are easier to cut when the material is long enough to handle safely. 2 2. . Saw the beads about 1 ⁄32 in. too long. This will allow a little room for sanding on each end. Do the best you can to cut them square, because this will save filing or sanding time later. 3 3. . If you are using a disk sander, sand the ends. Be careful not to burn them. Sand the part a little, then rotate it 60 degrees or 90 degrees, and sand it a little more. If your machine is set up with the table exactly square to the disk, this rota- tion will help keep the bead ends square. Round or bevel all corners slightly (1 ⁄32 in. to 1 ⁄16 in.). If you don’t have a disk sander, a piece of sanding belt glued to a flat surface—plywood or medium- density fiberboard (MDF)—makes a good alterna- tive. If you don’t use a sanding board or block of some type, the ends of the beads will inevitably be slightly rounded, making it frustrating to stack them (as kids are bound to do at times). If sanding by hand, don’t worry too much about the exact fin- ished length. I have also had good luck filing the end grain with a 6-in. double-cut smooth file. This small smooth file leaves a surprisingly good surface, and this approach is faster than sanding. 4 4. . Mark the center of each bead. For the square beads, just cross the corners. This will also work with the octagonal beads. For the triangular beads, draw light lines from the center of one side to the corner opposite that side, and repeat for each corner. The three lines will intersect at the center. If you have a center head for the combination set, use it to find the center of the round beads. If not, measure Big Beads 37 2 2 3 3
- 45. across the diameter and mark a line on center, then do it again at about 90 degrees to the previous diameter location. Put a dimple in the center with an awl (or just tap a nail with a hammer). You only need to mark one end of each bead. 5 5. . Clamp the bead in a drill press, and drill the 5 ⁄16-in.-dia. hole. Be sure the bead is sitting square on the table, with the drill-table hole or slot under the center so you can drill right through. 6 6. . Drill through. If it is a tiny bit off center, don’t worry about it. 7 7. . Put a little bevel on each end of the hole. I do this using a portable power drill and a drill bit ground to a sharp point, but a countersink bit would be even better. Just touch the drill to the end of the hole, and use a slow speed. If you are grind- ing the bit yourself, it may grab a little unless you are an expert drill sharpener, so be cautious. 8 8. . File or sand a small bevel or round on all the sharp edges and corners of each bead. Finishing To color the beads, I use food coloring because it is nontoxic and relatively inexpensive. See p. 13 for more information on coloring. If you are also plan- ning to make the Bead Board, you may want to color the bead slices at the same time that you color the beads. For this project, I used a lead-free varathane spray finish on my beads, but a salad-bowl finish is a good option as well. You need a waterproof finish to seal the coloring because food coloring is water soluble; when the beads get wet, they get messy without it. Whatever finish you use, make sure it is nontoxic when dry. For the string, just about anything will work, but one of the nicest choices is a brightly colored shoelace. The thick lace that I used here works well because it has big, wrapped ends, making it easier to thread the beads. Making Toys That Teach 38 5 5
- 46. Using the beads as blocks works well. Stacking the blocks into towers is great for practicing fine-motor skills. Similarly, patterns based on color or shape can also be done by stacking, especially if threading the beads is still too advanced for a young child. Have kids stack the beads by color (e.g., a pile of red beads, then a pile of yellow), by shape, or even by a combination of color and shape when the children are ready for a big- ger challenge. Lastly, let kids do whatever they want with the beads—within reason (unless you are a true anarchist). Children’s free play often provides teachable moments, as well as showing adults amazingly creative ways to use toys. Learning through Play THESE BEADS present lots of opportunity for young children to improve their fine-motor skills and eye-hand coordination. They can learn patterning skills and geometric-shape identifica- tion. The beads provide occasions for counting practice and color recognition as well as to encourage creativity. They are designed for children around the age of two but could be used through age eight, depending on the child. Have children make bead strings on their own, then let them describe to you how and why they chose certain beads. This will help them learn communication skills as well as exercise their natural creativity. It is a good idea to respond with specific, nonjudgmental comments, such as “I see you used all the red beads first, then the green ones.” If you say, “It’s great that you used the red ones first,” then children may always do the red ones first. Describe the geometric shapes, and have the children name the shapes as they use them. Ask them to make patterns such as: triangle, square, round, triangle, square, round, etc.; or one triangle, two squares, one triangle, two squares, etc. Colors can also be used in patterning, such as: one red, one blue, two red, two blue, etc. Big Beads 39
- 47. 40 M A K I N G T O Y S T H A T T E A C H he Bead Board not only provides a neat way to keep the Big Beads from the previous chapter in good shape, it has excellent educational value as well. Children learn to recognize and match the geometric shapes of the beads to the same geometric shapes on the Bead Board. Since both the beads and the board are col- ored, matching colors becomes part of the learning expe- rience as well. Each bead has a specific storage spot, based on color and shape, and is located in place with a short dowel. If you didn’t already make extra bead material when you ere making the Big Beads in the previous chapter, refer to those instructions to create the thin slices that will provide the pattern for putting beads on the board. This is a quick and easy project, especially if done in conjunction with the beads—an additional hour or two is all you’ll need to complete the board. The location of the holes is fairly critical as there is only 1 ⁄16 in. between beads. If this strikes you as a bit too tight for your comfort, allow 1 ⁄8 in. between beads. Bead Board t
- 48. 41 41 Small file (I use a 6-in. double-cut flat smooth file) Awl Bandsaw (a small one will do) or table saw Drill press 3 ⁄8-in. drill bit Tools You Need
- 49. Cutting and Drilling the Bead Slices These bead slices are a little tricky to work with because they are fairly thin and fragile. Make a few extra in case one or two break, and be careful when clamping them for drilling or sanding. 1 1. . Gather the extra bead material made in the pre- vious chapter. If you didn’t make it then, refer to the instructions (beginning on p. 34) and make 3 in. or 4 in. of each shape. Longer is better, as it allows for a better grip while sawing. 2 2. . Mark the material to length. A 3 ⁄8-in. length works well, but there is no hard and fast reason why 1 ⁄4-in. or 1 ⁄2-in. slices would not work, too. If the slices are any thinner, however, it makes the pieces harder to grip for sanding. 3 3. . Saw the slices about 1 ⁄32 in. too long. This will allow a little for sanding on each end. A bandsaw is the best and safest tool for this operation. Use a miter gauge to keep the wood square, as you did with the beads in the previous chapter. 4 4. . Sand the ends. Be careful not to burn them if you are using a disk sander. Round or bevel the cor- ners slightly on one side to break the sharp corner. The other side will be glued to the board, so a bevel is not wanted there. 5 5. . Mark the center of each bead slice, exactly as you did with the beads (see p. 37). With an awl, put a small dimple in the center of each slice. You only need to mark one end of each bead. 6 6. . Clamp the bead in a drill press, and drill the hole to fit a 5 ⁄16-in.-dia. dowel. Be sure to clamp the slice as gently as possible and still have it hold. It is best to use the same drill size for both the bead slices and the beads. 7 7. . Drill through. Coloring the Slices It’s best to color the bead slices when you color the beads. If you have not already done so, however, refer to the coloring instructions in the previous chapter (see p. 38), using the same colors as you did for the beads. Making Toys That Teach 42 Triangular bead slices 3 ⁄8 in. x 11 ⁄2 in. x 15 ⁄16 in. 5 Octagonal bead slices 3 ⁄8 in. x 11 ⁄2 in. x 11 ⁄2 in. 5 Square bead slices 3 ⁄8 in. x 11 ⁄2 in. x 11 ⁄2 in. 5 Round bead slices 11 ⁄2 in. dia. x 3 ⁄8 in. 5 Dowel pins 5 ⁄16 in. dia. x 11 ⁄4 in. 20 Sand dowel before cutting. Board 10 in. x 61 ⁄4 in. x 1 ⁄2 in. 1 Baltic birch plywood or solid wood F FI IN NI IS SH H D DI IM ME EN NS SI IO ON NS S N NO O. . P PA AR RT T N NA AM ME E L L X X W W X X T T R RE EQ Q’ ’D D. . N NO OT TE ES S BEAD BOARD CUT LIST 7 7
- 50. Making the Board 1 1. . Cut a piece of Baltic birch plywood (or other large, flat, solid wood) to 61 ⁄4 in. by 10 in. If you want to have 1 ⁄8 in. between the beads, cut the board 67 ⁄16 in. wide instead of 61 ⁄4 in. wide. 2 2. . Sand the edges, and bevel all the sharp corners. 3 3. . Lay out the location of the pattern slices, refer- ring to the drawing above. Note that the hole cen- ters are spaced 2 in. apart along the length of the board and 19 ⁄16 in. apart along the width. There is no need to draw out the outline of each slice. Try not Bead Board 43 5 /16 dia. dowel; 11 /4 long (20 pieces) 15 /16 11 /4 61 /4 19 /16 13 /8 3 /8 2 2 2 2 1 19 /16 3 /8 1 /2 1 /2 10 BEAD BOARD LAYOUT For bead sizes, see specific bead layouts (pp. 34-36). Dashed lines indicate pattern slices.
- 51. to draw the lines too long—just a short dash where you estimate the hole centers to be. This will save you from having to sand off the lines before finishing. 4 4. . Mark the centers with an awl or other sharp tool. 5 5. . Use a 5 ⁄16-in. bit to drill the holes for the dowels 3 ⁄8 in. deep into the board. It is easier and looks better if you do not go right through the board. Set some form of stop so that all holes are exactly the same depth. The stop on my little press is nonexistent, so I just lower the table enough to ensure that the drill bit hits the end of its reach at the correct depth. 6 6. . Fit the dowel to the holes in the beads and the bead slices. I had to sand the dowel material before I cut it, as it was a bit oversize. 7 7. . Cut the dowel pieces to length, and bevel the ends slightly. On one end, this is to make them safer and, on the other end, easier to install. Make sure the dowels are the same length—it makes the board look nicer. 8 8. . Glue the parts together. Use a toothpick to put glue in one hole in the board and in the hole of one bead slice. Put a little glue on the bottom face of the bead slice but not too close to the edge where it might squeeze out. Press the bead slice in place, and slide or tap the dowel into place. Using a square, check the alignment of the bead slice. It looks best to have one edge of the square, triangular, and octagonal slices at a clean 90 degrees to the edge of the board. Finishing The water-based food colors need to be sealed with a waterproof finish or the colors will eventually run and stain. It is best to apply this during the coloring process before the pieces are attached to the board. For this board, I used a natural tung-oil finish. The board, when complete, has a lot of little nooks and corners, so it is difficult to sand between coats—something to keep in mind when choosing a finish. For this reason, I didn’t use a plastic ure- thane finish. Whatever you decide to use, make sure it is nontoxic when dry. Making Toys That Teach 44 5 5 7 7 8 8
- 52. Bead Board 45 If a child is having trouble matching both shape and color, you may want to concentrate on just one characteristic—either color or shape. You may even find that with young children, just having them put the beads onto the pegs is enough of a challenge. In this case, don’t add the potential frustration of matching until the child is ready. Learning through Play THE BEAD BOARD, like the Big Beads, is designed for children between the ages of two and approximately eight years old, depending on the child. Like the beads themselves, the Bead Board helps young children improve their fine-motor skills and eye-hand coordination as they fit the beads onto the short dow- els. Each bead has a unique home, based on color and shape, so children learn to compare and match both the colors and the basic geometric shapes. Talk with children about ways to compare the shapes. Count the sides, count corners, and talk about the name of each shape. Note that the round bead has no corners. Compare and match the colors as well.
- 53. 46 M A K I N G T O Y S T H A T T E A C H ears ago our family was given a box of huge dominoes, nicely made from 2x4 pine. The children used these endlessly (and still do). Mostly they were used to build large structures that were admired and then knocked down with a great crash. As we’ll see in the Ultimate Building Block Set chapter, this has merit in its own right, but dominoes’ traditional use has educational value as well. This variation of dominoes is geared to teach attributes of shape and color. While played in the same way that traditional domino games are played, the players match geometric shapes, sizes, colors, or some combination of the above. This allows young children to play while ensuring that older players enjoy the game. Since the size of these dominoes is based on the basic unit of 11 ⁄2 in., they can be incorporated into the Ultimate Building Block Set. You can make the tiles out of 2x4 pine or fir or out of hardwood. The hard- wood version costs more and requires more planing and sizing, but it will resist denting better than softwood. For this project, I used local birch, which was an inexpensive option for me. However, our pine set has survived many years of use and is still functional. If you want a smaller set of dominoes, reduce all the sizes by half. The resulting 11 ⁄2-in.-wide by 3-in.-long dominoes may be made of 3 ⁄4-in.-thick solid wood. The attached geometric shapes are made from thin veneer, available at hobby shops and catalog companies, such as Lee Valley Tools. y Attribute Dominoes
- 54. I used a light-colored veneer and dyed it with food coloring to obtain different colors. This project is not difficult to make but does take a while because there are 21 dominoes, each with two shapes attached. All told, it will probably take you a couple of days to complete this project. Attribute Dominoes 47 47 Bandsaw (a small, inexpensive one is adequate) or table saw Sharp scissors Parallel or “C” clamps (two or three will do) Handplane, or a jointer if you have one Disk sander will be convenient (again, a small one will do) Tools You Need
- 55. Making Toys That Teach 48 Tiles 6 in. x 3 in. x 11 ⁄2 in. 21 Thickness includes veneer shapes. Large veneer triangles 23 ⁄16 in. x 17 ⁄8 in. x 1 ⁄32 in. 7 Large veneer circles 2 in. dia. x 1 ⁄32 in. 7 Large veneer squares 2 in. x 2 in. x 1 ⁄32 in. 7 Small veneer triangles 15 ⁄64 in. x 15 ⁄16 in. x 1 ⁄32 in. 7 Small veneer circles 1 in. dia. x 1 ⁄32 in. 7 Small veneer squares 1 in. x 1 in. x 1 ⁄32 in. 7 F FI IN NI IS SH H D DI IM ME EN NS SI IO ON NS S N NO O. . P PA AR RT T N NA AM ME E L L X X W W X X T T R RE EQ Q’ ’D D. . N NO OT TE ES S ATTRIBUTE DOMINOES CUT LIST 60° 2 2 2 23 /16 17 /8 15 /16 1 1 1 15 /64 60˚ 11 /2 1 /16 6 3 DOMINO TILE LAYOUT Top view Front view Small veneer shapes Large veneer shapes
- 56. Domino Tiles These blank rectangular blocks provide the base for the dominoes; when they are made and sanded, you will glue on the veneer shapes. Make 21 tiles and 42 veneer shapes. This number of tiles allows for every combination of pairs of size and shape. There will be six different geometric objects composed of three shapes, two sizes of each. To add the attribute of color, these shapes will be dyed red, yellow, or blue (you could use different colors, of course). 1 1. . Cut the stock to width if using 2x4 construction lumber. Carefully saw the wood to just over 3 in. wide and then plane to 3 in. exactly. 2 2. . Lay out the tiles to length. Do this as carefully as possible so that all the domino tiles will be the same size. Variations in size of more than 1 ⁄32 in. make the tiles less useful for stacking or for use as building blocks, although they still work just fine as dominoes. 3 3. . Cut the tiles to length, adding about 1 ⁄32 in. for sanding the ends. After cutting the long boards to a reasonably short length, I use the miter gauge on my little bandsaw. It is a big cut for a small saw so Attribute Dominoes 49 B B B R B Y Y B B B B B B R R B B R R R R R R R R B B B R Y Y Y Y Y Y Y Y Y Y R Y Y DOMINO TILE PATTERNING R = Red B = Blue Y = Yellow
- 57. if you do it this way, feed the wood in slowly. If you have a miter saw, use it with a stop to keep all the tiles the same length. 4 4. . Sand the edges and ends as needed. If using a disk or belt sander choose a fine-grit disk or belt, and check frequently for accurate length and squareness of the ends. You could do this sanding by hand as well, starting with a coarse grit. 5 5. . Saw a 1 ⁄16-in.-wide by 1 ⁄16-in.-deep slot down the center of each tile. This will mark off the two halves of the domino. Do this on the best face of the tile. You could use the bandsaw as shown in the photo below, but a handsaw would also work well. 6 6. . Sand all sharp corners, and sand the faces of the tiles as needed. Veneer Shapes On occasion I have sawn very thin strips, cut and glued them in place, and then sanded them flat and smooth. However, using purchased veneer is much easier and quicker than making your own. Use light-colored veneer for all the shapes and then color them with food coloring before gluing them to the tiles. 1 1. . Lay out the veneer for the three shapes, each shape in the two sizes. Cut eight of each (you only need seven, but one extra is a good idea because these veneer parts are fragile). The layout for the square and round shapes is easy. Use a square and ruler for the square shape, and a compass for the round shape. Since you will be cutting with a razor knife or scissors, you don’t need to leave any space between the squares, but a small gap (maybe 1 ⁄8 in.) between the circles makes the cutting a little easier. Making Toys That Teach 50 1 1 5 5 3 3
- 58. To lay out the large triangles, draw parallel lines 17 ⁄8 in. apart and about 10 in. long. On the bottom line, measure out four 23 ⁄16-in. distances. On the top line, start out half this distance in from the end, to locate the top point of the first triangle (13 ⁄32 in. from the end). From there, step off four 23 ⁄16-in. distances. Join the dots, and you should have eight triangles. Lay out the small triangles the same way but half the size (half of 13 ⁄32 is 35 ⁄64). On my layout, these are just above the large triangles. 2 2. . Cut the shapes using sharp scissors. Since the veneer is brittle and fragile, you may want to wet down the area you will be cutting. After soaking for about a minute, the wood will cut much better. 3 3. . When dry, lightly sand the edges. Watch for the fragile tips of the corners of the triangle; you may want to flatten them off slightly. 4 4. . Dye the shapes, and let them dry. You may sand a little after coloring, as the color soaks right through most thin veneer. For this project, I used red, yellow, and blue coloring. Each color is applied to two large and two small shapes, for a total of twelve objects per color. It takes 42 pieces to have every combination of size and shape paired off on the tiles. This will leave you with six leftover pieces, which you can color as you wish. For coloring hints, see p. 13. Attribute Dominoes 51 4 4
- 59. Assembly 1 1. . Glue the shapes to the dominoes. Spread glue on one side of the veneer shape. Use a small brush to get the glue right up to the edges. I thin the glue slightly (1 part water to 4 parts glue) so it spreads evenly and thinly. It is a good idea to try gluing a sample of veneer to scrap wood, ensuring that the glue is adequate but not squeezing out a lot when clamped. Clamp using a small, flat board over the shape. Use something that the glue will not stick to if it soaks through the veneer a bit. I use melamine, but covering the clamping block with plastic wrap or waxed paper will also work. 2 2. . When the glue is hard, remove the clamps and carefully remove any excess glue using a small chisel or a razor knife. 3 3. . Sand the veneer shapes lightly. Make sure there are no sharp corners anywhere on the domino tile. Finishing Finish as desired. I have sometimes used a natural tung-oil finish. It takes a while to dry and isn’t glossy, but it is nontoxic wet or dry. It is easy to sand out scratches and add a little more oil if natu- ral wear and tear makes this necessary. On this set, I decided to use a plastic finish, of the type often used on baby cribs. This urethane is nontoxic after it hardens and provides a hard finish. I have one set of dominoes that has wax only, and that works well also but doesn’t darken the wood in the way an oil or wet type of finish does. Whatever you put on, check that it is nontoxic. Making Toys That Teach 52 1 1
- 60. Attribute Dominoes 53 A variety of matching games can be played with attribute dominoes, just as with traditional dominoes. Matching may be done on the basis of: ■ Shape only (disregarding color and size) ■ Color only (disregarding shape and size) ■ Size only (disregarding shape and color) ■ Shape and size but color is different ■ Color and size but shape is different ■ Shape and color but size is different ■ Shape, color, and size There are almost endless ways to use dominoes, and it is worth reading instructions for domino games. These can be found in inexpensive domino sets, in library books, or on the Internet. Learning through Play THESE DOMINOES are intended for children ages two and up. There is no real age limit, but my children rarely used them after the age of about 12. Attribute dominoes help children develop recognition and understanding of the attributes of shape, color, and size. Children also help develop fine- and gross-motor skills when the dominoes are used to build towers or in “knockdown” rows. And letting children play with domi- noes in a free manner enhances creativity, as children invent all sorts of structures and games. To enhance the educational value, take the time to talk about the different geometric shapes. Describe the num- ber of sides and angles of each, and teach the names of the shapes. Even young children will easily learn the correct names when they’re taught through play.
- 61. 54 M A K I N G T O Y S T H A T T E A C H made a little box like this for my son Eric when he was a toddler. The next two children also played with it, and it has survived in fine condition. The box consists of three layers, each with a hole in the center. The holes are three different shapes: square, triangle, and circle. A hinged lid tops the box, and a thin slab forms the bottom. Inside, three wooden shapes with small handles fit into the shaped holes. A child learns to open the lid and place the three blocks into the corresponding layer in the box. This needs to be done in the right order, so that the smallest shape, the triangle, goes in first followed by the slightly larger circle, and finally the square. The triangular and square blocks need to be rotated to fit in place. The box can then be closed. There is nothing stopping you from adding another shape (four layers), changing the shapes, or adding a latch to the lid. This rewarding project is especially fun to make. There are only a few parts, sizes are not critical, and the fit of the puzzle pieces to the box is very loose, as it needs to be for children. Fitting hinges always takes a little care, but aside from that, the project is uncomplicated. Even if you miss a size or two, the puzzle can still work wonderfully. Making the puzzle box will likely take about half a day plus finishing time. Shape PuzzleBox i
- 62. 55 55 Scale (ruler) Square Compass Awl Coping saw Small file (I use a 6-in. double-cut flat smooth file) Medium-size file (such as an 8-in. double-cut flat bastard file) Handplane Parallel or “C” clamps, with at least a 3-in. opening (three or four will do) Drill press 1 ⁄4-in. drill bit Sanding drum (1 in. or 2 in. dia.) for the drill press Disk sander will be convenient Bandsaw (a small inexpensive one is adequate) Tools You Need
- 63. SHAPE PUZZLE BOX LAYOUT Box Layers The box consists of three layers. The layers are 3 ⁄4-in.-thick square boards, with a different shaped hole cut out of each one. 1 1. . Cut three squares, about 51 ⁄8 in. by 51 ⁄8 in., from a 3 ⁄4-in.-thick board. The box will end up close to 5 in. square by the time the three layers are glued together and the edges are trimmed even. Don’t sand any edges yet—it is best to do this after the box is assembled. 2 2. . Lay out the square hole, but don’t lay out the holes for the other two shapes until later. Reference the lines from one straight edge, using a ruler and a square to measure from this edge only. Start at the center of your 51 ⁄8-in. by 51 ⁄8-in. square, and lay out lines 11 ⁄2 in. on each side of the centerlines. After the square hole is cut out and sanded to its final shape and size, you will trace this onto the second layer. The size of the circle is based on the final size of the square, and the size of the tri- angle is based on the size of the circle. Doing it this way leaves some room for variation in case a part ends up slightly over or under the intended size. 3 3. . Lay out 1 ⁄4-in.-dia. holes at each corner. Have the center of the hole 1 ⁄8 in. from the line, so that the edge of the hole ends up exactly on the line. Mark the center of each hole with an awl. 4 4. . Drill the holes. Have the part clamped onto a scrap of wood so that it doesn’t splinter. Making Toys That Teach 56 3 /4 Top layer R1 /8 31 /2 31 /2 5 5 3 /4 33 /8 5 5 Middle layer 3 /4 5 5 37 /8 23 /8 113 /16 Bottom layer R1 /8 21 /2 15 /16 3 3 4 4 Top layer Middle layer Bottom layer
- 64. 5 5. . Lay out the square on the back side as well, using the hole edges as references. This will help you saw accurately. 6 6. . Cut along the lines using a coping saw. Be care- ful to have the saw cut square to the part, not at an angle. It is a good idea to cut about 1 ⁄64 in. to 1 ⁄32 in. from the line to allow for some filing and sanding. 7 7. . File and sand these inside surfaces straight and square, except where the drill bit left a radius in the corners of the square cutout. If, by mistake, you file into these rounded corners, just carry on doing so, to get a sharper corner. If you can leave the slight radius, do that. If you are using a coarser file to start with, watch for splintering on the end grain. You may need to use lighter strokes or a finer file. The side with splinters, if any, can be put facedown so that these splinters will not be seen, but you need at least one good side. 8 8. . Trace the finished square onto the next layer. 9 9. . Find the center of this drawn square, and use it as the center for the circle. Set the com- pass to draw a circle about 1 ⁄4 in. smaller in diameter than the pen- ciled square (the com- pass setting should be about 111 ⁄16 in. radius). 1 10 0. . Drill a hole along the edge of the circle. Again, have the edge of the hole lined up with the edge of the layout line. You may want to draw the circle on the back as well. To do this, measure carefully to locate the center. Shape Puzzle Box 57 Box lid 5 in. x 5 in. x 1 ⁄2 in. 1 Cut 1 ⁄8 in. over length and width; trim later. Layers 5 in. x 5 in. x 3 ⁄4 in. 3 Cut 1 ⁄8 in. over length and width; trim later. Bottom 5 in. x 5 in. x 1 ⁄8 in. 1 Use Baltic birch plywood. Cut 1 ⁄8 in. over length and width; trim later. Square puzzle piece 31 ⁄4 in. x 31 ⁄4 in. x 1 ⁄8 in. 1 Baltic birch plywood Round puzzle piece 31 ⁄8 in. dia. x 1 ⁄8 in. 1 Make diameter to fit—about 31 ⁄8 in. Triangular puzzle piece 25 ⁄16 in. x 2 in. x 1 ⁄8 in. 1 Size to fit round layer. Handles 1 in. x 3 ⁄4 in. x 1 ⁄2 in. 3 F FI IN NI IS SH H D DI IM ME EN NS SI IO ON NS S N NO O. . P PA AR RT T N NA AM ME E L L X X W W X X T T R RE EQ Q’ ’D D. . N NO OT TE ES S SHAPE PUZZLE BOX CUT LIST 6 6 8 8 9 9
- 65. 1 11 1. . Using the coping saw again, saw around the circle, then file and sand to the line as you did with the first layer, or use a sanding drum on the drill press. I like the sanding drum option, but don’t push too hard as the drill- press quill is not de- signed for continually high degrees of side force. 1 12 2. . Trace the circle onto the last layer. 1 13 3. . With a compass set to the radius of that circle, step off six times around the circumference. Start at the top of the circle so that the triangle does not end up at an odd angle to the square. If the compass is still set to the exact radius, it will step off exactly six times. Starting with the mark at the top of the cir- cle, use every other mark as a corner of the triangle, and draw the triangle. 1 14 4. . Lay out for a hole in each corner but set in 1 ⁄8 in. so that the edge of the hole will just touch the two lines that form the corner. 1 15 5. . Drill the holes. 1 16 6. . As with the square and circle, cut out the triangle. File and sand. Puzzle Pieces These are the three shapes that fit into the box. They are made of 1 ⁄8-in.-thick Baltic birch plywood, with small handles glued on. 1 1. . Lay out the three puzzle pieces. In the end, there should be a 1 ⁄8-in. gap all around when each piece fits into the box. Trace the cutouts from the box layers, then measure in 1 ⁄8 in. all around. 58 1 11 1 1 15 5 1 16 6 1 /8 2 25 /32 25 /16 R1 /16 R1 /16 1 /2 3 /16 Handle 1 /2 1 /8 31 /8 R1 /16 Handle 3 /4 1 /8 31 /4 31 /4 1 R1 /16 1 / R1 /16 R1 /16 1 /2 Handle 11 /8 PUZZLE PIECE LAYOUT Making Toys That Teach Square puzzle piece Round puzzle piece Triangular puzzle piece
- 66. 2 2. . Cut to size, and sand the edges as needed. 3 3. . Cut a strip of wood, 1 ⁄2 in. thick by 3 ⁄4 in. wide, for the handles. For this project, I used a strip of purpleheart, because it was handy and provided a little color. It only needs to be about 3 in. long, but a little extra makes it easier to plane. 4 4. . Lay out the slope on the sides. Plane to get the angle on each side so that the bottom of the strip is only about 1 ⁄2 in. wide while the top remains 3 ⁄4 in. wide. 5 5. . Sand as needed, rounding the sharp top edges a little. 6 6. . Lay out and cut the handles to length. 7 7. . File and sand as needed, rounding all sharp cor- ners and edges. Lid and Bottom These are just two squares of wood, each piece the same size as the middle layers. They will be trimmed and sanded to their exact size later. Cut the parts to 51 ⁄8 in. square, just like the box layers. Use 1 ⁄8-in.-thick plywood for the bottom and 1 ⁄2-in.-thick solid wood for the lid. Both of these parts could be a little thicker if that is more conven- ient for you. Screws will be put into the lid to attach the hinges, so the thickness may depend on which type and size of hinge you use. Assembly and Finishing 1 1. . Center the handles on the puzzle pieces by measuring in from each side. Make a couple of small pencil dots (barely visible) to mark the loca- tion, keeping in mind these dots cannot be easily removed later. Centering the handle on the triangle is more of a judgment call; just locate it so it looks right. This probably means having it about 3 ⁄16 in. from one edge and parallel to that edge (see the drawing on facing page). Spread a small amount of glue on the handles and clamp them gently to the puzzle pieces, checking that they don’t slide out of place. You may want to Shape Puzzle Box 59 4 4 6 6 5 1 /8 1 /2 Lid Middle layer Top layer Bottom layer Bottom ASSEMBLY
- 67. slide the handles over 1 ⁄64 in. or so, to just cover the tiny pencil dots. 2 2. . Sand the box layers, especially any surfaces that will be seen in the interior of the box later. 3 3. . Assemble the three box layers and the bottom. It is best to put glue on the bottom of the layers only, keeping the glue back from the interior edges. If you put glue on the tops of the layers, it is harder to define exactly where the glue should go, and it will be difficult to remove excess glue later. Clamp the parts together, aligning and centering the internal shapes carefully. Align the inside con- tours, but don’t worry about lining up the outside surfaces. I put a scrap block under the bottom to even out the clamping pressure. 4 4. . When the glue is hard, lay out a cutting line 3 ⁄4 in. out from the inside edge of the cutout, on all four sides. If 3 ⁄4 in. does not work well, adjust the size until it does, but keep it even on all sides. 5 5. . Carefully saw to the line, using the bandsaw. This is a thicker cut, so if you are using a small bandsaw, feed the piece through slowly and carefully. 6 6. . Sand all the surfaces flush and square. I use a disk/belt sander for this, but it could be done with a file and sandpaper, though this would take longer. 7 7. . Trim the lid to the size of the box, and sand all surfaces. 8 8. . Finish the box and the lid separately. For this project, I sprayed on three coats of urethane plastic finish, sanding lightly between coats. Do the same with the puzzle pieces. 9 9. . Attach the hinges. For this project, I kept this as simple as possible, with the piano hinge being sur- face mounted. You can chisel in hinges if you desire. If you do so, do the job carefully; even a lit- tle inaccuracy here produces an unsightly result. Making Toys That Teach 60 1 1 3 3 5 5
- 68. Although the lid is small and light, illustrate how it could pinch if a finger was left near the hinge as the lid is closed. Better to learn this here than with a car or house door. Don’t forget to leave some room for divergent (open- ended) learning. What other things fit into the box? This will give you the opportunity to talk about concepts such as long and short, thick and thin, and big and small. You may end up finding other things that are round or triangular or square that will fit. See what kids come up with, and talk about why each item either fits in the box or doesn’t. Learning through Play THE SHAPE PUZZLE BOX is particularly suitable for toddlers because it helps develop gross- and fine-motor skills through the careful placement of the puzzle pieces. As the child advances, simple geometry is introduced as the shapes become recognizable and familiar. The latching device, if simple, also develops fine- motor skills. Through all this, problem-solving processes are developed. Counting to three or four can be learned or reinforced as the three- and four-sided shapes are described. As you start to play with your little one, open the lid for him or her. Show one shape at a time and demon- strate how it fits. Have the child try. Talk about the shape, calling it by name (triangle, circle, and square) and describing it in simple terms. For example, show how the triangle has three corners, then count them out. Do the same with the triangular hole it fits into. Talk a little about circles, perhaps pointing out that they have no straight sides, which allows them to roll like a wheel or ball. You may even want to point out the difference between a circle and a sphere, if you have a ball to show and compare. When the child becomes familiar with the box, show how the catch works, and how the lid hinges up. Shape Puzzle Box 61
- 69. 62 M A K I N G T O Y S T H A T T E A C H uilding with blocks is a popular pastime for children of all ages, and this toy allows young children to make a pyramid tower that doesn’t fall over. To provide a challenge to the toddler, however, each block must be put on in order or it won’t fit on the central pillar, which is itself a pyramid shape. You can provide hints by using different-colored blocks in a pattern or by using two colors and alternating them as I have done here. The two- color approach seems to work best because young children tend to have trouble with more complicated patterns. The toy consists of a slender pyramid-shaped pillar attached to a square base. Six blocks stack onto the pillar, each a little smaller (and with a smaller square-shaped hole) than the last. This means that the small blocks cannot slide down to the bottom of the pillar, ensuring that the blocks are stacked in order. Choose hard, strong wood for this project. I use maple if I am coloring the wood; otherwise I use maple for the light-colored wood and black walnut or purpleheart for the darker wood. This is a little more difficult than the projects in the previous chapters, but even sanded nicely, it can be done in a couple of days. Filing and fit- ting the blocks to the pillar takes a bit of careful handwork and is the most difficult and time-consuming part of the project. If you have 3 ⁄4-in.-thick wood, simple machine work is all that is required. Stacking Pyramid b
- 70. 63 63 Square Handplane Disk sander Bench vise Scale (ruler) Awl Mallet Clamp or vise suitable for clamp- ing wood to drill-press table Coping saw Small file (I use a 6-in. double-cut flat smooth file) Medium-size file (such as an 8-in. or 10-in. double-cut flat bastard file) Drill press 1 ⁄4-in. drill bit 3 ⁄4-in. Forstner-style drill bit Bandsaw (a small one will do) or table saw Tools You Need
- 71. Pillar This pillar is the center post that locates the six blocks. It is 51 ⁄2 in. long and has a square cross sec- tion, tapering from 11 ⁄2 in. wide at the bottom to 1 ⁄2 in. wide at the top. It will be attached to the base later. 1. For the pillar, laminate two pieces of 3 ⁄4-in.-thick wood, or use 11 ⁄2-in.-thick wood if you have it. Cut a block 11 ⁄2 in. by 11 ⁄2 in. at least 51 ⁄2 in. long. 2. Square up the block by planing the edges as needed. Having it square now will make it easier to keep it square as you start to taper it. 3. Saw the ends to length and square them up carefully, especially the end that will be on the bot- tom. I cut the ends on a bandsaw or miter saw, then touch the ends to a disk sander that has the table set exactly square to the disk. Sand a little, rotate the block 90 degrees, and sand a bit more. Do this several times as you square it up, and the result should be satisfactory. Get it as close as you can to the finish dimensions. 4. Lay out for the taper on two sides. Use the end that is the most square as the large end. 5. Cut the taper on the bandsaw. Make the first two cuts leaving 1 ⁄2 in. or so uncut so the layout on the other side isn’t sawn off (see the photo top right). Then make the two cuts on the other side, completing the cut (see the photo bottom right). Finish off the first two cuts, by eye. Save the wedge-shaped pieces for the next step. Making Toys That Teach 64 Pillar 5 in. x 11 ⁄2 in. x 11 ⁄2 in. 1 Base 41 ⁄2 in. x 41 ⁄2 in. x 3 ⁄4 in. 1 Alternate light and dark wood for base and stacking blocks. Stacking block 1 11 ⁄2 in. x 11 ⁄2 in. x 3 ⁄4 in. 1 Stacking block 2 2 in. x 2 in. x 3 ⁄4 in. 1 Stacking block 3 21 ⁄2 in. x 21 ⁄2 in. x 3 ⁄4 in. 1 Stacking block 4 3 in. x 3 in. x 3 ⁄4 in. 1 Stacking block 5 31 ⁄2 in. x 31 ⁄2 in. x 3 ⁄4 in. 1 Stacking block 6 4 in. x 4 in. x 3 ⁄4 in. 1 Joint dowel 11 ⁄2 in. x 3 ⁄4 in. dia. 1 Cut 1 ⁄16 in. longer; trim after assembly. FINISH DIMENSIONS NO. PART NAME L X W X T REQ’D. NOTES STACKING PYRAMID CUT LIST 5a 5b
- 72. 6. Plane or sand the tapered surfaces. To hold the pillar in a vise, use the two discarded wedges cut from the sides. Check regularly for squareness. This can be tricky. It is easy to check at the large end of the pillar, but along its length, make sure you hold the square so it measures perpendicular to the centerline of the pillar (see the drawing p. 66). Also, make sure the angled surfaces are as straight as possible. Exact size is nice, but the stacking blocks Stacking Pyramid 65 1 /2 11 /2 41 /2 3 /4 5 3 /4 13 /4 11 /2 11 /2 1 /2 1 /2 41 /2 41 /2 STACKING PYRAMID LAYOUT Pillar and base top view Pillar and base front view 6
- 73. will be fitted to your tapered pillar, so accuracy is not as important as squareness. 7. Round the corners slightly (1 ⁄16 in. to 1 ⁄32 in. radius) except for the end where the pillar will attach to the base. 8. Lay out for the stacking blocks on the pillar. Do this by measuring 3 ⁄4-in. increments up from the bottom. Draw lines across, indicating where the dif- ferent blocks should fit. You will use these lines later to file the square holes to the correct size, allowing each block to slide down at least as far as the corresponding line. Stacking Blocks and Base Each block is a 3 ⁄4-in.-thick square, with a square hole in the center. The base is a similar block but without the hole. The blocks need to fit with either side up, so the holes are angled from the top and from the bottom. This is actually easier than designing them to fit from one side only. 1. Lay out the outside sizes for all the square blocks and for the base, all on 3 ⁄4-in.-thick wood. For this project, I have alternated light and dark wood. Do not lay out the square holes yet. Reference all the layout lines from a straight, planed edge. Use a square and ruler to get all measurements from this true surface. Making Toys That Teach 66 8 Pillar Square (side view) Square (side view) BLOCK AND PILLAR ALIGNMENT Incorrect Correct
- 74. Stacking Pyramid 67 STACKING BLOCK LAYOUT Top view Stacking block 1 Front view Stacking block 2 Stacking block 3 Stacking block 4 Stacking block 5 Stacking block 6 Note: All stacking blocks are 3 ⁄4-in. thick and are square when viewed from the top (like the top view of the small layer above). 11 /16 25 /32 11 /2 27 /32 15 /16 2 1 11 /16 17 /32 15 /32 13 /8 19 /32 117 /32 17 /16 21 /2 3 31 /2 4 3 /4 3 /4
- 75. 2. Saw the blocks to size, leaving only about 1 ⁄32 in. for sanding on the edges. I cut these using my little bandsaw, but I am pretty careful to make the cuts as straight as possible. 3. Sand the edges smooth, and square them to the original reference edge in step 1. Bevel the edges to about 1 ⁄16 in. It is probably best to bevel them by hand unless you have a sensitive touch on the disk sander. 4. Lay out the square holes using the pillar as a guide (see the drawing above). If your pillar did not end up the same size as indi- cated in the drawing, you should check the hole size by measuring the width of the pillar at a point 1 ⁄8 in. lower than where the center of the block will be (you want the blocks to be able to slide 1 ⁄16 in. to 1 ⁄8 in. below the line). To lay out the square holes, work from the center and measure out from there. This ensures that the holes will be centered on the block, regardless of block size or pillar size. Making Toys That Teach 68 4 2 1 13 /4 21 /2 31 /4 4 BLOCK LAYOUT ON THE PILLAR Measure at these places to get size of block hole layout. Location of blocks