1. Web Ticket Entry Basic Training Guide
BASIC MAPPING TOOLS
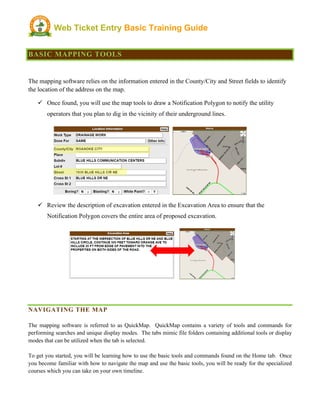
The mapping software relies on the information entered in the County/City and Street fields to identify
the location of the address on the map.
ü Once found, you will use the map tools to draw a Notification Polygon to notify the utility
operators that you plan to dig in the vicinity of their underground lines.
ü Review the description of excavation entered in the Excavation Area to ensure that the
Notification Polygon covers the entire area of proposed excavation.
NAVIGATING THE MAP
The mapping software is referred to as QuickMap. QuickMap contains a variety of tools and commands for
performing searches and unique display modes. The tabs mimic file folders containing additional tools or display
modes that can be utilized when the tab is selected.
To get you started, you will be learning how to use the basic tools and commands found on the Home tab. Once
you become familiar with how to navigate the map and use the basic tools, you will be ready for the specialized
courses which you can take on your own timeline.
2. Web Ticket Entry Basic Training Guide
11/24/2020 2 VERSION 9
HOME TAB
The Home tab automatically displays first and contains the primary functions and initial commands
needed to launch the map and activate the search for the data entered in County/City and Street fields.
The Home tab contains specific functions to display data and navigate within the map. Each row of
commands performs the functions defined by the term shown at the beginning of the row to include Find,
Zoom, Highlight, Search and Swap.
Find - uses the data entered in the County/ City, Street and
Cross Street fields to launch the map
Zoom - multi-functional command used to display specific
information about the data entered
Highlight – displays streets and cross streets entered in the
Street and Cross Street fields by their associated color
Search – displays available data based on command
selected
Swap – used to swap data entered in the Street and Cross
Street fields
The additional commands access external mapping
resources to include the satellite imagery provided by the
Virginia Geographic Information Network or VGIN,
Google and Bing maps.
3. Web Ticket Entry Basic Training Guide
11/24/2020 3 VERSION 9
LAUNCHING THE MAP
If a numerical address has been entered in the Street field, then select the command to launch
the map.
The street segment (Blue Hills Cir NE) displays in red
within two yellow vertices (yellow dots). This means
the address is found on the street between the two
yellow dots. The range of addresses found within the
two yellow dots also displays.
Parcel data indicated by the red shaded area will
display with the address point (when available). This
is referred to as a Direct Mapping Hit.
The cross street is highlighted green by selecting the
Cross 1 command.
Direct Mapping Hit – When ALL the following
attributes display on the map: road segment,
corresponding road address range, and parcel data
with address point.
4. Web Ticket Entry Basic Training Guide
11/24/2020 4 VERSION 9
Place field and Message Boxes
The Place field contains the name of the town or community within a county or city; however, it is not a
required field. If the address, street or cross street(s) are found within a town or community that has not
been entered in the Place field, a message box will display that provides information about the place.
In this example the message “Found in a different place”, displays because nothing was entered in the
Place field.
You can enter the information in the Place field or leave it blank if you are not familiar with the place
name.
A variety of messages may display based on what was entered in the Place, Street and Cross
Street(s) fields. Pay close attention to the message and respond accordingly.
You can enter the name of the place in the Subdivision field if the name entered in the Place field causes
a conflict with the map.
5. Web Ticket Entry Basic Training Guide
11/24/2020 5 VERSION 9
DRAWING THE NOTIFCATION POLYGON
The Virginia 811 Members (utility operators) indicate the approximate location of their underground
facilities using the same mapping program you will use to find the area where you plan to dig on the map.
The location of Virginia 811 member’s underground facilities is proprietary which means that you will
not be able to see where their service areas are located on the map.
When the Notification Polygon you draw intersects with the polygon the members drew on the map, the
member utility will receive notification that you plan to dig near their underground utilities when you
submit the ticket.
The utility line locator does not see where you drew the polygon on the map. The locator
uses the description entered in the Excavation area to mark the approximate location of the
underground utilities.
Automatically Draw Polygon
Use the drawing tools located directly under the map the draw the Notification Polygon. If the parcel
displays on the map, you can automatically draw the work area (Notification) polygon around the parcel
by selecting the tools and commands indicated by the arrows below:
Select
Then Select
Try it!
6. Web Ticket Entry Basic Training Guide
11/24/2020 6 VERSION 9
Manually Draw Polygon
Leave Roanoke City in the County/City field and enter the address of 1829 Blue Hills Cir
NE in the Street field.
When the parcel data does not display on the map and you can confirm that the address is located on the
street entered in the Street field in ticket entry, use the tool to manually draw the notification
polygon.
1. Activate and select the drawing tool. A tool is activated or in use when the icon highlights green.
Select
2. Place the mouse on the map and left click where you want to begin drawing
3. Remove your finger from the left mouse button and pull in the direction of the area you want to
cover (This will be the first side to your work area polygon)
4. Click once on the left mouse button to end, then lift finger from the mouse button to start the
next line and pull in the desired direction as shown in the example below. Continue this process
until you fully cover the area where you plan to dig
Parcel Data
7. Web Ticket Entry Basic Training Guide
11/24/2020 7 VERSION 9
5. To connect the first and last lines, double click on the left mouse button to complete the
Notification or work area polygon
This does take practice!
Removing the Notification Polygon
If the polygon does not cover the entire area where you plan to dig, you can remove the polygon without
making changes to any of the map data.
To remove the Notification Polygon, select the command from the Home Tab:
Follow Steps 1- 5 to redraw the polygon.
8. Web Ticket Entry Basic Training Guide
11/24/2020 8 VERSION 9
Satellite Imagery
Display satellite imagery to help you see where to draw the polygon. Select either the
command from the Home Tab or the from the tool bar.
9. Web Ticket Entry Basic Training Guide
11/24/2020 9 VERSION 9
Zoom Tools
We are going to take a bit of a detour at this point and learn about using Zoom Tools. You will find that
learning how to zoom in and out of the map is one of the most important skills to master. This will help
you remain in control of the data you want to display on the map.
The first set of tools are found on the tool bar just below the map. The map will remain centered when
these tools are selected.
Zoom in to see the area closer Zoom out to see more information
Enlarge the map view Return to normal map view
Using the mouse to zoom in and out
To zoom in and out, place the cursor on the map and use the roller on the mouse to zoom in and out.
ü Out – roll backward to display more data
ü In – roll forward to zoom in to an area
Center the map by selecting a specific location on the map with the mouse.
If you get “lost” in the map, select the Find Street command to re-display the original data.
Practice, Practice and Practice!
For a complete description of the mapping tools, select QuickMap HELP
10. Web Ticket Entry Basic Training Guide
11/24/2020 10 VERSION 9
Highlight Commands
The Highlight commands are used to display the entire length of the street and cross street(s) on the map
and helps you to see where the entire street(s) are found on the map. This gives you visual confirmation
that you have identified the correct location of your proposed excavation area on the map. The Street,
Cross 1 and Cross 2 commands will highlight the entire road segments individually on the map.
The commands will highlight the street and cross street(s) at the same time and is the
most efficient tool to use to display the entire streets on the map.
Search and Show Commands
The Search and Show commands are used to display single addresses, multiple addresses and parcels.
This is especially helpful when you are looking for an address or series of addresses that are near your
area of excavation but not a part of it.
Using the Show Both command is the best way to display the data.
Select to display all the data at once.
Select to remove.