Vip Call Girls Noida ➡️ Delhi ➡️ 9999965857 No Advance 24HRS Live
construction changes
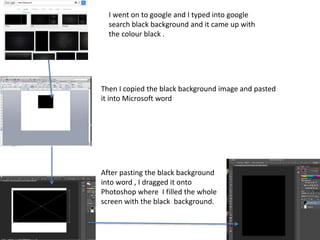
1. I went on to google and I typed into google
search black background and it came up with
the colour black .
After pasting the black background
into word , I dragged it onto
Photoshop where I filled the whole
screen with the black background.
Then I copied the black background image and pasted
it into Microsoft word
2. I went onto the font website Dafont and I
wanted the letter B , so I chose my style of
writing first which was American captain
and then I typed in the letter B. After
typing in the letter B I took a screenshot
of it by pressing ctrl,shift and 4 .
Then I went to my desktop
where the screenshot was and I
clicked on it , and it opened up
to this.
I took my mouse and I highlighted
the letter B, then on my keyboard
I pressed command and the letter
C
After that I went to Photoshop and on
the keyboard I then pressed command
and V , this pasted my letter onto the
page. Also the letter came out too
small so I also pressed command and T ,
which allowed me to change the size of
the letter.
3. I clicked the letter W , which brings up the
magic tool , which is the tool that can be
used to clear a certain area or fill up a
certain area of your choice. Here I clicked
the letter w , then the letter B and after
that I clicked inside the letter B , which
allowed me to add colour to the letter . T
o get the colour I wanted I had to click on
this tool here
Which then brought this colour pallet up
and you just had to choose what colour
you want.
After I chose the colour I wanted , which
was red I used my mouse to go over the
letter B and fill it in and ended up with
this .
4. This is the image I used on my front cover and dragged the image and pasted it in
Photoshop. I did not want my image to have the things it had in the background , so I
clicked on the letter W and clicked on the areas of the photos that I wanted to get rid
of .however, sometimes the magic tool would not work like I would of wanted it to and
so would delete some of the image that I did not want to get rid of . To solve my
problem I used a rubber instead to get rid of any of the other things in the background
that I did not need , I found that the edges on image wasn't looking very well done, so
I zoomed in on the image by going to view and clicking zoom in , and then I had a better
view on what the image really looked like .
5. I decided that I didn’t want the black background anymore and that instead I
wanted to have my masthead of my magazine to be the only thing of my front cover
that goes on the black background . I did this to make my masthead stand out more
as bright colours on top of dull colours always bring the bright colours out the most.
6. I went online on to google and I type in a bar code generator , and
I clicked on one of the websites and I created my own bar code
and put it on the front cover of my magazine .
7. For the yellow triangle at the bottom of the page, I put that there by
going on to the google and typing in yellow square , then copied in
onto word and slanted the shape to make it look diagonal because
when I drag it onto Photoshop It will be in the same position .Then
dragged it on to Photoshop . I got it to look like a triangle but cutting
of half on the square by hiding it
8. I clicked ctrl , shift and 4 ,
to screenshot the words.
Then I went to desktop and clicked
on the file to open in
After that I used my mouse
to highlight the word and
then I clicked command and
c
9. Then I opened up Photoshop and clicked
command and V , which pasted the word
“Angie” on to Photoshop
After pasting the word , I clicked on the
letter w to bring up the magic tool, where I
then clicked on the section of the word I
wanted to work on which was the
background
I wanted the background of the word “Angie” to be blue
, so I clicked the letter B , which allows me to the colour
in the area I want and I , went to this colour panel
clicking on the colour I want and then used my mouse
to brush over the background
To get it off the magic tool I clicked
command and d ,This was the final
outcome
10. I wanted the inside colour of the letters to be
yellow , so I clicked the letter w and then the
letter B , then went to the colour panel choosing
the colour yellow and filled in each of the letters
.
This was the final outcome
11. I pasted these words the same way I did to
the previous words.
Which was by taking a screenshot by
clicking ctrl , shift and 4, then opening it
up, highlight the word and clicking
command and c , then going to Photoshop
clicking command and v , and lastly clicking
command and T to change the size .
Then I wanted the next group of words
that I used to be the colour red , so I did
exactly the same process that I did to
the words before ,but this time I also
clicked the letter w , then b , choosing
the colour I want from the colour panel
and filled in each letter.
12. This was the final outcome
of my Music magazine front
cover
13. To get the layout of my page , I
went to file, new , changed the
paper to international paper ,A3,
and switched over the width and
length .This is how I started of my
double page spread by putting the
photo onto it and I did this by
opening up the photo in word and
dragging it onto Photoshop , then I
clicked on command and t to re size
it to fit half the page.
After pasting the photo, I decided to put the title onto
my double page spread, this was done by going onto
to the website Dafont . Then I chose the font I wanted
which was American captain, then I typed in the
words I wanted and took a screenshot of each one .
For each of the word I went on to the desktop ,
opened each word up , highlighted each one , clicked
command and c on the keyboard, changed to
Photoshop and clicked command and V pasting each
word, then finally I clicked command and T to resize
them . I also did the background colour by clicking the
letter w , clicked on the background ,then clicked
letter b , opened up colour panel , chose the colour I
wanted then used my mouse to fill in the background
14. To get the letter A , I went onto Dafont , typed
in the letter A , took a screenshot by clicking
ctrl , shift and 4 , went to desktop and opened
it up, highlighted the letter , clicked command
and c , switched to Photoshop, clicked
command and v , clicked command and t to
resize the letter . Then I clicked the letter w ,
clicked inside the letter A , clicked the letter b ,
chose the colour red on the colour panel and
used my mouse to fill in the letter.
For the information that I put onto my double
page spread , I used Microsoft word and I got
a text box and typed in the information tat I
wanted , then dragged each text box onto
Photoshop.
15. This was the final
outcome of my double
page spread.
16. I started to make my contents page here
and what I did to get the two black lines
was to go online and type in the colour
black , which came up with loads of black
background colours . So I clicked on one
and copied and pasted it onto word, then
dragged It onto Photoshop . Then I clicked
command and T , to resize the black
background making it really thin , then I
duplicated it to get another one by clicking
on the layer and clicking “duplicate layer”
To get the word “BURN” I went onto the
website Dafont . Then I chose the font I wanted
which was American captain, then I typed in
the individual letters and took a screenshot of
each one . For each of the word I went on to
the desktop , opened each word up ,
highlighted each one , clicked command and c
on the keyboard, changed to Photoshop and
clicked command and V pasting each word,
then finally I clicked command and T to resize
them . . I also clicked the letter w , clicked on
the inside of each letter ,then clicked letter b ,
opened up colour panel , chose the colour I
wanted then used my mouse to fill in each
letter with the colour red.
17. To get the image in the background , I
copied it onto Microsoft word then I
dragged it onto the Photoshop, clicking
command and T , to re size it to fit
most of the page. I made the image to
look faded by putting the opacity of
the percentage down.
I went onto Dafont , typed in the letters I wanted ,
took a screenshot by clicking ctrl , shift and 4 , went
to desktop and opened each letter up, highlighted
each letter , clicked command and c , switched to
Photoshop, clicked command and v , clicked
command and t to resize the each letter . Then I
clicked the letter w , clicked inside each letter ,
clicked the letter b , chose the colour red on the
colour panel and used my mouse to fill in the letter.
After I clicked the letter w again but this time
clicked on the background behind the letter , then I
clicked the colour panel and chose the colour black
and clicked the letter b , filling in the background
with the colour black using the brush tool
18. I went onto Dafont , typed in the numbers
I wanted , took a screenshot by clicking ctrl
, shift and 4 , went to desktop and opened
each number up, highlighted each number
, clicked command and c , switched to
Photoshop, clicked command and v ,
clicked command and t to resize each
number. Then I clicked the letter w ,
clicked on the background of each number
, clicked the letter b , chose the colour
black on the colour panel and used my
mouse to fill in the background. I also did
the same thing for the words and
background here as well.
I pasted three images onto
Microsoft word and I dragged
each one to Photoshop making
them overlap each other and I
also faded them out a bit by
changing the percentage of the
opacity.