Quick Installation Guide EnGenius EWS7928P
•
0 likes•992 views

The document provides a quick installation guide for the EnGenius EWS-series wireless management switches and access points. It includes instructions on unpacking the package contents, requirements for installation location, how to mount the switch on a flat surface or rack, how to connect devices to the switch and manage it through a web browser interface. It also describes how to locate, add and manage wireless access points connected to the switch through the management interface.

Recommended
Recommended
More Related Content
What's hot
What's hot (20)
Similar to Quick Installation Guide EnGenius EWS7928P
Similar to Quick Installation Guide EnGenius EWS7928P (20)
More from EnGenius Europe
More from EnGenius Europe (20)
Recently uploaded
Recently uploaded (20)
Quick Installation Guide EnGenius EWS7928P
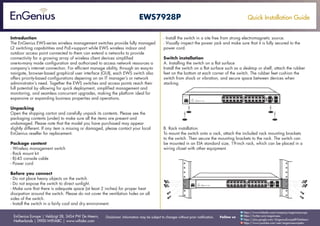
- 1. Quick Installation Guide EnGenius Europe | Veldzigt 28, 3454 PW De Meern, Netherlands | 0900-WIFIABC | www.wifiabc.com Disclaimer: Information may be subject to changes without prior notification. Follow us https://www.linkedin.com/company/engeniuseurope https://plus.google.com/+EngeniusEuropeBVDeMeern https://www.youtube.com/user/engeniuseuropebv https://twitter.com/engeniuseu EWS7928P Introduction The EnGenius EWS-series wireless management switches provide fully managed L2 switching capabitities and PoE+support while EWS wireless indoor and outdoor access point connected to them can extend a networks to provide connectivity for a growing array of wireless client devices simplified one-to-many mode configuration and authorized to access network resources a company’s internet connection. For efficient manage ability, through an easy-to navigate, browser-based graphical user interface (GUI), each EWS switch also offers priority-based configurations depening on an IT manager’s or network administrator’s need. Together the EWS switches and access points reach their full potential by allowing for quick deployment, simplified management and monitoring, and seamless concurrent upgrades, making the platform ideal for expansive or expanding business properties and operations. Unpacking Open the shipping carton and carefully unpack its contents. Please see the packaging contents (under) to make sure all the items are present and undamaged. Please note that the model you have purchased may appear slightly different. If any item is missing or damaged, please contact your local EnGenius reseller for replacement. Package content - Wireless management switch - Rack mount kit - RJ-45 console cable - Power cord Before you connect - Do not place heavy objects on the switch. - Do not expose the switch to direct sunlight. - Make sure that there is adequate space (at least 2 inches) for proper heat dissipation around the switch. Please do not cover the ventilation holes on all sides of the switch. - Install the switch in a fairly cool and dry environment. - Install the switch in a site free from strong electromagnetic source. - Visually inspect the power jack and make sure that it is fully secured to the power cord. Switch installation A. Installing the switch on a flat surface Install the switch on a flat surface such as a desktop or shelf, attach the rubber feet on the bottom at each corner of the switch. The rubber feet cushion the switch from shock or vibration, and secure space between devices when stacking. B. Rack installation To mount the switch onto a rack, attach the included rack mounting brackets to the switch. Then secure the mounting brackets to the rack. The switch can be mounted in an EIA standard size, 19-inch rack, which can be placed in a wiring closet with other equipment.
- 2. Quick Installation Guide EnGenius Europe | Veldzigt 28, 3454 PW De Meern, Netherlands | 0900-WIFIABC | www.wifiabc.com Disclaimer: Information may be subject to changes without prior notification. Follow us https://www.linkedin.com/company/engeniuseurope https://plus.google.com/+EngeniusEuropeBVDeMeern https://www.youtube.com/user/engeniuseuropebv https://twitter.com/engeniuseu EWS7928P Connecting to the switch Connecting the devices to the switch and managing the switch using a web browser Step 1: Connect the supplied power cord to the switch and plug the other end into an electrical outlet. Verify the power LED indicator is let on the switch. Step 2: Wait for the switch to complete boot up. It might take few minutes for the switch to complete boot up. Step 3: Connect one end of a cat 5/6 ethernet cable into the Gigabit (10/100/1000) Ethernet port on the switch’s front panel and the other end to Ethernet port on the computer. Verify that the LED on Ethernet ports of the switch is green. Step 4: Once your computer is on, ensure that your TCP/IP is set to ‘On’ of ‘Enable’. Open ‘Network Connections’ and then click ‘Local Area Connection’. Select ‘Internet Protocol Version 4’ (TCP/IPv4). Step 5: If your computer is already on a network, ensure that you have set it to a Static IP address on the interface. (Example: 192.168.0.10 and the subnet mask-address as 255.255.255.0.). Step 6: Open a web browser on you computer. In the address bar of the web browser, typ in 192.168.0.239 and choose enter.
- 3. Quick Installation Guide EnGenius Europe | Veldzigt 28, 3454 PW De Meern, Netherlands | 0900-WIFIABC | www.wifiabc.com Disclaimer: Information may be subject to changes without prior notification. Follow us https://www.linkedin.com/company/engeniuseurope https://plus.google.com/+EngeniusEuropeBVDeMeern https://www.youtube.com/user/engeniuseuropebv https://twitter.com/engeniuseu EWS7928P Step 7: A login screen will appear. By default, the username is admin and the password is password. Enter the current username and password of the switch an then click ‘login’. Step 8: The EnGenius wireless management switch user interface will appear. Make sure the controller state is set to ‘Enable’. Device management Locating wireless managed access point(s) Step 1: Go to device management and select access point. All managed access point(s) connected to the same network as the wireless management switch will appear on the right side of the screen, under the access point access point(s) detected list. Step 2: To manage the managed access point(s), select the desired managed access point(s) by checking the boxes and click ‘Add’. Step 3: You will prompted to enter an IP address range for the managed access point(s) - Select DHCP for an IP address to be assigned automatically if there is a DHCP server in the network. - Select ‘Static’ to enter the IP address, subnet mask, gateway and DNS server manually. Click ‘Apply’ to continue. Managing wireless managed access point(s) The managed access point(s) that are successfully being managed will be listed under the managed access point(s) list. Click on the device name to access to its configuration settings. Please refer to the wireless management switch user manual for more information on configuration settings. Managing wireless managed switch For futher switch configurations, click on switch at the top left of the dash board. Refer to the wireless managed switch user manual for more information on configuration settings.