SlideShare a Scribd company logo
1 of 102
Download to read offline
Eaton Wiring Manual 06/11
8-1
8
8
All about Motors
Page
Motor protection 8-3
Notes on engineering 8-15
Circuit documents 8-19
Power supply 8-21
Control circuit supply 8-24
Contactor markings 8-25
Direct-on-line start of three-phase motors 8-26
Control circuit devices for direct-on-line start 8-34
Star-delta switching of three-phase motors 8-35
Control circuit devices for star-delta starting 8-45
Pole-changing motors 8-47
Motor windings 8-50
Multi-speed contactors 8-53
Multi-speed switch for three-phase motors 8-55
Control circuit devices for multi-speed
contactors 8-63
Multi-speed switch for three-phase motors 8-68
Three-phase autotransformer starter 8-83
Three-phase automatic rotor starters 8-88
Eaton Wiring Manual 06/11
8-2
All about Motors
8 8
Page
Switching of capacitors 8-92
Duplex pump control 8-96
Fully automatic pump control 8-98
Fully automatic main transfer switch with
automatic release 8-102
Eaton Wiring Manual 06/11
8-3
All about Motors
8
8
Motor protection
Selection aids
The Eaton selector slide enables you to
determine quickly and reliably which motor
starter is the most suitable for the
application concerned. For this only the
operating voltage, the motor rating, the
various short-circuit ratings and
coordination types are required.
The selector slide can be used for
dimensioning devices with short-circuit
coordination types 1 and 2. Standard cable
cross-sections and permissible cable
lengths are stated for the tripping of
protective devices in compliance with
standards. They can vary according to the
installation requirements. The selector
slide has several variants of the movable
section with numerical values for DOL and
reversing starters or star-delta starters.
The selector slide can be obtained free of
charge. If you prefer to use the selection
aid online, this is available at:
www.eaton.com/moeller/support
(Online Selection Tools)
All about Motors
Motor protection
Eaton Wiring Manual 06/11
8-4
8 8
Overload relay with reclosing lockout
They should always be used where
continuous contact devices (two-wire
control) are concerned (e.g. pressure and
position switches), to prevent automatic
restarting. The reset button can be fitted as
an external feature in order to make it
accessible to all personnel. Overload
relays for example are always supplied
with manual reset. but can be converted to
automatic reset by the user.
Overload relays without reclosing
lockout
They can be used only with pulsed contact
devices (three-wire control) such as
pushbuttons etc., because on these, the
cooling of the bimetal strips cannot lead to
automatic reconnection.
Special circuitry
Special circuitry such as is found in
star-delta switches, individually
compensated motors, current
transformer-operated overload relays etc.
may require that the relay settings deviates
from the motor rated operational current.
Frequently recurring operating cycles
It makes motor protection difficult. The
relay should be set to higher than rated
motor current in view of its shorter time
constant.Motors which are ratedfora high
operating frequency will stand this setting
to a certain degree. Although this will not
ensure complete protection against
overload, it will nevertheless provide
adequate protection against non-starting.
Back-up fuses and instantaneous
releases
They are needed to protect not only the
motor, but also the relay, against the
effects of short-circuits. Their maximum
rating is shown clearly on every relay and
must be adhered to without fail. Higher
ratings – chosen for instance according to
the cable cross-section – would lead to the
destruction of the motor and relay.
The following important questions and
answers give a further guide to the
behaviour of an installation with motor
protection.
To what current must the overload relay
properly be set?
To the rated motor current – no higher, no
lower. A relay set to too low a figure will
prevent the full utilization of the motor; set
too high, it will not guarantee full overload
protection. If a correctly set relay trips too
frequently, then either the load on the
motor should be reduced or the motor
should be exchanged for a larger one.
When is it right for the overload relay to
trip?
Only when the current consumption of the
motor increases due to mechanical
overloading of the motor, undervoltage or
phase failure when the motor is under full
load or thereabout, or when the motor fails
to start due to a stalled rotor.
All about Motors
Motor protection
Eaton Wiring Manual 06/11
8-5
8
8
When does the overload relay fail to trip
in good time although the motor is
endangered?
With changes in the motor which do not
cause an increase in current consumption:
Effects of humidity, reduced cooling due to
a reduction in speed or motor dirt,
temporary additional external heating of
the motor or bearing wear.
What causes destruction of the overload
relay?
Destruction will take place only in the
event of a short-circuit on the load side of
the relay when the back-up fuse is rated
too high. In most cases, this will also
endanger the contactor and motor.
Therefore, always adhere to the maximum
fuse rating specified on every relay.
3-pole overload relays should be so
connected in the case of single-phase and
DC motors so that all three poles of the
overload relay carry the current, whether
in 1-pole or 2-pole circuits.
An important characteristic feature of
overload relays conforming to IEC/EN
60947-4-1 are the tripping classes (CLASS
10 A, 10, 20, 30). They determine different
tripping characteristics for the various
starting conditions of motors (normal
starting to heavy starting duty).
1 pole 2 pole
All about Motors
Motor protection
Eaton Wiring Manual 06/11
8-6
8 8
Pick-up times
Response limits of time-delayed overload
relays at all-pole load.
In the case of thermal overload relays with
a current setting range, the response limits
must apply equally to the highest and the
lowest setting of the associated current.
Type of
overload
relay
Multiple of current setting Reference
ambient
temperature
A B C D
t > 2 h
starting
from
cold
state of
relay
t ≦ 2 h Tripping
classes
Tripping
time in
minutes
Tripping
class
Tripping
time in
seconds
10 A
10
20
30
≦ 2
≦ 4
≦ 8
≦ 12
10 A
10
20
30
2 < T ≦ 10
4 < T ≦ 10
6 < T ≦ 20
9 < T ≦ 30
Non-ambient
temperature
compensated
thermal
relays and
magnetic
relays
1.0 1.2 1.5 7.2 +40 °C
Ambient
temperature
compensated
thermal
relays
1.05 1.2 1.5 7.2 +20 °C
All about Motors
Motor protection
Eaton Wiring Manual 06/11
8-7
8
8
Response limits of 3-pole thermal overload
relays at 2-pole load
In the case of thermal overload relays with
a current setting range, the response limits
must apply equally to the highest and the
lowest setting of the associated current.
Overload capacity
Overload relays and releases have heating
coils which can be thermally destroyed by
overheating. The making and breaking
currents of the motor flow in thermal
overload relays which are used for motor
protection. These currents are between 6
and 12 x Ie (rated operational current),
depending on the utilization category and
the size of the motor.
The point of destruction depends on the
frame size and design. It is usually
approximately 12 to 20 x Ie.
The point of destruction is the point of
intersection between the projected
tripping characteristic curves and the
multiple of the current.
Short-circuit strength of the main circuit
With currents that exceed the breaking
capacity of the motor starter in relation to
the utilization category (EN 60947-1, VDE
0660, Section 102, Table 7), it is permissible
for the current flowing during the break
time of the protective device to damage the
motor starter.
The permissible behaviour of starters
under short-circuit conditions is defined in
the so-called types of coordination
(1 and 2). It is common practice to state in
Type of thermal overload
relay
Multiple of current setting Reference
ambient
temperature
A
t > 2 h, starting
from cold state of
relay
B
t ≦ 2 h
Ambient temperature
compensated, without
phase failure sensitivity
3 poles 1.0 2 poles
1 pole
1.32
0
+20 °C
Non-ambient temperature
compensated, without
phase failure sensitivity
3 poles 1.0 2 poles
1 pole
1.25
0
+40 °C
Ambient temperature
compensated, with phase
failure sensitivity
2 poles
1 pole
1.0
0.9
2 poles
1 pole
1.15
0
+20 °C
All about Motors
Motor protection
Eaton Wiring Manual 06/11
8-8
8 8
the details of protective devices which
type of coordination is ensured by them.
Type 1 coordination
In the event of a short circuit the starter
must not endanger persons and
installations. It does not have to be fit for
renewed operation without repair.
Type 2 coordination
In the event of a short-circuit the starter
must not endanger persons and
installations. It must be fit for renewed
operation. There is a risk of contact weld.
for which the manufacturer must give
maintenance instructions.
The tripping type of the overload relay must
not differ from the given tripping
characteristic after a short-circuit.
Short-circuit strength of the auxiliary
contact
The manufacturer details the required
overcurrent protective device. The
combination is subjected to three test
disconnection's at 1000 A prospective
current with a power factor between 0.5
and 0.7 at rated operational voltage.
Welding of the contacts may not occur
(EN 60947-5-1, VDE 0660 Part 200).
Motor protection in special applications
Heavy starting duty
An adequate tripping time is essential in
order to allow a motor to start up smoothly.
In the majority of cases, overload relays
such as motor-protective circuit-breakers
PKZ(M) or circuit-breakers NZM can be
used. The tripping time can be taken from
the tripping characteristics in the main
catalogue, Industrial Switchgear.
In the case of especially high-inertia
motors, whose run-up time exceeds the
tripping delay of the above devices, it
would be completely wrong to adjust an
overload relay which tripped out before the
run-up time expired, to a current level
higher than the rated motor current. This
would, it is true, solve the starting problem,
but the motor would no longer be
adequatelyprotected during run.However,
there are other solutions to the problem:
Current transformer-operated overload
relays ZW7
The ZW7 consists of three special
saturable core current transformers,
supplying an overload relay Z… It is used
principally for medium and large motors.
Up to two times rated operational current
Ie, the transformation ratio I1/I2 of the
saturable core current transformers is
practically linear. Within this range it does
not differ from the normal overload relay,
i.e. it provides normal overload protection
during normal operation. However, within
the transformer characteristic range
(I > 2 x Ie) , the secondary current no longer
increases proportionally to the primary
current.
This non-linear increase in the secondary
current produces an extended tripping
delay if overcurrents greater than twice
ratedoperationalcurrentoccur,andhence
permits longer start-up times.
All about Motors
Motor protection
Eaton Wiring Manual 06/11
8-9
8
8
Adjusting the current
transformer-operated overload relay ZW7
for lower rated motor current
The setting ranges quoted in the main
catalogue, Industrial Switchgear, apply
when the incoming cable is looped once
through the transformer relay.
If the current transformer-operated
overload relay ZW7 is required to provide
protection to a motor of below 42 A rating
(minimum value in the setting range of 42 A
to 63 A), the necessary range adjustment is
achieved by looping the incomer several
times through the aperture in the relay. The
change in the rated motor current quoted
on the rating plate is inversely proportional
to the number of loops.
Example:
With the ZW7-63 relay, which has a setting
range from 42 A to 63 A, a rated motor
current of 21 A to 31.5 A can be
accommodated by looping the leads twice
through the relay.
Bridging of motor protection during
starting
For small motors the bridging of the motor
protection during starting is more
economical. Because of the additional
parallel contactor, the overload relay does
not carry the full current during starting.
Only when the motor has reached full
speed is the bridging contactor switched
off and the full motorcurrent isthen carried
by the overload relay. Provided it has been
set correctly to the rated motor current,
this will ensure full motor protection during
operation. Starting must be monitored.
The motor is a limiting factor with regard to
the tripping delay of the current
transformer-operated relay and the
bridging period. One must ensure that the
motor is able to tolerate the high
temperature generated by direct starting,
for the prescribed starting time. Motor and
starting procedure have to be selected
carefully when dealing with machines
having a very large rotating mass, which
are practically the only ones subject to this
problem when direct starting is used.
Depending on the operating conditions
adequate protection of the motor winding
may no longer be given by an overload
relay. In that case it must be weighed up
whether an electronic overload relay ZEV,
ZEB or a thermistor overload relay EMT 6 in
conjunction with an overload relay Z meets
the requirements.
Example circuits → page 8-10
All about Motors
Motor protection
Eaton Wiring Manual 06/11
8-10
8 8
Star-delta switch (Δ)
1 operating direction
Changeover time with overload relay in position
A: < 15 s B: > 15 < 40 s C: > 40 s
Setting of the overload relay
0.58 x Ie 1 x Ie 0.58 x Ie
Full motor protection in
 (star) position
Onlypartialmotorprotection
in  position
Motor not protected in
 position
Multi-speed switches
2 speeds
2 separate
windings
One tapped winding 3 speeds
1 x tapped winding
+ 1 winding
Attention must be paid to short-circuit protective device of the overload relays.
Separate supply input wirings should be provided if required.
-Q11
A
-Q15 -Q13
Ie
-Q11
B
-Q15 -Q13
Ie
-Q11 -Q15 -Q13
Ie
C
-Q17 -Q21 -Q17
-Q23 -Q21 -Q17
-Q23 -Q21
-Q11
All about Motors
Motor protection
Eaton Wiring Manual 06/11
8-11
8
8
Heavy starting duty
ZW7 current
transformer-operated
overload relays
Bridging of motor protection
during starting
Bridging during starting
using bridging relay
For medium and large
motors
For small motors; no
protection during starting
Automatic cut out of the
bridging contactor
-Q11 -Q11 -Q12 -Q11 -Q12
All about Motors
Motor protection
Eaton Wiring Manual 06/11
8-12
8 8
Individually compensated motor
Capacitor connected
Iw =
Ib =
Ic =
Ic =
Ie = Rated motor operational current [A]
Iw = Active current
Ib = Reactive current
Ic = Capacitor-Rated operational current [A]
IEM = Setting current of overload relay [A]
cos ϕ = Motor power factor
Ue = Rated operational voltage [V]
Pc = Rated capacitor output [kvar]
C = Capacitance of capacitor [μF]
Ie  [A]
cos

Ie
2
Iw
2
– A
 
Ue 3 2f C 10
6
–
A
 




Pc 103

3 Ue

------------------
-
}Proportion of motor rated operational current [A]
to protective conductor terminals to motor terminals
Setting IEM of overload relay
Capacitor does not relieve loading of cable
between contactor and motor.
Capacitor relieves loading of cable
between contactor and motor; normal
arrangement.
-Q11
PC
IEM
-Q11
PC
IEM
IEM 1 Ie

= IEM Iw
2
Ib
 Ic 
2
–
+
=
All about Motors
Motor protection
Eaton Wiring Manual 06/11
8-13
8
8
Thermistor overload relay for machine protection
Thermistor overload relays for machine
protection are used in conjunction with
temperature-dependent semi-conductor
resistors (thermistors) for monitoring the
temperature of motors, transformers,
heaters, gases, oils, bearings etc.
Depending on the application, thermistors
have positive (PTC thermistors) or negative
(NTC thermistors) temperature
coefficients. With PTC thermistors the
resistance at low temperature is small.
From a certain temperature it rises steeply.
On the other hand, NTC thermistors have a
falling resistance-temperature
characteristic, which does not exhibit the
pronounced change behaviour of the PTC
thermistor characteristic.
Temperature monitoring of electric
motors
Thermistor overload relays for machine
protection EMT6 comply with the
characteristics for the combination of
protective devices and PTC sensors to
EN 60947-8. They are therefore suitable for
monitoring the temperature of series
motors.
When designing motor protection, it is
necessary to differentiate between
stator-critical and rotor-critical motors:
• Stator-critical
Motors whose stator winding reaches
thepermissibletemperaturelimitquicker
than the rotor. The PTC sensor fitted in
the statorwinding ensures that the stator
winding and rotor are adequately
protected even with a stalled rotor.
• Rotor-critical
Squirrel-cage motors whose rotor in the
event of stalling reaches the permissible
temperature limit earlier than the stator
winding. The delayed temperature rise in
the stator can lead to a delayed tripping
of the thermistor overload relay for
machine protection. It is therefore
advisable to supplement the protection
of rotor-critical motors by a conventional
overload relay. Three-phase motors
above 15 kW are usually rotor-critical.
Overload protection for motors in
accordancewithIEC204andIEC/EN 60204.
These standards specify that motors above
2 kW used for frequent starting and
stopping should be adequately protected
for this type of duty. This can be achieved
by fitting temperature sensors. If the
temperature sensor is not able to ensure
adequate protection with stalled rotors, an
overcurrent relay must also be provided.
Generally, where there is frequent starting
and stopping of motors, intermittent
operation and excessive frequency of
operation, the use of overload relays in
conjunction with thermistor overload
relays is to be recommended. In order to
avoid premature tripping out of the
overload relay in these operating
conditions, it is set higher than the
predefinedoperatingcurrent.Theoverload
relay then assumes stalling protection; the
thermistor protection monitors the motor
winding.
All about Motors
Motor protection
Eaton Wiring Manual 06/11
8-14
8 8
Thermistor overload relays for machine
protection can be used in conjunction with
up to six PTC sensors to DIN 44081 for
direct monitoring of temperatures in Ex e
motors compliant with the ATEX directive
(94/9 EC). An EC type testing certificate can
be provided.
Protection of current and temperature-dependent motor-protective devices
+ Full protection
(+) Partial protection
– No protection
Protection of the motor under the
following conditions
Using
bimetal
Using
thermistor
Using
bimetal and
thermistor
Overload in continuous operation + + +
Extended starting and stopping (+) + +
Switching to stalled rotor
(stator-critical motor)
+ + +
Switching on stalled rotor
(rotor-critical motor)
(+) (+) (+)
Single-phasing + + +
Intermittent operation – + +
Excessive operating frequency – + +
Voltage and frequency
fluctuations
+ + +
Increased coolant temperature – + +
Impaired cooling – + +
Eaton Wiring Manual 06/11
8-15
All about Motors
8
8
Notes on engineering
Three-phase current-automatic starter
Three-phase autotransformer starter with starting
resistors
Single or multi-step resistors are connected upstream
of the three-phase squirrel-cage motors to reduce the
inrush current and the tightening torque.
With single-step starters, the inrush current is
approximatelythreetimesthe ratedmotorcurrent.With
multi-stage starters, the resistors can be so designed
that the inrush current is only 1.5 to 2 times the rated
motor current, with a very low level of tightening torque.
Three-phase autotransformer starters with starting
transformers
This type of starting is preferable where the same
tightening torque is to be obtained as with the primary
series resistors but the inrush current taken from the
mains is to be further reduced. A reduced voltage Ua
(approximately 70 % of the rated operating voltage) is
supplied to the motor when starting via the starting
transformer. Thus, the current taken from the mains is
reduced to approximately half the direct inrush current.
Three-phase automatic rotor starters with starting
resistors
Resistors are connected in the rotor circuit of the motor
to reduce the inrush current of motors with slipring
rotors. The current taken from the mains is thus
reduced. In contrast to stator resistance starters, the
torque of the motor is practically proportional to the
current taken from the mains. The number of steps of
the automatic starter is determined by the maximum
permissible inrush current and by the type of the motor.
I: Line current
Md: Torque
n: Speed
a Reduction of the line current
b Reduction of the torque
①
②
20 40 60 80
n
100 %
I
I
I'
Md
Md
M'd
①
20 40 60 80 100 %
②
n
I
I
I'
Md
Md
M'd
20 40 60 80 100 %
n
I Md
All about Motors
Notes on engineering
Eaton Wiring Manual 06/11
8-16
8 8
Important data and features of three-phase automatic starters
1) Type of starter Stator resistance starter (for squirrel-cage motors) Rotor starter
(for slipring rotors)
2) Part no. of
starter
Star-delta
switches
With starting
resistors
With start-up
transformers
Rotor resistance
starter
3) Number of
starting stages
1 only Normally 1 Normally 1 Selectable (no
longer selectable
when current or
torque have been
determined)
4) Voltage
reduction at the
motor
0.58 x rated
operational
voltage
Selectable:
a x rated
operational
voltage
(a < 1) e.g. 0.58 as
with △-switch
Selectable:
0.6/0.7/0.75 x Ua
(transformer
tappings)
None
5) Inrush current
taken from mains
0.33 x inrush
current at
rated
operational
voltage
a x inrushcurrent
at rated
operational
voltage
Selectable (see 4)
0.36/0.49/0.56 x
inrush current at
rated operational
voltage
Selectable: from
0.5 to about 2.5 x
rated operational
current
5a) Inrush current
at the motor
Selectable (see 4)
0.6/0.7/0.75 x Ie
6) Starting torque 0.33 x
tightening
torque at
rated
operational
voltage
a2 x tightening
torque at rated
operational
voltage
Selectable (see 4)
0.36/0.49/0.56 x
tightening torque
at rated
operational
voltage
Selectable (see 5)
from 0.5 to pull-out
torque
7) Current and
torque reduction
Proportional Currentreduction
less than torque
reduction
Proportional Current reduction
much greater than
torque reduction.
From pull-out
torque to rated
speed almost
proportional
8) Approximate
price (for similar
data)
DOL starting = 100
(with overload
relay, enclosed)
150 – 300 350 – 500 500 – 1500 500 – 1500
All about Motors
Notes on engineering
Eaton Wiring Manual 06/11
8-17
8
8
Switching of capacitors
DIL contactors for capacitors – individual switching
When capacitors are switched on,
contactors are heavily stressed by
transient current peaks. When a single
capacitor is switched on, currents up to
30 times the rated operational current can
occur; these can, however, be reliably
switched by Eaton DIL contactors.
When installing capacitors, the VDE
specification 0560 part 4 (Germany) and the
standards which apply to each country
should be observed. According to these,
capacitors not directly connected to an
electrical device which forms a discharge
circuit, should be equipped with a rigidly
connected discharge device. Capacitors
connected in parallel to the motor do not
require a discharge device, since
discharging is performed via the motor
winding.No switch-disconnectorsorfuses
must be installed between the discharge
circuit and the capacitor.
A discharge circuit or discharge device
must reduce the residual voltage of the
capacitor to less than 50 V within a minute
of the capacitor being switched off.
Individual compensation Group compensation
L1...3
-F1
-Q11 -Q31
-M1
-C1
M
3
L1...3
-F1
-Q11
-M1
-C1 M
3
M
3
M
3
-M2 -M3
All about Motors
Notes on engineering
Eaton Wiring Manual 06/11
8-18
8 8
Contactor for capacitor DILK… – Individual and group compensation
In the case of group compensation where
capacitors are connected in parallel, it
must be noted that the charging current is
taken not only from the mains but also from
the capacitors connected in parallel. This
produces inrush current peaks which can
exceed 150 times the rated operational
current. A further reason for these peak
currents is the use of low-loss capacitors
as well as the compact construction, with
short connecting elements between
contactor and capacitor.
Where standard contactors are used,
there is danger of welding. Special
contactors for capacitors such as those
available from Eaton in the DILK… range
which can control inrush current peaks of
up to 180 times the rated current, should be
used here.
If no special contactors are available, the
inrush currents can be damped by
additional inductance's. This is achieved
either by longer input wirings to the
capacitors or by inserting an air-cored coil
with a minimum induction of approximately
6 μH (5 windings, diameter of the coil
approximately 14 cm) between contactor
and capacitor. The use of series resistors
is another way of reducing high inrush
currents.
Use of reactors
Frequently the capacitors in group
compensation are provided with reactors
to avoid harmonics. The reactors also act
to limit the inrush current and normal
contactor can be used.
Group compensation
a Additional inductance with standard contactor
L1...3
-F1
-Q11
M
3
-F2 -F3
-Q12 -Q13
-Q1
M
3
M
3
-Q31 -Q32
a
-C0 -C1 -C2
-M1 -M2 -M3
I >
Eaton Wiring Manual 06/11
8-19
All about Motors
8
8
Circuit documents
General
Circuit documents serve to explain the
function of circuits or electrical
connections. They provide information for
the construction, installation and
maintenance of electrical installations.
The supplier and the operator must agree
on the form in which the circuit documents
are to be produced: paper, film, diskette,
etc. They must also agree on the language
or languages in which the documentation
is to be produced. In the case of machines,
user information must be written in the
official language of the country of use to
comply with ISO 12100.
The circuit documents are divided into two
groups:
Classification according to the purpose
Explanation of the mode of operation, the
connections or the physical position of the
apparatus. This consists of:
• Explanatory circuit diagrams,
• Block diagrams,
• Equivalent circuit diagrams,
• Explanatory tables or diagrams,
• Flow diagrams, tables
• Time flow diagrams, tables
• Wiring diagrams,
• Device wiring diagrams,
• Interconnection diagrams,
• Terminal diagrams,
• Assignment diagrams.
Classification according to the type of
representation
Simplified or detailed :
• 1-pole or multi-pole representation,
• Connected, semi-connected or separate
representation,
• Topographical representation.
In addition to this, there is the
process-orientated representation with
the function block diagram (see previous
pages).
Examples for drawing up circuit
documents are given in IEC/EN 61082-1.
Circuit diagrams
Diagrams indicate the voltage-free or
current-free status of the electrical
installation. A distinction is drawn
between:
• Block diagram. Simplified representation
of a circuit with its main parts. It shows
how the electrical installation works and
how it is subdivided.
• Circuit diagram. Detailed representation
of a circuit with its individual
components,which shows how the
electrical installation works.
• Equivalent circuit diagram. Special
version of an explanatory circuit diagram
for the analysis and calculation of circuit
characteristics.
All about Motors
Circuit documents
Eaton Wiring Manual 06/11
8-20
8 8
Wiring diagrams
Wiring diagrams show the conductive
connectionsbetweenelectricalapparatus.
They show the internal and/or external
connectionsbut, ingeneral, do not give any
information on the mode of operation.
Instead of wiring diagrams, wiring tables
can also be used.
• Unit wiring diagram. Representation of
all the connections within the device or
combination of devices.
• Interconnection diagram.
Representation of the connections
between the device or combination of
devices within an installation.
• Terminal diagram. Representation of the
connection points of an electrical
installation and the internal and external
conductive connections connected to
them.
• Location diagram (location diagram).
Representation of the physical position
of the electrical apparatus, which does
not have to be to scale.
You will find notes on the marking of
electrical apparatus in the diagram as well
as further diagram details in the chapter
“Specifications, Formulae, Tables”.
Circuit diagram: 1-pole and 3-pole representation
M
3 ~
Q1
Q11 Q12
1 3 5
2 4 6
1 3 5
2 4 6
M
3 ~
U V W
PE
Q12
1 3 5
2 4 6
L1
L2
L3
13
14
Q
Q11
L1, L2, L3
I > I > I >
I >
Eaton Wiring Manual 06/11
8-21
All about Motors
8
8
Power supply
4-conductor system, TN-C-S
a Protective earth conductor
Protective earth terminal in
enclosure (not totally insulated)
Overcurrent protective device is required in
the input wiring for compliance to
IEC/EN 60204-1
5-conductor system, TN-S
a Protective earth conductor
Protective earth terminal in
enclosure (not totally insulated)
Overcurrent protective device is required in
the input wiring for compliance to
IEC/EN 60204-1
L1 L2 L3 N PEN
PE
N
L31
L21
L11
햲
N
L31
L21
L11
L1 L2 L3 N PE
햲
All about Motors
Power supply
Eaton Wiring Manual 06/11
8-22
8 8
3-conductor system, IT
Overcurrent protective device is required in
the input wiring for compliance to IEC/EN
60204-1
For all systems: use the N neutral conductor
Separate primary and secondary
protection
Groundedcircuit.Innon-groundedcircuit,
remove link and provide insulation
monitoring.
L31
L21
L11
L1 L2 L3
PE
1
L1
L3
5
2
3
6
4
I⬎
L01
L02
0
I⬎ I⬎
All about Motors
Power supply
Eaton Wiring Manual 06/11
8-23
8
8
Combined primary and secondary
protection
Grounded circuit. In non-grounded circuit,
remove link and provide insulation
monitoring.
Maximum ratio of U1/U2 = 1/1.73
Circuit not to be used with STI/STZ (safety
or isolating transformers).
L1
L3
1 5
2
3
6
4
I> I> I>
L01
L02
0
Eaton Wiring Manual 06/11
8-24
All about Motors
8 8
Control circuit supply
Separate primary and secondary
protection, with insulation
monitoring on the secondary side
a Clear button
b Test button
DC power supply with
three-phase bridge rectifier
L1
L3
1 5
2
3
6
4
I. I. I.
L011
PE
0
L02
L01
A1
R <
A1
L 15
A2
15 S1 S2 E
E
E
16
16 18
18 L A2
ab
L2
L1
L3
1 5
2
3
6
4
I⬎ I⬎ I⬎
L2
Yy0
– +
Eaton Wiring Manual 06/11
8-25
All about Motors
8
8
Contactor markings
The contactors in contactor combinations
have, in accordance with EN 81346-2 for
apparatus and function, the code letter Q,
as well as numerical identification, which
shows the function of the device (e.g. Q22 =
mains contactor with anticlockwise
operation for high speed).
With contactor combinations which are
made up of several basic types, the basic
type is always maintained. Thus, the circuit
diagram for a reversing star-delta starter,
for example, is formed by combining the
basic circuit of the reversing contactor and
that of the standard star-delta starter.
Other marking of electrical apparatus:
• for the IEC world → page 10-2
• for North America → page 9-14
Eaton Wiring Manual 06/11
8-26
All about Motors
8 8
Direct-on-line start of three-phase motors
Typical circuits with DIL contactors
Fuseless without overload relay
Short-circuit protection1) and overload
protection by means of PKZM
motor-protective circuit-breaker or NZM
circuit-breaker.
Fuses with overload relay
Short-circuit protection2) for contactor and
overload relay by means of fuses F1.
Short-circuit protection3) for contactor by
means of fuses F1.
1) Protective device in the input wiring in accordance with the main catalogue,
Industrial Switchgear or IL installation instructions.
2) Fuse size in accordance with data on the rating plate of the overload relay.
3) Fuse size in accordance with the main catalogue, Industrial Switchgear
(Technical data for contactors)
L1 L3
1 5
2
3
6
4
L2
13
14
1 5
3
2 6
4
-Q1
PE
U V W
-Q11
M
3
-M1
I > I > I >
L1 L3
L2
1 5
3
2 6
4
PE
U V W
-Q11
M
3
-M1
-F1
-F2
2 6
4 96
95
97
98
L1 L3
L2
1 5
3
2 6
4
PE
U V W
-Q11
M
3
-M1
-F1
-F2
96
95
97
98
All about Motors
Direct-on-line start of three-phase motors
Eaton Wiring Manual 06/11
8-27
8
8
Typical circuit with bridging of overload relay during starting
Control circuit device
I: ON
0: OFF
For connection of further actuators
→ Section ”Three-wire control”,
page 8-34
Method of operation: Actuation of
pushbutton I energizes the coil of
contactor Q11. The contactor switches on
the motor and maintains itself after the
button is enabled via its own auxiliary
contact Q11/14-13 and pushbutton 0
(three-wirecontrolcontact).ContactorQ11
is de-energized, in the normal course of
events, by actuation of pushbutton 0. In the
event of an overload, it is de-energized via
the normally closed contact 95-96 on the
overload relay F2. The coil current is
interrupted, and contactor Q11 switches
the motor off.
Without overload relay with overload relay
The short-circuit strength capacity of the contacts in the circuit
has to be considered when selecting F0.
Double pushbutton
L1
(Q11/1)
-Q1
13
14
21
22
0
-S11
13
14
13
14
-Q11
A1
A2
-Q11
N
-F0
I
L1
(Q11/1)
95
96
21
22
13
14
-F2
0
-S11
I
13
14
-Q11
A1
A2
-Q11
N
-F0
21
22
13
14
96
14
13
14
13
21
22
Q11 Q11
F2
0 I
A B
All about Motors
Direct-on-line start of three-phase motors
Eaton Wiring Manual 06/11
8-28
8 8
Application on drive motors with heavy
starting duty
For connection when used with
motor-protective circuit-breakers
PKZM..., PKE and circuit-breakers
NZM(H)... → Section ”Fuses with
overload relays”, page 8-30
L1 L3
2 6
4
L2
1 5
3
2 6
4
-F1
PE
U V W
-Q11
M
3
-M1
-F2
2 6
4
1 5
3
96
98
97 95
-Q14
All about Motors
Direct-on-line start of three-phase motors
Eaton Wiring Manual 06/11
8-29
8
8
Function
Actuation of pushbutton I energizes
bridging contactor Q14 which then
maintains itself via Q14/13-14. At the same
time, voltage is applied to the timing relay
K1. The mains contactor Q11 is closed by
Q14/44-43 and maintains itself via
Q11/14-13. When the set time – which
corresponds to the start-up time of the
motor - has elapsed, the bridging contactor
Q14 is disconnected by K1/16-15. K1 is
likewise disconnected and, exactly as Q14,
can only be energized again after the motor
has been switched off by pressing
pushbutton 0. The N/C Q11/22-21 prevents
Q14 and K1 closing whilst the motor is
running. In the event of an overload,
normally closed contact 95-96 on the
overload relay F2 effects de-energization.
Q14:Bridging contactor
K1: Timing relays
Q11:Mains contactor
Control circuit device
I: ON
0: OFF
For connection of further actuators
→ Section ”Three-wire control”,
page 8-34
-Q11
-Q14 -Q14 -Q11
-K1
-K1
L1
(Q11/1)
-F2
95
96
21
22
0
-S11
16
15
13
14
-Q11
A1
A2
-Q14
N
-F0
13
14
-Q1
13
14
13
14 43
44
21
22
A1
A2
A1
A2
I
Q14 Q11
96 22
14
13
14
21
22
13
14
21
22
F2
0
-S11
I
A B
All about Motors
Direct-on-line start of three-phase motors
Eaton Wiring Manual 06/11
8-30
8 8
2 operating directions, DIUL reversing contactor
Fuseless without overload relay
Short-circuit protective device and
overload protection by means of
motor-protective circuit-breaker PKZM,
PKE or circuit-breaker NZM.
Fuse size in the input wiring in accordance
with the main catalogue, Industrial
Switchgear or AWA installation
instructions.
Fuses with overload relays
Short-circuit protection1) for contactor and
overload relay by means of fuses F1.
Short-circuit protection1) for contactor by
means of fuses F1.
1) Fuse size in accordance with data on the rating plate of the overload relay F2
L1 L3
L2
1 5
3
2 6
4
U V W
M
3
-M1
-Q1
1 5
3
2 6
4
1 5
3
2 6
4
-Q11 -Q12
13
14
PE
I > I > I >
L1 L3
L2
1 5
3
U V W
M
3
-M1
2 6
4
-Q11 -Q12
1 5
3
2 6
4
2 6
4
-F1
-F2
PE
96
97 95
98
L1 L3
L2
U V W
M
3
-M1
2 6
4
-Q12
1 5
3
2 6
4
-F1
PE
-F2
-Q11
1 5
3
All about Motors
Direct-on-line start of three-phase motors
Eaton Wiring Manual 06/11
8-31
8
8
Changing direction of rotation after actuation
of the 0 pushbutton
Changing direction of rotation without
actuation of the 0 pushbutton
Q11: Mains contactor, clockwise
Q12: Mains contactor,
anticlockwise operation
Control circuit
device
(three-way
pushbutton)
I = Clockwise
0 = Stop
II = anticlockwise
operation
-Q11 -Q12
-Q11
-Q11
-Q12
95
96
21
22
13
14
21
22
13
14
13
14
13
14
21
22
13
14
A1
A2
A1
A2
21
22
21
22
L1
(Q11/1)
0
-S11
-Q12
N
-F0
-Q1
I
I
II
-F2
II
-Q11 -Q12
-Q11
-Q11
-Q12
95
96
21
22
13
14
13
14
13
14
21
22
A1
A2
A1
A2
21
22
21
22
13
14
21
22
13
14
L1
(Q11/1)
0
-S11
-Q12
N
-F0
-Q1
I
I
II
-F2
II
Q12
0
-S11
I
Q12
21
22
13 14
Q11
96
F2
14
13
14
13
21
22
A B
14
13
C
21
22
13
II
Q12 Q12
Q11
13
14
Q11
96
F2
13 14
-S11
21
22
14
13
14
13
21
22
A B
14
13
C
21
22
0
I II
All about Motors
Direct-on-line start of three-phase motors
Eaton Wiring Manual 06/11
8-32
8 8
Method of operation: Actuation of
pushbutton I energizes the coil of
contactor Q11. It switches on the motor
running clockwise and maintains itself
after button I is enables via its own
auxiliarycontactQ11/14-13andpushbutton
0 (three-wire control). The normally closed
contact Q11/22-21 electrically inhibits the
closingofcontactorQ12.Whenpushbutton
II is pressed, contactor Q12 closes (motor
running anticlockwise). Depending on the
circuit, direction can be changed from
clockwise to anticlockwise either after
pressing pushbutton 0, or by directly
pressing the pushbutton for the reverse
direction. In the event of an overload,
normally closed contact 95-96 of the
overload relay F2 or the normally open
contact 13-14 of the motor-protective
circuit-breaker or the circuit-breaker will
switch.
Operating direction and two speeds (reversing contactor)
Special circuit (tapped winding) for feed
drives, etc.
FORWARD: feed or high-speed
RETRACT: high-speed only
STOP: tapped winding
1 5
3
L1 L3
L2
-F1
2 6
4
PE
M
3
-M1
97 95
98 96
1 5
3
2 6
4
1 5
3
2 6
4
2 6
4 2 6
4
2 6
4
1 5
3
-F2
97 95
98 96
-F21
-Q23
1U
1V
1W
2U
2V
2W
-Q17 -Q22 -Q21
All about Motors
Direct-on-line start of three-phase motors
Eaton Wiring Manual 06/11
8-33
8
8
Method of operation: Forward travel is
initiated by pressing pushbutton I or II
according to the speed required.
Pushbutton I switches on the feed motion
via Q17. Q17 maintains itself via its N/O
13-14. If the feed movement is to occur at
high-speed star contactor Q23 is energized
via pushbutton II which energizes the high
speed contactor Q21 via its N/O Q23/13-14.
Both of the contactors are maintained via
Q21/13-14. A direct switch over from feed
to high-speed during the process is
possible.
High-speed reverse is initiated by
pushbutton III. Contactor relay K1 picks up
and energizes star contactor Q23 via
K1/14-13. High-speed contactor Q22 is
energized via normally open contacts
K1/43-44 and Q23/44-43, and is maintained
via Q22/14-13. The reverse motion can only
be stopped via pushbutton 0. Direct
changeover/reversal is not possible.
0: Stop
I : Low speed – FORWARD
(Q17)
II: High speed –
FORWARD (Q21 + Q23)
III: High speed – BACK
(Q22 + Q23)
Q17: Feed forward
Q21: High-speed forward
Q23: Star contactor
K1: Contactor relay
Q22: Retract high-speed
L1
(Q17/1)
-F2/F21
95
96
21
22
0
-S11
13
14
A1
A2
N
-F0
13
14
44
21
22
III
21
22
13
14
22
21
I
13
I
II
14
21
-Q22
-Q21
-Q23
-Q17 -Q21
-Q23
31
32
-Q17 -Q17
-Q22
-Q23
A1
A2
22
21
A1
A2
13
14
-Q17
22
21
-K1 -Q21
-K1
-K1
13
14
A1
A2
-Q22
-Q23
-K1
A1
A2
43
43
44
31
32
31
32
21
22
-Q21
13
14
-Q22
13
14
21
22
III
22
II
Eaton Wiring Manual 06/11
8-34
All about Motors
8 8
Control circuit devices for direct-on-line start
Typical example of circuits with contactors DILM…
Three-wire control
Illuminated pushbutton
actuators
Two double actuator pushbuttons
Double actuator
pushbutton with indicator
light
T0-1-15511 spring-return
switchwithautomaticreturn
to position 1
T0-1-15366 spring-return
switchwithautomaticreturn
to position of rest
Two-wire control
Changeover switch
T0-1-15521 with fleeting
contact in the intermediate
position
MCS pressure switches
0 I
Q11
21
13
14
Q11
96
F2
13
14
Q11
A2
13
14
21
22
22
X1 X2
0 I
Q11
13
14
Q11
96
F2
13
14
21
22
-S11
I 0
-S11
13
14
21
22
21
22
21
22
13
14
13
14
A B B
A
0
Q11
13
14
Q11
96
F2
13
14
21
22
I
21
22
13
14
A B C
Q11
A2
0
Q11
13
14
Q11
96
F2
1
0
1
2
1
3
4
S11
Start
Start
Q11
13
14
Q11
96
F2
0 1
2
1
3
4
I
0 1
I
S11
Start
Q11
13
14
Q11
96
F2
2
1
3
4
I ON
0
OFF
0 1
S11
Q11
A1
F2
96
-S12
2
1
4
I
P >
Eaton Wiring Manual 06/11
8-35
All about Motors
8
8
Star-delta switching of three-phase motors
Star-delta switch with overload relay
Arrangement in the motor line
In a standard circuit configuration, the
star-delta switch with overload relay, i.e. a
thermally delayed overcurrent relay, is
installed in the cables leading to the motor
terminals U1, V1, W1 or V2, W2, U2. The
overload relay can also be operated in a
star circuit as it is usually connected in
series with the motor winding and the relay
current flowing through it = rated motor
current x 0.58.
The complete circuit diagram → Section
”Automatic star-delta switches SDAINL”,
page 8-37.
Arrangement in the mains supply line
Instead of the arrangement in the motor
line, the overload relay can be placed in the
mains supply line. The section shown here
indicates how the circuit diagram differs
from that on → Section ”Automatic
star-delta switches SDAINL”, page 8-37.
For drives where the F2 relay trips out when
the motor is starting in the star connection,
the F2 relay rated for the rated motor
current can be switched in the mains line.
The tripping delay is thus increased by
approximately four to six times. In the star
connection, the current also flows through
the relay but here the relay does not offer
full protection since its limit current is
increased to 1.73 times the phase current.
It does, however, offer protection against
non-starting.
1 5
3
U1 V1 W1
2 6
4
-Q11
2 6
4
-F2
96
97 95
98
2 6
4
-Q11
-F2
96
97 95
98
-F1
2 6
4
1 5
3
U1 V1 W1
All about Motors
Star-delta switching of three-phase motors
Eaton Wiring Manual 06/11
8-36
8 8
Configuration in the delta connection
Instead of the arrangement in the motor line
or mains supply line, the overload relay can
be placed in the delta connection. The
cutout shown here indicates the modified
circuit diagram from → Section
”Automatic star-delta switches SDAINL”,
page 8-37. When heavy, long-starting
procedures are involved (e.g. for
centrifuges) the F0.58 relay, rated for relay
current = rated motor current x 2, can also
be connected in the connecting cables
between the delta contactor Q15 and the
star contactor Q13. In the star connection
no current then flows through the F2 relay.
The motor is therefore not protected when
starting. This connection is always used
when exceptionally heavy and long starting
procedures are involved and when
saturable core current transformer-
operated relays react too quickly.
2 6
4
-Q15
-F2
96
97 95
98
2 6
4
1 5
3
U2
W2
V2
-Q13
1 5
3
2 6
4
All about Motors
Star-delta switching of three-phase motors
Eaton Wiring Manual 06/11
8-37
8
8
Automatic star-delta switches SDAINL
Arrangement and rating of protective devices
Rating of switchgear
Q11, Q15 = 0.58 x Ie
Q13 = 0.33 x Ie
Position A Position B
F2 = 0.58 x Ie
with F1 in position B ta ≦ 15 s
Q1 = Ie
ta > 15 – 40 s
Motor protection in - and
△-configuration
Only partial motor protection in
-configuration
M
3
-M1
U1
V1
W1
W2
U2
V2
L1 L3
L2
2 6
4
-Q15
-F2
96
97 95
98
2 6
4
1 5
3
-Q13
1 5
3
-F1
1 5
3
2 6
4
1 5
3
2 6
4
-Q11
B
-Q1
A
PE
2 6
4
13
14
21
22
I > I >
I >
All about Motors
Star-delta switching of three-phase motors
Eaton Wiring Manual 06/11
8-38
8 8
Further notes on the configuration of the
overload relay → Section ”Automatic
star-delta switches SDAINL”, page 8-37
SDAINLM12 to SDAINLM55
Pushbutton
K1: Timing relay
approx. 10 s
Q11: Mains contactor
Q13: Star contactor
Q15: Delta contactor
Double pushbutton
Function
Pushbutton I energizes
timing relay K1. The
normally open contact
K1/17-18 (instantaneous
contact) which applies
voltage to star contactor
Q13, which closes and
applies voltage to mains
contactorQ11vianormally
open contact Q13/14-13.
Q11 and Q13 maintain
themselves via the N/O
Q11/14-13 and Q11/44-43.
Q11 applies mains voltage
to motor M1 in star
connection.
SDAINLM70 to SDAINLM260
S11
0
(–)N
Q11
Q13
Q13
Q15
K1
I
Q11
Q11
Q15
Q13
K1
Q15
N Y
K1
21
22
13
14
A2
A1
A2
A1
53
54
22
21
28
17
17
18
14
13
53
54
53
54
A2
A1
A2
A1
22
21
S11
0
(–)N
Q11
Q13
Q13
Q15
K1
I
Q11
Q11
Q15
Q13
K1
Q15
N Y
K1
21
22
13
14
A2
A1
A2
A1
13
14
22
21
28
17
17
18
14
13
13
14
43
44
A2
A1
A2
A1
22
21
All about Motors
Star-delta switching of three-phase motors
Eaton Wiring Manual 06/11
8-39
8
8
SDAINLM12 to SDAINLM260
Two-wire control
Double pushbutton
Control circuit device
I = ON
0 = OFF
For connection of further control circuit
devices → Section ”Control circuit
devices for star-delta starting”, page 8-45
When the set changeover time has
elapsed, K1/17-18 opens the circuit of Q13
and after 50 ms closes the circuit of Q15 via
K1/17-28. Star contactor Q13 drops out.
Delta contactor Q15 closes and switches
motor M1 to full mains voltage. At the same
time, normally closed contact Q15/22-21
interrupts the circuit of Q13 thus
interlocking against renewed switching on
while the motor is running.
The motor cannot start up again unless it
has previously been disconnected by
pushbutton 0, or in the event of an overload
by the normally closed contact 95-96 of
overload relay F2, or via normally open
contact 13-14 of the motor-protective
circuit-breaker or standard
circuit-breaker.
44
2
43 13
14
L1
(Q11/1)
-F0
95
96
-F2
13
14
13
14
-S14
-Q11 -Q13 -Q15
-Q11
-S14
MCS
P >
2
4
1
SW
Q 1
Q11
21
22
13
14
Q11
96
F2
0 I
14
13
14
13
21
22
A B
-S11
HAND
All about Motors
Star-delta switching of three-phase motors
Eaton Wiring Manual 06/11
8-40
8 8
Automatic star-delta switches SDAINL EM
Pushbutton actuators Maintained contact sensors
K1: Timing relay approx. 10 s
Q11: Mains contactor
Q13: Star contactor
Q15: Delta contactor
Double pushbutton
Control circuit device
I = ON
0 = OFF
L1
(Q11/1)
-F2
95
96
0
-S11
13
14
A1
A2
N
-F0
44
21
22
2
13
14
I
-Q11
-Q15
-K1
A1
A2
A1
A2
A1
A2
-Q15
-Q13
43
44
43
-Q11 -Q13
-F0
95
96
-F2
13
14
-S14
13
14
13
14
-Q1
-Q11
14
13
22
21
-Q13
-Q11
-S14
MCS
2
4
1
SW
Q
-K1
22
21
16
15
18
-Q13
1
L1
(Q11/1)
Q11
21
22
44
14
Q11
96
F2
0 I
14
13
14
13
21
22
A B
-S11
-Q11
P >
HAND
All about Motors
Star-delta switching of three-phase motors
Eaton Wiring Manual 06/11
8-41
8
8
For connection of further control circuit
devices → Section ”Control circuit
devices for star-delta starting”, page 8-45
Function
Pushbutton I energizes star contactor Q13,
the normally open contact Q13/14-13
applies voltage to mains contactor Q11.
Q11 closes and applies mains voltage to
motor M1 in star connection. Q11 and Q13
maintain themselves via normally open
contact Q11/14-13 and Q11 additionally via
Q11/44-43 and pushbutton 0. Timing relay
Q11 is energized at the same time as mains
contactor K1. When the set changeover
time has elapsed, K1 opens the circuit of
Q13 via the changeover contact 15-16 and
closes the circuit of Q15 via 15-18.
Delta contactor Q15 closes and switches
motor M1 to full mains voltage. At the same
time, normally closed contact Q15/22-21
interrupts the circuit of Q13 thus
interlocking against renewed switching on
while the motor is running.
The motor cannot be started up again
unless it has previously been disconnected
by pushbutton 0, or in the event of an
overload, by the normally closed contact
95-96 of the overload relay F2, or via the
normally open contact 13-14 of the
motor-protective circuit-breaker or
circuit-breaker.
All about Motors
Star-delta switching of three-phase motors
Eaton Wiring Manual 06/11
8-42
8 8
Automatic reversing star-delta switches
2 operating directions
Rating of switchgear
Q11, Q12: Ie
F2, Q15: 0.58 x Ie
Q13: 0.33 x Ie
The maximum motor output is limited by the
upstream reversing contactor, and is lower
than with automatic star-delta switches for
only one direction of operating direction.
Standard version: Relay current = motor
rated operational current x 0.58
For other arrangements of overload relay
→ Section ”Star-delta switch with
overload relay”, page 8-35
M
3
-M1
U1
V1
W1
W2
U2
V2
L1 L3
L2
2 6
4
-Q12
-F2
96
97 95
98
2 6
4
-Q15
1 5
3
-F1
1 5
3
2 6
4
1 5
3
2 6
4
-Q11
-Q1
PE
2 6
4
13
1 3 5
14
21
22
-Q13
1 5
3
2 6
4
I > I > I >
All about Motors
Star-delta switching of three-phase motors
Eaton Wiring Manual 06/11
8-43
8
8
Changing direction of rotation after actuation of the 0
pushbutton
Three-way pushbutton
Control circuit devices
I = clockwise
0 = Stop
II = anticlockwise
operation
L1
(Q11/1)
-F2
0
-S11
A1
A2
N
-F0
44
13
14
II
-Q11 -K1
A1
A2
-Q15
-Q13
43
44
43
-Q11
-Q1
-Q11
-Q11
I
21
22
95
96
21
22
-Q12
13
14
13
14
-Q12
-K1
-K1
-Q12
13
14
13
14
II
I
21
22
21
22
A1
A2
-Q15 -Q13
21
22
-Q12
A1
A2
A1
A2
21
22
21
22
18
17
28
17
0
Q12
13 14
Q11
96
F2
13
14
21
22
I
13
14
A B C
13
Q12
II
13
14
21
22
21
22
-S11
All about Motors
Star-delta switching of three-phase motors
Eaton Wiring Manual 06/11
8-44
8 8
For connection of further actuators
→ Section ”Control circuit devices for
star-delta starting”, page 8-45
Function
Pushbutton I energizes contactor Q11
(e.g. clockwise). Pushbutton II energizes
contactor Q12 (e.g. anticlockwise
operation). The contactor first energized
applies voltage to the motor winding and
maintains itself via its own auxiliary
contact 14-13 and pushbutton 0. The
normally open contact 44-43 fitted to each
mains contactor energizes the star
contactor Q13.Q13 energizes and switches
on motor M1 in the star connection. At the
same time, timing relay K1 is triggered.
When the set changeover time has
elapsed, K1/17-18 opens the circuit of Q13.
Q13 drops out. K1/17-28 closes the circuit
of Q15.
Delta contactor Q15 energizes and
switches motor M1 to the delta
configuration, i.e. full mains voltage. At the
same time, normally closed contact
Q15/22-21 interrupts the circuit of Q13, thus
interlocking against renewed switching on
while the motor is running. Motor direction
can be changed, either after pressing
pushbutton 0, or by direct actuation of the
reverse button, depending upon the circuit.
In the event of an overload, disconnection
is effected by the normally closed contact
95-96 of the overload relay F2.
Changing direction of rotation without actuation of the 0
Three-way pushbutton
Control circuit devices
I = clockwise
0 = Stop
II = anticlockwise
operation
L1
(Q11/1)
-F2
0
-S11
A1
A2
N
-F0
44
13
14
II
-Q11 -K1
A1
A2
-Q15
-Q13
43
44
43
-Q11
18
17
-Q1
-Q11
-K1
-Q11
I
21
22
95
96
21
22
-Q12
13
14
13
14
-Q12 -Q12 13
14
13
14
II
I
21
22
21
22
A1
A2
-K1
-Q15 -Q13
21
22
-Q12
A1
A2
A1
A2
21
22
21
22
28
17
21
22
13 14 96
14
13
14
13
Q11
Q11 F2
0
I
A B
13
Q12
14
Q12
II
-S11
21
22
21
22
14
13
C
Eaton Wiring Manual 06/11
8-45
All about Motors
8
8
Control circuit devices for star-delta starting
Automatic star-delta switches
Pulse encoder
Illuminated pushbutton
actuators
Two double actuator pushbuttons
Double actuator pushbutton
with indicator light
Spring-return switch
T0-1-15511 with automatic
return to position 1.
Spring-return switch
T0-1-15366 with automatic
return to position of rest.
Two-wire control
Changeover switch
T0-1-15521 with fleeting
contact in the intermediate
position
e.g. selector switch
Cam switch T
LS position switches
MCS pressure switches
F2 Q11 Q11 Q11 Q11
21
22
13
14
13
14
21
22
96 13
X1 X2
14
-S11
44 A2
0 I
F2
-S11 -S11
21
13
14
13
14
13
14
13
14
22
21
22
21
22
21
22
0
A B A B
I 0 I
96
Q11
14
Q11
44
22
96 13
13
21
14
13
14
21
22
A2 14 44
F2
-S11
Q11 Q11 Q11 Q11
A B C
1
0
Q11
13
14
Q11
96
F2
1
0
1
2
1
3
4
S11
Start
Start
Q11
13
14
Q11
96
F2
0 1
2
1
3
4
I
0 1
I
S11
Start
Q11
13
14
Q11
96
F2
2
1
3
4
I ON
0
OFF
0 1
S11
Q11
14
Q11
44
F2
S14
96
All about Motors
Control circuit devices for star-delta starting
Eaton Wiring Manual 06/11
8-46
8 8
Three-phase current-reversing contactor-reversing star-delta switch
Two-way pushbutton1) without
self-maintaining circuit (inching)
for use only with reversing
contactors
Three-way pushbutton with indicator light. Reversing
after actuation of pushbutton 0
Spring-return switch1)
T0-1-8214, without
self-maintaining circuit
(inching)
automatic return to off
position only for reversing
contactors
Changeover switch1)
Switch T0-1-8210
remains in position 1 or 2
Spring-return switch
T0-2-8177 with automatic
return to position 1 or 2
Limit switch
Connected by removing the links
between the contactor terminals
Q11/13 and Q12/22 and between
Q12/13 and Q11/22 and
interposing the position switches.
1) Overload relays always with reclosing lockout
-S11
22
21
14
13
22
21
14
13
I II
B
A
13
Q12
13
Q11
96
F2
13
-S11
22
21
14
13
22
21
14
13
22
21
14
13
I
A B D E
C
Q11
A2 21 96
Q12
21 II
Q11
14
Q12
13
Q12
F2
0
2
3
4
0
1 2
1
Q12
13
F2
96
Q11
13
FS 4011
0
1 2
FS 684
0
1 2
2
1
2
3
4
5
6
0
1 START
START
7
8
Q11
F2
96 13
Q12
13
Q12
14
FS 140660
0
1 2
START START
Q11/13
Q12/22
Q12/13
Q11/22
Eaton Wiring Manual 06/11
8-47
All about Motors
8
8
Pole-changing motors
The speed is determined by the number of
poles on three-phase asynchronous
motors. Several speeds can be obtained by
altering the number of poles.
The usual types are:
The various tapped winding configurations
give differential output ratios for the two
speeds.
The △/ -connection comes nearest to
satisfying the most usual requirement for
constant torque. It has the additional
advantage that, because nine terminals
are available, y/d starting can be used to
provide smooth starting or to reduce the
startingcurrentforthelow speedcondition
(→ Section ”Motor windings”,
page 8-50).
The / -connection preferred for
better matching of the motor to machines
in which the torque increases by a
quadratic factor (pumps, fans, rotary
compressors). All multi-speed switches
can be used for both types of connection.
2 speeds – separate windings
In theory, motors with separate windings
allow any combination of speed and any
output ratio. Both windings are arranged in
y connection and are completely
independent of one another.
Preferred speed combinations are:
The code numbers are prefixed to the main
notations to denote increasing speed.
Example: 1U, 1V, 1W, 2U, 2V, 2W
Comparable to EN 60034-8
two speeds 1:2 1 convertible tapped winding
2 speeds as required 2 separate windings
three speeds 1 convertible tapped winding 1:2,
a separate winding
four speeds 2 convertible tapped windings 1:2
two speeds Tapped winding
Type of connection△/  / 
Output ratio 1/1.5–1.8 0.3/1
Motors with tapped
winding
1500/3000 – 750/1500 500/1000
Motors with separate
windings
– 1000/1500 – –
No. of poles 4/2 6/4 8/4 12/6
Code no. low/high 1/2 1/2 1/2 1/2
All about Motors
Pole-changing motors
Eaton Wiring Manual 06/11
8-48
8 8
Motor circuit
three speeds
The 1:2 - speeds tapped windings are
supplemented by the speed of the separate
winding. This speed can be below,
between or above the two tapped winding
speeds. The connection must consider it
(→ Figure, page 8-78).
Preferred speed combinations are:
Connection A
Selection of low and high
speed only from zero. No
return to low speed, only to
zero.
Connection B
Selection of either speed
from zero. Switching from
low to high speed possible.
Return only to zero.
Connection C
Selection of either speed
from zero. Switching back
and forward between low
andhighspeed(highbraking
torque). Return also to zero.
High speed
Low speed
Off (zero)
Switch-on and further switching
Switch-off
Speeds 1000/1500/3000 750/1000/1500 750/1500/3000 = separate
winding (in the
circuit
diagrams)
No. of
poles
6/4/2 8/6/4 8/4/2
Connection X Y Z
All about Motors
Pole-changing motors
Eaton Wiring Manual 06/11
8-49
8
8
Motor circuit
four speeds
The 1:2-speedstapped windingscan follow
in sequence or overlap, as the following
examples show:
For motors having 3 or 4 speeds the
non-connected winding has to be opened
at certain pole ratios to avoid inductive
circulating currents. This is achieved via
additional motor terminals. A series of cam
switches is equipped with this connection
(→ Section ”Multi-Speed Switches”,
page 4-7).
Connection A
Selection of any speed only
from zero. Return only to zero.
Connection B
Selectionofanyspeedfrom
zero and from low speed.
Return only to zero.
Connection C
Selectionofanyspeedfrom
zero and from low speed.
Return to low speed (high
braking torque) or to zero.
3rd speed
2nd speed
1st speed
Off (zero)
Switch-on and
further switching
Switch-off
1st winding 500/1000 2nd winding 1500/3000 = 500/1000/1500/3000
or
1st winding 500/1000 2nd winding 750/1500 = 500/750/1000/1500
Eaton Wiring Manual 06/11
8-50
All about Motors
8 8
Motor windings
Tapped winding
2 speeds
Motor circuit
2 speeds
2 separate windings
Tapped winding
with Δ-starting at
low speed
Low speed Δ Low speed  Low speed Low speed 
High speed High speed High speed Low speed Δ
→ Figure,
page 8-55
→ Figure, page 8-55 → Figure, page 8-59
High speed
→ Figure, page 8-68
1U
1W 1V
2W 2V
2U
1U
1W 1V
2W
2V
2U
1W 1V
1U 1U
1W 1V
2W1
2U2
2V1
2V2
2U1
2W2
1U
2U
1V
1W
2W 2V
1U
2U
1W
2V
1V
2W
2W 2V
2U
1V
1W
2W2 1U
2V1
2V2
2U2
2W1
2U1
1U 2V2
2U1
1V
1W
2W1 2V1
2W2
2U2
All about Motors
Motor windings
Eaton Wiring Manual 06/11
8-51
8
8
Tapped winding
3 speeds
Motor circuit X
2 windings, medium and
high speed – tapped
winding
Motor circuit Y
2 windings, low and high
speed – tapped winding
Motor circuit Z
2 windings, low and
medium speed – tapped
winding
2 2 2
or 2 or 2 or 2
Low speed
Separate winding
1
Medium speed
Separate winding
1
High speed
Separate winding
1
→ Figure, page 8-77 → Figure, page 8-79 → Figure, page 8-81
2U
2W 2V
3W
3V
3U
1U
1W 1V
3W
3V
3U
1U
1W 1V
2W
2V
2U
2U
2W 2V
3W 3V
3U
1U
1W 1V
3W 3V
3U
1U
1W 1V
2W 2V
2U
1W 1V
1U
2W 2V
2U
3W 3V
3U
Notes
Eaton Wiring Manual 06/11
8-52
8 8
Eaton Wiring Manual 06/11
8-53
All about Motors
8
8
Multi-speed contactors
Certain operating sequences for
pole-changing motors may be necessary,
or undesirable, depending on the nature of
the drive. If, for example, the starting
temperature rise is to be reduced or high
inertia loads are to be accelerated, it is
advisable to switch to low speed first and
then to high speed.
It may be necessary to prevent switching
from high to low speed in order to avoid
oversynchronousbraking. Inothercases,it
should be possible to switch each speed
on and off directly. The operating
sequence and indexing facilities of cam
switches allow for these possibilities.
Multi-speed contactor switches can
achieve these connecting by interlocking
with suitable control circuit devices.
Fuse protection of the overload relays
When a common fuse is used in the input
wiring, it must not be larger than the
back-up fuses specified on the nameplate
of either overload relay, otherwise each
relay must be protected by its own back-up
fuse, as shown in the diagram.
L1
-F11
-Q17 -Q21
-F21 -F2
1 3 5
2 4 6
2 4 6
1 3 5
2 4 6
2 4 6
97
98
95
96
L2 L3
97
98
95
96
-F1
All about Motors
Multi-speed contactors
Eaton Wiring Manual 06/11
8-54
8 8
Fuseless surface mounting
Pole-changing motors can be protected
against short-circuits and overloads by
motor-protectivecircuit-breakersPKZ/PKE
or circuit-breakers NZM. These provide all
the advantages of a fuseless circuit.
Normally, the fuse in input wiring protects
the switches from welding.
L1
-Q1
-Q17 -Q21
1
I > I > I >
3 5
1 3 5
2 4 6
1 3 5
2 4 6
2 4 6
13
14
L2 L3
-Q2
1
I > I > I >
3 5
2 4 6
13
14
Eaton Wiring Manual 06/11
8-55
All about Motors
8
8
Multi-speed switch for three-phase motors
Tapped winding, 1 operating direction, 2 speeds
Multi-speed contactors
Fuseless, without overload relay, with
motor-protective circuit-breaker or
circuit-breaker.
→ Section ”Motor windings”, page 8-50
Synchronous speeds
One multi-speed winding
L1
-Q1
-Q21 -Q17
PE
M
-M1
2U
2V
2W
1U
1V
1W
3
1
I > I > I >
3 5
1 3 5
2 4 6
1 3 5
2 4 6
-Q23
1 3 5
2 4 6
2 4 6
13
14
L2 L3
-Q2
1
I > I > I >
3 5 13
14
All about Motors
Multi-speed switch for three-phase motors
Eaton Wiring Manual 06/11
8-56
8 8
Rating of switchgear
Q2, Q17: I1 (low speed)
Q1, Q21: I2 (high speed)
Q23: 0.5 x I2
Motor terminals 1U, 1V, 1W 2U, 2V, 2W
Amount of poles 12 6
rpm 500 1000
Amount of poles 8 4
rpm 750 1500
Amount of poles 4 2
rpm 1500 3000
Contactors Q17 Q21, Q23
All about Motors
Multi-speed switch for three-phase motors
Eaton Wiring Manual 06/11
8-57
8
8
Connection A (→ Figure, page 8-49)
1 three-way pushbutton
For connection of further actuators
→ Figure, page 8-63, → Figure,
page 8-64, → Figure, page 8-65
Function
Pushbutton I energizes mains contactor
Q17 (low speed). Q17 maintains itself via its
N/O 13-14. Pushbutton II energizes star
contactor Q23 and via its N/O 13-14 mains
contactor Q21. Q21 and Q23 maintain
themselves via N/O 13-14 of Q21.
Speed can be changed either after
pressing pushbutton 0 (connection A) or
directly by pressing the appropriate
pushbutton (connection C), depending
upon the circuit. The motor can be
switched off either by pressing pushbutton
0, or in the event of an overload, by N/O
13-14 of the circuit-breaker.
Three-way pushbutton
I: Low speed (Q17)
0: Stop
II: high speed (Q21 + Q23)
Q17: Mains contactor, low speed
Q23: Star contactor
Q21: Mains contactor, high speed
L1
(Q11/1)
-F0
-Q1
-Q2
0
II
-S11
-Q17
-Q17 -Q23
N
-Q23
-Q21
I
13
14
13
14
21
22
21
22
14
13
14
13
21
22
22
21
A1
A2
A1
A2
-Q21
-Q17
-Q23
-Q21
22
21
13
14
A1
14
II
I
22
14
13
21
13
A2
-S11
14 13
13
I II
0
A B C
96
21
22
13
14
21
22
13
14
21
22
13
14
Q17 F21 Q21 Q21
All about Motors
Multi-speed switch for three-phase motors
Eaton Wiring Manual 06/11
8-58
8 8
Connection C (→ Figure, page 8-49)
1 three-way pushbutton
For connection of further actuators
→ Figure, page 8-66
Three-way pushbutton
I: Low speed (Q17)
0: Stop
II: High speed (Q21 + Q23)
Q17: Mains contactor, low speed
Q23: Star contactor
Q21: Mains contactor, high speed
L1
(Q11/1)
-F0
-Q1
-Q2
0
II
-S11
-Q17
-Q17 -Q23
N
-Q23
-Q21
I
13
14
13
14
21
22
21
22
14
13
14
13
22
21
21
22
A1
A2
A1
A2
-Q21
-Q23
-Q17
-Q21
22
21
13
14
A1
14
II
I
22
14
13
21
13
A2
14
-S11
Q17
14
Q21
13
Q21
13
I II
0
A B C
Q17
96
F21
21
22
13
14
21
22
13
14
21
22
13
14
All about Motors
Multi-speed switch for three-phase motors
Eaton Wiring Manual 06/11
8-59
8
8
2 separate windings, an operating direction, 2 speeds
Multi-speed contactor , fuseless without
overload relay
Rating of switchgear
Q1, Q17 = I1 (low speed)
Q2, Q21 = I2 (high speed)
Motor windings → Section ”Motor
windings”, page 8-50
L1
-Q1
-Q17 -Q21
PE
M
-M1
1U
1V
1W
2U
2V
2W
3
1
I > I > I >
3 5
1 3 5
2 4 6
1 3 5
2 4 6
2 4 6
13
14
L2 L3
-Q2
1
I > I > I >
3 5
2 4 6
13
14
All about Motors
Multi-speed switch for three-phase motors
Eaton Wiring Manual 06/11
8-60
8 8
2 separate windings, an operating direction, 2 speeds
Multi-speed contactor with fuses and
overload relay
Fuse size in accordance with data on the
nameplate of the overload relays F2 and
F21. If overload relays F2 and F21 cannot be
protected by a common fuse, then use
connection → Figure, page 8-53.
Motor windings → Section ”Motor
windings”, page 8-50
L1
F1
F1
F21 F2
M1
1W
1V
1U
2W
2V
2U
Q17 Q21
1 3 5
2 4 6
96
98
95
97
96
98
95
97
2 4 6
1 3 5
2 4 6
2 4 6
L2 L3
M
3
All about Motors
Multi-speed switch for three-phase motors
Eaton Wiring Manual 06/11
8-61
8
8
Connection A (→ Figure, page 8-49)
1 three-way pushbutton
Connection C (→ Figure, page 8-49)
1 three-way pushbutton
Q17: Mains contactor, low speed
Q21: Mains contactor, high speed
Three-way pushbutton
I: Low speed (Q17)
0: Stop
II: High speed (Q21 + Q23)
For connection of further actuators
→ Figure, page 8-67
L1
FO
F2
F21
Q1
13
14
13
21
22
21
22
14
13
14
13
22
21
A1
A2
A1
13
14
14
13
21
22
95
96
95
96
21
A2
14
Q2
0
S11
Q17
Q21 Q17
Q21
I
II
Q17 Q21
N
II
I
22
L1
(Q17/1)
-F0
0
-S11
A1
A2
A1
A2
II
I II
22
21
-Q21
22
21
95
96
22
21
22
21
14
13
-Q21
-Q17
-Q21
-Q17
14
13
N
-F21
-F2
FL1
14
13
14
13
-Q1
-Q2
95
96
14
13
-Q17
22
21
14
13
I
-S11
14
Q21
13
Q21
13
I II
0
A B C
Q17
96
F21
21
22
13
14
21
22
13
14
21
22
13
14
13
14
21
22
-S11
A
Q21
13
Q21
14
Q17
14
I 0 II
F21
96
Q17
13
B C
21
22
13
14
21
22
13
14
All about Motors
Multi-speed switch for three-phase motors
Eaton Wiring Manual 06/11
8-62
8 8
Operating principle
Actuation of pushbutton I energizes the
coil of contactor Q17. Q17 switches on the
low speed of the motor and after
pushbutton I is released, maintains itself
via its auxiliary contact 13-14 and
pushbutton 0.
Speed can be changed either after
pressing pushbutton 0, or directly by
pressing the appropriate pushbutton,
depending upon the connection. The motor
is switched off either by pressing
pushbutton 0, or in the event of an
overload, by normally closed contact 95-96
of overload relays F2 and F21.
Eaton Wiring Manual 06/11
8-63
All about Motors
8
8
Control circuit devices for multi-speed contactors
2 separate windings, an operating direction, 2 speeds
Connection A (→ Figure, page 8-49)
One three-way pushbutton with indicator
lights
Control circuit devices
I : Low speed (Q17)
0: Stop
II : High speed (Q21)
-F0
L1
0
A1
A2
A1
A2
II
I
22
21
-Q21
22
21
22
21
14
13
-Q21
-Q17
-Q21
14
13
N
95
96
14
13
-Q17
14
13
I
-Q17
22
21
II
-F2/F21
22
21
A
B D
B
-S11
I 0
21 II
13
A B C D E
21
21
13
22
22
22
14
13
21
13
14
14
Q17
A2
Q21
21
Q17
14
Q21
13
Q21
96
F21
All about Motors
Control circuit devices for multi-speed contactors
Eaton Wiring Manual 06/11
8-64
8 8
Connection A (→ Figure, page 8-49)
2 three-way pushbuttons
Control circuit devices
I: Low speed (Q17)
0: Stop
II: High speed (Q21)
Remove existing links and rewire
-F0
L1
95
21
22
21
22
21
22
22
21
22
21
21
14
13
14
13
22
21
13
14
13
14
22
22
21
13
14
13
14
96
-F2/F21
0a
0b
IIb
Ib
IIa
IIb
IIa
-Q17
-Q21
-Q21
-Q17
A B
Ia
Ib
Ia
13
A
96
B C B
A C
-S11 -S11
Ia
21
22
14
13
14
13
14
13
21
22
21
22
21
22
14
13
14
13
14
13
21
22
21
22
IIa
0a Ib IIb
0b
Q21
13
Q17
14
Q21
F21
All about Motors
Control circuit devices for multi-speed contactors
Eaton Wiring Manual 06/11
8-65
8
8
Connection A (→ Figure, page 8-49) T0-1-8210 changeover switch
Always set overload relay to manual reset
Connection B (→ Figure, page 8-49)
1 three-way pushbutton
L1
95
96
-F2/F21
-S12
-Q17
-Q21 -Q17
-Q21
-S12
A B
1 2
1 3
14
13
22
14
13
21
22
21
2 4
-F0
S12
Q21
13
F2
96
Q17
13
1 0 2
1
2
3
4
L1
95
96
21
22
21
22
14
13
14
13
13
14
14
13
22
21
A1
A2
A1
A2
22
21
-F0
-F2/F21
0
II
I
A B
II
N
-Q21 -Q17
-Q17 -Q21
-Q17 -Q21
All about Motors
Control circuit devices for multi-speed contactors
Eaton Wiring Manual 06/11
8-66
8 8
Connection B (→ Figure, page 8-49)
2 three-way pushbuttons
Control circuit device for connection B
-F0
L1
0a
-Q21
22
21
22
21
14
13
-Q21
14
13
95
96
-Q17
IIb
IIa
-F2(1)
22
21
B
0b
22
21
Ib
21
22
Ia IIa IIb
14
13
14
13
A
14
13
-Q17
22
21
14
13
A
Q21
13
F21
96
B C
Q17
14
Q17
13
Ia
S11 S11
Q21
14
0a IIa Ib 0b IIb
21 22
13 14
21 22
13 14
21 22
13 14
21 22
13 14
21 22
13 14
21 22
13 14
A B C
All about Motors
Control circuit devices for multi-speed contactors
Eaton Wiring Manual 06/11
8-67
8
8
Connection C (→ Figure, page 8-49)
2 three-way pushbuttons
Control circuit device for connection C
-F0
L1
0a
-Q21
22
21
22
21
14
13
-Q21
14
13
95
96
14
13
-Q17
IIb
-Q17
IIa
-F2(1)
22
21
A B
0b
22
21
Ib
22
21
Ia
22
21
14
13
IIa
Ib
Ia
IIb
14
13
14
13
22
21
22
21
-S11
A
Q21
13
F21
96
B C
Q17
14 13
Ia
-S11
Q21
14
0a IIa
21
22
13
14
21
22
13
14
21
22
13
14
Ib 0b IIb
A B C
21
22
13
14
21
22
13
14
21
22
13
14
Eaton Wiring Manual 06/11
8-68
All about Motors
8 8
Multi-speed switch for three-phase motors
Tapped winding, 1 operating direction, 2 speeds
Multi-speed contactor
Star-delta startup at low speed
Fuseless
Without overload relay
Rating of switchgear
Q1, Q17 = I1
(low speed)
Q2, Q21 = I2
(high speed)
Q19, Q23 = 0.5 x I2
L1
PE
Y
-M1
3
2W1
2V1
2U1
1W
1V
1U
1 3 5
2 4
L2 L3
3 5
2 4 6
2 4 6
-Q17
-Q23
-Q21
6
2W2
2V2
2U2
1 3 5
1
1 3 5
2 4 6
3 5
2 4 6
1
13
14
-Q1
-Q19
2 4 6
-Q2
14
13
1 3 5
I > I > I > I > I > I >
All about Motors
Multi-speed switch for three-phase motors
Eaton Wiring Manual 06/11
8-69
8
8
With fuses and overload relays
Rating of switchgear
F2, Q17 = I1
(low speed)
F21, Q21 = I2
(high speed)
Q19, Q23 = 0.5 x I2
F1 = I2
Overload relays F2 and F21 are not used on
multi-speed contactors without motor
protection. If F2 and F21 cannot be
protected by a common fuse, then use
connection on → Figure, page 8-53.
Motor windings → Section ”Motor
windings”, page 8-50
L1
PE
Y
-M1
3
2W1
2V1
2U1
1W
1V
1U
L2 L3
5
2 4 6
-Q17
-Q23
-Q21
2W2
2V2
2U2
1 3 5
1
1 3 5
2 4 6
3 5
2 4 6
1
-F1
-Q19
2 4 6
-F21
-F2
2 4 6
97 95
98 96
3
97 95
98 96
2 4 6
All about Motors
Multi-speed switch for three-phase motors
Eaton Wiring Manual 06/11
8-70
8 8
Function
Actuation of pushbutton I energizes the
coil of star contactor Q23. Its N/O 13-14
energizes the coil of contactor Q17. The
motor runs in star at low speed. The
contactors are maintained via auxiliary
contact Q17/13-14. At the same time, timing
relay K3 is triggered. When the set time has
elapsed, K3/15-16 opens the circuit of Q23.
Q23 drops out, the coil of delta contactor
Q19 is energized and maintains itself via
Q19/13-14. The timing relay is de-energized
via N/C Q19/32-31.
The motor runs in delta at low speed.
Actuation of pushbutton II de-energizes
the coil of Q17 and via Q17/22-21 energizes
the coil of Q21. This state is maintained by
Q21/43-44: The coil of star contactor Q23 is
re-energized by normally open contact
Q21/14-13. The motor runs at high speed.
Pushbutton 0 (= Stop) executes
disconnection.
Connection
Low speed selected
onlyfromoffposition,
high speed only via
low speed without
actuation of the Stop
button.
Three-way
pushbutton
I: Low speed
(Q17, Q19)
0: Stop
II: High speed (Q21,
Q19, Q23)
Q17: Mains contactor, low
speed
K3: Timing relays
Q23: Star contactor
Q19: Delta contactor
Q21: Mainscontactor,
high speed
-F0
-F21
-Q1
-Q2
-S11
-Q17
-Q21
-Q17
-Q17
21
21
A1
A2
N
22
22
-Q21
-Q21
-Q21
-Q17
-Q23 -Q19
-Q19
-Q23
-Q19
-Q19
-K3
-K3
A1
A2
A1
A2
A1
A2
31
32 21
22
21
A1
A2
21
22
44
43
22
13 15
16
14
13
14
13
14
13
14
43
44
L1
(Q17/1)
0
II
I
-Q23
14
13
22
21
95
96
95
96
14
13
14
13
14
13
II
-S11
A
Q17
13
Q19
44 14
F21
96
B C
21
22
13
14
Q17
43
Q17
14
I 0 II
Q21
22
21
22
13
14
21
22
13
14
All about Motors
Multi-speed switch for three-phase motors
Eaton Wiring Manual 06/11
8-71
8
8
Tapped winding, 2 operating directions, 2 speeds (direction preselected)
Multi-speed contactors
Overload relays F2 and
F21 are not used on
multi-speed contactors
without motor protection.
Rating of switchgear
Q11, Q12 = I2 (low and
high speed)
F2, Q17 = I1 (low speed)
F1, Q21 = I2
Q23 = 0.5 x I2 (high speed)
L1
PE
-M1
2W
2V
2U
1 3 5
2 4
L2 L3
-F1
2 4 6
2 4 6
-Q11
97
-Q17
6
1W
1V
1U
1 3 5
-F21
98
95
96 2 4 6
97
98
95
96
-F2
2 4 6
1 3 5
2 4 6
1 3 5
2 4 6
1 3 5
M
3
-Q12
-Q21
-Q23
All about Motors
Multi-speed switch for three-phase motors
Eaton Wiring Manual 06/11
8-72
8 8
Function
Contactor Q11 is energized by pressing
pushbutton I. Contactor Q11 selects the
operating direction, and maintains itself
after release of pushbutton I via its
auxiliary contact 14-13 and pushbutton 0.
Speed-selection buttons III and IV are
made operative by Q11/44-43.
Pushbutton III energizes Q17, which
maintains itself via its contact 14-13.
Pushbutton IV energizes high speed
contactors Q23 and Q21. Auxiliary contact
Q21/21-22 makes low-speed pushbutton III
inoperative. Pushbutton 0 must be pressed
before any change in speed or direction.
Five-way
pushbutton
Connection
Change of direction
FORWARD–REVERS
E after actuation of
Stop button,
optionally followed
bySLOW–FASTwith
no return to low
speed.
Control circuit device
0: Stop
I: Forward (Q11)
II: Back (Q12)
III: Slow (Q17)
IV: Fast (Q21 + Q23)
L1
(Q11/1)
-F0
0
-S11
A1
A2
A1
A2
-Q17
-Q17
A1
A2
A1
A2
N
-F21
-F2
II
I
II
14
13
22
21
-Q11
-Q17
-Q11 -Q21
14
13
22
21
95
96
22
22
21
14
13
44
43
-Q11
-Q21
95
96
21
A1
A2
22
21
I
22
21
-Q11
14
13
IV
22
21
14
13
III
22
21
-Q23
-Q12
-Q23
-Q23
21
22
14
13
-Q12
-Q21
14
13
IV
III
21
22
-Q12
44
43
-Q12
14
13
14
13
Q11
13
I
F21
96
13
14
21
22
-S11
A C
0
B D
Q12
13
Q12
14
Q17
13
Q11
43
Q17
14
Q17
21
II III IV
E
13
14
21
22
13
14
21
22
13
14
21
22
13
14
21
22
All about Motors
Multi-speed switch for three-phase motors
Eaton Wiring Manual 06/11
8-73
8
8
Tapped winding, 2 operating directions, 2 speeds
(direction and speed selected simultaneously)
Multi-speed contactor Fuseless without overload relay
Rating of switchgear
Q1, Q17, Q18 = I1 (low speed)
Q2, Q21, Q22 = I2
Q23 = 0.5 x I2 (high speed)
L1
PE
M
-M1
3
1W
1V
1U
2W
2V
2U
-Q23
1 3 5
2 4 6
L2 L3
-Q1
I> I> I>
-Q2
1 3 5
2 4 6
1 3 5
2 4 6
1 3 5 1 3 5 1 3 5
1 3 5
2 4 6
2 4 6 2 4 6 2 4 6
-Q17
I> I> I>
13
14
-Q18 -Q21 -Q22
13
14
All about Motors
Multi-speed switch for three-phase motors
Eaton Wiring Manual 06/11
8-74
8 8
Multi-speed contactor
With fuses and overload relays
Rating of switchgear
F2, Q17, Q18 = I1
(low speed)
F21, Q21, Q22 = I2
Q23 = 0.5 x I2
(high speed)
Overload relays F2 and F21 are not used on
multi-speed contactors without motor
protection
L1
PE
M
-M1
3
1W
1V
1U
2W
2V
2U
1 3 5
2 4 6
L2 L3
-F2
1 3 5
2 4 6
1 3 5
2 4 6
-Q17
-F1
-Q18
97 95
98 96
-Q23
97 95
98 96
-F21
2 4 6
2 4 6
-Q21 -Q22
1 3 5
2 4 6
1 3 5
2 4 6
All about Motors
Multi-speed switch for three-phase motors
Eaton Wiring Manual 06/11
8-75
8
8
Connection
Simultaneous selection of direction and
speed via one pushbutton. Always operate
Stop button before changeover.
Q17: Slow forward
Q18: Slow back
Q21: Fast forward
Q23: Star contactor
K1: Contactor relay
Q22: Fast back
L1
(Q17/1)
N
-F0
0
-S11
I
-Q18
A1
A2
A1
A2
-Q21
21
22
-Q21
14
13
22
21
95
96
II
22
21
-Q17
21
II
21
22
22
-Q23
21
-Q17
-Q22
-Q23
-Q22
-Q21
-Q23
A1
A2
A1
A2
-Q23
-Q22
-Q18
-Q17
22
-Q22
14
14
13
III
95
96
-F2
-F21
14
13
-Q2
-Q1
-Q17
13
31
32
-Q21
22
21
22
21
-K1
I
14
13 14
13
IV
14
13
22 21 14
21 22 13
-Q18 -K1
-K1
A1
A2
14
13
44
43
A1
A2
-K1
43
44
14
13
32
31
III
IV
21
22
-Q18
31
32
31
32
14
13
14
13
All about Motors
Multi-speed switch for three-phase motors
Eaton Wiring Manual 06/11
8-76
8 8
Function
Desired speed and operating direction can
be selected by actuation of one of the four
pushbutton. Contactors Q17, Q18, Q21 and
Q23 maintain themselves by their contact
14-13 and can be de-energized only by
actuation of pushbutton 0. Contactors Q21
and Q22 can maintain themselves only
when Q23 has picked up and contact
Q23/13-14 or 44-43 is closed.
Five-way pushbutton
Control circuit device
0: Stop
I: Slow forward (Q17)
II: Slow back (Q18)
III: Fast forward (Q21 + Q23)
IV: Fast back (Q22 + Q23)
Q18
22
13
14
21
22
-S11
A
Q21
21
Q23
22
Q17
21
I
0 II
F21
96
Q23
14
Q18
32
Q22
32
III IV
B C D E
13
14
21
22
21
22
13
14
21
22
13
14
21
22
13
14
All about Motors
Multi-speed switch for three-phase motors
Eaton Wiring Manual 06/11
8-77
8
8
Tapped winding, medium and high speed, 1 operating direction, 3 speeds, 2 windings
Multi-speed contactor
Multi-speed contactors with overload
relay → Figure, page 8-79
Motor circuit X→ Section ”Motor circuit
X”, page 8-51
Synchronous Speed
Rating of switchgear
Q2, Q11 : I1 (low speed)
Q1, Q17 : I2 (medium speed)
Q3, Q21 : I3 (high speed)
Q23 : 0.5 x I3
L1
PE
M
-M1
3 3W
3V
3U
2W
2V
2U
1 3 5
2 4
L2 L3
-Q1
I> I> I>
-Q2
1 3 5
2 4 6
1 3 5
2 4 6
1 3 5 1 3 5
1 3 5
2 4 6
2 4 6 2 4 6
-Q17
I> I> I>
13
14
-Q23
-Q11 -Q21
13
14
6
1W
1V
1U
13
14
2 4 6
I> I> I>
-Q3
1 3 5
Winding 1 2 2
Motor
terminals
1U, 1V,
1W
2U, 2V,
2W
3U, 3V,
3W
Amount of
poles
12 8 4
RPM 500 750 1500
Amount of
poles
8 4 2
RPM 750 1500 3000
Amount of
poles
6 4 2
RPM 1000 1500 3000
Contactors Q11 Q17 Q21,
Q23
All about Motors
Multi-speed switch for three-phase motors
Eaton Wiring Manual 06/11
8-78
8 8
Function
Pushbutton I energizes mains contactor
Q17 (low speed), pushbutton II mains
contactor Q11 (medium speed),pushbutton
III star contactor Q23 and via its N/O
Q23/14-13 mains contactor Q21 (high
speed).Allcontactorsmaintainthemselves
by their auxiliary contact 13-14.
Speed sequence from low to high is
optional. Switching in steps from high to
medium or low speed is not possible. The
motor is always switched off by pressing
pushbutton 0. In the event of an overload,
normally open contact 13-14 of the
motor-protective circuit-breaker or
circuit-breaker can also switch off.
Connection of motor winding: X
Connection A
Connection A
Selection of any speed only from zero.
No return to low speed, only to zero.
Connection B
Selection of any speed from zero or
from low speed. Return only to zero.
Q11: Low speed winding 1
Q17: Medium speed winding 2
Q23: High speed winding 2
Q21: High speed winding 2
Four-way pushbuttons
0: Stop
I: Low speed (Q11)
II: Medium speed (Q17)
III: High speed (Q21 + Q23)
L1
(Q17/1)
-F0
0
-S11
A1
A2
A1
A2
21
22
22
21
-Q17
21
-Q23
-Q17
-Q23 -Q21
A1
A2
A1
A2
-Q23
N
-Q17
14
13
III
14
13
-Q2
-Q1
31
32
-Q3
III
22
21
14
13
II
14
13
I
II
14
13
-Q11
14
13
13
14
22
21
22
21
-Q21
21
22
22
-Q11
-Q21
31
32
32
31
-Q11 -Q17
-Q11
-Q21
-Q23
32
31
14
13
13
14
21
22
A
Q21
13
Q11
14
Q17
14
I
0 II
F22
96
Q21
14
III
B C D
13
14
21
22
21
22
13
14
21
22
13
14
13
14
21
22
-S11
A
Q21
13
Q11
14
Q17
14
I
0 II
F22
96
Q23
14
III
B C D
13
14
21
22
21
22
13
14
Q11
13
Q17
13
21
22
13
14
All about Motors
Multi-speed switch for three-phase motors
Eaton Wiring Manual 06/11
8-79
8
8
Tapped winding, low and high speed, 1 operating direction, 3 speeds, 2 windings
Multi-speed contactor
Multi-speed contactor without overload
relay → Figure, page 8-77
Motor circuit Y → Section ”Motor circuit
Y”, page 8-51
Synchronous Speed
Rating of switchgear
F2, Q17: I1 (low speed)
F3, Q11: I2 (medium speed)
F4, Q21: I3 (high speed)
Q23: 0.5 x I3
L1 L2 L3
1 3 5
M1
2 4 6
F1
97 95
98 96
Q17 Q11
1 3 5
2 4 6
F2
2 4 6
F3
97 95
98 96
2 4 6
Q21
1 3 5
2 4 6
F4
97 95
98 96
2 4 6
1 3 5
Q23
1 3 5
2 4 6
3U 3V 3W
2U
2V
2W
1U
1V
1W
M
3
1 3 5
1 3 5
Winding 2 1 2
Motor
terminals
1U, 1V,
1W
2U, 2V,
2W
3U, 3V,
3W
Amount of
poles
12 8 6
RPM 500 750 1000
Amount of
poles
8 6 4
RPM 750 1000 1500
Contactors Q17 Q11 Q21,
Q23
All about Motors
Multi-speed switch for three-phase motors
Eaton Wiring Manual 06/11
8-80
8 8
Function
Pushbutton I energizes mains contactor
Q17 (low speed), pushbutton II mains
contactor Q11 (medium speed),pushbutton
III star contactor Q23 and via its N/O
Q23/14-13 mains contactor Q21 (high
speed).Allcontactorsmaintainthemselves
by their auxiliary contact 13-14.
Speed sequence from low to high is
optional. Switching in steps from high to
medium or low speed is not possible. The
motor is always switched off by pressing
pushbutton 0. In the event of an overload,
normally closed contact 95-96 of overload
relays F2, F21 and F22 can also switch off.
Connection of motor winding: Y
Connection A
Connection A
Selection of any speed only from
zero. No return to low speed, only
to zero.
Connection B
Selection of any speed from zero or
from low speed. Return only to zero.
Four-way pushbuttons
0: Stop
I: Low speed (Q17)
II: Medium speed (Q11)
III: High speed (Q21 + Q22)
Q17: Low speed winding 1
Q11: Medium speed winding 1
Q23: High speed winding 2
Q21: High speed winding 2
L1
F0
0
S2
S1
S3
S0
A1
A2
A1
A2
Q17
21
Q17 Q21
A1
A2
A1
A2
Q23
N
III
14
13
F3
F2
F4
III
II
I
II
14
13
14
13
22
21
22
21
21
22
22
Q11
31
32
32
31
Q11 Q11
Q21
Q23
14
13
22
21
95
96
22
21
22
21
14
13
14
13
Q11
31
32
Q21
Q23 Q23
32
31
Q17 Q21
Q17
14
13
Q17
14
13
14
21
22
-S11
A
Q21
13
Q11
14
I
0 II
F22
96
Q21
14
III
B C D
21
22
13
14
21
22
13
14
21
22
13
14
Q21
14
Q17
13
Q21
13
Q11
13
Q17
14
F22
96
0 I II
-S11
13
14
21
22
13
14
21
22
13
14
21
22
13
14
A B C D
Q11
14
21
22
III
All about Motors
Multi-speed switch for three-phase motors
Eaton Wiring Manual 06/11
8-81
8
8
Tapped winding, low and medium speed, 1 operating direction, 3 speeds, 2 windings
Multi-speed contactor
Multi-speed contactor without overload
relay → Figure, page 8-53
Motor circuit Z → Section ”Motor circuit
Z”, page 8-51
Synchronous Speed
Rating of switchgear
F2, Q17: I1 (low speed)
F4, Q21: I2 (medium speed)
F3, Q11: I3 (high speed)
Q23: 0.5 x I3
L1 L2 L3
1 3 5
M1
2 4 6
F1
97 95
98 96
Q17 Q11
1 3 5
2 4 6
F2
2 4 6
F3
97 95
98 96
2 4 6
Q21
1 3 5
2 4 6
F4
97 95
98 96
2 4 6
1 3 5
Q23
1 3 5
2 4 6
3U 3V 3W
2U
2V
2W
1U
1V
1W
M
3
1 3 5
1 3 5
Winding 2 2 1
Motor
terminals
1U, 1V,
1W
2U, 2V,
2W
3U, 3V,
3W
Amount of
poles
12 6 4
RPM 500 1000 1500
Amount of
poles
12 6 2
RPM 500 1000 3000
Amount of
poles
8 4 2
RPM 750 1500 3000
Contactors Q17 Q21,
Q23
Q11
All about Motors
Multi-speed switch for three-phase motors
Eaton Wiring Manual 06/11
8-82
8 8
Function
Pushbutton I energizes mains contactor
Q17 (low speed), pushbutton II mains
contactor Q23 (low speed) and via its N/O
Q23/14-13 mains contactor Q21 (high
speed), pushbutton III mains contactor
Q11. All contactors maintain themselves by
pushbutton I energizes m13n14co.
Speed sequence from low to high is
optional. Switching in steps from high to
medium or low speed is not possible. The
motor is always switched off by pressing
pushbutton 0. In the event of an overload,
normally closed contact 95-96 of overload
relays F2, F21 and F22 can also switch off.
Connection of motor winding: Z
Connection A
Connection A
Selection of any speed from zero.
No return to low speed, only to zero.
Connection B
Selection of any speed from zero or from
low speed. Return only to zero.
Q17: Low speed winding 1
Q23: Medium speed winding 2
Q21: Medium speed winding 2
Q11: High speed winding 1
Four-way pushbuttons
0: Stop
I: Low speed (Q17)
II: Medium speed (Q21 + Q23)
III: High speed (Q11)
L1
(Q17/1)
N
-F0
0
-S11
I
-Q11
A1
A2
A1
A2
-Q21
21
22
-Q21
14
13
22
21
-F2
-F21
-F22
95
96
III
II
22
21
-Q17
14
13
22
21
14
13
II
21
22
22
-Q23 21
-Q17 -Q23 -Q21
-Q11
-Q17
-Q23
A1
A2
A1
A2
-Q23
-Q11
-Q21
-Q17
14
13
32
31
32
31
22
21
32
31
32
31
-Q11
14
13
14
13
14
13
III
Q21
13
Q17
14
Q11
14
F22
96
0 I II III
13
14
21
22
A B C D
Q21
14
21
22
21
22
21
22
13
14
13
14
13
14
-S11
II III
0 I
14
Q23
13
Q23
14
Q17
13
Q17
14
Q11
13
Q11
14
F22
96
-S11
13
21
22
13
14
21
22
13
14
21
22
13
14
A B C D
21
22
Eaton Wiring Manual 06/11
8-83
All about Motors
8
8
Three-phase autotransformer starter
Three-phase autotransformer starter with mains contactor and resistors,
2-stage, 3-phase version
Use F2 when using F1 instead of Q1.
L1 L2 L3
-Q1
1 2 3
I> I> I>
2 4 6
13
14
-F1
1 5
3
2 4 6
-Q11 -Q17
-R2
X
Y
Z
-F2
PE
U V W
M
3
-M1
1 5
3
2 4 6
-Q16
2 4 6
1 3 5
-R1
U1 U2
V2
W2
V1
W1
4
2 6
97 95
98 96
Rating of switchgear:
Starting voltage: 0.6 x Ue
Inrush current: 0.6 x direct switching system
Tightening torque: 0.36 x direct switching system
Q1, Q11: Ie
Q16, Q17: 0.6 x Ie
All about Motors
Three-phase autotransformer starter
Eaton Wiring Manual 06/11
8-84
8 8
Three-phase autotransformer starter with mains contactor and resistors,
2-stage, 3-phase version
Q16: Step contactor
K1: Timing relay
Q17: Step contactor
K2: Timing relay
Q11: Mains contactor
Two-wire control
Always set overload relay to
reclosing lockout
-Q1
-F2
L1
(-Q11)
N
-F0
13
14
95
96
0
21
22
-S11
I
13
14
21
22
-Q11
-Q16
A1
A2
-K1
A1
A2
-Q17
A1
A2
-K1
15
18
-K2
-Q17
A1
A2
-Q11
A1
A2
-K2
13
14
13
14
-Q16
13
14
15
18
-Q11
32
31
-Q11
-F0
-Q1
13
14
-S12
-Q11
32
31
-Q11
L1
(Q11/1)
22
21
All about Motors
Three-phase autotransformer starter
Eaton Wiring Manual 06/11
8-85
8
8
Function
Pushbutton I energizes step contactor Q16
and timing relay K1. Q16/14-13 –
self-maintaining through Q11, Q11/32-31
and pushbutton 0. The motor is connected
to the supply with upstream resistors
R1 + R2. When the set starting time has
elapsed, normally open contact K1/15-18
energizes Q17. Step contactor Q17
bypasses the starting stage R1. At the
same time, normally open contact
Q17/14-13 energizes K2. When the set
starting time has elapsed, K2/15-18
energizes mains contactor Q11. This
bypassesthesecondstarting stage R2,and
the motor runs at the rated speed. Q11
maintains itself via Q11/14-13. Q16, Q17, K1
and K2 are de-energized by normally
closed contacts Q11/22-21 and Q11/32-31.
The motor is switched off with
pushbutton 0. In the event of an overload,
normally closed contact 95-96 of the
overload relay F2 or normally open contact
13-14 of the motor-protective
circuit-breaker switch off the motor.
Step contactor Q17, resistor R2 and timing
relay K1 are omitted in single-stage
starting circuits. Timing relay K2 is
connected directly to Q16/13 and resistor
R2 is connected by means of its terminals
U1, V1 and W1 to Q11/2, 4, 6.
Three-wire control
Double pushbutton
I = ON
0 = OFF
Two-wire control
-S11
Q11
32
22
21
Q11
21
F2
96
22
21
14
13
14
13
0 I
A B
F2
96
Q11
22
Q11
32
-S12
All about Motors
Three-phase autotransformer starter
Eaton Wiring Manual 06/11
8-86
8 8
Three-phase autotransformer starter with mains contactor and starting transformer,
1-stage, 3-phase
Use F2 when using F1 instead of Q1. Rating of switchgear
L1 L2 L3
4
1 5
3
2 4 6
U V W
1 5
3
2 4 6
a
U2
V2
W2
1U1
2W1
2V1
2U1
1V1
1W1
M
3
M1
F1
2 6
1 5
3
Q1
13
14
Q11
1 5
3
2 4 6
K1
Q13
2 4 6 97 95
98 96
I > I > I >
Starting voltage = 0.7 x Ue (typical value) Tightening torque = 0.49 x Direct
switching
Inrush current = 0.49 x direct switching
system
Q1, Q11 = Ie
IA/Ie = 6 Q16 = 0.6 x Ie
tA = 10 s Q13 = 0.25 x Ie
ops./h = 30
All about Motors
Three-phase autotransformer starter
Eaton Wiring Manual 06/11
8-87
8
8
Function
Pressing pushbutton I simultaneously
energizes star contactor Q13, timing relay
K1 and, via normally open contact
Q13/13-14, step contactor Q16, and are
maintained via K1/13-14. When K1 has
elapsed, normally closed contact K1/55-56
de-energizes star contactor Q13, and Q16 –
via normally open contact Q13/13-14:
The starting transformer is disconnected,
and the motor runs at the rated speed.
The motor cannot start up again unless
previously switched off by actuation of
pushbutton 0, or in the event of an
overload,by N/C 95-96of the overload relay
F2. With two-wire control, overload relay
F2 must always be set to reclosing lockout.
If the motor has been switched off by F2,
the motor cannot start up again unless the
reclosing lockout is released.
Two-wire control
Always set overload relay to reclosing
lockout (manual reset)
Q16: Step contactor
K1: Timing relay
Q11: Mains contactor
Q13: Star contactor
Three-wire control
I: ON
0: OFF
Two-wire control
L1
Q1
F0
13
14
95
96
F2
21
S11
0
I
13
14
K1
13
14
13
14
Q13
Q16
N
A1
A2
K1
Q13
A1
A2
Q11
K1
A1
A2
K1
Q11
Q13
22
21
A1
A2
22
21
67
68
55
56
22
L1
(Q11/1)
-F0
95
96
-F2
-S12
-K1 -K1
55
96
67
68
-S11
K1
13
22
21
F2
96
22
21
14
13
14
13
0 I
A B
K1
14
-S12
F2
96
K1
55
Eaton Wiring Manual 06/11
8-88
All about Motors
8 8
Three-phase automatic rotor starters
3-stage, rotor 3-phase
Use F2 when using F1 instead of Q1.
L1 L2 L3
-Q1
1 3 5
I > I > I >
13
14
-F1
2 6
4
2 4 6
PE
U V W
M
3
-M1
-Q12
2 4 6
97 95
98 96
1 3 5
-Q11
-F2
2 4 6
1 3 5 1 5
3
2 4 6
-Q13 -Q14
2 4 6
1 3 5
K
L
M
U3
V3
W3
U2
V2
W2
-R3 -R2
U1
V1
W2
-R1
All about Motors
Three-phase automatic rotor starters
Eaton Wiring Manual 06/11
8-89
8
8
2-stage, rotor 2-phase
Use F2 when using F1 instead of Q1.
Rating of switchgear
L1 L2 L3
1 3 5 13
14
I> I> I>
2 6
4
1 3 5
2 4 6
PE
U V W
M
3
-M1
-Q11
1 3 5
-F2
2 4 6
-R2
U1
V1
-R1
-Q1
-F1
97 95
98 96
K
L
M
-Q12 -Q14 2 4 6
1 3 5
U2
XY
V2
2 4 6
Inrush current = 0.5 – 2.5 x Ie
Tightening torque = 0.5 to pull-out torque
Q1, Q11 = Ie
Step contactors = 0.35 x Irotor
Final step
contactors
= 0.58 x Irotor
All about Motors
Three-phase automatic rotor starters
Eaton Wiring Manual 06/11
8-90
8 8
With mains contactor, style 3-stage, rotor 3-phase
Q11: Mains contactor
K1: Timing relay
Q14: Step contactor
K2: Timing relay
Q12: Step contactor
Q13: Final step contactor
K3: Timing relay
Q1 F2
L1
N
F0
0
S11
I
Q11
A1
A2
A1
A2
K1
K2
Q14
A1
A2
13
14
13
14
95
96
21
22
13
14
Q11
13
14
K1 Q14
A1
A2
15
18
K2
Q12
14
13
A1
A2
15
18
A1
A2
Q13
Q13 Q13
32
31
14
13
U3
A1
A2
U3
15
18
Q12
Q11
44
43
Double
pushbutton
I: ON
0: OFF
For connection of further actuators:
→ Section ”Control circuit devices for
star-delta starting”, page 8-45
F2
96
Q11
14
Q11
13
0 I
-S11
21
22
21
22
13
14
13
14
A B
All about Motors
Three-phase automatic rotor starters
Eaton Wiring Manual 06/11
8-91
8
8
Function
Pushbutton I energizes mains contactor
Q11: N/O Q11/14-13 transfers the voltage,
Q11/44-43 energizes timing relay K1. The
motor is connected to the supply system
with rotor resistors R1 + R2 + R3 in series.
When the set starting time has elapsed,
normally open contact K1/15-18 energizes
Q14. Step contactor Q14 short-circuits
starting stage R1 and via Q14/14-13
energizes timing relay K2. When the set
starting time has elapsed, K2/15-18
energizes step contactor Q12, which
short-circuits starting stage R2 and via
Q12/14-13 energizes timing relay K3. When
the set starting time has elapsed, K3/15-18
energizes final step contactor Q13, which
is maintained via Q13/14-13, Step
contactors Q14 and Q12 as well as timing
relays K1, K2 and K3 are de-energized via
Q13.Finalstep contactor Q13 short-circuits
the rotor slip rings: the motor operates with
rated speed.
The motor is switched off either by
pushbutton 0, or in the event of an
overload,by N/C 95-96of the overload relay
F2 or N/O 13-14 of the motor-protective
circuit-breaker or circuit-breaker.
Step contactors Q13 and/or Q12 with their
resistors R3,R2 and timing relays K3, K2are
omitted in single-stage or two-stage
starting circuits. The rotor is then
connected to the resistance terminals U, V,
W2 or U, V, W1. The references for step
contactors and timing relays in the wiring
diagrams are then changed from Q13, Q12
to Q12, Q11 or to Q13, Q11 as appropriate.
When there are more than three stages,
the additional step contactors, timing
relays and resistors have appropriate
increasing designations.
Eaton Wiring Manual 06/11
8-92
All about Motors
8 8
Switching of capacitors
Contactors for capacitors DIL
Individual circuit without
quick-discharge resistors
R1 discharge resistors fitted in
capacitor
L3
-F1
1 3 5
2 4 6
-Q11
-R1
-C1
-R1
-R1
L1 L2
All about Motors
Switching of capacitors
Eaton Wiring Manual 06/11
8-93
8
8
Double pushbutton
For connection of further actuators:
→ Section ”Control circuit devices for
star-delta starting”, page 8-45
L1
(Q11/1)
-F0
21
22
-S11
0
I
13
14
13
14
-Q11
-Q11
A1
A2
N
22
L1
21
0 I
Q11
14
A B
Q11
13
14
13
22
21
14
13
Maintained contact sensors
In the case of actuation by means of power
factor correction relay, check that this has
sufficient power to actuate the contactor
coil. Interpose a contactor relay if
necessary.
Function
Pushbutton I actuates contactor Q11,
which picks up and maintains itself via its
own auxiliary contact 14-13 and
pushbutton 0 on voltage. Capacitor C1 is
thus energized. Discharge resistors R1 are
not active when contactor Q11 is
energized. Actuation of pushbutton 0
effects de-energization. Normally closed
contacts Q11/21-22 then switch discharge
resistors R1 to capacitor C1.
L1
-S12
Q11
A1
All about Motors
Switching of capacitors
Eaton Wiring Manual 06/11
8-94
8 8
Capacitor contactor combination
Capacitors contactor with pilot contactor
and series resistors. Individual and parallel
circuit with and without discharge
resistors and with series resistors.
On the version without discharge resistors,
resistors R1 and the connections to the
auxiliary contacts 21-22 and 31-32 are
omitted.
L3
L1 L2
-F1
1 3 5
2 4 6
-Q14
-R1
-C1
-R1
21
22
-Q11
31
32
43
44
13
14
21
22
A1
A2
31
32
43
44
1 3 5
2 4 6
A1
A2
13
14
-R2
All about Motors
Switching of capacitors
Eaton Wiring Manual 06/11
8-95
8
8
Function
Actuation by double pushbutton S11:
Pushbutton I energizes pilot contactor Q14.
Q14 switches capacitor C1 in with bridged
series resistors R2. N/O Q14/14-13
energizes mains contactor Q11. Capacitor
C1 is then switched in with bridged series
resistors R2. Q14 is maintained via
Q11/14-13 when Q11 has closed.
Discharge resistors R1 are not operative
when Q11 and Q14 are energized.
Pushbutton 0 effects de-energization. N/C
Q11/21-22 and 31-32 then switch discharge
resistors R1 to capacitor C1
Q11: Mains contactor
Q14: Pilot contactor
Actuation by double pushbutton S11 Actuation by selector switch S13, two-wire
control S12 (power factor correction relay)
and double pushbutton S11
-F0
0
I
-S11
L1
(Q11/1)
-Q14
21
22
-Q11
A1
A2
13
14
-Q11
13
14
13
14
-Q14
A1
A2
N
-F0
0
I
-S12
L1
(Q11/1)
-Q14
21
22
13
14
-Q11
13
14
13
14
A1
A2
-S12
-Q14
A1
A2
-Q11
N
T0 (3)-1-15431
1
2
3
4
1
0 2
Eaton Wiring Manual 06/11
8-96
All about Motors
8 8
Duplex pump control
Fully automatic control for two pumps
Starting sequence of pumps 1 and 2 can be
selected by control switch S12.
Control circuit wiring with two float
switches for basic and peak loads
(operation is also possible with two
pressure switches)
P1 Auto = Pump 1 base load,
Pump 2 peak load
P2 Auto = Pump 2 base load,
Pump 1 peak load
P1 + P2 = Direct operation independent
of float switches (or pressure
switches)
a Cable with float, counterweight,
pulleys and clamps
b Storage tank
c Inlet
d Pressure pipe
e Outlet
f Centrifugal or reciprocating pump
g Pump 1
h Pump 2
i Suction pipe with filter
j Well
L1 L2 L3
-Q1
-F22
-Q11
U V W
M
3
-M1
-M2 M
3
F7
-F11 -F21
-F12
-Q12
U V W
F8
b
d
F7 Q
Q
a
a
F8
c
e
f
f
i
h
g
0
0
I
I
F7: 0
F7: I
F8: 0
F8: I
j
I > I > I >
All about Motors
Duplex pump control
Eaton Wiring Manual 06/11
8-97
8
8
Float
switch
F7
closes
before
F8
Q11:
Pump
1
mains
contactor
Q12:
Pump
2
mains
contactor
Function
The
duplex
pump
control
is
designed
for
operation
of
two
pump
motors
M1
and
M2.
Control
is
via
float
switches
F7
and
F8.
Operating
mode
selector
switch
S12
in
position
P1
auto.
The
system
operates
as
follows:
When
the
water
level
in
the
storage
tank
falls
or
rises,
F7
switches
pump
1
on
or
off
(base
load).
If
the
water
level
drops
below
the
range
of
F7
(discharge
is
greater
than
intake),
F8
starts
pump
2
(peak
load).
When
the
water
level
rises
again,
F8
is
deactivated.
Pump
2
continues
running
until
F7
stops
both
pumps.
The
operating
sequence
of
pumps
1
and
2
can
be
determined
using
operating
mode
selector
switch
S12:
Position
P1
auto
or
P2
auto.
In
position
P1
+
P2,
both
pumps
are
in
operation,
independent
of
the
float
switches
(Caution!
Tank
may
possibly
overflow).
On
the
version
of
duplex
pump
control
with
cyclic
load
sharing
(T0(3)-4-15915),
S12
has
a
further
state:
the
operating
sequences
are
automatically
reversed
after
each
cycle.
F11
F0
-F12
-F22
95
96
95
96
-F7
Q
2
1
-S11
14
13
-F8
Q
-S21
2
1
14
13
-Q12
14
13
-Q11
14
13
N
EO
-Q11
A1
A2
-Q12
A1
A2
-S12
L
1
2
3
4
5
6
7
8
9
10
11
12
13
0
P
1,
P
2
P
1
Auto
P
2
Auto
T0(3)-4-15833
Eaton Wiring Manual 06/11
8-98
All about Motors
8 8
Fully automatic pump control
With pressure switch for air tank and
domestic water supply without water
failure (run dry) safety device
With 3-pole pressure switch MCSN (main
circuit)
F1: Fuses (if required)
Q1:Motor-protective circuit-breaker
switch, manual (e.g. PKZ)
F7: Pressure switch MCSN, 3-pole
M1:Pump motor
a Air or pressure tank
b Non-return valve
c Pressure pipe
d Centrifugal (or reciprocating) pump
e Suction pipe with filter
f Well
L1
L2
L3
-F1
-Q1
a
b
d
c e
f
U V W
-M1
M
3
P
-F7
I > I >
I >
All about Motors
Fully automatic pump control
Eaton Wiring Manual 06/11
8-99
8
8
With 1 pole pressure switch MCS (control
circuit)
F1: Fuses
Q11:Contactor or automatic star-delta
switch
F2: Overload relay with reclosing lockout
F7: Pressure switch MCS, 1 pole
M1: Pump motor
a Air or pressure tank
b Non-return valve
c Centrifugal (or reciprocating) pump
d Pressure pipe
e Suction pipe with filter
f Well
3 5
2 4 6
95
96
-M1
M
3
U V W
L1
L2
L3
-F1
-F2
a
b
c
d
e
f
P
N
-Q11 1
-F7
All about Motors
Fully automatic pump control
Eaton Wiring Manual 06/11
8-100
8 8
With 3-pole float switch SW (main circuit)
F1: Fuses (if required)
Q1: Motor-protective
circuit-breakers, manual
(e.g. PKZ)
F7: Float switch 3-pole
(connection: pump full)
M1: Pump motor
HW:Highest level
NW:Lowest value
a Cable with float, counterweight,
pulleys and clamps
b Storage tank
c Pressure pipe
d Centrifugal (or reciprocating)
pump
e Outlet
f Suction pipe with filter
g Well
U V W
L1
L2
L3
-F1
-F7
I
0
HW
NW
-Q1
-M1
Q
M
3
a
c
b
d
e
f
g
I > I >
I >
All about Motors
Fully automatic pump control
Eaton Wiring Manual 06/11
8-101
8
8
With 1 pole float switch SW (control
circuit)
F1: Fuses
Q11:Contactor or automatic
star-delta switch
F2: Overload relay with reclosing
lockout
F8: Float switch 1 pole
(connection pump full)
S1: Changeover switch
MANUAL-OFF-AUTO
F9: Float switch 1 pole
(connection: pump full)
M1: Pump motor
a Cable with float,
counterweight, pulleys and
clamps
b Storage tank
c Pressure pipe
d Centrifugal (or reciprocating)
pump
e Outlet
f Suction pipe with filter
g Water-failure monitoring by
means of a float switch
h Well
L1
U V W
L2
L3
N
-F1
-F2
-Q11 1 3 5
2 4 6
95
96
-F8
0
H A
-M1
S1
HW
NW
M
3
-F9
I
0
Q
Q
a
b
c
d
e
h
f
g
0
I
Eaton Wiring Manual 06/11
8-102
All about Motors
8 8
Fully automatic main transfer switch with automatic release
Changeover device to DIN VDE 0100 – Erection of low-voltage installations
–... – Part 718: Installations for gathering of peopleAutomatic resetting, the phase
monitoring relay is set to:
Pick-up voltage Uan = 0.95 x Un
Drop-out voltage Ub = 0.85 x Uan
Function
Main switch Q1 is closed first, followed by
main switch Q1.1 (auxiliary supply).
Phase monitor K1 is energized via the main
supply and immediately energizes
contactor relay K2. N/C K2/21-22 blocks the
circuit contactor. Q12 (auxiliary supply)
and N/O K2/13-14 closes the circuit of
contactor Q11. Contactor Q11 energizes
and switches the mains supply on the
loads. Contactor Q12 is also interlocked
against main supply contactor Q11 via N/C
Q11/22-21.
a Main supply
b Auxiliary supply
c To load
L1
L2
L3
N
-Q1
-F01
21
22
14
21
21
22
22
11
11
12 14
12 14
R
R S
S
T
T
-F02
5
6
3
4
1
2
5
6
3
4
1
2
-Q1.1
-Q11
-K2
-Q12
-Q12
-Q11
-K2
-Q12
-Q11 -K2
-K1
A1
A2
A1
A2
A1
A2
L2.1
L3.1
N
L1.1
13
a b
c
I > I > I >
I > I > I >

More Related Content

Similar to WIRING MOTOR EMERSON EDUARDO RODRIGUES

transformerdesignandprotection-130408132534-phpapp02.ppt
transformerdesignandprotection-130408132534-phpapp02.ppttransformerdesignandprotection-130408132534-phpapp02.ppt
transformerdesignandprotection-130408132534-phpapp02.pptThien Phan Bản
 
Protection of alternators javid iqbal sodagar
Protection of alternators javid iqbal sodagarProtection of alternators javid iqbal sodagar
Protection of alternators javid iqbal sodagarjavid iqbal sodagar
 
Protection of alternators javid iqbal sodagar
Protection of alternators javid iqbal sodagarProtection of alternators javid iqbal sodagar
Protection of alternators javid iqbal sodagarjavid iqbal sodagar
 
Motor protection
Motor protectionMotor protection
Motor protectionH. Kheir
 
Major faults in an alternator and their protection.
Major faults in an alternator and their protection.Major faults in an alternator and their protection.
Major faults in an alternator and their protection.javid iqbal sodagar
 
Motor Control Centre
Motor Control CentreMotor Control Centre
Motor Control Centresalehkhan
 
10 - Ac Power Regulators & Control Power Transformers - Fuji Electric
10 - Ac Power Regulators & Control Power Transformers - Fuji Electric10 - Ac Power Regulators & Control Power Transformers - Fuji Electric
10 - Ac Power Regulators & Control Power Transformers - Fuji ElectricCTY TNHH HẠO PHƯƠNG
 
Advanced motion controls s30a40
Advanced motion controls s30a40Advanced motion controls s30a40
Advanced motion controls s30a40Electromate
 
Mag Switch Gears, Coimbatore, Switch Gear Equipment
Mag Switch Gears, Coimbatore, Switch Gear EquipmentMag Switch Gears, Coimbatore, Switch Gear Equipment
Mag Switch Gears, Coimbatore, Switch Gear EquipmentIndiaMART InterMESH Limited
 
Equipment protection
Equipment protectionEquipment protection
Equipment protectionSlides Hub
 
Protection Schemes for Three Phase Induction Motor
Protection Schemes for Three Phase Induction MotorProtection Schemes for Three Phase Induction Motor
Protection Schemes for Three Phase Induction MotorIRJET Journal
 
MTA GENERATOR PROTECTION .PPT.pptx
MTA GENERATOR PROTECTION .PPT.pptxMTA GENERATOR PROTECTION .PPT.pptx
MTA GENERATOR PROTECTION .PPT.pptxrajkumarmaurya31
 
Advanced motion controls s30a40ac
Advanced motion controls s30a40acAdvanced motion controls s30a40ac
Advanced motion controls s30a40acElectromate
 
Advanced motions controls 20a14
Advanced motions controls 20a14Advanced motions controls 20a14
Advanced motions controls 20a14Electromate
 

Similar to WIRING MOTOR EMERSON EDUARDO RODRIGUES (20)

transformerdesignandprotection-130408132534-phpapp02.ppt
transformerdesignandprotection-130408132534-phpapp02.ppttransformerdesignandprotection-130408132534-phpapp02.ppt
transformerdesignandprotection-130408132534-phpapp02.ppt
 
Protection of alternators javid iqbal sodagar
Protection of alternators javid iqbal sodagarProtection of alternators javid iqbal sodagar
Protection of alternators javid iqbal sodagar
 
Protection of alternators javid iqbal sodagar
Protection of alternators javid iqbal sodagarProtection of alternators javid iqbal sodagar
Protection of alternators javid iqbal sodagar
 
Motor protection
Motor protectionMotor protection
Motor protection
 
Major faults in an alternator and their protection.
Major faults in an alternator and their protection.Major faults in an alternator and their protection.
Major faults in an alternator and their protection.
 
Thông số kĩ thuật siemens contactor 3 rt
Thông số kĩ thuật siemens contactor 3 rtThông số kĩ thuật siemens contactor 3 rt
Thông số kĩ thuật siemens contactor 3 rt
 
Motor Control Centre
Motor Control CentreMotor Control Centre
Motor Control Centre
 
10 - Ac Power Regulators & Control Power Transformers - Fuji Electric
10 - Ac Power Regulators & Control Power Transformers - Fuji Electric10 - Ac Power Regulators & Control Power Transformers - Fuji Electric
10 - Ac Power Regulators & Control Power Transformers - Fuji Electric
 
C2000 m en_20120201
C2000 m en_20120201C2000 m en_20120201
C2000 m en_20120201
 
Advanced motion controls s30a40
Advanced motion controls s30a40Advanced motion controls s30a40
Advanced motion controls s30a40
 
Mag Switch Gears, Coimbatore, Switch Gear Equipment
Mag Switch Gears, Coimbatore, Switch Gear EquipmentMag Switch Gears, Coimbatore, Switch Gear Equipment
Mag Switch Gears, Coimbatore, Switch Gear Equipment
 
Equipment protection
Equipment protectionEquipment protection
Equipment protection
 
Protection Schemes for Three Phase Induction Motor
Protection Schemes for Three Phase Induction MotorProtection Schemes for Three Phase Induction Motor
Protection Schemes for Three Phase Induction Motor
 
ntpc
ntpcntpc
ntpc
 
MTA GENERATOR PROTECTION .PPT.pptx
MTA GENERATOR PROTECTION .PPT.pptxMTA GENERATOR PROTECTION .PPT.pptx
MTA GENERATOR PROTECTION .PPT.pptx
 
MAHIMAMECCONS
MAHIMAMECCONSMAHIMAMECCONS
MAHIMAMECCONS
 
Advanced motion controls s30a40ac
Advanced motion controls s30a40acAdvanced motion controls s30a40ac
Advanced motion controls s30a40ac
 
Thông số kĩ thuật siemens contactor 3 ru
Thông số kĩ thuật siemens contactor 3 ruThông số kĩ thuật siemens contactor 3 ru
Thông số kĩ thuật siemens contactor 3 ru
 
Catalogue siemens contactor 3 ru
Catalogue siemens contactor 3 ruCatalogue siemens contactor 3 ru
Catalogue siemens contactor 3 ru
 
Advanced motions controls 20a14
Advanced motions controls 20a14Advanced motions controls 20a14
Advanced motions controls 20a14
 

More from EMERSON EDUARDO RODRIGUES

STEP 7 - AWL para S7-300 y S7-400 emerson eduardo rodrigues
STEP 7 - AWL para S7-300 y S7-400 emerson eduardo rodriguesSTEP 7 - AWL para S7-300 y S7-400 emerson eduardo rodrigues
STEP 7 - AWL para S7-300 y S7-400 emerson eduardo rodriguesEMERSON EDUARDO RODRIGUES
 
PLC SCUBE STANDARD PROGRAMING EMERSON EDUARDO RODRIGUES
PLC SCUBE STANDARD PROGRAMING EMERSON EDUARDO RODRIGUESPLC SCUBE STANDARD PROGRAMING EMERSON EDUARDO RODRIGUES
PLC SCUBE STANDARD PROGRAMING EMERSON EDUARDO RODRIGUESEMERSON EDUARDO RODRIGUES
 
The+48+Laws+Of+Power EMERSON EDUARDO RODRIGUES
The+48+Laws+Of+Power EMERSON EDUARDO RODRIGUESThe+48+Laws+Of+Power EMERSON EDUARDO RODRIGUES
The+48+Laws+Of+Power EMERSON EDUARDO RODRIGUESEMERSON EDUARDO RODRIGUES
 
Basica_Documentacion EMERSON EDUARDO RODRIGUES
Basica_Documentacion EMERSON EDUARDO RODRIGUESBasica_Documentacion EMERSON EDUARDO RODRIGUES
Basica_Documentacion EMERSON EDUARDO RODRIGUESEMERSON EDUARDO RODRIGUES
 
Avanzado_Documentacion_EMERSON EDUARDO RODRIGUES
Avanzado_Documentacion_EMERSON EDUARDO RODRIGUESAvanzado_Documentacion_EMERSON EDUARDO RODRIGUES
Avanzado_Documentacion_EMERSON EDUARDO RODRIGUESEMERSON EDUARDO RODRIGUES
 
Tratamiento Digital de Señales__EMERSON EDUARDO RODRIGUES.pdf
Tratamiento Digital de Señales__EMERSON EDUARDO RODRIGUES.pdfTratamiento Digital de Señales__EMERSON EDUARDO RODRIGUES.pdf
Tratamiento Digital de Señales__EMERSON EDUARDO RODRIGUES.pdfEMERSON EDUARDO RODRIGUES
 
DICIONARIO_DICIONARIO_ITALIANO_PORTUGUES EMERSON EDUARDO RODRIGUES
DICIONARIO_DICIONARIO_ITALIANO_PORTUGUES EMERSON EDUARDO RODRIGUESDICIONARIO_DICIONARIO_ITALIANO_PORTUGUES EMERSON EDUARDO RODRIGUES
DICIONARIO_DICIONARIO_ITALIANO_PORTUGUES EMERSON EDUARDO RODRIGUESEMERSON EDUARDO RODRIGUES
 
penetration test essentials comptia EMERSON EDUARDO RODRIGUES
penetration test essentials comptia EMERSON EDUARDO RODRIGUESpenetration test essentials comptia EMERSON EDUARDO RODRIGUES
penetration test essentials comptia EMERSON EDUARDO RODRIGUESEMERSON EDUARDO RODRIGUES
 
compTIA guide to get the CERTIFICATION EMERSON EDUARDO RODRIGUES
compTIA guide to get the CERTIFICATION EMERSON EDUARDO RODRIGUEScompTIA guide to get the CERTIFICATION EMERSON EDUARDO RODRIGUES
compTIA guide to get the CERTIFICATION EMERSON EDUARDO RODRIGUESEMERSON EDUARDO RODRIGUES
 
Cómo programar Step 7 y no morir en el intento EMERSON EDUARDO RODRIGUES
Cómo programar Step 7 y no morir en el intento EMERSON EDUARDO RODRIGUESCómo programar Step 7 y no morir en el intento EMERSON EDUARDO RODRIGUES
Cómo programar Step 7 y no morir en el intento EMERSON EDUARDO RODRIGUESEMERSON EDUARDO RODRIGUES
 
11. EJERCICIOS PRACTICOS DE AUTOMATIZACION - AUTOMATI EMERSON EDUARDO RODRIGUES
11. EJERCICIOS PRACTICOS DE AUTOMATIZACION - AUTOMATI EMERSON EDUARDO RODRIGUES11. EJERCICIOS PRACTICOS DE AUTOMATIZACION - AUTOMATI EMERSON EDUARDO RODRIGUES
11. EJERCICIOS PRACTICOS DE AUTOMATIZACION - AUTOMATI EMERSON EDUARDO RODRIGUESEMERSON EDUARDO RODRIGUES
 
10. SISTEMAS PROGRAMABLES AVANZADOS - AUTOMATI EMERSON EDUARDO RODRIGUES
10. SISTEMAS PROGRAMABLES AVANZADOS - AUTOMATI EMERSON EDUARDO RODRIGUES10. SISTEMAS PROGRAMABLES AVANZADOS - AUTOMATI EMERSON EDUARDO RODRIGUES
10. SISTEMAS PROGRAMABLES AVANZADOS - AUTOMATI EMERSON EDUARDO RODRIGUESEMERSON EDUARDO RODRIGUES
 
9. LIBRO SISTEMAS SECUENCIALES PROGRAMABLES - AUTOMATI EMERSON EDUARDO RODRIGUES
9. LIBRO SISTEMAS SECUENCIALES PROGRAMABLES - AUTOMATI EMERSON EDUARDO RODRIGUES9. LIBRO SISTEMAS SECUENCIALES PROGRAMABLES - AUTOMATI EMERSON EDUARDO RODRIGUES
9. LIBRO SISTEMAS SECUENCIALES PROGRAMABLES - AUTOMATI EMERSON EDUARDO RODRIGUESEMERSON EDUARDO RODRIGUES
 
8. LIBRO PROGRAMACION DE CONTROLADORES AVANZADOS SIMATIC S7-1500 CON TIA PORT...
8. LIBRO PROGRAMACION DE CONTROLADORES AVANZADOS SIMATIC S7-1500 CON TIA PORT...8. LIBRO PROGRAMACION DE CONTROLADORES AVANZADOS SIMATIC S7-1500 CON TIA PORT...
8. LIBRO PROGRAMACION DE CONTROLADORES AVANZADOS SIMATIC S7-1500 CON TIA PORT...EMERSON EDUARDO RODRIGUES
 
6. LIBRO AUTOMATAS PROGRAMABLES Y SISTEMAS DE AUTOMATIZACION - AUTOMATI EMERS...
6. LIBRO AUTOMATAS PROGRAMABLES Y SISTEMAS DE AUTOMATIZACION - AUTOMATI EMERS...6. LIBRO AUTOMATAS PROGRAMABLES Y SISTEMAS DE AUTOMATIZACION - AUTOMATI EMERS...
6. LIBRO AUTOMATAS PROGRAMABLES Y SISTEMAS DE AUTOMATIZACION - AUTOMATI EMERS...EMERSON EDUARDO RODRIGUES
 
5. LIBRO APRENDA WINCC - AUTOMATI EMERSON EDUARDO RODRIGUES
5. LIBRO APRENDA WINCC - AUTOMATI EMERSON EDUARDO RODRIGUES5. LIBRO APRENDA WINCC - AUTOMATI EMERSON EDUARDO RODRIGUES
5. LIBRO APRENDA WINCC - AUTOMATI EMERSON EDUARDO RODRIGUESEMERSON EDUARDO RODRIGUES
 
4. LIBRO COMUNICACIONES INDUSTRIALES - AUTOMATISSANDRO EMERSON EDUARDO RODRIGUES
4. LIBRO COMUNICACIONES INDUSTRIALES - AUTOMATISSANDRO EMERSON EDUARDO RODRIGUES4. LIBRO COMUNICACIONES INDUSTRIALES - AUTOMATISSANDRO EMERSON EDUARDO RODRIGUES
4. LIBRO COMUNICACIONES INDUSTRIALES - AUTOMATISSANDRO EMERSON EDUARDO RODRIGUESEMERSON EDUARDO RODRIGUES
 
3. LIBRO AUTOMATAS PROGRABLES SIEMENS GRAFCET Y GUIA GEMMA CON TIA PORTAL - A...
3. LIBRO AUTOMATAS PROGRABLES SIEMENS GRAFCET Y GUIA GEMMA CON TIA PORTAL - A...3. LIBRO AUTOMATAS PROGRABLES SIEMENS GRAFCET Y GUIA GEMMA CON TIA PORTAL - A...
3. LIBRO AUTOMATAS PROGRABLES SIEMENS GRAFCET Y GUIA GEMMA CON TIA PORTAL - A...EMERSON EDUARDO RODRIGUES
 

More from EMERSON EDUARDO RODRIGUES (20)

emersoneduardorodrigues_curso-de-russo.pdf
emersoneduardorodrigues_curso-de-russo.pdfemersoneduardorodrigues_curso-de-russo.pdf
emersoneduardorodrigues_curso-de-russo.pdf
 
STEP 7 - AWL para S7-300 y S7-400 emerson eduardo rodrigues
STEP 7 - AWL para S7-300 y S7-400 emerson eduardo rodriguesSTEP 7 - AWL para S7-300 y S7-400 emerson eduardo rodrigues
STEP 7 - AWL para S7-300 y S7-400 emerson eduardo rodrigues
 
PLC SCUBE STANDARD PROGRAMING EMERSON EDUARDO RODRIGUES
PLC SCUBE STANDARD PROGRAMING EMERSON EDUARDO RODRIGUESPLC SCUBE STANDARD PROGRAMING EMERSON EDUARDO RODRIGUES
PLC SCUBE STANDARD PROGRAMING EMERSON EDUARDO RODRIGUES
 
The+48+Laws+Of+Power EMERSON EDUARDO RODRIGUES
The+48+Laws+Of+Power EMERSON EDUARDO RODRIGUESThe+48+Laws+Of+Power EMERSON EDUARDO RODRIGUES
The+48+Laws+Of+Power EMERSON EDUARDO RODRIGUES
 
Basica_Documentacion EMERSON EDUARDO RODRIGUES
Basica_Documentacion EMERSON EDUARDO RODRIGUESBasica_Documentacion EMERSON EDUARDO RODRIGUES
Basica_Documentacion EMERSON EDUARDO RODRIGUES
 
Avanzado_Documentacion_EMERSON EDUARDO RODRIGUES
Avanzado_Documentacion_EMERSON EDUARDO RODRIGUESAvanzado_Documentacion_EMERSON EDUARDO RODRIGUES
Avanzado_Documentacion_EMERSON EDUARDO RODRIGUES
 
Tratamiento Digital de Señales__EMERSON EDUARDO RODRIGUES.pdf
Tratamiento Digital de Señales__EMERSON EDUARDO RODRIGUES.pdfTratamiento Digital de Señales__EMERSON EDUARDO RODRIGUES.pdf
Tratamiento Digital de Señales__EMERSON EDUARDO RODRIGUES.pdf
 
DICIONARIO_DICIONARIO_ITALIANO_PORTUGUES EMERSON EDUARDO RODRIGUES
DICIONARIO_DICIONARIO_ITALIANO_PORTUGUES EMERSON EDUARDO RODRIGUESDICIONARIO_DICIONARIO_ITALIANO_PORTUGUES EMERSON EDUARDO RODRIGUES
DICIONARIO_DICIONARIO_ITALIANO_PORTUGUES EMERSON EDUARDO RODRIGUES
 
penetration test essentials comptia EMERSON EDUARDO RODRIGUES
penetration test essentials comptia EMERSON EDUARDO RODRIGUESpenetration test essentials comptia EMERSON EDUARDO RODRIGUES
penetration test essentials comptia EMERSON EDUARDO RODRIGUES
 
compTIA guide to get the CERTIFICATION EMERSON EDUARDO RODRIGUES
compTIA guide to get the CERTIFICATION EMERSON EDUARDO RODRIGUEScompTIA guide to get the CERTIFICATION EMERSON EDUARDO RODRIGUES
compTIA guide to get the CERTIFICATION EMERSON EDUARDO RODRIGUES
 
HHS_TOC_Glossary EMERSON EDUARDO RODRIGUES
HHS_TOC_Glossary EMERSON EDUARDO RODRIGUESHHS_TOC_Glossary EMERSON EDUARDO RODRIGUES
HHS_TOC_Glossary EMERSON EDUARDO RODRIGUES
 
Cómo programar Step 7 y no morir en el intento EMERSON EDUARDO RODRIGUES
Cómo programar Step 7 y no morir en el intento EMERSON EDUARDO RODRIGUESCómo programar Step 7 y no morir en el intento EMERSON EDUARDO RODRIGUES
Cómo programar Step 7 y no morir en el intento EMERSON EDUARDO RODRIGUES
 
11. EJERCICIOS PRACTICOS DE AUTOMATIZACION - AUTOMATI EMERSON EDUARDO RODRIGUES
11. EJERCICIOS PRACTICOS DE AUTOMATIZACION - AUTOMATI EMERSON EDUARDO RODRIGUES11. EJERCICIOS PRACTICOS DE AUTOMATIZACION - AUTOMATI EMERSON EDUARDO RODRIGUES
11. EJERCICIOS PRACTICOS DE AUTOMATIZACION - AUTOMATI EMERSON EDUARDO RODRIGUES
 
10. SISTEMAS PROGRAMABLES AVANZADOS - AUTOMATI EMERSON EDUARDO RODRIGUES
10. SISTEMAS PROGRAMABLES AVANZADOS - AUTOMATI EMERSON EDUARDO RODRIGUES10. SISTEMAS PROGRAMABLES AVANZADOS - AUTOMATI EMERSON EDUARDO RODRIGUES
10. SISTEMAS PROGRAMABLES AVANZADOS - AUTOMATI EMERSON EDUARDO RODRIGUES
 
9. LIBRO SISTEMAS SECUENCIALES PROGRAMABLES - AUTOMATI EMERSON EDUARDO RODRIGUES
9. LIBRO SISTEMAS SECUENCIALES PROGRAMABLES - AUTOMATI EMERSON EDUARDO RODRIGUES9. LIBRO SISTEMAS SECUENCIALES PROGRAMABLES - AUTOMATI EMERSON EDUARDO RODRIGUES
9. LIBRO SISTEMAS SECUENCIALES PROGRAMABLES - AUTOMATI EMERSON EDUARDO RODRIGUES
 
8. LIBRO PROGRAMACION DE CONTROLADORES AVANZADOS SIMATIC S7-1500 CON TIA PORT...
8. LIBRO PROGRAMACION DE CONTROLADORES AVANZADOS SIMATIC S7-1500 CON TIA PORT...8. LIBRO PROGRAMACION DE CONTROLADORES AVANZADOS SIMATIC S7-1500 CON TIA PORT...
8. LIBRO PROGRAMACION DE CONTROLADORES AVANZADOS SIMATIC S7-1500 CON TIA PORT...
 
6. LIBRO AUTOMATAS PROGRAMABLES Y SISTEMAS DE AUTOMATIZACION - AUTOMATI EMERS...
6. LIBRO AUTOMATAS PROGRAMABLES Y SISTEMAS DE AUTOMATIZACION - AUTOMATI EMERS...6. LIBRO AUTOMATAS PROGRAMABLES Y SISTEMAS DE AUTOMATIZACION - AUTOMATI EMERS...
6. LIBRO AUTOMATAS PROGRAMABLES Y SISTEMAS DE AUTOMATIZACION - AUTOMATI EMERS...
 
5. LIBRO APRENDA WINCC - AUTOMATI EMERSON EDUARDO RODRIGUES
5. LIBRO APRENDA WINCC - AUTOMATI EMERSON EDUARDO RODRIGUES5. LIBRO APRENDA WINCC - AUTOMATI EMERSON EDUARDO RODRIGUES
5. LIBRO APRENDA WINCC - AUTOMATI EMERSON EDUARDO RODRIGUES
 
4. LIBRO COMUNICACIONES INDUSTRIALES - AUTOMATISSANDRO EMERSON EDUARDO RODRIGUES
4. LIBRO COMUNICACIONES INDUSTRIALES - AUTOMATISSANDRO EMERSON EDUARDO RODRIGUES4. LIBRO COMUNICACIONES INDUSTRIALES - AUTOMATISSANDRO EMERSON EDUARDO RODRIGUES
4. LIBRO COMUNICACIONES INDUSTRIALES - AUTOMATISSANDRO EMERSON EDUARDO RODRIGUES
 
3. LIBRO AUTOMATAS PROGRABLES SIEMENS GRAFCET Y GUIA GEMMA CON TIA PORTAL - A...
3. LIBRO AUTOMATAS PROGRABLES SIEMENS GRAFCET Y GUIA GEMMA CON TIA PORTAL - A...3. LIBRO AUTOMATAS PROGRABLES SIEMENS GRAFCET Y GUIA GEMMA CON TIA PORTAL - A...
3. LIBRO AUTOMATAS PROGRABLES SIEMENS GRAFCET Y GUIA GEMMA CON TIA PORTAL - A...
 

Recently uploaded

power system scada applications and uses
power system scada applications and usespower system scada applications and uses
power system scada applications and usesDevarapalliHaritha
 
Gurgaon ✡️9711147426✨Call In girls Gurgaon Sector 51 escort service
Gurgaon ✡️9711147426✨Call In girls Gurgaon Sector 51 escort serviceGurgaon ✡️9711147426✨Call In girls Gurgaon Sector 51 escort service
Gurgaon ✡️9711147426✨Call In girls Gurgaon Sector 51 escort servicejennyeacort
 
Sachpazis Costas: Geotechnical Engineering: A student's Perspective Introduction
Sachpazis Costas: Geotechnical Engineering: A student's Perspective IntroductionSachpazis Costas: Geotechnical Engineering: A student's Perspective Introduction
Sachpazis Costas: Geotechnical Engineering: A student's Perspective IntroductionDr.Costas Sachpazis
 
Oxy acetylene welding presentation note.
Oxy acetylene welding presentation note.Oxy acetylene welding presentation note.
Oxy acetylene welding presentation note.eptoze12
 
IVE Industry Focused Event - Defence Sector 2024
IVE Industry Focused Event - Defence Sector 2024IVE Industry Focused Event - Defence Sector 2024
IVE Industry Focused Event - Defence Sector 2024Mark Billinghurst
 
APPLICATIONS-AC/DC DRIVES-OPERATING CHARACTERISTICS
APPLICATIONS-AC/DC DRIVES-OPERATING CHARACTERISTICSAPPLICATIONS-AC/DC DRIVES-OPERATING CHARACTERISTICS
APPLICATIONS-AC/DC DRIVES-OPERATING CHARACTERISTICSKurinjimalarL3
 
Software and Systems Engineering Standards: Verification and Validation of Sy...
Software and Systems Engineering Standards: Verification and Validation of Sy...Software and Systems Engineering Standards: Verification and Validation of Sy...
Software and Systems Engineering Standards: Verification and Validation of Sy...VICTOR MAESTRE RAMIREZ
 
chaitra-1.pptx fake news detection using machine learning
chaitra-1.pptx  fake news detection using machine learningchaitra-1.pptx  fake news detection using machine learning
chaitra-1.pptx fake news detection using machine learningmisbanausheenparvam
 
Biology for Computer Engineers Course Handout.pptx
Biology for Computer Engineers Course Handout.pptxBiology for Computer Engineers Course Handout.pptx
Biology for Computer Engineers Course Handout.pptxDeepakSakkari2
 
Call Girls Narol 7397865700 Independent Call Girls
Call Girls Narol 7397865700 Independent Call GirlsCall Girls Narol 7397865700 Independent Call Girls
Call Girls Narol 7397865700 Independent Call Girlsssuser7cb4ff
 
Gfe Mayur Vihar Call Girls Service WhatsApp -> 9999965857 Available 24x7 ^ De...
Gfe Mayur Vihar Call Girls Service WhatsApp -> 9999965857 Available 24x7 ^ De...Gfe Mayur Vihar Call Girls Service WhatsApp -> 9999965857 Available 24x7 ^ De...
Gfe Mayur Vihar Call Girls Service WhatsApp -> 9999965857 Available 24x7 ^ De...srsj9000
 
Architect Hassan Khalil Portfolio for 2024
Architect Hassan Khalil Portfolio for 2024Architect Hassan Khalil Portfolio for 2024
Architect Hassan Khalil Portfolio for 2024hassan khalil
 
Model Call Girl in Narela Delhi reach out to us at 🔝8264348440🔝
Model Call Girl in Narela Delhi reach out to us at 🔝8264348440🔝Model Call Girl in Narela Delhi reach out to us at 🔝8264348440🔝
Model Call Girl in Narela Delhi reach out to us at 🔝8264348440🔝soniya singh
 
HARMONY IN THE NATURE AND EXISTENCE - Unit-IV
HARMONY IN THE NATURE AND EXISTENCE - Unit-IVHARMONY IN THE NATURE AND EXISTENCE - Unit-IV
HARMONY IN THE NATURE AND EXISTENCE - Unit-IVRajaP95
 
Application of Residue Theorem to evaluate real integrations.pptx
Application of Residue Theorem to evaluate real integrations.pptxApplication of Residue Theorem to evaluate real integrations.pptx
Application of Residue Theorem to evaluate real integrations.pptx959SahilShah
 
(ANVI) Koregaon Park Call Girls Just Call 7001035870 [ Cash on Delivery ] Pun...
(ANVI) Koregaon Park Call Girls Just Call 7001035870 [ Cash on Delivery ] Pun...(ANVI) Koregaon Park Call Girls Just Call 7001035870 [ Cash on Delivery ] Pun...
(ANVI) Koregaon Park Call Girls Just Call 7001035870 [ Cash on Delivery ] Pun...ranjana rawat
 
High Profile Call Girls Nagpur Isha Call 7001035870 Meet With Nagpur Escorts
High Profile Call Girls Nagpur Isha Call 7001035870 Meet With Nagpur EscortsHigh Profile Call Girls Nagpur Isha Call 7001035870 Meet With Nagpur Escorts
High Profile Call Girls Nagpur Isha Call 7001035870 Meet With Nagpur Escortsranjana rawat
 

Recently uploaded (20)

young call girls in Rajiv Chowk🔝 9953056974 🔝 Delhi escort Service
young call girls in Rajiv Chowk🔝 9953056974 🔝 Delhi escort Serviceyoung call girls in Rajiv Chowk🔝 9953056974 🔝 Delhi escort Service
young call girls in Rajiv Chowk🔝 9953056974 🔝 Delhi escort Service
 
power system scada applications and uses
power system scada applications and usespower system scada applications and uses
power system scada applications and uses
 
Gurgaon ✡️9711147426✨Call In girls Gurgaon Sector 51 escort service
Gurgaon ✡️9711147426✨Call In girls Gurgaon Sector 51 escort serviceGurgaon ✡️9711147426✨Call In girls Gurgaon Sector 51 escort service
Gurgaon ✡️9711147426✨Call In girls Gurgaon Sector 51 escort service
 
Sachpazis Costas: Geotechnical Engineering: A student's Perspective Introduction
Sachpazis Costas: Geotechnical Engineering: A student's Perspective IntroductionSachpazis Costas: Geotechnical Engineering: A student's Perspective Introduction
Sachpazis Costas: Geotechnical Engineering: A student's Perspective Introduction
 
Call Us -/9953056974- Call Girls In Vikaspuri-/- Delhi NCR
Call Us -/9953056974- Call Girls In Vikaspuri-/- Delhi NCRCall Us -/9953056974- Call Girls In Vikaspuri-/- Delhi NCR
Call Us -/9953056974- Call Girls In Vikaspuri-/- Delhi NCR
 
9953056974 Call Girls In South Ex, Escorts (Delhi) NCR.pdf
9953056974 Call Girls In South Ex, Escorts (Delhi) NCR.pdf9953056974 Call Girls In South Ex, Escorts (Delhi) NCR.pdf
9953056974 Call Girls In South Ex, Escorts (Delhi) NCR.pdf
 
Oxy acetylene welding presentation note.
Oxy acetylene welding presentation note.Oxy acetylene welding presentation note.
Oxy acetylene welding presentation note.
 
IVE Industry Focused Event - Defence Sector 2024
IVE Industry Focused Event - Defence Sector 2024IVE Industry Focused Event - Defence Sector 2024
IVE Industry Focused Event - Defence Sector 2024
 
APPLICATIONS-AC/DC DRIVES-OPERATING CHARACTERISTICS
APPLICATIONS-AC/DC DRIVES-OPERATING CHARACTERISTICSAPPLICATIONS-AC/DC DRIVES-OPERATING CHARACTERISTICS
APPLICATIONS-AC/DC DRIVES-OPERATING CHARACTERISTICS
 
Software and Systems Engineering Standards: Verification and Validation of Sy...
Software and Systems Engineering Standards: Verification and Validation of Sy...Software and Systems Engineering Standards: Verification and Validation of Sy...
Software and Systems Engineering Standards: Verification and Validation of Sy...
 
chaitra-1.pptx fake news detection using machine learning
chaitra-1.pptx  fake news detection using machine learningchaitra-1.pptx  fake news detection using machine learning
chaitra-1.pptx fake news detection using machine learning
 
Biology for Computer Engineers Course Handout.pptx
Biology for Computer Engineers Course Handout.pptxBiology for Computer Engineers Course Handout.pptx
Biology for Computer Engineers Course Handout.pptx
 
Call Girls Narol 7397865700 Independent Call Girls
Call Girls Narol 7397865700 Independent Call GirlsCall Girls Narol 7397865700 Independent Call Girls
Call Girls Narol 7397865700 Independent Call Girls
 
Gfe Mayur Vihar Call Girls Service WhatsApp -> 9999965857 Available 24x7 ^ De...
Gfe Mayur Vihar Call Girls Service WhatsApp -> 9999965857 Available 24x7 ^ De...Gfe Mayur Vihar Call Girls Service WhatsApp -> 9999965857 Available 24x7 ^ De...
Gfe Mayur Vihar Call Girls Service WhatsApp -> 9999965857 Available 24x7 ^ De...
 
Architect Hassan Khalil Portfolio for 2024
Architect Hassan Khalil Portfolio for 2024Architect Hassan Khalil Portfolio for 2024
Architect Hassan Khalil Portfolio for 2024
 
Model Call Girl in Narela Delhi reach out to us at 🔝8264348440🔝
Model Call Girl in Narela Delhi reach out to us at 🔝8264348440🔝Model Call Girl in Narela Delhi reach out to us at 🔝8264348440🔝
Model Call Girl in Narela Delhi reach out to us at 🔝8264348440🔝
 
HARMONY IN THE NATURE AND EXISTENCE - Unit-IV
HARMONY IN THE NATURE AND EXISTENCE - Unit-IVHARMONY IN THE NATURE AND EXISTENCE - Unit-IV
HARMONY IN THE NATURE AND EXISTENCE - Unit-IV
 
Application of Residue Theorem to evaluate real integrations.pptx
Application of Residue Theorem to evaluate real integrations.pptxApplication of Residue Theorem to evaluate real integrations.pptx
Application of Residue Theorem to evaluate real integrations.pptx
 
(ANVI) Koregaon Park Call Girls Just Call 7001035870 [ Cash on Delivery ] Pun...
(ANVI) Koregaon Park Call Girls Just Call 7001035870 [ Cash on Delivery ] Pun...(ANVI) Koregaon Park Call Girls Just Call 7001035870 [ Cash on Delivery ] Pun...
(ANVI) Koregaon Park Call Girls Just Call 7001035870 [ Cash on Delivery ] Pun...
 
High Profile Call Girls Nagpur Isha Call 7001035870 Meet With Nagpur Escorts
High Profile Call Girls Nagpur Isha Call 7001035870 Meet With Nagpur EscortsHigh Profile Call Girls Nagpur Isha Call 7001035870 Meet With Nagpur Escorts
High Profile Call Girls Nagpur Isha Call 7001035870 Meet With Nagpur Escorts
 

WIRING MOTOR EMERSON EDUARDO RODRIGUES

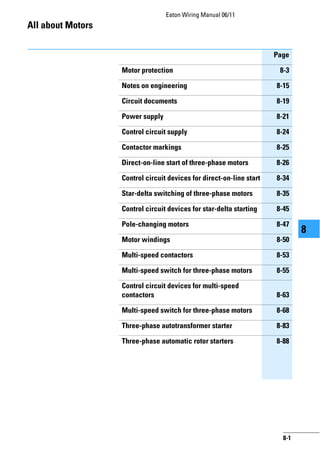
  • 1. Eaton Wiring Manual 06/11 8-1 8 8 All about Motors Page Motor protection 8-3 Notes on engineering 8-15 Circuit documents 8-19 Power supply 8-21 Control circuit supply 8-24 Contactor markings 8-25 Direct-on-line start of three-phase motors 8-26 Control circuit devices for direct-on-line start 8-34 Star-delta switching of three-phase motors 8-35 Control circuit devices for star-delta starting 8-45 Pole-changing motors 8-47 Motor windings 8-50 Multi-speed contactors 8-53 Multi-speed switch for three-phase motors 8-55 Control circuit devices for multi-speed contactors 8-63 Multi-speed switch for three-phase motors 8-68 Three-phase autotransformer starter 8-83 Three-phase automatic rotor starters 8-88
  • 2. Eaton Wiring Manual 06/11 8-2 All about Motors 8 8 Page Switching of capacitors 8-92 Duplex pump control 8-96 Fully automatic pump control 8-98 Fully automatic main transfer switch with automatic release 8-102
  • 3. Eaton Wiring Manual 06/11 8-3 All about Motors 8 8 Motor protection Selection aids The Eaton selector slide enables you to determine quickly and reliably which motor starter is the most suitable for the application concerned. For this only the operating voltage, the motor rating, the various short-circuit ratings and coordination types are required. The selector slide can be used for dimensioning devices with short-circuit coordination types 1 and 2. Standard cable cross-sections and permissible cable lengths are stated for the tripping of protective devices in compliance with standards. They can vary according to the installation requirements. The selector slide has several variants of the movable section with numerical values for DOL and reversing starters or star-delta starters. The selector slide can be obtained free of charge. If you prefer to use the selection aid online, this is available at: www.eaton.com/moeller/support (Online Selection Tools)
  • 4. All about Motors Motor protection Eaton Wiring Manual 06/11 8-4 8 8 Overload relay with reclosing lockout They should always be used where continuous contact devices (two-wire control) are concerned (e.g. pressure and position switches), to prevent automatic restarting. The reset button can be fitted as an external feature in order to make it accessible to all personnel. Overload relays for example are always supplied with manual reset. but can be converted to automatic reset by the user. Overload relays without reclosing lockout They can be used only with pulsed contact devices (three-wire control) such as pushbuttons etc., because on these, the cooling of the bimetal strips cannot lead to automatic reconnection. Special circuitry Special circuitry such as is found in star-delta switches, individually compensated motors, current transformer-operated overload relays etc. may require that the relay settings deviates from the motor rated operational current. Frequently recurring operating cycles It makes motor protection difficult. The relay should be set to higher than rated motor current in view of its shorter time constant.Motors which are ratedfora high operating frequency will stand this setting to a certain degree. Although this will not ensure complete protection against overload, it will nevertheless provide adequate protection against non-starting. Back-up fuses and instantaneous releases They are needed to protect not only the motor, but also the relay, against the effects of short-circuits. Their maximum rating is shown clearly on every relay and must be adhered to without fail. Higher ratings – chosen for instance according to the cable cross-section – would lead to the destruction of the motor and relay. The following important questions and answers give a further guide to the behaviour of an installation with motor protection. To what current must the overload relay properly be set? To the rated motor current – no higher, no lower. A relay set to too low a figure will prevent the full utilization of the motor; set too high, it will not guarantee full overload protection. If a correctly set relay trips too frequently, then either the load on the motor should be reduced or the motor should be exchanged for a larger one. When is it right for the overload relay to trip? Only when the current consumption of the motor increases due to mechanical overloading of the motor, undervoltage or phase failure when the motor is under full load or thereabout, or when the motor fails to start due to a stalled rotor.
  • 5. All about Motors Motor protection Eaton Wiring Manual 06/11 8-5 8 8 When does the overload relay fail to trip in good time although the motor is endangered? With changes in the motor which do not cause an increase in current consumption: Effects of humidity, reduced cooling due to a reduction in speed or motor dirt, temporary additional external heating of the motor or bearing wear. What causes destruction of the overload relay? Destruction will take place only in the event of a short-circuit on the load side of the relay when the back-up fuse is rated too high. In most cases, this will also endanger the contactor and motor. Therefore, always adhere to the maximum fuse rating specified on every relay. 3-pole overload relays should be so connected in the case of single-phase and DC motors so that all three poles of the overload relay carry the current, whether in 1-pole or 2-pole circuits. An important characteristic feature of overload relays conforming to IEC/EN 60947-4-1 are the tripping classes (CLASS 10 A, 10, 20, 30). They determine different tripping characteristics for the various starting conditions of motors (normal starting to heavy starting duty). 1 pole 2 pole
  • 6. All about Motors Motor protection Eaton Wiring Manual 06/11 8-6 8 8 Pick-up times Response limits of time-delayed overload relays at all-pole load. In the case of thermal overload relays with a current setting range, the response limits must apply equally to the highest and the lowest setting of the associated current. Type of overload relay Multiple of current setting Reference ambient temperature A B C D t > 2 h starting from cold state of relay t ≦ 2 h Tripping classes Tripping time in minutes Tripping class Tripping time in seconds 10 A 10 20 30 ≦ 2 ≦ 4 ≦ 8 ≦ 12 10 A 10 20 30 2 < T ≦ 10 4 < T ≦ 10 6 < T ≦ 20 9 < T ≦ 30 Non-ambient temperature compensated thermal relays and magnetic relays 1.0 1.2 1.5 7.2 +40 °C Ambient temperature compensated thermal relays 1.05 1.2 1.5 7.2 +20 °C
  • 7. All about Motors Motor protection Eaton Wiring Manual 06/11 8-7 8 8 Response limits of 3-pole thermal overload relays at 2-pole load In the case of thermal overload relays with a current setting range, the response limits must apply equally to the highest and the lowest setting of the associated current. Overload capacity Overload relays and releases have heating coils which can be thermally destroyed by overheating. The making and breaking currents of the motor flow in thermal overload relays which are used for motor protection. These currents are between 6 and 12 x Ie (rated operational current), depending on the utilization category and the size of the motor. The point of destruction depends on the frame size and design. It is usually approximately 12 to 20 x Ie. The point of destruction is the point of intersection between the projected tripping characteristic curves and the multiple of the current. Short-circuit strength of the main circuit With currents that exceed the breaking capacity of the motor starter in relation to the utilization category (EN 60947-1, VDE 0660, Section 102, Table 7), it is permissible for the current flowing during the break time of the protective device to damage the motor starter. The permissible behaviour of starters under short-circuit conditions is defined in the so-called types of coordination (1 and 2). It is common practice to state in Type of thermal overload relay Multiple of current setting Reference ambient temperature A t > 2 h, starting from cold state of relay B t ≦ 2 h Ambient temperature compensated, without phase failure sensitivity 3 poles 1.0 2 poles 1 pole 1.32 0 +20 °C Non-ambient temperature compensated, without phase failure sensitivity 3 poles 1.0 2 poles 1 pole 1.25 0 +40 °C Ambient temperature compensated, with phase failure sensitivity 2 poles 1 pole 1.0 0.9 2 poles 1 pole 1.15 0 +20 °C
  • 8. All about Motors Motor protection Eaton Wiring Manual 06/11 8-8 8 8 the details of protective devices which type of coordination is ensured by them. Type 1 coordination In the event of a short circuit the starter must not endanger persons and installations. It does not have to be fit for renewed operation without repair. Type 2 coordination In the event of a short-circuit the starter must not endanger persons and installations. It must be fit for renewed operation. There is a risk of contact weld. for which the manufacturer must give maintenance instructions. The tripping type of the overload relay must not differ from the given tripping characteristic after a short-circuit. Short-circuit strength of the auxiliary contact The manufacturer details the required overcurrent protective device. The combination is subjected to three test disconnection's at 1000 A prospective current with a power factor between 0.5 and 0.7 at rated operational voltage. Welding of the contacts may not occur (EN 60947-5-1, VDE 0660 Part 200). Motor protection in special applications Heavy starting duty An adequate tripping time is essential in order to allow a motor to start up smoothly. In the majority of cases, overload relays such as motor-protective circuit-breakers PKZ(M) or circuit-breakers NZM can be used. The tripping time can be taken from the tripping characteristics in the main catalogue, Industrial Switchgear. In the case of especially high-inertia motors, whose run-up time exceeds the tripping delay of the above devices, it would be completely wrong to adjust an overload relay which tripped out before the run-up time expired, to a current level higher than the rated motor current. This would, it is true, solve the starting problem, but the motor would no longer be adequatelyprotected during run.However, there are other solutions to the problem: Current transformer-operated overload relays ZW7 The ZW7 consists of three special saturable core current transformers, supplying an overload relay Z… It is used principally for medium and large motors. Up to two times rated operational current Ie, the transformation ratio I1/I2 of the saturable core current transformers is practically linear. Within this range it does not differ from the normal overload relay, i.e. it provides normal overload protection during normal operation. However, within the transformer characteristic range (I > 2 x Ie) , the secondary current no longer increases proportionally to the primary current. This non-linear increase in the secondary current produces an extended tripping delay if overcurrents greater than twice ratedoperationalcurrentoccur,andhence permits longer start-up times.
  • 9. All about Motors Motor protection Eaton Wiring Manual 06/11 8-9 8 8 Adjusting the current transformer-operated overload relay ZW7 for lower rated motor current The setting ranges quoted in the main catalogue, Industrial Switchgear, apply when the incoming cable is looped once through the transformer relay. If the current transformer-operated overload relay ZW7 is required to provide protection to a motor of below 42 A rating (minimum value in the setting range of 42 A to 63 A), the necessary range adjustment is achieved by looping the incomer several times through the aperture in the relay. The change in the rated motor current quoted on the rating plate is inversely proportional to the number of loops. Example: With the ZW7-63 relay, which has a setting range from 42 A to 63 A, a rated motor current of 21 A to 31.5 A can be accommodated by looping the leads twice through the relay. Bridging of motor protection during starting For small motors the bridging of the motor protection during starting is more economical. Because of the additional parallel contactor, the overload relay does not carry the full current during starting. Only when the motor has reached full speed is the bridging contactor switched off and the full motorcurrent isthen carried by the overload relay. Provided it has been set correctly to the rated motor current, this will ensure full motor protection during operation. Starting must be monitored. The motor is a limiting factor with regard to the tripping delay of the current transformer-operated relay and the bridging period. One must ensure that the motor is able to tolerate the high temperature generated by direct starting, for the prescribed starting time. Motor and starting procedure have to be selected carefully when dealing with machines having a very large rotating mass, which are practically the only ones subject to this problem when direct starting is used. Depending on the operating conditions adequate protection of the motor winding may no longer be given by an overload relay. In that case it must be weighed up whether an electronic overload relay ZEV, ZEB or a thermistor overload relay EMT 6 in conjunction with an overload relay Z meets the requirements. Example circuits → page 8-10
  • 10. All about Motors Motor protection Eaton Wiring Manual 06/11 8-10 8 8 Star-delta switch (Δ) 1 operating direction Changeover time with overload relay in position A: < 15 s B: > 15 < 40 s C: > 40 s Setting of the overload relay 0.58 x Ie 1 x Ie 0.58 x Ie Full motor protection in  (star) position Onlypartialmotorprotection in  position Motor not protected in  position Multi-speed switches 2 speeds 2 separate windings One tapped winding 3 speeds 1 x tapped winding + 1 winding Attention must be paid to short-circuit protective device of the overload relays. Separate supply input wirings should be provided if required. -Q11 A -Q15 -Q13 Ie -Q11 B -Q15 -Q13 Ie -Q11 -Q15 -Q13 Ie C -Q17 -Q21 -Q17 -Q23 -Q21 -Q17 -Q23 -Q21 -Q11
  • 11. All about Motors Motor protection Eaton Wiring Manual 06/11 8-11 8 8 Heavy starting duty ZW7 current transformer-operated overload relays Bridging of motor protection during starting Bridging during starting using bridging relay For medium and large motors For small motors; no protection during starting Automatic cut out of the bridging contactor -Q11 -Q11 -Q12 -Q11 -Q12
  • 12. All about Motors Motor protection Eaton Wiring Manual 06/11 8-12 8 8 Individually compensated motor Capacitor connected Iw = Ib = Ic = Ic = Ie = Rated motor operational current [A] Iw = Active current Ib = Reactive current Ic = Capacitor-Rated operational current [A] IEM = Setting current of overload relay [A] cos ϕ = Motor power factor Ue = Rated operational voltage [V] Pc = Rated capacitor output [kvar] C = Capacitance of capacitor [μF] Ie  [A] cos  Ie 2 Iw 2 – A   Ue 3 2f C 10 6 – A       Pc 103  3 Ue  ------------------ - }Proportion of motor rated operational current [A] to protective conductor terminals to motor terminals Setting IEM of overload relay Capacitor does not relieve loading of cable between contactor and motor. Capacitor relieves loading of cable between contactor and motor; normal arrangement. -Q11 PC IEM -Q11 PC IEM IEM 1 Ie  = IEM Iw 2 Ib  Ic  2 – + =
  • 13. All about Motors Motor protection Eaton Wiring Manual 06/11 8-13 8 8 Thermistor overload relay for machine protection Thermistor overload relays for machine protection are used in conjunction with temperature-dependent semi-conductor resistors (thermistors) for monitoring the temperature of motors, transformers, heaters, gases, oils, bearings etc. Depending on the application, thermistors have positive (PTC thermistors) or negative (NTC thermistors) temperature coefficients. With PTC thermistors the resistance at low temperature is small. From a certain temperature it rises steeply. On the other hand, NTC thermistors have a falling resistance-temperature characteristic, which does not exhibit the pronounced change behaviour of the PTC thermistor characteristic. Temperature monitoring of electric motors Thermistor overload relays for machine protection EMT6 comply with the characteristics for the combination of protective devices and PTC sensors to EN 60947-8. They are therefore suitable for monitoring the temperature of series motors. When designing motor protection, it is necessary to differentiate between stator-critical and rotor-critical motors: • Stator-critical Motors whose stator winding reaches thepermissibletemperaturelimitquicker than the rotor. The PTC sensor fitted in the statorwinding ensures that the stator winding and rotor are adequately protected even with a stalled rotor. • Rotor-critical Squirrel-cage motors whose rotor in the event of stalling reaches the permissible temperature limit earlier than the stator winding. The delayed temperature rise in the stator can lead to a delayed tripping of the thermistor overload relay for machine protection. It is therefore advisable to supplement the protection of rotor-critical motors by a conventional overload relay. Three-phase motors above 15 kW are usually rotor-critical. Overload protection for motors in accordancewithIEC204andIEC/EN 60204. These standards specify that motors above 2 kW used for frequent starting and stopping should be adequately protected for this type of duty. This can be achieved by fitting temperature sensors. If the temperature sensor is not able to ensure adequate protection with stalled rotors, an overcurrent relay must also be provided. Generally, where there is frequent starting and stopping of motors, intermittent operation and excessive frequency of operation, the use of overload relays in conjunction with thermistor overload relays is to be recommended. In order to avoid premature tripping out of the overload relay in these operating conditions, it is set higher than the predefinedoperatingcurrent.Theoverload relay then assumes stalling protection; the thermistor protection monitors the motor winding.
  • 14. All about Motors Motor protection Eaton Wiring Manual 06/11 8-14 8 8 Thermistor overload relays for machine protection can be used in conjunction with up to six PTC sensors to DIN 44081 for direct monitoring of temperatures in Ex e motors compliant with the ATEX directive (94/9 EC). An EC type testing certificate can be provided. Protection of current and temperature-dependent motor-protective devices + Full protection (+) Partial protection – No protection Protection of the motor under the following conditions Using bimetal Using thermistor Using bimetal and thermistor Overload in continuous operation + + + Extended starting and stopping (+) + + Switching to stalled rotor (stator-critical motor) + + + Switching on stalled rotor (rotor-critical motor) (+) (+) (+) Single-phasing + + + Intermittent operation – + + Excessive operating frequency – + + Voltage and frequency fluctuations + + + Increased coolant temperature – + + Impaired cooling – + +
  • 15. Eaton Wiring Manual 06/11 8-15 All about Motors 8 8 Notes on engineering Three-phase current-automatic starter Three-phase autotransformer starter with starting resistors Single or multi-step resistors are connected upstream of the three-phase squirrel-cage motors to reduce the inrush current and the tightening torque. With single-step starters, the inrush current is approximatelythreetimesthe ratedmotorcurrent.With multi-stage starters, the resistors can be so designed that the inrush current is only 1.5 to 2 times the rated motor current, with a very low level of tightening torque. Three-phase autotransformer starters with starting transformers This type of starting is preferable where the same tightening torque is to be obtained as with the primary series resistors but the inrush current taken from the mains is to be further reduced. A reduced voltage Ua (approximately 70 % of the rated operating voltage) is supplied to the motor when starting via the starting transformer. Thus, the current taken from the mains is reduced to approximately half the direct inrush current. Three-phase automatic rotor starters with starting resistors Resistors are connected in the rotor circuit of the motor to reduce the inrush current of motors with slipring rotors. The current taken from the mains is thus reduced. In contrast to stator resistance starters, the torque of the motor is practically proportional to the current taken from the mains. The number of steps of the automatic starter is determined by the maximum permissible inrush current and by the type of the motor. I: Line current Md: Torque n: Speed a Reduction of the line current b Reduction of the torque ① ② 20 40 60 80 n 100 % I I I' Md Md M'd ① 20 40 60 80 100 % ② n I I I' Md Md M'd 20 40 60 80 100 % n I Md
  • 16. All about Motors Notes on engineering Eaton Wiring Manual 06/11 8-16 8 8 Important data and features of three-phase automatic starters 1) Type of starter Stator resistance starter (for squirrel-cage motors) Rotor starter (for slipring rotors) 2) Part no. of starter Star-delta switches With starting resistors With start-up transformers Rotor resistance starter 3) Number of starting stages 1 only Normally 1 Normally 1 Selectable (no longer selectable when current or torque have been determined) 4) Voltage reduction at the motor 0.58 x rated operational voltage Selectable: a x rated operational voltage (a < 1) e.g. 0.58 as with △-switch Selectable: 0.6/0.7/0.75 x Ua (transformer tappings) None 5) Inrush current taken from mains 0.33 x inrush current at rated operational voltage a x inrushcurrent at rated operational voltage Selectable (see 4) 0.36/0.49/0.56 x inrush current at rated operational voltage Selectable: from 0.5 to about 2.5 x rated operational current 5a) Inrush current at the motor Selectable (see 4) 0.6/0.7/0.75 x Ie 6) Starting torque 0.33 x tightening torque at rated operational voltage a2 x tightening torque at rated operational voltage Selectable (see 4) 0.36/0.49/0.56 x tightening torque at rated operational voltage Selectable (see 5) from 0.5 to pull-out torque 7) Current and torque reduction Proportional Currentreduction less than torque reduction Proportional Current reduction much greater than torque reduction. From pull-out torque to rated speed almost proportional 8) Approximate price (for similar data) DOL starting = 100 (with overload relay, enclosed) 150 – 300 350 – 500 500 – 1500 500 – 1500
  • 17. All about Motors Notes on engineering Eaton Wiring Manual 06/11 8-17 8 8 Switching of capacitors DIL contactors for capacitors – individual switching When capacitors are switched on, contactors are heavily stressed by transient current peaks. When a single capacitor is switched on, currents up to 30 times the rated operational current can occur; these can, however, be reliably switched by Eaton DIL contactors. When installing capacitors, the VDE specification 0560 part 4 (Germany) and the standards which apply to each country should be observed. According to these, capacitors not directly connected to an electrical device which forms a discharge circuit, should be equipped with a rigidly connected discharge device. Capacitors connected in parallel to the motor do not require a discharge device, since discharging is performed via the motor winding.No switch-disconnectorsorfuses must be installed between the discharge circuit and the capacitor. A discharge circuit or discharge device must reduce the residual voltage of the capacitor to less than 50 V within a minute of the capacitor being switched off. Individual compensation Group compensation L1...3 -F1 -Q11 -Q31 -M1 -C1 M 3 L1...3 -F1 -Q11 -M1 -C1 M 3 M 3 M 3 -M2 -M3
  • 18. All about Motors Notes on engineering Eaton Wiring Manual 06/11 8-18 8 8 Contactor for capacitor DILK… – Individual and group compensation In the case of group compensation where capacitors are connected in parallel, it must be noted that the charging current is taken not only from the mains but also from the capacitors connected in parallel. This produces inrush current peaks which can exceed 150 times the rated operational current. A further reason for these peak currents is the use of low-loss capacitors as well as the compact construction, with short connecting elements between contactor and capacitor. Where standard contactors are used, there is danger of welding. Special contactors for capacitors such as those available from Eaton in the DILK… range which can control inrush current peaks of up to 180 times the rated current, should be used here. If no special contactors are available, the inrush currents can be damped by additional inductance's. This is achieved either by longer input wirings to the capacitors or by inserting an air-cored coil with a minimum induction of approximately 6 μH (5 windings, diameter of the coil approximately 14 cm) between contactor and capacitor. The use of series resistors is another way of reducing high inrush currents. Use of reactors Frequently the capacitors in group compensation are provided with reactors to avoid harmonics. The reactors also act to limit the inrush current and normal contactor can be used. Group compensation a Additional inductance with standard contactor L1...3 -F1 -Q11 M 3 -F2 -F3 -Q12 -Q13 -Q1 M 3 M 3 -Q31 -Q32 a -C0 -C1 -C2 -M1 -M2 -M3 I >
  • 19. Eaton Wiring Manual 06/11 8-19 All about Motors 8 8 Circuit documents General Circuit documents serve to explain the function of circuits or electrical connections. They provide information for the construction, installation and maintenance of electrical installations. The supplier and the operator must agree on the form in which the circuit documents are to be produced: paper, film, diskette, etc. They must also agree on the language or languages in which the documentation is to be produced. In the case of machines, user information must be written in the official language of the country of use to comply with ISO 12100. The circuit documents are divided into two groups: Classification according to the purpose Explanation of the mode of operation, the connections or the physical position of the apparatus. This consists of: • Explanatory circuit diagrams, • Block diagrams, • Equivalent circuit diagrams, • Explanatory tables or diagrams, • Flow diagrams, tables • Time flow diagrams, tables • Wiring diagrams, • Device wiring diagrams, • Interconnection diagrams, • Terminal diagrams, • Assignment diagrams. Classification according to the type of representation Simplified or detailed : • 1-pole or multi-pole representation, • Connected, semi-connected or separate representation, • Topographical representation. In addition to this, there is the process-orientated representation with the function block diagram (see previous pages). Examples for drawing up circuit documents are given in IEC/EN 61082-1. Circuit diagrams Diagrams indicate the voltage-free or current-free status of the electrical installation. A distinction is drawn between: • Block diagram. Simplified representation of a circuit with its main parts. It shows how the electrical installation works and how it is subdivided. • Circuit diagram. Detailed representation of a circuit with its individual components,which shows how the electrical installation works. • Equivalent circuit diagram. Special version of an explanatory circuit diagram for the analysis and calculation of circuit characteristics.
  • 20. All about Motors Circuit documents Eaton Wiring Manual 06/11 8-20 8 8 Wiring diagrams Wiring diagrams show the conductive connectionsbetweenelectricalapparatus. They show the internal and/or external connectionsbut, ingeneral, do not give any information on the mode of operation. Instead of wiring diagrams, wiring tables can also be used. • Unit wiring diagram. Representation of all the connections within the device or combination of devices. • Interconnection diagram. Representation of the connections between the device or combination of devices within an installation. • Terminal diagram. Representation of the connection points of an electrical installation and the internal and external conductive connections connected to them. • Location diagram (location diagram). Representation of the physical position of the electrical apparatus, which does not have to be to scale. You will find notes on the marking of electrical apparatus in the diagram as well as further diagram details in the chapter “Specifications, Formulae, Tables”. Circuit diagram: 1-pole and 3-pole representation M 3 ~ Q1 Q11 Q12 1 3 5 2 4 6 1 3 5 2 4 6 M 3 ~ U V W PE Q12 1 3 5 2 4 6 L1 L2 L3 13 14 Q Q11 L1, L2, L3 I > I > I > I >
  • 21. Eaton Wiring Manual 06/11 8-21 All about Motors 8 8 Power supply 4-conductor system, TN-C-S a Protective earth conductor Protective earth terminal in enclosure (not totally insulated) Overcurrent protective device is required in the input wiring for compliance to IEC/EN 60204-1 5-conductor system, TN-S a Protective earth conductor Protective earth terminal in enclosure (not totally insulated) Overcurrent protective device is required in the input wiring for compliance to IEC/EN 60204-1 L1 L2 L3 N PEN PE N L31 L21 L11 햲 N L31 L21 L11 L1 L2 L3 N PE 햲
  • 22. All about Motors Power supply Eaton Wiring Manual 06/11 8-22 8 8 3-conductor system, IT Overcurrent protective device is required in the input wiring for compliance to IEC/EN 60204-1 For all systems: use the N neutral conductor Separate primary and secondary protection Groundedcircuit.Innon-groundedcircuit, remove link and provide insulation monitoring. L31 L21 L11 L1 L2 L3 PE 1 L1 L3 5 2 3 6 4 I⬎ L01 L02 0 I⬎ I⬎
  • 23. All about Motors Power supply Eaton Wiring Manual 06/11 8-23 8 8 Combined primary and secondary protection Grounded circuit. In non-grounded circuit, remove link and provide insulation monitoring. Maximum ratio of U1/U2 = 1/1.73 Circuit not to be used with STI/STZ (safety or isolating transformers). L1 L3 1 5 2 3 6 4 I> I> I> L01 L02 0
  • 24. Eaton Wiring Manual 06/11 8-24 All about Motors 8 8 Control circuit supply Separate primary and secondary protection, with insulation monitoring on the secondary side a Clear button b Test button DC power supply with three-phase bridge rectifier L1 L3 1 5 2 3 6 4 I. I. I. L011 PE 0 L02 L01 A1 R < A1 L 15 A2 15 S1 S2 E E E 16 16 18 18 L A2 ab L2 L1 L3 1 5 2 3 6 4 I⬎ I⬎ I⬎ L2 Yy0 – +
  • 25. Eaton Wiring Manual 06/11 8-25 All about Motors 8 8 Contactor markings The contactors in contactor combinations have, in accordance with EN 81346-2 for apparatus and function, the code letter Q, as well as numerical identification, which shows the function of the device (e.g. Q22 = mains contactor with anticlockwise operation for high speed). With contactor combinations which are made up of several basic types, the basic type is always maintained. Thus, the circuit diagram for a reversing star-delta starter, for example, is formed by combining the basic circuit of the reversing contactor and that of the standard star-delta starter. Other marking of electrical apparatus: • for the IEC world → page 10-2 • for North America → page 9-14
  • 26. Eaton Wiring Manual 06/11 8-26 All about Motors 8 8 Direct-on-line start of three-phase motors Typical circuits with DIL contactors Fuseless without overload relay Short-circuit protection1) and overload protection by means of PKZM motor-protective circuit-breaker or NZM circuit-breaker. Fuses with overload relay Short-circuit protection2) for contactor and overload relay by means of fuses F1. Short-circuit protection3) for contactor by means of fuses F1. 1) Protective device in the input wiring in accordance with the main catalogue, Industrial Switchgear or IL installation instructions. 2) Fuse size in accordance with data on the rating plate of the overload relay. 3) Fuse size in accordance with the main catalogue, Industrial Switchgear (Technical data for contactors) L1 L3 1 5 2 3 6 4 L2 13 14 1 5 3 2 6 4 -Q1 PE U V W -Q11 M 3 -M1 I > I > I > L1 L3 L2 1 5 3 2 6 4 PE U V W -Q11 M 3 -M1 -F1 -F2 2 6 4 96 95 97 98 L1 L3 L2 1 5 3 2 6 4 PE U V W -Q11 M 3 -M1 -F1 -F2 96 95 97 98
  • 27. All about Motors Direct-on-line start of three-phase motors Eaton Wiring Manual 06/11 8-27 8 8 Typical circuit with bridging of overload relay during starting Control circuit device I: ON 0: OFF For connection of further actuators → Section ”Three-wire control”, page 8-34 Method of operation: Actuation of pushbutton I energizes the coil of contactor Q11. The contactor switches on the motor and maintains itself after the button is enabled via its own auxiliary contact Q11/14-13 and pushbutton 0 (three-wirecontrolcontact).ContactorQ11 is de-energized, in the normal course of events, by actuation of pushbutton 0. In the event of an overload, it is de-energized via the normally closed contact 95-96 on the overload relay F2. The coil current is interrupted, and contactor Q11 switches the motor off. Without overload relay with overload relay The short-circuit strength capacity of the contacts in the circuit has to be considered when selecting F0. Double pushbutton L1 (Q11/1) -Q1 13 14 21 22 0 -S11 13 14 13 14 -Q11 A1 A2 -Q11 N -F0 I L1 (Q11/1) 95 96 21 22 13 14 -F2 0 -S11 I 13 14 -Q11 A1 A2 -Q11 N -F0 21 22 13 14 96 14 13 14 13 21 22 Q11 Q11 F2 0 I A B
  • 28. All about Motors Direct-on-line start of three-phase motors Eaton Wiring Manual 06/11 8-28 8 8 Application on drive motors with heavy starting duty For connection when used with motor-protective circuit-breakers PKZM..., PKE and circuit-breakers NZM(H)... → Section ”Fuses with overload relays”, page 8-30 L1 L3 2 6 4 L2 1 5 3 2 6 4 -F1 PE U V W -Q11 M 3 -M1 -F2 2 6 4 1 5 3 96 98 97 95 -Q14
  • 29. All about Motors Direct-on-line start of three-phase motors Eaton Wiring Manual 06/11 8-29 8 8 Function Actuation of pushbutton I energizes bridging contactor Q14 which then maintains itself via Q14/13-14. At the same time, voltage is applied to the timing relay K1. The mains contactor Q11 is closed by Q14/44-43 and maintains itself via Q11/14-13. When the set time – which corresponds to the start-up time of the motor - has elapsed, the bridging contactor Q14 is disconnected by K1/16-15. K1 is likewise disconnected and, exactly as Q14, can only be energized again after the motor has been switched off by pressing pushbutton 0. The N/C Q11/22-21 prevents Q14 and K1 closing whilst the motor is running. In the event of an overload, normally closed contact 95-96 on the overload relay F2 effects de-energization. Q14:Bridging contactor K1: Timing relays Q11:Mains contactor Control circuit device I: ON 0: OFF For connection of further actuators → Section ”Three-wire control”, page 8-34 -Q11 -Q14 -Q14 -Q11 -K1 -K1 L1 (Q11/1) -F2 95 96 21 22 0 -S11 16 15 13 14 -Q11 A1 A2 -Q14 N -F0 13 14 -Q1 13 14 13 14 43 44 21 22 A1 A2 A1 A2 I Q14 Q11 96 22 14 13 14 21 22 13 14 21 22 F2 0 -S11 I A B
  • 30. All about Motors Direct-on-line start of three-phase motors Eaton Wiring Manual 06/11 8-30 8 8 2 operating directions, DIUL reversing contactor Fuseless without overload relay Short-circuit protective device and overload protection by means of motor-protective circuit-breaker PKZM, PKE or circuit-breaker NZM. Fuse size in the input wiring in accordance with the main catalogue, Industrial Switchgear or AWA installation instructions. Fuses with overload relays Short-circuit protection1) for contactor and overload relay by means of fuses F1. Short-circuit protection1) for contactor by means of fuses F1. 1) Fuse size in accordance with data on the rating plate of the overload relay F2 L1 L3 L2 1 5 3 2 6 4 U V W M 3 -M1 -Q1 1 5 3 2 6 4 1 5 3 2 6 4 -Q11 -Q12 13 14 PE I > I > I > L1 L3 L2 1 5 3 U V W M 3 -M1 2 6 4 -Q11 -Q12 1 5 3 2 6 4 2 6 4 -F1 -F2 PE 96 97 95 98 L1 L3 L2 U V W M 3 -M1 2 6 4 -Q12 1 5 3 2 6 4 -F1 PE -F2 -Q11 1 5 3
  • 31. All about Motors Direct-on-line start of three-phase motors Eaton Wiring Manual 06/11 8-31 8 8 Changing direction of rotation after actuation of the 0 pushbutton Changing direction of rotation without actuation of the 0 pushbutton Q11: Mains contactor, clockwise Q12: Mains contactor, anticlockwise operation Control circuit device (three-way pushbutton) I = Clockwise 0 = Stop II = anticlockwise operation -Q11 -Q12 -Q11 -Q11 -Q12 95 96 21 22 13 14 21 22 13 14 13 14 13 14 21 22 13 14 A1 A2 A1 A2 21 22 21 22 L1 (Q11/1) 0 -S11 -Q12 N -F0 -Q1 I I II -F2 II -Q11 -Q12 -Q11 -Q11 -Q12 95 96 21 22 13 14 13 14 13 14 21 22 A1 A2 A1 A2 21 22 21 22 13 14 21 22 13 14 L1 (Q11/1) 0 -S11 -Q12 N -F0 -Q1 I I II -F2 II Q12 0 -S11 I Q12 21 22 13 14 Q11 96 F2 14 13 14 13 21 22 A B 14 13 C 21 22 13 II Q12 Q12 Q11 13 14 Q11 96 F2 13 14 -S11 21 22 14 13 14 13 21 22 A B 14 13 C 21 22 0 I II
  • 32. All about Motors Direct-on-line start of three-phase motors Eaton Wiring Manual 06/11 8-32 8 8 Method of operation: Actuation of pushbutton I energizes the coil of contactor Q11. It switches on the motor running clockwise and maintains itself after button I is enables via its own auxiliarycontactQ11/14-13andpushbutton 0 (three-wire control). The normally closed contact Q11/22-21 electrically inhibits the closingofcontactorQ12.Whenpushbutton II is pressed, contactor Q12 closes (motor running anticlockwise). Depending on the circuit, direction can be changed from clockwise to anticlockwise either after pressing pushbutton 0, or by directly pressing the pushbutton for the reverse direction. In the event of an overload, normally closed contact 95-96 of the overload relay F2 or the normally open contact 13-14 of the motor-protective circuit-breaker or the circuit-breaker will switch. Operating direction and two speeds (reversing contactor) Special circuit (tapped winding) for feed drives, etc. FORWARD: feed or high-speed RETRACT: high-speed only STOP: tapped winding 1 5 3 L1 L3 L2 -F1 2 6 4 PE M 3 -M1 97 95 98 96 1 5 3 2 6 4 1 5 3 2 6 4 2 6 4 2 6 4 2 6 4 1 5 3 -F2 97 95 98 96 -F21 -Q23 1U 1V 1W 2U 2V 2W -Q17 -Q22 -Q21
  • 33. All about Motors Direct-on-line start of three-phase motors Eaton Wiring Manual 06/11 8-33 8 8 Method of operation: Forward travel is initiated by pressing pushbutton I or II according to the speed required. Pushbutton I switches on the feed motion via Q17. Q17 maintains itself via its N/O 13-14. If the feed movement is to occur at high-speed star contactor Q23 is energized via pushbutton II which energizes the high speed contactor Q21 via its N/O Q23/13-14. Both of the contactors are maintained via Q21/13-14. A direct switch over from feed to high-speed during the process is possible. High-speed reverse is initiated by pushbutton III. Contactor relay K1 picks up and energizes star contactor Q23 via K1/14-13. High-speed contactor Q22 is energized via normally open contacts K1/43-44 and Q23/44-43, and is maintained via Q22/14-13. The reverse motion can only be stopped via pushbutton 0. Direct changeover/reversal is not possible. 0: Stop I : Low speed – FORWARD (Q17) II: High speed – FORWARD (Q21 + Q23) III: High speed – BACK (Q22 + Q23) Q17: Feed forward Q21: High-speed forward Q23: Star contactor K1: Contactor relay Q22: Retract high-speed L1 (Q17/1) -F2/F21 95 96 21 22 0 -S11 13 14 A1 A2 N -F0 13 14 44 21 22 III 21 22 13 14 22 21 I 13 I II 14 21 -Q22 -Q21 -Q23 -Q17 -Q21 -Q23 31 32 -Q17 -Q17 -Q22 -Q23 A1 A2 22 21 A1 A2 13 14 -Q17 22 21 -K1 -Q21 -K1 -K1 13 14 A1 A2 -Q22 -Q23 -K1 A1 A2 43 43 44 31 32 31 32 21 22 -Q21 13 14 -Q22 13 14 21 22 III 22 II
  • 34. Eaton Wiring Manual 06/11 8-34 All about Motors 8 8 Control circuit devices for direct-on-line start Typical example of circuits with contactors DILM… Three-wire control Illuminated pushbutton actuators Two double actuator pushbuttons Double actuator pushbutton with indicator light T0-1-15511 spring-return switchwithautomaticreturn to position 1 T0-1-15366 spring-return switchwithautomaticreturn to position of rest Two-wire control Changeover switch T0-1-15521 with fleeting contact in the intermediate position MCS pressure switches 0 I Q11 21 13 14 Q11 96 F2 13 14 Q11 A2 13 14 21 22 22 X1 X2 0 I Q11 13 14 Q11 96 F2 13 14 21 22 -S11 I 0 -S11 13 14 21 22 21 22 21 22 13 14 13 14 A B B A 0 Q11 13 14 Q11 96 F2 13 14 21 22 I 21 22 13 14 A B C Q11 A2 0 Q11 13 14 Q11 96 F2 1 0 1 2 1 3 4 S11 Start Start Q11 13 14 Q11 96 F2 0 1 2 1 3 4 I 0 1 I S11 Start Q11 13 14 Q11 96 F2 2 1 3 4 I ON 0 OFF 0 1 S11 Q11 A1 F2 96 -S12 2 1 4 I P >
  • 35. Eaton Wiring Manual 06/11 8-35 All about Motors 8 8 Star-delta switching of three-phase motors Star-delta switch with overload relay Arrangement in the motor line In a standard circuit configuration, the star-delta switch with overload relay, i.e. a thermally delayed overcurrent relay, is installed in the cables leading to the motor terminals U1, V1, W1 or V2, W2, U2. The overload relay can also be operated in a star circuit as it is usually connected in series with the motor winding and the relay current flowing through it = rated motor current x 0.58. The complete circuit diagram → Section ”Automatic star-delta switches SDAINL”, page 8-37. Arrangement in the mains supply line Instead of the arrangement in the motor line, the overload relay can be placed in the mains supply line. The section shown here indicates how the circuit diagram differs from that on → Section ”Automatic star-delta switches SDAINL”, page 8-37. For drives where the F2 relay trips out when the motor is starting in the star connection, the F2 relay rated for the rated motor current can be switched in the mains line. The tripping delay is thus increased by approximately four to six times. In the star connection, the current also flows through the relay but here the relay does not offer full protection since its limit current is increased to 1.73 times the phase current. It does, however, offer protection against non-starting. 1 5 3 U1 V1 W1 2 6 4 -Q11 2 6 4 -F2 96 97 95 98 2 6 4 -Q11 -F2 96 97 95 98 -F1 2 6 4 1 5 3 U1 V1 W1
  • 36. All about Motors Star-delta switching of three-phase motors Eaton Wiring Manual 06/11 8-36 8 8 Configuration in the delta connection Instead of the arrangement in the motor line or mains supply line, the overload relay can be placed in the delta connection. The cutout shown here indicates the modified circuit diagram from → Section ”Automatic star-delta switches SDAINL”, page 8-37. When heavy, long-starting procedures are involved (e.g. for centrifuges) the F0.58 relay, rated for relay current = rated motor current x 2, can also be connected in the connecting cables between the delta contactor Q15 and the star contactor Q13. In the star connection no current then flows through the F2 relay. The motor is therefore not protected when starting. This connection is always used when exceptionally heavy and long starting procedures are involved and when saturable core current transformer- operated relays react too quickly. 2 6 4 -Q15 -F2 96 97 95 98 2 6 4 1 5 3 U2 W2 V2 -Q13 1 5 3 2 6 4
  • 37. All about Motors Star-delta switching of three-phase motors Eaton Wiring Manual 06/11 8-37 8 8 Automatic star-delta switches SDAINL Arrangement and rating of protective devices Rating of switchgear Q11, Q15 = 0.58 x Ie Q13 = 0.33 x Ie Position A Position B F2 = 0.58 x Ie with F1 in position B ta ≦ 15 s Q1 = Ie ta > 15 – 40 s Motor protection in - and △-configuration Only partial motor protection in -configuration M 3 -M1 U1 V1 W1 W2 U2 V2 L1 L3 L2 2 6 4 -Q15 -F2 96 97 95 98 2 6 4 1 5 3 -Q13 1 5 3 -F1 1 5 3 2 6 4 1 5 3 2 6 4 -Q11 B -Q1 A PE 2 6 4 13 14 21 22 I > I > I >
  • 38. All about Motors Star-delta switching of three-phase motors Eaton Wiring Manual 06/11 8-38 8 8 Further notes on the configuration of the overload relay → Section ”Automatic star-delta switches SDAINL”, page 8-37 SDAINLM12 to SDAINLM55 Pushbutton K1: Timing relay approx. 10 s Q11: Mains contactor Q13: Star contactor Q15: Delta contactor Double pushbutton Function Pushbutton I energizes timing relay K1. The normally open contact K1/17-18 (instantaneous contact) which applies voltage to star contactor Q13, which closes and applies voltage to mains contactorQ11vianormally open contact Q13/14-13. Q11 and Q13 maintain themselves via the N/O Q11/14-13 and Q11/44-43. Q11 applies mains voltage to motor M1 in star connection. SDAINLM70 to SDAINLM260 S11 0 (–)N Q11 Q13 Q13 Q15 K1 I Q11 Q11 Q15 Q13 K1 Q15 N Y K1 21 22 13 14 A2 A1 A2 A1 53 54 22 21 28 17 17 18 14 13 53 54 53 54 A2 A1 A2 A1 22 21 S11 0 (–)N Q11 Q13 Q13 Q15 K1 I Q11 Q11 Q15 Q13 K1 Q15 N Y K1 21 22 13 14 A2 A1 A2 A1 13 14 22 21 28 17 17 18 14 13 13 14 43 44 A2 A1 A2 A1 22 21
  • 39. All about Motors Star-delta switching of three-phase motors Eaton Wiring Manual 06/11 8-39 8 8 SDAINLM12 to SDAINLM260 Two-wire control Double pushbutton Control circuit device I = ON 0 = OFF For connection of further control circuit devices → Section ”Control circuit devices for star-delta starting”, page 8-45 When the set changeover time has elapsed, K1/17-18 opens the circuit of Q13 and after 50 ms closes the circuit of Q15 via K1/17-28. Star contactor Q13 drops out. Delta contactor Q15 closes and switches motor M1 to full mains voltage. At the same time, normally closed contact Q15/22-21 interrupts the circuit of Q13 thus interlocking against renewed switching on while the motor is running. The motor cannot start up again unless it has previously been disconnected by pushbutton 0, or in the event of an overload by the normally closed contact 95-96 of overload relay F2, or via normally open contact 13-14 of the motor-protective circuit-breaker or standard circuit-breaker. 44 2 43 13 14 L1 (Q11/1) -F0 95 96 -F2 13 14 13 14 -S14 -Q11 -Q13 -Q15 -Q11 -S14 MCS P > 2 4 1 SW Q 1 Q11 21 22 13 14 Q11 96 F2 0 I 14 13 14 13 21 22 A B -S11 HAND
  • 40. All about Motors Star-delta switching of three-phase motors Eaton Wiring Manual 06/11 8-40 8 8 Automatic star-delta switches SDAINL EM Pushbutton actuators Maintained contact sensors K1: Timing relay approx. 10 s Q11: Mains contactor Q13: Star contactor Q15: Delta contactor Double pushbutton Control circuit device I = ON 0 = OFF L1 (Q11/1) -F2 95 96 0 -S11 13 14 A1 A2 N -F0 44 21 22 2 13 14 I -Q11 -Q15 -K1 A1 A2 A1 A2 A1 A2 -Q15 -Q13 43 44 43 -Q11 -Q13 -F0 95 96 -F2 13 14 -S14 13 14 13 14 -Q1 -Q11 14 13 22 21 -Q13 -Q11 -S14 MCS 2 4 1 SW Q -K1 22 21 16 15 18 -Q13 1 L1 (Q11/1) Q11 21 22 44 14 Q11 96 F2 0 I 14 13 14 13 21 22 A B -S11 -Q11 P > HAND
  • 41. All about Motors Star-delta switching of three-phase motors Eaton Wiring Manual 06/11 8-41 8 8 For connection of further control circuit devices → Section ”Control circuit devices for star-delta starting”, page 8-45 Function Pushbutton I energizes star contactor Q13, the normally open contact Q13/14-13 applies voltage to mains contactor Q11. Q11 closes and applies mains voltage to motor M1 in star connection. Q11 and Q13 maintain themselves via normally open contact Q11/14-13 and Q11 additionally via Q11/44-43 and pushbutton 0. Timing relay Q11 is energized at the same time as mains contactor K1. When the set changeover time has elapsed, K1 opens the circuit of Q13 via the changeover contact 15-16 and closes the circuit of Q15 via 15-18. Delta contactor Q15 closes and switches motor M1 to full mains voltage. At the same time, normally closed contact Q15/22-21 interrupts the circuit of Q13 thus interlocking against renewed switching on while the motor is running. The motor cannot be started up again unless it has previously been disconnected by pushbutton 0, or in the event of an overload, by the normally closed contact 95-96 of the overload relay F2, or via the normally open contact 13-14 of the motor-protective circuit-breaker or circuit-breaker.
  • 42. All about Motors Star-delta switching of three-phase motors Eaton Wiring Manual 06/11 8-42 8 8 Automatic reversing star-delta switches 2 operating directions Rating of switchgear Q11, Q12: Ie F2, Q15: 0.58 x Ie Q13: 0.33 x Ie The maximum motor output is limited by the upstream reversing contactor, and is lower than with automatic star-delta switches for only one direction of operating direction. Standard version: Relay current = motor rated operational current x 0.58 For other arrangements of overload relay → Section ”Star-delta switch with overload relay”, page 8-35 M 3 -M1 U1 V1 W1 W2 U2 V2 L1 L3 L2 2 6 4 -Q12 -F2 96 97 95 98 2 6 4 -Q15 1 5 3 -F1 1 5 3 2 6 4 1 5 3 2 6 4 -Q11 -Q1 PE 2 6 4 13 1 3 5 14 21 22 -Q13 1 5 3 2 6 4 I > I > I >
  • 43. All about Motors Star-delta switching of three-phase motors Eaton Wiring Manual 06/11 8-43 8 8 Changing direction of rotation after actuation of the 0 pushbutton Three-way pushbutton Control circuit devices I = clockwise 0 = Stop II = anticlockwise operation L1 (Q11/1) -F2 0 -S11 A1 A2 N -F0 44 13 14 II -Q11 -K1 A1 A2 -Q15 -Q13 43 44 43 -Q11 -Q1 -Q11 -Q11 I 21 22 95 96 21 22 -Q12 13 14 13 14 -Q12 -K1 -K1 -Q12 13 14 13 14 II I 21 22 21 22 A1 A2 -Q15 -Q13 21 22 -Q12 A1 A2 A1 A2 21 22 21 22 18 17 28 17 0 Q12 13 14 Q11 96 F2 13 14 21 22 I 13 14 A B C 13 Q12 II 13 14 21 22 21 22 -S11
  • 44. All about Motors Star-delta switching of three-phase motors Eaton Wiring Manual 06/11 8-44 8 8 For connection of further actuators → Section ”Control circuit devices for star-delta starting”, page 8-45 Function Pushbutton I energizes contactor Q11 (e.g. clockwise). Pushbutton II energizes contactor Q12 (e.g. anticlockwise operation). The contactor first energized applies voltage to the motor winding and maintains itself via its own auxiliary contact 14-13 and pushbutton 0. The normally open contact 44-43 fitted to each mains contactor energizes the star contactor Q13.Q13 energizes and switches on motor M1 in the star connection. At the same time, timing relay K1 is triggered. When the set changeover time has elapsed, K1/17-18 opens the circuit of Q13. Q13 drops out. K1/17-28 closes the circuit of Q15. Delta contactor Q15 energizes and switches motor M1 to the delta configuration, i.e. full mains voltage. At the same time, normally closed contact Q15/22-21 interrupts the circuit of Q13, thus interlocking against renewed switching on while the motor is running. Motor direction can be changed, either after pressing pushbutton 0, or by direct actuation of the reverse button, depending upon the circuit. In the event of an overload, disconnection is effected by the normally closed contact 95-96 of the overload relay F2. Changing direction of rotation without actuation of the 0 Three-way pushbutton Control circuit devices I = clockwise 0 = Stop II = anticlockwise operation L1 (Q11/1) -F2 0 -S11 A1 A2 N -F0 44 13 14 II -Q11 -K1 A1 A2 -Q15 -Q13 43 44 43 -Q11 18 17 -Q1 -Q11 -K1 -Q11 I 21 22 95 96 21 22 -Q12 13 14 13 14 -Q12 -Q12 13 14 13 14 II I 21 22 21 22 A1 A2 -K1 -Q15 -Q13 21 22 -Q12 A1 A2 A1 A2 21 22 21 22 28 17 21 22 13 14 96 14 13 14 13 Q11 Q11 F2 0 I A B 13 Q12 14 Q12 II -S11 21 22 21 22 14 13 C
  • 45. Eaton Wiring Manual 06/11 8-45 All about Motors 8 8 Control circuit devices for star-delta starting Automatic star-delta switches Pulse encoder Illuminated pushbutton actuators Two double actuator pushbuttons Double actuator pushbutton with indicator light Spring-return switch T0-1-15511 with automatic return to position 1. Spring-return switch T0-1-15366 with automatic return to position of rest. Two-wire control Changeover switch T0-1-15521 with fleeting contact in the intermediate position e.g. selector switch Cam switch T LS position switches MCS pressure switches F2 Q11 Q11 Q11 Q11 21 22 13 14 13 14 21 22 96 13 X1 X2 14 -S11 44 A2 0 I F2 -S11 -S11 21 13 14 13 14 13 14 13 14 22 21 22 21 22 21 22 0 A B A B I 0 I 96 Q11 14 Q11 44 22 96 13 13 21 14 13 14 21 22 A2 14 44 F2 -S11 Q11 Q11 Q11 Q11 A B C 1 0 Q11 13 14 Q11 96 F2 1 0 1 2 1 3 4 S11 Start Start Q11 13 14 Q11 96 F2 0 1 2 1 3 4 I 0 1 I S11 Start Q11 13 14 Q11 96 F2 2 1 3 4 I ON 0 OFF 0 1 S11 Q11 14 Q11 44 F2 S14 96
  • 46. All about Motors Control circuit devices for star-delta starting Eaton Wiring Manual 06/11 8-46 8 8 Three-phase current-reversing contactor-reversing star-delta switch Two-way pushbutton1) without self-maintaining circuit (inching) for use only with reversing contactors Three-way pushbutton with indicator light. Reversing after actuation of pushbutton 0 Spring-return switch1) T0-1-8214, without self-maintaining circuit (inching) automatic return to off position only for reversing contactors Changeover switch1) Switch T0-1-8210 remains in position 1 or 2 Spring-return switch T0-2-8177 with automatic return to position 1 or 2 Limit switch Connected by removing the links between the contactor terminals Q11/13 and Q12/22 and between Q12/13 and Q11/22 and interposing the position switches. 1) Overload relays always with reclosing lockout -S11 22 21 14 13 22 21 14 13 I II B A 13 Q12 13 Q11 96 F2 13 -S11 22 21 14 13 22 21 14 13 22 21 14 13 I A B D E C Q11 A2 21 96 Q12 21 II Q11 14 Q12 13 Q12 F2 0 2 3 4 0 1 2 1 Q12 13 F2 96 Q11 13 FS 4011 0 1 2 FS 684 0 1 2 2 1 2 3 4 5 6 0 1 START START 7 8 Q11 F2 96 13 Q12 13 Q12 14 FS 140660 0 1 2 START START Q11/13 Q12/22 Q12/13 Q11/22
  • 47. Eaton Wiring Manual 06/11 8-47 All about Motors 8 8 Pole-changing motors The speed is determined by the number of poles on three-phase asynchronous motors. Several speeds can be obtained by altering the number of poles. The usual types are: The various tapped winding configurations give differential output ratios for the two speeds. The △/ -connection comes nearest to satisfying the most usual requirement for constant torque. It has the additional advantage that, because nine terminals are available, y/d starting can be used to provide smooth starting or to reduce the startingcurrentforthelow speedcondition (→ Section ”Motor windings”, page 8-50). The / -connection preferred for better matching of the motor to machines in which the torque increases by a quadratic factor (pumps, fans, rotary compressors). All multi-speed switches can be used for both types of connection. 2 speeds – separate windings In theory, motors with separate windings allow any combination of speed and any output ratio. Both windings are arranged in y connection and are completely independent of one another. Preferred speed combinations are: The code numbers are prefixed to the main notations to denote increasing speed. Example: 1U, 1V, 1W, 2U, 2V, 2W Comparable to EN 60034-8 two speeds 1:2 1 convertible tapped winding 2 speeds as required 2 separate windings three speeds 1 convertible tapped winding 1:2, a separate winding four speeds 2 convertible tapped windings 1:2 two speeds Tapped winding Type of connection△/  /  Output ratio 1/1.5–1.8 0.3/1 Motors with tapped winding 1500/3000 – 750/1500 500/1000 Motors with separate windings – 1000/1500 – – No. of poles 4/2 6/4 8/4 12/6 Code no. low/high 1/2 1/2 1/2 1/2
  • 48. All about Motors Pole-changing motors Eaton Wiring Manual 06/11 8-48 8 8 Motor circuit three speeds The 1:2 - speeds tapped windings are supplemented by the speed of the separate winding. This speed can be below, between or above the two tapped winding speeds. The connection must consider it (→ Figure, page 8-78). Preferred speed combinations are: Connection A Selection of low and high speed only from zero. No return to low speed, only to zero. Connection B Selection of either speed from zero. Switching from low to high speed possible. Return only to zero. Connection C Selection of either speed from zero. Switching back and forward between low andhighspeed(highbraking torque). Return also to zero. High speed Low speed Off (zero) Switch-on and further switching Switch-off Speeds 1000/1500/3000 750/1000/1500 750/1500/3000 = separate winding (in the circuit diagrams) No. of poles 6/4/2 8/6/4 8/4/2 Connection X Y Z
  • 49. All about Motors Pole-changing motors Eaton Wiring Manual 06/11 8-49 8 8 Motor circuit four speeds The 1:2-speedstapped windingscan follow in sequence or overlap, as the following examples show: For motors having 3 or 4 speeds the non-connected winding has to be opened at certain pole ratios to avoid inductive circulating currents. This is achieved via additional motor terminals. A series of cam switches is equipped with this connection (→ Section ”Multi-Speed Switches”, page 4-7). Connection A Selection of any speed only from zero. Return only to zero. Connection B Selectionofanyspeedfrom zero and from low speed. Return only to zero. Connection C Selectionofanyspeedfrom zero and from low speed. Return to low speed (high braking torque) or to zero. 3rd speed 2nd speed 1st speed Off (zero) Switch-on and further switching Switch-off 1st winding 500/1000 2nd winding 1500/3000 = 500/1000/1500/3000 or 1st winding 500/1000 2nd winding 750/1500 = 500/750/1000/1500
  • 50. Eaton Wiring Manual 06/11 8-50 All about Motors 8 8 Motor windings Tapped winding 2 speeds Motor circuit 2 speeds 2 separate windings Tapped winding with Δ-starting at low speed Low speed Δ Low speed  Low speed Low speed  High speed High speed High speed Low speed Δ → Figure, page 8-55 → Figure, page 8-55 → Figure, page 8-59 High speed → Figure, page 8-68 1U 1W 1V 2W 2V 2U 1U 1W 1V 2W 2V 2U 1W 1V 1U 1U 1W 1V 2W1 2U2 2V1 2V2 2U1 2W2 1U 2U 1V 1W 2W 2V 1U 2U 1W 2V 1V 2W 2W 2V 2U 1V 1W 2W2 1U 2V1 2V2 2U2 2W1 2U1 1U 2V2 2U1 1V 1W 2W1 2V1 2W2 2U2
  • 51. All about Motors Motor windings Eaton Wiring Manual 06/11 8-51 8 8 Tapped winding 3 speeds Motor circuit X 2 windings, medium and high speed – tapped winding Motor circuit Y 2 windings, low and high speed – tapped winding Motor circuit Z 2 windings, low and medium speed – tapped winding 2 2 2 or 2 or 2 or 2 Low speed Separate winding 1 Medium speed Separate winding 1 High speed Separate winding 1 → Figure, page 8-77 → Figure, page 8-79 → Figure, page 8-81 2U 2W 2V 3W 3V 3U 1U 1W 1V 3W 3V 3U 1U 1W 1V 2W 2V 2U 2U 2W 2V 3W 3V 3U 1U 1W 1V 3W 3V 3U 1U 1W 1V 2W 2V 2U 1W 1V 1U 2W 2V 2U 3W 3V 3U
  • 52. Notes Eaton Wiring Manual 06/11 8-52 8 8
  • 53. Eaton Wiring Manual 06/11 8-53 All about Motors 8 8 Multi-speed contactors Certain operating sequences for pole-changing motors may be necessary, or undesirable, depending on the nature of the drive. If, for example, the starting temperature rise is to be reduced or high inertia loads are to be accelerated, it is advisable to switch to low speed first and then to high speed. It may be necessary to prevent switching from high to low speed in order to avoid oversynchronousbraking. Inothercases,it should be possible to switch each speed on and off directly. The operating sequence and indexing facilities of cam switches allow for these possibilities. Multi-speed contactor switches can achieve these connecting by interlocking with suitable control circuit devices. Fuse protection of the overload relays When a common fuse is used in the input wiring, it must not be larger than the back-up fuses specified on the nameplate of either overload relay, otherwise each relay must be protected by its own back-up fuse, as shown in the diagram. L1 -F11 -Q17 -Q21 -F21 -F2 1 3 5 2 4 6 2 4 6 1 3 5 2 4 6 2 4 6 97 98 95 96 L2 L3 97 98 95 96 -F1
  • 54. All about Motors Multi-speed contactors Eaton Wiring Manual 06/11 8-54 8 8 Fuseless surface mounting Pole-changing motors can be protected against short-circuits and overloads by motor-protectivecircuit-breakersPKZ/PKE or circuit-breakers NZM. These provide all the advantages of a fuseless circuit. Normally, the fuse in input wiring protects the switches from welding. L1 -Q1 -Q17 -Q21 1 I > I > I > 3 5 1 3 5 2 4 6 1 3 5 2 4 6 2 4 6 13 14 L2 L3 -Q2 1 I > I > I > 3 5 2 4 6 13 14
  • 55. Eaton Wiring Manual 06/11 8-55 All about Motors 8 8 Multi-speed switch for three-phase motors Tapped winding, 1 operating direction, 2 speeds Multi-speed contactors Fuseless, without overload relay, with motor-protective circuit-breaker or circuit-breaker. → Section ”Motor windings”, page 8-50 Synchronous speeds One multi-speed winding L1 -Q1 -Q21 -Q17 PE M -M1 2U 2V 2W 1U 1V 1W 3 1 I > I > I > 3 5 1 3 5 2 4 6 1 3 5 2 4 6 -Q23 1 3 5 2 4 6 2 4 6 13 14 L2 L3 -Q2 1 I > I > I > 3 5 13 14
  • 56. All about Motors Multi-speed switch for three-phase motors Eaton Wiring Manual 06/11 8-56 8 8 Rating of switchgear Q2, Q17: I1 (low speed) Q1, Q21: I2 (high speed) Q23: 0.5 x I2 Motor terminals 1U, 1V, 1W 2U, 2V, 2W Amount of poles 12 6 rpm 500 1000 Amount of poles 8 4 rpm 750 1500 Amount of poles 4 2 rpm 1500 3000 Contactors Q17 Q21, Q23
  • 57. All about Motors Multi-speed switch for three-phase motors Eaton Wiring Manual 06/11 8-57 8 8 Connection A (→ Figure, page 8-49) 1 three-way pushbutton For connection of further actuators → Figure, page 8-63, → Figure, page 8-64, → Figure, page 8-65 Function Pushbutton I energizes mains contactor Q17 (low speed). Q17 maintains itself via its N/O 13-14. Pushbutton II energizes star contactor Q23 and via its N/O 13-14 mains contactor Q21. Q21 and Q23 maintain themselves via N/O 13-14 of Q21. Speed can be changed either after pressing pushbutton 0 (connection A) or directly by pressing the appropriate pushbutton (connection C), depending upon the circuit. The motor can be switched off either by pressing pushbutton 0, or in the event of an overload, by N/O 13-14 of the circuit-breaker. Three-way pushbutton I: Low speed (Q17) 0: Stop II: high speed (Q21 + Q23) Q17: Mains contactor, low speed Q23: Star contactor Q21: Mains contactor, high speed L1 (Q11/1) -F0 -Q1 -Q2 0 II -S11 -Q17 -Q17 -Q23 N -Q23 -Q21 I 13 14 13 14 21 22 21 22 14 13 14 13 21 22 22 21 A1 A2 A1 A2 -Q21 -Q17 -Q23 -Q21 22 21 13 14 A1 14 II I 22 14 13 21 13 A2 -S11 14 13 13 I II 0 A B C 96 21 22 13 14 21 22 13 14 21 22 13 14 Q17 F21 Q21 Q21
  • 58. All about Motors Multi-speed switch for three-phase motors Eaton Wiring Manual 06/11 8-58 8 8 Connection C (→ Figure, page 8-49) 1 three-way pushbutton For connection of further actuators → Figure, page 8-66 Three-way pushbutton I: Low speed (Q17) 0: Stop II: High speed (Q21 + Q23) Q17: Mains contactor, low speed Q23: Star contactor Q21: Mains contactor, high speed L1 (Q11/1) -F0 -Q1 -Q2 0 II -S11 -Q17 -Q17 -Q23 N -Q23 -Q21 I 13 14 13 14 21 22 21 22 14 13 14 13 22 21 21 22 A1 A2 A1 A2 -Q21 -Q23 -Q17 -Q21 22 21 13 14 A1 14 II I 22 14 13 21 13 A2 14 -S11 Q17 14 Q21 13 Q21 13 I II 0 A B C Q17 96 F21 21 22 13 14 21 22 13 14 21 22 13 14
  • 59. All about Motors Multi-speed switch for three-phase motors Eaton Wiring Manual 06/11 8-59 8 8 2 separate windings, an operating direction, 2 speeds Multi-speed contactor , fuseless without overload relay Rating of switchgear Q1, Q17 = I1 (low speed) Q2, Q21 = I2 (high speed) Motor windings → Section ”Motor windings”, page 8-50 L1 -Q1 -Q17 -Q21 PE M -M1 1U 1V 1W 2U 2V 2W 3 1 I > I > I > 3 5 1 3 5 2 4 6 1 3 5 2 4 6 2 4 6 13 14 L2 L3 -Q2 1 I > I > I > 3 5 2 4 6 13 14
  • 60. All about Motors Multi-speed switch for three-phase motors Eaton Wiring Manual 06/11 8-60 8 8 2 separate windings, an operating direction, 2 speeds Multi-speed contactor with fuses and overload relay Fuse size in accordance with data on the nameplate of the overload relays F2 and F21. If overload relays F2 and F21 cannot be protected by a common fuse, then use connection → Figure, page 8-53. Motor windings → Section ”Motor windings”, page 8-50 L1 F1 F1 F21 F2 M1 1W 1V 1U 2W 2V 2U Q17 Q21 1 3 5 2 4 6 96 98 95 97 96 98 95 97 2 4 6 1 3 5 2 4 6 2 4 6 L2 L3 M 3
  • 61. All about Motors Multi-speed switch for three-phase motors Eaton Wiring Manual 06/11 8-61 8 8 Connection A (→ Figure, page 8-49) 1 three-way pushbutton Connection C (→ Figure, page 8-49) 1 three-way pushbutton Q17: Mains contactor, low speed Q21: Mains contactor, high speed Three-way pushbutton I: Low speed (Q17) 0: Stop II: High speed (Q21 + Q23) For connection of further actuators → Figure, page 8-67 L1 FO F2 F21 Q1 13 14 13 21 22 21 22 14 13 14 13 22 21 A1 A2 A1 13 14 14 13 21 22 95 96 95 96 21 A2 14 Q2 0 S11 Q17 Q21 Q17 Q21 I II Q17 Q21 N II I 22 L1 (Q17/1) -F0 0 -S11 A1 A2 A1 A2 II I II 22 21 -Q21 22 21 95 96 22 21 22 21 14 13 -Q21 -Q17 -Q21 -Q17 14 13 N -F21 -F2 FL1 14 13 14 13 -Q1 -Q2 95 96 14 13 -Q17 22 21 14 13 I -S11 14 Q21 13 Q21 13 I II 0 A B C Q17 96 F21 21 22 13 14 21 22 13 14 21 22 13 14 13 14 21 22 -S11 A Q21 13 Q21 14 Q17 14 I 0 II F21 96 Q17 13 B C 21 22 13 14 21 22 13 14
  • 62. All about Motors Multi-speed switch for three-phase motors Eaton Wiring Manual 06/11 8-62 8 8 Operating principle Actuation of pushbutton I energizes the coil of contactor Q17. Q17 switches on the low speed of the motor and after pushbutton I is released, maintains itself via its auxiliary contact 13-14 and pushbutton 0. Speed can be changed either after pressing pushbutton 0, or directly by pressing the appropriate pushbutton, depending upon the connection. The motor is switched off either by pressing pushbutton 0, or in the event of an overload, by normally closed contact 95-96 of overload relays F2 and F21.
  • 63. Eaton Wiring Manual 06/11 8-63 All about Motors 8 8 Control circuit devices for multi-speed contactors 2 separate windings, an operating direction, 2 speeds Connection A (→ Figure, page 8-49) One three-way pushbutton with indicator lights Control circuit devices I : Low speed (Q17) 0: Stop II : High speed (Q21) -F0 L1 0 A1 A2 A1 A2 II I 22 21 -Q21 22 21 22 21 14 13 -Q21 -Q17 -Q21 14 13 N 95 96 14 13 -Q17 14 13 I -Q17 22 21 II -F2/F21 22 21 A B D B -S11 I 0 21 II 13 A B C D E 21 21 13 22 22 22 14 13 21 13 14 14 Q17 A2 Q21 21 Q17 14 Q21 13 Q21 96 F21
  • 64. All about Motors Control circuit devices for multi-speed contactors Eaton Wiring Manual 06/11 8-64 8 8 Connection A (→ Figure, page 8-49) 2 three-way pushbuttons Control circuit devices I: Low speed (Q17) 0: Stop II: High speed (Q21) Remove existing links and rewire -F0 L1 95 21 22 21 22 21 22 22 21 22 21 21 14 13 14 13 22 21 13 14 13 14 22 22 21 13 14 13 14 96 -F2/F21 0a 0b IIb Ib IIa IIb IIa -Q17 -Q21 -Q21 -Q17 A B Ia Ib Ia 13 A 96 B C B A C -S11 -S11 Ia 21 22 14 13 14 13 14 13 21 22 21 22 21 22 14 13 14 13 14 13 21 22 21 22 IIa 0a Ib IIb 0b Q21 13 Q17 14 Q21 F21
  • 65. All about Motors Control circuit devices for multi-speed contactors Eaton Wiring Manual 06/11 8-65 8 8 Connection A (→ Figure, page 8-49) T0-1-8210 changeover switch Always set overload relay to manual reset Connection B (→ Figure, page 8-49) 1 three-way pushbutton L1 95 96 -F2/F21 -S12 -Q17 -Q21 -Q17 -Q21 -S12 A B 1 2 1 3 14 13 22 14 13 21 22 21 2 4 -F0 S12 Q21 13 F2 96 Q17 13 1 0 2 1 2 3 4 L1 95 96 21 22 21 22 14 13 14 13 13 14 14 13 22 21 A1 A2 A1 A2 22 21 -F0 -F2/F21 0 II I A B II N -Q21 -Q17 -Q17 -Q21 -Q17 -Q21
  • 66. All about Motors Control circuit devices for multi-speed contactors Eaton Wiring Manual 06/11 8-66 8 8 Connection B (→ Figure, page 8-49) 2 three-way pushbuttons Control circuit device for connection B -F0 L1 0a -Q21 22 21 22 21 14 13 -Q21 14 13 95 96 -Q17 IIb IIa -F2(1) 22 21 B 0b 22 21 Ib 21 22 Ia IIa IIb 14 13 14 13 A 14 13 -Q17 22 21 14 13 A Q21 13 F21 96 B C Q17 14 Q17 13 Ia S11 S11 Q21 14 0a IIa Ib 0b IIb 21 22 13 14 21 22 13 14 21 22 13 14 21 22 13 14 21 22 13 14 21 22 13 14 A B C
  • 67. All about Motors Control circuit devices for multi-speed contactors Eaton Wiring Manual 06/11 8-67 8 8 Connection C (→ Figure, page 8-49) 2 three-way pushbuttons Control circuit device for connection C -F0 L1 0a -Q21 22 21 22 21 14 13 -Q21 14 13 95 96 14 13 -Q17 IIb -Q17 IIa -F2(1) 22 21 A B 0b 22 21 Ib 22 21 Ia 22 21 14 13 IIa Ib Ia IIb 14 13 14 13 22 21 22 21 -S11 A Q21 13 F21 96 B C Q17 14 13 Ia -S11 Q21 14 0a IIa 21 22 13 14 21 22 13 14 21 22 13 14 Ib 0b IIb A B C 21 22 13 14 21 22 13 14 21 22 13 14
  • 68. Eaton Wiring Manual 06/11 8-68 All about Motors 8 8 Multi-speed switch for three-phase motors Tapped winding, 1 operating direction, 2 speeds Multi-speed contactor Star-delta startup at low speed Fuseless Without overload relay Rating of switchgear Q1, Q17 = I1 (low speed) Q2, Q21 = I2 (high speed) Q19, Q23 = 0.5 x I2 L1 PE Y -M1 3 2W1 2V1 2U1 1W 1V 1U 1 3 5 2 4 L2 L3 3 5 2 4 6 2 4 6 -Q17 -Q23 -Q21 6 2W2 2V2 2U2 1 3 5 1 1 3 5 2 4 6 3 5 2 4 6 1 13 14 -Q1 -Q19 2 4 6 -Q2 14 13 1 3 5 I > I > I > I > I > I >
  • 69. All about Motors Multi-speed switch for three-phase motors Eaton Wiring Manual 06/11 8-69 8 8 With fuses and overload relays Rating of switchgear F2, Q17 = I1 (low speed) F21, Q21 = I2 (high speed) Q19, Q23 = 0.5 x I2 F1 = I2 Overload relays F2 and F21 are not used on multi-speed contactors without motor protection. If F2 and F21 cannot be protected by a common fuse, then use connection on → Figure, page 8-53. Motor windings → Section ”Motor windings”, page 8-50 L1 PE Y -M1 3 2W1 2V1 2U1 1W 1V 1U L2 L3 5 2 4 6 -Q17 -Q23 -Q21 2W2 2V2 2U2 1 3 5 1 1 3 5 2 4 6 3 5 2 4 6 1 -F1 -Q19 2 4 6 -F21 -F2 2 4 6 97 95 98 96 3 97 95 98 96 2 4 6
  • 70. All about Motors Multi-speed switch for three-phase motors Eaton Wiring Manual 06/11 8-70 8 8 Function Actuation of pushbutton I energizes the coil of star contactor Q23. Its N/O 13-14 energizes the coil of contactor Q17. The motor runs in star at low speed. The contactors are maintained via auxiliary contact Q17/13-14. At the same time, timing relay K3 is triggered. When the set time has elapsed, K3/15-16 opens the circuit of Q23. Q23 drops out, the coil of delta contactor Q19 is energized and maintains itself via Q19/13-14. The timing relay is de-energized via N/C Q19/32-31. The motor runs in delta at low speed. Actuation of pushbutton II de-energizes the coil of Q17 and via Q17/22-21 energizes the coil of Q21. This state is maintained by Q21/43-44: The coil of star contactor Q23 is re-energized by normally open contact Q21/14-13. The motor runs at high speed. Pushbutton 0 (= Stop) executes disconnection. Connection Low speed selected onlyfromoffposition, high speed only via low speed without actuation of the Stop button. Three-way pushbutton I: Low speed (Q17, Q19) 0: Stop II: High speed (Q21, Q19, Q23) Q17: Mains contactor, low speed K3: Timing relays Q23: Star contactor Q19: Delta contactor Q21: Mainscontactor, high speed -F0 -F21 -Q1 -Q2 -S11 -Q17 -Q21 -Q17 -Q17 21 21 A1 A2 N 22 22 -Q21 -Q21 -Q21 -Q17 -Q23 -Q19 -Q19 -Q23 -Q19 -Q19 -K3 -K3 A1 A2 A1 A2 A1 A2 31 32 21 22 21 A1 A2 21 22 44 43 22 13 15 16 14 13 14 13 14 13 14 43 44 L1 (Q17/1) 0 II I -Q23 14 13 22 21 95 96 95 96 14 13 14 13 14 13 II -S11 A Q17 13 Q19 44 14 F21 96 B C 21 22 13 14 Q17 43 Q17 14 I 0 II Q21 22 21 22 13 14 21 22 13 14
  • 71. All about Motors Multi-speed switch for three-phase motors Eaton Wiring Manual 06/11 8-71 8 8 Tapped winding, 2 operating directions, 2 speeds (direction preselected) Multi-speed contactors Overload relays F2 and F21 are not used on multi-speed contactors without motor protection. Rating of switchgear Q11, Q12 = I2 (low and high speed) F2, Q17 = I1 (low speed) F1, Q21 = I2 Q23 = 0.5 x I2 (high speed) L1 PE -M1 2W 2V 2U 1 3 5 2 4 L2 L3 -F1 2 4 6 2 4 6 -Q11 97 -Q17 6 1W 1V 1U 1 3 5 -F21 98 95 96 2 4 6 97 98 95 96 -F2 2 4 6 1 3 5 2 4 6 1 3 5 2 4 6 1 3 5 M 3 -Q12 -Q21 -Q23
  • 72. All about Motors Multi-speed switch for three-phase motors Eaton Wiring Manual 06/11 8-72 8 8 Function Contactor Q11 is energized by pressing pushbutton I. Contactor Q11 selects the operating direction, and maintains itself after release of pushbutton I via its auxiliary contact 14-13 and pushbutton 0. Speed-selection buttons III and IV are made operative by Q11/44-43. Pushbutton III energizes Q17, which maintains itself via its contact 14-13. Pushbutton IV energizes high speed contactors Q23 and Q21. Auxiliary contact Q21/21-22 makes low-speed pushbutton III inoperative. Pushbutton 0 must be pressed before any change in speed or direction. Five-way pushbutton Connection Change of direction FORWARD–REVERS E after actuation of Stop button, optionally followed bySLOW–FASTwith no return to low speed. Control circuit device 0: Stop I: Forward (Q11) II: Back (Q12) III: Slow (Q17) IV: Fast (Q21 + Q23) L1 (Q11/1) -F0 0 -S11 A1 A2 A1 A2 -Q17 -Q17 A1 A2 A1 A2 N -F21 -F2 II I II 14 13 22 21 -Q11 -Q17 -Q11 -Q21 14 13 22 21 95 96 22 22 21 14 13 44 43 -Q11 -Q21 95 96 21 A1 A2 22 21 I 22 21 -Q11 14 13 IV 22 21 14 13 III 22 21 -Q23 -Q12 -Q23 -Q23 21 22 14 13 -Q12 -Q21 14 13 IV III 21 22 -Q12 44 43 -Q12 14 13 14 13 Q11 13 I F21 96 13 14 21 22 -S11 A C 0 B D Q12 13 Q12 14 Q17 13 Q11 43 Q17 14 Q17 21 II III IV E 13 14 21 22 13 14 21 22 13 14 21 22 13 14 21 22
  • 73. All about Motors Multi-speed switch for three-phase motors Eaton Wiring Manual 06/11 8-73 8 8 Tapped winding, 2 operating directions, 2 speeds (direction and speed selected simultaneously) Multi-speed contactor Fuseless without overload relay Rating of switchgear Q1, Q17, Q18 = I1 (low speed) Q2, Q21, Q22 = I2 Q23 = 0.5 x I2 (high speed) L1 PE M -M1 3 1W 1V 1U 2W 2V 2U -Q23 1 3 5 2 4 6 L2 L3 -Q1 I> I> I> -Q2 1 3 5 2 4 6 1 3 5 2 4 6 1 3 5 1 3 5 1 3 5 1 3 5 2 4 6 2 4 6 2 4 6 2 4 6 -Q17 I> I> I> 13 14 -Q18 -Q21 -Q22 13 14
  • 74. All about Motors Multi-speed switch for three-phase motors Eaton Wiring Manual 06/11 8-74 8 8 Multi-speed contactor With fuses and overload relays Rating of switchgear F2, Q17, Q18 = I1 (low speed) F21, Q21, Q22 = I2 Q23 = 0.5 x I2 (high speed) Overload relays F2 and F21 are not used on multi-speed contactors without motor protection L1 PE M -M1 3 1W 1V 1U 2W 2V 2U 1 3 5 2 4 6 L2 L3 -F2 1 3 5 2 4 6 1 3 5 2 4 6 -Q17 -F1 -Q18 97 95 98 96 -Q23 97 95 98 96 -F21 2 4 6 2 4 6 -Q21 -Q22 1 3 5 2 4 6 1 3 5 2 4 6
  • 75. All about Motors Multi-speed switch for three-phase motors Eaton Wiring Manual 06/11 8-75 8 8 Connection Simultaneous selection of direction and speed via one pushbutton. Always operate Stop button before changeover. Q17: Slow forward Q18: Slow back Q21: Fast forward Q23: Star contactor K1: Contactor relay Q22: Fast back L1 (Q17/1) N -F0 0 -S11 I -Q18 A1 A2 A1 A2 -Q21 21 22 -Q21 14 13 22 21 95 96 II 22 21 -Q17 21 II 21 22 22 -Q23 21 -Q17 -Q22 -Q23 -Q22 -Q21 -Q23 A1 A2 A1 A2 -Q23 -Q22 -Q18 -Q17 22 -Q22 14 14 13 III 95 96 -F2 -F21 14 13 -Q2 -Q1 -Q17 13 31 32 -Q21 22 21 22 21 -K1 I 14 13 14 13 IV 14 13 22 21 14 21 22 13 -Q18 -K1 -K1 A1 A2 14 13 44 43 A1 A2 -K1 43 44 14 13 32 31 III IV 21 22 -Q18 31 32 31 32 14 13 14 13
  • 76. All about Motors Multi-speed switch for three-phase motors Eaton Wiring Manual 06/11 8-76 8 8 Function Desired speed and operating direction can be selected by actuation of one of the four pushbutton. Contactors Q17, Q18, Q21 and Q23 maintain themselves by their contact 14-13 and can be de-energized only by actuation of pushbutton 0. Contactors Q21 and Q22 can maintain themselves only when Q23 has picked up and contact Q23/13-14 or 44-43 is closed. Five-way pushbutton Control circuit device 0: Stop I: Slow forward (Q17) II: Slow back (Q18) III: Fast forward (Q21 + Q23) IV: Fast back (Q22 + Q23) Q18 22 13 14 21 22 -S11 A Q21 21 Q23 22 Q17 21 I 0 II F21 96 Q23 14 Q18 32 Q22 32 III IV B C D E 13 14 21 22 21 22 13 14 21 22 13 14 21 22 13 14
  • 77. All about Motors Multi-speed switch for three-phase motors Eaton Wiring Manual 06/11 8-77 8 8 Tapped winding, medium and high speed, 1 operating direction, 3 speeds, 2 windings Multi-speed contactor Multi-speed contactors with overload relay → Figure, page 8-79 Motor circuit X→ Section ”Motor circuit X”, page 8-51 Synchronous Speed Rating of switchgear Q2, Q11 : I1 (low speed) Q1, Q17 : I2 (medium speed) Q3, Q21 : I3 (high speed) Q23 : 0.5 x I3 L1 PE M -M1 3 3W 3V 3U 2W 2V 2U 1 3 5 2 4 L2 L3 -Q1 I> I> I> -Q2 1 3 5 2 4 6 1 3 5 2 4 6 1 3 5 1 3 5 1 3 5 2 4 6 2 4 6 2 4 6 -Q17 I> I> I> 13 14 -Q23 -Q11 -Q21 13 14 6 1W 1V 1U 13 14 2 4 6 I> I> I> -Q3 1 3 5 Winding 1 2 2 Motor terminals 1U, 1V, 1W 2U, 2V, 2W 3U, 3V, 3W Amount of poles 12 8 4 RPM 500 750 1500 Amount of poles 8 4 2 RPM 750 1500 3000 Amount of poles 6 4 2 RPM 1000 1500 3000 Contactors Q11 Q17 Q21, Q23
  • 78. All about Motors Multi-speed switch for three-phase motors Eaton Wiring Manual 06/11 8-78 8 8 Function Pushbutton I energizes mains contactor Q17 (low speed), pushbutton II mains contactor Q11 (medium speed),pushbutton III star contactor Q23 and via its N/O Q23/14-13 mains contactor Q21 (high speed).Allcontactorsmaintainthemselves by their auxiliary contact 13-14. Speed sequence from low to high is optional. Switching in steps from high to medium or low speed is not possible. The motor is always switched off by pressing pushbutton 0. In the event of an overload, normally open contact 13-14 of the motor-protective circuit-breaker or circuit-breaker can also switch off. Connection of motor winding: X Connection A Connection A Selection of any speed only from zero. No return to low speed, only to zero. Connection B Selection of any speed from zero or from low speed. Return only to zero. Q11: Low speed winding 1 Q17: Medium speed winding 2 Q23: High speed winding 2 Q21: High speed winding 2 Four-way pushbuttons 0: Stop I: Low speed (Q11) II: Medium speed (Q17) III: High speed (Q21 + Q23) L1 (Q17/1) -F0 0 -S11 A1 A2 A1 A2 21 22 22 21 -Q17 21 -Q23 -Q17 -Q23 -Q21 A1 A2 A1 A2 -Q23 N -Q17 14 13 III 14 13 -Q2 -Q1 31 32 -Q3 III 22 21 14 13 II 14 13 I II 14 13 -Q11 14 13 13 14 22 21 22 21 -Q21 21 22 22 -Q11 -Q21 31 32 32 31 -Q11 -Q17 -Q11 -Q21 -Q23 32 31 14 13 13 14 21 22 A Q21 13 Q11 14 Q17 14 I 0 II F22 96 Q21 14 III B C D 13 14 21 22 21 22 13 14 21 22 13 14 13 14 21 22 -S11 A Q21 13 Q11 14 Q17 14 I 0 II F22 96 Q23 14 III B C D 13 14 21 22 21 22 13 14 Q11 13 Q17 13 21 22 13 14
  • 79. All about Motors Multi-speed switch for three-phase motors Eaton Wiring Manual 06/11 8-79 8 8 Tapped winding, low and high speed, 1 operating direction, 3 speeds, 2 windings Multi-speed contactor Multi-speed contactor without overload relay → Figure, page 8-77 Motor circuit Y → Section ”Motor circuit Y”, page 8-51 Synchronous Speed Rating of switchgear F2, Q17: I1 (low speed) F3, Q11: I2 (medium speed) F4, Q21: I3 (high speed) Q23: 0.5 x I3 L1 L2 L3 1 3 5 M1 2 4 6 F1 97 95 98 96 Q17 Q11 1 3 5 2 4 6 F2 2 4 6 F3 97 95 98 96 2 4 6 Q21 1 3 5 2 4 6 F4 97 95 98 96 2 4 6 1 3 5 Q23 1 3 5 2 4 6 3U 3V 3W 2U 2V 2W 1U 1V 1W M 3 1 3 5 1 3 5 Winding 2 1 2 Motor terminals 1U, 1V, 1W 2U, 2V, 2W 3U, 3V, 3W Amount of poles 12 8 6 RPM 500 750 1000 Amount of poles 8 6 4 RPM 750 1000 1500 Contactors Q17 Q11 Q21, Q23
  • 80. All about Motors Multi-speed switch for three-phase motors Eaton Wiring Manual 06/11 8-80 8 8 Function Pushbutton I energizes mains contactor Q17 (low speed), pushbutton II mains contactor Q11 (medium speed),pushbutton III star contactor Q23 and via its N/O Q23/14-13 mains contactor Q21 (high speed).Allcontactorsmaintainthemselves by their auxiliary contact 13-14. Speed sequence from low to high is optional. Switching in steps from high to medium or low speed is not possible. The motor is always switched off by pressing pushbutton 0. In the event of an overload, normally closed contact 95-96 of overload relays F2, F21 and F22 can also switch off. Connection of motor winding: Y Connection A Connection A Selection of any speed only from zero. No return to low speed, only to zero. Connection B Selection of any speed from zero or from low speed. Return only to zero. Four-way pushbuttons 0: Stop I: Low speed (Q17) II: Medium speed (Q11) III: High speed (Q21 + Q22) Q17: Low speed winding 1 Q11: Medium speed winding 1 Q23: High speed winding 2 Q21: High speed winding 2 L1 F0 0 S2 S1 S3 S0 A1 A2 A1 A2 Q17 21 Q17 Q21 A1 A2 A1 A2 Q23 N III 14 13 F3 F2 F4 III II I II 14 13 14 13 22 21 22 21 21 22 22 Q11 31 32 32 31 Q11 Q11 Q21 Q23 14 13 22 21 95 96 22 21 22 21 14 13 14 13 Q11 31 32 Q21 Q23 Q23 32 31 Q17 Q21 Q17 14 13 Q17 14 13 14 21 22 -S11 A Q21 13 Q11 14 I 0 II F22 96 Q21 14 III B C D 21 22 13 14 21 22 13 14 21 22 13 14 Q21 14 Q17 13 Q21 13 Q11 13 Q17 14 F22 96 0 I II -S11 13 14 21 22 13 14 21 22 13 14 21 22 13 14 A B C D Q11 14 21 22 III
  • 81. All about Motors Multi-speed switch for three-phase motors Eaton Wiring Manual 06/11 8-81 8 8 Tapped winding, low and medium speed, 1 operating direction, 3 speeds, 2 windings Multi-speed contactor Multi-speed contactor without overload relay → Figure, page 8-53 Motor circuit Z → Section ”Motor circuit Z”, page 8-51 Synchronous Speed Rating of switchgear F2, Q17: I1 (low speed) F4, Q21: I2 (medium speed) F3, Q11: I3 (high speed) Q23: 0.5 x I3 L1 L2 L3 1 3 5 M1 2 4 6 F1 97 95 98 96 Q17 Q11 1 3 5 2 4 6 F2 2 4 6 F3 97 95 98 96 2 4 6 Q21 1 3 5 2 4 6 F4 97 95 98 96 2 4 6 1 3 5 Q23 1 3 5 2 4 6 3U 3V 3W 2U 2V 2W 1U 1V 1W M 3 1 3 5 1 3 5 Winding 2 2 1 Motor terminals 1U, 1V, 1W 2U, 2V, 2W 3U, 3V, 3W Amount of poles 12 6 4 RPM 500 1000 1500 Amount of poles 12 6 2 RPM 500 1000 3000 Amount of poles 8 4 2 RPM 750 1500 3000 Contactors Q17 Q21, Q23 Q11
  • 82. All about Motors Multi-speed switch for three-phase motors Eaton Wiring Manual 06/11 8-82 8 8 Function Pushbutton I energizes mains contactor Q17 (low speed), pushbutton II mains contactor Q23 (low speed) and via its N/O Q23/14-13 mains contactor Q21 (high speed), pushbutton III mains contactor Q11. All contactors maintain themselves by pushbutton I energizes m13n14co. Speed sequence from low to high is optional. Switching in steps from high to medium or low speed is not possible. The motor is always switched off by pressing pushbutton 0. In the event of an overload, normally closed contact 95-96 of overload relays F2, F21 and F22 can also switch off. Connection of motor winding: Z Connection A Connection A Selection of any speed from zero. No return to low speed, only to zero. Connection B Selection of any speed from zero or from low speed. Return only to zero. Q17: Low speed winding 1 Q23: Medium speed winding 2 Q21: Medium speed winding 2 Q11: High speed winding 1 Four-way pushbuttons 0: Stop I: Low speed (Q17) II: Medium speed (Q21 + Q23) III: High speed (Q11) L1 (Q17/1) N -F0 0 -S11 I -Q11 A1 A2 A1 A2 -Q21 21 22 -Q21 14 13 22 21 -F2 -F21 -F22 95 96 III II 22 21 -Q17 14 13 22 21 14 13 II 21 22 22 -Q23 21 -Q17 -Q23 -Q21 -Q11 -Q17 -Q23 A1 A2 A1 A2 -Q23 -Q11 -Q21 -Q17 14 13 32 31 32 31 22 21 32 31 32 31 -Q11 14 13 14 13 14 13 III Q21 13 Q17 14 Q11 14 F22 96 0 I II III 13 14 21 22 A B C D Q21 14 21 22 21 22 21 22 13 14 13 14 13 14 -S11 II III 0 I 14 Q23 13 Q23 14 Q17 13 Q17 14 Q11 13 Q11 14 F22 96 -S11 13 21 22 13 14 21 22 13 14 21 22 13 14 A B C D 21 22
  • 83. Eaton Wiring Manual 06/11 8-83 All about Motors 8 8 Three-phase autotransformer starter Three-phase autotransformer starter with mains contactor and resistors, 2-stage, 3-phase version Use F2 when using F1 instead of Q1. L1 L2 L3 -Q1 1 2 3 I> I> I> 2 4 6 13 14 -F1 1 5 3 2 4 6 -Q11 -Q17 -R2 X Y Z -F2 PE U V W M 3 -M1 1 5 3 2 4 6 -Q16 2 4 6 1 3 5 -R1 U1 U2 V2 W2 V1 W1 4 2 6 97 95 98 96 Rating of switchgear: Starting voltage: 0.6 x Ue Inrush current: 0.6 x direct switching system Tightening torque: 0.36 x direct switching system Q1, Q11: Ie Q16, Q17: 0.6 x Ie
  • 84. All about Motors Three-phase autotransformer starter Eaton Wiring Manual 06/11 8-84 8 8 Three-phase autotransformer starter with mains contactor and resistors, 2-stage, 3-phase version Q16: Step contactor K1: Timing relay Q17: Step contactor K2: Timing relay Q11: Mains contactor Two-wire control Always set overload relay to reclosing lockout -Q1 -F2 L1 (-Q11) N -F0 13 14 95 96 0 21 22 -S11 I 13 14 21 22 -Q11 -Q16 A1 A2 -K1 A1 A2 -Q17 A1 A2 -K1 15 18 -K2 -Q17 A1 A2 -Q11 A1 A2 -K2 13 14 13 14 -Q16 13 14 15 18 -Q11 32 31 -Q11 -F0 -Q1 13 14 -S12 -Q11 32 31 -Q11 L1 (Q11/1) 22 21
  • 85. All about Motors Three-phase autotransformer starter Eaton Wiring Manual 06/11 8-85 8 8 Function Pushbutton I energizes step contactor Q16 and timing relay K1. Q16/14-13 – self-maintaining through Q11, Q11/32-31 and pushbutton 0. The motor is connected to the supply with upstream resistors R1 + R2. When the set starting time has elapsed, normally open contact K1/15-18 energizes Q17. Step contactor Q17 bypasses the starting stage R1. At the same time, normally open contact Q17/14-13 energizes K2. When the set starting time has elapsed, K2/15-18 energizes mains contactor Q11. This bypassesthesecondstarting stage R2,and the motor runs at the rated speed. Q11 maintains itself via Q11/14-13. Q16, Q17, K1 and K2 are de-energized by normally closed contacts Q11/22-21 and Q11/32-31. The motor is switched off with pushbutton 0. In the event of an overload, normally closed contact 95-96 of the overload relay F2 or normally open contact 13-14 of the motor-protective circuit-breaker switch off the motor. Step contactor Q17, resistor R2 and timing relay K1 are omitted in single-stage starting circuits. Timing relay K2 is connected directly to Q16/13 and resistor R2 is connected by means of its terminals U1, V1 and W1 to Q11/2, 4, 6. Three-wire control Double pushbutton I = ON 0 = OFF Two-wire control -S11 Q11 32 22 21 Q11 21 F2 96 22 21 14 13 14 13 0 I A B F2 96 Q11 22 Q11 32 -S12
  • 86. All about Motors Three-phase autotransformer starter Eaton Wiring Manual 06/11 8-86 8 8 Three-phase autotransformer starter with mains contactor and starting transformer, 1-stage, 3-phase Use F2 when using F1 instead of Q1. Rating of switchgear L1 L2 L3 4 1 5 3 2 4 6 U V W 1 5 3 2 4 6 a U2 V2 W2 1U1 2W1 2V1 2U1 1V1 1W1 M 3 M1 F1 2 6 1 5 3 Q1 13 14 Q11 1 5 3 2 4 6 K1 Q13 2 4 6 97 95 98 96 I > I > I > Starting voltage = 0.7 x Ue (typical value) Tightening torque = 0.49 x Direct switching Inrush current = 0.49 x direct switching system Q1, Q11 = Ie IA/Ie = 6 Q16 = 0.6 x Ie tA = 10 s Q13 = 0.25 x Ie ops./h = 30
  • 87. All about Motors Three-phase autotransformer starter Eaton Wiring Manual 06/11 8-87 8 8 Function Pressing pushbutton I simultaneously energizes star contactor Q13, timing relay K1 and, via normally open contact Q13/13-14, step contactor Q16, and are maintained via K1/13-14. When K1 has elapsed, normally closed contact K1/55-56 de-energizes star contactor Q13, and Q16 – via normally open contact Q13/13-14: The starting transformer is disconnected, and the motor runs at the rated speed. The motor cannot start up again unless previously switched off by actuation of pushbutton 0, or in the event of an overload,by N/C 95-96of the overload relay F2. With two-wire control, overload relay F2 must always be set to reclosing lockout. If the motor has been switched off by F2, the motor cannot start up again unless the reclosing lockout is released. Two-wire control Always set overload relay to reclosing lockout (manual reset) Q16: Step contactor K1: Timing relay Q11: Mains contactor Q13: Star contactor Three-wire control I: ON 0: OFF Two-wire control L1 Q1 F0 13 14 95 96 F2 21 S11 0 I 13 14 K1 13 14 13 14 Q13 Q16 N A1 A2 K1 Q13 A1 A2 Q11 K1 A1 A2 K1 Q11 Q13 22 21 A1 A2 22 21 67 68 55 56 22 L1 (Q11/1) -F0 95 96 -F2 -S12 -K1 -K1 55 96 67 68 -S11 K1 13 22 21 F2 96 22 21 14 13 14 13 0 I A B K1 14 -S12 F2 96 K1 55
  • 88. Eaton Wiring Manual 06/11 8-88 All about Motors 8 8 Three-phase automatic rotor starters Three-phase automatic rotor starters 3-stage, rotor 3-phase Use F2 when using F1 instead of Q1. L1 L2 L3 -Q1 1 3 5 I > I > I > 13 14 -F1 2 6 4 2 4 6 PE U V W M 3 -M1 -Q12 2 4 6 97 95 98 96 1 3 5 -Q11 -F2 2 4 6 1 3 5 1 5 3 2 4 6 -Q13 -Q14 2 4 6 1 3 5 K L M U3 V3 W3 U2 V2 W2 -R3 -R2 U1 V1 W2 -R1
  • 89. All about Motors Three-phase automatic rotor starters Eaton Wiring Manual 06/11 8-89 8 8 2-stage, rotor 2-phase Use F2 when using F1 instead of Q1. Rating of switchgear L1 L2 L3 1 3 5 13 14 I> I> I> 2 6 4 1 3 5 2 4 6 PE U V W M 3 -M1 -Q11 1 3 5 -F2 2 4 6 -R2 U1 V1 -R1 -Q1 -F1 97 95 98 96 K L M -Q12 -Q14 2 4 6 1 3 5 U2 XY V2 2 4 6 Inrush current = 0.5 – 2.5 x Ie Tightening torque = 0.5 to pull-out torque Q1, Q11 = Ie Step contactors = 0.35 x Irotor Final step contactors = 0.58 x Irotor
  • 90. All about Motors Three-phase automatic rotor starters Eaton Wiring Manual 06/11 8-90 8 8 With mains contactor, style 3-stage, rotor 3-phase Q11: Mains contactor K1: Timing relay Q14: Step contactor K2: Timing relay Q12: Step contactor Q13: Final step contactor K3: Timing relay Q1 F2 L1 N F0 0 S11 I Q11 A1 A2 A1 A2 K1 K2 Q14 A1 A2 13 14 13 14 95 96 21 22 13 14 Q11 13 14 K1 Q14 A1 A2 15 18 K2 Q12 14 13 A1 A2 15 18 A1 A2 Q13 Q13 Q13 32 31 14 13 U3 A1 A2 U3 15 18 Q12 Q11 44 43 Double pushbutton I: ON 0: OFF For connection of further actuators: → Section ”Control circuit devices for star-delta starting”, page 8-45 F2 96 Q11 14 Q11 13 0 I -S11 21 22 21 22 13 14 13 14 A B
  • 91. All about Motors Three-phase automatic rotor starters Eaton Wiring Manual 06/11 8-91 8 8 Function Pushbutton I energizes mains contactor Q11: N/O Q11/14-13 transfers the voltage, Q11/44-43 energizes timing relay K1. The motor is connected to the supply system with rotor resistors R1 + R2 + R3 in series. When the set starting time has elapsed, normally open contact K1/15-18 energizes Q14. Step contactor Q14 short-circuits starting stage R1 and via Q14/14-13 energizes timing relay K2. When the set starting time has elapsed, K2/15-18 energizes step contactor Q12, which short-circuits starting stage R2 and via Q12/14-13 energizes timing relay K3. When the set starting time has elapsed, K3/15-18 energizes final step contactor Q13, which is maintained via Q13/14-13, Step contactors Q14 and Q12 as well as timing relays K1, K2 and K3 are de-energized via Q13.Finalstep contactor Q13 short-circuits the rotor slip rings: the motor operates with rated speed. The motor is switched off either by pushbutton 0, or in the event of an overload,by N/C 95-96of the overload relay F2 or N/O 13-14 of the motor-protective circuit-breaker or circuit-breaker. Step contactors Q13 and/or Q12 with their resistors R3,R2 and timing relays K3, K2are omitted in single-stage or two-stage starting circuits. The rotor is then connected to the resistance terminals U, V, W2 or U, V, W1. The references for step contactors and timing relays in the wiring diagrams are then changed from Q13, Q12 to Q12, Q11 or to Q13, Q11 as appropriate. When there are more than three stages, the additional step contactors, timing relays and resistors have appropriate increasing designations.
  • 92. Eaton Wiring Manual 06/11 8-92 All about Motors 8 8 Switching of capacitors Contactors for capacitors DIL Individual circuit without quick-discharge resistors R1 discharge resistors fitted in capacitor L3 -F1 1 3 5 2 4 6 -Q11 -R1 -C1 -R1 -R1 L1 L2
  • 93. All about Motors Switching of capacitors Eaton Wiring Manual 06/11 8-93 8 8 Double pushbutton For connection of further actuators: → Section ”Control circuit devices for star-delta starting”, page 8-45 L1 (Q11/1) -F0 21 22 -S11 0 I 13 14 13 14 -Q11 -Q11 A1 A2 N 22 L1 21 0 I Q11 14 A B Q11 13 14 13 22 21 14 13 Maintained contact sensors In the case of actuation by means of power factor correction relay, check that this has sufficient power to actuate the contactor coil. Interpose a contactor relay if necessary. Function Pushbutton I actuates contactor Q11, which picks up and maintains itself via its own auxiliary contact 14-13 and pushbutton 0 on voltage. Capacitor C1 is thus energized. Discharge resistors R1 are not active when contactor Q11 is energized. Actuation of pushbutton 0 effects de-energization. Normally closed contacts Q11/21-22 then switch discharge resistors R1 to capacitor C1. L1 -S12 Q11 A1
  • 94. All about Motors Switching of capacitors Eaton Wiring Manual 06/11 8-94 8 8 Capacitor contactor combination Capacitors contactor with pilot contactor and series resistors. Individual and parallel circuit with and without discharge resistors and with series resistors. On the version without discharge resistors, resistors R1 and the connections to the auxiliary contacts 21-22 and 31-32 are omitted. L3 L1 L2 -F1 1 3 5 2 4 6 -Q14 -R1 -C1 -R1 21 22 -Q11 31 32 43 44 13 14 21 22 A1 A2 31 32 43 44 1 3 5 2 4 6 A1 A2 13 14 -R2
  • 95. All about Motors Switching of capacitors Eaton Wiring Manual 06/11 8-95 8 8 Function Actuation by double pushbutton S11: Pushbutton I energizes pilot contactor Q14. Q14 switches capacitor C1 in with bridged series resistors R2. N/O Q14/14-13 energizes mains contactor Q11. Capacitor C1 is then switched in with bridged series resistors R2. Q14 is maintained via Q11/14-13 when Q11 has closed. Discharge resistors R1 are not operative when Q11 and Q14 are energized. Pushbutton 0 effects de-energization. N/C Q11/21-22 and 31-32 then switch discharge resistors R1 to capacitor C1 Q11: Mains contactor Q14: Pilot contactor Actuation by double pushbutton S11 Actuation by selector switch S13, two-wire control S12 (power factor correction relay) and double pushbutton S11 -F0 0 I -S11 L1 (Q11/1) -Q14 21 22 -Q11 A1 A2 13 14 -Q11 13 14 13 14 -Q14 A1 A2 N -F0 0 I -S12 L1 (Q11/1) -Q14 21 22 13 14 -Q11 13 14 13 14 A1 A2 -S12 -Q14 A1 A2 -Q11 N T0 (3)-1-15431 1 2 3 4 1 0 2
  • 96. Eaton Wiring Manual 06/11 8-96 All about Motors 8 8 Duplex pump control Fully automatic control for two pumps Starting sequence of pumps 1 and 2 can be selected by control switch S12. Control circuit wiring with two float switches for basic and peak loads (operation is also possible with two pressure switches) P1 Auto = Pump 1 base load, Pump 2 peak load P2 Auto = Pump 2 base load, Pump 1 peak load P1 + P2 = Direct operation independent of float switches (or pressure switches) a Cable with float, counterweight, pulleys and clamps b Storage tank c Inlet d Pressure pipe e Outlet f Centrifugal or reciprocating pump g Pump 1 h Pump 2 i Suction pipe with filter j Well L1 L2 L3 -Q1 -F22 -Q11 U V W M 3 -M1 -M2 M 3 F7 -F11 -F21 -F12 -Q12 U V W F8 b d F7 Q Q a a F8 c e f f i h g 0 0 I I F7: 0 F7: I F8: 0 F8: I j I > I > I >
  • 97. All about Motors Duplex pump control Eaton Wiring Manual 06/11 8-97 8 8 Float switch F7 closes before F8 Q11: Pump 1 mains contactor Q12: Pump 2 mains contactor Function The duplex pump control is designed for operation of two pump motors M1 and M2. Control is via float switches F7 and F8. Operating mode selector switch S12 in position P1 auto. The system operates as follows: When the water level in the storage tank falls or rises, F7 switches pump 1 on or off (base load). If the water level drops below the range of F7 (discharge is greater than intake), F8 starts pump 2 (peak load). When the water level rises again, F8 is deactivated. Pump 2 continues running until F7 stops both pumps. The operating sequence of pumps 1 and 2 can be determined using operating mode selector switch S12: Position P1 auto or P2 auto. In position P1 + P2, both pumps are in operation, independent of the float switches (Caution! Tank may possibly overflow). On the version of duplex pump control with cyclic load sharing (T0(3)-4-15915), S12 has a further state: the operating sequences are automatically reversed after each cycle. F11 F0 -F12 -F22 95 96 95 96 -F7 Q 2 1 -S11 14 13 -F8 Q -S21 2 1 14 13 -Q12 14 13 -Q11 14 13 N EO -Q11 A1 A2 -Q12 A1 A2 -S12 L 1 2 3 4 5 6 7 8 9 10 11 12 13 0 P 1, P 2 P 1 Auto P 2 Auto T0(3)-4-15833
  • 98. Eaton Wiring Manual 06/11 8-98 All about Motors 8 8 Fully automatic pump control With pressure switch for air tank and domestic water supply without water failure (run dry) safety device With 3-pole pressure switch MCSN (main circuit) F1: Fuses (if required) Q1:Motor-protective circuit-breaker switch, manual (e.g. PKZ) F7: Pressure switch MCSN, 3-pole M1:Pump motor a Air or pressure tank b Non-return valve c Pressure pipe d Centrifugal (or reciprocating) pump e Suction pipe with filter f Well L1 L2 L3 -F1 -Q1 a b d c e f U V W -M1 M 3 P -F7 I > I > I >
  • 99. All about Motors Fully automatic pump control Eaton Wiring Manual 06/11 8-99 8 8 With 1 pole pressure switch MCS (control circuit) F1: Fuses Q11:Contactor or automatic star-delta switch F2: Overload relay with reclosing lockout F7: Pressure switch MCS, 1 pole M1: Pump motor a Air or pressure tank b Non-return valve c Centrifugal (or reciprocating) pump d Pressure pipe e Suction pipe with filter f Well 3 5 2 4 6 95 96 -M1 M 3 U V W L1 L2 L3 -F1 -F2 a b c d e f P N -Q11 1 -F7
  • 100. All about Motors Fully automatic pump control Eaton Wiring Manual 06/11 8-100 8 8 With 3-pole float switch SW (main circuit) F1: Fuses (if required) Q1: Motor-protective circuit-breakers, manual (e.g. PKZ) F7: Float switch 3-pole (connection: pump full) M1: Pump motor HW:Highest level NW:Lowest value a Cable with float, counterweight, pulleys and clamps b Storage tank c Pressure pipe d Centrifugal (or reciprocating) pump e Outlet f Suction pipe with filter g Well U V W L1 L2 L3 -F1 -F7 I 0 HW NW -Q1 -M1 Q M 3 a c b d e f g I > I > I >
  • 101. All about Motors Fully automatic pump control Eaton Wiring Manual 06/11 8-101 8 8 With 1 pole float switch SW (control circuit) F1: Fuses Q11:Contactor or automatic star-delta switch F2: Overload relay with reclosing lockout F8: Float switch 1 pole (connection pump full) S1: Changeover switch MANUAL-OFF-AUTO F9: Float switch 1 pole (connection: pump full) M1: Pump motor a Cable with float, counterweight, pulleys and clamps b Storage tank c Pressure pipe d Centrifugal (or reciprocating) pump e Outlet f Suction pipe with filter g Water-failure monitoring by means of a float switch h Well L1 U V W L2 L3 N -F1 -F2 -Q11 1 3 5 2 4 6 95 96 -F8 0 H A -M1 S1 HW NW M 3 -F9 I 0 Q Q a b c d e h f g 0 I
  • 102. Eaton Wiring Manual 06/11 8-102 All about Motors 8 8 Fully automatic main transfer switch with automatic release Changeover device to DIN VDE 0100 – Erection of low-voltage installations –... – Part 718: Installations for gathering of peopleAutomatic resetting, the phase monitoring relay is set to: Pick-up voltage Uan = 0.95 x Un Drop-out voltage Ub = 0.85 x Uan Function Main switch Q1 is closed first, followed by main switch Q1.1 (auxiliary supply). Phase monitor K1 is energized via the main supply and immediately energizes contactor relay K2. N/C K2/21-22 blocks the circuit contactor. Q12 (auxiliary supply) and N/O K2/13-14 closes the circuit of contactor Q11. Contactor Q11 energizes and switches the mains supply on the loads. Contactor Q12 is also interlocked against main supply contactor Q11 via N/C Q11/22-21. a Main supply b Auxiliary supply c To load L1 L2 L3 N -Q1 -F01 21 22 14 21 21 22 22 11 11 12 14 12 14 R R S S T T -F02 5 6 3 4 1 2 5 6 3 4 1 2 -Q1.1 -Q11 -K2 -Q12 -Q12 -Q11 -K2 -Q12 -Q11 -K2 -K1 A1 A2 A1 A2 A1 A2 L2.1 L3.1 N L1.1 13 a b c I > I > I > I > I > I >