
Recommended
Recommended
More Related Content
Similar to How to carve a wood spirit
Similar to How to carve a wood spirit (20)
Recently uploaded
Recently uploaded (20)
How to carve a wood spirit
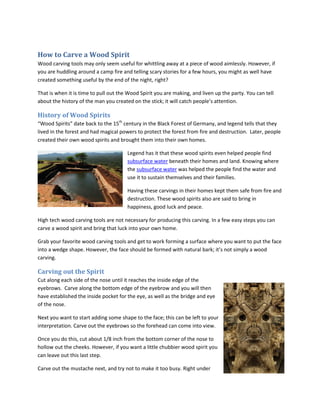
- 1. How to Carve a Wood Spirit Wood carving tools may only seem useful for whittling away at a piece of wood aimlessly. However, if you are huddling around a camp fire and telling scary stories for a few hours, you might as well have created something useful by the end of the night, right? That is when it is time to pull out the Wood Spirit you are making, and liven up the party. You can tell about the history of the man you created on the stick; it will catch people’s attention. History of Wood Spirits “Wood Spirits” date back to the 15th century in the Black Forest of Germany, and legend tells that they lived in the forest and had magical powers to protect the forest from fire and destruction. Later, people created their own wood spirits and brought them into their own homes. Legend has it that these wood spirits even helped people find subsurface water beneath their homes and land. Knowing where the subsurface water was helped the people find the water and use it to sustain themselves and their families. Having these carvings in their homes kept them safe from fire and destruction. These wood spirits also are said to bring in happiness, good luck and peace. High tech wood carving tools are not necessary for producing this carving. In a few easy steps you can carve a wood spirit and bring that luck into your own home. Grab your favorite wood carving tools and get to work forming a surface where you want to put the face into a wedge shape. However, the face should be formed with natural bark; it’s not simply a wood carving. Carving out the Spirit Cut along each side of the nose until it reaches the inside edge of the eyebrows. Carve along the bottom edge of the eyebrow and you will then have established the inside pocket for the eye, as well as the bridge and eye of the nose. Next you want to start adding some shape to the face; this can be left to your interpretation. Carve out the eyebrows so the forehead can come into view. Once you do this, cut about 1/8 inch from the bottom corner of the nose to hollow out the cheeks. However, if you want a little chubbier wood spirit you can leave out this last step. Carve out the mustache next, and try not to make it too busy. Right under
- 2. the mustache, just make a small cut to form the bottom lip. Now, we can’t leave this poor man bald, so we have to make some hair. Make several flowing cuts up to the bottom of the mustache for a long beard, and down the forehead as well for his head of hair. The flows of these waves are up to your interpretation. Remember though, this spirit is here to bring you safety and luck, so make sure he gets a look he will appreciate. Your handsome wood spirit is almost completed. Now all you have left is accenting the eyes and the nose. Take a look at the work you have created; show it off to your friends. Next time you are sitting around the campfire there won’t be scary stories; instead, pull out your wood carving tools because there will be new wood spirits making their way into the world. Photo credit: james_gordon_losangeles via photopin cc Photo credit: Elido Turco - Gigi via photopin cc