Why Teams call analytics are critical to your entire business
Volley lab btc_bbit
1. Volley Lab: ICS and BTC
Instructor: Stanslaus Mwongela
Core Knowledge
1. Make an API call to a github ENDPOINT with Volley
2. Process the JSON data returned as response
3. Arrange and display the response on RecyclerView with Cardviews
Additional side knowledge to gain in this tutorial will be
How to populate the RecyclerView with Cards
How to parse an image response data to a View with Picasso
First off, what we’ll be building in this lab is an android app that will make a request
to get a list of java developers in Nairobi from github using this API ENDPOINT
private static final string URL_DATA=
“https://api.github.com/search/users?q=language:java+location:nairobi";
We will then proceed to display the contents (developers image, developers username
and developer git URL) on the RecyclerView with cards (CardView).
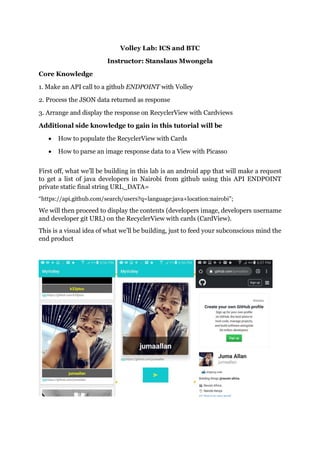
This is a visual idea of what we’ll be building, just to feed your subconscious mind the
end product
2. Set Up
First off, launch android studio and create a new project [File > New > New
Project]. While setting up your project feel free to give your project any name of your
choice, in my case I’ll name it My Volley.
Once your project has finished building, you’ll need to add some dependencies to your
app level Gradle file [app > build.gradle] then locate the dependency block and add
these dependencies.
implementation 'com.google.android.material:material:1.1.0'
implementation 'androidx.cardview:cardview:1.0.0'
implementation 'com.android.volley:volley:1.1.0'
implementation 'com.squareup.picasso:picasso:2.5.2'
Then set internet permissions in the manifest file.
<manifest xmlns:android="http://schemas.android.com/apk/res/android"
package="com.mwongela.myvolley">
<uses-permission android:name="android.permission.INTERNET" />
<application
android:allowBackup="true"
android:icon="@mipmap/ic_launcher"
android:label="@string/app_name"
Layout
By default you already have activity_main.xml [res > layout >
activity_main.xml] this is the layout that will hold the RecyclerView, so set the
layout to RelativeLayout initialize the RecyclerView here.
<?xml version="1.0" encoding="utf-8"?>
<RelativeLayout xmlns:android="http://schemas.android.com/apk/res/android"
xmlns:app="http://schemas.android.com/apk/res-auto"
xmlns:tools="http://schemas.android.com/tools"
android:layout_width="match_parent"
android:layout_height="match_parent"
tools:context=".MainActivity">
<androidx.recyclerview.widget.RecyclerView
android:id="@+id/recycler_view"
android:layout_width="match_parent"
android:layout_height="match_parent"
/>
</RelativeLayout>
Open the MainActivity.java file and initialize the RecyclerView in the on create method
and find it by the id you assigned to it in the activity_main.xml file. In my case I set it’s
3. id to be “recyler_view” according to the snippet above. So open your MainActivity and
do this:
public class MainActivity extends AppCompatActivity {
//declare the recycler view
private RecyclerView recyclerView;
@Override
protected void onCreate(Bundle savedInstanceState) {
super.onCreate(savedInstanceState);
setContentView(R.layout.activity_main);
//Initialize the recycler view
recyclerView=findViewById(R.id.recycler_view);
recyclerView.setHasFixedSize(true);
recyclerView.setLayoutManager(new LinearLayoutManager(this));
Now we have the RecyclerView set, for the items that will be in the RecyclerView, we’ll
create another layout resource file that will store the data in a CardView and then use
the cards to populate the RecyclerView.
Create a new layout resource file [app > res > layout > New > layout resource
file] and name it developers_list.xml.
4. We have created a layout resource file and specified its root view as linear layout.
Next, we’ll create a CardView in the developers_list.xml to hold the contents that will
be displayed to a user. Inside the card view we will nest a linear layout to specify the
order of displaying details of a particular developer.
Below is the Screen shot of developer_list.xml layout resource file.
5. Now, we are done with the two layout files (activity_main and developer_list). To
actually get the data with which we’ll populate our developer_list file, we need to create
a java class for it ,this is what we call a model class.
6. Name the Java class as you deem fit, in my case I called this java class DevelopersList
and set it up like this
So here we define 3 String variables “login” to hold the developers name, “avatar_url”
to hold the developers image url and “html_url” to hold the developers github url.
We then initialized them and generated their getters and constructors since we’ll be
making use of them in the DevelopersAdapter class.
The Adapter
P.S: If this is hard to follow please revisit the video I shared for creating recycler view
adapter on e-learning.
Android uses adapters (from the Adapter class) to connect data with View items in a
list. There are many different kinds of adapters available, and you can also write
custom adapters. In this task you will create an adapter that associates your list of
words with word list View items.
To connect data with View items, the adapter needs to know about the View items. The
adapter uses a ViewHolder that describes a View item and its position within
the RecyclerView.
First, we will build an adapter that bridges the gap between the data in your Developer
list and the RecyclerView that displays it:
1. Right-click java/com.android.example.recyclerview and select New >
Java Class.
2. Name the class DevelopersAdapter.
3. Give DevelopersAdapter the following signature:
7. DevelopersAdapter extends a generic adapter for RecyclerView to use a View holder
that is specific for your app and defined inside DevelopersAdapter. ViewHolder shows
an error, because you have not yet defined it.
4. Click the class declaration (DevelopersAdapter), then click the red light bulb on
the left side of the pane. Choose Implement methods.
A dialog appears that asks you to choose which methods to implement. Choose all
three methods and click OK.
Android Studio creates empty placeholders for all the methods. Note
how onCreateViewHolder and onBindViewHolder both reference the ViewHolder,
which hasn't been implemented yet.
Create the ViewHolder for the adapter
To create the ViewHolder, follow these steps:
1. Inside the DevelopersAdapter class, add a new ViewHolder inner class with this
signature:
public class ViewHolder extends RecyclerView.ViewHolder { }
You will see an error about a missing default constructor. You can see details about the
errors by hovering your mouse cursor over the red-underlined code or over any red
horizontal line on the right margin of the editor pane. Ensure you add this constructor.
2. Add variables to the ViewHolder inner class for the developer name TextView,
developer ImageView, developer GitHub Url and the Linear Layout that
contained this three items(we will set a on click listener to this linear layout later)
Then initialize this variables in the constructor of the ViewHolder class;
public class ViewHolder extends RecyclerView.ViewHolder {
//Define the view objects
public TextView login;
public ImageView avatar_url;
public TextView html_url;
public LinearLayout linearLayout;
//the constructor
public ViewHolder(@NonNull View itemView) {
super(itemView);
//initialize view objects
login=itemView.findViewById(R.id.username);
avatar_url=itemView.findViewById(R.id.imageView);
html_url=itemView.findViewById(R.id.html_url);
linearLayout=itemView.findViewById(R.id.linearLayout);
}
}
8. Storing your data in the adapter
You need to hold your data in the adapter, and DevelopersAdapter needs a constructor
that initializes the developers list from the data. Follow these steps:
1. To hold your data in the adapter, create a private list of DevelopersList(model Java
Class) in DevelopersAdapter and call it developerList. Additionally create a private
member variable for providing the context and call it mContext
public class DevelopersAdapter extends
RecyclerView.Adapter<DevelopersAdapter.ViewHolder> {
//declare DeveloperList private member variable
private List<DeveloperList> developerList;
//context variable
private Context mContext;
2. You can now fill in the getItemCount() method to return the size of developerList:
@Override
public int getItemCount() {
//return the size of developer list
return developerList.size();
}
3. Implement the constructor for DevelopersAdapter. The constructor needs to have
a context parameter, and a List of developers which will be fetched remotely.
public DevelopersAdapter(List<DeveloperList>developerList,
Context context){
this.developerList=developerList;
this.mContext=context;
}
4. Fill out the onCreateViewHolder() method with this code:
public DevelopersAdapter.ViewHolder onCreateViewHolder(@NonNull
ViewGroup parent, int viewType) {
return new
ViewHolder(LayoutInflater.from(parent.getContext()).inflate(
R.layout.developer_list,parent,false));
}
The onCreateViewHolder() method is similar to the onCreate() method. It inflates
the developer_list layout, and returns a ViewHolder with the layout and the
adapter.
5. Fill out the onBindViewHolder() method with the code below:
public void onBindViewHolder(@NonNull DevelopersAdapter.ViewHolder holder, final int
position) {
//create a variable that get the current instance of the developer in the list
final DeveloperList currentDeveloper=developerList.get(position);
// populate the text views and image view with data
holder.login.setText(currentDeveloper.getLogin());
holder.html_url.setText(currentDeveloper.getHtml_url());
//Use the library Picasso to load images to prevent crashing..laoding images is
9. resource intensive
Picasso.with(mContext)
.load(currentDeveloper.getAvatar_url())
.into(holder.avatar_url);
The onBindViewHolder () method connects your data to the view holder.
* @param holder Refers to the ViewHolder into which the data should be put.
* @param position Refers to the adapter position.
6. Run your app to make sure that there are no errors.
Fetching the remote json data.
First off this is the structure of the json data we’ll be returning
Check this link
https://api.github.com/search/users?q=language:java+location:nairobi
As seen the data is in JSON format with other {Json Objects} all wrapped in a [Json
Array], so we’ll be returning the data in the same format. However we are not
particularly interested in all the keys of the objects, we only need the login, the html_url
and the avatar_url. These are the variables we defined in the DevelopersList class.
So we’ll be parsing the respective values to their corresponding variables.
Goto MainActivity and define a String variable for the api private static final String
URL_DATA = “api-url here”;
public class MainActivity extends AppCompatActivity {
//api
private static final String URL_DATA =
"https://api.github.com/search/users?q=language:java+location:nairobi";
Additionally create instances of the developer adapter and developer list you defined.
public class MainActivity extends AppCompatActivity {
//api
private static final String URL_DATA =
"https://api.github.com/search/users?q=language:java+location:nairobi";
//declare the recycler view
private RecyclerView recyclerView;
//declare the adapter
private DevelopersAdapter myAdapter;
//declare the Developers List
private List<DeveloperList> developerList;
Initialize the developers list in the on create method...this list will hold the contents of
our remote JSON and pass it to recycler view
protected void onCreate(Bundle savedInstanceState) {
super.onCreate(savedInstanceState);
setContentView(R.layout.activity_main);
//Initialize the recycler view
recyclerView=findViewById(R.id.recycler_view);
10. recyclerView.setHasFixedSize(true);
recyclerView.setLayoutManager(new LinearLayoutManager(this));
//Initialize the developers list...THIS LIST WILL HOLD THE CONTENTS OF OUR REMOTE JSON
AND PASS IT TO RECYCLERVIEW
developerList= new ArrayList<>();
loadUrlData();
}
Now, create a method loadUrlData() to fetch the url data for the RecyclerView and we’ll
call this method in the onCreate() .
private void loadUrlData(){
final ProgressDialog progressDialog = new ProgressDialog(this);
progressDialog.setMessage("Loading....");
progressDialog.show();
StringRequest stringRequest = new StringRequest(Request.Method.GET, URL_DATA, new
Response.Listener<String>() {
@Override
public void onResponse(String response) {
Log.w("res","Response:" + response);
progressDialog.dismiss();
try {
JSONObject jsonObject = new JSONObject(response);
JSONArray array = jsonObject.getJSONArray("items");
for (int i = 0; i < array.length(); i++) {
JSONObject jo = array.getJSONObject(i);
DeveloperList developers = new DeveloperList(jo.getString("login"),
jo.getString("html_url"), jo.getString("avatar_url"));
developerList.add(developers);
Log.d("res","developers"+ developers);
}
myAdapter = new DevelopersAdapter(developerList, getApplicationContext());
recyclerView.setAdapter(myAdapter);
} catch (JSONException e) {
e.printStackTrace();
}
Log.d("Tag",response);
}
}, new Response.ErrorListener() {
@Override
public void onErrorResponse(VolleyError error) {
Toast.makeText(MainActivity.this,"Error"+
error.toString(),Toast.LENGTH_SHORT).show();
}
});
RequestQueue requestQueue = Volley.newRequestQueue(this);
requestQueue.add(stringRequest);
}
This is a lot of code in one block, yeah I know so am going to try and explain what is
going in this block and hopefully you’ll get it. So we start by using StringRequest (From
the volley dependency) to define the request and RequestQueue to then send the
request. We then create an instance of the DevelopersList to store the individual objects
we’ll be getting from the items Array.
Once the request is sent, we need to display a progress dialog to keep the user engaged
while the task is performed. So we initialize the ProgressDialog globally and define it
inside the loadUrlData() method.
11. We’ll then process the JSON file that will be returned so we can easily parse it into the
defined variables we’ve already set for them. So we create a new JSONObject and pass
in (response) as a parameter, then surround it with (try and catch) to catch all the
possible exceptions. Next we define a JSONArray from the jsonObject we just created,
this is to enable us gain access to the “items” array inside the jsonObject thus we’ll pass
in “items” as a parameter.
Now we have the array, to get the data we want from the array, we’ll need a for-loop,
like the one we defined in the snippet above. This is to enable us get the data from the
array according to their index. Inside the loop, we create another JSONObject that will
allow us get data from the array according to the current index.
Next we create a DevelopersList object called developers and pass in the data we’ll be
getting from the jsonObject(o) as parameters with the getString method. This will get
the data as a String and save it to the corresponding variable as earlier defined in the
DevelopersList class. When this is all done, we then add the list into developersLists.
Then after the loop, we create the adapter and pass in the developersLists and the
application context as its parameters, after which we’ll set it as the RecyclerView
adapter.
The Profile Activity
So far we’ve been able to set up our layouts, used volley StringRequest and
RequestQueue to define and send our request, we’ve fetched the data from the server
and set it to display on the layout. Next we’ll handle what happens when an item is
clicked on the list. What we want is to have an intent that will launch a profile page for
every developer clicked on.
So first we create a new empty activity for profiles, call it ProfileActivity. This will be
the profile page for every developer, we’ll use an intent to pass their information from
the developerslist to this profile page and display their image, username (login) and
github link (html_url). We’ll also add a share button that will use intent to share their
profile with some hardcoded messages on other apps.
1. Create an activity using empty activity template and name the Activity : Profile
Activity
2. Create the layout for the Profile activity.
This is how the layout for the profile activity should look like
<?xml version="1.0" encoding="utf-8"?>
<LinearLayout xmlns:android="http://schemas.android.com/apk/res/android"
xmlns:app="http://schemas.android.com/apk/res-auto"
xmlns:tools="http://schemas.android.com/tools"
android:layout_width="match_parent"
android:layout_height="match_parent"
android:padding="16dp"
android:background="#FFFFFF"
android:orientation="vertical"
tools:context=".ProfileActivity">
<androidx.cardview.widget.CardView
android:layout_width="match_parent"
android:layout_height="0dp"
android:layout_weight="2"
13. another Relative layout to hold the developers gihub link (html_url) and the share
button. So basically we have 3 new views and a button, we’ll initialize them with their
id’s in the onCreate method of the profile activity
public class ProfileActivity extends AppCompatActivity {
@Override
protected void onCreate(Bundle savedInstanceState) {
super.onCreate(savedInstanceState);
setContentView(R.layout.activity_profile);
//Initialize the views using the ID's you set in activity_profile.xml
ImageView profileImageView = findViewById(R.id.profileImageView);
TextView userNameTextView = findViewById(R.id.usernameTextView);
ImageButton shareProfile = findViewById(R.id.shareProfile);
TextView developerUrl = findViewById(R.id.developerUrl);
Handling Intents
We need to be able to pass data from the MainActivity to the ProfileActivity since we’ll
be displaying the developers image, username and link (in their profile page). Notice
that we defined 3 global static variables (KEY_NAME, KEY_IMAGE and KEY_URL)
in the DevelopersAdapter class.
public class DevelopersAdapter extends RecyclerView.Adapter<DevelopersAdapter.ViewHolder> {
//declare DeveloperList private member variable
private List<DeveloperList> developerList;
//context variable
private Context mContext;
//Keys for our intents
public static final String KEY_NAME = "name";
public static final String KEY_IMAGE = "image";
public static final String KEY_URL = "url";
These variables will help us achieve that task. So in the onBindVieHolder method inside
the DevelopersAdapter class, we’ll set an OnClickListener on the linear layout holding
the CardViews so that upon clicking any card on the RecyclerView, it’ll open the profile
page of the developer on that card with an Intent.
public void onBindViewHolder(@NonNull DevelopersAdapter.ViewHolder holder, final int
position) {
//create a variable that get the current instance of the developer in the list
final DeveloperList currentDeveloper=developerList.get(position);
// populate the text views and image view with data
holder.login.setText(currentDeveloper.getLogin());
holder.html_url.setText(currentDeveloper.getHtml_url());
//Use the library Picasso to load images to prevent crashing..laoding images is
resource intensive
Picasso.with(mContext)
.load(currentDeveloper.getAvatar_url())
.into(holder.avatar_url);
//Set on click listener to handle click events
holder.linearLayout.setOnClickListener(new View.OnClickListener() {
@Override
//ensure you override the onClick method
public void onClick(View v) {
//create an instance of the developer list and initialize it
DeveloperList developersList1 = developerList.get(position);
//create an intent and specify the target class as Profile Activity
Intent skipIntent = new Intent(v.getContext(), ProfileActivity.class);
//Use intent EXTRA TO Pass data from Main Activity to Profile Activity
14. skipIntent.putExtra(KEY_NAME, developersList1.getLogin());
skipIntent.putExtra(KEY_URL, developersList1.getHtml_url());
skipIntent.putExtra(KEY_IMAGE, developersList1.getAvatar_url());
v.getContext().startActivity(skipIntent);
}
});
}
So to achieve this we’ll define an object of the DevelopersList class inside the
OnClickListener and get the values we need from it (developersList1). Then we save
these values (Login, Html_url and Avatar_url) into the global static variables
(KEY_NAME, KEY_URL and KEY_IMAGE) so that we can get the values from
them in the ProfileActivity. To open the ProfileActivity we create an Intent (in this
context) which I called skipIntent and put the values into the static variables.
Getting the Intents
In the ProfileActivity java class, we’ll create an intent to get these values from the
holding variables and set them into the display String variables we’ve defined. For the
image we’ll still use Picasso to display it on the imageView of the profile page. So in the
onCreate() of the ProfileActivity java file add:
//Getting the intents send from main Activity
Intent intent = getIntent();
final String userName = intent.getStringExtra(DevelopersAdapter.KEY_NAME);
String image = intent.getStringExtra(DevelopersAdapter.KEY_IMAGE);
final String profileUrl = intent.getStringExtra(DevelopersAdapter.KEY_URL);
//Setting the views
Picasso.with(this)
.load(image)
.into(profileImageView);
userNameTextView.setText(userName);
developerUrl.setText(profileUrl);
Recall we’ve set the id’s of the TextView in the ProfileActivity layout file to
userNameTextView and developerUrl . so here we just set the Texts on them whilst
displaying the image on the profileImageView with Picasso.
Handling OnItem Clicks
Then we want to launch the browser to load the developers github profile page upon
clicking the developerUrl on the profile page so we set an onClickListener on the
developerUrl.
//set on click listener to developerUrl so as to open the developer link using implicit
intent
developerUrl.setOnClickListener(new View.OnClickListener() {
@Override
public void onClick(View v) {
String url = profileUrl;
Intent i = new Intent(Intent.ACTION_VIEW);
i.setData(Uri.parse(url));
startActivity(i);
15. }
});
The last functionality we want for the app is to have a button in the Profile page that
will share the contents of the profile page via other social media apps, so we’ll define
the intent to handle this with an onClickListener on the button.
//set onclickLister to the image button shareProfile and implement implicit intent for
sharing developers profile
shareProfile.setOnClickListener(new View.OnClickListener() {
@Override
public void onClick(View v) {
Intent shareIntent = new Intent(Intent.ACTION_SEND);
shareIntent.setType("text/plain");
shareIntent.putExtra(Intent.EXTRA_TEXT, "Check out this awesome developer " +
userName +
", " + profileUrl);
Intent chooser = Intent.createChooser(shareIntent, "Share via");
if (shareIntent.resolveActivity(getPackageManager()) != null) {
startActivity(chooser);
}
}
});
We have achieved all we set out to do in this tutorial, we’ve successfully built an android
app that returns a list of java developers from a github api and parse it to a RecyclerView
with CardViews.
Coding Challenge:
1. Redo the Lab using Retrofit Library.
2. Create the REST API for your group project and connect your Android Client to
your remote Server.
Copy protected with Online-PDF-No-Copy.com
![Set Up
First off, launch android studio and create a new project [File > New > New
Project]. While setting up your project feel free to give your project any name of your
choice, in my case I’ll name it My Volley.
Once your project has finished building, you’ll need to add some dependencies to your
app level Gradle file [app > build.gradle] then locate the dependency block and add
these dependencies.
implementation 'com.google.android.material:material:1.1.0'
implementation 'androidx.cardview:cardview:1.0.0'
implementation 'com.android.volley:volley:1.1.0'
implementation 'com.squareup.picasso:picasso:2.5.2'
Then set internet permissions in the manifest file.
<manifest xmlns:android="http://schemas.android.com/apk/res/android"
package="com.mwongela.myvolley">
<uses-permission android:name="android.permission.INTERNET" />
<application
android:allowBackup="true"
android:icon="@mipmap/ic_launcher"
android:label="@string/app_name"
Layout
By default you already have activity_main.xml [res > layout >
activity_main.xml] this is the layout that will hold the RecyclerView, so set the
layout to RelativeLayout initialize the RecyclerView here.
<?xml version="1.0" encoding="utf-8"?>
<RelativeLayout xmlns:android="http://schemas.android.com/apk/res/android"
xmlns:app="http://schemas.android.com/apk/res-auto"
xmlns:tools="http://schemas.android.com/tools"
android:layout_width="match_parent"
android:layout_height="match_parent"
tools:context=".MainActivity">
<androidx.recyclerview.widget.RecyclerView
android:id="@+id/recycler_view"
android:layout_width="match_parent"
android:layout_height="match_parent"
/>
</RelativeLayout>
Open the MainActivity.java file and initialize the RecyclerView in the on create method
and find it by the id you assigned to it in the activity_main.xml file. In my case I set it’s](data:image/gif;base64,R0lGODlhAQABAIAAAAAAAP///yH5BAEAAAAALAAAAAABAAEAAAIBRAA7)