
Recommended
More Related Content
What's hot
What's hot (20)
Similar to Create Pivot Tables and Charts in Excel
Similar to Create Pivot Tables and Charts in Excel (20)
Create Pivot Tables and Charts in Excel
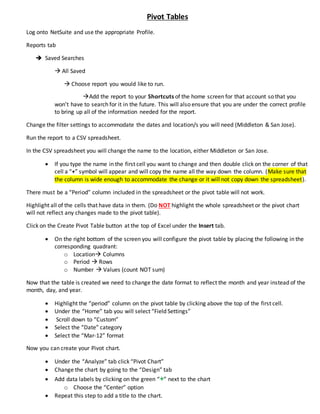
- 1. Pivot Tables Log onto NetSuite and use the appropriate Profile. Reports tab Saved Searches All Saved Choose report you would like to run. Add the report to your Shortcuts of the home screen for that account so that you won’t have to search for it in the future. This will also ensure that you are under the correct profile to bring up all of the information needed for the report. Change the filter settings to accommodate the dates and location/s you will need (Middleton & San Jose). Run the report to a CSV spreadsheet. In the CSV spreadsheet you will change the name to the location, either Middleton or San Jose. If you type the name in the first cell you want to change and then double click on the corner of that cell a “+” symbol will appear and will copy the name all the way down the column. (Make sure that the column is wide enough to accommodate the change or it will not copy down the spreadsheet). There must be a “Period” column included in the spreadsheet or the pivot table will not work. Highlight all of the cells that have data in them. (Do NOT highlight the whole spreadsheet or the pivot chart will not reflect any changes made to the pivot table). Click on the Create Pivot Table button at the top of Excel under the Insert tab. On the right bottom of the screen you will configure the pivot table by placing the following in the corresponding quadrant: o Location Columns o Period Rows o Number Values (count NOT sum) Now that the table is created we need to change the date format to reflect the month and year instead of the month, day, and year. Highlight the “period” column on the pivot table by clicking above the top of the first cell. Under the “Home” tab you will select “Field Settings” Scroll down to “Custom” Select the “Date” category Select the “Mar-12” format Now you can create your Pivot chart. Under the “Analyze” tab click “Pivot Chart” Change the chart by going to the “Design” tab Add data labels by clicking on the green “+” next to the chart o Choose the “Center” option Repeat this step to add a title to the chart.