SlideShare a Scribd company logo
1 of 56
1
COURSE OBJECTIVES
ME3382 - MANUFACTURING TECHNOLOGY LABORATORY
SYLLABUS
To study and practice the various operations that can be performed in lathe, shaper, drilling, milling machines,
etc. and to equip with the practical knowledge required in the core industries.
LIST OF EXPERIMENTS
Machining and machining time estimations for:
1. Taper turning
2. External thread cutting
3. Internal thread cutting
4. Eccentric turning
5. Knurling
6. Square head shaping
7. Hexagonal head shaping
8. Drilling and reaming
9. Milling contours on plate
10. Cutting spur gear
11. Cutting helical gear
12. Generating gear by gear hobbing machine
13. Cylindrical grinding
14. Center less cylindrical grinding
15. Cutting force measurement using dynamometer in milling machine
16. Cutting force measurement using dynamometer in lathe machine
17. Preparing green sand moulds with cast pattern
18. Fabricating simple structure shapes using gas metal arc welding machine
2
Expt. No.01 STUDY OF LATHE
Aim:
To understand the working principle and operations done in lathe machine to identify the
various components of lathe machine and its function
Machining processes:
Machining is one of the processes of manufacturing in which the specified shape to the work piece
is imparted by removing surplus material. Conventionally this surplus material from the work piece is
removed in the form of chips by interacting the work piece with an appropriate tool. This mechanical
generation of chips can be carried out by single point or multi point tools or by abrasive operations these
are summarized below
Machining Processes
Single point tool operations Multi-point tool operations Abrasive operations
1. Boring 1. Drilling 1. Lapping
2. Shaping 2. Tapping 2. Honing
3. Planning 3. Reaming 3. S
1
u
.
p
G
er
r
-
i
f
n
in
d
i
i
s
n
h
g
ing
4. Turning 4. Hobbing 4.Grinding
5. Broaching
6. Sawing
7. Milling
Multi-point tool operations:
The process of chip formation in metal cutting is affected by relative motion between the tool and the work
piece achieved with the aid of a device called machine tool. This relative motion can be obtained by a
combination of rotary and translator movements of either the tool or the work piece or both. The kind of
surface that is produced by the operation depends on the shape of the tool and the path it traverses through
the materials.
When the workpiece is rotated about an axis and the tool is traversed in a definite path relative to the axis, a
surface of revolution is generated. When the tool path is parallel to the axis, the surface generated is a
cylinder as in straight turning or boring operations. Similarly, planes may be generated by a series of straight
cuts without rotating the workpiece as in shaping and planning operations (Fig.3).
In shaping the tool is reciprocating and the work piece is moved crosswise at the end of each stroke.
Planning is done by reciprocating the work piece and crosswise movement is provided to the tool.
3
Surface may be machined by the tools having a number of cutting edges that can cut successively through
the work piece materials. In plane milling, the cutter revolves and moves over the work piece as shown Fig.
4. The axis of the cutter is parallel to the surface generated.
Similarly in drilling, the drill may turn and be fed into the work piece or the work piece may revolve while the
drill is fed into it (Fig.5).
The machine tools, in general, provide two kinds of relative motions. The primary motion is responsible for the
cutting action and absorbs most of the power required to perform the machining action.
The secondary motion of the feed motion may proceed in steps or continuously and absorbs o1nly a
fraction of the total power required for machining. When the secondary motion is added to the primary
motion, machine surfaces of desired geometric characteristics are produced.
Lathe:
Lathe is the machine tool which is used to perform several operations on the work piece. Lathe is
useful in making several parts which is further assembled to make new machine. Hence lathe is known as
“mother of machines”.
Basic working principle of lathe:
In lathe, the work piece is held in the chuck, a work holding device. The cutting tool is mounted in the
tool post. The chuck is rotated by means of power. When the chuck rotates, the work piece also rotates.
4
The tool is moved against the rotating work piece by giving small amount of depth of cut. The material is
removed in the form of chips. Continuous feed and depth of cut is given until the required dimensions are
obtained in the work piece.
Types of lathe machines:
There are different types of lathe machines, they are
1. Centre lathe
2. Tool room lathe
3. Bench lathe
4. Capstan lathe
5. Turret lathe
6. Automatic lathe
Description of lathe:
Lathe is a machine which has several parts in it. They are
Bed:
It is the base of the machine. On its left side, the head stock is mounted and on its right it has movable
casting known as tailstock. Its legs have holes to bolt down on the ground.
Head stock:
It consists of spindles, gears and speed changing levers. It is used to transmit the motion to the
job. It has two types; one is the headstock driven by belt and the other one is the gear driven.
Carriage:
Carriage is used to carry a tool to bring in contact with the rotating work piece or to with draw from such
a contact. It operates on bed ways between the headstock and tail stock.
Saddle:
It is an ‘H’ shaped part fitted on the lathe bed. There is a hand wheel to move it on the bed way. Cross
slide, compound rest, tool post is fitted on this saddle.
Cross slide:
It is on the upper slide of saddle in the form of dove tail. A hand wheel is provided to drive the cross
slide. It permits the cross wise movement of the tool (i.e.) movement of tool towards or away from the
operator.
5
Compound rest:
It is fitted over the cross slide on a turn table. It permits both parallel and angular movements to
cutting tool.
Tool post:
It is fitted on the top most part of the compound rest. Tool is mounted on this tool post. Cutting tool is
fixed in it with the help of screws.
Apron:
It is the hanging part in front of the carriage. It accommodates the mechanism of hand and power feed
to the cutting tool for carrying out different operations.
Lead screw:
It is a long screw with ACME threads. It is used for transmitting power for automatic feed or feed for
thread cutting operation.
6
Tail stock:
It is located at the right end of the lathe bed and it can be positioned anywhere in the bed. It is used for
supporting lengthy jobs and also carries tool to carry out operations such as tapping, drilling and reaming.
Work holding devices:
Lathe centers:
They are used to support work. It has two categories of centers. Live center is one which is fitted in
the headstock spindle. Dead is another one which is fitted in the tail stock.
Chuck:
It is a device used to hold a job. It is easily fitted on the thread cut on the end of head stock
spindle. Various types of chuck are Two jaw chuck, three jaw chuck, four jaw chuck collect chuck and
magnetic chuck.
7
Face plate:
Lathe carriers or dogs:
Steady rest:
Clamped to the lathe ways, it uses adjustable fingers to contact the work piece and align It Can be used in
place of tailstock or in the middle to support long or unstable parts being machined.
Mandrel:
Mandrel used to hold hollow jobs.
Follower rest:
Bolted to the lathe carriage, it uses adjustable fingers to bear against the work piece opposite the cutting tool
to prevent deflection.
8
Cutting tools used:
For making a finished job on lathe machine, various types of cutting tools are used. One of them is single
point cutting tool which is used to perform several operations on the work piece. Various types of cutting
tools are furnished below.
Facing Tool:
It is used for facing the longitudinal ends of the job. Its shape is like a knife.
Rough Turning Tool:
It is used to remove excess material from the work piece in quick time. It can be used to give large depth of
cut and work at coarse feed.
Finishing Tool:
It is used for getting smooth finish on the work piece. Its point is a little more round.
Radius Tool:
Jobs which need round cutting are done with this tool. Its types are Convex radius tool and concave radius
tool.
Parting Tools:
It is used to cut the jobs into two parts. It is also used for grooving.
Form Turning Tool:
It is used for jobs which require both convex and concave turning.
Thread Cutting Tool:
It is used for making internal or external threads on the work piece. The tool nose is designed with a
definite profile for taking threads.
Drill Tool:
It is used for making holes of various diameters on the job. Drill bit of various sizes of diameter are
available.
9
Boring Tool:
It used for enlarging the drill hole.
Tool materials:
The single point cutting tools are made of high speed steel(H.S.S). The main alloying elements in 18-4-1 HSS
tools are 18% tungsten, 4% chromium and 1% vanadium. 5 to 10% cobalt is also added to improve the heat
resisting properties of the tool. General purpose hand cutting tools are usually made from carbon steel or tool
steel. Carbide tipped tools fixed in tool holders, are mostly used in production shops.
Cutting tool angles:
Top rake angle (back rake angle):
If the slope is given to the face or surface of the tool and if this slope is along the tools length then it is called
top rake angle. It is usually from 15o to 20o.
Side rake angle:
If the slope is given to the face or top of the tool along the tools width then it is called side rake angle.
It lies between 6 o and 15 o.
Clearance angle (relief angle):
Types: 1. Side clearance angle 2. End clearance angle.
They are provided to keep surface of the tool clear of the work piece.
10
Cutting edge angle:
Types: 1. Side cutting edge angle – (generally 15 o) it is an angle, the side cutting edge makes with the axis
of the tool 2. End cutting edge angle – (from 7 o to 15 o) it is an angle made by the end cutting edge with
the width of the tool.
Lip angle (cutting angle):
It is the angle between the face and the end surface of the tool.
Nose angle:
It is the angle between the side cutting edge and end cutting edge.
Lathe operations:
Facing:
It is done for getting fine finish (good surface finish) on the face of the job. Facing tool is set at an angle to the
work piece. The tool is fed from the centre of work piece towards the outer surface against the rotating
work piece. Depth of cut is low for the facing operation.
Plain Turning:
It is done for reducing the diameter of the work piece. A cutting tool with 70 o setting angle is used for roughing
operation. More feed is given for rough turning while less feed is given for finishing. Work piece is held in chuck
and tool is set to center height of the work piece.
11
Step Turning:
It is similar to the process of turning but in this case different diameter in step of various sizes is taken on
the work piece.
Taper Turning:
It is different from the turning operation. Taper is defined as uniform change in the diameter of a work
piece measured along its length.
Where
D – large diameter
d – small diameter
l – length of taper
12
Knurling:
It is process of making serrations on the work piece. Knurling tools of different shape and size are used to
make grip on the work piece. It has two hardened steel rollers. The tool is held in tool post and pressed
against the rotating work piece. Work piece is rotated at lower speed and small amount of feed is given.
Drilling:
It is a process of making a hole on the work piece Job is held in chuck while the drill is held in the tail stock
sleeve. Feed is given by rotating the hand wheel in the tail stock which pushes the tailstock sleeve.
Cutting Speed:
It is the peripheral speed of the work past the cutting tool. It is the speed at which metal is removed by the tool
from the work piece. It is expressed in meter / minute. Cutting speed= (π x diameter x R.P.M)/1000 = π
DN/1000 in m/min
D – Diameter in mm
N – Spindle speed in rpm
Feed:
It is defined as the rate of tool travel across a surface cutting it. It is the distance of the tool advances for each
revolution of the work piece. It is expressed in mm/revolution.
Depth of Cut:
It is the perpendicular distance measured from the machined surface to the uncut surface of work. It is
expressed in mm.
Depth of cut= (d1- d2)/2
d1 - diameter of work before machining
d2 - diameter of work after machining
13
Expt. No.02 TAPER TURNING USING COMPOUND REST
METHOD
Aim:
To produce the component by performing taper turning using lathe
Materials required:
Mild steel Φ 32 mm X 100 mm long
Tools required:
1. Chuck key
2. Tool post spanner
3. Verneir caliper
4. Steel rule
5. Single point cutting tool
Specimen drawing:
Procedure:
All dimensions are in mm
1. Check the size of raw material given and ensure the size.
2. Hold the workpiece in the chuck and tight it properly.
3. Clamp the tool on post properly and check the centre of work piece with cutting tool tip.
4. Do the facing operation by giving cross feed to the cross slide and reduce length.
14
5. Do the turning operation by giving longitudinal feed to the carriage and reduce the diameter of the
work piece.
6. Two or three pass can be given for turning operation.
7. Remove the work piece and hold in chuck on other side and do the turning operation for the remaining
portion of the work piece.
8. Calculate the taper angle and swivel the compound rest and clamp it properly.
9. Do the taper turning operation by giving angular feed to the compound rest as per the dimension.
10. Do the facing operation and get the required length.
11. Remove the component carefully and check the dimension.
Result:
Thus the component is produced as per the given drawing using lathe.
Outcome:
Able to produce a component by performing taper turning operation by compound rest method
15
1. What is meant by lathe?
2. What are the various operations can be performed on a lathe?
3. What are principle parts of the lathe?
4. What are the types of headstock?
5. What are the various parts mounted on the carriage?
6. What are the four types of tool post?
7. What is meant by an apron?
8. What are the two specification of lathe?
9. What are the types of lathe?
10. What is meant by semi-automatic lathe?
11. What is meant by capstan lathe?
12. Write down the formula used for taper turning by compound rest method.
13. What is the purpose of compound rest?
14. How to give angular feed in lathe
15. What is the purpose of three jaw chuck?
Viva - voce
16
Expt. No.03 TAPER TURNING BY TAIL STOCK OFFSET
METHOD
Aim:
To produce the component by performing taper turning using lathe
Material required:
Mild steel Φ 32 mm X 100 mm long
Tools required:
1. Chuck key
2. Tool post spanner
3. Verneir caliper
4. Steel rule
5. Single point cutting tool
6. Revolving centre
7. Drill chuck with centre drill bit
8. Catch plate with dog carrier
Specimen drawing:
All dimensions are in mm
17
Procedure:
1. Check the size of raw material given and ensure the size.
2. Held the work piece in the chuck and tight it properly.
3. Clamp the tool on tool post properly and check the centre of work piece with cutting tool tip.
4. Do the facing operation by giving cross feed to the cross slide and reduce the length.
5. Do the turning operation by giving longitudinal feed to the carriage and reduce the diameter of the
work piece.
6. Two or three passes can be given for turning operation.
7. Remove the work piece and hold in chuck on other side. Does the turning operation for the remaining
portion of the work piece also do the facing operation and get the required length.
8. Make a centre drilling operation on both sides by tail stock.
9. Calculate the offset distance and offset the tail stock from the lathe axis.
10. Hold the work piece between lathe centers on both side using catch plate with dog carrier.
11. Do the taper turning operation by giving longitudinal feed to the carriage as per the dimension.
12. Remove the component carefully and check the dimension.
Result:
Thus the component is produced as per the given drawing using lathe.
Outcome:
Able to produce a component by performing taper turning operation by tail stock offset method
18
1. Define – Conicity
2. What are the different operations performed on the lathe?
3. What are the holding devices?
4. What are the various feed mechanisms used for obtaining automatic feed?
5. What is copying lathe?
6. What are the advantage of capston lathe & turret lathe?
7. What is meant by tooling?
8. What are the three stage of a tool-layout?
9. What are the different drives used in copying lathe?
10. What are the two specifications of capstan and turret lathe?
11. What are the methods used for taper turning in lathe?
12. What are various feeds in lathe?
13. Which method is suitable for steep turning?
14. Which method is suitable for taper turning on lengthy workpiece?
15. What is meant by lead screw?
Viva - voce
19
Expt. No.04 EXTERNAL THREAD CUTTING
Aim:
To produce the component by performing threads cutting operation using lathe
Material required:
Mild steel Φ 32 mm X 100 mm long
Tools required:
1. Chuck key
2. Tool post spanner
3. Verneir caliper
4. Steel rule
5. Single point cutting tool
6. V thread cutting tool
7. Pitch gauge
8. Grooving tool
9. Drill chuck with centre drill bit
Specimen drawing:
Procedure:
All dimensions are in mm
1. Check the size of raw material given and ensure the size.
2. Hold the work pieces in the chuck and tight it properly.
3. Clamp the tool on tool post properly and check the centre of work piece with cutting tool tip.
4. Do the facing operation by giving cross feed to the cross slide and reduce the length.
20
5. Do the turning operation by giving longitudinal feed to the carriage and reduce the length.
6. Two or three pass can be given for the turning operation.
7. Remove the work piece and hold in chuck on the other side and do the turning operation for the
remaining work piece.
8. Engage the back gear mechanism to reduce the speed of the work piece.
9. Check the pitch required, calculate the tumbler gear, and engage it with head stock.
10. Move the carriage towards tail stock and make a mark on the dial.
11. Give small depth of cut and engage the half nut so that the carriage will move automatically towards
head stock and cut the v-thread on the work piece.
12. After reaching the required length of thread, release the tool by rotating cross slide in opposite to the
depth of cut by counting the number of rotation.
13. Move the carriage towards tail stock, give depth of cut and engage the half nut.
14. Repeat the procedure to produce complete form of v-thread. After finishing remove the work piece
from the chuck.
Result:
Thus the component is produced as per the given drawing using lathe.
Outcome:
Able to produce the component by performing external thread cutting operation using lathe
21
1. What are the components that can be turned on a copying lathe?
2. What is meant by shaper?
3. What are the four important parts of a shaper?
4. How the feed & depth of cut is given to the shaper?
5. What are the four-shaper specifications?
6. How does the planer differ from the shaper?
7. What is the use of planer?
8. What are the various types of planners?
9. Name the various parts of a double housing planer?
10. What are the four specifications of planer?
11. Write down different types of thread.
12. Define – Pitch
13. What is meant by knurling?
14. Distinguish between square and V type thread
15. Write down the formula used for pitch calculation.
Viva - voce
22
Expt. No.05 DRILLING, BORING AND INTERNAL THREAD
CUTTING
Aim:
To produce the component by performing drilling, boring and thread cutting using lathe
Material required:
Mild steel Φ 50 mm X 45 mm long
Tools required:
1. Chuck key
2. Tool post spanner
3. Verneir caliper & Steel rule
4. Single point cutting tool & Boring tool
5. Drill chuck with drill bits
6. Internal thread cutting tool
Specimen drawing:
Procedure:
All dimensions are in mm
1. Check the size of raw material given and ensure the size.
2. Hold the workpiece in the chuck and tight it properly.
3. Clamp the tool on tool post properly and check the centre of work piece with cutting tool tip.
4. Do the facing operation by giving cross feed to the cross slide and reduce the length.
5. Hold the drill bit on the tail stock and unclamp the tail stock, then move it towards the head stock and
ensure the centre coincidence with work piece centre.
23
6. Start the motor and give depth of cut to the drill bit by rotating the tail stock wheel and make complete
hole.
7. Clamp the boring tool on the tool post to perform the boring operation.
8. Clamp the internal thread tool on the tool post to perform internal threading operation,
9. Engage the back gear mechanism to reduce the speed of the work piece.
10. Check the pitch required, calculate the tumbler gear and engage it with head stock.
11. Move the carriage towards tailstock and make marking on the dial.
12. Give small depth of cut and engage the half nut so that the carriage will move automatically towards
headstock and cut the v thread on the work piece.
13. Release the tool by rotating cross slide in opposite to the depth of cut by counting number of rotation
after reaching the required length of thread.
14. Move the carriage toward the tail stock and give depth of cut and engage the half nut.
15. Repeat the procedure to produce complete form of v thread. After finishing remove the work piece
from the chuck.
Result:
Thus the component is produced as per the given drawing using lathe
Outcome:
Able to produce the component by performing drilling, boring and thread cutting operation using lathe
24
1. What is meant by drilling?
2. What is meant by gang -drilling machine?
3. What are the specifications of drilling machine?
4. What are the machining operations that can be performed on a drilling machine?
5. What are the different ways to mount the drilling tool?
6. What is meant by broaching?
7. What are the specifications of a broaching machine?
8. What are the advantages and limitation of broaching?
9. What are the different operations that can be performed on a broaching machine?
10. What is meant by boring?
11. Differentiate between drilling and boring
12. What is meant by counter boring?
13. What is meant by counter sinking?
14. Which type of tool used for boring?
15. What is meant by pitch circle diameter?
Viva - voce
25
Expt. No.06 ECCENTRIC TURNING
Aim:
To turn a given work piece eccentrically in a lathe machine as per the given dimensions
Material required:
Mild steel Φ 32 mm X 75 mm long
Tools required:
1. Steel rule
2. Dot punch
3. Ball pen hammer
4. Single point cutting tool
5. Surface gauge
6. Drill bit
7. Drill chuck
8. Boring tool
Specimen drawing:
Procedure:
All dimensions are in mm
1. Check the size of raw material given and ensure the size.
2. The work piece is fixed in the four jaw chuck using surface gauge.
3. The cutting tool is fixed in the tool post to the lathe axis.
4. Facing operation has been done on both sides of given work pieces.
5. Marking and punching is to be done on the given work pieces as per the dimension.
26
6. Then the work piece is fixed in the chuck such that the offset point coincides with spindle axis.
7. Using the turning tool, turning operation has been performed.
8. The same procedure is also carried out to the other side of the work piece for the given offset
distance.
9. Thus the eccentric turning would be finished.
Result:
Thus the work piece is turned eccentrically as per the given dimensions.
Outcome:
Able to turn a given work piece eccentrically in a lathe machine as per the given dimensions
27
1. What is meant by eccentricity?
2. What is meant by effect of back rake angle? Mention the types.
3. What is meant by side rake angle? Mention its effects.
4. What are all the conditions for using positive rake angle?
5. When will the negative rake angles be used?
6. Define – Orthogonal cutting
7. What is meant by cutting force?
8. What is meant by chip thickness ratio?
9. What are the purposes of chip breakers?
10. Define – Machinability of metal
11. Define – Oblique cutting
12. Differentiate between orthogonal and oblique cutting.
13. Which type of chuck used for eccentric turning?
14. What are the applications of eccentric components?
15. What is meant by tool signature?
Viva - voce
28
Expt. No.07 SQUARE HEAD SHAPING
Aim:
To make round work piece to square by using shaper
Material required:
Mild steel Φ 50 mm x 25 mm long
Tools required:
Steel rule, dot punch, hammer, verneir height gauge, T-square, scriber, surface plate, single point cutting
tool, tool holder.
Specimen drawing:
All dimensions are in mm
Procedure:
1. Check the size of raw material given and ensure the size.
2. The work piece is fixed in the three jaw chuck.
3. The cutting tool is fixed in the tool post to the lathe axis.
4. Facing operation has been done on both sides of given work pieces.
5. Chalk is applied uniformly on the face of the work piece.
6. Marking and punching is to be done on the given work pieces as per the dimension.
7. The cutting tool is fixed in the tool holder in shaper machine.
8. The work piece is fixed in the machine vice, then switch on the machine.
29
Viva - voce
9. At the end of each stroke give the feed to the work piece.
10. Shaping operation has been done on four sides in the work piece till the round work piece is turned
into square shaped as per the given dimension.
Result:
Thus the round work piece is machined to square work piece by shaper machine.
Outcome:
Able to make round work piece to square shape by using shaper
1. What is meant by shaper?
2. What are the various types of shaper?
3. What are the specifications of shaper?
4. W hat are the operations of shaper?
5. What is the application of square head?
6. What is meant by indexing?
7. What are the three types dividing heads?
8. What is cam milling?
9. What are the different types of thread milling?
10. What are the other forming methods for manufacturing gears?
11. Write any ten nomenclature of plain milling cutter?
12. What are the various milling operations?
13. What are the advantages of milling process?
14. What are the down milling processes?
15. What is the various type of milling attachment?
30
Expt. No.08 HEXAGONAL HEAD SHAPING
Aim:
To make a round work piece to hexagonal shape by using shaper
Material required:
Mild steel rod size of dia. 32 mm and length 50 mm
Tools required:
Steel rule, dot punch, hammer, verneir height gauge, T-square, scriber, surface plate, single point cutting
tool, tool holder.
Specimen drawing:
Procedure:
All dimensions are in mm
1. Check the size of raw material given and ensure the size.
2. The work piece is fixed in the three jaw chuck.
3. The cutting tool is fixed in the tool post to the lathe axis.
4. Facing operation has been done on both sides of given work pieces.
5. Chalk is applied uniformly on the face of the work piece.
6. Marking and punching is to be done on the given work pieces as per the dimension.
7. The cutting tool is fixed in the tool holder in shaper machine.
8. The work piece is fixed in the machine vice, then switch on the machine.
31
Viva-voce
9. At the end of each stroke give the feed to the work piece.
10. Follow the same procedure to the other side of the work piece.
11. Shaping operation has been done on six sides in the work piece till the round work piece is turned into
hexagonal shaped as per the given dimension.
Result:
Thus the round work piece is machined to hexagonal shape by shaper machine.
Outcome:
Able to make a round work piece to hexagonal shape by using shaper
1. What is the function of cutting fluids?
2. What are the properties of cutting fluid?
3. What are the causes of wear?
4. What are the specifications of the milling machine?
5. What are the various movements of universal milling machine table?
6. Distinguish between plain and universal milling machine?
7. What are the cutter holding devices?
8. What are the various type of milling attachment?
9. Write any ten nomenclature of plain milling cutter?
10. What are the advantages of milling process?
11. What are the applications of hexagonal head?
12. Differentiate shaper from planner.
13. What are the operations of planner?
14. What are the work holding devices used in shaper?
15. What are the tool holding devices used in shaper?
32
Expt. No. 9 STUDY OF WELDING
Aim:
To understand the basic concepts of welding by carrying out simple exercises relevant to its principles
Introduction:
Welding is the progress of joining two metal plates using a joining material by heat. It is commonly used to
join metal plates in making boilers, vessels, furnitures, automobile parts, etc.
Safety equipments and tools:
Welding goggles:
Goggles with glasses are used to protect the eyes of the eyes of the welder from the light sparks produced
during welding.
Face shield:
A face shield is also used to protect the eyes of the welder from the light sparks produced during welding.
It is normally held in hand.
Welding goggles Face shield
Hand gloves:
It is used to protect the hands of the welder from the effect of ultra violet rays, infra red rays, heat and
sparks.
Chipping Hammer:
A chipping hammer is used to remove slags which from during welding.
Hand gloves Chipping hammer
33
Ground Clamp:
It is connected to the end of the ground cable. It is normally clamped to the welding table or the
job itself to complete the electric circuit.
Wire brush:
The wire brush is used to clean the surface to be welded.
Types of Welding:
Ground clamp Wire brush
The two types of welding most prevalently in use are
1. Arc welding
2. Gas Arc welding
1. Arc welding:
Electric arc welding is widely used to join metal plates using a filler rod. The filler rod (welding rod)
melts on the electric arc produced and welds the metal plates.
Arc welding
2. Gas welding
Gas welding is a process in which the required heat to melt the surfaces is supplied by a high temerature
flame obtained by a mixture of two gases. Usually the mixture of oxygen and acetylene is used for welding
purpose. The filler rod and parent metal plates are melted by the heat of the flame produced using oxygen and
acetylene gas mixture. Gas welding is also widely used to join metal plates.
34
Expt. No. 10 SINGLE V BUTT JOINT
Aim:
To join two given metal plates by a single 'V' butt joint in gas welding
Materials required:
MS flat: Length = mm
Breadth = mm
Thickness
Tools Required:
= mm
1. Welding transformer
2. welding rods
3. Safety gloves
4. Goggle
5. Chipping hammer
6. Flat file
Diagram:
Procedure:
All dimensions are in 'mm'
1. Check the surface to be welded and file the edge of the plates for perfect joint and more strength.
2. Hold the welding rod in the electrode holder and clamp the ground clamp to the plate to be welded.
3. Position the plates to be welded touching each other (butting) and tag weld on the ends to avoid
the movement of the plates during welding.
4. Now start welding one end of the plates.
5. The electric arc produced melts the welding rod and joints the two metal plates. Maintain a gap of
3 mm between the plate and the welding rod.
6. Complete the welding process by removing slag using chipping hammer.
35
Result:
Thus the two metal plates are welded in single 'V' butt joint.
Outcome:
Able to join two given metal plates by a single 'V' butt joint in gas welding.
36
Expt. No. 11 DOUBLE V BUTT JOINT
Aim:
To join two given metal plates by a double 'V' butt joint in gas welding
Materials required:
MS flat: Length = mm
Breadth = mm
Thickness
Tools Required:
= mm
1. Welding transformer
2. welding rods
3. Safety gloves
4. Goggle
5. Chipping hammer
6. Flat file
Diagram:
Procedure:
All dimensions are in 'mm'
1. Clean the surface to be welded and file the edge of the plates for perfect joint and more strength.
2. Hold the welding rod in the electrode holder and clamp the ground clamp is clamped to the plate
to be welded.
3. Position the plates to be welded touching each other (butting) and tag weld on the ends to avoid
the movement of the plates during welding.
4. Now start welding one end of the plates.
37
5. The electric arc produced melts the welding rod and joints the two metal plates. Maintain a gap
of 3 mm between the plate and the welding rod.
6. Complete the welding process by removing slag using chipping hammer.
Result:
Thus the two metal plates are welded in double ‘V’ butt joint.
Outcome:
Able to join two given metal plates by a double 'V' butt joint in gas welding.
38
Expt. No. 12 LAP JOINT
Aim:
To join two given metal plates by a lap joint in gas welding
Materials required:
MS flat: Length = mm
Breadth = mm
Thickness
Tools Required:
= mm
1. Welding transformer
2. welding rods
3. Safety gloves
4. Goggle
5. Chipping hammer
6. Flat file
Diagram:
Procedure:
All the dimensions are in 'mm'
1. Clean the surface to be welded and file the edge of the plates for perfect joint and more strength.
2. Hold the welding rod in the electrode holder and clamp the ground clamp to the plate to be
welded.
39
3. Position the plates to be welded overlapping and tag weld on the ends to avoid the movement of the
plates during welding.
4. Now start welding one end of the plates.
5. The electric arc produced melts the welding rod and joints the two metal plates. Maintain a gap of
3 mm between the plate and the welding rod.
6. Complete the welding process by removing slag using chipping hammer.
Result:
Thus the two metal plates are welded in lap joint.
Outcome:
Able to join two given metal plates by a lap joint in gas welding.
40
Expt. No. 13 TEE FILLET JOINT
Aim:
To join two given metal plates by a tee fillet joint in gas welding
Materials required:
MS flat: Length = mm
Breadth = mm
Thickness
Tools Required:
= mm
1. Welding transformer
2. welding rods
3. Safety gloves
4. Goggle
5. Chipping hammer
6. Flat file
Diagram:
All dimensions are in 'mm'
41
Procedure:
1. Clean the surface to be welded and file the edge of the plates for perfect joint and more strength.
2. Hold the welding rod in the electrode holder and clamp the ground clamp to the plate to be
welded.
3. Position one of the plates to be welded perpendicularly on the surface of the other plate. Tag weld
on the ends to avoid the movement of the plates during welding.
4. Now start welding one end of the plates.
5. The electric arc produced melts the welding rod and joints the two metal plates. Maintain a gap of
3 mm between the plate and the welding rod.
6. Complete the welding process by removing slag using chipping hammer.
Result:
Thus the two metal plates are welded in tee fillet joint.
Outcome:
Able to join two given metal plates by a tee fillet joint in gas welding.
42
Expt. No. 14 GAS WELDING PRACTICE
Aim:
To join the given two work piece as per the required type of joint by gas welding
Materials required:
Two mild steel plates.
Tools required:
1. Oxygen and acetylene gas cylinders with pressure regulators
2. Gas welding torch
3. Filler rod
4. Gloves and apron
5. Safety goggles, gloves
6. Chipping hammer
7. Wire brush
Procedure:
1. Clean the given work piece thoroughly and remove rust, scale and other foreign materials.
2. Position the joining work pieces properly.
3. Open acetylene and oxygen cylinder valves and open the acetylene torch valve.
4. Light the tip of torch using the lighter.
5. Adjust oxygen and acetylene torch to get the required flame.
6. Hold the welding torch and filler rod along the line of weld and weld by maintaining 3 mm gap between
plate and inner core of flame.
43
Viva - voce
Result:
Thus the required welding is obtained by gas welding process.
Outcome:
Able to join the given two work piece as per the required type of joint by gas welding.
(Expt. No. 10 to 15)
1. What is meant by welding?
2. Welding is used to join similar (or dissimilar metals. Say True (or) False.
3. Name the two important welding process.
4. Name the three basic types of joints, common to arc welding and gas welding.
5. What is gas welding?
6. What is flux?
7. What is the significance of filler material?
8. What is arc welding?
9. What is an electrode?
10. What are the types of electrodes used in practice?
11. What are the types of welding?
12. What is the temperature obtained in gas and arc welding?
13. List the equipments needed to carry out welding operation.
14. Which type of welding (Gas / Arc) you prefer?
15. What are the necessary precautions you have to take while welding?
16. Why you should not see the flame during the welding operation?
17. What are the two gases used in gas welding?
18. What are the different types of joints, you make in the lab?
19. What is the difference between riveting and welding?
20. How do welding is different from machining?
44
Expt. No. 15 STUDY OF FOUNDRY
Aim:
To understand the basic concepts of foundry by carrying out simple exercises relevant to its principles
Introduction:
Foundry is a process of forming different shapes and sizes of metals in their molten state. It is also called
as metal casting. The shape of the metal cast obtained depends on the shape and size of the cavity
produced in sand mould by using a wooden model. This wooden model is called a pattern.
The foundry process involves three steps:
a. Making the required pattern
b. Moulding process to produce the cavity in sand using the pattern
c. Pouring the molten metal into the cavity to get the casing
Pattern:
A pattern is normally a wooden model which is the facsimile of the cast/product to be made. There are
many types of patterns and are either one piece or two - pieces.
Moulding Box:
A moulding box is normally a rectangular wooden/metal box with bottom and top surfaces open. The
upper part (cope) and the lower part (drag) are aligned properly.
45
Sieve:
A sieve is used to remove foreign materials from the moulding sand. A sieve is a rectangular or
circular frame with a wire mesh.
Rammer:
A rammer is used to press or ram the moulding sand uniformly into the moulding box.
Strike-off Bar:
A strike off bar is a flat-edged rectangular bar made of wood. It is used to remove excess sand on top
of the mould box after ramming.
Vent wire:
A vent wire is a steel wire used to produce holes in sand fill after ramming. This enables the gases to
escape out to the atmosphere when the molten metal is poured into the cavity of the mould.
Draw spike:
A draw spike is a steel spike with sharp pointed end. This is used to pick the pattern from the mould
after ramming.
Mallet:
A mallet is used to give light blow to the draw spike to drive it into the pattern in order to lift the
pattern with the help of draw spike. It is round or rectangular and is made of hard wood.
46
Lifter:
A lifter is used to remove the loose sand in the cavity produced in moulding. It is also used to finish the
walls of the cavity after removing the pattern.
Trowel:
A trowel is used to finish the cavity obtained in the mould. Trowels of various shapes and sizes are used
in moulding process.
Sprue Pin:
A sprue pin is a cylindrical and tapered wooden piece used to make a hole through which the molten
metal is poured into the mould cavity.
Core:
Trowel Sqrue pin
The core is used to make a hole or hollow casting. The core is normally made of core sand. The core
sand can be removed easily after the casting. The core sand is having
90% silica sand and the remaining is binding materials (saw dust, asbestos, linseed oil, molasses etc.)
Shovel:
It is used to mix and move the mould sand from one place to another in the foundry shop. It consists of
a broad iron pan fitted with a long wooden handle.
Bellow:
It is used to blow out sand particles and dust on the surface of the mould.
Swab:
It is used to apply water on the edges of the pattern before removing it from the mould. It is easy
to remove the moisturized pattern, otherwise mould sand sticks along with the pattern.
47
Slick:
Shovel Bellow Swab
It is used to repair and smoothen the mould surface after removing the pattern. It consists of spoon
shaped double ended trowel.
Gate cutter:
It is used to cut gates in the mould. The gate is connecting the runner hole and the mould cavity.
Melting furnaces:
Slick Gate cutter
The melting furnaces are used to melt the metal to be cast. Furnaces used to melt ferrous or non-
ferrous metals are
1. Coke fired crucible furnace
2. Oil fired crucible furnace
3. Gas fired crucible furnace
4. Cupola furnace
5. Electric furnace
48
Shank Ladle:
Melting furnaces
The ladle is used to collect the molten metal from the crucible and pour it to the mould cavity.
Shank ladle
49
Expt. No. 16 GEAR PATTERN
Aim:
To prepare a sand mould using a gear pattern
Tools required:
1. Shovel
2. Sieve
3. Mould box
4. Rammer
5. Trowel
6. Strike off bar
7. Lifter
8. Gate cutter
9. Runner
10. Riser
11. Vent rod
12. Draw spike
13. Swap etc.
Gear pattern:
50
Procedure:
1. Clean the mould box, pattern, tools and table/floor.
2. Fill the drag with green sand after positioning the gear pattern on the table.
3. Ram the green sand carefully and the excess sand is struck off.
4. Tilt the drag upside down and sprinkle river sand on top of it.
5. Position the cope on top of the drag.
6. Position the sprue pin and riser pin, then fill the cope with sand and ramming is done and the excess
sand is struck off.
7. Remove the sprue pin and the riser pin carefully.
8. Apply water on the edges of the pattern and remove it carefully using the draw spike, and then finish
the cavity.
9. Vent holes are made using vent wire.
10. A funnel-shaped opening and gate is made to pour the molten metal.
Result:
Thus the mould of the given gear pattern is obtained.
Outcome:
Able to prepare sand mould using a gear pattern.
51
Expt. No. 17 STEPPED CONE PULLEY
Aim:
To make the mould for the given stepped cone pulley
Tools required:
1. Trowel
2. Rammer
3. Strike off bar
4. Lifter
5. Runner
6. Riser
7. Gate cutter
8. Vent wire
9. Draw spike
10. Swap
11. Riddle
12. Sprue pin
13. Bellow
14. Moulding
Materials required:
1. Moulding sand
2. Parting sand
3. Facing sand
Procedure:
1. Clean the mould box, pattern, tools and the table / floor.
2. Prepare a suitable core with the help of core box.
3. Place the drag box above the moulding board. Now keep the pattern at center of the drag.
4. Sprinkle now parting sand before keeping the pattern.
5. Sprinkle facing sand over the pattern to a depth of 5 mm. Then fill the green sand over it.
6. Ram the green sand to get a air tight packing. Remove excess sand is removed by strike off bar.
7. Invert the drag box upside down. Place the cope box over the drag box and locked.
8. Place the raiser pin and sprue pin at right position and fill the green sand over the pattern.
9. The green sand to get air tight packing with strike off bar leveling is done.
10. Now remove riser pin and sprue pin from the green sand mould.
11. Remove the pattern by drag spike tool.
52
12. Prepare gate using gate cutter and place the core is placed vertically inside the cavity.
13. Mark the vent holes are made with vent wire on the cope.
Stepped cone pulley:
53
Viva - voce
Result:
Thus the mould of the stepped cone pulley is obtained.
Outcome:
Able to make the mould for the given stepped cone pulley.
(Expt. No. 29 to 31)
1. What is foundry?
2. What is meant by casting?
3. What is meant by pattern?
4. What are the materials used for making patterns?
5. Name the various types of pattern.
6. What are the types of allowances used for making pattern?
7. What is the name of the binder used to mix with moulding sand?
8. Name the different types of sand used in foundry work.
9. What are the ingredients of good moulding sand?
10. What are the types of casting used in foundry?
11. List the foundry tools?
12. What is gate?
13. What is vent rod?
14. Name the types of moulding boxes.
15. Give the application of casting.
16. What do you mean by green sand?
17. Why ramming is done?
18. What is the use of sprue pin?
19. What is the function of gate cutter?
20. What is the function of riser?
54
55
Expt. No.18 KNURLING AND GROOVING
Aim:
To produce the component by performing knurling and grooving operation using lathe
Material required:
Mild steel rod size of dia. 32 mm and length 100 mm
Tools required:
1. Single point cutting tool
2. Knurling tool
3. Pitch gauge
4. Grooving tool
5. Drill chuck with centre drill bit
Specimen drawing:
All dimensions are in mm
Procedure:
1. Check the size of raw material given and ensure the size.
2. Held the work pieces in the chuck and tight it properly.
3. Clamp the tool on tool post properly and check the centre of work piece with cutting tool tip.
4. Do the facing operation by giving cross feed to the cross slide and reduce the length.
5. Do the turning operation by giving longitudinal feed to the carriage and reduce the length.
6. Two or three passes can be given for the turning operation.
7. The grooving tool is fixed in the tool holder on lathe.
56
Viva - voce
8. The work piece is fixed in the machine vice. Then switch on the machine.
9. Make the grooving operation as per the dimension using grooving tool.
10. Then place a knurling tool in the tool holder of lathe.
11. Make the knurling operation as per the dimension using knurling tool.
12. Make the chamfer at the end of the component.
13. Remove the component and inspect its size.
Result:
Thus the component is produced by performing knurling and grooving operation using lathe.
Outcome:
Able to produce the component by performing knurling and grooving operation using lathe
1. What is the purpose of knurling?
2. What are the various types of knurling tool?
3. Which machine used for knurling operation?
4. What is meant by Machinability index?
5. What is the purpose of grooving?
6. What are various types of grooving tool?
7. Write the tailor’s tool life equation.
8. What are the purposes of gear grinding process?
9. What is meant by gear lapping?
10. What is meant by cutting shaping process?
11. Define – Tool life
12. What are the factors affecting tool life?
13. What are the factors affecting the machinability?
14. Define – Machinability of metal
15. What are the purposes of chip breakers?

More Related Content

Similar to Manufacturing Technology Lab Objectives and Experiments

Presentation on lathe machine
Presentation on lathe machinePresentation on lathe machine
Presentation on lathe machineSanaUllah264
 
Workshop techniques
Workshop techniquesWorkshop techniques
Workshop techniquesAnasMirza10
 
Drilling,boring & reaming.pptx
Drilling,boring & reaming.pptxDrilling,boring & reaming.pptx
Drilling,boring & reaming.pptxmniryk
 
Drilling & boring & reaming.pptx
Drilling  & boring & reaming.pptxDrilling  & boring & reaming.pptx
Drilling & boring & reaming.pptxmniryk
 
Shaper, Planer and Slotter
Shaper, Planer and SlotterShaper, Planer and Slotter
Shaper, Planer and SlotterAvinash Navin
 
Engineering Fitting workshop:holding,measuring,marking,finishing, striking an...
Engineering Fitting workshop:holding,measuring,marking,finishing, striking an...Engineering Fitting workshop:holding,measuring,marking,finishing, striking an...
Engineering Fitting workshop:holding,measuring,marking,finishing, striking an...Mechanicalstudents.com
 
Drilling,broaching and grinding machines
Drilling,broaching and grinding machinesDrilling,broaching and grinding machines
Drilling,broaching and grinding machinesArul R
 
Lecture 4 - Manufacturing Processes -Material Removal Processes and Analysis....
Lecture 4 - Manufacturing Processes -Material Removal Processes and Analysis....Lecture 4 - Manufacturing Processes -Material Removal Processes and Analysis....
Lecture 4 - Manufacturing Processes -Material Removal Processes and Analysis....MuhammadAwaisNaveedA
 
Part 2: Shaper Planer & Slotter machine
Part 2: Shaper Planer & Slotter machinePart 2: Shaper Planer & Slotter machine
Part 2: Shaper Planer & Slotter machineSBM Polytechnic
 
Lathe machine
Lathe machineLathe machine
Lathe machineRaju D
 
3 yr 1sem mech machine tools
3 yr 1sem mech machine tools3 yr 1sem mech machine tools
3 yr 1sem mech machine toolsOm Brar
 

Similar to Manufacturing Technology Lab Objectives and Experiments (20)

Presentation on lathe machine
Presentation on lathe machinePresentation on lathe machine
Presentation on lathe machine
 
Lath machine
Lath machineLath machine
Lath machine
 
Workshop techniques
Workshop techniquesWorkshop techniques
Workshop techniques
 
Lathe Machines
Lathe MachinesLathe Machines
Lathe Machines
 
Drilling,boring & reaming.pptx
Drilling,boring & reaming.pptxDrilling,boring & reaming.pptx
Drilling,boring & reaming.pptx
 
Drilling & boring & reaming.pptx
Drilling  & boring & reaming.pptxDrilling  & boring & reaming.pptx
Drilling & boring & reaming.pptx
 
Lathe machine
Lathe machine Lathe machine
Lathe machine
 
Lab manual workshop
Lab manual workshopLab manual workshop
Lab manual workshop
 
Milling
MillingMilling
Milling
 
Shaper, Planer and Slotter
Shaper, Planer and SlotterShaper, Planer and Slotter
Shaper, Planer and Slotter
 
machine tool & casting.pdf
machine tool & casting.pdfmachine tool & casting.pdf
machine tool & casting.pdf
 
Lathe ppt
Lathe pptLathe ppt
Lathe ppt
 
Lathe ppt
Lathe pptLathe ppt
Lathe ppt
 
Engineering Fitting workshop:holding,measuring,marking,finishing, striking an...
Engineering Fitting workshop:holding,measuring,marking,finishing, striking an...Engineering Fitting workshop:holding,measuring,marking,finishing, striking an...
Engineering Fitting workshop:holding,measuring,marking,finishing, striking an...
 
Drilling,broaching and grinding machines
Drilling,broaching and grinding machinesDrilling,broaching and grinding machines
Drilling,broaching and grinding machines
 
Lecture 4 - Manufacturing Processes -Material Removal Processes and Analysis....
Lecture 4 - Manufacturing Processes -Material Removal Processes and Analysis....Lecture 4 - Manufacturing Processes -Material Removal Processes and Analysis....
Lecture 4 - Manufacturing Processes -Material Removal Processes and Analysis....
 
Part 2: Shaper Planer & Slotter machine
Part 2: Shaper Planer & Slotter machinePart 2: Shaper Planer & Slotter machine
Part 2: Shaper Planer & Slotter machine
 
Cad
CadCad
Cad
 
Lathe machine
Lathe machineLathe machine
Lathe machine
 
3 yr 1sem mech machine tools
3 yr 1sem mech machine tools3 yr 1sem mech machine tools
3 yr 1sem mech machine tools
 

Recently uploaded

HARMONY IN THE NATURE AND EXISTENCE - Unit-IV
HARMONY IN THE NATURE AND EXISTENCE - Unit-IVHARMONY IN THE NATURE AND EXISTENCE - Unit-IV
HARMONY IN THE NATURE AND EXISTENCE - Unit-IVRajaP95
 
What are the advantages and disadvantages of membrane structures.pptx
What are the advantages and disadvantages of membrane structures.pptxWhat are the advantages and disadvantages of membrane structures.pptx
What are the advantages and disadvantages of membrane structures.pptxwendy cai
 
Architect Hassan Khalil Portfolio for 2024
Architect Hassan Khalil Portfolio for 2024Architect Hassan Khalil Portfolio for 2024
Architect Hassan Khalil Portfolio for 2024hassan khalil
 
Biology for Computer Engineers Course Handout.pptx
Biology for Computer Engineers Course Handout.pptxBiology for Computer Engineers Course Handout.pptx
Biology for Computer Engineers Course Handout.pptxDeepakSakkari2
 
chaitra-1.pptx fake news detection using machine learning
chaitra-1.pptx  fake news detection using machine learningchaitra-1.pptx  fake news detection using machine learning
chaitra-1.pptx fake news detection using machine learningmisbanausheenparvam
 
College Call Girls Nashik Nehal 7001305949 Independent Escort Service Nashik
College Call Girls Nashik Nehal 7001305949 Independent Escort Service NashikCollege Call Girls Nashik Nehal 7001305949 Independent Escort Service Nashik
College Call Girls Nashik Nehal 7001305949 Independent Escort Service NashikCall Girls in Nagpur High Profile
 
Heart Disease Prediction using machine learning.pptx
Heart Disease Prediction using machine learning.pptxHeart Disease Prediction using machine learning.pptx
Heart Disease Prediction using machine learning.pptxPoojaBan
 
Internship report on mechanical engineering
Internship report on mechanical engineeringInternship report on mechanical engineering
Internship report on mechanical engineeringmalavadedarshan25
 
Oxy acetylene welding presentation note.
Oxy acetylene welding presentation note.Oxy acetylene welding presentation note.
Oxy acetylene welding presentation note.eptoze12
 
CCS355 Neural Network & Deep Learning UNIT III notes and Question bank .pdf
CCS355 Neural Network & Deep Learning UNIT III notes and Question bank .pdfCCS355 Neural Network & Deep Learning UNIT III notes and Question bank .pdf
CCS355 Neural Network & Deep Learning UNIT III notes and Question bank .pdfAsst.prof M.Gokilavani
 
CCS355 Neural Network & Deep Learning Unit II Notes with Question bank .pdf
CCS355 Neural Network & Deep Learning Unit II Notes with Question bank .pdfCCS355 Neural Network & Deep Learning Unit II Notes with Question bank .pdf
CCS355 Neural Network & Deep Learning Unit II Notes with Question bank .pdfAsst.prof M.Gokilavani
 
OSVC_Meta-Data based Simulation Automation to overcome Verification Challenge...
OSVC_Meta-Data based Simulation Automation to overcome Verification Challenge...OSVC_Meta-Data based Simulation Automation to overcome Verification Challenge...
OSVC_Meta-Data based Simulation Automation to overcome Verification Challenge...Soham Mondal
 
Past, Present and Future of Generative AI
Past, Present and Future of Generative AIPast, Present and Future of Generative AI
Past, Present and Future of Generative AIabhishek36461
 
High Profile Call Girls Nagpur Isha Call 7001035870 Meet With Nagpur Escorts
High Profile Call Girls Nagpur Isha Call 7001035870 Meet With Nagpur EscortsHigh Profile Call Girls Nagpur Isha Call 7001035870 Meet With Nagpur Escorts
High Profile Call Girls Nagpur Isha Call 7001035870 Meet With Nagpur Escortsranjana rawat
 
Artificial-Intelligence-in-Electronics (K).pptx
Artificial-Intelligence-in-Electronics (K).pptxArtificial-Intelligence-in-Electronics (K).pptx
Artificial-Intelligence-in-Electronics (K).pptxbritheesh05
 
VIP Call Girls Service Kondapur Hyderabad Call +91-8250192130
VIP Call Girls Service Kondapur Hyderabad Call +91-8250192130VIP Call Girls Service Kondapur Hyderabad Call +91-8250192130
VIP Call Girls Service Kondapur Hyderabad Call +91-8250192130Suhani Kapoor
 
(MEERA) Dapodi Call Girls Just Call 7001035870 [ Cash on Delivery ] Pune Escorts
(MEERA) Dapodi Call Girls Just Call 7001035870 [ Cash on Delivery ] Pune Escorts(MEERA) Dapodi Call Girls Just Call 7001035870 [ Cash on Delivery ] Pune Escorts
(MEERA) Dapodi Call Girls Just Call 7001035870 [ Cash on Delivery ] Pune Escortsranjana rawat
 
(ANVI) Koregaon Park Call Girls Just Call 7001035870 [ Cash on Delivery ] Pun...
(ANVI) Koregaon Park Call Girls Just Call 7001035870 [ Cash on Delivery ] Pun...(ANVI) Koregaon Park Call Girls Just Call 7001035870 [ Cash on Delivery ] Pun...
(ANVI) Koregaon Park Call Girls Just Call 7001035870 [ Cash on Delivery ] Pun...ranjana rawat
 

Recently uploaded (20)

HARMONY IN THE NATURE AND EXISTENCE - Unit-IV
HARMONY IN THE NATURE AND EXISTENCE - Unit-IVHARMONY IN THE NATURE AND EXISTENCE - Unit-IV
HARMONY IN THE NATURE AND EXISTENCE - Unit-IV
 
What are the advantages and disadvantages of membrane structures.pptx
What are the advantages and disadvantages of membrane structures.pptxWhat are the advantages and disadvantages of membrane structures.pptx
What are the advantages and disadvantages of membrane structures.pptx
 
Architect Hassan Khalil Portfolio for 2024
Architect Hassan Khalil Portfolio for 2024Architect Hassan Khalil Portfolio for 2024
Architect Hassan Khalil Portfolio for 2024
 
Biology for Computer Engineers Course Handout.pptx
Biology for Computer Engineers Course Handout.pptxBiology for Computer Engineers Course Handout.pptx
Biology for Computer Engineers Course Handout.pptx
 
chaitra-1.pptx fake news detection using machine learning
chaitra-1.pptx  fake news detection using machine learningchaitra-1.pptx  fake news detection using machine learning
chaitra-1.pptx fake news detection using machine learning
 
College Call Girls Nashik Nehal 7001305949 Independent Escort Service Nashik
College Call Girls Nashik Nehal 7001305949 Independent Escort Service NashikCollege Call Girls Nashik Nehal 7001305949 Independent Escort Service Nashik
College Call Girls Nashik Nehal 7001305949 Independent Escort Service Nashik
 
Heart Disease Prediction using machine learning.pptx
Heart Disease Prediction using machine learning.pptxHeart Disease Prediction using machine learning.pptx
Heart Disease Prediction using machine learning.pptx
 
Internship report on mechanical engineering
Internship report on mechanical engineeringInternship report on mechanical engineering
Internship report on mechanical engineering
 
Oxy acetylene welding presentation note.
Oxy acetylene welding presentation note.Oxy acetylene welding presentation note.
Oxy acetylene welding presentation note.
 
CCS355 Neural Network & Deep Learning UNIT III notes and Question bank .pdf
CCS355 Neural Network & Deep Learning UNIT III notes and Question bank .pdfCCS355 Neural Network & Deep Learning UNIT III notes and Question bank .pdf
CCS355 Neural Network & Deep Learning UNIT III notes and Question bank .pdf
 
CCS355 Neural Network & Deep Learning Unit II Notes with Question bank .pdf
CCS355 Neural Network & Deep Learning Unit II Notes with Question bank .pdfCCS355 Neural Network & Deep Learning Unit II Notes with Question bank .pdf
CCS355 Neural Network & Deep Learning Unit II Notes with Question bank .pdf
 
OSVC_Meta-Data based Simulation Automation to overcome Verification Challenge...
OSVC_Meta-Data based Simulation Automation to overcome Verification Challenge...OSVC_Meta-Data based Simulation Automation to overcome Verification Challenge...
OSVC_Meta-Data based Simulation Automation to overcome Verification Challenge...
 
young call girls in Rajiv Chowk🔝 9953056974 🔝 Delhi escort Service
young call girls in Rajiv Chowk🔝 9953056974 🔝 Delhi escort Serviceyoung call girls in Rajiv Chowk🔝 9953056974 🔝 Delhi escort Service
young call girls in Rajiv Chowk🔝 9953056974 🔝 Delhi escort Service
 
🔝9953056974🔝!!-YOUNG call girls in Rajendra Nagar Escort rvice Shot 2000 nigh...
🔝9953056974🔝!!-YOUNG call girls in Rajendra Nagar Escort rvice Shot 2000 nigh...🔝9953056974🔝!!-YOUNG call girls in Rajendra Nagar Escort rvice Shot 2000 nigh...
🔝9953056974🔝!!-YOUNG call girls in Rajendra Nagar Escort rvice Shot 2000 nigh...
 
Past, Present and Future of Generative AI
Past, Present and Future of Generative AIPast, Present and Future of Generative AI
Past, Present and Future of Generative AI
 
High Profile Call Girls Nagpur Isha Call 7001035870 Meet With Nagpur Escorts
High Profile Call Girls Nagpur Isha Call 7001035870 Meet With Nagpur EscortsHigh Profile Call Girls Nagpur Isha Call 7001035870 Meet With Nagpur Escorts
High Profile Call Girls Nagpur Isha Call 7001035870 Meet With Nagpur Escorts
 
Artificial-Intelligence-in-Electronics (K).pptx
Artificial-Intelligence-in-Electronics (K).pptxArtificial-Intelligence-in-Electronics (K).pptx
Artificial-Intelligence-in-Electronics (K).pptx
 
VIP Call Girls Service Kondapur Hyderabad Call +91-8250192130
VIP Call Girls Service Kondapur Hyderabad Call +91-8250192130VIP Call Girls Service Kondapur Hyderabad Call +91-8250192130
VIP Call Girls Service Kondapur Hyderabad Call +91-8250192130
 
(MEERA) Dapodi Call Girls Just Call 7001035870 [ Cash on Delivery ] Pune Escorts
(MEERA) Dapodi Call Girls Just Call 7001035870 [ Cash on Delivery ] Pune Escorts(MEERA) Dapodi Call Girls Just Call 7001035870 [ Cash on Delivery ] Pune Escorts
(MEERA) Dapodi Call Girls Just Call 7001035870 [ Cash on Delivery ] Pune Escorts
 
(ANVI) Koregaon Park Call Girls Just Call 7001035870 [ Cash on Delivery ] Pun...
(ANVI) Koregaon Park Call Girls Just Call 7001035870 [ Cash on Delivery ] Pun...(ANVI) Koregaon Park Call Girls Just Call 7001035870 [ Cash on Delivery ] Pun...
(ANVI) Koregaon Park Call Girls Just Call 7001035870 [ Cash on Delivery ] Pun...
 

Manufacturing Technology Lab Objectives and Experiments

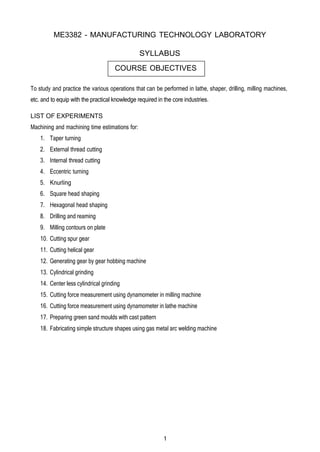
  • 1. 1 COURSE OBJECTIVES ME3382 - MANUFACTURING TECHNOLOGY LABORATORY SYLLABUS To study and practice the various operations that can be performed in lathe, shaper, drilling, milling machines, etc. and to equip with the practical knowledge required in the core industries. LIST OF EXPERIMENTS Machining and machining time estimations for: 1. Taper turning 2. External thread cutting 3. Internal thread cutting 4. Eccentric turning 5. Knurling 6. Square head shaping 7. Hexagonal head shaping 8. Drilling and reaming 9. Milling contours on plate 10. Cutting spur gear 11. Cutting helical gear 12. Generating gear by gear hobbing machine 13. Cylindrical grinding 14. Center less cylindrical grinding 15. Cutting force measurement using dynamometer in milling machine 16. Cutting force measurement using dynamometer in lathe machine 17. Preparing green sand moulds with cast pattern 18. Fabricating simple structure shapes using gas metal arc welding machine
  • 2. 2 Expt. No.01 STUDY OF LATHE Aim: To understand the working principle and operations done in lathe machine to identify the various components of lathe machine and its function Machining processes: Machining is one of the processes of manufacturing in which the specified shape to the work piece is imparted by removing surplus material. Conventionally this surplus material from the work piece is removed in the form of chips by interacting the work piece with an appropriate tool. This mechanical generation of chips can be carried out by single point or multi point tools or by abrasive operations these are summarized below Machining Processes Single point tool operations Multi-point tool operations Abrasive operations 1. Boring 1. Drilling 1. Lapping 2. Shaping 2. Tapping 2. Honing 3. Planning 3. Reaming 3. S 1 u . p G er r - i f n in d i i s n h g ing 4. Turning 4. Hobbing 4.Grinding 5. Broaching 6. Sawing 7. Milling Multi-point tool operations: The process of chip formation in metal cutting is affected by relative motion between the tool and the work piece achieved with the aid of a device called machine tool. This relative motion can be obtained by a combination of rotary and translator movements of either the tool or the work piece or both. The kind of surface that is produced by the operation depends on the shape of the tool and the path it traverses through the materials. When the workpiece is rotated about an axis and the tool is traversed in a definite path relative to the axis, a surface of revolution is generated. When the tool path is parallel to the axis, the surface generated is a cylinder as in straight turning or boring operations. Similarly, planes may be generated by a series of straight cuts without rotating the workpiece as in shaping and planning operations (Fig.3). In shaping the tool is reciprocating and the work piece is moved crosswise at the end of each stroke. Planning is done by reciprocating the work piece and crosswise movement is provided to the tool.
  • 3. 3 Surface may be machined by the tools having a number of cutting edges that can cut successively through the work piece materials. In plane milling, the cutter revolves and moves over the work piece as shown Fig. 4. The axis of the cutter is parallel to the surface generated. Similarly in drilling, the drill may turn and be fed into the work piece or the work piece may revolve while the drill is fed into it (Fig.5). The machine tools, in general, provide two kinds of relative motions. The primary motion is responsible for the cutting action and absorbs most of the power required to perform the machining action. The secondary motion of the feed motion may proceed in steps or continuously and absorbs o1nly a fraction of the total power required for machining. When the secondary motion is added to the primary motion, machine surfaces of desired geometric characteristics are produced. Lathe: Lathe is the machine tool which is used to perform several operations on the work piece. Lathe is useful in making several parts which is further assembled to make new machine. Hence lathe is known as “mother of machines”. Basic working principle of lathe: In lathe, the work piece is held in the chuck, a work holding device. The cutting tool is mounted in the tool post. The chuck is rotated by means of power. When the chuck rotates, the work piece also rotates.
  • 4. 4 The tool is moved against the rotating work piece by giving small amount of depth of cut. The material is removed in the form of chips. Continuous feed and depth of cut is given until the required dimensions are obtained in the work piece. Types of lathe machines: There are different types of lathe machines, they are 1. Centre lathe 2. Tool room lathe 3. Bench lathe 4. Capstan lathe 5. Turret lathe 6. Automatic lathe Description of lathe: Lathe is a machine which has several parts in it. They are Bed: It is the base of the machine. On its left side, the head stock is mounted and on its right it has movable casting known as tailstock. Its legs have holes to bolt down on the ground. Head stock: It consists of spindles, gears and speed changing levers. It is used to transmit the motion to the job. It has two types; one is the headstock driven by belt and the other one is the gear driven. Carriage: Carriage is used to carry a tool to bring in contact with the rotating work piece or to with draw from such a contact. It operates on bed ways between the headstock and tail stock. Saddle: It is an ‘H’ shaped part fitted on the lathe bed. There is a hand wheel to move it on the bed way. Cross slide, compound rest, tool post is fitted on this saddle. Cross slide: It is on the upper slide of saddle in the form of dove tail. A hand wheel is provided to drive the cross slide. It permits the cross wise movement of the tool (i.e.) movement of tool towards or away from the operator.
  • 5. 5 Compound rest: It is fitted over the cross slide on a turn table. It permits both parallel and angular movements to cutting tool. Tool post: It is fitted on the top most part of the compound rest. Tool is mounted on this tool post. Cutting tool is fixed in it with the help of screws. Apron: It is the hanging part in front of the carriage. It accommodates the mechanism of hand and power feed to the cutting tool for carrying out different operations. Lead screw: It is a long screw with ACME threads. It is used for transmitting power for automatic feed or feed for thread cutting operation.
  • 6. 6 Tail stock: It is located at the right end of the lathe bed and it can be positioned anywhere in the bed. It is used for supporting lengthy jobs and also carries tool to carry out operations such as tapping, drilling and reaming. Work holding devices: Lathe centers: They are used to support work. It has two categories of centers. Live center is one which is fitted in the headstock spindle. Dead is another one which is fitted in the tail stock. Chuck: It is a device used to hold a job. It is easily fitted on the thread cut on the end of head stock spindle. Various types of chuck are Two jaw chuck, three jaw chuck, four jaw chuck collect chuck and magnetic chuck.
  • 7. 7 Face plate: Lathe carriers or dogs: Steady rest: Clamped to the lathe ways, it uses adjustable fingers to contact the work piece and align It Can be used in place of tailstock or in the middle to support long or unstable parts being machined. Mandrel: Mandrel used to hold hollow jobs. Follower rest: Bolted to the lathe carriage, it uses adjustable fingers to bear against the work piece opposite the cutting tool to prevent deflection.
  • 8. 8 Cutting tools used: For making a finished job on lathe machine, various types of cutting tools are used. One of them is single point cutting tool which is used to perform several operations on the work piece. Various types of cutting tools are furnished below. Facing Tool: It is used for facing the longitudinal ends of the job. Its shape is like a knife. Rough Turning Tool: It is used to remove excess material from the work piece in quick time. It can be used to give large depth of cut and work at coarse feed. Finishing Tool: It is used for getting smooth finish on the work piece. Its point is a little more round. Radius Tool: Jobs which need round cutting are done with this tool. Its types are Convex radius tool and concave radius tool. Parting Tools: It is used to cut the jobs into two parts. It is also used for grooving. Form Turning Tool: It is used for jobs which require both convex and concave turning. Thread Cutting Tool: It is used for making internal or external threads on the work piece. The tool nose is designed with a definite profile for taking threads. Drill Tool: It is used for making holes of various diameters on the job. Drill bit of various sizes of diameter are available.
  • 9. 9 Boring Tool: It used for enlarging the drill hole. Tool materials: The single point cutting tools are made of high speed steel(H.S.S). The main alloying elements in 18-4-1 HSS tools are 18% tungsten, 4% chromium and 1% vanadium. 5 to 10% cobalt is also added to improve the heat resisting properties of the tool. General purpose hand cutting tools are usually made from carbon steel or tool steel. Carbide tipped tools fixed in tool holders, are mostly used in production shops. Cutting tool angles: Top rake angle (back rake angle): If the slope is given to the face or surface of the tool and if this slope is along the tools length then it is called top rake angle. It is usually from 15o to 20o. Side rake angle: If the slope is given to the face or top of the tool along the tools width then it is called side rake angle. It lies between 6 o and 15 o. Clearance angle (relief angle): Types: 1. Side clearance angle 2. End clearance angle. They are provided to keep surface of the tool clear of the work piece.
  • 10. 10 Cutting edge angle: Types: 1. Side cutting edge angle – (generally 15 o) it is an angle, the side cutting edge makes with the axis of the tool 2. End cutting edge angle – (from 7 o to 15 o) it is an angle made by the end cutting edge with the width of the tool. Lip angle (cutting angle): It is the angle between the face and the end surface of the tool. Nose angle: It is the angle between the side cutting edge and end cutting edge. Lathe operations: Facing: It is done for getting fine finish (good surface finish) on the face of the job. Facing tool is set at an angle to the work piece. The tool is fed from the centre of work piece towards the outer surface against the rotating work piece. Depth of cut is low for the facing operation. Plain Turning: It is done for reducing the diameter of the work piece. A cutting tool with 70 o setting angle is used for roughing operation. More feed is given for rough turning while less feed is given for finishing. Work piece is held in chuck and tool is set to center height of the work piece.
  • 11. 11 Step Turning: It is similar to the process of turning but in this case different diameter in step of various sizes is taken on the work piece. Taper Turning: It is different from the turning operation. Taper is defined as uniform change in the diameter of a work piece measured along its length. Where D – large diameter d – small diameter l – length of taper
  • 12. 12 Knurling: It is process of making serrations on the work piece. Knurling tools of different shape and size are used to make grip on the work piece. It has two hardened steel rollers. The tool is held in tool post and pressed against the rotating work piece. Work piece is rotated at lower speed and small amount of feed is given. Drilling: It is a process of making a hole on the work piece Job is held in chuck while the drill is held in the tail stock sleeve. Feed is given by rotating the hand wheel in the tail stock which pushes the tailstock sleeve. Cutting Speed: It is the peripheral speed of the work past the cutting tool. It is the speed at which metal is removed by the tool from the work piece. It is expressed in meter / minute. Cutting speed= (π x diameter x R.P.M)/1000 = π DN/1000 in m/min D – Diameter in mm N – Spindle speed in rpm Feed: It is defined as the rate of tool travel across a surface cutting it. It is the distance of the tool advances for each revolution of the work piece. It is expressed in mm/revolution. Depth of Cut: It is the perpendicular distance measured from the machined surface to the uncut surface of work. It is expressed in mm. Depth of cut= (d1- d2)/2 d1 - diameter of work before machining d2 - diameter of work after machining
  • 13. 13 Expt. No.02 TAPER TURNING USING COMPOUND REST METHOD Aim: To produce the component by performing taper turning using lathe Materials required: Mild steel Φ 32 mm X 100 mm long Tools required: 1. Chuck key 2. Tool post spanner 3. Verneir caliper 4. Steel rule 5. Single point cutting tool Specimen drawing: Procedure: All dimensions are in mm 1. Check the size of raw material given and ensure the size. 2. Hold the workpiece in the chuck and tight it properly. 3. Clamp the tool on post properly and check the centre of work piece with cutting tool tip. 4. Do the facing operation by giving cross feed to the cross slide and reduce length.
  • 14. 14 5. Do the turning operation by giving longitudinal feed to the carriage and reduce the diameter of the work piece. 6. Two or three pass can be given for turning operation. 7. Remove the work piece and hold in chuck on other side and do the turning operation for the remaining portion of the work piece. 8. Calculate the taper angle and swivel the compound rest and clamp it properly. 9. Do the taper turning operation by giving angular feed to the compound rest as per the dimension. 10. Do the facing operation and get the required length. 11. Remove the component carefully and check the dimension. Result: Thus the component is produced as per the given drawing using lathe. Outcome: Able to produce a component by performing taper turning operation by compound rest method
  • 15. 15 1. What is meant by lathe? 2. What are the various operations can be performed on a lathe? 3. What are principle parts of the lathe? 4. What are the types of headstock? 5. What are the various parts mounted on the carriage? 6. What are the four types of tool post? 7. What is meant by an apron? 8. What are the two specification of lathe? 9. What are the types of lathe? 10. What is meant by semi-automatic lathe? 11. What is meant by capstan lathe? 12. Write down the formula used for taper turning by compound rest method. 13. What is the purpose of compound rest? 14. How to give angular feed in lathe 15. What is the purpose of three jaw chuck? Viva - voce
  • 16. 16 Expt. No.03 TAPER TURNING BY TAIL STOCK OFFSET METHOD Aim: To produce the component by performing taper turning using lathe Material required: Mild steel Φ 32 mm X 100 mm long Tools required: 1. Chuck key 2. Tool post spanner 3. Verneir caliper 4. Steel rule 5. Single point cutting tool 6. Revolving centre 7. Drill chuck with centre drill bit 8. Catch plate with dog carrier Specimen drawing: All dimensions are in mm
  • 17. 17 Procedure: 1. Check the size of raw material given and ensure the size. 2. Held the work piece in the chuck and tight it properly. 3. Clamp the tool on tool post properly and check the centre of work piece with cutting tool tip. 4. Do the facing operation by giving cross feed to the cross slide and reduce the length. 5. Do the turning operation by giving longitudinal feed to the carriage and reduce the diameter of the work piece. 6. Two or three passes can be given for turning operation. 7. Remove the work piece and hold in chuck on other side. Does the turning operation for the remaining portion of the work piece also do the facing operation and get the required length. 8. Make a centre drilling operation on both sides by tail stock. 9. Calculate the offset distance and offset the tail stock from the lathe axis. 10. Hold the work piece between lathe centers on both side using catch plate with dog carrier. 11. Do the taper turning operation by giving longitudinal feed to the carriage as per the dimension. 12. Remove the component carefully and check the dimension. Result: Thus the component is produced as per the given drawing using lathe. Outcome: Able to produce a component by performing taper turning operation by tail stock offset method
  • 18. 18 1. Define – Conicity 2. What are the different operations performed on the lathe? 3. What are the holding devices? 4. What are the various feed mechanisms used for obtaining automatic feed? 5. What is copying lathe? 6. What are the advantage of capston lathe & turret lathe? 7. What is meant by tooling? 8. What are the three stage of a tool-layout? 9. What are the different drives used in copying lathe? 10. What are the two specifications of capstan and turret lathe? 11. What are the methods used for taper turning in lathe? 12. What are various feeds in lathe? 13. Which method is suitable for steep turning? 14. Which method is suitable for taper turning on lengthy workpiece? 15. What is meant by lead screw? Viva - voce
  • 19. 19 Expt. No.04 EXTERNAL THREAD CUTTING Aim: To produce the component by performing threads cutting operation using lathe Material required: Mild steel Φ 32 mm X 100 mm long Tools required: 1. Chuck key 2. Tool post spanner 3. Verneir caliper 4. Steel rule 5. Single point cutting tool 6. V thread cutting tool 7. Pitch gauge 8. Grooving tool 9. Drill chuck with centre drill bit Specimen drawing: Procedure: All dimensions are in mm 1. Check the size of raw material given and ensure the size. 2. Hold the work pieces in the chuck and tight it properly. 3. Clamp the tool on tool post properly and check the centre of work piece with cutting tool tip. 4. Do the facing operation by giving cross feed to the cross slide and reduce the length.
  • 20. 20 5. Do the turning operation by giving longitudinal feed to the carriage and reduce the length. 6. Two or three pass can be given for the turning operation. 7. Remove the work piece and hold in chuck on the other side and do the turning operation for the remaining work piece. 8. Engage the back gear mechanism to reduce the speed of the work piece. 9. Check the pitch required, calculate the tumbler gear, and engage it with head stock. 10. Move the carriage towards tail stock and make a mark on the dial. 11. Give small depth of cut and engage the half nut so that the carriage will move automatically towards head stock and cut the v-thread on the work piece. 12. After reaching the required length of thread, release the tool by rotating cross slide in opposite to the depth of cut by counting the number of rotation. 13. Move the carriage towards tail stock, give depth of cut and engage the half nut. 14. Repeat the procedure to produce complete form of v-thread. After finishing remove the work piece from the chuck. Result: Thus the component is produced as per the given drawing using lathe. Outcome: Able to produce the component by performing external thread cutting operation using lathe
  • 21. 21 1. What are the components that can be turned on a copying lathe? 2. What is meant by shaper? 3. What are the four important parts of a shaper? 4. How the feed & depth of cut is given to the shaper? 5. What are the four-shaper specifications? 6. How does the planer differ from the shaper? 7. What is the use of planer? 8. What are the various types of planners? 9. Name the various parts of a double housing planer? 10. What are the four specifications of planer? 11. Write down different types of thread. 12. Define – Pitch 13. What is meant by knurling? 14. Distinguish between square and V type thread 15. Write down the formula used for pitch calculation. Viva - voce
  • 22. 22 Expt. No.05 DRILLING, BORING AND INTERNAL THREAD CUTTING Aim: To produce the component by performing drilling, boring and thread cutting using lathe Material required: Mild steel Φ 50 mm X 45 mm long Tools required: 1. Chuck key 2. Tool post spanner 3. Verneir caliper & Steel rule 4. Single point cutting tool & Boring tool 5. Drill chuck with drill bits 6. Internal thread cutting tool Specimen drawing: Procedure: All dimensions are in mm 1. Check the size of raw material given and ensure the size. 2. Hold the workpiece in the chuck and tight it properly. 3. Clamp the tool on tool post properly and check the centre of work piece with cutting tool tip. 4. Do the facing operation by giving cross feed to the cross slide and reduce the length. 5. Hold the drill bit on the tail stock and unclamp the tail stock, then move it towards the head stock and ensure the centre coincidence with work piece centre.
  • 23. 23 6. Start the motor and give depth of cut to the drill bit by rotating the tail stock wheel and make complete hole. 7. Clamp the boring tool on the tool post to perform the boring operation. 8. Clamp the internal thread tool on the tool post to perform internal threading operation, 9. Engage the back gear mechanism to reduce the speed of the work piece. 10. Check the pitch required, calculate the tumbler gear and engage it with head stock. 11. Move the carriage towards tailstock and make marking on the dial. 12. Give small depth of cut and engage the half nut so that the carriage will move automatically towards headstock and cut the v thread on the work piece. 13. Release the tool by rotating cross slide in opposite to the depth of cut by counting number of rotation after reaching the required length of thread. 14. Move the carriage toward the tail stock and give depth of cut and engage the half nut. 15. Repeat the procedure to produce complete form of v thread. After finishing remove the work piece from the chuck. Result: Thus the component is produced as per the given drawing using lathe Outcome: Able to produce the component by performing drilling, boring and thread cutting operation using lathe
  • 24. 24 1. What is meant by drilling? 2. What is meant by gang -drilling machine? 3. What are the specifications of drilling machine? 4. What are the machining operations that can be performed on a drilling machine? 5. What are the different ways to mount the drilling tool? 6. What is meant by broaching? 7. What are the specifications of a broaching machine? 8. What are the advantages and limitation of broaching? 9. What are the different operations that can be performed on a broaching machine? 10. What is meant by boring? 11. Differentiate between drilling and boring 12. What is meant by counter boring? 13. What is meant by counter sinking? 14. Which type of tool used for boring? 15. What is meant by pitch circle diameter? Viva - voce
  • 25. 25 Expt. No.06 ECCENTRIC TURNING Aim: To turn a given work piece eccentrically in a lathe machine as per the given dimensions Material required: Mild steel Φ 32 mm X 75 mm long Tools required: 1. Steel rule 2. Dot punch 3. Ball pen hammer 4. Single point cutting tool 5. Surface gauge 6. Drill bit 7. Drill chuck 8. Boring tool Specimen drawing: Procedure: All dimensions are in mm 1. Check the size of raw material given and ensure the size. 2. The work piece is fixed in the four jaw chuck using surface gauge. 3. The cutting tool is fixed in the tool post to the lathe axis. 4. Facing operation has been done on both sides of given work pieces. 5. Marking and punching is to be done on the given work pieces as per the dimension.
  • 26. 26 6. Then the work piece is fixed in the chuck such that the offset point coincides with spindle axis. 7. Using the turning tool, turning operation has been performed. 8. The same procedure is also carried out to the other side of the work piece for the given offset distance. 9. Thus the eccentric turning would be finished. Result: Thus the work piece is turned eccentrically as per the given dimensions. Outcome: Able to turn a given work piece eccentrically in a lathe machine as per the given dimensions
  • 27. 27 1. What is meant by eccentricity? 2. What is meant by effect of back rake angle? Mention the types. 3. What is meant by side rake angle? Mention its effects. 4. What are all the conditions for using positive rake angle? 5. When will the negative rake angles be used? 6. Define – Orthogonal cutting 7. What is meant by cutting force? 8. What is meant by chip thickness ratio? 9. What are the purposes of chip breakers? 10. Define – Machinability of metal 11. Define – Oblique cutting 12. Differentiate between orthogonal and oblique cutting. 13. Which type of chuck used for eccentric turning? 14. What are the applications of eccentric components? 15. What is meant by tool signature? Viva - voce
  • 28. 28 Expt. No.07 SQUARE HEAD SHAPING Aim: To make round work piece to square by using shaper Material required: Mild steel Φ 50 mm x 25 mm long Tools required: Steel rule, dot punch, hammer, verneir height gauge, T-square, scriber, surface plate, single point cutting tool, tool holder. Specimen drawing: All dimensions are in mm Procedure: 1. Check the size of raw material given and ensure the size. 2. The work piece is fixed in the three jaw chuck. 3. The cutting tool is fixed in the tool post to the lathe axis. 4. Facing operation has been done on both sides of given work pieces. 5. Chalk is applied uniformly on the face of the work piece. 6. Marking and punching is to be done on the given work pieces as per the dimension. 7. The cutting tool is fixed in the tool holder in shaper machine. 8. The work piece is fixed in the machine vice, then switch on the machine.
  • 29. 29 Viva - voce 9. At the end of each stroke give the feed to the work piece. 10. Shaping operation has been done on four sides in the work piece till the round work piece is turned into square shaped as per the given dimension. Result: Thus the round work piece is machined to square work piece by shaper machine. Outcome: Able to make round work piece to square shape by using shaper 1. What is meant by shaper? 2. What are the various types of shaper? 3. What are the specifications of shaper? 4. W hat are the operations of shaper? 5. What is the application of square head? 6. What is meant by indexing? 7. What are the three types dividing heads? 8. What is cam milling? 9. What are the different types of thread milling? 10. What are the other forming methods for manufacturing gears? 11. Write any ten nomenclature of plain milling cutter? 12. What are the various milling operations? 13. What are the advantages of milling process? 14. What are the down milling processes? 15. What is the various type of milling attachment?
  • 30. 30 Expt. No.08 HEXAGONAL HEAD SHAPING Aim: To make a round work piece to hexagonal shape by using shaper Material required: Mild steel rod size of dia. 32 mm and length 50 mm Tools required: Steel rule, dot punch, hammer, verneir height gauge, T-square, scriber, surface plate, single point cutting tool, tool holder. Specimen drawing: Procedure: All dimensions are in mm 1. Check the size of raw material given and ensure the size. 2. The work piece is fixed in the three jaw chuck. 3. The cutting tool is fixed in the tool post to the lathe axis. 4. Facing operation has been done on both sides of given work pieces. 5. Chalk is applied uniformly on the face of the work piece. 6. Marking and punching is to be done on the given work pieces as per the dimension. 7. The cutting tool is fixed in the tool holder in shaper machine. 8. The work piece is fixed in the machine vice, then switch on the machine.
  • 31. 31 Viva-voce 9. At the end of each stroke give the feed to the work piece. 10. Follow the same procedure to the other side of the work piece. 11. Shaping operation has been done on six sides in the work piece till the round work piece is turned into hexagonal shaped as per the given dimension. Result: Thus the round work piece is machined to hexagonal shape by shaper machine. Outcome: Able to make a round work piece to hexagonal shape by using shaper 1. What is the function of cutting fluids? 2. What are the properties of cutting fluid? 3. What are the causes of wear? 4. What are the specifications of the milling machine? 5. What are the various movements of universal milling machine table? 6. Distinguish between plain and universal milling machine? 7. What are the cutter holding devices? 8. What are the various type of milling attachment? 9. Write any ten nomenclature of plain milling cutter? 10. What are the advantages of milling process? 11. What are the applications of hexagonal head? 12. Differentiate shaper from planner. 13. What are the operations of planner? 14. What are the work holding devices used in shaper? 15. What are the tool holding devices used in shaper?
  • 32. 32 Expt. No. 9 STUDY OF WELDING Aim: To understand the basic concepts of welding by carrying out simple exercises relevant to its principles Introduction: Welding is the progress of joining two metal plates using a joining material by heat. It is commonly used to join metal plates in making boilers, vessels, furnitures, automobile parts, etc. Safety equipments and tools: Welding goggles: Goggles with glasses are used to protect the eyes of the eyes of the welder from the light sparks produced during welding. Face shield: A face shield is also used to protect the eyes of the welder from the light sparks produced during welding. It is normally held in hand. Welding goggles Face shield Hand gloves: It is used to protect the hands of the welder from the effect of ultra violet rays, infra red rays, heat and sparks. Chipping Hammer: A chipping hammer is used to remove slags which from during welding. Hand gloves Chipping hammer
  • 33. 33 Ground Clamp: It is connected to the end of the ground cable. It is normally clamped to the welding table or the job itself to complete the electric circuit. Wire brush: The wire brush is used to clean the surface to be welded. Types of Welding: Ground clamp Wire brush The two types of welding most prevalently in use are 1. Arc welding 2. Gas Arc welding 1. Arc welding: Electric arc welding is widely used to join metal plates using a filler rod. The filler rod (welding rod) melts on the electric arc produced and welds the metal plates. Arc welding 2. Gas welding Gas welding is a process in which the required heat to melt the surfaces is supplied by a high temerature flame obtained by a mixture of two gases. Usually the mixture of oxygen and acetylene is used for welding purpose. The filler rod and parent metal plates are melted by the heat of the flame produced using oxygen and acetylene gas mixture. Gas welding is also widely used to join metal plates.
  • 34. 34 Expt. No. 10 SINGLE V BUTT JOINT Aim: To join two given metal plates by a single 'V' butt joint in gas welding Materials required: MS flat: Length = mm Breadth = mm Thickness Tools Required: = mm 1. Welding transformer 2. welding rods 3. Safety gloves 4. Goggle 5. Chipping hammer 6. Flat file Diagram: Procedure: All dimensions are in 'mm' 1. Check the surface to be welded and file the edge of the plates for perfect joint and more strength. 2. Hold the welding rod in the electrode holder and clamp the ground clamp to the plate to be welded. 3. Position the plates to be welded touching each other (butting) and tag weld on the ends to avoid the movement of the plates during welding. 4. Now start welding one end of the plates. 5. The electric arc produced melts the welding rod and joints the two metal plates. Maintain a gap of 3 mm between the plate and the welding rod. 6. Complete the welding process by removing slag using chipping hammer.
  • 35. 35 Result: Thus the two metal plates are welded in single 'V' butt joint. Outcome: Able to join two given metal plates by a single 'V' butt joint in gas welding.
  • 36. 36 Expt. No. 11 DOUBLE V BUTT JOINT Aim: To join two given metal plates by a double 'V' butt joint in gas welding Materials required: MS flat: Length = mm Breadth = mm Thickness Tools Required: = mm 1. Welding transformer 2. welding rods 3. Safety gloves 4. Goggle 5. Chipping hammer 6. Flat file Diagram: Procedure: All dimensions are in 'mm' 1. Clean the surface to be welded and file the edge of the plates for perfect joint and more strength. 2. Hold the welding rod in the electrode holder and clamp the ground clamp is clamped to the plate to be welded. 3. Position the plates to be welded touching each other (butting) and tag weld on the ends to avoid the movement of the plates during welding. 4. Now start welding one end of the plates.
  • 37. 37 5. The electric arc produced melts the welding rod and joints the two metal plates. Maintain a gap of 3 mm between the plate and the welding rod. 6. Complete the welding process by removing slag using chipping hammer. Result: Thus the two metal plates are welded in double ‘V’ butt joint. Outcome: Able to join two given metal plates by a double 'V' butt joint in gas welding.
  • 38. 38 Expt. No. 12 LAP JOINT Aim: To join two given metal plates by a lap joint in gas welding Materials required: MS flat: Length = mm Breadth = mm Thickness Tools Required: = mm 1. Welding transformer 2. welding rods 3. Safety gloves 4. Goggle 5. Chipping hammer 6. Flat file Diagram: Procedure: All the dimensions are in 'mm' 1. Clean the surface to be welded and file the edge of the plates for perfect joint and more strength. 2. Hold the welding rod in the electrode holder and clamp the ground clamp to the plate to be welded.
  • 39. 39 3. Position the plates to be welded overlapping and tag weld on the ends to avoid the movement of the plates during welding. 4. Now start welding one end of the plates. 5. The electric arc produced melts the welding rod and joints the two metal plates. Maintain a gap of 3 mm between the plate and the welding rod. 6. Complete the welding process by removing slag using chipping hammer. Result: Thus the two metal plates are welded in lap joint. Outcome: Able to join two given metal plates by a lap joint in gas welding.
  • 40. 40 Expt. No. 13 TEE FILLET JOINT Aim: To join two given metal plates by a tee fillet joint in gas welding Materials required: MS flat: Length = mm Breadth = mm Thickness Tools Required: = mm 1. Welding transformer 2. welding rods 3. Safety gloves 4. Goggle 5. Chipping hammer 6. Flat file Diagram: All dimensions are in 'mm'
  • 41. 41 Procedure: 1. Clean the surface to be welded and file the edge of the plates for perfect joint and more strength. 2. Hold the welding rod in the electrode holder and clamp the ground clamp to the plate to be welded. 3. Position one of the plates to be welded perpendicularly on the surface of the other plate. Tag weld on the ends to avoid the movement of the plates during welding. 4. Now start welding one end of the plates. 5. The electric arc produced melts the welding rod and joints the two metal plates. Maintain a gap of 3 mm between the plate and the welding rod. 6. Complete the welding process by removing slag using chipping hammer. Result: Thus the two metal plates are welded in tee fillet joint. Outcome: Able to join two given metal plates by a tee fillet joint in gas welding.
  • 42. 42 Expt. No. 14 GAS WELDING PRACTICE Aim: To join the given two work piece as per the required type of joint by gas welding Materials required: Two mild steel plates. Tools required: 1. Oxygen and acetylene gas cylinders with pressure regulators 2. Gas welding torch 3. Filler rod 4. Gloves and apron 5. Safety goggles, gloves 6. Chipping hammer 7. Wire brush Procedure: 1. Clean the given work piece thoroughly and remove rust, scale and other foreign materials. 2. Position the joining work pieces properly. 3. Open acetylene and oxygen cylinder valves and open the acetylene torch valve. 4. Light the tip of torch using the lighter. 5. Adjust oxygen and acetylene torch to get the required flame. 6. Hold the welding torch and filler rod along the line of weld and weld by maintaining 3 mm gap between plate and inner core of flame.
  • 43. 43 Viva - voce Result: Thus the required welding is obtained by gas welding process. Outcome: Able to join the given two work piece as per the required type of joint by gas welding. (Expt. No. 10 to 15) 1. What is meant by welding? 2. Welding is used to join similar (or dissimilar metals. Say True (or) False. 3. Name the two important welding process. 4. Name the three basic types of joints, common to arc welding and gas welding. 5. What is gas welding? 6. What is flux? 7. What is the significance of filler material? 8. What is arc welding? 9. What is an electrode? 10. What are the types of electrodes used in practice? 11. What are the types of welding? 12. What is the temperature obtained in gas and arc welding? 13. List the equipments needed to carry out welding operation. 14. Which type of welding (Gas / Arc) you prefer? 15. What are the necessary precautions you have to take while welding? 16. Why you should not see the flame during the welding operation? 17. What are the two gases used in gas welding? 18. What are the different types of joints, you make in the lab? 19. What is the difference between riveting and welding? 20. How do welding is different from machining?
  • 44. 44 Expt. No. 15 STUDY OF FOUNDRY Aim: To understand the basic concepts of foundry by carrying out simple exercises relevant to its principles Introduction: Foundry is a process of forming different shapes and sizes of metals in their molten state. It is also called as metal casting. The shape of the metal cast obtained depends on the shape and size of the cavity produced in sand mould by using a wooden model. This wooden model is called a pattern. The foundry process involves three steps: a. Making the required pattern b. Moulding process to produce the cavity in sand using the pattern c. Pouring the molten metal into the cavity to get the casing Pattern: A pattern is normally a wooden model which is the facsimile of the cast/product to be made. There are many types of patterns and are either one piece or two - pieces. Moulding Box: A moulding box is normally a rectangular wooden/metal box with bottom and top surfaces open. The upper part (cope) and the lower part (drag) are aligned properly.
  • 45. 45 Sieve: A sieve is used to remove foreign materials from the moulding sand. A sieve is a rectangular or circular frame with a wire mesh. Rammer: A rammer is used to press or ram the moulding sand uniformly into the moulding box. Strike-off Bar: A strike off bar is a flat-edged rectangular bar made of wood. It is used to remove excess sand on top of the mould box after ramming. Vent wire: A vent wire is a steel wire used to produce holes in sand fill after ramming. This enables the gases to escape out to the atmosphere when the molten metal is poured into the cavity of the mould. Draw spike: A draw spike is a steel spike with sharp pointed end. This is used to pick the pattern from the mould after ramming. Mallet: A mallet is used to give light blow to the draw spike to drive it into the pattern in order to lift the pattern with the help of draw spike. It is round or rectangular and is made of hard wood.
  • 46. 46 Lifter: A lifter is used to remove the loose sand in the cavity produced in moulding. It is also used to finish the walls of the cavity after removing the pattern. Trowel: A trowel is used to finish the cavity obtained in the mould. Trowels of various shapes and sizes are used in moulding process. Sprue Pin: A sprue pin is a cylindrical and tapered wooden piece used to make a hole through which the molten metal is poured into the mould cavity. Core: Trowel Sqrue pin The core is used to make a hole or hollow casting. The core is normally made of core sand. The core sand can be removed easily after the casting. The core sand is having 90% silica sand and the remaining is binding materials (saw dust, asbestos, linseed oil, molasses etc.) Shovel: It is used to mix and move the mould sand from one place to another in the foundry shop. It consists of a broad iron pan fitted with a long wooden handle. Bellow: It is used to blow out sand particles and dust on the surface of the mould. Swab: It is used to apply water on the edges of the pattern before removing it from the mould. It is easy to remove the moisturized pattern, otherwise mould sand sticks along with the pattern.
  • 47. 47 Slick: Shovel Bellow Swab It is used to repair and smoothen the mould surface after removing the pattern. It consists of spoon shaped double ended trowel. Gate cutter: It is used to cut gates in the mould. The gate is connecting the runner hole and the mould cavity. Melting furnaces: Slick Gate cutter The melting furnaces are used to melt the metal to be cast. Furnaces used to melt ferrous or non- ferrous metals are 1. Coke fired crucible furnace 2. Oil fired crucible furnace 3. Gas fired crucible furnace 4. Cupola furnace 5. Electric furnace
  • 48. 48 Shank Ladle: Melting furnaces The ladle is used to collect the molten metal from the crucible and pour it to the mould cavity. Shank ladle
  • 49. 49 Expt. No. 16 GEAR PATTERN Aim: To prepare a sand mould using a gear pattern Tools required: 1. Shovel 2. Sieve 3. Mould box 4. Rammer 5. Trowel 6. Strike off bar 7. Lifter 8. Gate cutter 9. Runner 10. Riser 11. Vent rod 12. Draw spike 13. Swap etc. Gear pattern:
  • 50. 50 Procedure: 1. Clean the mould box, pattern, tools and table/floor. 2. Fill the drag with green sand after positioning the gear pattern on the table. 3. Ram the green sand carefully and the excess sand is struck off. 4. Tilt the drag upside down and sprinkle river sand on top of it. 5. Position the cope on top of the drag. 6. Position the sprue pin and riser pin, then fill the cope with sand and ramming is done and the excess sand is struck off. 7. Remove the sprue pin and the riser pin carefully. 8. Apply water on the edges of the pattern and remove it carefully using the draw spike, and then finish the cavity. 9. Vent holes are made using vent wire. 10. A funnel-shaped opening and gate is made to pour the molten metal. Result: Thus the mould of the given gear pattern is obtained. Outcome: Able to prepare sand mould using a gear pattern.
  • 51. 51 Expt. No. 17 STEPPED CONE PULLEY Aim: To make the mould for the given stepped cone pulley Tools required: 1. Trowel 2. Rammer 3. Strike off bar 4. Lifter 5. Runner 6. Riser 7. Gate cutter 8. Vent wire 9. Draw spike 10. Swap 11. Riddle 12. Sprue pin 13. Bellow 14. Moulding Materials required: 1. Moulding sand 2. Parting sand 3. Facing sand Procedure: 1. Clean the mould box, pattern, tools and the table / floor. 2. Prepare a suitable core with the help of core box. 3. Place the drag box above the moulding board. Now keep the pattern at center of the drag. 4. Sprinkle now parting sand before keeping the pattern. 5. Sprinkle facing sand over the pattern to a depth of 5 mm. Then fill the green sand over it. 6. Ram the green sand to get a air tight packing. Remove excess sand is removed by strike off bar. 7. Invert the drag box upside down. Place the cope box over the drag box and locked. 8. Place the raiser pin and sprue pin at right position and fill the green sand over the pattern. 9. The green sand to get air tight packing with strike off bar leveling is done. 10. Now remove riser pin and sprue pin from the green sand mould. 11. Remove the pattern by drag spike tool.
  • 52. 52 12. Prepare gate using gate cutter and place the core is placed vertically inside the cavity. 13. Mark the vent holes are made with vent wire on the cope. Stepped cone pulley:
  • 53. 53 Viva - voce Result: Thus the mould of the stepped cone pulley is obtained. Outcome: Able to make the mould for the given stepped cone pulley. (Expt. No. 29 to 31) 1. What is foundry? 2. What is meant by casting? 3. What is meant by pattern? 4. What are the materials used for making patterns? 5. Name the various types of pattern. 6. What are the types of allowances used for making pattern? 7. What is the name of the binder used to mix with moulding sand? 8. Name the different types of sand used in foundry work. 9. What are the ingredients of good moulding sand? 10. What are the types of casting used in foundry? 11. List the foundry tools? 12. What is gate? 13. What is vent rod? 14. Name the types of moulding boxes. 15. Give the application of casting. 16. What do you mean by green sand? 17. Why ramming is done? 18. What is the use of sprue pin? 19. What is the function of gate cutter? 20. What is the function of riser?
  • 54. 54
  • 55. 55 Expt. No.18 KNURLING AND GROOVING Aim: To produce the component by performing knurling and grooving operation using lathe Material required: Mild steel rod size of dia. 32 mm and length 100 mm Tools required: 1. Single point cutting tool 2. Knurling tool 3. Pitch gauge 4. Grooving tool 5. Drill chuck with centre drill bit Specimen drawing: All dimensions are in mm Procedure: 1. Check the size of raw material given and ensure the size. 2. Held the work pieces in the chuck and tight it properly. 3. Clamp the tool on tool post properly and check the centre of work piece with cutting tool tip. 4. Do the facing operation by giving cross feed to the cross slide and reduce the length. 5. Do the turning operation by giving longitudinal feed to the carriage and reduce the length. 6. Two or three passes can be given for the turning operation. 7. The grooving tool is fixed in the tool holder on lathe.
  • 56. 56 Viva - voce 8. The work piece is fixed in the machine vice. Then switch on the machine. 9. Make the grooving operation as per the dimension using grooving tool. 10. Then place a knurling tool in the tool holder of lathe. 11. Make the knurling operation as per the dimension using knurling tool. 12. Make the chamfer at the end of the component. 13. Remove the component and inspect its size. Result: Thus the component is produced by performing knurling and grooving operation using lathe. Outcome: Able to produce the component by performing knurling and grooving operation using lathe 1. What is the purpose of knurling? 2. What are the various types of knurling tool? 3. Which machine used for knurling operation? 4. What is meant by Machinability index? 5. What is the purpose of grooving? 6. What are various types of grooving tool? 7. Write the tailor’s tool life equation. 8. What are the purposes of gear grinding process? 9. What is meant by gear lapping? 10. What is meant by cutting shaping process? 11. Define – Tool life 12. What are the factors affecting tool life? 13. What are the factors affecting the machinability? 14. Define – Machinability of metal 15. What are the purposes of chip breakers?