Call Girl in Bur Dubai O5286O4116 Indian Call Girls in Bur Dubai By VIP Bur D...
Win7 settings
1. WiFi settings for WINDOWS 7
Step 1: Open Network and Sharing Center
Right-click mouse button on the wireless network icon in the taskbar (bottom right on the desktop).
Select Open Network and Sharing Center:
You can also find your network connections :
by clicking the Start button → clicking Control Panel → clicking Network and Internet → clicking
Network and Sharing Center
Step 2: The following pop-up box should emerge and click on “Set up a new connection or
network”:
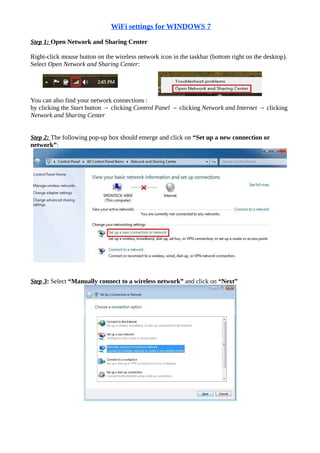
Step 3: Select “Manually connect to a wireless network” and click on “Next”
2. Step 4: Do the setting as follows and click on “Next” (Note: Network name is case-sensitive.)
Step 5: After adding the wireless network IITG_WIFI successfully, click on the “Change connection
settings”. Pop-up window will appear.
Step 6: Select Security tab and Choose
network authentication method as
“Cisco:PEAP” ,then click on “Settings”.
If “Cisco:PEAP” is not available in
the list, then please follow the manual
“Windows 7 (for not supporting Cisco:PEAP)"
available in the Wi-Fi manual page
3. Step 7: Deselect check box “Use anonymous outer identity” and “Validate server certificate” as
follows and then click on “User Credentials” tab
Step 8: Do the setting as below and click on “OK”
4. Step 9: Click on “Advanced Settings” and select “Specify authentication mode ” as “User
authentication” and click on “OK”
Step 10: Once Clicking OK on the previously opened window “IITG_WIFI wireless networking
properties ” the following window will pop-up.
Step 11: Enter your IITG Webmail Username and Password and get connected to IITG_WIFI.
Note:
• Steps 1 to 10 are one time settings and Step 11 needs
to perform every time you connect to IITG_WIFI
• After connecting to IITG_WIFI,
do the proxy settings (if required)
• Report any connection problem
to netadmin@iitg.ernet.in