Hp Load Runner Tutorial 2 How To Design A Scenario For Load Testing Using Hp Load Runner
•Download as DOC, PDF•
12 likes•11,977 views

This article is a part of the series “Tutorials cum Knowledge-base on HP LoadRunner”

Recommended
Recommended
More Related Content
More from Yogindernath Gupta
More from Yogindernath Gupta (20)
Recently uploaded
Recently uploaded (20)
Hp Load Runner Tutorial 2 How To Design A Scenario For Load Testing Using Hp Load Runner
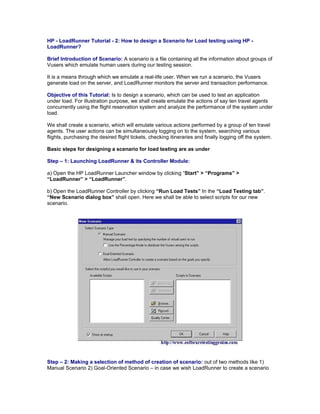
- 1. HP - LoadRunner Tutorial - 2: How to design a Scenario for Load testing using HP - LoadRunner? Brief Introduction of Scenario: A scenario is a file containing all the information about groups of Vusers which emulate human users during our testing session. It is a means through which we emulate a real-life user. When we run a scenario, the Vusers generate load on the server, and LoadRunner monitors the server and transaction performance. Objective of this Tutorial: Is to design a scenario, which can be used to test an application under load. For illustration purpose, we shall create emulate the actions of say ten travel agents concurrently using the flight reservation system and analyze the performance of the system under load. We shall create a scenario, which will emulate various actions performed by a group of ten travel agents. The user actions can be simultaneously logging on to the system, searching various flights, purchasing the desired flight tickets, checking itineraries and finally logging off the system. Basic steps for designing a scenario for load testing are as under Step – 1: Launching LoadRunner & its Controller Module: a) Open the HP LoadRunner Launcher window by clicking “Start” > “Programs” > “LoadRunner” > “LoadRunner”. b) Open the LoadRunner Controller by clicking “Run Load Tests” In the “Load Testing tab”. “New Scenario dialog box” shall open. Here we shall be able to select scripts for our new scenario. Step – 2: Making a selection of method of creation of scenario: out of two methods like 1) Manual Scenario 2) Goal-Oriented Scenario – in case we wish LoadRunner to create a scenario
- 2. for us. In this tutorial we shall select a “Manual Scenario”. Step – 3: Adding a script to the load test: Select a script out of the list of Scripts already available. Selected Scripts appear in the Scenario pane. Alternatively we can click the “Browse” button & navigate to the desired script ( for example: say basic_script) lying in our known directory. For the sake of illustration here we shall use just one Vuser script describing a single group of users performing identical actions. Whereas in case of real world scenario involving variety of user profiles, we can create different groups running several scripts with different user settings. Step – 4: Defining the group attributes for the script: a) Locate the desired script: Navigate to find out that that our desired script (basic_script in this case) appears in the Group Name column of the Scenario Groups pane. b) Change Scenario group name: Select the script and click the “Details” button to launch the “Group Information” dialog box. Provide easily understandable enter a more meaningful name, for example travel_agent. c) Vusers Quantity: Provide the desired number of Vusers intended to be created in the group. Click “OK” to display the name in the Scenario Groups pane under the Design tab. Step – 5: Adding a load generator or localhost: for creating load on our application by running the Vusers. a) For using already available Load Generator: Click the “Load Generators” button In the Design view to launch the “Load Generators” dialog box.
- 3. b) For creating & using a new Load Generator: When the desired load generator does not appear in the list, select “Add” from the Load Generator Name list to launch the “Add New Load Generator” dialog box. Provide the information like “Name” of the load generator and the type of “Platform” on which the load generator is running. Click “OK” to close the “Add New Load Generator” dialog box. Step – 6: Testing the Load Generator Connection: Involves instructing the Controller to make attempts to connect to the load generator machine. a) Select “localhost” and click “Connect”. b) When the connection gets established, the status changes from “Down” to “Ready”. Click “Close”. Step – 7: Scheduling of scenario in schedule pane of the Controller window: In real world scenario, the actual users do not log on and off the system exactly at the same time. Here we instruct the LoadRunner users to gradually log on to and off the system by scheduling the scenario. As described in the following “Scenario schedule” Dialog Box; Select “Scenario” radio button under “Schedule by” and select “Real-life schedule” radio button under “Run Mode”.
- 4. Step – 8: Setting the schedule actions definitions in Actions Grid: As described in the following Global Schedule Actions Grid following four definitions are set. We need to Double-click on every action in the first column like 1) Initialize 2) Start Vusers 3) Duration 4) End Vusers, one by one in the above Action grid to launch the respective dialog Boxes for defining the settings. Step – 9: Initializing of Vusers – for getting ready for the load test run by running the vuser_init action in the script & readying the load generators. Double-click “Initialize” in the Action grid to launch the following “Edit Action” dialog box. For this tutorial, select the radio button of “Initialize all Vusers simultaneously”. Step – 10: Starting of Vusers at specified Intervals: Double-click “Start Vusers” in the Action grid to launch the following “Edit Action” dialog box. For this tutorial, feed 8 Vusers in the Start Vusers box, and select the second option box & feed 2
- 5. Vusers every 30 seconds. Step – 11: Specifying a duration: Through “Interactive Schedule Graph” a duration is defined so that the Vusers keep on doing the scheduled action for a specific period thereby enabling us to measure the continuous load on the server. During the specified duration, the script will keep on doing as much iterations as possible irrespective of the number of iterations defined in the script’s run-time settings. Click the “Duration” in the Action grid or click the horizontal line representing the duration in the graph. The time line gets highlighted and a dot and a diamond appear at its endpoints. Drag the diamond shaped endpoint to set the desired time say 00:11:30. This means that Vusers shall run for a duration of 10 minutes. Step – 12: Stopping of Vusers – is done gradually. Double-click “Stop Vusers” in the Action grid to launch the following “Edit Action” dialog box. For this tutorial, select the second option box & feed 2 Vusers every 30 seconds.
- 6. Step – 13: Configuring the Run-time settings: to define the behavior of the Vusers during the test. Click the “Run -Time Settings” button in the “Design” tab. Then select the desired script and modify the following run-time settings if necessary. a) Run Logic to define the number of times a user repeats a group of actions. b) Pacing to define the time to wait before repeating an action. c) Log to define the type of information needed to be captured during the test. d) Think Time to define the time a user stops to think between steps. e) Speed Simulation to define network connections like modem, DSL or cable. f) Browser Emulation to define different browsers. g) Content Check for automatically detecting user-defined errors. Step – 14: Enabling think time - Select the “General:Think Time” node. Select “Replay think time” radio button, and select the “Use random percentage of recorded think time” radio button. For this tutorial, specify a minimum of 50% and a maximum of 150% as described in the following picture. Step – 15: Enabling the logging option- Select the “General:Log” node. Select “Enable logging” check Box. In the Log options, select “Always send messages”. Select “Extended
- 7. log” radio button, and select “Data returned by server” check box for this tutorial as described in the following picture. Click “OK” to close the Run -Time settings dialog Box. Step – 16: Configuring the Windows Resources monitor: to view the performance of every single tier, server and component of the application during the load test in real time. a) Opening of the Run view - by clicking the “Run” tab in the Controller window to display the Windows Resources graph which is one of four default graphs getting displayed in the graph viewing area as shown in following picture. Right-click the “Windows Resources graph” and select Add Measurements to open the Windows Resources dialog box as shown in following picture.
- 8. b) Selection of monitored server - Click “Add” In the Monitored Server Machines section of the Windows Resources dialog box to open the following “Add Machine” dialog box. Type “localhost” in the “Name” field & specify the Name of the Platform say Win 2000 in the “Platform” field. Click “OK” to close the “Add Machine” dialog box. c) Activation of the monitor – by clicking “OK” in the Windows Resources dialog box. With these steps the design of our Scenario gets complete & becomes ready for the load testing. Tutorial by : http://www.softwaretestinggenius.com