1. WebSetNet
Webmaster Blog
http://websetnet.com
Secure WordPress Blog from Hackers
WordPress blog hacks can be very annoying and are very real as well. Over 90,000 botnet hack
attacks are recorded every week on average, so if you ever thought that no one would bother
hacking into your site, you might want to think again. The problem with the hacked wordpress
sites is that they rapidly spread the botnets to other related sites as well.
So the only way to curb them is to secure your blog from such attacks. One of the most obvious
things that you should do is to maintain a highly distinctive username and password. Most users
are pretty lazy and leave pretty common usernames to their admin panel such as ‘Admin’
‘manager’ and so on. These can be easily tracked down by the bots and hacked. Also it is
recommended that you change the password and ID frequently.
A . Better WP security
Though these may delay hack attacks, they will not completely prevent them. One best way to
do that is to use security plugins such as Better WP security. Here the steps to install and
secure your site using this plugin are explained. First download the plugin and install into to the
admin panel using the – add new – plugin option. Once the plugin is installed, activate it and you
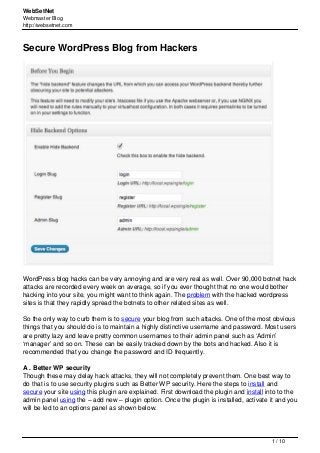
will be led to an options panel as shown below.
1 / 10
2. WebSetNet
Webmaster Blog
http://websetnet.com
Though all the options are already set for you, it’s worth taking a look. Ensure that the Hide
Backend tick box is checked. This feature alternates the backend wordpress URL and thus
obscures your site from hackers. The plugin works in a number of ways to secure your website
from hacker threats, but on the whole it scans the website for vulnerabilities and obscures them
from potential hacker threats. The plugin also manages to effectively hide weak passwords and
obsolete software from hackers.
2 / 10
3. WebSetNet
Webmaster Blog
http://websetnet.com
B. Clef – Log in to WordPress with your smartphone
Intrigued!? You should be, this is one of the coolest innovations I’ve seen recently.
To get started, go to getclef.com and click on Download the App, and follow the prompts to
download the app for your phone. Open the app and create an account using the same email
address that you use in your WordPress profile.
Then, go to your WordPress site and install the Clef plugin.
Head on over to Settings > Clef and enter a descriptive name for your site, as well as your login
page and click Submit. This will create an API key for you to enable you to start using Clef. You
can also choose whether or not you want to use Clef exclusively (and disallow
usernames/passwords) or use Clef to supplement your login options.
3 / 10
4. WebSetNet
Webmaster Blog
http://websetnet.com
Now, whenever you need to log in to your site, you go to the login page on your WordPress site
and click on Log in with your phone. The Wave will appear on the screen, you open the app on
your smartphone and match the wave on your smartphone to the wave on the screen, and it will
automagically log you in.
4 / 10
5. WebSetNet
Webmaster Blog
http://websetnet.com
It’s really hard to describe how this works, so it’s something that you just have to try for
yourself.
C. Google Authenticator plugin
If you have spent a great deal of time and effort into creating your site or blog over the years,
then making sure that it is secure has to be one of the most important things you must consider.
So for this article I will show you how you can set up 2-Step Authentication for your self-hosted
WordPress.org site which should take you less than 5 minutes to complete, but will give you a
much better level of security. If you are looking for the steps to take to implement 2-Step
Authentication on your free WordPress.com site, then please refer to this article
Step 1
Download the Google Authenticator plugin for WordPress, install and activate it.
5 / 10
6. WebSetNet
Webmaster Blog
http://websetnet.com
Step 2
Download and install the Google Authenticator app for your Smartphone
Android (Requires Android OS 2.1 and up)
iPhone, iPod Touch, iPad (Requires iOS 3.1.3 or later)
Blackberry (Requires BB10.0 or higher)
Step 3
Go to your User Profile (users>your profile) where you will find the Google Authenticator
Settings
After clicking Show/Hide barcode (just reveals the barcode so you can scan it)
6 / 10
7. WebSetNet
Webmaster Blog
http://websetnet.com
Step 4
Activate the Authenticator by checking the box next to Active and click Show/Hide QR code
which will show you your unique barcode. Also make sure that you add a name in the
description box that you can associate with your site. (My example is TechFleece 2-Step) If you
wish to enable an App password you can, but bear in mind that will decrease the overall login
security. People who use third-part software in which to post articles to their WordPress account
may wish to enable this.
Note: Users of the iPhone app may have issues scanning the barcode if there are spaces in the
description. This may have been resolved by now, but am unable to confirm as I don’t have an
Apple device.
Step 5 – Important
Hit Update Profile once you have added your site description and checked the Active box
7 / 10
8. WebSetNet
Webmaster Blog
http://websetnet.com
Now you are ready to scan your barcode.
Step 6
Grab your smartphone and open the Google Authentication app that you just downloaded.
When you first start the app the main page will be pretty empty. Click on the Options icon (top
right) and choose Set up account
Select Scan a barcode from the options, and choose which program you would like to complete
the action. In my example below you can see that I can scan the barcode using either QR Droid
or the default Google one.
8 / 10
9. WebSetNet
Webmaster Blog
http://websetnet.com
The app will instantly scan and create your account. You will now see that your WordPress
account details (the description name you gave it in WordPress) are present as well as a newly
generated number.
9 / 10
10. WebSetNet
Webmaster Blog
http://websetnet.com
These numbers change every 30 seconds meaning that once you have entered the number
when you actually login again, you will have a short amount of time to hit enter. Don’t worry if
you miss the time slot as you can simply use the next generated number instead.
Logging In for the first time
First, make sure that you are logged out of your site. Now log back in and you will see that
along with having to input your Username and Password you will also be required to input your
Google Authenticator code. You won’t have to do this every time but will be required when
logging on via other devices.
Powered by TCPDF (www.tcpdf.org)
10 / 10