SlideShare a Scribd company logo
1 of 3
Download to read offline
54 HORRORSHOW HORRORSHOW 55
HOW TOMake your own face into a
latex monster mask!
By Arnold Goldman of The Monster Makers
	 I am sure you have all heard it said before—“Boy,
would your face make a great Halloween mask!”or,“That
mask is almost as scary as my (brother, uncle, sister, fa-
ther, etc.)!” Anyone who has ever made, seen, or owned
a scary Halloween mask has heard that corny line many
times, and I thought it would be fun to do a demo that
would finally put some real meaning into those annoy-
ing and predictable remarks. So, come along as I show
you a simple process for turning your own face into a
gruesome latex Halloween mask!
STEP 1. Meet our unfortunate victim and fellow Monster
Makers crew member, Ronnie K. Ron has kindly agreed
to let us replicate and then destroy his cool exterior.
He understands that it is for a good cause. So no hard
feelings.
STEP 2. The first task in turning Ron’s face into a mask
is to take a lifecast. We’ve prepped all of our materials:
Prosthetic Grade Cream Alginate, plaster bandages, latex
gloves, water, and a couple of buckets.We start by mixing
the alginate with water.
STEP 3. It’s a messy job but someone has be the victim.
If you’re especially claustrophobic you might not be the
best candidate for a mask, but Ron has been through all
of this before and gladly agrees to receive the first glob of
gooey alginate. Yuck!
STEP 4. The alginate goes on quickly. When applying al-
ginate, press it firmly against the skin so you do not trap
air. This is especially important around the eyes, corners
of the mouth, and behind the edges of the nostrils. We
are just doing the face, so no bald cap is necessary. You
of course DO NOT want to cover the nostrils. Be sure
to work carefully around that area. If the nostrils do get
covered just have your subject exhale sharply though
them to open up the airway. No need to panic should it
happen. Just discuss it with your subject in advance.
1. 2. 3. 4. 5. 6. 7. 8. 9.
56 HORRORSHOW HORRORSHOW 57
STEP 5. Just before the alginate begins to set, we should
press some cotton fiber into the alginate. This will
allow the plaster bandages to adhere to the alginate by
forming a mechanical bond between the alginate and the
bandages.
STEP 6. After the alginate sets we begin to apply the
plaster bandages. It is also important to work the ban-
dages against the alginate to make sure that they make
complete contact with the alginate so there are no air
pockets.
STEP 7. The bandages are applied over all exposed alg-
inate, leaving the nose for last. Beforehand it is impor-
tant to prepare various size small strips that you can use
to cover the nose area.
STEP 8. Once the plaster bandages have set, have the
subject lean forward and help remove the mold. We ap-
plied a little Vaseline along the eyebrows and hairline be-
forehand so the mold comes free easily.
STEP 9. Here is our subject, happy to be free from the
mold. Most people describe it as a very relaxing expe-
rience. This mold looks like it will work great for our
purpose.
STEP 10. Because latex masks are made from plaster
molds, we will need to first cast the face in a material
that is malleable. We also want to make some gruesome
changes so we will need to create a copy of the face in
clay. For that we will melt down some oil-based clay and
pour it into the mold.
	 As you melt it you will want to make sure it is suf-
ficiently hot to pour. Our clay melts to a pourable con-
sistency at around 200-degrees F. Some of the Chavant
clays melt very well, too. Be very careful, though, when
melting clay—it can get dangerously hot and cause se-
vere burns. Never exceed 220-degrees F.
STEP 11. After about 10 minutes the clay will build up
sufficiently in the mold and we pour out the excess. We
have deposited about a half-inch thickness in the mold
that will work fine.
STEP 12. After the clay is completely cool (you can re-
frigerate the mold or submerge it in cold water), we can
begin to demold.
STEP 13. The clay comes out very easily. No mold re-
lease is necessary. Keep in mind that the mold is usually
destroyed in the process so you cannot reuse it.
STEP 14. Here is the finished clay copy. Any imperfec-
tions can be easily removed. In the case of making a
monster mask we can’t really have enough defects, so we
will be adding a generous amount of exciting new flaws!
Muuaahhaahaha!
STEP 15. Here is the clay all cleaned up and ready for
damage.
STEP 16. Now we can get busy on making changes for
the mask. I have decided that we will give Ron a disease.
Let’s see—leprosy? necrotizing fasciitis?—there are so
many to choose from. Why don’t we just make this up as
we go along, then? I like Ron, but he did spill a drum of
latex once. This will be fun!
STEP 17. It doesn’t take long for things to go horribly
wrong with Ron’s complection. Yikes! But now we need
to remove his clay eye and put in a fake eye. We will leave
one diseased and one unaffected.
STEP 18. Once the fake eye is positioned and the eyelids
sculpted we can begin to ready the pattern for the mold.
Here I am filling the gaps around the bottom of the oil
clay as it meets the tabletop, using water-based clay.
STEP 19. Here you can see a closeup of one of the gaps.
If we didn’t fill this, the plaster would seep underneath
and make a very unsightly and unworkable mold.
STEP 20. In this image I have everything ready to go. All
we need is some hydrocal, a brush, and a bucket of room
temperature water.
STEP 21. Carefully sift the plaster into the water until
it comes up a few inches above the top and doesn’t sink
back down. Mix until it is creamy and has no lumps.
STEP 22. Once the plaster is uniform, apply with a brush
to capture all of the detail.A few sharp breaths of air over
10. 11. 12. 13. 14. 15.
16. 17. 18. 19. 20.
21. 22. 23. 24. 25. 26.
58 HORRORSHOW HORRORSHOW 59
Ultra-Realistic Silicone Skin
PlatSil®
Gel-10 & Deadener make skins so
real, they’ll take your breath away!
PlatSil Gel-10 offers:
• Unmatched versatility-any skin hardness
• Translucency for any coloration or effect
• Self-sticking if needed, adheres to skin, reuseable
• Easy 1:1 mix, rapid cure
• Pour, brush or spray application
800-858-5990 • www.polytek.com
Polytek®
manufactures liquid rubbers & plastics and is a
single source for all your mold making & casting needs.
Call Polytek for Low-Cost Trial Kits!
No other
FAKE skin
looks, acts
or feels as
REAL!
Mystique from X-Men by FXSmith
the surface will release all the bubbles and better capture
the detail.
STEP 23. Here is a shot of the finished detail coat.
STEP 24. Once the plaster thickens sufficiently you can
glob it on and build it up fast. Just make sure there are no
thin spots. We want at least one inch all the way around,
preferably two-inches thick.
STEP 25. As the plaster sets you can shape a flattish top
that allows you to rest the mold on its back while you
pour in the latex.
STEP 26. Once the plaster is set we can carefully remove
the clay sculpt. Be sure the plaster mold gets hot before
you remove the clay.
STEP 27. Here is the finished mold with the clay re-
moved. We have a little clean up left but nothing signifi-
cant.
STEP 28. To make sure we capture all the detail we will
apply the latex with a brush.You do not have to wait long
to do this, and in fact the mold is still warm when I be-
gin.
STEP 29. Make sure you gently scrub the latex into the
mold to get all the nasty detail.You can than pour the re-
maining latex into the mold. Let it sit for about 10 min-
utes to build up a sufficient thickness.
STEP 30. After the time is up, drain the excess latex
back into the container. We used about six ounces for
this casting. Turn the mold over and leave it in front side
down to drain the excess latex. Five minutes should do.
You can then place the mold open side up in front of a
fan overnight to dry.
STEP 31. Once the latex is dry you can carefully peel it
from the mold. The latex will still contain some moisture
so it is a good idea to powder it with cornstarch to keep it
from sticking to itself and creating a crease.
STEP 32. Since I’m only doing a face mask I’ve attached
an elastic band to hold the mask in place on one of our
head forms. This will allow me to work hands-free while
I paint.
STEP 33. I start with a jaundiced-looking flesh tone us-
ing mask paint. As with the previous demos, I am using
a Paasche H to apply the base color. Since it is all set up I
will stick with it for the entire demo and use a new tech-
nique that I learned for some of the detailing.
STEP 34. For the diseased areas I spray a brownish color
to act as a background for layering. I turn down the spray
to about 50 PSI. For the base color I usually set it a bit
higher at up to 80 PSI. It is hard on the hose but mask
paint sometimes needs the extra push since it is a thicker
medium than acrylics and inks.
STEP 35. Over the brown I use a sponge to stipple a
lightened version of the base color. This is lightly applied
to the high areas of the diseased spots to create a second-
ary background to accentuate the additional colors that
will be overlaid.
STEP 36. Next I start to add some bits of color to break
up the skin tone. These little flecks of color are splashed
on using a chip brush, which is cut in half with your
finger running through the brush near the mask. Mask
maker extraordinaire Jordu Schell demonstrated this
very effective technique at our June seminar. All kinds of
subtle color variations can be easily added this way.
STEP 37. I then go back to the diseased area and begin to
stipple additional colors over the highlighted base.Green,
red, and yellow are all added to the boils and affected ar-
eas. I am starting to really like my Ronnie mask, now! As
I think back to all of that valuable latex he poured down
the drain, I start to ratchet it up a notch. More puss!
STEP 38. To make the diseased areas stand out I add
some darker colors to the low points of the wounds. I
also spray some red around the bad spots.
STEP 39. Next I get busy on the good eye. The iris is
carefully painted. First a dark blue for the background
color and then lighter for the iris detail. This time I use a
small brush to do the iris detailing.
STEP 40. I decide to add quite a bit more red around
the face to adjust the flesh tone. I’ve concentrated the red
around the edges of the diseased areas as well. This pulls
all the colors together and creates a nice finished look.
STEP 41. For the last touches I add five-minute epoxy to
gloss the eyes and Perma-Wet over the diseased spots.
	 At last, here is the finished piece—Ronnie will never
be the same! He is actually a great guy and we love to
have him around the shop. Let’s give a big round of ap-
plause to Ronnie and P.J. for assisting me with this really
fun demo.
	 For more details on the making of this mask, be sure to
log on to www.monstermakers.com.
27. 28. 29. 30. 31. 32.
33. 34. 35. 36. 37.
38. 39. 40. 41.

More Related Content

Viewers also liked

Abusu sarean
Abusu sarean Abusu sarean
Abusu sarean
Erika Csr
 

Viewers also liked (7)

TheCrowdCafe | Investment Crowdfunding Presentation
TheCrowdCafe | Investment Crowdfunding Presentation TheCrowdCafe | Investment Crowdfunding Presentation
TheCrowdCafe | Investment Crowdfunding Presentation
 
Monografia adopcion
Monografia adopcionMonografia adopcion
Monografia adopcion
 
Abusu sarean
Abusu sarean Abusu sarean
Abusu sarean
 
Examensarbete: Att designa en virtuell plats
Examensarbete: Att designa en virtuell platsExamensarbete: Att designa en virtuell plats
Examensarbete: Att designa en virtuell plats
 
O 18 de Brumário de Luís Bonaparte
O 18 de Brumário de Luís BonaparteO 18 de Brumário de Luís Bonaparte
O 18 de Brumário de Luís Bonaparte
 
Vamos sair da chuva quando a bomba cair mario bortolotto
Vamos sair da chuva quando a bomba cair  mario bortolotto Vamos sair da chuva quando a bomba cair  mario bortolotto
Vamos sair da chuva quando a bomba cair mario bortolotto
 
TheCrowdCafe: Global Crowdinvesting Industry Presentation
TheCrowdCafe: Global Crowdinvesting Industry Presentation  TheCrowdCafe: Global Crowdinvesting Industry Presentation
TheCrowdCafe: Global Crowdinvesting Industry Presentation
 

Similar to máscara cinematográfica de látex

Dos and donts of clay power point
Dos and donts of clay power pointDos and donts of clay power point
Dos and donts of clay power point
Alyson Sprague
 
Crackle finished leather
Crackle finished leatherCrackle finished leather
Crackle finished leather
Sadman Prodhan
 
Research presentation a
Research presentation aResearch presentation a
Research presentation a
crispy2012
 

Similar to máscara cinematográfica de látex (20)

Transgender
TransgenderTransgender
Transgender
 
The Newest Art Form Doll Rebirthing - Terry Quinn
The Newest Art Form Doll Rebirthing - Terry QuinnThe Newest Art Form Doll Rebirthing - Terry Quinn
The Newest Art Form Doll Rebirthing - Terry Quinn
 
Paint effects
Paint effectsPaint effects
Paint effects
 
Creating a Dog Chew Toy using Silicone Mold
Creating a Dog Chew Toy using Silicone MoldCreating a Dog Chew Toy using Silicone Mold
Creating a Dog Chew Toy using Silicone Mold
 
Dog Chew Toy for Oral Hygiene
Dog Chew Toy for Oral HygieneDog Chew Toy for Oral Hygiene
Dog Chew Toy for Oral Hygiene
 
New printing technologies
New printing technologiesNew printing technologies
New printing technologies
 
Crystaltek Green Products
Crystaltek Green ProductsCrystaltek Green Products
Crystaltek Green Products
 
Mosaics
MosaicsMosaics
Mosaics
 
Can you repair your own inflatable?
Can you repair your own inflatable?Can you repair your own inflatable?
Can you repair your own inflatable?
 
Dos and donts of clay power point
Dos and donts of clay power pointDos and donts of clay power point
Dos and donts of clay power point
 
Raftaar -Taiyari Jeet Ki-1.pdf
Raftaar -Taiyari Jeet Ki-1.pdfRaftaar -Taiyari Jeet Ki-1.pdf
Raftaar -Taiyari Jeet Ki-1.pdf
 
Screen Printing With Water Based Inks: 5 Solutions
Screen Printing With Water Based Inks: 5 SolutionsScreen Printing With Water Based Inks: 5 Solutions
Screen Printing With Water Based Inks: 5 Solutions
 
Paintyourguitarhotrod
PaintyourguitarhotrodPaintyourguitarhotrod
Paintyourguitarhotrod
 
How to create a photo caricature in adobe photoshop
How to create a photo caricature in adobe photoshopHow to create a photo caricature in adobe photoshop
How to create a photo caricature in adobe photoshop
 
Crackle finished leather
Crackle finished leatherCrackle finished leather
Crackle finished leather
 
Resin casting
Resin castingResin casting
Resin casting
 
Finishing tips
Finishing tipsFinishing tips
Finishing tips
 
Garage flooring installation instructions
Garage flooring installation instructionsGarage flooring installation instructions
Garage flooring installation instructions
 
Cleaning and spot cleaning guide
Cleaning and spot cleaning guideCleaning and spot cleaning guide
Cleaning and spot cleaning guide
 
Research presentation a
Research presentation aResearch presentation a
Research presentation a
 

More from studio silvio selva

More from studio silvio selva (20)

Lei 1574 71- Estatuto dos Servidores Municipais de Bauru
Lei 1574 71- Estatuto dos Servidores Municipais de BauruLei 1574 71- Estatuto dos Servidores Municipais de Bauru
Lei 1574 71- Estatuto dos Servidores Municipais de Bauru
 
Cenotécnicos do Brasil
Cenotécnicos do BrasilCenotécnicos do Brasil
Cenotécnicos do Brasil
 
Gabriel garcia marques ninguém escreve ao coronel
Gabriel garcia marques   ninguém escreve ao coronelGabriel garcia marques   ninguém escreve ao coronel
Gabriel garcia marques ninguém escreve ao coronel
 
As alegres matronas de windsor W. Shakespeare
As alegres matronas de windsor W. ShakespeareAs alegres matronas de windsor W. Shakespeare
As alegres matronas de windsor W. Shakespeare
 
"Alegres senhoras de Windsor" William Shakespeare,
"Alegres senhoras de Windsor"  William Shakespeare, "Alegres senhoras de Windsor"  William Shakespeare,
"Alegres senhoras de Windsor" William Shakespeare,
 
'O casamento do pequeno burgues' bertolt brecht
'O casamento do pequeno burgues'   bertolt brecht'O casamento do pequeno burgues'   bertolt brecht
'O casamento do pequeno burgues' bertolt brecht
 
Fulana, Sicrana e Beltrana- Paulo Sacaldassy
Fulana, Sicrana e Beltrana- Paulo SacaldassyFulana, Sicrana e Beltrana- Paulo Sacaldassy
Fulana, Sicrana e Beltrana- Paulo Sacaldassy
 
Pastelão 1
Pastelão 1Pastelão 1
Pastelão 1
 
O pastel e a torta
O pastel e a tortaO pastel e a torta
O pastel e a torta
 
O pastelao e a torta
O pastelao e a tortaO pastelao e a torta
O pastelao e a torta
 
"Esperando godot" de Beckett
"Esperando godot" de Beckett"Esperando godot" de Beckett
"Esperando godot" de Beckett
 
Molière o tartufo
Molière o tartufoMolière o tartufo
Molière o tartufo
 
Mário Bortolotto "HOMENS, SANTOS E DESERTORES"
Mário Bortolotto "HOMENS, SANTOS E DESERTORES"Mário Bortolotto "HOMENS, SANTOS E DESERTORES"
Mário Bortolotto "HOMENS, SANTOS E DESERTORES"
 
Luigi pirandello "O Homem da Flor na Boca"
Luigi pirandello "O Homem da Flor na Boca"Luigi pirandello "O Homem da Flor na Boca"
Luigi pirandello "O Homem da Flor na Boca"
 
Luigi pirandello
Luigi pirandello Luigi pirandello
Luigi pirandello
 
Gonçalves dias leonor de mendonça
Gonçalves dias leonor de mendonçaGonçalves dias leonor de mendonça
Gonçalves dias leonor de mendonça
 
Anton tchekov os maleficios do tabaco
Anton tchekov os maleficios do tabacoAnton tchekov os maleficios do tabaco
Anton tchekov os maleficios do tabaco
 
Anton tchékhov o canto do cisne
Anton tchékhov o canto do cisneAnton tchékhov o canto do cisne
Anton tchékhov o canto do cisne
 
Ida ao Show da Ivete, segunda versão
Ida ao Show da Ivete, segunda versão Ida ao Show da Ivete, segunda versão
Ida ao Show da Ivete, segunda versão
 
Ida ao show da ivete
Ida ao show da iveteIda ao show da ivete
Ida ao show da ivete
 

Recently uploaded

Russian Escort Service in Delhi 11k Hotel Foreigner Russian Call Girls in Delhi
Russian Escort Service in Delhi 11k Hotel Foreigner Russian Call Girls in DelhiRussian Escort Service in Delhi 11k Hotel Foreigner Russian Call Girls in Delhi
Russian Escort Service in Delhi 11k Hotel Foreigner Russian Call Girls in Delhi
kauryashika82
 
Beyond the EU: DORA and NIS 2 Directive's Global Impact
Beyond the EU: DORA and NIS 2 Directive's Global ImpactBeyond the EU: DORA and NIS 2 Directive's Global Impact
Beyond the EU: DORA and NIS 2 Directive's Global Impact
PECB
 
An Overview of Mutual Funds Bcom Project.pdf
An Overview of Mutual Funds Bcom Project.pdfAn Overview of Mutual Funds Bcom Project.pdf
An Overview of Mutual Funds Bcom Project.pdf
SanaAli374401
 
Seal of Good Local Governance (SGLG) 2024Final.pptx
Seal of Good Local Governance (SGLG) 2024Final.pptxSeal of Good Local Governance (SGLG) 2024Final.pptx
Seal of Good Local Governance (SGLG) 2024Final.pptx
negromaestrong
 
Gardella_PRCampaignConclusion Pitch Letter
Gardella_PRCampaignConclusion Pitch LetterGardella_PRCampaignConclusion Pitch Letter
Gardella_PRCampaignConclusion Pitch Letter
MateoGardella
 

Recently uploaded (20)

psychiatric nursing HISTORY COLLECTION .docx
psychiatric  nursing HISTORY  COLLECTION  .docxpsychiatric  nursing HISTORY  COLLECTION  .docx
psychiatric nursing HISTORY COLLECTION .docx
 
Accessible design: Minimum effort, maximum impact
Accessible design: Minimum effort, maximum impactAccessible design: Minimum effort, maximum impact
Accessible design: Minimum effort, maximum impact
 
Russian Escort Service in Delhi 11k Hotel Foreigner Russian Call Girls in Delhi
Russian Escort Service in Delhi 11k Hotel Foreigner Russian Call Girls in DelhiRussian Escort Service in Delhi 11k Hotel Foreigner Russian Call Girls in Delhi
Russian Escort Service in Delhi 11k Hotel Foreigner Russian Call Girls in Delhi
 
Mattingly "AI & Prompt Design: The Basics of Prompt Design"
Mattingly "AI & Prompt Design: The Basics of Prompt Design"Mattingly "AI & Prompt Design: The Basics of Prompt Design"
Mattingly "AI & Prompt Design: The Basics of Prompt Design"
 
Beyond the EU: DORA and NIS 2 Directive's Global Impact
Beyond the EU: DORA and NIS 2 Directive's Global ImpactBeyond the EU: DORA and NIS 2 Directive's Global Impact
Beyond the EU: DORA and NIS 2 Directive's Global Impact
 
An Overview of Mutual Funds Bcom Project.pdf
An Overview of Mutual Funds Bcom Project.pdfAn Overview of Mutual Funds Bcom Project.pdf
An Overview of Mutual Funds Bcom Project.pdf
 
Introduction to Nonprofit Accounting: The Basics
Introduction to Nonprofit Accounting: The BasicsIntroduction to Nonprofit Accounting: The Basics
Introduction to Nonprofit Accounting: The Basics
 
Mattingly "AI & Prompt Design: Structured Data, Assistants, & RAG"
Mattingly "AI & Prompt Design: Structured Data, Assistants, & RAG"Mattingly "AI & Prompt Design: Structured Data, Assistants, & RAG"
Mattingly "AI & Prompt Design: Structured Data, Assistants, & RAG"
 
Measures of Central Tendency: Mean, Median and Mode
Measures of Central Tendency: Mean, Median and ModeMeasures of Central Tendency: Mean, Median and Mode
Measures of Central Tendency: Mean, Median and Mode
 
Seal of Good Local Governance (SGLG) 2024Final.pptx
Seal of Good Local Governance (SGLG) 2024Final.pptxSeal of Good Local Governance (SGLG) 2024Final.pptx
Seal of Good Local Governance (SGLG) 2024Final.pptx
 
Gardella_PRCampaignConclusion Pitch Letter
Gardella_PRCampaignConclusion Pitch LetterGardella_PRCampaignConclusion Pitch Letter
Gardella_PRCampaignConclusion Pitch Letter
 
PROCESS RECORDING FORMAT.docx
PROCESS      RECORDING        FORMAT.docxPROCESS      RECORDING        FORMAT.docx
PROCESS RECORDING FORMAT.docx
 
Unit-IV- Pharma. Marketing Channels.pptx
Unit-IV- Pharma. Marketing Channels.pptxUnit-IV- Pharma. Marketing Channels.pptx
Unit-IV- Pharma. Marketing Channels.pptx
 
APM Welcome, APM North West Network Conference, Synergies Across Sectors
APM Welcome, APM North West Network Conference, Synergies Across SectorsAPM Welcome, APM North West Network Conference, Synergies Across Sectors
APM Welcome, APM North West Network Conference, Synergies Across Sectors
 
Web & Social Media Analytics Previous Year Question Paper.pdf
Web & Social Media Analytics Previous Year Question Paper.pdfWeb & Social Media Analytics Previous Year Question Paper.pdf
Web & Social Media Analytics Previous Year Question Paper.pdf
 
Z Score,T Score, Percential Rank and Box Plot Graph
Z Score,T Score, Percential Rank and Box Plot GraphZ Score,T Score, Percential Rank and Box Plot Graph
Z Score,T Score, Percential Rank and Box Plot Graph
 
INDIA QUIZ 2024 RLAC DELHI UNIVERSITY.pptx
INDIA QUIZ 2024 RLAC DELHI UNIVERSITY.pptxINDIA QUIZ 2024 RLAC DELHI UNIVERSITY.pptx
INDIA QUIZ 2024 RLAC DELHI UNIVERSITY.pptx
 
Paris 2024 Olympic Geographies - an activity
Paris 2024 Olympic Geographies - an activityParis 2024 Olympic Geographies - an activity
Paris 2024 Olympic Geographies - an activity
 
Unit-IV; Professional Sales Representative (PSR).pptx
Unit-IV; Professional Sales Representative (PSR).pptxUnit-IV; Professional Sales Representative (PSR).pptx
Unit-IV; Professional Sales Representative (PSR).pptx
 
Holdier Curriculum Vitae (April 2024).pdf
Holdier Curriculum Vitae (April 2024).pdfHoldier Curriculum Vitae (April 2024).pdf
Holdier Curriculum Vitae (April 2024).pdf
 

máscara cinematográfica de látex

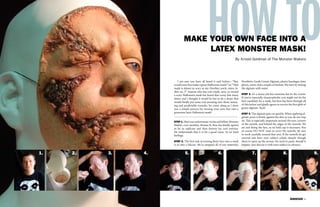
  • 1. 54 HORRORSHOW HORRORSHOW 55 HOW TOMake your own face into a latex monster mask! By Arnold Goldman of The Monster Makers I am sure you have all heard it said before—“Boy, would your face make a great Halloween mask!”or,“That mask is almost as scary as my (brother, uncle, sister, fa- ther, etc.)!” Anyone who has ever made, seen, or owned a scary Halloween mask has heard that corny line many times, and I thought it would be fun to do a demo that would finally put some real meaning into those annoy- ing and predictable remarks. So, come along as I show you a simple process for turning your own face into a gruesome latex Halloween mask! STEP 1. Meet our unfortunate victim and fellow Monster Makers crew member, Ronnie K. Ron has kindly agreed to let us replicate and then destroy his cool exterior. He understands that it is for a good cause. So no hard feelings. STEP 2. The first task in turning Ron’s face into a mask is to take a lifecast. We’ve prepped all of our materials: Prosthetic Grade Cream Alginate, plaster bandages, latex gloves, water, and a couple of buckets.We start by mixing the alginate with water. STEP 3. It’s a messy job but someone has be the victim. If you’re especially claustrophobic you might not be the best candidate for a mask, but Ron has been through all of this before and gladly agrees to receive the first glob of gooey alginate. Yuck! STEP 4. The alginate goes on quickly. When applying al- ginate, press it firmly against the skin so you do not trap air. This is especially important around the eyes, corners of the mouth, and behind the edges of the nostrils. We are just doing the face, so no bald cap is necessary. You of course DO NOT want to cover the nostrils. Be sure to work carefully around that area. If the nostrils do get covered just have your subject exhale sharply though them to open up the airway. No need to panic should it happen. Just discuss it with your subject in advance. 1. 2. 3. 4. 5. 6. 7. 8. 9.
  • 2. 56 HORRORSHOW HORRORSHOW 57 STEP 5. Just before the alginate begins to set, we should press some cotton fiber into the alginate. This will allow the plaster bandages to adhere to the alginate by forming a mechanical bond between the alginate and the bandages. STEP 6. After the alginate sets we begin to apply the plaster bandages. It is also important to work the ban- dages against the alginate to make sure that they make complete contact with the alginate so there are no air pockets. STEP 7. The bandages are applied over all exposed alg- inate, leaving the nose for last. Beforehand it is impor- tant to prepare various size small strips that you can use to cover the nose area. STEP 8. Once the plaster bandages have set, have the subject lean forward and help remove the mold. We ap- plied a little Vaseline along the eyebrows and hairline be- forehand so the mold comes free easily. STEP 9. Here is our subject, happy to be free from the mold. Most people describe it as a very relaxing expe- rience. This mold looks like it will work great for our purpose. STEP 10. Because latex masks are made from plaster molds, we will need to first cast the face in a material that is malleable. We also want to make some gruesome changes so we will need to create a copy of the face in clay. For that we will melt down some oil-based clay and pour it into the mold. As you melt it you will want to make sure it is suf- ficiently hot to pour. Our clay melts to a pourable con- sistency at around 200-degrees F. Some of the Chavant clays melt very well, too. Be very careful, though, when melting clay—it can get dangerously hot and cause se- vere burns. Never exceed 220-degrees F. STEP 11. After about 10 minutes the clay will build up sufficiently in the mold and we pour out the excess. We have deposited about a half-inch thickness in the mold that will work fine. STEP 12. After the clay is completely cool (you can re- frigerate the mold or submerge it in cold water), we can begin to demold. STEP 13. The clay comes out very easily. No mold re- lease is necessary. Keep in mind that the mold is usually destroyed in the process so you cannot reuse it. STEP 14. Here is the finished clay copy. Any imperfec- tions can be easily removed. In the case of making a monster mask we can’t really have enough defects, so we will be adding a generous amount of exciting new flaws! Muuaahhaahaha! STEP 15. Here is the clay all cleaned up and ready for damage. STEP 16. Now we can get busy on making changes for the mask. I have decided that we will give Ron a disease. Let’s see—leprosy? necrotizing fasciitis?—there are so many to choose from. Why don’t we just make this up as we go along, then? I like Ron, but he did spill a drum of latex once. This will be fun! STEP 17. It doesn’t take long for things to go horribly wrong with Ron’s complection. Yikes! But now we need to remove his clay eye and put in a fake eye. We will leave one diseased and one unaffected. STEP 18. Once the fake eye is positioned and the eyelids sculpted we can begin to ready the pattern for the mold. Here I am filling the gaps around the bottom of the oil clay as it meets the tabletop, using water-based clay. STEP 19. Here you can see a closeup of one of the gaps. If we didn’t fill this, the plaster would seep underneath and make a very unsightly and unworkable mold. STEP 20. In this image I have everything ready to go. All we need is some hydrocal, a brush, and a bucket of room temperature water. STEP 21. Carefully sift the plaster into the water until it comes up a few inches above the top and doesn’t sink back down. Mix until it is creamy and has no lumps. STEP 22. Once the plaster is uniform, apply with a brush to capture all of the detail.A few sharp breaths of air over 10. 11. 12. 13. 14. 15. 16. 17. 18. 19. 20. 21. 22. 23. 24. 25. 26.
  • 3. 58 HORRORSHOW HORRORSHOW 59 Ultra-Realistic Silicone Skin PlatSil® Gel-10 & Deadener make skins so real, they’ll take your breath away! PlatSil Gel-10 offers: • Unmatched versatility-any skin hardness • Translucency for any coloration or effect • Self-sticking if needed, adheres to skin, reuseable • Easy 1:1 mix, rapid cure • Pour, brush or spray application 800-858-5990 • www.polytek.com Polytek® manufactures liquid rubbers & plastics and is a single source for all your mold making & casting needs. Call Polytek for Low-Cost Trial Kits! No other FAKE skin looks, acts or feels as REAL! Mystique from X-Men by FXSmith the surface will release all the bubbles and better capture the detail. STEP 23. Here is a shot of the finished detail coat. STEP 24. Once the plaster thickens sufficiently you can glob it on and build it up fast. Just make sure there are no thin spots. We want at least one inch all the way around, preferably two-inches thick. STEP 25. As the plaster sets you can shape a flattish top that allows you to rest the mold on its back while you pour in the latex. STEP 26. Once the plaster is set we can carefully remove the clay sculpt. Be sure the plaster mold gets hot before you remove the clay. STEP 27. Here is the finished mold with the clay re- moved. We have a little clean up left but nothing signifi- cant. STEP 28. To make sure we capture all the detail we will apply the latex with a brush.You do not have to wait long to do this, and in fact the mold is still warm when I be- gin. STEP 29. Make sure you gently scrub the latex into the mold to get all the nasty detail.You can than pour the re- maining latex into the mold. Let it sit for about 10 min- utes to build up a sufficient thickness. STEP 30. After the time is up, drain the excess latex back into the container. We used about six ounces for this casting. Turn the mold over and leave it in front side down to drain the excess latex. Five minutes should do. You can then place the mold open side up in front of a fan overnight to dry. STEP 31. Once the latex is dry you can carefully peel it from the mold. The latex will still contain some moisture so it is a good idea to powder it with cornstarch to keep it from sticking to itself and creating a crease. STEP 32. Since I’m only doing a face mask I’ve attached an elastic band to hold the mask in place on one of our head forms. This will allow me to work hands-free while I paint. STEP 33. I start with a jaundiced-looking flesh tone us- ing mask paint. As with the previous demos, I am using a Paasche H to apply the base color. Since it is all set up I will stick with it for the entire demo and use a new tech- nique that I learned for some of the detailing. STEP 34. For the diseased areas I spray a brownish color to act as a background for layering. I turn down the spray to about 50 PSI. For the base color I usually set it a bit higher at up to 80 PSI. It is hard on the hose but mask paint sometimes needs the extra push since it is a thicker medium than acrylics and inks. STEP 35. Over the brown I use a sponge to stipple a lightened version of the base color. This is lightly applied to the high areas of the diseased spots to create a second- ary background to accentuate the additional colors that will be overlaid. STEP 36. Next I start to add some bits of color to break up the skin tone. These little flecks of color are splashed on using a chip brush, which is cut in half with your finger running through the brush near the mask. Mask maker extraordinaire Jordu Schell demonstrated this very effective technique at our June seminar. All kinds of subtle color variations can be easily added this way. STEP 37. I then go back to the diseased area and begin to stipple additional colors over the highlighted base.Green, red, and yellow are all added to the boils and affected ar- eas. I am starting to really like my Ronnie mask, now! As I think back to all of that valuable latex he poured down the drain, I start to ratchet it up a notch. More puss! STEP 38. To make the diseased areas stand out I add some darker colors to the low points of the wounds. I also spray some red around the bad spots. STEP 39. Next I get busy on the good eye. The iris is carefully painted. First a dark blue for the background color and then lighter for the iris detail. This time I use a small brush to do the iris detailing. STEP 40. I decide to add quite a bit more red around the face to adjust the flesh tone. I’ve concentrated the red around the edges of the diseased areas as well. This pulls all the colors together and creates a nice finished look. STEP 41. For the last touches I add five-minute epoxy to gloss the eyes and Perma-Wet over the diseased spots. At last, here is the finished piece—Ronnie will never be the same! He is actually a great guy and we love to have him around the shop. Let’s give a big round of ap- plause to Ronnie and P.J. for assisting me with this really fun demo. For more details on the making of this mask, be sure to log on to www.monstermakers.com. 27. 28. 29. 30. 31. 32. 33. 34. 35. 36. 37. 38. 39. 40. 41.