
Recommended
More Related Content
What's hot
What's hot (19)
Viewers also liked
Viewers also liked (17)
Similar to Session Notes
Similar to Session Notes (20)
Recently uploaded
Recently uploaded (20)
Session Notes
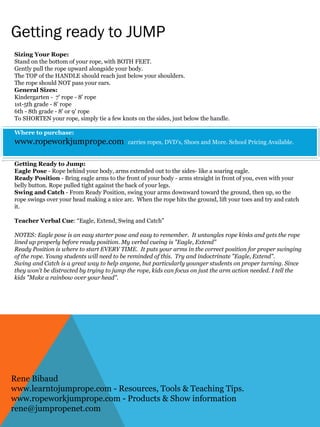
- 1. Getting ready to JUMP Sizing Your Rope: Stand on the bottom of your rope, with BOTH FEET. Gently pull the rope upward alongside your body. The TOP of the HANDLE should reach just below your shoulders. The rope should NOT pass your ears. General Sizes: Kindergarten - 7' rope - 8' rope 1st-5th grade - 8' rope 6th - 8th grade - 8' or 9' rope To SHORTEN your rope, simply tie a few knots on the sides, just below the handle. Where to purchase: www.ropeworkjumprope.com carries ropes, DVD’s, Shoes and More. School Pricing Available. Getting Ready to Jump: Eagle Pose - Rope behind your body, arms extended out to the sides- like a soaring eagle. Ready Position - Bring eagle arms to the front of your body - arms straight in front of you, even with your belly button. Rope pulled tight against the back of your legs. Swing and Catch - From Ready Position, swing your arms downward toward the ground, then up, so the rope swings over your head making a nice arc. When the rope hits the ground, lift your toes and try and catch it. Teacher Verbal Cue: “Eagle, Extend, Swing and Catch” NOTES: Eagle pose is an easy starter pose and easy to remember. It untangles rope kinks and gets the rope lined up properly before ready position. My verbal cueing is "Eagle, Extend" Ready Position is where to start EVERY TIME. It puts your arms in the correct position for proper swinging of the rope. Young students will need to be reminded of this. Try and indoctrinate "Eagle, Extend". Swing and Catch is a great way to help anyone, but particularly younger students on proper turning. Since they won't be distracted by trying to jump the rope, kids can focus on just the arm action needed. I tell the kids "Make a rainbow over your head". Rene Bibaud www.learntojumprope.com - Resources, Tools & Teaching Tips. www.ropeworkjumprope.com - Products & Show information rene@jumpropenet.com
- 2. The skills Basic Bounce – This is the fundamental rhythm that all other skills come from. Spend a little time each day encouraging students to jump one time for every spin. (the fast time beat) TEACHING CUES- Fast arms, legs straight, steady beat. Finer Points – Keep hands near hips, turn small circles, feet low to the ground. Jack Jump - Feet go apart and together, like jumping jacks, as the rope spins a steady beat. Additional Add On Challenges to the Jack Jump: Jack X - Feet go apart then make an X. Foot X - Feet stay in the X position for 3 jumps, then X with alternate foot on top Skier – Small hops side to side. Bell – Small hops forward and back One Foot Hop – Hop on one foot. Add’l challenges to the one foot hop Hop your age – Hop on one foot x your age. Try other foot Jogging Step – Hop one time on each foot. The rope needs to pass under your right and left foot. (Avoid galloping) Full Twist – This is a full turn. Swing rope over head, and before jumping it, swing it off to the left side, follow the rope around in a circle. The rope should keep swinging in an up and down motion, and stay in front of the body- when you arrive forward, let the rope drop down, and jump over it. Caution- End up jumping backwards? The rope went over your head. Keep it out in front of you until you are forward. TIP – Go slowly and keep the rope going up and down as your turn. Walk the Dog – Drag the rope behind you, until it’s making a straight line. Glide the rope out in front (like rolling a ball down a hill) the rope handle should glide up into the air. Try to catch it in front of you. Add on Challenges: Catch and jump forward Catch and go backward Catch in one hand Catch behind your back
- 3. The skills continued Want to see the skills in action? Click on the link below to my demonstrational video: Cross - Make an X with your arms and jump through the loop you make with your arms. Common Errors – Not crossing BIG ENOUGH, Not crossing LONG ENOUGH Teaching Cues: Bend Slightly, Cross BIG, Point arms down to ground. Stay crossed until you jump through. Teaching Steps: 1. Rope Down. 2. Make an X with your arms. 3. Check that arms are straight and crossed as much as possible. 4. Pick up Rope. 5. Eagle, Extend. 6. Swing rope over head and cross before it hits your toes. 7. Check your arms. Are they crossed all the way? 8. If so, try it while jumping. Additional Challenges to the cross: Crosses in a row – Cross, open, cross, open, cross, open Continuous Cross – Keep arms crossed Continuous Cross on one foot – One foot hop while arms stay crossed Pretzel – The RIGHT ARM swoops from inside the RIGHT LEG so that the hand is on the outside of the body. The leg lifts up so the knee is level with the hip. Bend over slightly so the arm is all the way under the leg and flexed so as to hold the leg up. Spin the rope in a large motion with the LEFT arm and use the wrist of the right arm. Teaching Steps: 1. Rope Down 2. Hold right hand out like you are holding a tray. 3. Lift RIGHT LEG up and bend your knee in front of you, so your knee is even with your hip. 4. Take that right arm and keep holding a tray as you stick it under your leg. Bend over a little. Now hop up and down. PICK UP ROPE – Put the rope in front of you, and then place your left foot in FRONT OF THE ROPE, so you are standing in a split stance. Now repeat the steps above and start swinging the rope over your head. Hop on your left foot.
- 4. Add – on Challenges Keeping an entire class engaged can be challenging. These four add-on challenges work like a dream! For any skill already acquired, students can try one of the four add-on challenges for making a skill more interesting and dynamic! Do the skill plus: 1. Go Backwards 2. Move through space 3. Add a Cross 4. Add a Double Under
- 5. Basic Skills Quick reference Here’s a list of the basic skills I always start off with. Some skills include additional challenges specific to the skill being taught, for kids who have mastered the skill. I have listed the skills in my “smart sequencing” approach. This order works very well for most classes. ADD-ON TOOLS- Remember to add the 4 add-on’s! Backward, thru space, w/cross, w/double under.