Nail making machine operation manuals download
•Download as DOC, PDF•
7 likes•2,753 views

China uniwin machines co.,ltd is one of the top nail making machine manufacturers in China,we have over 100 workers and have workshop making nails ,to train our customers if they need to learn how to operate the nail making machines.this file is an instruction and reminders of how to operate the nail making machine,for more info,pls email :lingduxiaolang@gmail.com or visit :www.nailmakingmachine.net

Recommended
More Related Content
Recently uploaded
Recently uploaded (20)
Featured
Featured (20)
Nail making machine operation manuals download
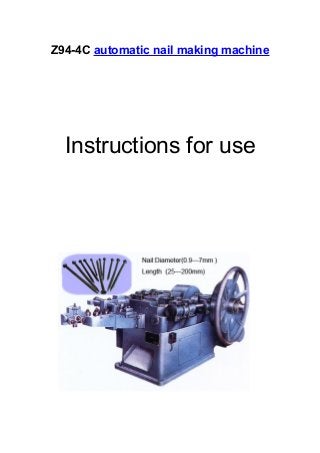
- 1. Z94-4C automatic nail making machine Instructions for use
- 2. Zhengzhou Uniwin Machines Co.,ltd Skype:lingduxiaolang Email:lingduxiaolang@gmail.com Wetsite: www.nailmakingmachine.net Content 1. Main application and feature 2. Main specifications and parameters 3. Transmission system (Pic 1) 4. Main mechanism and regulation (1) Wire straightening system (Pic 2) (2) Wire feeding system (Pic 3) (3) Mould - die and clamping system (Pic 4) (4) Punching system (Pic 5) (5) Cutting system (Pic 6) (6) Wire reel system (Pic 7) 5. lubrication system (Pic 8) 6. Electrical system (Pic 9) 7. Machine carrying, installment and trial run (Pic 10) 8. The use of machinery and maintenance 9. Breakdown and obviating methods
- 3. 10.Main easy-wire parts (1.) Nail knife (Pic 11) (2.) Pin punch (Pic 12) (3.) left mould-die (Pic 13) (4.) right mould (Pic 14) Main application and feature 1. Main application Z94-100A nail making machine is mainly used for making round nails with diameter (2.8-4.5mm), length (50-100mm). .With slightly refitting the wire strengthening system and punching system of the machine, we can make other specific steel nails, such as coil roofing nails, roofing nails, etc. 2. Feature (1.) elegant appearance, Reasonable structure, Stable performance, Security and reliability, Durability in use, Easy maintenance, High efficiency. (2.) The main parts like all the shafts, cams and gears are made of quality steels. (3.) The feeding system is installed with control handles, which makes it easier to feed wires or stop feeding wires at any time during machine running. (4.) An friction device is assembled between crank shafts and flywheels to provide protection when a machine break down or overload. (5.) Full automation. Once launched, it can make nails continuously. Main mechanism and regulation 1. wire strengthening system(picture2) strengthening wire pedestal700, which have 8gears702,703,706,etc to adjust steel
- 4. wires, is fastened on the feeding wire shelf800 with screws . Adjust gear702 by spinning screw701 to adjust the curving degree of crew between up and down. Adjust gears706,703 by spinning screw705 to adjust the curving degree of screw between left and right. Wire enters the system through 707. 2. wire feeding system(picture3) feeding wire pedestal800 is fastened in the form of the body100 with screw803.The one side of draw bar804 is linked with feeding wire eccentric disc202, the other side of which is linked with transmission arm805.And the other side of transmission arm is connected to clamping slide801.When crank shaft spinning, feeding wire eccentric disc202 spins with it. Meanwhile it drives draw bar804 to move back and forth, which impels transmission arm805 to move around 806,and brings along clamping slide801 sliding back and forth to feed wires. Pulling feeding control handle802 can control feeding and make it stop anytime during running. Adjusting the angle of feeding eccentric disc202 can change the feeding time. Adjusting bar201, resting on feeding eccentric disc, can get different wire feeding length. Adjust the length of silde804 can get different places, where feeding wire slide moves. With adjusting the position of slide807, the feeding wire shears mark can be regulated to nail cap or nail head, which realizes no shears mark on the nail body. 3. mould-die and clamping system(picture4) Nail mould seat900 is installed on the supporting surface of mould table. Gear909, located on transmission arm905 contacted cam312. With the effect of spring908, gear909 keeps a certain pressure with cam312.The turning of right axis makes cam reverse. Because of the effect of cam
- 5. surface, transmission arm905 moves around hinge pin. Drag hook907 drives left nail mould moving back and forth through tip903 to realize clamp and wire-loosening. Spinning screw904 can adjust the clamp level of wire. Spinning screw910 can adjust die hole position around. Spinning screw901 can adjust die hole up and down positions. 4. punching system(picture5) Slide504 is located in guidetrack groove. The one side of connecting rod is linked with crank shaft213, the other side of which is connected with slide 504. The spinning of crank shaft makes 501 drive slide504 moving back and forth in main guidetrack groove to achieve punching. Loosening pressing plate and spinning screw nut506 can adjust the length that puncher pin507 stretches out of the slide. Consequently the thickness of nail cap can be adjusted. When the machine stops and flywheel can not move, Loosening screw nut506 with much strength can make it work again. Wedge502 slightly plugs into the chute of slide504 with its own gravity and makes the gap between screw503 and wedge502 is 0.5-1mm (making sure the machine works) 5. cutting system Cutting system lies in the inside of left and right side shafts, symmetrical. The one side of connecting rod604 is linked with side cam shaft, the other side of which is connected with scissors slider603. Because of the effect of partiality, the spinning of side cam shaft drives scissors slider moves around to achieve cutting nails. Spinning screw605 can adjust the longitudinal position of scissors seat608, consequently adjust that of the pointingknife. Spinning screw606 can adjust up and down position of modulation 607, Consequently adjust the that of the pointingknife.
- 6. Spinning screw602 can adjust wedge609 to achieve the regulation of the length pointingknife601. 6. Wire reel system Wire reel system lies in the form of the machine, base seat312 is fixed by screw315. Payoff reel313 is used for storing wire. The stanchion314 and free foot315 is used for fixing wires. When wiring is needed, you can take out plug317, then wire coil hangs. Lubrication system(picture8) 1. The machine uses 3# or 4# calcium base oil. 2. When first use it, you should lubricate rubbing surfaces for removing remaining dirt in 15 days. 3. You can use it again after lubrication of every rubbing surface when it is out of use for a long time. 4. The machine should be lubricated regularly. Electrical system (picture9) 1. main electric equipment number name model specification qty 1 Three-phase Y112M-4 4KW,380V 1
- 7. asynchronous 2 Magnetic starter QC12-3/H 380V,50H2.11A.HJ07 1 3 Thermodynami c button LA4-22H 380V 1 2. wiring diagram (picture9) 3 .Magnetic starter, with thermorelay can realize overload protection of motor Maintaince: 1)Don’t adjust the length when the machine is operating. 2)Keep the machine clean,wash the dies regularly,don’t use rusty steel to make nails. 3)Don’t feed the wire until the machine is started up steadily,stop feeding first when turn off the machine. 4)Keep the knife sharp. 5)Should notice the unusual noise when the machine is operating. 6)Disconnect the power before implement the maintaince. 7)Inject oil to lubricate the machine frequently and make each part works well.
- 8. Position Appearance The cause Solution nail head there is no nail head the mould is not tight adjust the mould to be tight the length to make head is too short adjust the legth nail head is not round the hole of mould is not proper adjust the mould the length to make head is too short make it longer two parts of the mould is not at the same level make the mould flat the wire is too hard backfire nail head is skew hole is not in line with the center line adjust the nail knife nail mould is not at the same level adjust the mould the mould is not tightly fixed adjust the screw nail knife is not aligned adjust the nail knife the thickness of nail head the height of mould adjust the mould the mould is not tightly fixed adjust it the mould is frayed change mould the distance between rocker die is long adjust the distance the wrie is too hard backfire stick part of the nails not straight the roll straighten system don’t work well adjust the roll the mould is bad change the mould the hardness of backfire wire is not uniform the hard of wire is not uniform change the wire press out part is long adjust it nail length is not uniform the position of nail knife is not adjust the position