1. NX Plotting Basic Setup Guide - TeamWiki Page 1 of 12
NX Plotting Basic Setup Guide
From TeamWiki
Contents
„ 1 NX Plotting Basic Setup Guide (NX3 onwards)
„ 1.1 For Multiple Seats of Unigraphics
„ 1.2 To Plot Drawing Line Widths Correctly(in NX3 and NX4)
„ 1.3 Useful Tips
NX Plotting Basic Setup Guide (NX3 onwards)
The steps for configuring NX plotting are described below:
1. Ensure that you have the printer/plotter set up in Windows and that Windows can print to it. It does not matter if
this is connected to a share on a server or set up locally.
2. Create a directory where you want to keep your plotter settings. This could be on a server if you have multiple
clients that all want to see the same settings.
e.g. c:nxplotters
3. Start NX
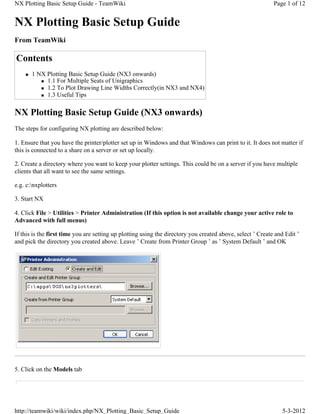
4. Click File > Utilities > Printer Administration (If this option is not available change your active role to
Advanced with full menus)
If this is the first time you are setting up plotting using the directory you created above, select ’ Create and Edit ’
and pick the directory you created above. Leave ’ Create from Printer Group ’ as ’ System Default ’ and OK
5. Click on the Models tab
http://teamwiki/wiki/index.php/NX_Plotting_Basic_Setup_Guide 5-3-2012
2. NX Plotting Basic Setup Guide - TeamWiki Page 2 of 12
Find the closest match to your plotter in the list and select it.
Click ’ Save As ’ to create your own copy of the model with a new name
http://teamwiki/wiki/index.php/NX_Plotting_Basic_Setup_Guide 5-3-2012
3. NX Plotting Basic Setup Guide - TeamWiki Page 3 of 12
6. Find the newly created plotter model in the list, highlight it and click on Properties.
In the properties dialog , the paper sizes available can be modified if required. Important …Also the Class should
be noted.
By default it might read Raster/RTL
http://teamwiki/wiki/index.php/NX_Plotting_Basic_Setup_Guide 5-3-2012
4. NX Plotting Basic Setup Guide - TeamWiki Page 4 of 12
This is not always the best option for performance, often changing this to HPGL, HPGL2 or Postscript will
improved the time to generate a plot considerably.
Click ok when finished modifications
7. Click on the ’ printers ’ tab and click ’ Add ’
Give your printer a new name, and pick the model you just created form the list (it will be at the bottom)
http://teamwiki/wiki/index.php/NX_Plotting_Basic_Setup_Guide 5-3-2012
5. NX Plotting Basic Setup Guide - TeamWiki Page 5 of 12
Ensure ’ NT/Queue ’ is ticked and pick your windows printer from the list, then OK
NOTE! – If you do not have the plotter defined as a local printer it can still be accessed using the unc path.
E.g. lhrsrv02UK_UK_helpdesk . To do this select the option "Device" (NOT LPR/Queue!) and enter the
path in the lower box.
8. Highlight the new printer in the list and click ’ System Profile ’
http://teamwiki/wiki/index.php/NX_Plotting_Basic_Setup_Guide 5-3-2012
7. NX Plotting Basic Setup Guide - TeamWiki Page 7 of 12
Edit the settings as appropriate for your printer - specifically Paper Size and plot scaling (for printers rather than
plotters), then OK, and OK once more
9. Exit from NX, File > Exit
10. Edit the ugii_env.dat file that your setup of NX is using, set the variable UGII_SDI_SERVER_CFG_DIR to
point to the plotting directory that you set up in Step 2.
Remember to remove the # from the start of the line.
e.g.
# This variable specifies a single printer group directory that is
# shared by all users. If you prefer to use multiple printer group
# directories, then specify the directories in a printer group list
# file instead. Before setting this variable, review printer group
# concepts presented in NX Help documentation.
#
UGII_SDI_SERVER_CFG_DIR=c:nxplotters
11. Restart NX, open a part or drawing. The select File > Plot
http://teamwiki/wiki/index.php/NX_Plotting_Basic_Setup_Guide 5-3-2012
9. NX Plotting Basic Setup Guide - TeamWiki Page 9 of 12
Change any settings as necessary, for more advanced options you can select the "Advanced Plot" button which will
bring up the following dialog.
http://teamwiki/wiki/index.php/NX_Plotting_Basic_Setup_Guide 5-3-2012
11. NX Plotting Basic Setup Guide - TeamWiki Page 11 of 12
The CGM Viewer button will show you a preview of the display that is to be plotted.
For Multiple Seats of Unigraphics
Once configured correctly, to roll out to multiple seats of NX, ensure that UGII_SDI_SERVER_CFG_DIR is set
correctly for each client, and that the Windows printer(s) are set up the same on each client.
To Plot Drawing Line Widths Correctly(in NX3 and NX4)
After Selecting File > Plot , enable the Use Drawing Sheet Widths toggle. If this does not work change the
Option under widths to Custom 3 Widths and define widths as required
In NX3 and NX4:
In NX5:
http://teamwiki/wiki/index.php/NX_Plotting_Basic_Setup_Guide 5-3-2012
12. NX Plotting Basic Setup Guide - TeamWiki Page 12 of 12
Useful Tips
If you frequently get the message: "image exceeds printable area" when in reality you plot is an acceptable size.
This message can be suppressed by setting the environment variable "UGII_SDI_IGNORE_SIZE_WARNING=1"
Retrieved from "http://teamwiki/wiki/index.php/NX_Plotting_Basic_Setup_Guide"
Category: NX tips and tricks
„ This page was last modified 10:36, 27 May 2008.
http://teamwiki/wiki/index.php/NX_Plotting_Basic_Setup_Guide 5-3-2012