UGC NET Paper 1 Mathematical Reasoning & Aptitude.pdf
Grade 4 science sound unit
1. Science - Grade 4 Sound Unit
Rationale
This grade 4 Science unit about sound will include a variety of lesson activities
such as: class discussions, videos, hands on experiments, student presentations, centres,
power point presentations and a research project. There will be a combination of
individual and group work, where students will learn to cooperate and organize
presentations with other classmates. Science journaling will be common throughout this
unit and will be encouraged upon the students. The unit will be completed with a final
research project about Canada’s contributors to sound technology.
Assessment/Evaluation
A few assessments will occur throughout the unit. The few presentations that
occur will be assessed along with the individual student work. The lessons explain if an
assessment will occur. Science journals can be taken in at the end of every week for
assessment, or can be evaluated at the end of the unit. Rubrics have been implemented for
some of the lesson assessments, however, can be changed and modified.
Safety
Safety procedures will be outlined in every lesson depending upon the type of
experiment or student work taking place. Some lessons do not require specific safety
procedures and have been labeled as: N/A.
2. Lesson 1
Topic: Science – Sound: Vibration Class: Grade 4 Science
Description of Lesson: Students will be lead in an engaging explanation of the human
ear and how humans hear sound. Students will be exploring how sound is created through
vibrations by making kazoos. The kazoos are a representation of the ear canal and how
we hear.
E’s: Explore, Engage, Explain
Objectives: Evaluation:
S04.1: Students will:
Identify sources and characteristics of
sound in the environment, including how
humans and animals hear sound.
S04.2: Investigate the characteristics and
properties of sound.
Students will:
d.) Describe how the human ear is designed
to detect vibrations
a.) Relate vibrations to sound production.
Materials/Resources:
-Ear diagram
-Music (Good Vibrations by the Beach Boys)
-Bristle board paper or paper towel tubes (students could collect and bring from home)
----Tap
-Elastics
-Scissors
-Wax paper
-Colouring utensils
Safety:
Students will be thoroughly warned that fooling around during the experiment is not
acceptable and appropriate consequences will be in place. We will only be using scissors
for this experiment and students will know the expectations of appropriate behaviour.
3. Presentation
Set
Ask students: Have you ever wondered how a human ear works?
How do we actually hear? What is sound? Ask students for ideas.
Get students to hum on the spot and feel their throat, nose and
mouth. What do you feel? Explain vibrations.
We are going to explore how we hear sound!
Time
5-10 mins
Development
Hand out ear diagrams. (One student from each science group to
pick up sheets for group)
We are going to be playing connect the dots (minus the dots).
Show diagram of an ear on overhead and go over the parts of the
ear and how sound travels through the ear. (Description to follow)
-Have students follow along with a pencil or pen.
-(briefly play song) The sound travels into the outer ear, through
the ear canal to reach the cochlea (middle ear). Get students to
repeat the term cochlea. The sound is then transformed into
electrical pulses (in the cochlea, or inner ear) that travel down the
nerves to the brain, in which the sound is processed. Our brains
then determine what we are hearing. Ask a volunteer to go over the
hearing process using the diagram and terms.
-Go over terms that were not mentioned (ear drum, Eustachian
tube, hammer, anvil and stirrup) get students to repeat terms and
give each student a copy of these notes.
Another way to see sound waves in action is by creating Kazoos!
Each student will get a piece of bristle board paper and tape it to
create a tube or paper towel tube also works (can colour). Cut a
square piece of wax paper, enough to cover one end of the tube.
Hold the wax paper in place at one end of the tube, or fasten with
an elastic band. Talk or sing into the Kazoo. The wax paper will
vibrate as the sound waves bounce through the tube. Ask the
groups what is happening.
30 mins
Closure – Science journals and clean-up
All scraps of paper and colouring utensils should be put away.
In the science journals, students have the choice to do one of the
following:
-Draw your kazoo and write a few sentences as to how it works, or
-Explain how sound travels through our ears/ how we hear and
draw your own diagram of an ear.
10 mins
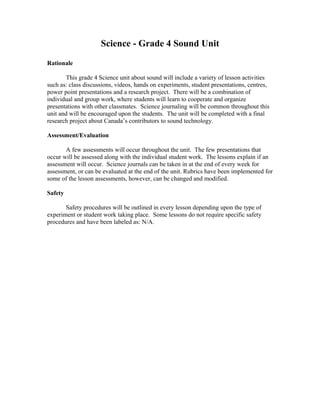
4. The Human Ear
Ear drum: separates the outer ear from the middle ear. It transfers sound to the middle ear
by vibrating. (It also protects the inner ear)
Eustachian tube: The auditory, or hearing tube that links our neck and throat, behind our
noses to the middle ear.
Three small bones in the middle ear:
Hammer: The malleus or hammer is a hammer-shaped small bone of the middle ear
which is attached to the inner surface of the eardrum. It transmits the sound vibrations
from the eardrum.
Anvil: The incus or anvil is another small bone in the middle ear. It also transmits sound
vibrations.
Stirrup: The stapes or stirrup is a small bone in the middle ear which is attached to the
incus or anvil. It is the smallest bone in the human body.
Cochlea
Nerves to
brain
Hammer
Anvil Stirrup
5. Lesson 2
Topic: Everyday Sounds Class: Grade 4 Science
Description of Lesson: Students will be learning about everyday sounds including
sounds from the natural environment, animal sounds and sounds that humans rely on for
pleasure and also for a warning that something will happen. Students will also explore
some everyday objects in a sound matching activity.
E’s: Engage, Explore, Explain, Elaborate
Objectives: Evaluation:
Students will:
SO4.1: Identify sources and
characteristics of sound in the
environment, including how humans and
animals hear sound.
S04.3: Assess the impact on self, society
and the environment of technological
innovations related to sound.
a) Relate vibrations to sound production.
b) Describe examples of sound
technologies used by people to meet their
everyday needs (e.g., radio, alarm clock,
fire alarm, and whistling steam kettle)
c) Explain how certain sounds in their
environment are used for enjoyment and
others to let you know that something is
going to happen.
d) Identify the positive and negative
effects of technological devices that
produce loud sounds and identify the need
for protection from loud sounds to prevent
hearing loss.
Materials/Resources:
• 10 or 12 containers with lids (yogurt, sour cream containers, or cans work best)
• Red and blue markers
• Objects to be used as sound makers: marbles, pennies, keys, paper clips, rice,
beans, cotton balls, popsicle sticks, rocks (challenge the students and pick similar
sounds)
• Sounds All Around by Wendy Pfeffer
Safety:
N/A
6. Presentation
Set
Read Sounds All Around by Wendy Pfeffer.
As the book is read, get the students to perform the sounds
suggested (e.g., clap hands, touch throat while humming). Write the
following words on the board as they are being read: echolocation,
sound waves, and decibels. After reading, get volunteers to explain
what these words mean related to sound.
Time
10 mins
Development
Make a chart on the board (for students to copy in Science
duotangs).
Compare “Enjoyment sounds” and “Warning (or something is
going to happen) sounds.” Enjoyment sounds can include the
suggestions from the book and others (e.g., Ipod, radio, concert,
singing). Warning sounds can include an alarm clock, sirens,
vehicle honking, door bell, school bell and thunder. Get the
students to make these suggestions. After all suggestions have been
made, discuss some of these sounds and how may affect our
hearing – positively or negatively and how we need to be cautious
with loudness of these sounds to prevent possible hearing troubles.
Matching Sounds Activity:
Containers filled with different objects will be on display. Each
container will have a match (pair) filled with the same objects. This
will be a large group/class activity where students will have
different roles in determining which containers match according to
sound. Student roles: recorder to write the results on the board, and
10 volunteers to shake the containers. The remaining students will
be voting to match the sounds. (See following page for activity set
up and rules).
-This activity simply justifies that sounds can be made with
everyday items and that sounds are everywhere.
15 mins
30 mins
Closure – Review - Elaborate
Review everyday sounds: enjoyment sounds and warning sounds.
Discuss the words we learned – echolocation, decibel, sound
waves. We will be learning more about these terms next day and
throughout the unit.
5 mins
7. Matching Sounds Activity
Setting Up
• Collect ten identical containers with lids
• With markers, put a red X on five cans and put a blue X on the other
five (can make more, as long as each container has a pair)
• Put an equal amount of objects into one red container and one blue
container. Fill other pairs with other sound makers (marbles, pennies,
keys, paper clips, rice, beans, cotton balls, popsicle sticks, rocks
(challenge the students and pick similar sounds)
• Place the red containers together and the blue together
Instructions
• Get two volunteers, one to shake a red container and one to shake a
blue container. If both make the same sound, get the class to vote
what the sound objects are. If correct, get another volunteer to write
object in corresponding chart and place those containers aside from
the others. If not correct, the containers will be returned.
• Get more volunteers and repeat process until all containers have been
matched.
Chart suggestions:
1st
Match Beans
8. Lesson 3 (will carry over two days)
Topic: Comparing human and animal sound ranges. Class: Grade 4 Science
Description of Lesson: Students will be exploring different animals and the sounds they
produce, along with their sound range. A comparison chart will be created to compare the
different animals’ sound ranges to that of a human.
E’s: Engage, Explore, Explain, Elaborate, Evaluate
Objectives: Evaluation:
Students will:
SO4.1: Identify sources and
characteristics of sound in the
environment, including how humans and
animals hear sound.
a) Relate vibrations to sound production.
e) Compare the range of sounds heard by
humans to that heard by other animals.
Materials/Resources:
• The Very Quiet Cricket by Eric Carle – book or YouTube version (preferred for
technology component and differentiated instruction)
• 11x17 paper (enough for each pair of students)
• Markers
• Sounds All Around by Wendy Pfeffer
Safety:
N/A
9. Presentation
Set
Re-read Sounds All Around sections about animal sounds.
Play video: The Very Quiet Cricket by Eric Carle on YouTube.
Time
Day 1:
10 mins
Development
*Note: For this lesson, with the help of the school librarian, gather
as many books, or information about different animals and sound,
(e.g., range of sound heard, sounds made). Enough for each pair of
students so that each pair has one animal.
Students will be paired up for this activity. The task will be to read
the sound information about selected animal, complete the selected
criteria steps (what information to include) and display the
information in the form of a poster, using words, sentences and
pictures (hand drawn). Another day to complete posters will most
likely be necessary.
Suggested criteria:
-animal name
-range of sound heard
-what sound this animal makes
-comparison to humans
Next day will consist of approximately 10-15 minutes to complete
posters. Students will present their animal and its corresponding
sound information. Each pair will have about 2 minutes to present.
Day 1:
50 mins
Day 2:
45 mins
Closure – Explain and Elaborate – Day 2
Create a class made chart on the board that compares the presented
animals and a brief summary of their sound information. Discuss
the similarities and differences. (Get students to copy in Science
duotangs). How do humans’ sound ranges compare?
15 mins
Sample animals to study: bat, cat, dog, cricket, dolphin, elephant, mice, snake, owl,
whale, birds, fish, ant, spider
Animal information: http://www.seaworld.org/animal-info/info-books/index.htm
10. Lesson 4
Topic: Watch Sound Travel – through a gas. Class: Grade 4 Science
Description of Lesson: In this lesson, students will review previous knowledge regarding
sound produced from vibrations. The students will be constructing bottle drums and using
them to see how sound travels. They will have time to predict the outcome of the
experiment and why they feel their result will occur.
E’s: Engage, Explore, Explain
Objectives: Evaluation:
SO4.2: Investigating the characteristics
and properties of sound.
This lesson is designed to help students
review that vibrations are responsible for
the sounds we hear. Additionally, they
learn that sound vibrations can travel
through different mediums.
a) Relate vibrations to sound production.
b) Compare how vibrations travel
differently through a variety of solids and
liquids and through air.
Materials/Resources:
Scissors
Plastic bottle
Tea light candle
Matches or source of fire
Elastic band
Plastic bags
Instruction Sheet
Music player
Safety:
Students will be wearing goggles because we are using fire/candles.
Students will know fire safety procedures, and where fire exits and fire extinguishers are
located in the classroom.
Students will be thoroughly warned that fooling around during the experiment is not
acceptable and appropriate consequences will be in place.
11. Presentation
Set
Review how sound is produced by vibrations.
Ask students if they think we can “see” sound.
For the next few lessons we will be testing to see if sound can
travel through solids, liquids and gases. Ask the students what they
think are solids, liquids and gases.
Today we will see if vibrations can travel through a gas.
Time
10 mins
Development
Before we begin this engage activity, it is crucial to discuss the
safety rules (listed above) as we will be working with fire.
Distribute materials, and then instruction sheets so that we can go
through each step when the students have the materials in front of
them. Students will be in put into groups (previously made). One
student from each group can come and get a bag of supplies.
Read the instruction sheet together and get the students to volunteer
to read. I will have the materials (cut and put together) on display
for student reference.
Predictions – After reading, the groups will be given a few minutes
to discuss their predictions about what will happen to the candle. I
will ask for a few predictions from the students and will write them
on the board. Begin activity! I will be lighting the candles.
Observations – Ask what is happening to the candle and why?
30 mins
Closure - Explanations and clean-up
When the student taps the piece of plastic, tiny particles in the air
beside it vibrate. These vibrations make the particles beside them
vibrate as well. The vibration travels through the bottle and the
flame is blown out. We cannot see sound, we can see a result of
sound. In their Science journals, students will be asked to draw a
picture of what they saw and experienced, as well as a few
sentenced as to what resulted and why.
Clean Up Procedure:
One student from each group will collect all of the bottles and
bring them to the front where they will be placed back in a bag.
Another student will pick up the candles and lighters and bring
them to the front desk and put away into their box.
15 mins
12. * Science experiment taken from Easy Science for Kids - http://www.kids-science-
experiments.com/watchsoundtravel.html
Watch Sound Travel - Gas
Steps:
Make a drum from the plastic bottle:
1. Cut the bottom end (base) from the plastic bottle.
2. Cut a piece from the plastic bag to cover the bottom of
the bottle.
3. Stretch and fit the piece of plastic tightly over the end of
the bottle.
4. Place the elastic band over the plastic bag to secure it.
5. Light the tea-light candle.
6. Point the top end of the bottle to face the tea-light
candle, about 2.5cm (1 in.) away from the candle.
7. Tap the piece of plastic bag with your fingertips.
13. Lesson 5
Topic: Watch Sound Travel – through a solid and a liquid. Class: Grade 4 Science
Description of Lesson: We previously learned that sound travels through air, considering
that we can hear sound. Throughout the activities, students will be examining sound and
how it can travel through a solid and a liquid as well.
E’s: Engage, Explore, Explain, Evaluate
Objectives: Evaluation:
Students will:
SO4.2: Investigating the characteristics
and properties of sound.
This lesson is designed to help students
review that vibrations are responsible for
the sounds we hear. Additionally, they
learn that sound vibrations can travel
through different mediums.
a) Relate vibrations to sound production.
b) Compare how vibrations travel
differently through a variety of solids and
liquids and through air.
Materials/Resources:
• Paper cups – enough for each pair to have two
• String
• Drinking glasses
• Wooden spoons, pencils, or teaspoons
• 2-cup (500 mL) measuring cup or small pitcher
• Tap water in large pitcher
Safety:
We will be experimenting with water, therefore, proper safety rules will be discussed
before the experiment takes place.
Rule: If a water spill occurs, stay by the spill and notify another student or teacher around
to go get paper towel to clean it up.
We are also using water glasses, students will be warned to be gentle when tapping the
glasses, so they are not broken. If a glass is broken, do not touch the glass! The teacher
will clean it up.
14. Presentation
Set - Review
Review how sound travels through air – how we hear things on a
daily basis. We also saw how sound travelled through fire. Review
what happened to the fire and why.
Time
5-10 mins
Development
*Note: Two experiments will occur in this lesson.
First, we will be making predictions in our Science journals. We
already know that sound can travel through the air and through a
gas. Do you think sound can travel through a solid? Why? Do you
think sound can travel through a liquid? Why?
Let’s test a liquid. Examine how sound travels through water by
making musical glasses. This activity will be a large class activity
because a number of glasses are necessary. (See instructions
following for set up). Once all glasses are set up and filled with
different amounts of water, get students to voice their predictions
about sound travelling through a liquid. Ask what the significance
of different amounts of water is and how that could affect the sound
made. Get students to gather around the table of glasses. Ask for
some volunteers to tap the glasses. What is happening? Why? Write
findings on board. Give a few minutes for the students to
experiment with the water glasses. Where is best to tap the glass?
Now, let’s test a solid. Distribute instruction sheets. Students will
be making a string telephone to determine if sound can travel
through a solid - string. Pair up the students for this activity. Each
pair will receive two paper cups and some string. (Instructions to
follow). As the students are testing their telephones, ask what they
are experiencing.
5 mins
20 mins
15 mins
Closure – Clean up and Explain
As students were creating their telephones, the water can be poured
back into large pitcher.
Sound through water – Sound is heard, but you cannot see the glass
shake. The surface of the water will shake. Sound through a solid –
The sound travels through the string. In Science journals, students
can look back to their predictions made earlier, have a discussion,
did any predict correctly? Get students to write a few sentences as
to how their predictions were either correct or incorrect and draw a
picture of their telephones and water glasses.
10 mins
15. Listen to Sound Travel through a Solid Object
1. With two paper cups and about ten feet of string, make a string telephone.
2. Attach the string to each cup:
• Put a hole in the bottom of each cup.
• Put the string through each hole.
• Tie knots in the ends of the string inside each cup to keep the string
ends from coming out.
3. Pull the string tight between the cups. The sound stops if the string is
loose and cannot vibrate.
4. Whisper into one cup and have your friend put their ear to the cup and
listen.
**Can you hear a whisper better through the telephone or normally through
the air?
Musical Glasses
1. Gather eight water glasses, all the same size.
2. Pour one ounce of water into the first glass, two ounces into the second
glass, three ounces into the third glass, and so on until all glasses have been
used.
3. Tap each glass with a pencil or wooden spoon.
4. Listen to the sound that comes from each glass.
5. Tap on each glass. Go up the scale and down the scale.
16. Lesson 6
Topic: Sound – Pitch Class: Grade 4 Science
Description of Lesson: Students will learn how sound pitch can be changed and
modified.
E’s: Engage, Explore, Explain, Elaborate
Objectives: Evaluation:
Students will:
SO4.2: Investigating the characteristics
and properties of sound.
c) Identify questions about ways to
change pitch and loudness.
d) Demonstrate and describe how the
pitch and loudness of sounds can be
modified.
e) State a prediction and hypothesis about
the effect a modification will have on the
pitch and loudness of a sound produced
based on the pattern of sounds produced.
Materials/Resources:
• Large jar
• Small jar
• Balloons
• Radio
• The Remarkable Farkle McBride by John Lithgow
• Science Alive: Sound book
Safety:
We are also using glass jars, students will be warned to be gentle with the jars, so they are
not broken. If a glass is broken, do not touch the glass! The teacher will clean it up.
17. Presentation
Set -
What happens to the qualities of sound when the sound passing
through them gets louder and louder?
Create a dancing balloon!
1) Blow a balloon three quarters full.
2) Turn on the radio and place the balloon near one of the radio
speakers. (Ask for a volunteer to hold the balloon).
3) Slowly increase the volume of the radio. Can you feel the
balloon vibrating?
Ask: What is happening and why?
Time
10 mins
Development
Read the “Volume and Pitch” section of Science Alive: Sound on
page 26. (If the book cannot be accessed, the description is on the
following page).
Write some notes on the board as the section is being read and
explained. Get the students to copy in Science duotangs.
(Will need to collect jars at the beginning of the year. Each pair of
students will need a small jar and a large jar).
First, hold the opening of the large jar to your mouth and hum into
it; then hum the same way into the smaller jar. What happens?
A deeper sound is produced through the large jar and a higher
sound through the smaller jar. Switch jars between pairs. (Remind
students not to spit on the jars, mouths should not be touching the
jars, they are just humming into them).
Discuss and write on the board:
(leave the underlined terms blank for students to make an educated
guess)
The pitch of the sound depends on the height and diameter of the
jar. With more room in the large jar, the humming makes longer
sound waves, so a deeper, lower sound is heard in the jar. The
sound waves in the smaller jar have less room, therefore, they are
shortened and the frequency or pitch of the sound you hear is
higher.
10 mins
20 mins
Closure
All jars can be kept for a different science experiment.
Read The Remarkable Farkle McBride by John Lithgow as an
allusion for the next lesson – learning about musical instruments.
10 mins
18. “Volume and Pitch” – Science Alive: Sound (pg. 26)
Why did the balloon shake when you turned up the volume of the radio in
the experiment?
When you increased the noise from the radio, more sound energy was
transmitted to the air molecules in the balloon. The molecules vibrated more
vigorously and caused the balloon to shake.
Have you ever noticed that when an ambulance on the road passes you, the
pitch of its siren increases as it approaches you and decreases once it passes
you? Sound waves in front of a moving object are compressed when it
moves toward you. This compression of sound waves increases the
frequency and makes the pitch higher. The sound waves behind the
ambulance are stretched. As the sound waves become longer, they decrease
in frequency and pitch. This change in sound frequency of a moving object
is called the Doppler Effect.
19. Lesson 7, 8 & 9
Topic: Sound – Musical Instruments Class: Grade 4 Science
Description of Lesson: Students will be engaged in learning about the different types of
musical instruments. Students will be further exploring these instruments by creating
their own musical device that relates to one of the types of musical instruments we have
discussed.
E’s: Engage, Explore, Explain, Elaborate, Evaluate
Objectives: Evaluation:
Students will:
SO4.2: Investigating the characteristics
and properties of sound.
SO4.3: Assess the impact on self, society
and the environment of technological
innovations related to sound.
This musical instrument assignment gives
students the opportunity to show what
they know about instruments and sound –
vibration and pitch should be explained in
presentations.
f) Use a technological problem solving
process to design and construct a device
which has the ability to create sounds of
variable pitch and loudness.
g) Evaluate personally constructed
musical devices with respect to their
ability to vary their pitch and loudness.
SO4.3 b) Use the term “decibel” correctly
in descriptions of sound intensity.
Materials/Resources:
• Sound (Energy Works! Series) by Jenny Karpelenia
• Scholastic’s The Magic School Bus: In the Haunted Museum: A Book About
Sound
• Making Music worksheet
• Clothes hangers - chimes
• Kleenex boxes (start collecting throughout year – do not throw away after empty)
• Shoe boxes (also start collecting from students)
• Different sizes of elastics
• Tissue paper
• Construction paper
• Glue
• Scissors
• Markers
Safety:
Students will be working with clothes hangers – these can be dangerous and students will
be warned that the hangers are not to be used inappropriately.
20. Presentation
Set – Day 1:
Distribute Making Music handouts.
Read Sound (Energy Works! Series) by Jenny Karpelenia – (only
the instrument section pg. 28-32). As the book is read, students are
to fill out the handout according how the sounds are made for each
type of instrument and how the pitch is changed for each.
*Read slowly and pause at the end of each type for students to have
time to fill in their sheet.
Go over each answer, asking for volunteers and fill in missing
information.
Time
15 mins
Development
Tell students they are going to be using what they have learned
about sound and pitch to make their own instruments. After the
instruments are created, students will present their instruments
according to type of instrument.
Instrument Criteria:
- Name of instrument
- Type of instrument
- An explanation of how they made the instrument
- An explanation and demonstration of how the instrument makes
sound and changes pitch
The instrument presentations will be assessed.
-Provide a checklist for students that list the criteria needed.
-Display scoring rubric on overhead and discuss.
Students will begin the written portion with the explanations.
Day 2:
-Students will work on their instruments. Allow for enough clean-
up time at the end of the lesson.
Day 3:
-Instrument presentations – arrange the students in groups
according to the types of instruments.
Day 1:
40 mins
Day 2:
50 mins
Day 3:
40 mins
Closure - Elaborate - end of Day 3
Read The Magic School Bus: In the Haunted Museum
Elaborate on the musical instruments and introduce the idea of
decibels and how it relates to sound.
15 mins
**handout and presentation rubric included in zipped folder
21. Answer Key to the Making Music Sheet
Type of Instrument How the Sound is Made How the Pitch is Changed
Wind
Blowing into it makes the
wood, plastic, or brass
vibrate, causing the air
inside the instrument to
vibrate.
Pushing keys changes the
length of the column of
vibrating air, which changes
the pitch.
Stringed
Plucking or strumming
strings causes them to
vibrate. The air inside the
instrument vibrates, too.
Placing fingers on the
strings creates different
string lengths.
Percussion
Hitting or shaking materials
causes them to vibrate.
Hitting different sized
instruments or different
sized parts of the instrument
creates different pitches.
22. Lesson 10
Topic: Sound – Noise Pollution Class: Grade 4 Science
Description of Lesson: Students will be engaged in centres in which a variety of topics
related to sound pollution and impairment will be discussed. Students should be aware
that not all sounds are good for our hearing, and they should be cautious of the sounds
they are exposing themselves to in preventing possible hearing impairments.
E’s: Engage, Explore, Explain,
Objectives: Evaluation:
Students will:
SO4.3: Assess the impact on self, society
and the environment of technological
innovations related to sound.
c) Demonstrate processes for
investigating the extent of noise pollution
in their surroundings, and work with
group members to evaluate the processes
used in investigating noise pollution.
d) Identify the positive and negative
effects of technological devices that
produce loud sounds and identify the need
for protection from loud sounds to prevent
hearing loss.
e) Describe specific personal actions or
products that can help reduce noise
pollution.
Materials/Resources:
• Large paper – 11x14
• Markers
• Computers
• Sound handout:
http://kidshealth.org/classroom/prekto2/body/functions/hearing_handout2
.pdf
• Chart paper
Safety: N/A
23. Presentation
Set –
Use chart paper, and as a class, brainstorm and discuss what
students think/know what noise pollution is or could be.
Time
10 mins
Development
Sound Centres: Divide the class into groups (enough for five
groups). Each centre should take about 5 minutes. Explain each
centre before, and have a switching routine set.
1) What is noise? After looking up the definition, brainstorm as a
group what is noise to your ears.
2) Sounds in Everyday Life (loud, soft; pleasant, unpleasant; high-
pitched, low-pitched; etc.) Use the handout to rate the loudest and
quietest sounds:
http://kidshealth.org/classroom/prekto2/body/functions/hearing_ha
ndout2.pdf
3) Jobs Requiring Sound – Using large paper, write a list of any
jobs that deal with sound and draw corresponding pictures.
4)http://www.youtube.com/watch?
v=NoyScburK_U&feature=related - meet Caroline, a hearing
impaired teen – need computers and a few laptops.
5) Ways to Help Others With Hearing Problems – teacher led
centre – discussion with the groups
35 mins
Closure -
Discussion of each centre and what the groups learned. What are
ways to reduce noise pollution which affects our hearing? What are
simple things that we can do? Create a list on the board.
15 mins
24. Lesson 11 -
Topic: Sound – Sound Technology and Canadian Contributors Class: Grade 4 Science
This conclusion of the sound unit will take a few class periods to complete.
Description of Lesson: This will be the final lesson for the sound unit, authenticating the
students’ journey and learnings of sound and the facets of sound. Students will be
engaged in learning about sound enhancers and the collection of sound data with the
current sound technologies used today. Students will also take part in a research project,
gathering information about past sound inventions created or contributed by Canadian
people.
E’s: Engage, Explore, Explain, Evaluate, Elaborate
Objectives: Evaluation:
Students will:
SO4.2: Investigate the characteristics and
properties of sound.
SO4.3: Assess the impact on self, society
and the environment of technological
innovations related to sound.
h) Identify and use a variety of sources
and technologies to gather pertinent
information about Canadians who have
contributed to sound technology.
a) Describe examples of devices that
enhance our abilities to hear and collect
sound data, such as hearing aids, sonar,
amplifiers, oscilloscopes, and ultrasound.
f) Identify examples of current research
related to sound.
Materials/Resources:
• Data Projector
• Power point
• Laptops and computers, possible books from library
• Project Criteria handout:
• Project Assessment rubric
• Poster Paper
• Inventors
Safety: N/A
25. Presentation
Set – Review of Sound
Bill Nye the Science Guy – Sound video (optional)
Time
35 mins
Development
Power point presentation about devices that enhance our abilities to
hear and collect sound data. The presentation will introduce the
students to other types of sound devices besides the typical CD
players, televisions and radios.
After the presentation, get students to fill out Exit Slips explaining
2 or 3 new things that they learned.
(Who, What, When, Where, and Why Project)
Introduce Students to the research project.
Students will be starting a research project about sound technology.
Students will research and gather information about Canadians who
have contributed to sound technology. This project will be the
finale to what sound has become and how it has been used
throughout history. (The project will take approximately 3 full
class periods to complete, with research time using laptops and
books – students can split up tasks to take home for homework as
well)
-Each pair will choose their inventor randomly out of a hat.
(Inventors to be pre-chosen by teacher based on enough research
information)
Day 1 of research:
Students will be paired for the research project because there are
limited Canadian inventors in the area of sound.
Criteria for research project:
Give each student a handout of criteria as a checklist.
Go over on overhead with students.
Presentation Options:
-power point
-poster form – large poster paper
-time – 5-10 minutes each.
*A rubric will be used to assess the project and presentations.
15 mins
5 mins
15 mins
45 mins
Closure of Unit - presentations
Each pair will present their research project.
(Will take
about two
class
periods).
26. Canadian Sound Inventor Options:
http://www.canadiangeographic.ca/magazine/JF06/indepth/history.asp
1876
Telephone – Alexander Graham Bell (Non-Canadian exception – important invention with
Canada relation)
1800s
Glass tube organ - James P. Clarke
1853
Fog Horn - Robert Foulis
1901
Morse code - Guglielmo Marconi
1906
Radio telephony - Reginald Fessenden - the first recording of the first radio broadcast.
1923
The Robb Wave Organ - Morse Robb
1930s
Sonobel (Electric piano) - Oswald Michaud
1942
Walkie-Talkie - Donald L. Hings
1945
Electronic Music Synthesizer, Hugh Le Caine
1951
Animated sound film - Norman McLaren
1953
Composertron - Osmond Kendall
1955
Multi-Track Tape Recorder - Hugh Le Caine
1970
Polyphone - Hugh Le Caine
27. 1988
Graphite violins - Leonard John
Who? What? When? Where? Why? Research Project
Canadians and Sound Technology
1) Name of inventor/contributor (Who)
2) Name of particular technology – What is it called? (What)
3) Date of when the technology was invented (When)
4) Where did the invention occur? (Where)
5) What the invention does/did? Description (Why)
6) 2 extra facts about the invention
7) Diagram/Picture with detailed description of parts
8) Is the invention still used today/Is there current research
about the invention?
9) How has this invention affected people/Why is it important?
28. Names___________________________________________
Inventor/Invention______________________________________________
Research Project Rubric
Criteria 1 2 3 4
Organization
*Presentation
• Information is
disorganized
• Gaps in content
or repeated
content
• Reader confused
• 2 or 3 problems with
organization of
information
• Separate ideas are not
discussed in separate
paragraphs
• Reader must reread at
times for clarity
• Information is
generally organized
with only 1 or 2
problems
• Separate ideas
discussed in separate
paragraphs
• Reader finds content
generally clear
• Information is
organized Content
flows nicely
• Reader finds content
clear and easy to
follow
Quality of
Information
*Presentation
• Information has
little to do with
the questions
posed
• no supporting
details and/or
examples
provided
• Reader confused
and annoyed
• Information is not
entirely related to
questions posed in
introduction
• Supporting detail(s)
and/or example(s)
not directly related
• Reader finds little of
interest
• Information generally
relates to the
questions posed
• 1 supporting detail
and/or example is
provided
• Reader generally
enjoys piece
• Information clearly
relates to questions
posed in the
introduction
• 1 or 2 supporting
details and/or
examples are used
• Reader finds some
things of interest
Diagrams/
Pictures
• Diagrams and
illustrations are
neither neat nor
accurate
• They don’t appear
to relate to the
questions posed
• They confuse the
content
• Diagrams and
illustrations are
neither neat nor
entirely accurate
• They don’t add much
to the content
• Diagrams and
illustrations are
mostly accurate and
somewhat related to
the questions posed
in the introduction
• They reinforce the
content
• Diagrams and
illustrations are
accurate and clearly
relate to the questions
posed
• They add interest to
the content
Summary • Important points
not identified or
included
• Both important and
insignificant
information are
included
• Mentions some
important
information
• Highlights the most
important
information
Punctuation,
Capitalization
& Spelling
• There are a
number of major
errors in
punctuation,
grammar and/or
spelling which
make it difficult
to read
• There are more than 3
minor errors in
punctuation, grammar
and/or spelling which
do interrupt the flow
for the reader
There are 1 or 2
minor grammatical,
spelling or
punctuation errors
There are no
grammatical, spelling
or punctuation errors,
or they relate to risk-
taking on the part of
the student
29. Total: /20
Comments:
Resources
Breckenridge, Judy. Physics Experiments. New York: Sterling Publishing Co., Inc., 2006.
Pfeffer, Wendy. Sounds All Around. New York: Harper Collins Publishers, 1999.
Dearling, Robert. The Encyclopedia of Musical Instruments: Percussion & Electronic
Instruments. Philadelphia: Chelsea House Publishers, 2001.
VanCleave, Janice. Play and Find Out about Science: Easy Experiments for Young
Children. USA: John Wiley & Sons, Inc, 1996.
Beech, Linda W. Scholastic’s The Magic School Bus In the Haunted Museum: A Book
About Sound. New York: Scholastic Inc., 1995.
Snedden, Robert. Smart Science: Sound and Light. Illinois, USA: Heinemann
Library, 1999.
Rodger, Ellen. (Ed.). Science Alive: Sound. Ontario, Canada: Crabtree Publishing
Company, 2002.
**Note – page 4 and 5 have some simple experiments to introduce sound energy
and sound waves.
Hart, Avery & Mantell, Paul. Kids Make Music! Clapping & Tapping from Bach to
Rock!
Vermont, USA: Williamson Publishing, 1993.
http://www.canadiangeographic.ca/magazine/JF06/indepth/history.asp
Bill Nye the Science Guy – Sound video
http://kidshealth.org/classroom/prekto2/body/functions/hearing_handout2.pdf
http://www.youtube.com/watch?v=NoyScburK_U&feature=related
Sound (Energy Works! Series) by Jenny Karpelenia
The Remarkable Farkle McBride by John Lithgow
http://www.kids-science-experiments.com/watchsoundtravel.html
30. The Very Quiet Cricket by Eric Carle on YouTube
http://www.seaworld.org/animal-info/info-books/index.htm
“Good Vibrations” by the Beach Boys - song