SlideShare a Scribd company logo
1 of 132
Download to read offline
GLC/GDC60VX, GLC/GDC70VX (E879)
SERVICE MANUAL CONTENTS
SECTION
PART
NUMBER
YRM
NUMBER
REV
DATE
FRAME............................................................................................................................ 524288189 0100 YRM 1316 08/13
GM 4.3L V-6 ENGINES................................................................................................... 524265337 0600 YRM 1251 05/14
KUBOTA ENGINE REPAIR............................................................................................ 550048607 0600 YRM 1557 03/13
COOLING SYSTEM........................................................................................................ 524223757 0700 YRM 1123 03/13
LPG FUEL SYSTEM GM 4.3L ENGINE WITH PSI........................................................ 550043871 0900 YRM 1556 04/14
THREE-SPEED POWERSHIFT TRANSMISSION REPAIR........................................... 524288194 1300 YRM 1317 03/13
TRANSMISSION REPAIR (DANA SPICER) 2X2........................................................... 524294873 1300 YRM 1343 03/14
DRIVE AXLE AND DIFFERENTIAL ASSEMBLY REPAIR (WET BRAKE)................... 524288199 1400 YRM 1318 12/13
STEERING AXLE............................................................................................................ 524223764 1600 YRM 1133 07/13
BRAKE SYSTEM............................................................................................................ 524262279 1800 YRM 1247 03/13
HYDRAULIC GEAR PUMP............................................................................................. 524223766 1900 YRM 1136 04/14
HYDRAULIC CLEANLINESS PROCEDURES............................................................... 550073240 1900 YRM 1620 12/14
MAIN CONTROL VALVE................................................................................................ 524223767 2000 YRM 1137 04/14
CYLINDER REPAIR (MAST S/N A513, A514, A613, A614, B513, B514)..................... 524294878 2100 YRM 1328 02/14
HIGH VOLTAGE SWITCH (HVS) IGNITION.................................................................. 524208014 2200 YRM 1097 05/14
WIRE HARNESS REPAIR.............................................................................................. 524223769 2200 YRM 1128 12/14
USER INTERFACE......................................................................................................... 524223770 2200 YRM 1130 12/14
USER INTERFACE......................................................................................................... 524223771 2200 YRM 1131 12/14
ELECTRICAL SYSTEM.................................................................................................. 524223772 2200 YRM 1142 04/14
MAST REPAIRS (S/N A513, A514, A613, A614, A702, A703, A704, A705, A706,
A707, A751, A752, B513, B514, B586, B587, B588, B589, B590, B591, B749,
B750, B751, B752, B753, B754)................................................................................ 524265342 4000 YRM 1250 02/14
METRIC AND INCH (SAE) FASTENERS....................................................................... 524150797 8000 YRM 0231 10/13
CALIBRATION PROCEDURES...................................................................................... 524223780 8000 YRM 1134 12/14
PERIODIC MAINTENANCE............................................................................................ 550048616 8000 YRM 1571 11/13
CAPACITIES AND SPECIFICATIONS........................................................................... 550048609 8000 YRM 1572 04/13
DIAGRAMS AND SCHEMATICS.................................................................................... 550055283 8000 YRM 1585 04/14
DIAGNOSTIC TROUBLESHOOTING MANUAL............................................................ 524221866 9000 YRM 1112 12/14
Service information for Cummins diesel engines can be ordered through the Hyster Literature Distribution Center.
9000 YRM 1112 ON CD
PART NO. 550048594 (12/14)
General
This section contains repair procedures for tilt cylinders, main lift cylinder, and free-lift cylinders. The number and
the design of the parts can be different, but the operation of the cylinders is the same.
Safety Procedures When Working Near Mast
The following procedures MUST be used when in-
specting or working near the mast. Additional precau-
tions and procedures can be required when repairing
or removing the mast.
WARNING
Mast parts are heavy and can move. Distances be-
tween parts are small. Serious injury or death can
result if part of the body is hit by parts of the mast
or the carriage.
• Never put any part of the body into or under
the mast or carriage unless all parts are
completely lowered or a safety chain is in-
stalled. Also make sure that the power is
OFF and the key is removed. Put a DO NOT
OPERATE tag in the operator's compart-
ment. Disconnect the battery and put a tag
or lock on the battery connector.
• Be careful of the forks. When the mast is
raised, the forks can be at a height to cause
an injury.
• DO NOT climb on the mast or lift truck at
any time. Use a ladder or personnel lift to
work on the mast.
• DO NOT use blocks to support the mast
weldments nor to restrain their movement.
• Mast repairs require disassembly and re-
moval of parts and can require removal of
the mast or carriage. Follow the repair pro-
cedures in this section.
WHEN WORKING NEAR THE MAST ALWAYS:
• Lower the mast and carriage completely.
Push the lift/lower control lever forward and
make sure there is no movement in the
mast. Make sure that all parts of the mast
that move are fully lowered.
OR
• If parts of the mast must be in a raised posi-
tion, install a safety chain to restrain the
moving parts of the mast. Connect moving
parts to a part that does not move. Follow
these procedures:
1. Put mast in vertical position.
2. Raise mast to align bottom crossmember of weld-
ment that moves in outer weldment with cross-
member on outer weldment. On the two-stage
and free-lift mast, the moving part is the inner
weldment. On the three-stage mast, it is the inter-
mediate weldment. On the four-stage mast, it is
the first intermediate weldment. See Figure 1.
3. Use a 3/8-inch minimum safety chain with a hook
to fasten the crossmembers together so the mov-
able member cannot lower. Put hook on back side
of mast. Make sure hook is completely engaged
with a link in the chain. Make sure safety chain
does not touch lift chains or chain sheaves, tubes,
hoses, fittings, or other parts on the mast.
4. Lower mast until there is tension in safety chain
and free-lift cylinder (two-stage full free-lift, three-
stage, and four-stage) is completely retracted. If
running, turn the power OFF. Apply the parking
brake. Install a DO NOT REMOVE tag on the
safety chain(s).
5. Install another safety chain (3/8-in. minimum) be-
tween the top or bottom crossmember of the car-
riage bar and a crossmember on the outer weld-
ment.
6. After lowering or restraining the mast, shut off the
power, and remove key.
NOTE: Place a DO NOT OPERATE tag in the opera-
tor's compartment.
7. Disconnect battery and put a tag or lock on bat-
tery connector.
2100 YRM 1328 General
1
A. TWO-STAGE LFL MAST
B. TWO-STAGE FFL MAST
C. THREE-STAGE FFL MAST
D. FOUR-STAGE FFL MAST
1. OUTER WELDMENT
2. INNER WELDMENT
3. INTERMEDIATE WELDMENT
4. HOOK
5. FREE-LIFT CYLINDER
6. CARRIAGE BAR
7. CROSSMEMBER
8. FIRST INTERMEDIATE WELDMENT
Figure 1. Two-Stage LFL, Two-Stage FFL, Three-Stage FFL, and Four-Stage FFL Masts
Safety Procedures When Working Near Mast 2100 YRM 1328
2
Tilt Cylinder Repair
REMOVE
WARNING
Before removing the tilt cylinder(s), tilt the mast
forward. Use a chain to hold the mast to the frame
and prevent the mast from moving forward or
backwards.
WARNING
DO NOT push the tilt pins out of the rod end with
your fingers. DO NOT permit the tilt cylinders to
drop and cause damage.
NOTE: Insure that the parking brake is applied be-
fore starting the procedure below.
NOTE: Perform Step 1 and Step 2 if mast is installed
on the lift truck.
1. At the mast end mount, remove the capscrew and
anchor pin from the tilt pin. Using a brass drift or
similar tool, push the tilt pin out of the rod end.
Remove lube fitting from tilt pin.
See Figure 2 for lift truck models
• GLP/GDP60VX, GLP/GDP70VX (GP/GLP/
GDP135VX, GP/GLP/GDP155VX) (C878,
D878, E878)
• GLC/GDC60VX, GLC/GDC70VX (GC/GLC/
GDC135VX, GC/GLC/GDC155VX) (C879,
D879, E879, F879)
See Figure 3 for lift truck model
• GLP/GDP80VX, GLP/GDP80VX9, GLP/
GDP90VX (GLP/GDP170VX, GLP/
GDP175VX36, GLP/GDP190VX) (A909,
B909)
2. Stroke cylinder to the full back tilt position.
3. Remove floor mats, floor plates and side covers
to access the frame end mount of tilt cylinder. See
Side Covers Remove procedures in
Frame 0100YRM1321 for lift truck models
• GLP/GDP60VX, GLP/GDP70VX (GP/GLP/
GDP135VX, GP/GLP/GDP155VX) (C878,
D878)
• GLP/GDP80VX, GLP/GDP80VX9, GLP/
GDP90VX (GLP/GDP170VX, GLP/
GDP175VX36, GLP/GDP190VX) (A909)
Frame 0100YRM1316 for lift truck models
• GLC/GDC60VX, GLC/GDC70VX, (GC/GLC/
GDC135VX, GC/GLC/GDC155VX) (C879,
D879, E879, F879)
Frame 0100YRM1581 for lift truck models
• GLP/GDP60VX, GLP/GDP70VX (GP/GLP/
GDP135VX, GP/GLP/GDP155VX) (E878)
• GLP/GDP80VX, GLP/GDP80VX9, GLP/
GDP90VX (GLP/GDP170VX, GLP/
GDP175VX36, GLP/GDP190VX) (B909)
4. Disconnect the hydraulic lines at the cylinder hose
ports. Install caps on the hydraulic lines and in the
cylinder hose ports.
See Figure 2 for lift truck models
• GLP/GDP60VX, GLP/GDP70VX (GP/GLP/
GDP135VX, GP/GLP/GDP155VX) (C878,
D878, E878)
• GLC/GDC60VX, GLC/GDC70VX (GC/GLC/
GDC135VX, GC/GLC/GDC155VX) (C879,
D879, E879, F879)
See Figure 3 for lift truck model
• GLP/GDP80VX, GLP/GDP80VX9, GLP/
GDP90VX (GLP/GDP170VX, GLP/
GDP175VX36, GLP/GDP190VX) (A909,
B909)
5. Use a lifting device to support tilt cylinders. At
frame end mount, remove capscrew, washer, and
anchor pin from the tilt pin. Using a brass drift or
similar tool, push the tilt pin out to the bushing
and frame end mount. Remove lube fitting from tilt
pin.
See Figure 2 for lift truck models
• GLP/GDP60VX, GLP/GDP70VX (GP/GLP/
GDP135VX, GP/GLP/GDP155VX) (C878,
D878, E878)
• GLC/GDC60VX, GLC/GDC70VX (GC/GLC/
GDC135VX, GC/GLC/GDC155VX) (C879,
D879, E879, F879)
2100 YRM 1328 Tilt Cylinder Repair
3
Figure 2. Tilt Cylinder Installation for Lift Truck Models GLP/GDP60VX, GLP/GDP70VX (GP/GLP/
GDP135VX, GP/GLP/GDP155VX) (C878, D878, E878) and GLC/GDC60VX, GLC/GDC70VX (GC/GLC/
GDC135VX, GC/GLC/GDC155VX) (C879, D879, E879, F879)
Tilt Cylinder Repair 2100 YRM 1328
4
Legend for Figure 2
NOTE: HYDRAULIC HOSES ARE SHOWN DISCONNECTED FOR CLARITY.
A. GLC/GDC60VX, GLC/GDC70VX (GC/GLC/
GDC135VX, GC/GLC/GDC155VX) (C879, D879,
E879, F879)
B. GLP/GDP60VX, GLP/GDP70VX (GP/GLP/
GDP135VX, GP/GLP/GDP155VX) (C878, D878,
E878)
1. CAPSCREW
2. LOCK NUT
3. ANCHOR PIN
4. TILT PIN
5. FRAME END MOUNT
6. MAST END MOUNT
7. CYLINDER HOSE PORTS
8. ROD END
9. LUBE FITTINGS
10. WASHER
See Figure 3 for lift truck model
• GLP/GDP80VX, GLP/GDP80VX9, GLP/
GDP90VX (GLP/GDP170VX, GLP/
GDP175VX36, GLP/GDP190VX) (A909,
B909)
6. Using a lifting device, remove the tilt cylinder from
the lift truck.
7. Repeat Step 1 through Step 6 for the opposite tilt
cylinder.
DISASSEMBLE
NOTE: Perform only those steps below required to
repair the tilt cylinder.
NOTE: Perform Step 1 for lift truck models:
• GLP/GDP60VX, GLP/GDP70VX (GP/GLP/
GDP135VX, GP/GLP/GDP155VX) (C878,
D878, E878)
• GLC/GDC60VX, GLC/GDC70VX (GC/GLC/
GDC135VX, GC/GLC/GDC155VX) (C879,
D879, E879, F879)
NOTE: Note the position of the rod end and number
of turns used to remove the rod end.
1. Place the tilt cylinder in a soft jaw vise. Remove
capscrew, lock nut, and washer securing rod end
to rod. See Figure 2.
NOTE: Perform Step 2 for lift truck model GLP/
GDP80VX, GLP/GDP80VX9, GLP/GDP90VX (GLP/
GDP170VX, GLP/GDP175VX36, GLP/GDP190VX)
(A909, B909).
NOTE: Note the position of the rod end and number
of turns used to remove the rod end.
2. Place the tilt cylinder in a soft jaw vise. Remove
hex nut, washer, capscrew and rod end from rod.
See Figure 3.
3. Using a pin-type spanner wrench, remove the
gland from the tilt cylinder shell. Remove the rod
and piston assembly from the cylinder shell.
See Figure 4 for lift truck models
• GLP/GDP60VX, GLP/GDP70VX (GP/GLP/
GDP135VX, GP/GLP/GDP155VX) (C878,
D878, E878)
• GLC/GDC60VX, GLC/GDC70VX (GC/GLC/
GDC135VX, GC/GLC/GDC155VX) (C879,
D879, E879, F879)
See Figure 5 for lift truck model
• GLP/GDP80VX, GLP/GDP80VX9, GLP/
GDP90VX (GLP/GDP170VX, GLP/
GDP175VX36, GLP/GDP190VX) (A909,
B909)
NOTE: To prevent damage to sealing surfaces, use
brass tools when removing seals and O-rings.
NOTE: Perform Step 4 for lift truck models
• GLP/GDP60VX, GLP/GDP70VX (GP/GLP/
GDP135VX, GP/GLP/GDP155VX) (C878,
D878, E878)
• GLC/GDC60VX, GLC/GDC70VX (GC/GLC/
GDC135VX, GC/GLC/GDC155VX) (C879,
D879, E879, F879)
4. Remove and discard the O-ring, backup ring,
seal, and wiper ring from the gland. See Figure 4.
2100 YRM 1328 Tilt Cylinder Repair
5
Figure 3. Tilt Cylinder Installation for Lift Truck Model GLP/GDP80VX, GLP/GDP80VX9, GLP/GDP90VX
(GLP/GDP170VX, GLP/GDP175VX36, GLP/GDP190VX) (A909, B909)
Tilt Cylinder Repair 2100 YRM 1328
6
Legend for Figure 3
A. OUTER VIEW B. INNER VIEW
1. TILT PIN
2. CAPSCREW
3. WASHER
4. ANCHOR PIN
5. CYLINDER HOSE PORT
6. FRAME END MOUNT
7. MAST END MOUNT
8. ROD END
9. LUBE FITTING
10. HEX NUT
NOTE: Perform Step 5 for lift truck model GLP/
GDP80VX, GLP/GDP80VX9, GLP/GDP90VX (GLP/
GDP170VX, GLP/GDP175VX36, GLP/GDP190VX)
(A909, B909).
5. Remove and discard the rod wiper, O-rings, rod
seal, and backup ring from the gland. See Fig-
ure 5.
NOTE: Perform Step 6 only if the piston or rod has
been damaged.
6. Place the rod in a soft-jaw vise and remove lock
nut and piston from the rod.
See Figure 4 for lift truck models
• GLP/GDP60VX, GLP/GDP70VX (GP/GLP/
GDP135VX, GP/GLP/GDP155VX) (C878,
D878, E878)
• GLC/GDC60VX, GLC/GDC70VX (GC/GLC/
GDC135VX, GC/GLC/GDC155VX) (C879,
D879, E879, F879)
See Figure 5 for lift truck model
• GLP/GDP80VX, GLP/GDP80VX9, GLP/
GDP90VX (GLP/GDP170VX, GLP/
GDP175VX36, GLP/GDP190VX) (A909,
B909)
7. Remove O-ring, and if equipped tilt spacer from
rod. Discard O-ring.
See Figure 4 for lift truck models
• GLP/GDP60VX, GLP/GDP70VX (GP/GLP/
GDP135VX, GP/GLP/GDP155VX) (C878,
D878, E878)
• GLC/GDC60VX, GLC/GDC70VX (GC/GLC/
GDC135VX, GC/GLC/GDC155VX) (C879,
D879, E879, F879)
See Figure 5 for lift truck model
• GLP/GDP80VX, GLP/GDP80VX9, GLP/
GDP90VX (GLP/GDP170VX, GLP/
GDP175VX36, GLP/GDP190VX) (A909,
B909)
8. Remove and discard the wear ring and piston
seal from the piston.
See Figure 4 for lift truck models
• GLP/GDP60VX, GLP/GDP70VX (GP/GLP/
GDP135VX, GP/GLP/GDP155VX) (C878,
D878, E878)
• GLC/GDC60VX, GLC/GDC70VX (GC/GLC/
GDC135VX, GC/GLC/GDC155VX) (C879,
D879, E879, F879)
See Figure 5 for lift truck model
• GLP/GDP80VX, GLP/GDP80VX9, GLP/
GDP90VX (GLP/GDP170VX, GLP/
GDP175VX36, GLP/GDP190VX) (A909,
B909)
CLEAN
WARNING
Cleaning solvents can be flammable and toxic and
can cause skin irritation. When using cleaning
solvents, always follow the solvent manufactur-
er's recommended safety procedures.
Compressed air can move particles so they cause
injury to the user or to other personnel. Make sure
the path of the compressed air is away from all
personnel. Wear protective goggles or a face
shield to prevent injury to the eyes.
CAUTION
DO NOT allow cleaning solvent to come in contact
with rubber components, as it will damage those
components.
Clean all metal parts in solvent and dry with com-
pressed air.
2100 YRM 1328 Tilt Cylinder Repair
7
NOTE: * USED ON TILT CYLINDER 6°
FORWARD/6° OR 10° BACK TILT FOR LIFT TRUCK
MODELS GLC/GDC60VX, GLC/GDC70VX (GC/GLC/
GDC135VX, GC/GLC/GDC155VX) (C879, D879,
E879, F879)
1. SHELL
2. GLAND
3. ROD
4. WIPER RING
5. SEAL
6. BACKUP RING
7. O-RING
8. PISTON
9. PISTON SEAL
10. LOCK NUT
11. WEAR RING
12. BUSHING
13. TILT SPACER*
14. CYLINDER HOSE PORTS
Figure 4. Tilt Cylinder Assembly for Lift Truck
Models GLP/GDP60VX, GLP/GDP70VX (GP/GLP/
GDP135VX, GP/GLP/GDP155VX) (C878, D878,
E878) and GLC/GDC60VX, GLC/GDC70VX
(GC/GLC/GDC135VX, GC/GLC/GDC155VX) (C879,
D879, E879, F879)
1. SHELL
2. GLAND
3. ROD WIPER
4. O-RING
5. ROD SEAL
6. BACKUP RING
7. ROD
8. PISTON SEAL
9. WEAR RING
10. PISTON
11. LOCKNUT
12. BUSHING
13. CYLINDER HOSE PORT
Figure 5. Tilt Cylinder Assembly for Lift Truck
Model GLP/GDP80VX, GLP/GDP80VX9, GLP/
GDP90VX (GLP/GDP170VX, GLP/GDP175VX36,
GLP/GDP190VX) (A909, B909)
Tilt Cylinder Repair 2100 YRM 1328
8
INSPECT
Inspect the gland for damage to the threads and the
seal surfaces. Replace the gland if damaged.
Inspect the piston for any damage to the seal surfa-
ces and replace if damaged.
Inspect the rod for damage to the rod surface and en-
sure that the rod is not bent. Replace the rod if found
to be damaged.
Inspect the inner surface of the cylinder shell for dam-
age. If the shell is found to be damaged, replace the
cylinder assembly.
ASSEMBLE
NOTE: To prevent damage to sealing surfaces, use
brass tools when installing seals and O-rings.
1. Install a new piston seal and wear ring on the pis-
ton.
See Figure 4 for lift truck models
• GLP/GDP60VX, GLP/GDP70VX (GP/GLP/
GDP135VX, GP/GLP/GDP155VX) (C878,
D878, E878)
• GLC/GDC60VX, GLC/GDC70VX (GC/GLC/
GDC135VX, GC/GLC/GDC155VX) (C879,
D879, E879, F879)
See Figure 5 for lift truck model
• GLP/GDP80VX, GLP/GDP80VX9, GLP/
GDP90VX (GLP/GDP170VX, GLP/
GDP175VX36, GLP/GDP190VX) (A909,
B909)
2. Install new O-ring, and if equipped, install tilt
spacer onto rod.
See Figure 4 for lift truck models
• GLP/GDP60VX, GLP/GDP70VX (GP/GLP/
GDP135VX, GP/GLP/GDP155VX) (C878,
D878, E878)
• GLC/GDC60VX, GLC/GDC70VX (GC/GLC/
GDC135VX, GC/GLC/GDC155VX) (C879,
D879, E879, F879)
See Figure 5 for lift truck model
• GLP/GDP80VX, GLP/GDP80VX9, GLP/
GDP90VX (GLP/GDP170VX, GLP/
GDP175VX36, GLP/GDP190VX) (A909,
B909)
NOTE: Perform Step 3, if the piston was removed
from the rod, for lift truck models
• GLP/GDP60VX, GLP/GDP70VX (GP/GLP/
GDP135VX, GP/GLP/GDP155VX) (C878,
D878, E878)
• GLC/GDC60VX, GLC/GDC70VX (GC/GLC/
GDC135VX, GC/GLC/GDC155VX) (C879,
D879, E879, F879)
3. Place the rod in a soft-jaw vise, and install the pis-
ton on the rod and tighten the lock nut to
400-440 N•m (295 to 325 lbf ft). See Figure 4.
NOTE: Perform Step 4 and Step 5, if the piston was
removed from the rod, for lift truck model GLP/
GDP80VX, GLP/GDP80VX9, GLP/GDP90VX (GLP/
GDP170VX, GLP/GDP175VX36, GLP/GDP190VX)
(A909, B909).
4. Place the rod in a soft jaw vise and install the pis-
ton onto the rod. See Figure 5.
5. Install locknut onto rod. See Figure 5. Tighten
locknut to 400 to 440 N•m (295 to 325 lbf ft).
NOTE: Perform Step 6 for lift truck models
• GLP/GDP60VX, GLP/GDP70VX (GP/GLP/
GDP135VX, GP/GLP/GDP155VX) (C878,
D878, E878)
• GLC/GDC60VX, GLC/GDC70VX (GC/GLC/
GDC135VX, GC/GLC/GDC155VX) (C879,
D879, E879, F879)
6. Install a new wiper ring, seal, backup ring, and O-
ring onto gland. See Figure 4.
NOTE: Perform Step 7 for lift truck model GLP/
GDP80VX, GLP/GDP80VX9, GLP/GDP90VX (GLP/
GDP170VX, GLP/GDP175VX36, GLP/GDP190VX)
(A909, B909).
2100 YRM 1328 Tilt Cylinder Repair
9
7. Install new O-rings, backup ring, rod seal, and rod
wiper onto gland. See Figure 5 for specific part or-
der.
8. Install the rod and piston assembly in the cylinder
shell.
See Figure 4 for lift truck models
• GLP/GDP60VX, GLP/GDP70VX (GP/GLP/
GDP135VX, GP/GLP/GDP155VX) (C878,
D878, E878)
• GLC/GDC60VX, GLC/GDC70VX (GC/GLC/
GDC135VX, GC/GLC/GDC155VX) (C879,
D879, E879, F879)
See Figure 5 for lift truck model
• GLP/GDP80VX, GLP/GDP80VX9, GLP/
GDP90VX (GLP/GDP170VX, GLP/
GDP175VX36, GLP/GDP190VX) (A909,
B909)
NOTE: Perform Step 9 and Step 10 for lift truck mod-
els
• GLP/GDP60VX, GLP/GDP70VX (GP/GLP/
GDP135VX, GP/GLP/GDP155VX) (C878,
D878, E878)
• GLC/GDC60VX, GLC/GDC70VX (GC/GLC/
GDC135VX, GC/GLC/GDC155VX) (C879,
D879, E879, F879)
9. Using a pin-type spanner wrench, install the gland
in the cylinder shell. Tighten the gland to 400 to
500 N•m (295 to 370 lbf ft). See Figure 4.
NOTE: Rod end to be turned and positioned as noted
during disassembly.
10. Install rod end on rod. Lubricate threads on cap-
screw with lubricant (Yale P/N 504234269). Install
capscrew in rod end so that capscrew head is on
the inboard side of rod end. Install washer and nut
on capscrew. Washer and nut must be on the out-
board side of rod end. Tighten nut to
90 N•m (66 lbf ft). See Figure 6.
NOTE: Perform Step 11 through Step 13 for lift truck
model GLP/GDP80VX, GLP/GDP80VX9, GLP/
GDP90VX (GLP/GDP170VX, GLP/GDP175VX36,
GLP/GDP190VX) (A909, B909).
11. Apply two drops of Loctite®
545 or equivalent on
gland threads.
12. Using a pin-type spanner wrench, install the gland
onto the rod inside the shell. Tighten gland to 400
to 500 N•m (295 to 370 lbf ft). See Figure 5.
NOTE: Rod end to be turned and positioned as noted
during disassembly.
13. Install rod end, capscrew, washer, and hex nut
onto rod. Tighten hex nut to 120 to 130 N•m (89
to 96 lbf ft). See Figure 3.
14. Repeat Step 1 through Step 13 for the opposite
tilt cylinder.
NOTE: LEFT TILT CYLINDER SHOWN. TILT CYLIN-
DER AND MAST FOR LIFT TRUCK MODELS GLC/
GDC60VX, GLC/GDC70VX (GC/GLC/GDC135VX,
GC/GLC/GDC155VX) (C879, D879, E879, F879)
SHOWN. PARTS OF MAST OMITTED FOR
CLARITY.
A. OUTBOARD SIDE
B. INBOARD SIDE
1. NUT
2. WASHER
3. ROD END
4. CAPSCREW
Figure 6. Rod End Installation
Tilt Cylinder Repair 2100 YRM 1328
10
INSTALL
NOTE: Lock nut should be pointed toward outside of
truck, on lift truck models:
• GLP/GDP60VX, GLP/GDP70VX (GP/GLP/
GDP135VX, GP/GLP/GDP155VX) (C878,
D878, E878)
• GLC/GDC60VX, GLC/GDC70VX (GC/GLC/
GDC135VX, GC/GLC/GDC155VX) (C879,
D879, E879, F879)
1. Using a lifting device, place the tilt cylinder in
mounting point on the lift truck frame end mount.
See Figure 2 for lift truck models
• GLP/GDP60VX, GLP/GDP70VX (GP/GLP/
GDP135VX, GP/GLP/GDP155VX) (C878,
D878, E878)
• GLC/GDC60VX, GLC/GDC70VX (GC/GLC/
GDC135VX, GC/GLC/GDC155VX) (C879,
D879, E879, F879)
See Figure 3 for lift truck model
• GLP/GDP80VX, GLP/GDP80VX9, GLP/
GDP90VX (GLP/GDP170VX, GLP/
GDP175VX36, GLP/GDP190VX) (A909,
B909)
2. Install the lube fitting in the tilt pin and coat the tilt
pin with grease.
See Figure 2 for lift truck models
• GLP/GDP60VX, GLP/GDP70VX (GP/GLP/
GDP135VX, GP/GLP/GDP155VX) (C878,
D878, E878)
• GLC/GDC60VX, GLC/GDC70VX (GC/GLC/
GDC135VX, GC/GLC/GDC155VX) (C879,
D879, E879, F879)
See Figure 3 for lift truck model
• GLP/GDP80VX, GLP/GDP80VX9, GLP/
GDP90VX (GLP/GDP170VX, GLP/
GDP175VX36, GLP/GDP190VX) (A909,
B909)
3. Install tilt pin into rod end and frame end mount.
See Figure 2 for lift truck models
• GLP/GDP60VX, GLP/GDP70VX (GP/GLP/
GDP135VX, GP/GLP/GDP155VX) (C878,
D878, E878)
• GLC/GDC60VX, GLC/GDC70VX (GC/GLC/
GDC135VX, GC/GLC/GDC155VX) (C879,
D879, E879, F879)
See Figure 3 for lift truck model
• GLP/GDP80VX, GLP/GDP80VX9, GLP/
GDP90VX (GLP/GDP170VX, GLP/
GDP175VX36, GLP/GDP190VX) (A909,
B909)
NOTE: Perform Step 4 for lift truck models:
• GLP/GDP60VX, GLP/GDP70VX (GP/GLP/
GDP135VX, GP/GLP/GDP155VX) (C878,
D878, E878)
• GLC/GDC60VX, GLC/GDC70VX (GC/GLC/
GDC135VX, GC/GLC/GDC155VX) (C879,
D879, E879, F879)
NOTE: Lubricate the threads on the capscrew with
packing lubricant (Yale Part No. 504234269) prior to
installation.
4. Install the anchor pin and capscrew onto rod end
at frame end mount. Tighten capscrew to
90 N•m (66 lbf ft). See Figure 2.
NOTE: Perform Step 5 for lift truck model GLP/
GDP80VX, GLP/GDP80VX9, GLP/GDP90VX (GLP/
GDP170VX, GLP/GDP175VX36, GLP/GDP190VX)
(A909, B909).
NOTE: Lubricate threads on capscrew with multipur-
pose grease prior to installation.
5. Install anchor pin, washer, and capscrew onto rod
end at frame end mount. Tighten capscrew to
66 N•m (49 lbf ft). See Figure 3.
NOTE: Perform Step 6 and Step 7 if mast is installed
on lift truck.
6. At the mast end mount, place the rod end on the
mounting point.
See Figure 2 for lift truck models
• GLP/GDP60VX, GLP/GDP70VX (GP/GLP/
GDP135VX, GP/GLP/GDP155VX) (C878,
D878, E878)
• GLC/GDC60VX, GLC/GDC70VX (GC/GLC/
GDC135VX, GC/GLC/GDC155VX) (C879,
D879, E879, F879)
2100 YRM 1328 Tilt Cylinder Repair
11
See Figure 3 for lift truck model
• GLP/GDP80VX, GLP/GDP80VX9, GLP/
GDP90VX (GLP/GDP170VX, GLP/
GDP175VX36, GLP/GDP190VX) (A909,
B909)
7. Install lube fitting in tilt pin and coat tilt pin with
grease. Install tilt pin into rod end and mast end
mount.
See Figure 2 for lift truck models
• GLP/GDP60VX, GLP/GDP70VX (GP/GLP/
GDP135VX, GP/GLP/GDP155VX) (C878,
D878, E878)
• GLC/GDC60VX, GLC/GDC70VX (GC/GLC/
GDC135VX, GC/GLC/GDC155VX) (C879,
D879, E879, F879)
See Figure 3 for lift truck model
• GLP/GDP80VX, GLP/GDP80VX9, GLP/
GDP90VX (GLP/GDP170VX, GLP/
GDP175VX36, GLP/GDP190VX) (A909,
B909)
NOTE: Perform Step 8 for lift truck models
• GLP/GDP60VX, GLP/GDP70VX (GP/GLP/
GDP135VX, GP/GLP/GDP155VX) (C878,
D878, E878)
• GLC/GDC60VX, GLC/GDC70VX (GC/GLC/
GDC135VX, GC/GLC/GDC155VX) (C879,
D879, E879, F879)
NOTE: Lubricate the threads on the capscrew with
packing lubricant (Yale P/N 504234269).
8. Install anchor pin and capscrew. Tighten cap-
screw to 90 N•m (66 lbf ft). See Figure 2.
NOTE: Perform Step 9 for lift truck model GLP/
GDP80VX, GLP/GDP80VX9, GLP/GDP90VX (GLP/
GDP170VX, GLP/GDP175VX36, GLP/GDP190VX)
(A909, B909).
9. Install washer, anchor pin, and capscrew onto rod
end at mast end mount. Tighten capscrew to 95
to 100 N•m (70 to 74 lbf ft). See Figure 3.
10. Uncap and connect the hydraulic lines to the tilt
cylinder hose ports. Slowly stroke the cylinder un-
til the rod holes line up with the mast tilt anchor
holes.
11. Repeat Step 1 through Step 10 for opposite tilt
cylinder.
12. Install side covers, floor mats, and floor plates.
See Side Covers Install procedures in
Frame 0100YRM1321 for lift truck models
• GLP/GDP60VX, GLP/GDP70VX (GP/GLP/
GDP135VX, GP/GLP/GDP155VX) (C878,
D878)
• GLP/GDP80VX, GLP/GDP80VX9, GLP/
GDP90VX (GLP/GDP170VX, GLP/
GDP175VX36, GLP/GDP190VX) (A909)
Frame 0100YRM1316 for lift truck models
• GLC/GDC60VX, GLC/GDC70VX, (GC/GLC/
GDC135VX, GC/GLC/GDC155VX) (C879,
D879, E879, F879)
Frame 0100YRM1581 for lift truck models
• GLP/GDP60VX, GLP/GDP70VX (GP/GLP/
GDP135VX, GP/GLP/GDP155VX) (E878)
• GLP/GDP80VX, GLP/GDP80VX9, GLP/
GDP90VX (GLP/GDP170VX, GLP/
GDP175VX36, GLP/GDP190VX) (B909)
13. Remove chain holding the mast to the frame.
WARNING
DO NOT put hands between the cylinder rod end
and the mast. Serious injury can occur.
14. Operate the tilt cylinders. Check for correct opera-
tion and leakage. Adjust the tilt cylinders, see Tilt
Cylinders, Adjust.
TILT CYLINDERS, ADJUST
WARNING
When the tilt cylinders have tilt limit spacers,
make sure they are installed during installation
procedures. Without the tilt limit spacers, the
mast can tilt too much and cause an accident or
serious injury.
Check the tilt cylinder stroke by slowly tilting the mast
fully forward and backward several times. Both tilt cyl-
inders must stop their stroke at the same time. Adjust
the rod ends as shown in Figure 7. There must be no
twist in the mast weldments.
NOTE: Tilt cylinders with 6° forward/6° or 10° back tilt
for lift truck models GLC/GDC60VX, GLC/GDC70VX,
(GC/GLC/GDC135VX, GC/GLC/GDC155VX) (C879,
D879, E879) have internal tilt spacers. See Figure 4.
Tilt Cylinder Repair 2100 YRM 1328
12
1. Adjust the stroke of the tilt cylinders with or with-
out tilt spacers as follows (see Figure 7).
a. Adjust the rod ends to:
15 mm (0.6 in.) for lift truck models
• GLC/GDC60VX, GLC/GDC70VX
(GC/GLC/GDC135VX, GC/GLC/
GDC155VX) (C879, D879, E879, F879)
20 mm (0.8 in.) for lift truck models
• GLP/GDP60VX, GLP/GDP70VX
(GP/GLP/GDP135VX, GP/GLP/
GDP155VX) (C878, D878, E878)
• GLP/GDP80VX, GLP/GDP80VX9, GLP/
GDP90VX (GLP/GDP170VX, GLP/
GDP175VX36, GLP/GDP190VX) (A909,
B909)
b. Slowly tilt the mast backward until one cylinder
rod stops. On the opposite cylinder, loosen the
capscrews on the rod end. Measure the dis-
tance from the end of the cylinder to the back
end of the rod end. Use a wrench and turn the
cylinder rod IN until the dimension starts to de-
crease, then stop. Repeat this procedure until
both cylinder rods stop at the same position
within
1 mm (0.04 in.) for lift truck models
• GLP/GDP60VX, GLP/GDP70VX
(GP/GLP/GDP135VX, GP/GLP/
GDP155VX) (C878, D878, E878)
• GLP/GDP80VX, GLP/GDP80VX9, GLP/
GDP90VX (GLP/GDP170VX, GLP/
GDP175VX36, GLP/GDP190VX) (A909,
B909)
0.5 mm (0.02 in.) for lift truck models
• GLC/GDC60VX, GLC/GDC70VX
(GC/GLC/GDC135VX, GC/GLC/
GDC155VX) (C879, D879, E879, F879)
c. After the adjustments are complete, tighten
lock nut on the rod end to
90 N•m (66 lbf ft) for lift truck models
• GLP/GDP60VX, GLP/GDP70VX
(GP/GLP/GDP135VX, GP/GLP/
GDP155VX) (C878, D878, E878)
• GLC/GDC60VX, GLC/GDC70VX
(GC/GLC/GDC135VX, GC/GLC/
GDC155VX) (C879, D879, E879, F879)
120 to 130 N•m (89 to 96 lbf ft) for lift truck
model
• GLP/GDP80VX, GLP/GDP80VX9, GLP/
GDP90VX (GLP/GDP170VX, GLP/
GDP175VX36, GLP/GDP190VX) (A909,
B909)
d. Tilt the mast fully backward and measure the
tilt angle. See the Nameplate for tilt angles. If
necessary, adjust both rod ends equally for the
correct angle.
1. MAST
2. ROD END
3. TILT CYLINDER
4. CAPSCREW
5. LOCK NUT
Figure 7. Tilt Cylinder Adjustments
2100 YRM 1328 Tilt Cylinder Repair
13
TILT CYLINDER LEAK CHECK
WARNING
Never allow anyone under a raised carriage. DO
NOT put any part of your body in or through the
lift mechanism unless all parts of the mast are
completely lowered and the engine is STOPPED.
DO NOT try to find hydraulic leaks by putting your
hand on hydraulic components under pressure.
Hydraulic oil can be injected into the body by the
pressure.
1. Put a capacity load on the forks. Use a safety
chain to hold the load to the carriage. Raise the
load approximately 2.5 m (8 ft). Put the mast in a
vertical position.
2. Measure the distance that the rod for tilt cylinder
extends from the shell. Check the distance the
rod moves after ten minutes. Multiply the rate in
Table 1 by the time of the test and compare the
numbers.
3. If the tilt rate is greater than the specifications,
lower the mast and remove the load from the
forks. Check for leaks in the hydraulic lines and
fittings and install a gate valve between the port at
the front of the tilt cylinder and the hydraulic line.
Place a load on the forks and tilt the mast forward
just past the vertical position and close the gate
valve. The gate valve must be able to completely
shut off the flow of hydraulic oil. If the mast contin-
ues to tilt SLOWLY forward, the seals on the pis-
ton are leaking.
4. If the mast does not move, open the gate valve
and check the movement again. If the mast
moves forward when the gate valve is open, the
main control valve can be worn or damaged. Re-
move the load from the forks when the checks are
complete.
Table 1. Movement Rates (Maximum) for Tilt Cylinders
Lift Truck Model Hydraulic Oil Temperature/Mast Tilt Rate
20°C (68°F) 60°C (140°F)
mm/min in./min mm/min in./min
GLC/GDC60VX, GLC/GDC70VX (GC/GLC/GDC135VX,
GC/GLC/GDC155VX) (C879, D879, E879, F879)
1.236 0.54 8.20 0.323
GLP/GDP60VX, GLP/GDP70VX (GP/GLP/GDP135VX,
GP/GLP/GDP155VX) (C878, D878, E878)
1.303 0.51 8.65 0.323
GLP/GDP80VX, GLP/GDP80VX9, GLP/GDP90VX (GLP/
GDP170VX, GLP/GDP175VX36, GLP/GDP190VX) (A909,
B909)
1.3 0.51 8.9 0.35
Tilt Cylinder Repair 2100 YRM 1328
14
Lift Cylinder Repair
REMOVE
WARNING
Before working on or near the mast, see Safety
Procedures When Working Near Mast and Fig-
ure 1.
NOTE: The following procedures are for the removal
of the lift cylinders with the mast installed on the lift
truck.
1. Remove the carriage as described in the carriage
removal procedures located in the section
Mast Repairs (S/N A513, A514, A613, A614,
A702, A703, A704, A705, A706, A707, A751,
A752, B513, B514, B586, B587, B588, B589,
B590, B591, B749, B750, B751, B752, B753,
B754) 4000YRM1250 for lift truck models
• GLP/GDP60VX, GLP/GDP70VX (GP/GLP/
GDP135VX, GP/GLP/GDP155VX) (C878,
D878, E878)
• GLC/GDC60VX, GLC/GDC70VX (GC/GLC/
GDC135VX, GC/GLC/GDC155VX) (C879,
D879, E879, F879)
Mast Repair (S/N A513, A514, A613, A614, A643,
A644, A683, A684) 4000YRM1406 for lift truck
model
• GLP/GDP80VX, GLP/GDP80VX9, GLP/
GDP90VX (GLP/GDP170VX, GLP/
GDP175VX36, GLP/GDP190VX) (A909,
B909)
2. On two-stage limited free-lift mast, raise the mast
a few inches and attach safety chain prior to re-
moving lift cylinder.
a. Use safety chains to connect the bottom cross-
member of the inner mast section to the top
crossmember of the outer mast section. See
Figure 1. Lower the mast so the safety chains
hold the weight of the mast sections.
3. On full free-lift mast, raise the mast a few inches
out of free-lift and attach safety chain prior to re-
moving lift cylinder.
a. Use safety chains to connect the bottom cross-
member of the intermediate mast section to the
top crossmember of the outer mast section.
Use another safety chain to connect the bottom
crossmember to a crossmember on the inter-
mediate or outer mast section. See Figure 1.
Lower the mast so the safety chains hold the
weight of the mast sections.
WARNING
Be careful when removing or installing snap
rings. These snap rings can come loose during re-
moval or installation with enough force to cause
an injury. Always use the correct snap ring pliers,
and wear eye and face protection during removal
or installation.
4. If working on a two-stage or three-stage mast, re-
move the snap rings at the top of the cylinder.
See Figure 8 and Figure 9 for lift truck models
• GLP/GDP60VX, GLP/GDP70VX (GP/GLP/
GDP135VX, GP/GLP/GDP155VX) (C878,
D878, E878)
• GLC/GDC60VX, GLC/GDC70VX (GC/GLC/
GDC135VX, GC/GLC/GDC155VX) (C879,
D879, E879, F879)
WARNING
Hydraulic oil is hot after system operation and
can cause burns. DO NOT disconnect any hy-
draulic hoses until the oil in the system is cool.
NOTE: Tag hydraulic lines during removal to aid in
installation.
5. Put a drain pan under the area of the hydraulic fit-
tings. Retract the rod into the lift cylinder. Discon-
nect and cap the hydraulic lines at the cylinder.
See Figure 8 and Figure 9 for lift truck models
• GLP/GDP60VX, GLP/GDP70VX (GP/GLP/
GDP135VX, GP/GLP/GDP155VX) (C878,
D878, E878)
• GLC/GDC60VX, GLC/GDC70VX (GC/GLC/
GDC135VX, GC/GLC/GDC155VX) (C879,
D879, E879, F879)
See Figure 10 and Figure 11 for lift truck model
• GLP/GDP80VX, GLP/GDP80VX9, GLP/
GDP90VX (GLP/GDP170VX, GLP/
GDP175VX36, GLP/GDP190VX) (A909,
B909)
2100 YRM 1328 Lift Cylinder Repair
15
1. BOLT
2. WASHER
3. SHIM
4. SNAP RING
5. LOCK NUT
6. CAPSCREWS
7. HOSE CLAMPS
8. HYDRAULIC FITTINGS
9. LOWERING CONTROL VALVE HOUSING
10. HYDRAULIC LINES
11. HEADER HOSE (FIVE FUNCTION)
12. HEADER HOSE (THREE FUNCTION)
13. HEADER HOSE (FOUR FUNCTION)
14. BRACKET
15. CYLINDER MOUNT
16. CHAIN ANCHOR
17. OUTER MAST
Figure 8. Two-Stage Limited Free-Lift Mast, Cylinder Installation for Lift Truck Models GLP/GDP60VX,
GLP/GDP70VX (GP/GLP/GDP135VX, GP/GLP/GDP155VX) (C878, D878, E878) and GLC/GDC60VX, GLC/
GDC70VX (GC/GLC/GDC135VX, GC/GLC/GDC155VX) (C879, D879, E879, F879)
Lift Cylinder Repair 2100 YRM 1328
16
Figure 9. Three-Stage Full Free-Lift Mast, Cylinder Installation for Lift Truck Models GLP/GDP60VX, GLP/
GDP70VX (GP/GLP/GDP135VX, GP/GLP/GDP155VX) (C878, D878, E878) and GLC/GDC60VX, GLC/
GDC70VX (GC/GLC/GDC135VX, GC/GLC/GDC155VX) (C879, D879, E879, F879)
2100 YRM 1328 Lift Cylinder Repair
17
Legend for Figure 9
1. MAIN CYLINDER (RH)
2. FREE-LIFT CYLINDER
3. MAIN CYLINDER (LH)
4. LOCK NUT
5. SPACER
6. WASHER
7. CAPSCREW
8. HEADER HOSE (THREE FUNCTION)
9. HYDRAULIC FITTINGS
10. HEADER HOSE (FOUR FUNCTION)
11. HEADER HOSE (FIVE FUNCTION)
12. CHAIN ANCHOR
13. LOWERING CONTROL VALVE HOUSING
14. SNAP RING
15. CYLINDER MOUNT
16. HOSE CLAMPS
17. HYDRAULIC LINES
18. OUTER MAST
Lift Cylinder Repair 2100 YRM 1328
18
1. MAST
2. CARRIAGE
3. HYDRAULIC LINE
4. HYDRAULIC FITTING
5. LIFT CYLINDER
6. HOSE CLAMP
Figure 10. Two-Stage Mast, Hydraulic Lines and Fittings for Lift Truck Model GLP/GDP80VX, GLP/
GDP80VX9, GLP/GDP90VX (GLP/GDP170VX, GLP/GDP175VX36, GLP/GDP190VX) (A909, B909)
2100 YRM 1328 Lift Cylinder Repair
19
1. MAST
2. CARRIAGE
3. HYDRAULIC LINE
4. HYDRAULIC FITTING
5. LIFT CYLINDER
6. HOSE CLAMP
7. FREE-LIFT CYLINDER
Figure 11. Three-Stage Mast, Hydraulic Lines and Fittings for Lift Truck Model GLP/GDP80VX, GLP/
GDP80VX9, GLP/GDP90VX (GLP/GDP170VX, GLP/GDP175VX36, GLP/GDP190VX) (A909, B909)
Lift Cylinder Repair 2100 YRM 1328
20
6. Remove hose clamps securing hoses to lift cylin-
der.
See Figure 8 and Figure 9 for lift truck models
• GLP/GDP60VX, GLP/GDP70VX (GP/GLP/
GDP135VX, GP/GLP/GDP155VX) (C878,
D878, E878)
• GLC/GDC60VX, GLC/GDC70VX (GC/GLC/
GDC135VX, GC/GLC/GDC155VX) (C879,
D879, E879, F879)
See Figure 10 and Figure 11 for lift truck model
• GLP/GDP80VX, GLP/GDP80VX9, GLP/
GDP90VX (GLP/GDP170VX, GLP/
GDP175VX36, GLP/GDP190VX) (A909,
B909)
NOTE: Perform Step 7 and Step 8 for lift truck mod-
els:
• GLP/GDP60VX, GLP/GDP70VX (GP/GLP/
GDP135VX, GP/GLP/GDP155VX) (C878,
D878, E878)
• GLC/GDC60VX, GLC/GDC70VX (GC/GLC/
GDC135VX, GC/GLC/GDC155VX) (C879,
D879, E879, F879)
7. For lift truck models equipped with a three-stage
full free-lift mast, see Figure 9.
a. Disconnect the main lift chain anchor and
header hoses at the cylinder mount.
b. Remove the lock nut, capscrew, and spacer
securing the cylinder mount to the outer mast.
8. For lift truck models equipped with a two-stage
limited free-lift mast, see Figure 8.
a. Remove the lock nuts and bracket and discon-
nect the main lift chain anchor at the cylinder
mount.
b. Remove the bolt, washer, and shims securing
the cylinder mount to the outer mast.
NOTE: Perform Step 9 and Step 10 for lift truck
model GLP/GDP80VX, GLP/GDP80VX9, GLP/
GDP90VX (GLP/GDP170VX, GLP/GDP175VX36,
GLP/GDP190VX) (A909, B909).
9. For lift truck models equipped with a three-stage
full free lift mast, see Figure 12.
a. Remove capscrews, washers, and bracket
from anchor bracket.
b. Remove snap ring and washer at top of lift cyl-
inder.
c. Remove retention screw from mast and bottom
of lift cylinder.
10. For lift truck model, GLP/GDP80VX, GLP/
GDP80VX9, GLP/GDP90VX (GLP/GDP170VX,
GLP/GDP175VX36, GLP/GDP190VX) (A909,
B909), equipped with a two-stage limited free-lift
mast, see Figure 13 and Figure 14.
a. Remove anchor screw, washer, and spacer
from top of lift cylinder and crossmember.
b. Remove retention screw from mast and bottom
of lift cylinder.
11. Using a lifting device, remove lift cylinder from
mast.
NOTE: Perform Step 12 for lift truck model GLP/
GDP80VX, GLP/GDP80VX9, GLP/GDP90VX (GLP/
GDP170VX, GLP/GDP175VX36, GLP/GDP190VX)
(A909, B909).
12. Remove convex washer from top of lift cylinder.
See Figure 15.
13. Repeat Step 4 through Step 12 for opposite lift
cylinder.
2100 YRM 1328 Lift Cylinder Repair
21
1. MAST
2. LIFT CYLINDER
3. SNAP RING
4. WASHER
5. CONVEX WASHER
6. CAPSCREW
7. WASHER
8. BRACKET
9. ANCHOR BRACKET
10. RETENTION SCREW
Figure 12. Three-Stage Full Free-Lift Mast, Cylinder Installation for Lift Truck Model GLP/GDP80VX, GLP/
GDP80VX9, GLP/GDP90VX (GLP/GDP170VX, GLP/GDP175VX36, GLP/GDP190VX) (A909, B909)
Lift Cylinder Repair 2100 YRM 1328
22
1. LIFT CYLINDER
2. ANCHOR SCREW
3. WASHER
4. SPACER
5. CROSSMEMBER
Figure 13. Two-Stage Limited Free-Lift Mast,
Cylinder Installation - Top for Lift Truck Model
GLP/GDP80VX, GLP/GDP80VX9, GLP/GDP90VX
(GLP/GDP170VX, GLP/GDP175VX36, GLP/
GDP190VX) (A909, B909)
1. MAST
2. LIFT CYLINDER
3. RETENTION SCREW
Figure 14. Two-Stage Limited Free-Lift Mast,
Cylinder Installation - Bottom for Lift Truck Model
GLP/GDP80VX, GLP/GDP80VX9, GLP/GDP90VX
(GLP/GDP170VX, GLP/GDP175VX36, GLP/
GDP190VX) (A909, B909)
2100 YRM 1328 Lift Cylinder Repair
23
NOTE: TWO-STAGE LIMITED FREE-LIFT MAST
SHOWN.
1. MAST
2. LIFT CYLINDER
3. CONVEX WASHER
Figure 15. Lift Cylinder with Convex Washer
DISASSEMBLE
CAUTION
Carefully disassemble the main lift cylinders so
the piston rods and sliding surfaces are not dam-
aged.
NOTE: To prevent damage to sealing surfaces, use
brass tools when removing seals and O-rings.
1. Loosen gland with a spanner wrench.
See Figure 16 and Figure 17 for lift truck models
• GLP/GDP60VX, GLP/GDP70VX (GP/GLP/
GDP135VX, GP/GLP/GDP155VX) (C878,
D878, E878)
• GLC/GDC60VX, GLC/GDC70VX (GC/GLC/
GDC135VX, GC/GLC/GDC155VX) (C879,
D879, E879, F879)
See Figure 18 for lift truck model
• GLP/GDP80VX, GLP/GDP80VX9, GLP/
GDP90VX (GLP/GDP170VX, GLP/
GDP175VX36, GLP/GDP190VX) (A909,
B909)
NOTE: Perform Step 2 for lift truck models
• GLP/GDP60VX, GLP/GDP70VX (GP/GLP/
GDP135VX, GP/GLP/GDP155VX) (C878,
D878, E878)
• GLC/GDC60VX, GLC/GDC70VX (GC/GLC/
GDC135VX, GC/GLC/GDC155VX) (C879,
D879, E879, F879)
NOTE: Note placement of components as removed
from gland during disassembly to aid in assembly.
2. Remove gland from shell. Remove and discard
rod wiper, backup ring, rod seal, O-ring, and wear
ring from gland.
See Figure 16 and Figure 17 for lift truck models
• GLP/GDP60VX, GLP/GDP70VX (GP/GLP/
GDP135VX, GP/GLP/GDP155VX) (C878,
D878, E878)
• GLC/GDC60VX, GLC/GDC70VX (GC/GLC/
GDC135VX, GC/GLC/GDC155VX) (C879,
D879, E879, F879)
NOTE: Perform Step 3 and Step 4 for lift truck model
GLP/GDP80VX, GLP/GDP80VX9, GLP/GDP90VX
(GLP/GDP170VX, GLP/GDP175VX36, GLP/
GDP190VX) (A909, B909).
3. Remove gland from shell. See Figure 18.
4. Remove and discard rod wiper from gland. See
Figure 18.
5. Remove rod and piston assembly from shell.
Drain hydraulic oil into container.
Lift Cylinder Repair 2100 YRM 1328
24
See Figure 16 and Figure 17 for lift truck models
• GLP/GDP60VX, GLP/GDP70VX (GP/GLP/
GDP135VX, GP/GLP/GDP155VX) (C878,
D878, E878)
• GLC/GDC60VX, GLC/GDC70VX (GC/GLC/
GDC135VX, GC/GLC/GDC155VX) (C879,
D879, E879, F879)
See Figure 18 for lift truck model
• GLP/GDP80VX, GLP/GDP80VX9, GLP/
GDP90VX (GLP/GDP170VX, GLP/
GDP175VX36, GLP/GDP190VX) (A909,
B909)
NOTE: Perform Step 6 and Step 7 for lift truck mod-
els
• GLP/GDP60VX, GLP/GDP70VX (GP/GLP/
GDP135VX, GP/GLP/GDP155VX) (C878,
D878, E878)
• GLC/GDC60VX, GLC/GDC70VX (GC/GLC/
GDC135VX, GC/GLC/GDC155VX) (C879,
D879, E879, F879)
6. On lift trucks equipped with a two-stage limited
free-lift mast. Remove and discard backup ring,
seal, and wear ring from piston. See Figure 16.
7. On lift trucks equipped with a three-stage full free-
lift mast. Remove and discard backup ring, seal,
wear ring, and piston ring from piston. See Fig-
ure 17.
NOTE: Perform Step 8 for lift truck model GLP/
GDP80VX, GLP/GDP80VX9, GLP/GDP90VX (GLP/
GDP170VX, GLP/GDP175VX36, GLP/GDP190VX)
(A909, B909).
8. Remove backup ring, piston ring, piston seal, and
O-ring from piston. Discard backup ring, piston
seal, and O-ring. See Figure 18.
9. Repeat Step 1 through Step 8 for opposite lift cyl-
inder.
1. SHELL
2. WEAR RING
3. SEAL
4. BACKUP RING
5. ROD AND PISTON ASSEMBLY
6. O-RING
7. WEAR RING
8. ROD SEAL
9. ROD WIPER
10. GLAND
Figure 16. Two-Stage Mast, Lift Cylinder
Assembly for Lift Truck Models GLP/GDP60VX,
GLP/GDP70VX (GP/GLP/GDP135VX, GP/GLP/
GDP155VX) (C878, D878, E878) and GLC/
GDC60VX, GLC/GDC70VX (GC/GLC/GDC135VX,
GC/GLC/GDC155VX) (C879, D879, E879, F879)
2100 YRM 1328 Lift Cylinder Repair
25
1. SHELL
2. PISTON RING
3. WEAR RING
4. SEAL
5. BACKUP RING
6. ROD AND PISTON ASSEMBLY
7. ROD SEAL
8. ROD WIPER
9. O-RING
10. GLAND
Figure 17. Three-Stage Mast, Lift Cylinder
Assembly for Lift Truck Models GLP/GDP60VX,
GLP/GDP70VX (GP/GLP/GDP135VX, GP/GLP/
GDP155VX) (C878, D878, E878) and GLC/
GDC60VX, GLC/GDC70VX (GC/GLC/GDC135VX,
GC/GLC/GDC155VX) (C879, D879, E879, F879)
1. ROD WIPER
2. GLAND
3. BLEED-BACK PORT
4. SHELL
5. ROD
6. PISTON
7. O-RING
8. PISTON SEAL
9. PISTON RING
10. BACKUP RING
11. RETENTION SCREW
Figure 18. Lift Cylinder Assembly for Lift Truck
Model GLP/GDP80VX, GLP/GDP80VX9, GLP/
GDP90VX (GLP/GDP170VX, GLP/GDP175VX36,
GLP/GDP190VX) (A909, B909)
Lift Cylinder Repair 2100 YRM 1328
26
CLEAN
WARNING
Cleaning solvents can be flammable and toxic and
can cause skin irritation. When using cleaning
solvents, always follow the solvent manufactur-
er's recommended safety procedures.
Compressed air can move particles so they cause
injury to the user or to other personnel. Make sure
the path of the compressed air is away from all
personnel. Wear protective goggles or a face
shield to prevent injury to the eyes.
CAUTION
DO NOT allow cleaning solvent to come in contact
with rubber components, as it will damage those
components.
Clean all metal parts in solvent and dry with com-
pressed air.
INSPECT
Inspect the gland for damage to the threads and the
seal surfaces. If damaged, replace gland.
Inspect the piston for any damage to the seal surfa-
ces. If damaged, replace piston.
Inspect the rod for damage to the rod surface and en-
sure that the rod is not bent. If damaged replace rod.
Inspect the inner surface of the cylinder shell for dam-
age. If damaged, replace cylinder assembly.
ASSEMBLE, LIFT TRUCK MODELS GLP/
GDP60VX, GLP/GDP70VX (GP/GLP/
GDP135VX, GP/GLP/GDP155VX) (C878,
D878, E878) AND GLC/GDC60VX, GLC/
GDC70VX (GC/GLC/GDC135VX, GC/GLC/
GDC155VX) (C879, D879, E879, F879)
CAUTION
A difficult and important step in assembling lift
cylinders is the correct installation of the seals.
Most lift cylinder maintenance is caused by seal
leaks. DO NOT damage any parts during assem-
bly.
NOTE: To prevent damage to sealing surfaces, use
brass tools when installing seal and O-rings.
NOTE: Lubricate all internal parts of the lift cylinder
with clean hydraulic oil during to assembly.
1. On lift trucks equipped with a two-stage limited
free-lift mast. Install new backup ring, seal, and
wear ring into onto piston. See Figure 16.
2. On lift trucks equipped with a three-stage full free-
lift mast. Install new backup ring, seal, wear ring,
and piston ring onto piston. See Figure 17.
3. Install rod and piston assembly into shell.
4. Install new wear ring, O-ring, rod seal, backup
ring, and rod wiper onto gland as noted during
disassembly.
See Figure 16 and Figure 17.
5. Using a spanner wrench, install gland onto piston
rod inside shell. Tighten gland to 375 to
450 N•m (277 to 332 lbf ft).
See Figure 16 and Figure 17.
6. Repeat Step 1 through Step 5 for the opposite lift
cylinder.
ASSEMBLE, LIFT TRUCK MODELS GLP/
GDP80VX, GLP/GDP80VX9, GLP/
GDP90VX (GLP/GDP170VX, GLP/
GDP175VX36, GLP/GDP190VX) (A909,
B909)
CAUTION
A difficult and important step in assembling lift
cylinders is the correct installation of the seals.
Most lift cylinder maintenance is caused by seal
leaks. DO NOT damage any parts during assem-
bly.
NOTE: To prevent damage to sealing surfaces, use
brass tools when installing seal and O-rings.
NOTE: Lubricate all internal parts of the lift cylinder
with clean hydraulic oil during to assembly.
1. Install new O-ring and piston seal onto piston.
See Figure 18.
2. Install piston ring onto piston and tighten. See
Figure 18.
3. Install new backup ring onto piston. See Fig-
ure 18.
2100 YRM 1328 Lift Cylinder Repair
27
4. Install rod and piston assembly into shell.
5. Install rod wiper onto gland. See Figure 18.
6. Apply two drops of Loctite®
545 or equivalent on
gland threads.
7. Using a spanner wrench, install gland onto piston
rod inside shell. Tighten gland to 350 to
400 N•m (258 to 295 lbf ft). See Figure 18.
8. Repeat Step 1 through Step 7 for the opposite lift
cylinder.
INSTALL, LIFT TRUCK MODELS GLP/
GDP60VX, GLP/GDP70VX (GP/GLP/
GDP135VX, GP/GLP/GDP155VX) (C878,
D878, E878) AND GLC/GDC60VX, GLC/
GDC70VX (GC/GLC/GDC135VX, GC/GLC/
GDC155VX) (C879, D879, E879, F879)
1. Using a lifting device, install the lift cylinder in the
mount at the bottom of the outer mast. See Fig-
ure 8 and Figure 9.
2. For lift truck models equipped with a three-stage
full free-lift mast, see Figure 9.
a. Install spacer, capscrew, and lock nut to se-
cure the cylinder mount to the outer mast.
Tighten lock nut to 135 N•m (100 lbf ft).
b. Connect the main lift chain anchor and hy-
draulic header hoses at the cylinder mount.
Tighten chain anchor lock nut to
370 N•m (273 lbf ft).
3. For lift truck models equipped with a two-stage
limited free-lift mast, see Figure 8.
a. Install shims, washer, and bolt to secure cylin-
der mount to the outer mast. Tighten bolt to
555 N•m (410 lbf ft).
b. Install the bracket and lock nuts and connect
the main lift chain anchor at the cylinder mount.
Tighten chain anchor lock nut to
370 N•m (273 lbf ft).
WARNING
Be careful when removing or installing snap
rings. These snap rings can come loose during re-
moval or installation with enough force to cause
an injury. Always use the correct snap ring pliers,
and wear eye and face protection during removal
or installation.
4. If working on a two-stage or three-stage mast, in-
stall the snap rings at the top of the cylinder. See
Figure 8 and Figure 9.
5. Connect the hydraulic fittings and hydraulic lines
to lift cylinders as tagged during removal. See
Figure 8 and Figure 9.
6. Repeat Step 1 through Step 5 for opposite lift cyl-
inder.
7. Remove safety chains.
8. Use a lifting device to lower the inner mast (two-
stage limited free-lift) or intermediate mast (three-
stage full free-lift) onto the lift cylinders.
9. Install the carriage as described in the carriage In-
stall procedures. See Mast Repairs (S/N A513,
A514, A613, A614, A702, A703, A704, A705,
A706, A707, A751, A752, B513, B514, B586,
B587, B588, B589, B590, B591, B749, B750,
B751, B752, B753, B754) 4000YRM1250.
INSTALL, LIFT TRUCK MODELS GLP/
GDP80VX, GLP/GDP80VX9, GLP/
GDP90VX (GLP/GDP170VX, GLP/
GDP175VX36, GLP/GDP190VX) (A909,
B909)
1. Install convex washer on top of lift cylinder.
See Figure 12 and Figure 15.
2. Using a lifting device, install the lift cylinder in the
mount at the bottom of the outer mast. See Fig-
ure 12 and Figure 15.
3. For lift truck model equipped with a three-stage
full free-lift mast, see Figure 12.
a. Install retention screw into mast and bottom of
lift cylinder.
b. Install washer and snap ring onto top of lift cyl-
inder.
c. Install bracket, washers, and capscrews onto
anchor bracket.
4. For lift truck model equipped with a two-stage full
free-lift mast, see Figure 14.
a. Install retention screw into mast and bottom of
lift cylinder.
b. Install spacer, washer, and anchor screw onto
lift cylinder and crossmember.
Lift Cylinder Repair 2100 YRM 1328
28
5. Connect the hydraulic fittings and hydraulic lines
to lift cylinders as tagged during removal. See
Figure 11.
6. Repeat Step 1 through Step 5 for opposite lift cyl-
inder.
7. Remove safety chains.
8. Use a lifting device to lower the inner mast (two-
stage limited free-lift) or intermediate mast (three-
stage full free-lift) onto the lift cylinders.
9. Install the carriage as described in the carriage In-
stall procedures. See Mast Repair (S/N A513,
A514, A613, A614, A643, A644, A683, A684)
4000YRM1406.
Free-Lift Cylinder Repair
REMOVE
1. Remove the carriage and load backrest as descri-
bed in the carriage removal procedures in the
section
Mast Repairs (S/N A513, A514, A613, A614,
A702, A703, A704, A705, A706, A707, A751,
A752, B513, B514, B586, B587, B588, B589,
B590, B591, B749, B750, B751, B752, B753,
B754) 4000YRM1250 for lift truck models
• GLP/GDP60VX, GLP/GDP70VX (GP/GLP/
GDP135VX, GP/GLP/GDP155VX) (C878,
D878, E878)
• GLC/GDC60VX, GLC/GDC70VX (GC/GLC/
GDC135VX, GC/GLC/GDC155VX) (C879,
D879, E879, F879)
Mast Repair (S/N A513, A514, A613, A614, A643,
A644, A683, A684) 4000YRM1406 for lift truck
model
• GLP/GDP80VX, GLP/GDP80VX9, GLP/
GDP90VX (GLP/GDP170VX, GLP/
GDP175VX36, GLP/GDP190VX) (A909,
B909)
NOTE: Tag hydraulic lines during removal to aid in
installation.
2. Place a drain pan under the free-lift cylinder. Dis-
connect and cap the hydraulic hose and fittings at
the bottom of the cylinder.
See Figure 19 for lift truck models
• GLP/GDP60VX, GLP/GDP70VX (GP/GLP/
GDP135VX, GP/GLP/GDP155VX) (C878,
D878, E878)
• GLC/GDC60VX, GLC/GDC70VX (GC/GLC/
GDC135VX, GC/GLC/GDC155VX) (C879,
D879, E879, F879)
See Figure 21 for lift truck model
• GLP/GDP80VX, GLP/GDP80VX9, GLP/
GDP90VX (GLP/GDP170VX, GLP/
GDP175VX36, GLP/GDP190VX) (A909,
B909)
NOTE: Perform Step 3 and Step 4 for lift truck mod-
els:
• GLP/GDP60VX, GLP/GDP70VX (GP/GLP/
GDP135VX, GP/GLP/GDP155VX) (C878,
D878, E878)
• GLC/GDC60VX, GLC/GDC70VX (GC/GLC/
GDC135VX, GC/GLC/GDC155VX) (C879,
D879, E879, F879)
3. Remove capscrews, washers, and lockwashers
from hose sheave shaft and hose sheave bracket.
Remove hose sheave bracket from chain guard.
See Figure 20.
4. Remove hose sheaves and hose sheave shaft.
5. Disconnect and cap the hydraulic fittings at the
hose mounting brackets.
See Figure 19 for lift truck models
• GLP/GDP60VX, GLP/GDP70VX (GP/GLP/
GDP135VX, GP/GLP/GDP155VX) (C878,
D878, E878)
• GLC/GDC60VX, GLC/GDC70VX (GC/GLC/
GDC135VX, GC/GLC/GDC155VX) (C879,
D879, E879, F879)
See Figure 21 for lift truck model
• GLP/GDP80VX, GLP/GDP80VX9, GLP/
GDP90VX (GLP/GDP170VX, GLP/
GDP175VX36, GLP/GDP190VX) (A909,
B909)
2100 YRM 1328 Free-Lift Cylinder Repair
29
6. Remove hoses from hose sheaves.
See Figure 20 for lift truck models
• GLP/GDP60VX, GLP/GDP70VX (GP/GLP/
GDP135VX, GP/GLP/GDP155VX) (C878,
D878, E878)
• GLC/GDC60VX, GLC/GDC70VX (GC/GLC/
GDC135VX, GC/GLC/GDC155VX) (C879,
D879, E879, F879)
See Figure 22 for lift truck model
• GLP/GDP80VX, GLP/GDP80VX9, GLP/
GDP90VX (GLP/GDP170VX, GLP/
GDP175VX36, GLP/GDP190VX) (A909,
B909)
NOTE: Perform Step 7 for lift truck model GLP/
GDP80VX, GLP/GDP80VX9, GLP/GDP90VX (GLP/
GDP170VX, GLP/GDP175VX36, GLP/GDP190VX)
(A909, B909).
7. Remove four screws and hose sheave assembly
from chain guard. See Figure 22.
NOTE: Perform Step 8 through Step 11 for lift truck
models:
• GLP/GDP60VX, GLP/GDP70VX (GP/GLP/
GDP135VX, GP/GLP/GDP155VX) (C878,
D878, E878)
• GLC/GDC60VX, GLC/GDC70VX (GC/GLC/
GDC135VX, GC/GLC/GDC155VX) (C879,
D879, E879, F879)
8. Remove chain guard from crosshead. See Fig-
ure 20.
9. Remove lock nuts from chain anchor and remove
chain. See Figure 19.
10. Using a brass drift, remove pin from crosshead.
See Figure 20.
11. Remove chain sheave assembly from crosshead.
NOTE: Perform Step 12 and Step 13 for lift truck
model GLP/GDP80VX, GLP/GDP80VX9, GLP/
GDP90VX (GLP/GDP170VX, GLP/GDP175VX36,
GLP/GDP190VX) (A909, B909).
12. Remove lock nut from chain anchor; remove
chain anchor from crossmember; remove chain
from chain sheave. See Figure 23.
13. Remove chain sheave from top of free-lift cylinder
by unscrewing. See Figure 24.
NOTE: Perform Step 14 and Step 15 for lift truck
models
• GLP/GDP60VX, GLP/GDP70VX (GP/GLP/
GDP135VX, GP/GLP/GDP155VX) (C878,
D878, E878)
• GLC/GDC60VX, GLC/GDC70VX (GC/GLC/
GDC135VX, GC/GLC/GDC155VX) (C879,
D879, E879, F879)
14. Remove two capscrews and washers securing
crosshead to cylinder rod. Remove crosshead.
See Figure 20.
15. Remove two capscrews, lock nuts, lockwashers,
washers, and spacer from inner mast mounting
bracket. With a lifting device, remove free-lift cyl-
inder assembly from inner mast.
See Figure 19 and Figure 20 for lift truck models
• GLP/GDP60VX, GLP/GDP70VX (GP/GLP/
GDP135VX, GP/GLP/GDP155VX) (C878,
D878, E878)
• GLC/GDC60VX, GLC/GDC70VX (GC/GLC/
GDC135VX, GC/GLC/GDC155VX) (C879,
D879, E879, F879)
NOTE: Perform Step 16 and Step 17 for lift truck
model GLP/GDP80VX, GLP/GDP80VX9, GLP/
GDP90VX (GLP/GDP170VX, GLP/GDP175VX36,
GLP/GDP190VX) (A909, B909).
16. Remove two screws, two washers, and bracket
from crossmember and free-lift cylinder. See Fig-
ure 25.
17. Remove retention screw from bottom of free-lift
cylinder and mast. See Figure 25.
18. Using a lifting device, remove free-lift cylinder
from inner mast.
NOTE: Perform Step 19 for lift truck model GLP/
GDP80VX, GLP/GDP80VX9, GLP/GDP90VX (GLP/
GDP170VX, GLP/GDP175VX36, GLP/GDP190VX)
(A909, B909).
19. Repeat above steps as required for opposite free-
lift cylinder.
Free-Lift Cylinder Repair 2100 YRM 1328
30
NOTE: BOTTOM CROSSMEMBER OF THE INNER MAST HAS BEEN REMOVED FOR CLARITY.
A. REAR VIEW B. FRONT VIEW
1. CAPSCREW
2. LOCK NUT
3. HYDRAULIC FITTINGS
4. CHAIN
5. HOSE
6. CHAIN ANCHOR
7. INNER MAST
8. HOSE MOUNTING BRACKET
Figure 19. Free-Lift Cylinder Removal for Lift Truck Models GLP/GDP60VX, GLP/GDP70VX (GP/GLP/
GDP135VX, GP/GLP/GDP155VX) (C878, D878, E878) and GLC/GDC60VX, GLC/GDC70VX (GC/GLC/
GDC135VX, GC/GLC/GDC155VX) (C879, D879, E879, F879)
2100 YRM 1328 Free-Lift Cylinder Repair
31
Figure 20. Hose Sheave, Chain Sheave, and Crosshead Installation for Lift Truck Models GLP/GDP60VX,
GLP/GDP70VX (GP/GLP/GDP135VX, GP/GLP/GDP155VX) (C878, D878, E878) and GLC/GDC60VX, GLC/
GDC70VX (GC/GLC/GDC135VX, GC/GLC/GDC155VX) (C879, D879, E879, F879)
Free-Lift Cylinder Repair 2100 YRM 1328
32
Legend for Figure 20
1. CAPSCREW
2. WASHER
3. LOCKWASHER
4. HOSE SHEAVE BRACKET
5. SNAP RING
6. HOSE SHEAVE SHAFT
7. HOSE SHEAVE
8. HOSE
9. HYDRAULIC FITTINGS
10. CHAIN GUARD
11. CHAIN
12. COTTER PIN
13. PIN
14. BEARING
15. FREE-LIFT CYLINDER
16. CHAIN SHEAVE ASSEMBLY
17. SPACER
18. PIN
19. CROSSHEAD
20. LOCK NUT
21. CHAIN ANCHOR
22. HOSE MOUNTING BRACKET
23. INNER MAST MOUNTING BRACKET
24. CYLINDER ROD
NOTE: MAST CROSSMEMBERS REMOVED FOR
CLARITY.
1. FREE-LIFT CYLINDER
2. HYDRAULIC HOSE
3. FITTING
4. HOSE MOUNTING BRACKET
Figure 21. Free Lift Cylinder Hydraulic Lines and
Fittings for Lift Truck Model GLP/GDP80VX, GLP/
GDP80VX9, GLP/GDP90VX (GLP/GDP170VX, GLP/
GDP175VX36, GLP/GDP190VX) (A909, B909)
1. HOSE SHEAVE ASSEMBLY
2. CHAIN GUARD
3. SCREW
Figure 22. Hose Sheave for Lift Truck Model GLP/
GDP80VX, GLP/GDP80VX9, GLP/GDP90VX (GLP/
GDP170VX, GLP/GDP175VX36, GLP/GDP190VX)
(A909, B909)
2100 YRM 1328 Free-Lift Cylinder Repair
33
1. LOCKNUT
2. CHAIN ANCHOR
3. CHAIN
Figure 23. Chain Anchor for Lift Truck Model GLP/
GDP80VX, GLP/GDP80VX9, GLP/GDP90VX (GLP/
GDP170VX, GLP/GDP175VX36, GLP/GDP190VX)
(A909, B909)
1. CHAIN SHEAVE
2. FREE-LIFT CYLINDER
Figure 24. Chain Sheave for Lift Truck Model GLP/
GDP80VX, GLP/GDP80VX9, GLP/GDP90VX (GLP/
GDP170VX, GLP/GDP175VX36, GLP/GDP190VX)
(A909, B909)
Free-Lift Cylinder Repair 2100 YRM 1328
34
A. FRONT VIEW B. REAR VIEW
1. CROSSMEMBER
2. BRACKET
3. SCREW
4. WASHER
5. RETENTION SCREW
6. MAST
7. FREE-LIFT CYLINDER
Figure 25. Free-Lift Cylinder Mount for Lift Truck Model GLP/GDP80VX, GLP/GDP80VX9, GLP/GDP90VX
(GLP/GDP170VX, GLP/GDP175VX36, GLP/GDP190VX) (A909, B909)
2100 YRM 1328 Free-Lift Cylinder Repair
35
DISASSEMBLE
CAUTION
Carefully disassemble the free-lift cylinder so the
piston rods and sliding surfaces are not damaged.
NOTE: To prevent damage to sealing surfaces, use
brass tools when removing or installing seal and O-
rings.
1. Loosen gland with spanner wrench.
2. Remove gland from shell.
See Figure 26 for lift truck models
• GLP/GDP60VX, GLP/GDP70VX (GP/GLP/
GDP135VX, GP/GLP/GDP155VX) (C878,
D878, E878)
• GLC/GDC60VX, GLC/GDC70VX (GC/GLC/
GDC135VX, GC/GLC/GDC155VX) (C879,
D879, E879, F879)
See Figure 27 for lift truck model
• GLP/GDP80VX, GLP/GDP80VX9, GLP/
GDP90VX (GLP/GDP170VX, GLP/
GDP175VX36, GLP/GDP190VX) (A909,
B909)
NOTE: Perform Step 3 for lift truck model GLP/
GDP80VX, GLP/GDP80VX9, GLP/GDP90VX (GLP/
GDP170VX, GLP/GDP175VX36, GLP/GDP190VX)
(A909, B909).
3. Remove and discard rod wiper, rod seal, and O-
ring from gland. See Figure 27.
4. Remove rod and piston assembly from shell.
Drain hydraulic oil into container.
See Figure 26 for lift truck models
• GLP/GDP60VX, GLP/GDP70VX (GP/GLP/
GDP135VX, GP/GLP/GDP155VX) (C878,
D878, E878)
• GLC/GDC60VX, GLC/GDC70VX (GC/GLC/
GDC135VX, GC/GLC/GDC155VX) (C879,
D879, E879, F879)
See Figure 27 for lift truck model
• GLP/GDP80VX, GLP/GDP80VX9, GLP/
GDP90VX (GLP/GDP170VX, GLP/
GDP175VX36, GLP/GDP190VX) (A909,
B909)
NOTE: Perform Step 5 through Step 7 for lift truck
models:
• GLP/GDP60VX, GLP/GDP70VX (GP/GLP/
GDP135VX, GP/GLP/GDP155VX) (C878,
D878, E878)
• GLC/GDC60VX, GLC/GDC70VX (GC/GLC/
GDC135VX, GC/GLC/GDC155VX) (C879,
D879, E879, F879)
5. Remove and discard O-ring from outside of gland
and remove, wear ring, backup ring, rod seal, and
rod wiper from inside of gland. See Figure 26.
WARNING
Be careful when removing or installing snap
rings. These snap rings can come loose during re-
moval or installation with enough force to cause
an injury. Always use the correct snap ring pliers,
and wear eye and face protection during removal
or installation.
6. Remove snap ring, washer, check valve from
base of piston. Remove and discard seal from
check valve. See Figure 26.
7. Remove wear ring and backup ring. Remove and
discard piston seal from piston. See Figure 26.
NOTE: Perform Step 8 and Step 9 for lift truck model
GLP/GDP80VX, GLP/GDP80VX9, GLP/GDP90VX
(GLP/GDP170VX, GLP/GDP175VX36, GLP/
GDP190VX) (A909, B909).
8. Remove and discard wear ring from piston. See
Figure 27.
9. Repeat above steps as required for opposite free-
lift cylinder.
Free-Lift Cylinder Repair 2100 YRM 1328
36
1. GLAND
2. O-RING
3. ROD WIPER
4. BACKUP RING
5. ROD SEAL
6. WEAR RING
7. ROD AND PISTON ASSEMBLY
8. PISTON SEAL
9. CHECK VALVE
10. SEAL
11. WASHER
12. SNAP RING
13. SHELL
Figure 26. Free-Lift Cylinder Assembly for Lift
Truck Models GLP/GDP60VX, GLP/GDP70VX
(GP/GLP/GDP135VX, GP/GLP/GDP155VX) (C878,
D878, E878) and GLC/GDC60VX, GLC/GDC70VX
(GC/GLC/GDC135VX, GC/GLC/GDC155VX) (C879,
D879, E879, F879)
Figure 27. Free-Lift Cylinder Assembly for Lift
Truck Model GLP/GDP80VX, GDP80VX9, GLP/
GDP90VX (GLP/GDP170VX, GLP/GDP175VX36,
GLP/GDP190VX) (A909, B909)
2100 YRM 1328 Free-Lift Cylinder Repair
37
Legend for Figure 27
1. ROD WIPER
2. ROD SEAL
3. GLAND
4. O-RING
5. BLEED SCREW
6. SHELL
7. ROD
8. PISTON
9. WEAR RING
10. RETENTION SCREW
CLEAN
WARNING
Cleaning solvents can be flammable and toxic and
can cause skin irritation. When using cleaning
solvents, always follow the solvent manufactur-
er's recommended safety procedures.
Compressed air can move particles so they cause
injury to the user or to other personnel. Make sure
the path of the compressed air is away from all
personnel. Wear protective goggles or a face
shield to prevent injury to the eyes.
CAUTION
Do not allow cleaning solvent to come in contact
with rubber components, as it will damage those
components.
Clean all metal parts in solvent and dry with com-
pressed air.
INSPECT
Inspect the gland for damage to the threads and the
seal surfaces. If damaged, replace gland.
Inspect the piston for any damage to the seal surfa-
ces. If damaged, replace piston.
Inspect the rod for damage to the rod surface and en-
sure that the rod is not bent. If damaged replace rod.
Inspect the inner surface of the cylinder shell for dam-
age. If damaged, replace cylinder assembly.
ASSEMBLE, LIFT TRUCK MODELS GLP/
GDP60VX, GLP/GDP70VX (GP/GLP/
GDP135VX, GP/GLP/GDP155VX) (C878,
D878, E878) AND GLC/GDC60VX, GLC/
GDC70VX (GC/GLC/GDC135VX, GC/GLC/
GDC155VX) (C879, D879, E879, F879)
CAUTION
A difficult and important step in assembling free-
lift cylinders is the correct installation of the
seals. Most cylinders maintenance is caused by
seal leaks. DO NOT damage any parts during as-
sembly.
NOTE: Lubricate all internal parts of the free-lift cylin-
der with clean hydraulic oil.
NOTE:
1. Install check valve and new seal in base of piston
of free-lift cylinder. Make sure arrow on check
valve is toward base of piston. Install washer and
snap ring for check valve. See Figure 26.
2. Install new wear ring, piston seal, and backup ring
on rod an piston assembly. See Figure 26.
3. Carefully install rod and piston assembly into
shell. See Figure 26.
4. Install new wear ring, new rod seal, new backup
ring, and new rod wiper into gland. Install new O-
ring on outside of gland. See Figure 26.
NOTE: Hydraulic oil is pored into the free-lift cylinder
to act as a cushion during load lifting to prevent dam-
age to the cylinder.
5. Before installing gland, pour 150 cc (5 oz) of hy-
draulic oil into the cylinder shell.
6. Install gland on rod and piston assembly. See Fig-
ure 26. Tighten gland to 400 to 475 N•m (295 to
350 lbf ft).
7. Repeat above steps as required for opposite free-
lift cylinder.
Free-Lift Cylinder Repair 2100 YRM 1328
38
ASSEMBLE, LIFT TRUCK MODELS GLP/
GDP80VX, GLP/GDP80VX9, GLP/
GDP90VX (GLP/GDP170VX, GLP/
GDP175VX36, GLP/GDP190VX) (A909,
B909)
CAUTION
A difficult and important step in assembling free-
lift cylinders is the correct installation of the
seals. Most cylinders maintenance is caused by
seal leaks. DO NOT damage any parts during as-
sembly.
NOTE: Lubricate all internal parts of the free-lift cylin-
der with clean hydraulic oil.
1. Install new wear ring onto piston. See Figure 27.
2. Carefully install rod and piston assembly into
shell. See Figure 27.
3. Install new O-ring, new rod sea, and new rod
wiper onto gland. See Figure 27.
4. Install gland onto rod and piston assembly. See
Figure 27. Tighten gland to 350 to 400 N•m (258
to 295 lbf ft).
5. Repeat above steps as required for opposite free-
lift cylinder.
INSTALL, LIFT TRUCK MODELS GLP/
GDP60VX, GLP/GDP70VX (GP/GLP/
GDP135VX, GP/GLP/GDP155VX) (C878,
D878, E878) AND GLC/GDC60VX, GLC/
GDC70VX (GC/GLC/GDC135VX, GC/GLC/
GDC155VX) (C879, D879, E879, F879)
1. Install crosshead onto cylinder rod, then install
two capscrews and lockwashers securing cross-
head to cylinder rod. See Figure 20.
2. Install chain sheave assembly and spacers into
crosshead. See Figure 20.
3. Using a brass drift, install pin through the chain
sheave assembly. See Figure 20.
4. Using a lifting device, install free-lift cylinder into
the inner mast and align cylinder mount holes with
inner mast mounting holes.
5. Install two capscrews through hose mounting
bracket, spacers and inner mast mounting
bracket. Secure capscrews with two washers,
lockwashers, and lock nuts. See Figure 20.
Tighten lock nut to 135 N•m (100 lbf ft).
6. Install chain and chain anchor over chain sheave
assembly and install chain anchor into cylinder
mount. Tighten lock nuts to 370 N•m (273 lbf ft).
See Figure 19 and Figure 20.
7. Install chain guard over the chain sheave assem-
bly. See Figure 20.
8. Install hose sheave brackets to crosshead with
capscrews, washers, and lockwashers. Tighten
capscrews to 33 N•m (25 lbf ft). See Figure 20.
9. Place hose sheaves and hose sheave shaft inside
of hose sheave bracket and install two capscrews
and washers. Tighten capscrews to
33 N•m (25 lbf ft). See Figure 20.
10. Install the hoses over the hose sheaves and
through hose mounting bracket and uncap hoses.
Connect hoses to hydraulic fittings.
11. Install hydraulic fittings at the bottom of the cylin-
der. See Figure 19.
12. Perform above steps as required for opposite
free-lift cylinder.
13. Install the load backrest an carriage as described
in the carriage install procedures. See Mast Re-
pairs (S/N A513, A514, A613, A614, A702,
A703, A704, A705, A706, A707, A751, A752,
B513, B514, B586, B587, B588, B589, B590,
B591, B749, B750, B751, B752, B753, B754)
4000YRM1250.
2100 YRM 1328 Free-Lift Cylinder Repair
39
INSTALL, LIFT TRUCK MODELS GLP/
GDP80VX, GLP/GDP80VX9, GLP/
GDP90VX (GLP/GDP170VX, GLP/
GDP175VX36, GLP/GDP190VX) (A909,
B909)
1. Using a lifting device, install free-lift cylinder into
the inner mast and align cylinder mount holes with
inner mast mounting holes.
2. Install retention screw into bottom of mast and
free-lift cylinder. See Figure 25.
3. Install bracket, two washers, and two screws on
free-lift cylinder and crossmember. See Figure 25.
4. Install chain sheave into top of free-lift cylinder.
See Figure 24.
5. Install chain onto chain sheave; install chain an-
chor through crossmember; install locknut onto
chain anchor. See Figure 23.
6. Install the hoses over the hose sheaves and
through hose mounting bracket and uncap hoses.
Connect hoses to hydraulic fittings.
7. Install hose sheave assembly and four screws
onto chain guard. See Figure 22.
8. Install hydraulic hoses onto hose sheave.
9. Uncap and connect hydraulic lines at bottom of
free-lift cylinder. See Figure 25.
10. Perform above steps as required for opposite
free-lift cylinder.
11. Install the load backrest an carriage as described
in the carriage install procedures. See Mast Re-
pair (S/N A513, A514, A613, A614, A643, A644,
A683, A684) 4000YRM1406.
Sideshift Cylinder Repair
REMOVE
WARNING
Before working on or near the mast, see Safety
Procedures When Working Near Mast and Fig-
ure 1.
1. Remove carriage as described in carriage re-
moval procedures.
See Mast Repairs (S/N A513, A514, A613, A614,
A702, A703, A704, A705, A706, A707, A751,
A752, B513, B514, B586, B587, B588, B589,
B590, B591, B749, B750, B751, B752, B753,
B754) 4000YRM1250 for lift truck models
• GLC/GDC60VX, GLC/GDC70VX (GC/GLC/
GDC135VX, GC/GLC/GDC155VX) (C879,
D879, E879, F879)
• GLP/GDP60VX, GLP/GDP70VX (GP/GLP/
GDP135VX, GP/GLP/GDP155VX) (C878,
D878, E878)
See Mast Repair (S/N A513, A514, A613, A614,
A643, A644, A683, A684) 4000YRM1406 for lift
truck model
• GLP/GDP80VX, GLP/GDP80VX9,
GLP/GDP90VX (GLP/GDP170VX, GLP/
GDP175VX36, GLP/GDP190VX) (A909,
B909)
NOTE: Perform Step 2 for lift truck models
• GLC/GDC60VX, GLC/GDC70VX (GC/GLC/
GDC135VX, GC/GLC/GDC155VX) (C879,
D879, E879, F879)
• GLP/GDP60VX, GLP/GDP70VX (GP/GLP/
GDP135VX, GP/GLP/GDP155VX) (C878,
D878, E878)
2. Remove sideshift cylinder from sideshift carriage
as described in disassemble procedures.
See Mast Repairs (S/N A513, A514, A613, A614,
A702, A703, A704, A705, A706, A707, A751,
A752, B513, B514, B586, B587, B588, B589,
B590, B591, B749, B750, B751, B752, B753,
B754) 4000YRM1250 for lift truck models
• GLC/GDC60VX, GLC/GDC70VX (GC/GLC/
GDC135VX, GC/GLC/GDC155VX) (C879,
D879, E879, F879)
• GLP/GDP60VX, GLP/GDP70VX (GP/GLP/
GDP135VX, GP/GLP/GDP155VX) (C878,
D878, E878)
Sideshift Cylinder Repair 2100 YRM 1328
40
WARNING
Be careful when removing or installing snap
rings. These snap rings can come loose during re-
moval or installation with enough force to cause
an injury. Always use the correct snap ring pliers,
and wear eye and face protections during removal
or installation.
NOTE: Perform Step 3 for lift truck model GLP/
GDP80VX, GLP/GDP80VX9, GLP/GDP90VX (GLP/
GDP170VX, GLP/GDP175VX36, GLP/GDP190VX)
(A909, B909).
3. Remove four snap rings, two clevis pins, and
sideshift cylinder from carriage. See Figure 28.
1. SIDESHIFT CYLINDER
2. SNAP RING
3. CLEVIS PIN
4. ISS OUTER FRAME
Figure 28. Sideshift Cylinder Removal, Lift Truck Models GLP/GDP80VX, GLP/GDP80VX9, GLP/GDP90VX
(GLP/GDP170VX, GLP/GDP175VX36, GLP/GDP190VX) (A909, B909)
2100 YRM 1328 Sideshift Cylinder Repair
41
DISASSEMBLE
NOTE: For lift trucks manufactured before August,
2012, perform Step 1 through Step 8 for lift truck mod-
els
• GLC/GDC60VX, GLC/GDC70VX (GC/GLC/
GDC135VX, GC/GLC/GDC155VX) (C879,
D879, E879, F879)
• GLP/GDP60VX, GLP/GDP70VX (GP/GLP/
GDP135VX, GP/GLP/GDP155VX) (C878,
D878, E878)
1. Position cylinder rod in fully extended position and
remove snap ring from retainer. See Figure 29.
2. Push cylinder retainer into cylinder shell approxi-
mately 50 mm (2 in.) until retainer ring is exposed.
3. Remove retainer ring. See Figure 29.
4. Remove rod assembly and retainer from cylinder
shell. See Figure 29.
5. Remove retainer from rod. See Figure 29.
CAUTION
To prevent damage to sealing surfaces, use brass
tools when removing seals and O-rings.
6. Remove and discard, wiper, rod seal, backup
ring, and O-ring from retainer. See Figure 29.
7. Remove lock nut and piston from rod. See Fig-
ure 29.
8. Remove and discard backup ring and piston seal
from piston. See Figure 29.
NOTE: For lift trucks manufactured after August,
2012, perform Step 9 through Step 13 for lift truck
models
• GLC/GDC60VX, GLC/GDC70VX (GC/GLC/
GDC135VX, GC/GLC/GDC155VX) (C879,
D879, E879, F879)
• GLP/GDP60VX, GLP/GDP70VX (GP/GLP/
GDP135VX, GP/GLP/GDP155VX) (E878)
9. Remove the retainer. See Figure 30.
10. Remove rod wiper from retainer. See Figure 30.
11. Remove O-ring from retainer. See Figure 30.
12. Remove rod seal from retainer. See Figure 30.
13. Remove fittings and O-rings from cylinder assem-
bly. See Figure 30. Discard O-rings.
CAUTION
Carefully disassemble the sideshift cylinder so
the piston rods and sliding surfaces are not dam-
aged.
CAUTION
To prevent damage to sealing surfaces use brass
tools when removing seals and O-rings.
NOTE: Perform Step 14 through Step 18 for lift truck
models
• GLP/GDP80VX, GLP/GDP80VX9, GLP/
GDP90VX (GLP/GDP170VX, GLP/
GDP175VX36, GLP/GDP190VX) (A909, B909)
14. Loosen gland with spanner wrench. See Fig-
ure 31.
15. Remove gland from shell. See Figure 31.
16. Remove and discard rod wiper from gland. See
Figure 31.
17. Remove rod and piston assembly from shell. See
Figure 31. Drain hydraulic oil into container.
18. Remove backup ring, piston ring, piston seal, and
O-ring from piston. See Figure 31. Discard
backup ring, piston seal, and O-ring.
Sideshift Cylinder Repair 2100 YRM 1328
42
1. SNAP RING
2. RETAINER RING
3. ROD
4. RETAINER
5. CYLINDER SHELL
6. WIPER
7. ROD SEAL
8. BACKUP RING
9. O-RING
10. LOCK NUT
11. PISTON
12. PISTON SEAL
13. BACKUP RING
Figure 29. Hang On Sideshift Cylinder for Lift Truck Models GLC/GDC60VX, GLC/GDC70VX (GC/GLC/
GDC135VX, GC/GLC/GDC155VX) (C879, D879, E879, F879) and GLP/GDP60VX, GLP/GDP70VX (GP/GLP/
GDP135VX, GP/GLP/GDP155VX) (C878, D878, E878) Manufactured Before August, 2012
2100 YRM 1328 Sideshift Cylinder Repair
43
1. ROD WIPER
2. RETAINER
3. O-RING
4. ROD SEAL
5. ROD
6. FITTINGS
7. CYLINDER ASSEMBLY
Figure 30. Hang On Sideshift Cylinder for Lift Truck Models GLC/GDC60VX, GLC/GDC70VX (GC/GLC/
GDC135VX, GC/GLC/GDC155VX) (E879, F879) and GLP/GDP60VX, GLP/GDP70VX (GP/GLP/GDP135VX,
GP/GLP/GDP155VX) (E878) Manufactured After August, 2012
Sideshift Cylinder Repair 2100 YRM 1328
44
1. ROD
2. ROD WIPER
3. GLAND
4. PISTON
5. O-RING
6. PISTON SEAL
7. PISTON RING
8. BACKUP RING
9. SHELL
Figure 31. Sideshift Cylinder for Lift Truck Model GLP/GDP80VX, GLP/GDP80VX9, GLP/GDP90VX (GLP/
GDP170VX, GLP/GDP175VX36, GLP/GDP190VX) (A909, B909)
2100 YRM 1328 Sideshift Cylinder Repair
45
CLEAN
WARNING
Cleaning solvents can be flammable and toxic and
can cause skin irritation. When using cleaning
solvents, always follow the solvent manufactur-
er's recommended safety procedures.
Compressed air can move particles so they cause
injury to the user or to other personnel. Make sure
the path of the compressed air is away from all
personnel. Wear protective goggles or a face
shield to prevent injury to the eyes.
CAUTION
DO NOT allow cleaning solvent to come in contact
with rubber components, as it will damage those
components.
1. Clean all metal parts in solvent and dry with com-
pressed air.
INSPECT
1. Inspect gland and fittings for damage to threads
and seal surfaces. Replace if damaged.
2. Inspect piston for any damage to seal surfaces.
Replace if damaged.
3. Inspect rod for damage to rod surface and ensure
rod is not bent. Replace if damaged or bent.
4. Inspect inner surface of cylinder shell for damage.
Replace cylinder assembly if damaged.
ASSEMBLE
CAUTION
To prevent damage to sealing surfaces, use brass
tools when installing seals and O-rings.
NOTE: For lift trucks manufactured before August,
2012, perform Step 1 through Step 9 for lift truck mod-
els
• GLC/GDC60VX, GLC/GDC70VX (GC/GLC/
GDC135VX, GC/GLC/GDC155VX) (C879,
D879, E879, F879)
• GLP/GDP60VX, GLP/GDP70VX (GP/GLP/
GDP135VX, GP/GLP/GDP155VX) (C878,
D878, E878)
NOTE: Lubricate all internal parts of the cylinder with
clean hydraulic oil prior to assembly.
1. Install new piston seal and backup ring onto pis-
ton. See Figure 29.
CAUTION
To prevent damage to the cylinder, DO NOT clamp
on cylinder rod sealing surface.
2. Place cylinder shell in soft-jawed vise and install
piston onto rod. See Figure 29.
3. Install lock nut onto rod. See Figure 29. Tighten
lock nut to 135 to 163 N•m (100 to 120 lbf ft).
4. Install rod and piston into cylinder shell.
5. Install new O-ring and backup ring into groove of
retainer. See Figure 29.
6. Push retainer into cylinder shell until retainer ring
groove is exposed.
7. Install retainer rig into groove of cylinder shell.
See Figure 29.
8. Pull rod and piston out of cylinder shell until re-
tainer stops on retainer ring and snap ring groove
is exposed. See Figure 29.
9. Install snap ring onto retainer. See Figure 29.
NOTE: For lift trucks manufactured after August,
2012, perform Step 10 through Step 14 for lift truck
models
• GLC/GDC60VX, GLC/GDC70VX (GC/GLC/
GDC135VX, GC/GLC/GDC155VX) (E879,
F879)
• GLP/GDP60VX, GLP/GDP70VX (GP/GLP/
GDP135VX, GP/GLP/GDP155VX) (E878)
10. Install new O-ring on fittings and install fittings in
cylinder. See Figure 30.
11. Install rod seal in retainer. See Figure 30.
12. Install O-ring on retainer. See Figure 30.
13. Install rod wiper in retainer. See Figure 30.
14. Install retainer onto cylinder assembly. See Fig-
ure 30.
Sideshift Cylinder Repair 2100 YRM 1328
46
CAUTION
To prevent damage to sealing surfaces, use brass
tools when installing seal and O-rings.
NOTE: Perform Step 15 through Step 21 for lift truck
model
• GLP/GDP80VX, GLP/GDP80VX9, GLP/
GDP90VX (GLP/GDP170VX, GLP/
GDP175VX36, GLP/GDP190VX) (A909, B909)
NOTE: Lubricate all internal parts of the cylinder with
clean hydraulic oil prior to assembly.
15. Install new O-ring and piston seal onto piston.
See Figure 31.
16. Install piston ring onto piston and tighten. See
Figure 31.
17. Install new backup ring onto piston. See Fig-
ure 31.
18. Install rod and piston assembly into shell. See
Figure 31.
19. Install rod wiper onto gland. See Figure 31.
20. Apply two drops of Loctite®
545 or equivalent on
gland threads.
21. Install gland onto shell. See Figure 31. Tighten
gland to 350 to 400 N•m (258 to 295 lbf ft).
INSTALL
NOTE: Perform Step 1 for lift truck models
• GLC/GDC60VX, GLC/GDC70VX (GC/GLC/
GDC135VX, GC/GLC/GDC155VX) (C879,
D879, E879, F879)
• GLP/GDP60VX, GLP/GDP70VX (GP/GLP/
GDP135VX, GP/GLP/GDP155VX) (C878,
D878, E878)
1. Install sideshift cylinder as described in install pro-
cedure in section
Mast Repairs (S/N A513, A514, A613, A614,
A702, A703, A704, A705, A706, A707, A751,
A752, B513, B514, B586, B587, B588, B589,
B590, B591, B749, B750, B751, B752, B753,
B754) 4000YRM1250 for lift truck models
• GLC/GDC60VX, GLC/GDC70VX (GC/GLC/
GDC135VX, GC/GLC/GDC155VX) (C879,
D879, E879, F879)
• GLP/GDP60VX, GLP/GDP70VX (GP/GLP/
GDP135VX, GP/GLP/GDP155VX) (C878,
D878, E878)
WARNING
Be careful when removing or installing snap
rings. These snap rings can come loose during re-
moval or installation with enough force to cause
an injury. Always use the correct snap ring pliers,
and wear eye and face protections during removal
or installation.
NOTE: Perform Step 2 for lift truck model GLP/
GDP80VX, GLP/GDP80VX9, GLP/GDP90VX (GLP/
GDP170VX, GLP/GDP175VX36, GLP/GDP190VX)
(A909, B909).
2. Install sideshift cylinder, two clevis pins, and four
snap rings onto carriage. See Figure 28.
3. Install carriage as described in the carriage install
procedures located in the section
Mast Repairs (S/N A513, A514, A613, A614,
A702, A703, A704, A705, A706, A707, A751,
A752, B513, B514, B586, B587, B588, B589,
B590, B591, B749, B750, B751, B752, B753,
B754) 4000YRM1250 for lift truck models
• GLC/GDC60VX, GLC/GDC70VX (GC/GLC/
GDC135VX, GC/GLC/GDC155VX) (C879,
D879, E879, F879)
• GLP/GDP60VX, GLP/GDP70VX (GP/GLP/
GDP135VX, GP/GLP/GDP155VX) (C878,
D878, E878)
Mast Repair (S/N A513, A514, A613, A614, A643,
A644, A683, A684) 4000YRM1406 for lift truck
model
• GLP/GDP80VX, GLP/GDP80VX9, GLP/
GDP90VX (GLP/GDP170VX, GLP/
GDP175VX36, GLP/GDP190VX) (A909,
B909)
2100 YRM 1328 Fork Positioner Cylinder Repair
47
Fork Positioner Cylinder Repair
REMOVE
WARNING
Before working on or near the mast, see Safety
Procedures When Working Near Mast and Fig-
ure 1.
NOTE: Perform Step 1 for lift truck models
• GLC/GDC60VX, GLC/GDC70VX (GC/GLC/
GDC135VX, GC/GLC/GDC155VX) (C879,
D879, E879, F879)
• GLP/GDP60VX, GLP/GDP70VX (GP/GLP/
GDP135VX, GP/GLP/GDP155VX) (C878,
D878, E878)
1. Remove fork positioner cylinder as described in
Hang On Sideshift Carriage Repair removal pro-
cedures located in the section Mast Repairs (S/N
A513, A514, A613, A614, A702, A703, A704,
A705, A706, A707, A751, A752, B513, B514,
B586, B587, B588, B589, B590, B591, B749,
B750, B751, B752, B753, B754) 4000YRM1250.
NOTE: Perform Step 2 through Step 7 for lift truck
model
• GLP/GDP80VX, GLP/GDP80VX9, GLP/
GDP90VX (GLP/GDP170VX, GLP/
GDP175VX36, GLP/GDP190VX) (A909, B909)
2. Remove carriage as described in carriage re-
moval procedures located in the section Mast Re-
pair (S/N A513, A514, A613, A614, A643, A644,
A683, A684) 4000YRM1406.
NOTE: The following step to be performed for both
upper and lower fork positioner cylinders.
NOTE: Note placement of fork positioner cylinders
prior to removal to aid in installation.
3. Disconnect all hydraulic fittings and lines from fork
positioner cylinders on carriage. See Figure 32.
4. Remove screw, washer, and bushing from lower
fork positioner cylinder rod end and carriage. See
Figure 33.
5. Remove nut from lower fork positioner cylinder
shell end. See Figure 33.
6. Retract rod into shell and remove lower fork posi-
tioner cylinder from carriage.
7. Repeat Step 4 through Step 6 for upper fork posi-
tioner cylinder.
DISASSEMBLE
CAUTION
Carefully disassemble the fork positioner cylin-
ders so the piston rods and sliding surfaces are
not damaged.
NOTE: For lift trucks manufactured before August,
2012, perform Step 1 through Step 7 for lift truck mod-
els
• GLC/GDC60VX, GLC/GDC70VX (GC/GLC/
GDC135VX, GC/GLC/GDC155VX) (C879,
D879, E879, F879)
• GLP/GDP60VX, GLP/GDP70VX (GP/GLP/
GDP135VX, GP/GLP/GDP155VX) (C878,
D878, E878)
1. Unscrew cylinder rod retainer. See Figure 34.
CAUTION
To prevent damage to sealing surfaces, use brass
tools when removing seals and O-rings.
2. Remove piston, rod, and cylinder rod retainer as
an assembly from cylinder shell. See Figure 34.
3. Remove cylinder rod retainer from cylinder rod.
See Figure 34.
4. Remove spacer from cylinder rod. See Figure 34.
5. Remove and discard rod wiper, rod seal, backup
rings, and O-rings from cylinder rod retainer. See
Figure 34.
CAUTION
To prevent damage to cylinder rod, DO NOT
clamp on the cylinder rod sealing surface.
6. Place cylinder rod in soft-jawed vise and remove
piston nut and piston. See Figure 34.
7. Remove and discard piston seal and O-ring from
piston. See Figure 34.
Fork Positioner Cylinder Repair 2100 YRM 1328
48
1. CARRIAGE
2. FORK POSITIONER CYLINDER
3. HYDRAULIC FITTING
4. HYDRAULIC LINE
Figure 32. Hydraulic Connections Fork Positioner Cylinder
2100 YRM 1328 Fork Positioner Cylinder Repair
49
1. UPPER FORK POSITIONER CYLINDER ROD
END
2. UPPER FORK POSITIONER CYLINDER SHELL
END
3. LOWER FORK POSITIONER CYLINDER ROD
END
4. LOWER FORK POSITIONER CYLINDER SHELL
END
5. CARRIAGE
6. SCREW
7. WASHER
8. BUSHING
9. NUT
Figure 33. Fork Positioner Cylinder Mount
Fork Positioner Cylinder Repair 2100 YRM 1328
50
1. CYLINDER ROD
2. ROD SEAL
3. ROD WIPER
4. CYLINDER ROD RETAINER
5. BACKUP RING
6. O-RING
7. SPACER
8. CYLINDER SHELL
9. PISTON
10. PISTON SEAL
11. PISTON NUT
Figure 34. Fork Positioner Cylinder for Lift Truck Models GLC/GDC60VX, GLC/GDC70VX (GC/GLC/
GDC135VX, GC/GLC/GDC155VX) (C879, D879, E879) and GLP/GDP60VX, GLP/GDP70VX (GP/GLP/
GDP135VX, GP/GLP/GDP155VX) (C878, D878, E878) Manufactured Before August, 2012
CAUTION
Carefully disassemble the fork positioner cylin-
ders so the piston rods and sliding surfaces are
not damaged.
CAUTION
To prevent damage to sealing surfaces use brass
tools when removing seals and O-rings.
NOTE: For lift trucks manufactured after August,
2012, perform Step 8 through Step 15 for lift truck
models
• GLC/GDC60VX, GLC/GDC70VX (GC/GLC/
GDC135VX, GC/GLC/GDC155VX) (D879,
E879, F879)
• GLP/GDP60VX, GLP/GDP70VX (GP/GLP/
GDP135VX, GP/GLP/GDP155VX) (D878,
E878)
8. Place fork positioner on flat surface. Use clamps
to hold fork positioner in position and blocks for
clearance and to keep parts in alignment. See
Figure 35.
9. Remove cylinder rod anchor plug. Move fork car-
rier lug towards manifold and remove half-ring
keepers. Move cylinder rod to fully retracted posi-
tion shown in Figure 35.
10. Using retainer socket tool (see Special Tools), un-
screw cylinder retainer to remove cylinder assem-
bly from manifold.
CAUTION
DO NOT bend hydraulic tubes when removing
them. Damage to hydraulic tubes can result if they
are bent.
NOTE: Make note of which end hydraulic tubes are
removed from. If hydraulic tubes are removed from
cylinder head end, install hydraulic tubes first, before
installing cylinder and fork carrier lug assembly to
manifold.
11. Disconnect hydraulic tubes at manifold. Remove
clamps and remove cylinder and fork carrier lug
assembly. See Figure 35.
12. Slide fork carrier lug from cylinder shell. Remove
piston/rod assembly from cylinder shell.
2100 YRM 1328 Fork Positioner Cylinder Repair
51
1. ANCHOR PLUG
2. HALF-RING KEEPERS
3. FORK CARRIER LUG
4. RETAINER SOCKET TOOL
5. CYLINDER RETAINER
6. CYLINDER ROD
7. HEAD TIGHTENING TOOL
8. CYLINDER SHELL
Figure 35. Fork Positioner Assembly for Lift Truck Models GLC/GDC60VX, GLC/GDC70VX (GC/GLC/
GDC135VX, GC/GLC/GDC155VX) (E879, F879) and GLP/GDP60VX, GLP/GDP70VX (GP/GLP/GDP135VX,
GP/GLP/GDP155VX) (E878) Manufactured After August, 2012
NOTE: DO NOT scratch seal grooves. Use brass
seal removal tools to pry items from grooves.
13. Remove all seals, O-ring, wear rings and bearings
from components as shown in Figure 36.
14. If required, unscrew cylinder shell from head end
using head tightening tool. See Special Tools.
15. Repeat Step 9 through Step 14 for other cylinder.
NOTE: Perform Step 16 through Step 20 for lift truck
model:
• GLP/GDP80VX, GLP/GDP80VX9, GLP/
GDP90VX (GLP/GDP170VX, GLP/
GDP175VX36, GLP/GDP190VX) (A909, B909)
16. Loosen gland with spanner wrench. See Fig-
ure 37.
17. Remove gland from shell. See Figure 37.
18. Remove and discard rod wiper from gland. See
Figure 37.
19. Remove rod and piston assembly from shell.
Drain hydraulic oil into container. See Figure 37.
20. Remove backup ring, piston ring, piston seal, and
O-ring from piston. Discard backup ring, piston
seal, and O-ring. See Figure 37.
21. Repeat Step 16 through Step 20 for other fork po-
sitioner cylinder.
Fork Positioner Cylinder Repair 2100 YRM 1328
52
A. RETAINER B. PISTON C. FORK CARRIER LUG
1. RETAINER
2. MANIFOLD
3. CYLINDER SHELL
4. CYLINDER ROD
5. FORK CARRIER LUG
6. INTERNAL SPACER (IF RE-
QUIRED)
7. HEAD END/MOUNTING
FOOT
8. O-RING
9. U-CUP PRESSURE SEAL
10. WIPER SEAL
11. WEAR RING
12. TWO-PIECE PRESSURE SEAL
13. WIPERS
14. BEARINGS
Figure 36. Fork Positioner Cylinder for Lift Truck Models GLC/GDC60VX, GLC/GDC70VX (GC/GLC/
GDC135VX, GC/GLC/GDC155VX) (E879, F879) and GLP/GDP60VX, GLP/GDP70VX (GP/GLP/GDP135VX,
GP/GLP/GDP155VX) (E878) Manufactured After August, 2012
2100 YRM 1328 Fork Positioner Cylinder Repair
53
Figure 37. Fork Positioner Cylinder
Legend for Figure 37
1. ROD WIPER
2. GLAND
3. SHELL
4. ROD
5. PISTON
6. O-RING
7. PISTON SEAL
8. PISTON RING
9. BACKUP RING
CLEAN
WARNING
Cleaning solvents can be flammable and toxic and
can cause skin irritation. When using cleaning
solvents, always follow the solvent manufactur-
er's recommended safety procedures.
Compressed air can move particles so they cause
injury to the user or to other personnel. Make sure
the path of the compressed air is away from all
personnel. Wear protective goggles or a face
shield to prevent injury to the eyes.
CAUTION
DO NOT allow cleaning solvent to come in contact
with rubber components, as it will damage those
components.
1. Clean all metal parts in solvent and dry with com-
pressed air.
INSPECT
1. Inspect gland for damage to threads and seal sur-
faces. Replace if damaged.
2. Inspect piston for any damage to seal surfaces.
Replace if damaged.
3. Inspect rod for damage to rod surface and ensure
rod is not bent. Replace if damaged or bent.
4. Inspect inner surface of cylinder shell for damage.
Replace cylinder assembly if damaged.
Fork Positioner Cylinder Repair 2100 YRM 1328
54
ASSEMBLE
CAUTION
To prevent damage to sealing surfaces, use brass
tools when installing seal and O-ring.
NOTE: Lubricate all internal parts of the cylinder with
clean hydraulic oil during assembly.
NOTE: For lift trucks manufactured before August,
2012, perform Step 1 through Step 7 for lift truck mod-
els
• GLC/GDC60VX, GLC/GDC70VX (GC/GLC/
GDC135VX, GC/GLC/GDC155VX) (C879,
D879, E879, F879)
• GLP/GDP60VX, GLP/GDP70VX (GP/GLP/
GDP135VX, GP/GLP/GDP155VX) (C878,
D878, E878)
1. Install new O-rings, backup rings, rod seal, and
rod wiper onto cylinder rod retainer. See Fig-
ure 34.
CAUTION
To prevent damage to cylinder rod, DO NOT
clamp on cylinder rod sealing surface.
2. Place cylinder rod in soft-jawed vise and install
piston onto rod. See Figure 34.
3. Apply Loctite®
242 (Blue) to threads of piston nut.
Install piston nut onto cylinder rod. Tighten piston
nut to 75 N•m (55 lbf ft). See Figure 34.
4. Install new piston seal onto piston. See Figure 34.
5. Install cylinder rod retainer onto cylinder rod. See
Figure 34.
NOTE: For lift trucks manufactured after August,
2012, perform Step 6 through Step 15 for lift truck
models
• GLC/GDC60VX, GLC/GDC70VX (GC/GLC/
GDC135VX, GC/GLC/GDC155VX) (C879,
D879, E879, F879)
• GLP/GDP60VX, GLP/GDP70VX (GP/GLP/
GDP135VX, GP/GLP/GDP155VX) (D878,
E878)
NOTE: If necessary, use 400-grit emery cloth to
break any sharp edge on the piston, retainer and cyl-
inder shell chamfer angles and threads to prevent
seal damage.
6. If the cylinder head end was removed during dis-
assembly, replace cylinder head end O-ring and
apply Loctite®
242 (Blue) to threads. Clamp head
end in vice and tighten cylinder shell to
270 N•m (200 lbf ft).
7. Lubricate new seals, O-rings and wear rings with
O-ring lube or hydraulic fluid.
NOTE: Fork carrier lug bearings snap into their re-
spective grooves. Bronze bearings consist of three
separate segments.
8. Install new seals, O-rings, wear rings and fork
carrier lug bearings as shown in Figure 36.
9. Twist seal into "figure 8" or half circle shape see
Figure 38.
1. SEAL
2. ROD
3. RETAINER
4. PIN PUNCH
5. FLAT BRASS O-RING TOOL
Figure 38. Installing Retainer Internal Seals for Lift
Truck Models GLC/GDC60VX, GLC/GDC70VX
(GC/GLC/GDC135VX, GC/GLC/GDC155VX) (E879,
F879) and GLP/GDP60VX, GLP/GDP70VX
(GP/GLP/GDP135VX, GP/GLP/GDP155VX) (E878)
Manufactured After August, 2012
2100 YRM 1328 Fork Positioner Cylinder Repair
55
NOTE: DO NOT use a pin punch with sharp edges.
10. Lubricate seal and force partially into grove using
15 mm (0.6 in.) pin punch. See Figure 38.
NOTE: Make sure piston seal is not damaged by cyl-
inder shell threads during installation.
11. Use flat brass O-ring tool to seat seals fully into
groove. See Figure 38.
12. Slide fork carrier lug onto cylinder shell with the
plug heads facing outwards. See Figure 35.
13. Align cylinder assembly to manifold and engage
opposite cylinder rod into fork carrier. Install exter-
nal spacer on cylinder rod, if required. Install cyl-
inder retainer through opposite side of manifold
and screw partially into cylinder shell. See Fig-
ure 35.
14. Make sure cylinder is properly oriented with re-
strictor fittings on backside. Engage tube and
screw retainer fully into shell. Reclamp assembly
to bench.
15. Tighten retainer to 165 N•m (120 lbf ft). Tighten
hydraulic tubes at manifold and cylinder head
end.
16. Repeat Step 6 through Step 15 for other cylinder.
CAUTION
To prevent damage to sealing surfaces, use brass
tools when installing seal and O-ring.
NOTE: Perform Step 17 through Step 23 for lift truck
models
• GLP/GDP80VX, GLP/GDP80VX9, GLP/
GDP90VX (GLP/GDP170VX, GLP/
GDP175VX36, GLP/GDP190VX) (A909, B909)
NOTE: Lubricate all internal parts of the cylinder with
clean hydraulic oil during assembly.
17. Install new O-ring and piston seal onto piston.
See Figure 37.
18. Install piston ring onto piston and tighten. See
Figure 37.
19. Install new backup ring onto piston. See Fig-
ure 37.
20. Install rod and piston assembly into shell. See
Figure 37.
21. Install rod wiper onto gland. See Figure 37.
22. Apply two drops of Loctite®
545 or equivalent on
gland threads.
23. Install gland onto shell. Tighten gland to 350 to
400 N•m (258 to 295 lbf ft). See Figure 37.
24. Repeat Step 17 through Step 23 for other fork po-
sitioner cylinder.
INSTALL
NOTE: Perform Step 1 for lift truck models
• GLC/GDC60VX, GLC/GDC70VX (GC/GLC/
GDC135VX, GC/GLC/GDC155VX) (C879,
D879, E879, F879)
• GLP/GDP60VX, GLP/GDP70VX (GP/GLP/
GDP135VX, GP/GLP/GDP155VX) (C878,
D878, E878)
1. Install fork positioner cylinder and carriage as de-
scribed in Hang On Sideshift Carriage Repair in-
stallation procedures located in the section Mast
Repairs (S/N A513, A514, A613, A614, A702,
A703, A704, A705, A706, A707, A751, A752,
B513, B514, B586, B587, B588, B589, B590,
B591, B749, B750, B751, B752, B753, B754)
4000YRM1250.
NOTE: Perform Step 2 through Step 10 for lift truck
model
• GLP/GDP80VX, GLP/GDP80VX9, GLP/
GDP90VX (GLP/GDP170VX, GLP/
GDP175VX36, GLP/GDP190VX) (A909, B909)
2. Install upper fork positioner cylinder onto carriage
as noted during removal. See Figure 33.
3. Install nut onto upper fork positioner cylinder shell
end. See Figure 33.
4. Install bushing, washer, and screw onto upper
fork positioner rod end and carriage. See Fig-
ure 33.
5. Connect hydraulic fittings and lines onto upper
fork positioner cylinder. See Figure 32.
6. Install lower fork positioner cylinder onto carriage
as noted during removal. Install bushing, washer,
and screw onto lower fork positioner rod end and
carriage. See Figure 33.
7. Install nut onto lower fork positioner cylinder shell
end. See Figure 33.
Fork Positioner Cylinder Repair 2100 YRM 1328
56
8. Install bushing, washer, and screw onto lower fork
positioner rod end and carriage. See Figure 33.
9. Connect hydraulic fittings and lines onto lower
fork positioner cylinder. See Figure 32.
10. Install carriage as described in carriage install
procedures in the section Mast Repair (S/N
A513, A514, A613, A614, A643, A644, A683,
A684) 4000YRM1406.
Lift Cylinder Leak Check
WARNING
During the test procedures for the hydraulic sys-
tem, use chains to fasten the load to the carriage
to prevent it from falling. Keep all people away
from the lift truck during the tests.
DO NOT try to find hydraulic leaks by putting your
hand on hydraulic components under pressure.
Hydraulic oil can be injected into the body by the
pressure.
NOTE: The following checks are to be performed
with a capacity load on forks and with hydraulic oil at
normal operating temperature.
1. Operate hydraulic system. Put capacity load on
forks. Use safety chain to hold load to carriage.
Raise and lower load several times. Lower load
and tilt mast forward and backward several times.
Check for leaks.
2. Put mast in vertical position and raise carriage
and load 2.5 m (8 ft).
If carriage slowly lowers when control valve is in
NEUTRAL position, there are leaks in hydraulic
system. The maximum speed the carriage is al-
lowed to lower is 100 mm (4 in.) per 10 minutes
when hydraulic oil is at normal operating tempera-
ture.
3. Check lift cylinders for internal leaks. Remove
load from forks. Install valve in supply line be-
tween main control valve and mast. Put capacity
load on forks again. Raise carriage 2.5 m (8 ft).
Close valve. If carriage or mast lower slowly,
seals in lift cylinders have leaks.
4. If carriage does not move, open valve and check
movement again. If carriage lowers when valve is
open, check for leaks in hydraulic lines and fit-
tings. If no leaks are found, main control valve
can be worn or damaged. Remove load from
forks.
Seal Kit Installation
EXTERNAL INSTALLATION (SEAL AND
BACK-UP RING)
NOTE: It is recommended that seal is heated in hy-
draulic oil prior to installation to make it more flexible
and pliable.
1. Lubricate seal, back-up ring, external installation
sleeve and piston rod groove with hydraulic fluid.
2. Install wear ring onto piston rod assembly. See
Figure 39.
3. Slide external installation sleeve over piston rod
assembly and wear ring. See Figure 39.
4. Install back-up ring into piston rod groove. See
Figure 39.
5. Slide seal over external installation sleeve and
into piston rod groove. See Figure 39.
6. Remove external installation sleeve.
INTERNAL INSTALLATION (PISTON ROD
ASSEMBLY)
1. Insert internal installation sleeve into end of cylin-
der tube. See Figure 40.
2. Install piston rod assembly into cylinder tube. See
Figure 40.
3. Remove internal installation sleeve from cylinder
tube and piston rod assembly. See Figure 40.
2100 YRM 1328 Lift Cylinder Leak Check
57
1. PISTON ROD ASSEMBLY
2. WEAR RING
3. EXTERNAL INSTALLATION SLEEVE
4. BACK-UP RING
5. SEAL
Figure 39. Cylinder External Seal Installation
1. PISTON ROD ASSEMBLY
2. BACK-UP RING
3. SEAL
4. INTERNAL INSTALLATION SLEEVE
5. CYLINDER TUBE
6. WEAR RING
Figure 40. Cylinder Internal Installation
SPECIAL TOOLS
Special Tool Cascade Part Number
6075028
6075087
Cylinder Repair (Mast S/N A513, A514, A613, A614, B513, B514) 2100 YRM 1328
58
Torque Specifications
FOR LIFT TRUCK MODELS GLC/
GDC60VX, GLC/GDC70VX (GC/GLC/
GDC135VX, GC/GLC/GDC155VX) (C879,
D879, E879, F879) AND GLP/GDP60VX,
GLP/GDP70VX (GP/GLP/GDP135VX,
GP/GLP/GDP155VX) (C878, D878, E878)
Tilt Cylinder Piston Rod Nut
400 to 440 N•m (295 to 325 lbf ft)
Tilt Cylinder Gland
400 to 440 N•m (295 to 325 lbf ft)
Tilt Cylinder Rod End to Rod Locknut- Mast End
90 N•m (66 lbf ft)
Tilt Cylinder Rod End to Rod Capscrew - Frame
End
90 N•m (66 lbf ft)
Tilt Cylinder Anchor Pin Capscrew
90 N•m (66 lbf ft)
Lift Cylinder Gland
375 to 450 N•m (277 to 332 lbf ft)
Lift Cylinder Mount to Outer Mast Lock Nut
135 N•m (100 lbf ft)
Lift Cylinder Chain Anchor Lock Nuts
370 N•m (273 lbf ft)
Lift Cylinder Mounting Bolts to Outer Mast
555 N•m (410 lbf ft)
Free- Lift Cylinder Gland
400 to 475 N•m (295 to 350 lbf ft)
Free- Lift Cylinder Mount Lock Nut to Inner Mast
370 N•m (273 lbf ft)
Free- Lift Cylinder Chain Anchor to Cylinder
Mount Lock Nuts
135 N•m (100 lbf ft)
Free- Lift Cylinder Hose Sheave Bracket to Chain
Sheave Bracket Capscrews
33 N•m (25 lbf ft)
Free- Lift Cylinder Hose Sheave Bracket to Hose
Sheave Shaft Capscrews
33 N•m (25 lbf ft)
FOR LIFT TRUCK MODEL GLP/GDP80VX,
GLP/GDP80VX9, GLP/GDP90VX (GLP/
GDP170VX, GLP/GDP175VX36, GLP/
GDP190VX) (A909, B909)
Tilt Cylinder Piston Rod Nut
400 to 440 N•m (295 to 325 lbf ft)
Tilt Cylinder Gland
400 to 500 N•m (295 to 325 lbf ft)
Rod End Hex Nut
120 to 130 N•m (89 to 96 lbf ft)
Tilt Cylinder Rod End to Rod Capscrew- Mast End
95 to 100 N•m (70 to 74 lbf ft)
Tilt Cylinder Rod End to Rod Capscrew - Frame
End
66 N•m (49 lbf ft)
Tilt Cylinder Anchor Pin Capscrew
90 N•m (66 lbf ft)
Lift Cylinder Gland
350 to 400 N•m (258 to 295 lbf ft)
Fork Positioner Cylinder Gland
350 to 400 N•m (258 to 295 lbf ft)
Sideshift Cylinder Gland
350 to 400 N•m (258 to 295 lbf ft)
2100 YRM 1328 Torque Specifications
59
General
This section covers the repair of the wire harness
connectors, pins, sockets, and splicing of wires.
Deutsch Crimping Tool
HOW TO STRIP A WIRE FOR USE WITH
DEUTSCH CRIMPING TOOL
1. Choose the correct AWG for the contact being
used. See Table 1.
2. See Table 1 for recommended strip length for
contact size. Measure strip length from end of
wire as shown in Figure 1.
Figure 1. Strip Length Measurement
3. Strip the wire to the recommended strip length. A
small piece of insulation should come off the wire
after stripping. See Figure 2.
Figure 2. Stripped Wire
4. Check for any broken strands or for a nick in the
wire. If either exists, the wires are damaged and
should be cut and stripped again.
5. Measure the exposed strands to verify strip length
is correct. See Figure 3.
Figure 3. Strip Length Measurement Verification
2200 YRM 1128 General
1
YALE E879 GDC60VX LIFT TRUCK Service Repair Manual

More Related Content

Similar to YALE E879 GDC60VX LIFT TRUCK Service Repair Manual

Yale c879 glc70 vx lift truck service repair manual
Yale c879 glc70 vx lift truck service repair manualYale c879 glc70 vx lift truck service repair manual
Yale c879 glc70 vx lift truck service repair manualfjjskekdmmme
 
Yale c879 gdc60 vx lift truck service repair manual
Yale c879 gdc60 vx lift truck service repair manualYale c879 gdc60 vx lift truck service repair manual
Yale c879 gdc60 vx lift truck service repair manualfhhsjdkmem
 
Yale c879 gdc70 vx lift truck service repair manual
Yale c879 gdc70 vx lift truck service repair manualYale c879 gdc70 vx lift truck service repair manual
Yale c879 gdc70 vx lift truck service repair manualjfjskekdhnejd
 
Yale c879 glc60 vx lift truck service repair manual
Yale c879 glc60 vx lift truck service repair manualYale c879 glc60 vx lift truck service repair manual
Yale c879 glc60 vx lift truck service repair manualfjjskdmnenemm
 
Yale c879 glc70 vx lift truck service repair manual
Yale c879 glc70 vx lift truck service repair manualYale c879 glc70 vx lift truck service repair manual
Yale c879 glc70 vx lift truck service repair manualjkmsme ekdmm
 
Yale d810 glp16 vx lift truck (europe) service repair manual
Yale d810 glp16 vx lift truck (europe) service repair manualYale d810 glp16 vx lift truck (europe) service repair manual
Yale d810 glp16 vx lift truck (europe) service repair manualfskkkdjskemd
 
Yale d810 gdp16 vx lift truck (europe) service repair manual
Yale d810 gdp16 vx lift truck (europe) service repair manualYale d810 gdp16 vx lift truck (europe) service repair manual
Yale d810 gdp16 vx lift truck (europe) service repair manualfjjskekdmem
 
Yale d810 gdp20 svx lift truck (europe) service repair manual
Yale d810 gdp20 svx lift truck (europe) service repair manualYale d810 gdp20 svx lift truck (europe) service repair manual
Yale d810 gdp20 svx lift truck (europe) service repair manualfjskemedcdmme
 
Yale d810 glp18 vx lift truck (europe) service repair manual
Yale d810 glp18 vx lift truck (europe) service repair manualYale d810 glp18 vx lift truck (europe) service repair manual
Yale d810 glp18 vx lift truck (europe) service repair manualfjskkdmmmse
 
Yale d810 glp20 sx lift truck (europe) service repair manual
Yale d810 glp20 sx lift truck (europe) service repair manualYale d810 glp20 sx lift truck (europe) service repair manual
Yale d810 glp20 sx lift truck (europe) service repair manualfjskekdmmse
 
Yale d810 glp16 vx lift truck (europe) service repair manual
Yale d810 glp16 vx lift truck (europe) service repair manualYale d810 glp16 vx lift truck (europe) service repair manual
Yale d810 glp16 vx lift truck (europe) service repair manualjksemmmd
 
Yale a879 glc135 155 ca lift truck service repair manual
Yale a879 glc135 155 ca lift truck service repair manualYale a879 glc135 155 ca lift truck service repair manual
Yale a879 glc135 155 ca lift truck service repair manualfhjskemme
 
Yale a879 gc135 155 ca lift truck service repair manual
Yale a879 gc135 155 ca lift truck service repair manualYale a879 gc135 155 ca lift truck service repair manual
Yale a879 gc135 155 ca lift truck service repair manualdueikdkmem
 

Similar to YALE E879 GDC60VX LIFT TRUCK Service Repair Manual (13)

Yale c879 glc70 vx lift truck service repair manual
Yale c879 glc70 vx lift truck service repair manualYale c879 glc70 vx lift truck service repair manual
Yale c879 glc70 vx lift truck service repair manual
 
Yale c879 gdc60 vx lift truck service repair manual
Yale c879 gdc60 vx lift truck service repair manualYale c879 gdc60 vx lift truck service repair manual
Yale c879 gdc60 vx lift truck service repair manual
 
Yale c879 gdc70 vx lift truck service repair manual
Yale c879 gdc70 vx lift truck service repair manualYale c879 gdc70 vx lift truck service repair manual
Yale c879 gdc70 vx lift truck service repair manual
 
Yale c879 glc60 vx lift truck service repair manual
Yale c879 glc60 vx lift truck service repair manualYale c879 glc60 vx lift truck service repair manual
Yale c879 glc60 vx lift truck service repair manual
 
Yale c879 glc70 vx lift truck service repair manual
Yale c879 glc70 vx lift truck service repair manualYale c879 glc70 vx lift truck service repair manual
Yale c879 glc70 vx lift truck service repair manual
 
Yale d810 glp16 vx lift truck (europe) service repair manual
Yale d810 glp16 vx lift truck (europe) service repair manualYale d810 glp16 vx lift truck (europe) service repair manual
Yale d810 glp16 vx lift truck (europe) service repair manual
 
Yale d810 gdp16 vx lift truck (europe) service repair manual
Yale d810 gdp16 vx lift truck (europe) service repair manualYale d810 gdp16 vx lift truck (europe) service repair manual
Yale d810 gdp16 vx lift truck (europe) service repair manual
 
Yale d810 gdp20 svx lift truck (europe) service repair manual
Yale d810 gdp20 svx lift truck (europe) service repair manualYale d810 gdp20 svx lift truck (europe) service repair manual
Yale d810 gdp20 svx lift truck (europe) service repair manual
 
Yale d810 glp18 vx lift truck (europe) service repair manual
Yale d810 glp18 vx lift truck (europe) service repair manualYale d810 glp18 vx lift truck (europe) service repair manual
Yale d810 glp18 vx lift truck (europe) service repair manual
 
Yale d810 glp20 sx lift truck (europe) service repair manual
Yale d810 glp20 sx lift truck (europe) service repair manualYale d810 glp20 sx lift truck (europe) service repair manual
Yale d810 glp20 sx lift truck (europe) service repair manual
 
Yale d810 glp16 vx lift truck (europe) service repair manual
Yale d810 glp16 vx lift truck (europe) service repair manualYale d810 glp16 vx lift truck (europe) service repair manual
Yale d810 glp16 vx lift truck (europe) service repair manual
 
Yale a879 glc135 155 ca lift truck service repair manual
Yale a879 glc135 155 ca lift truck service repair manualYale a879 glc135 155 ca lift truck service repair manual
Yale a879 glc135 155 ca lift truck service repair manual
 
Yale a879 gc135 155 ca lift truck service repair manual
Yale a879 gc135 155 ca lift truck service repair manualYale a879 gc135 155 ca lift truck service repair manual
Yale a879 gc135 155 ca lift truck service repair manual
 

More from yjekmmd jksmefjmm

YALE G807 ERP16VT LIFT TRUCK (EUROPE) Service Repair Manual
YALE G807 ERP16VT LIFT TRUCK (EUROPE) Service Repair ManualYALE G807 ERP16VT LIFT TRUCK (EUROPE) Service Repair Manual
YALE G807 ERP16VT LIFT TRUCK (EUROPE) Service Repair Manualyjekmmd jksmefjmm
 
YALE F879 GDC70VX LIFT TRUCK (EUROPE) Service Repair Manual
YALE F879 GDC70VX LIFT TRUCK (EUROPE) Service Repair ManualYALE F879 GDC70VX LIFT TRUCK (EUROPE) Service Repair Manual
YALE F879 GDC70VX LIFT TRUCK (EUROPE) Service Repair Manualyjekmmd jksmefjmm
 
YALE F818 GLC45VX LIFT TRUCK (EUROPE) Service Repair Manual
YALE F818 GLC45VX LIFT TRUCK (EUROPE) Service Repair ManualYALE F818 GLC45VX LIFT TRUCK (EUROPE) Service Repair Manual
YALE F818 GLC45VX LIFT TRUCK (EUROPE) Service Repair Manualyjekmmd jksmefjmm
 
Massey Ferguson MF 8130 Tractor Service Repair Manual
Massey Ferguson MF 8130 Tractor Service Repair ManualMassey Ferguson MF 8130 Tractor Service Repair Manual
Massey Ferguson MF 8130 Tractor Service Repair Manualyjekmmd jksmefjmm
 
Massey Ferguson MF 690 Tractor Service Repair Manual
Massey Ferguson MF 690 Tractor Service Repair ManualMassey Ferguson MF 690 Tractor Service Repair Manual
Massey Ferguson MF 690 Tractor Service Repair Manualyjekmmd jksmefjmm
 
2007 Artic Cat 500cc 2-Stroke Snowmobile Service Repair Manual
2007 Artic Cat 500cc 2-Stroke Snowmobile Service Repair Manual2007 Artic Cat 500cc 2-Stroke Snowmobile Service Repair Manual
2007 Artic Cat 500cc 2-Stroke Snowmobile Service Repair Manualyjekmmd jksmefjmm
 
2007 Arctic Cat 400 DVX ATV Service Repair Manual
2007 Arctic Cat 400 DVX ATV Service Repair Manual2007 Arctic Cat 400 DVX ATV Service Repair Manual
2007 Arctic Cat 400 DVX ATV Service Repair Manualyjekmmd jksmefjmm
 
2005 YAMAHA RS90R SNOWMOBILE Service Repair Manual
2005 YAMAHA RS90R SNOWMOBILE Service Repair Manual2005 YAMAHA RS90R SNOWMOBILE Service Repair Manual
2005 YAMAHA RS90R SNOWMOBILE Service Repair Manualyjekmmd jksmefjmm
 
1966 Ford 5500 Tractor Service Repair Manual
1966 Ford 5500 Tractor Service Repair Manual1966 Ford 5500 Tractor Service Repair Manual
1966 Ford 5500 Tractor Service Repair Manualyjekmmd jksmefjmm
 

More from yjekmmd jksmefjmm (9)

YALE G807 ERP16VT LIFT TRUCK (EUROPE) Service Repair Manual
YALE G807 ERP16VT LIFT TRUCK (EUROPE) Service Repair ManualYALE G807 ERP16VT LIFT TRUCK (EUROPE) Service Repair Manual
YALE G807 ERP16VT LIFT TRUCK (EUROPE) Service Repair Manual
 
YALE F879 GDC70VX LIFT TRUCK (EUROPE) Service Repair Manual
YALE F879 GDC70VX LIFT TRUCK (EUROPE) Service Repair ManualYALE F879 GDC70VX LIFT TRUCK (EUROPE) Service Repair Manual
YALE F879 GDC70VX LIFT TRUCK (EUROPE) Service Repair Manual
 
YALE F818 GLC45VX LIFT TRUCK (EUROPE) Service Repair Manual
YALE F818 GLC45VX LIFT TRUCK (EUROPE) Service Repair ManualYALE F818 GLC45VX LIFT TRUCK (EUROPE) Service Repair Manual
YALE F818 GLC45VX LIFT TRUCK (EUROPE) Service Repair Manual
 
Massey Ferguson MF 8130 Tractor Service Repair Manual
Massey Ferguson MF 8130 Tractor Service Repair ManualMassey Ferguson MF 8130 Tractor Service Repair Manual
Massey Ferguson MF 8130 Tractor Service Repair Manual
 
Massey Ferguson MF 690 Tractor Service Repair Manual
Massey Ferguson MF 690 Tractor Service Repair ManualMassey Ferguson MF 690 Tractor Service Repair Manual
Massey Ferguson MF 690 Tractor Service Repair Manual
 
2007 Artic Cat 500cc 2-Stroke Snowmobile Service Repair Manual
2007 Artic Cat 500cc 2-Stroke Snowmobile Service Repair Manual2007 Artic Cat 500cc 2-Stroke Snowmobile Service Repair Manual
2007 Artic Cat 500cc 2-Stroke Snowmobile Service Repair Manual
 
2007 Arctic Cat 400 DVX ATV Service Repair Manual
2007 Arctic Cat 400 DVX ATV Service Repair Manual2007 Arctic Cat 400 DVX ATV Service Repair Manual
2007 Arctic Cat 400 DVX ATV Service Repair Manual
 
2005 YAMAHA RS90R SNOWMOBILE Service Repair Manual
2005 YAMAHA RS90R SNOWMOBILE Service Repair Manual2005 YAMAHA RS90R SNOWMOBILE Service Repair Manual
2005 YAMAHA RS90R SNOWMOBILE Service Repair Manual
 
1966 Ford 5500 Tractor Service Repair Manual
1966 Ford 5500 Tractor Service Repair Manual1966 Ford 5500 Tractor Service Repair Manual
1966 Ford 5500 Tractor Service Repair Manual
 

Recently uploaded

GREEN VEHICLES the kids picture show 2024
GREEN VEHICLES the kids picture show 2024GREEN VEHICLES the kids picture show 2024
GREEN VEHICLES the kids picture show 2024AHOhOops1
 
UNIT-III-TRANSMISSION SYSTEMS REAR AXLES
UNIT-III-TRANSMISSION SYSTEMS REAR AXLESUNIT-III-TRANSMISSION SYSTEMS REAR AXLES
UNIT-III-TRANSMISSION SYSTEMS REAR AXLESDineshKumar4165
 
call girls in G.T.B. Nagar (DELHI) 🔝 >༒9953330565🔝 genuine Escort Service 🔝✔️✔️
call girls in  G.T.B. Nagar (DELHI) 🔝 >༒9953330565🔝 genuine Escort Service 🔝✔️✔️call girls in  G.T.B. Nagar (DELHI) 🔝 >༒9953330565🔝 genuine Escort Service 🔝✔️✔️
call girls in G.T.B. Nagar (DELHI) 🔝 >༒9953330565🔝 genuine Escort Service 🔝✔️✔️9953056974 Low Rate Call Girls In Saket, Delhi NCR
 
UNOSAFE ELEVATOR PRIVATE LTD BANGALORE BROUCHER
UNOSAFE ELEVATOR PRIVATE LTD BANGALORE BROUCHERUNOSAFE ELEVATOR PRIVATE LTD BANGALORE BROUCHER
UNOSAFE ELEVATOR PRIVATE LTD BANGALORE BROUCHERunosafeads
 
Russian Call Girls Delhi Indirapuram {9711199171} Aarvi Gupta ✌️Independent ...
Russian  Call Girls Delhi Indirapuram {9711199171} Aarvi Gupta ✌️Independent ...Russian  Call Girls Delhi Indirapuram {9711199171} Aarvi Gupta ✌️Independent ...
Russian Call Girls Delhi Indirapuram {9711199171} Aarvi Gupta ✌️Independent ...shivangimorya083
 
Call Girls Vastrapur 7397865700 Ridhima Hire Me Full Night
Call Girls Vastrapur 7397865700 Ridhima Hire Me Full NightCall Girls Vastrapur 7397865700 Ridhima Hire Me Full Night
Call Girls Vastrapur 7397865700 Ridhima Hire Me Full Nightssuser7cb4ff
 
UNIT-II-ENGINE AUXILIARY SYSTEMS &TURBOCHARGER
UNIT-II-ENGINE AUXILIARY SYSTEMS &TURBOCHARGERUNIT-II-ENGINE AUXILIARY SYSTEMS &TURBOCHARGER
UNIT-II-ENGINE AUXILIARY SYSTEMS &TURBOCHARGERDineshKumar4165
 
2024 WRC Hyundai World Rally Team’s i20 N Rally1 Hybrid
2024 WRC Hyundai World Rally Team’s i20 N Rally1 Hybrid2024 WRC Hyundai World Rally Team’s i20 N Rally1 Hybrid
2024 WRC Hyundai World Rally Team’s i20 N Rally1 HybridHyundai Motor Group
 
FULL ENJOY - 9953040155 Call Girls in Sector 61 | Noida
FULL ENJOY - 9953040155 Call Girls in Sector 61 | NoidaFULL ENJOY - 9953040155 Call Girls in Sector 61 | Noida
FULL ENJOY - 9953040155 Call Girls in Sector 61 | NoidaMalviyaNagarCallGirl
 
办理学位证(MLU文凭证书)哈勒 维滕贝格大学毕业证成绩单原版一模一样
办理学位证(MLU文凭证书)哈勒 维滕贝格大学毕业证成绩单原版一模一样办理学位证(MLU文凭证书)哈勒 维滕贝格大学毕业证成绩单原版一模一样
办理学位证(MLU文凭证书)哈勒 维滕贝格大学毕业证成绩单原版一模一样umasea
 
꧁༒☬ 7042364481 (Call Girl) In Dwarka Delhi Escort Service In Delhi Ncr☬༒꧂
꧁༒☬ 7042364481 (Call Girl) In Dwarka Delhi Escort Service In Delhi Ncr☬༒꧂꧁༒☬ 7042364481 (Call Girl) In Dwarka Delhi Escort Service In Delhi Ncr☬༒꧂
꧁༒☬ 7042364481 (Call Girl) In Dwarka Delhi Escort Service In Delhi Ncr☬༒꧂Hot Call Girls In Sector 58 (Noida)
 
办理埃默里大学毕业证Emory毕业证原版一比一
办理埃默里大学毕业证Emory毕业证原版一比一办理埃默里大学毕业证Emory毕业证原版一比一
办理埃默里大学毕业证Emory毕业证原版一比一mkfnjj
 
如何办理(Flinders毕业证)查理斯特大学毕业证毕业证成绩单原版一比一
如何办理(Flinders毕业证)查理斯特大学毕业证毕业证成绩单原版一比一如何办理(Flinders毕业证)查理斯特大学毕业证毕业证成绩单原版一比一
如何办理(Flinders毕业证)查理斯特大学毕业证毕业证成绩单原版一比一ypfy7p5ld
 
Call Girls in Karachi | +923081633338 | Karachi Call Girls
Call Girls in Karachi  | +923081633338 | Karachi Call GirlsCall Girls in Karachi  | +923081633338 | Karachi Call Girls
Call Girls in Karachi | +923081633338 | Karachi Call GirlsAyesha Khan
 
办理(PITT毕业证书)美国匹兹堡大学毕业证成绩单原版一比一
办理(PITT毕业证书)美国匹兹堡大学毕业证成绩单原版一比一办理(PITT毕业证书)美国匹兹堡大学毕业证成绩单原版一比一
办理(PITT毕业证书)美国匹兹堡大学毕业证成绩单原版一比一F La
 
如何办理(UQ毕业证书)昆士兰大学毕业证毕业证成绩单原版一比一
如何办理(UQ毕业证书)昆士兰大学毕业证毕业证成绩单原版一比一如何办理(UQ毕业证书)昆士兰大学毕业证毕业证成绩单原版一比一
如何办理(UQ毕业证书)昆士兰大学毕业证毕业证成绩单原版一比一hnfusn
 
(办理学位证)(Toledo毕业证)托莱多大学毕业证成绩单修改留信学历认证原版一模一样
(办理学位证)(Toledo毕业证)托莱多大学毕业证成绩单修改留信学历认证原版一模一样(办理学位证)(Toledo毕业证)托莱多大学毕业证成绩单修改留信学历认证原版一模一样
(办理学位证)(Toledo毕业证)托莱多大学毕业证成绩单修改留信学历认证原版一模一样gfghbihg
 
如何办理(UC毕业证书)堪培拉大学毕业证毕业证成绩单原版一比一
如何办理(UC毕业证书)堪培拉大学毕业证毕业证成绩单原版一比一如何办理(UC毕业证书)堪培拉大学毕业证毕业证成绩单原版一比一
如何办理(UC毕业证书)堪培拉大学毕业证毕业证成绩单原版一比一fjjwgk
 
What Causes DPF Failure In VW Golf Cars & How Can They Be Prevented
What Causes DPF Failure In VW Golf Cars & How Can They Be PreventedWhat Causes DPF Failure In VW Golf Cars & How Can They Be Prevented
What Causes DPF Failure In VW Golf Cars & How Can They Be PreventedAutobahn Automotive Service
 
定制(Plymouth文凭证书)普利茅斯大学毕业证毕业证成绩单学历认证原版一比一
定制(Plymouth文凭证书)普利茅斯大学毕业证毕业证成绩单学历认证原版一比一定制(Plymouth文凭证书)普利茅斯大学毕业证毕业证成绩单学历认证原版一比一
定制(Plymouth文凭证书)普利茅斯大学毕业证毕业证成绩单学历认证原版一比一fhhkjh
 

Recently uploaded (20)

GREEN VEHICLES the kids picture show 2024
GREEN VEHICLES the kids picture show 2024GREEN VEHICLES the kids picture show 2024
GREEN VEHICLES the kids picture show 2024
 
UNIT-III-TRANSMISSION SYSTEMS REAR AXLES
UNIT-III-TRANSMISSION SYSTEMS REAR AXLESUNIT-III-TRANSMISSION SYSTEMS REAR AXLES
UNIT-III-TRANSMISSION SYSTEMS REAR AXLES
 
call girls in G.T.B. Nagar (DELHI) 🔝 >༒9953330565🔝 genuine Escort Service 🔝✔️✔️
call girls in  G.T.B. Nagar (DELHI) 🔝 >༒9953330565🔝 genuine Escort Service 🔝✔️✔️call girls in  G.T.B. Nagar (DELHI) 🔝 >༒9953330565🔝 genuine Escort Service 🔝✔️✔️
call girls in G.T.B. Nagar (DELHI) 🔝 >༒9953330565🔝 genuine Escort Service 🔝✔️✔️
 
UNOSAFE ELEVATOR PRIVATE LTD BANGALORE BROUCHER
UNOSAFE ELEVATOR PRIVATE LTD BANGALORE BROUCHERUNOSAFE ELEVATOR PRIVATE LTD BANGALORE BROUCHER
UNOSAFE ELEVATOR PRIVATE LTD BANGALORE BROUCHER
 
Russian Call Girls Delhi Indirapuram {9711199171} Aarvi Gupta ✌️Independent ...
Russian  Call Girls Delhi Indirapuram {9711199171} Aarvi Gupta ✌️Independent ...Russian  Call Girls Delhi Indirapuram {9711199171} Aarvi Gupta ✌️Independent ...
Russian Call Girls Delhi Indirapuram {9711199171} Aarvi Gupta ✌️Independent ...
 
Call Girls Vastrapur 7397865700 Ridhima Hire Me Full Night
Call Girls Vastrapur 7397865700 Ridhima Hire Me Full NightCall Girls Vastrapur 7397865700 Ridhima Hire Me Full Night
Call Girls Vastrapur 7397865700 Ridhima Hire Me Full Night
 
UNIT-II-ENGINE AUXILIARY SYSTEMS &TURBOCHARGER
UNIT-II-ENGINE AUXILIARY SYSTEMS &TURBOCHARGERUNIT-II-ENGINE AUXILIARY SYSTEMS &TURBOCHARGER
UNIT-II-ENGINE AUXILIARY SYSTEMS &TURBOCHARGER
 
2024 WRC Hyundai World Rally Team’s i20 N Rally1 Hybrid
2024 WRC Hyundai World Rally Team’s i20 N Rally1 Hybrid2024 WRC Hyundai World Rally Team’s i20 N Rally1 Hybrid
2024 WRC Hyundai World Rally Team’s i20 N Rally1 Hybrid
 
FULL ENJOY - 9953040155 Call Girls in Sector 61 | Noida
FULL ENJOY - 9953040155 Call Girls in Sector 61 | NoidaFULL ENJOY - 9953040155 Call Girls in Sector 61 | Noida
FULL ENJOY - 9953040155 Call Girls in Sector 61 | Noida
 
办理学位证(MLU文凭证书)哈勒 维滕贝格大学毕业证成绩单原版一模一样
办理学位证(MLU文凭证书)哈勒 维滕贝格大学毕业证成绩单原版一模一样办理学位证(MLU文凭证书)哈勒 维滕贝格大学毕业证成绩单原版一模一样
办理学位证(MLU文凭证书)哈勒 维滕贝格大学毕业证成绩单原版一模一样
 
꧁༒☬ 7042364481 (Call Girl) In Dwarka Delhi Escort Service In Delhi Ncr☬༒꧂
꧁༒☬ 7042364481 (Call Girl) In Dwarka Delhi Escort Service In Delhi Ncr☬༒꧂꧁༒☬ 7042364481 (Call Girl) In Dwarka Delhi Escort Service In Delhi Ncr☬༒꧂
꧁༒☬ 7042364481 (Call Girl) In Dwarka Delhi Escort Service In Delhi Ncr☬༒꧂
 
办理埃默里大学毕业证Emory毕业证原版一比一
办理埃默里大学毕业证Emory毕业证原版一比一办理埃默里大学毕业证Emory毕业证原版一比一
办理埃默里大学毕业证Emory毕业证原版一比一
 
如何办理(Flinders毕业证)查理斯特大学毕业证毕业证成绩单原版一比一
如何办理(Flinders毕业证)查理斯特大学毕业证毕业证成绩单原版一比一如何办理(Flinders毕业证)查理斯特大学毕业证毕业证成绩单原版一比一
如何办理(Flinders毕业证)查理斯特大学毕业证毕业证成绩单原版一比一
 
Call Girls in Karachi | +923081633338 | Karachi Call Girls
Call Girls in Karachi  | +923081633338 | Karachi Call GirlsCall Girls in Karachi  | +923081633338 | Karachi Call Girls
Call Girls in Karachi | +923081633338 | Karachi Call Girls
 
办理(PITT毕业证书)美国匹兹堡大学毕业证成绩单原版一比一
办理(PITT毕业证书)美国匹兹堡大学毕业证成绩单原版一比一办理(PITT毕业证书)美国匹兹堡大学毕业证成绩单原版一比一
办理(PITT毕业证书)美国匹兹堡大学毕业证成绩单原版一比一
 
如何办理(UQ毕业证书)昆士兰大学毕业证毕业证成绩单原版一比一
如何办理(UQ毕业证书)昆士兰大学毕业证毕业证成绩单原版一比一如何办理(UQ毕业证书)昆士兰大学毕业证毕业证成绩单原版一比一
如何办理(UQ毕业证书)昆士兰大学毕业证毕业证成绩单原版一比一
 
(办理学位证)(Toledo毕业证)托莱多大学毕业证成绩单修改留信学历认证原版一模一样
(办理学位证)(Toledo毕业证)托莱多大学毕业证成绩单修改留信学历认证原版一模一样(办理学位证)(Toledo毕业证)托莱多大学毕业证成绩单修改留信学历认证原版一模一样
(办理学位证)(Toledo毕业证)托莱多大学毕业证成绩单修改留信学历认证原版一模一样
 
如何办理(UC毕业证书)堪培拉大学毕业证毕业证成绩单原版一比一
如何办理(UC毕业证书)堪培拉大学毕业证毕业证成绩单原版一比一如何办理(UC毕业证书)堪培拉大学毕业证毕业证成绩单原版一比一
如何办理(UC毕业证书)堪培拉大学毕业证毕业证成绩单原版一比一
 
What Causes DPF Failure In VW Golf Cars & How Can They Be Prevented
What Causes DPF Failure In VW Golf Cars & How Can They Be PreventedWhat Causes DPF Failure In VW Golf Cars & How Can They Be Prevented
What Causes DPF Failure In VW Golf Cars & How Can They Be Prevented
 
定制(Plymouth文凭证书)普利茅斯大学毕业证毕业证成绩单学历认证原版一比一
定制(Plymouth文凭证书)普利茅斯大学毕业证毕业证成绩单学历认证原版一比一定制(Plymouth文凭证书)普利茅斯大学毕业证毕业证成绩单学历认证原版一比一
定制(Plymouth文凭证书)普利茅斯大学毕业证毕业证成绩单学历认证原版一比一
 

YALE E879 GDC60VX LIFT TRUCK Service Repair Manual

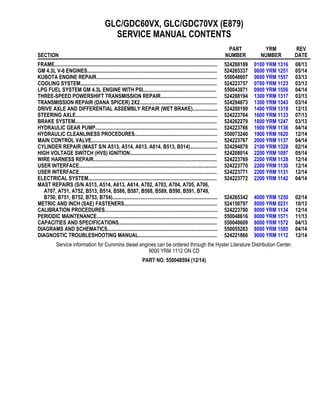
  • 1. GLC/GDC60VX, GLC/GDC70VX (E879) SERVICE MANUAL CONTENTS SECTION PART NUMBER YRM NUMBER REV DATE FRAME............................................................................................................................ 524288189 0100 YRM 1316 08/13 GM 4.3L V-6 ENGINES................................................................................................... 524265337 0600 YRM 1251 05/14 KUBOTA ENGINE REPAIR............................................................................................ 550048607 0600 YRM 1557 03/13 COOLING SYSTEM........................................................................................................ 524223757 0700 YRM 1123 03/13 LPG FUEL SYSTEM GM 4.3L ENGINE WITH PSI........................................................ 550043871 0900 YRM 1556 04/14 THREE-SPEED POWERSHIFT TRANSMISSION REPAIR........................................... 524288194 1300 YRM 1317 03/13 TRANSMISSION REPAIR (DANA SPICER) 2X2........................................................... 524294873 1300 YRM 1343 03/14 DRIVE AXLE AND DIFFERENTIAL ASSEMBLY REPAIR (WET BRAKE)................... 524288199 1400 YRM 1318 12/13 STEERING AXLE............................................................................................................ 524223764 1600 YRM 1133 07/13 BRAKE SYSTEM............................................................................................................ 524262279 1800 YRM 1247 03/13 HYDRAULIC GEAR PUMP............................................................................................. 524223766 1900 YRM 1136 04/14 HYDRAULIC CLEANLINESS PROCEDURES............................................................... 550073240 1900 YRM 1620 12/14 MAIN CONTROL VALVE................................................................................................ 524223767 2000 YRM 1137 04/14 CYLINDER REPAIR (MAST S/N A513, A514, A613, A614, B513, B514)..................... 524294878 2100 YRM 1328 02/14 HIGH VOLTAGE SWITCH (HVS) IGNITION.................................................................. 524208014 2200 YRM 1097 05/14 WIRE HARNESS REPAIR.............................................................................................. 524223769 2200 YRM 1128 12/14 USER INTERFACE......................................................................................................... 524223770 2200 YRM 1130 12/14 USER INTERFACE......................................................................................................... 524223771 2200 YRM 1131 12/14 ELECTRICAL SYSTEM.................................................................................................. 524223772 2200 YRM 1142 04/14 MAST REPAIRS (S/N A513, A514, A613, A614, A702, A703, A704, A705, A706, A707, A751, A752, B513, B514, B586, B587, B588, B589, B590, B591, B749, B750, B751, B752, B753, B754)................................................................................ 524265342 4000 YRM 1250 02/14 METRIC AND INCH (SAE) FASTENERS....................................................................... 524150797 8000 YRM 0231 10/13 CALIBRATION PROCEDURES...................................................................................... 524223780 8000 YRM 1134 12/14 PERIODIC MAINTENANCE............................................................................................ 550048616 8000 YRM 1571 11/13 CAPACITIES AND SPECIFICATIONS........................................................................... 550048609 8000 YRM 1572 04/13 DIAGRAMS AND SCHEMATICS.................................................................................... 550055283 8000 YRM 1585 04/14 DIAGNOSTIC TROUBLESHOOTING MANUAL............................................................ 524221866 9000 YRM 1112 12/14 Service information for Cummins diesel engines can be ordered through the Hyster Literature Distribution Center. 9000 YRM 1112 ON CD PART NO. 550048594 (12/14)
  • 2. General This section contains repair procedures for tilt cylinders, main lift cylinder, and free-lift cylinders. The number and the design of the parts can be different, but the operation of the cylinders is the same. Safety Procedures When Working Near Mast The following procedures MUST be used when in- specting or working near the mast. Additional precau- tions and procedures can be required when repairing or removing the mast. WARNING Mast parts are heavy and can move. Distances be- tween parts are small. Serious injury or death can result if part of the body is hit by parts of the mast or the carriage. • Never put any part of the body into or under the mast or carriage unless all parts are completely lowered or a safety chain is in- stalled. Also make sure that the power is OFF and the key is removed. Put a DO NOT OPERATE tag in the operator's compart- ment. Disconnect the battery and put a tag or lock on the battery connector. • Be careful of the forks. When the mast is raised, the forks can be at a height to cause an injury. • DO NOT climb on the mast or lift truck at any time. Use a ladder or personnel lift to work on the mast. • DO NOT use blocks to support the mast weldments nor to restrain their movement. • Mast repairs require disassembly and re- moval of parts and can require removal of the mast or carriage. Follow the repair pro- cedures in this section. WHEN WORKING NEAR THE MAST ALWAYS: • Lower the mast and carriage completely. Push the lift/lower control lever forward and make sure there is no movement in the mast. Make sure that all parts of the mast that move are fully lowered. OR • If parts of the mast must be in a raised posi- tion, install a safety chain to restrain the moving parts of the mast. Connect moving parts to a part that does not move. Follow these procedures: 1. Put mast in vertical position. 2. Raise mast to align bottom crossmember of weld- ment that moves in outer weldment with cross- member on outer weldment. On the two-stage and free-lift mast, the moving part is the inner weldment. On the three-stage mast, it is the inter- mediate weldment. On the four-stage mast, it is the first intermediate weldment. See Figure 1. 3. Use a 3/8-inch minimum safety chain with a hook to fasten the crossmembers together so the mov- able member cannot lower. Put hook on back side of mast. Make sure hook is completely engaged with a link in the chain. Make sure safety chain does not touch lift chains or chain sheaves, tubes, hoses, fittings, or other parts on the mast. 4. Lower mast until there is tension in safety chain and free-lift cylinder (two-stage full free-lift, three- stage, and four-stage) is completely retracted. If running, turn the power OFF. Apply the parking brake. Install a DO NOT REMOVE tag on the safety chain(s). 5. Install another safety chain (3/8-in. minimum) be- tween the top or bottom crossmember of the car- riage bar and a crossmember on the outer weld- ment. 6. After lowering or restraining the mast, shut off the power, and remove key. NOTE: Place a DO NOT OPERATE tag in the opera- tor's compartment. 7. Disconnect battery and put a tag or lock on bat- tery connector. 2100 YRM 1328 General 1
  • 3. A. TWO-STAGE LFL MAST B. TWO-STAGE FFL MAST C. THREE-STAGE FFL MAST D. FOUR-STAGE FFL MAST 1. OUTER WELDMENT 2. INNER WELDMENT 3. INTERMEDIATE WELDMENT 4. HOOK 5. FREE-LIFT CYLINDER 6. CARRIAGE BAR 7. CROSSMEMBER 8. FIRST INTERMEDIATE WELDMENT Figure 1. Two-Stage LFL, Two-Stage FFL, Three-Stage FFL, and Four-Stage FFL Masts Safety Procedures When Working Near Mast 2100 YRM 1328 2
  • 4. Tilt Cylinder Repair REMOVE WARNING Before removing the tilt cylinder(s), tilt the mast forward. Use a chain to hold the mast to the frame and prevent the mast from moving forward or backwards. WARNING DO NOT push the tilt pins out of the rod end with your fingers. DO NOT permit the tilt cylinders to drop and cause damage. NOTE: Insure that the parking brake is applied be- fore starting the procedure below. NOTE: Perform Step 1 and Step 2 if mast is installed on the lift truck. 1. At the mast end mount, remove the capscrew and anchor pin from the tilt pin. Using a brass drift or similar tool, push the tilt pin out of the rod end. Remove lube fitting from tilt pin. See Figure 2 for lift truck models • GLP/GDP60VX, GLP/GDP70VX (GP/GLP/ GDP135VX, GP/GLP/GDP155VX) (C878, D878, E878) • GLC/GDC60VX, GLC/GDC70VX (GC/GLC/ GDC135VX, GC/GLC/GDC155VX) (C879, D879, E879, F879) See Figure 3 for lift truck model • GLP/GDP80VX, GLP/GDP80VX9, GLP/ GDP90VX (GLP/GDP170VX, GLP/ GDP175VX36, GLP/GDP190VX) (A909, B909) 2. Stroke cylinder to the full back tilt position. 3. Remove floor mats, floor plates and side covers to access the frame end mount of tilt cylinder. See Side Covers Remove procedures in Frame 0100YRM1321 for lift truck models • GLP/GDP60VX, GLP/GDP70VX (GP/GLP/ GDP135VX, GP/GLP/GDP155VX) (C878, D878) • GLP/GDP80VX, GLP/GDP80VX9, GLP/ GDP90VX (GLP/GDP170VX, GLP/ GDP175VX36, GLP/GDP190VX) (A909) Frame 0100YRM1316 for lift truck models • GLC/GDC60VX, GLC/GDC70VX, (GC/GLC/ GDC135VX, GC/GLC/GDC155VX) (C879, D879, E879, F879) Frame 0100YRM1581 for lift truck models • GLP/GDP60VX, GLP/GDP70VX (GP/GLP/ GDP135VX, GP/GLP/GDP155VX) (E878) • GLP/GDP80VX, GLP/GDP80VX9, GLP/ GDP90VX (GLP/GDP170VX, GLP/ GDP175VX36, GLP/GDP190VX) (B909) 4. Disconnect the hydraulic lines at the cylinder hose ports. Install caps on the hydraulic lines and in the cylinder hose ports. See Figure 2 for lift truck models • GLP/GDP60VX, GLP/GDP70VX (GP/GLP/ GDP135VX, GP/GLP/GDP155VX) (C878, D878, E878) • GLC/GDC60VX, GLC/GDC70VX (GC/GLC/ GDC135VX, GC/GLC/GDC155VX) (C879, D879, E879, F879) See Figure 3 for lift truck model • GLP/GDP80VX, GLP/GDP80VX9, GLP/ GDP90VX (GLP/GDP170VX, GLP/ GDP175VX36, GLP/GDP190VX) (A909, B909) 5. Use a lifting device to support tilt cylinders. At frame end mount, remove capscrew, washer, and anchor pin from the tilt pin. Using a brass drift or similar tool, push the tilt pin out to the bushing and frame end mount. Remove lube fitting from tilt pin. See Figure 2 for lift truck models • GLP/GDP60VX, GLP/GDP70VX (GP/GLP/ GDP135VX, GP/GLP/GDP155VX) (C878, D878, E878) • GLC/GDC60VX, GLC/GDC70VX (GC/GLC/ GDC135VX, GC/GLC/GDC155VX) (C879, D879, E879, F879) 2100 YRM 1328 Tilt Cylinder Repair 3
  • 5. Figure 2. Tilt Cylinder Installation for Lift Truck Models GLP/GDP60VX, GLP/GDP70VX (GP/GLP/ GDP135VX, GP/GLP/GDP155VX) (C878, D878, E878) and GLC/GDC60VX, GLC/GDC70VX (GC/GLC/ GDC135VX, GC/GLC/GDC155VX) (C879, D879, E879, F879) Tilt Cylinder Repair 2100 YRM 1328 4
  • 6. Legend for Figure 2 NOTE: HYDRAULIC HOSES ARE SHOWN DISCONNECTED FOR CLARITY. A. GLC/GDC60VX, GLC/GDC70VX (GC/GLC/ GDC135VX, GC/GLC/GDC155VX) (C879, D879, E879, F879) B. GLP/GDP60VX, GLP/GDP70VX (GP/GLP/ GDP135VX, GP/GLP/GDP155VX) (C878, D878, E878) 1. CAPSCREW 2. LOCK NUT 3. ANCHOR PIN 4. TILT PIN 5. FRAME END MOUNT 6. MAST END MOUNT 7. CYLINDER HOSE PORTS 8. ROD END 9. LUBE FITTINGS 10. WASHER See Figure 3 for lift truck model • GLP/GDP80VX, GLP/GDP80VX9, GLP/ GDP90VX (GLP/GDP170VX, GLP/ GDP175VX36, GLP/GDP190VX) (A909, B909) 6. Using a lifting device, remove the tilt cylinder from the lift truck. 7. Repeat Step 1 through Step 6 for the opposite tilt cylinder. DISASSEMBLE NOTE: Perform only those steps below required to repair the tilt cylinder. NOTE: Perform Step 1 for lift truck models: • GLP/GDP60VX, GLP/GDP70VX (GP/GLP/ GDP135VX, GP/GLP/GDP155VX) (C878, D878, E878) • GLC/GDC60VX, GLC/GDC70VX (GC/GLC/ GDC135VX, GC/GLC/GDC155VX) (C879, D879, E879, F879) NOTE: Note the position of the rod end and number of turns used to remove the rod end. 1. Place the tilt cylinder in a soft jaw vise. Remove capscrew, lock nut, and washer securing rod end to rod. See Figure 2. NOTE: Perform Step 2 for lift truck model GLP/ GDP80VX, GLP/GDP80VX9, GLP/GDP90VX (GLP/ GDP170VX, GLP/GDP175VX36, GLP/GDP190VX) (A909, B909). NOTE: Note the position of the rod end and number of turns used to remove the rod end. 2. Place the tilt cylinder in a soft jaw vise. Remove hex nut, washer, capscrew and rod end from rod. See Figure 3. 3. Using a pin-type spanner wrench, remove the gland from the tilt cylinder shell. Remove the rod and piston assembly from the cylinder shell. See Figure 4 for lift truck models • GLP/GDP60VX, GLP/GDP70VX (GP/GLP/ GDP135VX, GP/GLP/GDP155VX) (C878, D878, E878) • GLC/GDC60VX, GLC/GDC70VX (GC/GLC/ GDC135VX, GC/GLC/GDC155VX) (C879, D879, E879, F879) See Figure 5 for lift truck model • GLP/GDP80VX, GLP/GDP80VX9, GLP/ GDP90VX (GLP/GDP170VX, GLP/ GDP175VX36, GLP/GDP190VX) (A909, B909) NOTE: To prevent damage to sealing surfaces, use brass tools when removing seals and O-rings. NOTE: Perform Step 4 for lift truck models • GLP/GDP60VX, GLP/GDP70VX (GP/GLP/ GDP135VX, GP/GLP/GDP155VX) (C878, D878, E878) • GLC/GDC60VX, GLC/GDC70VX (GC/GLC/ GDC135VX, GC/GLC/GDC155VX) (C879, D879, E879, F879) 4. Remove and discard the O-ring, backup ring, seal, and wiper ring from the gland. See Figure 4. 2100 YRM 1328 Tilt Cylinder Repair 5
  • 7. Figure 3. Tilt Cylinder Installation for Lift Truck Model GLP/GDP80VX, GLP/GDP80VX9, GLP/GDP90VX (GLP/GDP170VX, GLP/GDP175VX36, GLP/GDP190VX) (A909, B909) Tilt Cylinder Repair 2100 YRM 1328 6
  • 8. Legend for Figure 3 A. OUTER VIEW B. INNER VIEW 1. TILT PIN 2. CAPSCREW 3. WASHER 4. ANCHOR PIN 5. CYLINDER HOSE PORT 6. FRAME END MOUNT 7. MAST END MOUNT 8. ROD END 9. LUBE FITTING 10. HEX NUT NOTE: Perform Step 5 for lift truck model GLP/ GDP80VX, GLP/GDP80VX9, GLP/GDP90VX (GLP/ GDP170VX, GLP/GDP175VX36, GLP/GDP190VX) (A909, B909). 5. Remove and discard the rod wiper, O-rings, rod seal, and backup ring from the gland. See Fig- ure 5. NOTE: Perform Step 6 only if the piston or rod has been damaged. 6. Place the rod in a soft-jaw vise and remove lock nut and piston from the rod. See Figure 4 for lift truck models • GLP/GDP60VX, GLP/GDP70VX (GP/GLP/ GDP135VX, GP/GLP/GDP155VX) (C878, D878, E878) • GLC/GDC60VX, GLC/GDC70VX (GC/GLC/ GDC135VX, GC/GLC/GDC155VX) (C879, D879, E879, F879) See Figure 5 for lift truck model • GLP/GDP80VX, GLP/GDP80VX9, GLP/ GDP90VX (GLP/GDP170VX, GLP/ GDP175VX36, GLP/GDP190VX) (A909, B909) 7. Remove O-ring, and if equipped tilt spacer from rod. Discard O-ring. See Figure 4 for lift truck models • GLP/GDP60VX, GLP/GDP70VX (GP/GLP/ GDP135VX, GP/GLP/GDP155VX) (C878, D878, E878) • GLC/GDC60VX, GLC/GDC70VX (GC/GLC/ GDC135VX, GC/GLC/GDC155VX) (C879, D879, E879, F879) See Figure 5 for lift truck model • GLP/GDP80VX, GLP/GDP80VX9, GLP/ GDP90VX (GLP/GDP170VX, GLP/ GDP175VX36, GLP/GDP190VX) (A909, B909) 8. Remove and discard the wear ring and piston seal from the piston. See Figure 4 for lift truck models • GLP/GDP60VX, GLP/GDP70VX (GP/GLP/ GDP135VX, GP/GLP/GDP155VX) (C878, D878, E878) • GLC/GDC60VX, GLC/GDC70VX (GC/GLC/ GDC135VX, GC/GLC/GDC155VX) (C879, D879, E879, F879) See Figure 5 for lift truck model • GLP/GDP80VX, GLP/GDP80VX9, GLP/ GDP90VX (GLP/GDP170VX, GLP/ GDP175VX36, GLP/GDP190VX) (A909, B909) CLEAN WARNING Cleaning solvents can be flammable and toxic and can cause skin irritation. When using cleaning solvents, always follow the solvent manufactur- er's recommended safety procedures. Compressed air can move particles so they cause injury to the user or to other personnel. Make sure the path of the compressed air is away from all personnel. Wear protective goggles or a face shield to prevent injury to the eyes. CAUTION DO NOT allow cleaning solvent to come in contact with rubber components, as it will damage those components. Clean all metal parts in solvent and dry with com- pressed air. 2100 YRM 1328 Tilt Cylinder Repair 7
  • 9. NOTE: * USED ON TILT CYLINDER 6° FORWARD/6° OR 10° BACK TILT FOR LIFT TRUCK MODELS GLC/GDC60VX, GLC/GDC70VX (GC/GLC/ GDC135VX, GC/GLC/GDC155VX) (C879, D879, E879, F879) 1. SHELL 2. GLAND 3. ROD 4. WIPER RING 5. SEAL 6. BACKUP RING 7. O-RING 8. PISTON 9. PISTON SEAL 10. LOCK NUT 11. WEAR RING 12. BUSHING 13. TILT SPACER* 14. CYLINDER HOSE PORTS Figure 4. Tilt Cylinder Assembly for Lift Truck Models GLP/GDP60VX, GLP/GDP70VX (GP/GLP/ GDP135VX, GP/GLP/GDP155VX) (C878, D878, E878) and GLC/GDC60VX, GLC/GDC70VX (GC/GLC/GDC135VX, GC/GLC/GDC155VX) (C879, D879, E879, F879) 1. SHELL 2. GLAND 3. ROD WIPER 4. O-RING 5. ROD SEAL 6. BACKUP RING 7. ROD 8. PISTON SEAL 9. WEAR RING 10. PISTON 11. LOCKNUT 12. BUSHING 13. CYLINDER HOSE PORT Figure 5. Tilt Cylinder Assembly for Lift Truck Model GLP/GDP80VX, GLP/GDP80VX9, GLP/ GDP90VX (GLP/GDP170VX, GLP/GDP175VX36, GLP/GDP190VX) (A909, B909) Tilt Cylinder Repair 2100 YRM 1328 8
  • 10. INSPECT Inspect the gland for damage to the threads and the seal surfaces. Replace the gland if damaged. Inspect the piston for any damage to the seal surfa- ces and replace if damaged. Inspect the rod for damage to the rod surface and en- sure that the rod is not bent. Replace the rod if found to be damaged. Inspect the inner surface of the cylinder shell for dam- age. If the shell is found to be damaged, replace the cylinder assembly. ASSEMBLE NOTE: To prevent damage to sealing surfaces, use brass tools when installing seals and O-rings. 1. Install a new piston seal and wear ring on the pis- ton. See Figure 4 for lift truck models • GLP/GDP60VX, GLP/GDP70VX (GP/GLP/ GDP135VX, GP/GLP/GDP155VX) (C878, D878, E878) • GLC/GDC60VX, GLC/GDC70VX (GC/GLC/ GDC135VX, GC/GLC/GDC155VX) (C879, D879, E879, F879) See Figure 5 for lift truck model • GLP/GDP80VX, GLP/GDP80VX9, GLP/ GDP90VX (GLP/GDP170VX, GLP/ GDP175VX36, GLP/GDP190VX) (A909, B909) 2. Install new O-ring, and if equipped, install tilt spacer onto rod. See Figure 4 for lift truck models • GLP/GDP60VX, GLP/GDP70VX (GP/GLP/ GDP135VX, GP/GLP/GDP155VX) (C878, D878, E878) • GLC/GDC60VX, GLC/GDC70VX (GC/GLC/ GDC135VX, GC/GLC/GDC155VX) (C879, D879, E879, F879) See Figure 5 for lift truck model • GLP/GDP80VX, GLP/GDP80VX9, GLP/ GDP90VX (GLP/GDP170VX, GLP/ GDP175VX36, GLP/GDP190VX) (A909, B909) NOTE: Perform Step 3, if the piston was removed from the rod, for lift truck models • GLP/GDP60VX, GLP/GDP70VX (GP/GLP/ GDP135VX, GP/GLP/GDP155VX) (C878, D878, E878) • GLC/GDC60VX, GLC/GDC70VX (GC/GLC/ GDC135VX, GC/GLC/GDC155VX) (C879, D879, E879, F879) 3. Place the rod in a soft-jaw vise, and install the pis- ton on the rod and tighten the lock nut to 400-440 N•m (295 to 325 lbf ft). See Figure 4. NOTE: Perform Step 4 and Step 5, if the piston was removed from the rod, for lift truck model GLP/ GDP80VX, GLP/GDP80VX9, GLP/GDP90VX (GLP/ GDP170VX, GLP/GDP175VX36, GLP/GDP190VX) (A909, B909). 4. Place the rod in a soft jaw vise and install the pis- ton onto the rod. See Figure 5. 5. Install locknut onto rod. See Figure 5. Tighten locknut to 400 to 440 N•m (295 to 325 lbf ft). NOTE: Perform Step 6 for lift truck models • GLP/GDP60VX, GLP/GDP70VX (GP/GLP/ GDP135VX, GP/GLP/GDP155VX) (C878, D878, E878) • GLC/GDC60VX, GLC/GDC70VX (GC/GLC/ GDC135VX, GC/GLC/GDC155VX) (C879, D879, E879, F879) 6. Install a new wiper ring, seal, backup ring, and O- ring onto gland. See Figure 4. NOTE: Perform Step 7 for lift truck model GLP/ GDP80VX, GLP/GDP80VX9, GLP/GDP90VX (GLP/ GDP170VX, GLP/GDP175VX36, GLP/GDP190VX) (A909, B909). 2100 YRM 1328 Tilt Cylinder Repair 9
  • 11. 7. Install new O-rings, backup ring, rod seal, and rod wiper onto gland. See Figure 5 for specific part or- der. 8. Install the rod and piston assembly in the cylinder shell. See Figure 4 for lift truck models • GLP/GDP60VX, GLP/GDP70VX (GP/GLP/ GDP135VX, GP/GLP/GDP155VX) (C878, D878, E878) • GLC/GDC60VX, GLC/GDC70VX (GC/GLC/ GDC135VX, GC/GLC/GDC155VX) (C879, D879, E879, F879) See Figure 5 for lift truck model • GLP/GDP80VX, GLP/GDP80VX9, GLP/ GDP90VX (GLP/GDP170VX, GLP/ GDP175VX36, GLP/GDP190VX) (A909, B909) NOTE: Perform Step 9 and Step 10 for lift truck mod- els • GLP/GDP60VX, GLP/GDP70VX (GP/GLP/ GDP135VX, GP/GLP/GDP155VX) (C878, D878, E878) • GLC/GDC60VX, GLC/GDC70VX (GC/GLC/ GDC135VX, GC/GLC/GDC155VX) (C879, D879, E879, F879) 9. Using a pin-type spanner wrench, install the gland in the cylinder shell. Tighten the gland to 400 to 500 N•m (295 to 370 lbf ft). See Figure 4. NOTE: Rod end to be turned and positioned as noted during disassembly. 10. Install rod end on rod. Lubricate threads on cap- screw with lubricant (Yale P/N 504234269). Install capscrew in rod end so that capscrew head is on the inboard side of rod end. Install washer and nut on capscrew. Washer and nut must be on the out- board side of rod end. Tighten nut to 90 N•m (66 lbf ft). See Figure 6. NOTE: Perform Step 11 through Step 13 for lift truck model GLP/GDP80VX, GLP/GDP80VX9, GLP/ GDP90VX (GLP/GDP170VX, GLP/GDP175VX36, GLP/GDP190VX) (A909, B909). 11. Apply two drops of Loctite® 545 or equivalent on gland threads. 12. Using a pin-type spanner wrench, install the gland onto the rod inside the shell. Tighten gland to 400 to 500 N•m (295 to 370 lbf ft). See Figure 5. NOTE: Rod end to be turned and positioned as noted during disassembly. 13. Install rod end, capscrew, washer, and hex nut onto rod. Tighten hex nut to 120 to 130 N•m (89 to 96 lbf ft). See Figure 3. 14. Repeat Step 1 through Step 13 for the opposite tilt cylinder. NOTE: LEFT TILT CYLINDER SHOWN. TILT CYLIN- DER AND MAST FOR LIFT TRUCK MODELS GLC/ GDC60VX, GLC/GDC70VX (GC/GLC/GDC135VX, GC/GLC/GDC155VX) (C879, D879, E879, F879) SHOWN. PARTS OF MAST OMITTED FOR CLARITY. A. OUTBOARD SIDE B. INBOARD SIDE 1. NUT 2. WASHER 3. ROD END 4. CAPSCREW Figure 6. Rod End Installation Tilt Cylinder Repair 2100 YRM 1328 10
  • 12. INSTALL NOTE: Lock nut should be pointed toward outside of truck, on lift truck models: • GLP/GDP60VX, GLP/GDP70VX (GP/GLP/ GDP135VX, GP/GLP/GDP155VX) (C878, D878, E878) • GLC/GDC60VX, GLC/GDC70VX (GC/GLC/ GDC135VX, GC/GLC/GDC155VX) (C879, D879, E879, F879) 1. Using a lifting device, place the tilt cylinder in mounting point on the lift truck frame end mount. See Figure 2 for lift truck models • GLP/GDP60VX, GLP/GDP70VX (GP/GLP/ GDP135VX, GP/GLP/GDP155VX) (C878, D878, E878) • GLC/GDC60VX, GLC/GDC70VX (GC/GLC/ GDC135VX, GC/GLC/GDC155VX) (C879, D879, E879, F879) See Figure 3 for lift truck model • GLP/GDP80VX, GLP/GDP80VX9, GLP/ GDP90VX (GLP/GDP170VX, GLP/ GDP175VX36, GLP/GDP190VX) (A909, B909) 2. Install the lube fitting in the tilt pin and coat the tilt pin with grease. See Figure 2 for lift truck models • GLP/GDP60VX, GLP/GDP70VX (GP/GLP/ GDP135VX, GP/GLP/GDP155VX) (C878, D878, E878) • GLC/GDC60VX, GLC/GDC70VX (GC/GLC/ GDC135VX, GC/GLC/GDC155VX) (C879, D879, E879, F879) See Figure 3 for lift truck model • GLP/GDP80VX, GLP/GDP80VX9, GLP/ GDP90VX (GLP/GDP170VX, GLP/ GDP175VX36, GLP/GDP190VX) (A909, B909) 3. Install tilt pin into rod end and frame end mount. See Figure 2 for lift truck models • GLP/GDP60VX, GLP/GDP70VX (GP/GLP/ GDP135VX, GP/GLP/GDP155VX) (C878, D878, E878) • GLC/GDC60VX, GLC/GDC70VX (GC/GLC/ GDC135VX, GC/GLC/GDC155VX) (C879, D879, E879, F879) See Figure 3 for lift truck model • GLP/GDP80VX, GLP/GDP80VX9, GLP/ GDP90VX (GLP/GDP170VX, GLP/ GDP175VX36, GLP/GDP190VX) (A909, B909) NOTE: Perform Step 4 for lift truck models: • GLP/GDP60VX, GLP/GDP70VX (GP/GLP/ GDP135VX, GP/GLP/GDP155VX) (C878, D878, E878) • GLC/GDC60VX, GLC/GDC70VX (GC/GLC/ GDC135VX, GC/GLC/GDC155VX) (C879, D879, E879, F879) NOTE: Lubricate the threads on the capscrew with packing lubricant (Yale Part No. 504234269) prior to installation. 4. Install the anchor pin and capscrew onto rod end at frame end mount. Tighten capscrew to 90 N•m (66 lbf ft). See Figure 2. NOTE: Perform Step 5 for lift truck model GLP/ GDP80VX, GLP/GDP80VX9, GLP/GDP90VX (GLP/ GDP170VX, GLP/GDP175VX36, GLP/GDP190VX) (A909, B909). NOTE: Lubricate threads on capscrew with multipur- pose grease prior to installation. 5. Install anchor pin, washer, and capscrew onto rod end at frame end mount. Tighten capscrew to 66 N•m (49 lbf ft). See Figure 3. NOTE: Perform Step 6 and Step 7 if mast is installed on lift truck. 6. At the mast end mount, place the rod end on the mounting point. See Figure 2 for lift truck models • GLP/GDP60VX, GLP/GDP70VX (GP/GLP/ GDP135VX, GP/GLP/GDP155VX) (C878, D878, E878) • GLC/GDC60VX, GLC/GDC70VX (GC/GLC/ GDC135VX, GC/GLC/GDC155VX) (C879, D879, E879, F879) 2100 YRM 1328 Tilt Cylinder Repair 11
  • 13. See Figure 3 for lift truck model • GLP/GDP80VX, GLP/GDP80VX9, GLP/ GDP90VX (GLP/GDP170VX, GLP/ GDP175VX36, GLP/GDP190VX) (A909, B909) 7. Install lube fitting in tilt pin and coat tilt pin with grease. Install tilt pin into rod end and mast end mount. See Figure 2 for lift truck models • GLP/GDP60VX, GLP/GDP70VX (GP/GLP/ GDP135VX, GP/GLP/GDP155VX) (C878, D878, E878) • GLC/GDC60VX, GLC/GDC70VX (GC/GLC/ GDC135VX, GC/GLC/GDC155VX) (C879, D879, E879, F879) See Figure 3 for lift truck model • GLP/GDP80VX, GLP/GDP80VX9, GLP/ GDP90VX (GLP/GDP170VX, GLP/ GDP175VX36, GLP/GDP190VX) (A909, B909) NOTE: Perform Step 8 for lift truck models • GLP/GDP60VX, GLP/GDP70VX (GP/GLP/ GDP135VX, GP/GLP/GDP155VX) (C878, D878, E878) • GLC/GDC60VX, GLC/GDC70VX (GC/GLC/ GDC135VX, GC/GLC/GDC155VX) (C879, D879, E879, F879) NOTE: Lubricate the threads on the capscrew with packing lubricant (Yale P/N 504234269). 8. Install anchor pin and capscrew. Tighten cap- screw to 90 N•m (66 lbf ft). See Figure 2. NOTE: Perform Step 9 for lift truck model GLP/ GDP80VX, GLP/GDP80VX9, GLP/GDP90VX (GLP/ GDP170VX, GLP/GDP175VX36, GLP/GDP190VX) (A909, B909). 9. Install washer, anchor pin, and capscrew onto rod end at mast end mount. Tighten capscrew to 95 to 100 N•m (70 to 74 lbf ft). See Figure 3. 10. Uncap and connect the hydraulic lines to the tilt cylinder hose ports. Slowly stroke the cylinder un- til the rod holes line up with the mast tilt anchor holes. 11. Repeat Step 1 through Step 10 for opposite tilt cylinder. 12. Install side covers, floor mats, and floor plates. See Side Covers Install procedures in Frame 0100YRM1321 for lift truck models • GLP/GDP60VX, GLP/GDP70VX (GP/GLP/ GDP135VX, GP/GLP/GDP155VX) (C878, D878) • GLP/GDP80VX, GLP/GDP80VX9, GLP/ GDP90VX (GLP/GDP170VX, GLP/ GDP175VX36, GLP/GDP190VX) (A909) Frame 0100YRM1316 for lift truck models • GLC/GDC60VX, GLC/GDC70VX, (GC/GLC/ GDC135VX, GC/GLC/GDC155VX) (C879, D879, E879, F879) Frame 0100YRM1581 for lift truck models • GLP/GDP60VX, GLP/GDP70VX (GP/GLP/ GDP135VX, GP/GLP/GDP155VX) (E878) • GLP/GDP80VX, GLP/GDP80VX9, GLP/ GDP90VX (GLP/GDP170VX, GLP/ GDP175VX36, GLP/GDP190VX) (B909) 13. Remove chain holding the mast to the frame. WARNING DO NOT put hands between the cylinder rod end and the mast. Serious injury can occur. 14. Operate the tilt cylinders. Check for correct opera- tion and leakage. Adjust the tilt cylinders, see Tilt Cylinders, Adjust. TILT CYLINDERS, ADJUST WARNING When the tilt cylinders have tilt limit spacers, make sure they are installed during installation procedures. Without the tilt limit spacers, the mast can tilt too much and cause an accident or serious injury. Check the tilt cylinder stroke by slowly tilting the mast fully forward and backward several times. Both tilt cyl- inders must stop their stroke at the same time. Adjust the rod ends as shown in Figure 7. There must be no twist in the mast weldments. NOTE: Tilt cylinders with 6° forward/6° or 10° back tilt for lift truck models GLC/GDC60VX, GLC/GDC70VX, (GC/GLC/GDC135VX, GC/GLC/GDC155VX) (C879, D879, E879) have internal tilt spacers. See Figure 4. Tilt Cylinder Repair 2100 YRM 1328 12
  • 14. 1. Adjust the stroke of the tilt cylinders with or with- out tilt spacers as follows (see Figure 7). a. Adjust the rod ends to: 15 mm (0.6 in.) for lift truck models • GLC/GDC60VX, GLC/GDC70VX (GC/GLC/GDC135VX, GC/GLC/ GDC155VX) (C879, D879, E879, F879) 20 mm (0.8 in.) for lift truck models • GLP/GDP60VX, GLP/GDP70VX (GP/GLP/GDP135VX, GP/GLP/ GDP155VX) (C878, D878, E878) • GLP/GDP80VX, GLP/GDP80VX9, GLP/ GDP90VX (GLP/GDP170VX, GLP/ GDP175VX36, GLP/GDP190VX) (A909, B909) b. Slowly tilt the mast backward until one cylinder rod stops. On the opposite cylinder, loosen the capscrews on the rod end. Measure the dis- tance from the end of the cylinder to the back end of the rod end. Use a wrench and turn the cylinder rod IN until the dimension starts to de- crease, then stop. Repeat this procedure until both cylinder rods stop at the same position within 1 mm (0.04 in.) for lift truck models • GLP/GDP60VX, GLP/GDP70VX (GP/GLP/GDP135VX, GP/GLP/ GDP155VX) (C878, D878, E878) • GLP/GDP80VX, GLP/GDP80VX9, GLP/ GDP90VX (GLP/GDP170VX, GLP/ GDP175VX36, GLP/GDP190VX) (A909, B909) 0.5 mm (0.02 in.) for lift truck models • GLC/GDC60VX, GLC/GDC70VX (GC/GLC/GDC135VX, GC/GLC/ GDC155VX) (C879, D879, E879, F879) c. After the adjustments are complete, tighten lock nut on the rod end to 90 N•m (66 lbf ft) for lift truck models • GLP/GDP60VX, GLP/GDP70VX (GP/GLP/GDP135VX, GP/GLP/ GDP155VX) (C878, D878, E878) • GLC/GDC60VX, GLC/GDC70VX (GC/GLC/GDC135VX, GC/GLC/ GDC155VX) (C879, D879, E879, F879) 120 to 130 N•m (89 to 96 lbf ft) for lift truck model • GLP/GDP80VX, GLP/GDP80VX9, GLP/ GDP90VX (GLP/GDP170VX, GLP/ GDP175VX36, GLP/GDP190VX) (A909, B909) d. Tilt the mast fully backward and measure the tilt angle. See the Nameplate for tilt angles. If necessary, adjust both rod ends equally for the correct angle. 1. MAST 2. ROD END 3. TILT CYLINDER 4. CAPSCREW 5. LOCK NUT Figure 7. Tilt Cylinder Adjustments 2100 YRM 1328 Tilt Cylinder Repair 13
  • 15. TILT CYLINDER LEAK CHECK WARNING Never allow anyone under a raised carriage. DO NOT put any part of your body in or through the lift mechanism unless all parts of the mast are completely lowered and the engine is STOPPED. DO NOT try to find hydraulic leaks by putting your hand on hydraulic components under pressure. Hydraulic oil can be injected into the body by the pressure. 1. Put a capacity load on the forks. Use a safety chain to hold the load to the carriage. Raise the load approximately 2.5 m (8 ft). Put the mast in a vertical position. 2. Measure the distance that the rod for tilt cylinder extends from the shell. Check the distance the rod moves after ten minutes. Multiply the rate in Table 1 by the time of the test and compare the numbers. 3. If the tilt rate is greater than the specifications, lower the mast and remove the load from the forks. Check for leaks in the hydraulic lines and fittings and install a gate valve between the port at the front of the tilt cylinder and the hydraulic line. Place a load on the forks and tilt the mast forward just past the vertical position and close the gate valve. The gate valve must be able to completely shut off the flow of hydraulic oil. If the mast contin- ues to tilt SLOWLY forward, the seals on the pis- ton are leaking. 4. If the mast does not move, open the gate valve and check the movement again. If the mast moves forward when the gate valve is open, the main control valve can be worn or damaged. Re- move the load from the forks when the checks are complete. Table 1. Movement Rates (Maximum) for Tilt Cylinders Lift Truck Model Hydraulic Oil Temperature/Mast Tilt Rate 20°C (68°F) 60°C (140°F) mm/min in./min mm/min in./min GLC/GDC60VX, GLC/GDC70VX (GC/GLC/GDC135VX, GC/GLC/GDC155VX) (C879, D879, E879, F879) 1.236 0.54 8.20 0.323 GLP/GDP60VX, GLP/GDP70VX (GP/GLP/GDP135VX, GP/GLP/GDP155VX) (C878, D878, E878) 1.303 0.51 8.65 0.323 GLP/GDP80VX, GLP/GDP80VX9, GLP/GDP90VX (GLP/ GDP170VX, GLP/GDP175VX36, GLP/GDP190VX) (A909, B909) 1.3 0.51 8.9 0.35 Tilt Cylinder Repair 2100 YRM 1328 14
  • 16. Lift Cylinder Repair REMOVE WARNING Before working on or near the mast, see Safety Procedures When Working Near Mast and Fig- ure 1. NOTE: The following procedures are for the removal of the lift cylinders with the mast installed on the lift truck. 1. Remove the carriage as described in the carriage removal procedures located in the section Mast Repairs (S/N A513, A514, A613, A614, A702, A703, A704, A705, A706, A707, A751, A752, B513, B514, B586, B587, B588, B589, B590, B591, B749, B750, B751, B752, B753, B754) 4000YRM1250 for lift truck models • GLP/GDP60VX, GLP/GDP70VX (GP/GLP/ GDP135VX, GP/GLP/GDP155VX) (C878, D878, E878) • GLC/GDC60VX, GLC/GDC70VX (GC/GLC/ GDC135VX, GC/GLC/GDC155VX) (C879, D879, E879, F879) Mast Repair (S/N A513, A514, A613, A614, A643, A644, A683, A684) 4000YRM1406 for lift truck model • GLP/GDP80VX, GLP/GDP80VX9, GLP/ GDP90VX (GLP/GDP170VX, GLP/ GDP175VX36, GLP/GDP190VX) (A909, B909) 2. On two-stage limited free-lift mast, raise the mast a few inches and attach safety chain prior to re- moving lift cylinder. a. Use safety chains to connect the bottom cross- member of the inner mast section to the top crossmember of the outer mast section. See Figure 1. Lower the mast so the safety chains hold the weight of the mast sections. 3. On full free-lift mast, raise the mast a few inches out of free-lift and attach safety chain prior to re- moving lift cylinder. a. Use safety chains to connect the bottom cross- member of the intermediate mast section to the top crossmember of the outer mast section. Use another safety chain to connect the bottom crossmember to a crossmember on the inter- mediate or outer mast section. See Figure 1. Lower the mast so the safety chains hold the weight of the mast sections. WARNING Be careful when removing or installing snap rings. These snap rings can come loose during re- moval or installation with enough force to cause an injury. Always use the correct snap ring pliers, and wear eye and face protection during removal or installation. 4. If working on a two-stage or three-stage mast, re- move the snap rings at the top of the cylinder. See Figure 8 and Figure 9 for lift truck models • GLP/GDP60VX, GLP/GDP70VX (GP/GLP/ GDP135VX, GP/GLP/GDP155VX) (C878, D878, E878) • GLC/GDC60VX, GLC/GDC70VX (GC/GLC/ GDC135VX, GC/GLC/GDC155VX) (C879, D879, E879, F879) WARNING Hydraulic oil is hot after system operation and can cause burns. DO NOT disconnect any hy- draulic hoses until the oil in the system is cool. NOTE: Tag hydraulic lines during removal to aid in installation. 5. Put a drain pan under the area of the hydraulic fit- tings. Retract the rod into the lift cylinder. Discon- nect and cap the hydraulic lines at the cylinder. See Figure 8 and Figure 9 for lift truck models • GLP/GDP60VX, GLP/GDP70VX (GP/GLP/ GDP135VX, GP/GLP/GDP155VX) (C878, D878, E878) • GLC/GDC60VX, GLC/GDC70VX (GC/GLC/ GDC135VX, GC/GLC/GDC155VX) (C879, D879, E879, F879) See Figure 10 and Figure 11 for lift truck model • GLP/GDP80VX, GLP/GDP80VX9, GLP/ GDP90VX (GLP/GDP170VX, GLP/ GDP175VX36, GLP/GDP190VX) (A909, B909) 2100 YRM 1328 Lift Cylinder Repair 15
  • 17. 1. BOLT 2. WASHER 3. SHIM 4. SNAP RING 5. LOCK NUT 6. CAPSCREWS 7. HOSE CLAMPS 8. HYDRAULIC FITTINGS 9. LOWERING CONTROL VALVE HOUSING 10. HYDRAULIC LINES 11. HEADER HOSE (FIVE FUNCTION) 12. HEADER HOSE (THREE FUNCTION) 13. HEADER HOSE (FOUR FUNCTION) 14. BRACKET 15. CYLINDER MOUNT 16. CHAIN ANCHOR 17. OUTER MAST Figure 8. Two-Stage Limited Free-Lift Mast, Cylinder Installation for Lift Truck Models GLP/GDP60VX, GLP/GDP70VX (GP/GLP/GDP135VX, GP/GLP/GDP155VX) (C878, D878, E878) and GLC/GDC60VX, GLC/ GDC70VX (GC/GLC/GDC135VX, GC/GLC/GDC155VX) (C879, D879, E879, F879) Lift Cylinder Repair 2100 YRM 1328 16
  • 18. Figure 9. Three-Stage Full Free-Lift Mast, Cylinder Installation for Lift Truck Models GLP/GDP60VX, GLP/ GDP70VX (GP/GLP/GDP135VX, GP/GLP/GDP155VX) (C878, D878, E878) and GLC/GDC60VX, GLC/ GDC70VX (GC/GLC/GDC135VX, GC/GLC/GDC155VX) (C879, D879, E879, F879) 2100 YRM 1328 Lift Cylinder Repair 17
  • 19. Legend for Figure 9 1. MAIN CYLINDER (RH) 2. FREE-LIFT CYLINDER 3. MAIN CYLINDER (LH) 4. LOCK NUT 5. SPACER 6. WASHER 7. CAPSCREW 8. HEADER HOSE (THREE FUNCTION) 9. HYDRAULIC FITTINGS 10. HEADER HOSE (FOUR FUNCTION) 11. HEADER HOSE (FIVE FUNCTION) 12. CHAIN ANCHOR 13. LOWERING CONTROL VALVE HOUSING 14. SNAP RING 15. CYLINDER MOUNT 16. HOSE CLAMPS 17. HYDRAULIC LINES 18. OUTER MAST Lift Cylinder Repair 2100 YRM 1328 18
  • 20. 1. MAST 2. CARRIAGE 3. HYDRAULIC LINE 4. HYDRAULIC FITTING 5. LIFT CYLINDER 6. HOSE CLAMP Figure 10. Two-Stage Mast, Hydraulic Lines and Fittings for Lift Truck Model GLP/GDP80VX, GLP/ GDP80VX9, GLP/GDP90VX (GLP/GDP170VX, GLP/GDP175VX36, GLP/GDP190VX) (A909, B909) 2100 YRM 1328 Lift Cylinder Repair 19
  • 21. 1. MAST 2. CARRIAGE 3. HYDRAULIC LINE 4. HYDRAULIC FITTING 5. LIFT CYLINDER 6. HOSE CLAMP 7. FREE-LIFT CYLINDER Figure 11. Three-Stage Mast, Hydraulic Lines and Fittings for Lift Truck Model GLP/GDP80VX, GLP/ GDP80VX9, GLP/GDP90VX (GLP/GDP170VX, GLP/GDP175VX36, GLP/GDP190VX) (A909, B909) Lift Cylinder Repair 2100 YRM 1328 20
  • 22. 6. Remove hose clamps securing hoses to lift cylin- der. See Figure 8 and Figure 9 for lift truck models • GLP/GDP60VX, GLP/GDP70VX (GP/GLP/ GDP135VX, GP/GLP/GDP155VX) (C878, D878, E878) • GLC/GDC60VX, GLC/GDC70VX (GC/GLC/ GDC135VX, GC/GLC/GDC155VX) (C879, D879, E879, F879) See Figure 10 and Figure 11 for lift truck model • GLP/GDP80VX, GLP/GDP80VX9, GLP/ GDP90VX (GLP/GDP170VX, GLP/ GDP175VX36, GLP/GDP190VX) (A909, B909) NOTE: Perform Step 7 and Step 8 for lift truck mod- els: • GLP/GDP60VX, GLP/GDP70VX (GP/GLP/ GDP135VX, GP/GLP/GDP155VX) (C878, D878, E878) • GLC/GDC60VX, GLC/GDC70VX (GC/GLC/ GDC135VX, GC/GLC/GDC155VX) (C879, D879, E879, F879) 7. For lift truck models equipped with a three-stage full free-lift mast, see Figure 9. a. Disconnect the main lift chain anchor and header hoses at the cylinder mount. b. Remove the lock nut, capscrew, and spacer securing the cylinder mount to the outer mast. 8. For lift truck models equipped with a two-stage limited free-lift mast, see Figure 8. a. Remove the lock nuts and bracket and discon- nect the main lift chain anchor at the cylinder mount. b. Remove the bolt, washer, and shims securing the cylinder mount to the outer mast. NOTE: Perform Step 9 and Step 10 for lift truck model GLP/GDP80VX, GLP/GDP80VX9, GLP/ GDP90VX (GLP/GDP170VX, GLP/GDP175VX36, GLP/GDP190VX) (A909, B909). 9. For lift truck models equipped with a three-stage full free lift mast, see Figure 12. a. Remove capscrews, washers, and bracket from anchor bracket. b. Remove snap ring and washer at top of lift cyl- inder. c. Remove retention screw from mast and bottom of lift cylinder. 10. For lift truck model, GLP/GDP80VX, GLP/ GDP80VX9, GLP/GDP90VX (GLP/GDP170VX, GLP/GDP175VX36, GLP/GDP190VX) (A909, B909), equipped with a two-stage limited free-lift mast, see Figure 13 and Figure 14. a. Remove anchor screw, washer, and spacer from top of lift cylinder and crossmember. b. Remove retention screw from mast and bottom of lift cylinder. 11. Using a lifting device, remove lift cylinder from mast. NOTE: Perform Step 12 for lift truck model GLP/ GDP80VX, GLP/GDP80VX9, GLP/GDP90VX (GLP/ GDP170VX, GLP/GDP175VX36, GLP/GDP190VX) (A909, B909). 12. Remove convex washer from top of lift cylinder. See Figure 15. 13. Repeat Step 4 through Step 12 for opposite lift cylinder. 2100 YRM 1328 Lift Cylinder Repair 21
  • 23. 1. MAST 2. LIFT CYLINDER 3. SNAP RING 4. WASHER 5. CONVEX WASHER 6. CAPSCREW 7. WASHER 8. BRACKET 9. ANCHOR BRACKET 10. RETENTION SCREW Figure 12. Three-Stage Full Free-Lift Mast, Cylinder Installation for Lift Truck Model GLP/GDP80VX, GLP/ GDP80VX9, GLP/GDP90VX (GLP/GDP170VX, GLP/GDP175VX36, GLP/GDP190VX) (A909, B909) Lift Cylinder Repair 2100 YRM 1328 22
  • 24. 1. LIFT CYLINDER 2. ANCHOR SCREW 3. WASHER 4. SPACER 5. CROSSMEMBER Figure 13. Two-Stage Limited Free-Lift Mast, Cylinder Installation - Top for Lift Truck Model GLP/GDP80VX, GLP/GDP80VX9, GLP/GDP90VX (GLP/GDP170VX, GLP/GDP175VX36, GLP/ GDP190VX) (A909, B909) 1. MAST 2. LIFT CYLINDER 3. RETENTION SCREW Figure 14. Two-Stage Limited Free-Lift Mast, Cylinder Installation - Bottom for Lift Truck Model GLP/GDP80VX, GLP/GDP80VX9, GLP/GDP90VX (GLP/GDP170VX, GLP/GDP175VX36, GLP/ GDP190VX) (A909, B909) 2100 YRM 1328 Lift Cylinder Repair 23
  • 25. NOTE: TWO-STAGE LIMITED FREE-LIFT MAST SHOWN. 1. MAST 2. LIFT CYLINDER 3. CONVEX WASHER Figure 15. Lift Cylinder with Convex Washer DISASSEMBLE CAUTION Carefully disassemble the main lift cylinders so the piston rods and sliding surfaces are not dam- aged. NOTE: To prevent damage to sealing surfaces, use brass tools when removing seals and O-rings. 1. Loosen gland with a spanner wrench. See Figure 16 and Figure 17 for lift truck models • GLP/GDP60VX, GLP/GDP70VX (GP/GLP/ GDP135VX, GP/GLP/GDP155VX) (C878, D878, E878) • GLC/GDC60VX, GLC/GDC70VX (GC/GLC/ GDC135VX, GC/GLC/GDC155VX) (C879, D879, E879, F879) See Figure 18 for lift truck model • GLP/GDP80VX, GLP/GDP80VX9, GLP/ GDP90VX (GLP/GDP170VX, GLP/ GDP175VX36, GLP/GDP190VX) (A909, B909) NOTE: Perform Step 2 for lift truck models • GLP/GDP60VX, GLP/GDP70VX (GP/GLP/ GDP135VX, GP/GLP/GDP155VX) (C878, D878, E878) • GLC/GDC60VX, GLC/GDC70VX (GC/GLC/ GDC135VX, GC/GLC/GDC155VX) (C879, D879, E879, F879) NOTE: Note placement of components as removed from gland during disassembly to aid in assembly. 2. Remove gland from shell. Remove and discard rod wiper, backup ring, rod seal, O-ring, and wear ring from gland. See Figure 16 and Figure 17 for lift truck models • GLP/GDP60VX, GLP/GDP70VX (GP/GLP/ GDP135VX, GP/GLP/GDP155VX) (C878, D878, E878) • GLC/GDC60VX, GLC/GDC70VX (GC/GLC/ GDC135VX, GC/GLC/GDC155VX) (C879, D879, E879, F879) NOTE: Perform Step 3 and Step 4 for lift truck model GLP/GDP80VX, GLP/GDP80VX9, GLP/GDP90VX (GLP/GDP170VX, GLP/GDP175VX36, GLP/ GDP190VX) (A909, B909). 3. Remove gland from shell. See Figure 18. 4. Remove and discard rod wiper from gland. See Figure 18. 5. Remove rod and piston assembly from shell. Drain hydraulic oil into container. Lift Cylinder Repair 2100 YRM 1328 24
  • 26. See Figure 16 and Figure 17 for lift truck models • GLP/GDP60VX, GLP/GDP70VX (GP/GLP/ GDP135VX, GP/GLP/GDP155VX) (C878, D878, E878) • GLC/GDC60VX, GLC/GDC70VX (GC/GLC/ GDC135VX, GC/GLC/GDC155VX) (C879, D879, E879, F879) See Figure 18 for lift truck model • GLP/GDP80VX, GLP/GDP80VX9, GLP/ GDP90VX (GLP/GDP170VX, GLP/ GDP175VX36, GLP/GDP190VX) (A909, B909) NOTE: Perform Step 6 and Step 7 for lift truck mod- els • GLP/GDP60VX, GLP/GDP70VX (GP/GLP/ GDP135VX, GP/GLP/GDP155VX) (C878, D878, E878) • GLC/GDC60VX, GLC/GDC70VX (GC/GLC/ GDC135VX, GC/GLC/GDC155VX) (C879, D879, E879, F879) 6. On lift trucks equipped with a two-stage limited free-lift mast. Remove and discard backup ring, seal, and wear ring from piston. See Figure 16. 7. On lift trucks equipped with a three-stage full free- lift mast. Remove and discard backup ring, seal, wear ring, and piston ring from piston. See Fig- ure 17. NOTE: Perform Step 8 for lift truck model GLP/ GDP80VX, GLP/GDP80VX9, GLP/GDP90VX (GLP/ GDP170VX, GLP/GDP175VX36, GLP/GDP190VX) (A909, B909). 8. Remove backup ring, piston ring, piston seal, and O-ring from piston. Discard backup ring, piston seal, and O-ring. See Figure 18. 9. Repeat Step 1 through Step 8 for opposite lift cyl- inder. 1. SHELL 2. WEAR RING 3. SEAL 4. BACKUP RING 5. ROD AND PISTON ASSEMBLY 6. O-RING 7. WEAR RING 8. ROD SEAL 9. ROD WIPER 10. GLAND Figure 16. Two-Stage Mast, Lift Cylinder Assembly for Lift Truck Models GLP/GDP60VX, GLP/GDP70VX (GP/GLP/GDP135VX, GP/GLP/ GDP155VX) (C878, D878, E878) and GLC/ GDC60VX, GLC/GDC70VX (GC/GLC/GDC135VX, GC/GLC/GDC155VX) (C879, D879, E879, F879) 2100 YRM 1328 Lift Cylinder Repair 25
  • 27. 1. SHELL 2. PISTON RING 3. WEAR RING 4. SEAL 5. BACKUP RING 6. ROD AND PISTON ASSEMBLY 7. ROD SEAL 8. ROD WIPER 9. O-RING 10. GLAND Figure 17. Three-Stage Mast, Lift Cylinder Assembly for Lift Truck Models GLP/GDP60VX, GLP/GDP70VX (GP/GLP/GDP135VX, GP/GLP/ GDP155VX) (C878, D878, E878) and GLC/ GDC60VX, GLC/GDC70VX (GC/GLC/GDC135VX, GC/GLC/GDC155VX) (C879, D879, E879, F879) 1. ROD WIPER 2. GLAND 3. BLEED-BACK PORT 4. SHELL 5. ROD 6. PISTON 7. O-RING 8. PISTON SEAL 9. PISTON RING 10. BACKUP RING 11. RETENTION SCREW Figure 18. Lift Cylinder Assembly for Lift Truck Model GLP/GDP80VX, GLP/GDP80VX9, GLP/ GDP90VX (GLP/GDP170VX, GLP/GDP175VX36, GLP/GDP190VX) (A909, B909) Lift Cylinder Repair 2100 YRM 1328 26
  • 28. CLEAN WARNING Cleaning solvents can be flammable and toxic and can cause skin irritation. When using cleaning solvents, always follow the solvent manufactur- er's recommended safety procedures. Compressed air can move particles so they cause injury to the user or to other personnel. Make sure the path of the compressed air is away from all personnel. Wear protective goggles or a face shield to prevent injury to the eyes. CAUTION DO NOT allow cleaning solvent to come in contact with rubber components, as it will damage those components. Clean all metal parts in solvent and dry with com- pressed air. INSPECT Inspect the gland for damage to the threads and the seal surfaces. If damaged, replace gland. Inspect the piston for any damage to the seal surfa- ces. If damaged, replace piston. Inspect the rod for damage to the rod surface and en- sure that the rod is not bent. If damaged replace rod. Inspect the inner surface of the cylinder shell for dam- age. If damaged, replace cylinder assembly. ASSEMBLE, LIFT TRUCK MODELS GLP/ GDP60VX, GLP/GDP70VX (GP/GLP/ GDP135VX, GP/GLP/GDP155VX) (C878, D878, E878) AND GLC/GDC60VX, GLC/ GDC70VX (GC/GLC/GDC135VX, GC/GLC/ GDC155VX) (C879, D879, E879, F879) CAUTION A difficult and important step in assembling lift cylinders is the correct installation of the seals. Most lift cylinder maintenance is caused by seal leaks. DO NOT damage any parts during assem- bly. NOTE: To prevent damage to sealing surfaces, use brass tools when installing seal and O-rings. NOTE: Lubricate all internal parts of the lift cylinder with clean hydraulic oil during to assembly. 1. On lift trucks equipped with a two-stage limited free-lift mast. Install new backup ring, seal, and wear ring into onto piston. See Figure 16. 2. On lift trucks equipped with a three-stage full free- lift mast. Install new backup ring, seal, wear ring, and piston ring onto piston. See Figure 17. 3. Install rod and piston assembly into shell. 4. Install new wear ring, O-ring, rod seal, backup ring, and rod wiper onto gland as noted during disassembly. See Figure 16 and Figure 17. 5. Using a spanner wrench, install gland onto piston rod inside shell. Tighten gland to 375 to 450 N•m (277 to 332 lbf ft). See Figure 16 and Figure 17. 6. Repeat Step 1 through Step 5 for the opposite lift cylinder. ASSEMBLE, LIFT TRUCK MODELS GLP/ GDP80VX, GLP/GDP80VX9, GLP/ GDP90VX (GLP/GDP170VX, GLP/ GDP175VX36, GLP/GDP190VX) (A909, B909) CAUTION A difficult and important step in assembling lift cylinders is the correct installation of the seals. Most lift cylinder maintenance is caused by seal leaks. DO NOT damage any parts during assem- bly. NOTE: To prevent damage to sealing surfaces, use brass tools when installing seal and O-rings. NOTE: Lubricate all internal parts of the lift cylinder with clean hydraulic oil during to assembly. 1. Install new O-ring and piston seal onto piston. See Figure 18. 2. Install piston ring onto piston and tighten. See Figure 18. 3. Install new backup ring onto piston. See Fig- ure 18. 2100 YRM 1328 Lift Cylinder Repair 27
  • 29. 4. Install rod and piston assembly into shell. 5. Install rod wiper onto gland. See Figure 18. 6. Apply two drops of Loctite® 545 or equivalent on gland threads. 7. Using a spanner wrench, install gland onto piston rod inside shell. Tighten gland to 350 to 400 N•m (258 to 295 lbf ft). See Figure 18. 8. Repeat Step 1 through Step 7 for the opposite lift cylinder. INSTALL, LIFT TRUCK MODELS GLP/ GDP60VX, GLP/GDP70VX (GP/GLP/ GDP135VX, GP/GLP/GDP155VX) (C878, D878, E878) AND GLC/GDC60VX, GLC/ GDC70VX (GC/GLC/GDC135VX, GC/GLC/ GDC155VX) (C879, D879, E879, F879) 1. Using a lifting device, install the lift cylinder in the mount at the bottom of the outer mast. See Fig- ure 8 and Figure 9. 2. For lift truck models equipped with a three-stage full free-lift mast, see Figure 9. a. Install spacer, capscrew, and lock nut to se- cure the cylinder mount to the outer mast. Tighten lock nut to 135 N•m (100 lbf ft). b. Connect the main lift chain anchor and hy- draulic header hoses at the cylinder mount. Tighten chain anchor lock nut to 370 N•m (273 lbf ft). 3. For lift truck models equipped with a two-stage limited free-lift mast, see Figure 8. a. Install shims, washer, and bolt to secure cylin- der mount to the outer mast. Tighten bolt to 555 N•m (410 lbf ft). b. Install the bracket and lock nuts and connect the main lift chain anchor at the cylinder mount. Tighten chain anchor lock nut to 370 N•m (273 lbf ft). WARNING Be careful when removing or installing snap rings. These snap rings can come loose during re- moval or installation with enough force to cause an injury. Always use the correct snap ring pliers, and wear eye and face protection during removal or installation. 4. If working on a two-stage or three-stage mast, in- stall the snap rings at the top of the cylinder. See Figure 8 and Figure 9. 5. Connect the hydraulic fittings and hydraulic lines to lift cylinders as tagged during removal. See Figure 8 and Figure 9. 6. Repeat Step 1 through Step 5 for opposite lift cyl- inder. 7. Remove safety chains. 8. Use a lifting device to lower the inner mast (two- stage limited free-lift) or intermediate mast (three- stage full free-lift) onto the lift cylinders. 9. Install the carriage as described in the carriage In- stall procedures. See Mast Repairs (S/N A513, A514, A613, A614, A702, A703, A704, A705, A706, A707, A751, A752, B513, B514, B586, B587, B588, B589, B590, B591, B749, B750, B751, B752, B753, B754) 4000YRM1250. INSTALL, LIFT TRUCK MODELS GLP/ GDP80VX, GLP/GDP80VX9, GLP/ GDP90VX (GLP/GDP170VX, GLP/ GDP175VX36, GLP/GDP190VX) (A909, B909) 1. Install convex washer on top of lift cylinder. See Figure 12 and Figure 15. 2. Using a lifting device, install the lift cylinder in the mount at the bottom of the outer mast. See Fig- ure 12 and Figure 15. 3. For lift truck model equipped with a three-stage full free-lift mast, see Figure 12. a. Install retention screw into mast and bottom of lift cylinder. b. Install washer and snap ring onto top of lift cyl- inder. c. Install bracket, washers, and capscrews onto anchor bracket. 4. For lift truck model equipped with a two-stage full free-lift mast, see Figure 14. a. Install retention screw into mast and bottom of lift cylinder. b. Install spacer, washer, and anchor screw onto lift cylinder and crossmember. Lift Cylinder Repair 2100 YRM 1328 28
  • 30. 5. Connect the hydraulic fittings and hydraulic lines to lift cylinders as tagged during removal. See Figure 11. 6. Repeat Step 1 through Step 5 for opposite lift cyl- inder. 7. Remove safety chains. 8. Use a lifting device to lower the inner mast (two- stage limited free-lift) or intermediate mast (three- stage full free-lift) onto the lift cylinders. 9. Install the carriage as described in the carriage In- stall procedures. See Mast Repair (S/N A513, A514, A613, A614, A643, A644, A683, A684) 4000YRM1406. Free-Lift Cylinder Repair REMOVE 1. Remove the carriage and load backrest as descri- bed in the carriage removal procedures in the section Mast Repairs (S/N A513, A514, A613, A614, A702, A703, A704, A705, A706, A707, A751, A752, B513, B514, B586, B587, B588, B589, B590, B591, B749, B750, B751, B752, B753, B754) 4000YRM1250 for lift truck models • GLP/GDP60VX, GLP/GDP70VX (GP/GLP/ GDP135VX, GP/GLP/GDP155VX) (C878, D878, E878) • GLC/GDC60VX, GLC/GDC70VX (GC/GLC/ GDC135VX, GC/GLC/GDC155VX) (C879, D879, E879, F879) Mast Repair (S/N A513, A514, A613, A614, A643, A644, A683, A684) 4000YRM1406 for lift truck model • GLP/GDP80VX, GLP/GDP80VX9, GLP/ GDP90VX (GLP/GDP170VX, GLP/ GDP175VX36, GLP/GDP190VX) (A909, B909) NOTE: Tag hydraulic lines during removal to aid in installation. 2. Place a drain pan under the free-lift cylinder. Dis- connect and cap the hydraulic hose and fittings at the bottom of the cylinder. See Figure 19 for lift truck models • GLP/GDP60VX, GLP/GDP70VX (GP/GLP/ GDP135VX, GP/GLP/GDP155VX) (C878, D878, E878) • GLC/GDC60VX, GLC/GDC70VX (GC/GLC/ GDC135VX, GC/GLC/GDC155VX) (C879, D879, E879, F879) See Figure 21 for lift truck model • GLP/GDP80VX, GLP/GDP80VX9, GLP/ GDP90VX (GLP/GDP170VX, GLP/ GDP175VX36, GLP/GDP190VX) (A909, B909) NOTE: Perform Step 3 and Step 4 for lift truck mod- els: • GLP/GDP60VX, GLP/GDP70VX (GP/GLP/ GDP135VX, GP/GLP/GDP155VX) (C878, D878, E878) • GLC/GDC60VX, GLC/GDC70VX (GC/GLC/ GDC135VX, GC/GLC/GDC155VX) (C879, D879, E879, F879) 3. Remove capscrews, washers, and lockwashers from hose sheave shaft and hose sheave bracket. Remove hose sheave bracket from chain guard. See Figure 20. 4. Remove hose sheaves and hose sheave shaft. 5. Disconnect and cap the hydraulic fittings at the hose mounting brackets. See Figure 19 for lift truck models • GLP/GDP60VX, GLP/GDP70VX (GP/GLP/ GDP135VX, GP/GLP/GDP155VX) (C878, D878, E878) • GLC/GDC60VX, GLC/GDC70VX (GC/GLC/ GDC135VX, GC/GLC/GDC155VX) (C879, D879, E879, F879) See Figure 21 for lift truck model • GLP/GDP80VX, GLP/GDP80VX9, GLP/ GDP90VX (GLP/GDP170VX, GLP/ GDP175VX36, GLP/GDP190VX) (A909, B909) 2100 YRM 1328 Free-Lift Cylinder Repair 29
  • 31. 6. Remove hoses from hose sheaves. See Figure 20 for lift truck models • GLP/GDP60VX, GLP/GDP70VX (GP/GLP/ GDP135VX, GP/GLP/GDP155VX) (C878, D878, E878) • GLC/GDC60VX, GLC/GDC70VX (GC/GLC/ GDC135VX, GC/GLC/GDC155VX) (C879, D879, E879, F879) See Figure 22 for lift truck model • GLP/GDP80VX, GLP/GDP80VX9, GLP/ GDP90VX (GLP/GDP170VX, GLP/ GDP175VX36, GLP/GDP190VX) (A909, B909) NOTE: Perform Step 7 for lift truck model GLP/ GDP80VX, GLP/GDP80VX9, GLP/GDP90VX (GLP/ GDP170VX, GLP/GDP175VX36, GLP/GDP190VX) (A909, B909). 7. Remove four screws and hose sheave assembly from chain guard. See Figure 22. NOTE: Perform Step 8 through Step 11 for lift truck models: • GLP/GDP60VX, GLP/GDP70VX (GP/GLP/ GDP135VX, GP/GLP/GDP155VX) (C878, D878, E878) • GLC/GDC60VX, GLC/GDC70VX (GC/GLC/ GDC135VX, GC/GLC/GDC155VX) (C879, D879, E879, F879) 8. Remove chain guard from crosshead. See Fig- ure 20. 9. Remove lock nuts from chain anchor and remove chain. See Figure 19. 10. Using a brass drift, remove pin from crosshead. See Figure 20. 11. Remove chain sheave assembly from crosshead. NOTE: Perform Step 12 and Step 13 for lift truck model GLP/GDP80VX, GLP/GDP80VX9, GLP/ GDP90VX (GLP/GDP170VX, GLP/GDP175VX36, GLP/GDP190VX) (A909, B909). 12. Remove lock nut from chain anchor; remove chain anchor from crossmember; remove chain from chain sheave. See Figure 23. 13. Remove chain sheave from top of free-lift cylinder by unscrewing. See Figure 24. NOTE: Perform Step 14 and Step 15 for lift truck models • GLP/GDP60VX, GLP/GDP70VX (GP/GLP/ GDP135VX, GP/GLP/GDP155VX) (C878, D878, E878) • GLC/GDC60VX, GLC/GDC70VX (GC/GLC/ GDC135VX, GC/GLC/GDC155VX) (C879, D879, E879, F879) 14. Remove two capscrews and washers securing crosshead to cylinder rod. Remove crosshead. See Figure 20. 15. Remove two capscrews, lock nuts, lockwashers, washers, and spacer from inner mast mounting bracket. With a lifting device, remove free-lift cyl- inder assembly from inner mast. See Figure 19 and Figure 20 for lift truck models • GLP/GDP60VX, GLP/GDP70VX (GP/GLP/ GDP135VX, GP/GLP/GDP155VX) (C878, D878, E878) • GLC/GDC60VX, GLC/GDC70VX (GC/GLC/ GDC135VX, GC/GLC/GDC155VX) (C879, D879, E879, F879) NOTE: Perform Step 16 and Step 17 for lift truck model GLP/GDP80VX, GLP/GDP80VX9, GLP/ GDP90VX (GLP/GDP170VX, GLP/GDP175VX36, GLP/GDP190VX) (A909, B909). 16. Remove two screws, two washers, and bracket from crossmember and free-lift cylinder. See Fig- ure 25. 17. Remove retention screw from bottom of free-lift cylinder and mast. See Figure 25. 18. Using a lifting device, remove free-lift cylinder from inner mast. NOTE: Perform Step 19 for lift truck model GLP/ GDP80VX, GLP/GDP80VX9, GLP/GDP90VX (GLP/ GDP170VX, GLP/GDP175VX36, GLP/GDP190VX) (A909, B909). 19. Repeat above steps as required for opposite free- lift cylinder. Free-Lift Cylinder Repair 2100 YRM 1328 30
  • 32. NOTE: BOTTOM CROSSMEMBER OF THE INNER MAST HAS BEEN REMOVED FOR CLARITY. A. REAR VIEW B. FRONT VIEW 1. CAPSCREW 2. LOCK NUT 3. HYDRAULIC FITTINGS 4. CHAIN 5. HOSE 6. CHAIN ANCHOR 7. INNER MAST 8. HOSE MOUNTING BRACKET Figure 19. Free-Lift Cylinder Removal for Lift Truck Models GLP/GDP60VX, GLP/GDP70VX (GP/GLP/ GDP135VX, GP/GLP/GDP155VX) (C878, D878, E878) and GLC/GDC60VX, GLC/GDC70VX (GC/GLC/ GDC135VX, GC/GLC/GDC155VX) (C879, D879, E879, F879) 2100 YRM 1328 Free-Lift Cylinder Repair 31
  • 33. Figure 20. Hose Sheave, Chain Sheave, and Crosshead Installation for Lift Truck Models GLP/GDP60VX, GLP/GDP70VX (GP/GLP/GDP135VX, GP/GLP/GDP155VX) (C878, D878, E878) and GLC/GDC60VX, GLC/ GDC70VX (GC/GLC/GDC135VX, GC/GLC/GDC155VX) (C879, D879, E879, F879) Free-Lift Cylinder Repair 2100 YRM 1328 32
  • 34. Legend for Figure 20 1. CAPSCREW 2. WASHER 3. LOCKWASHER 4. HOSE SHEAVE BRACKET 5. SNAP RING 6. HOSE SHEAVE SHAFT 7. HOSE SHEAVE 8. HOSE 9. HYDRAULIC FITTINGS 10. CHAIN GUARD 11. CHAIN 12. COTTER PIN 13. PIN 14. BEARING 15. FREE-LIFT CYLINDER 16. CHAIN SHEAVE ASSEMBLY 17. SPACER 18. PIN 19. CROSSHEAD 20. LOCK NUT 21. CHAIN ANCHOR 22. HOSE MOUNTING BRACKET 23. INNER MAST MOUNTING BRACKET 24. CYLINDER ROD NOTE: MAST CROSSMEMBERS REMOVED FOR CLARITY. 1. FREE-LIFT CYLINDER 2. HYDRAULIC HOSE 3. FITTING 4. HOSE MOUNTING BRACKET Figure 21. Free Lift Cylinder Hydraulic Lines and Fittings for Lift Truck Model GLP/GDP80VX, GLP/ GDP80VX9, GLP/GDP90VX (GLP/GDP170VX, GLP/ GDP175VX36, GLP/GDP190VX) (A909, B909) 1. HOSE SHEAVE ASSEMBLY 2. CHAIN GUARD 3. SCREW Figure 22. Hose Sheave for Lift Truck Model GLP/ GDP80VX, GLP/GDP80VX9, GLP/GDP90VX (GLP/ GDP170VX, GLP/GDP175VX36, GLP/GDP190VX) (A909, B909) 2100 YRM 1328 Free-Lift Cylinder Repair 33
  • 35. 1. LOCKNUT 2. CHAIN ANCHOR 3. CHAIN Figure 23. Chain Anchor for Lift Truck Model GLP/ GDP80VX, GLP/GDP80VX9, GLP/GDP90VX (GLP/ GDP170VX, GLP/GDP175VX36, GLP/GDP190VX) (A909, B909) 1. CHAIN SHEAVE 2. FREE-LIFT CYLINDER Figure 24. Chain Sheave for Lift Truck Model GLP/ GDP80VX, GLP/GDP80VX9, GLP/GDP90VX (GLP/ GDP170VX, GLP/GDP175VX36, GLP/GDP190VX) (A909, B909) Free-Lift Cylinder Repair 2100 YRM 1328 34
  • 36. A. FRONT VIEW B. REAR VIEW 1. CROSSMEMBER 2. BRACKET 3. SCREW 4. WASHER 5. RETENTION SCREW 6. MAST 7. FREE-LIFT CYLINDER Figure 25. Free-Lift Cylinder Mount for Lift Truck Model GLP/GDP80VX, GLP/GDP80VX9, GLP/GDP90VX (GLP/GDP170VX, GLP/GDP175VX36, GLP/GDP190VX) (A909, B909) 2100 YRM 1328 Free-Lift Cylinder Repair 35
  • 37. DISASSEMBLE CAUTION Carefully disassemble the free-lift cylinder so the piston rods and sliding surfaces are not damaged. NOTE: To prevent damage to sealing surfaces, use brass tools when removing or installing seal and O- rings. 1. Loosen gland with spanner wrench. 2. Remove gland from shell. See Figure 26 for lift truck models • GLP/GDP60VX, GLP/GDP70VX (GP/GLP/ GDP135VX, GP/GLP/GDP155VX) (C878, D878, E878) • GLC/GDC60VX, GLC/GDC70VX (GC/GLC/ GDC135VX, GC/GLC/GDC155VX) (C879, D879, E879, F879) See Figure 27 for lift truck model • GLP/GDP80VX, GLP/GDP80VX9, GLP/ GDP90VX (GLP/GDP170VX, GLP/ GDP175VX36, GLP/GDP190VX) (A909, B909) NOTE: Perform Step 3 for lift truck model GLP/ GDP80VX, GLP/GDP80VX9, GLP/GDP90VX (GLP/ GDP170VX, GLP/GDP175VX36, GLP/GDP190VX) (A909, B909). 3. Remove and discard rod wiper, rod seal, and O- ring from gland. See Figure 27. 4. Remove rod and piston assembly from shell. Drain hydraulic oil into container. See Figure 26 for lift truck models • GLP/GDP60VX, GLP/GDP70VX (GP/GLP/ GDP135VX, GP/GLP/GDP155VX) (C878, D878, E878) • GLC/GDC60VX, GLC/GDC70VX (GC/GLC/ GDC135VX, GC/GLC/GDC155VX) (C879, D879, E879, F879) See Figure 27 for lift truck model • GLP/GDP80VX, GLP/GDP80VX9, GLP/ GDP90VX (GLP/GDP170VX, GLP/ GDP175VX36, GLP/GDP190VX) (A909, B909) NOTE: Perform Step 5 through Step 7 for lift truck models: • GLP/GDP60VX, GLP/GDP70VX (GP/GLP/ GDP135VX, GP/GLP/GDP155VX) (C878, D878, E878) • GLC/GDC60VX, GLC/GDC70VX (GC/GLC/ GDC135VX, GC/GLC/GDC155VX) (C879, D879, E879, F879) 5. Remove and discard O-ring from outside of gland and remove, wear ring, backup ring, rod seal, and rod wiper from inside of gland. See Figure 26. WARNING Be careful when removing or installing snap rings. These snap rings can come loose during re- moval or installation with enough force to cause an injury. Always use the correct snap ring pliers, and wear eye and face protection during removal or installation. 6. Remove snap ring, washer, check valve from base of piston. Remove and discard seal from check valve. See Figure 26. 7. Remove wear ring and backup ring. Remove and discard piston seal from piston. See Figure 26. NOTE: Perform Step 8 and Step 9 for lift truck model GLP/GDP80VX, GLP/GDP80VX9, GLP/GDP90VX (GLP/GDP170VX, GLP/GDP175VX36, GLP/ GDP190VX) (A909, B909). 8. Remove and discard wear ring from piston. See Figure 27. 9. Repeat above steps as required for opposite free- lift cylinder. Free-Lift Cylinder Repair 2100 YRM 1328 36
  • 38. 1. GLAND 2. O-RING 3. ROD WIPER 4. BACKUP RING 5. ROD SEAL 6. WEAR RING 7. ROD AND PISTON ASSEMBLY 8. PISTON SEAL 9. CHECK VALVE 10. SEAL 11. WASHER 12. SNAP RING 13. SHELL Figure 26. Free-Lift Cylinder Assembly for Lift Truck Models GLP/GDP60VX, GLP/GDP70VX (GP/GLP/GDP135VX, GP/GLP/GDP155VX) (C878, D878, E878) and GLC/GDC60VX, GLC/GDC70VX (GC/GLC/GDC135VX, GC/GLC/GDC155VX) (C879, D879, E879, F879) Figure 27. Free-Lift Cylinder Assembly for Lift Truck Model GLP/GDP80VX, GDP80VX9, GLP/ GDP90VX (GLP/GDP170VX, GLP/GDP175VX36, GLP/GDP190VX) (A909, B909) 2100 YRM 1328 Free-Lift Cylinder Repair 37
  • 39. Legend for Figure 27 1. ROD WIPER 2. ROD SEAL 3. GLAND 4. O-RING 5. BLEED SCREW 6. SHELL 7. ROD 8. PISTON 9. WEAR RING 10. RETENTION SCREW CLEAN WARNING Cleaning solvents can be flammable and toxic and can cause skin irritation. When using cleaning solvents, always follow the solvent manufactur- er's recommended safety procedures. Compressed air can move particles so they cause injury to the user or to other personnel. Make sure the path of the compressed air is away from all personnel. Wear protective goggles or a face shield to prevent injury to the eyes. CAUTION Do not allow cleaning solvent to come in contact with rubber components, as it will damage those components. Clean all metal parts in solvent and dry with com- pressed air. INSPECT Inspect the gland for damage to the threads and the seal surfaces. If damaged, replace gland. Inspect the piston for any damage to the seal surfa- ces. If damaged, replace piston. Inspect the rod for damage to the rod surface and en- sure that the rod is not bent. If damaged replace rod. Inspect the inner surface of the cylinder shell for dam- age. If damaged, replace cylinder assembly. ASSEMBLE, LIFT TRUCK MODELS GLP/ GDP60VX, GLP/GDP70VX (GP/GLP/ GDP135VX, GP/GLP/GDP155VX) (C878, D878, E878) AND GLC/GDC60VX, GLC/ GDC70VX (GC/GLC/GDC135VX, GC/GLC/ GDC155VX) (C879, D879, E879, F879) CAUTION A difficult and important step in assembling free- lift cylinders is the correct installation of the seals. Most cylinders maintenance is caused by seal leaks. DO NOT damage any parts during as- sembly. NOTE: Lubricate all internal parts of the free-lift cylin- der with clean hydraulic oil. NOTE: 1. Install check valve and new seal in base of piston of free-lift cylinder. Make sure arrow on check valve is toward base of piston. Install washer and snap ring for check valve. See Figure 26. 2. Install new wear ring, piston seal, and backup ring on rod an piston assembly. See Figure 26. 3. Carefully install rod and piston assembly into shell. See Figure 26. 4. Install new wear ring, new rod seal, new backup ring, and new rod wiper into gland. Install new O- ring on outside of gland. See Figure 26. NOTE: Hydraulic oil is pored into the free-lift cylinder to act as a cushion during load lifting to prevent dam- age to the cylinder. 5. Before installing gland, pour 150 cc (5 oz) of hy- draulic oil into the cylinder shell. 6. Install gland on rod and piston assembly. See Fig- ure 26. Tighten gland to 400 to 475 N•m (295 to 350 lbf ft). 7. Repeat above steps as required for opposite free- lift cylinder. Free-Lift Cylinder Repair 2100 YRM 1328 38
  • 40. ASSEMBLE, LIFT TRUCK MODELS GLP/ GDP80VX, GLP/GDP80VX9, GLP/ GDP90VX (GLP/GDP170VX, GLP/ GDP175VX36, GLP/GDP190VX) (A909, B909) CAUTION A difficult and important step in assembling free- lift cylinders is the correct installation of the seals. Most cylinders maintenance is caused by seal leaks. DO NOT damage any parts during as- sembly. NOTE: Lubricate all internal parts of the free-lift cylin- der with clean hydraulic oil. 1. Install new wear ring onto piston. See Figure 27. 2. Carefully install rod and piston assembly into shell. See Figure 27. 3. Install new O-ring, new rod sea, and new rod wiper onto gland. See Figure 27. 4. Install gland onto rod and piston assembly. See Figure 27. Tighten gland to 350 to 400 N•m (258 to 295 lbf ft). 5. Repeat above steps as required for opposite free- lift cylinder. INSTALL, LIFT TRUCK MODELS GLP/ GDP60VX, GLP/GDP70VX (GP/GLP/ GDP135VX, GP/GLP/GDP155VX) (C878, D878, E878) AND GLC/GDC60VX, GLC/ GDC70VX (GC/GLC/GDC135VX, GC/GLC/ GDC155VX) (C879, D879, E879, F879) 1. Install crosshead onto cylinder rod, then install two capscrews and lockwashers securing cross- head to cylinder rod. See Figure 20. 2. Install chain sheave assembly and spacers into crosshead. See Figure 20. 3. Using a brass drift, install pin through the chain sheave assembly. See Figure 20. 4. Using a lifting device, install free-lift cylinder into the inner mast and align cylinder mount holes with inner mast mounting holes. 5. Install two capscrews through hose mounting bracket, spacers and inner mast mounting bracket. Secure capscrews with two washers, lockwashers, and lock nuts. See Figure 20. Tighten lock nut to 135 N•m (100 lbf ft). 6. Install chain and chain anchor over chain sheave assembly and install chain anchor into cylinder mount. Tighten lock nuts to 370 N•m (273 lbf ft). See Figure 19 and Figure 20. 7. Install chain guard over the chain sheave assem- bly. See Figure 20. 8. Install hose sheave brackets to crosshead with capscrews, washers, and lockwashers. Tighten capscrews to 33 N•m (25 lbf ft). See Figure 20. 9. Place hose sheaves and hose sheave shaft inside of hose sheave bracket and install two capscrews and washers. Tighten capscrews to 33 N•m (25 lbf ft). See Figure 20. 10. Install the hoses over the hose sheaves and through hose mounting bracket and uncap hoses. Connect hoses to hydraulic fittings. 11. Install hydraulic fittings at the bottom of the cylin- der. See Figure 19. 12. Perform above steps as required for opposite free-lift cylinder. 13. Install the load backrest an carriage as described in the carriage install procedures. See Mast Re- pairs (S/N A513, A514, A613, A614, A702, A703, A704, A705, A706, A707, A751, A752, B513, B514, B586, B587, B588, B589, B590, B591, B749, B750, B751, B752, B753, B754) 4000YRM1250. 2100 YRM 1328 Free-Lift Cylinder Repair 39
  • 41. INSTALL, LIFT TRUCK MODELS GLP/ GDP80VX, GLP/GDP80VX9, GLP/ GDP90VX (GLP/GDP170VX, GLP/ GDP175VX36, GLP/GDP190VX) (A909, B909) 1. Using a lifting device, install free-lift cylinder into the inner mast and align cylinder mount holes with inner mast mounting holes. 2. Install retention screw into bottom of mast and free-lift cylinder. See Figure 25. 3. Install bracket, two washers, and two screws on free-lift cylinder and crossmember. See Figure 25. 4. Install chain sheave into top of free-lift cylinder. See Figure 24. 5. Install chain onto chain sheave; install chain an- chor through crossmember; install locknut onto chain anchor. See Figure 23. 6. Install the hoses over the hose sheaves and through hose mounting bracket and uncap hoses. Connect hoses to hydraulic fittings. 7. Install hose sheave assembly and four screws onto chain guard. See Figure 22. 8. Install hydraulic hoses onto hose sheave. 9. Uncap and connect hydraulic lines at bottom of free-lift cylinder. See Figure 25. 10. Perform above steps as required for opposite free-lift cylinder. 11. Install the load backrest an carriage as described in the carriage install procedures. See Mast Re- pair (S/N A513, A514, A613, A614, A643, A644, A683, A684) 4000YRM1406. Sideshift Cylinder Repair REMOVE WARNING Before working on or near the mast, see Safety Procedures When Working Near Mast and Fig- ure 1. 1. Remove carriage as described in carriage re- moval procedures. See Mast Repairs (S/N A513, A514, A613, A614, A702, A703, A704, A705, A706, A707, A751, A752, B513, B514, B586, B587, B588, B589, B590, B591, B749, B750, B751, B752, B753, B754) 4000YRM1250 for lift truck models • GLC/GDC60VX, GLC/GDC70VX (GC/GLC/ GDC135VX, GC/GLC/GDC155VX) (C879, D879, E879, F879) • GLP/GDP60VX, GLP/GDP70VX (GP/GLP/ GDP135VX, GP/GLP/GDP155VX) (C878, D878, E878) See Mast Repair (S/N A513, A514, A613, A614, A643, A644, A683, A684) 4000YRM1406 for lift truck model • GLP/GDP80VX, GLP/GDP80VX9, GLP/GDP90VX (GLP/GDP170VX, GLP/ GDP175VX36, GLP/GDP190VX) (A909, B909) NOTE: Perform Step 2 for lift truck models • GLC/GDC60VX, GLC/GDC70VX (GC/GLC/ GDC135VX, GC/GLC/GDC155VX) (C879, D879, E879, F879) • GLP/GDP60VX, GLP/GDP70VX (GP/GLP/ GDP135VX, GP/GLP/GDP155VX) (C878, D878, E878) 2. Remove sideshift cylinder from sideshift carriage as described in disassemble procedures. See Mast Repairs (S/N A513, A514, A613, A614, A702, A703, A704, A705, A706, A707, A751, A752, B513, B514, B586, B587, B588, B589, B590, B591, B749, B750, B751, B752, B753, B754) 4000YRM1250 for lift truck models • GLC/GDC60VX, GLC/GDC70VX (GC/GLC/ GDC135VX, GC/GLC/GDC155VX) (C879, D879, E879, F879) • GLP/GDP60VX, GLP/GDP70VX (GP/GLP/ GDP135VX, GP/GLP/GDP155VX) (C878, D878, E878) Sideshift Cylinder Repair 2100 YRM 1328 40
  • 42. WARNING Be careful when removing or installing snap rings. These snap rings can come loose during re- moval or installation with enough force to cause an injury. Always use the correct snap ring pliers, and wear eye and face protections during removal or installation. NOTE: Perform Step 3 for lift truck model GLP/ GDP80VX, GLP/GDP80VX9, GLP/GDP90VX (GLP/ GDP170VX, GLP/GDP175VX36, GLP/GDP190VX) (A909, B909). 3. Remove four snap rings, two clevis pins, and sideshift cylinder from carriage. See Figure 28. 1. SIDESHIFT CYLINDER 2. SNAP RING 3. CLEVIS PIN 4. ISS OUTER FRAME Figure 28. Sideshift Cylinder Removal, Lift Truck Models GLP/GDP80VX, GLP/GDP80VX9, GLP/GDP90VX (GLP/GDP170VX, GLP/GDP175VX36, GLP/GDP190VX) (A909, B909) 2100 YRM 1328 Sideshift Cylinder Repair 41
  • 43. DISASSEMBLE NOTE: For lift trucks manufactured before August, 2012, perform Step 1 through Step 8 for lift truck mod- els • GLC/GDC60VX, GLC/GDC70VX (GC/GLC/ GDC135VX, GC/GLC/GDC155VX) (C879, D879, E879, F879) • GLP/GDP60VX, GLP/GDP70VX (GP/GLP/ GDP135VX, GP/GLP/GDP155VX) (C878, D878, E878) 1. Position cylinder rod in fully extended position and remove snap ring from retainer. See Figure 29. 2. Push cylinder retainer into cylinder shell approxi- mately 50 mm (2 in.) until retainer ring is exposed. 3. Remove retainer ring. See Figure 29. 4. Remove rod assembly and retainer from cylinder shell. See Figure 29. 5. Remove retainer from rod. See Figure 29. CAUTION To prevent damage to sealing surfaces, use brass tools when removing seals and O-rings. 6. Remove and discard, wiper, rod seal, backup ring, and O-ring from retainer. See Figure 29. 7. Remove lock nut and piston from rod. See Fig- ure 29. 8. Remove and discard backup ring and piston seal from piston. See Figure 29. NOTE: For lift trucks manufactured after August, 2012, perform Step 9 through Step 13 for lift truck models • GLC/GDC60VX, GLC/GDC70VX (GC/GLC/ GDC135VX, GC/GLC/GDC155VX) (C879, D879, E879, F879) • GLP/GDP60VX, GLP/GDP70VX (GP/GLP/ GDP135VX, GP/GLP/GDP155VX) (E878) 9. Remove the retainer. See Figure 30. 10. Remove rod wiper from retainer. See Figure 30. 11. Remove O-ring from retainer. See Figure 30. 12. Remove rod seal from retainer. See Figure 30. 13. Remove fittings and O-rings from cylinder assem- bly. See Figure 30. Discard O-rings. CAUTION Carefully disassemble the sideshift cylinder so the piston rods and sliding surfaces are not dam- aged. CAUTION To prevent damage to sealing surfaces use brass tools when removing seals and O-rings. NOTE: Perform Step 14 through Step 18 for lift truck models • GLP/GDP80VX, GLP/GDP80VX9, GLP/ GDP90VX (GLP/GDP170VX, GLP/ GDP175VX36, GLP/GDP190VX) (A909, B909) 14. Loosen gland with spanner wrench. See Fig- ure 31. 15. Remove gland from shell. See Figure 31. 16. Remove and discard rod wiper from gland. See Figure 31. 17. Remove rod and piston assembly from shell. See Figure 31. Drain hydraulic oil into container. 18. Remove backup ring, piston ring, piston seal, and O-ring from piston. See Figure 31. Discard backup ring, piston seal, and O-ring. Sideshift Cylinder Repair 2100 YRM 1328 42
  • 44. 1. SNAP RING 2. RETAINER RING 3. ROD 4. RETAINER 5. CYLINDER SHELL 6. WIPER 7. ROD SEAL 8. BACKUP RING 9. O-RING 10. LOCK NUT 11. PISTON 12. PISTON SEAL 13. BACKUP RING Figure 29. Hang On Sideshift Cylinder for Lift Truck Models GLC/GDC60VX, GLC/GDC70VX (GC/GLC/ GDC135VX, GC/GLC/GDC155VX) (C879, D879, E879, F879) and GLP/GDP60VX, GLP/GDP70VX (GP/GLP/ GDP135VX, GP/GLP/GDP155VX) (C878, D878, E878) Manufactured Before August, 2012 2100 YRM 1328 Sideshift Cylinder Repair 43
  • 45. 1. ROD WIPER 2. RETAINER 3. O-RING 4. ROD SEAL 5. ROD 6. FITTINGS 7. CYLINDER ASSEMBLY Figure 30. Hang On Sideshift Cylinder for Lift Truck Models GLC/GDC60VX, GLC/GDC70VX (GC/GLC/ GDC135VX, GC/GLC/GDC155VX) (E879, F879) and GLP/GDP60VX, GLP/GDP70VX (GP/GLP/GDP135VX, GP/GLP/GDP155VX) (E878) Manufactured After August, 2012 Sideshift Cylinder Repair 2100 YRM 1328 44
  • 46. 1. ROD 2. ROD WIPER 3. GLAND 4. PISTON 5. O-RING 6. PISTON SEAL 7. PISTON RING 8. BACKUP RING 9. SHELL Figure 31. Sideshift Cylinder for Lift Truck Model GLP/GDP80VX, GLP/GDP80VX9, GLP/GDP90VX (GLP/ GDP170VX, GLP/GDP175VX36, GLP/GDP190VX) (A909, B909) 2100 YRM 1328 Sideshift Cylinder Repair 45
  • 47. CLEAN WARNING Cleaning solvents can be flammable and toxic and can cause skin irritation. When using cleaning solvents, always follow the solvent manufactur- er's recommended safety procedures. Compressed air can move particles so they cause injury to the user or to other personnel. Make sure the path of the compressed air is away from all personnel. Wear protective goggles or a face shield to prevent injury to the eyes. CAUTION DO NOT allow cleaning solvent to come in contact with rubber components, as it will damage those components. 1. Clean all metal parts in solvent and dry with com- pressed air. INSPECT 1. Inspect gland and fittings for damage to threads and seal surfaces. Replace if damaged. 2. Inspect piston for any damage to seal surfaces. Replace if damaged. 3. Inspect rod for damage to rod surface and ensure rod is not bent. Replace if damaged or bent. 4. Inspect inner surface of cylinder shell for damage. Replace cylinder assembly if damaged. ASSEMBLE CAUTION To prevent damage to sealing surfaces, use brass tools when installing seals and O-rings. NOTE: For lift trucks manufactured before August, 2012, perform Step 1 through Step 9 for lift truck mod- els • GLC/GDC60VX, GLC/GDC70VX (GC/GLC/ GDC135VX, GC/GLC/GDC155VX) (C879, D879, E879, F879) • GLP/GDP60VX, GLP/GDP70VX (GP/GLP/ GDP135VX, GP/GLP/GDP155VX) (C878, D878, E878) NOTE: Lubricate all internal parts of the cylinder with clean hydraulic oil prior to assembly. 1. Install new piston seal and backup ring onto pis- ton. See Figure 29. CAUTION To prevent damage to the cylinder, DO NOT clamp on cylinder rod sealing surface. 2. Place cylinder shell in soft-jawed vise and install piston onto rod. See Figure 29. 3. Install lock nut onto rod. See Figure 29. Tighten lock nut to 135 to 163 N•m (100 to 120 lbf ft). 4. Install rod and piston into cylinder shell. 5. Install new O-ring and backup ring into groove of retainer. See Figure 29. 6. Push retainer into cylinder shell until retainer ring groove is exposed. 7. Install retainer rig into groove of cylinder shell. See Figure 29. 8. Pull rod and piston out of cylinder shell until re- tainer stops on retainer ring and snap ring groove is exposed. See Figure 29. 9. Install snap ring onto retainer. See Figure 29. NOTE: For lift trucks manufactured after August, 2012, perform Step 10 through Step 14 for lift truck models • GLC/GDC60VX, GLC/GDC70VX (GC/GLC/ GDC135VX, GC/GLC/GDC155VX) (E879, F879) • GLP/GDP60VX, GLP/GDP70VX (GP/GLP/ GDP135VX, GP/GLP/GDP155VX) (E878) 10. Install new O-ring on fittings and install fittings in cylinder. See Figure 30. 11. Install rod seal in retainer. See Figure 30. 12. Install O-ring on retainer. See Figure 30. 13. Install rod wiper in retainer. See Figure 30. 14. Install retainer onto cylinder assembly. See Fig- ure 30. Sideshift Cylinder Repair 2100 YRM 1328 46
  • 48. CAUTION To prevent damage to sealing surfaces, use brass tools when installing seal and O-rings. NOTE: Perform Step 15 through Step 21 for lift truck model • GLP/GDP80VX, GLP/GDP80VX9, GLP/ GDP90VX (GLP/GDP170VX, GLP/ GDP175VX36, GLP/GDP190VX) (A909, B909) NOTE: Lubricate all internal parts of the cylinder with clean hydraulic oil prior to assembly. 15. Install new O-ring and piston seal onto piston. See Figure 31. 16. Install piston ring onto piston and tighten. See Figure 31. 17. Install new backup ring onto piston. See Fig- ure 31. 18. Install rod and piston assembly into shell. See Figure 31. 19. Install rod wiper onto gland. See Figure 31. 20. Apply two drops of Loctite® 545 or equivalent on gland threads. 21. Install gland onto shell. See Figure 31. Tighten gland to 350 to 400 N•m (258 to 295 lbf ft). INSTALL NOTE: Perform Step 1 for lift truck models • GLC/GDC60VX, GLC/GDC70VX (GC/GLC/ GDC135VX, GC/GLC/GDC155VX) (C879, D879, E879, F879) • GLP/GDP60VX, GLP/GDP70VX (GP/GLP/ GDP135VX, GP/GLP/GDP155VX) (C878, D878, E878) 1. Install sideshift cylinder as described in install pro- cedure in section Mast Repairs (S/N A513, A514, A613, A614, A702, A703, A704, A705, A706, A707, A751, A752, B513, B514, B586, B587, B588, B589, B590, B591, B749, B750, B751, B752, B753, B754) 4000YRM1250 for lift truck models • GLC/GDC60VX, GLC/GDC70VX (GC/GLC/ GDC135VX, GC/GLC/GDC155VX) (C879, D879, E879, F879) • GLP/GDP60VX, GLP/GDP70VX (GP/GLP/ GDP135VX, GP/GLP/GDP155VX) (C878, D878, E878) WARNING Be careful when removing or installing snap rings. These snap rings can come loose during re- moval or installation with enough force to cause an injury. Always use the correct snap ring pliers, and wear eye and face protections during removal or installation. NOTE: Perform Step 2 for lift truck model GLP/ GDP80VX, GLP/GDP80VX9, GLP/GDP90VX (GLP/ GDP170VX, GLP/GDP175VX36, GLP/GDP190VX) (A909, B909). 2. Install sideshift cylinder, two clevis pins, and four snap rings onto carriage. See Figure 28. 3. Install carriage as described in the carriage install procedures located in the section Mast Repairs (S/N A513, A514, A613, A614, A702, A703, A704, A705, A706, A707, A751, A752, B513, B514, B586, B587, B588, B589, B590, B591, B749, B750, B751, B752, B753, B754) 4000YRM1250 for lift truck models • GLC/GDC60VX, GLC/GDC70VX (GC/GLC/ GDC135VX, GC/GLC/GDC155VX) (C879, D879, E879, F879) • GLP/GDP60VX, GLP/GDP70VX (GP/GLP/ GDP135VX, GP/GLP/GDP155VX) (C878, D878, E878) Mast Repair (S/N A513, A514, A613, A614, A643, A644, A683, A684) 4000YRM1406 for lift truck model • GLP/GDP80VX, GLP/GDP80VX9, GLP/ GDP90VX (GLP/GDP170VX, GLP/ GDP175VX36, GLP/GDP190VX) (A909, B909) 2100 YRM 1328 Fork Positioner Cylinder Repair 47
  • 49. Fork Positioner Cylinder Repair REMOVE WARNING Before working on or near the mast, see Safety Procedures When Working Near Mast and Fig- ure 1. NOTE: Perform Step 1 for lift truck models • GLC/GDC60VX, GLC/GDC70VX (GC/GLC/ GDC135VX, GC/GLC/GDC155VX) (C879, D879, E879, F879) • GLP/GDP60VX, GLP/GDP70VX (GP/GLP/ GDP135VX, GP/GLP/GDP155VX) (C878, D878, E878) 1. Remove fork positioner cylinder as described in Hang On Sideshift Carriage Repair removal pro- cedures located in the section Mast Repairs (S/N A513, A514, A613, A614, A702, A703, A704, A705, A706, A707, A751, A752, B513, B514, B586, B587, B588, B589, B590, B591, B749, B750, B751, B752, B753, B754) 4000YRM1250. NOTE: Perform Step 2 through Step 7 for lift truck model • GLP/GDP80VX, GLP/GDP80VX9, GLP/ GDP90VX (GLP/GDP170VX, GLP/ GDP175VX36, GLP/GDP190VX) (A909, B909) 2. Remove carriage as described in carriage re- moval procedures located in the section Mast Re- pair (S/N A513, A514, A613, A614, A643, A644, A683, A684) 4000YRM1406. NOTE: The following step to be performed for both upper and lower fork positioner cylinders. NOTE: Note placement of fork positioner cylinders prior to removal to aid in installation. 3. Disconnect all hydraulic fittings and lines from fork positioner cylinders on carriage. See Figure 32. 4. Remove screw, washer, and bushing from lower fork positioner cylinder rod end and carriage. See Figure 33. 5. Remove nut from lower fork positioner cylinder shell end. See Figure 33. 6. Retract rod into shell and remove lower fork posi- tioner cylinder from carriage. 7. Repeat Step 4 through Step 6 for upper fork posi- tioner cylinder. DISASSEMBLE CAUTION Carefully disassemble the fork positioner cylin- ders so the piston rods and sliding surfaces are not damaged. NOTE: For lift trucks manufactured before August, 2012, perform Step 1 through Step 7 for lift truck mod- els • GLC/GDC60VX, GLC/GDC70VX (GC/GLC/ GDC135VX, GC/GLC/GDC155VX) (C879, D879, E879, F879) • GLP/GDP60VX, GLP/GDP70VX (GP/GLP/ GDP135VX, GP/GLP/GDP155VX) (C878, D878, E878) 1. Unscrew cylinder rod retainer. See Figure 34. CAUTION To prevent damage to sealing surfaces, use brass tools when removing seals and O-rings. 2. Remove piston, rod, and cylinder rod retainer as an assembly from cylinder shell. See Figure 34. 3. Remove cylinder rod retainer from cylinder rod. See Figure 34. 4. Remove spacer from cylinder rod. See Figure 34. 5. Remove and discard rod wiper, rod seal, backup rings, and O-rings from cylinder rod retainer. See Figure 34. CAUTION To prevent damage to cylinder rod, DO NOT clamp on the cylinder rod sealing surface. 6. Place cylinder rod in soft-jawed vise and remove piston nut and piston. See Figure 34. 7. Remove and discard piston seal and O-ring from piston. See Figure 34. Fork Positioner Cylinder Repair 2100 YRM 1328 48
  • 50. 1. CARRIAGE 2. FORK POSITIONER CYLINDER 3. HYDRAULIC FITTING 4. HYDRAULIC LINE Figure 32. Hydraulic Connections Fork Positioner Cylinder 2100 YRM 1328 Fork Positioner Cylinder Repair 49
  • 51. 1. UPPER FORK POSITIONER CYLINDER ROD END 2. UPPER FORK POSITIONER CYLINDER SHELL END 3. LOWER FORK POSITIONER CYLINDER ROD END 4. LOWER FORK POSITIONER CYLINDER SHELL END 5. CARRIAGE 6. SCREW 7. WASHER 8. BUSHING 9. NUT Figure 33. Fork Positioner Cylinder Mount Fork Positioner Cylinder Repair 2100 YRM 1328 50
  • 52. 1. CYLINDER ROD 2. ROD SEAL 3. ROD WIPER 4. CYLINDER ROD RETAINER 5. BACKUP RING 6. O-RING 7. SPACER 8. CYLINDER SHELL 9. PISTON 10. PISTON SEAL 11. PISTON NUT Figure 34. Fork Positioner Cylinder for Lift Truck Models GLC/GDC60VX, GLC/GDC70VX (GC/GLC/ GDC135VX, GC/GLC/GDC155VX) (C879, D879, E879) and GLP/GDP60VX, GLP/GDP70VX (GP/GLP/ GDP135VX, GP/GLP/GDP155VX) (C878, D878, E878) Manufactured Before August, 2012 CAUTION Carefully disassemble the fork positioner cylin- ders so the piston rods and sliding surfaces are not damaged. CAUTION To prevent damage to sealing surfaces use brass tools when removing seals and O-rings. NOTE: For lift trucks manufactured after August, 2012, perform Step 8 through Step 15 for lift truck models • GLC/GDC60VX, GLC/GDC70VX (GC/GLC/ GDC135VX, GC/GLC/GDC155VX) (D879, E879, F879) • GLP/GDP60VX, GLP/GDP70VX (GP/GLP/ GDP135VX, GP/GLP/GDP155VX) (D878, E878) 8. Place fork positioner on flat surface. Use clamps to hold fork positioner in position and blocks for clearance and to keep parts in alignment. See Figure 35. 9. Remove cylinder rod anchor plug. Move fork car- rier lug towards manifold and remove half-ring keepers. Move cylinder rod to fully retracted posi- tion shown in Figure 35. 10. Using retainer socket tool (see Special Tools), un- screw cylinder retainer to remove cylinder assem- bly from manifold. CAUTION DO NOT bend hydraulic tubes when removing them. Damage to hydraulic tubes can result if they are bent. NOTE: Make note of which end hydraulic tubes are removed from. If hydraulic tubes are removed from cylinder head end, install hydraulic tubes first, before installing cylinder and fork carrier lug assembly to manifold. 11. Disconnect hydraulic tubes at manifold. Remove clamps and remove cylinder and fork carrier lug assembly. See Figure 35. 12. Slide fork carrier lug from cylinder shell. Remove piston/rod assembly from cylinder shell. 2100 YRM 1328 Fork Positioner Cylinder Repair 51
  • 53. 1. ANCHOR PLUG 2. HALF-RING KEEPERS 3. FORK CARRIER LUG 4. RETAINER SOCKET TOOL 5. CYLINDER RETAINER 6. CYLINDER ROD 7. HEAD TIGHTENING TOOL 8. CYLINDER SHELL Figure 35. Fork Positioner Assembly for Lift Truck Models GLC/GDC60VX, GLC/GDC70VX (GC/GLC/ GDC135VX, GC/GLC/GDC155VX) (E879, F879) and GLP/GDP60VX, GLP/GDP70VX (GP/GLP/GDP135VX, GP/GLP/GDP155VX) (E878) Manufactured After August, 2012 NOTE: DO NOT scratch seal grooves. Use brass seal removal tools to pry items from grooves. 13. Remove all seals, O-ring, wear rings and bearings from components as shown in Figure 36. 14. If required, unscrew cylinder shell from head end using head tightening tool. See Special Tools. 15. Repeat Step 9 through Step 14 for other cylinder. NOTE: Perform Step 16 through Step 20 for lift truck model: • GLP/GDP80VX, GLP/GDP80VX9, GLP/ GDP90VX (GLP/GDP170VX, GLP/ GDP175VX36, GLP/GDP190VX) (A909, B909) 16. Loosen gland with spanner wrench. See Fig- ure 37. 17. Remove gland from shell. See Figure 37. 18. Remove and discard rod wiper from gland. See Figure 37. 19. Remove rod and piston assembly from shell. Drain hydraulic oil into container. See Figure 37. 20. Remove backup ring, piston ring, piston seal, and O-ring from piston. Discard backup ring, piston seal, and O-ring. See Figure 37. 21. Repeat Step 16 through Step 20 for other fork po- sitioner cylinder. Fork Positioner Cylinder Repair 2100 YRM 1328 52
  • 54. A. RETAINER B. PISTON C. FORK CARRIER LUG 1. RETAINER 2. MANIFOLD 3. CYLINDER SHELL 4. CYLINDER ROD 5. FORK CARRIER LUG 6. INTERNAL SPACER (IF RE- QUIRED) 7. HEAD END/MOUNTING FOOT 8. O-RING 9. U-CUP PRESSURE SEAL 10. WIPER SEAL 11. WEAR RING 12. TWO-PIECE PRESSURE SEAL 13. WIPERS 14. BEARINGS Figure 36. Fork Positioner Cylinder for Lift Truck Models GLC/GDC60VX, GLC/GDC70VX (GC/GLC/ GDC135VX, GC/GLC/GDC155VX) (E879, F879) and GLP/GDP60VX, GLP/GDP70VX (GP/GLP/GDP135VX, GP/GLP/GDP155VX) (E878) Manufactured After August, 2012 2100 YRM 1328 Fork Positioner Cylinder Repair 53
  • 55. Figure 37. Fork Positioner Cylinder Legend for Figure 37 1. ROD WIPER 2. GLAND 3. SHELL 4. ROD 5. PISTON 6. O-RING 7. PISTON SEAL 8. PISTON RING 9. BACKUP RING CLEAN WARNING Cleaning solvents can be flammable and toxic and can cause skin irritation. When using cleaning solvents, always follow the solvent manufactur- er's recommended safety procedures. Compressed air can move particles so they cause injury to the user or to other personnel. Make sure the path of the compressed air is away from all personnel. Wear protective goggles or a face shield to prevent injury to the eyes. CAUTION DO NOT allow cleaning solvent to come in contact with rubber components, as it will damage those components. 1. Clean all metal parts in solvent and dry with com- pressed air. INSPECT 1. Inspect gland for damage to threads and seal sur- faces. Replace if damaged. 2. Inspect piston for any damage to seal surfaces. Replace if damaged. 3. Inspect rod for damage to rod surface and ensure rod is not bent. Replace if damaged or bent. 4. Inspect inner surface of cylinder shell for damage. Replace cylinder assembly if damaged. Fork Positioner Cylinder Repair 2100 YRM 1328 54
  • 56. ASSEMBLE CAUTION To prevent damage to sealing surfaces, use brass tools when installing seal and O-ring. NOTE: Lubricate all internal parts of the cylinder with clean hydraulic oil during assembly. NOTE: For lift trucks manufactured before August, 2012, perform Step 1 through Step 7 for lift truck mod- els • GLC/GDC60VX, GLC/GDC70VX (GC/GLC/ GDC135VX, GC/GLC/GDC155VX) (C879, D879, E879, F879) • GLP/GDP60VX, GLP/GDP70VX (GP/GLP/ GDP135VX, GP/GLP/GDP155VX) (C878, D878, E878) 1. Install new O-rings, backup rings, rod seal, and rod wiper onto cylinder rod retainer. See Fig- ure 34. CAUTION To prevent damage to cylinder rod, DO NOT clamp on cylinder rod sealing surface. 2. Place cylinder rod in soft-jawed vise and install piston onto rod. See Figure 34. 3. Apply Loctite® 242 (Blue) to threads of piston nut. Install piston nut onto cylinder rod. Tighten piston nut to 75 N•m (55 lbf ft). See Figure 34. 4. Install new piston seal onto piston. See Figure 34. 5. Install cylinder rod retainer onto cylinder rod. See Figure 34. NOTE: For lift trucks manufactured after August, 2012, perform Step 6 through Step 15 for lift truck models • GLC/GDC60VX, GLC/GDC70VX (GC/GLC/ GDC135VX, GC/GLC/GDC155VX) (C879, D879, E879, F879) • GLP/GDP60VX, GLP/GDP70VX (GP/GLP/ GDP135VX, GP/GLP/GDP155VX) (D878, E878) NOTE: If necessary, use 400-grit emery cloth to break any sharp edge on the piston, retainer and cyl- inder shell chamfer angles and threads to prevent seal damage. 6. If the cylinder head end was removed during dis- assembly, replace cylinder head end O-ring and apply Loctite® 242 (Blue) to threads. Clamp head end in vice and tighten cylinder shell to 270 N•m (200 lbf ft). 7. Lubricate new seals, O-rings and wear rings with O-ring lube or hydraulic fluid. NOTE: Fork carrier lug bearings snap into their re- spective grooves. Bronze bearings consist of three separate segments. 8. Install new seals, O-rings, wear rings and fork carrier lug bearings as shown in Figure 36. 9. Twist seal into "figure 8" or half circle shape see Figure 38. 1. SEAL 2. ROD 3. RETAINER 4. PIN PUNCH 5. FLAT BRASS O-RING TOOL Figure 38. Installing Retainer Internal Seals for Lift Truck Models GLC/GDC60VX, GLC/GDC70VX (GC/GLC/GDC135VX, GC/GLC/GDC155VX) (E879, F879) and GLP/GDP60VX, GLP/GDP70VX (GP/GLP/GDP135VX, GP/GLP/GDP155VX) (E878) Manufactured After August, 2012 2100 YRM 1328 Fork Positioner Cylinder Repair 55
  • 57. NOTE: DO NOT use a pin punch with sharp edges. 10. Lubricate seal and force partially into grove using 15 mm (0.6 in.) pin punch. See Figure 38. NOTE: Make sure piston seal is not damaged by cyl- inder shell threads during installation. 11. Use flat brass O-ring tool to seat seals fully into groove. See Figure 38. 12. Slide fork carrier lug onto cylinder shell with the plug heads facing outwards. See Figure 35. 13. Align cylinder assembly to manifold and engage opposite cylinder rod into fork carrier. Install exter- nal spacer on cylinder rod, if required. Install cyl- inder retainer through opposite side of manifold and screw partially into cylinder shell. See Fig- ure 35. 14. Make sure cylinder is properly oriented with re- strictor fittings on backside. Engage tube and screw retainer fully into shell. Reclamp assembly to bench. 15. Tighten retainer to 165 N•m (120 lbf ft). Tighten hydraulic tubes at manifold and cylinder head end. 16. Repeat Step 6 through Step 15 for other cylinder. CAUTION To prevent damage to sealing surfaces, use brass tools when installing seal and O-ring. NOTE: Perform Step 17 through Step 23 for lift truck models • GLP/GDP80VX, GLP/GDP80VX9, GLP/ GDP90VX (GLP/GDP170VX, GLP/ GDP175VX36, GLP/GDP190VX) (A909, B909) NOTE: Lubricate all internal parts of the cylinder with clean hydraulic oil during assembly. 17. Install new O-ring and piston seal onto piston. See Figure 37. 18. Install piston ring onto piston and tighten. See Figure 37. 19. Install new backup ring onto piston. See Fig- ure 37. 20. Install rod and piston assembly into shell. See Figure 37. 21. Install rod wiper onto gland. See Figure 37. 22. Apply two drops of Loctite® 545 or equivalent on gland threads. 23. Install gland onto shell. Tighten gland to 350 to 400 N•m (258 to 295 lbf ft). See Figure 37. 24. Repeat Step 17 through Step 23 for other fork po- sitioner cylinder. INSTALL NOTE: Perform Step 1 for lift truck models • GLC/GDC60VX, GLC/GDC70VX (GC/GLC/ GDC135VX, GC/GLC/GDC155VX) (C879, D879, E879, F879) • GLP/GDP60VX, GLP/GDP70VX (GP/GLP/ GDP135VX, GP/GLP/GDP155VX) (C878, D878, E878) 1. Install fork positioner cylinder and carriage as de- scribed in Hang On Sideshift Carriage Repair in- stallation procedures located in the section Mast Repairs (S/N A513, A514, A613, A614, A702, A703, A704, A705, A706, A707, A751, A752, B513, B514, B586, B587, B588, B589, B590, B591, B749, B750, B751, B752, B753, B754) 4000YRM1250. NOTE: Perform Step 2 through Step 10 for lift truck model • GLP/GDP80VX, GLP/GDP80VX9, GLP/ GDP90VX (GLP/GDP170VX, GLP/ GDP175VX36, GLP/GDP190VX) (A909, B909) 2. Install upper fork positioner cylinder onto carriage as noted during removal. See Figure 33. 3. Install nut onto upper fork positioner cylinder shell end. See Figure 33. 4. Install bushing, washer, and screw onto upper fork positioner rod end and carriage. See Fig- ure 33. 5. Connect hydraulic fittings and lines onto upper fork positioner cylinder. See Figure 32. 6. Install lower fork positioner cylinder onto carriage as noted during removal. Install bushing, washer, and screw onto lower fork positioner rod end and carriage. See Figure 33. 7. Install nut onto lower fork positioner cylinder shell end. See Figure 33. Fork Positioner Cylinder Repair 2100 YRM 1328 56
  • 58. 8. Install bushing, washer, and screw onto lower fork positioner rod end and carriage. See Figure 33. 9. Connect hydraulic fittings and lines onto lower fork positioner cylinder. See Figure 32. 10. Install carriage as described in carriage install procedures in the section Mast Repair (S/N A513, A514, A613, A614, A643, A644, A683, A684) 4000YRM1406. Lift Cylinder Leak Check WARNING During the test procedures for the hydraulic sys- tem, use chains to fasten the load to the carriage to prevent it from falling. Keep all people away from the lift truck during the tests. DO NOT try to find hydraulic leaks by putting your hand on hydraulic components under pressure. Hydraulic oil can be injected into the body by the pressure. NOTE: The following checks are to be performed with a capacity load on forks and with hydraulic oil at normal operating temperature. 1. Operate hydraulic system. Put capacity load on forks. Use safety chain to hold load to carriage. Raise and lower load several times. Lower load and tilt mast forward and backward several times. Check for leaks. 2. Put mast in vertical position and raise carriage and load 2.5 m (8 ft). If carriage slowly lowers when control valve is in NEUTRAL position, there are leaks in hydraulic system. The maximum speed the carriage is al- lowed to lower is 100 mm (4 in.) per 10 minutes when hydraulic oil is at normal operating tempera- ture. 3. Check lift cylinders for internal leaks. Remove load from forks. Install valve in supply line be- tween main control valve and mast. Put capacity load on forks again. Raise carriage 2.5 m (8 ft). Close valve. If carriage or mast lower slowly, seals in lift cylinders have leaks. 4. If carriage does not move, open valve and check movement again. If carriage lowers when valve is open, check for leaks in hydraulic lines and fit- tings. If no leaks are found, main control valve can be worn or damaged. Remove load from forks. Seal Kit Installation EXTERNAL INSTALLATION (SEAL AND BACK-UP RING) NOTE: It is recommended that seal is heated in hy- draulic oil prior to installation to make it more flexible and pliable. 1. Lubricate seal, back-up ring, external installation sleeve and piston rod groove with hydraulic fluid. 2. Install wear ring onto piston rod assembly. See Figure 39. 3. Slide external installation sleeve over piston rod assembly and wear ring. See Figure 39. 4. Install back-up ring into piston rod groove. See Figure 39. 5. Slide seal over external installation sleeve and into piston rod groove. See Figure 39. 6. Remove external installation sleeve. INTERNAL INSTALLATION (PISTON ROD ASSEMBLY) 1. Insert internal installation sleeve into end of cylin- der tube. See Figure 40. 2. Install piston rod assembly into cylinder tube. See Figure 40. 3. Remove internal installation sleeve from cylinder tube and piston rod assembly. See Figure 40. 2100 YRM 1328 Lift Cylinder Leak Check 57
  • 59. 1. PISTON ROD ASSEMBLY 2. WEAR RING 3. EXTERNAL INSTALLATION SLEEVE 4. BACK-UP RING 5. SEAL Figure 39. Cylinder External Seal Installation 1. PISTON ROD ASSEMBLY 2. BACK-UP RING 3. SEAL 4. INTERNAL INSTALLATION SLEEVE 5. CYLINDER TUBE 6. WEAR RING Figure 40. Cylinder Internal Installation SPECIAL TOOLS Special Tool Cascade Part Number 6075028 6075087 Cylinder Repair (Mast S/N A513, A514, A613, A614, B513, B514) 2100 YRM 1328 58
  • 60. Torque Specifications FOR LIFT TRUCK MODELS GLC/ GDC60VX, GLC/GDC70VX (GC/GLC/ GDC135VX, GC/GLC/GDC155VX) (C879, D879, E879, F879) AND GLP/GDP60VX, GLP/GDP70VX (GP/GLP/GDP135VX, GP/GLP/GDP155VX) (C878, D878, E878) Tilt Cylinder Piston Rod Nut 400 to 440 N•m (295 to 325 lbf ft) Tilt Cylinder Gland 400 to 440 N•m (295 to 325 lbf ft) Tilt Cylinder Rod End to Rod Locknut- Mast End 90 N•m (66 lbf ft) Tilt Cylinder Rod End to Rod Capscrew - Frame End 90 N•m (66 lbf ft) Tilt Cylinder Anchor Pin Capscrew 90 N•m (66 lbf ft) Lift Cylinder Gland 375 to 450 N•m (277 to 332 lbf ft) Lift Cylinder Mount to Outer Mast Lock Nut 135 N•m (100 lbf ft) Lift Cylinder Chain Anchor Lock Nuts 370 N•m (273 lbf ft) Lift Cylinder Mounting Bolts to Outer Mast 555 N•m (410 lbf ft) Free- Lift Cylinder Gland 400 to 475 N•m (295 to 350 lbf ft) Free- Lift Cylinder Mount Lock Nut to Inner Mast 370 N•m (273 lbf ft) Free- Lift Cylinder Chain Anchor to Cylinder Mount Lock Nuts 135 N•m (100 lbf ft) Free- Lift Cylinder Hose Sheave Bracket to Chain Sheave Bracket Capscrews 33 N•m (25 lbf ft) Free- Lift Cylinder Hose Sheave Bracket to Hose Sheave Shaft Capscrews 33 N•m (25 lbf ft) FOR LIFT TRUCK MODEL GLP/GDP80VX, GLP/GDP80VX9, GLP/GDP90VX (GLP/ GDP170VX, GLP/GDP175VX36, GLP/ GDP190VX) (A909, B909) Tilt Cylinder Piston Rod Nut 400 to 440 N•m (295 to 325 lbf ft) Tilt Cylinder Gland 400 to 500 N•m (295 to 325 lbf ft) Rod End Hex Nut 120 to 130 N•m (89 to 96 lbf ft) Tilt Cylinder Rod End to Rod Capscrew- Mast End 95 to 100 N•m (70 to 74 lbf ft) Tilt Cylinder Rod End to Rod Capscrew - Frame End 66 N•m (49 lbf ft) Tilt Cylinder Anchor Pin Capscrew 90 N•m (66 lbf ft) Lift Cylinder Gland 350 to 400 N•m (258 to 295 lbf ft) Fork Positioner Cylinder Gland 350 to 400 N•m (258 to 295 lbf ft) Sideshift Cylinder Gland 350 to 400 N•m (258 to 295 lbf ft) 2100 YRM 1328 Torque Specifications 59
  • 61. General This section covers the repair of the wire harness connectors, pins, sockets, and splicing of wires. Deutsch Crimping Tool HOW TO STRIP A WIRE FOR USE WITH DEUTSCH CRIMPING TOOL 1. Choose the correct AWG for the contact being used. See Table 1. 2. See Table 1 for recommended strip length for contact size. Measure strip length from end of wire as shown in Figure 1. Figure 1. Strip Length Measurement 3. Strip the wire to the recommended strip length. A small piece of insulation should come off the wire after stripping. See Figure 2. Figure 2. Stripped Wire 4. Check for any broken strands or for a nick in the wire. If either exists, the wires are damaged and should be cut and stripped again. 5. Measure the exposed strands to verify strip length is correct. See Figure 3. Figure 3. Strip Length Measurement Verification 2200 YRM 1128 General 1