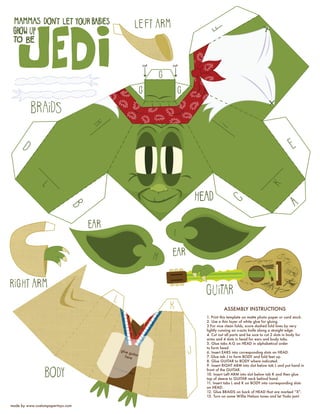
cut   cut


                                                                    ASSEMBLY INSTRUCTIONS
                                                          1. Print this template on matte photo paper or card stock.
                                                          2. Use a thin layer of white glue for gluing.
                                                          3.For nice clean folds, score dashed fold lines by very
                                                          lightly running an x-acto knife along a straight edge.
                                                          4. Cut out all parts and be sure to cut 2 slots in body for
                                                          arms and 4 slots in head for ears and body tabs.
                                                          5. Glue tabs A-G on HEAD in alphabetical order
                                                          to form head.
                                  glue                    6. Insert EARS into corresponding slots on HEAD.
                                      guit
                                    here ar               7. Glue tab J to form BODY and fold feet up.
                                                          8. Glue GUITAR to BODY where indicated.
                                                          9. Insert RIGHT ARM into slot below tab L and put hand in
                                                          front of the GUITAR.
                                                          10. Insert Left ARM into slot below tab K and then glue
                                                          top of sleeve to GUITAR neck behind hand.
                                                          11. Insert tabs L and K on BODY into corresponding slots
                                                          on HEAD.
                                                          12. Glue BRAIDS on back of HEAD that are marked “X”.
                                                          13. Turn on some Willie Nelson tunes and let Yoda jam!

made by www.custompapertoys.com

Yoda Paper Toy

  • 1.
    cut cut ASSEMBLY INSTRUCTIONS 1. Print this template on matte photo paper or card stock. 2. Use a thin layer of white glue for gluing. 3.For nice clean folds, score dashed fold lines by very lightly running an x-acto knife along a straight edge. 4. Cut out all parts and be sure to cut 2 slots in body for arms and 4 slots in head for ears and body tabs. 5. Glue tabs A-G on HEAD in alphabetical order to form head. glue 6. Insert EARS into corresponding slots on HEAD. guit here ar 7. Glue tab J to form BODY and fold feet up. 8. Glue GUITAR to BODY where indicated. 9. Insert RIGHT ARM into slot below tab L and put hand in front of the GUITAR. 10. Insert Left ARM into slot below tab K and then glue top of sleeve to GUITAR neck behind hand. 11. Insert tabs L and K on BODY into corresponding slots on HEAD. 12. Glue BRAIDS on back of HEAD that are marked “X”. 13. Turn on some Willie Nelson tunes and let Yoda jam! made by www.custompapertoys.com