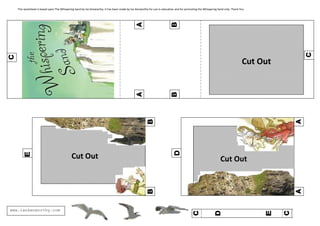
The Whispering Sand 3d Card                                                                                                             Using this instruction sheet and the template on the next
                                                                                                                                          page you can create your very own The Whispering Sand
                                                                                                                                          3d greetings card! Send them to your friends, impress
                                                                                                                                          your teachers and have a lot of fun in the process.
             What you will need:

                        Scissors                                                                                      1) The card should now stand up on its own. When the
                        Glue
                        Sticky tape
                                                                                                                         glue is dry find the arch shaped piece with Grandpa
                        String (cotton or thread)                                                                        on. Fold down the tabs marked ‘A’ and ‘D’. Using
                        A responsible adult                                                                              Glue affix the ‘A’ tabs onto the ‘A’ tabs on the u-
                                                                                                                         shaped piece.


                    10) The first step is to cut out all the individual pieces.                                                                      4) Carefully glue the tab marked ‘D’ to the ‘D’
                        You should end up with seven. One large piece,                                                                                  marked space on the thin strip
                        two smaller ones, a long strip and three seagull
                        shapes. Be careful not to cut off the tabs, each are
                        labelled with a letter of the alphabet.                                                         8) Repeat the above steps for the second arch shaped
                                                                                                                           piece attaching tabs ‘B’ and ‘E’ to the correct places


                            3) Once you have cut out all the separate pieces
                               you need to cut out the boxes labelled ‘cut out’.                                                     5) The card should now be complete and hopefully it will
                               The two smaller pieces (the ones featuring                                                               stand on its own. All you need to do is add the details. Cut
                               Annabeth and Grandpa) should end up as arch                                                              three short lengths of thread.
                               shapes with little tabs at the bottom. On the
                               large piece you may need some help to cut the
                               box out without breaking the frame shape.                                                     7) Attach the threads to the backs of the seagulls
                                                                                                                                using a small amount of sticky tape.
                     9) Fold the large piece along the dotted lines so
                        that it creates a large U-shape.
                                                                                                                                               6) Finally, attach the loose ends of the threads to the
                                       2) Fold the long strip along the two dotted lines. Smear                                                   rear of the arch shapes or the long strip so that
                                          a bit of glue onto the tabs marked ‘C’ and attach the                                                   your sea gulls hang down
                                          strip to the ‘C’ marked tabs on the U-shaped piece
                                                                                                                                                                                  www.iankenworthy.com
This worksheet is based upon The Whispering Sand by Ian Kenworthy. It has been made by Ian Kenworthy for use in education and for promoting the Whispering Sand only. Thank You


                                                                                                                                                                                Cut Out


                                            Cut Out                                                                                                            Cut Out


www.iankenworthy.com

Whispering Sand 3 D Card

  • 1.
    The Whispering Sand3d Card Using this instruction sheet and the template on the next page you can create your very own The Whispering Sand 3d greetings card! Send them to your friends, impress your teachers and have a lot of fun in the process. What you will need: Scissors 1) The card should now stand up on its own. When the Glue Sticky tape glue is dry find the arch shaped piece with Grandpa String (cotton or thread) on. Fold down the tabs marked ‘A’ and ‘D’. Using A responsible adult Glue affix the ‘A’ tabs onto the ‘A’ tabs on the u- shaped piece. 10) The first step is to cut out all the individual pieces. 4) Carefully glue the tab marked ‘D’ to the ‘D’ You should end up with seven. One large piece, marked space on the thin strip two smaller ones, a long strip and three seagull shapes. Be careful not to cut off the tabs, each are labelled with a letter of the alphabet. 8) Repeat the above steps for the second arch shaped piece attaching tabs ‘B’ and ‘E’ to the correct places 3) Once you have cut out all the separate pieces you need to cut out the boxes labelled ‘cut out’. 5) The card should now be complete and hopefully it will The two smaller pieces (the ones featuring stand on its own. All you need to do is add the details. Cut Annabeth and Grandpa) should end up as arch three short lengths of thread. shapes with little tabs at the bottom. On the large piece you may need some help to cut the box out without breaking the frame shape. 7) Attach the threads to the backs of the seagulls using a small amount of sticky tape. 9) Fold the large piece along the dotted lines so that it creates a large U-shape. 6) Finally, attach the loose ends of the threads to the 2) Fold the long strip along the two dotted lines. Smear rear of the arch shapes or the long strip so that a bit of glue onto the tabs marked ‘C’ and attach the your sea gulls hang down strip to the ‘C’ marked tabs on the U-shaped piece www.iankenworthy.com This worksheet is based upon The Whispering Sand by Ian Kenworthy. It has been made by Ian Kenworthy for use in education and for promoting the Whispering Sand only. Thank You
  • 2.
    This worksheet isbased upon The Whispering Sand by Ian Kenworthy. It has been made by Ian Kenworthy for use in education and for promoting the Whispering Sand only. Thank You Cut Out Cut Out Cut Out www.iankenworthy.com