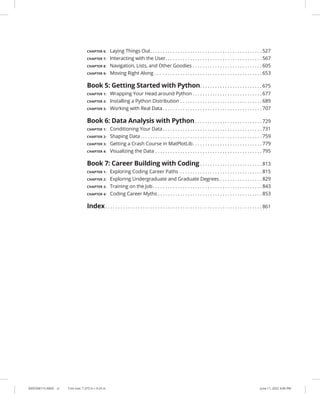
This document is the table of contents for the book "Coding All-in-One For Dummies, 2nd Edition". The book contains 5 mini-books covering various coding topics: 1) Getting Started with Coding, 2) Basic Web Coding, 3) Advanced Web Coding, 4) Creating Mobile Apps, and 5) Getting Started with Python. Each mini-book contains multiple chapters on coding fundamentals and languages like HTML, CSS, JavaScript, Flutter, and Python. The book is authored by several expert coders and coding educators and is intended to help readers learn coding from the ground up across multiple domains.


![Styling
with
Bootstrap
0005390139.INDD 157 Trim size: 7.375 in × 9.25 in June 13, 2022 7:39 AM
CHAPTER 6 Styling with Bootstrap 157
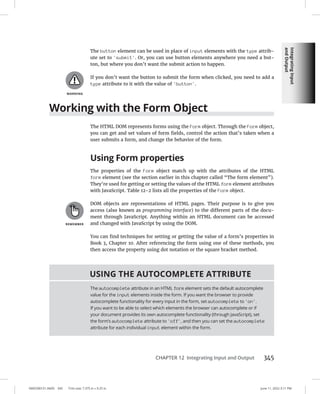
The dropdown-toggle class and the data-bs-toggle=dropdown attribute and
value work together to add drop-down menus to elements such as links. For addi-
tional toolbar options, see https://getbootstrap.com/docs/5.1/components/
navs-tabs/.
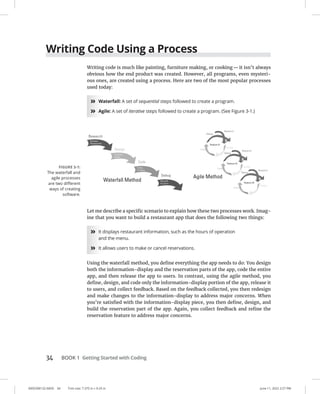
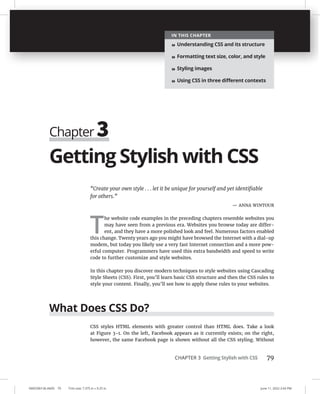
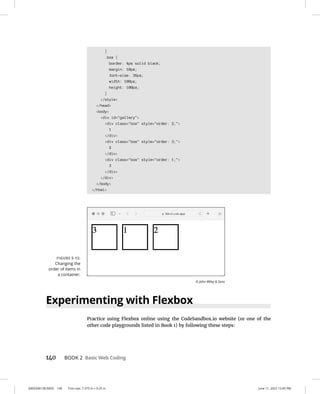
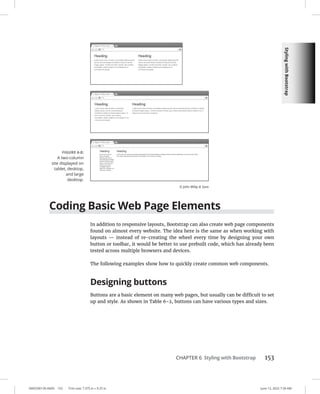
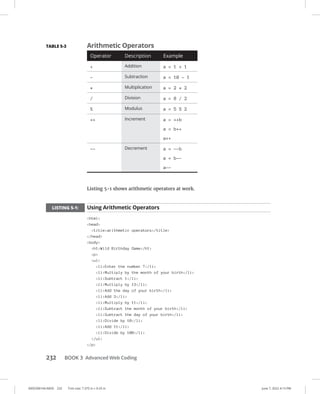
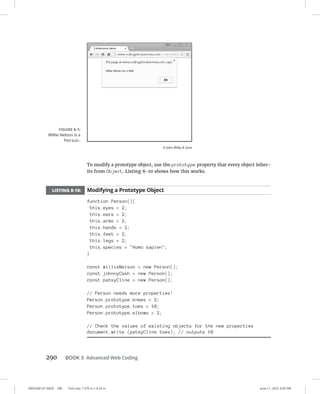
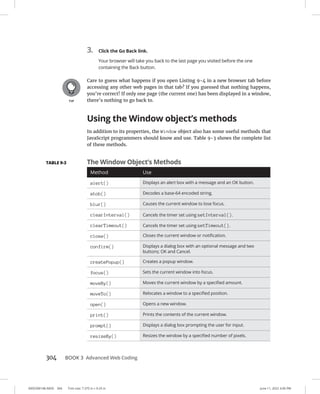
Adding icons
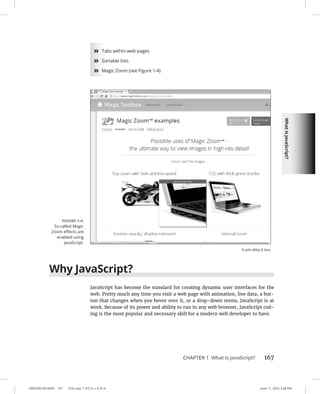
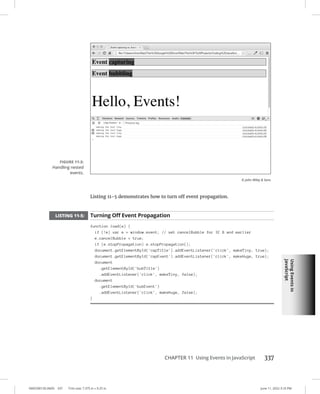
Icons are frequently used with buttons to help convey some type of action. For
example, your email program likely uses a button with a trash can icon to delete
emails. Icons quickly communicate a suggested action to users without much
explanation.
Bootstrap Icons is a free and open-source library of over 1,500 icons. To use
Bootstrap Icons, you first need to link to the icon library. One way to do this is by
putting the following link to the Bootstrap Icons CDN URL in the head of your
HTML page.
link rel=stylesheet href=https://cdn.jsdelivr.net/npm/bootstrap-icons@1.7.2/
font/bootstrap-icons.css
Once you’ve included the Bootstrap Icons in your page, you can browse the icons
at https://icons.getbootstrap.com/ to find the icon you want. To use the icon,
give an element the bi class along with the bi-[icon-name] class. As shown in
Figure 6-11, the following example code creates three buttons with a star, paper-
clip, and trash can icon.
Although you can include the entire library in your web page, if you’re only going
to use one of two, you can improve the loading time of your website by only
importing the icons you use. You can get the code for importing individual icons
at icons.getbootstrap.com/#install.
button type=button class=btn btn-lightStar
i class=bi bi-star/i
FIGURE 6-10:
Bootstrap toolbar
with drop-down
menus.
© John Wiley Sons](https://image.slidesharecdn.com/wwile445-231111022106-fdd944b6/85/w_wile445-pdf-180-320.jpg)


![Working
with
Variables
0005390142.INDD 207 Trim size: 7.375 in × 9.25 in June 11, 2022 2:52 PM
CHAPTER 3 Working with Variables 207
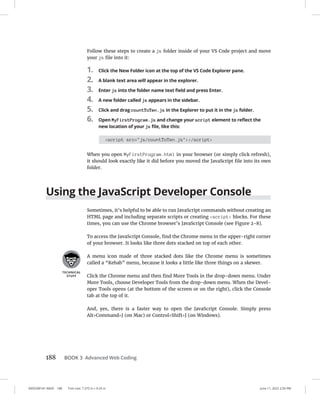
Escaping quotes
The solution to the problem of not being able to include quotes inside of a string
surrounded with that type of quotes is to preface the quotes with a . Adding a
backslash before a quote is called escaping the quotes.
String functions
JavaScript includes many helpful functions for working with and converting
strings.
Here’s a list of the most frequently used built-in string functions:
»
» charAt produces the character at a specified position. Note that the counting
of characters starts with 0:
let watzThisString = 'JavaScript is Fun!';
console.log (watzThisString.charAt(3));
// returns a
»
» concat combines one or more strings and returns the incorporated string:
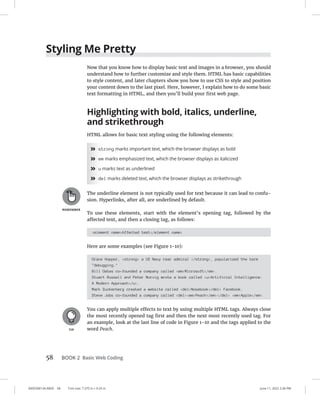
let watzThisString = 'JavaScript is Fun!';
console.log (watzThisString.concat(' We love
JavaScript!'));
// returns JavaScript is Fun! We love JavaScript!
»
» indexOf searches and returns the position of the first occurrence of the
searched character or substring within the string:
let watzThisString = 'JavaScript is Fun!';
console.log (watzThisString.indexOf('Fun');
// returns 14
»
» split splits strings into an array of substrings:
let watzThisString = 'JavaScript is Fun!';
console.log (watzThisString.split('F'));
// returns [JavaScript is , un!]
»
» substr extracts a portion of a string beginning at start through a speci-
fied length:
let watzThisString = 'JavaScript is Fun!';
console.log (watzThisString.substr(2,5));
// returns vaScr](https://image.slidesharecdn.com/wwile445-231111022106-fdd944b6/85/w_wile445-pdf-230-320.jpg)


![Understanding
Arrays
0005390143.INDD 213 Trim size: 7.375 in × 9.25 in June 11, 2022 2:55 PM
CHAPTER 4 Understanding Arrays 213
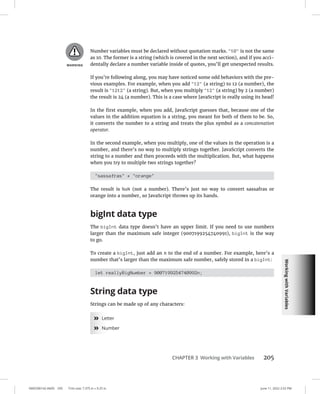
Arrays are a way to store groups of related data inside of a single variable. With
arrays, you can create lists containing any mix of string values, numbers, Boolean
values, objects, functions, any other type of data, and even other arrays!
Array Fundamentals
An array consists of array elements. Array elements are made up of the array
name and then an index number that is contained in square brackets. The individ-
ual value within an array is called an array element. Arrays use numbers (called the
index numbers) to access those elements. The following example illustrates how
arrays use index numbers to access elements:
myArray[0] = yellow balloon;
myArray[1] = red balloon;
myArray[2] = blue balloon;
myArray[3] = pink balloon;
In this example, the element with the index number of 0 has a value of yellow
balloon. The element with an index number 3 has a value of pink balloon.
Just as with any variable, you can give an array any name that complies with
the rules of naming JavaScript variables. By assigning index numbers in arrays,
JavaScript gives you the ability to make a single variable name hold a nearly
unlimited list of values.
Just so you don’t get too carried away, there actually is a limit to the number of
elements that you can have in an array, although you’re very unlikely to ever
reach it. The limit is 4,294,967,295 elements.
In addition to naming requirements (which are the same for any type of variable,
as described in Book 3, Chapter 3), arrays have a couple of other rules and special
properties that you need to be familiar with:
»
» Arrays are zero-indexed
»
» Arrays can store any type of data
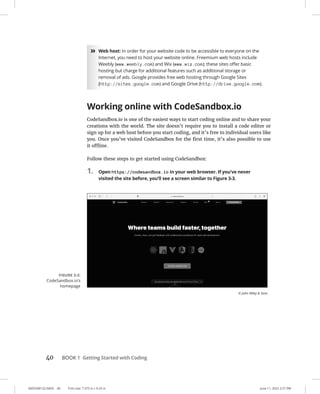
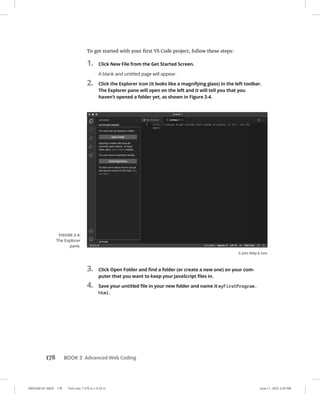
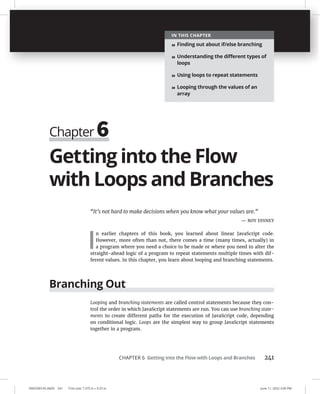
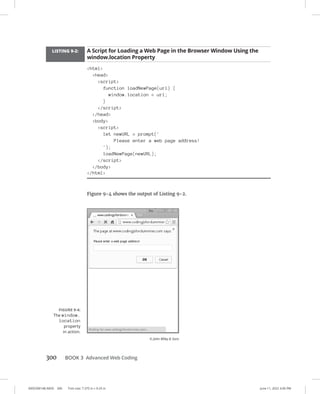
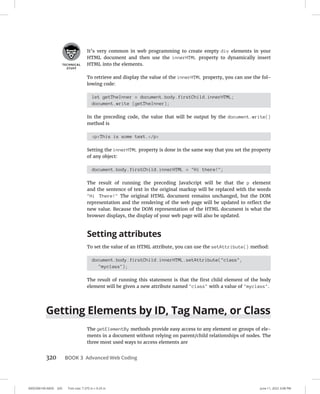
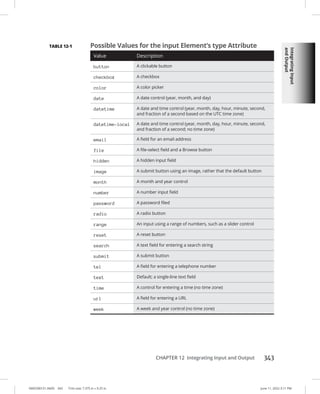
Arrays are zero-indexed
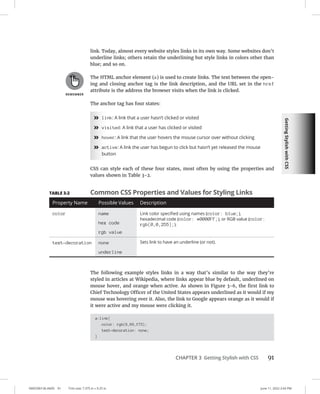
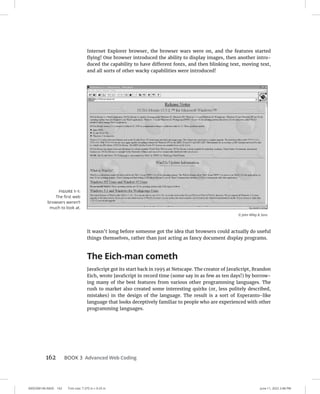
JavaScript doesn’t have fingers or toes. As such, it doesn’t need to abide by our
crazy human rules about starting counting at 1. The first element in a JavaScript
array always has an index number of 0 (see Figure 4-1).](https://image.slidesharecdn.com/wwile445-231111022106-fdd944b6/85/w_wile445-pdf-236-320.jpg)
![0005390143.INDD 214 Trim size: 7.375 in × 9.25 in June 11, 2022 2:55 PM
214 BOOK 3 Advanced Web Coding
What this means for you is that myArray[3] is actually the fourth element in the
array.
Zero-based numbering is a frequent cause of bugs and confusion for those new to
programming, but once you get used to it, it will become quite natural. You may
even discover that there are benefits to it, such as the ability to turn your guitar
amp up to the 11th level.
Arrays can store any type of data
Each element in an array can store any of the data types (see Book 3, Chapter 3),
as well as other arrays. Array elements can also contain functions and JavaScript
objects (see Book 3, Chapters 7 and 8).
While you can store any type of data in an array, you can also store elements that
contain different types of data, together, within one array, as shown in Listing 4-1.
LISTING 4-1: Storing Different Types of Data in an Array
item[0] = apple;
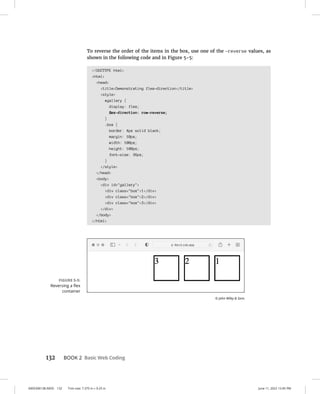
item[1] = 4+8;
item[2] = 3;
item[3] = item[2] * item[1];
FIGURE 4-1:
JavaScript is
similar to a
volume knob. It
starts counting at
zero!](https://image.slidesharecdn.com/wwile445-231111022106-fdd944b6/85/w_wile445-pdf-237-320.jpg)
![Understanding
Arrays
0005390143.INDD 215 Trim size: 7.375 in × 9.25 in June 11, 2022 2:55 PM
CHAPTER 4 Understanding Arrays 215
Creating Arrays
JavaScript provides two ways for you to create new arrays:
»
» new keyword
»
» Array literal notation
Using the new keyword method
The new keyword method uses new Array to create an array and add values to it.
let catNames = new Array(Larry, Fuzzball, Mr. Furly);
You may see this method used in your career as a programmer, and it’s a perfectly
acceptable way to create an array.
Many JavaScript experts recommend against using this method, however. The
biggest problem with using the new keyword is what happens when you forget
to include it. Forgetting to use the new keyword can dramatically change the way
your program operates.
Array literal
A much simpler and safer way to create arrays is to use what is called the array
literal method of notation. This is what it looks like:
let dogNames =[Shaggy, Tennessee, Dr. Spock];
That’s all there is to it. The use of square brackets and no special keywords means
that you’re less likely to accidentally leave something out. The array literal method
also uses less characters than the new keyword method — and when you’re trying
to keep your JavaScript as tidy as possible, every little bit helps!
Populating Arrays
You can add values to an array when it is first created, or you can simply create
an array and then add elements to it at a later time. Adding elements to an array
works exactly the same as creating or modifying a variable, except that you spec-
ify the index number of the element that you want to create or modify. Listing 4-2
shows an example of creating an empty array and adding elements to it.](https://image.slidesharecdn.com/wwile445-231111022106-fdd944b6/85/w_wile445-pdf-238-320.jpg)
![0005390143.INDD 216 Trim size: 7.375 in × 9.25 in June 11, 2022 2:55 PM
216 BOOK 3 Advanced Web Coding
LISTING 4-2: Populating an Empty Array
let peopleList =[];
peopleList[0] = Chris Minnick;
peopleList[1] = Eva Holland;
peopleList[2] = Abraham Lincoln;
You don’t always need to add elements sequentially. It is perfectly legal in
JavaScript to create a new element out of sequence. For example, in the array in
Listing 4-2, you could add the following:
peopleList[99] = Tina Turner;
Creating an array out of sequence like this effectively creates blank elements for
all of the indexes in between peopleList[2] and peopleList[99].
So, if you check the length property of the peopleList array after adding an ele-
ment with an index of 99, something interesting happens:
peopleList.length // returns 100
Even though you’ve only created four elements, JavaScript will say that the length
of an array is 100 because the length is based on the highest numbered index,
rather than on how many elements you’ve actually created.
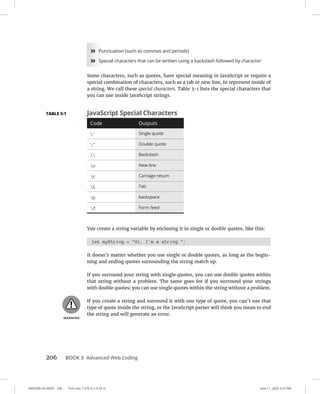
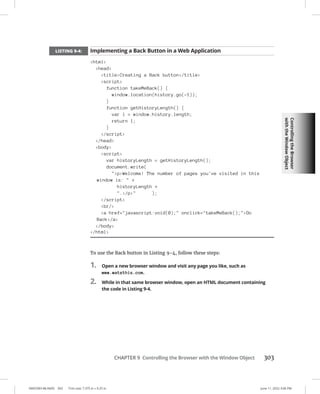
Understanding Multidimensional Arrays
Not only can you store arrays inside of arrays, you can even put arrays inside of
arrays inside of arrays. This can go on and on.
An array that contains an array is called a multidimensional array. To write a mul-
tidimensional array, you simply add more sets of square brackets to a variable
name. For example:
let listOfLists[0][0];
Multidimensional arrays can be difficult to visualize when you first start work-
ing with them. Figure 4-2 shows a pictorial representation of a multidimensional
array.](https://image.slidesharecdn.com/wwile445-231111022106-fdd944b6/85/w_wile445-pdf-239-320.jpg)
![Understanding
Arrays
0005390143.INDD 217 Trim size: 7.375 in × 9.25 in June 11, 2022 2:55 PM
CHAPTER 4 Understanding Arrays 217
You can also visualize multidimensional arrays as hierarchal lists or outlines. For
example:
Top Albums by Genre
1. Country
1.1 Johnny Cash:Live at Folsom Prison
1.2 Patsy Cline:Sentimentally Yours
1.3 Hank Williams:I’m Blue Inside
2. Rock
2.1 T-Rex:Slider
2.2 Nirvana:Nevermind
2.3 Lou Reed:Transformer
3. Punk
3.1 Flipper:Generic
3.2 The Dead Milkmen:Big Lizard in my Backyard
3.3 Patti Smith:Easter
Here is a code that would create an array based on Figure 4-2:
let bestAlbumsByGenre = []
bestAlbumsByGenre[0] = Country;
bestAlbumsByGenre[0][0] = Johnny Cash:Live at Folsom Prison
bestAlbumsByGenre[0][1] = Patsy Cline:Sentimentally Yours;
bestAlbumsByGenre[0][2] = Hank Williams:I'm Blue Inside;
bestAlbumsByGenre[1] = Rock;
bestAlbumsByGenre[1][0] = T-Rex:Slider;
bestAlbumsByGenre[1][1] = Nirvana:Nevermind;
bestAlbumsByGenre[1][2] = Lou Reed:Tranformer;
bestAlbumsByGenre[2] = Punk;
bestAlbumsByGenre[2][0] = Flipper:Generic;
bestAlbumsByGenre[2][1] = The Dead Milkmen:Big Lizard in my
Backyard;
bestAlbumsByGenre[2][2] = Patti Smith:Easter;](https://image.slidesharecdn.com/wwile445-231111022106-fdd944b6/85/w_wile445-pdf-240-320.jpg)
![0005390143.INDD 218 Trim size: 7.375 in × 9.25 in June 11, 2022 2:55 PM
218 BOOK 3 Advanced Web Coding
Accessing Array Elements
You can access the elements of arrays in the same way that you set them, using
square brackets and the index number. For example, to access the third element
in any array called myArray, you would use the following:
myArray[2];
To access elements in a multidimensional array, just add more square brackets to
get to the element you want:
bestAlbumsByGenre[0][1]; // returns Patsy_Cline:Sentimentally
Yours;
To test out setting and accessing the elements of an array, follow these steps:
1. Open your Chrome browser and then open the JavaScript Console.
You can open your JavaScript Console using the Chrome menu or by pressing
Command+Option+J on Mac or Ctrl+Shift+J in Windows.
FIGURE 4-2:
A pictorial
representation
of a
multidimensional
array.](https://image.slidesharecdn.com/wwile445-231111022106-fdd944b6/85/w_wile445-pdf-241-320.jpg)
![Understanding
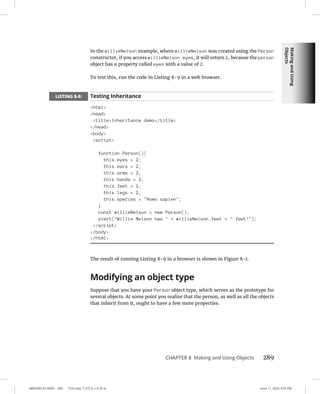
Arrays
0005390143.INDD 219 Trim size: 7.375 in × 9.25 in June 11, 2022 2:55 PM
CHAPTER 4 Understanding Arrays 219
2. In the console, type the following statement, followed by the Return or
Enter key, to create an array called lengthsOfString:
let lengthsOfString = [2,4,1.5,80];
3. Type the array name followed by the index number in square brackets to
retrieve the value of each array element.
For example:
lengthsOfString[0];
lengthsOfString[3];
lengthsOfString[2];
4. Enter an index number that doesn’t exist in the array.
For example:
lengthsOfString[4];
Notice that the value of this array element is undefined.
5. Type the following command to create a new variable to hold the total
length of string that you have:
let totalLength = lengthsOfString[0] + lengthsOfString[1] +
lengthsOfString[2] + lengthsOfString[3];
6. Finally, get the value of totalLength with this command:
totalLength;
Looping through arrays
As you can imagine, working with multiple values of arrays by typing the array
name and the index number can get tiring for your fingers after a while. Fortu-
nately, there are easier ways to work with all of the elements in an array. The most
common method is to use a programming construct called a loop. (We cover loops
in much more detail in Book 3, Chapter 6.)
It’s also possible to work with multiple elements in an array by using JavaScript’s
built-in array functions.](https://image.slidesharecdn.com/wwile445-231111022106-fdd944b6/85/w_wile445-pdf-242-320.jpg)
![0005390143.INDD 220 Trim size: 7.375 in × 9.25 in June 11, 2022 2:55 PM
220 BOOK 3 Advanced Web Coding
Array properties
You can access certain data about an array by accessing array properties. The way
to access array properties in JavaScript is by using dot notation. To use dot nota-
tion, you type the name of the array, followed by a period, followed by the prop-
erty you want to access. (You can find out much more about properties in Book 3,
Chapter 8.) Table 4-1 lists all of the properties of JavaScript arrays.
The most commonly used array property is length. You have already seen the
length property in action. Its purpose is to provide the number of elements in an
array, whether defined or undefined. For example:
let myArray = [];
myArray[2000] = surprise!;
myArray.length; // returns 2001
You can also use the length property to truncate an array:
myArray.length; // returns 2001
myArray.length = 10;
myArray.length; // returns 10
Array methods
JavaScript array methods (also known as array functions) provide handy ways to
manipulate and work with arrays. Table 4-2 shows a list of the most commonly
used array methods, along with descriptions of what they do or the values they
produce.
TABLE 4-1 JavaScript’s Array Properties
Property Return Value
prototype Allows the addition of properties and methods to an Array object
constructor A reference to the function that created the Array object’s prototype
length Either returns or sets the number of elements in an array](https://image.slidesharecdn.com/wwile445-231111022106-fdd944b6/85/w_wile445-pdf-243-320.jpg)
![0005390143.INDD 222 Trim size: 7.375 in × 9.25 in June 11, 2022 2:55 PM
222 BOOK 3 Advanced Web Coding
Using array methods
The syntax for using array methods differs depending on the particular method
you are trying to use. You do, however, access the functionality of every array
method the same way that you access array properties: by using dot notation.
For a complete reference to JavaScript array methods, with examples, visit
https://developer.mozilla.org/en-US/docs/Web/JavaScript/Reference/
Global_Objects/Array.
Listing 4-3 shows some examples of how to use JavaScript array methods.
LISTING 4-3: Commonly Used JavaScript Array Methods in Action
html
head
titlecommon array methods/title
/head
body
script
let animals = ['tiger', 'bear'];
let fruit = ['cantaloupe', 'orange'];
let dishes = ['plate', 'bowl', 'cup'];
let fruitsAndAnimals = fruit.concat(animals);
document.write(fruitsAndAnimals + 'br');
let whereIsTheTiger = animals.indexOf('tiger');
document.write(
'The tiger has an index number of: ' + whereIsTheTiger +
'br'
);
/script
/body
/html
Figure 4-3 shows the result of Listing 4-3 when run in a browser.](https://image.slidesharecdn.com/wwile445-231111022106-fdd944b6/85/w_wile445-pdf-245-320.jpg)


![0005390144.INDD 228 Trim size: 7.375 in × 9.25 in June 7, 2022 4:13 PM
228 BOOK 3 Advanced Web Coding
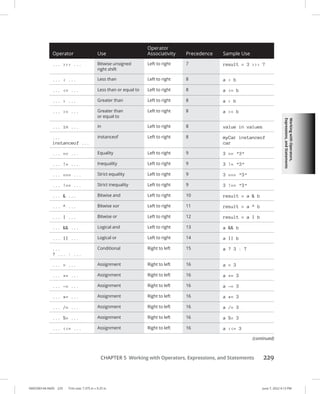
TABLE 5-1 Operator Precedence
Operator Use
Operator
Associativity Precedence Sample Use
( .. ) Grouping n/a 0 — highest
precedence
(1 + 3)
..... Operator
property access
Left to right 1 myCar.color
[ .. ] Array access Left to right 1 thingsToDo[4]
new ...() Creates an object
(with arguments list)
n/a 1 new Car (red)
function ...() Function call Left to right 2 function sum (1,2)
new ... Creates an object
(without a list)
Right to left 2 new Car
...++ Postfix increment n/a 3 number++
...-- Postfix decrement n/a 3 number--
! ... Logical not Right to left 4 !myVal
~ ... Bitwise not Right to left 4 ~myVal
- ... Negation Right to left 4 -aNumber
++ ... Prefix increment Right to left 4 ++aNumber
-- ... Prefix decrement Right to left 4 --aNumber
typeof ... typeof Right to left 4 typeof myVar
void ... void Right to left 4 void(0)
delete ... delete Right to left 4 delete
object.property
... * ... Multiplication Left to right 5 result = 3 * 7
... / ... Division Left to right 5 result = 3 / 7
... % ... Remainder Left to right 5 result = 7 % 3
... + ... Addition Left to right 6 result = 3 + 7
... - ... Subtraction Left to right 6 result = 3 - 7
... ... Bitwise left shift Left to right 7 result = 3 7
... ... Bitwise right shift Left to right 7 result = 3 7](https://image.slidesharecdn.com/wwile445-231111022106-fdd944b6/85/w_wile445-pdf-251-320.jpg)
![0005390144.INDD 230 Trim size: 7.375 in × 9.25 in June 7, 2022 4:13 PM
230 BOOK 3 Advanced Web Coding
Types of Operators
JavaScript has several types of operators. This section discusses the most used
types of operators.
Assignment operators
The assignment operator assigns the value of the operand on the right to the oper-
and on the left:
a = 5;
After this expression runs, the variable a will have a value of 5. You can also chain
assignment operators together to assign the same value to multiple variables, as
in the following example:
a = b = c = 5;
Because the operator’s associativity is right to left (see Table 5-1), 5 will first be
assigned to c, then the value of c will be assigned to b, and then the value of b will
be assigned to a. The result of this expression is that a, b, and c all have a value of 5.
What do you think the end value of a will be after these expressions are evaluated?
let b = 1;
let a = b += c = 5;
TABLE 5-1 (continued)
Operator Use
Operator
Associativity Precedence Sample Use
... = ... Assignment Right to left 16 a = 3
... = ... Assignment Right to left 16 a = 3
... = ... Assignment Right to left 16 a = 3
... ^= ... Assignment Right to left 16 a ^= 3
... |= ... Assignment Right to left 16 a |= 3
yield ... Yield Right to left 17 yield [expression]
... , ... Comma / sequence Left to right 18 a + b, c + d](https://image.slidesharecdn.com/wwile445-231111022106-fdd944b6/85/w_wile445-pdf-253-320.jpg)


![Working
with
Operators,
Expressions,
and
Statements
0005390144.INDD 237 Trim size: 7.375 in × 9.25 in June 7, 2022 4:13 PM
CHAPTER 5 Working with Operators, Expressions, and Statements 237
You can also use the OR operator to set a default value for variables. For example,
in the following expression, the value of myVar will be set to the value of x unless
x evaluates to a false value (for example, if x is undefined). Otherwise, it will be
set to the default value of 0.
let myVar = x||0;
Special operators
JavaScript’s special operators are a hodge-podge of miscellaneous other symbols
and words that perform other important functions.
Conditional operator
The conditional operator (also known as the ternary operator) uses three operands.
It evaluates a logical expression and then returns a value based on whether that
expression is true or false. The conditional operator is the only operator that
requires three operands. For example:
let isItBiggerThanTen = (value 10) ? greater than 10 : not
greater than 10;
Comma operator
The comma operator evaluates two operands and returns the value of the sec-
ond one. It’s most often used to perform multiple assignments or other opera-
tions within loops. It can also serve as a shorthand for initializing variables. For
example:
let a = 10 , b = 0;
Because the comma has the lowest precedence of the operators, its operands are
always evaluated separately.
delete operator
The delete operator removes a property from an object or an element from an
array.
When you use the delete operator to remove an element from an array, the length
of the array stays the same. The removed element will have a value of undefined.
let animals = [dog,cat,bird,octopus];
console.log (animals[3]); // returns octopus](https://image.slidesharecdn.com/wwile445-231111022106-fdd944b6/85/w_wile445-pdf-260-320.jpg)
![0005390144.INDD 238 Trim size: 7.375 in × 9.25 in June 7, 2022 4:13 PM
238 BOOK 3 Advanced Web Coding
delete animals[3];
console.log (animals[3]); // returns undefined
in operator
The in operator returns true if the specified value exists in an array or object.
let animals = [dog,cat,bird,octopus];
if (3 in animals) {
console.log (it's in there);
}
In this example, if the animals array has an element with the index of 3, the string
it's in there will print out to the JavaScript Console.
instanceof operator
The instanceof operator returns true if the object you specify is the type of
object that has been specified.
let myString = new String();
if (myString instanceof String) {
console.log(yup, it's a string!);
}
new operator
The new operator creates an instance of an object. As you can see in Book 3, Chap-
ter 8, JavaScript has several built-in object types, and you can also define your
own. In the following example, Date is a built-in JavaScript object, while Pet and
Flower are examples of objects that a programmer could create to serve custom
purposes within a program.
let today = new Date();
let bird = new Pet();
let daisy = new Flower();](https://image.slidesharecdn.com/wwile445-231111022106-fdd944b6/85/w_wile445-pdf-261-320.jpg)


![Getting
into
the
Flow
with
Loops
and
Branches
0005390145.INDD 247 Trim size: 7.375 in × 9.25 in June 11, 2022 3:00 PM
CHAPTER 6 Getting into the Flow with Loops and Branches 247
3. The test is done again to determine whether x is less than 10.
If so, the statements inside the loop are executed.
4. The test repeats, until the condition expression no longer evaluates to
true.
Figure 6-2 shows the result of running this for statement in the Chrome devel-
oper tools.
Looping through an array
You can use for loops to list the contents of an array by testing the value of the
counter against the value of the length property of the array. Be sure to remember
that JavaScript arrays are zero-indexed, so the value of any array.length will be
one more than the highest index numbered element in the array. That is why we
subtract 1 in Listing 6-2.
LISTING 6-2: Listing the Contents of an Array with for Loop
html
head
titleDifferent Area Codes/title
/head
body
script
let areaCodes = [770, 404, 718, 202, 901, 305,
312, 313, 215, 803];
FIGURE 6-2:
A loop that
counts from 1
to 9.
© John Wiley Sons
(continued)](https://image.slidesharecdn.com/wwile445-231111022106-fdd944b6/85/w_wile445-pdf-270-320.jpg)
![0005390145.INDD 248 Trim size: 7.375 in × 9.25 in June 11, 2022 3:00 PM
248 BOOK 3 Advanced Web Coding
for (x=0; x areaCodes.length - 1; x++){
document.write(Different Area Code: + areaCodes[x] +
br);
}
/script
/body
/html
Figure 6-3 shows the output of running the program detailed in Listing 6-2.
for . . . in loops
The for...in statements loop through the properties in an object. You can also
use a for...in statement to loop through the values of an array.
The for...in loop has an interesting quirk. It doesn’t care about the order of
properties or elements that it’s looping through. For this reason, and because
using for...in loop is slower, you’re better off using a standard for loop to loop
through array elements.
Objects are data containers that have properties (what they are) and methods
(what they do). Web browsers have a set of built-in objects that programmers can
use to control the function of the browser. The most basic of these is the Document
object. The write method of the Document object, for example, tells your browser
to insert a specified value into the HTML document.
FIGURE 6-3:
Output of listing
the contents of
an array with a
for loop.
© John Wiley Sons
LISTING 6-2: (continued)](https://image.slidesharecdn.com/wwile445-231111022106-fdd944b6/85/w_wile445-pdf-271-320.jpg)

![0005390145.INDD 250 Trim size: 7.375 in × 9.25 in June 11, 2022 3:00 PM
250 BOOK 3 Advanced Web Coding
LISTING 6-4: Outputting the Property Names and Values of the Document
Object with for . . . in
html
head
titledocument properties with values/title
style
.columns {
column-count: 6;
}
/style
/head
body
div class=columns
script
for (var prop in document) {
document.write(prop + ': ' + document[prop] + 'br');
}
FIGURE 6-4:
A list of all the
properties of
a Document
object using the
for...in loop.
© John Wiley Sons](https://image.slidesharecdn.com/wwile445-231111022106-fdd944b6/85/w_wile445-pdf-273-320.jpg)


![Getting
Functional
0005390146.INDD 259 Trim size: 7.375 in × 9.25 in June 11, 2022 3:03 PM
CHAPTER 7 Getting Functional 259
LISTING 7-1: A Program for Adding Numbers Using the for . . . in Loop
html
head
titleGet the total/title
/head
body
script
let myNumbers = [2,4,2,7];
let total = 0;
for (oneNumber in myNumbers){
total = total + myNumbers[oneNumber];
}
document.write(total);
/script
/body
/html
If you had multiple sets of numbers to add together, however, you’d need to write
a new loop statement specifically for each new array of numbers.
Listing 7-2 turns the program from Listing 7-1 into a function and then uses that
function to find the sums of the elements in several different arrays.
LISTING 7-2: A Function for Adding Numbers from an Array
html
head
titleGet the sum/title
/head
body
script
/**
*Adds elements in an array
*@param {Array.number} numbersToAdd
*@return {Number} sum
*/
function addNumbers(numbersToAdd) {
let sum = 0;
for (oneNumber in numbersToAdd) {
sum = sum + numbersToAdd[oneNumber];
}
(continued)](https://image.slidesharecdn.com/wwile445-231111022106-fdd944b6/85/w_wile445-pdf-282-320.jpg)
![0005390146.INDD 260 Trim size: 7.375 in × 9.25 in June 11, 2022 3:03 PM
260 BOOK 3 Advanced Web Coding
return sum;
}
let myNumbers = [2,4,2,7];
let myNumbers2 = [3333,222,111];
let myNumbers3 = [777,555,777,555];
let sum1 = addNumbers(myNumbers);
let sum2 = addNumbers(myNumbers2);
let sum3 = addNumbers(myNumbers3);
document.write(sum1 + br);
document.write(sum2 + br);
document.write(sum3 + br);
/script
/body
/html
LISTING 7-2: (continued)
DOCUMENTING JAVASCRIPT WITH JSDOC
It’s a good practice to always document your JavaScript code using a standard system.
The most widely used JavaScript documentation system, and thus the de-facto stan-
dard, is JSDoc.
The JSDoc language is a simple markup language that can be inserted inside of
JavaScript files. JSDoc is based on the JavaDoc system that’s used for documenting code
written in the Java programming language.
After you’ve annotated your JavaScript files with JSDoc, you can use a documentation
generator, such as jsdoc-toolkit, to create HTML files documenting the code.
JSDoc markup goes inside of special block comment tags. The only difference between
JSDoc markup and regular JavaScript block comments is that JSDoc markup starts with
/** and ends with */, whereas normal block comments in JavaScript only require one
asterisk after the beginning slash. The extra asterisk in JSDoc markup tags allows you
to create normal comment blocks without having them be a part of the generated
documentation.](https://image.slidesharecdn.com/wwile445-231111022106-fdd944b6/85/w_wile445-pdf-283-320.jpg)


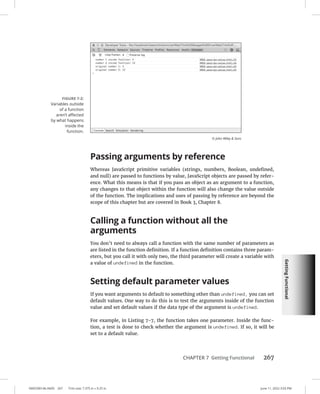

![Getting
Functional
0005390146.INDD 269 Trim size: 7.375 in × 9.25 in June 11, 2022 3:03 PM
CHAPTER 7 Getting Functional 269
Listing 7-9 demonstrates the use of the arguments object to present a welcome
message to someone with two middle names as well as someone with one middle
name.
LISTING 7-9: Using the Arguments Object to Define a Function that Can Add an
Arbitrary Number of Numbers
html
head
titleWelcome Message/title
/head
body
script
/**
*Flexible Welcome Message
*/
function flexibleWelcome() {
let welcome = 'Welcome,';
for (i = 0; i arguments.length; i++) {
welcome = welcome + arguments[i] + '';
}
return welcome;
}
document.write(
flexibleWelcome('John', 'Jacob', 'Jingleheimer', 'Schmidt') + 'br'
);
document.write(
flexibleWelcome('Christopher', 'James', 'Minnick') + 'br'
);
/script
/body
/html
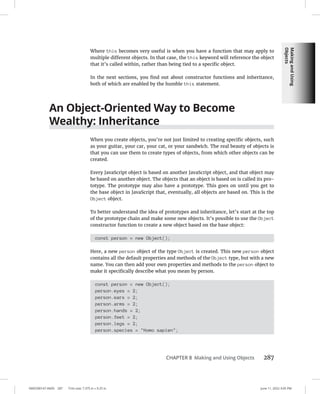
Understanding Function Scope
Variables created inside a function by passing arguments are only available within
that function. Programmers call this feature of JavaScript function scope. Variables
created inside of a function are destroyed when the function exits.
However, if you create a variable inside a function without using a var, let, or
const keyword, that variable becomes a global variable and can be changed and
accessed anywhere in your program.](https://image.slidesharecdn.com/wwile445-231111022106-fdd944b6/85/w_wile445-pdf-292-320.jpg)


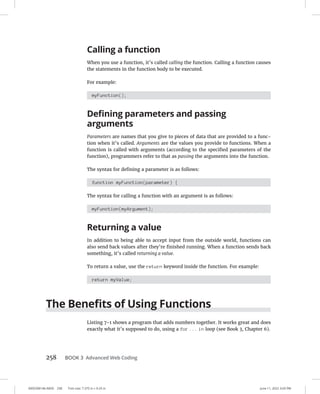
![Making
and
Using
Objects
0005390147.INDD 281 Trim size: 7.375 in × 9.25 in June 11, 2022 3:05 PM
CHAPTER 8 Making and Using Objects 281
Using dot notation
In dot notation, the name of an object is followed by a period (or dot), followed by
the name of the property that you want to get or set.
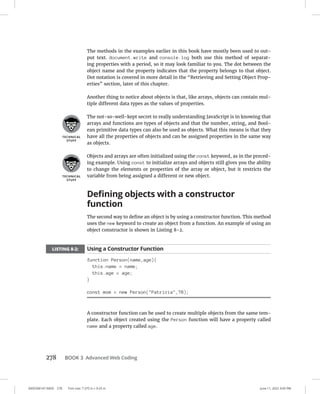
To create a new property called firstName in the person object or to modify the
value of an existing firstName property, you would use a statement like the
following:
person.firstName = Glenn;
If the firstName property doesn’t already exist, this statement will create it. If it
does exist, it will update it with a new value.
To retrieve the value of a property using dot notation, you would use the exact
same syntax, but you would move the object and property names (called the prop-
erty accessor) into a different position in the statement. For example, if you want
to concatenate the values of person.firstName and person.lastName and assign
them to a new variable called fullName, you do the following:
let fullname = person.firstName + person.lastName;
Or, to write out the value of a person.firstName to your browser console, just use
the property accessor as you would any variable; such as
console.log(person.firstName);
Dot notation is generally faster to type and easier to read. It’s an easier way to set
and retrieve object property values.
Using square bracket notation
Square bracket notation uses, you guessed it, square brackets after the object name
in order to get and set property values. To set a property value with square bracket
notation, put the name of the property in quotes inside square brackets, like this:
person[firstName] = Iggy;
Square bracket notation has a couple of capabilities that dot notation doesn’t. The
main one is that you can use variables inside of square bracket notation for cases
where you don’t know the name of the property that you want to retrieve when
you’re writing your program.](https://image.slidesharecdn.com/wwile445-231111022106-fdd944b6/85/w_wile445-pdf-304-320.jpg)
![0005390147.INDD 282 Trim size: 7.375 in × 9.25 in June 11, 2022 3:05 PM
282 BOOK 3 Advanced Web Coding
The following example does the exact same thing as the preceding example, but
with a variable inside of the square brackets rather than a literal string. Using this
technique, you can make a single statement that can function in many different
circumstances, such as in a loop or a function:
let personProperty = firstName;
person[personProperty] = Iggy;
Listing 8-4 shows a simple program that creates an object called chair, then
loops through each of the object’s properties and asks the user to input values
for each. Once the user has entered a value for each of the properties, the write-
ChairReceipt function is called, which prints out each property along with the
value the user entered.
LISTING 8-4: Chair Configuration Script
html
head
titleThe WatzThis? Chair Configurator/title
/head
body
script
let myChair = {
cushionMaterial: '',
numberOfLegs: '',
legHeight: '',
};
function configureChair() {
let userValue;
for (const property in myChair) {
if (myChair.hasOwnProperty(property)) {
userValue = prompt('Enter a value for ' + property);
myChair[property] = userValue;
}
}
}](https://image.slidesharecdn.com/wwile445-231111022106-fdd944b6/85/w_wile445-pdf-305-320.jpg)
![Making
and
Using
Objects
0005390147.INDD 283 Trim size: 7.375 in × 9.25 in June 11, 2022 3:05 PM
CHAPTER 8 Making and Using Objects 283
function writeChairReceipt() {
document.write(
'h2Your chair will have the following
configuration:/h2'
);
for (const property in myChair) {
if (myChair.hasOwnProperty(property)) {
document.write(property + ': ' + myChair[property] +
'br');
}
}
}
configureChair();
writeChairReceipt();
/script
/body
/html
Deleting Properties
You can delete properties from objects by using the delete operator. Listing 8-5
demonstrates how this operator works.
LISTING 8-5: Using the delete Operator
const myObject = {
var1 : the value,
var2 : another value,
var3 : yet another
};
// delete var2 from myObject
delete myObject.var2;
// try to write the value of var2
document.write(myObject.var2); // result is an error](https://image.slidesharecdn.com/wwile445-231111022106-fdd944b6/85/w_wile445-pdf-306-320.jpg)


![Controlling
the
Browser
with
the
Window
Object
0005390148.INDD 297 Trim size: 7.375 in × 9.25 in June 11, 2022 3:06 PM
CHAPTER 9 Controlling the Browser with the Window Object 297
/style
/head
body
div class=columns
script
for (var prop in navigator) {
document.write(prop + ': ' + navigator[prop] + 'br');
}
/script
/div
/body
/html
Figure 9-3 shows the output of Listing 9-1 when opened in a web browser.
If you run Listing 9-1 yourself, you’ll notice something interesting about the
output: The values for the appName and userAgent properties are seemingly just
plain wrong. For example, the browser used to generate Figure 9-3 was Google
Chrome, but appName lists it as Netscape.
This misleading value is a relic from the days when programmers used the prop-
erties of the Navigator object to detect whether a user was using a particular
browser and supported certain features.
FIGURE 9-3:
Listing all the
properties of
the Navigator
object with
their values.
© John Wiley Sons](https://image.slidesharecdn.com/wwile445-231111022106-fdd944b6/85/w_wile445-pdf-320-320.jpg)


![Manipulating
Documents
with
the
DOM
0005390149.INDD 309 Trim size: 7.375 in × 9.25 in June 11, 2022 3:08 PM
CHAPTER 10 Manipulating Documents with the DOM 309
Understanding Node Relationships
HTML DOM trees resemble family trees in the hierarchical relationship between
nodes. In fact, the technical terms used to describe relationships between nodes
in a tree take their names from familial relationships.
»
» Every node, except the root node, has one parent.
»
» Each node may have any number of children.
»
» Nodes with the same parent are siblings.
Because HTML documents often have multiple elements that are of the same type,
the DOM allows you to access distinct elements in a node list using an index num-
ber. For example, you can refer to the first p element in a document as p[0], and
the second p element node as p[1].
Although a node list may look like an array, it’s not. You can loop through the
contents of a node list, but you can’t use array methods on node lists.
FIGURE 10-1:
A representation
of the Document
Object Model for
Listing 10-1.](https://image.slidesharecdn.com/wwile445-231111022106-fdd944b6/85/w_wile445-pdf-332-320.jpg)

![Manipulating
Documents
with
the
DOM
0005390149.INDD 311 Trim size: 7.375 in × 9.25 in June 11, 2022 3:08 PM
CHAPTER 10 Manipulating Documents with the DOM 311
pFirst/p !-- 1st child of section element,
sibling of 2 p elements --
pSecond/p
!-- 2nd p child of section element,
sibling of 2 p elements --
pThird/p
!-- 3rd p child of section element,
sibling of 2 p elements --
/section
h1Nodes in the section element/h1
script
let myNodelist = document.body.childNodes[1].childNodes;
for (let i = 0; i myNodelist.length; i++) {
document.write(myNodelist[i] + 'br');
}
/script
/body
/html
Figure 10-2 shows what the output of Listing 10-3 looks like in a browser. Notice
that the first child node of the section element is a text node. If you look closely
at the HTML markup in Listing 10-3, you’ll see that there is a single space between
the opening section tag and the comment. Even something as simple as a single
space (or a tab or a line break) creates a node in the DOM tree. This fact needs to
be taken into consideration when you’re navigating the DOM using relationships
between nodes.
The HTML DOM also provides a couple of keywords for navigating nodes using
their positions relative to their siblings or parents. The relative properties are:
»
» firstChild: References the first child of a node
»
» lastChild: References the last child of the node
»
» nextSibling: References the next node with the same parent node
»
» previousSibling: References the previous node with the same parent node
Listing 10-4 shows how you can use these relative properties to traverse the DOM.](https://image.slidesharecdn.com/wwile445-231111022106-fdd944b6/85/w_wile445-pdf-334-320.jpg)
![0005390149.INDD 312 Trim size: 7.375 in × 9.25 in June 11, 2022 3:08 PM
312 BOOK 3 Advanced Web Coding
LISTING 10-4: Using firstChild and lastChild to Highlight Navigation Links
html
head
titleIguanas Are No Fun/title
script
function boldFirstAndLastNav() {
document.body.childNodes[1].firstChild.style
.fontWeight = 'bold';
document.body.childNodes[1].lastChild.style
.fontWeight = 'bold';
}
/script
/head
body
nav
a href=home.htmlHome/a |
a href=why.htmlWhy Are Iguanas No Fun?/a |
a href=what.htmlWhat Can Be Done?/a |
a href=contact.htmlContact Us/a
FIGURE 10-2:
Viewing the
output of
Listing 10-3.
© John Wiley Sons](https://image.slidesharecdn.com/wwile445-231111022106-fdd944b6/85/w_wile445-pdf-335-320.jpg)


![0005390149.INDD 322 Trim size: 7.375 in × 9.25 in June 11, 2022 3:08 PM
322 BOOK 3 Advanced Web Coding
getElementsByTagName
The getElementsByTagName method returns a node list of all the elements with
the specified tag name. For example, in Listing 10-6, getElementsByTagName is
used to select all h1 elements and change their innerHTML properties to sequential
numbers.
LISTING 10-6: Using getElementsByTagName to Select and Change Elements
html
head
titleUsing getElementsByTagName/title
script
function numberElements(tagName) {
let getTags = document.getElementsByTagName(tagName);
for (let i = 0; i getTags.length; i++) {
getTags[i].innerHTML = i + 1;
}
}
/script
/head
body
h1this text will go away/h1
h1this will get overwritten/h1
h1JavaScript will erase this/h1
script
numberElements('h1');
/script
/body
/html
getElementsByClassName
The getElementsByClassName method works in much the same way as the
getElementsByTagName, but it uses the values of the class attribute to select ele-
ments. The function in Listing 10-7 selects elements with a class of error and
will change the value of their innerHTML property.](https://image.slidesharecdn.com/wwile445-231111022106-fdd944b6/85/w_wile445-pdf-345-320.jpg)
![Manipulating
Documents
with
the
DOM
0005390149.INDD 323 Trim size: 7.375 in × 9.25 in June 11, 2022 3:08 PM
CHAPTER 10 Manipulating Documents with the DOM 323
LISTING 10-7: Using getElementsByClassName to Select and Change Elements
html
head
titleUsing getElementsByClassName/title
script
function checkMath(result) {
let userMath = document.getElementById('answer1').value;
let errors = document.getElementsByClassName('error');
if (parseInt(userMath) != parseInt(result)) {
errors[0].innerHTML =
'That's wrong. You entered ' +
userMath +
'. The answer is ' +
result;
} else {
errors[0].innerHTML = 'Correct!';
}
}
/script
/head
body
label for=number14+1 = /label
input type=text id=answer1 value=/
button id=submit onclick=checkMath(4+1);Check your math!/button
h1 class=error/h1
/body
/html
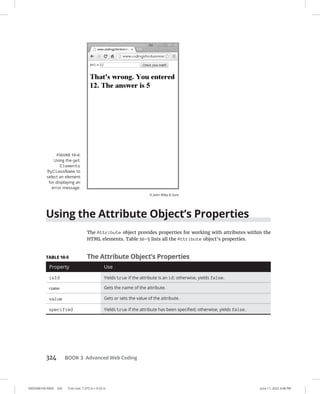
The result of running Listing 10-7 in a web browser and entering a wrong answer
is shown in Figure 10-4.
Notice that Listing 10-7 uses an onclick attribute inside the button element. This
is an example of a DOM event handler attribute. You can find out more about event
handlers in Book 3, Chapter 11.](https://image.slidesharecdn.com/wwile445-231111022106-fdd944b6/85/w_wile445-pdf-346-320.jpg)
![Manipulating
Documents
with
the
DOM
0005390149.INDD 325 Trim size: 7.375 in × 9.25 in June 11, 2022 3:08 PM
CHAPTER 10 Manipulating Documents with the DOM 325
Creating and Appending Elements
To create a new element in an HTML document, use the document.create
Element() method. When you use createElement(), a new beginning and end
tag of the type you specify will be created.
Listing 10-8 shows an example of how you can use this method to dynamically
create a list in an HTML document from an array.
LISTING 10-8: Using document.createElement() to Generate a Table from an Array
html
head
titleGenerating a list/title
/head
body
h1Here are some types of balls/h1
ul id=ballList/ul
script
let typeOfBall = ['basket', 'base', 'soccer', 'foot', 'hand'];
for (let i = 0; i typeOfBall.length; i++) {
let listElement = document.createElement('li');
listElement.innerHTML = typeOfBall[i];
document.getElementById('ballList').appendChild(listElement);
}
/script
/body
/html
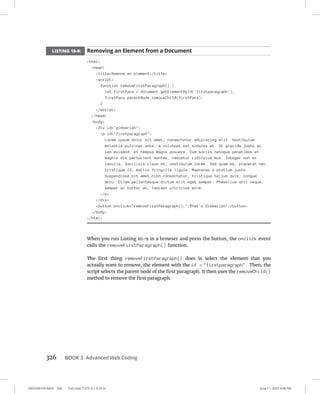
Removing Elements
For all the great things that it lets you do with HTML documents, the HTML DOM
is not highly regarded by professional JavaScript programmers. It has a number of
oddities and tends to make some things more difficult than they should be.
One of the big faults with the DOM is that it doesn’t provide a way to directly
remove an element from a document. Instead, you have to tell the DOM to find the
parent of the element you want to remove and then tell the parent to remove its
child. It sounds a little confusing, but Listing 10-9 should clear it all up.](https://image.slidesharecdn.com/wwile445-231111022106-fdd944b6/85/w_wile445-pdf-348-320.jpg)


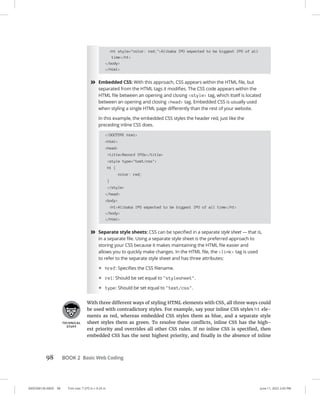
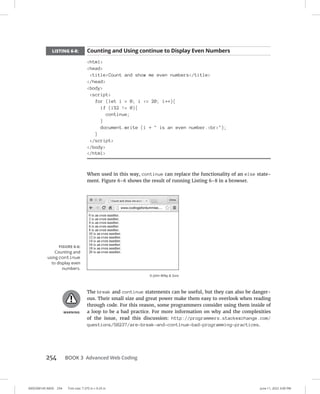
![0005390151.INDD 346 Trim size: 7.375 in × 9.25 in June 11, 2022 3:11 PM
346 BOOK 3 Advanced Web Coding
To get the value of the name property of the first form in a document, you could
use the following statement:
document.getElementByTagName(form)[0].name
A more common way to access a form is by assigning it an id attribute and using
getElementById to select it.
The DOM provides another, more convenient method for accessing forms: the
forms collection. The forms collection lets you access the forms in a document in
two different ways:
»
» By index number: When a form element is created in the document, it is
assigned an index number, starting with zero. To access the first form in the
document, use document.forms[0].
»
» By name: You can also access forms using the name attribute of the form
element. For example, to get the value of the action property of a form with a
name of subscribeForm, you would use document.forms.subscribeForm.
action. Or you can use the square brackets method of accessing properties
and write document.forms[subscribeForm].action.
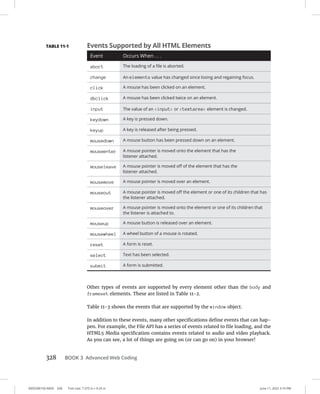
TABLE 12-2 Form Object Properties
Property Use
acceptCharset Gets or sets a list of character sets that are supported by the server.
action Gets or sets the value of the action attribute of the form element.
autocomplete Gets or sets whether input elements can have their values automatically completed by
the browser.
encoding Tells the browser how to encode the form data (either as text or as a file). This property
is synonymous with enctype.
enctype Tells the browser how to encode the form data (either as text or as a file).
length Gets the number of controls in the form.
method Gets or sets the HTTP method the browser uses to submit the form.
name Gets or sets the name of the form.
noValidate Indicates that the form does not need to be validated upon submittal.
target Indicates the place to display the results of a submitted form.](https://image.slidesharecdn.com/wwile445-231111022106-fdd944b6/85/w_wile445-pdf-369-320.jpg)
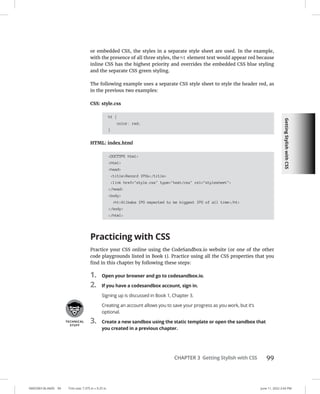
![0005390151.INDD 348 Trim size: 7.375 in × 9.25 in June 11, 2022 3:11 PM
348 BOOK 3 Advanced Web Coding
function submitForm() {
document.forms.subscribeForm.submit();
}
function resetForm() {
document.forms.subscribeForm.reset();
}
/script
/head
body onload=setFormDefaults();
form name=subscribeForm
h2Subscribe to our mailing list/h2
label for=mce-EMAILEmail Address /label
input type=email value= name=EMAIL id=mce-EMAIL/
button type=button id=btnSubscribeSubscribe!/button
button type=button id=btnResetReset/button
/form
/body
/html
Accessing form elements
JavaScript offers several ways to access form input fields and their values. These
ways are not all created equal, however, and differences of opinion exist among
JavaScript programmers as to which technique is the best. The following list pres-
ents the different techniques and their benefits and drawbacks:
»
» Use the index number of the form and of its input fields. For example, to
access the first input field in the first form, you could use the following code:
document.forms[0].elements[0]
Avoid the preceding technique because it relies on the structure of the
document and the order of the elements within the form not to change. As
soon as someone decides that the email field should come before the first
name field in the form, your whole script will break.
»
» Use the name of the form and the name of the input field. For example:
document.myForm.firstName
This technique has the benefit of being easy to read and easy to use. It’s
supported by every browser (and has been since very early in the develop-
ment of the DOM).
LISTING 12-3: (continued)](https://image.slidesharecdn.com/wwile445-231111022106-fdd944b6/85/w_wile445-pdf-371-320.jpg)


![Embracing
AJAX
and
JSON
0005390153.INDD 379 Trim size: 7.375 in × 9.25 in June 11, 2022 3:15 PM
CHAPTER 14 Embracing AJAX and JSON 379
If you examine gasbuddy.com in the Network tab, you’ll find that some requests
have responses that look something like the code shown in Listing 14-2.
LISTING 14-2: Part of a Response to an AJAX Request on gasbuddy.com
([{id:tuwtvtuvvvv,base:[351289344,822599680],zrange:[11,11],
layer:m@288429816,features:[{
id:17243857463485476481,a:[0,0],bb:[-8,-8,7,7,-47,7,48,22,-41,19,41,34],c:{1:
{title:Folsom Lake State Recreation Area},4:{type:1}}}]},{id:tuwtvtuvvvw,
zrange:[11,11],layer:m@288429816},{id:tuwtvtuvvwv,base:[351506432,824291328],
zrange:[11,11],layer:m@288429816,features:[{id:8748558518353272790,a:[0,0],
bb:[-8,-8,7,7,-41,7,41,22],c:{1:{title:Deer Creek Hills},4:{type:1}}}]},
{id:tuwtvtuvvww,zrange:[11,11],layer:m@288429816}])
If you take a small piece of data out of this block of code and reformat it, you get
something like Listing 14-3, which should look more familiar to you.
LISTING 14-3: gasbuddy.com Response Data, Reformatted
{id:tuwtvtuvvvv,
base:[351289344,822599680],
zrange:[11,11],
layer:m@288429816,
features:[{
id:17243857463485476481,
a:[0,0],
bb:[-8,-8,7,7,-47,7,48,22,-41,19,41,34],
c:{
1:{title:Folsom Lake State Recreation Area},
4:{type:1}
}}
]}
}
By looking at the format of the data, you can see that it looks suspiciously like
the name:value format of a JavaScript object literal, also known as a comma-
separated list of name-value pairs enclosed in curly braces.
The main reason JSON is so easy to use is because it’s already in a format that
JavaScript can work with, so no conversion is necessary. For example, Listing 14-4
shows a JSON file containing information about this book.](https://image.slidesharecdn.com/wwile445-231111022106-fdd944b6/85/w_wile445-pdf-402-320.jpg)


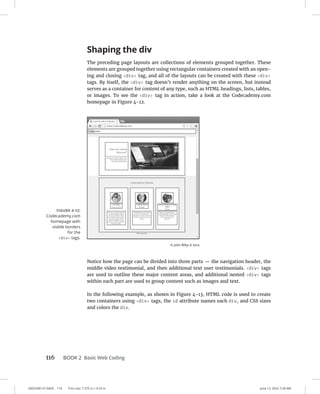
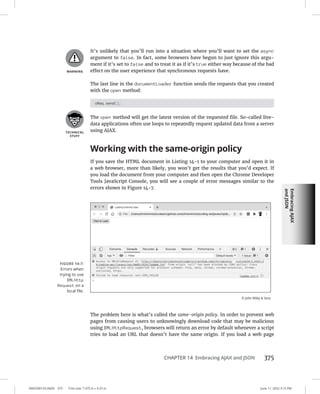
![0005390156.INDD 456 Trim size: 7.375 in × 9.25 in June 11, 2022 3:23 PM
456 BOOK 4 Creating Mobile Apps
For more information, visit https://pub.dev/packages/device_info_plus.
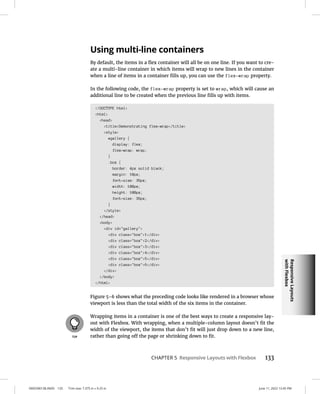
Adding another widget
Relationships between widgets can be described in terms that are similar to a
family tree. In the previous examples, the Text widget is a child of the Center
widget and the Center widget is a child of the body. In both cases, the widgets are
only children.
How do you put two children on a scaffold’s body? You might be tempted to try this:
// DON'T DO THIS:
body: Center(
child: Text(Hello world!),
child: AnotherWidget(...)
)
But a constructor call can’t have two parameters with the same name. So, what
can you do?
Flutter has a Column widget. The Column widget’s constructor has a children
parameter. The Column widget’s children line up, one under another, on the
screen. That sounds promising! Listing 3-6 has some code, and Figure 3-17 has
the resulting display.
LISTING 3-6: More Widgets, Please!
import 'package:flutter/material.dart';
main() = runApp(App0306());
class App0306 extends StatelessWidget {
Widget build(BuildContext context) {
return MaterialApp(
home: Scaffold(
appBar: AppBar(
title: Text(Adding Widgets),
),
body: Column(
children: [
Text(
Hello world!,
textScaleFactor: 2.0,
),
Text(It's lonely for me inside this phone.)
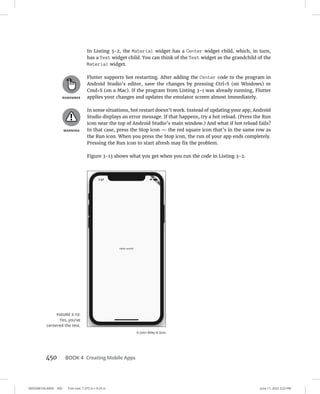
],](https://image.slidesharecdn.com/wwile445-231111022106-fdd944b6/85/w_wile445-pdf-479-320.jpg)


![“Hello”
from
Flutter
0005390156.INDD 461 Trim size: 7.375 in × 9.25 in June 11, 2022 3:23 PM
CHAPTER 3 “Hello” from Flutter 461
children: [
Text(
Hello world!,
textScaleFactor: 2.0,
),
Text(It's lonely for me inside this phone.)
],
),
),
),
);
}
}
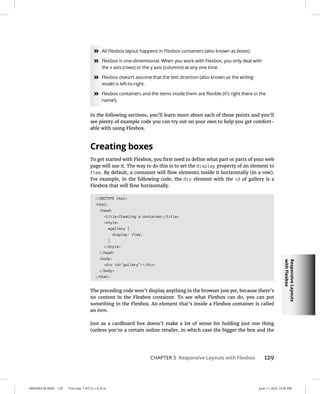
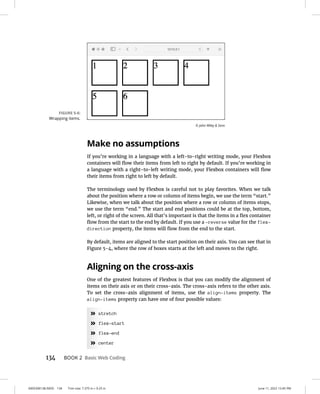
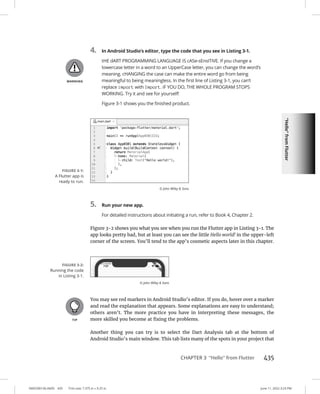
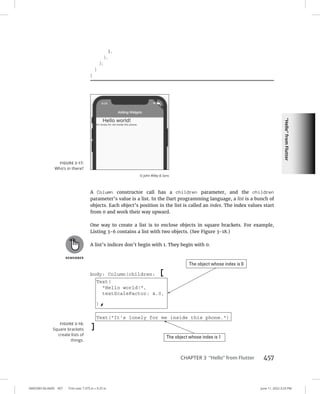
When you save your changes, Android Studio does a hot restart and you see the
new-and-improved display in Figure 3-22.
Centering the text (Part 2)
The Text widgets in Figure 3-22 are centered horizontally, but they’re not cen-
tered vertically. To center them vertically, you can fiddle with Flutter’s Center
widget, but there’s a much easier way.
1. In Android Studio’s Flutter Inspector, hover your mouse pointer over the
Column widget.
The Flutter Inspector displays all the properties of whatever widget you’re
hovering over in a popup.
Wait! What’s a “property”? Every object has properties, and each property of
each object has a value. For example, every instance of Flutter’s Text class has
FIGURE 3-22:
The Column
widget is
centered.
© John Wiley Sons](https://image.slidesharecdn.com/wwile445-231111022106-fdd944b6/85/w_wile445-pdf-484-320.jpg)
![“Hello”
from
Flutter
0005390156.INDD 463 Trim size: 7.375 in × 9.25 in June 11, 2022 3:23 PM
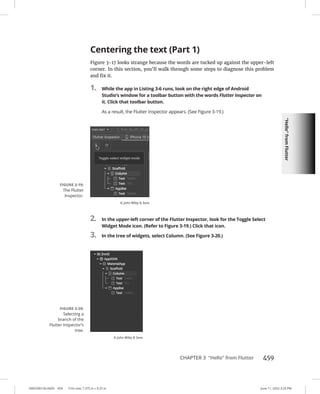
CHAPTER 3 “Hello” from Flutter 463
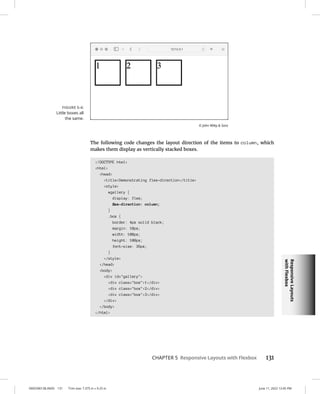
In Listing 3-8, mainAxisAlignment is the name of a parameter,
MainAxisAlignment is the name of an enum, and MainAxisAlignment.
center is one of the enum’s values.
For another look at Dart’s enum feature, refer to the “Dart’s enum feature”
section earlier in this chapter. And if you hunger for even more, see Book 4,
Chapter 7.
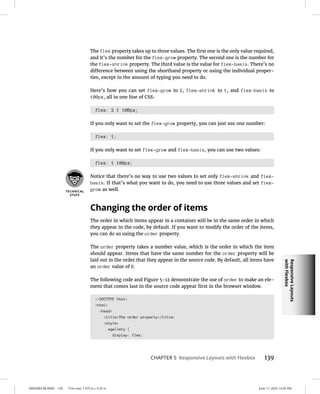
3. Save your editor changes to do a hot restart.
On the device that’s running your app, the Text widgets are now centered
horizontally and vertically. (See Figure 3-24.)
This section’s example illustrates aspects of Flutter’s Column widget, which dis-
plays things from top to bottom. It should come as no surprise that Flutter has a
Row widget, which displays things from side to side. Most facts about the Column
widget are also true of the Row widget. (Well, they’re true when you’re lying down
instead of sitting upright.)
In addition, Flutter has a ListView widget. The ListView widget displays things
either way — from top to bottom or from side to side. In addition, the ListView
widget has its own scrolling feature. You can put 100 items on a ListView even
though only 20 items fit on the screen. When the user scrolls the screen, items
move off the screen while other items move on. To read about Flutter’s ListView
widget, see Book 4, Chapter 8.
title: Text(Adding Widgets),
),
body: Center(
child: Column(
mainAxisAlignment: MainAxisAlignment.center,
children: [
Text(
Hello world!,
textScaleFactor: 2.0,
),
Text(It's lonely for me inside this phone.)
],
),
),
),
);
}
}](https://image.slidesharecdn.com/wwile445-231111022106-fdd944b6/85/w_wile445-pdf-486-320.jpg)


![0005390157.INDD 474 Trim size: 7.375 in × 9.25 in June 11, 2022 3:27 PM
474 BOOK 4 Creating Mobile Apps
Figures 4-4 and 4-5 show what it means to give values to a function, and for a
function to return a value.
»
» You give values to a function with the function’s parameter list.
Like any constructor call, every function call has a parameter list. Each
parameter feeds a piece of information for the function to use. In Figure 4-5,
the function call highlight(Look at me) passes the value Look at me
to the highlight function’s declaration. Inside the function declaration, the
name words stands for Look at me, so the expression *** + words +
*** stands for *** Look at me ***.
»
» You return a value from a function with a return statement.
In Listing 4-2, the line
return *** + words + ***;
»
» is a return statement. Again, imagine a phone that’s running the code in
Listing 4-2. With the execution of this return statement, this is what happens:
• The phone stops executing any code inside the body of the highlight
function.
• The phone replaces the entire function call with the returned value so that
Center(child: Text(highlight(Look at me)))
• effectively becomes
Center(child: Text(*** Look at me ***))
• It continues to execute whatever code it was executing before it became
diverted by the function call. It takes up where it left off, constructing the
Center, Material, and MaterialApp widgets.
A cookbook may have only one recipe for chicken fricassee, but you can follow
the recipe as many times as you want. In the same way, a particular function has
only one declaration, but an app may contain many calls to that function. To see
this in action, look at Listing 4-2 and change the code’s child parameter, like so:
child: Column(mainAxisAlignment: MainAxisAlignment.center, children: [
Text(highlight(Look at me)),
Text(highlight(Your attention, please))
])
The new child contains two calls to the highlight function, each with its own
parameter value. The resulting app is what you see in Figure 4-6.](https://image.slidesharecdn.com/wwile445-231111022106-fdd944b6/85/w_wile445-pdf-497-320.jpg)


![Hello
Again
0005390157.INDD 485 Trim size: 7.375 in × 9.25 in June 11, 2022 3:27 PM
CHAPTER 4 Hello Again 485
TABLE 4-2 Dart’s Built-In Types
Type Name What Literals Look Like Useful Info About the Type
Number types
int 42 Numbers with no digits to the right of the decimal
point — typically, from –9007199254740992 to
9007199254740991.
double 42.0 42.1 Numbers with digits to the right of the decimal point
(possibly, all zero digits).
num 42 42.0 42.1 A number of some kind. Every int value, and every
double value, is an example of a num value.
Collection Types
List [2, 4, –9, 25, 18]
[Hello, Goodbye, 86]
[]
int[]
A bunch of values. The initial value is the 0th, the next
value is the 1st, the next value is the 2nd, and so on.
(With [], the bunch has no values in it.)
Set {2, 4, –9, 25, 18}
{Hello, Goodbye, 86}
{}
int{}
A bunch of values with no duplicates in no particular
order. (With {}, the bunch has no values in it.)
Map { 'one' : 1, 'two' : 2 ,
'three' : 3, 'many': 99}
String, int{}
A bunch of pairs, each pair consisting of a key (such
as 'one', 'two', 'three', or 'many') and a value
(such as 1, 2, 3, or 99). (With {}, the bunch has no
pairs in it.)
Other Types
String 'Dart is boring'
The previous
string is empty.
A sequence of characters.
bool true, false A logical value. A variable of this type has one of only
two possible values: true and false.
Runes Runes('I ' 'u2665' ' you') A string of Unicode characters. For example, '
u2665' is a heart character (♥).
Symbol (Not applicable) Turns an identifier in a Dart program into a value in a
Dart program. (Don’t worry about it!)](https://image.slidesharecdn.com/wwile445-231111022106-fdd944b6/85/w_wile445-pdf-508-320.jpg)
![0005390157.INDD 486 Trim size: 7.375 in × 9.25 in June 11, 2022 3:27 PM
486 BOOK 4 Creating Mobile Apps
You can combine types to create new types. One way to do this is to put types
inside of collection types. For example, in the following declaration, the variable
amounts is a List containing only int values.
Listint amounts = [7, 3, 8, 2];
Of course, you can go crazy layering types within types within other types:
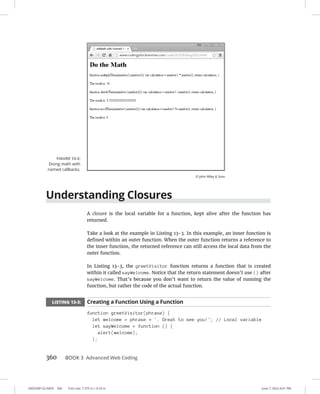
MapString, MapString, Listint values = {
Size: {
Small: [1, 2, 3],
},
};
In cases like that, your best bet is to use the var keyword. Dart can usually figure
things out by looking at the rest of the code.
var values = {
Size: {
Small: [1, 2, 3],
},
};
Types that aren’t built-in
In addition to the types in Table 4-2, every class is a type. For example, in
Listing 4-1, App0401 is the name of a type. It’s a type that’s defined in Listing 4-1.
You can add a line to Listing 4-1 that makes a variable refer to an instance of the
App0401 class. Here’s one such line:
App0401 myApp = App0401();
Like many other variable declarations, this line has a type name (App0401), fol-
lowed by a new variable name (myApp), followed by an initialization. The initial-
ization makes myApp refer to a newly constructed App0401 instance.
The Dart language comes with a library full of standard, reusable code. The formal
name for such as library is an application programming interface (API). Dart’s API
has declarations of many classes. For example, instances of Dart’s DateTime class
are moments in time, and instances of the Duration class are time intervals.
Similarly, the Flutter toolkit comes with a feature-rich API. In Listing 4-1, Widget,
StatelessWidget, BuildContext, MaterialApp, Material, Center, and Text are
the names of classes in the Flutter API.](https://image.slidesharecdn.com/wwile445-231111022106-fdd944b6/85/w_wile445-pdf-509-320.jpg)


![0005390158.INDD 510 Trim size: 7.375 in × 9.25 in June 11, 2022 3:34 PM
510 BOOK 4 Creating Mobile Apps
}
}
class MyHomePage extends StatefulWidget {
@override
_MyHomePageState createState() = _MyHomePageState();
}
class _MyHomePageState extends State {
int _counter = 0;
void _incrementCounter() {
setState(() {
_counter++;
});
}
@override
Widget build(BuildContext context) {
return Scaffold(
appBar: AppBar(
title: Text(Listing 5-2),
),
body: Center(
child: Column(
mainAxisAlignment: MainAxisAlignment.center,
children: Widget[
Text(
'You have pushed the button this many times:',
),
Text(
'$_counter',
style: Theme.of(context).textTheme.titleLarge,
),
],
),
),
floatingActionButton: FloatingActionButton(
onPressed: _incrementCounter,
tooltip: 'Increment',
child: Icon(Icons.add),
),
);
}
}
(continued)](https://image.slidesharecdn.com/wwile445-231111022106-fdd944b6/85/w_wile445-pdf-533-320.jpg)


![Making
Things
Happen
0005390158.INDD 515 Trim size: 7.375 in × 9.25 in June 11, 2022 3:34 PM
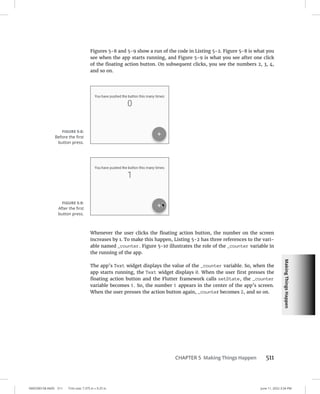
CHAPTER 5 Making Things Happen 515
Flutter API code has a build(BuildContext context) method with no body. It
all works out nicely.
Listing 5-2 has @override annotations, but Listing 5-1 doesn’t. Look at that! You
can get away without having @override annotations! So, why bother having them?
The answer is “safety.” The more information you give Dart about your code,
the less likely it is that Dart will let you do something wrong. If you make a mis-
take and declare your build method incorrectly, Dart might warn you. “Hey!
You said that you intend to override the build method that’s declared in the
StatelessWidget class, but your new build method doesn’t do that correctly.
Fix it, my friend!”
You can make Dart warn you about methods that don’t match with their
@override annotations. For details, visit https://dart.dev/guides/language/
analysis-options.
What does Widget mean?
In Listing 5-2, the column’s list of children starts with some extra stuff:
children: Widget[
Text(
'You have pushed the button this many times:',
),
Text(
'$_counter',
style: Theme.of(context).textTheme.display1,
),
]
The Widget word, with its surrounding angle brackets, is called a generic, and
a list that starts with a generic is called a parameterized list. In Listing 5-2, the
Widget generic tells Dart that each of the list’s values is, in one way or another,
a Widget. According to Book 4, Chapter 3, every instance of the Text class is an
instance of the Widget class, so the Widget generic isn’t lying.
In many situations, the use of generics is a safety issue. Consider the following
two lines of code:
var words1 = [Hello, Goodbye, 1108]; // No error message
var words2 = String[Hello, Goodbye, 1108]; // Error message!](https://image.slidesharecdn.com/wwile445-231111022106-fdd944b6/85/w_wile445-pdf-538-320.jpg)


![Laying
Things
Out
0005390159.INDD 529 Trim size: 7.375 in × 9.25 in June 11, 2022 3:42 PM
CHAPTER 6 Laying Things Out 529
class _MyHomePage extends StatelessWidget {
@override
Widget build(BuildContext context) {
return Material(
color: Colors.grey[400],
child: Padding(
padding: const EdgeInsets.symmetric(
horizontal: 20.0,
),
child: buildColumn(context),
),
);
}
}
Widget buildTitleText() {
return Text(
My Pet Shop,
textScaleFactor: 3.0,
textAlign: TextAlign.center,
);
}
Widget buildRoundedBox(
String label, {
double height = 88.0,
}) {
return Container(
height: height,
width: 88.0,
alignment: Alignment(0.0, 0.0),
decoration: BoxDecoration(
color: Colors.white,
border: Border.all(color: Colors.black),
borderRadius: BorderRadius.all(
Radius.circular(10.0),
),
),
child: Text(
label,
textAlign: TextAlign.center,
),
);
}](https://image.slidesharecdn.com/wwile445-231111022106-fdd944b6/85/w_wile445-pdf-552-320.jpg)
![0005390159.INDD 530 Trim size: 7.375 in × 9.25 in June 11, 2022 3:42 PM
530 BOOK 4 Creating Mobile Apps
LISTING 6-2: A Very Simple Layout
// app0602.dart
import 'package:flutter/material.dart';
import 'app06main.dart';
Widget buildColumn(BuildContext context) {
return Column(
mainAxisAlignment: MainAxisAlignment.center,
crossAxisAlignment: CrossAxisAlignment.stretch,
children: Widget[
buildTitleText(),
SizedBox(height: 20.0),
buildRoundedBox(
Sale Today,
height: 150.0,
),
],
);
}
The code in Listing 6-1 refers to code in Listing 6-2, and vice versa. As long
as these two files are in the same Android Studio project, running the app in
Listing 6-1 automatically uses code from Listing 6-2. This works because of the
import declarations near the top of each of the listings. For info about import
declarations, refer to Book 4, Chapter 4.
Listings 6-1 and 6-2 illustrate some coding concepts along with a bunch of useful
Flutter features that will be covered in the next several sections.
FIGURE 6-1:
A sale at
My Pet Shop.](https://image.slidesharecdn.com/wwile445-231111022106-fdd944b6/85/w_wile445-pdf-553-320.jpg)


![0005390159.INDD 534 Trim size: 7.375 in × 9.25 in June 11, 2022 3:42 PM
534 BOOK 4 Creating Mobile Apps
buildRoundedBox( // The height parameter is a named parameter,
Flutter, // not a positional parameter.
1000.0,
)
buildRoundedBox() // You can't omit the label parameter, because
// the label parameter has no default value.
For info about positional parameters and named parameters, refer to Book 4,
Chapter 3. For the basics on declaring functions, refer to Book 4, Chapter 4.
In Listing 6-2, the declaration of buildColumn has a BuildContext parame-
ter. You may ask, “What good is this BuildContext parameter? The body of the
buildColumn method makes no reference to this parameter’s value.” For an
answer, see the last section of this chapter.
Living color
Book 4, Chapter 5 introduces Flutter’s Colors class with basic things like Colors.
grey and Colors.black. In fact, the Colors class provides 12 different shades
of gray, 7 shades of black, 28 shades of blue, and a similar variety for other col-
ors. For example, the shades of grey are named Colors.grey[50] (the lightest),
Colors.grey[100], Colors.grey[200], Colors.grey[300], and so on, up to
Colors.grey[900] (the darkest). You can’t put arbitrary numbers inside the
brackets, so things like Colors.grey[101] and Colors.grey[350] simply don’t
exist. But one shade — Colors.grey[500] — is special. You can abbreviate
Colors.grey[500] by writing Colors.grey without having a number in brackets.
If you want extra-fine control over the look of your app, you can use Flutter’s
Color.fromRGBO constructor. (That’s Color singular, as opposed to Colors plu-
ral.) The letters RGBO stand for Red, Green, Blue, and Opacity. In the constructor,
the values of Red, Green, and Blue range from 0 to 255, and the value of Opacity
ranges from 0.0 to 1.0. For example, Color.fromRGBO(255, 0, 0, 1.0) stands
for completely opaque Red. Table 6-1 has some other examples.
To find out about other options for describing colors, visit Flutter’s Color class
documentation page:
https://api.flutter.dev/flutter/dart-ui/Color-class.html](https://image.slidesharecdn.com/wwile445-231111022106-fdd944b6/85/w_wile445-pdf-557-320.jpg)


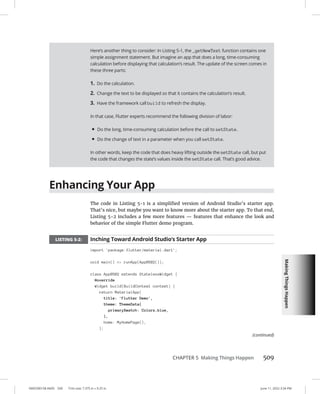
![0005390159.INDD 542 Trim size: 7.375 in × 9.25 in June 11, 2022 3:42 PM
542 BOOK 4 Creating Mobile Apps
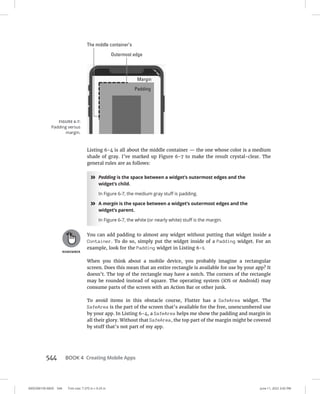
The padding and margin parameters
The Container constructor call in Listing 6-1 has no padding or margin param-
eters, but padding and margin can be useful in other settings. To find out how
padding and margin work, look first at Listing 6-3.
LISTING 6-3: Without Padding or Margin
// app0603.dart
import 'package:flutter/material.dart';
void main() = runApp(App0602());
class App0602 extends StatelessWidget {
@override
Widget build(BuildContext context) {
return MaterialApp(
home: Material(
color: Colors.grey[50],
child: Container(
color: Colors.grey[500],
child: Container(
color: Colors.grey[700],
),
),
),
);
}
}
FIGURE 6-6:
Experiments with
a border radius.](https://image.slidesharecdn.com/wwile445-231111022106-fdd944b6/85/w_wile445-pdf-565-320.jpg)
![Laying
Things
Out
0005390159.INDD 543 Trim size: 7.375 in × 9.25 in June 11, 2022 3:42 PM
CHAPTER 6 Laying Things Out 543
Listing 6-3 has a container within another container that’s within a Material
widget. The inner container is grey[700], which is fairly dark gray. The outer
container is a lighter gray, and the Material widget background is grey[50],
which is almost white.
When you run the app in Listing 6-3, the inner container completely covers the
outer container, which, in turn, completely covers the Material widget. Each of
these widgets expands to fill its parent, so each of the three widgets takes up the
entire screen. The only widget you can see is the innermost, dark gray container.
What a waste!
To remedy this situation, Listing 6-4 uses both padding and margin. Figure 6-7
shows you the result.
LISTING 6-4: With Padding and Margin
// app0604.dart
import 'package:flutter/material.dart';
void main() = runApp(App0604());
class App0604 extends StatelessWidget {
@override
Widget build(BuildContext context) {
return MaterialApp(
home: SafeArea(
child: Material(
color: Colors.grey[50],
child: Container(
color: Colors.grey[500],
padding: EdgeInsets.all(80.0),
margin: EdgeInsets.all(40.0),
child: Container(
color: Colors.grey[700],
),
),
),
),
);
}
}](https://image.slidesharecdn.com/wwile445-231111022106-fdd944b6/85/w_wile445-pdf-566-320.jpg)
![Laying
Things
Out
0005390159.INDD 545 Trim size: 7.375 in × 9.25 in June 11, 2022 3:42 PM
CHAPTER 6 Laying Things Out 545
Nesting Rows and Columns
You hardly ever see an app with only one column of widgets. Most of the time, you
see widgets alongside other widgets, widgets arranged in grids, widgets at angles
to other widgets, and so on. The most straightforward way to arrange Flutter wid-
gets is to put columns inside of rows and rows inside of columns. Listing 6-5 has
an example, and Figure 6-8 shows you the results.
LISTING 6-5: A Row within a Column
// app0605.dart
import 'package:flutter/material.dart';
import 'app06main.dart';
Widget buildColumn(BuildContext context) {
return Column(
mainAxisAlignment: MainAxisAlignment.center,
crossAxisAlignment: CrossAxisAlignment.stretch,
children: Widget[
buildTitleText(),
SizedBox(height: 20.0),
_buildRowOfThree(),
],
);
}
Widget _buildRowOfThree() {
return Row(
mainAxisAlignment: MainAxisAlignment.spaceBetween,
children: Widget[
buildRoundedBox(Cat),
buildRoundedBox(Dog),
buildRoundedBox(Ape),
],
);
}
In Listing 6-1, the Column widget’s crossAxisAlignment property forces the Sale
Today box to be as wide as it could possibly be. That happens because the Sale
Today box is one of the Column widget’s children. But in Listing 6-5, the Cat, Dog,
and Ape boxes aren’t children of the Column widget. Instead, they’re grandchildren
of the Column widget. So, for Listing 6-5, the major factor positioning the Cat,
Dog, and Ape boxes is the Row widget’s mainAxisAlignment property.](https://image.slidesharecdn.com/wwile445-231111022106-fdd944b6/85/w_wile445-pdf-568-320.jpg)

![Laying
Things
Out
0005390159.INDD 547 Trim size: 7.375 in × 9.25 in June 11, 2022 3:42 PM
CHAPTER 6 Laying Things Out 547
LISTING 6-6: Adding Captions to the Boxes
// app0606.dart
import 'package:flutter/material.dart';
import 'app06main.dart';
Widget buildColumn(BuildContext context) {
return Column(
mainAxisAlignment: MainAxisAlignment.center,
crossAxisAlignment: CrossAxisAlignment.stretch,
children: Widget[
buildTitleText(),
SizedBox(height: 20.0),
_buildCaptionedRow(),
],
);
}
Widget _buildCaptionedRow() {
return Row(
mainAxisAlignment: MainAxisAlignment.spaceBetween,
children: Widget[
_buildCaptionedItem(
Cat,
caption: Meow,
),
_buildCaptionedItem(
Dog,
caption: Woof,
),
_buildCaptionedItem(
Ape,
caption: Chatter,
),
],
);
}
Column _buildCaptionedItem(String label, {required String caption}) {
return Column(
children: Widget[
buildRoundedBox(label),
SizedBox(
height: 5.0,
),
(continued)](https://image.slidesharecdn.com/wwile445-231111022106-fdd944b6/85/w_wile445-pdf-570-320.jpg)
![0005390159.INDD 548 Trim size: 7.375 in × 9.25 in June 11, 2022 3:42 PM
548 BOOK 4 Creating Mobile Apps
Text(
caption,
textScaleFactor: 1.25,
),
],
);
}
Figure 6-10 shows a run of the code from Listing 6-6.
The next example, Listing 6-7, does something a bit different. In Listing 6-7, two
boxes share the space where one box might be.
LISTING 6-7: More Widget Nesting
// app0607.dart
import 'package:flutter/material.dart';
import 'app06main.dart';
Widget buildColumn(BuildContext context) {
return Column(
mainAxisAlignment: MainAxisAlignment.center,
crossAxisAlignment: CrossAxisAlignment.stretch,
children: Widget[
buildTitleText(),
SizedBox(height: 20.0),
_buildColumnWithinRow(),
],
);
}
FIGURE 6-10:
Noisy animals
for sale.
LISTING 6-6: (continued)](https://image.slidesharecdn.com/wwile445-231111022106-fdd944b6/85/w_wile445-pdf-571-320.jpg)
![Laying
Things
Out
0005390159.INDD 549 Trim size: 7.375 in × 9.25 in June 11, 2022 3:42 PM
CHAPTER 6 Laying Things Out 549
Widget _buildColumnWithinRow() {
return Row(
mainAxisAlignment: MainAxisAlignment.spaceBetween,
children: Widget[
buildRoundedBox(Cat),
SizedBox(width: 20.0),
buildRoundedBox(Dog),
SizedBox(width: 20.0),
Column(
children: Widget[
buildRoundedBox(
Big ox,
height: 36.0,
),
SizedBox(height: 16.0),
buildRoundedBox(
Small ox,
height: 36.0,
),
],
),
],
);
}
Figure 6-11 shows a run of the code from Listing 6-7.
Using the Expanded Widget
Start with the code in Listing 6-5 and add two more boxes to the row:
Widget _buildRowOfFive() {
return Row(
mainAxisAlignment: MainAxisAlignment.spaceBetween,
children: Widget[
FIGURE 6-11:
A multilevel
arrangement.](https://image.slidesharecdn.com/wwile445-231111022106-fdd944b6/85/w_wile445-pdf-572-320.jpg)
![0005390159.INDD 550 Trim size: 7.375 in × 9.25 in June 11, 2022 3:42 PM
550 BOOK 4 Creating Mobile Apps
buildRoundedBox(Cat),
buildRoundedBox(Dog),
buildRoundedBox(Ape),
buildRoundedBox(Ox),
buildRoundedBox(Gnu),
],
);
}
When you run this modified code on a not-too-large phone in portrait mode, you
see the ugly display in Figure 6-12. (If your phone is too large to see the ugliness,
add more buildRoundedBox calls.)
The segment on the right side of Figure 6-12 (the stuff that looks like barricade
tape) indicates overflow. The row is trying to be wider than the phone’s screen.
Look near the top of Android Studio’s Run tool window and you see the following
message:
A RenderFlex overflowed by 67 pixels on the right.
When you line up too many boxes side-by-side, the screen becomes overcrowded.
That’s not surprising. But some layout situations aren’t so obvious. You can
stumble into an overflow problem when you least expect it.
What can you do when your app overflows? Here’s an off-the-wall suggestion:
Tell each of the boxes to expand. (You read that correctly: Tell them to expand!)
Listing 6-8 has the code, and Figure 6-13 shows you the results.
LISTING 6-8: Expanding Your Widgets
// app0608.dart
import 'package:flutter/material.dart';
FIGURE 6-12:
You can’t cross
the barricade.](https://image.slidesharecdn.com/wwile445-231111022106-fdd944b6/85/w_wile445-pdf-573-320.jpg)
![Laying
Things
Out
0005390159.INDD 551 Trim size: 7.375 in × 9.25 in June 11, 2022 3:42 PM
CHAPTER 6 Laying Things Out 551
import 'app06main.dart';
Widget buildColumn(BuildContext context) {
return Column(
mainAxisAlignment: MainAxisAlignment.center,
crossAxisAlignment: CrossAxisAlignment.stretch,
children: Widget[
buildTitleText(),
SizedBox(height: 20.0),
_buildRowOfFive(),
],
);
}
Widget _buildRowOfFive() {
return Row(
mainAxisAlignment: MainAxisAlignment.spaceBetween,
children: Widget[
_buildExpandedBox(Cat),
_buildExpandedBox(Dog),
_buildExpandedBox(Ape),
_buildExpandedBox(Ox),
_buildExpandedBox(Gnu),
],
);
}
Widget _buildExpandedBox(
String label, {
double height = 88.0,
}) {
return Expanded(
child: buildRoundedBox(
label,
height: height,
),
);
}
FIGURE 6-13:
A nice row of five.](https://image.slidesharecdn.com/wwile445-231111022106-fdd944b6/85/w_wile445-pdf-574-320.jpg)
![0005390159.INDD 552 Trim size: 7.375 in × 9.25 in June 11, 2022 3:42 PM
552 BOOK 4 Creating Mobile Apps
To quote from the official Flutter documentation (https://api.flutter.dev/
flutter/widgets/Expanded-class.html):
“A widget that expands a child of a Row, Column, or Flex so that the child fills the
available space.
Using an Expanded widget makes a child of a Row, Column, or Flex expand to fill
the available space along the main axis (horizontally for a Row or vertically for a
Column). If multiple children are expanded, the available space is divided among
them according to the flex factor.”
In spite of its name, the Expanded widget doesn’t necessarily make its child big-
ger. Instead, the Expanded widget makes its child fill the available space along
with any other widgets that are competing for that space. If that available space
differs from the code’s explicit height or width value, so be it. Listing 6-8 inher-
its the line
width: 88.0,
to describe the width of each rounded box. But, in Figure 6-13, none of the boxes
is 88.0 dp wide. On an iPhone 11 Pro Max, each box is only 74.8 dp wide.
Expanded versus unexpanded
The code in the previous section surrounds each of a row’s boxes with the
Expanded widget. In this section, Listing 6-9 shows you what happens when you
use Expanded more sparingly.
LISTING 6-9: Expanding One of Three Widgets
// app0609.dart
import 'package:flutter/material.dart';
import 'app06main.dart';
Widget buildColumn(BuildContext context) {
return Column(
mainAxisAlignment: MainAxisAlignment.center,
crossAxisAlignment: CrossAxisAlignment.stretch,
children: Widget[
buildTitleText(),
SizedBox(height: 20.0),
_buildRowOfThree(),
],
);
}](https://image.slidesharecdn.com/wwile445-231111022106-fdd944b6/85/w_wile445-pdf-575-320.jpg)
![Laying
Things
Out
0005390159.INDD 553 Trim size: 7.375 in × 9.25 in June 11, 2022 3:42 PM
CHAPTER 6 Laying Things Out 553
Widget _buildRowOfThree() {
return Row(
mainAxisAlignment: MainAxisAlignment.spaceBetween,
children: Widget[
buildRoundedBox(
Giraffe,
height: 150.0,
),
SizedBox(width: 10.0),
buildRoundedBox(
Wombat,
height: 36.0,
),
SizedBox(width: 10.0),
_buildExpandedBox(
Store Manager,
height: 36.0,
),
],
);
}
Widget _buildExpandedBox(
String label, {
double height = 88.0,
}) {
return Expanded(
child: buildRoundedBox(
label,
height: height,
),
);
}
The code in Listing 6-9 surrounds only one box — the Store Manager box — with
an Expanded widget. Here’s what happens:
»
» The code gets width: 88.0 from the buildRoundedBox method in Listing 6-1,
so the Giraffe and Wombat boxes are 88.0 dp wide each.
»
» Two SizedBox widgets are 10.0 dp wide each.
So far, the total is 196.0 dp.
»
» Because the Store Manager box sits inside an Expanded widget, the remaining
screen width goes to the Store Manager box. (See Figure 6-14.)](https://image.slidesharecdn.com/wwile445-231111022106-fdd944b6/85/w_wile445-pdf-576-320.jpg)
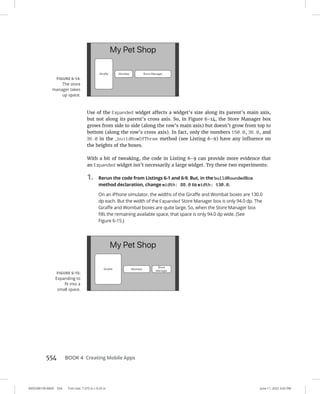
![Laying
Things
Out
0005390159.INDD 555 Trim size: 7.375 in × 9.25 in June 11, 2022 3:42 PM
CHAPTER 6 Laying Things Out 555
2. In the buildRoundedBox method declaration, change width from its value
in Step 1 (width: 130.0) to width: 180.0.
With the Giraffe and Wombat boxes and the SizedBox widgets taking up
380.0 dp, there’s no room left on the iPhone simulator for the Store Manager
box and you’ll see the black-and-yellow stripe, indicating RenderBox overflow.
(See Figure 6-16.) The Expanded widget isn’t a miracle worker. It doesn’t help
solve every problem.
Expanded widget saves the day
Listings 6-10 and 6-11 illustrate a nasty situation that may arise when you mix
rows and columns at various levels.
LISTING 6-10: A Listing That’s Doomed to Failure
// app0610.dart -- BAD CODE
import 'package:flutter/material.dart';
import 'app06main.dart';
import 'constraints_logger.dart';
Widget buildColumn(BuildContext context) {
return Row(
children: [
_buildRowOfThree(),
],
);
}
Widget _buildRowOfThree() {
return ConstraintsLogger(
comment: 'In _buildRowOfThree',
FIGURE 6-16:
More barricade
tape.
(continued)](https://image.slidesharecdn.com/wwile445-231111022106-fdd944b6/85/w_wile445-pdf-578-320.jpg)
![0005390159.INDD 556 Trim size: 7.375 in × 9.25 in June 11, 2022 3:42 PM
556 BOOK 4 Creating Mobile Apps
child: Row(
children: Widget[
_buildExpandedBox(Cat),
_buildExpandedBox(Dog),
_buildExpandedBox(Ape),
],
),
);
}
Widget _buildExpandedBox(
String label, {
double height = 88.0,
}) {
return Expanded(
child: buildRoundedBox(
label,
height: height,
),
);
}
LISTING 6-11: An Aid for Debugging
// constraints_logger.dart
import 'package:flutter/material.dart';
class ConstraintsLogger extends StatelessWidget {
final String comment;
final Widget child;
ConstraintsLogger({
this.comment = ,
required this.child,
}) : assert(comment != null);
Widget build(BuildContext context) {
return LayoutBuilder(
builder: (BuildContext context, BoxConstraints constraints) {
print('$comment: $constraints to ${child.runtimeType}');
return child;
},
);
}
}
LISTING 6-10: (continued)](https://image.slidesharecdn.com/wwile445-231111022106-fdd944b6/85/w_wile445-pdf-579-320.jpg)


![Laying
Things
Out
0005390159.INDD 559 Trim size: 7.375 in × 9.25 in June 11, 2022 3:42 PM
CHAPTER 6 Laying Things Out 559
comment: 'In _buildRowOfThree',
child: Row(
children: Widget[
_buildExpandedBox(Cat),
_buildExpandedBox(Dog),
_buildExpandedBox(Ape),
],
),
),
);
}
This new Expanded widget passes bounded constraints down the widget tree, as
you can see from this new message in the Run tool window:
I/flutter ( 5317): In _buildRowOfThree:
BoxConstraints(w=371.4, 0.0=h=683.4) to Row
The new Expanded widget tells the inner row that its width must be exactly
371.4 dp, so the confusion that’s illustrated in Figure 6-18 goes away. Flutter
knows how to display the app’s widgets, and you see three nicely arranged
animal
boxes on your device’s screen. Problem solved!
The constraint w=371.4 is called a tight constraint because it gives the row an exact
size with no leeway whatsoever. In contrast, the constraint 0.0=h=683.4 is
called a loose constraint. The loose constraint says, “Be as short as 0.0 dp high and
as tall as 683.4 dp high. See if I care.”
FIGURE 6-18:
Someone needs
to make a
decision!](https://image.slidesharecdn.com/wwile445-231111022106-fdd944b6/85/w_wile445-pdf-582-320.jpg)
![0005390159.INDD 560 Trim size: 7.375 in × 9.25 in June 11, 2022 3:42 PM
560 BOOK 4 Creating Mobile Apps
This business with constraints and sizes may seem overly complicated. But the
process of scanning down the tree and then up the tree is an important part of
the Flutter framework. The two-scan approach makes for efficient rebuilding of
stateful widgets. And the rebuilding of stateful widgets is fundamental to the way
Flutter apps are designed.
Some layout schemes work well with small numbers of components but start
slowing down when the number of components becomes large. Flutter’s layout
scheme works well with only a few widgets and scales nicely for complicated
layouts with large numbers of widgets.
The ConstraintsLogger widget is for debugging purposes only. Before publish-
ing an app, remove all uses of the ConstraintsLogger from your code.
Flexing some muscles
Using Flutter’s Expanded widget, you can specify the relative sizes of the children
inside a column or a row. Listing 6-12 has an example.
LISTING 6-12: How to Specify Relative Sizes
// app0612.dart
import 'package:flutter/material.dart';
import 'app06main.dart';
Widget buildColumn(BuildContext context) {
return Column(
mainAxisAlignment: MainAxisAlignment.center,
crossAxisAlignment: CrossAxisAlignment.stretch,
children: Widget[
buildTitleText(),
SizedBox(height: 20.0),
_buildRowOfThree(),
],
);
}
Widget _buildRowOfThree() {
return Row(
mainAxisAlignment: MainAxisAlignment.spaceBetween,
children: Widget[
_buildExpandedBox(
Moose,](https://image.slidesharecdn.com/wwile445-231111022106-fdd944b6/85/w_wile445-pdf-583-320.jpg)
![Laying
Things
Out
0005390159.INDD 561 Trim size: 7.375 in × 9.25 in June 11, 2022 3:42 PM
CHAPTER 6 Laying Things Out 561
),
_buildExpandedBox(
Squirrel,
flex: 1,
),
_buildExpandedBox(
Dinosaur,
flex: 3,
),
],
);
}
Widget _buildExpandedBox(
String label, {
double height = 88.0,
int flex = 1,
}) {
return Expanded(
flex: flex,
child: buildRoundedBox(
label,
height: height,
),
);
}
What will happen to our heroes, the Moose and the Squirrel, in Listing 6-12? To
find out, see Figure 6-19.
Notice the frequent use of the word flex in Listing 6-12. An Expanded widget can
have a flex value, also known as a flex factor. A flex factor decides how much space
the widget consumes relative to the other widgets in the row or column.
FIGURE 6-19:
The squirrel
is small; the
dinosaur is big.](https://image.slidesharecdn.com/wwile445-231111022106-fdd944b6/85/w_wile445-pdf-584-320.jpg)

![Laying
Things
Out
0005390159.INDD 563 Trim size: 7.375 in × 9.25 in June 11, 2022 3:42 PM
CHAPTER 6 Laying Things Out 563
return _buildTwoSmallRows();
}
}
Widget _buildOneLargeRow() {
return Column(
mainAxisAlignment: MainAxisAlignment.center,
children: Widget[
Row(
mainAxisAlignment: MainAxisAlignment.spaceEvenly,
children: Widget[
buildRoundedBox(Aardvark),
buildRoundedBox(Baboon),
buildRoundedBox(Unicorn),
buildRoundedBox(Eel),
buildRoundedBox(Emu),
buildRoundedBox(Platypus),
],
),
],
);
}
Widget _buildTwoSmallRows() {
return Column(
mainAxisAlignment: MainAxisAlignment.center,
children: [
Row(
mainAxisAlignment: MainAxisAlignment.spaceEvenly,
children: [
buildRoundedBox(Aardvark),
buildRoundedBox(Baboon),
buildRoundedBox(Unicorn),
],
),
SizedBox(
height: 30.0,
),
Row(
mainAxisAlignment: MainAxisAlignment.spaceEvenly,
children: [
buildRoundedBox(Eel),
buildRoundedBox(Emu),
buildRoundedBox(Platypus),
],
),
],
);
}](https://image.slidesharecdn.com/wwile445-231111022106-fdd944b6/85/w_wile445-pdf-586-320.jpg)

![Interacting
with
the
User
0005390160.INDD 569 Trim size: 7.375 in × 9.25 in June 11, 2022 3:45 PM
CHAPTER 7 Interacting with the User 569
padding: const EdgeInsets.all(8.0),
child: Column(
children: Widget[
_buildAgeSwitch(),
_buildResultArea(),
],
),
),
);
}
/// Build
Widget _buildAgeSwitch() {
return Row(
children: Widget[
Text(Are you 18 or older?),
Switch(
value: _ageSwitchValue,
onChanged: _updateAgeSwitch,
),
],
);
}
Widget _buildResultArea() {
return Text(_messageToUser, textAlign: TextAlign.center);
}
/// Actions
void _updateAgeSwitch(bool newValue) {
setState(() {
_ageSwitchValue = newValue;
_messageToUser =
_youAre + (_ageSwitchValue ? : NOT ) + _compatible;
});
}
}
Figures 7-1 and 7-2 show the app in its two possible states.
This chapter’s listings are practice apps. They’re bite-size samples of Doris’s
completed dating app. But even “bite-size” programs can be long and compli-
cated. To keep this chapter’s listings short, code is reused from one listing to
another. You can download the entire dating app from this book’s website.](https://image.slidesharecdn.com/wwile445-231111022106-fdd944b6/85/w_wile445-pdf-592-320.jpg)


![Interacting
with
the
User
0005390160.INDD 575 Trim size: 7.375 in × 9.25 in June 11, 2022 3:45 PM
CHAPTER 7 Interacting with the User 575
This section’s example shuns the quick response of the app in Listing 7-1. When
the user flicks a switch, the switch simply moves. The app doesn’t say, “You’re
compatible” or “You’re not compatible” until the user presses the button. The
code is in Listing 7-2.
LISTING 7-2: Responding to a Button Press
// Copy the code up to and including the _buildAgeSwitch
// method from Listing 7-1 here.
Widget _buildResultArea() {
return Row(
children: Widget[
ElevatedButton(
child: Text(Submit),
onPressed: _updateResults,
),
SizedBox(
width: 15.0,
),
Text(_messageToUser, textAlign: TextAlign.center),
],
);
}
/// Actions
void _updateAgeSwitch(bool newValue) {
setState(() {
_ageSwitchValue = newValue;
});
}
void _updateResults() {
setState(() {
_messageToUser = _youAre +
(_ageSwitchValue ? : NOT ) +
_compatible;
});
}
}
Figure 7-4 shows a snapshot from a run of the code in Listing 7-2.](https://image.slidesharecdn.com/wwile445-231111022106-fdd944b6/85/w_wile445-pdf-598-320.jpg)
![Interacting
with
the
User
0005390160.INDD 577 Trim size: 7.375 in × 9.25 in June 11, 2022 3:45 PM
CHAPTER 7 Interacting with the User 577
LISTING 7-3: For the Love of Flutter
import 'package:flutter/material.dart';
void main() = runApp(app0703());
class App0703 extends StatelessWidget {
@override
Widget build(BuildContext context) {
return MaterialApp(
home: MyHomePage(),
);
}
}
class MyHomePage extends StatefulWidget {
@override
_MyHomePageState createState() = _MyHomePageState();
}
const _youAre = 'You are';
const _compatible = 'compatible withnDoris D. Developer.';
class _MyHomePageState extends StateMyHomePage {
double _loveFlutterSliderValue = 1.0;
String _messageToUser = ;
/// State
@override
Widget build(BuildContext context) {
return Scaffold(
appBar: AppBar(
title: Text(Are you compatible with Doris?),
),
body: Padding(
padding: const EdgeInsets.all(8.0),
child: Column(
children: Widget[
_buildLoveFlutterSlider(),
_buildResultArea(),
],
),
),
);
}
(continued)](https://image.slidesharecdn.com/wwile445-231111022106-fdd944b6/85/w_wile445-pdf-600-320.jpg)
![0005390160.INDD 578 Trim size: 7.375 in × 9.25 in June 11, 2022 3:45 PM
578 BOOK 4 Creating Mobile Apps
/// Build
Widget _buildLoveFlutterSlider() {
return Column(
children: Widget[
SizedBox(
height: 10.0,
),
Text(On a scale of 1 to 10,
how much do you love developing Flutter apps?),
Slider(
min: 1.0,
max: 10.0,
divisions: 9,
value: _loveFlutterSliderValue,
onChanged: _updateLoveFlutterSlider,
label: '${_loveFlutterSliderValue.toInt()}',
),
],
);
}
Widget _buildResultArea() {
return Row(
children: Widget[
ElevatedButton(
child: Text(Submit),
onPressed: _updateResults,
),
SizedBox(
width: 15.0,
),
Text(_messageToUser, textAlign: TextAlign.center),
],
);
}
/// Actions
void _updateLoveFlutterSlider(double newValue) {
setState(() {
_loveFlutterSliderValue = newValue;
});
}
void _updateResults() {
setState(() {
LISTING 7-3: (continued)](https://image.slidesharecdn.com/wwile445-231111022106-fdd944b6/85/w_wile445-pdf-601-320.jpg)

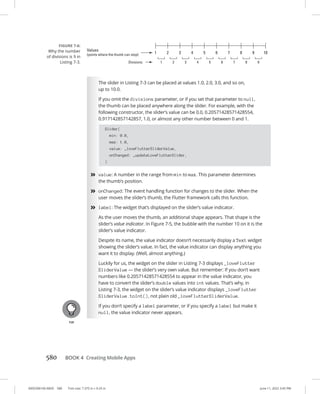

![0005390160.INDD 582 Trim size: 7.375 in × 9.25 in June 11, 2022 3:45 PM
582 BOOK 4 Creating Mobile Apps
Callouts 1 and 2
In a Flutter program, constructor calls rule the roost. You get a Text widget with
a constructor call like Text(Hello). You get a Column and two Text widgets
with code like Column(children: [Text('a'), Text('b')]).
FIGURE 7-7:
How much do
you earn?](https://image.slidesharecdn.com/wwile445-231111022106-fdd944b6/85/w_wile445-pdf-605-320.jpg)
![Interacting
with
the
User
0005390160.INDD 583 Trim size: 7.375 in × 9.25 in June 11, 2022 3:45 PM
CHAPTER 7 Interacting with the User 583
When you issue a constructor call, the call itself stands for an object. For example,
the call Text(Hello) stands for a particular Text widget — an instance of the
Text class. You can assign the call to a variable and use that variable elsewhere in
your code:
@override
Widget build(BuildContext context) {
Text myTextInstance = Text(I'm reusable);
return Scaffold(
appBar: AppBar(
title: myTextInstance,
),
body: Column(
children: Widget[
myTextInstance,
],
),
);
}
In many cases, you can separate the variable declaration from the call:
Text myTextInstance;
// More code here, and elsewhere ...
myTextInstance = Text(I'm reusable);
In Figure 7-7, the declaration of the two controller variables (_nameField
Controller and _incomeFieldController) is separate from the corresponding
TextEditingController constructor calls. This was done to introduce Flutter’s
initState and dispose methods.
FIGURE 7-8:
Bad news for Pat.
© John Wiley Sons](https://image.slidesharecdn.com/wwile445-231111022106-fdd944b6/85/w_wile445-pdf-606-320.jpg)


![Interacting
with
the
User
0005390160.INDD 591 Trim size: 7.375 in × 9.25 in June 11, 2022 3:45 PM
CHAPTER 7 Interacting with the User 591
String shorten(Gender gender) = gender.toString().replaceAll(Gender., );
class _MyHomePageState extends StateMyHomePage {
String _messageToUser = ;
Gender _genderRadioValue = Gender.NoSelection;
// And later ...
Widget _buildGenderRadio() {
return Row(
children: Widget[
Text(shorten(Gender.Female)),
Radio(
value: Gender.Female,
groupValue: _genderRadioValue,
onChanged: _updateGenderRadio,
),
SizedBox(width: 25.0),
Text(shorten(Gender.Male)),
Radio(
value: Gender.Male,
groupValue: _genderRadioValue,
onChanged: _updateGenderRadio,
),
SizedBox(width: 25.0),
Text(shorten(Gender.Other)),
Radio(
value: Gender.Other,
groupValue: _genderRadioValue,
onChanged: _updateGenderRadio,
),
],
);
}
Widget _buildResultArea() {
return Row(
children: Widget[
ElevatedButton(
child: Text(Submit),
onPressed: _genderRadioValue != null ? _updateResults : null,
),
SizedBox(
width: 15.0,
),
Text(
_messageToUser,
textAlign: TextAlign.center,
(continued)](https://image.slidesharecdn.com/wwile445-231111022106-fdd944b6/85/w_wile445-pdf-614-320.jpg)
![0005390160.INDD 592 Trim size: 7.375 in × 9.25 in June 11, 2022 3:45 PM
592 BOOK 4 Creating Mobile Apps
),
],
);
}
/// Actions
void _updateGenderRadio(Gender? newValue) {
setState(() {
_genderRadioValue = newValue!;
});
}
void _updateResults() {
setState(() {
_messageToUser =
You selected ${shorten(_genderRadioValue)}.;
});
}
}
Figures 7-10 and 7-11 show snapshots from a run of the code in Listing 7-4.
FIGURE 7-10:
Before selecting a
radio button.
© John Wiley Sons
LISTING 7-4: (continued)
FIGURE 7-11:
After selecting a
radio button and
pressing Submit.
© John Wiley Sons](https://image.slidesharecdn.com/wwile445-231111022106-fdd944b6/85/w_wile445-pdf-615-320.jpg)


![Interacting
with
the
User
0005390160.INDD 597 Trim size: 7.375 in × 9.25 in June 11, 2022 3:45 PM
CHAPTER 7 Interacting with the User 597
MapRelationship, String show = {
Relationship.None: None,
Relationship.Friend: Friend,
Relationship.OneDate: One date,
Relationship.Ongoing: Ongoing relationship,
Relationship.Committed: Committed relationship,
Relationship.Marriage: Marriage
};
ListDropdownMenuItemRelationship _relationshipsList = [
DropdownMenuItem(
value: Relationship.None,
child: Text(show[Relationship.None]!),
),
DropdownMenuItem(
value: Relationship.Friend,
child: Text(show[Relationship.Friend]!),
),
DropdownMenuItem(
value: Relationship.OneDate,
child: Text(show[Relationship.OneDate]!),
),
DropdownMenuItem(
value: Relationship.Ongoing,
child: Text(show[Relationship.Ongoing]!),
),
DropdownMenuItem(
value: Relationship.Committed,
child: Text(show[Relationship.Committed]!),
),
DropdownMenuItem(
value: Relationship.Marriage,
child: Text(show[Relationship.Marriage]!),
),
];
class _MyHomePageState extends StateMyHomePage {
Relationship _relationshipDropdownValue = Relationship.None;
/// State
@override
Widget build(BuildContext context) {
return Scaffold(
appBar: AppBar(
title: Text(Are you compatible with Hilda?),
),
(continued)](https://image.slidesharecdn.com/wwile445-231111022106-fdd944b6/85/w_wile445-pdf-620-320.jpg)
![0005390160.INDD 598 Trim size: 7.375 in × 9.25 in June 11, 2022 3:45 PM
598 BOOK 4 Creating Mobile Apps
body: Padding(
padding: const EdgeInsets.all(16.0),
child: Column(
children: Widget[
SizedBox(
height: 30.0,
),
_buildRelationshipDropdown(),
_buildResultsImage(),
],
),
),
);
}
/// Build
Widget _buildRelationshipDropdown() {
return Column(
crossAxisAlignment: CrossAxisAlignment.start,
children: Widget[
Text(What kind of relationship are you looking for?),
_buildDropdownButtonRow(),
],
);
}
Widget _buildDropdownButtonRow() {
return Row(
mainAxisAlignment: MainAxisAlignment.start,
children: Widget[
DropdownButtonRelationship(
items: _relationshipsList,
onChanged: _updateRelationshipDropdown,
value: _relationshipDropdownValue,
),
if (_relationshipDropdownValue != Relationship.None)
TextButton(
child: Text(
Reset,
style: TextStyle(color: Colors.blue),
),
onPressed: _reset,
),
],
LISTING 7-5: (continued)](https://image.slidesharecdn.com/wwile445-231111022106-fdd944b6/85/w_wile445-pdf-621-320.jpg)

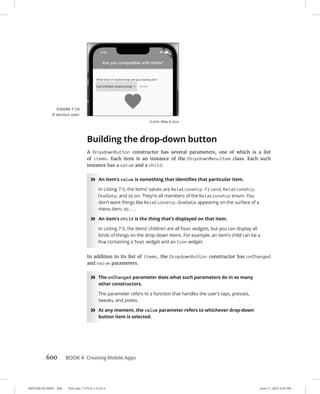
![Interacting
with
the
User
0005390160.INDD 601 Trim size: 7.375 in × 9.25 in June 11, 2022 3:45 PM
CHAPTER 7 Interacting with the User 601
The little Reset button
The Reset button in Listing 7-5 is interesting for more than one reason. First,
it’s not an ElevatedButton. Instead, it’s a TextButton. A TextButton is like an
ElevatedButton except . . . well, a TextButton is flat.
Another reason to wallow in the Reset button’s code is because of a peculiar Dart
language feature — one that’s available only from Dart 2.3 onward. Here’s an
abridged version of the _buildDropdownButtonRow method’s code in Listing 7-5:
Widget _buildDropdownButtonRow() {
return Row(
children: Widget[
DropdownButtonRelationship(
),
if (_relationshipDropdownValue != Relationship.None)
TextButton(
),
],
);
}
In this code, the Row widget’s children parameter is a list, and the list consists
of two items: a DropdownButton and something that looks like an if statement.
But appearances can be deceiving. The thing in Listing 7-5 isn’t an if statement.
The thing in Listing 7-5 is a collection if. In Book 4, Chapter 4, I unceremoniously
sneak in the word collection to describe Dart’s List, Set, and Map types. A collec-
tion if helps you define an instance of one of those types.
In Listing 7-5, the meaning of the collection if is exactly what you’d guess.
If _relationshipDropdownValue isn’t Relationship.None, the list includes a
TextButton. Otherwise, the list doesn’t include a TextButton. That makes sense
because, when _relationshipDropdownValue is Relationship.None, there’s no
sense in offering the user an option to make it be Relationship.None.
In addition to its collection if, the Dart programming language has a collection
for. You can read about the collection for in Book 4, Chapter 8.](https://image.slidesharecdn.com/wwile445-231111022106-fdd944b6/85/w_wile445-pdf-624-320.jpg)
![0005390160.INDD 602 Trim size: 7.375 in × 9.25 in June 11, 2022 3:45 PM
602 BOOK 4 Creating Mobile Apps
Making a map
Book 4, Chapter 4 introduces Dart’s types, one of which is the Map type. A Map is
a lot like a dictionary. To find the definition of a word, you look up the word in
a dictionary. To find a user-friendly representation of the enum value Relation
ship.OneDate, you look up Relationship.OneDate in the show map.
To be a bit more precise, a Map is a bunch of pairs, each pair consisting of a
key and a value. In Listing 7-5, the variable show refers to a map whose keys
are Relationship.Friend, Relationship.OneDate, and so on. The map’s values
are None, Friend, One date, Ongoing relationship, and so on. See
Table 7-1.
In a Dart program, you use brackets to look up a value in a map. For example, in
Listing 7-5, looking up show[Relationship.OneDate] gives you the string One
date.
In addition to their keys and values, each map entry has an index. An entry’s
index is its position number in the declaration of the map, starting with posi-
tion number 0. Doris’s buddy Hilda wants a committed relationship and possibly
marriage. So the code in Listing 7-5 checks this condition. When this condition
is true, the app displays a heart to indicate a good match. Otherwise, the app dis-
plays a sad face. (Sorry, Hilda.)
TABLE 7-1 The show Map
Key Value Index
Relationship.None None 0
Relationship.Friend Friend 1
Relationship.OneDate One date 2
Relationship.Ongoing Ongoing relationship 3
Relationship.Committed Committed relationship 4
Relationship.Marriage Marriage 5](https://image.slidesharecdn.com/wwile445-231111022106-fdd944b6/85/w_wile445-pdf-625-320.jpg)


![0005390161.INDD 610 Trim size: 7.375 in × 9.25 in June 11, 2022 3:48 PM
610 BOOK 4 Creating Mobile Apps
LISTING 8-2: Basic Navigation
// app0802.dart
import 'package:flutter/material.dart';
import 'app08main.dart';
extension MoreMovieTitlePage on MovieTitlePageState {
goToDetailPage() {
Navigator.push(
context,
MaterialPageRoute(
builder: (context) = DetailPage(),
),
);
}
Widget buildTitlePageCore() {
return Column(
crossAxisAlignment: CrossAxisAlignment.center,
children: Widget[
Text(
'Being John Malkovich',
textScaleFactor: 1.5,
),
SizedBox(height: 16.0),
ElevatedButton.icon(
icon: Icon(Icons.arrow_forward),
label: Text('Details'),
onPressed: goToDetailPage,
),
],
);
}
}
extension MoreDetailPage on DetailPage {
Widget buildDetailPageCore(context) {
return Column(
crossAxisAlignment: CrossAxisAlignment.center,
children: Widget[
Text(
overview,
),
],
);
}
}](https://image.slidesharecdn.com/wwile445-231111022106-fdd944b6/85/w_wile445-pdf-633-320.jpg)
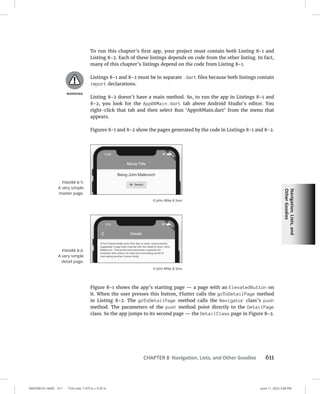
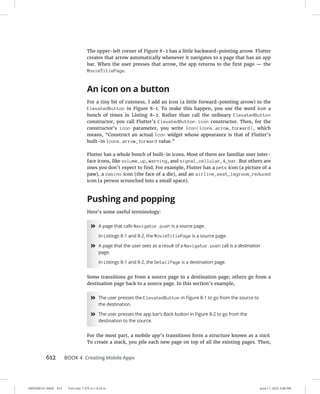

![0005390161.INDD 614 Trim size: 7.375 in × 9.25 in June 11, 2022 3:48 PM
614 BOOK 4 Creating Mobile Apps
Before you try to run this section’s app, change one of the import lines in List-
ing 8-1. Change 'App0802.dart' to 'App0803.dart'. Make similar changes to
run Listings 8-3, 8-4, 8-5, 8-7, 8-8, and 8-10.
LISTING 8-3: From Movie Title Page to Detail Page
// App0803.dart
import 'package:flutter/material.dart';
import 'App08Main.dart';
extension MoreMovieTitlePage on MovieTitlePageState {
static bool _isFavorite = true; // You can change this to false.
goToDetailPage() {
Navigator.push(
context,
MaterialPageRoute(
builder: (context) = DetailPage(),
settings: RouteSettings(
arguments: _isFavorite,
),
),
);
}
Widget buildTitlePageCore() {
return Column(
crossAxisAlignment: CrossAxisAlignment.center,
children: Widget[
Text(
'Being John Malkovich',
textScaleFactor: 1.5,
),
SizedBox(height: 16.0),
ElevatedButton.icon(
icon: Icon(Icons.arrow_forward),
label: Text('Details'),
onPressed: goToDetailPage,
),
],
);
}
}
extension MoreDetailPage on DetailPage {
Widget buildDetailPageCore(context) {
return Column(
crossAxisAlignment: CrossAxisAlignment.center,
children: Widget[
Text(](https://image.slidesharecdn.com/wwile445-231111022106-fdd944b6/85/w_wile445-pdf-637-320.jpg)
![Navigation,
Lists,
and
Other
Goodies
0005390161.INDD 615 Trim size: 7.375 in × 9.25 in June 11, 2022 3:48 PM
CHAPTER 8 Navigation, Lists, and Other Goodies 615
overview,
),
Visibility(
visible: ModalRoute.of(context)?.settings.arguments as bool,
child: Icon(Icons.favorite),
),
],
);
}
}
Figure 8-3 shows you the DetailPage generated by the code in Listings 8-1 and
8-3. A little heart indicates that Being John Malkovich is a favorite movie.
Figure 8-4 illustrates the trip made by the _isFavorite variable’s value in a run
of this section’s example.
FIGURE 8-3:
The Favorite icon
on the detail
page.
© John Wiley Sons
FIGURE 8-4:
Passing the value
of _isFavorite
from place to
place.](https://image.slidesharecdn.com/wwile445-231111022106-fdd944b6/85/w_wile445-pdf-638-320.jpg)


![0005390161.INDD 618 Trim size: 7.375 in × 9.25 in June 11, 2022 3:48 PM
618 BOOK 4 Creating Mobile Apps
In a RouteSettings constructor call, the parameter name arguments is a bit mis-
leading. That parameter can have only one value at a time — a value such as
_isFavorite. So why is the parameter name plural (arguments) instead of singu-
lar (argument)? It’s plural because the single thing that you pass to another page
can have several parts. For example, you can pass many values by making the one
and only arguments value be a list:
settings: RouteSettings(
arguments: [_isFavorite, _isInTheaters, _isAComedy,],
),
Passing Data Back to the Source
In the previous section, the code uses Navigator.push to send a value from a
source to a destination. That’s cool, but how can the destination send values back
to the source? Listing 8-4 has an answer.
LISTING 8-4: From Detail Page to Movie Title Page
import 'package:flutter/material.dart';
import 'App08Main.dart';
extension MoreMovieTitlePage on MovieTitlePageState {
static bool? _isFavorite;
goToDetailPage() async {
_isFavorite = await Navigator.push(
context,
MaterialPageRoute(
builder: (context) = DetailPage(),
),
);
setState(() {});
}
Widget buildTitlePageCore() {
return Column(
crossAxisAlignment: CrossAxisAlignment.center,
children: Widget[
Row(
mainAxisAlignment: MainAxisAlignment.center,
children: Widget[
Text(
'Being John Malkovich',
textScaleFactor: 1.5,](https://image.slidesharecdn.com/wwile445-231111022106-fdd944b6/85/w_wile445-pdf-641-320.jpg)
![Navigation,
Lists,
and
Other
Goodies
0005390161.INDD 619 Trim size: 7.375 in × 9.25 in June 11, 2022 3:48 PM
CHAPTER 8 Navigation, Lists, and Other Goodies 619
),
Visibility(
visible: _isFavorite ?? false,
child: Icon(Icons.favorite),
),
],
),
SizedBox(height: 16.0),
ElevatedButton.icon(
icon: Icon(Icons.arrow_forward),
label: Text('Details'),
onPressed: goToDetailPage,
),
],
);
}
}
extension MoreDetailPage on DetailPage {
Widget buildDetailPageCore(context) {
return Column(
crossAxisAlignment: CrossAxisAlignment.center,
children: Widget[
Text(
overview,
),
SizedBox(height: 16.0),
ElevatedButton(
child: Text(
'Make It a Favorite!',
),
onPressed: () {
Navigator.pop(context, true);
},
),
],
);
}
}
Figure 8-5 illustrates the action that takes place during a run of this section’s
example.
The code in Listing 8-4 creates the DetailPage that you see in Figure 8-6.](https://image.slidesharecdn.com/wwile445-231111022106-fdd944b6/85/w_wile445-pdf-642-320.jpg)

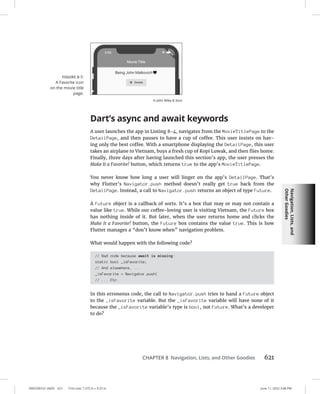


![0005390161.INDD 624 Trim size: 7.375 in × 9.25 in June 11, 2022 3:48 PM
624 BOOK 4 Creating Mobile Apps
context: context,
child: AlertDialog(
title: Text(The back button doesn't work),
content: Text('Sorry about that, Chief.'),
actions: Widget[
new FlatButton(
onPressed: () = Navigator.pop(context, false),
child: Text('OK'),
),
],
),
) ??
false;
}
When the user clicks the Back button on the DetailPage app bar, Flutter displays
a dialog box containing a FlatButton labeled OK. (See Figure 8-9.) When the user
clicks the FlatButton, Flutter dismisses the dialog box.
Passing Data in Both Directions
This section’s example is a bit more realistic than examples in the previous sec-
tions. In this section, the source and destination pages pass information back and
forth. The code is in Listing 8-5.
LISTING 8-5: From Title Page to Detail Page and Back Again
// app0805.dart
import 'package:flutter/material.dart';
import 'app08main.dart';
extension MoreMovieTitlePage on MovieTitlePageState {
static bool _isFavorite = false;
goToDetailPage() async {
_isFavorite = await Navigator.push(
FIGURE 8-9:
You Can’t Go
Home Again
(Thomas Wolfe).
© John Wiley Sons](https://image.slidesharecdn.com/wwile445-231111022106-fdd944b6/85/w_wile445-pdf-647-320.jpg)
![Navigation,
Lists,
and
Other
Goodies
0005390161.INDD 625 Trim size: 7.375 in × 9.25 in June 11, 2022 3:48 PM
CHAPTER 8 Navigation, Lists, and Other Goodies 625
context,
MaterialPageRoute(
builder: (context) = DetailPage(),
settings: RouteSettings(
arguments: _isFavorite,
),
),
);
setState(() {});
}
Widget buildTitlePageCore() {
return Column(
crossAxisAlignment: CrossAxisAlignment.center,
children: Widget[
Row(
mainAxisAlignment: MainAxisAlignment.center,
children: Widget[
Text(
'Being John Malkovich',
textScaleFactor: 1.5,
),
Visibility(
visible: _isFavorite,
child: Icon(Icons.favorite),
),
],
),
SizedBox(height: 16.0),
ElevatedButton.icon(
icon: Icon(Icons.arrow_forward),
label: Text('Details'),
onPressed: goToDetailPage,
),
],
);
}
}
extension MoreDetailPage on DetailPage {
Widget buildDetailPageCore(context) {
final bool _isFavoriteArgument =
ModalRoute.of(context)?.settings.arguments as bool;
return Column(
crossAxisAlignment: CrossAxisAlignment.center,
children: Widget[
Text(
overview,
(continued)](https://image.slidesharecdn.com/wwile445-231111022106-fdd944b6/85/w_wile445-pdf-648-320.jpg)
![0005390161.INDD 626 Trim size: 7.375 in × 9.25 in June 11, 2022 3:48 PM
626 BOOK 4 Creating Mobile Apps
),
SizedBox(height: 16.0),
ElevatedButton(
child: Text(
_isFavoriteArgument == true
? 'Unfavorite this'
: 'Make It a Favorite!',
),
onPressed: () {
Navigator.pop(context, !_isFavoriteArgument);
},
),
],
);
}
}
In this section’s app, the MainTitlePage and DetailPage share the responsibil-
ity for the movie’s “favorite” status. When the Favorite icon appears, it appears
on the MainTitlePage, but the DetailPage has the button that switches between
“favorite” and “not favorite.”
Figure 8-10 describes the action of this section’s app. In the next several para-
graphs, I guide you through the numbered steps in that figure.
LISTING 8-5: (continued)
FIGURE 8-10:
Moving from
page to page.](https://image.slidesharecdn.com/wwile445-231111022106-fdd944b6/85/w_wile445-pdf-649-320.jpg)

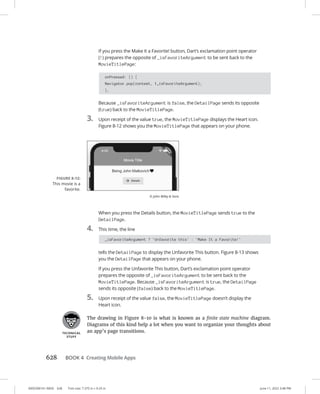

![0005390161.INDD 630 Trim size: 7.375 in × 9.25 in June 11, 2022 3:48 PM
630 BOOK 4 Creating Mobile Apps
}
}
class MovieTitlePage extends StatelessWidget {
@override
Widget build(BuildContext context) {
return _buildEasyScaffold(
appBarTitle: 'Movie Title Page',
body: _buildEasyButton(
context,
label: 'Go to Detail Page',
whichRoute: '/details',
),
);
}
}
class DetailPage extends StatelessWidget {
@override
Widget build(BuildContext context) {
return _buildEasyScaffold(
appBarTitle: 'Detail Page',
body: Column(
children: Widget[
_buildEasyButton(
context,
label: 'Go to Cast Page',
whichRoute: '/details/cast',
),
_buildEasyButton(
context,
label: 'Go to Reviews Page',
whichRoute: '/details/reviews',
),
],
),
);
}
}
class CastPage extends StatelessWidget {
@override
Widget build(BuildContext context) {
return _buildEasyScaffold(
appBarTitle: 'Cast Page',
body: Container(),
);
}
}
LISTING 8-6: (continued)](https://image.slidesharecdn.com/wwile445-231111022106-fdd944b6/85/w_wile445-pdf-653-320.jpg)


![Navigation,
Lists,
and
Other
Goodies
0005390161.INDD 633 Trim size: 7.375 in × 9.25 in June 11, 2022 3:48 PM
CHAPTER 8 Navigation, Lists, and Other Goodies 633
Creating a List
The beginning of this chapter describes the master-detail interface. It says, “The
first page [in a master-detail interface] displays a list of items.” You can’t cram
information about every item on the list into one page. So, for details about a par-
ticular item, the user clicks that item and navigates to a separate page.
This section shows you how to navigate between a list of items and a detail page.
The new example is much more useful than the chapter’s Being John Malkov-
ich examples. The app in Listing 8-7 lists 25 films in Sylvester Stallone’s Rocky
franchise.
LISTING 8-7: A Rather Long List
// App0807.dart
import 'package:flutter/material.dart';
import 'App08Main.dart';
extension MoreMovieTitlePage on MovieTitlePageState {
goToDetailPage(int index) {
Navigator.push(
context,
MaterialPageRoute(
builder: (context) = DetailPage(),
settings: RouteSettings(
arguments: index,
),
),
);
}
Widget buildTitlePageCore() {
return ListView.builder(
itemCount: 25,
itemBuilder: (context, index) = ListTile(
title: Text('Rocky ${index + 1}'),
onTap: () = goToDetailPage(index + 1),
),
);
}
}
extension MoreDetailPage on DetailPage {
Widget buildDetailPageCore(context) {
final sequelNumber = ModalRoute.of(context)?.settings.arguments as int;
final overview =
'For the $sequelNumber${getSuffix(sequelNumber)} time, palooka '
'Rocky Balboa fights to be the world heavyweight boxing champion.';
(continued)](https://image.slidesharecdn.com/wwile445-231111022106-fdd944b6/85/w_wile445-pdf-656-320.jpg)
![0005390161.INDD 634 Trim size: 7.375 in × 9.25 in June 11, 2022 3:48 PM
634 BOOK 4 Creating Mobile Apps
return Column(
crossAxisAlignment: CrossAxisAlignment.center,
children: Widget[
Text(overview),
],
);
}
String getSuffix(int sequelNumber) {
String suffix;
switch (sequelNumber) {
case 1:
case 21:
suffix = 'st';
break;
case 2:
case 22:
suffix = 'nd';
break;
case 3:
case 23:
suffix = 'rd';
break;
default:
suffix = 'th';
}
return suffix;
}
}
To run the app in Listing 8-7, your project must have at least two .dart files — one
containing the code in Listing 8-7 and another containing the code in Listing 8-1.
When you run the code in Listing 8-7, you get two pages — a front page with a
list of movie titles and, as usual, a detail page. Figure 8-15 shows you the page
with the list of movie titles, and Figure 8-16 shows you a detail page.
The ListView widget
The essence of Listing 8-7 is a call to Flutter’s ListView.builder constructor.
The constructor takes two parameters: an itemCount and an itemBuilder.
LISTING 8-7: (continued)](https://image.slidesharecdn.com/wwile445-231111022106-fdd944b6/85/w_wile445-pdf-657-320.jpg)

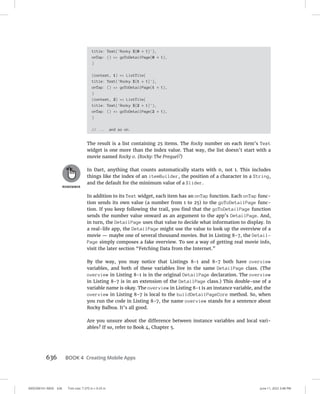
![Navigation,
Lists,
and
Other
Goodies
0005390161.INDD 637 Trim size: 7.375 in × 9.25 in June 11, 2022 3:48 PM
CHAPTER 8 Navigation, Lists, and Other Goodies 637
PUTTING A LISTVIEW INSIDE A COLUMN
Some layouts — ones that you might think are okay — send Flutter into an unending,
tail-chasing game. Book 4, Chapter 6 has a section about it. The game is especially frus-
trating when you try to put a list view inside a column. Here’s some bad code:
// Don't do this:
Widget buildTitlePageCore() {
return Column(
children: Widget[
Text('Rocky Movies'),
ListView.builder(
itemCount: 25,
itemBuilder: (context, index) = ListTile(
title: Text('Rocky ${index + 1}'),
onTap: () = goToDetailPage(index + 1),
),
),
],
);
}
When you run this code, no list view appears. Among dozens of lines of diagnostics,
Android Studio’s Run tool window reports that Vertical viewport was given
unbounded height. As it is in Book 4, Chapter 6, one widget (the Column widget) is
sending an unbounded height constraint to its children, and one of the children (the
ListView widget) can’t handle all that freedom. The result is an impasse in which the
ListView can’t be displayed. To fix the problem, do the same thing that helps in
Book 4, Chapter 6 — add an Expanded widget:
// Do this instead
return Column(
children: Widget[
Text('Rocky Movies'),
Expanded(
child: ListView.builder(
// ... etc.
The Expanded widget says, “Hey, Column. Figure out how tall the Text widget is and tell
the ListView how much vertical space is left over.” When the Column hands this infor-
mation to the ListView, the ListView says, “Thanks. I’ll use all of the left over space.”
The app displays itself correctly, and everyone’s happy.](https://image.slidesharecdn.com/wwile445-231111022106-fdd944b6/85/w_wile445-pdf-660-320.jpg)

![Navigation,
Lists,
and
Other
Goodies
0005390161.INDD 639 Trim size: 7.375 in × 9.25 in June 11, 2022 3:48 PM
CHAPTER 8 Navigation, Lists, and Other Goodies 639
String getSuffix(int sequelNumber) {
switch (sequelNumber) {
case 1:
case 21:
return 'st';
case 2:
case 22:
return 'nd';
case 3:
case 23:
return 'rd';
}
return 'th';
}
This new version of getSuffix is much more concise than the one in Listing 8-7.
In this version of getSuffix, each return statement jumps you entirely out of the
getSuffix function. You don’t even need a default clause, because you reach the
return 'th' statement when none of the case clauses applies.
Even this new-and-improved getSuffix function falters if Sylvester Stallone
makes Rocky 31. The movie’s overview will be, “For the 31th time, palooka Rocky
Balboa . . .” That doesn’t sound good.
There are dozens of ways to create more versatile versions of getSuffix, and it’s
fun to try to create one of your own. One of them looks like this:
String getSuffix(int sequelNumber) {
int onesDigit = sequelNumber % 10;
int tensDigit = sequelNumber ~/ 10 % 10;
Mapint, String suffixes = {1: 'st', 2: 'nd', 3: 'rd'};
String suffix = suffixes[onesDigit] ?? 'th';
if (tensDigit == 1) suffix = 'th';
return suffix;
}
Creating list items one-by-one
From one row to another, the items in Figure 8-15 have no surprises. Each item
displays the name Rocky and a number. Each item exhibits the same behavior
when you tap on it. Because of this uniformity, you can create one itemBuilder
that describes all 25 of the list’s items.](https://image.slidesharecdn.com/wwile445-231111022106-fdd944b6/85/w_wile445-pdf-662-320.jpg)
![0005390161.INDD 640 Trim size: 7.375 in × 9.25 in June 11, 2022 3:48 PM
640 BOOK 4 Creating Mobile Apps
SOME NEWS ABOUT SCROLLING
You don’t need a ListView to create a scrolling screen. You can enclose all kinds of
stuff inside a SingleChildScrollView. Here’s some code:
return MaterialApp(
home: Material(
child: Column(
children: Widget[
SizedBox(height: 200, child: Text(You've)),
SizedBox(height: 200, child: Text(read)),
SizedBox(height: 200, child: Text(many)),
SizedBox(height: 200, child: Text(chapters)),
SizedBox(height: 200, child: Text(of)),
Icon(Icons.book),
SizedBox(height: 100, child: Text(Flutter For Dummies)),
Icon(Icons.thumb_up),
],
),
),
);
It’s likely that your phone doesn’t have enough room for all this stuff. So if you don’t
add some sort of scrolling, you’ll see the dreaded black-and-yellow stripes along
the bottom of the screen. To avoid seeing these stripes, enclose the widgets in a
SingleChildScrollView:
return MaterialApp(
home: Material(
child: SingleChildScrollView(
child: Column(
children: Widget[
SizedBox(height: 200, child: Text(You've)),
// ... etc.
],
),
),
),
);
When you rerun the code, you’ll see the topmost few widgets with the option to scroll
and see others.](https://image.slidesharecdn.com/wwile445-231111022106-fdd944b6/85/w_wile445-pdf-663-320.jpg)

![0005390161.INDD 642 Trim size: 7.375 in × 9.25 in June 11, 2022 3:48 PM
642 BOOK 4 Creating Mobile Apps
title: Text('Citizen Kane'),
onTap: () = goToDetailPage('Citizen Kane'),
),
ListTile(
title: Text('Lawrence of Arabia'),
onTap: () = goToDetailPage('Lawrence of Arabia'),
),
],
);
}
}
extension MoreDetailPage on DetailPage {
Widget buildDetailPageCore(context) {
final movieName = ModalRoute.of(context)?.settings.arguments;
final overview = '(From themoviedb.com) ${synopses[movieName]}';
return Column(
crossAxisAlignment: CrossAxisAlignment.center,
children: Widget[
Text(overview),
],
);
}
}
If you visit https://api.flutter.dev/flutter/widgets/ListView-class.html,
you see the documentation for Flutter’s ListView class. In the page’s upper-right
corner, you see the class’s constructors, which include ListView and ListView.
builder. Listing 8-7 calls the named ListView.builder constructor. But in the
same place in Listing 8-8, you find the unnamed ListView constructor call. To
read about Dart’s named and unnamed constructors, refer to Book 4, Chapter 3.
FIGURE 8-17:
Three movies.
© John Wiley Sons
LISTING 8-8: (continued)](https://image.slidesharecdn.com/wwile445-231111022106-fdd944b6/85/w_wile445-pdf-665-320.jpg)
![Navigation,
Lists,
and
Other
Goodies
0005390161.INDD 643 Trim size: 7.375 in × 9.25 in June 11, 2022 3:48 PM
CHAPTER 8 Navigation, Lists, and Other Goodies 643
Flutter’s unnamed ListView constructor has a children parameter, and that
children parameter’s value is . . . wait for it . . . a Dart language List. A Dart
language List is a bunch of objects inside a pair of square brackets, like this:
// A Dart language List:
[
ListTile(...),
ListTile(...),
ListTile(...),
]
To read about Dart’s List type, refer to Book 4, Chapter 4.
In Listing 8-8, the Dart List is actually a bunch of ListTile widgets. (They’re
like bathroom tiles with no grout between them.) But Flutter’s ListView is
versatile. The children don’t have to be ListTile widgets. The children of a
ListView may be a mixture of Text widgets, SizedBox widgets, Image.asset
widgets, and any other kinds of widgets. It can be a big grab bag.
(If you’re keeping score, Listing 8-8 contains a ListView which contains a Dart
language List of ListTile widgets.)
Making loops with Dart
Most programming languages have statements that perform repetitive tasks. For
example, languages such as Java, C/C++, and Dart have a thing called a for state-
ment, also known as a for loop. Figure 8-19 shows you a tiny example.
The example in Figure 8-19 is a Dart program, but it’s not a Flutter program. To
run this program, there’s no need to bother creating a Flutter project. Instead,
you can visit https://dartpad.dev, type the code in the page’s big editor win-
dow, and then press Run.
FIGURE 8-18:
“Play it
again, Sam”
(misquoted).
© John Wiley Sons](https://image.slidesharecdn.com/wwile445-231111022106-fdd944b6/85/w_wile445-pdf-666-320.jpg)

![Navigation,
Lists,
and
Other
Goodies
0005390161.INDD 645 Trim size: 7.375 in × 9.25 in June 11, 2022 3:48 PM
CHAPTER 8 Navigation, Lists, and Other Goodies 645
ListTile(
title: Text('Rocky ${index + 1}'),
onTap: () = goToDetailPage(index + 1),
),
],
);
}
If you replace the buildTitlePageCore method in Listing 8-7 with the code in
Listing 8-9, your app behaves exactly the same way. When Flutter encounters the
code in Listing 8-9, it starts creating 25 ListTile widgets.
Listings 8-7 and 8-9 give you two ways to create a 25-item ListView. Which
way is better? You can decide by asking, “Which way makes the code easier to
read and understand?” Most people would agree that the new code (the code in
Listing 8-9) is much clearer.
The stuff in Listing 8-9 looks like a for statement, but it’s not really a for state-
ment. It’s a collection for. The name collection for comes from the fact that a
List is one of Dart’s collection types. (See Table 4-2, over in Book 4, Chapter 4,
for more on collection types.) You can put a collection for inside any kind of
collection — a List, a Set, or a Map. The following code does all three of these
things:
main() {
Listint myList = [for (int i = 1; i = 5; i++) i];
Setint mySet = {for (int i = 1; i = 5; i++) i};
Mapint, int myMap = {for (int i = 1; i = 5; i++) i: i + 100};
print(myList);
print(mySet);
print(myMap);
}
For some rollicking good fun, run this code at https://dartpad.dev. Compare
Dart’s collection for with its collection if. The collection if appears in Book 4,
Chapter 7.
Dart’s collection for is interesting because it’s a new kind of programming lan-
guage construct. The two pillars of programming languages are statements and
expressions, but the collection for is neither a statement nor an expression. If you
want to do some reading about all this geeky stuff, visit https://medium.com/
dartlang/making-dart-a-better-language-for-ui-f1ccaf9f546c.](https://image.slidesharecdn.com/wwile445-231111022106-fdd944b6/85/w_wile445-pdf-668-320.jpg)
![0005390161.INDD 646 Trim size: 7.375 in × 9.25 in June 11, 2022 3:48 PM
646 BOOK 4 Creating Mobile Apps
Fetching Data from the Internet
Do this chapter’s examples remind you of movies that you’ve enjoyed? Would
you like an app that displays facts about these movies? If so, look no further than
Listing 8-10.
LISTING 8-10: Accessing Online Data
// app0810.dart
import 'dart:convert';
import 'package:flutter/material.dart';
import 'package:http/http.dart';
import 'app08main.dart';
extension MoreMovieTitlePage on MovieTitlePageState {
goToDetailPage(String movieTitle) {
Navigator.push(
context,
MaterialPageRoute(
builder: (context) = DetailPage(),
settings: RouteSettings(
arguments: movieTitle,
),
),
);
}
Widget buildTitlePageCore() {
TextEditingController _controller = TextEditingController();
return Column(
crossAxisAlignment: CrossAxisAlignment.center,
children: Widget[
TextField(
decoration: InputDecoration(labelText: 'Movie title:'),
controller: _controller,
),
SizedBox(height: 16.0),
ElevatedButton.icon(
icon: Icon(Icons.arrow_forward),
label: Text('Details'),
onPressed: () = goToDetailPage(_controller.text),
),
],
);
}
}
extension MoreDetailPage on DetailPage {
FutureString _getMovieData(String movieTitle) {](https://image.slidesharecdn.com/wwile445-231111022106-fdd944b6/85/w_wile445-pdf-669-320.jpg)
![Navigation,
Lists,
and
Other
Goodies
0005390161.INDD 647 Trim size: 7.375 in × 9.25 in June 11, 2022 3:48 PM
CHAPTER 8 Navigation, Lists, and Other Goodies 647
return updateOverview(
movieTitle: movieTitle,
api_key: Parents: Don't let your sons and
daughters put api keys in their code.,
);
}
Widget buildDetailPageCore(context) {
final _movieTitle = ModalRoute.of(context)?.settings.arguments as String;
return Column(
crossAxisAlignment: CrossAxisAlignment.center,
children: Widget[
FutureBuilderString(
future: _getMovieData(_movieTitle),
builder: (context, snapshot) {
if (snapshot.hasData) {
return Text(snapshot.data as String);
}
return CircularProgressIndicator();
},
),
],
);
}
FutureString updateOverview({required String api_key, required String
movieTitle}) async {
final response = await get(Uri.parse(
'https://api.themoviedb.org/3/search/movie?api_key=' +
'$api_keyquery=$movieTitle'));
return json.decode(response.body)['results'][0]['overview'];
}
}
Figures 8-21 and 8-22 show a run of the code in Listing 8-10.
There’s a lot to unpack in Listing 8-10, so I divide it into parts.
Using a public API
Before creating Listing 8-10, I searched the web for a site that provides free
access to movie information. Among the sites I found, the one I liked best was
The Movie Database (www.themoviedb.org). Like many such sites, The Movie
Database provides access through its own application programming interface (API).
When you use the prescribed API code to send a query to themoviedb.org, the site
spits back information about one or more movies.](https://image.slidesharecdn.com/wwile445-231111022106-fdd944b6/85/w_wile445-pdf-670-320.jpg)
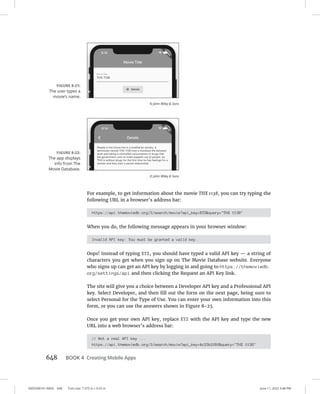


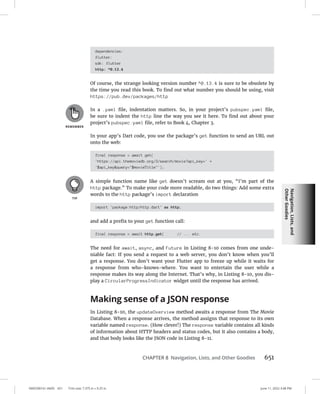
![0005390161.INDD 652 Trim size: 7.375 in × 9.25 in June 11, 2022 3:48 PM
652 BOOK 4 Creating Mobile Apps
But wait! How do you sift information out of all that JSON code? I’ll tell you
how. You call the json.decode function — one of the many functions in Dart’s
convert package. (Refer to code near the top and bottom of Listing 8-10.) The
json.decode function turns the code in Listing 8-11 into a big Dart Map structure.
Like all of Dart’s maps, this map has keys and values, and some of the values can
be lists. You use square brackets to get the values from maps and lists. (Refer to
Book 4, Chapter 7.) So, to pull a movie’s overview out of the code in Listing 8-11,
write the following line:
return json.decode(response.body)['results'][0]['overview'];
Each pair of square brackets brings you closer to the bottom of the tree in
Figure 8-24.
What’s Next?
Navigator.push(
context,
MaterialPageRoute(
builder: (context) = Chapter_9(),
),
);](https://image.slidesharecdn.com/wwile445-231111022106-fdd944b6/85/w_wile445-pdf-675-320.jpg)

![Moving
Right
Along
.
.
.
0005390162.INDD 655 Trim size: 7.375 in × 9.25 in June 11, 2022 3:49 PM
CHAPTER 9 Moving Right Along . . . 655
],
),
),
buildRowOfButtons(),
],
),
),
),
);
}
Widget buildRowOfButtons() {
return Row(
mainAxisAlignment: MainAxisAlignment.center,
children: Widget[
ElevatedButton(
onPressed: () = controller.forward(),
child: Text('Forward'),
),
SizedBox(
width: 8.0,
),
ElevatedButton(
onPressed: () = controller.animateBack(0.0),
child: Text('Backward'),
),
SizedBox(
width: 8.0,
),
ElevatedButton(
onPressed: () = controller.reset(),
child: Text('Reset'),
),
],
);
}
@override
void dispose() {
controller.dispose();
super.dispose();
}
}
Figure 9-1 illustrates the concepts that come together to make Flutter animation.](https://image.slidesharecdn.com/wwile445-231111022106-fdd944b6/85/w_wile445-pdf-678-320.jpg)


![Moving
Right
Along
.
.
.
0005390162.INDD 659 Trim size: 7.375 in × 9.25 in June 11, 2022 3:49 PM
CHAPTER 9 Moving Right Along . . . 659
child: Container(
width: 25.0,
height: 25.0,
color: Colors.white,
),
),
],
)
This code creates the drawing shown in Figure 9-2.
The drawing consists of two Container rectangles — one black and the other
white. The white rectangle’s width and height are half those of the black rectangle.
But notice this: The two rectangles overlap because the rectangles’ top and left
edges are almost the same.
A Stack constructor has a children parameter, and that parameter’s value is a
list. The order of the widgets in the list matters. If two widgets overlap one another,
the widget that comes later in the list appears to be on top. In the code accompa-
nying Figure 9-2, you don’t want to change the order of the two Positioned
widgets in the list. If you do, the white rectangle becomes completely hidden
behind the bigger black rectangle.
You can download and run the little Stack app shown in Figure 9-2. It’s the project
named app0900 in the files that you download from this book’s website.
Moving Along a Straight Line
Listing 9-2 contains an extension for the code in Listing 9-1.
FIGURE 9-2:
Two containers
on a stack.](https://image.slidesharecdn.com/wwile445-231111022106-fdd944b6/85/w_wile445-pdf-682-320.jpg)


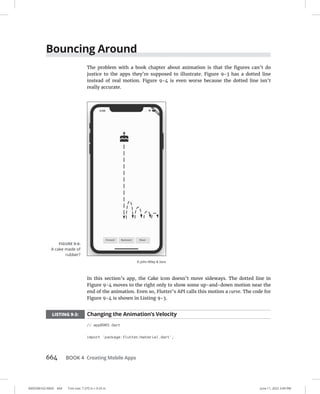


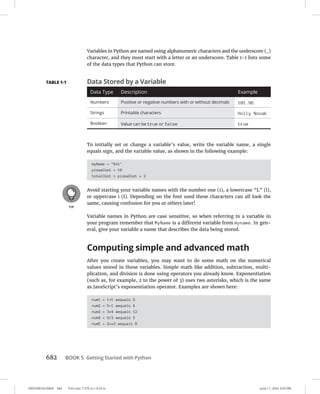

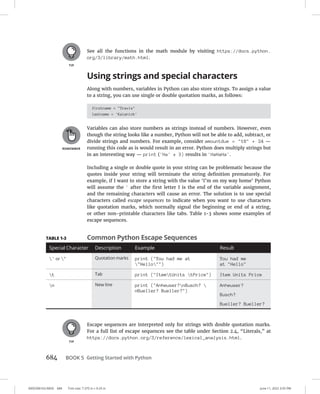

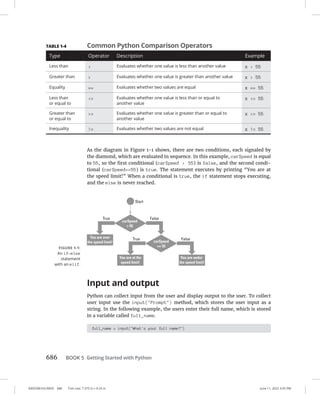


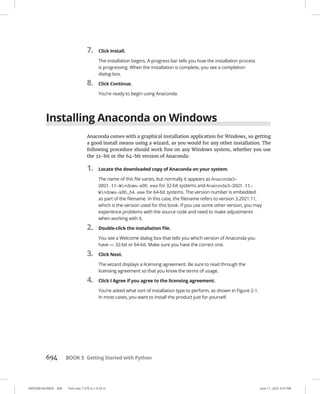


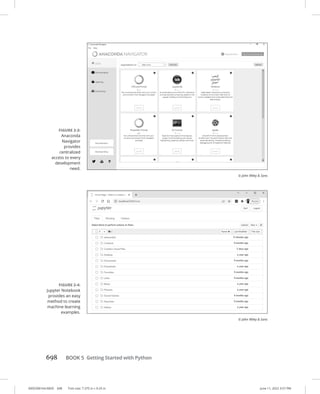


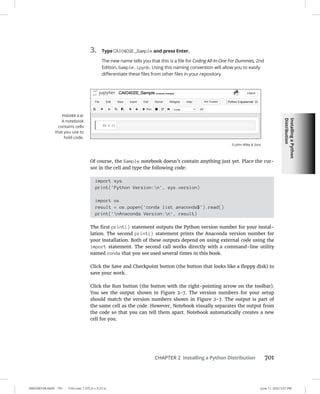
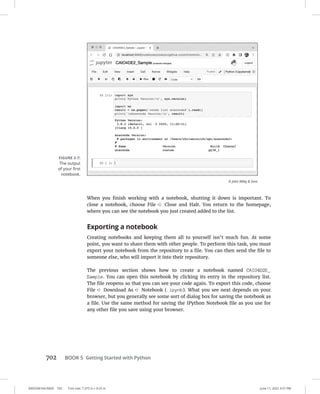
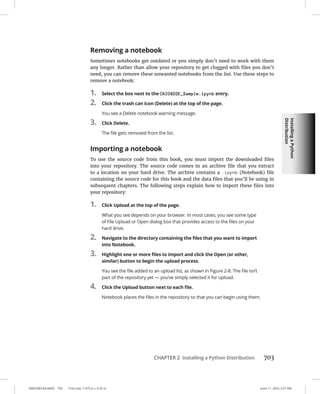


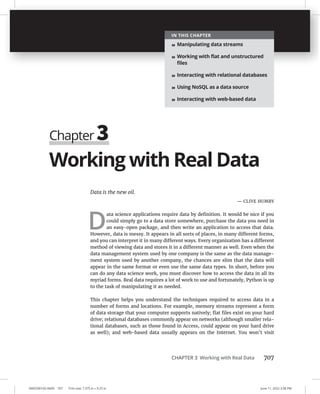


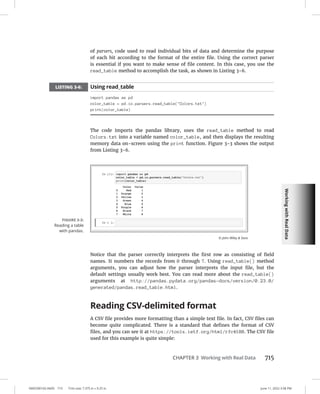


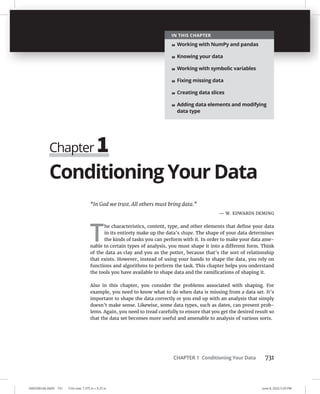


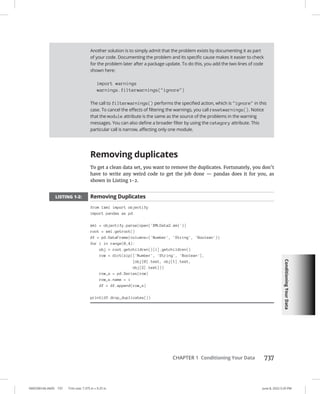

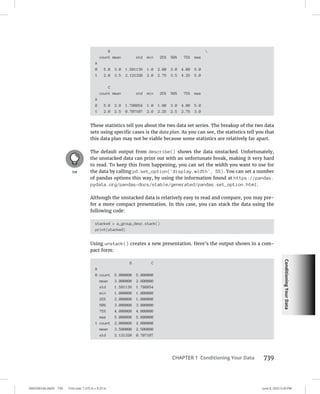


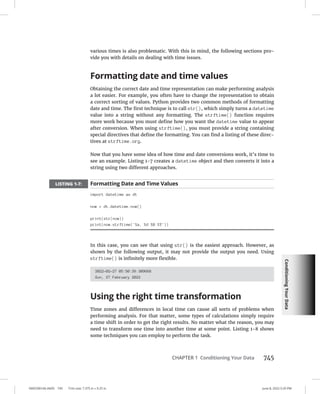


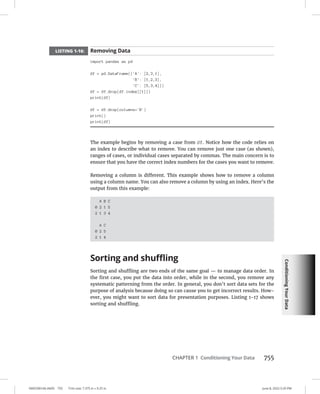


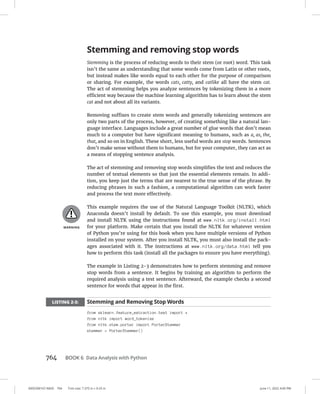


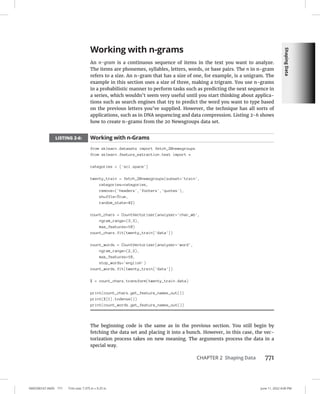


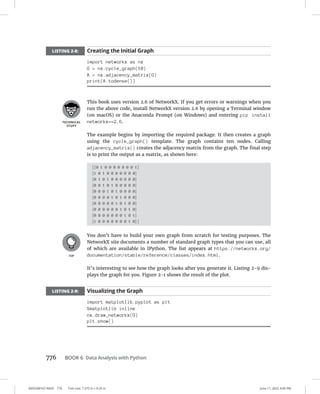


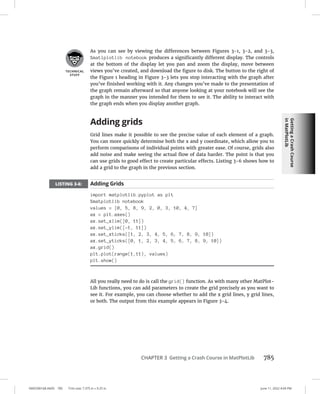

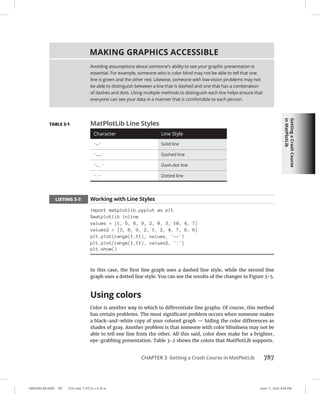


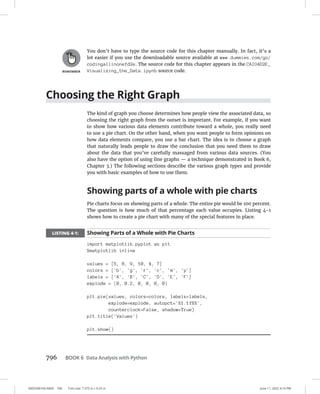


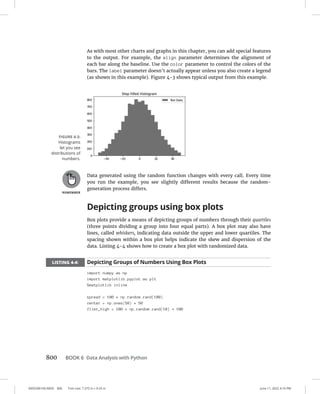

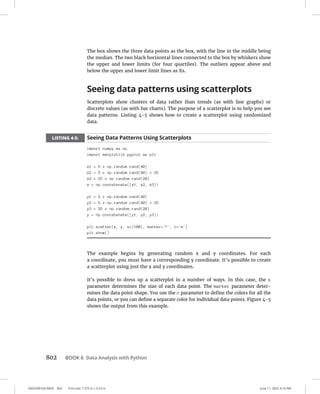


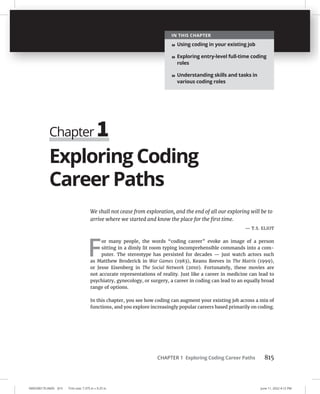


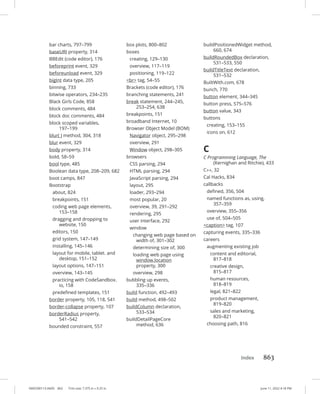


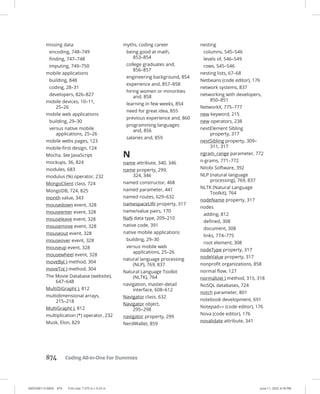

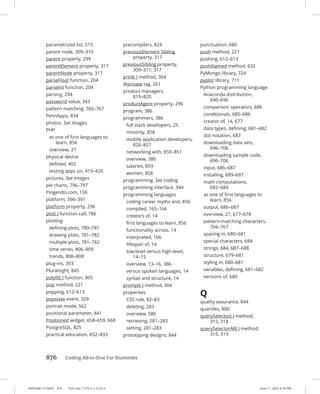


![www.webre24h.com - [O`reilly] javascript cookbook - [powers]](https://cdn.slidesharecdn.com/ss_thumbnails/oreilly-javascriptcookbook-powers-160415020836-thumbnail.jpg?width=640&height=640&fit=bounds)

![www.webre24h.com - [Wordware] advanced javascript, 3rd ed. - [easttom]](https://cdn.slidesharecdn.com/ss_thumbnails/wordware-advancedjavascript3rded-160421130838-thumbnail.jpg?width=640&height=640&fit=bounds)