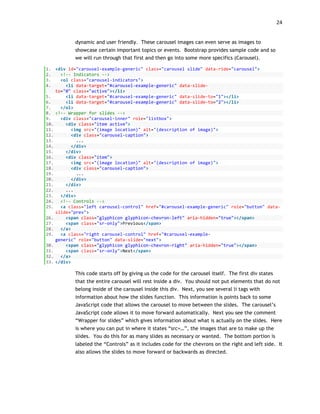
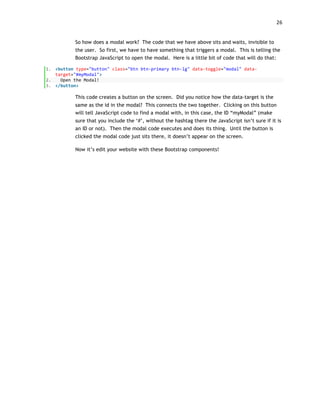
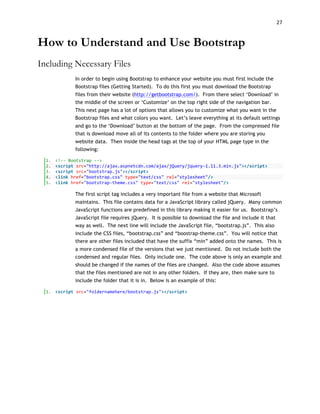
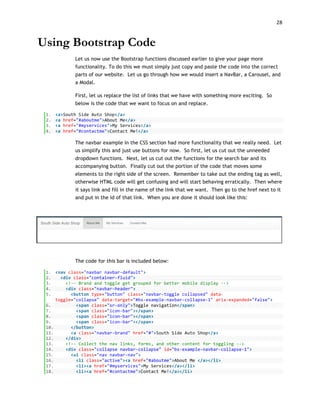
This document provides a tutorial for understanding and using HTML, CSS, and JavaScript to create websites. It is intended for high school students and presented as a guide created by the author, Linus Remington, for his classmate Jake Jordan. The guide covers basic HTML tags such as <DOCTYPE>, <html>, <head>, <title>, and <body> as well as other common tags. It also provides introductions to CSS and JavaScript and how they can be used to further enhance websites. The overall document serves as a beginner's manual for learning web development.
Given from a developer's perspective, this presentation will address the concept of responsible web design as an approach to the authoring of accessible web sites.
If you’re a creative or technical professional, odds are you need a great portfolio website. What makes a good portfolio? What if you’re a writer, or a developer, and don’t have a lot of visual work to show? We’ll go over how to navigate the intimidating world of personal portfolio websites, using WordPress as our guide.
Don’t make me think là cuốn sách nền tảng nhất, căn bản nhất. Steve Krug giúp bạn xây dựng tư duy của người làm UX – tư duy hướng người dùng sâu sắc. Xuyên suốt gần 200 trang sách, ông chỉ làm rõ 1 điều duy nhất đó là làm sao để người dùng có thể sử dụng sản phẩm mà không phải suy nghĩ bất kỳ điều gì.
Triết lý này đang trở thành tiêu chuẩn trong thiết kế sản phẩm với tổ chức tiên phong đi đầu là Apple. Khi mà người ta còn đang chạy đua về công nghệ với những phát minh, bằng sáng chế, những tính năng và công nghệ siêu việt thì Apple đã tập trung vào thiết kế cho người dùng cá nhân với những trải nghiệm mượt mà và thích thú đến diệu kỳ.
Don’t make me think là cuốn sách gối đầu giường cho bất kỳ ai đang bắt đầu tìm hiểu UX, bắt đầu xây dựng tư duy hướng người dùng trong thiết kế.
Tập đoàn Internet NOVAON trân trọng giới thiệu!
If you've ever searched for images for your blog posts before, you understand that sometimes it's just too hard to find exactly what you want. Or, if you do find it, you probably shouldn't use it due to copyright. Well, here's some info on creating your own webgraphics and images. Check it out!
Web Design for Literary Theorists I: Introduction to HTMLPatrick Mooney
First in a series of workshops for graduate students in the Department of English at UC Santa Barbara.
More information: http://patrickbrianmooney.nfshost.com/~patrick/ta/lead-ta/web-design/2013-2014/
YouTube screencast with audio: http://youtu.be/7Sv0LLGgi9A
How Digital Deceptions transitioned from a Flash based website to a WordPress Content Management System and all the benefits and doors it has opened for me over the last year.
Introduction to Web Design for Literary Theorists I: Introduction to HTML (v....Patrick Mooney
First in a series of workshops for graduate students in the Department of English at UC Santa Barbara.
More information: http://patrickbrianmooney.nfshost.com/~patrick/ta/lead-ta/web-design/
YouTube screencast with audio: http://youtu.be/ZyYRmJXbT4o
The way we work with HTML and CSS has evolved massively over recent years. From writing native CSS, many of us now consider pre-processors a key part of our development toolkit. This talk will explore how we use the front-end tools at our disposal today. We’ll cover some of the mistakes that can (easily) be made when using them and how to ensure that they complement our workflow, helping us to write more maintainable, well structured front-end code.
Web Design for Literary Theorists III: Machines Read, Too (just not well) (v ...Patrick Mooney
Third (and last) in a series of workshops for graduate students in the Department of English at UC Santa Barbara.
More information: http://patrickbrianmooney.nfshost.com/~patrick/ta/lead-ta/web-design/2013-2014/
YouTube screencast with audio: http://youtu.be/IwuS0K21ZoU
The web is not a fixed width, and Steve Fisher thinks we are remembering that. If our medium is fluid, should our process be fixed? Steve prefers designing within the browser, especially when responsive design is a requirement. Fireworks and Photoshop are not flexible enough to demonstrate media queries, button and menu states, HTML5 and JavaScript behaviors, dynamic resizing of elements and navigation flow. Because the medium is fluid, our approach to design has to be fluid as well. A responsive process is a responsible process, matching the medium. After working with many companies and organizations, helping them transform their process to fit a responsive workflow, Steve is going to share the goods. One web to rule them all!
1. 1
Web Programming for Bootstrap:
A Tutorial for High School Students
Jacob Johnson
Phillip Anderson
Duffy Young
28 October 2015
English 316 Professor Hatch
4. 4
Introduction
Insignificant. The word that I would have described myself as of a while back. The
twists and turns of life have helped me realize that I’m actually not insignificant at all.
The recent turn of events have helped me realize many things. My name is Linus
Remington and I’m a nerd. I love reading books and obtaining as much knowledge as I
can. I don’t see the world like most people do. If you asked me what my favorite color
was, I’d probably say that 4 out of 10 people prefer the color blue, but that I prefer
anything but blue. My eyes are blue and I like my eyes, but conforming is definitely not
something I morally believe in.
Anyway, I love computers. I love video games. My most recent moment of pride and joy
was when I successfully beat Halo, on legendary difficulty, by myself in only 5 hours.
I’m pretty impressive … I know. The world is full of opportunity, but I don’t really want
to talk to anyone but Cortana, my virtual A.I companion. I think some of you can relate
… maybe. I have been creating websites for a while now, but I will get to that later.
One day about two years ago, after finishing all my homework and going to the arcade,
I saw a big sign that said, “The power to create whatever you want, IN YOUR HANDS.” I
wanted to learn more. The poster was talking about a short course on Thursday night
about creating your own website. I had always wanted to learn more about web
development, so I went. I learned in detail about HTML, the basic tool to create the
“look” of your website. HTML stands for Hyper Test Markup Language. I learned how to
start, for a middle, and end a webpage. I didn’t know that the coding was so simple.
You just need to memorize some simple terms. These were the notes that I wrote
down:
HTML is first step in creating a functioning website. You use different codes to Start,
create headings and titles, and end the document. It sounds like a boring bunch of
nonsense to memorize, but is essential in establishing your foundation in website
development.
First thing you need to know is how to start and end the document (all of this will be
covered later in in the book, in my “How to Understand and Use HTML” section. I
realized that things like creating headings and a title was not just a matter of copy and
paste your material onto a webpage; these codes are the key to understand how to use
HTML. Codes interest me. I loved exact sciences and hate trying to analyze different
interpretations. Coding may not be for everyone, but anyone wanting to create
websites needs to comprehend this material.
After learning about HTML, I became addicted to the idea of being able to create my
own website. The knowledge of creating a basic webpage excited me so much, imagine
having the knowledge to create links, connect various different pages, and do whatever
you want with a website. The possibilities are endless. Anyways, after Thursday night I
5. 5
put in my calendar the next meeting. This next meeting was going to go over HTML
again while implementing the beginnings of CSS. I had no idea what CSS was until I
arrived at the meeting that next Thursday evening.
The first thing they emphasized at the next meeting was the necessity to grasp HTML
before moving forward. I was anxious because I need that I had practiced HTML that
entire week. I felt as if my preparation made me stick out of the crowd. I was ready to
move forward. I learned that CSS stands for Cascading Style Sheets. I got that it is a
great tool in adding layout to your website. They say that it saves you a whole lot of
time, if you can get it down. Once again, I returned home excited as a kid on Christmas
Eve. Knowing how to create a website would open up so many opportunities for me.
CSS is more complicated than HTML, but I’m up for the challenge.
The final of three meetings went great. We learned a tiny bit about a site called
Bootstrap. Bootstrap is an open source framework to help create websites. People use
the site in helping them create high-quality websites. Bootstrap uses HTML, CSS, and
JavaScript. JavaScript is a scripting language that is useful in web development. I
understand now that creating a website is like learning a new language. It is difficult at
times, but once you get it, it is so rewarding. I don’t even know what the big rewards
will be at this point, but that’s what’s so exciting about life; you never know what
you’re going to get.
Let’s fast forward a bit to about a year ago. I had created a couple of different
websites for myself and actually made some great money. My most lucrative website
helps people find the best prices for plane tickets. It actually wasn’t very hard to make
at all. I loved what I was doing at home with my websites, but at school, I was
struggling a lot.
I understand that I think differently than most people, but I didn’t believe how much I
was being persecuted for it. I have always considered myself a good person -- a weird
and nerdy person; but a good person. I guess some of the things I used to say were
“demeaning” and “offensive.” I thought it was clear to everyone that their lack of
studying, and their goofing off all the time made them less intelligent beings. No one
ever taught me how to talk with people, and I learned by myself how to talk to
computers. I was mocked, bullied, and attacked at every angle. I didn’t know what to
do.
One day when I had my laptop open in my American History class, I heard a guy named
Jake Jordan start talking about me. He started saying that I was a complete dork, and
he couldn’t imagine having no friends like me. All the girls around him started
laughing, including Sarah, his girlfriend. Everyone at school talked about how gorgeous
she was, but I can see an idiot when I see one. I bet she couldn’t even complete basic
math if you paid her to. In addition, she doesn’t know what hard work even means. Her
6. 6
dad has paid for every little thing she has wanted since she was born. I’m not too
bitter; I just wish I didn’t have to work to help sustain my mom and me. I’m ok.
Months passed after this moment; Jake had separated from Sarah and the world was
still dark. On March 25, 2014, Jake Jordan approached me unexpectedly. I couldn’t
believe my ears as he started asking me questions about web development. I,
personally, couldn’t believe that he knew what the web was and that we as humans are
capable of developing it. He wanted to create his own website.
I suddenly felt a rush of excitement as he asked me more questions. He looked pathetic
in the beginning, as if he’d never asked for help in his life. He seemed so
uncomfortable, but became more calm and comfortable as I responded calmly and
comfortably. He wanted to create his own website because his dad had lost his job and
they wanted to start their own car repair company. I understand more than anybody
what that’s like, so I accepted to help him. He was so excited to hear a “yes” that gave
me a great smile. I smiled back. He asked me if I wanted anything in return. I didn’t
know what to say, so I just said “nothing.” He wanted to give me something, so he
offered to help me to “get more friends” as he said it. I was surprised by his
straightforward offer and I thought about it. After a couple of days of swallowing my
pride, I reluctantly accepted.
Jake started in our first session by asking me where we would start. I told him that the
first step was understanding and memorizing some important parts of HTML. I told him
that I would teach him step by step what to do and write a guide a for him. This guide
will be used to assist him when he forgets anything. Here is the guide that I created for
my new friend Jake. It will include a guide on HTML, CSS, and JavaScript. We’ll start
with HTML. Here we go.
7. 7
How to Understand and Use HTML
I will teach you how to build a comprehensive webpage for your new business. We will
begin with HTML coding and then move to CSS. After learning about those two coding
forms, we will finish with JavaScript.
Coding is like the hidden map for your website. HTML is the most basic building blocks
of your map. With HTML, you can put text and images on your website page. CSS allows
you to add more detail and emphasis to the map of your website. With CSS, you can
choose features such as text font, text size, and the layout of your webpage. Your map
becomes much more aesthetically pleasing to users. Finally, JavaScript coding makes
your webpage interactive. With JavaScript, you can allow for logins and feedback on
your website. With the combination of HTML, CSS, and JavaScript, your map is fully
functional and your webpage is ready for use.
HTML Doctype
Let’s get started. HTML is made up of a series of tags, which are the instructions for
the rest of your webpage. HTML creates the backbone of your webpage.
When you begin coding a new project, the first tag you use will look exactly like this:
1. <!DOCTYPE html>
This is called the Document Type Declaration (HTML <!DOCTYPE> Declaration, n.d.).
With this first tag, you declare to the browser what version of HTML you will be using
for the rest of this project. This particular Document Type Declaration informs your
browser that you are using HTML version 5, the most recent and standard version of
HTML. This most recent version was introduced in October 2014. If you look at projects
that were created before this, you likely will see a different declaration:
1. !DOCTYPE HTML PUBLIC "-
//W3C//DTD HTML 4.01//EN" "http://www.w3.org/TR/html4/strict.dtd">
Obviously, with the introduction of version 5.0, starting projects became much simpler.
After you have declared what document you are ready to add more tags. With the
exception of the Document Type Declaration tag, all tags come in pairs. The first tag is
called the “start” tag or the “on” tag; the second tag in the pair is called the “end” or
“off” tag. I wanted to emphasize that point now, but it will make more sense as we
progress what I mean exactly.
8. 8
<html> tag
The next tag you will use always is the <html> tag (HTML <html> tag, n.d.). This tag
tells the browser that this will be a HTML document. All of the rest of your coding will
fall between the start <html> tag and the end tag, </html>. Notice that the end tag
has a back slash in front of the acronym. All end tags will look similar.
You might be asking yourself, “Wait! What’s the difference between the <!DOCTYPE
html> and the <html>?”
When I first started I had the same question and confusion. The <!DOCTYPE html> tag
tells the browser which version of HTML you will be using; <html> tag tells the browser
that the coding will be HTML. That may seem to be a bit redundant, and I won’t
disagree. But know this: every new project must start this same way or the rest of your
coding will not work. I cannot stress that enough.
Your browser should like this so far;
1. <!DOCTYPE html>
2. <html>
3. </html>
So far, nothing will be visible on your webpage.
<head> tag
The next tag is the <head> tag, with the accompanying end tag, </head>. In between
the heading tags, you will write the code for the “title of the document, styles, scripts,
meta information and more.”
<title> tag
We will learn about the title right now, and will return to everything else in the head
at a later point. Between the <title> tags, you will write the title of the webpage
(HTML <title> Tag, n.d.). This text will be the first to actually show on the webpage.
Without a CSS coding, you will not be able to choose text size, font, color, or other
features. Later, we’ll discuss how to add those features. Here’s what your browser
should look like:
1. <!DOCTYPE html>
2. <html>
3. <head>
4. <title>Example Title for Web Page</title>
5. </head>
6. </html>
9. 9
Not too difficult, right? Let’s continue then.
<body> tag
After the head, you will add the body of your browser, beginning with the <body> tag.
Between the <body> tags, we will write the code associated with the rest of the text
on your web page. Let’s learn about several body tags: heading tags <h>, the paragraph
tag <p>, the hyperlink tag <a>, list tags <ul>/<li>, the <div> tag, <img> tag and the
<button> tag.
<heading tag>
There are six heading tags (HTML <h1> to <h6>, n.d.). Increasing numbers, 1-6,
designates them. The <h1> tag shows the heading with the most important information.
As the number associated with the heading tag increases, the importance of the
heading decreases; <h6> is the least important heading. Let’s take a look at the
differences between the <h1> and <h6> tags.
The <h1> has the largest text size; the default size is 24 pt or 2 em. After coding
<h1>Most Important heading</h1>, the text would appear like this on your web page:
Most Important Heading
The <h6> tag has the smallest default text size, only 7.55 pt or .67em. An example
heading with the code <h6>Least Important Heading</h6> would appear:
Least Important Heading
With default settings, between the <h1> heading and surrounding text, there is the
least amount of space; between the <h6> heading and surrounding text, the greatest.
<p> tag
When writing large bodies of text, it will be helpful to define and differentiate
paragraphs. Such is the purpose of the <p> tag (HTML <p> tag, n.d.). All of the text
between paired <p> tags will appear on the web page as one paragraph. Here’s an
example of the coding:
1. <p> This is the first paragraph. It is an introduction to the rest of the information o
n this webpage. It follows the first heading. </p><p> This is the second paragraph. It
outlines and argues the first point of the article written on the webpage. It follows t
he first paragraph.</p><p>This is the final paragraph. It sums the argument and calls t
he reader to action. </p>
10. 10
And here’s how it will look on the webpage:
This is the first paragraph. It is an introduction to the rest of the information on this
webpage. It follows the first heading.
This is the second paragraph. It outlines and argues the first point of the article written
on the webpage. It follows the first paragraph.
By default, space will be added between paragraphs; that space can be adjusted by
CSS.
<a> tag
The <a> defines a hyperlink; you will be able to link from one web page to another
(HTML <a> Tag, n.d.). Let’s see how this will work. If you wanted to create a hyperlink
to Google with the text on your webpage saying, “Google it!!”, then your tag would
look like this:
1. <a href=”google.com”>Google it!!</a>
The ‘href’ defines the hyperlink as a URL to a specific website. By clicking on the
words, “Google it!!” on your webpage, a new window will open to the Google
homepage.
<ul> and <ol> tags
As a part of your paragraphs, you may make lists to present some information more
clearly. HTML can create two different types of lists: unordered (bullets identifying
different items in the list) or ordered lists (numbers ordering different items in the
list). I’ll show an example of each (HTML <ol> Tag, n.d.). Let’s say you want to make a
shopping list, without any particular order. The coding for that would be similar to this:
1. <ul>
2. <li>Milk</li>
3. <li>Juice</li>
4. <li>Cereal</li>
5. </ul>
With this coding, your webpage would look like this:
• Milk
• Juice
• Cereal
11. 11
Now let’s order that same list (HTML <li> Tag, n.d):
1. <ol>
2. <li>Milk</li>
3. <li>Juice</li>
4. <li>Cereal</li>
5. </ol>
This would appear:
1. Milk
2. Juice
3. Cereal
<img> tag
Nearly all websites use images and pictures to make their website more pleasing to the
eye (HTML <img) tag, n.d.). To add an image, you will need to know the url of the
image. This can either be an image on a website or an image saved in your computer.
You For our example, we will use a stock image of a car from the internet, with the url
of: http://cliparts.co/cliparts/di9/KXK/di9KXK6jT.png
Here’s the coding:
1. <img src="http://cliparts.co/cliparts/di9/KXK/di9KXK6jT.png”>
<button> tag
Finally, I will teach you the <button> tag (HTML <button tag, n.d.). This tag allows you
to make certain parts of your text responsive. By clicking on text with the button tag,
users will open a new screen. Here’s how the coding and appears:
<button type="button" onclick="alert('My
page')">Click</button>
With this coding, users would see the word Click on the screen and after clicking on it,
would see the words My page pop up in a new browser.
Now that we’ve gone over the basics of HTML, let’s make your personal web page.
We’ll begin as we would with any other HTML document (adding your personalized
title:
1. <!DOCTYPE html>
2. <html>
3. <head>
12. 12
4. <title>Jake And Phillip’s Car Services</title>
5. </head>
6.
7. <body>
8. <a>South Side Auto Shop</a>
9. <a href="#aboutme">About Me</a>
10. <a href="#myservices">My Services</a>
11. <a href="#contactme">Contact Me!</a>
12.
13. <h1> South Side Auto Shop </h2>
14. <img src="http://cliparts.co/cliparts/di9/KXK/di9KXK6jT.png" alt="Mechanic Fixi
ng Car">
15.
16. </br>
17. <h2 id="aboutme">About Me</h2>
18. <p>I am a talented and hardworking mechanic. My son and I have started this bus
iness to give normal and hardworking people like us, an opportunity to have your car fi
xed for a truly appropriate and reasonable price. We know what it’s like to struggle.
We want to give a quality and high-
professional experience to each customer that comes through our door. We promise 100 %
satisfaction or you money back.</p>
19. <p>I am a happily married man and I’m the father of three children. My s
on Jacob is here to help me make your experience as easy and comfortable as possible. W
e’re a family. We want you to be part of our family. We are here because we care, and
that is hard to find in today’s world. Trust in our reliability and believe in our w
ords.</p>
20.
21. </br>
22. <h2 id="myservices">My Services</h2>
23. <p>Trust us with every possible problem your car could have. I have over 15 yea
rs of experience and am confidant your problem will be resolved within 48 hours. Our pl
edge is to give you the best experience in the business, and we understand that your ca
r is essential for your daily lives.</p>
24. </br>
25. <div>We provide high quality service to Toyota, Honda, and Subaru brand cars.
Come in with any questions or concerns and we will diagnose your problem free of charge
!</div>
26. <ul>
27. <li>Brakes</li>
28. <li>Tires</li>
29. <li>Transmission</li>
30. <li>Oil Change</li>
31. <li>Tire Rotation/Alignment</li>
32. <li>Timing Belts</li>
33. <li>Heading and Cooling</li>
34. <li>Batteries</li>
35. <li>Wiper Blades and Headlights</li>
36. <li>State Emissions Inspections</li>
37.
38. </ul>
39. </br>
40. <p>We understand this so much that we have a car you can borrow while we fix yo
ur car. The car will be available in shifts and can only be rented if you sign a contra
ct making you liable for it. The car is a 2008 Toyota Camry and is very reliable. If yo
ur car is being fixed while our rental is occupied, we regret to inform you that we can
not provide another car for you; one more reason to come in as soon as a problem arises
in your car.</p>
41. <img src="http://d1r57ja1amoclf.cloudfront.net/wp-
content/uploads/2014/04/Toyota-Logo.jpg" alt="Toyota Logo">
42. <img src="http://www.zeroto60times.com/blog/wp-content/uploads/2013/02/honda-
cars-logo-emblem.jpg" alt="Honda Logo">
13. 13
43. <img src="https://i.ytimg.com/vi/ZSRQdUhemUc/maxresdefault.jpg" alt="Subaru Log
o">
44.
45. </br>
46. <h2 id="contactme">Contact Me</h2>
47. <p> Name: Jacob and Phillip Jordan </p>
48. <p> Phone Number: 1-891-333-2345 </p>
49.
50. <p> Location: 134 Freedom Boulevard, Provo, UT, 84604</p>
51. <p>You may also leave us an email. Please make sure to include: </p>
52. <ol>
53. <li>Name</li>
54. <li>A way to contact you</li>
55. <li>Car Model</li>
56. <li>Description of Problem</li>
57. </ol>
58. <p> <button type="button" onclick="alert(‘jake.johnson@yahoo.com')">Email Me!
!</button> </p>
59. </br>
60. <p> Available Hours: </p>
61. <ul>
62. <li>8:00 a.m. - 6:00 p.m. Monday</li>
63. <li>8:00 a.m. - 7:00 p.m. Tuesday-Thursday</li>
64. <li>8:00 a.m. - 5:00 p.m. Friday</li>
65. <li>10:00 a.m. - 4:00 p.m. Saturday</li>
66. <li>CLOSED ON SUNDAYS</li>
67. </ul>
68. <p>(Only call at the times listed below at Available Hours)</p>
69. </br>
70. <p><a>South Side Auto Shop</a><a>134 Freedom Boulevard, Provo, UT, 84604</a><a>
1-891-333-2345</a>
71. </body>
72. </html>
Transition to CSS
After teaching this part of the guide to Jake, I got frustrated because he didn’t grasp
the concepts well at all. I kept telling him that the success of his dad’s business
depended on his diligence. These concepts are not easy, but if you dedicate the time
and effort, you will get it. I learned how to be a better teacher during this time. I have
to admit that I liked the opportunity to help someone other than myself. I gave Jake a
couple of weeks to study and grasp HTML. I told him to come back to me when he can
effectively explain the guide that I created for him. This goes for anyone using this
guide; take the time to understand and comprehend HTML before you move forward at
this point. Most people think like Jake. They want to understand everything without
putting in the work, and this will never work. I had to put in the time and you will have
to as well.
Now that you have reached this point and are confidant in HTML, let’s move forward to
CSS. Do you remember what CSS stands for? I’ll remind you: Cascading Style Sheets. I
know. It sounds super exciting. Let’s get started.
14. 14
How to Understand and Use CSS
Basics of CSS
As was mentioned earlier, CSS stands for Cascading Style Sheets (Bos). CSS is a
different programming language that is used to make HTML look better. CSS can add
many styles but we will go through just a few basic ones right now. We will do: colors,
fonts, backgrounds, borders, and padding. To finish the CSS section we will build a
navbar for our website. So to start off we will go through some basics of how to use
CSS.
The first thing I want to go over is the basics of CSS syntax (or how CSS is written). CSS
is written with the style name, a semi-colon, the properties of the style, and usually a
semi-colon (Syntax). The semi-colon is necessary if you are going to list more styles as
you will separate them a semi-colon. If there is only one style or if you are writing
down the last one, you do not need a semi-colon. There are many different style
names and each style name usually has several properties that you can write down.
1. style="color:green;"
If the style name or the property is written down incorrectly, usually nothing will
happen. No error messages will come up and the style will not change to what you
wanted. An easy way to check what styles are being applied is to launch the webpage
and then right click and click “Inspect Element” (depending on your browser this may
or may not appear, on Microsoft Edge, Mozilla Firefox, and Google Chrome this option
is available) (Weakley, 2014).
First CSS can be placed in 3 different places (A Jade Bazar Enterprises ). The first is to
imbed the code into the HTML. What this means is that in different HTML tags you
would insert an additional bit of code that adds style to that tag. This allows you to
control certain tags exactly how you want them to be controlled.
1. <span style="color:green;"> </span>
However, the downside to this is that only that tag is changed, for other tags you will
need to add code again. That is repetitive and will clutter up your code and make it
hard to read.
Another format that allows you to style HTML is to create a section in your HTML file
that allows you to set styles for that one page. This method of internally including
CSS, allows you to be able to style any HTML tags using the class and ID. If you style an
ID you will just add styles to that one ID (as IDs are unique to each page). However if
you style a class then you will add styles to every tag that has that class, allowing you
to do many things will just a few lines of code.
1. <style>
15. 15
2. p {
3. padding-right: 100px;
4. font-size: 25px;
5. font-family: Garamond, "Trebuchet MS", serif;
6. color: #23527c;
7. }
8. .footnotes {
9. font-size:12.5px;
10. }
11. </style>
In the example above, I have a style for every p tag in the page and I also have a style
for the class named “footnotes”. The biggest problem of this style is that this makes
the code page really long and makes it slightly unwieldy.
The third method is known as external. You can place CSS code on a separate CSS file.
In order to link your HTML and CSS file, you will need to include a link in your HTML
file. In the example below I am calling my separate CSS file, “Stylesheet.css”.
1. <link href="Stylesheet.css" type="text/css" rel="stylesheet"/>
This is the most widely used and most recommended format. This keeps your HTML
clean and easy to look at. With your CSS in a separate file you are also able to reuse it
on any other page you would like. This means you don’t have to duplicate code on
different pages and you also can keep your website looking consistent. The actual
format of the CSS page is exactly the same as the format for internally including CSS.
The only downside of this method is that the CSS is in a different file and so you will
need to open that in order to edit styles.
Note: Many examples will have lots of space on the left hand side (or sometimes it
looks like it keeps going). This is because Firefox (and most browsers) will stretch
things to fill the screen.
Colors
In order to add colors to HTML you will just simply need to put down the word ‘color’,
followed by a semi-colon, and then the actual color (CSS color Property). In the
example below I decided I wanted to make all the text in the p tags to be red:
1. p {
2. color:red;
3. }
However, if you wanted to get more creative you can put down the hex value of your
desired color. The hex value (or known as the hex code) simply is a series of numbers
or letters that signify a color. There are so many colors and shades, people had to find
a way to distinguish them all and so they put assigned a code to each one. Online
16. 16
resources are available that allow you to find these codes and insert them into your
code. A personal favorite is the website https://color.adobe.com/create/color-wheel/
(Adobe Systems Incorporated). This site allows you to find the hex value of any color
and also find the colors that go along with other colors (for instance analogous,
monochromatic, triad, complementary colors just to name a few). This is useful for
finding colors that complement each other and make a complete website. Now you
can be a designer without having to go through discovering what colors work and which
ones clash.
Fonts
The font options allow you to be able to change a number of things. We will focus on
the font family, the font style, the font size, the font weight, and the font variant (CSS
Fonts).
The font family is simply the font of the lettering. This is known as the font family
because fonts typically fall into 3 styles and each font falls into one of these families.
The 3 font families are explain in the next paragraph. For instance if you wanted the
font to be Times New Roman you would write down the following:
1. body {
2. font-family: "Times New Roman";
3. }
It is actually a good idea to list several fonts down for each font family. This is
because depending on the web browser or computer some fonts may or may not be
available. Fonts go from left to right and selects the first font that it can display. Due
to this many font families end in a generic font family. There are serif, sans-serif, and
monospace. Serif fonts are fancier, while sans-serif fonts are plainer. Monospace are
basic fonts that have the same space between each letter (this can make words look
weird are letters are unnaturally far apart). One last note that I have for you is that if
the font family is more than one word, than you must put the font name in quotes (like
the Times New Roman example above).
The font style will allow you to set the font as either normal (meaning nothing is
changed) or italic (meaning it is italicized).
1. <div style="font-style: italic">
2. This is some sample text!
3. </div>
This code will look like this:
17. 17
The font size changes the size of the font. However it is a little confusing as there are
many ways to do this. If you wanted to be exact you could set the font size by defining
how many pixels (px) the font is. For reference 12 point font is 16px. Another
reference point is em. One em is equal to 16px. You can also write down generic sizes
(like small, medium, large etc.) for the font size. However to keep things simple, if
you are doing a heading you should use the HTML <h> tags.
The font weight is used to bold font. You set the font-weight to ‘bold’.
1. <div style="font-weight: bold">
2. This is some sample text!
3. </div>
The last font option that we will talk about today is the font variant. The font variant
allows you to set the letters to all be uppercase. However whatever you capitalized in
the original will appear larger than the rest of the text. To use this setting, write
down the font-variant to be set to ‘small-caps’. Let me show you an example:
1. <div style="font-variant: small-caps">
2. This is some sample text!
3. </div>
The text would appear like this (notice how the letter ‘T’ is capitalized in the text and
this style changes the letter to make it larger than the rest of the letters):
Background
You can set the background of your page through two simple methods. The first is to
set a background color and the second is to use an image as the background (CSS
Backgrounds). In order to set a background color you will need to find the color that
you want and then use the “background-color” style.
1. <div style="background-color: darkcyan">
2. This is some sample text!
3. </div>
The code will look like this:
For using an image as your background you would have to put down that it is an URL
and then specify where the image is (whether in a file on your computer or online).
Don’t forget to put quotes inside of the parenthesis where the actual image file is!
18. 18
1. html {
2. background-color: url(“sweetbackground.gif”);
3. }
Borders
There are three main properties to borders: the border style, the border width, and
the border color (CSS Borders). The most important border property is border style.
You must have this property if you are going to use border width or border color.
There are five options to choose from with border style. The first is just border-style,
meaning this entire border. The other four correspond the four sides that a border
consists of. They are: border-top-style, border-right-style, border-bottom-style, and
border-left-style (border). Here is an image of what different kinds of borders that you
can set and what the code looks like to:
1. <div style="border-style: solid">
2. This border is solid!
3. </div>
4. <br />
5. <div style="border-style: double">
6. This border is double!
7. </div>
8. <br />
9. <div style="border-style: dotted">
10. This border is dotted!
11. </div>
19. 19
12. <br />
13. <div style="border-style: dashed">
14. This border is dashed!
15. </div>
16. <br />
17. <div style="border-style: groove">
18. This border is groove!
19. </div>
20. <br />
21. <div style="border-style: ridge">
22. This border is ridge!
23. </div>
24. <br />
25. <div style="border-style: outset">
26. This border is outset!
27. </div>
28. <br />
29. <div style="border-style: inset">
30. This border is inset!
31. </div>
The border width is how wide the border is. This is set by simply stating either the
amount of pixels wide you want it or by using generic (small, medium, large) settings.
The style for the border width is br-width (border).
Padding
Padding is a very powerful but difficult concept to master. Padding modifies the space
around elements. You may have noticed that the borders are pretty close to the words
in the examples above. To change this and make things more readable you would add
padding. This increases the distance between the words and the border. Let me show
you an example:
1. <div style="border-style: solid; padding: 20px">
2. This is some sample text!
3. </div>
Do you notice how there is now space around the text? If you look at the code you see
that I asked that there be 20 px of space around it (like it said in the notice at the
beginning of the CSS section, Firefox stretched out the right hand side to fill the
browser). Like the borders property, you can specify different amounts of padding for
the top, right, bottom, or left of the element (CSS Padding).
20. 20
Navbar
A navbar or navigation bar is a bar that you typically see on websites that contain
information. This information is in the form of links, menus, information as to where
you are in the site, and sometimes a search bar to find more information. A navbar is
an extremely useful method for displaying information in a condensed, easy to find
format. The following is a sample navbar from Bootstrap (Navbar).
1. <nav class="navbar navbar-default">
2. <div class="container-fluid">
3. <!-- Brand and toggle get grouped for better mobile display -->
4. <div class="navbar-header">
5. <button type="button" class="navbar-toggle collapsed" data-
toggle="collapse" data-target="#bs-example-navbar-collapse-1" aria-expanded="false">
6. <span class="sr-only">Toggle navigation</span>
7. <span class="icon-bar"></span>
8. <span class="icon-bar"></span>
9. <span class="icon-bar"></span>
10. </button>
11. <a class="navbar-brand" href="#">Brand</a>
12. </div>
13.
14. <!-- Collect the nav links, forms, and other content for toggling -->
15. <div class="collapse navbar-collapse" id="bs-example-navbar-collapse-1">
16. <ul class="nav navbar-nav">
17. <li class="active"><a href="#">Link <span class="sr-
only">(current)</span></a></li>
18. <li><a href="#">Link</a></li>
19. <li class="dropdown">
20. <a href="#" class="dropdown-toggle" data-
toggle="dropdown" role="button" aria-haspopup="true" aria-
expanded="false">Dropdown <span class="caret"></span></a>
21. <ul class="dropdown-menu">
22. <li><a href="#">Action</a></li>
23. <li><a href="#">Another action</a></li>
24. <li><a href="#">Something else here</a></li>
25. <li role="separator" class="divider"></li>
26. <li><a href="#">Separated link</a></li>
27. <li role="separator" class="divider"></li>
28. <li><a href="#">One more separated link</a></li>
29. </ul>
30. </li>
31. </ul>
32. <form class="navbar-form navbar-left" role="search">
33. <div class="form-group">
34. <input type="text" class="form-control" placeholder="Search">
35. </div>
36. <button type="submit" class="btn btn-default">Submit</button>
37. </form>
38. <ul class="nav navbar-nav navbar-right">
21. 21
39. <li><a href="#">Link</a></li>
40. <li class="dropdown">
41. <a href="#" class="dropdown-toggle" data-
toggle="dropdown" role="button" aria-haspopup="true" aria-
expanded="false">Dropdown <span class="caret"></span></a>
42. <ul class="dropdown-menu">
43. <li><a href="#">Action</a></li>
44. <li><a href="#">Another action</a></li>
45. <li><a href="#">Something else here</a></li>
46. <li role="separator" class="divider"></li>
47. <li><a href="#">Separated link</a></li>
48. </ul>
49. </li>
50. </ul>
51. </div><!-- /.navbar-collapse -->
52. </div><!-- /.container-fluid -->
53. </nav>
Transition to JavaScript
I hope you don’t feel completely lost at this point. I remember reaching this point. I
remember how frustrating it was because it was like learning a new language. Here’s
the truth: learning HTML and CSS is not an easy task. It takes time and dedication. It
takes reaching into your soul and finding the inner nerd in you. Think of the
possibilities. Think of the power that you’ll have with this knowledge. Stay strong in
this time of learning such valuable information. I believe in you. If so many people
before you have learned this, you also will.
You may not want to hear this, but the last step is the hardest to grasp. Don’t give up
now; I’m going to make this as easy as possible. Remember that learning a new
language takes patience. Do you remember what JavaScript does? JavaScript is a
scripting language that is useful in web development. It is amazing and necessary. Let’s
get started.
22. 22
How to Use and Understand Basic JavaScript
JavaScript is the brains of a website. It allows much more advanced functionality and
makes websites dynamic (Introduction). However there is a lot to this programming
language and so we will just introduce it and show a few basics. Afterwards, though,
there are a few Bootstrap components that require JavaScript to come to life. We will
cover the syntax of JavaScript, the Carousel code, and the Modal code. Don’t worry
this is very general overview, you won’t get overwhelmed.
Let’s again start with the syntax for JavaScript. JavaScript is regularly written inside
of ‘script’ tags (TutorialsPoint). Usually JavaScript is written all at the end of the
document (mostly to keep things organized). Sometimes JavaScript is written inline,
this is especially true for buttons. Let’s do an example. For instance, we want a
button that will display the date when you click on it. This is a simple function or a set
of instructions that is used to do something. This is the set up:
1. <p>What is the time?</p>
2. <button type="button" onclick="document.getElementById('date').innerHTML = Date()"> Cli
ck Me! </button>
3. <p id="date"></p>
Let’s break this down. First I have a line that asks a question to the user. I then
declare a button tag. This automatically creates a simple button. I tell the button tag
that it should act like a button by selecting the type to be ‘button’. I then added a
property of the button that allows it to perform some action when it is click on (hence
the name ‘onclick’). Inside the quotations in the onclick property is JavaScript. This
JavaScript says first, on this document get this element (which I specified as being an
ID). I then stated in the parenthesis that the ID that I wanted to get was name ‘date’.
I then told the JavaScript function to change the ‘innerHTML’. The ‘innerHTML’ simply
means take the tags that are associated with what I am grabbing and put some HTML
code inside of that tag. I then used the equal sign to set the HTML code that I want to
put inside. I set it to “Date()”. Date() is a predefined JavaScript function. This
function tells us the day of the week, the month, the date, the year, the time, and the
time zone. So as soon as the button is clicked, the JavaScript function Date() will
display the current date and time. Underneath that I created a p tag that has the ID
‘date’ (otherwise nothing would appear). There you go! You have just created a very
simple program!
You can change this to do many other things. For instance you can change the HTML to
not be Date() but instead be some text that you wanted. To do this you simply erase
‘Date()’ and insert text. Be careful, make sure that you put it in quotations and make
sure that you use different quotations from the ones that you used for the onclick
property (onclick Event). Meaning you cannot do this:
1. <button type="button" onclick="document.getElementById('date').innerHTML = 'Wrong!'">Cl
ick Me!</button>
23. 23
Why is this wrong? Well, the onclick property sees the first double quotation mark and
then go to the next double quotation mark. Anything after that it thinks that it is part
of something else. But that isn’t true. This is what we should do:
1. <button type="button" onclick="document.getElementById('date').innerHTML = 'Correct!'">
Click Me!</button>
You can see the word Correct in single quotations. This way the onclick property will
go to the end of the tag like it is supposed to while ignoring all the single quotes. You
could have started the onclick property with single quotes, but then in the inside of the
single quotes you would need to use double quotes to prevent the onclick property
from ending prematurely.
JavaScript can be a little difficult in this way. It is possible to miss these little
mistakes without realizing it. JavaScript must also be typed with the correct capitals.
You cannot write down ‘getelementbyid’ and expect it to function the same as
‘getElementById’ does.
Now that we have gotten a little taste of JavaScript let’s see what it is capable of.
Here are some functions that Bootstrap has in it that allows us make cool things happen
with minimal effort.
First let’s take about some JavaScript provided by Bootstrap that creates a Carousel.
Carousel
A carousel is a set of images that rotate through. This makes the homepage more
24. 24
dynamic and user friendly. These carousel images can even serve as images to
showcase certain important topics or events. Bootstrap provides sample code and so
we will run through that first and then go into some more specifics (Carousel).
1. <div id="carousel-example-generic" class="carousel slide" data-ride="carousel">
2. <!-- Indicators -->
3. <ol class="carousel-indicators">
4. <li data-target="#carousel-example-generic" data-slide-
to="0" class="active"></li>
5. <li data-target="#carousel-example-generic" data-slide-to="1"></li>
6. <li data-target="#carousel-example-generic" data-slide-to="2"></li>
7. </ol>
8. <!-- Wrapper for slides -->
9. <div class="carousel-inner" role="listbox">
10. <div class="item active">
11. <img src="(image location)" alt="(description of image)">
12. <div class="carousel-caption">
13. ...
14. </div>
15. </div>
16. <div class="item">
17. <img src="(image location)" alt="(description of image)">
18. <div class="carousel-caption">
19. ...
20. </div>
21. </div>
22. ...
23. </div>
24. <!-- Controls -->
25. <a class="left carousel-control" href="#carousel-example-generic" role="button" data-
slide="prev">
26. <span class="glyphicon glyphicon-chevron-left" aria-hidden="true"></span>
27. <span class="sr-only">Previous</span>
28. </a>
29. <a class="right carousel-control" href="#carousel-example-
generic" role="button" data-slide="next">
30. <span class="glyphicon glyphicon-chevron-right" aria-hidden="true"></span>
31. <span class="sr-only">Next</span>
32. </a>
33. </div>
This code starts off by giving us the code for the carousel itself. The first div states
that the entire carousel will rest inside a div. You should not put elements that do not
belong inside of the carousel inside this div. Next, you see several li tags with
information about how the slides function. This information is points back to some
JavaScript code that allows the carousel to move between the slides. The carousel’s
JavaScript code allows it to move forward automatically. Next you see the comment
“Wrapper for slides” which gives information about what is actually on the slides. Here
is where you can put in where it states “src=…”, the images that are to make up the
slides. You do this for as many slides as necessary or wanted. The bottom portion is
labeled the “Controls” as it includes code for the chevrons on the right and left side. It
also allows the slides to move forward or backwards as directed.
25. 25
Modal
A modal is a small window that pops up when called upon (usually someone clicks on a
button or preforms a similar action). This is useful as it can draw attention to certain
questions, ask for confirmation, or gives the user important information (Modals).
1. <!-- Modal -->
2. <div class="modal fade" id="myModal" tabindex="-1" role="dialog" aria-
labelledby="myModalLabel">
3. <div class="modal-dialog" role="document">
4. <div class="modal-content">
5. <div class="modal-header">
6. <button type="button" class="close" data-dismiss="modal" aria-
label="Close"><span aria-hidden="true">×</span></button>
7. <h4 class="modal-title" id="myModalLabel">Modal title</h4>
8. </div>
9. <div class="modal-body">
10. ...
11. </div>
12. <div class="modal-footer">
13. <button type="button" class="btn btn-default" data-
dismiss="modal">Close</button>
14. <button type="button" class="btn btn-primary">Save changes</button>
15. </div>
16. </div>
17. </div>
18. </div>
Let’s go through the code together. First, we have several div’s that describe what we
are trying to create. Bootstrap defines these classes to make sure that all will work
correctly. Next, we have a button. This button is the little ‘x’ that you see at the top
right. There is code in there that tells it to dismiss the modal if clicked on. Next, we
have the modal title and the body (or where most of the text would go). Then we have
a close and save button. The great things about modals is that they are very flexible.
Inside the modal where the title and body would go, we can replace that with anything
we want! That means we could put HTML and CSS in there to create instructions or a
notice. We can even include JavaScript to make it more dynamic.
26. 26
So how does a modal work? The code that we have above sits and waits, invisible to
the user. So first, we have to have something that triggers a modal. This is telling the
Bootstrap JavaScript to open the modal. Here is a little bit of code that will do that:
1. <button type="button" class="btn btn-primary btn-lg" data-toggle="modal" data-
target="#myModal">
2. Open the Modal!
3. </button>
This code creates a button on the screen. Did you notice how the data-target is the
same as the id in the modal? This connects the two together. Clicking on this button
will tell JavaScript code to find a modal with, in this case, the ID “myModal” (make
sure that you include the ‘#’, without the hashtag there the JavaScript isn’t sure if it is
an ID or not). Then the modal code executes and does its thing. Until the button is
clicked the modal code just sits there, it doesn’t appear on the screen.
Now it’s edit your website with these Bootstrap components!
27. 27
How to Understand and Use Bootstrap
Including Necessary Files
In order to begin using Bootstrap to enhance your website you must first include the
Bootstrap files (Getting Started). To do this first you must download the Bootstrap
files from their website (http://getbootstrap.com/). From there select ‘Download’ in
the middle of the screen or ‘Customize’ on the top right side of the navigation bar.
This next page has a lot of options that allows you to customize what you want in the
Bootstrap files and what colors you want. Let’s leave everything at its default settings
and go to the ‘Download’ button at the bottom of the page. From the compressed file
that is download move all of its contents to the folder where you are storing you
website data. Then inside the head tags at the top of your HTML page type in the
following:
1. <!-- Bootstrap -->
2. <script src="http://ajax.aspnetcdn.com/ajax/jQuery/jquery-1.11.3.min.js"></script>
3. <script src="bootstrap.js"></script>
4. <link href="bootstrap.css" type="text/css" rel="stylesheet"/>
5. <link href="bootstrap-theme.css" type="text/css" rel="stylesheet"/>
The first script tag includes a very important file from a website that Microsoft
maintains. This file contains data for a JavaScript library called jQuery. Many common
JavaScript functions are predefined in this library making it easier for us. Bootstrap’s
JavaScript file requires jQuery. It is possible to download the file and include it that
way as well. The next line will include the JavaScript file, “bootstrap.js”. This also
include the CSS files, “bootstrap.css” and “boostrap-theme.css”. You will notice that
there are other files included that have the suffix “min” added onto the names. This is
a more condensed file of the versions that we just mentioned. Do not include both the
condensed and regular files. Only include one. The code above is only an example and
should be changed if the names of the files are changed. Also the code above assumes
that the files mentioned are not in any other folders. If they are, then make sure to
include the folder that it is in. Below is an example of this:
1. <script src="foldernamehere/bootstrap.js"></script>
28. 28
Using Bootstrap Code
Let us now use the Bootstrap functions discussed earlier to give your page more
functionality. To do this we must simply just copy and paste the code into the correct
parts of our website. Let us go through how we would insert a NavBar, a Carousel, and
a Modal.
First, let us replace the list of links that we have with something more exciting. So
below is the code that we want to focus on and replace.
1. <a>South Side Auto Shop</a>
2. <a href="#aboutme">About Me</a>
3. <a href="#myservices">My Services</a>
4. <a href="#contactme">Contact Me!</a>
The navbar example in the CSS section had more functionality that we really need. Let
us simplify this and just use buttons for now. So first, let us cut out the unneeded
dropdown functions. Next, let us cut out the functions for the search bar and its
accompanying button. Finally cut out the portion of the code that moves some
elements to the right side of the screen. Remember to take out the ending tag as well,
otherwise HTML code will get confusing and will start behaving erratically. Then where
it says link and fill in the name of the link that we want. Then go to the href next to it
and put in the id of that link. When you are done it should look like this:
The code for this bar is included below:
1. <nav class="navbar navbar-default">
2. <div class="container-fluid">
3. <!-- Brand and toggle get grouped for better mobile display -->
4. <div class="navbar-header">
5. <button type="button" class="navbar-toggle collapsed" data-
toggle="collapse" data-target="#bs-example-navbar-collapse-1" aria-expanded="false">
6. <span class="sr-only">Toggle navigation</span>
7. <span class="icon-bar"></span>
8. <span class="icon-bar"></span>
9. <span class="icon-bar"></span>
10. </button>
11. <a class="navbar-brand" href="#">South Side Auto Shop</a>
12. </div>
13. <!-- Collect the nav links, forms, and other content for toggling -->
14. <div class="collapse navbar-collapse" id="bs-example-navbar-collapse-1">
15. <ul class="nav navbar-nav">
16. <li class="active"><a href="#aboutme">About Me </a></li>
17. <li><a href="#myservices">My Services</a></li>
18. <li><a href="#contactme">Contact Me!</a></li>
29. 29
19. </ul>
20. </div><!-- /.navbar-collapse -->
21. </div><!-- /.container-fluid -->
22. </nav>
Next, we would like to change our boring image into a carousel that shows you hard at
work. It is more dynamic and allows more information to be displayed in a set space.
The code that will be edited is the follow:
1. <h1> South Side Auto Shop </h2>
2. <img src="http://cliparts.co/cliparts/di9/KXK/di9KXK6jT.png" alt="Mechanic Fixing Car">
Beware of a few things that could go wrong with the carousel. First is that the
carousel will change sizes depending of the size of the image. Therefore, if you have
three different images, than the carousel will grow/shrink three different times.
Another common problem is that the text on the image is difficult to read. This is
quickly remedied by using styles to edit the font. The last problem that many people
face is that the carousel will usually stretch from one side of the screen to the other.
Many people do not want this and would like the carousel centered on the screen. This
is again done using styles. In the final version of the code below, I have included the
fix for the carousel size. The carousel will sit in the middle of the screen; however, if
you do not want this then delete the styles I have included in the first div tag.
Here is an image of the carousel:
The code below shows how to make this carousel:
1. <div id="carousel-example-
generic" class="carousel slide" style="width:1000px; margin:0 auto" data-
ride="carousel">
2. <!-- Indicators -->
3. <ol class="carousel-indicators">
4. <li data-target="#carousel-example-generic" data-slide-
to="0" class="active"></li>
5. <li data-target="#carousel-example-generic" data-slide-to="1"></li>
6. <li data-target="#carousel-example-generic" data-slide-to="2"></li>
7. </ol>
8. <!-- Wrapper for slides -->
9. <div class="carousel-inner" role="listbox">
30. 30
10. <div class="item active">
11. <img style="width: auto; height: auto; vertical-
align: middle" src="http://cliparts.co/cliparts/di9/KXK/di9KXK6jT.png" alt="Mechanic Fi
xing Car">
12. <div class="carousel-caption">
13. South Side Auto Shop
14. </div>
15. </div>
16. <div class="item">
17. <img style="width: auto; height: auto; vertical-
align: middle" src="(Image Link)†alt="(description of image)">
18. <div class="carousel-caption">
19. Include Text here
20. </div>
21. </div>
22. <div class="item">
23. <img style="width: auto; height: auto; vertical-
align: middle" src="(Image Link)" alt="(description of image)">
24. <div class="carousel-caption">
25. Include Text here
26. </div>
27. </div>
28. </div>
29. <!-- Controls -->
30. <a class="left carousel-control" href="#carousel-example-generic" role="button" data-
slide="prev">
31. <span class="glyphicon glyphicon-chevron-left" aria-hidden="true"></span>
32. <span class="sr-only">Previous</span>
33. </a>
34. <a class="right carousel-control" href="#carousel-example-
generic" role="button" data-slide="next">
35. <span class="glyphicon glyphicon-chevron-right" aria-hidden="true"></span>
36. <span class="sr-only">Next</span>
37. </a>
38. </div>
Finally, let us include a modal that asks for the users confirmation that they want to
send an email.
First, let us edit the button that opens the modal to state that this button is used to
send an email.
1. <button type="button" class="btn btn-primary btn-lg" data-toggle="modal" data-
target="#myModal">
2. Send us an Email!
3. </button>
Next, let us change the insides of the modal. First, we will change the wording of the
title. Instead of text inside the modal let us include a button. This button will be set
up so that the users email application will open. Be aware that this might not always
work. Methods to automatically generate emails exist; however, that is beyond the
scope of what we are doing today. At the bottom of the modal lies a button for saving
changes that we will not need. So let’s cut that out.
31. 31
The button will look like this:
The modal itself will look like this:
Here is the code for the above images:
1. <!-- Modal -->
2. <div class="modal fade" id="myModal" tabindex="-1" role="dialog" aria-
labelledby="myModalLabel">
3. <div class="modal-dialog" role="document">
4. <div class="modal-content">
5. <div class="modal-header">
6. <button type="button" class="close" data-dismiss="modal" aria-
label="Close"><span aria-hidden="true">×</span></button>
7. <h4 class="modal-title" id="myModalLabel">Send us an Email</h4>
8. </div>
9. <div class="modal-body">
10. <a href="mailto:southsideautoshop@email.com"> <button type="button" > Open Emai
l App </button> </a>
11. </div>
12. <div class="modal-footer">
13. <button type="button" class="btn btn-default" data-
dismiss="modal">Close</button>
14. </div>
15. </div>
16. </div>
17. </div>
32. 32
Conclusion
Does it feel good being done with the guide? Do you feel accomplished in learning so
much information that you didn’t know before? Look, I created the guide as a
reference and as a source for you to learn more and more all the time. You learned the
basics of a new language with this guide. In order to become fluent, you will need to
practice, practice, and practice more.
Jake took the chunk of knowledge that I gave him and came to me after some extra
weeks of study. He came to me and said, “You don’t know what difference you have
made in my life and in the life of my family.” Jake took the knowledge that I gave him
and created his site for his dad’s car repair shop. They called it Family Car Repairs,
concentrating their efforts on families like them.
Jake and I became great friends after I created this guide for him (The guide is now for
everyone). We both came to realize some things after spending so much time together.
He never realized how hard my life at home was being. I never realized how much he
lacked confidence and needed a friend to support him. We both couldn’t have possible
imagined how much we have in common. We both love Star Wars and the Cleveland
Cavaliers. We both ended up being really into web development. Jake’s website is
prettier than mine is. He really ran with the things that I taught him. I’m so proud of
him and know that we’ll be friends for a long time.
If Jake was able to create his own website with Bootstrap then anyone can. I’m not
calling Jake an idiot (although I like to joke with him that he seemed like it when he
started learning about web development), but simply stating how possible it is for any
type of person. Use this guide to get started. I created this guide for high schoolers like
Jake. I hope you have found this “hands on tutorial” useful in your endeavors to
become a successful web developer.
Common people do not hold the skills in this guide. People who are ready to put in the
work and push themselves acquire the skills they need to succeed. This book is not
meant to be inspirational, but is meant to make a difference in your life. Web
development is more useful than knowing a foreign language. Web development is the
future language of the most successful people in the world. Go back and start trying to
grasp HTML, CSS, and JavaScript more. The more you try and comprehend the material
the more you will be able to use it. The more you use it and practice the skills, the
more useful you’ll be in the world. Good luck to you
33. 33
References
A Jade Bazar Enterprises. (n.d.). Cascading style sheet lnline, <Style>, & External. Web Start
Center: http://www.webstartcenter.com/howto/css_inc.php
Adobe Systems Incorporated. (n.d.). Adobe Color CC. A Creative Cloud Service:
https://color.adobe.com/create/color-wheel/
Beach, J. (n.d.). Syntax highlight code in word documents. planetB:
http://www.planetb.ca/syntax-highlight-word
border. (n.d.). Mozilla Developers Network: https://developer.mozilla.org/en-
US/docs/Web/CSS/border
Bos, B. (n.d.). Cascading style sheets home page. W3C.
http://www.w3.org/Style/CSS/Overview.en.html
Carousel. (n.d.). Boostrap: https://getbootstrap.com/javascript/#carousel
CSS backgrounds. (n.d.). W3Schools: http://www.w3schools.com/css/css_background.asp
CSS borders. (n.d.). W3Schools: http://www.w3schools.com/css/css_border.asp
CSS color property. (n.d.). W3Schools: http://www.w3schools.com/cssref/pr_text_color.asp
CSS Fonts. (n.d.). W3Schools: http://www.w3schools.com/css/css_font.asp
CSS Padding. (n.d.). W3Schools: http://www.w3schools.com/css/css_padding.asp
Date. (n.d.). Mozilla Developers Network: https://developer.mozilla.org/en-
US/docs/Web/JavaScript/Reference/Global_Objects/Date
Getting Started. (n.d.). Bootstrap: https://getbootstrap.com/getting-started/
HTML <a> Tag (n.d.) W3Schools: http://www.w3schools.com/tags/tag_a.asp
HTML <button> Tag (n.d.) W3Schools: http://www.w3schools.com/tags/tag_button.asp
HTML <!DOCTYPE> Declaration (n.d.) W3Schools:
http://www.w3schools.com/tags/tag_doctype.asp
HTML <html> Tag (n.d.) W3Schools: http://www.w3schools.com/tags/tag_html.asp
HTML <h1> to <h6> Tags (n.d.) W3Schools: http://www.w3schools.com/tags/tag_hn.asp
HTML <img> Tag (n.d.) W3Schools: http://www.w3schools.com/tags/tag_img.asp
HTML <li> Tag (n.d.) W3Schools: http://www.w3schools.com/tags/tag_li.asp
HTML <ol> Tag (n.d.) W3Schools: http://www.w3schools.com/tags/tag_ol.asp
HTML <p> Tag (n.d.) W3Schools: http://www.w3schools.com/tags/tag_p.asp
HTML <title> Tag (n.d.) W3Schools: http://www.w3schools.com/tags/tag_title.asp
HTML <ul> Tag (n.d.) W3Schools: http://www.w3schools.com/tags/tag_ul.asp
Introduction. (n.d.). Mozilla Developers Network: https://developer.mozilla.org/en-
US/docs/Web/JavaScript/Guide/Introduction
Modals. (n.d.). Bootstrap: https://getbootstrap.com/javascript/#modals
Navbar. (n.d.). Bootstrap: https://getbootstrap.com/components/#navbar
onclick Event. (n.d.). W3Schools: http://www.w3schools.com/jsref/event_onclick.asp
34. 34
Syntax. (n.d.). Mozilla Developers Network: https://developer.mozilla.org/en-
US/docs/Web/CSS/Syntax
TutorialsPoint. (n.d.). JavaScript - syntax. TutorialsPoint:
http://www.tutorialspoint.com/javascript/javascript_syntax.htm
Weakley, R. (2014, May 23). Inspect element: troubleshooting CSS in the browser. SitePoint:
http://www.sitepoint.com/inspect-element-troubleshooting-css-browser/