SlideShare a Scribd company logo
1 of 47
Download to read offline
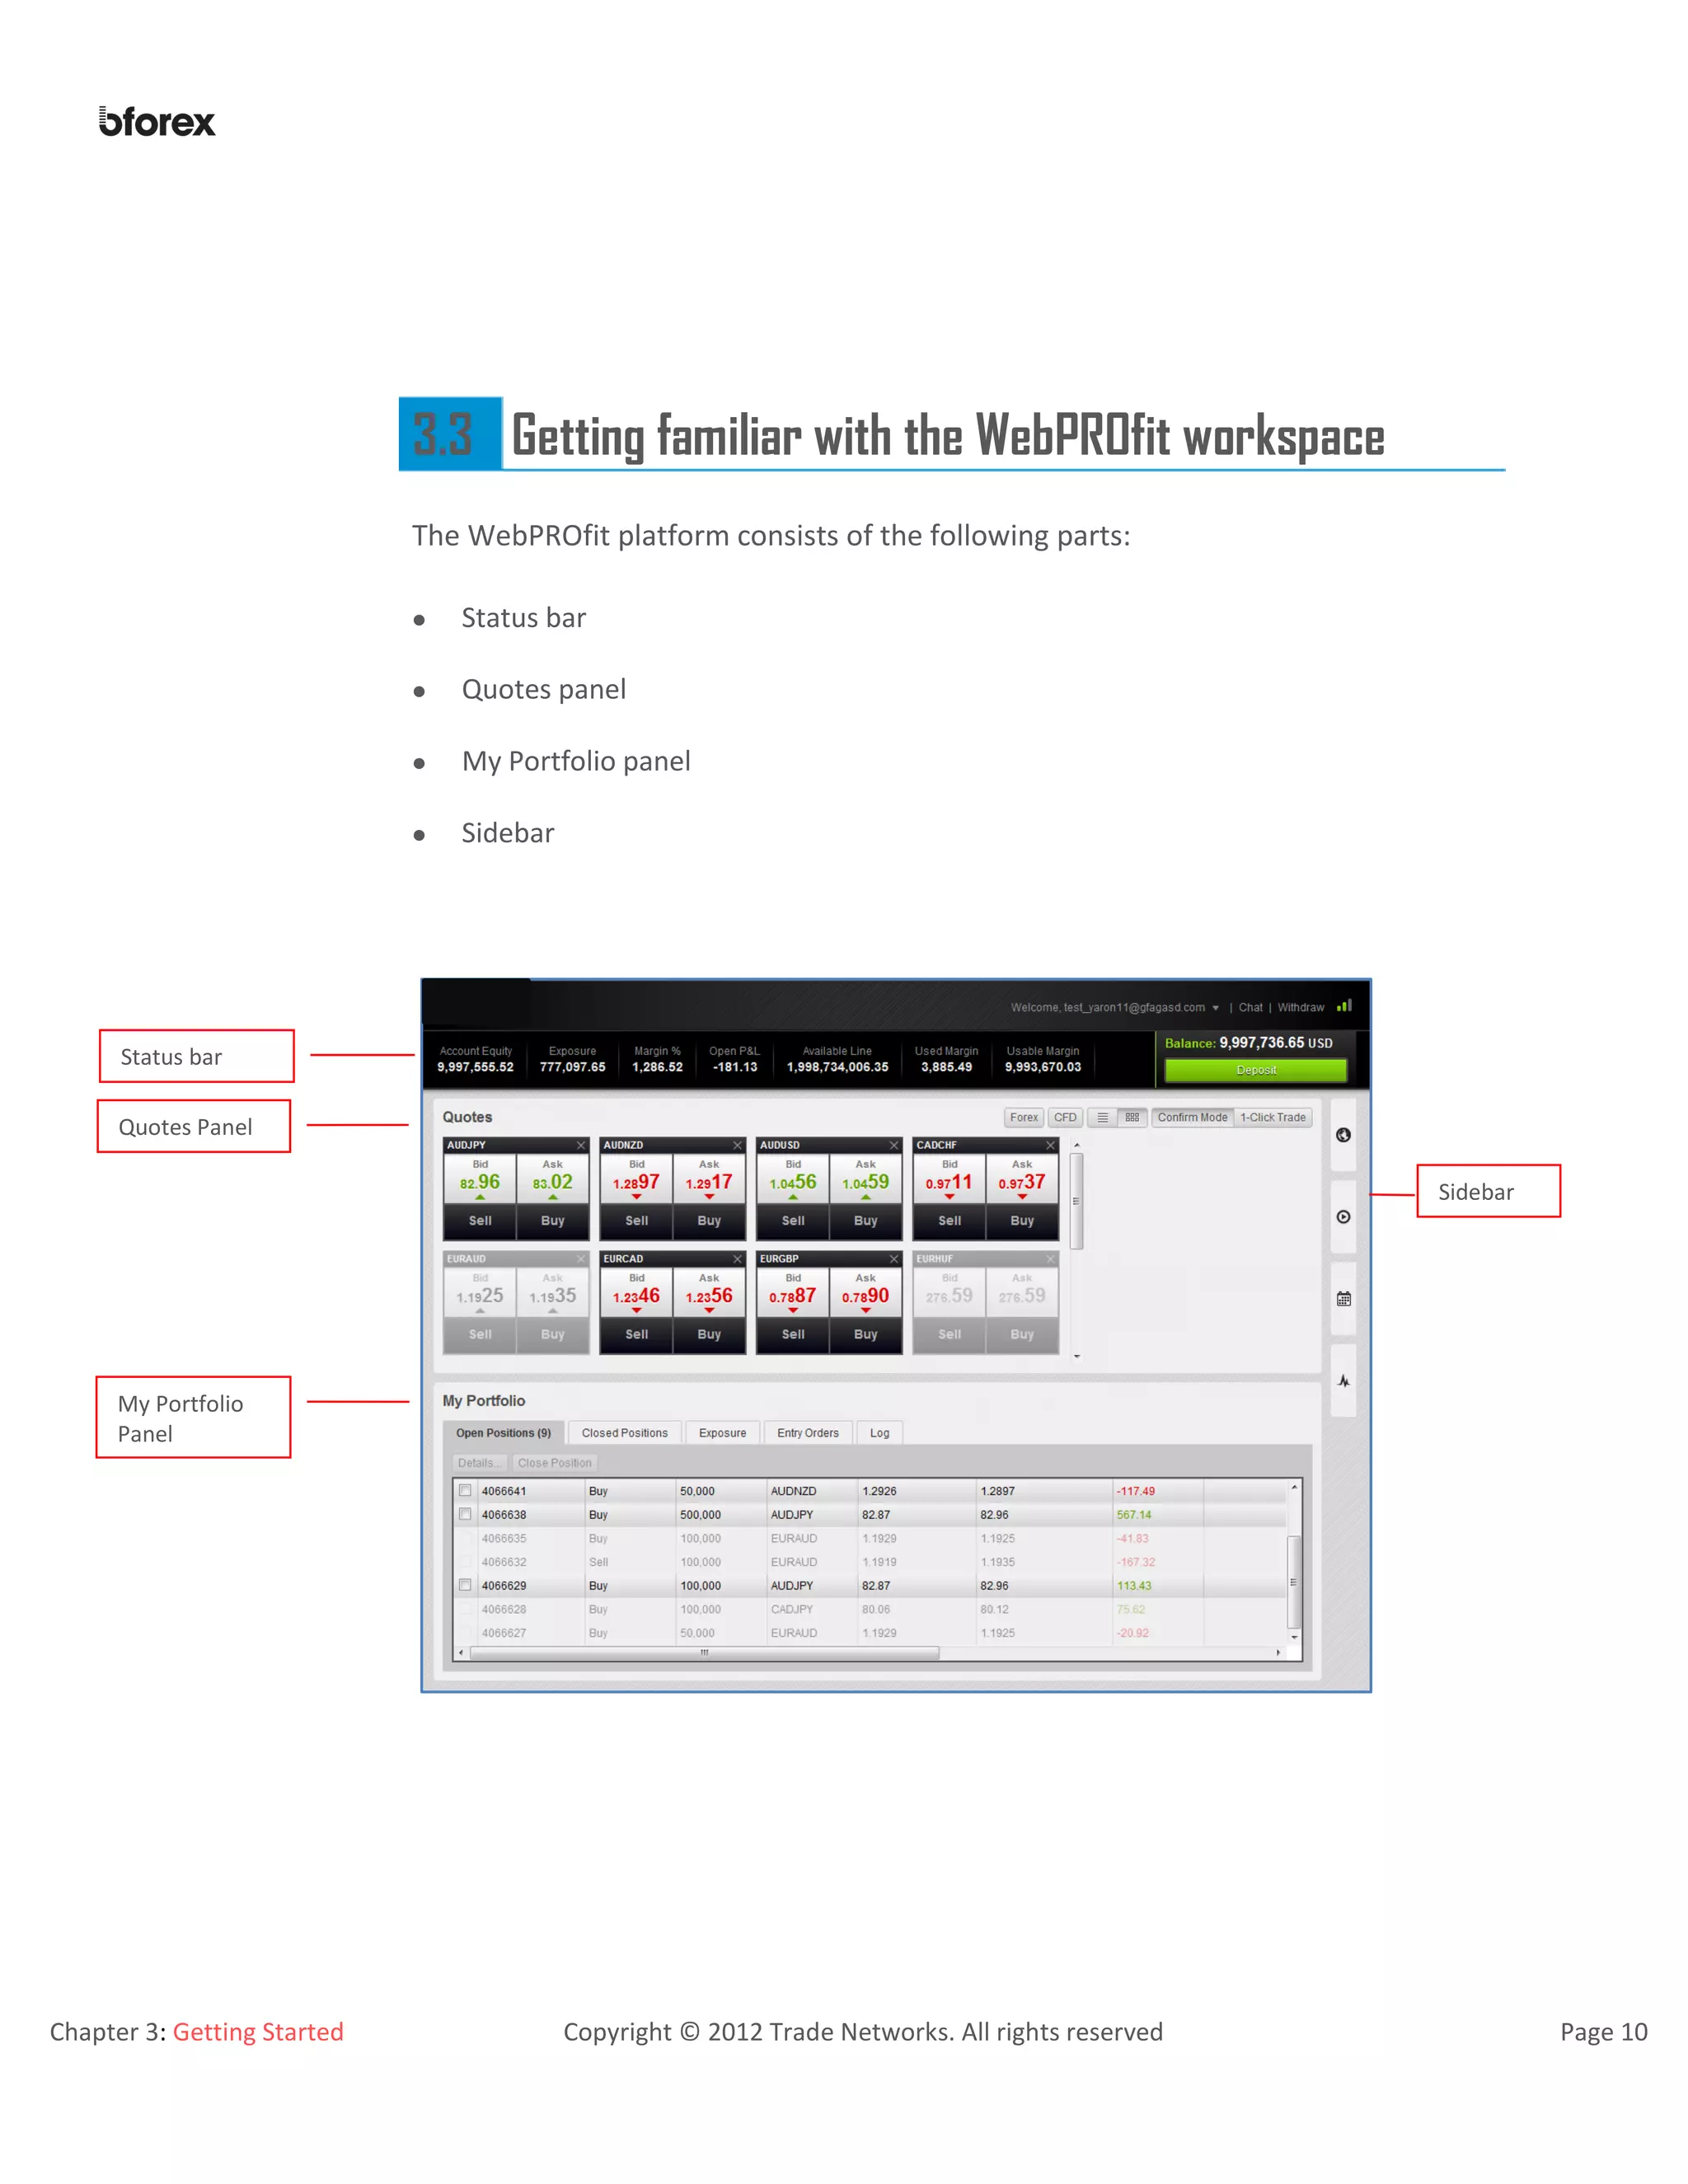
Version 3
Page 2
Contents
1. INTRODUCTION........................................................................................................................................................................................................4
2. OVERVIEW...............................................................................................................................................................................................................6
3. GETTING STARTED...................................................................................................................................................................................................7
3.1 LOGGING IN TO WEBPROFIT ....................................................................................................................................8
3.2 FUNDING AND WITHDRAWING FROM YOUR PROFIT ACCOUNT........................................................................................9
3.3 GETTING FAMILIAR WITH THE WEBPROFIT WORKSPACE...............................................................................................10
3.3.1 Status bar...................................................................................................................................................11
3.3.2 Quotes panel..............................................................................................................................................12
3.3.3 My Portfolio Panel .....................................................................................................................................14
3.3.4 Side bar ......................................................................................................................................................15
4. OPENING NEWPOSITIONS AND PLACING NEW ORDERS........................................................................................................................................19
4.1 DISPLAYING SYMBOLS IN THE QUOTES PANEL.............................................................................................................20
4.2 OPENING A POSITION AT THE CURRENT MARKET PRICE OR PLACING A MARKET ORDER .....................................................22
4.2.1 Opening a Position in the Confirm Mode ..................................................................................................23
4.2.2 Opening a Position in 1-Click Trade Mode.................................................................................................24
4.3 PLACING AN ENTRY ORDER.....................................................................................................................................25
4.4 PROTECTING YOUR POSITIONS WITH SL/TP ORDERS...................................................................................................27
4.5 PROTECTING YOUR ENTRY ORDER WITH OCO ORDER .................................................................................................30
5. MANAGING EXISTING POSITIONS AND WORKING ORDERS ...................................................................................................................................32
5.1 MODIFYING OPEN POSITIONS .................................................................................................................................33
5.2 MODIFYING ENTRY ORDERS....................................................................................................................................35
5.3 CLOSING POSITIONS..............................................................................................................................................37
5.4 REMOVING ENTRY ORDERS ....................................................................................................................................39
5.5 MANAGING YOUR POSITIONS AND WORKING ORDERS VIA THE MY PORTFOLIO PANEL ......................................................41
5.5.1 Managing Your Open Positions..................................................................................................................42
5.5.2 Viewing Your Closed Positions...................................................................................................................43
5.5.3 Managing the Exposure of Your Trades.....................................................................................................44
5.5.4 Managing Your Entry Orders......................................................................................................................45
5.5.5 Viewing Your Trading History.....................................................................................................................46
Page 3
6. USING NETDANIA CHART TOOLS...........................................................................................................................................................................47
Chapter 1: Introduction Copyright © 2012 Trade Networks. All rights reserved. Page 4
1. Introduction
WebPROfit is an easy to use online trading platform allowing you to trade anytime from
anywhere. This platform is based on cutting-edge trading technology which was designed
with the user in mind. WebPROfit provides a real time customizable graphical
representation of the market movements and of your trades. WebPROfit offers you
various trading tools, news feeds and support directly from the platform. Both, the
beginners and the experienced traders can use this trading platform by easily adjusting its
customizable features to their specific needs.
The use of WebPROfit will maximize your trading success due to the following features
and advantages:
 No download required.
 One-click trading execution.
 Instant trade execution.
 Direct platform support.
 Ability to trade forex, commodities and CFDs using advanced charting tools.
 Up-to-the-minute news streamed to the platform.
 Ultimate trading environment.
Chapter 1: Introduction Copyright © 2012 Trade Networks. All rights reserved. Page 5
About this Manual
Whether you are a beginner or an expert, you can use this manual as a guideline for using
WebPROfit.
The following notes are used in this manual:
Additional
Options
Describes additional operational instructions related to a particular
feature.
Note Indicates information that can be helpful in performing a particular
procedure.
This manual contains 3 main sections: Chapters 1-3 cover the basic information you need
to know about WebPROfit before starting to trade; Chapter 4-5 cover the main trading
tools that you can use to manage your trades; Chapter 6 explains how to use NetDania
Chart tools.
This manual provides information on the WebPROfit platform without getting into an
explanation of how to trade forex. To get a general overview about forex trading
principals, please refer to the Forex Academy at www.bforex.com/Forex-Academy/
Chapter 2: Overview Copyright © 2012 Trade Networks. All rights reserved. Page 6
2. Overview
WebPROfit platform helps you easily manage your trades by providing you with advanced
trading tools. The WebPROfit workspace is customizable and can be adjusted to your
needs.
WebPROfit provides you with various ways to manage your trades. You can use
WebPROfit tools to quickly open positions, place and modify orders. Once you become an
experienced trader, you can also use advanced chart tools to better analyze the forex
market and your personal trading strategy.
Symbolis a
tradable asset.
WebPROfit allows you to trade with two types of Symbols:
 Forex (FX) – is a Currency Pair. For example, AUD/CAD is one FX symbol.
 CFD – is a Contract for Difference. For example, APPLE is one CFD symbol.
Chapter 3: Getting Started Copyright © 2012 Trade Networks. All rights reserved Page 7
3. Getting Started
The current chapter provides information on basic steps you need to perform before
actually starting to trade with WebPROfit:
1. Logging in to WebPROfit.
2. Funding and Withdrawing from your WebPROfit account.
3. Getting familiar with the WebPROfit workspace.
Chapter 3: Getting Started Copyright © 2012 Trade Networks. All rights reserved Page 8
3.1 Logging in to WebPROfit
You can use the same login link to access both of your PROfit accounts, Demo and Live.
If you want to change the default language of your trading platform, select the desired
language from the languages list in the Login screen before inserting your login details.
To log in to your PROfit account
1. Click the login link; the Login screen is displayed.
Retrieving
Password
Click the Forgot
Password. In the box
displayed, enter your
email address and click
OK. The password is
sent to your email.
2. Enter your username and password.
Getting
Online help
3. Click the “Show Only Live” check box to display only your Live accounts.
4. Click Login; the list of your accounts is displayed.
Click the Live Chat or
the Contact us icon and
follow the instructions
5. Select the desired account and click Launch; the selected account opens.
Chapter 3: Getting Started Copyright © 2012 Trade Networks. All rights reserved Page 9
3.2 Funding and Withdrawing from your PROfit Account
You can easily fund and withdraw from your PROfit account directly from the WebPROfit
platform.
To Fund your Account
1. In the Status bar, click Deposit.
You will automatically be redirected to the billing site.
2. Fill in your Billing Information and click Deposit.
To Withdraw from your Account
1. In the Status bar, click Withdrawal.
You will automatically be redirected to the billing site.
2. Fill in the Withdrawal Details, and click Submit.
Chapter 3: Getting Started Copyright © 2012 Trade Networks. All rights reserved Page 10
3.3 Getting familiar with the WebPROfit workspace
The WebPROfit platform consists of the following parts:
 Status bar
 Quotes panel
 My Portfolio panel
 Sidebar
Quotes Panel
My Portfolio
Panel
Status bar
Sidebar
Chapter 3: Getting Started Copyright © 2012 Trade Networks. All rights reserved Page 11
3.3.1 Status bar
The Status Bar
On top of the screen is the Status bar. This bar provides you with general information on
your PROfit account and allows you to deposit funds directly from the platform (for more
information, see section 3.2 Funding and Withdrawing from your PROfit Account).
Help
Clicking the error above
the Balance indicator
will open a menu
containing the Contact
Us and Help options.
Use the help option to
download a complete
user manual. In
addition, you can click
the Chat button next to
the error to begin the
chat session.
Account Equity: Displays the current value of your account. PROfit calculates this as your
initial deposit plus the Profit and loss on open and closed trades (realized and unrealized
P&L) plus Bonus plus Credit plus withdrawals plus rollover.
Exposure: Displays the amount of real time capital exposure on your account based on
your leverage and account equity.
Margin %: The amount of equity contributed by a customer as a percentage of the
current market value of the securities held in a margin account.
Open P&L (Open Profit / Loss): Displays the potential profit or loss you would make if
your active positions were closed at the current market price.
Available Line: Displays the amount of your total buying power existing in USD, based on
your leverage and account equity. For example, with 0.5% margin, your available buying
power is equal to 200x your current account balance.
Used Margin: Displays the amount of Account Equity currently being used to maintain all
your open positions. Used Margin calculated as follows: Size of position * Rate to USD) /
100. For example: If you buy 1 lot (10,000) GBP/USD @ 1.9520, the Margin Calculation
will be: (10,000 GBP * 1.9520)/100 = $195.20 Used Margin
Usable Margin: Displays the amount of account equity not currently committed to
maintain the open positions. Usable Margin is also known as the amount available to
open new positions. Used Margin plus Usable Margin equals Equity.
Balance: Account Equity plus Open P&L.
Chapter 3: Getting Started Copyright © 2012 Trade Networks. All rights reserved Page 12
3.3.2Quotes panel
You can use the Quotes panel to view forex symbols available for trading, to open
positions and to place different order types. The Quotes panel reflects streaming real-
time prices which are updated automatically with the slightest market movement.
On top the Quotes panel is the Layout toolbar that allows you to change the view of the
Quotes panel. The quotes panel offers two main layouts: Box View and List View.
Layout Toolbar
The Layout toolbar is on the top right side of the Quotes Panel.
Allows you to add Currency Pairs into the Quotes panel.
Allows you to add CFD’s into the Quotes panel.
Displays the List View
Displays the Box View
Enables trading in Confirm mode.
Enables trading in 1-Click Trade mode.
Quotes panel in
the Box view
Layout
Toolbar
Chapter 3: Getting Started Copyright © 2012 Trade Networks. All rights reserved Page 13
Quotes panel in the List View (Confirm Mode)
List View in
1-Click
Mode
Clicking the in the Layout Toolbar, will display all the symbols in a List view. In this
view, each symbol appears as a separate row in a grid. The Quotes List displays live
dealing rates of each symbol and the time of last modification to the exchange rates. This
list also displays the lowest ask price and the highest bid price recorded since the start of
the trading day. In addition, the percentage of change which was recorded since the last
market close is also displayed in % and in pips.When you choose the
1-Click Mode, an
additional column
appears in the grid
allowing you to indicate
your trading amount
directly in the grid.
You can use the Sell/Buy buttons to open positions. See section 4.2 Opening a Position at
the Current Market Price or Placing a Market Order for more information.
Quotes panel in the Boxes View (Confirm Mode)
Boxes View
in 1-Click
Mode
Clicking the in the Layout Toolbar, will display all the Symbols in a Box view. In this
view, each symbol is presented as a separate box that shows live dealing rates of the
symbol.
When you choose the
1-Click Mode, the
Amount list appears
allowing you to indicate
your trading amount
directly in the grid.
You can use the Sell/Buy buttons to open positions. See section 4.2 Opening a Position at
the Current Market Price or Placing a Market Order for more information.
Chapter 3: Getting Started Copyright © 2012 Trade Networks. All rights reserved Page 14
3.3.3My Portfolio Panel
You can use the My Portfolio panel to view and modify all your open positions and
working orders. The My Portfolio panel contains key information on all your trades
including open and closed positions, your current exposure and entry orders, as well as
your trading history.
There are five tabs in the My Portfolio panel: Open Positions, Closed Positions, Exposure,
Entry orders, and Log.
 In the Open Positions tab you can view all your open positions, modify and close
them.
 In the Closed Positions tab you can search and view the details of all your closed
positions.
 In the Exposure tab you can view your account exposure which is divided by symbols.
 In the Entry Orders tab you can view your orders that have not been executed yet
and edit them.
 In the Log tab you can view all your transactions, as well as search all your positions
and orders by date.
For more information, see Section 5.5 Managing Your Positions and Working Orders via
the My Portfolio Panel.
Chapter 3: Getting Started Copyright © 2012 Trade Networks. All rights reserved Page 15
3.3.4Side bar
The Sidebar Panel contains 4 sliders: News Feeds, Daily Market Update, Event Calendar
and Chart Tools.
Event
Calendar
Chart tools
Daily Market
Update
News Feeds
Chapter 3: Getting Started Copyright © 2012 Trade Networks. All rights reserved Page 16
News Feeds
Clicking the slider opens the News Deeds slide, which provides you with streaming
market updates. To view the complete news story, simply click on the running headline
and the News Details window appears. Use the Previous, Next and Close buttons to
navigate the window.
Daily Market Update
Clicking the slider opens the Daily Market Updates slide where you can watch a daily
video report that provides you with forex tips.
Chapter 3: Getting Started Copyright © 2012 Trade Networks. All rights reserved Page 17
Economic Calendar
Clicking the slider opens the Even Calendar slide that provides you with a quick
preview of economic events for specific dates, including their evaluated importance.
Clicking the Event title will display additional information under the Details tab. Clicking
the Chart tab will display the current symbol as a chart, and clicking the History tab will
show related history events.
Chapter 3: Getting Started Copyright © 2012 Trade Networks. All rights reserved Page 18
NetDania Chart
Clicking the slider opens a slide containing the NetDania chart.
For more information on how to use chart tools, see section 6 Using NetDania Chart Tools
for more information.
Chapter 4: Opening New Positions and Placing New Orders Copyright © 2012 Trade Networks. All rights reserved Page 19
4. Opening New Positions and
Placing New Orders
After you have specified your trading level, you can open positions at the current market
price, as well as to enter the market when the price meets certain conditions you have
specified. WebPROfit helps you to monitor your entering to the market by allowing you to
place the following order types:
Market order –place this order when you want to enter into a position immediately, at the
best available price at the time.
The following
example illustrates the
placement of Buy
Entry Limit order:
suppose the EURUSD
market price is 1.2600
and you believe that
the price will begin to
rise after first
dropping to 1.2540. In
this case, you set your
Buy Entry Limit to
1.2540. When the
market will reach this
rate, the position will
automatically open.
Buy Entry limit –place this order when you believe that the price will begin to rise after
first dropping to a certain level. The order is executed when the ask price is equal to the
Buy Entry order.
Buy Entry Stop – place this order when you believe that the price will continue to rise after
it breaks above a certain level. The order is executed when the ask price is equal to the Buy
stop order.
Sell Entry limit– place this order when you believe that the price will begin to fall after it
reaches a certain level. The order is executed when the bid price is equal to the Sell Entry
order.
Sell Entry Stop – place this order when you believe that the price will continue to fall after
it breaks below a certain level. The order is executed when the bid price is equal to the Sell
Stop order.
Chapter 4: Opening New Positions and Placing New Orders Copyright © 2012 Trade Networks. All rights reserved Page 20
4.1 Displaying Symbols in the Quotes panel
Before opening a position or placing an entry order, you must determine a good time to enter
the market. In order to do this, you need to know the real-time dealing rates of the symbols.
WebPROfit allows you to view streaming real-time bid and ask prices of all available symbols
via the Quotes panel.
Chapter 4: Opening New Positions and Placing New Orders Copyright © 2012 Trade Networks. All rights reserved Page 21
To display a symbol in the Quotes panel:
1. In the Quotes toolbar, click Forex or CFD; the Select Symbols window opens a Forex
or CRF tab accordingly, containing all symbols available for trading.
For example, if you click Forex, the Select Symbols window appears when the Forex
tab is selected and the list of all available FX symbols is displayed.
Removing a
Symbol
To remove a single
symbol from the
Quotes panel you can
uncheck the Box/ List
View checkboxes.
Alternatively, you can
select the desired
symbol from the right
list and then click
Remove.
To remove all symbols
from the Quotes
panel, click the
Remove All button,
and then click Yes to
confirm.
2. In the left list find the symbol you want to add by using the scroll bar. Alternatively,
you can simply type letters into the Search text box; the list of all symbols containing
these letters will be displayed.
3. Double click the symbol you want to add to the Quotes panel or click the checkbox
next to all symbols you want to add, and then click Add; The selected Symbol is added
to the list on the right side.
By default, the Box View and the List View checkboxes are checked, so the symbol
appears both as a row in the Quotes list view and as a box in a Quote box view.
To change the symbols order, click the symbol in the list on the right side, and use the
Up and Down errors to change its place.
4. Click OK to confirm.
Chapter 4: Opening New Positions and Placing New Orders Copyright © 2012 Trade Networks. All rights reserved Page 22
4.2 Opening a Position at the Current Market Price or
Placing a Market Order
WebPROfit enables you to open your positions at the current market prices in two different
modes: Confirm mode and 1-Click Trade mode. You can use the Confirm Mode and the 1-
Click Trade buttons to switch between the modes.
The ability to open positions in 1-Click Trade mode and in the Confirm mode is enabled in
both, the List view and the Box view.
Chapter 4: Opening New Positions and Placing New Orders Copyright © 2012 Trade Networks. All rights reserved Page 23
4.2.1 Opening a Position in the Confirm Mode
To Turn On
the Confirm
Mode
Click the Confirm
Mode button
The Confirm mode enables you to confirm each position you open before its final execution.
In this mode, you can use the Open Position window to place positions at the best available
market price. You can display the Open Position window via the Quotes panel, both in the
List View and in the Box view.
To open a position in Confirm Mode
1. Display the Open Position window by doing one of the following:
- In the List view, click the Buy or Sell button in the relevant symbol row.
- In the Box view, click the Buy or Sell button in the relevant symbol box.
2. In the Open Position window, in the Amount list, select or type the size of your trade.
3. Click OK to confirm; the position opens and the Info window appears confirming your
action.
4. Click OK or to close the Info window.
By default, the Limit
Type field is set to
None. For more
information on
limiting your
position, see Section
4.4 Protecting Your
Positions with SL/TP
Orders.
The Type field is set to
Market Order, allowing you
to open a position at the
current market price.
The name of the
selected symbol
The Ask / Bid button which
represents the current
direction of your position
appears highlighted.
Chapter 4: Opening New Positions and Placing New Orders Copyright © 2012 Trade Networks. All rights reserved Page 24
4.2.2Opening a Position in 1-Click Trade Mode
To Turn On
the 1-Click
Trade Mode
Click the 1 Click Trade
Mode button.
When you want to monitor market movement and make trades quickly, you can use the 1-
Click Trade mode. The 1-Click Trade mode allows you to open a position without
confirmation, in one click. After you define your trading mode as the 1-Click trade mode the
Quotes panel is modified as follows:
 In the List view, a new Amount column appears.
 In the Box view, a new button appears in the right corner of the Buy and Sell
buttons, and the amount list is displayed:
To open a position in 1-Click mode, follow one of the following methods:
Method A In the List view, in a desired symbol row, select or type the size of your trade and click
Buy/Sell; the position opens.
Method B In the Box view, in a desired symbol box, select or type the size of your trade and click
Buy/Sell; the position opens.
Chapter 4: Opening New Positions and Placing New Orders Copyright © 2012 Trade Networks. All rights reserved Page 25
4.3 Placing an Entry Order
Sometimes, when you wish to enter the market at a specified rate other than the current
market price you can place an entry order. To place an entry order, you can use the Open
Entry Order window which can be accessed via the Quotes panel. This order will
automatically become an open position once the market price will reach the price you have
specified in this window.
.
You can view all your entry orders that haven’t been executed yet in the My Portfolio
panel, under the Entry Orders tab. Once the entry order is executed, it is exported to the
Open positions tab.
The Type field is set to
Entry Order allowing
you to specified rate
other than the current
market price in the
Order Rate.The execution
rate of your entry
order which you
enter into the
Order Rate text
box must be in
the range
indicated below
the text box.
Use the Good till
Cancelled option to
specify the expiration
date of your entry order.
Once the market
reaches this value, the
entry order will be
canceled.
Chapter 4: Opening New Positions and Placing New Orders Copyright © 2012 Trade Networks. All rights reserved Page 26
There are several methods to display the Open Entry Order window:
Method A
In confirm
mode
In the List view, click the Buy or Sell button in the relevant symbol row; the Open Position
window is displayed. In this window, in the Type drop down list, choose Entry Order; the
Open Position window is expanded to the Open Entry Order window.
Method B
In confirm
mode
In the Box view, click the Buy or Sell button in the relevant symbol box; the Open Position
window is displayed. In this window, in the Type drop down list, choose Entry Order; the
Open Position window is expanded to the Open Entry Order window.
Method C
In 1-Click mode
In the Box view, click in the relevant symbol box. The Open Entry Order window is
displayed.
To Place an Entry Order
1. Use one of the methods listed above to display the Open Entry Order window.
2. From the Amount list, select or type the size of your trade.
Limiting
your Order
For more information
on limiting your entry
order with SL/TP/OCO
orders see Section 4.4
Protecting Your
Positions with SL/TP
Orders as well as
Section 4.5 Protecting
Your Entry Order with
OCO Order.
3. In the Order text box, type the execution rate of your entry order.
4. Specify the expiration date of your entry order by using the Good Till Value option.
5. Click OK; the entry order is placed and the Info window appears to confirm your
action.
6. Click OK or to close the Info window.
Chapter 4: Opening New Positions and Placing New Orders Copyright © 2012 Trade Networks. All rights reserved Page 27
4.4 Protecting Your Positions with SL/TP Orders
Placing SL/TP orders allows you to manage your risk on any open position. You can place
the SL/TP for both a Market Order and Entry Order.
Stop loss Order (SL) - You can use the Stop Loss order to limit your losses by making your
positions automatically close if the price moves in a direction different to what you
expected. You can place a stop loss order to close your trade at a specified amount or at a
specified rate which is different from the current market price.
Take Profit order (TP) - placing a Take Profit order ensures, that your position will be closed
if your target price is reached. This helps you manage your risk even when you are not
available, or when the price touches the target too quickly for you to react.
Chapter 4: Opening New Positions and Placing New Orders Copyright © 2012 Trade Networks. All rights reserved Page 28
To place a Stop Loss / Take Profit order to Market order
1. Choose the Confirmation Mode and display the Open Position window by doing one
of the following:
- In the List view, click the Buy or Sell button in the relevant symbol row.
- In the Box view, click the Buy or Sell button in the relevant symbol box.
2. From the Amount list, select or type the size of your trade.
3. From the Limit Type drop down list, choose SL/ TP; the Open Position window is
expanded as follows:
4. Check the Stop Loss and/or Take Profit checkbox; the rate range is displayed.
When entering an
Amount value, the
modified At Rate
value must fall inside
the range indicated in
the Range text box
below.
5. Define your SL and/or TP rates by doing one of the following: In the At Rate text box
enter your SL/ TP rate; the Amount value is automatically modified to fit the entered
rate. Alternatively, in the Amount text box enter the approximate amount which will
trigger the SL/ TP order; the At Rate value is automatically modified.
6. In the Limit Expiration section, specify the expiration date of your SL/TP, if desired.
7. Click OK; the SL/TP order is placed and the Info window appears.
8. Click OK or to close the Info window.
Chapter 4: Opening New Positions and Placing New Orders Copyright © 2012 Trade Networks. All rights reserved Page 29
To place a Stop Loss / Take Profit order to Entry Order
1. Display the Open Entry Order window by using one of the methods described in
Section 4.3 Placing an Entry Order.
2. In the Open Entry Order window, from the Amount list select or type the size of your
trade.
3. In the Order text box, type the execution rate of your entry order.
4. In the Entry Expiration section, specify the expiration date of your entry order, if
desired.
5. From the Limit Type drop down list choose SL/ TP; the Open Entry Order window is
expanded:
6. Check the Stop Loss and/or Take Profit check box; the rate range is displayed.
7. Define your SL/TP rates. For more information, see To place a Stop Loss / Take Profit
order to Market order, in Section 4.4 Protecting Your Positions with SL/TP Orders.
8. Click OK; the SL/TP order is placed and the Info window appears.
9. Click OK or to close the Info window.
Chapter 4: Opening New Positions and Placing New Orders Copyright © 2012 Trade Networks. All rights reserved Page 30
4.5 Protecting Your Entry Order with OCO Order
You can place
either an OCO order
or SL/TP orders for
each entry order.
You can use the OCO order to monitor your entry to the market by placing two entry orders
simultaneously. If one part of the order is executed, then the other part is automatically
canceled.
Chapter 4: Opening New Positions and Placing New Orders Copyright © 2012 Trade Networks. All rights reserved Page 31
To place an OCO order
1. Display the Open Entry Order window by using one of the methods described in
Section 4.3 Placing an Entry Order.
2. In this window, from the Amount list, select or type the size of your trade.
3. In the Order text box, type the execution rate of your entry order.
4. From the Limit Type drop down list choose OCO; the Open Entry Order window is
expanded.
5. In the At Rate text box, enter the rate of your OCO order execution. The entered
OCO rate must fall in the range displayed below.
6. Specify the expiration date of your OCO entry order, if desired.
7. Click OK; the OCO order is placed, and the Information window appears.
8. Click OK or to close the Information window.
Chapter 5: Managing Existing Positions and Working Orders. Copyright © 2012 Trade Networks. All rights reserved. Page 32
5. Managing Existing Positions
and Working Orders
After opening a position or placing an entry order, you can still react to dynamic market
movements by changing the values of orders you have placed.
You can use the My Portfolio panel to view, edit and close all your open positions at any
time. You can also protect your trades by changing their amounts and modifying the rates
of SL/TP orders you have placed.
The My Portfolio panel can also be used for modifying your entry orders. You can update
their values such as amount, entry rate and OCO rate, until the entry orders are executed.
All entry orders can be canceled as long as they have not reached the execution rate you
defined.
Chapter 5: Managing Existing Positions and Working Orders. Copyright © 2012 Trade Networks. All rights reserved. Page 33
5.1 Modifying Open Positions
You can follow market movement by modifying positions you have already opened. To do
this you can use the Position Details window that provides you with several ways to modify
open positions. You can:
 Place new SL/TP orders.
 Change the values of the existing SL/TP orders.
 Update the expiration date and time of the placed SL/TP orders.
 Remove SL/TP orders.
 Close a position.
See details about your open
position.
You can use this section to update
the expiration date and time of
the SL/TP orders you placed.
You can use this section to place
new SL/TP orders, or to update
and cancel existing ones.
You can use this
button to close your
position at the
current rate.
Chapter 5: Managing Existing Positions and Working Orders. Copyright © 2012 Trade Networks. All rights reserved. Page 34
To modify an open position
1. In the My Portfolio panel, under the Open Positions tab, double click on the position
you want to modify; the Position Details window opens.
2. Modify your open position by doing the following in the Position Details window:
- Add new SL/TP orders or change the rates of the existing ones. For more
information see To place a Stop Loss / Take Profit order to Market order,
paragraph 5 in Section 4.4 Protecting Your Positions with SL/TP Orders.
- In the Limits Expiration section, specify the expiration date and time of the
SL/TP orders.
- Remove your SL/TP orders by simply un-checking the related SL/TP check
boxes.
- Close your position by clicking the Close At “Rate” button; the Question
window is displayed.
3. Click OK; the open position is modified, and the Info window appears, confirming
your action.
4. Click OK or to close the Info window.
Chapter 5: Managing Existing Positions and Working Orders. Copyright © 2012 Trade Networks. All rights reserved. Page 35
5.2 Modifying Entry Orders
Unpredictable market movements can entice you to modify entry orders which haven’t
been executed yet. To do this, you can use the Entry Order Details window which provides
you with several ways to modify entry orders. You can:
 Change the amount of your trade.
 Change entry order execution rate.
 Specify the entry order expiration date and time.
 Place, edit and remove SL/TP or OCO orders.
 Cancel an entry order.
See details about your open position.
You can use this section to change an
entry order execution rate and
amount.
You can use this section to update
the expiration date and time of the
entry order you placed.
You can use this section to place new
SL/TP or OCO orders, as well as to
update and cancel them.
You can use this
button to close your
position at the
current rate.
Chapter 5: Managing Existing Positions and Working Orders. Copyright © 2012 Trade Networks. All rights reserved. Page 36
To modify an entry order
1. In the My Portfolio panel, under the Entry Order tab, double click the order you want
to modify; the Entry Order Details window opens.
2. Modify your entry order by doing the following in the Entry Order Details window:
- Adjust the size of your trade in the Amount list.
- Enter a new execution rate into the Order Rate text field.
- Under the Entry Expiration section, specify the expiration date and time of
your entry order.
- Add new SL/TP or OCO orders, or change the rates of the existing ones.
- Remove your SL/TP or OCO orders by simply unchecking the related SL/TP
check boxes.
- Remove your entry order by clicking the Remove Order button; the Question
window is displayed.
3. Click OK; the entry order is modified, and the Info window appears confirming your
action.
4. Click OK or to close the Info window.
Chapter 5: Managing Existing Positions and Working Orders. Copyright © 2012 Trade Networks. All rights reserved. Page 37
5.3 Closing Positions
WebPROfit provides you with several ways to close your positions. You can close positions
one by one, or several positions at once. You can also close all your positions in one action.
To close a single position
Method A 1. In the My Portfolio panel, under the Open Positions tab, double click on the position
you want to modify. Alternatively, you can select the desired position and click the
“Details” button: the Position Details window opens.
2. In this window, click the Close at “rate” button; the Confirm window is displayed.
3. Click OK; the selected position is closed and the Info window appears confirming
your action.
4. Click OK or to close the Info window.
Method B 1. In the My Portfolio panel, under the Open Positions tab, scroll to the end of the grid
on the right.
2. Click “Close Position” in the row which represents details regarding the position you
want to close; the Confirm window is displayed.
3. Follow steps 2-4 in Method A.
Chapter 5: Managing Existing Positions and Working Orders. Copyright © 2012 Trade Networks. All rights reserved. Page 38
To close several positions
1. In the My Portfolio panel, under the Open Positions tab, select the checkboxes next
to all positions you want to close.
2. Click the Close Position button; the Confirm window is displayed.
3. Click OK; the selected position is closed and the Info window appears confirming
your action.
4. Click OK or to close the Info window.
To close all your open positions at once
1. In the My Portfolio panel, under the Open Positions tab, select the check box, as
displayed:
2. Follow steps 2-4 in the To close several positions instructions.
Chapter 5: Managing Existing Positions and Working Orders. Copyright © 2012 Trade Networks. All rights reserved. Page 39
5.4 Removing Entry Orders
WebPROfit provides you with several ways to remove your Entry Orders that haven’t been
executed yet. You can remove them one by one or several at once. You can also close all
your entry orders in one action.
To remove a single Entry Order
Method A 1. In the My Portfolio panel, under the Entry Orders tab, double click on the order you
want to modify. Alternatively, you can select the desired position and click the
“Details” button: the Entry Order Details window opens.
2. In this window, click the “Remove Order” button; the Confirm window is displayed.
3. Click OK; the selected entry order is removed and the Info window appears
confirming your action.
4. Click OK or to close the Info window.
Method B 1. In the My Portfolio panel, under the Entry Orders tab, scroll to the end of the grid on
the right.
2. Click “Remove Order” in the row which represents details regarding the entry order
you want to close; the Confirm window is displayed.
3. Follow steps 2-4 in the in Method A.
Chapter 5: Managing Existing Positions and Working Orders. Copyright © 2012 Trade Networks. All rights reserved. Page 40
To remove several entry orders
1. In My Portfolio panel, under the Entry Order tab, select the checkboxes next to all
entry orders you want to remove.
2. Click the Remove Order button; the Confirm window is displayed.
3. Click OK; the selected order is removed and the Info window appears confirming
your action.
4. Click OK or to close the Info window.
To remove all your entry orders at once
1. In the My Portfolio panel, under the Entry Orders tab, select the main check box, as
displayed:
2. Follow steps 2-4 in the To remove several entry orders instructions appeared above.
Chapter 5: Managing Existing Positions and Working Orders. Copyright © 2012 Trade Networks. All rights reserved. Page 41
5.5 Managing Your Positions and Working Orders via the
My Portfolio Panel
The My Portfolio panel provides you with detailed information regarding all your existing
and closed trades. This enables you to easily and effectively manage multiple positions and
entry orders which haven’t been executed yet. In addition, you can use the My Portfolio
panel to access the Position Details and Entry Orders Details windows, which allow you to
modify all your positions and orders.
Chapter 5: Managing Existing Positions and Working Orders. Copyright © 2012 Trade Networks. All rights reserved. Page 42
5.5.1 Managing Your Open Positions
Clicking the Open Positions tab in the My Portfolio panel will display all your open
positions, including executed entry orders. Under this tab you can see the rate of each
symbol at the time the position was opened, the symbol’s ID, the size of your trade, the
direction of your trade (buy/sell), the current market rate and the SL/TP rates. You can also
view the open P&L which is calculated according to the updates of the exchange rates.
To view more detailed information on your open positions, double click the symbol row or
left click the symbol row and then click Details. The Position Details window appears. You
can also use this window to modify your open positions and limit orders. For more
information, see Section 5.1 Modifying Open Positions.
Chapter 5: Managing Existing Positions and Working Orders. Copyright © 2012 Trade Networks. All rights reserved. Page 43
5.5.2Viewing Your Closed Positions
You can search your closed positions by their opening and closing dates in the Closed
Positions tab.
To view the details of your closed positions
1. In the My Portfolio panel, under the Closed Positions tab, limit your search by
selecting the position’s Open Date or Close Date option from the provided
dropdown list.
2. Specify the date and time range of the period for which you want to view the details.
3. Click Show; the selected symbols are displayed in the grid.
You can view more detailed information on your closed positions via the Position Details
window. To open a Position Details window, double click a position or left click the symbol
and then click Details. The Position Details window is displayed.
Chapter 5: Managing Existing Positions and Working Orders. Copyright © 2012 Trade Networks. All rights reserved. Page 44
5.5.3Managing the Exposure of Your Trades
PROfit calculates
Net value as long
positions minus short
positions.
Under the Exposure tab you can see the number of all positions currently open for a
particular symbol, the total size of your trades for the same symbol (Net Value), the Open
P&L, and the average rate of all open positions for this symbol.
WebPROfit enables you to manage your exposure by specifying the exact positions to be
closed for a selected symbol. You can close Only Sell symbol positions, Only Buy symbol
positions or All symbol positions.
To close several positions of the same symbol
1. In the My Portfolio panel, under the Exposure tab, double click on the desired
symbol row. Alternatively, select a desired symbol and click the Close Symbol
Positions button; the Close Symbol Positions window is displayed.
.
.
2. Define which symbol positions to close by clicking the matching radio button.
3. Click OK; the Confirm window is displayed.
4. Click OK; the selected symbol positions are closed and the Info window appears
confirming your action.
5. Click OK or to close the Info window.
The amount that will be sold / bought
by closing this position is indicated next
to each option.
Chapter 5: Managing Existing Positions and Working Orders. Copyright © 2012 Trade Networks. All rights reserved. Page 45
5.5.4Managing Your Entry Orders
Clicking the Entry Order tab will display a grid with all your entry orders that haven’t been
executed yet.
The Entry Order tab displays the order’s execution rate, its ID and the SL, TP and OCO rates.
To view more detailed information on your entry orders, double click the symbol row or left
click the selected symbol and then click Details. The Entry Order Details window appears.
You can also use the Entry Order Details window to modify your entry and limit orders. See
Section 5.2 Modifying Entry Orders for more information.
To remove an entry order, see Section 5.4 Removing Entry Orders for more information.
Chapter 5: Managing Existing Positions and Working Orders. Copyright © 2012 Trade Networks. All rights reserved. Page 46
5.5.5Viewing Your Trading History
The Log panel enables you to view your account history. This information can help you to
evaluate the effectiveness of your trading strategy for a specified period of time. The
Account history is a detailed database containing information on all the trading operations
you have performed which can be presented based on the time range you specify.
To view the Account History
1. In the Log panel, specify the date and time range of the period for which you want to
view your account history.
2. Click “Search”.
Chapter 6: Using the Charts Tools Copyright © 2012 Trade Networks. All rights reserved. Page 47
6. Using NetDania Chart Tools
You can easily display all your desired symbols as chart lines in the NetDania Finance Chart.
This can help you to better analyze the market movements and to predict where the market
will go with greater accuracy.
To display the NetDania Chart
To learn using
NetDania Finance
Chart tools, click the
Help menu in the
Chart’s menu bar and
choose the User Guide
option.
1. In the sidebar, click the slider; the NetDania chart is displayed.
2. From the Chart toolbar, choose the icon. The Chart opens in a different window.
This will allow you to simultaneously use both, the WebPROfit trading tools and the
NetDania Chart tools.
3. Click to close the slider. The NetDania Chart window will remain open.

More Related Content

Viewers also liked

GLORIAD's New Measurement and Monitoring System
GLORIAD's New Measurement and Monitoring SystemGLORIAD's New Measurement and Monitoring System
GLORIAD's New Measurement and Monitoring System
Ed Dodds
 
Calendar Final Cuban Animals 50th Anniversary Of The Cuban Revolution
Calendar Final Cuban Animals 50th Anniversary Of The Cuban RevolutionCalendar Final Cuban Animals 50th Anniversary Of The Cuban Revolution
Calendar Final Cuban Animals 50th Anniversary Of The Cuban Revolution
Wilder Solveig
 
Media Coursework
Media CourseworkMedia Coursework
Media Coursework
jemmagraham
 
From Device Drivers to Data Analytics
From Device Drivers to Data AnalyticsFrom Device Drivers to Data Analytics
From Device Drivers to Data Analytics
Dorai Thodla
 
Bua 235 teamwork
Bua 235 teamwork Bua 235 teamwork
Bua 235 teamwork
UMaine
 

Viewers also liked (17)

GLORIAD's New Measurement and Monitoring System
GLORIAD's New Measurement and Monitoring SystemGLORIAD's New Measurement and Monitoring System
GLORIAD's New Measurement and Monitoring System
 
Calendar Final Cuban Animals 50th Anniversary Of The Cuban Revolution
Calendar Final Cuban Animals 50th Anniversary Of The Cuban RevolutionCalendar Final Cuban Animals 50th Anniversary Of The Cuban Revolution
Calendar Final Cuban Animals 50th Anniversary Of The Cuban Revolution
 
Media Coursework
Media CourseworkMedia Coursework
Media Coursework
 
Hybrid ICC
Hybrid ICCHybrid ICC
Hybrid ICC
 
From Device Drivers to Data Analytics
From Device Drivers to Data AnalyticsFrom Device Drivers to Data Analytics
From Device Drivers to Data Analytics
 
Social Media: The Real Return On Investment (ROI)
Social Media: The Real Return On Investment (ROI)Social Media: The Real Return On Investment (ROI)
Social Media: The Real Return On Investment (ROI)
 
10 semiologia imagen - sistemas
10   semiologia imagen - sistemas10   semiologia imagen - sistemas
10 semiologia imagen - sistemas
 
Projecte pel canvi
Projecte pel canviProjecte pel canvi
Projecte pel canvi
 
InfoTools: Beyond Search
InfoTools: Beyond SearchInfoTools: Beyond Search
InfoTools: Beyond Search
 
Bua 235 teamwork
Bua 235 teamwork Bua 235 teamwork
Bua 235 teamwork
 
5º basico a
5º basico a5º basico a
5º basico a
 
Exploring Opportunities E Week Talk
Exploring Opportunities   E Week TalkExploring Opportunities   E Week Talk
Exploring Opportunities E Week Talk
 
Section 4 scenic conservationstrategies
Section 4   scenic conservationstrategiesSection 4   scenic conservationstrategies
Section 4 scenic conservationstrategies
 
Report: CIOs & Big Data
Report: CIOs & Big DataReport: CIOs & Big Data
Report: CIOs & Big Data
 
FUNME_4L1_LOSCREATIVOS
FUNME_4L1_LOSCREATIVOSFUNME_4L1_LOSCREATIVOS
FUNME_4L1_LOSCREATIVOS
 
Lucene/Solr Revolution 2013: Paul Doscher Opening Remarks
Lucene/Solr Revolution 2013: Paul Doscher Opening Remarks Lucene/Solr Revolution 2013: Paul Doscher Opening Remarks
Lucene/Solr Revolution 2013: Paul Doscher Opening Remarks
 
Hiring, Firing, and Co-Founders: My Founder Institute Session
Hiring, Firing, and Co-Founders: My Founder Institute SessionHiring, Firing, and Co-Founders: My Founder Institute Session
Hiring, Firing, and Co-Founders: My Founder Institute Session
 

Similar to Web pr ofit-manual-bforex-3-2

Microcat land rover
Microcat land roverMicrocat land rover
Microcat land rover
sersam
 
multi-vendor-catering-management-sytem.docx
multi-vendor-catering-management-sytem.docxmulti-vendor-catering-management-sytem.docx
multi-vendor-catering-management-sytem.docx
veerdevshreyas1
 
Qs2 en initial_interview
Qs2 en initial_interviewQs2 en initial_interview
Qs2 en initial_interview
khayer
 

Similar to Web pr ofit-manual-bforex-3-2 (20)

Microcat land rover
Microcat land roverMicrocat land rover
Microcat land rover
 
76262973 treasury-setup
76262973 treasury-setup76262973 treasury-setup
76262973 treasury-setup
 
GETTING STARTED WITH NSEData.com
GETTING STARTED WITH NSEData.comGETTING STARTED WITH NSEData.com
GETTING STARTED WITH NSEData.com
 
SugarMob Pro
SugarMob ProSugarMob Pro
SugarMob Pro
 
Tf20manual
Tf20manualTf20manual
Tf20manual
 
Tf20manual
Tf20manualTf20manual
Tf20manual
 
Procedures in xero accounting application
Procedures in xero accounting applicationProcedures in xero accounting application
Procedures in xero accounting application
 
multi-vendor-catering-management-sytem.docx
multi-vendor-catering-management-sytem.docxmulti-vendor-catering-management-sytem.docx
multi-vendor-catering-management-sytem.docx
 
Ebook on stock market concept 0
Ebook on stock market concept 0Ebook on stock market concept 0
Ebook on stock market concept 0
 
Roadmap for forex brokers
Roadmap for forex brokersRoadmap for forex brokers
Roadmap for forex brokers
 
Magento tutorial
Magento tutorialMagento tutorial
Magento tutorial
 
Magento 2 Store Login Access Permissions Extension by IToris Inc.
Magento 2 Store Login Access Permissions Extension by IToris Inc.Magento 2 Store Login Access Permissions Extension by IToris Inc.
Magento 2 Store Login Access Permissions Extension by IToris Inc.
 
Ecommerce
EcommerceEcommerce
Ecommerce
 
LyRex Business Plan
LyRex Business PlanLyRex Business Plan
LyRex Business Plan
 
Qs2 en initial_interview
Qs2 en initial_interviewQs2 en initial_interview
Qs2 en initial_interview
 
Social Trading:The most interesting and useful tool to get access to financia...
Social Trading:The most interesting and useful tool to get access to financia...Social Trading:The most interesting and useful tool to get access to financia...
Social Trading:The most interesting and useful tool to get access to financia...
 
User_Manual
User_ManualUser_Manual
User_Manual
 
User_Manual
User_ManualUser_Manual
User_Manual
 
Vat exempt magento 2
Vat exempt magento  2Vat exempt magento  2
Vat exempt magento 2
 
Magento Design Guide
Magento Design GuideMagento Design Guide
Magento Design Guide
 

More from altos estudios de la universidad europea

More from altos estudios de la universidad europea (20)

aways
awaysaways
aways
 
Renuncias, privilegios, records edison jeferson
Renuncias, privilegios, records edison jefersonRenuncias, privilegios, records edison jeferson
Renuncias, privilegios, records edison jeferson
 
Edison jeferson perfil
Edison jeferson perfilEdison jeferson perfil
Edison jeferson perfil
 
Trayectoria academica,profesional, religiosa jeferson
Trayectoria academica,profesional, religiosa jefersonTrayectoria academica,profesional, religiosa jeferson
Trayectoria academica,profesional, religiosa jeferson
 
Tipografia trabajo parcial
Tipografia trabajo parcialTipografia trabajo parcial
Tipografia trabajo parcial
 
Tesina (2)
Tesina (2)Tesina (2)
Tesina (2)
 
Marisela vargas ingeniera
Marisela  vargas ingenieraMarisela  vargas ingeniera
Marisela vargas ingeniera
 
Poenecia del evangelio de lucas
Poenecia del evangelio de lucasPoenecia del evangelio de lucas
Poenecia del evangelio de lucas
 
Investigacion antropologiaabril2012.
Investigacion antropologiaabril2012.Investigacion antropologiaabril2012.
Investigacion antropologiaabril2012.
 
Pensamiento moderno.
Pensamiento moderno.Pensamiento moderno.
Pensamiento moderno.
 
Trabajo final nietche edison jeferson. (1)
Trabajo final nietche edison jeferson. (1)Trabajo final nietche edison jeferson. (1)
Trabajo final nietche edison jeferson. (1)
 
Trabajo final tragedia griega (2) (2)
Trabajo final tragedia griega (2) (2)Trabajo final tragedia griega (2) (2)
Trabajo final tragedia griega (2) (2)
 
Tutoria hugo seccion 2 (1)
Tutoria hugo seccion 2 (1)Tutoria hugo seccion 2 (1)
Tutoria hugo seccion 2 (1)
 
Web internet (1)
Web internet (1)Web internet (1)
Web internet (1)
 
Trabajo final ensayo filosofico (2)
Trabajo final ensayo filosofico (2)Trabajo final ensayo filosofico (2)
Trabajo final ensayo filosofico (2)
 
Mapa potsmodernidad
Mapa potsmodernidadMapa potsmodernidad
Mapa potsmodernidad
 
Latinoamericana final (1)
Latinoamericana final (1)Latinoamericana final (1)
Latinoamericana final (1)
 
Leibniz.
Leibniz.Leibniz.
Leibniz.
 
Estetica en argumentos.
Estetica en argumentos.Estetica en argumentos.
Estetica en argumentos.
 
Diseã‘o grafico. (1)
Diseã‘o grafico. (1)Diseã‘o grafico. (1)
Diseã‘o grafico. (1)
 

Recently uploaded

2024 May - Clearbit Integration with Hubspot - Greenville HUG.pptx
2024 May - Clearbit Integration with Hubspot  - Greenville HUG.pptx2024 May - Clearbit Integration with Hubspot  - Greenville HUG.pptx
2024 May - Clearbit Integration with Hubspot - Greenville HUG.pptx
Boundify
 
Jual obat aborsi Hongkong ( 085657271886 ) Cytote pil telat bulan penggugur k...
Jual obat aborsi Hongkong ( 085657271886 ) Cytote pil telat bulan penggugur k...Jual obat aborsi Hongkong ( 085657271886 ) Cytote pil telat bulan penggugur k...
Jual obat aborsi Hongkong ( 085657271886 ) Cytote pil telat bulan penggugur k...
Klinik kandungan
 
Contact +971581248768 for 100% original and safe abortion pills available for...
Contact +971581248768 for 100% original and safe abortion pills available for...Contact +971581248768 for 100% original and safe abortion pills available for...
Contact +971581248768 for 100% original and safe abortion pills available for...
DUBAI (+971)581248768 BUY ABORTION PILLS IN ABU dhabi...Qatar
 

Recently uploaded (20)

Moradia Isolada com Logradouro; Detached house with patio in Penacova
Moradia Isolada com Logradouro; Detached house with patio in PenacovaMoradia Isolada com Logradouro; Detached house with patio in Penacova
Moradia Isolada com Logradouro; Detached house with patio in Penacova
 
Falcon Invoice Discounting: Empowering Your Business Growth
Falcon Invoice Discounting: Empowering Your Business GrowthFalcon Invoice Discounting: Empowering Your Business Growth
Falcon Invoice Discounting: Empowering Your Business Growth
 
2024 May - Clearbit Integration with Hubspot - Greenville HUG.pptx
2024 May - Clearbit Integration with Hubspot  - Greenville HUG.pptx2024 May - Clearbit Integration with Hubspot  - Greenville HUG.pptx
2024 May - Clearbit Integration with Hubspot - Greenville HUG.pptx
 
A DAY IN THE LIFE OF A SALESPERSON .pptx
A DAY IN THE LIFE OF A SALESPERSON .pptxA DAY IN THE LIFE OF A SALESPERSON .pptx
A DAY IN THE LIFE OF A SALESPERSON .pptx
 
Jual obat aborsi Hongkong ( 085657271886 ) Cytote pil telat bulan penggugur k...
Jual obat aborsi Hongkong ( 085657271886 ) Cytote pil telat bulan penggugur k...Jual obat aborsi Hongkong ( 085657271886 ) Cytote pil telat bulan penggugur k...
Jual obat aborsi Hongkong ( 085657271886 ) Cytote pil telat bulan penggugur k...
 
How does a bike-share company navigate speedy success? - Cyclistic
How does a bike-share company navigate speedy success? - CyclisticHow does a bike-share company navigate speedy success? - Cyclistic
How does a bike-share company navigate speedy success? - Cyclistic
 
Contact +971581248768 for 100% original and safe abortion pills available for...
Contact +971581248768 for 100% original and safe abortion pills available for...Contact +971581248768 for 100% original and safe abortion pills available for...
Contact +971581248768 for 100% original and safe abortion pills available for...
 
Arti Languages Pre Seed Teaser Deck 2024.pdf
Arti Languages Pre Seed Teaser Deck 2024.pdfArti Languages Pre Seed Teaser Deck 2024.pdf
Arti Languages Pre Seed Teaser Deck 2024.pdf
 
HomeRoots Pitch Deck | Investor Insights | April 2024
HomeRoots Pitch Deck | Investor Insights | April 2024HomeRoots Pitch Deck | Investor Insights | April 2024
HomeRoots Pitch Deck | Investor Insights | April 2024
 
WheelTug Short Pitch Deck 2024 | Byond Insights
WheelTug Short Pitch Deck 2024 | Byond InsightsWheelTug Short Pitch Deck 2024 | Byond Insights
WheelTug Short Pitch Deck 2024 | Byond Insights
 
Marel Q1 2024 Investor Presentation from May 8, 2024
Marel Q1 2024 Investor Presentation from May 8, 2024Marel Q1 2024 Investor Presentation from May 8, 2024
Marel Q1 2024 Investor Presentation from May 8, 2024
 
Pimpri Chinchwad Call Girl Just Call♥️ 8084732287 ♥️Top Class Call Girl Servi...
Pimpri Chinchwad Call Girl Just Call♥️ 8084732287 ♥️Top Class Call Girl Servi...Pimpri Chinchwad Call Girl Just Call♥️ 8084732287 ♥️Top Class Call Girl Servi...
Pimpri Chinchwad Call Girl Just Call♥️ 8084732287 ♥️Top Class Call Girl Servi...
 
Falcon Invoice Discounting: Aviate Your Cash Flow Challenges
Falcon Invoice Discounting: Aviate Your Cash Flow ChallengesFalcon Invoice Discounting: Aviate Your Cash Flow Challenges
Falcon Invoice Discounting: Aviate Your Cash Flow Challenges
 
Putting the SPARK into Virtual Training.pptx
Putting the SPARK into Virtual Training.pptxPutting the SPARK into Virtual Training.pptx
Putting the SPARK into Virtual Training.pptx
 
PALWAL CALL GIRL ❤ 82729*64427❤ CALL GIRLS IN PALWAL ESCORTS
PALWAL CALL GIRL ❤ 82729*64427❤ CALL GIRLS IN PALWAL ESCORTSPALWAL CALL GIRL ❤ 82729*64427❤ CALL GIRLS IN PALWAL ESCORTS
PALWAL CALL GIRL ❤ 82729*64427❤ CALL GIRLS IN PALWAL ESCORTS
 
MEHSANA 💋 Call Girl 9827461493 Call Girls in Escort service book now
MEHSANA 💋 Call Girl 9827461493 Call Girls in  Escort service book nowMEHSANA 💋 Call Girl 9827461493 Call Girls in  Escort service book now
MEHSANA 💋 Call Girl 9827461493 Call Girls in Escort service book now
 
Thompson_Taylor_MBBS_PB1_2024-03 (1)- Project & Portfolio 2.pptx
Thompson_Taylor_MBBS_PB1_2024-03 (1)- Project & Portfolio 2.pptxThompson_Taylor_MBBS_PB1_2024-03 (1)- Project & Portfolio 2.pptx
Thompson_Taylor_MBBS_PB1_2024-03 (1)- Project & Portfolio 2.pptx
 
JIND CALL GIRL ❤ 8272964427❤ CALL GIRLS IN JIND ESCORTS SERVICE PROVIDE
JIND CALL GIRL ❤ 8272964427❤ CALL GIRLS IN JIND ESCORTS SERVICE PROVIDEJIND CALL GIRL ❤ 8272964427❤ CALL GIRLS IN JIND ESCORTS SERVICE PROVIDE
JIND CALL GIRL ❤ 8272964427❤ CALL GIRLS IN JIND ESCORTS SERVICE PROVIDE
 
Buy gmail accounts.pdf buy Old Gmail Accounts
Buy gmail accounts.pdf buy Old Gmail AccountsBuy gmail accounts.pdf buy Old Gmail Accounts
Buy gmail accounts.pdf buy Old Gmail Accounts
 
Home Furnishings Ecommerce Platform Short Pitch 2024
Home Furnishings Ecommerce Platform Short Pitch 2024Home Furnishings Ecommerce Platform Short Pitch 2024
Home Furnishings Ecommerce Platform Short Pitch 2024
 

Web pr ofit-manual-bforex-3-2

  • 2. Page 2 Contents 1. INTRODUCTION........................................................................................................................................................................................................4 2. OVERVIEW...............................................................................................................................................................................................................6 3. GETTING STARTED...................................................................................................................................................................................................7 3.1 LOGGING IN TO WEBPROFIT ....................................................................................................................................8 3.2 FUNDING AND WITHDRAWING FROM YOUR PROFIT ACCOUNT........................................................................................9 3.3 GETTING FAMILIAR WITH THE WEBPROFIT WORKSPACE...............................................................................................10 3.3.1 Status bar...................................................................................................................................................11 3.3.2 Quotes panel..............................................................................................................................................12 3.3.3 My Portfolio Panel .....................................................................................................................................14 3.3.4 Side bar ......................................................................................................................................................15 4. OPENING NEWPOSITIONS AND PLACING NEW ORDERS........................................................................................................................................19 4.1 DISPLAYING SYMBOLS IN THE QUOTES PANEL.............................................................................................................20 4.2 OPENING A POSITION AT THE CURRENT MARKET PRICE OR PLACING A MARKET ORDER .....................................................22 4.2.1 Opening a Position in the Confirm Mode ..................................................................................................23 4.2.2 Opening a Position in 1-Click Trade Mode.................................................................................................24 4.3 PLACING AN ENTRY ORDER.....................................................................................................................................25 4.4 PROTECTING YOUR POSITIONS WITH SL/TP ORDERS...................................................................................................27 4.5 PROTECTING YOUR ENTRY ORDER WITH OCO ORDER .................................................................................................30 5. MANAGING EXISTING POSITIONS AND WORKING ORDERS ...................................................................................................................................32 5.1 MODIFYING OPEN POSITIONS .................................................................................................................................33 5.2 MODIFYING ENTRY ORDERS....................................................................................................................................35 5.3 CLOSING POSITIONS..............................................................................................................................................37 5.4 REMOVING ENTRY ORDERS ....................................................................................................................................39 5.5 MANAGING YOUR POSITIONS AND WORKING ORDERS VIA THE MY PORTFOLIO PANEL ......................................................41 5.5.1 Managing Your Open Positions..................................................................................................................42 5.5.2 Viewing Your Closed Positions...................................................................................................................43 5.5.3 Managing the Exposure of Your Trades.....................................................................................................44 5.5.4 Managing Your Entry Orders......................................................................................................................45 5.5.5 Viewing Your Trading History.....................................................................................................................46
  • 3. Page 3 6. USING NETDANIA CHART TOOLS...........................................................................................................................................................................47
  • 4. Chapter 1: Introduction Copyright © 2012 Trade Networks. All rights reserved. Page 4 1. Introduction WebPROfit is an easy to use online trading platform allowing you to trade anytime from anywhere. This platform is based on cutting-edge trading technology which was designed with the user in mind. WebPROfit provides a real time customizable graphical representation of the market movements and of your trades. WebPROfit offers you various trading tools, news feeds and support directly from the platform. Both, the beginners and the experienced traders can use this trading platform by easily adjusting its customizable features to their specific needs. The use of WebPROfit will maximize your trading success due to the following features and advantages:  No download required.  One-click trading execution.  Instant trade execution.  Direct platform support.  Ability to trade forex, commodities and CFDs using advanced charting tools.  Up-to-the-minute news streamed to the platform.  Ultimate trading environment.
  • 5. Chapter 1: Introduction Copyright © 2012 Trade Networks. All rights reserved. Page 5 About this Manual Whether you are a beginner or an expert, you can use this manual as a guideline for using WebPROfit. The following notes are used in this manual: Additional Options Describes additional operational instructions related to a particular feature. Note Indicates information that can be helpful in performing a particular procedure. This manual contains 3 main sections: Chapters 1-3 cover the basic information you need to know about WebPROfit before starting to trade; Chapter 4-5 cover the main trading tools that you can use to manage your trades; Chapter 6 explains how to use NetDania Chart tools. This manual provides information on the WebPROfit platform without getting into an explanation of how to trade forex. To get a general overview about forex trading principals, please refer to the Forex Academy at www.bforex.com/Forex-Academy/
  • 6. Chapter 2: Overview Copyright © 2012 Trade Networks. All rights reserved. Page 6 2. Overview WebPROfit platform helps you easily manage your trades by providing you with advanced trading tools. The WebPROfit workspace is customizable and can be adjusted to your needs. WebPROfit provides you with various ways to manage your trades. You can use WebPROfit tools to quickly open positions, place and modify orders. Once you become an experienced trader, you can also use advanced chart tools to better analyze the forex market and your personal trading strategy. Symbolis a tradable asset. WebPROfit allows you to trade with two types of Symbols:  Forex (FX) – is a Currency Pair. For example, AUD/CAD is one FX symbol.  CFD – is a Contract for Difference. For example, APPLE is one CFD symbol.
  • 7. Chapter 3: Getting Started Copyright © 2012 Trade Networks. All rights reserved Page 7 3. Getting Started The current chapter provides information on basic steps you need to perform before actually starting to trade with WebPROfit: 1. Logging in to WebPROfit. 2. Funding and Withdrawing from your WebPROfit account. 3. Getting familiar with the WebPROfit workspace.
  • 8. Chapter 3: Getting Started Copyright © 2012 Trade Networks. All rights reserved Page 8 3.1 Logging in to WebPROfit You can use the same login link to access both of your PROfit accounts, Demo and Live. If you want to change the default language of your trading platform, select the desired language from the languages list in the Login screen before inserting your login details. To log in to your PROfit account 1. Click the login link; the Login screen is displayed. Retrieving Password Click the Forgot Password. In the box displayed, enter your email address and click OK. The password is sent to your email. 2. Enter your username and password. Getting Online help 3. Click the “Show Only Live” check box to display only your Live accounts. 4. Click Login; the list of your accounts is displayed. Click the Live Chat or the Contact us icon and follow the instructions 5. Select the desired account and click Launch; the selected account opens.
  • 9. Chapter 3: Getting Started Copyright © 2012 Trade Networks. All rights reserved Page 9 3.2 Funding and Withdrawing from your PROfit Account You can easily fund and withdraw from your PROfit account directly from the WebPROfit platform. To Fund your Account 1. In the Status bar, click Deposit. You will automatically be redirected to the billing site. 2. Fill in your Billing Information and click Deposit. To Withdraw from your Account 1. In the Status bar, click Withdrawal. You will automatically be redirected to the billing site. 2. Fill in the Withdrawal Details, and click Submit.
  • 10. Chapter 3: Getting Started Copyright © 2012 Trade Networks. All rights reserved Page 10 3.3 Getting familiar with the WebPROfit workspace The WebPROfit platform consists of the following parts:  Status bar  Quotes panel  My Portfolio panel  Sidebar Quotes Panel My Portfolio Panel Status bar Sidebar
  • 11. Chapter 3: Getting Started Copyright © 2012 Trade Networks. All rights reserved Page 11 3.3.1 Status bar The Status Bar On top of the screen is the Status bar. This bar provides you with general information on your PROfit account and allows you to deposit funds directly from the platform (for more information, see section 3.2 Funding and Withdrawing from your PROfit Account). Help Clicking the error above the Balance indicator will open a menu containing the Contact Us and Help options. Use the help option to download a complete user manual. In addition, you can click the Chat button next to the error to begin the chat session. Account Equity: Displays the current value of your account. PROfit calculates this as your initial deposit plus the Profit and loss on open and closed trades (realized and unrealized P&L) plus Bonus plus Credit plus withdrawals plus rollover. Exposure: Displays the amount of real time capital exposure on your account based on your leverage and account equity. Margin %: The amount of equity contributed by a customer as a percentage of the current market value of the securities held in a margin account. Open P&L (Open Profit / Loss): Displays the potential profit or loss you would make if your active positions were closed at the current market price. Available Line: Displays the amount of your total buying power existing in USD, based on your leverage and account equity. For example, with 0.5% margin, your available buying power is equal to 200x your current account balance. Used Margin: Displays the amount of Account Equity currently being used to maintain all your open positions. Used Margin calculated as follows: Size of position * Rate to USD) / 100. For example: If you buy 1 lot (10,000) GBP/USD @ 1.9520, the Margin Calculation will be: (10,000 GBP * 1.9520)/100 = $195.20 Used Margin Usable Margin: Displays the amount of account equity not currently committed to maintain the open positions. Usable Margin is also known as the amount available to open new positions. Used Margin plus Usable Margin equals Equity. Balance: Account Equity plus Open P&L.
  • 12. Chapter 3: Getting Started Copyright © 2012 Trade Networks. All rights reserved Page 12 3.3.2Quotes panel You can use the Quotes panel to view forex symbols available for trading, to open positions and to place different order types. The Quotes panel reflects streaming real- time prices which are updated automatically with the slightest market movement. On top the Quotes panel is the Layout toolbar that allows you to change the view of the Quotes panel. The quotes panel offers two main layouts: Box View and List View. Layout Toolbar The Layout toolbar is on the top right side of the Quotes Panel. Allows you to add Currency Pairs into the Quotes panel. Allows you to add CFD’s into the Quotes panel. Displays the List View Displays the Box View Enables trading in Confirm mode. Enables trading in 1-Click Trade mode. Quotes panel in the Box view Layout Toolbar
  • 13. Chapter 3: Getting Started Copyright © 2012 Trade Networks. All rights reserved Page 13 Quotes panel in the List View (Confirm Mode) List View in 1-Click Mode Clicking the in the Layout Toolbar, will display all the symbols in a List view. In this view, each symbol appears as a separate row in a grid. The Quotes List displays live dealing rates of each symbol and the time of last modification to the exchange rates. This list also displays the lowest ask price and the highest bid price recorded since the start of the trading day. In addition, the percentage of change which was recorded since the last market close is also displayed in % and in pips.When you choose the 1-Click Mode, an additional column appears in the grid allowing you to indicate your trading amount directly in the grid. You can use the Sell/Buy buttons to open positions. See section 4.2 Opening a Position at the Current Market Price or Placing a Market Order for more information. Quotes panel in the Boxes View (Confirm Mode) Boxes View in 1-Click Mode Clicking the in the Layout Toolbar, will display all the Symbols in a Box view. In this view, each symbol is presented as a separate box that shows live dealing rates of the symbol. When you choose the 1-Click Mode, the Amount list appears allowing you to indicate your trading amount directly in the grid. You can use the Sell/Buy buttons to open positions. See section 4.2 Opening a Position at the Current Market Price or Placing a Market Order for more information.
  • 14. Chapter 3: Getting Started Copyright © 2012 Trade Networks. All rights reserved Page 14 3.3.3My Portfolio Panel You can use the My Portfolio panel to view and modify all your open positions and working orders. The My Portfolio panel contains key information on all your trades including open and closed positions, your current exposure and entry orders, as well as your trading history. There are five tabs in the My Portfolio panel: Open Positions, Closed Positions, Exposure, Entry orders, and Log.  In the Open Positions tab you can view all your open positions, modify and close them.  In the Closed Positions tab you can search and view the details of all your closed positions.  In the Exposure tab you can view your account exposure which is divided by symbols.  In the Entry Orders tab you can view your orders that have not been executed yet and edit them.  In the Log tab you can view all your transactions, as well as search all your positions and orders by date. For more information, see Section 5.5 Managing Your Positions and Working Orders via the My Portfolio Panel.
  • 15. Chapter 3: Getting Started Copyright © 2012 Trade Networks. All rights reserved Page 15 3.3.4Side bar The Sidebar Panel contains 4 sliders: News Feeds, Daily Market Update, Event Calendar and Chart Tools. Event Calendar Chart tools Daily Market Update News Feeds
  • 16. Chapter 3: Getting Started Copyright © 2012 Trade Networks. All rights reserved Page 16 News Feeds Clicking the slider opens the News Deeds slide, which provides you with streaming market updates. To view the complete news story, simply click on the running headline and the News Details window appears. Use the Previous, Next and Close buttons to navigate the window. Daily Market Update Clicking the slider opens the Daily Market Updates slide where you can watch a daily video report that provides you with forex tips.
  • 17. Chapter 3: Getting Started Copyright © 2012 Trade Networks. All rights reserved Page 17 Economic Calendar Clicking the slider opens the Even Calendar slide that provides you with a quick preview of economic events for specific dates, including their evaluated importance. Clicking the Event title will display additional information under the Details tab. Clicking the Chart tab will display the current symbol as a chart, and clicking the History tab will show related history events.
  • 18. Chapter 3: Getting Started Copyright © 2012 Trade Networks. All rights reserved Page 18 NetDania Chart Clicking the slider opens a slide containing the NetDania chart. For more information on how to use chart tools, see section 6 Using NetDania Chart Tools for more information.
  • 19. Chapter 4: Opening New Positions and Placing New Orders Copyright © 2012 Trade Networks. All rights reserved Page 19 4. Opening New Positions and Placing New Orders After you have specified your trading level, you can open positions at the current market price, as well as to enter the market when the price meets certain conditions you have specified. WebPROfit helps you to monitor your entering to the market by allowing you to place the following order types: Market order –place this order when you want to enter into a position immediately, at the best available price at the time. The following example illustrates the placement of Buy Entry Limit order: suppose the EURUSD market price is 1.2600 and you believe that the price will begin to rise after first dropping to 1.2540. In this case, you set your Buy Entry Limit to 1.2540. When the market will reach this rate, the position will automatically open. Buy Entry limit –place this order when you believe that the price will begin to rise after first dropping to a certain level. The order is executed when the ask price is equal to the Buy Entry order. Buy Entry Stop – place this order when you believe that the price will continue to rise after it breaks above a certain level. The order is executed when the ask price is equal to the Buy stop order. Sell Entry limit– place this order when you believe that the price will begin to fall after it reaches a certain level. The order is executed when the bid price is equal to the Sell Entry order. Sell Entry Stop – place this order when you believe that the price will continue to fall after it breaks below a certain level. The order is executed when the bid price is equal to the Sell Stop order.
  • 20. Chapter 4: Opening New Positions and Placing New Orders Copyright © 2012 Trade Networks. All rights reserved Page 20 4.1 Displaying Symbols in the Quotes panel Before opening a position or placing an entry order, you must determine a good time to enter the market. In order to do this, you need to know the real-time dealing rates of the symbols. WebPROfit allows you to view streaming real-time bid and ask prices of all available symbols via the Quotes panel.
  • 21. Chapter 4: Opening New Positions and Placing New Orders Copyright © 2012 Trade Networks. All rights reserved Page 21 To display a symbol in the Quotes panel: 1. In the Quotes toolbar, click Forex or CFD; the Select Symbols window opens a Forex or CRF tab accordingly, containing all symbols available for trading. For example, if you click Forex, the Select Symbols window appears when the Forex tab is selected and the list of all available FX symbols is displayed. Removing a Symbol To remove a single symbol from the Quotes panel you can uncheck the Box/ List View checkboxes. Alternatively, you can select the desired symbol from the right list and then click Remove. To remove all symbols from the Quotes panel, click the Remove All button, and then click Yes to confirm. 2. In the left list find the symbol you want to add by using the scroll bar. Alternatively, you can simply type letters into the Search text box; the list of all symbols containing these letters will be displayed. 3. Double click the symbol you want to add to the Quotes panel or click the checkbox next to all symbols you want to add, and then click Add; The selected Symbol is added to the list on the right side. By default, the Box View and the List View checkboxes are checked, so the symbol appears both as a row in the Quotes list view and as a box in a Quote box view. To change the symbols order, click the symbol in the list on the right side, and use the Up and Down errors to change its place. 4. Click OK to confirm.
  • 22. Chapter 4: Opening New Positions and Placing New Orders Copyright © 2012 Trade Networks. All rights reserved Page 22 4.2 Opening a Position at the Current Market Price or Placing a Market Order WebPROfit enables you to open your positions at the current market prices in two different modes: Confirm mode and 1-Click Trade mode. You can use the Confirm Mode and the 1- Click Trade buttons to switch between the modes. The ability to open positions in 1-Click Trade mode and in the Confirm mode is enabled in both, the List view and the Box view.
  • 23. Chapter 4: Opening New Positions and Placing New Orders Copyright © 2012 Trade Networks. All rights reserved Page 23 4.2.1 Opening a Position in the Confirm Mode To Turn On the Confirm Mode Click the Confirm Mode button The Confirm mode enables you to confirm each position you open before its final execution. In this mode, you can use the Open Position window to place positions at the best available market price. You can display the Open Position window via the Quotes panel, both in the List View and in the Box view. To open a position in Confirm Mode 1. Display the Open Position window by doing one of the following: - In the List view, click the Buy or Sell button in the relevant symbol row. - In the Box view, click the Buy or Sell button in the relevant symbol box. 2. In the Open Position window, in the Amount list, select or type the size of your trade. 3. Click OK to confirm; the position opens and the Info window appears confirming your action. 4. Click OK or to close the Info window. By default, the Limit Type field is set to None. For more information on limiting your position, see Section 4.4 Protecting Your Positions with SL/TP Orders. The Type field is set to Market Order, allowing you to open a position at the current market price. The name of the selected symbol The Ask / Bid button which represents the current direction of your position appears highlighted.
  • 24. Chapter 4: Opening New Positions and Placing New Orders Copyright © 2012 Trade Networks. All rights reserved Page 24 4.2.2Opening a Position in 1-Click Trade Mode To Turn On the 1-Click Trade Mode Click the 1 Click Trade Mode button. When you want to monitor market movement and make trades quickly, you can use the 1- Click Trade mode. The 1-Click Trade mode allows you to open a position without confirmation, in one click. After you define your trading mode as the 1-Click trade mode the Quotes panel is modified as follows:  In the List view, a new Amount column appears.  In the Box view, a new button appears in the right corner of the Buy and Sell buttons, and the amount list is displayed: To open a position in 1-Click mode, follow one of the following methods: Method A In the List view, in a desired symbol row, select or type the size of your trade and click Buy/Sell; the position opens. Method B In the Box view, in a desired symbol box, select or type the size of your trade and click Buy/Sell; the position opens.
  • 25. Chapter 4: Opening New Positions and Placing New Orders Copyright © 2012 Trade Networks. All rights reserved Page 25 4.3 Placing an Entry Order Sometimes, when you wish to enter the market at a specified rate other than the current market price you can place an entry order. To place an entry order, you can use the Open Entry Order window which can be accessed via the Quotes panel. This order will automatically become an open position once the market price will reach the price you have specified in this window. . You can view all your entry orders that haven’t been executed yet in the My Portfolio panel, under the Entry Orders tab. Once the entry order is executed, it is exported to the Open positions tab. The Type field is set to Entry Order allowing you to specified rate other than the current market price in the Order Rate.The execution rate of your entry order which you enter into the Order Rate text box must be in the range indicated below the text box. Use the Good till Cancelled option to specify the expiration date of your entry order. Once the market reaches this value, the entry order will be canceled.
  • 26. Chapter 4: Opening New Positions and Placing New Orders Copyright © 2012 Trade Networks. All rights reserved Page 26 There are several methods to display the Open Entry Order window: Method A In confirm mode In the List view, click the Buy or Sell button in the relevant symbol row; the Open Position window is displayed. In this window, in the Type drop down list, choose Entry Order; the Open Position window is expanded to the Open Entry Order window. Method B In confirm mode In the Box view, click the Buy or Sell button in the relevant symbol box; the Open Position window is displayed. In this window, in the Type drop down list, choose Entry Order; the Open Position window is expanded to the Open Entry Order window. Method C In 1-Click mode In the Box view, click in the relevant symbol box. The Open Entry Order window is displayed. To Place an Entry Order 1. Use one of the methods listed above to display the Open Entry Order window. 2. From the Amount list, select or type the size of your trade. Limiting your Order For more information on limiting your entry order with SL/TP/OCO orders see Section 4.4 Protecting Your Positions with SL/TP Orders as well as Section 4.5 Protecting Your Entry Order with OCO Order. 3. In the Order text box, type the execution rate of your entry order. 4. Specify the expiration date of your entry order by using the Good Till Value option. 5. Click OK; the entry order is placed and the Info window appears to confirm your action. 6. Click OK or to close the Info window.
  • 27. Chapter 4: Opening New Positions and Placing New Orders Copyright © 2012 Trade Networks. All rights reserved Page 27 4.4 Protecting Your Positions with SL/TP Orders Placing SL/TP orders allows you to manage your risk on any open position. You can place the SL/TP for both a Market Order and Entry Order. Stop loss Order (SL) - You can use the Stop Loss order to limit your losses by making your positions automatically close if the price moves in a direction different to what you expected. You can place a stop loss order to close your trade at a specified amount or at a specified rate which is different from the current market price. Take Profit order (TP) - placing a Take Profit order ensures, that your position will be closed if your target price is reached. This helps you manage your risk even when you are not available, or when the price touches the target too quickly for you to react.
  • 28. Chapter 4: Opening New Positions and Placing New Orders Copyright © 2012 Trade Networks. All rights reserved Page 28 To place a Stop Loss / Take Profit order to Market order 1. Choose the Confirmation Mode and display the Open Position window by doing one of the following: - In the List view, click the Buy or Sell button in the relevant symbol row. - In the Box view, click the Buy or Sell button in the relevant symbol box. 2. From the Amount list, select or type the size of your trade. 3. From the Limit Type drop down list, choose SL/ TP; the Open Position window is expanded as follows: 4. Check the Stop Loss and/or Take Profit checkbox; the rate range is displayed. When entering an Amount value, the modified At Rate value must fall inside the range indicated in the Range text box below. 5. Define your SL and/or TP rates by doing one of the following: In the At Rate text box enter your SL/ TP rate; the Amount value is automatically modified to fit the entered rate. Alternatively, in the Amount text box enter the approximate amount which will trigger the SL/ TP order; the At Rate value is automatically modified. 6. In the Limit Expiration section, specify the expiration date of your SL/TP, if desired. 7. Click OK; the SL/TP order is placed and the Info window appears. 8. Click OK or to close the Info window.
  • 29. Chapter 4: Opening New Positions and Placing New Orders Copyright © 2012 Trade Networks. All rights reserved Page 29 To place a Stop Loss / Take Profit order to Entry Order 1. Display the Open Entry Order window by using one of the methods described in Section 4.3 Placing an Entry Order. 2. In the Open Entry Order window, from the Amount list select or type the size of your trade. 3. In the Order text box, type the execution rate of your entry order. 4. In the Entry Expiration section, specify the expiration date of your entry order, if desired. 5. From the Limit Type drop down list choose SL/ TP; the Open Entry Order window is expanded: 6. Check the Stop Loss and/or Take Profit check box; the rate range is displayed. 7. Define your SL/TP rates. For more information, see To place a Stop Loss / Take Profit order to Market order, in Section 4.4 Protecting Your Positions with SL/TP Orders. 8. Click OK; the SL/TP order is placed and the Info window appears. 9. Click OK or to close the Info window.
  • 30. Chapter 4: Opening New Positions and Placing New Orders Copyright © 2012 Trade Networks. All rights reserved Page 30 4.5 Protecting Your Entry Order with OCO Order You can place either an OCO order or SL/TP orders for each entry order. You can use the OCO order to monitor your entry to the market by placing two entry orders simultaneously. If one part of the order is executed, then the other part is automatically canceled.
  • 31. Chapter 4: Opening New Positions and Placing New Orders Copyright © 2012 Trade Networks. All rights reserved Page 31 To place an OCO order 1. Display the Open Entry Order window by using one of the methods described in Section 4.3 Placing an Entry Order. 2. In this window, from the Amount list, select or type the size of your trade. 3. In the Order text box, type the execution rate of your entry order. 4. From the Limit Type drop down list choose OCO; the Open Entry Order window is expanded. 5. In the At Rate text box, enter the rate of your OCO order execution. The entered OCO rate must fall in the range displayed below. 6. Specify the expiration date of your OCO entry order, if desired. 7. Click OK; the OCO order is placed, and the Information window appears. 8. Click OK or to close the Information window.
  • 32. Chapter 5: Managing Existing Positions and Working Orders. Copyright © 2012 Trade Networks. All rights reserved. Page 32 5. Managing Existing Positions and Working Orders After opening a position or placing an entry order, you can still react to dynamic market movements by changing the values of orders you have placed. You can use the My Portfolio panel to view, edit and close all your open positions at any time. You can also protect your trades by changing their amounts and modifying the rates of SL/TP orders you have placed. The My Portfolio panel can also be used for modifying your entry orders. You can update their values such as amount, entry rate and OCO rate, until the entry orders are executed. All entry orders can be canceled as long as they have not reached the execution rate you defined.
  • 33. Chapter 5: Managing Existing Positions and Working Orders. Copyright © 2012 Trade Networks. All rights reserved. Page 33 5.1 Modifying Open Positions You can follow market movement by modifying positions you have already opened. To do this you can use the Position Details window that provides you with several ways to modify open positions. You can:  Place new SL/TP orders.  Change the values of the existing SL/TP orders.  Update the expiration date and time of the placed SL/TP orders.  Remove SL/TP orders.  Close a position. See details about your open position. You can use this section to update the expiration date and time of the SL/TP orders you placed. You can use this section to place new SL/TP orders, or to update and cancel existing ones. You can use this button to close your position at the current rate.
  • 34. Chapter 5: Managing Existing Positions and Working Orders. Copyright © 2012 Trade Networks. All rights reserved. Page 34 To modify an open position 1. In the My Portfolio panel, under the Open Positions tab, double click on the position you want to modify; the Position Details window opens. 2. Modify your open position by doing the following in the Position Details window: - Add new SL/TP orders or change the rates of the existing ones. For more information see To place a Stop Loss / Take Profit order to Market order, paragraph 5 in Section 4.4 Protecting Your Positions with SL/TP Orders. - In the Limits Expiration section, specify the expiration date and time of the SL/TP orders. - Remove your SL/TP orders by simply un-checking the related SL/TP check boxes. - Close your position by clicking the Close At “Rate” button; the Question window is displayed. 3. Click OK; the open position is modified, and the Info window appears, confirming your action. 4. Click OK or to close the Info window.
  • 35. Chapter 5: Managing Existing Positions and Working Orders. Copyright © 2012 Trade Networks. All rights reserved. Page 35 5.2 Modifying Entry Orders Unpredictable market movements can entice you to modify entry orders which haven’t been executed yet. To do this, you can use the Entry Order Details window which provides you with several ways to modify entry orders. You can:  Change the amount of your trade.  Change entry order execution rate.  Specify the entry order expiration date and time.  Place, edit and remove SL/TP or OCO orders.  Cancel an entry order. See details about your open position. You can use this section to change an entry order execution rate and amount. You can use this section to update the expiration date and time of the entry order you placed. You can use this section to place new SL/TP or OCO orders, as well as to update and cancel them. You can use this button to close your position at the current rate.
  • 36. Chapter 5: Managing Existing Positions and Working Orders. Copyright © 2012 Trade Networks. All rights reserved. Page 36 To modify an entry order 1. In the My Portfolio panel, under the Entry Order tab, double click the order you want to modify; the Entry Order Details window opens. 2. Modify your entry order by doing the following in the Entry Order Details window: - Adjust the size of your trade in the Amount list. - Enter a new execution rate into the Order Rate text field. - Under the Entry Expiration section, specify the expiration date and time of your entry order. - Add new SL/TP or OCO orders, or change the rates of the existing ones. - Remove your SL/TP or OCO orders by simply unchecking the related SL/TP check boxes. - Remove your entry order by clicking the Remove Order button; the Question window is displayed. 3. Click OK; the entry order is modified, and the Info window appears confirming your action. 4. Click OK or to close the Info window.
  • 37. Chapter 5: Managing Existing Positions and Working Orders. Copyright © 2012 Trade Networks. All rights reserved. Page 37 5.3 Closing Positions WebPROfit provides you with several ways to close your positions. You can close positions one by one, or several positions at once. You can also close all your positions in one action. To close a single position Method A 1. In the My Portfolio panel, under the Open Positions tab, double click on the position you want to modify. Alternatively, you can select the desired position and click the “Details” button: the Position Details window opens. 2. In this window, click the Close at “rate” button; the Confirm window is displayed. 3. Click OK; the selected position is closed and the Info window appears confirming your action. 4. Click OK or to close the Info window. Method B 1. In the My Portfolio panel, under the Open Positions tab, scroll to the end of the grid on the right. 2. Click “Close Position” in the row which represents details regarding the position you want to close; the Confirm window is displayed. 3. Follow steps 2-4 in Method A.
  • 38. Chapter 5: Managing Existing Positions and Working Orders. Copyright © 2012 Trade Networks. All rights reserved. Page 38 To close several positions 1. In the My Portfolio panel, under the Open Positions tab, select the checkboxes next to all positions you want to close. 2. Click the Close Position button; the Confirm window is displayed. 3. Click OK; the selected position is closed and the Info window appears confirming your action. 4. Click OK or to close the Info window. To close all your open positions at once 1. In the My Portfolio panel, under the Open Positions tab, select the check box, as displayed: 2. Follow steps 2-4 in the To close several positions instructions.
  • 39. Chapter 5: Managing Existing Positions and Working Orders. Copyright © 2012 Trade Networks. All rights reserved. Page 39 5.4 Removing Entry Orders WebPROfit provides you with several ways to remove your Entry Orders that haven’t been executed yet. You can remove them one by one or several at once. You can also close all your entry orders in one action. To remove a single Entry Order Method A 1. In the My Portfolio panel, under the Entry Orders tab, double click on the order you want to modify. Alternatively, you can select the desired position and click the “Details” button: the Entry Order Details window opens. 2. In this window, click the “Remove Order” button; the Confirm window is displayed. 3. Click OK; the selected entry order is removed and the Info window appears confirming your action. 4. Click OK or to close the Info window. Method B 1. In the My Portfolio panel, under the Entry Orders tab, scroll to the end of the grid on the right. 2. Click “Remove Order” in the row which represents details regarding the entry order you want to close; the Confirm window is displayed. 3. Follow steps 2-4 in the in Method A.
  • 40. Chapter 5: Managing Existing Positions and Working Orders. Copyright © 2012 Trade Networks. All rights reserved. Page 40 To remove several entry orders 1. In My Portfolio panel, under the Entry Order tab, select the checkboxes next to all entry orders you want to remove. 2. Click the Remove Order button; the Confirm window is displayed. 3. Click OK; the selected order is removed and the Info window appears confirming your action. 4. Click OK or to close the Info window. To remove all your entry orders at once 1. In the My Portfolio panel, under the Entry Orders tab, select the main check box, as displayed: 2. Follow steps 2-4 in the To remove several entry orders instructions appeared above.
  • 41. Chapter 5: Managing Existing Positions and Working Orders. Copyright © 2012 Trade Networks. All rights reserved. Page 41 5.5 Managing Your Positions and Working Orders via the My Portfolio Panel The My Portfolio panel provides you with detailed information regarding all your existing and closed trades. This enables you to easily and effectively manage multiple positions and entry orders which haven’t been executed yet. In addition, you can use the My Portfolio panel to access the Position Details and Entry Orders Details windows, which allow you to modify all your positions and orders.
  • 42. Chapter 5: Managing Existing Positions and Working Orders. Copyright © 2012 Trade Networks. All rights reserved. Page 42 5.5.1 Managing Your Open Positions Clicking the Open Positions tab in the My Portfolio panel will display all your open positions, including executed entry orders. Under this tab you can see the rate of each symbol at the time the position was opened, the symbol’s ID, the size of your trade, the direction of your trade (buy/sell), the current market rate and the SL/TP rates. You can also view the open P&L which is calculated according to the updates of the exchange rates. To view more detailed information on your open positions, double click the symbol row or left click the symbol row and then click Details. The Position Details window appears. You can also use this window to modify your open positions and limit orders. For more information, see Section 5.1 Modifying Open Positions.
  • 43. Chapter 5: Managing Existing Positions and Working Orders. Copyright © 2012 Trade Networks. All rights reserved. Page 43 5.5.2Viewing Your Closed Positions You can search your closed positions by their opening and closing dates in the Closed Positions tab. To view the details of your closed positions 1. In the My Portfolio panel, under the Closed Positions tab, limit your search by selecting the position’s Open Date or Close Date option from the provided dropdown list. 2. Specify the date and time range of the period for which you want to view the details. 3. Click Show; the selected symbols are displayed in the grid. You can view more detailed information on your closed positions via the Position Details window. To open a Position Details window, double click a position or left click the symbol and then click Details. The Position Details window is displayed.
  • 44. Chapter 5: Managing Existing Positions and Working Orders. Copyright © 2012 Trade Networks. All rights reserved. Page 44 5.5.3Managing the Exposure of Your Trades PROfit calculates Net value as long positions minus short positions. Under the Exposure tab you can see the number of all positions currently open for a particular symbol, the total size of your trades for the same symbol (Net Value), the Open P&L, and the average rate of all open positions for this symbol. WebPROfit enables you to manage your exposure by specifying the exact positions to be closed for a selected symbol. You can close Only Sell symbol positions, Only Buy symbol positions or All symbol positions. To close several positions of the same symbol 1. In the My Portfolio panel, under the Exposure tab, double click on the desired symbol row. Alternatively, select a desired symbol and click the Close Symbol Positions button; the Close Symbol Positions window is displayed. . . 2. Define which symbol positions to close by clicking the matching radio button. 3. Click OK; the Confirm window is displayed. 4. Click OK; the selected symbol positions are closed and the Info window appears confirming your action. 5. Click OK or to close the Info window. The amount that will be sold / bought by closing this position is indicated next to each option.
  • 45. Chapter 5: Managing Existing Positions and Working Orders. Copyright © 2012 Trade Networks. All rights reserved. Page 45 5.5.4Managing Your Entry Orders Clicking the Entry Order tab will display a grid with all your entry orders that haven’t been executed yet. The Entry Order tab displays the order’s execution rate, its ID and the SL, TP and OCO rates. To view more detailed information on your entry orders, double click the symbol row or left click the selected symbol and then click Details. The Entry Order Details window appears. You can also use the Entry Order Details window to modify your entry and limit orders. See Section 5.2 Modifying Entry Orders for more information. To remove an entry order, see Section 5.4 Removing Entry Orders for more information.
  • 46. Chapter 5: Managing Existing Positions and Working Orders. Copyright © 2012 Trade Networks. All rights reserved. Page 46 5.5.5Viewing Your Trading History The Log panel enables you to view your account history. This information can help you to evaluate the effectiveness of your trading strategy for a specified period of time. The Account history is a detailed database containing information on all the trading operations you have performed which can be presented based on the time range you specify. To view the Account History 1. In the Log panel, specify the date and time range of the period for which you want to view your account history. 2. Click “Search”.
  • 47. Chapter 6: Using the Charts Tools Copyright © 2012 Trade Networks. All rights reserved. Page 47 6. Using NetDania Chart Tools You can easily display all your desired symbols as chart lines in the NetDania Finance Chart. This can help you to better analyze the market movements and to predict where the market will go with greater accuracy. To display the NetDania Chart To learn using NetDania Finance Chart tools, click the Help menu in the Chart’s menu bar and choose the User Guide option. 1. In the sidebar, click the slider; the NetDania chart is displayed. 2. From the Chart toolbar, choose the icon. The Chart opens in a different window. This will allow you to simultaneously use both, the WebPROfit trading tools and the NetDania Chart tools. 3. Click to close the slider. The NetDania Chart window will remain open.