Water timers maintenance
•
0 likes•938 views

Maintain your Claber Timers www.royceirrigation.co.uk

Recommended
Recommended
More Related Content
What's hot
What's hot (20)
Similar to Water timers maintenance
Similar to Water timers maintenance (20)
More from Tim Royce
More from Tim Royce (15)
Recently uploaded
Recently uploaded (14)
Water timers maintenance
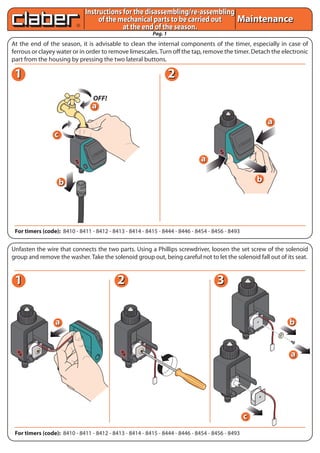
- 1. Pag. 1 MaintenanceMaintenance At the end of the season, it is advisable to clean the internal components of the timer, especially in case of ferrous or clayey water or in order to remove limescales.Turn off the tap, remove the timer. Detach the electronic part from the housing by pressing the two lateral buttons. Unfasten the wire that connects the two parts. Using a Phillips screwdriver, loosen the set screw of the solenoid group and remove the washer. Take the solenoid group out, being careful not to let the solenoid fall out of its seat. For timers (code): 8410 - 8411 - 8412 - 8413 - 8414 - 8415 - 8444 - 8446 - 8454 - 8456 - 8493 For timers (code): 8410 - 8411 - 8412 - 8413 - 8414 - 8415 - 8444 - 8446 - 8454 - 8456 - 8493 Instructions for the disassembling/re-assembling of the mechanical parts to be carried out at the end of the season. Instructions for the disassembling/re-assembling of the mechanical parts to be carried out at the end of the season. OFF! aa RESET CA NC EL aa bb bb bb cc aa aa cc aa VALVOLA BATTERYRAIN SENSOR 11 22 11 22 33
- 2. Pag. 2 Using a torx 10 screwdriver, loosen the four screws of the metal clamp where the magnet is fixed.Take the clamp and the magnet out. Pull then the other components out: bushing, piston with spring, valve. Use only water to clean the components. For resistant scaling, keep the bushing, the piston with the spring and the valve immer- sed in a solution of water and vinegar for 48 hours. Do not use solvents or other substances. Check that the hole of the valve is not obstructed. Check that the seat of the components is free from dirt and scale; in case clean them with a cloth. Should the compo- nents be extremely damaged or still dirty after having been cleaned, it is necessary to request the spare parts to Claber S.p.A. For timers (code): 8410 - 8411 - 8412 - 8413 - 8414 - 8415 - 8444 - 8446 - 8454 - 8456 - 8493 For timers (code): 8410 - 8411 - 8412 - 8413 - 8414 - 8415 - 8444 - 8446 - 8454 - 8456 - 8493 MaintenanceMaintenance Instructions for the disassembling/re-assembling of the mechanical parts to be carried out at the end of the season. Instructions for the disassembling/re-assembling of the mechanical parts to be carried out at the end of the season. 11 22 33 11 22 33 aa aa bb bb cc 48 h Rust Persistent dirt
- 3. Pag. 3 Re-assembling: fit the membrane in its seat, place the piston with the spring in the bushing and fit the bushing back. Place the metal clamp with the magnet back, being careful that the face of the magnet outwards should be the white one. Using a torx 10 screwdriver, drive in the 4 screws (turn them a quarter backwards first, in order to catch the thread). Fit back the clamp with the solenoid. Warning: for Aquauno timers, the solenoid wire must be turned towards the inside, whilst for Aquauno Plus and Duplo timers towards the outside. Fix the clamp with the solenoid by tightening the cross-recessed screw, interposing the washer. For timers (code): 8410 - 8411 - 8412 - 8413 - 8414 - 8415 - 8444 - 8446 - 8454 - 8456 - 8493 For timers (code): 8410 - 8411 - 8412 - 8413 - 8414 - 8415 - 8444 - 8446 - 8454 - 8456 - 8493 MaintenanceMaintenance Instructions for the disassembling/re-assembling of the mechanical parts to be carried out at the end of the season. Instructions for the disassembling/re-assembling of the mechanical parts to be carried out at the end of the season. 11 22 33 11 22 aa aa bb bb cc OK! NO! For Aquauno Plus and Duplo timers (code): 8410 - 8411 - 8412 - 8413 - 8414 - 8415 For Aquauno timers (code): 8444 - 8446 - 8454 - 8456 - 8493 bb aa
- 4. Pag. 4 Connect the solenoid wire to the electronic component. Join the two parts of the timer. At the end of the season, store the timer in a dry place, where the temperature does not fall below 0°C. For timers (code): 8410 - 8411 - 8412 - 8413 - 8414 - 8415 - 8444 - 8446 - 8454 - 8456 - 8493 MaintenanceMaintenance Instructions for the disassembling/re-assembling of the mechanical parts to be carried out at the end of the season. Instructions for the disassembling/re-assembling of the mechanical parts to be carried out at the end of the season. 11 22 33 aa VALVOLA BATTERYRAIN SENSOR RESET CA NC EL STARTSTOP RESETCANCEL