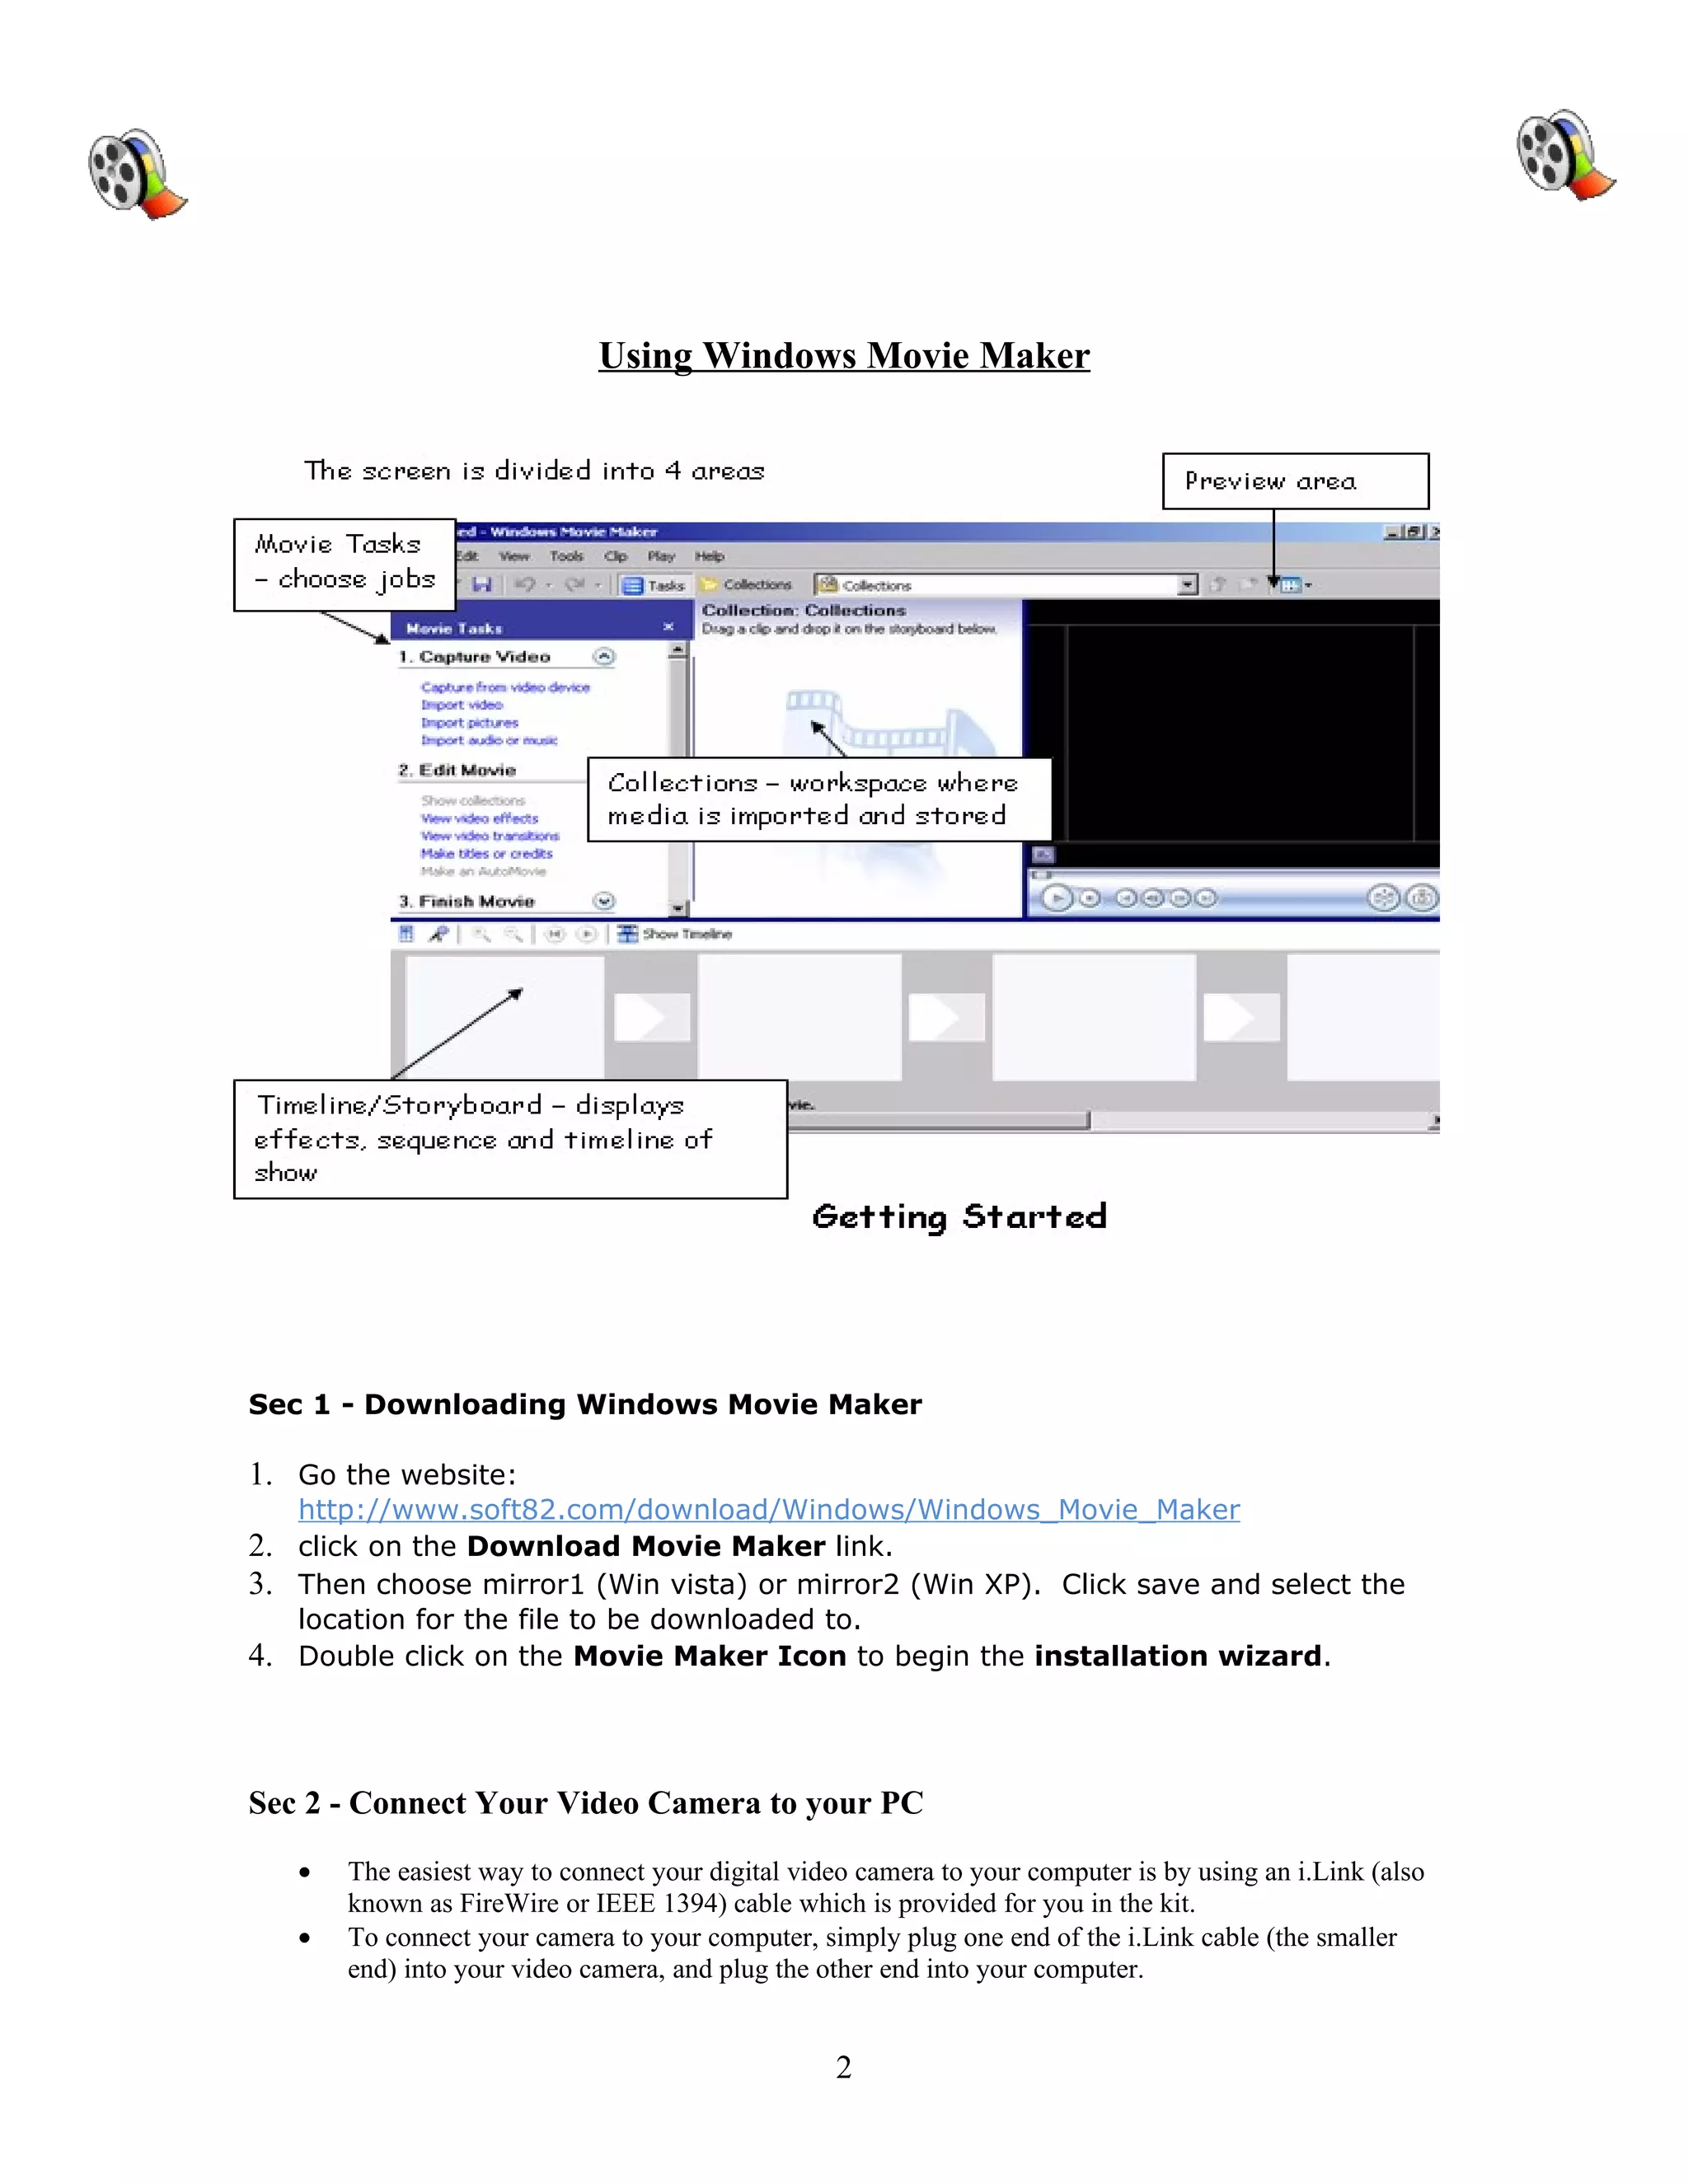
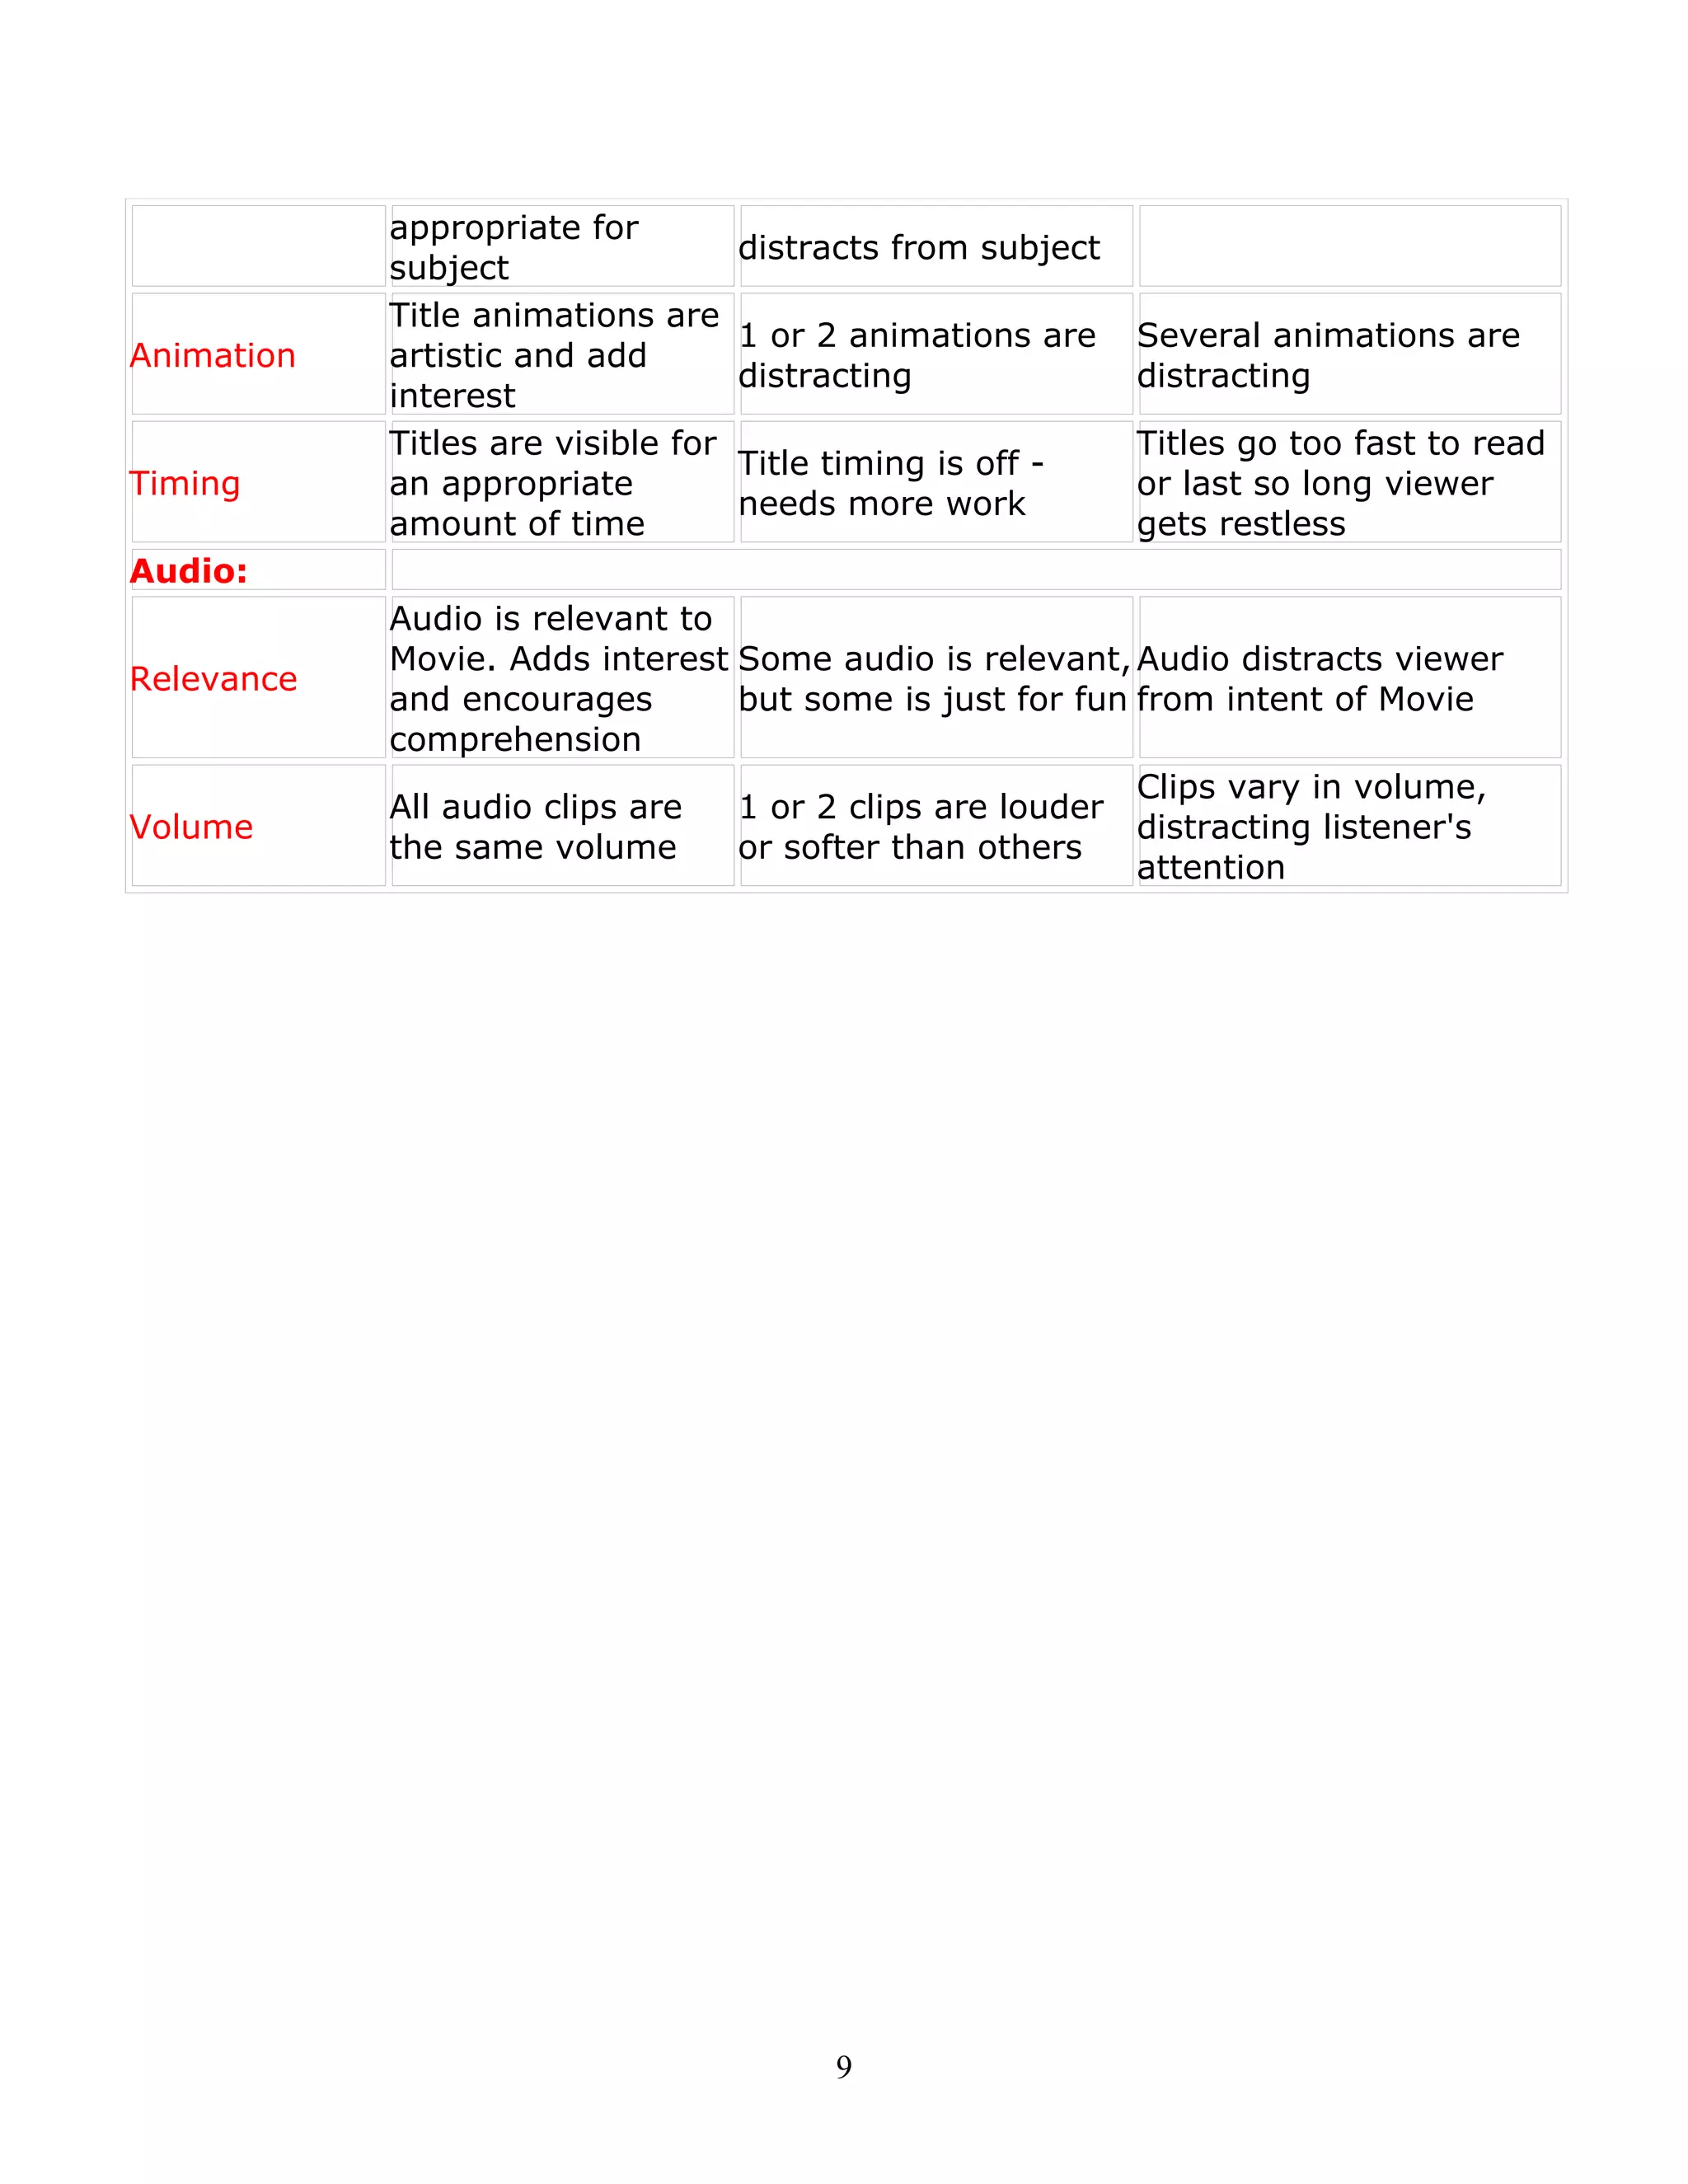
Table of Contents


Sec 1 - Steps for Downloading Windows Movie Maker 2......................................2

Sec 2 - Connect Your Video Camera to your PC..................................................2

Sec 3 - Importing images, audio and video.......................................................3

Sec 4 - Editing your Movie...............................................................................3

Sec 5 - Saving Movie Maker Show....................................................................5
Using Windows Movie Maker


Sec 1 - Downloading Windows Movie Maker

1. Go the website:
     http://www.soft82.com/download/Windows/Windows_Movie_Maker
2.   click on the Download Movie Maker link.
3.   Then choose mirror1 (Win vista) or mirror2 (Win XP). Click save and select the
     location for the file to be downloaded to.
4.   Double click on the Movie Maker Icon to begin the installation wizard.


Sec 2 - Connect Your Video Camera to your PC

     •   The easiest way to connect your digital video camera to your computer is by using an i.Link (also
         known as FireWire or IEEE 1394) cable which is provided for you in the kit.
     •   To connect your camera to your computer, simply plug one end of the i.Link cable (the smaller
         end) into your video camera, and plug the other end into your computer.


                                                    2
Download video from your camera to your computer

    •   Turn your camera on, and set it to playback mode. When prompted, click Capture Video using
        Windows Movie Maker. Then click OK.
    •   Microsoft Windows Movie Maker starts the Video Capture Wizard. On the Capture Video File
        page, type a name for your video. Then click Next.
    •   On the Video Setting page, accept the default settings by clicking Next. The default setting should
        read: “Best quality for playback on my computer (recommended)”
    •   On the Capture Method page, click Next. (It's easiest to capture the entire tape at once; if
        sections remain that you don't need, you can delete them later.)
    •   The Video Capture Wizard rewinds your tape and then begins capturing it. While the tape is being
        captured, you'll see it playing in the Preview window and you'll be able to hear the audio through
        your speakers. After the tape is captured which takes about an hour, the wizard will stop
        automatically. Note: It always scans the entire tape, even if you have just recorded a few minutes
        of video. If you reach the end of your recording before it reaches the end of your tape, click the
        Stop Capture button, and then click Yes.
    •   Movie Maker automatically breaks your movie into clips and adds the clips to a video collection
        with the name you provided.
    •   Now you're ready to edit your movie!

Sec 3 - Importing
All audio, video and photo clips are imported the same way.
Click on import video, picture or audio and select files to add to your show.
(Ctrl A selects all files in a folder.)
Repeat until all video, audio and photos are imported to the Collection area.
Click and drag media (audio, video, photo) into the correct Timeline sections of the
screen. Drag objects to arrange order if needed.
   -Saving a PowerPoint slide as a .jpg file
   1. Create a PointPoint slide.
   2. Save as a regular presentation first to keep the native file. Click on File,
      Save, give a File Name, click on Ok.
   3. Save as a .jpg, by clicking on File, Save As, under the filename section is an
      area called “Type”, click on the down arrow and click on .jpg.
   4. Click on Current Slide for one slide to be export or click on all slides for the
      entire presentation to be exported into separate slides. Note: when choosing
      the save all the slides PowerPoint will create a folder with all the slides inside.


Sec 4 - Editing your Movie
How to add transitions

    •   In the Movie Tasks pane, under Edit Movie, click View video transitions.
    •   Preview transitions by double-clicking them and watching the Preview Monitor. Once you've
        found a transition you like, drag it from the Video Transitions pane, under Edit Movie pane to
        the box between two of your clips. This inserts the transition between the two clips.
    •   In the Preview Monitor, click the Video Transitions pane, under Play button to watch your
        transition in action. If you don't like it, just return to the previous step to replace it with a different
        transition. Note: If you decide not to use any transition, right-click it on the storyboard, and click
        Delete.


                                                        3
DID YOU KNOW?
Transitions cause your video clips to overlap by about one second, which means you won't see all of the
first or last second of your clip. So, when you're filming, it's good to start the camera a few seconds before
the action starts, and to keep filming for a couple of seconds afterward so that you have time to transition
between scenes. This also helps you get a steadier shot.

How to add special effects

    •    In the Movie Tasks pane, under Edit Movie click View video effects.
    •    Preview effects by double-clicking them and watching the Preview Monitor. Once you’ve found
         an effect you like, drag it from the Video Effects pane to one of your clips. This adds the effect to
         the clip, which you can see by looking at the star in the lower-left corner of the clip.
    •    In the Preview Monitor, click the Play button to watch your effect in action.
    •    If you don't like the effect, right-click the star icon in the lower-left corner of the clip, and click
         Delete Effects.

DID YOU KNOW?
You can add more than one effect to a clip. For example, if you want to both brighten a clip and add a
zoom effect, you can add Ease In and Brightness, Increase. You can also add a single effect multiple
times to increase the effect. For example, add multiple Brightness, Increase effects to brighten a scene
even more, or add two Speed Up Double effects to quadruple the speed of a clip.


                   Video Effects                                            Video Transitions


How to add titles and credits

    •    If you want to add a title before, after, or on top of a clip, click the clip on the storyboard or
         timeline.
    •    In the Movie Tasks pane, under Edit Movie, click Make titles or credits.
    •    Choose the type of title you want to add.
    •    Click Change the title animation. Notice that you can choose between one-line titles, two-line
         titles, and credits, which can be many lines. Note: You can use credits any time you need to
         display more than two lines of text, not just at the end of your video.
    •    On the Choose the Title Animation page, browse through the different animations and watch
         them in the Preview Monitor to get an idea of what they'll look like. When you find the animation
         you want to use, click Change the text font and color.
    •    On the Select Title Font and Color page, choose the color and font you want to use. If you're
         adding the title over a clip, use a dark font color for bright scenes and a light font color for dark
         scenes. Then click Edit the title text.
    •    On the Enter Text for Title page, enter your text. Then click Done to add the title to your movie.
    •    If you are prompted to switch to the timeline view, click OK.
    •    In the Preview Monitor, click the Play button to see how your title will look in your video.

                                                       4
•   If you want to change your title (for example, to change the color of the text to make it more
        readable), right-click the title on the Title Overlay row of the timeline, and then click Edit Title
        on the shortcut menu.

DID YOU KNOW?
You can add titles any time you want the viewer to know what you're showing or who someone on the
screen is.

How to add music

    •   In the Movie Tasks pane in Movie Maker, under Capture Video, click Import audio or music.
    •   In the Import File dialog box, click the name of the song you want to use in the background. Then
        click Import. Note: This adds your song to your collection but does not add it to your video.
    •   Drag the song from the collection to the video clip where you want the music to start playing.
    •   If prompted, click OK.
    •   Movie Maker shows your song on the timeline. If the song extends beyond the end of the movie,
        drag the right edge of the song so that it ends at the same time as your movie
    •   Click Play in the Preview Monitor to watch your movie and listen to the background music.
    •   If the background music is too loud or too soft in comparison to the movie, right-click the music
        on your timeline, and then click Volume. If the audio and music sound good, you can skip the
        next step.
    •   In the Audio Clip Volume dialog box, move the slider to the left to make the music quieter, or to
        the right to make it louder. Then click OK. Click Play in the Preview Monitor to listen to the
        audio again and make another adjustment if necessary.

      - Recording using the Sound Recorder
    1. Click on Start, Programs, Accessories, Entertainment, Sound Recorder.
    2. When ready click on the Play button. When finished recording click on the
        Stop button.
    3. Click Play to be sure it plays back correctly.
    4. Click on File, Save As, type the filename. WinXP automatically saves it in
        wav format.


    Sec 5 - Saving Movie Maker Show
    There are two types of saving….
    a) While working on the Movie Maker 2 show save your work regularly using File Save As
    and select Save Project. The show will be saved and will load properly as long as all of the
    media files are also saved on that computer. Movie Maker 2 does not imbed the media clips
    into your show at this point. This file can be re-opened and edited in Movie Maker 2. The
    extension of this file will be .MSWMM

                                                     5
b) Saving a completed show. Click on File, Save Movie File, and follow the Save Movie
    Wizard instructions. Choose Best Quality for playback on my computer. This file cannot be
    re-opened or edited. It will play on all computers with MS Windows. It does not need Movie
    Maker 2. The extension of this file will be .WMV


    Congratulations! You have just made a movie using Windows Movie Maker!

    Source: http://www.microsoft.com/windowsxp/using/moviemaker/getstarted/default.mspx


For more support , visit these sites to see the tips in video:
http://video.google.com/videosearch?
hl=ar&q=youtube+movie+maker&revid=2042909672&resnum=0&um=1&ie=UTF-8&ei=Jv8ZS_bZCc2SlAfdq9HyCQ&sa=X&oi=v
ideo_result_group&ct=title&resnum=1&ved=0CA4QqwQwAA#hl=ar&q=youtube+movie+maker&revid=2042909672&resnum=0&u
m=1&ie=UTF-8&ei=Jv8ZS_bZCc2SlAfdq9HyCQ&sa=X&oi=video_result_group&ct=title&ved=0CA4QqwQwAA&qvid=youtube+
movie+maker&vid=-6277667913208906368


                                                    6
Objectives:

    •   The students will be able to download Windows Movie Maker.
    •   SWBAT Connect Video Camera to PC.
    •   SWBAT import images, audio and video.
    •   SWBAT edit Movie by using movie maker.
    •   SWBAT save Movie Maker Show.

Students will be able to:

    •   Recognize the value of multimedia in instruction
    •   Design a Movie Maker movie to augment a lesson
    •   Capture pictures, video, and audio from the internet
    •   Apply copyright laws to media taken from internet
    •   Import video, pictures, and audio into Movie Maker
    •   Arrange media appropriately on a timeline
    •   Add effects and transitions
    •   Add titles and credits
    •   Save a movie on a computers


    Activities:


Sec 1 - Steps for Downloading Windows Movie Maker 2......................................2

Download Movie Maker from one of those links:
www.microsoft.com › ... › Software Updates
www.almeethaq.net/tag/download+movie+maker.htm
download.cnet.com/...Movie-Maker.../3000-13631_4-10165075.html


Sec 2 - Connect Your Video Camera to your PC..................................................2
Shoot with your camera photographs about:
       1- Animals.
       2- The nature.
       3- Foods.
       4- Technology.
And import these photos to the movie maker.

Sec 3 - Importing images, audio and video.......................................................2
Depending on the subject that you chose in section 2 bring related images, audio
and video from your computer or internet to your movie.


                                                7
Sec 4 - Editing your Movie...............................................................................4
          Add title, music including recording your voice, effect and transition .


          Sec 5 - Saving Movie Maker Show....................................................................4
          Save your movie and send it to your teacher E-mail.

          Evaluation and revision:
          The teacher will assess your movie depending on this sheet:


                               Movie Maker Rubric
                                     5                                 3                                     1
Graphics:
                      All graphics are
                                                      1 or 2 graphics are
Appearance            clear and                                                           Several blurry graphics
                                                      somewhat blurry
                      unpixelated
                      All graphics are                1 or 2 graphics are                 Several graphics do not
Relevance
                      relevant to topic               somewhat irrelevant                 belong
                      Graphics appear
                                                      1 or 2 graphics                     Several graphics
                      long enough to
Timing                                                disappear too soon or               disappear too soon or
                      make their point,
                                                      remain for too long                 remain for too long
                      but not too long
Effects:
                      All effects enhance
                                          1 or 2 effects distract
                      pictures and                                                        Several effects are
Appropriate                               viewer from intent of
                      augment the flow of                                                 distracting
                                          movie
                      the movie
Transitions:
                      All transitions
                                                      1 or 2 transitions
                      enhance pictures                                                    Several transitions are
Appropriate                                           distract viewer from
                      and augment the                                                     distracting
                                                      intent of movie
                      flow of the movie
                      Transitions last an             1 or 2 transitions go   Several transitions go
Timing                appropriate amount              too quickly or drag out too quickly or drag out
                      of time                         too long                too long
Titles:
                      Good contrast
                      between text and    1 or 2 titles have poor Several titles have poor
Contrast
                      background; easy to contrast                contrast
                      see
Font choice           Readable font;      Font hard to read;      Font unreadable

                                                               8
appropriate for
                                     distracts from subject
            subject
            Title animations are
                                     1 or 2 animations are    Several animations are
Animation   artistic and add
                                     distracting              distracting
            interest
            Titles are visible for                            Titles go too fast to read
                                     Title timing is off -
Timing      an appropriate                                    or last so long viewer
                                     needs more work
            amount of time                                    gets restless
Audio:
            Audio is relevant to
            Movie. Adds interest Some audio is relevant, Audio distracts viewer
Relevance
            and encourages       but some is just for fun from intent of Movie
            comprehension
                                                          Clips vary in volume,
            All audio clips are  1 or 2 clips are louder
Volume                                                    distracting listener's
            the same volume      or softer than others
                                                          attention


                                           9

Using Windows Movie Maker

  • 1.
    Table of Contents Sec1 - Steps for Downloading Windows Movie Maker 2......................................2 Sec 2 - Connect Your Video Camera to your PC..................................................2 Sec 3 - Importing images, audio and video.......................................................3 Sec 4 - Editing your Movie...............................................................................3 Sec 5 - Saving Movie Maker Show....................................................................5
  • 2.
    Using Windows MovieMaker Sec 1 - Downloading Windows Movie Maker 1. Go the website: http://www.soft82.com/download/Windows/Windows_Movie_Maker 2. click on the Download Movie Maker link. 3. Then choose mirror1 (Win vista) or mirror2 (Win XP). Click save and select the location for the file to be downloaded to. 4. Double click on the Movie Maker Icon to begin the installation wizard. Sec 2 - Connect Your Video Camera to your PC • The easiest way to connect your digital video camera to your computer is by using an i.Link (also known as FireWire or IEEE 1394) cable which is provided for you in the kit. • To connect your camera to your computer, simply plug one end of the i.Link cable (the smaller end) into your video camera, and plug the other end into your computer. 2
  • 3.
    Download video fromyour camera to your computer • Turn your camera on, and set it to playback mode. When prompted, click Capture Video using Windows Movie Maker. Then click OK. • Microsoft Windows Movie Maker starts the Video Capture Wizard. On the Capture Video File page, type a name for your video. Then click Next. • On the Video Setting page, accept the default settings by clicking Next. The default setting should read: “Best quality for playback on my computer (recommended)” • On the Capture Method page, click Next. (It's easiest to capture the entire tape at once; if sections remain that you don't need, you can delete them later.) • The Video Capture Wizard rewinds your tape and then begins capturing it. While the tape is being captured, you'll see it playing in the Preview window and you'll be able to hear the audio through your speakers. After the tape is captured which takes about an hour, the wizard will stop automatically. Note: It always scans the entire tape, even if you have just recorded a few minutes of video. If you reach the end of your recording before it reaches the end of your tape, click the Stop Capture button, and then click Yes. • Movie Maker automatically breaks your movie into clips and adds the clips to a video collection with the name you provided. • Now you're ready to edit your movie! Sec 3 - Importing All audio, video and photo clips are imported the same way. Click on import video, picture or audio and select files to add to your show. (Ctrl A selects all files in a folder.) Repeat until all video, audio and photos are imported to the Collection area. Click and drag media (audio, video, photo) into the correct Timeline sections of the screen. Drag objects to arrange order if needed. -Saving a PowerPoint slide as a .jpg file 1. Create a PointPoint slide. 2. Save as a regular presentation first to keep the native file. Click on File, Save, give a File Name, click on Ok. 3. Save as a .jpg, by clicking on File, Save As, under the filename section is an area called “Type”, click on the down arrow and click on .jpg. 4. Click on Current Slide for one slide to be export or click on all slides for the entire presentation to be exported into separate slides. Note: when choosing the save all the slides PowerPoint will create a folder with all the slides inside. Sec 4 - Editing your Movie How to add transitions • In the Movie Tasks pane, under Edit Movie, click View video transitions. • Preview transitions by double-clicking them and watching the Preview Monitor. Once you've found a transition you like, drag it from the Video Transitions pane, under Edit Movie pane to the box between two of your clips. This inserts the transition between the two clips. • In the Preview Monitor, click the Video Transitions pane, under Play button to watch your transition in action. If you don't like it, just return to the previous step to replace it with a different transition. Note: If you decide not to use any transition, right-click it on the storyboard, and click Delete. 3
  • 4.
    DID YOU KNOW? Transitionscause your video clips to overlap by about one second, which means you won't see all of the first or last second of your clip. So, when you're filming, it's good to start the camera a few seconds before the action starts, and to keep filming for a couple of seconds afterward so that you have time to transition between scenes. This also helps you get a steadier shot. How to add special effects • In the Movie Tasks pane, under Edit Movie click View video effects. • Preview effects by double-clicking them and watching the Preview Monitor. Once you’ve found an effect you like, drag it from the Video Effects pane to one of your clips. This adds the effect to the clip, which you can see by looking at the star in the lower-left corner of the clip. • In the Preview Monitor, click the Play button to watch your effect in action. • If you don't like the effect, right-click the star icon in the lower-left corner of the clip, and click Delete Effects. DID YOU KNOW? You can add more than one effect to a clip. For example, if you want to both brighten a clip and add a zoom effect, you can add Ease In and Brightness, Increase. You can also add a single effect multiple times to increase the effect. For example, add multiple Brightness, Increase effects to brighten a scene even more, or add two Speed Up Double effects to quadruple the speed of a clip. Video Effects Video Transitions How to add titles and credits • If you want to add a title before, after, or on top of a clip, click the clip on the storyboard or timeline. • In the Movie Tasks pane, under Edit Movie, click Make titles or credits. • Choose the type of title you want to add. • Click Change the title animation. Notice that you can choose between one-line titles, two-line titles, and credits, which can be many lines. Note: You can use credits any time you need to display more than two lines of text, not just at the end of your video. • On the Choose the Title Animation page, browse through the different animations and watch them in the Preview Monitor to get an idea of what they'll look like. When you find the animation you want to use, click Change the text font and color. • On the Select Title Font and Color page, choose the color and font you want to use. If you're adding the title over a clip, use a dark font color for bright scenes and a light font color for dark scenes. Then click Edit the title text. • On the Enter Text for Title page, enter your text. Then click Done to add the title to your movie. • If you are prompted to switch to the timeline view, click OK. • In the Preview Monitor, click the Play button to see how your title will look in your video. 4
  • 5.
    If you want to change your title (for example, to change the color of the text to make it more readable), right-click the title on the Title Overlay row of the timeline, and then click Edit Title on the shortcut menu. DID YOU KNOW? You can add titles any time you want the viewer to know what you're showing or who someone on the screen is. How to add music • In the Movie Tasks pane in Movie Maker, under Capture Video, click Import audio or music. • In the Import File dialog box, click the name of the song you want to use in the background. Then click Import. Note: This adds your song to your collection but does not add it to your video. • Drag the song from the collection to the video clip where you want the music to start playing. • If prompted, click OK. • Movie Maker shows your song on the timeline. If the song extends beyond the end of the movie, drag the right edge of the song so that it ends at the same time as your movie • Click Play in the Preview Monitor to watch your movie and listen to the background music. • If the background music is too loud or too soft in comparison to the movie, right-click the music on your timeline, and then click Volume. If the audio and music sound good, you can skip the next step. • In the Audio Clip Volume dialog box, move the slider to the left to make the music quieter, or to the right to make it louder. Then click OK. Click Play in the Preview Monitor to listen to the audio again and make another adjustment if necessary. - Recording using the Sound Recorder 1. Click on Start, Programs, Accessories, Entertainment, Sound Recorder. 2. When ready click on the Play button. When finished recording click on the Stop button. 3. Click Play to be sure it plays back correctly. 4. Click on File, Save As, type the filename. WinXP automatically saves it in wav format. Sec 5 - Saving Movie Maker Show There are two types of saving…. a) While working on the Movie Maker 2 show save your work regularly using File Save As and select Save Project. The show will be saved and will load properly as long as all of the media files are also saved on that computer. Movie Maker 2 does not imbed the media clips into your show at this point. This file can be re-opened and edited in Movie Maker 2. The extension of this file will be .MSWMM 5
  • 6.
    b) Saving acompleted show. Click on File, Save Movie File, and follow the Save Movie Wizard instructions. Choose Best Quality for playback on my computer. This file cannot be re-opened or edited. It will play on all computers with MS Windows. It does not need Movie Maker 2. The extension of this file will be .WMV Congratulations! You have just made a movie using Windows Movie Maker! Source: http://www.microsoft.com/windowsxp/using/moviemaker/getstarted/default.mspx For more support , visit these sites to see the tips in video: http://video.google.com/videosearch? hl=ar&q=youtube+movie+maker&revid=2042909672&resnum=0&um=1&ie=UTF-8&ei=Jv8ZS_bZCc2SlAfdq9HyCQ&sa=X&oi=v ideo_result_group&ct=title&resnum=1&ved=0CA4QqwQwAA#hl=ar&q=youtube+movie+maker&revid=2042909672&resnum=0&u m=1&ie=UTF-8&ei=Jv8ZS_bZCc2SlAfdq9HyCQ&sa=X&oi=video_result_group&ct=title&ved=0CA4QqwQwAA&qvid=youtube+ movie+maker&vid=-6277667913208906368 6
  • 7.
    Objectives: • The students will be able to download Windows Movie Maker. • SWBAT Connect Video Camera to PC. • SWBAT import images, audio and video. • SWBAT edit Movie by using movie maker. • SWBAT save Movie Maker Show. Students will be able to: • Recognize the value of multimedia in instruction • Design a Movie Maker movie to augment a lesson • Capture pictures, video, and audio from the internet • Apply copyright laws to media taken from internet • Import video, pictures, and audio into Movie Maker • Arrange media appropriately on a timeline • Add effects and transitions • Add titles and credits • Save a movie on a computers Activities: Sec 1 - Steps for Downloading Windows Movie Maker 2......................................2 Download Movie Maker from one of those links: www.microsoft.com › ... › Software Updates www.almeethaq.net/tag/download+movie+maker.htm download.cnet.com/...Movie-Maker.../3000-13631_4-10165075.html Sec 2 - Connect Your Video Camera to your PC..................................................2 Shoot with your camera photographs about: 1- Animals. 2- The nature. 3- Foods. 4- Technology. And import these photos to the movie maker. Sec 3 - Importing images, audio and video.......................................................2 Depending on the subject that you chose in section 2 bring related images, audio and video from your computer or internet to your movie. 7
  • 8.
    Sec 4 -Editing your Movie...............................................................................4 Add title, music including recording your voice, effect and transition . Sec 5 - Saving Movie Maker Show....................................................................4 Save your movie and send it to your teacher E-mail. Evaluation and revision: The teacher will assess your movie depending on this sheet: Movie Maker Rubric 5 3 1 Graphics: All graphics are 1 or 2 graphics are Appearance clear and Several blurry graphics somewhat blurry unpixelated All graphics are 1 or 2 graphics are Several graphics do not Relevance relevant to topic somewhat irrelevant belong Graphics appear 1 or 2 graphics Several graphics long enough to Timing disappear too soon or disappear too soon or make their point, remain for too long remain for too long but not too long Effects: All effects enhance 1 or 2 effects distract pictures and Several effects are Appropriate viewer from intent of augment the flow of distracting movie the movie Transitions: All transitions 1 or 2 transitions enhance pictures Several transitions are Appropriate distract viewer from and augment the distracting intent of movie flow of the movie Transitions last an 1 or 2 transitions go Several transitions go Timing appropriate amount too quickly or drag out too quickly or drag out of time too long too long Titles: Good contrast between text and 1 or 2 titles have poor Several titles have poor Contrast background; easy to contrast contrast see Font choice Readable font; Font hard to read; Font unreadable 8
  • 9.
    appropriate for distracts from subject subject Title animations are 1 or 2 animations are Several animations are Animation artistic and add distracting distracting interest Titles are visible for Titles go too fast to read Title timing is off - Timing an appropriate or last so long viewer needs more work amount of time gets restless Audio: Audio is relevant to Movie. Adds interest Some audio is relevant, Audio distracts viewer Relevance and encourages but some is just for fun from intent of Movie comprehension Clips vary in volume, All audio clips are 1 or 2 clips are louder Volume distracting listener's the same volume or softer than others attention 9