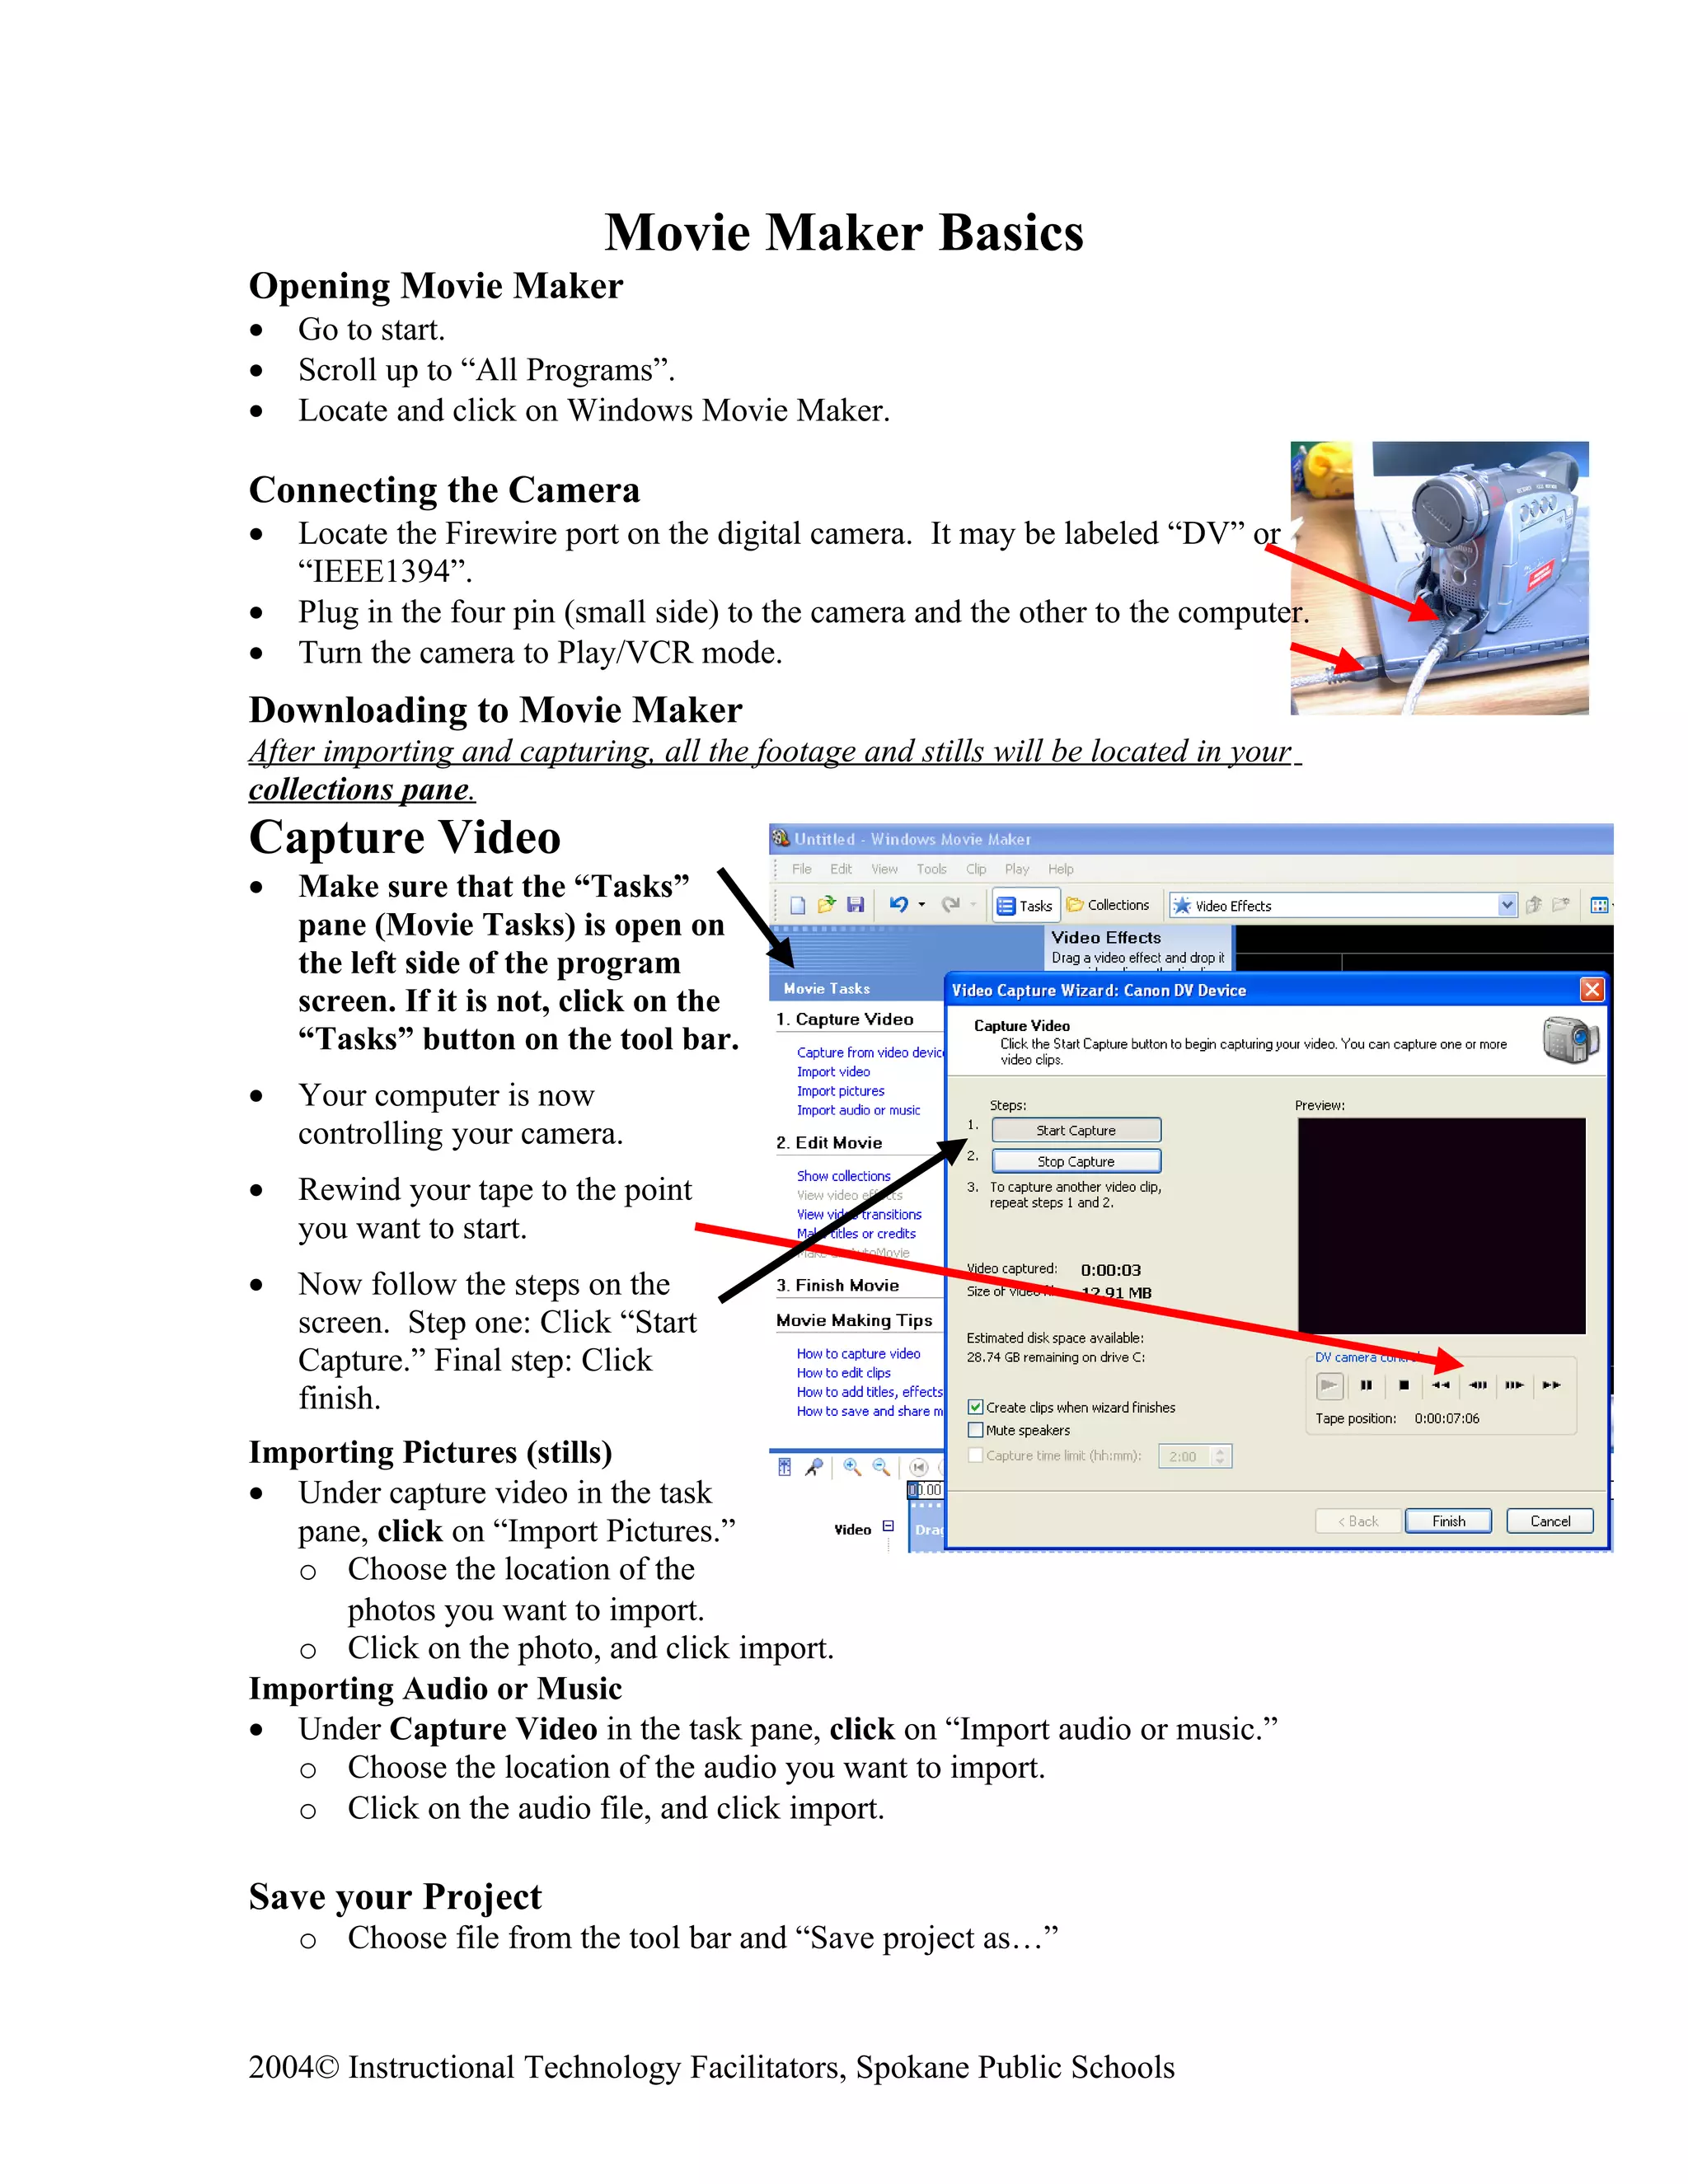
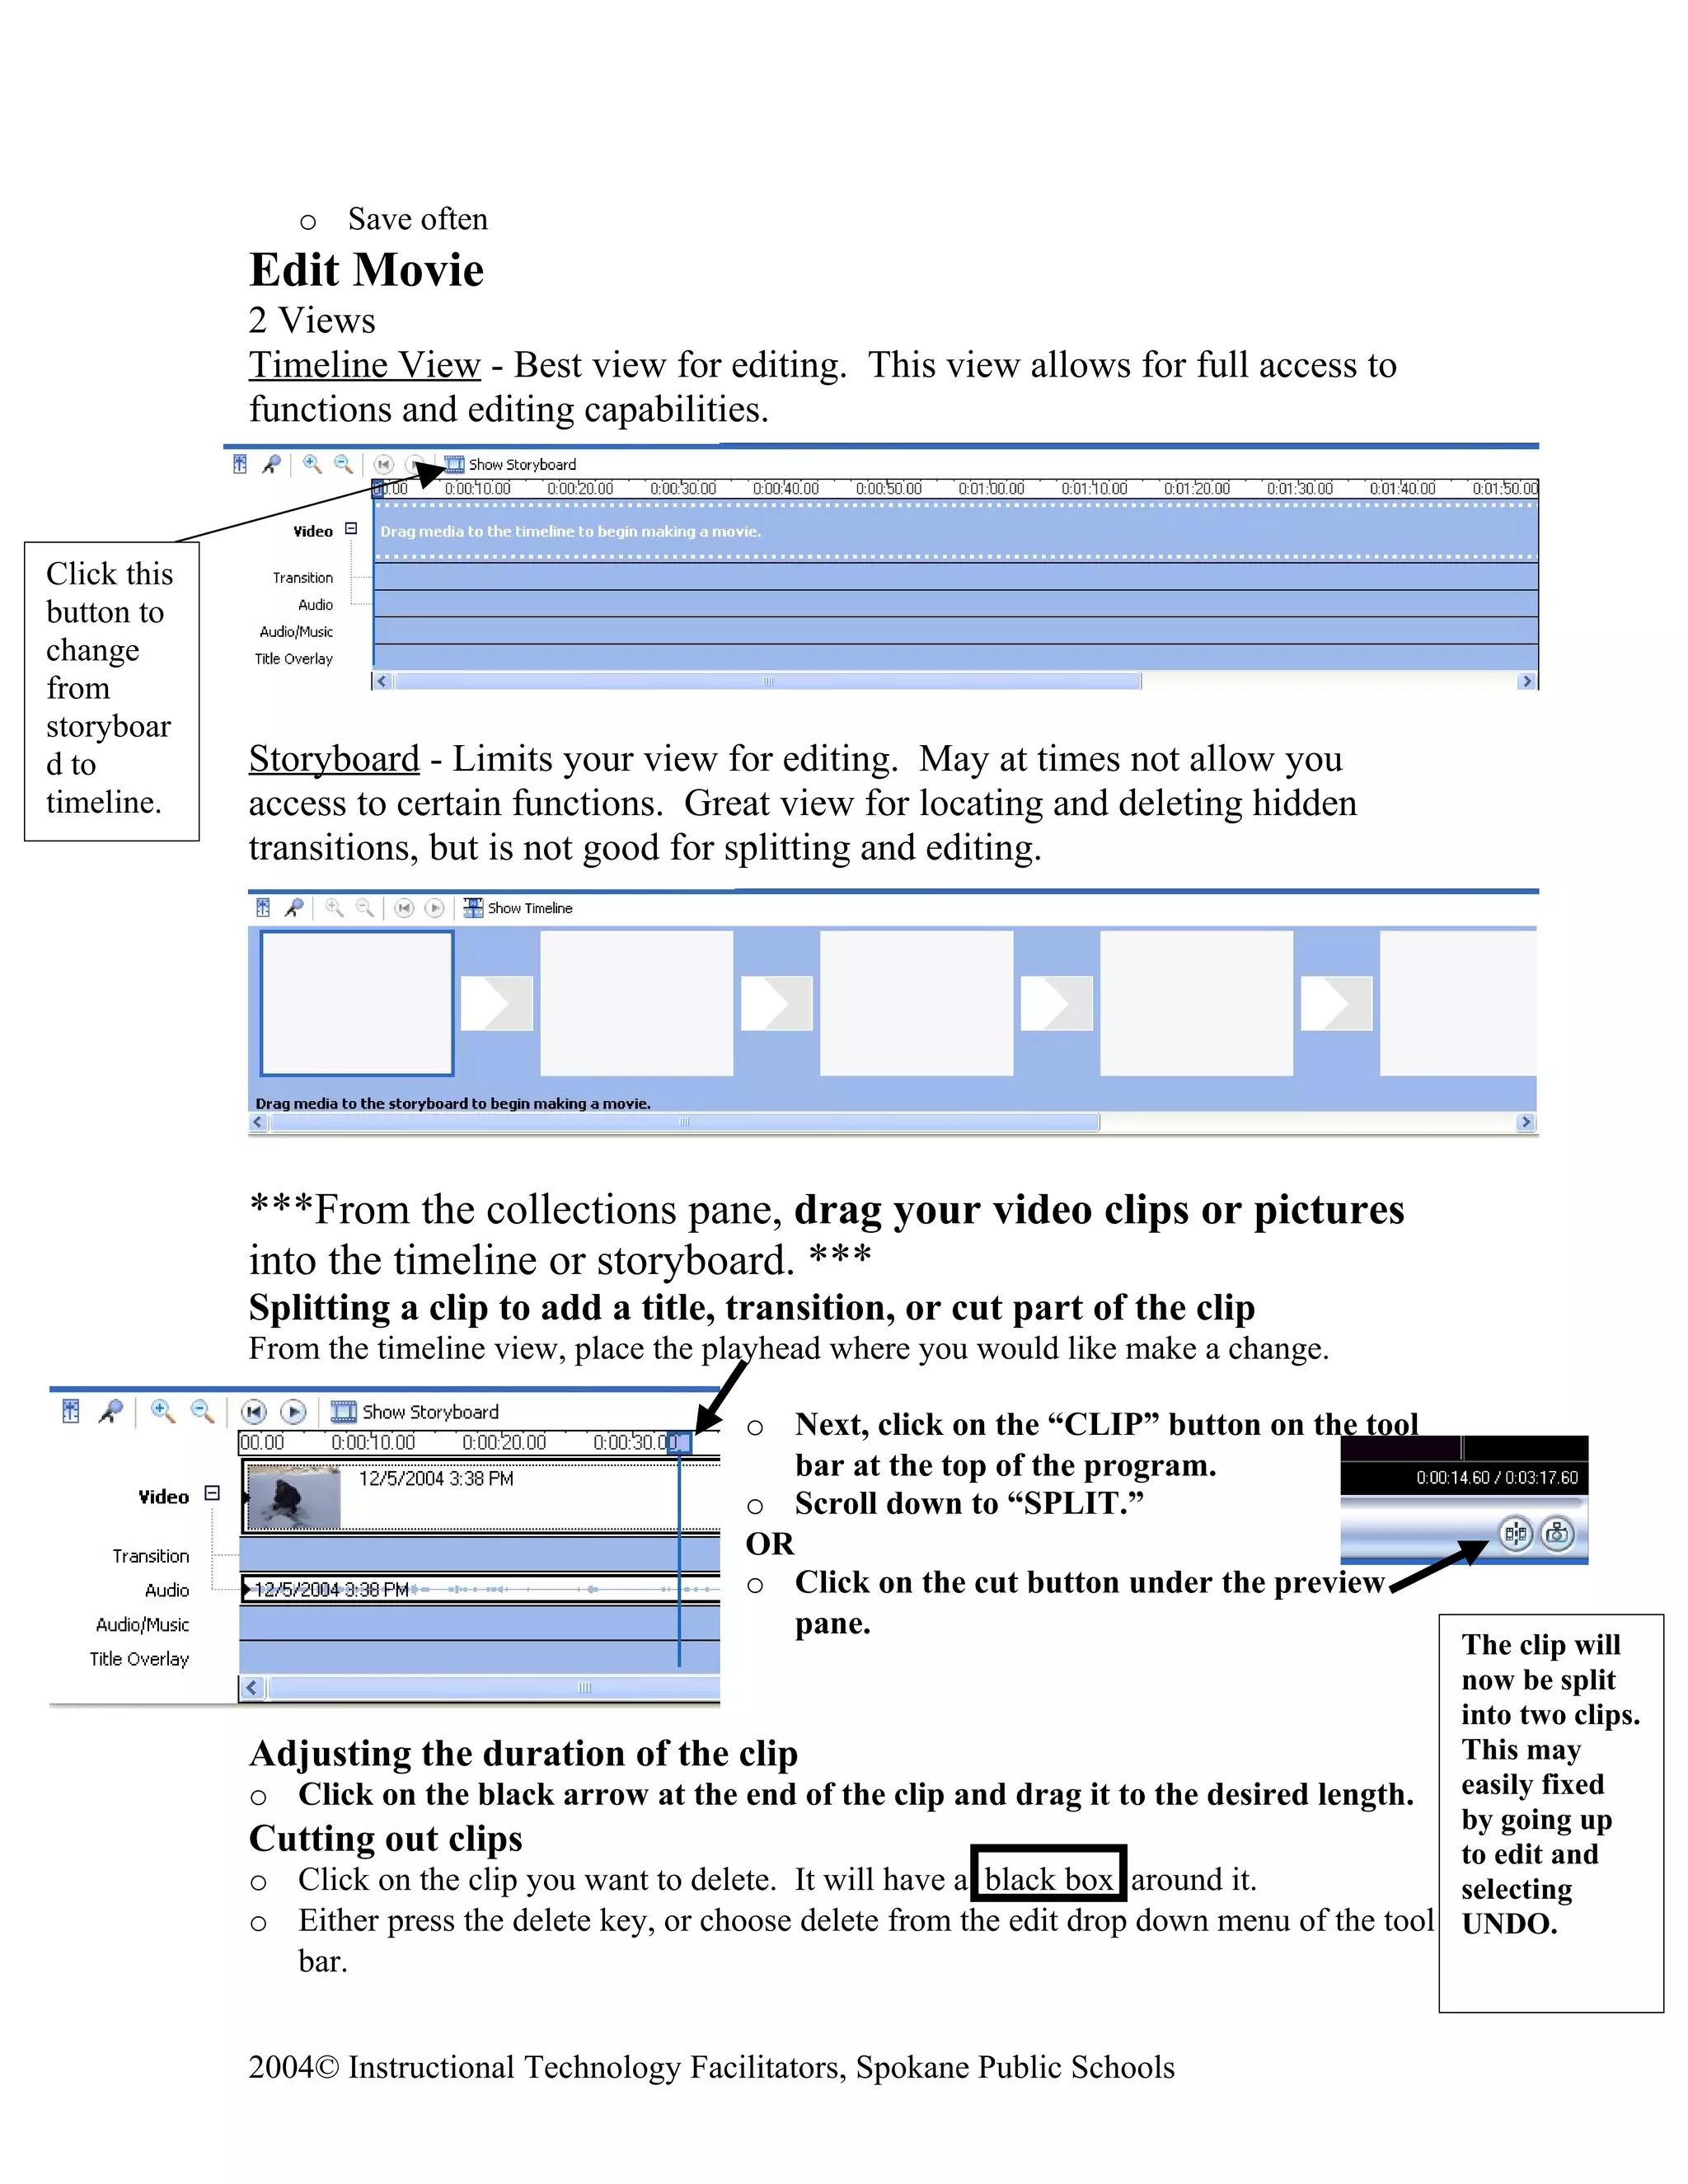
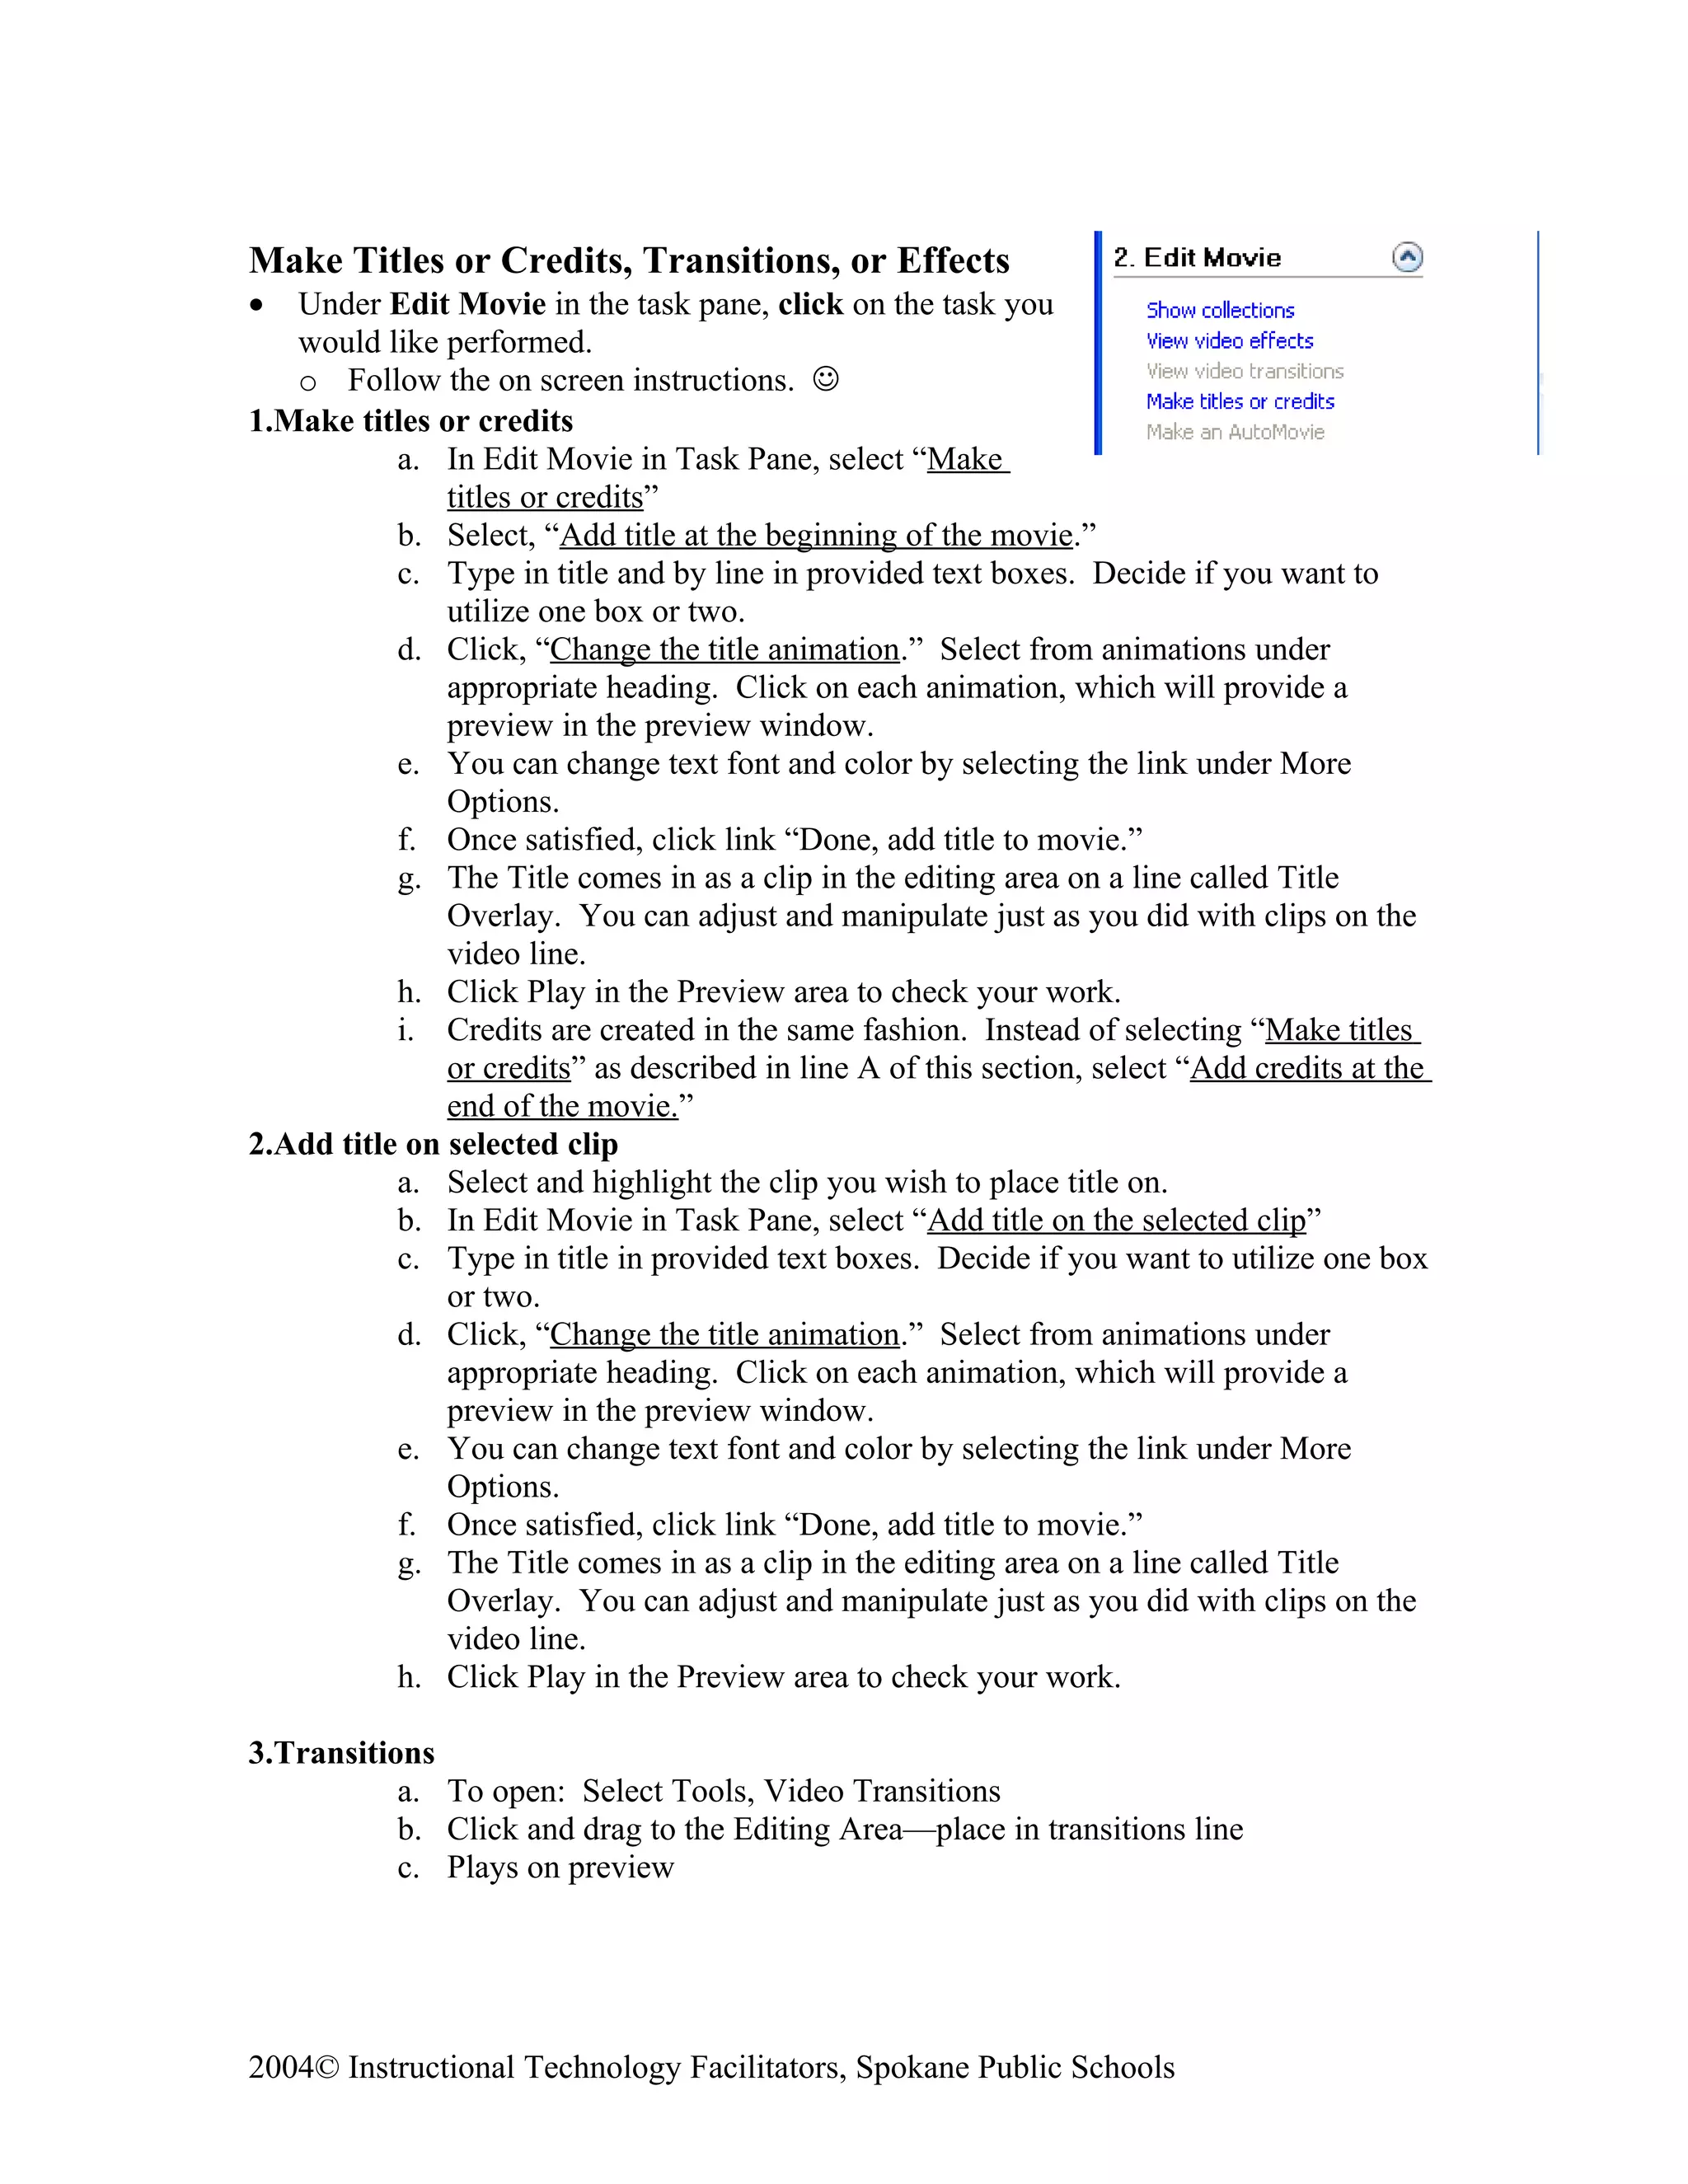
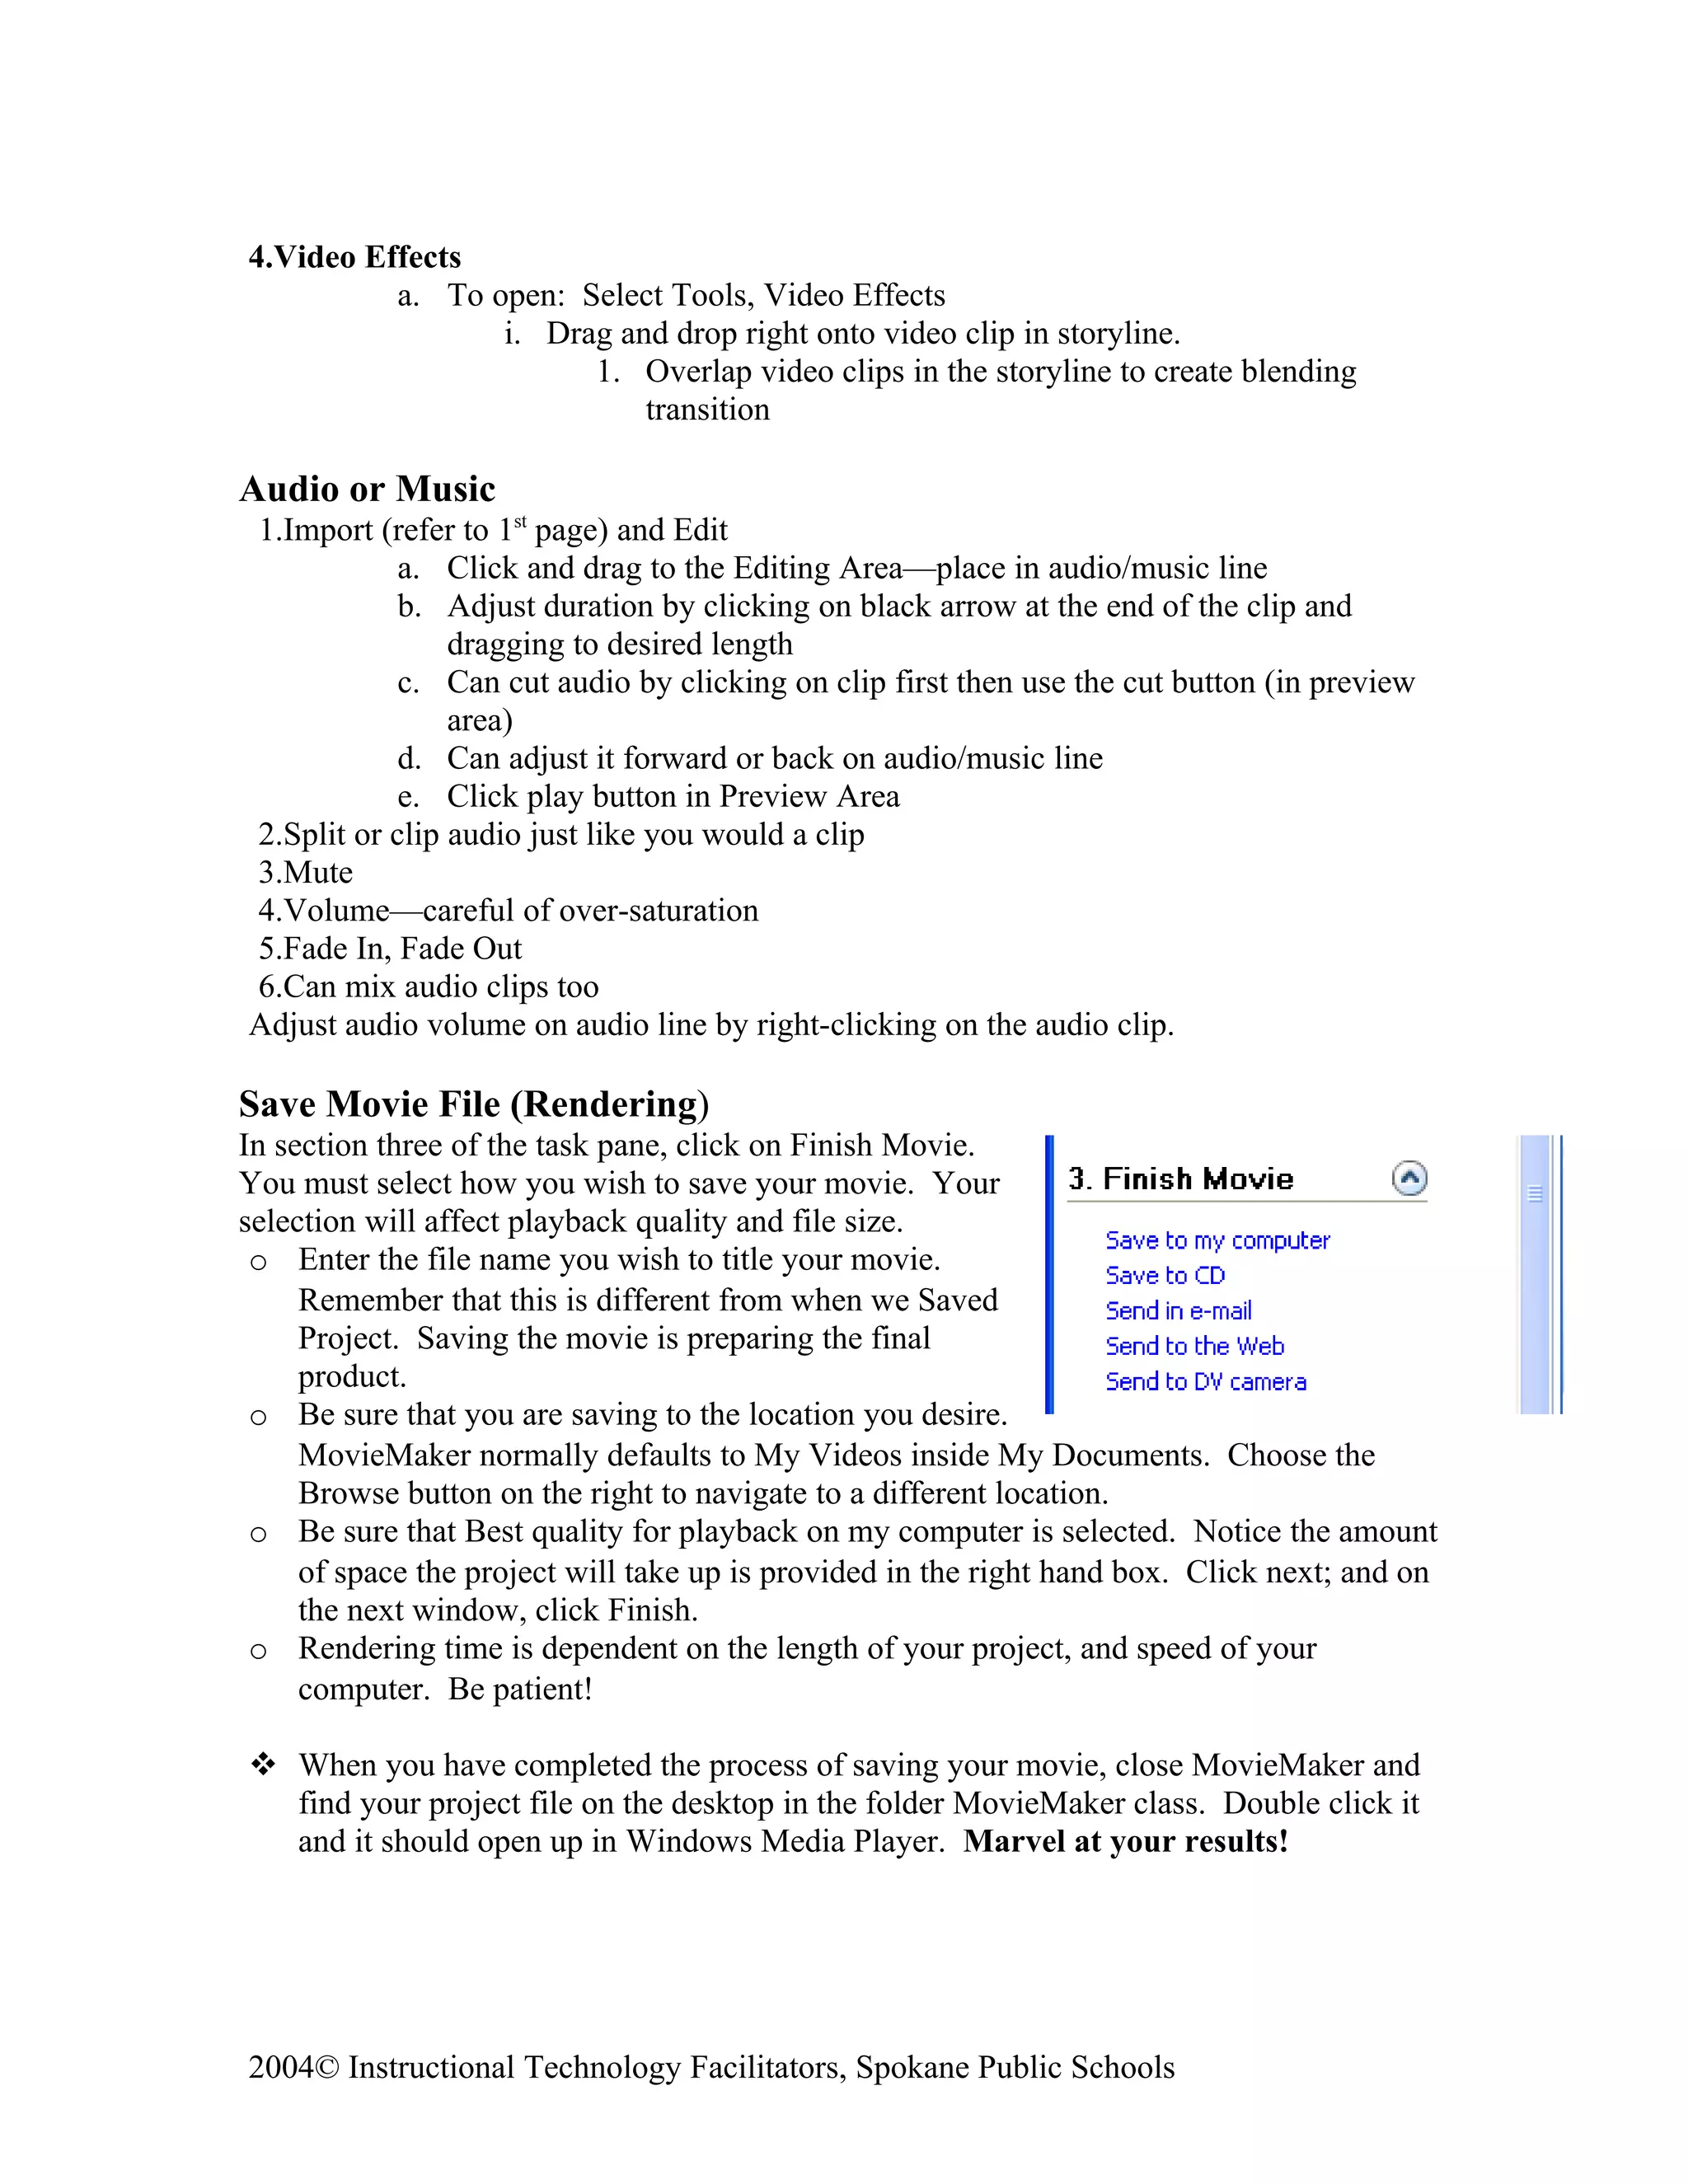
Movie Maker Basics
Opening Movie Maker
•   Go to start.
•   Scroll up to “All Programs”.
•   Locate and click on Windows Movie Maker.

Connecting the Camera
•   Locate the Firewire port on the digital camera. It may be labeled “DV” or
    “IEEE1394”.
•   Plug in the four pin (small side) to the camera and the other to the computer.
•   Turn the camera to Play/VCR mode.
Downloading to Movie Maker
After importing and capturing, all the footage and stills will be located in your
collections pane.
Capture Video
•   Make sure that the “Tasks”
    pane (Movie Tasks) is open on
    the left side of the program
    screen. If it is not, click on the
    “Tasks” button on the tool bar.
•   Your computer is now
    controlling your camera.
•   Rewind your tape to the point
    you want to start.
•   Now follow the steps on the
    screen. Step one: Click “Start
    Capture.” Final step: Click
    finish.
Importing Pictures (stills)
• Under capture video in the task
  pane, click on “Import Pictures.”
  o Choose the location of the
      photos you want to import.
  o Click on the photo, and click import.
Importing Audio or Music
• Under Capture Video in the task pane, click on “Import audio or music.”
  o Choose the location of the audio you want to import.
  o Click on the audio file, and click import.

Save your Project
    o Choose file from the tool bar and “Save project as…”


2004© Instructional Technology Facilitators, Spokane Public Schools
o Save often
             Edit Movie
             2 Views
             Timeline View - Best view for editing. This view allows for full access to
             functions and editing capabilities.


Click this
button to
change
from
storyboar
d to         Storyboard - Limits your view for editing. May at times not allow you
timeline.    access to certain functions. Great view for locating and deleting hidden
             transitions, but is not good for splitting and editing.


             ***From the collections pane, drag your video clips or pictures
             into the timeline or storyboard. ***
             Splitting a clip to add a title, transition, or cut part of the clip
             From the timeline view, place the playhead where you would like make a change.

                                                  o Next, click on the “CLIP” button on the tool
                                                     bar at the top of the program.
                                                  o Scroll down to “SPLIT.”
                                                  OR
                                                  o Click on the cut button under the preview
                                                     pane.
                                                                                                      The clip will
                                                                                                      now be split
                                                                                                      into two clips.
             Adjusting the duration of the clip                                                       This may
             o Click on the black arrow at the end of the clip and drag it to the desired length. easily fixed
                                                                                                      by going up
             Cutting out clips                                                                        to edit and
             o Click on the clip you want to delete. It will have a black box around it.              selecting
             o Either press the delete key, or choose delete from the edit drop down menu of the tool UNDO.
                bar.


             2004© Instructional Technology Facilitators, Spokane Public Schools
Make Titles or Credits, Transitions, or Effects
•  Under Edit Movie in the task pane, click on the task you
   would like performed.
   o Follow the on screen instructions. 
1.Make titles or credits
           a. In Edit Movie in Task Pane, select “Make
               titles or credits”
           b. Select, “Add title at the beginning of the movie.”
           c. Type in title and by line in provided text boxes. Decide if you want to
               utilize one box or two.
           d. Click, “Change the title animation.” Select from animations under
               appropriate heading. Click on each animation, which will provide a
               preview in the preview window.
           e. You can change text font and color by selecting the link under More
               Options.
           f. Once satisfied, click link “Done, add title to movie.”
           g. The Title comes in as a clip in the editing area on a line called Title
               Overlay. You can adjust and manipulate just as you did with clips on the
               video line.
           h. Click Play in the Preview area to check your work.
           i. Credits are created in the same fashion. Instead of selecting “Make titles
               or credits” as described in line A of this section, select “Add credits at the
               end of the movie.”
2.Add title on selected clip
           a. Select and highlight the clip you wish to place title on.
           b. In Edit Movie in Task Pane, select “Add title on the selected clip”
           c. Type in title in provided text boxes. Decide if you want to utilize one box
               or two.
           d. Click, “Change the title animation.” Select from animations under
               appropriate heading. Click on each animation, which will provide a
               preview in the preview window.
           e. You can change text font and color by selecting the link under More
               Options.
           f. Once satisfied, click link “Done, add title to movie.”
           g. The Title comes in as a clip in the editing area on a line called Title
               Overlay. You can adjust and manipulate just as you did with clips on the
               video line.
           h. Click Play in the Preview area to check your work.

3.Transitions
           a. To open: Select Tools, Video Transitions
           b. Click and drag to the Editing Area—place in transitions line
           c. Plays on preview


2004© Instructional Technology Facilitators, Spokane Public Schools
4.Video Effects
          a. To open: Select Tools, Video Effects
                 i. Drag and drop right onto video clip in storyline.
                       1. Overlap video clips in the storyline to create blending
                           transition

Audio or Music
1.Import (refer to 1st page) and Edit
            a. Click and drag to the Editing Area—place in audio/music line
            b. Adjust duration by clicking on black arrow at the end of the clip and
                dragging to desired length
            c. Can cut audio by clicking on clip first then use the cut button (in preview
                area)
            d. Can adjust it forward or back on audio/music line
            e. Click play button in Preview Area
2.Split or clip audio just like you would a clip
3.Mute
4.Volume—careful of over-saturation
5.Fade In, Fade Out
6.Can mix audio clips too
Adjust audio volume on audio line by right-clicking on the audio clip.

Save Movie File (Rendering)
In section three of the task pane, click on Finish Movie.
You must select how you wish to save your movie. Your
selection will affect playback quality and file size.
 o Enter the file name you wish to title your movie.
     Remember that this is different from when we Saved
     Project. Saving the movie is preparing the final
     product.
 o Be sure that you are saving to the location you desire.
     MovieMaker normally defaults to My Videos inside My Documents. Choose the
     Browse button on the right to navigate to a different location.
 o Be sure that Best quality for playback on my computer is selected. Notice the amount
     of space the project will take up is provided in the right hand box. Click next; and on
     the next window, click Finish.
 o Rendering time is dependent on the length of your project, and speed of your
     computer. Be patient!

 When you have completed the process of saving your movie, close MovieMaker and
  find your project file on the desktop in the folder MovieMaker class. Double click it
  and it should open up in Windows Media Player. Marvel at your results!


2004© Instructional Technology Facilitators, Spokane Public Schools

Movie maker basics

  • 1.
    Movie Maker Basics OpeningMovie Maker • Go to start. • Scroll up to “All Programs”. • Locate and click on Windows Movie Maker. Connecting the Camera • Locate the Firewire port on the digital camera. It may be labeled “DV” or “IEEE1394”. • Plug in the four pin (small side) to the camera and the other to the computer. • Turn the camera to Play/VCR mode. Downloading to Movie Maker After importing and capturing, all the footage and stills will be located in your collections pane. Capture Video • Make sure that the “Tasks” pane (Movie Tasks) is open on the left side of the program screen. If it is not, click on the “Tasks” button on the tool bar. • Your computer is now controlling your camera. • Rewind your tape to the point you want to start. • Now follow the steps on the screen. Step one: Click “Start Capture.” Final step: Click finish. Importing Pictures (stills) • Under capture video in the task pane, click on “Import Pictures.” o Choose the location of the photos you want to import. o Click on the photo, and click import. Importing Audio or Music • Under Capture Video in the task pane, click on “Import audio or music.” o Choose the location of the audio you want to import. o Click on the audio file, and click import. Save your Project o Choose file from the tool bar and “Save project as…” 2004© Instructional Technology Facilitators, Spokane Public Schools
  • 2.
    o Save often Edit Movie 2 Views Timeline View - Best view for editing. This view allows for full access to functions and editing capabilities. Click this button to change from storyboar d to Storyboard - Limits your view for editing. May at times not allow you timeline. access to certain functions. Great view for locating and deleting hidden transitions, but is not good for splitting and editing. ***From the collections pane, drag your video clips or pictures into the timeline or storyboard. *** Splitting a clip to add a title, transition, or cut part of the clip From the timeline view, place the playhead where you would like make a change. o Next, click on the “CLIP” button on the tool bar at the top of the program. o Scroll down to “SPLIT.” OR o Click on the cut button under the preview pane. The clip will now be split into two clips. Adjusting the duration of the clip This may o Click on the black arrow at the end of the clip and drag it to the desired length. easily fixed by going up Cutting out clips to edit and o Click on the clip you want to delete. It will have a black box around it. selecting o Either press the delete key, or choose delete from the edit drop down menu of the tool UNDO. bar. 2004© Instructional Technology Facilitators, Spokane Public Schools
  • 3.
    Make Titles orCredits, Transitions, or Effects • Under Edit Movie in the task pane, click on the task you would like performed. o Follow the on screen instructions.  1.Make titles or credits a. In Edit Movie in Task Pane, select “Make titles or credits” b. Select, “Add title at the beginning of the movie.” c. Type in title and by line in provided text boxes. Decide if you want to utilize one box or two. d. Click, “Change the title animation.” Select from animations under appropriate heading. Click on each animation, which will provide a preview in the preview window. e. You can change text font and color by selecting the link under More Options. f. Once satisfied, click link “Done, add title to movie.” g. The Title comes in as a clip in the editing area on a line called Title Overlay. You can adjust and manipulate just as you did with clips on the video line. h. Click Play in the Preview area to check your work. i. Credits are created in the same fashion. Instead of selecting “Make titles or credits” as described in line A of this section, select “Add credits at the end of the movie.” 2.Add title on selected clip a. Select and highlight the clip you wish to place title on. b. In Edit Movie in Task Pane, select “Add title on the selected clip” c. Type in title in provided text boxes. Decide if you want to utilize one box or two. d. Click, “Change the title animation.” Select from animations under appropriate heading. Click on each animation, which will provide a preview in the preview window. e. You can change text font and color by selecting the link under More Options. f. Once satisfied, click link “Done, add title to movie.” g. The Title comes in as a clip in the editing area on a line called Title Overlay. You can adjust and manipulate just as you did with clips on the video line. h. Click Play in the Preview area to check your work. 3.Transitions a. To open: Select Tools, Video Transitions b. Click and drag to the Editing Area—place in transitions line c. Plays on preview 2004© Instructional Technology Facilitators, Spokane Public Schools
  • 4.
    4.Video Effects a. To open: Select Tools, Video Effects i. Drag and drop right onto video clip in storyline. 1. Overlap video clips in the storyline to create blending transition Audio or Music 1.Import (refer to 1st page) and Edit a. Click and drag to the Editing Area—place in audio/music line b. Adjust duration by clicking on black arrow at the end of the clip and dragging to desired length c. Can cut audio by clicking on clip first then use the cut button (in preview area) d. Can adjust it forward or back on audio/music line e. Click play button in Preview Area 2.Split or clip audio just like you would a clip 3.Mute 4.Volume—careful of over-saturation 5.Fade In, Fade Out 6.Can mix audio clips too Adjust audio volume on audio line by right-clicking on the audio clip. Save Movie File (Rendering) In section three of the task pane, click on Finish Movie. You must select how you wish to save your movie. Your selection will affect playback quality and file size. o Enter the file name you wish to title your movie. Remember that this is different from when we Saved Project. Saving the movie is preparing the final product. o Be sure that you are saving to the location you desire. MovieMaker normally defaults to My Videos inside My Documents. Choose the Browse button on the right to navigate to a different location. o Be sure that Best quality for playback on my computer is selected. Notice the amount of space the project will take up is provided in the right hand box. Click next; and on the next window, click Finish. o Rendering time is dependent on the length of your project, and speed of your computer. Be patient!  When you have completed the process of saving your movie, close MovieMaker and find your project file on the desktop in the folder MovieMaker class. Double click it and it should open up in Windows Media Player. Marvel at your results! 2004© Instructional Technology Facilitators, Spokane Public Schools