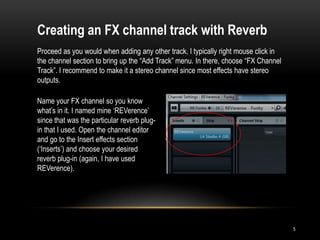
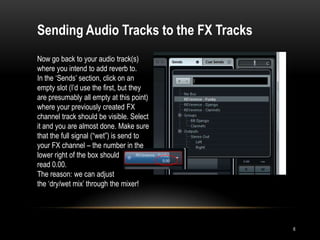
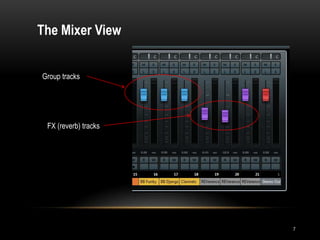
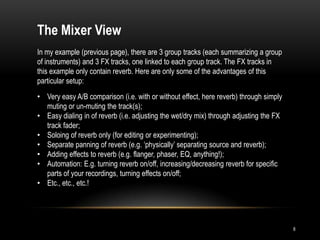
Monkey’s Tips #3

USING REVERB AS A SEND EFFECT IN
            CUBASE


                 d.c.k.
         blindfoldedmonkey.com
Intro
What I’m NOT talking about
Any tips or tricks related to reverb itself, i.e. when to use it, how much to use or any
technical aspect of it, etc.

What AM I talking about?
The most efficient way to put (the same) reverb on several audio tracks and be able
to fine tune the amount of reverb at the mixing stage in a very elegant way. Said
differently, I will show you how to „promote‟ reverb from a track insert to its own
mixer track where you get a whole series of additional advantages (again, compared
with a pure track insert). At the same time and depending on the kind of reverb you
use, you might also save some serious computing power!

I am using Cubase 7 so all pictures and references are for Cubase 7. That said, I
will try to keep things as generic as possible so I am pretty sure that one can apply
the same principle in other DAWs (Digital Audio Work Stations).


                                                                                           2
Getting Started


Here is a picture of my channel editor. This is a group track where I send 5 instruments
to (for tips on how to use group tracks, please see Monkey Tips #1). You could also do
the following steps for each of the five instruments individually from the respective
instrument tracks, but I prefer to do it once out of the group track as shown.


                                                                                           3
Insert vs. Send
One way of inserting reverb would be to use the “Insert”
function on each track. But, any adjustments to reverb in
the mix would have to be done out of Inserts using the
actual reverb tool. Insert effects are inserted into the
channel‟s signal path.

A more elegant way to do this would be to use
the “Sends” function in the channel settings.
Because Send effects are outside of an audio
channel‟s signal path, we have to „send‟ the
audio data to the effect, where the 2 signals,
original audio and reverb in this case, are mixed.
But, before we can do that, we have to set up an
FX channel track that contains the reverb (or
any other effect, for that matter).


                                                            4
Creating an FX channel track with Reverb
Proceed as you would when adding any other track, I typically right mouse click in
the channel section to bring up the “Add Track” menu. In there, choose “FX Channel
Track”. I recommend to make it a stereo channel since most effects have stereo
outputs.

Name your FX channel so you know
what‟s in it. I named mine „REVerence‟
since that was the particular reverb plug-
in that I used. Open the channel editor
and go to the Insert effects section
(„Inserts‟) and choose your desired
reverb plug-in (again, I have used
REVerence).


                                                                                     5
Sending Audio Tracks to the FX Tracks
Now go back to your audio track(s)
where you intend to add reverb to.
In the „Sends‟ section, click on an
empty slot (I‟d use the first, but they
are presumably all empty at this point)
where your previously created FX
channel track should be visible. Select
it and you are almost done. Make sure
that the full signal (“wet”) is send to
your FX channel – the number in the
lower right of the box should
read 0.00.
The reason: we can adjust
the „dry/wet mix‟ through the mixer!


                                          6
The Mixer View


Group tracks


 FX (reverb) tracks


                      7
The Mixer View
In my example (previous page), there are 3 group tracks (each summarizing a group
of instruments) and 3 FX tracks, one linked to each group track. The FX tracks in
this example only contain reverb. Here are only some of the advantages of this
particular setup:
• Very easy A/B comparison (i.e. with or without effect, here reverb) through simply
  muting or un-muting the track(s);
• Easy dialing in of reverb (i.e. adjusting the wet/dry mix) through adjusting the FX
  track fader;
• Soloing of reverb only (for editing or experimenting);
• Separate panning of reverb (e.g. „physically‟ separating source and reverb);
• Adding effects to reverb (e.g. flanger, phaser, EQ, anything!);
• Automation: E.g. turning reverb on/off, increasing/decreasing reverb for specific
  parts of your recordings, turning effects on/off;
• Etc., etc., etc.!


                                                                                        8
Summary
As always, there is literally an infinite number of ways one can do or approach
things. I am certain that my specific examples don‟t necessarily fit your particular
circumstances. The message here should be that through intelligent routing, one
can introduce a new level of flexibility that can greatly add to your project. Also,
please be aware that there are certainly many more details that might deserve
attention. My goal was to concentrate on the core principle (and maybe leave some
details for later episodes).

In this case, I hope I was able to show you how to „promote‟ an insert effect (reverb)
to its own channel track through the use of a send effect. Doing so, reverb will get its
own „place‟ in the mix (and as such the mixer) and can be adjusted and manipulated
almost like everything else. Also, it allows for a very „clean‟ workflow without ever
having to touch the original audio source.

Have fun trying and experimenting!!!


                                                                                           9
d.c.k
liberty.sounds@live.com
blindfoldedmonkey.com


                          10

Using Reverb as a Send Effect in Cubase

  • 1.
    Monkey’s Tips #3 USINGREVERB AS A SEND EFFECT IN CUBASE d.c.k. blindfoldedmonkey.com
  • 2.
    Intro What I’m NOTtalking about Any tips or tricks related to reverb itself, i.e. when to use it, how much to use or any technical aspect of it, etc. What AM I talking about? The most efficient way to put (the same) reverb on several audio tracks and be able to fine tune the amount of reverb at the mixing stage in a very elegant way. Said differently, I will show you how to „promote‟ reverb from a track insert to its own mixer track where you get a whole series of additional advantages (again, compared with a pure track insert). At the same time and depending on the kind of reverb you use, you might also save some serious computing power! I am using Cubase 7 so all pictures and references are for Cubase 7. That said, I will try to keep things as generic as possible so I am pretty sure that one can apply the same principle in other DAWs (Digital Audio Work Stations). 2
  • 3.
    Getting Started Here isa picture of my channel editor. This is a group track where I send 5 instruments to (for tips on how to use group tracks, please see Monkey Tips #1). You could also do the following steps for each of the five instruments individually from the respective instrument tracks, but I prefer to do it once out of the group track as shown. 3
  • 4.
    Insert vs. Send Oneway of inserting reverb would be to use the “Insert” function on each track. But, any adjustments to reverb in the mix would have to be done out of Inserts using the actual reverb tool. Insert effects are inserted into the channel‟s signal path. A more elegant way to do this would be to use the “Sends” function in the channel settings. Because Send effects are outside of an audio channel‟s signal path, we have to „send‟ the audio data to the effect, where the 2 signals, original audio and reverb in this case, are mixed. But, before we can do that, we have to set up an FX channel track that contains the reverb (or any other effect, for that matter). 4
  • 5.
    Creating an FXchannel track with Reverb Proceed as you would when adding any other track, I typically right mouse click in the channel section to bring up the “Add Track” menu. In there, choose “FX Channel Track”. I recommend to make it a stereo channel since most effects have stereo outputs. Name your FX channel so you know what‟s in it. I named mine „REVerence‟ since that was the particular reverb plug- in that I used. Open the channel editor and go to the Insert effects section („Inserts‟) and choose your desired reverb plug-in (again, I have used REVerence). 5
  • 6.
    Sending Audio Tracksto the FX Tracks Now go back to your audio track(s) where you intend to add reverb to. In the „Sends‟ section, click on an empty slot (I‟d use the first, but they are presumably all empty at this point) where your previously created FX channel track should be visible. Select it and you are almost done. Make sure that the full signal (“wet”) is send to your FX channel – the number in the lower right of the box should read 0.00. The reason: we can adjust the „dry/wet mix‟ through the mixer! 6
  • 7.
    The Mixer View Grouptracks FX (reverb) tracks 7
  • 8.
    The Mixer View Inmy example (previous page), there are 3 group tracks (each summarizing a group of instruments) and 3 FX tracks, one linked to each group track. The FX tracks in this example only contain reverb. Here are only some of the advantages of this particular setup: • Very easy A/B comparison (i.e. with or without effect, here reverb) through simply muting or un-muting the track(s); • Easy dialing in of reverb (i.e. adjusting the wet/dry mix) through adjusting the FX track fader; • Soloing of reverb only (for editing or experimenting); • Separate panning of reverb (e.g. „physically‟ separating source and reverb); • Adding effects to reverb (e.g. flanger, phaser, EQ, anything!); • Automation: E.g. turning reverb on/off, increasing/decreasing reverb for specific parts of your recordings, turning effects on/off; • Etc., etc., etc.! 8
  • 9.
    Summary As always, thereis literally an infinite number of ways one can do or approach things. I am certain that my specific examples don‟t necessarily fit your particular circumstances. The message here should be that through intelligent routing, one can introduce a new level of flexibility that can greatly add to your project. Also, please be aware that there are certainly many more details that might deserve attention. My goal was to concentrate on the core principle (and maybe leave some details for later episodes). In this case, I hope I was able to show you how to „promote‟ an insert effect (reverb) to its own channel track through the use of a send effect. Doing so, reverb will get its own „place‟ in the mix (and as such the mixer) and can be adjusted and manipulated almost like everything else. Also, it allows for a very „clean‟ workflow without ever having to touch the original audio source. Have fun trying and experimenting!!! 9
  • 10.