EN
Instructions
Gebruiksaanwijzing
NL
Manual de instrucciones
ES
DUO Carrycot Mode d’emploi
FR
www.easywalker.nl
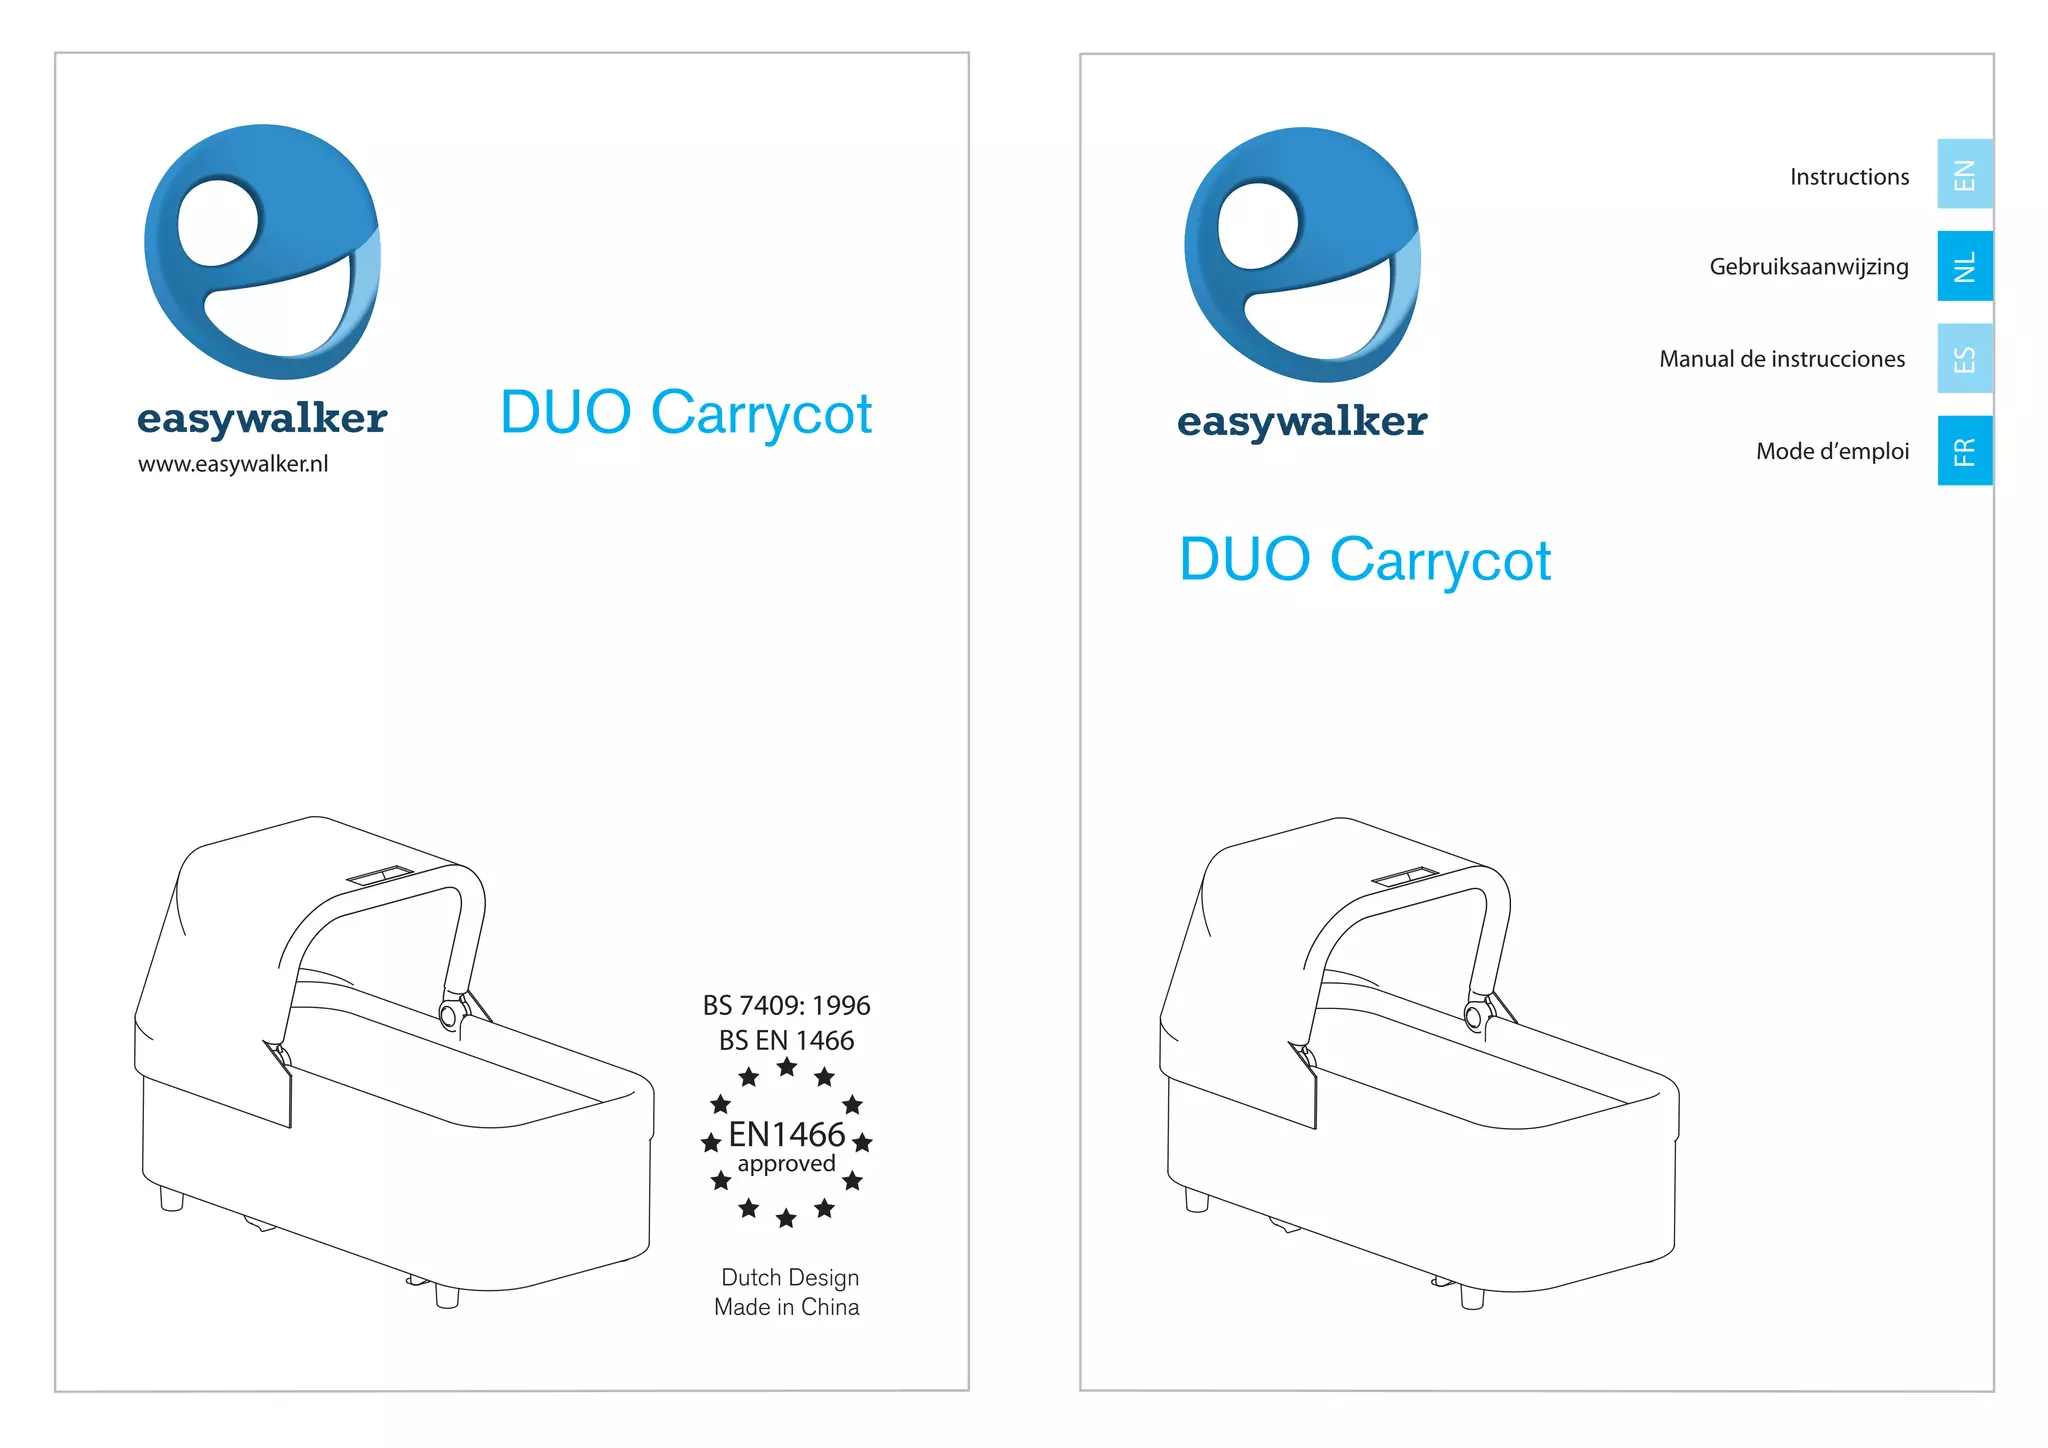
DUO Carrycot
BS 7409: 1996
BS EN 1466
EN1466
approved
Dutch Design
Made in China
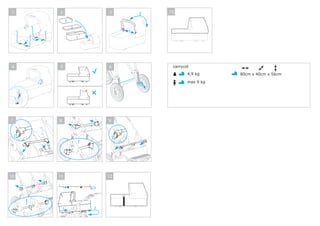
2.
1 2 3 2 13
3
2
1
1
4 5 23
6 carrycot
4,9 kg 80cm x 40cm x 56cm
max 9 kg
2
1
7 8 9
!
10 11 12
!
1 2
3.
INSTRUCTIONS TIP: If the instructions say left or right, this is always meant when looking from behind
the EasyWalker DUO push-bar.
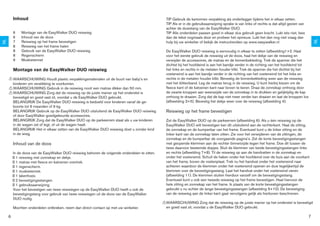
2 Assembling the EasyWalker DUO carrycot TIP: All components are designed to fit together so you do not need to use force. If
2 Contents of the box something is not working, read the instructions again and try once more. If something
3 Attaching the carrycot to the frame still does not work then ask for help in the shop where you purchased the item or watch
4 Removing the carrycot from the frame the instruction video on www.easywalker.nl
EN
EN
4 Using the EasyWalker DUO carrycot
4 Rain cover The EasyWalker DUO carrycot is simple to assemble (image 1+2). Before using for
6 Mosquito net the first time, take the carrycot out of the box, take the cover off the carrycot and remove
the accessories, the mattress and the inside covers. Pull the fastener on the bar (nearest
Assembling the EasyWalker DUO carrycot to the head-end) in the direction of the head-end until it clicks, left and right, into the
metal holder. Pull the fastener on the bar (nearest to the foot-end) in the direction of the
! WARNING: Keep plastic covers away from babies and children to avoid suffocation. foot-end until it clicks, left and right, into the metal holder.
! WARNING: Do not add a mattress thicker than 50 mm in the carrycot.
! WARNING: Check that the carrycot is properly attached to the supporting frame and Attach the inside covers to the carrycot again with Velcro. Put the mattress back in the
that it is securely fixed before you use the EasyWalker DUO. carrycot. You can now choose whether you want the fleece or cotton side uppermost.
IMPORTANT: The EasyWalker DUO carrycot is intended to be used for children from Turn the sun canopy upwards by pushing the black buttons on both sides of the sun
birth to the age of 6 months or 9 kg. canopy and simultaneously turning the canopy upwards. Ensure that the canopy cannot
IMPORTANT: Only use the EasyWalker DUO carrycot or accessories approved for turn any further and release the buttons (image 3+5). Reattach the cover over the
use by EasyWalker on the EasyWalker DUO. carrycot (image 4).
IMPORTANT: Ensure that the parking brake is engaged when you place your children
in or remove them from the EasyWalker DUO. Attaching the carrycot to the frame
IMPORTANT: When assembling the EasyWalker DUO carrycot a child should not be
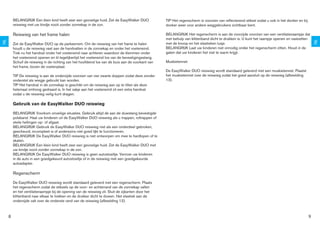
in the cot. Engage the parking brake of the EasyWalker DUO (image 6). If you want to attach one
carrycot to the EasyWalker DUO, this can only be done on the right-hand side. Remove
Contents of the box the seat, the sun canopy and the bumper bar from the frame. If required, you can leave
the left-hand seat and the left-hand side of the sun canopy in place. See the previous
The following items must be contained in the EasyWalker DUO carrycot box. pages for instructions on the removal of the seats, the sun canopy and the bumper bar.
1 carrycot with sun canopy and cover. Place the short connection tubes with open clips, on the right-hand side against the
1 mattress with fleece and cotton cover. frame. Position between the two caps and shut the left and right clips of both connection
1 rain cover. tubes (image 7+8). Lift up the carrycot using the grips in the sun canopy and under
1 mosquito net. the foot-end. Slide the hooks (under the head-end) over the tube at the front of the
1 sheet cover. frame, above the footplate. Now pull the hand grip under the foot-end backwards so
2 connection tubes. that the clips under the foot-end open and, at the same time, push the clips over the
1 instruction leaflet. connection tube. Let go of the hand grip under the foot-end (image 11). The clips shut
In order to attach two carrycots onto the EasyWalker DUO, you will also need the long by themselves around the connection tube. If required, a second carrycot can be fixed
connection tubes, from the EasyWalker DUO box. to the frame. In order to do so, remove the entire seat and sun canopy from the frame.
Instead of the short connection tubes, you would now use the long connection tubes
If items are missing, immediately contact the shop where you purchased the pushchair. (image 9+10). Connecting the carrycot to the left-hand side is done in the same way
as described above.
TIP: Use the cardboard packaging as a mat whilst assembling the item.
2 3
4.
! WARNING: Check that the carrycot is properly attached to the supporting frame and closing the popper. The elastic on the underside rests on the lower edge of the
and that it is securely fixed, before you use the EasyWalker DUO. carrycot (image 12).
EN
EN
IMPORTANT: A small child has very sensitive skin. Never leave your child in the TIP: The rain cover has reflective stitching so that you are visible to other road users in
EasyWalker DUO in the sun without the sun canopy on. the dark and during bad weather.
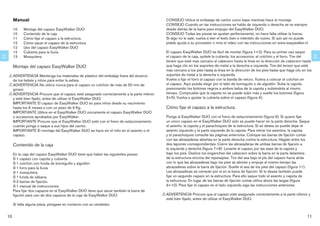
Removing the carrycot from the frame IMPORTANT: The rain cover has a ventilation window at the front that can be closed
using Velcro. You can open and secure the window with the button and the elastic loop.
Engage the parking brake of the EasyWalker DUO. To remove the carrycot from the IMPORTANT: Do not let your child sit under the rain cover unnecessarily. Ensure that
frame, hold onto the carrycot by the hand grips in the sun canopy and under the your child does not get too hot.
footend.
Now pull the hand grip (under the foot-end) backwards so that the clips under the Mosquito net
foot-end open and, at the same time, lift the foot-end away from the connection tube.
Slide the carrycot towards the head-end, away from the tube at the front of the frame, The EasyWalker DUO carrycot is supplied, as standard, with a mosquito net. Place the
above the footplate. mosquito net over the carrycot so that it connects properly to the carrycot (image 13).
TIP: The carrycot has four black feet on the underside so that it can be used as a cot
without a supporting frame.
TIP: The hand grip in the sun canopy is suitable for lifting the carrycot if it has been
lifted up completely. In the bag, at the foot-end, there is an extra hand grip so that
you can safely carry the carrycot.
Using the EasyWalker DUO carrycot
IMPORTANT: Avoid dangerous situations. Always use the wrist band attached to
the pushbar. Take your child out of the EasyWalker DUO carrycot if you go up or
down stairs, escalators or steep hills.
IMPORTANT: Do not use the EasyWalker DUO carrycot if any part is broken, torn,
incomplete or does not seem to be functioning correctly.
IMPORTANT: The EasyWalker DUO carrycot is not designed for use when jogging or
roller skating.
IMPORTANT: A small child has very sensitive skin. Never leave your child in the
EasyWalker DUO in the sun without the sun canopy on.
IMPORTANT: The EasyWalker DUO carrycot is not a car seat. Transport your child in
the car in an approved car seat or in the carrycot with an approved car adapter.
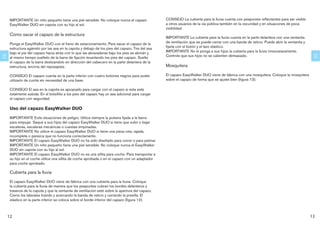
Rain cover
The EasyWalker DUO carrycot is supplied, as standard, with a rain cover. Place the rain
cover so that the stitching rests on the front and rear edges of the sun canopy and the
ventilation window is by the opening. Shut the sides by closing the Velcro fastenings
4 5
5.
Inhoud TIP Gebruik de kartonnen verpakking als onderlegger tijdens het in elkaar zetten.
TIP Als er in de gebruiksaanwijzing sprake is van links of rechts is dat altijd gezien van
achter de duwstang van de EasyWalker DUO.
6 Montage van de EasyWalker DUO reiswieg TIP Alle onderdelen passen goed in elkaar dus gebruik geen kracht. Lukt iets niet, lees
6 Inhoud van de doos dan de tekst nogmaals door en probeer het opnieuw. Lukt het dan nog niet vraag dan
NL
NL
7 Reiswieg op het frame bevestigen hulp bij uw winkelier of bekijk de instructievideo op www.easywalker.nl
8 Reiswieg van het frame halen
8 Gebruik van de EasyWalker DUO reiswieg De EasyWalker DUO reiswieg is eenvoudig in elkaar te zetten (afbeelding1+2. Haal
8 Regenscherm voor het eerste gebruik de reiswieg uit de doos, haal het dekje van de reiswieg en
9 Muskietennet verwijder de accessoires, de matras en de binnenbekleding. Trek de spanner die het
dichtst bij het hoofdeind is aan het bandje verder in de richting van het hoofdeind tot
Montage van de EasyWalker DUO reiswieg het links en rechts in de metalen houder klikt. Trek de spanner die het dichtst bij het
voeteneind is aan het bandje verder in de richting van het voeteneind tot het links en
! WAARSCHUWING Houdt plastic verpakkingsmaterialen uit de buurt van baby’s en rechts in de metalen houder klikt. Bevestig de binnenbekleding weer aan de reiswieg
kinderen om verstikking te voorkomen. met het klittenband. Leg de matras terug in de reiswieg. U kunt hierbij kiezen om de
! WAARSCHUWING Gebruik in de reiswieg nooit een matras dikker dan 50 mm. fleece kant of de katoenen kant naar boven te keren. Draai de zonnekap omhoog door
! WAARSCHUWING Zorg dat de reiswieg op de juiste manier op het onderstel is de zwarte knoppen aan weerszijde van de zonnekap in te drukken en gelijktijdig de kap
bevestigd en goed vast zit, voordat u de EasyWalker DUO gebruikt. omhoog te draaien. Zorg dat de kap niet meer verder kan draaien en laat de knoppen los
BELANGRIJK De EasyWalker DUO reiswieg is bedoeld voor kinderen vanaf de ge- (afbeelding 3+5). Bevestig het dekje weer over de reiswieg (afbeelding 4).
boorte tot 6 maanden of 9 kg.
BELANGRIJK Gebruik op de EasyWalker DUO uitsluitend de EasyWalker DUO reiswieg Reiswieg op het frame bevestigen
of door EasyWalker goedgekeurde accessoires.
BELANGRIJK Zorg dat de EasyWalker DUO op de parkeerrem staat als u uw kinderen Zet de EasyWalker DUO op de parkeerrem (afbeelding 6). Als u één reiswieg op de
in de wagen zet of legt, of uit de wagen haalt. EasyWalker DUO wilt bevestigen kan dit uitsluitend aan de rechterkant. Haal de zitting,
BELANGRIJK Het in elkaar zetten van de EasyWalker DUO reiswieg doet u zonder kind de zonnekap en de bumperbar van het frame. Eventueel kunt u de linker zitting en de
in de wieg. linker kant van de zonnekap laten zitten. Zie voor het verwijderen van de zittingen, de
zonnekap en de bumperbar de voorgaande pagina’s. Zet de korte bevestigingsstangen
Inhoud van de doos met geopende klemmen aan de rechter binnenzijde tegen het frame. Doe dit tussen de
twee daarvoor bestemde dopjes. Sluit de klemmen van beide bevestigingsstangen links
In de doos van de EasyWalker DUO reiswieg behoren de volgende onderdelen te zitten. en rechts (afbeelding 7+8). Til de reiswieg op aan de handvatten in de zonnekap en
onder het voeteneind. Schuif de haken onder het hoofdeind over de buis aan de voorkant
van het frame, boven de voetenplaat. Trek nu het handvat onder het voeteneind naar
achteren waardoor de klemmen onder het voeteneind openen en duw tegelijkertijd de
klemmen over de bevestigingsstang. Laat het handvat onder het voeteneind vieren
(afbeelding 11). De klemmen sluiten hierdoor vanzelf om de bevestigingsstang.
Eventueel kunt u ook een tweede reiswieg op het frame bevestigen. Haal hiervoor de
hele zitting en zonnekap van het frame. In plaats van de korte bevestigingsstangen
Voor het bevestigen van twee reiswiegen op de EasyWalker DUO heeft u ook de gebruikt u nu echter de lange bevestigingsstangen (afbeelding 9+10). De bevestiging
bevestigingstang voor gebruik van twee reiswiegen uit de doos van de EasyWalker van de reiswieg aan de linker kant gaat vervolgens gelijk als hierboven beschreven.
DUO nodig.
! WAARSCHUWING Zorg dat de reiswieg op de juiste manier op het onderstel is bevestigd
Mochten onderdelen ontbreken, neem dan direct contact op met uw winkelier. en goed vast zit, voordat u de EasyWalker DUO gebruikt.
6 7
6.
BELANGRIJK Een kleinkind heeft zeer een gevoelige huid. Zet de EasyWalker DUO TIP Het regenscherm is voorzien van reflecterend stiksel zodat u ook in het donker en bij
reiswieg met uw kindje nooit zonder zonnekap in de zon. donker weer voor andere weggebruikers zichtbaar bent.
Reiswieg van het frame halen BELANGRIJK Het regenscherm is aan de voorzijde voorzien van een ventilatieraampje dat
met behulp van klittenband dicht te drukken is. U kunt het raampje openen en vastzetten
NL
NL
Zet de EasyWalker DUO op de parkeerrem. Om de reiswieg van het frame te halen met de knoop en het elastieken lusje.
houdt u de reiswieg vast aan de handvatten in de zonnekap en onder het voeteneind. BELANGRIJK Laat uw kinderen niet onnodig onder het regenscherm zitten. Houd in de
Trek nu het handvat onder het voeteneind naar achteren waardoor de klemmen onder gaten dat uw kinderen het niet te warm krijgt.
het voeteneind openen en til tegelijkertijd het voeteneind los van de bevestigingsstang.
Schuif de reiswieg in de richting van het hoofdeind los van de buis aan de voorkant van Muskietennet
het frame, boven de voetenplaat.
De EasyWalker DUO reiswieg wordt standaard geleverd met een muskietennet. Plaatst
TIP De reiswieg is aan de onderzijde voorzien van vier zwarte doppen zodat deze zonder het muskietennet over de reiswieg zodat het goed aansluit op de reiswieg (afbeelding
onderstel als wiegje gebruikt kan worden. 13).
TIP Het handvat in de zonnekap is geschikt om de reiswieg aan op te tillen als deze
helemaal omhoog gedraaid is. In het zakje aan het voeteneind zit een extra handvat
zodat u de reiswieg veilig kunt dragen.
Gebruik van de EasyWalker DUO reiswieg
BELANGRIJK Voorkom onveilige situaties. Gebruik altijd de aan de duwstang bevestigde
polsband. Haal uw kinderen uit de EasyWalker DUO reiswieg als u trappen, roltrappen of
steile hellingen op- of afgaat.
BELANGRIJK Gebruik de EasyWalker DUO reiswieg niet als een onderdeel gebroken,
gescheurd, incompleet is of anderszins niet goed lijkt te functioneren.
BELANGRIJK De EasyWalker DUO reiswieg is niet ontworpen om mee te hardlopen of te
skaten.
BELANGRIJK Een klein kind heeft zeer een gevoelige huid. Zet de EasyWalker DUO met
uw kindje nooit zonder zonnekap in de zon.
BELANGRIJK De EasyWalker DUO reiswieg is geen autostoeltje. Vervoer uw kinderen
in de auto in een goedgekeurd autostoeltje of in de reiswieg met een goedgekeurde
autoadapter.
Regenscherm
De EasyWalker DUO reiswieg wordt standaard geleverd met een regenscherm. Plaats
het regenscherm zodat de stiksels op de voor- en achterrand van de zonnekap vallen
en het ventilatieraampje bij de opening van de reiswieg zit. Sluit de zijkanten door het
klittenband naar elkaar te trekken en de drukker dicht te duwen. Het elastiek aan de
onderzijde valt over de onderste rand van de reiswieg (afbeelding 12).
8 9
7.
Manual CONSEJO Utilice el embalaje de cartón como base mientras hace el montaje.
CONSEJO Cuando en las instrucciones se habla de izquierda o derecha se ve siempre
10 Montaje del capazo EasyWalker DUO desde detrás de la barra para empujar del EasyWalker DUO.
10 Contenido de la caja CONSEJO Todas las piezas se ajustan perfectamente, no hace falta utilizar la fuerza.
11 Cómo fijar el capazo a la estructura. Si algo no le sale, vuelva a leer el texto bien e inténtelo de nuevo. Si aún así no puede
12 Cómo sacar el capazo de la estructura pídale ayuda a su proveedor o mire el vídeo con las instrucciones en www.easywalker.nl
12 Uso del capazo EasyWalker DUO
12 Cubierta para la lluvia El capazo EasyWalker DUO es fácil de montar (figura 1+2). Para su primer uso saque
ES
ES
13 Mosquitera el capazo de la caja, quítele la cubierta, los accesorios, el colchón y el forro. Tire del
tensor que esté mas cercano al cabecero hasta la línea en la dirección de cabecero hasta
Montaje del capazo EasyWalker DUO que haga clic en los soportes de metal a la derecha e izquierda. Tire del tensor que esté
mas cercano a los pies hasta la línea en la dirección de los pies hasta que haga clic en los
! ADVERTENCIA Mantenga los materiales de plástico del embalaje fuera del alcance soportes de metal a la derecha e izquierda.
de los bebés y niños para evitar la asfixia. Vuelva a fijar el forro al capazo con la banda de velcro. Vuelva a colocar el colchón en
! ADVERTENCIA No utilice nunca para el capazo un colchón de más de 50 mm de el capazo. Aquí puede elegir por el lado de borreguito o de algodón. Suba la capota
grosor. presionando los botones negros a ambos lados de la capota y subiéndola al mismo
! ADVERTENCIA Procure que el capazo esté asegurado correctamente a la parte inferior tiempo. Compruebe que la capota no se puede subir más y suelte los botones (figura
y esté bien fijado, antes de utilizar el EasyWalker DUO. 3+5). Vuelva a ajustar la cubierta sobre el capazo (figura 4).
IMPORTANTE El capazo de EasyWalker DUO es para niños desde su nacimiento
hasta los 6 meses o con un peso de 9 Kg. Cómo fijar el capazo a la estructura.
IMPORTANTE Utilice en el EasyWalker DUO únicamente el capazo EasyWalker DUO
o accesorios aprobados por EasyWalker. Ponga el EasyWalker DUO con el freno de estacionamiento (figura 6). Si quiere fijar
IMPORTANTE Procure que el EasyWalker DUO esté con el freno de estacionamiento un único capazo en el EasyWalker DUO sólo se puede hacer en la parte derecha. Saque
cuando ponga o saque a sus hijos del carrito. el asiento, la capota y el parachoques de la estructura. Si se desea se puede dejar el
IMPORTANTE El montaje del EasyWalker DUO se hace sin el niño en el asiento o el asiento izquierdo y la parte izquierda de la capota. Para retirar los asientos, la capota
capazo. y el parachoques consulte las páginas anteriores. Coloque las barras de fijación cortas
con las abrazaderas abiertas en la parte derecha contra la estructura. Hágalo entre los
Contenido de la caja dos tapones correspondientes. Cierre las abrazaderas de ambas barras de fijación a
la izquierda y derecha (figura 7+8). Levante el capazo por las asas de la capota y
En la caja del capazo EasyWalker DUO tiene que haber las siguientes piezas: bajo los pies. Deslice los enganches del cabecero sobre la barra en la parte delantera
de la estructura encima del reposapies. Tire del asa bajo el pie del capazo hacia atrás
con lo que las abrazaderas bajo los pies se abrirán y empuje al mismo tiempo las
abrazaderas sobre la barra de fijación. Suelte el asa de los pies del capazo (figura 11).
Las abrazaderas se cerrarán por sí en la barra de fijación. Si lo desea también puede
fijar un segundo capazo en la estructura. Para ello saque todo el asiento y capota de
la estructura. En lugar de las barras de fijación cortas utilice ahora las largas (figura
9+10). Para fijar el capazo en el lado izquierdo siga las instrucciones anteriores.
Para fijar dos capazos en el EasyWalker DUO tiene que sacar también la barra de
fijación para uso de dos capazos de la caja de EasyWalker DUO. ! ADVERTENCIA Procure que el capazo esté asegurado correctamente a la parte inferior y
esté bien fijado, antes de utilizar el EasyWalker DUO.
Si falta alguna pieza, póngase en contacto con su vendedor.
10 11
8.
IMPORTANTE Un niñopequeño tiene una piel sensible. No coloque nunca el capazo CONSEJO La cubierta para la lluvia cuenta con pespuntes reflectantes para ser visible
EasyWalker DUO sin capota con su hijo al sol. a otros usuarios de la via pública también en la oscuridad y en situaciones de poca
visibilidad.
Cómo sacar el capazo de la estructura
IMPORTANTE La cubierta para la lluvia cuenta en la parte delantera con una ventanita
Ponga el EasyWalker DUO con el freno de estacionamiento. Para sacar el capazo de la de ventilación que se puede cerrar con una banda de velcro. Puede abrir la ventanita y
estructura agárrelo por las asa en la capota y debajo de los pies del capazo. Tire del asa fijarla con el botón y el lazo elástico.
bajo el pie del capazo hacia atrás con lo que las abrazaderas bajo los pies se abrirán y IMPORTANTE No le ponga a sus hijos la cubierta para la lluvia innecesiaramente.
Controle que sus hijos no se calienten demasiado.
ES
ES
al mismo tiempo suéltelo de la barra de fijación levantando los pies del capazo. Suelte
el capazo de la barra deslizándolo en dirección del cabecero en la parte delantera de la
estructura, encima del reposapies. Mosquitera
CONSEJO El capazo cuenta en la parte inferior con cuatro botones negros para poder El capazo EasyWalker DUO viene de fábrica con una mosquitera. Coloque la mosquitera
utilizarlo de cunita sin necesidad de una base. sobre el capazo de forma que se ajuste bien (figura 13).
CONSEJO El asa en la capota es apropiado para cargar con el capazo si esta está
totalmente subida. En el bolsillito a los pies del capazo hay un asa adicional para cargar
el capazo con seguridad.
Uso del capazo EasyWalker DUO
IMPORTANTE Evite situaciones de peligro. Utilice siempre la pulsera fijada a la barra
para empujar. Saqué a sus hijos del capazo EasyWalker DUO si tiene que subir o bajar
escaleras, escaleras mecánicas o cuestas empinadas.
IMPORTANTE No utilice el capazo EasyWalker DUO si tiene una pieza rota, rajada,
incompleta o parezca que no funciona correctamente.
IMPORTANTE El capazo EasyWalker DUO no ha sido diseñado para correr o para patinar.
IMPORTANTE Un niño pequeño tiene una piel sensible. No coloque nunca el EasyWalker
DUO sin capota con su hijo al sol.
IMPORTANTE El capazo EasyWalker DUO no es una sillita para coche. Para transportar a
su hijo en el coche utilice una sillita de coche aprobada o en el capazo con un adaptador
para coche aprobado.
Cubierta para la lluvia
El capazo EasyWalker DUO viene de fábrica con una cubierta para la lluvia. Coloque
la cubierta para la lluvia de manera que los pespuntes cubran los bordes delanteros y
traseros de la capota y que la ventanita de ventilación esté sobre la apertura del capazo.
Cierre los laterales tirando y acercando la banda de velcro y cerrando la presilla. El
elástico en la parte inferior se coloca sobre el borde inferior del capazo (figura 12).
12 13
9.
Mode d’emploi S’il y a des pièces manquantes, merci de contacter votre fournisseur.
CONSEIL Utilisez l’emballage en carton comme protection au sol lors du montage.
CONSEIL Lorsque le mode d’emploi indique droite ou gauche, il s’agit toujours du point
14 Montage de la nacelle EasyWalker DUO
de vue de derrière le guidon DE L’EasyWalker DUO.
14 Contenu de la boîte
CONSEIL Tous les éléments s’emboîtent facilement, sans avoir à forcer. Si vous ne
15 Fixer la nacelle sur le châssis
réussissez pas, relisez alors le texte, puis réessayez. Si vous ne réussissez toujours
16 Déposer la nacelle du châssis
pas, demandez de l’aide à votre revendeur, ou regardez la vidéo d’instruction sur www.
16 Utilisation de la nacelle EasyWalker DUO
easywalker.nl.
16 Protection anti-pluie
17 Moustiquaire
La nacelle EasyWalker DUO est facile à monter (illustration 22+23). Avant la première
utilisation, sortez la nacelle de la boîte, enlevez la housse de la nacelle et les accessoires,
FR
FR
Montage de la nacelle EasyWalker DUO le matelas et l’habillage intérieur. Tirez sur la bande de tension le plus près de la tête,
dans la direction de la tête de nacelle, jusqu’à ce qu’elle clique en place dans le support
! AVERTISSEMENT Afin d’éviter tout risque d’étouffement, conservez les matériaux métallique à droite et à gauche. Tirez sur la bande de tension le plus près du pied, dans
d’emballage en plastique loin des bébés et enfants. la direction du pied, jusqu’à ce qu’il clique en place dans le support métallique à droite
! AVERTISSEMENT N’utilisez jamais un matelas d’épaisseur supérieure à 50 mm dans
et à gauche. Remettez l’habillage intérieur sur la nacelle à l’aide de la bande velcro.
la nacelle Remettez le matelas dans la nacelle. Vous pouvez choisir : côté polaire ou côté coton vers
! AVERTISSEMENT Avant d’utiliser l’EasyWalker DUO, assurez-vous de fixer
le haut. Tournez le pare-soleil vers le haut en appuyant sur les boutons noirs de chaque
correctement la nacelle sur le châssis inférieur et de bien l’attacher. côté du pare-soleil, et en pivotant le pare-soleil vers le haut en même temps. Assurezvous
IMPORTANT La nacelle EasyWalker DUO est destiné aux enfants à partir de la que le pare-soleil est en bout de course, puis relâchez les boutons (illustration
naissance jusqu’à 6 mois ou 9 kg. 24+25). Remettez la housse sur la nacelle
IMPORTANT Sur l’EasyWalker DUO, utilisez exclusivement la nacelle EasyWalker
DUO ou un accessoire approuvé par EasyWalker.
IMPORTANT Assurez-vous que le frein parking de l’EasyWalker DUO est activé
Fixer la nacelle sur le châssis
lorsque vous déposez ou enlevez votre enfant de la poussette.
Actionnez le frein parking de l’EasyWalker DUO (illustration 26). Si vous désirez fixer
IMPORTANT Le montage de l’EasyWalker DUO s’effectue sans enfant dans la
une seule nacelle sur l’EasyWalker DUO, vous ne pourrez le faire que sur le côté droit.
poussette.
Détachez le siège, le pare-soleil et l’arceau de maintien du châssis. Vous pouvez
éventuellement laisser en place le siège de gauche et le côté gauche du pare-soleil.
Contenu de la boîte Pour déposer les sièges, le pare-soleil et l’arceau de maintien, consultez les pages
précédentes. Posez les barres de fixation courtes, pinces ouvertes, contre le châssis, côté
La boîte de la nacelle EasyWalker DUO doit contenir les éléments suivants : droit. Posez-la entre les deux bouchons prévus à cet effet. Fermez les pinces des deux
barres de fixation, à gauche et à droite (illustration 27+28). Soulevez la nacelle par les
poignées dans le pare-soleil et au pied. Glissez les crochets par dessous la tête, pardessus
le tube à l’avant du châssis, au-dessus du cale-pieds. Maintenant, tirez la poignée
sous le pied vers l’arrière, ce qui ouvre les pinces se situant en dessous des pieds, puis
poussez en même temps les pinces par-dessus la barre de fixation. Lâchez la poignée
en dessous des pieds (illustration 31). Les pinces se referment automatiquement autour
de la barre de fixation. Vous pouvez éventuellement monter une deuxième nacelle sur le
Pour fixer deux nacelles sur l’EasyWalker DUO, il vous faut également la barre de fixation châssis. Pour ce faire, enlevez tout le siège et le pare-soleil du châssis. Au lieu d’utiliser
prévue pour l’utilisation de deux nacelles. Elle se trouve dans la boîte de l’EasyWalker les barres de fixation courtes, vous allez utiliser les barres longues (illustration 29+30).
DUO. La fixation de la nacelle du côté gauche s’effectue comme décrite ci-dessus.
14 15
10.
! AVERTISSEMENT Avant d’utiliser l’EasyWalker DUO, assurez-vous de fixer correctement CONSEIL La protection anti-pluie comporte une couture réfléchissante, qui vous permet
la nacelle sur le châssis inférieur et de bien l’attacher. d’être visible aux autres usagers de la route, même dans le noir et par temps sombre.
IMPORTANT La peau d’un enfant est très fragile. N’exposez jamais votre enfant au IMPORTANT La protection anti-pluie est équipée, sur le devant, d’une fenêtre de
soleil, dans sa nacelle EasyWalker DUO, sans pare-soleil. ventilation que vous pouvez fermer à l’aide d’une bande velcro. Vous pouvez ouvrir la
fenêtre et la fixer avec le bouton et la boucle en élastique.
Déposer la nacelle du châssis IMPORTANT Ne laissez pas vos enfants sous la protection anti-pluie sans raison. Assurezvous
que les enfants n’ont pas trop chaud.
Actionnez le frein parking de l’EasyWalker DUO. Pour enlever la nacelle du châssis, vous
devez tenir la nacelle par les poignées se situant dans le pare-soleil et en dessous du Moustiquaire
cale-pied. Maintenant, tirez la poignée sous le cale-pied vers l’arrière, ce qui ouvre les
FR
La nacelle EasyWalker DUO est livrée en série avec une moustiquaire. Posez la
FR
pinces se situant en dessous, puis soulevez en même temps le cale-pied de la barre de
fixation. Glissez la nacelle en direction de la tête, en la décrochant du tube avant du moustiquaire sur la nacelle, pour qu’elle épouse bien les formes de celle-ci (illustration
châssis, au-dessus du cale-pied. 13).
CONSEIL La nacelle est équipée de quatre bouchons noirs sur le dessous afin de
pouvoir l’utiliser comme berceau sans utiliser le châssis.
CONSEIL La poignée dans le pare-soleil sert à soulever la nacelle lorsque celle-ci
est entièrement tournée vers le haut. Dans la poche, aux pieds, il y a une poignée
supplémentaire pour vous permettre de porter la nacelle en toute sécurité.
Utilisation de la nacelle EasyWalker DUO
IMPORTANT Évitez les situations de danger. Utilisez toujours la dragonne attachée au
guidon. Enlevez vos enfants de l’EasyWalker DUO lorsque vous montez ou descendez des
escaliers, escalators ou pentes raides.
IMPORTANT N’utilisez pas l’EasyWalker DUO si l’un de ses composants est cassé, déchiré,
incomplet ou ne semble pas fonctionner correctement.
IMPORTANT L’EasyWalker DUO n’a pas été conçu pour courir avec ou pour faire du skate.
IMPORTANT La peau d’un enfant est très fragile. Ne mettez jamais l’EasyWalker DUO
avec votre enfant au soleil sans pare-soleil.
IMPORTANT La nacelle EasyWalker DUO n’est pas un siège auto. Dans la voiture,
transportez vos enfants dans un siège homologué ou dans le couffin avec un adaptateur
homologué.
Protection anti-pluie
La nacelle EasyWalker DUO est livrée en série avec une protection anti-pluie. Posez la
protection de manière à ce que les coutures s’alignent sur le bord avant et arrière du
pare-soleil, avec la fenêtre de ventilation à l’ouverture de la nacelle. Fermez les côtés en
tirant sur le velcro et en appuyant sur le bouton-pression. L’élastique du bas couvre le
bord inférieur de la nacelle (illustration 12)
16 17
11.
The Netherlands /Head office
Belgium / Luxemburg
EasyWalker bv
P. O. Box 138
1380 AC WEESP
+31-294-230351
www.easywalker.nl
www.easywalker.be
info@easywalker.nl
USA
EasyWalker® Inc
001 4806194114 & 001 4803232666
Info@easywalker-usa.com
Canada
Oyaco Products Inc.
1-866-768-4224
info@oyaco.com
16 17