Download to read offline

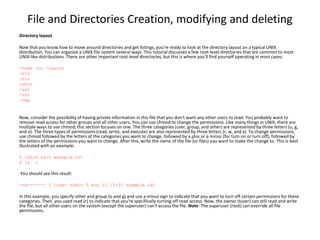
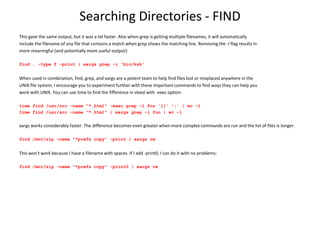
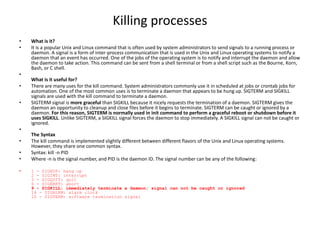
![GREP command syntax
grep options searchterm filename
OR
command | grep options searchterm
For searching a word in file
grep 'ada' filename
For search a word which is either caps or small letters(i — case insensitive )
grep -i 'ac' filename
inverse search for a word
grep -v 'ac' filename
To count a word occurrence
grep -c ‘ac’ filename
Find ac characters along line numbers
grep -n 'ac' filename
Find exact word ac
grep -x 'ac' filename
Basic regular expressions:
^ -- Caret symbol, Match beginning of the line.
$ -- Match End of the line
* -- Match 0 or more occurrence of previous character .
? – Match Any single character
[] – Match Range of characters, just single occurrence.
[a-z] –Match small letters
[A-Z] –Match cap letters
[0-9] – Match numerical.
[^] – Match Negate a sequence
-- Match Escape character.
Searching Files - GREP](https://image.slidesharecdn.com/unixtrng-170829164231/85/Unix-Basics-Commands-6-320.jpg)
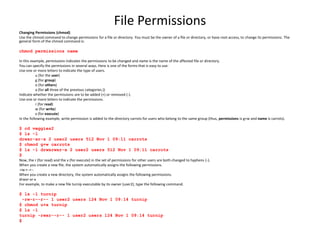


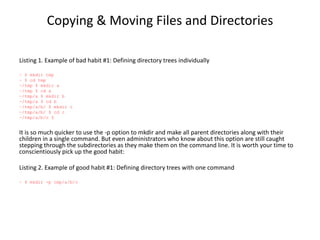
![The ps command produces a report summarizing execution statistics for current processes. The bare ps command lists the process ID, the terminal the command was started
from, how much CPU time it has used, and the command itself. The output looks something like this (it differs from system to system):
PID TT STAT TIME COMMAND
1803 p5 IW 0:00 -csh (csh)
1883 p5 IW 0:04 vi outline
1811 p6 IW 0:01 -csh (csh)
5353 p6 TW 0:01 vi 4890
By default, ps lists only your own processes. There are many times, though, when it's desirable to have a more complete listing with a lot of data about all of the processes
currently running on the system. The options required to do this differ between BSD UNIX and System V. Under BSD UNIX, the command is ps -aux, which produces a table of
all processes, arranged in order of decreasing CPU usage at the moment when the ps command was executed. [The -a option gives processes belonging to all users, -u gives a
more detailed listing, and -x includes processes that no longer have a controlling terminal (38.6). -TOR ] It is often useful to pipe this output to head (25.20), which will display
the most active processes:
% ps -aux | head -5
USER PID %CPU %MEM SZ RSS TTY STAT TIME COMMAND
martin 12923 74.2 22.5 223 376 p5 R 2:12 f77 -o foo foo.F
chavez 16725 10.9 50.8 1146 1826 p6 R N 56:04 g94 HgO.dat
The meanings of the fields in this output (as well as others displayed by the -l option to ps) are given in Table 38.1.
The first line of this output shows that user martin is running a FORTRAN compilation (f77). This process has PID (38.3) 12923 and is currently either running or runable. User
chavez's process (PID 16725), executing the program g94, is also running or runable, though at a lowered priority. From this display, it's obvious who is using most system
resources at this instant: martin and chavez have about 85% of the CPU and 73% of the memory between them. However, although it does display total CPU time, ps does not
average the %CPU or %MEM values over time in any way.
A vaguely similar listing is produced by the System V ps -ef command:
$ ps -ef
UID PID PPID C STIME TTY TIME CMD
root 0 0 0 09:36:35 ? 0:00 sched
root 1 0 0 09:36:35 ? 0:02 /etc/init
...
gull 7997 1 10 09:49:32 ttyp3 0:04 csh
The columns hold the username, process ID, parent's PID (the PID of the process that created it), the current scheduler value, the time the process started, its associated
terminal, its accumulated CPU time, and the command it is running. Note that the ordering is by PID, not resource usage.
Locating & monitoring of processes with ps](https://image.slidesharecdn.com/unixtrng-170829164231/85/Unix-Basics-Commands-13-320.jpg)

This document provides information about scheduling jobs in UNIX/Linux systems. It discusses using the cron daemon to schedule jobs to run periodically based on time and date settings. It also covers using the at command to schedule single jobs to run once at a specific time. The crontab file format and common cron directories are described. It outlines how to list, delete, and manage scheduled jobs, and how user access to job scheduling is configured through cron access control files.


![Getting Started with Apache Spark: Big Data Made Simple [Free Meetup]](https://cdn.slidesharecdn.com/ss_thumbnails/apachesparkgettingstarted-260203175547-8361bcc3-thumbnail.jpg?width=640&height=640&fit=bounds)

