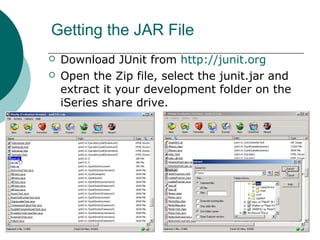
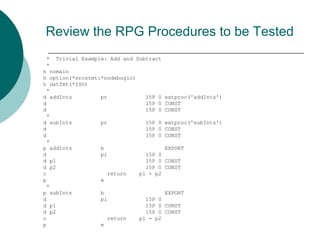
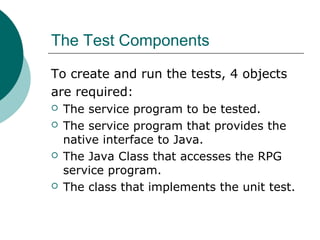
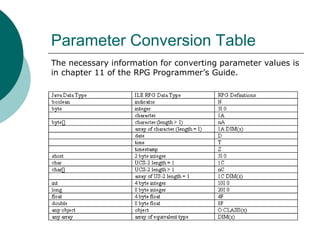
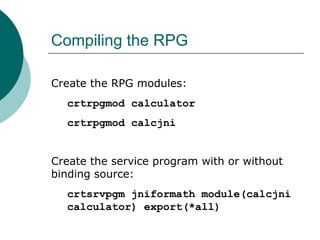
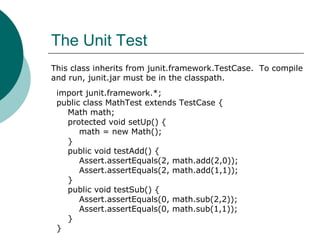
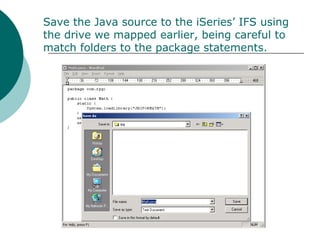
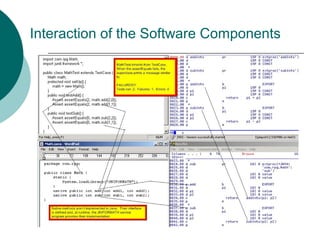
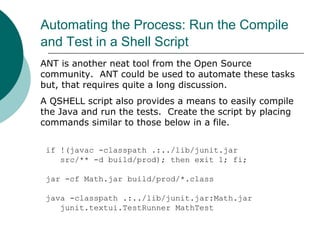
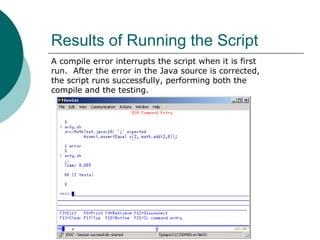
Unit Testing RPG with JUnit
"Never in the field of software
development was so much owed by
so many to so few lines of code"
Martin Fowler (speaking of JUnit)
Agenda
 Costs of Manual Testing
 Value of Automated Unit Testing
 The Tools We’ll Use
 Creating the Infrastructure
 Reviewing the Component to be Tested
 The Test Components
 Writing the interface code and the Tests
 Compiling the Java
 Running the Tests
 Automating the Process
Costs of Manual Testing
 Manual testing generally occurs late, just
before integration. The cost to correct
problems at this stage are ten to a hundred
times greater than the cost to correct the
problem before the project reaches this
stage.
 A problem found late in the development
cycle can delay the carefully planned work
of a dozen people.
Value of Automated Testing
 Writing tests before writing the application
code increases cohesion and reduces
coupling.
 You won’t understand it until you’ve done
it.
 The tests are reusable. Reuse is free.
Write tests once; verify quality a thousand
times without lifting a finger.
The Tools We’ll Use
 The JUnit JAR file (junit.jar)
 iSeries QSHELL and shell scripts
 javac, the Java compiler
 JNI, Java Native Interface
 iSeries Navigator
 iSeries IFS (integrated file system)
 PC-based Text Editor
 iSeries Source Editor
 RPG Compiler
Creating the Infrastructure
 Add a “Share” to your IFS folder.
 Map the share to Windows Explorer.
 Place a copy of the JUnit jar file in your IFS
folder.
To add the file share, use iSeries Navigator
and select the Integrated File System on the
iSeries on which you’ll be developing.
Find or create your IFS folder. We
require one to be under Root/home.
Right click and select Sharing/New
Share…
Create the file system share
Be sure to select Read/Write access!
In Windows Explorer, select Tools/Map
Network Drive…
Complete mapping a drive to the share
created earlier.
Example: servershare
Getting the JAR File
 Download JUnit from http://junit.org
 Open the Zip file, select the junit.jar and
extract it your development folder on the
iSeries share drive.
Next Steps
 Review the ILE RPG procedures we will
test.
 Create the test components.
 Run the tests.
Review the RPG Procedures to be Tested
* Trivial Example: Add and Subtract
*
h nomain
h option(*srcstmt:*nodebugio)
h datfmt(*ISO)
*
d addInts pr 15P 0 extproc('addInts')
d 15P 0 CONST
d 15P 0 CONST
*
d subInts pr 15P 0 extproc('subInts')
d 15P 0 CONST
d 15P 0 CONST
*
p addInts b EXPORT
d pi 15P 0
d p1 15P 0 CONST
d p2 15P 0 CONST
c return p1 + p2
p e
*
p subInts b EXPORT
d pi 15P 0
d p1 15P 0 CONST
d p2 15P 0 CONST
c return p1 - p2
p e
The Test Components
To create and run the tests, 4 objects
are required:
 The service program to be tested.
 The service program that provides the
native interface to Java.
 The Java Class that accesses the RPG
service program.
 The class that implements the unit test.
Parameter Conversion Table
The necessary information for converting parameter values is
in chapter 11 of the RPG Programmer’s Guide.
A second RPG module is required
1. the *JAVA keyword
2. the fully qualified name of the Java class
that will execute this procedure.
3. the name of the Java method (marked
native) which will call the ILE procedure.
For Java to access the RPG, the ILE
procedures must be given a Java interface
with the EXTPROC keyword.
When interfacing with Java, the EXTPROC
keyword requires three parameters:
h nomain
h option(*srcstmt:*nodebugio)
h datfmt(*ISO)
* Imported Procedures
d addInts pr 15P 0 extproc('addInts')
d 15P 0 CONST
d 15P 0 CONST
*
d subInts pr 15P 0 extproc('subInts')
d 15P 0 CONST
d 15P 0 CONST
* Exported Procedures
d add pr 10I 0 extproc(*JAVA:
d 'com.rpg.Math‘ : 'add')
d 10I 0 value
d 10I 0 value
*
d sub pr 10I 0 extproc(*JAVA:
d 'com.rpg.Math‘ : 'sub')
d 10I 0 value
d 10I 0 value
*
p add b EXPORT
d pi 10I 0
d p1 10I 0 value
d p2 10I 0 value
c return addInts(p1: p2)
p e
*
p sub b EXPORT
d pi 10I 0
d p1 10I 0 value
d p2 10I 0 value
c return subInts(p1: p2)
p e
Compiling the RPG
Create the RPG modules:
crtrpgmod calculator
crtrpgmod calcjni
Create the service program with or without
binding source:
crtsrvpgm jniformath module(calcjni
calculator) export(*all)
Write the Java code that calls RPG
package com.rpg;
public class Math {
static {
System.loadLibrary("JNIFORMATH");
}
native public int add(int add1, int add2);
native public int sub(int sub1, int sub2);
}
The JNI magic necessary for Java to call RPG
simply requires (1.) the name of the service
program to be provided in the parameter of the
call to System.loadLibrary() and (2.) the
creation of the native method signatures.
Your PC’s NotePad or WordPad editor is sufficient for this task.
The Unit Test
import junit.framework.*;
public class MathTest extends TestCase {
Math math;
protected void setUp() {
math = new Math();
}
public void testAdd() {
Assert.assertEquals(2, math.add(2,0));
Assert.assertEquals(2, math.add(1,1));
}
public void testSub() {
Assert.assertEquals(0, math.sub(2,2));
Assert.assertEquals(0, math.sub(1,1));
}
}
This class inherits from junit.framework.TestCase. To compile
and run, junit.jar must be in the classpath.
Save the Java source to the iSeries’ IFS using
the drive we mapped earlier, being careful to
match folders to the package statements.
Interaction of the Software Components
Preparing to Compile the Java Source
The Java source is in folders in the
iSeries’s IFS. We will compile and run
the Java programs in the QSHELL
environment on the iSeries.
From the command line of the iSeries
system where the Java and RPG are
placed, enter the command QSH to
start the alternative Unix shell
environment on iSeries.
Commands Useful in QSHELL
 LS – list files (similar to MS-DOS
DIR command)
 PWD – display name of current
folder
 CD – change directory (just as in
MS-DOS)
 CAT – takes a file name as its
parameter and displays file’s text
Java’s Compile Command
 JAVAC is the Java compiler. It can
be run by an IDE or from the
command line. It is most convenient
in this exercise to run JAVAC from
QSHELL.
Compile Dependencies
 The classes you compile in Java
may be dependent on JAR files just
as the compile of RPG programs can
be dependent on binding
directories, service programs and
modules.
 The Test classes will depend on
junit.jar.
Compiling With JAVAC
The Math class provides the JNI interface to
RPG. It was placed in the com.rpg package so
the compile command is as follows:
javac com/rpg/Math.java
The MathTest class inherits from
junit.framework.TestCase so, the junit.jar file
must be in the classpath when it is compiled:
javac –classpath .:../lib/junit.jar
MathTest.java
Running With JAVA
To execute Java Classes, the JAVA command
is used instead of CALL. Note that the
classpath contains the junit.jar file.
Also note that we are calling junit’s
TestRunner class and passing it the name of
our test class.
java -classpath .:../lib/junit.jar
junit.textui.TestRunner MathTest
The entire JAVA command above wraps to two lines but it is not
required that it do so.
Compile and Run the Java
Automating the Process: Run the Compile
and Test in a Shell Script
if !(javac -classpath .:../lib/junit.jar
src/** -d build/prod); then exit 1; fi;
jar -cf Math.jar build/prod/*.class
java -classpath .:../lib/junit.jar:Math.jar
junit.textui.TestRunner MathTest
ANT is another neat tool from the Open Source
community. ANT could be used to automate these tasks
but, that requires quite a long discussion.
A QSHELL script also provides a means to easily compile
the Java and run the tests. Create the script by placing
commands similar to those below in a file.
Results of Running the Script
A compile error interrupts the script when it is first
run. After the error in the Java source is corrected,
the script runs successfully, performing both the
compile and the testing.
Next Steps
 Don’t stop with just these tests.
Create more. Find out what breaks
your application’s code and attack
those problems.
 Implement a way for your team to
share, store and version tests.
 Learn Test Driven Development.
References
1. JUnit: http://junit.org
2. QSHELL for iSeries by Ted Holt and Fred
A. Kulack: http://skillport.books24x7.com
3. JNI Articles: http://
www.iseriesnetwork.com/artarchive/index.cfm
=ListArticlesByAuthor&ID=883
4. JNI RPG and the eBusiness World (ch 11)
http://publib.boulder.ibm.com/infocenter/iserie
References (continued)
 Sun’s Tutorial – First Steps for Unix:
http://java.sun.com/docs/books/tutoria


Unit Testing RPG with JUnit

  • 1.
    Unit Testing RPGwith JUnit "Never in the field of software development was so much owed by so many to so few lines of code" Martin Fowler (speaking of JUnit)
  • 2.
    Agenda  Costs ofManual Testing  Value of Automated Unit Testing  The Tools We’ll Use  Creating the Infrastructure  Reviewing the Component to be Tested  The Test Components  Writing the interface code and the Tests  Compiling the Java  Running the Tests  Automating the Process
  • 3.
    Costs of ManualTesting  Manual testing generally occurs late, just before integration. The cost to correct problems at this stage are ten to a hundred times greater than the cost to correct the problem before the project reaches this stage.  A problem found late in the development cycle can delay the carefully planned work of a dozen people.
  • 4.
    Value of AutomatedTesting  Writing tests before writing the application code increases cohesion and reduces coupling.  You won’t understand it until you’ve done it.  The tests are reusable. Reuse is free. Write tests once; verify quality a thousand times without lifting a finger.
  • 5.
    The Tools We’llUse  The JUnit JAR file (junit.jar)  iSeries QSHELL and shell scripts  javac, the Java compiler  JNI, Java Native Interface  iSeries Navigator  iSeries IFS (integrated file system)  PC-based Text Editor  iSeries Source Editor  RPG Compiler
  • 6.
    Creating the Infrastructure Add a “Share” to your IFS folder.  Map the share to Windows Explorer.  Place a copy of the JUnit jar file in your IFS folder.
  • 7.
    To add thefile share, use iSeries Navigator and select the Integrated File System on the iSeries on which you’ll be developing.
  • 8.
    Find or createyour IFS folder. We require one to be under Root/home.
  • 9.
    Right click andselect Sharing/New Share…
  • 10.
    Create the filesystem share Be sure to select Read/Write access!
  • 11.
    In Windows Explorer,select Tools/Map Network Drive…
  • 12.
    Complete mapping adrive to the share created earlier. Example: servershare
  • 13.
    Getting the JARFile  Download JUnit from http://junit.org  Open the Zip file, select the junit.jar and extract it your development folder on the iSeries share drive.
  • 14.
    Next Steps  Reviewthe ILE RPG procedures we will test.  Create the test components.  Run the tests.
  • 15.
    Review the RPGProcedures to be Tested * Trivial Example: Add and Subtract * h nomain h option(*srcstmt:*nodebugio) h datfmt(*ISO) * d addInts pr 15P 0 extproc('addInts') d 15P 0 CONST d 15P 0 CONST * d subInts pr 15P 0 extproc('subInts') d 15P 0 CONST d 15P 0 CONST * p addInts b EXPORT d pi 15P 0 d p1 15P 0 CONST d p2 15P 0 CONST c return p1 + p2 p e * p subInts b EXPORT d pi 15P 0 d p1 15P 0 CONST d p2 15P 0 CONST c return p1 - p2 p e
  • 16.
    The Test Components Tocreate and run the tests, 4 objects are required:  The service program to be tested.  The service program that provides the native interface to Java.  The Java Class that accesses the RPG service program.  The class that implements the unit test.
  • 17.
    Parameter Conversion Table Thenecessary information for converting parameter values is in chapter 11 of the RPG Programmer’s Guide.
  • 18.
    A second RPGmodule is required 1. the *JAVA keyword 2. the fully qualified name of the Java class that will execute this procedure. 3. the name of the Java method (marked native) which will call the ILE procedure. For Java to access the RPG, the ILE procedures must be given a Java interface with the EXTPROC keyword. When interfacing with Java, the EXTPROC keyword requires three parameters:
  • 19.
    h nomain h option(*srcstmt:*nodebugio) hdatfmt(*ISO) * Imported Procedures d addInts pr 15P 0 extproc('addInts') d 15P 0 CONST d 15P 0 CONST * d subInts pr 15P 0 extproc('subInts') d 15P 0 CONST d 15P 0 CONST * Exported Procedures d add pr 10I 0 extproc(*JAVA: d 'com.rpg.Math‘ : 'add') d 10I 0 value d 10I 0 value * d sub pr 10I 0 extproc(*JAVA: d 'com.rpg.Math‘ : 'sub') d 10I 0 value d 10I 0 value * p add b EXPORT d pi 10I 0 d p1 10I 0 value d p2 10I 0 value c return addInts(p1: p2) p e * p sub b EXPORT d pi 10I 0 d p1 10I 0 value d p2 10I 0 value c return subInts(p1: p2) p e
  • 20.
    Compiling the RPG Createthe RPG modules: crtrpgmod calculator crtrpgmod calcjni Create the service program with or without binding source: crtsrvpgm jniformath module(calcjni calculator) export(*all)
  • 21.
    Write the Javacode that calls RPG package com.rpg; public class Math { static { System.loadLibrary("JNIFORMATH"); } native public int add(int add1, int add2); native public int sub(int sub1, int sub2); } The JNI magic necessary for Java to call RPG simply requires (1.) the name of the service program to be provided in the parameter of the call to System.loadLibrary() and (2.) the creation of the native method signatures. Your PC’s NotePad or WordPad editor is sufficient for this task.
  • 22.
    The Unit Test importjunit.framework.*; public class MathTest extends TestCase { Math math; protected void setUp() { math = new Math(); } public void testAdd() { Assert.assertEquals(2, math.add(2,0)); Assert.assertEquals(2, math.add(1,1)); } public void testSub() { Assert.assertEquals(0, math.sub(2,2)); Assert.assertEquals(0, math.sub(1,1)); } } This class inherits from junit.framework.TestCase. To compile and run, junit.jar must be in the classpath.
  • 23.
    Save the Javasource to the iSeries’ IFS using the drive we mapped earlier, being careful to match folders to the package statements.
  • 24.
    Interaction of theSoftware Components
  • 25.
    Preparing to Compilethe Java Source The Java source is in folders in the iSeries’s IFS. We will compile and run the Java programs in the QSHELL environment on the iSeries. From the command line of the iSeries system where the Java and RPG are placed, enter the command QSH to start the alternative Unix shell environment on iSeries.
  • 26.
    Commands Useful inQSHELL  LS – list files (similar to MS-DOS DIR command)  PWD – display name of current folder  CD – change directory (just as in MS-DOS)  CAT – takes a file name as its parameter and displays file’s text
  • 27.
    Java’s Compile Command JAVAC is the Java compiler. It can be run by an IDE or from the command line. It is most convenient in this exercise to run JAVAC from QSHELL.
  • 28.
    Compile Dependencies  Theclasses you compile in Java may be dependent on JAR files just as the compile of RPG programs can be dependent on binding directories, service programs and modules.  The Test classes will depend on junit.jar.
  • 29.
    Compiling With JAVAC TheMath class provides the JNI interface to RPG. It was placed in the com.rpg package so the compile command is as follows: javac com/rpg/Math.java The MathTest class inherits from junit.framework.TestCase so, the junit.jar file must be in the classpath when it is compiled: javac –classpath .:../lib/junit.jar MathTest.java
  • 30.
    Running With JAVA Toexecute Java Classes, the JAVA command is used instead of CALL. Note that the classpath contains the junit.jar file. Also note that we are calling junit’s TestRunner class and passing it the name of our test class. java -classpath .:../lib/junit.jar junit.textui.TestRunner MathTest The entire JAVA command above wraps to two lines but it is not required that it do so.
  • 31.
  • 32.
    Automating the Process:Run the Compile and Test in a Shell Script if !(javac -classpath .:../lib/junit.jar src/** -d build/prod); then exit 1; fi; jar -cf Math.jar build/prod/*.class java -classpath .:../lib/junit.jar:Math.jar junit.textui.TestRunner MathTest ANT is another neat tool from the Open Source community. ANT could be used to automate these tasks but, that requires quite a long discussion. A QSHELL script also provides a means to easily compile the Java and run the tests. Create the script by placing commands similar to those below in a file.
  • 33.
    Results of Runningthe Script A compile error interrupts the script when it is first run. After the error in the Java source is corrected, the script runs successfully, performing both the compile and the testing.
  • 34.
    Next Steps  Don’tstop with just these tests. Create more. Find out what breaks your application’s code and attack those problems.  Implement a way for your team to share, store and version tests.  Learn Test Driven Development.
  • 35.
    References 1. JUnit: http://junit.org 2.QSHELL for iSeries by Ted Holt and Fred A. Kulack: http://skillport.books24x7.com 3. JNI Articles: http:// www.iseriesnetwork.com/artarchive/index.cfm =ListArticlesByAuthor&ID=883 4. JNI RPG and the eBusiness World (ch 11) http://publib.boulder.ibm.com/infocenter/iserie
  • 36.
    References (continued)  Sun’sTutorial – First Steps for Unix: http://java.sun.com/docs/books/tutoria 