SlideShare a Scribd company logo
1 of 66
Introduction to C# Windows Forms Applications
Windows Forms is a Graphical User Interface(GUI) class library which is bundled in .Net
Framework. Its main purpose is to provide an easier interface to develop the applications for
desktop, tablet, PCs. It is also termed as the WinForms. The applications which are developed
by using Windows Forms or WinForms are known as the Windows Forms Applications that
runs on the desktop computer. WinForms can be used only to develop the Windows Forms
Applications not web applications. WinForms applications can contain the different type of
controls like labels, list boxes, tooltip etc.
Creating a Windows Forms Application Using Visual Studio 2017
 First, open the Visual Studio then Go to File -> New -> Project to create a new project and
then select the language as Visual C# from the left menu. Click on Windows Forms
App(.NET Framework) in the middle of current window. After that give the project name
and Click OK.
 Here the solution is like a container which contains the projects and files that may be
required by the program.
 After that following window will display which will be divided into three parts as follows:
1. Editor Window or Main Window: Here, you will work with forms and code editing.
You can notice the layout of form which is now blank. You will double click the form
then it will open the code for that.
2. Solution Explorer Window: It is used to navigate between all items in solution. For
example, if you will select a file form this window then particular information will be
display in the property window.
3. Properties Window: This window is used to change the different properties of the
selected item in the Solution Explorer. Also, you can change the properties of
components or controls that you will add to the forms.
Now to add the controls to your WinForms application go to Toolbox tab present in the
extreme left side of Visual Studio. Here, you can see a list of controls. To access the most
commonly used controls go to Common Controls present in Toolbox tab.
 Now drag and drop the controls that you needed on created Form. For example, if you can
add TextBox, ListBox, Button etc. as shown below. By clicking on the particular dropped
control you can see and change its properties present in the right most corner of Visual
Studio.
In the above image, you can see the TextBox is selected and its properties like TextAlign,
MaxLength etc. are opened in right most corner. You can change its properties’ values as
per the application need. The code of controls will be automatically added in the
background. You can check the Form1.Designer.cs file present in the Solution Explorer
Window.
 To run the program you can use an F5 key or Play button present in the toolbar of Visual
Studio. To stop the program you can use pause button present in the ToolBar. You can also
run the program by going to Debug->Start Debugging menu in the menubar.
C# Windows Forms is a graphical user interface (GUI) framework that enables developers to
create desktop applications for the Windows operating system. Windows Forms applications
are created using the C# programming language and the .NET framework. They are built by
dragging and dropping controls such as buttons, text boxes, labels, and other user interface
elements onto a form.
1. The Windows Forms framework provides a rich set of controls that developers can use to
build applications with. These controls are designed to provide a consistent and familiar
user interface for Windows users. Developers can customize the appearance and behavior
of these controls by setting various properties and handling events.
2. To create a Windows Forms application in C#, you can use Microsoft Visual Studio, which
is an integrated development environment (IDE) that provides a visual designer to create
and layout the user interface elements. The visual designer is a drag-and-drop interface for
building your UI, and you can easily configure each control’s properties through a user-
friendly interface.
3. In addition to the visual designer, Visual Studio also provides a code editor that enables
developers to write the C# code for the application’s logic. Developers can handle events
and perform tasks such as data validation, data manipulation, and business logic
implementation.
4. Windows Forms applications are versatile and can be used to create various types of
applications such as data entry, management, and reporting applications, as well as games
and multimedia applications.
Overall, Windows Forms applications provide an easy-to-use and familiar graphical user
interface for Windows users, making it an ideal choice for building desktop applications that
require a high degree of interactivity and user engagement.
APPLICATION CLASS
Application is a class that encapsulates WPF application-specific functionality, including the
following:
 Application
Lifetime: Activated, Current, Deactivated, DispatcherUnhandledException, Exit, Run, Ses
sionEnding, Shutdown, ShutdownMode, Startup.
 Application-Scope Window, Property, and Resource
Management: FindResource, GetContentStream, GetResourceStream, LoadComponent,
MainWindow, Properties, Resources, StartupUri, Windows.
 Command-Line Parameter and Exit Code
Processing: Application.Startup, Application.Exit, Application.Shutdown.
 Navigation: FragmentNavigation, LoadCompleted, Navigated, Navigating, NavigationPro
gress, NavigationStopped, NavigationFailed, SetCookie, GetCookie.
Application implements the singleton pattern to provide shared access to its window, property,
and resource scope services. Consequently, only one instance of the Application class can be
created per AppDomain.
You can implement an Application using markup, markup and code-behind, or code.
If Application is implemented with markup, whether markup or markup and code-behind, the
markup file must be configured as an Microsoft build engine
(MSBuild) ApplicationDefinition item.
Note
A standalone application does not require an Application object; it is possible to implement a
custom static entry point method (Main) that opens a window without creating an instance
of Application. However, XAML browser applications (XBAPs) require an Application object.
Constructors
Application() Initializes a new instance of the Application class.
Properties
Current Gets the Application object for the current AppDomain.
Dispatcher Gets the Dispatcher this DispatcherObject is associated with.
(Inherited from DispatcherObject)
MainWindow Gets or sets the main window of the application.
Properties Gets a collection of application-scope properties.
ResourceAssembly Gets or sets the Assembly that provides the pack uniform resource
identifiers (URIs) for resources in a WPF application.
Resources Gets or sets a collection of application-scope resources, such as
styles and brushes.
ShutdownMode Gets or sets the condition that causes the Shutdown() method to be
called.
StartupUri Gets or sets a UI that is automatically shown when an application
starts.
Windows Gets the instantiated windows in an application.
Methods
CheckAccess() Determines whether the calling thread has
access to this DispatcherObject.
(Inherited from DispatcherObject)
Equals(Object) Determines whether the specified object is
equal to the current object.
(Inherited from Object)
FindResource(Object) Searches for a user interface (UI)
resource, such as a Style or Brush, with
the specified key, and throws an exception
if the requested resource is not found
(see XAML Resources).
GetContentStream(Uri) Returns a resource stream for a content
data file that is located at the
specified Uri (see WPF Application
Resource, Content, and Data Files).
GetCookie(Uri) Retrieves a cookie for the location
specified by a Uri.
GetHashCode() Serves as the default hash function.
(Inherited from Object)
GetRemoteStream(Uri) Returns a resource stream for a site-of-
origin data file that is located at the
specified Uri (see WPF Application
Resource, Content, and Data Files).
GetResourceStream(Uri) Returns a resource stream for a resource
data file that is located at the
specified Uri (see WPF Application
Resource, Content, and Data Files).
GetType() Gets the Type of the current instance.
(Inherited from Object)
LoadComponent(Object, Uri) Loads a XAML file that is located at the
specified uniform resource identifier
(URI) and converts it to an instance of the
object that is specified by the root element
of the XAML file.
LoadComponent(Uri) Loads a XAML file that is located at the
specified uniform resource identifier
(URI), and converts it to an instance of
the object that is specified by the root
element of the XAML file.
MemberwiseClone() Creates a shallow copy of the
current Object.
(Inherited from Object)
OnActivated(EventArgs) Raises the Activated event.
OnDeactivated(EventArgs) Raises the Deactivated event.
OnExit(ExitEventArgs) Raises the Exit event.
OnFragmentNavigation(FragmentNavigationEventArgs) Raises the FragmentNavigation event.
OnLoadCompleted(NavigationEventArgs) Raises the LoadCompleted event.
OnNavigated(NavigationEventArgs) Raises the Navigated event.
OnNavigating(NavigatingCancelEventArgs) Raises the Navigating event.
OnNavigationFailed(NavigationFailedEventArgs) Raises the NavigationFailed event.
OnNavigationProgress(NavigationProgressEventArgs) Raises the NavigationProgress event.
OnNavigationStopped(NavigationEventArgs) Raises the NavigationStopped event.
OnSessionEnding(SessionEndingCancelEventArgs) Raises the SessionEnding event.
OnStartup(StartupEventArgs) Raises the Startup event.
Run() Starts a Windows Presentation Foundation
application.
Run(Window) Starts a Windows Presentation Foundation
application and opens the specified
window.
SetCookie(Uri, String) Creates a cookie for the location specified
by a Uri.
Shutdown() Shuts down an application.
Shutdown(Int32) Shuts down an application that returns the
specified exit code to the operating
system.
ToString() Returns a string that represents the current
object.
(Inherited from Object)
TryFindResource(Object) Searches for the specified resource.
VerifyAccess() Enforces that the calling thread has access
to this DispatcherObject.
(Inherited from DispatcherObject)
Events
Activated Occurs when an application becomes the foreground application.
Deactivated Occurs when an application stops being the foreground
application.
DispatcherUnhandledException Occurs when an exception is thrown by an application but not
handled.
Exit Occurs just before an application shuts down and cannot be
canceled.
FragmentNavigation Occurs when a navigator in the application begins navigation to a
content fragment, Navigation occurs immediately if the desired
fragment is in the current content, or after the source XAML
content has been loaded if the desired fragment is in different
content.
LoadCompleted Occurs when content that was navigated to by a navigator in the
application has been loaded, parsed, and has begun rendering.
Navigated Occurs when the content that is being navigated to by a navigator
in the application has been found, although it may not have
completed loading.
Navigating Occurs when a new navigation is requested by a navigator in the
application.
NavigationFailed Occurs when an error occurs while a navigator in the application
is navigating to the requested content.
NavigationProgress Occurs periodically during a download that is being managed by a
navigator in the application to provide navigation progress
information.
NavigationStopped Occurs when the StopLoading method of a navigator in the
application is called, or when a new navigation is requested by a
navigator while a current navigation is in progress.
SessionEnding Occurs when the user ends the Windows session by logging off or
shutting down the operating system.
Startup Occurs when the Run() method of the Application object is called.
Explicit Interface Implementations
IQueryAmbient.IsAmbientPropertyAvailable(String)Queries for whether a specified ambient
property is available in the current scope.
Applies to
Product Versions
.NET Framework 3.0, 3.5, 4.0, 4.5, 4.5.1, 4.5.2, 4.6, 4.6.1, 4.6.2, 4.7, 4.7.1, 4.7.2, 4.8, 4.8.1
Windows Desktop 3.0, 3.1, 5, 6, 7, 8
Thread Safety
The public static (Shared in Visual Basic) members of this type are thread safe. In addition,
the FindResource(Object) and TryFindResource(Object) methods and
the Properties and Resources properties are thread safe.
FUNCTIONALITY OF THE CONTROL CLASS
Consistency and adaptability are two often-undeclared but implicit software design goals. In an
object-oriented world, a frequently employed mechanism to achieve these objectives is
inheritance.
In the System.Windows.Forms namespace, all controls derive from the Control class. The raw
Control class is not normally instantiated but rather forms the basis for further refining the user
interface hierarchy.
The Control class implements the basic functionality of controls and, where appropriate,
provides for members to be overridden. This approach promotes not only reusability but also
standardization. This can be seen in two Control class properties, Name and Text. The Name
property, the equivalent to a control ID in Win32, applies to all controls regardless of type and
therefore is not declared "virtual," whereas a Text property implementation differs depending on
the type and can be overridden. For example, Form.Text refers to the caption in the title bar,
while TextBox.Text returns the user's keyboard input.
In addition to many controls directly deriving from the Control class, a number of classes act as
intermediaries to collect controls into what loosely could be termed a behavioral unit. Figure
9.16 shows a number of these intermediate classes.
Figure 9.16: Intermediate Classes
The ButtonBase class, for instance, is the root of the Button, CheckBox, and RadioButton
classes, which exhibit a similar behavior. The ButtonBase class handles common chores such as
raising mouse and focus events. Other classes that use this method of control intercession will be
pointed out as they arise.
Another gauge of consistency in the Windows.Forms namespace is its treatment of collections.
While objects range from the general to the very specific, the means of accessing an object in a
collection remains consistent throughout the namespace. Each collection in the namespace has an
indexer, as well as identical methods to add and remove objects. The most commonly referenced
collection is the nested Control.ControlCollection, accessible through the read-only property
called Controls. This is a container for Control objects.
Some of the properties of the Control classes are defined in Table 9.2.
Table 9.2: Control Class Properties
Some Control class methods are itemized in Table 9.3.
Table 9.3: Control Class Methods
The Control class implements basic mouse and keyboard events, some of which are defined in
Table 9.4.
Table 9.4: Control Class Events
Besides the methods defined in Table 9.4, there are overridable methods for raising events
programmatically, such as OnClick, OnEnter, and OnKeyUp. When overriding any of these
eventtriggering methods, the base class's method must be called, so that any registered delegate
receives the event.
Control Classes
Table 9.5 lists some of the common control classes.
Table 9.5: Windows Forms Common Control Classes
As has been seen earlier, you can create these controls programmatically as well as from the
VS.NET Form Designer. The Form Designer allows you to drag and drop controls from the
toolbox onto a form. Here we will show you how to create a control manually and set its
properties.
Creating a Control
Use a constructor to create an instance of a control. Most controls are constructed with a default
constructor, that is, a constructor with no parameters. Here is an example of creating a Button
control:
Button btn1 = new System.Windows.Forms.Button();
Setting Properties
After creating the object, set the control's properties. The code in Listing 9.5 sets the button
properties.
Listing 9.5: Setting the properties of a Button Control
btn1.ImageAlign = System.Drawing.ContentAlignment.TopLeft;
btn1.Dock = System.Windows.Forms.DockStyle.Left;
btn1.ForeColor = System.Drawing.Color.Red;
btn1.BackColor = System.Drawing.SystemColors.Desktop;
btn1.DialogResult = System.Windows.Forms.DialogResult.OK;
btn1.AllowDrop = true;
btn1.FlatStyle = System.Windows.Forms.FlatStyle.Flat;
btn1.Size = new System.Drawing.Size (336, 568);
btn1.TabIndex = 0;
btn1.Font = new System.Drawing.Font ("Verdana", 10, System.Drawing.FontStyle.Bold);
btn1.Text = "Click Me";
Once you have set the properties, you can write an event handler for the control.
Conclusion
Hope this article would have helped you in understanding Working with Controls using C# in
windows programming. See other articles on the website on .NET and C#.
The Complete Visual C# Programmer's Guide covers most of the major components that make
up C# and the .net environment. The book is geared toward the intermediate programmer, but
contains enough material to satisfy the advanced developer.
BUILDING WINDOWS APPLICATIONS
In this article, we’ll achieve numerous goals. First of all, we’ll learn through a step-by-step
process to create the project in Visual Studio 2019 and create a windows form application.
Within the application, we’ll use the features of the drag and drop low code approach supported
for the Designer in Visual Studio 2019. A small part of gamification has been creatively put in to
make it interesting for beginners. Later, we run the application and look at the
prospective possibilities with the windows from the application.
The previous article, C# Connect to MySQL in Visual Studio 2019 will help you connect to the
database for applications in C# and the .NET framework from Visual Studio itself.
Step 1
Let us start with the installation of Visual Studio 2019. The Community edition is free for use.
Once installed, the following screen will pop up. Click on Launch.
Step 2
To start a new project, click on Create a new project.
Step 3
Now, as we are making a Windows Forms App, we choose the Windows Forms App (.NET
Framework).
If you don’t find the options available, it's probably not installed yet. You can select the Install
more tools and features and then choose the .NET desktop development workload which
supports console application building, windows forms application, and WPF.
Step 4
Fill in the project name, the location where the solutions repository will be saved, the solution
name, and the .NET framework of your choice. After that, Click on Create.
Step 5
The Visual Studio Solution will be created and the window will look similar to as shown below.
Step 6
In caset he Toolbox is not there, you can opt for it from the View section in Menu.
Step 7
The Toolbox should look similar to the following image.
Now, let us start our project. Choose the Button and then drag and top on the Designer.
I’ve created three buttons here, button1, button2, and button3.
The properties of the button can be seen in the Properties section. The Text shows the displayed
name of the button - the first button.
Let us change the text to Press Here.
Moreover, the Name of the Design is the one that will call functions for in the program. Here,
we name it btnPresshere.
Step 8
Let us go back to Toolbox and search for labels by typing in the search bar. Select the Label and
drag and drop one in the designer.
Step 9
The new label i.e. label1 is placed below the button Press Here.
The reason for the label is to call an action while pressing the Press Here button.
Step 10
Let us change the name of the label to labelPressHere. A good convention is to create label
names as per the action it operates to.
Step 11
Now double click the Press Here button from the Designer.
A class will be created automatically in the Form1.cs file that would look similar to the one
below.
Now, let us add the following code to create action while pressing the Press Here button.
labelPresshere.Text= “Welcome to C# Corner”
C#
Copy
Let us test what the program can do now. You can run the program, by clicking the Start button.
Let us see, what happens when we click the Press Here button.
See, label1 changes to Welcome to C# Corner now.
Step 12 - ROCK PAPER SCISSOR
Let us get creative now with button2. Let's create a small Rock Paper Scissor game.
Let us rename the button to Rock Paper Scissor and the label to labelRPS and create another
label called labelDYW.
Double Clicking the Rock Paper Scissor button, new classes are created.
Add the following code for button2_Click action.
privatevoidbutton2_Click(object sender,EventArgs e){
string[] game ={
"Rock",
"Paper",
"Scissor"
};
Random rand =newRandom();
int index =rand.Next(game.Length);
labelRockPaperScissor.Text= game[index];
labelDYW.Text="Did you win?";
}
C#
Copy
An array of strings named game is created. The random function is called and
with randomness for the possible outcome for Rock, Paper, and Scissor – this is now a legit
game you can play when you are bored.
Step 13
When we run the program, we can see, how every time we press the Rock Paper Scissor button,
the new Round comes out with a different answer. So, Did You Win?
Step 14
Let us go, and change the label text to white spaces. This will make the User Interface of the
App, cleaner as follows.
Step 15
Think of something creative of your own and making something out of the button3 from the
lessons you learned above.
Conclusion
Thus, in this article, we learned about creating the Windows Form Application in C# using
Visual Studio 2019. All the tools and resources in this article are freemium versions. So, you can
try it without any payment requirement. Here, we went through a step-by-step procedure to
create windows form app, design a simple app, call actions when clicking a button and with a
pinch of creativity, literally made a game. I wanted to showcase; how powerful programming is.
With this bit of learning, you have now entered a huge possibility of creation. You can now
make an app, you might in the future make a fun game. Find out problems that can be solved,
and with the stepping stone of today, their possibilities of creation are endless for you in days to
come.
Using StatusStripIn Windows Forms
INTRODUCTION
In this article, I am going to explain how to use a StatusStrip in a Windows Forms app using
Visual Studio 2017.
STEP 1 - Start the Project
Let's create a new project using Visual Studio 2017.
Select New Project--->Visual C#-->Windows Forms App (.NET Framework), give your project
a name and click OK.
This action creates a WinForms project with a default form and you should see the Windows
designer.
STEP 2 - Drag and Drop Control
Let's add a StatusStrip control to the form by dragging it from Toolbox and dropping it to the
form. You will see a StatusStrip 1 is added to the form. This control is now availabe to you in
the code behind.
StatusStrip Control
StatusStrip control displays windows status. It is usually at the bottom of a window. We use a
ToolStrip hyperlink in the C# windows forms Status Bar.
ToolStrip
StatusStrip replaces and extends the Status Bar control of the previous version. StatusStrip
control displays information about an object being viewed on a form, the object components or
contextual information that relates to that object's operation within the application.
Typically, a StatusStrip consists of ToolStrip objects, but by default, StatusStrip has no
panels. ToolStrip control is capable of hosting Button, Label, SplitButton, DropDownButton,
Separator, ComboBox, TextBox, and ProgressBar controls.
Now, let's add another control to the form by dragging a n control from the Toolbox to the form.
You may also want to change the properties of the other controls.
Let's add a Label, Button and Textbox control to the form. Change the text of button and Label
controls to what you like.
STEP 3 - Coding
Follow the coding given below,
1. private void textBox1_MouseHover(object sender, EventArgs e) {
2. toolStripStatusLabel1.Text = "Enter User Name ";
3. }
4. private void textBox1_MouseLeave(object sender, EventArgs e) {
5. toolStripStatusLabel1.Text = "";
6. }
7. private void textBox2_MouseHover(object sender, EventArgs e) {
8. toolStripStatusLabel1.Text = "Enter Password with minimum one character";
9. }
10. private void button1_MouseHover(object sender, EventArgs e) {
11. toolStripStatusLabel1.Text = "Click here to Login";
12. }
STEP 4 - Compile and Run
Now simply compile and run the application.
Once you place the cursor on the Textbox and Button, the corresponding text belonging to that
will be displayed on the Status Bar.
Build ToolBars Using ToolStrip Control In C#
oolStrip control provides functionality of Windows toolbar controls in Visual Studio 2010.
ToolStrip class represents a ToolStrip control in Windows Forms and serves as a base class of
MenuStrip, StatusStrip, and ContextMenuStrip classes.
In this article, I will discuss how to create and use a ToolStrip control and use its properties and
methods.
We can create a ToolStrip control at design-time using Visual Studio designer or using the
ToolStrip class at run-time.
Using Designer
To create a ToolStrip control at design-time, simply drag and drop a ToolStrip control from
Toolbox onto a Form. By default, a ToolStrip control is docked at the top of the Form. We can
change docking and other properties using the Tasks control as shown in Figure 1.
Figure 1
The next step is to set ToolStrip control properties. We can set properties by calling Properties
window by using Right click on the control and selecting Properties menu item or simply hitting
F4. Figure 2 shows Properties window where I set BackColor to green and GripStyle to Visible.
Figure 2
A ToolStrip control is nothing but a container without adding its child controls. A ToolStrip
control is capable of hosting Button, Label, SplitButton, DropDownButton, Separator,
ComboBox, TextBox and ProgressBar controls.
Now let's add a few controls to ToolStrip control.
If you click on a little dropdown handle on a ToolStrip control in designer, you will see a list of
possible controls (See Figure 3) that can be added to a ToolStrip. To add a control, simply select
that control and it will be added to the ToolStrip control.
Figure 3
Another way to add controls to a ToolStrip control is by using the Items property.
Click on the Items property and you will see Item Collection Editor that looks like Figure 4. We
are going to add a Button, a TextBox, and a Label control to ToolStrip with a few separators.
Figure 4
If you need to reposition controls, you can simply use up and down arrows.
Here is the good part. Once these controls are added to a ToolStrip control, they all act as
individual controls and you can access them by using their Name property anywhere in the code.
Now let's create a sample. We are going to add three Button controls, three separators and a
Label control as you can see in Figure 5.
Figure 5
Now next we are going to set an icon for the Button controls by setting Image property of
Button. See Figure 6.
Figure 6
Once you click on the browse option to browse an image, Resource editor window pops up
where you can import an image. Click on Import button and browse an image file.
Figure 7
We set three icons for all three buttons and the ToolStrip looks like Figure 8.
Figure 8
Next step is to set the button click event handler. It is easy. Just double click or use Events
window and set click event handlers for all three buttons.
Figure 9
Three button click event handlers look like the following where we set Text property of Label.
1. private void toolStripButton1_Click_1(object sender, EventArgs e) {
2. toolStripLabel1.Text = "Button1 is clicked";
3. }
4. private void toolStripButton2_Click_1(object sender, EventArgs e) {
5. toolStripLabel1.Text = "Button2 is clicked";
6. }
7. private void toolStripButton3_Click_1(object sender, EventArgs e) {
8. toolStripLabel1.Text = "Button3 is clicked";
9. }
Now if you run the project and click on Buttons, you will see something like Figure 10.
Figure 10
Summary
In this article, we discussed how to create and use a ToolStrip control in a Windows Forms
application.
Building MDI WinForms Application using C#
Implementing an MDI Form
The Multiple-Document Interface (MDI) is a specification that defines a user interface for
applications that enable the user to work with more than one document at the same time under
one parent form (window).
Visualize the working style of an application in which you are allowed to open multiple forms in
one parent container window, and all the open forms will get listed under the Windows menu.
Whereas having an individual window for each instance of the same application is termed as
single document interface (SDI); applications such as Notepad, Microsoft Paint, Calculator, and
so on, are SDI applications. SDI applications get opened only in their own windows and can
become difficult to manage, unlike when you have multiple documents or forms open inside one
MDI interface.
Hence, MDI applications follow a parent form and child form relationship model. MDI
applications allow you to open, organize, and work with multiple documents at the same time by
opening them under the context of the MDI parent form; therefore, once opened, they can't be
dragged out of it like an individual form.
The parent (MDI) form organizes and arranges all the child forms or documents that are
currently open. You might have seen such options in many Windows applications under a
Windows menu, such as Cascade, Tile Vertical, and so on.
Try It: Creating an MDI Parent Form with a Menu Bar
In this exercise, you will create an MDI form in the WinApp project. You will also see how to
create a menu bar for the parent form, that will allow you to navigate to all the child forms. To
do so, follow these steps:
1. Navigate to Solution Explorer, select the WinApp project, right-click, and select "Add" ->
"Windows form". Change the Name value from "Form1.cs" to "ParentForm.cs", and click
"Add".
2. Select the newly added ParentForm in the Design View. Select the ParentForm form by
clicking the form's title bar, navigate to the Properties window, and set the following
properties:
o Set the "IsMdiContainer" property to True (the default value is False). Notice that the
background color of the form has changed to dark gray.
o Set the Size property's Width to 546 and Height to 411.
3. Drag a MenuStrip control to the ParentForm. In the top-left corner, you should now see a
drop-down showing the text "Type Here". Enter the text "Open Forms" in the drop-down.
This will be your main, top-level menu.
4. Now under the Open Forms menu, add a submenu by entering the text "Win App".
5. Under the Win App submenu, enter "User Info".
6. Now click the top menu, "Open Forms", and on the right side of it, type "Help". Under the
Help menu, enter "Exit".
7. Now, click the top menu, on the right side of Help, type "Windows".
8. Under the Windows menu, add the following options as separate submenus: Cascade, Tile
Horizontal, Tile Vertical, and Arrange Icons. These will help in arranging the child forms.
9. Now it's time to attach code to the submenus you have added under the main menu Open
Forms. First, you'll add code for the submenu Win App, that basically will open the
WinApp form. In the Design View, double-click the "Win App" submenu, that will take
you to the Code View. Under the click event, add the following code:
WinAppobjWA = new WinApp();
objWA.Show();
10. Now to associate functionality with the User Info submenu: double-click this submenu, and
under the click event add the following code:
UserInfoobjUI = new UserInfo();
objUI.Show();
11. To associate functionality with the Exit submenu located under the Help main menu,
double-click "Exit", and under the click event add the following code:
Application.Exit();
12. Now you have the form-opening code functionality in place, and you are nearly set to run
the application. But first, you need to set the ParentForm as the start-up object. To do so,
open Program.cs, and modify the "Application.Run(new UserInfo());" statement to the
following:
Application.Run(new ParentForm());
13. Now build the solution, and run the application by pressing F5; the MDI application will
open and should look as in Figure 1-1.
Figure 1-1. Running an MDI form application
14. Now if you click "Win App" and then "User Info" then both the forms will open one by
one. These forms can be opened and dragged outside of the MDI form. This is not an
expected behavior from a MDI application, as shown in Figure 1-2.
This issue will be addressed later in this chapter.
Figure 1-2. Running an MDI form application
How It Works
Each Windows Forms form is a class and exposes a Show() function by an instance created for
it. You use the following code, that is creating an object and then invoking the Show() method.
This opens the other form from the MDI parent form.
This creates an instance of the WinApp form and opens it for you:
WinAppobjWA = new WinApp();
objWA.Show();
The following code creates an instance of the UserInfo form and opens it for you:
UserInfoobjUI = new UserInfo();
objUI.Show();
You close the application with the following code:
Application.Exit();
Try It: Opening an MDI Child Form Within an MDI Application
As mentioned and shown in Figure 1-2 above, the problem is that even though the MDI form
shows a parent menu, the forms are still able to open outside, and context is moved from a form
to another. You can try clicking the title bar of each the open form, and you will see how you can
move back and forth with these opened forms.
In this exercise, you will overcome this problem and associate all the forms you created earlier as
MDI child forms to the main MDI parent form you created in the previous task.
1. In the project you modified in the previous exercise, you'll first make the WinApp form an
MDI child form. To do so, you need to set the MdiParent property of the child form's object
to the MDI parent form itself, but in the Code View. You have already added functionality
in the previous task (opening the WinApp form); just before the line where you are calling
the Show() method, add the following code (this code can be found under Win App menu
click event):
objWA.MdiParent=this;
After adding this line, the code will appear as follows:
WinAppobjWA = new WinApp();
objWA.MdiParent = this;
objWA.Show();
Note: this is a C# language keyword that represents the current instance of the class. In this
case, it refers to ParentForm. Because you are writing this code inside ParentForm, you can
use the this keyword for the same.
Now you will make the UserInfo form an MDI child form. To do so, you need to set the
MdiParent property to the name of the MDI parent form but in the Code View. Add the
following code as you did in the previous step (this code can be found under the User Info
menu click event):
objUI.MdiParent=this;
After adding this line, the code will appear as follows:
UserInfoobjUI = new UserInfo();
objUI.MdiParent=this;
objUI.Show();
Now build the solution, and run the application by pressing F5; the MDI application will
open and should appear as shown in Figure 1-3.
Click "Open Form" -> "Win App"; the WinApp form should open. Again, open the main
menu and click "User Info". Both the forms should now be open inside your main MDI
parent form application, and unlike before, you will not be able to drag these out of your
MDI parent form (as shown in Figure 1-2). Figure 1-3 shows the expected behavior of an
MDI application with opened form(s).
Figure 1-3. Opening child forms inside an MDI form application:
Because both the forms are open inside one MDI parent, it becomes easier to work with
them, and they are not draggable outside of the MDI parent. Switch among these forms by
clicking their title bars. Once you are done with the forms, close the application by
selecting "Help" -> "Exit".
How It Works
As you noticed in an earlier exercise, the only issue discussed was that child forms opened and
were able to be dragged outside. In other words, they didn't really belong to a parent form. An
MDI application is about claiming a form with a menu bar as an MDI parent so all the child
forms can open inside it.
To do so, first an object of the child form needs to be created:
WinAppobjWA = new WinApp();
But before we really invoke the Show() method on the objWA, you need to tell the object who is
its parent so it operates from within the MDI parent form. To accomplish this, you will use the
"this" keyword, that represents the current form class.
objWA.MdiParent = this;
You have an object created and its context set to a MDI parent form, so now it's a perfect time to
call the Show() method, that will launch the form so you can work with it.
objWA.Show();
The "wa.MdiParent=this;" line tells the child form which form is its parent. Because you want all
the child forms to appear inside ParentForm and you write the code inside the MDI parent form,
you can use the "this" keyword to represent the current object.
Set the previous suggested changes for UserInfo as well.
UserInfoobjUI = new UserInfo();
objUI.MdiParent=this;
objUI.Show();
Try It: Arranging MDI Child Forms Within an MDI Application
Multiple forms will open within one MDI window, so once you have a few open, your MDI
application will be cluttered. It's hard to move forms around to shift your focus from one to
another. Hence, it is a prime concern to have a mechanism that allows you to arrange the forms
in an organized manner.
For example, in most applications you can arrange the forms and then cascade them so you can
see the stack of open forms. Or you can tile them vertically or horizontally so you can see
multiple forms side by side. You can even minimize all the open forms and arrange them as an
icon.
To accomplish this, in this exercise you will add the Windows menu as shown in Figure 1-4.
Figure 1-4. Windows menu of MDI form application to arrange child forms
.NET's Windows Forms offers the LayoutMdimethod, that takes the MdiLayout enumeration to
rearrange the child forms in an MDI parent form. There are four modes you can arrange your
forms into: Cascade, Tile Horizontal, Tile Vertical, and ArrangeIcons.
1. Open the ParentForm in the Design View, and click the Windows menu, as shown in
Figure 1-4.
2. Double-click the first option, Cascade, under Windows, and it will take you to its click
event. Add the following code:
LayoutMdi(MdiLayout.Cascade);
3. Double-click Tile Horizontal, and in the Code View under the click event, add the
following code:
LayoutMdi(MdiLayout.TileHorizontal);
4. Double-click the Tile Vertical, and in the Code View under the click event, add the
following code:
LayoutMdi(MdiLayout.TileVertical);
5. Double-click Tile Vertical, and in the Code View under the click event, add the following
code:
LayoutMdi(MdiLayout.ArrangeIcons);
6. Now build the solution, and run the application by pressing F5; the MDI application will
open. After it opens, go to the Open Forms menu and click Win App and User Info one by
one. It is important to have at least two forms open in the MDI parent form. Now go to the
Windows menu and try the available options by clicking Cascade, then Arrange Vertical,
then Arrange Horizontal, and finally Arrange Icons. When you will try these options, Tile
Vertical will show the child forms arranged as in Figure 1-5.
Figure 1-5. Arranging (Tile Vertical) child forms in the MDI form application
Controls
There are two differences between the controls and the Office ActiveX controls
1) windows form controls are implemented by extensible managed classes. Office controls are
unmanaged
2) windows form controls have no concept of their location in relation to the containing
workbook or document
You can use this.Controls collection to enumerate through all the controls
Control Prefix Comments
BackgroundWorker Allows the user to to execute an operation on a separate
(dedicated) thread.
Button btn Allows the user to run a separate subroutine.
CheckBox chb Allows the user to either select or deselect an option.
CheckedListBox chlb Allows the user to select multiple items from a list of items.
ComboBox cbo Allows the user to either select an item from a drop-down box
or enter a different item.
DataGridView dgr Allows the user to display (and edit) a table of information.
DateTimePicker dtp Allows the user to select a specific date and/or time.
DHTML Editing Control dht Allows the user to display a web page (not supported).
FolderBrowseDialog fol Allows the user to browse, create and select folders (not files).
GroupBox grp Allows you to group other controls together.
ImageList img Allows you to have a repository of images in your assembly.
Label lbl Allows you to display text to the user.
LinkLabel llb Allows you to include hyperlinks in your text.
ListBox lsb Allows the user to select an item from a list of items.
ListView lsv Allows the user to select a single (or multiple) items from a list
with multiple columns.
MenuStrip msp Allows the user to group commands by a common theme.
NumericUpDown nud Allows the user to display numeric values.
Panel pnl Allows the user an area for grouping controls and scrolling.
PictureBox pic (Image) Allows you to display a graphic or picture.
ProgressBar prg Allows the user to indicate progress using a graphical bar.
RadioButton rad (OptionButton) Allows the user to select from a list of possible
distinct options.
RefEdit ref
RichTextBox rch Allows the user to display text with formatting.
SplitContainer spl Allows you to split an area into two resizeable panels.
StatusStrip sts Allows you to add a status bar to your window.
TabControl tab Allows you to display multiple tabs of the same controls.
TableLayoutPanel tlp
TextBox txt (EditBox) Allows you to display text and to allow the user to
enter information.
ToolTip tip Allows you to display text when you hover over other controls.
ToolStrip tls Represents a panel in a StatusStrip control.
ToolStripButton tlsb Represents a selectable item for a ToolStrip control.
TreeView tvw Allows you to display a hierarchy of nodes with parents and
child.
VScrollBar vsb Allows the user to drag a button in order to select a value.
WebBrowser wbr Allows the user to include a web browser on a form.
Toolbox
This window holds a list of controls that you can drag onto the forms. There are different sets of
controls available, depending on the type of designer that is active, ie Windows Forms, Web
Forms, XML document. If you wish to customise which tools are dipsplayed in the toolbox, or if
you wish to add any additional .NET components, ActiveX controls or third party conttrols, click
(Tools >Customise Toolbar)
There are several categories on the Toolbox
Docking of a control to the top, left, right or bottom of the container. You can also set the Dock
property to DockStyle.Fill which will adjust the control to fill the container.
The Format menu allows you to:
 Lock the controls on a form
 Align selected controls with the primary control
 Resize controls to the dimensions of the control selected last
 Make equal, increase, decrease or rmeove the horizontal spacing between controls
Common Dialogs
ColorDialog
FileDialog
FontDialog
OpenFileDialog
PageSetupDialog
PrintDialog
PrintPreviewDialog
SaveFileDialog
(View > Tab Order)
If you set the Font property on a form, prior to adding any controls then all the controls will
inherit the font style for the form
You can select all the controls using (Ctrl + "A")
You can lock the controls (Format > Lock Controls). This prevents any of the controls on the
form being accidently moved.
(Format > Align)
Aligning controls is made a lot easier by having the grid on the form
The alignments and sizing options
Timer
This is an invisible stopwatch that gives you access to the system clock.
It can be used to count down from a preset time to cause a delay in a program or to repeat an
action at prescribed intervals.
Although timer objects ate not visible at runtime, each timer is associated with an event
procedure that runs every time the timer's preset interval has elapsed.
ActiveX Controls
You can easily expand the collection of controls that you have access to by loading ActiveX or
COM controls.
When you add an ActiveX control to your Toolbox, Visual Studio displays them with the .NET
controls and you can use them on your forms with few limitations. Visual Studio must create a
wrapper for the control to enable it to be used in a .NET program.
FileOpenDialog
WithdlgOpenFile
.CheckFileExists = True
.Filter = "Design Templates (*.pot)|*.pot"
If .ShowDialog = Windows.Forms.DialogResult.OKThen
txtTemplatePath.Text = .FileName
EndIf
EndWith
Me.tabMyTabControl.Controls.Find(key:="mytag", SearchAllChildren=True)
In Visual Studio.NET, there are no drawing controls provided in the Toolbox. Instead you are
encouraged to use GDI graphics services directly through the System.Drawing namespace.
bitmaps
icons
The System.Drawing namespace include numerous classes for creating graphics
Line DrawLine
Rectangle DrawRectangle
Arc DrawArc
Circle / Ellipse DrawEllipse
Polygon DrawPolygon
Curve DrawCurve
Beziersplines DrawBezier
Overloading Handlers
PrivateSubControl_OnEvent() Handles Control1.OnEvent, Control2.OnEvent
What is a Custom Control ?
no user interface
Positioning Controls
When you add controls to a windows form the default mode is GridLayout
They will be arranged using absolute positioning (x,y) corodinates
The other mode is FlowLayout
Here the controls are added top to bottom
The mode can be changed using the PageLayout property.
Setting Focus
txtTextBox.Select()
KB - 822493
Me.ActiveControl = Me.txtMyTextbox
Me.txtMyTextbox.Focus
BASIC CONTROLS
Web server controls are created on the server. The runat="server" attribute is added to the
control. The control is processed by the server. Some of the basic web server controls are
mentioned below.
1. Label control
2. TextBox control
3. ListBox control
4. CheckBox and CheckBoxList control
5. RadioButton and RadioButtonList control
6. DropdownList control
7. Button control
8. ImageButton control
9. Wizard control
1. Label control
The label control is used to show the text in a form. The text cannot be modified by user. The
text is static.
The properties for the label control are:
1. Text: The text for the label is assigned or retrieved
2. Visible: The label control is visible to the user
Syntax for label control:
Code:
<asp:Label ID="label1" runat="server" Text="Name" />
2. TextBox control
The data is retrieved from the user through the textbox control. The textbox control is single line,
multi line or password. In single line textbox, characters are added to single line. For multi line,
multiple lines are displayed. The characters are masked in the password.
The properties for the textbox control are:
1. Text: The text in the textbox control is accessed or assigned
2. Rows: The vertical size of the textbox control is assigned
3. Height: The height of the control is assigned
4. MaxLength: The maximum number of character is entered in the control.
Syntax for textbox control:
Code:
<asp:TextBox ID="Text1" runat="server" ></asp:TextBox>
3. ListBox control
The collection of list items is defined in the listbox control. More than one item can be selected
using the control.
1. Rows: The vertical size of the listbox control is set. If there are more times, a scroll bar is
added to it.
2. Items: The collection of list items is represented in the control
3. SelectionMode: The number of items selected by the user is set. The property can have
value as Single or Multiple.
4. SelectedValue: The value of the item currently selected by the user. The value is
dependent on one or more items selected.
4. CheckBox and CheckBoxList control
The individual choices are provided to the user through the checkbox control. A single checkbox
is added to the web form. The checkboxlist contains collection of checkboxes. The list is useful
when the user needs to add a series of checkboxes to the page.
Syntax for CheckBox control:
Code:
<asp:CheckBox ID="CheckBox1" runat="server"></asp:CheckBox>
Syntax for CheckboxList control:
Code:
<asp:CheckBoxList ID="CheckBoxList1" runat="server" AutoPostBack="True"
OnSelectedIndexChanged="CheckBoxList1_SelectedIndexChanged" >
</asp:CheckBoxList>
Properties of the checkbox control are:
1. Text: The text for the checkbox control is added.
2. Items: The individual check boxes are added to the control.
3. TextAlign: The alignment of the Text property of the control
4. RepeatDirection: The direction to which the control must be repeated is defined
5. RepeatColumns: The number of columns used for repeating the values
5. RadioButton and RadioButtonList control
The radiobutton control provides set of choices. The control can be added to the web form. A
single radio button is added in the radiobutton control. A collection of radio buttons is added to
the radiobuttonlist.
Syntax for RadioButton control:
Code:
<asp:RadioButton ID="Radio1" runat="server" ></asp:RadioButton>
Syntax for RadioButtonList control:
Code:
<asp:RadioButtonList ID="RadioButtonList1" runat="server" AutoPostBack="True"
OnSelectedIndexChanged="RadioButton1_SelectedIndexChanged" >
</asp:RadioButtonList>
Properties of RadioButtonList control:
1. Text: The text for the radiobutton control is added.
2. TextAlign: The alignment of the Text property of the control
3. Items: The individual radio buttons are added to the control.
4. RepeatColumns: The number of columns used for repeating the values
6. DropdownList control
The control allows user to select the values from some predefined items. An item is a separate
object containing the properties. User can add items through the Items property. Only one item
can be selected at a time.
Syntax for dropdown list control is:
Code:
<asp:DropDownList ID="Drop1" runat="server">
<Items>
</Items>
</asp:DropDownList>
The properties used in the drop down list control are:
1. Items: The collection of items present in the drop down list
2. Width: The width of the control is set.
3. Height: The vertical size of the control is set
7. Button control
The control is used for posting the data from the user to the web applications. The page is posted
to the server, the click event is triggered. Three types of button as LinkButton, ImageButton and
Button are provided by ASP.NET.
1. ImageButton: It is added in the form of a graphic button. A good look of the button
appears to the user.
2. LinkButton: It is used as a hyperlink on the web page. The client side script is used for
performing the postback to the server.
3. Button: The general button used for rendering the HTML input element.
8. ImageButton control
Animagebutton is used for displaying an image. All the image control properties are inherited
using the ImageButton control.
Properties of ImageButton control:
1. ImageAlign: User for aligning the image on the page. The values can be top, left, right,
bottom, etc.
2. ImageURL: The URL of the image is shown
3. CommandName: The command name associated with the control is displayed.
4. AlternativeText: The text to be displayed when the web browser does not support the
images.
5. CommandArgument: The event associated with the command name.
9. Wizard Control
The wizard contains group of forms for performing the specific task. It performs step by step
task for collecting user related information. It provides user with built in steps, add new steps and
modify the order of the steps.
User can navigate between the steps provided by the wizard. The data across the pages is
maintained in the state while performing the wizard steps.
Properties of the wizard control are:
1. ID: It states the unique identifier associated with the control
2. Enabled: The value stating the wizard content is enabled.
3. ToolTip: The text to be shown when the mouse hovers over the control
4. WizardSteps: A collection of all the WizardStepBase objects used for defining the control

More Related Content

Similar to unit 4.docx

Login Project with introduction .pptx
Login Project with introduction .pptxLogin Project with introduction .pptx
Login Project with introduction .pptxkulmiyealiabdille
 
Android Tutorial For Beginners Part-1
Android Tutorial For Beginners Part-1Android Tutorial For Beginners Part-1
Android Tutorial For Beginners Part-1Amit Saxena
 
Visual basic 6.0
Visual basic 6.0Visual basic 6.0
Visual basic 6.0sanket1996
 
Unit -II Introduction to visual programming.pdf
Unit -II Introduction to visual programming.pdfUnit -II Introduction to visual programming.pdf
Unit -II Introduction to visual programming.pdfUjwala Junghare
 
iPhone application development training day 1
iPhone application development training day 1iPhone application development training day 1
iPhone application development training day 1Shyamala Prayaga
 
Visual programming basic.ppt bs cs5th class
Visual programming basic.ppt bs cs5th classVisual programming basic.ppt bs cs5th class
Visual programming basic.ppt bs cs5th classmnewg218
 
vb-160518151614.pdf
vb-160518151614.pdfvb-160518151614.pdf
vb-160518151614.pdfLimEchYrr
 
vb-160518151614.pptx
vb-160518151614.pptxvb-160518151614.pptx
vb-160518151614.pptxLimEchYrr
 
Lecture 05. UI programming for Mobile Apps
Lecture 05. UI programming for Mobile AppsLecture 05. UI programming for Mobile Apps
Lecture 05. UI programming for Mobile AppsMaksym Davydov
 

Similar to unit 4.docx (20)

Login Project with introduction .pptx
Login Project with introduction .pptxLogin Project with introduction .pptx
Login Project with introduction .pptx
 
Vb.net ide
Vb.net ideVb.net ide
Vb.net ide
 
As pnet
As pnetAs pnet
As pnet
 
Chapter 01
Chapter 01Chapter 01
Chapter 01
 
Android Tutorial For Beginners Part-1
Android Tutorial For Beginners Part-1Android Tutorial For Beginners Part-1
Android Tutorial For Beginners Part-1
 
Visual basic 6.0
Visual basic 6.0Visual basic 6.0
Visual basic 6.0
 
4.C#
4.C#4.C#
4.C#
 
Unit -II Introduction to visual programming.pdf
Unit -II Introduction to visual programming.pdfUnit -II Introduction to visual programming.pdf
Unit -II Introduction to visual programming.pdf
 
Neha
NehaNeha
Neha
 
iPhone application development training day 1
iPhone application development training day 1iPhone application development training day 1
iPhone application development training day 1
 
Visual programming basic.ppt bs cs5th class
Visual programming basic.ppt bs cs5th classVisual programming basic.ppt bs cs5th class
Visual programming basic.ppt bs cs5th class
 
vb.pptx
vb.pptxvb.pptx
vb.pptx
 
vb-160518151614.pdf
vb-160518151614.pdfvb-160518151614.pdf
vb-160518151614.pdf
 
vb-160518151614.pptx
vb-160518151614.pptxvb-160518151614.pptx
vb-160518151614.pptx
 
Ch02 bronson
Ch02 bronsonCh02 bronson
Ch02 bronson
 
Lecture 05. UI programming for Mobile Apps
Lecture 05. UI programming for Mobile AppsLecture 05. UI programming for Mobile Apps
Lecture 05. UI programming for Mobile Apps
 
Web tech
Web techWeb tech
Web tech
 
Web tech
Web techWeb tech
Web tech
 
Web tech
Web techWeb tech
Web tech
 
Web techh
Web techhWeb techh
Web techh
 

Recently uploaded

VICTOR MAESTRE RAMIREZ - Planetary Defender on NASA's Double Asteroid Redirec...
VICTOR MAESTRE RAMIREZ - Planetary Defender on NASA's Double Asteroid Redirec...VICTOR MAESTRE RAMIREZ - Planetary Defender on NASA's Double Asteroid Redirec...
VICTOR MAESTRE RAMIREZ - Planetary Defender on NASA's Double Asteroid Redirec...VICTOR MAESTRE RAMIREZ
 
An experimental study in using natural admixture as an alternative for chemic...
An experimental study in using natural admixture as an alternative for chemic...An experimental study in using natural admixture as an alternative for chemic...
An experimental study in using natural admixture as an alternative for chemic...Chandu841456
 
Call Girls Narol 7397865700 Independent Call Girls
Call Girls Narol 7397865700 Independent Call GirlsCall Girls Narol 7397865700 Independent Call Girls
Call Girls Narol 7397865700 Independent Call Girlsssuser7cb4ff
 
Arduino_CSE ece ppt for working and principal of arduino.ppt
Arduino_CSE ece ppt for working and principal of arduino.pptArduino_CSE ece ppt for working and principal of arduino.ppt
Arduino_CSE ece ppt for working and principal of arduino.pptSAURABHKUMAR892774
 
Introduction to Machine Learning Unit-3 for II MECH
Introduction to Machine Learning Unit-3 for II MECHIntroduction to Machine Learning Unit-3 for II MECH
Introduction to Machine Learning Unit-3 for II MECHC Sai Kiran
 
Internship report on mechanical engineering
Internship report on mechanical engineeringInternship report on mechanical engineering
Internship report on mechanical engineeringmalavadedarshan25
 
pipeline in computer architecture design
pipeline in computer architecture  designpipeline in computer architecture  design
pipeline in computer architecture designssuser87fa0c1
 
HARMONY IN THE NATURE AND EXISTENCE - Unit-IV
HARMONY IN THE NATURE AND EXISTENCE - Unit-IVHARMONY IN THE NATURE AND EXISTENCE - Unit-IV
HARMONY IN THE NATURE AND EXISTENCE - Unit-IVRajaP95
 
Heart Disease Prediction using machine learning.pptx
Heart Disease Prediction using machine learning.pptxHeart Disease Prediction using machine learning.pptx
Heart Disease Prediction using machine learning.pptxPoojaBan
 
INFLUENCE OF NANOSILICA ON THE PROPERTIES OF CONCRETE
INFLUENCE OF NANOSILICA ON THE PROPERTIES OF CONCRETEINFLUENCE OF NANOSILICA ON THE PROPERTIES OF CONCRETE
INFLUENCE OF NANOSILICA ON THE PROPERTIES OF CONCRETEroselinkalist12
 
Churning of Butter, Factors affecting .
Churning of Butter, Factors affecting  .Churning of Butter, Factors affecting  .
Churning of Butter, Factors affecting .Satyam Kumar
 
Risk Assessment For Installation of Drainage Pipes.pdf
Risk Assessment For Installation of Drainage Pipes.pdfRisk Assessment For Installation of Drainage Pipes.pdf
Risk Assessment For Installation of Drainage Pipes.pdfROCENODodongVILLACER
 
Study on Air-Water & Water-Water Heat Exchange in a Finned Tube Exchanger
Study on Air-Water & Water-Water Heat Exchange in a Finned Tube ExchangerStudy on Air-Water & Water-Water Heat Exchange in a Finned Tube Exchanger
Study on Air-Water & Water-Water Heat Exchange in a Finned Tube ExchangerAnamika Sarkar
 
Biology for Computer Engineers Course Handout.pptx
Biology for Computer Engineers Course Handout.pptxBiology for Computer Engineers Course Handout.pptx
Biology for Computer Engineers Course Handout.pptxDeepakSakkari2
 

Recently uploaded (20)

VICTOR MAESTRE RAMIREZ - Planetary Defender on NASA's Double Asteroid Redirec...
VICTOR MAESTRE RAMIREZ - Planetary Defender on NASA's Double Asteroid Redirec...VICTOR MAESTRE RAMIREZ - Planetary Defender on NASA's Double Asteroid Redirec...
VICTOR MAESTRE RAMIREZ - Planetary Defender on NASA's Double Asteroid Redirec...
 
An experimental study in using natural admixture as an alternative for chemic...
An experimental study in using natural admixture as an alternative for chemic...An experimental study in using natural admixture as an alternative for chemic...
An experimental study in using natural admixture as an alternative for chemic...
 
young call girls in Rajiv Chowk🔝 9953056974 🔝 Delhi escort Service
young call girls in Rajiv Chowk🔝 9953056974 🔝 Delhi escort Serviceyoung call girls in Rajiv Chowk🔝 9953056974 🔝 Delhi escort Service
young call girls in Rajiv Chowk🔝 9953056974 🔝 Delhi escort Service
 
Call Us -/9953056974- Call Girls In Vikaspuri-/- Delhi NCR
Call Us -/9953056974- Call Girls In Vikaspuri-/- Delhi NCRCall Us -/9953056974- Call Girls In Vikaspuri-/- Delhi NCR
Call Us -/9953056974- Call Girls In Vikaspuri-/- Delhi NCR
 
Call Girls Narol 7397865700 Independent Call Girls
Call Girls Narol 7397865700 Independent Call GirlsCall Girls Narol 7397865700 Independent Call Girls
Call Girls Narol 7397865700 Independent Call Girls
 
Arduino_CSE ece ppt for working and principal of arduino.ppt
Arduino_CSE ece ppt for working and principal of arduino.pptArduino_CSE ece ppt for working and principal of arduino.ppt
Arduino_CSE ece ppt for working and principal of arduino.ppt
 
Design and analysis of solar grass cutter.pdf
Design and analysis of solar grass cutter.pdfDesign and analysis of solar grass cutter.pdf
Design and analysis of solar grass cutter.pdf
 
Introduction to Machine Learning Unit-3 for II MECH
Introduction to Machine Learning Unit-3 for II MECHIntroduction to Machine Learning Unit-3 for II MECH
Introduction to Machine Learning Unit-3 for II MECH
 
Internship report on mechanical engineering
Internship report on mechanical engineeringInternship report on mechanical engineering
Internship report on mechanical engineering
 
pipeline in computer architecture design
pipeline in computer architecture  designpipeline in computer architecture  design
pipeline in computer architecture design
 
POWER SYSTEMS-1 Complete notes examples
POWER SYSTEMS-1 Complete notes  examplesPOWER SYSTEMS-1 Complete notes  examples
POWER SYSTEMS-1 Complete notes examples
 
HARMONY IN THE NATURE AND EXISTENCE - Unit-IV
HARMONY IN THE NATURE AND EXISTENCE - Unit-IVHARMONY IN THE NATURE AND EXISTENCE - Unit-IV
HARMONY IN THE NATURE AND EXISTENCE - Unit-IV
 
young call girls in Green Park🔝 9953056974 🔝 escort Service
young call girls in Green Park🔝 9953056974 🔝 escort Serviceyoung call girls in Green Park🔝 9953056974 🔝 escort Service
young call girls in Green Park🔝 9953056974 🔝 escort Service
 
Heart Disease Prediction using machine learning.pptx
Heart Disease Prediction using machine learning.pptxHeart Disease Prediction using machine learning.pptx
Heart Disease Prediction using machine learning.pptx
 
INFLUENCE OF NANOSILICA ON THE PROPERTIES OF CONCRETE
INFLUENCE OF NANOSILICA ON THE PROPERTIES OF CONCRETEINFLUENCE OF NANOSILICA ON THE PROPERTIES OF CONCRETE
INFLUENCE OF NANOSILICA ON THE PROPERTIES OF CONCRETE
 
Churning of Butter, Factors affecting .
Churning of Butter, Factors affecting  .Churning of Butter, Factors affecting  .
Churning of Butter, Factors affecting .
 
Risk Assessment For Installation of Drainage Pipes.pdf
Risk Assessment For Installation of Drainage Pipes.pdfRisk Assessment For Installation of Drainage Pipes.pdf
Risk Assessment For Installation of Drainage Pipes.pdf
 
Study on Air-Water & Water-Water Heat Exchange in a Finned Tube Exchanger
Study on Air-Water & Water-Water Heat Exchange in a Finned Tube ExchangerStudy on Air-Water & Water-Water Heat Exchange in a Finned Tube Exchanger
Study on Air-Water & Water-Water Heat Exchange in a Finned Tube Exchanger
 
Biology for Computer Engineers Course Handout.pptx
Biology for Computer Engineers Course Handout.pptxBiology for Computer Engineers Course Handout.pptx
Biology for Computer Engineers Course Handout.pptx
 
🔝9953056974🔝!!-YOUNG call girls in Rajendra Nagar Escort rvice Shot 2000 nigh...
🔝9953056974🔝!!-YOUNG call girls in Rajendra Nagar Escort rvice Shot 2000 nigh...🔝9953056974🔝!!-YOUNG call girls in Rajendra Nagar Escort rvice Shot 2000 nigh...
🔝9953056974🔝!!-YOUNG call girls in Rajendra Nagar Escort rvice Shot 2000 nigh...
 

unit 4.docx

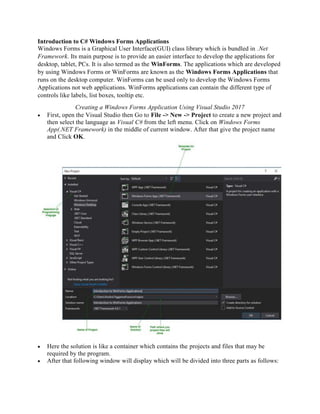
  • 1. Introduction to C# Windows Forms Applications Windows Forms is a Graphical User Interface(GUI) class library which is bundled in .Net Framework. Its main purpose is to provide an easier interface to develop the applications for desktop, tablet, PCs. It is also termed as the WinForms. The applications which are developed by using Windows Forms or WinForms are known as the Windows Forms Applications that runs on the desktop computer. WinForms can be used only to develop the Windows Forms Applications not web applications. WinForms applications can contain the different type of controls like labels, list boxes, tooltip etc. Creating a Windows Forms Application Using Visual Studio 2017  First, open the Visual Studio then Go to File -> New -> Project to create a new project and then select the language as Visual C# from the left menu. Click on Windows Forms App(.NET Framework) in the middle of current window. After that give the project name and Click OK.  Here the solution is like a container which contains the projects and files that may be required by the program.  After that following window will display which will be divided into three parts as follows:
  • 2. 1. Editor Window or Main Window: Here, you will work with forms and code editing. You can notice the layout of form which is now blank. You will double click the form then it will open the code for that. 2. Solution Explorer Window: It is used to navigate between all items in solution. For example, if you will select a file form this window then particular information will be display in the property window. 3. Properties Window: This window is used to change the different properties of the selected item in the Solution Explorer. Also, you can change the properties of components or controls that you will add to the forms. Now to add the controls to your WinForms application go to Toolbox tab present in the extreme left side of Visual Studio. Here, you can see a list of controls. To access the most commonly used controls go to Common Controls present in Toolbox tab.  Now drag and drop the controls that you needed on created Form. For example, if you can add TextBox, ListBox, Button etc. as shown below. By clicking on the particular dropped control you can see and change its properties present in the right most corner of Visual Studio.
  • 3. In the above image, you can see the TextBox is selected and its properties like TextAlign, MaxLength etc. are opened in right most corner. You can change its properties’ values as per the application need. The code of controls will be automatically added in the background. You can check the Form1.Designer.cs file present in the Solution Explorer Window.  To run the program you can use an F5 key or Play button present in the toolbar of Visual Studio. To stop the program you can use pause button present in the ToolBar. You can also run the program by going to Debug->Start Debugging menu in the menubar.
  • 4. C# Windows Forms is a graphical user interface (GUI) framework that enables developers to create desktop applications for the Windows operating system. Windows Forms applications are created using the C# programming language and the .NET framework. They are built by dragging and dropping controls such as buttons, text boxes, labels, and other user interface elements onto a form. 1. The Windows Forms framework provides a rich set of controls that developers can use to build applications with. These controls are designed to provide a consistent and familiar user interface for Windows users. Developers can customize the appearance and behavior of these controls by setting various properties and handling events. 2. To create a Windows Forms application in C#, you can use Microsoft Visual Studio, which is an integrated development environment (IDE) that provides a visual designer to create and layout the user interface elements. The visual designer is a drag-and-drop interface for building your UI, and you can easily configure each control’s properties through a user- friendly interface. 3. In addition to the visual designer, Visual Studio also provides a code editor that enables developers to write the C# code for the application’s logic. Developers can handle events and perform tasks such as data validation, data manipulation, and business logic implementation. 4. Windows Forms applications are versatile and can be used to create various types of applications such as data entry, management, and reporting applications, as well as games and multimedia applications. Overall, Windows Forms applications provide an easy-to-use and familiar graphical user interface for Windows users, making it an ideal choice for building desktop applications that require a high degree of interactivity and user engagement. APPLICATION CLASS Application is a class that encapsulates WPF application-specific functionality, including the following:  Application Lifetime: Activated, Current, Deactivated, DispatcherUnhandledException, Exit, Run, Ses sionEnding, Shutdown, ShutdownMode, Startup.  Application-Scope Window, Property, and Resource Management: FindResource, GetContentStream, GetResourceStream, LoadComponent, MainWindow, Properties, Resources, StartupUri, Windows.  Command-Line Parameter and Exit Code Processing: Application.Startup, Application.Exit, Application.Shutdown.  Navigation: FragmentNavigation, LoadCompleted, Navigated, Navigating, NavigationPro gress, NavigationStopped, NavigationFailed, SetCookie, GetCookie. Application implements the singleton pattern to provide shared access to its window, property, and resource scope services. Consequently, only one instance of the Application class can be created per AppDomain.
  • 5. You can implement an Application using markup, markup and code-behind, or code. If Application is implemented with markup, whether markup or markup and code-behind, the markup file must be configured as an Microsoft build engine (MSBuild) ApplicationDefinition item. Note A standalone application does not require an Application object; it is possible to implement a custom static entry point method (Main) that opens a window without creating an instance of Application. However, XAML browser applications (XBAPs) require an Application object. Constructors Application() Initializes a new instance of the Application class. Properties Current Gets the Application object for the current AppDomain. Dispatcher Gets the Dispatcher this DispatcherObject is associated with. (Inherited from DispatcherObject) MainWindow Gets or sets the main window of the application. Properties Gets a collection of application-scope properties. ResourceAssembly Gets or sets the Assembly that provides the pack uniform resource identifiers (URIs) for resources in a WPF application. Resources Gets or sets a collection of application-scope resources, such as styles and brushes. ShutdownMode Gets or sets the condition that causes the Shutdown() method to be called. StartupUri Gets or sets a UI that is automatically shown when an application starts. Windows Gets the instantiated windows in an application. Methods CheckAccess() Determines whether the calling thread has access to this DispatcherObject. (Inherited from DispatcherObject) Equals(Object) Determines whether the specified object is equal to the current object.
  • 6. (Inherited from Object) FindResource(Object) Searches for a user interface (UI) resource, such as a Style or Brush, with the specified key, and throws an exception if the requested resource is not found (see XAML Resources). GetContentStream(Uri) Returns a resource stream for a content data file that is located at the specified Uri (see WPF Application Resource, Content, and Data Files). GetCookie(Uri) Retrieves a cookie for the location specified by a Uri. GetHashCode() Serves as the default hash function. (Inherited from Object) GetRemoteStream(Uri) Returns a resource stream for a site-of- origin data file that is located at the specified Uri (see WPF Application Resource, Content, and Data Files). GetResourceStream(Uri) Returns a resource stream for a resource data file that is located at the specified Uri (see WPF Application Resource, Content, and Data Files). GetType() Gets the Type of the current instance. (Inherited from Object) LoadComponent(Object, Uri) Loads a XAML file that is located at the specified uniform resource identifier (URI) and converts it to an instance of the object that is specified by the root element of the XAML file. LoadComponent(Uri) Loads a XAML file that is located at the specified uniform resource identifier (URI), and converts it to an instance of the object that is specified by the root element of the XAML file. MemberwiseClone() Creates a shallow copy of the current Object. (Inherited from Object) OnActivated(EventArgs) Raises the Activated event. OnDeactivated(EventArgs) Raises the Deactivated event. OnExit(ExitEventArgs) Raises the Exit event.
  • 7. OnFragmentNavigation(FragmentNavigationEventArgs) Raises the FragmentNavigation event. OnLoadCompleted(NavigationEventArgs) Raises the LoadCompleted event. OnNavigated(NavigationEventArgs) Raises the Navigated event. OnNavigating(NavigatingCancelEventArgs) Raises the Navigating event. OnNavigationFailed(NavigationFailedEventArgs) Raises the NavigationFailed event. OnNavigationProgress(NavigationProgressEventArgs) Raises the NavigationProgress event. OnNavigationStopped(NavigationEventArgs) Raises the NavigationStopped event. OnSessionEnding(SessionEndingCancelEventArgs) Raises the SessionEnding event. OnStartup(StartupEventArgs) Raises the Startup event. Run() Starts a Windows Presentation Foundation application. Run(Window) Starts a Windows Presentation Foundation application and opens the specified window. SetCookie(Uri, String) Creates a cookie for the location specified by a Uri. Shutdown() Shuts down an application. Shutdown(Int32) Shuts down an application that returns the specified exit code to the operating system. ToString() Returns a string that represents the current object. (Inherited from Object) TryFindResource(Object) Searches for the specified resource. VerifyAccess() Enforces that the calling thread has access to this DispatcherObject. (Inherited from DispatcherObject) Events Activated Occurs when an application becomes the foreground application. Deactivated Occurs when an application stops being the foreground application. DispatcherUnhandledException Occurs when an exception is thrown by an application but not handled.
  • 8. Exit Occurs just before an application shuts down and cannot be canceled. FragmentNavigation Occurs when a navigator in the application begins navigation to a content fragment, Navigation occurs immediately if the desired fragment is in the current content, or after the source XAML content has been loaded if the desired fragment is in different content. LoadCompleted Occurs when content that was navigated to by a navigator in the application has been loaded, parsed, and has begun rendering. Navigated Occurs when the content that is being navigated to by a navigator in the application has been found, although it may not have completed loading. Navigating Occurs when a new navigation is requested by a navigator in the application. NavigationFailed Occurs when an error occurs while a navigator in the application is navigating to the requested content. NavigationProgress Occurs periodically during a download that is being managed by a navigator in the application to provide navigation progress information. NavigationStopped Occurs when the StopLoading method of a navigator in the application is called, or when a new navigation is requested by a navigator while a current navigation is in progress. SessionEnding Occurs when the user ends the Windows session by logging off or shutting down the operating system. Startup Occurs when the Run() method of the Application object is called. Explicit Interface Implementations IQueryAmbient.IsAmbientPropertyAvailable(String)Queries for whether a specified ambient property is available in the current scope. Applies to Product Versions .NET Framework 3.0, 3.5, 4.0, 4.5, 4.5.1, 4.5.2, 4.6, 4.6.1, 4.6.2, 4.7, 4.7.1, 4.7.2, 4.8, 4.8.1 Windows Desktop 3.0, 3.1, 5, 6, 7, 8
  • 9. Thread Safety The public static (Shared in Visual Basic) members of this type are thread safe. In addition, the FindResource(Object) and TryFindResource(Object) methods and the Properties and Resources properties are thread safe. FUNCTIONALITY OF THE CONTROL CLASS Consistency and adaptability are two often-undeclared but implicit software design goals. In an object-oriented world, a frequently employed mechanism to achieve these objectives is inheritance. In the System.Windows.Forms namespace, all controls derive from the Control class. The raw Control class is not normally instantiated but rather forms the basis for further refining the user interface hierarchy. The Control class implements the basic functionality of controls and, where appropriate, provides for members to be overridden. This approach promotes not only reusability but also standardization. This can be seen in two Control class properties, Name and Text. The Name property, the equivalent to a control ID in Win32, applies to all controls regardless of type and therefore is not declared "virtual," whereas a Text property implementation differs depending on the type and can be overridden. For example, Form.Text refers to the caption in the title bar, while TextBox.Text returns the user's keyboard input. In addition to many controls directly deriving from the Control class, a number of classes act as intermediaries to collect controls into what loosely could be termed a behavioral unit. Figure 9.16 shows a number of these intermediate classes. Figure 9.16: Intermediate Classes The ButtonBase class, for instance, is the root of the Button, CheckBox, and RadioButton classes, which exhibit a similar behavior. The ButtonBase class handles common chores such as raising mouse and focus events. Other classes that use this method of control intercession will be pointed out as they arise.
  • 10. Another gauge of consistency in the Windows.Forms namespace is its treatment of collections. While objects range from the general to the very specific, the means of accessing an object in a collection remains consistent throughout the namespace. Each collection in the namespace has an indexer, as well as identical methods to add and remove objects. The most commonly referenced collection is the nested Control.ControlCollection, accessible through the read-only property called Controls. This is a container for Control objects. Some of the properties of the Control classes are defined in Table 9.2. Table 9.2: Control Class Properties Some Control class methods are itemized in Table 9.3.
  • 11. Table 9.3: Control Class Methods The Control class implements basic mouse and keyboard events, some of which are defined in Table 9.4. Table 9.4: Control Class Events Besides the methods defined in Table 9.4, there are overridable methods for raising events programmatically, such as OnClick, OnEnter, and OnKeyUp. When overriding any of these eventtriggering methods, the base class's method must be called, so that any registered delegate receives the event. Control Classes Table 9.5 lists some of the common control classes.
  • 12. Table 9.5: Windows Forms Common Control Classes As has been seen earlier, you can create these controls programmatically as well as from the VS.NET Form Designer. The Form Designer allows you to drag and drop controls from the toolbox onto a form. Here we will show you how to create a control manually and set its properties. Creating a Control Use a constructor to create an instance of a control. Most controls are constructed with a default constructor, that is, a constructor with no parameters. Here is an example of creating a Button control: Button btn1 = new System.Windows.Forms.Button(); Setting Properties After creating the object, set the control's properties. The code in Listing 9.5 sets the button properties. Listing 9.5: Setting the properties of a Button Control btn1.ImageAlign = System.Drawing.ContentAlignment.TopLeft; btn1.Dock = System.Windows.Forms.DockStyle.Left; btn1.ForeColor = System.Drawing.Color.Red; btn1.BackColor = System.Drawing.SystemColors.Desktop; btn1.DialogResult = System.Windows.Forms.DialogResult.OK; btn1.AllowDrop = true; btn1.FlatStyle = System.Windows.Forms.FlatStyle.Flat; btn1.Size = new System.Drawing.Size (336, 568); btn1.TabIndex = 0; btn1.Font = new System.Drawing.Font ("Verdana", 10, System.Drawing.FontStyle.Bold); btn1.Text = "Click Me"; Once you have set the properties, you can write an event handler for the control. Conclusion Hope this article would have helped you in understanding Working with Controls using C# in windows programming. See other articles on the website on .NET and C#.
  • 13. The Complete Visual C# Programmer's Guide covers most of the major components that make up C# and the .net environment. The book is geared toward the intermediate programmer, but contains enough material to satisfy the advanced developer. BUILDING WINDOWS APPLICATIONS In this article, we’ll achieve numerous goals. First of all, we’ll learn through a step-by-step process to create the project in Visual Studio 2019 and create a windows form application. Within the application, we’ll use the features of the drag and drop low code approach supported for the Designer in Visual Studio 2019. A small part of gamification has been creatively put in to make it interesting for beginners. Later, we run the application and look at the prospective possibilities with the windows from the application. The previous article, C# Connect to MySQL in Visual Studio 2019 will help you connect to the database for applications in C# and the .NET framework from Visual Studio itself. Step 1 Let us start with the installation of Visual Studio 2019. The Community edition is free for use. Once installed, the following screen will pop up. Click on Launch. Step 2
  • 14. To start a new project, click on Create a new project. Step 3 Now, as we are making a Windows Forms App, we choose the Windows Forms App (.NET Framework).
  • 15. If you don’t find the options available, it's probably not installed yet. You can select the Install more tools and features and then choose the .NET desktop development workload which supports console application building, windows forms application, and WPF. Step 4 Fill in the project name, the location where the solutions repository will be saved, the solution name, and the .NET framework of your choice. After that, Click on Create.
  • 16. Step 5 The Visual Studio Solution will be created and the window will look similar to as shown below.
  • 17. Step 6 In caset he Toolbox is not there, you can opt for it from the View section in Menu.
  • 19. The Toolbox should look similar to the following image. Now, let us start our project. Choose the Button and then drag and top on the Designer. I’ve created three buttons here, button1, button2, and button3. The properties of the button can be seen in the Properties section. The Text shows the displayed name of the button - the first button.
  • 20. Let us change the text to Press Here.
  • 21. Moreover, the Name of the Design is the one that will call functions for in the program. Here, we name it btnPresshere. Step 8 Let us go back to Toolbox and search for labels by typing in the search bar. Select the Label and drag and drop one in the designer.
  • 22. Step 9 The new label i.e. label1 is placed below the button Press Here. The reason for the label is to call an action while pressing the Press Here button.
  • 23. Step 10 Let us change the name of the label to labelPressHere. A good convention is to create label names as per the action it operates to.
  • 24. Step 11 Now double click the Press Here button from the Designer.
  • 25. A class will be created automatically in the Form1.cs file that would look similar to the one below.
  • 26. Now, let us add the following code to create action while pressing the Press Here button. labelPresshere.Text= “Welcome to C# Corner” C# Copy Let us test what the program can do now. You can run the program, by clicking the Start button. Let us see, what happens when we click the Press Here button.
  • 27. See, label1 changes to Welcome to C# Corner now.
  • 28. Step 12 - ROCK PAPER SCISSOR Let us get creative now with button2. Let's create a small Rock Paper Scissor game. Let us rename the button to Rock Paper Scissor and the label to labelRPS and create another label called labelDYW.
  • 29. Double Clicking the Rock Paper Scissor button, new classes are created. Add the following code for button2_Click action. privatevoidbutton2_Click(object sender,EventArgs e){ string[] game ={ "Rock", "Paper", "Scissor" }; Random rand =newRandom(); int index =rand.Next(game.Length); labelRockPaperScissor.Text= game[index]; labelDYW.Text="Did you win?"; } C# Copy
  • 30. An array of strings named game is created. The random function is called and with randomness for the possible outcome for Rock, Paper, and Scissor – this is now a legit game you can play when you are bored. Step 13 When we run the program, we can see, how every time we press the Rock Paper Scissor button, the new Round comes out with a different answer. So, Did You Win?
  • 31.
  • 32. Step 14 Let us go, and change the label text to white spaces. This will make the User Interface of the App, cleaner as follows.
  • 33.
  • 34. Step 15 Think of something creative of your own and making something out of the button3 from the lessons you learned above. Conclusion Thus, in this article, we learned about creating the Windows Form Application in C# using Visual Studio 2019. All the tools and resources in this article are freemium versions. So, you can try it without any payment requirement. Here, we went through a step-by-step procedure to create windows form app, design a simple app, call actions when clicking a button and with a pinch of creativity, literally made a game. I wanted to showcase; how powerful programming is. With this bit of learning, you have now entered a huge possibility of creation. You can now make an app, you might in the future make a fun game. Find out problems that can be solved, and with the stepping stone of today, their possibilities of creation are endless for you in days to come.
  • 35. Using StatusStripIn Windows Forms INTRODUCTION In this article, I am going to explain how to use a StatusStrip in a Windows Forms app using Visual Studio 2017. STEP 1 - Start the Project Let's create a new project using Visual Studio 2017. Select New Project--->Visual C#-->Windows Forms App (.NET Framework), give your project a name and click OK. This action creates a WinForms project with a default form and you should see the Windows designer.
  • 36. STEP 2 - Drag and Drop Control Let's add a StatusStrip control to the form by dragging it from Toolbox and dropping it to the form. You will see a StatusStrip 1 is added to the form. This control is now availabe to you in the code behind. StatusStrip Control StatusStrip control displays windows status. It is usually at the bottom of a window. We use a ToolStrip hyperlink in the C# windows forms Status Bar. ToolStrip StatusStrip replaces and extends the Status Bar control of the previous version. StatusStrip control displays information about an object being viewed on a form, the object components or contextual information that relates to that object's operation within the application.
  • 37. Typically, a StatusStrip consists of ToolStrip objects, but by default, StatusStrip has no panels. ToolStrip control is capable of hosting Button, Label, SplitButton, DropDownButton, Separator, ComboBox, TextBox, and ProgressBar controls. Now, let's add another control to the form by dragging a n control from the Toolbox to the form. You may also want to change the properties of the other controls. Let's add a Label, Button and Textbox control to the form. Change the text of button and Label controls to what you like. STEP 3 - Coding Follow the coding given below, 1. private void textBox1_MouseHover(object sender, EventArgs e) { 2. toolStripStatusLabel1.Text = "Enter User Name ";
  • 38. 3. } 4. private void textBox1_MouseLeave(object sender, EventArgs e) { 5. toolStripStatusLabel1.Text = ""; 6. } 7. private void textBox2_MouseHover(object sender, EventArgs e) { 8. toolStripStatusLabel1.Text = "Enter Password with minimum one character"; 9. } 10. private void button1_MouseHover(object sender, EventArgs e) { 11. toolStripStatusLabel1.Text = "Click here to Login"; 12. } STEP 4 - Compile and Run Now simply compile and run the application. Once you place the cursor on the Textbox and Button, the corresponding text belonging to that will be displayed on the Status Bar.
  • 39. Build ToolBars Using ToolStrip Control In C#
  • 40. oolStrip control provides functionality of Windows toolbar controls in Visual Studio 2010. ToolStrip class represents a ToolStrip control in Windows Forms and serves as a base class of MenuStrip, StatusStrip, and ContextMenuStrip classes. In this article, I will discuss how to create and use a ToolStrip control and use its properties and methods. We can create a ToolStrip control at design-time using Visual Studio designer or using the ToolStrip class at run-time. Using Designer To create a ToolStrip control at design-time, simply drag and drop a ToolStrip control from Toolbox onto a Form. By default, a ToolStrip control is docked at the top of the Form. We can change docking and other properties using the Tasks control as shown in Figure 1. Figure 1 The next step is to set ToolStrip control properties. We can set properties by calling Properties window by using Right click on the control and selecting Properties menu item or simply hitting F4. Figure 2 shows Properties window where I set BackColor to green and GripStyle to Visible.
  • 41. Figure 2 A ToolStrip control is nothing but a container without adding its child controls. A ToolStrip control is capable of hosting Button, Label, SplitButton, DropDownButton, Separator, ComboBox, TextBox and ProgressBar controls. Now let's add a few controls to ToolStrip control. If you click on a little dropdown handle on a ToolStrip control in designer, you will see a list of possible controls (See Figure 3) that can be added to a ToolStrip. To add a control, simply select that control and it will be added to the ToolStrip control.
  • 42. Figure 3 Another way to add controls to a ToolStrip control is by using the Items property. Click on the Items property and you will see Item Collection Editor that looks like Figure 4. We are going to add a Button, a TextBox, and a Label control to ToolStrip with a few separators. Figure 4 If you need to reposition controls, you can simply use up and down arrows.
  • 43. Here is the good part. Once these controls are added to a ToolStrip control, they all act as individual controls and you can access them by using their Name property anywhere in the code. Now let's create a sample. We are going to add three Button controls, three separators and a Label control as you can see in Figure 5. Figure 5 Now next we are going to set an icon for the Button controls by setting Image property of Button. See Figure 6.
  • 44. Figure 6 Once you click on the browse option to browse an image, Resource editor window pops up where you can import an image. Click on Import button and browse an image file.
  • 45. Figure 7 We set three icons for all three buttons and the ToolStrip looks like Figure 8. Figure 8 Next step is to set the button click event handler. It is easy. Just double click or use Events window and set click event handlers for all three buttons.
  • 46. Figure 9 Three button click event handlers look like the following where we set Text property of Label. 1. private void toolStripButton1_Click_1(object sender, EventArgs e) { 2. toolStripLabel1.Text = "Button1 is clicked"; 3. } 4. private void toolStripButton2_Click_1(object sender, EventArgs e) { 5. toolStripLabel1.Text = "Button2 is clicked"; 6. } 7. private void toolStripButton3_Click_1(object sender, EventArgs e) { 8. toolStripLabel1.Text = "Button3 is clicked"; 9. } Now if you run the project and click on Buttons, you will see something like Figure 10.
  • 47. Figure 10 Summary In this article, we discussed how to create and use a ToolStrip control in a Windows Forms application. Building MDI WinForms Application using C# Implementing an MDI Form The Multiple-Document Interface (MDI) is a specification that defines a user interface for applications that enable the user to work with more than one document at the same time under one parent form (window). Visualize the working style of an application in which you are allowed to open multiple forms in one parent container window, and all the open forms will get listed under the Windows menu. Whereas having an individual window for each instance of the same application is termed as single document interface (SDI); applications such as Notepad, Microsoft Paint, Calculator, and so on, are SDI applications. SDI applications get opened only in their own windows and can become difficult to manage, unlike when you have multiple documents or forms open inside one MDI interface. Hence, MDI applications follow a parent form and child form relationship model. MDI applications allow you to open, organize, and work with multiple documents at the same time by opening them under the context of the MDI parent form; therefore, once opened, they can't be dragged out of it like an individual form. The parent (MDI) form organizes and arranges all the child forms or documents that are currently open. You might have seen such options in many Windows applications under a Windows menu, such as Cascade, Tile Vertical, and so on.
  • 48. Try It: Creating an MDI Parent Form with a Menu Bar In this exercise, you will create an MDI form in the WinApp project. You will also see how to create a menu bar for the parent form, that will allow you to navigate to all the child forms. To do so, follow these steps: 1. Navigate to Solution Explorer, select the WinApp project, right-click, and select "Add" -> "Windows form". Change the Name value from "Form1.cs" to "ParentForm.cs", and click "Add". 2. Select the newly added ParentForm in the Design View. Select the ParentForm form by clicking the form's title bar, navigate to the Properties window, and set the following properties: o Set the "IsMdiContainer" property to True (the default value is False). Notice that the background color of the form has changed to dark gray. o Set the Size property's Width to 546 and Height to 411. 3. Drag a MenuStrip control to the ParentForm. In the top-left corner, you should now see a drop-down showing the text "Type Here". Enter the text "Open Forms" in the drop-down. This will be your main, top-level menu. 4. Now under the Open Forms menu, add a submenu by entering the text "Win App". 5. Under the Win App submenu, enter "User Info". 6. Now click the top menu, "Open Forms", and on the right side of it, type "Help". Under the Help menu, enter "Exit". 7. Now, click the top menu, on the right side of Help, type "Windows". 8. Under the Windows menu, add the following options as separate submenus: Cascade, Tile Horizontal, Tile Vertical, and Arrange Icons. These will help in arranging the child forms. 9. Now it's time to attach code to the submenus you have added under the main menu Open Forms. First, you'll add code for the submenu Win App, that basically will open the WinApp form. In the Design View, double-click the "Win App" submenu, that will take you to the Code View. Under the click event, add the following code: WinAppobjWA = new WinApp(); objWA.Show(); 10. Now to associate functionality with the User Info submenu: double-click this submenu, and under the click event add the following code: UserInfoobjUI = new UserInfo(); objUI.Show(); 11. To associate functionality with the Exit submenu located under the Help main menu, double-click "Exit", and under the click event add the following code: Application.Exit();
  • 49. 12. Now you have the form-opening code functionality in place, and you are nearly set to run the application. But first, you need to set the ParentForm as the start-up object. To do so, open Program.cs, and modify the "Application.Run(new UserInfo());" statement to the following: Application.Run(new ParentForm()); 13. Now build the solution, and run the application by pressing F5; the MDI application will open and should look as in Figure 1-1. Figure 1-1. Running an MDI form application 14. Now if you click "Win App" and then "User Info" then both the forms will open one by one. These forms can be opened and dragged outside of the MDI form. This is not an expected behavior from a MDI application, as shown in Figure 1-2. This issue will be addressed later in this chapter.
  • 50. Figure 1-2. Running an MDI form application How It Works Each Windows Forms form is a class and exposes a Show() function by an instance created for it. You use the following code, that is creating an object and then invoking the Show() method. This opens the other form from the MDI parent form. This creates an instance of the WinApp form and opens it for you: WinAppobjWA = new WinApp(); objWA.Show(); The following code creates an instance of the UserInfo form and opens it for you: UserInfoobjUI = new UserInfo(); objUI.Show(); You close the application with the following code: Application.Exit(); Try It: Opening an MDI Child Form Within an MDI Application As mentioned and shown in Figure 1-2 above, the problem is that even though the MDI form shows a parent menu, the forms are still able to open outside, and context is moved from a form to another. You can try clicking the title bar of each the open form, and you will see how you can
  • 51. move back and forth with these opened forms. In this exercise, you will overcome this problem and associate all the forms you created earlier as MDI child forms to the main MDI parent form you created in the previous task. 1. In the project you modified in the previous exercise, you'll first make the WinApp form an MDI child form. To do so, you need to set the MdiParent property of the child form's object to the MDI parent form itself, but in the Code View. You have already added functionality in the previous task (opening the WinApp form); just before the line where you are calling the Show() method, add the following code (this code can be found under Win App menu click event): objWA.MdiParent=this; After adding this line, the code will appear as follows: WinAppobjWA = new WinApp(); objWA.MdiParent = this; objWA.Show(); Note: this is a C# language keyword that represents the current instance of the class. In this case, it refers to ParentForm. Because you are writing this code inside ParentForm, you can use the this keyword for the same. Now you will make the UserInfo form an MDI child form. To do so, you need to set the MdiParent property to the name of the MDI parent form but in the Code View. Add the following code as you did in the previous step (this code can be found under the User Info menu click event): objUI.MdiParent=this; After adding this line, the code will appear as follows: UserInfoobjUI = new UserInfo(); objUI.MdiParent=this; objUI.Show(); Now build the solution, and run the application by pressing F5; the MDI application will open and should appear as shown in Figure 1-3. Click "Open Form" -> "Win App"; the WinApp form should open. Again, open the main menu and click "User Info". Both the forms should now be open inside your main MDI parent form application, and unlike before, you will not be able to drag these out of your MDI parent form (as shown in Figure 1-2). Figure 1-3 shows the expected behavior of an MDI application with opened form(s).
  • 52. Figure 1-3. Opening child forms inside an MDI form application: Because both the forms are open inside one MDI parent, it becomes easier to work with them, and they are not draggable outside of the MDI parent. Switch among these forms by clicking their title bars. Once you are done with the forms, close the application by selecting "Help" -> "Exit". How It Works As you noticed in an earlier exercise, the only issue discussed was that child forms opened and were able to be dragged outside. In other words, they didn't really belong to a parent form. An MDI application is about claiming a form with a menu bar as an MDI parent so all the child forms can open inside it. To do so, first an object of the child form needs to be created: WinAppobjWA = new WinApp(); But before we really invoke the Show() method on the objWA, you need to tell the object who is its parent so it operates from within the MDI parent form. To accomplish this, you will use the "this" keyword, that represents the current form class.
  • 53. objWA.MdiParent = this; You have an object created and its context set to a MDI parent form, so now it's a perfect time to call the Show() method, that will launch the form so you can work with it. objWA.Show(); The "wa.MdiParent=this;" line tells the child form which form is its parent. Because you want all the child forms to appear inside ParentForm and you write the code inside the MDI parent form, you can use the "this" keyword to represent the current object. Set the previous suggested changes for UserInfo as well. UserInfoobjUI = new UserInfo(); objUI.MdiParent=this; objUI.Show(); Try It: Arranging MDI Child Forms Within an MDI Application Multiple forms will open within one MDI window, so once you have a few open, your MDI application will be cluttered. It's hard to move forms around to shift your focus from one to another. Hence, it is a prime concern to have a mechanism that allows you to arrange the forms in an organized manner. For example, in most applications you can arrange the forms and then cascade them so you can see the stack of open forms. Or you can tile them vertically or horizontally so you can see multiple forms side by side. You can even minimize all the open forms and arrange them as an icon.
  • 54. To accomplish this, in this exercise you will add the Windows menu as shown in Figure 1-4. Figure 1-4. Windows menu of MDI form application to arrange child forms .NET's Windows Forms offers the LayoutMdimethod, that takes the MdiLayout enumeration to rearrange the child forms in an MDI parent form. There are four modes you can arrange your forms into: Cascade, Tile Horizontal, Tile Vertical, and ArrangeIcons. 1. Open the ParentForm in the Design View, and click the Windows menu, as shown in Figure 1-4. 2. Double-click the first option, Cascade, under Windows, and it will take you to its click event. Add the following code: LayoutMdi(MdiLayout.Cascade); 3. Double-click Tile Horizontal, and in the Code View under the click event, add the following code: LayoutMdi(MdiLayout.TileHorizontal); 4. Double-click the Tile Vertical, and in the Code View under the click event, add the following code: LayoutMdi(MdiLayout.TileVertical);
  • 55. 5. Double-click Tile Vertical, and in the Code View under the click event, add the following code: LayoutMdi(MdiLayout.ArrangeIcons); 6. Now build the solution, and run the application by pressing F5; the MDI application will open. After it opens, go to the Open Forms menu and click Win App and User Info one by one. It is important to have at least two forms open in the MDI parent form. Now go to the Windows menu and try the available options by clicking Cascade, then Arrange Vertical, then Arrange Horizontal, and finally Arrange Icons. When you will try these options, Tile Vertical will show the child forms arranged as in Figure 1-5. Figure 1-5. Arranging (Tile Vertical) child forms in the MDI form application Controls There are two differences between the controls and the Office ActiveX controls 1) windows form controls are implemented by extensible managed classes. Office controls are unmanaged 2) windows form controls have no concept of their location in relation to the containing
  • 56. workbook or document You can use this.Controls collection to enumerate through all the controls Control Prefix Comments BackgroundWorker Allows the user to to execute an operation on a separate (dedicated) thread. Button btn Allows the user to run a separate subroutine. CheckBox chb Allows the user to either select or deselect an option. CheckedListBox chlb Allows the user to select multiple items from a list of items. ComboBox cbo Allows the user to either select an item from a drop-down box or enter a different item. DataGridView dgr Allows the user to display (and edit) a table of information. DateTimePicker dtp Allows the user to select a specific date and/or time. DHTML Editing Control dht Allows the user to display a web page (not supported). FolderBrowseDialog fol Allows the user to browse, create and select folders (not files). GroupBox grp Allows you to group other controls together. ImageList img Allows you to have a repository of images in your assembly. Label lbl Allows you to display text to the user. LinkLabel llb Allows you to include hyperlinks in your text. ListBox lsb Allows the user to select an item from a list of items. ListView lsv Allows the user to select a single (or multiple) items from a list with multiple columns.
  • 57. MenuStrip msp Allows the user to group commands by a common theme. NumericUpDown nud Allows the user to display numeric values. Panel pnl Allows the user an area for grouping controls and scrolling. PictureBox pic (Image) Allows you to display a graphic or picture. ProgressBar prg Allows the user to indicate progress using a graphical bar. RadioButton rad (OptionButton) Allows the user to select from a list of possible distinct options. RefEdit ref RichTextBox rch Allows the user to display text with formatting. SplitContainer spl Allows you to split an area into two resizeable panels. StatusStrip sts Allows you to add a status bar to your window. TabControl tab Allows you to display multiple tabs of the same controls. TableLayoutPanel tlp TextBox txt (EditBox) Allows you to display text and to allow the user to enter information. ToolTip tip Allows you to display text when you hover over other controls. ToolStrip tls Represents a panel in a StatusStrip control. ToolStripButton tlsb Represents a selectable item for a ToolStrip control. TreeView tvw Allows you to display a hierarchy of nodes with parents and child. VScrollBar vsb Allows the user to drag a button in order to select a value.
  • 58. WebBrowser wbr Allows the user to include a web browser on a form. Toolbox This window holds a list of controls that you can drag onto the forms. There are different sets of controls available, depending on the type of designer that is active, ie Windows Forms, Web Forms, XML document. If you wish to customise which tools are dipsplayed in the toolbox, or if you wish to add any additional .NET components, ActiveX controls or third party conttrols, click (Tools >Customise Toolbar) There are several categories on the Toolbox Docking of a control to the top, left, right or bottom of the container. You can also set the Dock property to DockStyle.Fill which will adjust the control to fill the container. The Format menu allows you to:  Lock the controls on a form  Align selected controls with the primary control  Resize controls to the dimensions of the control selected last  Make equal, increase, decrease or rmeove the horizontal spacing between controls Common Dialogs ColorDialog FileDialog FontDialog OpenFileDialog PageSetupDialog PrintDialog PrintPreviewDialog SaveFileDialog
  • 59. (View > Tab Order) If you set the Font property on a form, prior to adding any controls then all the controls will inherit the font style for the form You can select all the controls using (Ctrl + "A") You can lock the controls (Format > Lock Controls). This prevents any of the controls on the form being accidently moved. (Format > Align) Aligning controls is made a lot easier by having the grid on the form The alignments and sizing options Timer This is an invisible stopwatch that gives you access to the system clock. It can be used to count down from a preset time to cause a delay in a program or to repeat an action at prescribed intervals. Although timer objects ate not visible at runtime, each timer is associated with an event procedure that runs every time the timer's preset interval has elapsed. ActiveX Controls You can easily expand the collection of controls that you have access to by loading ActiveX or COM controls. When you add an ActiveX control to your Toolbox, Visual Studio displays them with the .NET controls and you can use them on your forms with few limitations. Visual Studio must create a wrapper for the control to enable it to be used in a .NET program. FileOpenDialog WithdlgOpenFile .CheckFileExists = True
  • 60. .Filter = "Design Templates (*.pot)|*.pot" If .ShowDialog = Windows.Forms.DialogResult.OKThen txtTemplatePath.Text = .FileName EndIf EndWith Me.tabMyTabControl.Controls.Find(key:="mytag", SearchAllChildren=True) In Visual Studio.NET, there are no drawing controls provided in the Toolbox. Instead you are encouraged to use GDI graphics services directly through the System.Drawing namespace. bitmaps icons The System.Drawing namespace include numerous classes for creating graphics Line DrawLine Rectangle DrawRectangle Arc DrawArc Circle / Ellipse DrawEllipse Polygon DrawPolygon Curve DrawCurve Beziersplines DrawBezier
  • 61. Overloading Handlers PrivateSubControl_OnEvent() Handles Control1.OnEvent, Control2.OnEvent What is a Custom Control ? no user interface Positioning Controls When you add controls to a windows form the default mode is GridLayout They will be arranged using absolute positioning (x,y) corodinates The other mode is FlowLayout Here the controls are added top to bottom The mode can be changed using the PageLayout property. Setting Focus txtTextBox.Select() KB - 822493
  • 62. Me.ActiveControl = Me.txtMyTextbox Me.txtMyTextbox.Focus BASIC CONTROLS Web server controls are created on the server. The runat="server" attribute is added to the control. The control is processed by the server. Some of the basic web server controls are mentioned below. 1. Label control 2. TextBox control 3. ListBox control 4. CheckBox and CheckBoxList control 5. RadioButton and RadioButtonList control 6. DropdownList control 7. Button control 8. ImageButton control 9. Wizard control 1. Label control The label control is used to show the text in a form. The text cannot be modified by user. The text is static. The properties for the label control are: 1. Text: The text for the label is assigned or retrieved 2. Visible: The label control is visible to the user Syntax for label control: Code: <asp:Label ID="label1" runat="server" Text="Name" /> 2. TextBox control The data is retrieved from the user through the textbox control. The textbox control is single line,
  • 63. multi line or password. In single line textbox, characters are added to single line. For multi line, multiple lines are displayed. The characters are masked in the password. The properties for the textbox control are: 1. Text: The text in the textbox control is accessed or assigned 2. Rows: The vertical size of the textbox control is assigned 3. Height: The height of the control is assigned 4. MaxLength: The maximum number of character is entered in the control. Syntax for textbox control: Code: <asp:TextBox ID="Text1" runat="server" ></asp:TextBox> 3. ListBox control The collection of list items is defined in the listbox control. More than one item can be selected using the control. 1. Rows: The vertical size of the listbox control is set. If there are more times, a scroll bar is added to it. 2. Items: The collection of list items is represented in the control 3. SelectionMode: The number of items selected by the user is set. The property can have value as Single or Multiple. 4. SelectedValue: The value of the item currently selected by the user. The value is dependent on one or more items selected. 4. CheckBox and CheckBoxList control The individual choices are provided to the user through the checkbox control. A single checkbox is added to the web form. The checkboxlist contains collection of checkboxes. The list is useful when the user needs to add a series of checkboxes to the page. Syntax for CheckBox control: Code: <asp:CheckBox ID="CheckBox1" runat="server"></asp:CheckBox> Syntax for CheckboxList control:
  • 64. Code: <asp:CheckBoxList ID="CheckBoxList1" runat="server" AutoPostBack="True" OnSelectedIndexChanged="CheckBoxList1_SelectedIndexChanged" > </asp:CheckBoxList> Properties of the checkbox control are: 1. Text: The text for the checkbox control is added. 2. Items: The individual check boxes are added to the control. 3. TextAlign: The alignment of the Text property of the control 4. RepeatDirection: The direction to which the control must be repeated is defined 5. RepeatColumns: The number of columns used for repeating the values 5. RadioButton and RadioButtonList control The radiobutton control provides set of choices. The control can be added to the web form. A single radio button is added in the radiobutton control. A collection of radio buttons is added to the radiobuttonlist. Syntax for RadioButton control: Code: <asp:RadioButton ID="Radio1" runat="server" ></asp:RadioButton> Syntax for RadioButtonList control: Code: <asp:RadioButtonList ID="RadioButtonList1" runat="server" AutoPostBack="True" OnSelectedIndexChanged="RadioButton1_SelectedIndexChanged" > </asp:RadioButtonList> Properties of RadioButtonList control: 1. Text: The text for the radiobutton control is added. 2. TextAlign: The alignment of the Text property of the control 3. Items: The individual radio buttons are added to the control. 4. RepeatColumns: The number of columns used for repeating the values 6. DropdownList control The control allows user to select the values from some predefined items. An item is a separate object containing the properties. User can add items through the Items property. Only one item
  • 65. can be selected at a time. Syntax for dropdown list control is: Code: <asp:DropDownList ID="Drop1" runat="server"> <Items> </Items> </asp:DropDownList> The properties used in the drop down list control are: 1. Items: The collection of items present in the drop down list 2. Width: The width of the control is set. 3. Height: The vertical size of the control is set 7. Button control The control is used for posting the data from the user to the web applications. The page is posted to the server, the click event is triggered. Three types of button as LinkButton, ImageButton and Button are provided by ASP.NET. 1. ImageButton: It is added in the form of a graphic button. A good look of the button appears to the user. 2. LinkButton: It is used as a hyperlink on the web page. The client side script is used for performing the postback to the server. 3. Button: The general button used for rendering the HTML input element. 8. ImageButton control Animagebutton is used for displaying an image. All the image control properties are inherited using the ImageButton control. Properties of ImageButton control: 1. ImageAlign: User for aligning the image on the page. The values can be top, left, right, bottom, etc. 2. ImageURL: The URL of the image is shown 3. CommandName: The command name associated with the control is displayed. 4. AlternativeText: The text to be displayed when the web browser does not support the images. 5. CommandArgument: The event associated with the command name.
  • 66. 9. Wizard Control The wizard contains group of forms for performing the specific task. It performs step by step task for collecting user related information. It provides user with built in steps, add new steps and modify the order of the steps. User can navigate between the steps provided by the wizard. The data across the pages is maintained in the state while performing the wizard steps. Properties of the wizard control are: 1. ID: It states the unique identifier associated with the control 2. Enabled: The value stating the wizard content is enabled. 3. ToolTip: The text to be shown when the mouse hovers over the control 4. WizardSteps: A collection of all the WizardStepBase objects used for defining the control