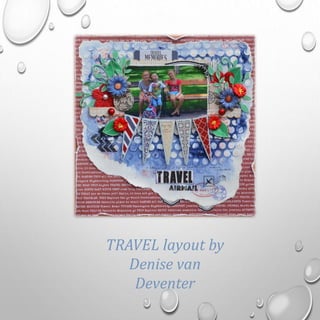
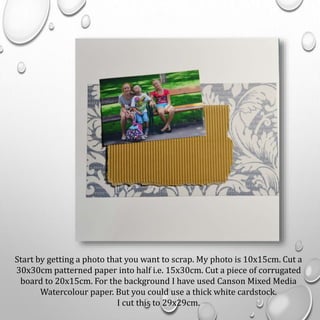
Paper Craft Planet and Stampendous team up to bring you this weekly series on the Basics of Rubber Stamping.
This is lesson #2 -- an introduction to spectrum inks and different stamping techniques.
Learn the basics of rubber stamping with this free class from Stampendous and Paper Craft Planet.
Lesson Ten: This week we're coloring with pencils and markers. Learn about lighting sources and different techniques to give your images a sense of depth and definition.
Woodcut is a relief printing technique in printmaking. An artist carves an image into the surface of a block of wood —typically with gouges —leaving the printing parts level with the surface while removing the non-printing parts. Areas that the artist cuts away carry no ink, while characters or images at surface level carry the ink to produce the print. The block is cut along the wood grain (unlike wood engraving, where the block is cut in the end-grain). The surface is covered with ink by rolling over the surface with an ink-covered roller (brayer), leaving ink upon the flat surface but not in the non-printing areas. Multiple colours can be printed by keying the paper to a frame around the woodblocks (using a different block for each colour).
Paper Craft Planet and Stampendous team up to bring you this weekly series on the Basics of Rubber Stamping.
This is lesson #5 -- embossing and painting with powder techniques
Paper Craft Planet and Stampendous team up to bring you this weekly series on the Basics of Rubber Stamping.
This is lesson #6 -- flock and glitter techniques
Paper Craft Planet and Stampendous team up to bring you this weekly series on the Basics of Rubber Stamping.
This is lesson #2 -- an introduction to spectrum inks and different stamping techniques.
Learn the basics of rubber stamping with this free class from Stampendous and Paper Craft Planet.
Lesson Ten: This week we're coloring with pencils and markers. Learn about lighting sources and different techniques to give your images a sense of depth and definition.
Woodcut is a relief printing technique in printmaking. An artist carves an image into the surface of a block of wood —typically with gouges —leaving the printing parts level with the surface while removing the non-printing parts. Areas that the artist cuts away carry no ink, while characters or images at surface level carry the ink to produce the print. The block is cut along the wood grain (unlike wood engraving, where the block is cut in the end-grain). The surface is covered with ink by rolling over the surface with an ink-covered roller (brayer), leaving ink upon the flat surface but not in the non-printing areas. Multiple colours can be printed by keying the paper to a frame around the woodblocks (using a different block for each colour).
Paper Craft Planet and Stampendous team up to bring you this weekly series on the Basics of Rubber Stamping.
This is lesson #5 -- embossing and painting with powder techniques
Paper Craft Planet and Stampendous team up to bring you this weekly series on the Basics of Rubber Stamping.
This is lesson #6 -- flock and glitter techniques
Paper Craft Planet Presents Back to Basics with Stampendous: Lesson 9GreenMellen Media
Learn the basics of rubber stamping with this free class from Stampendous and Paper Craft Planet.
Lesson Nine: Out of ink? No worries -- this lesson is all about learning to stamp with bleach! Create dramatic results by stamping with this household cleaner.
Paper Craft Planet Presents Back to Basics with Stampendous: Lesson 8GreenMellen Media
Learn the basics of rubber stamping with this free class from Stampendous and Paper Craft Planet.
Lesson Eight: manipulate polymer stamps to change the image and create a custom look.
Simple and hassle-free. This is an art book with 100+ of the best personal project ideas you'll find on the market. today. This is an art book with 100+ of the best personal project ideas you'll find on the market today.
All the prompts are easy to follow and can be done by anyone, no matter how much experience you have with art.
Includes one monthly delivery of a painting idea for the novice painter.
How to make a collage. Which papers to use, where to find them, how to apply them. Which glues work best. Background techniques. Image transfer techniques.
The perfect Sundabet Slot mudah menang Promo new member Animated PDF for your conversation. Discover and Share the best GIFs on Tenor
Admin Ramah Cantik Aktif 24 Jam Nonstop siap melayani pemain member Sundabet login via apk sundabet rtp daftar slot gacor daftar
The Legacy of Breton In A New Age by Master Terrance LindallBBaez1
Brave Destiny 2003 for the Future for Technocratic Surrealmageddon Destiny for Andre Breton Legacy in Agenda 21 Technocratic Great Reset for Prison Planet Earth Galactica! The Prophecy of the Surreal Blasphemous Desires from the Paradise Lost Governments!
Explore the multifaceted world of Muntadher Saleh, an Iraqi polymath renowned for his expertise in visual art, writing, design, and pharmacy. This SlideShare delves into his innovative contributions across various disciplines, showcasing his unique ability to blend traditional themes with modern aesthetics. Learn about his impactful artworks, thought-provoking literary pieces, and his vision as a Neo-Pop artist dedicated to raising awareness about Iraq's cultural heritage. Discover why Muntadher Saleh is celebrated as "The Last Polymath" and how his multidisciplinary talents continue to inspire and influence.
thGAP - BAbyss in Moderno!! Transgenic Human Germline Alternatives ProjectMarc Dusseiller Dusjagr
thGAP - Transgenic Human Germline Alternatives Project, presents an evening of input lectures, discussions and a performative workshop on artistic interventions for future scenarios of human genetic and inheritable modifications.
To begin our lecturers, Marc Dusseiller aka "dusjagr" and Rodrigo Martin Iglesias, will give an overview of their transdisciplinary practices, including the history of hackteria, a global network for sharing knowledge to involve artists in hands-on and Do-It-With-Others (DIWO) working with the lifesciences, and reflections on future scenarios from the 8-bit computer games of the 80ies to current real-world endeavous of genetically modifiying the human species.
We will then follow up with discussions and hands-on experiments on working with embryos, ovums, gametes, genetic materials from code to slime, in a creative and playful workshop setup, where all paticipant can collaborate on artistic interventions into the germline of a post-human future.
2137ad - Characters that live in Merindol and are at the center of main storiesluforfor
Kurgan is a russian expatriate that is secretly in love with Sonia Contado. Henry is a british soldier that took refuge in Merindol Colony in 2137ad. He is the lover of Sonia Contado.
2137ad Merindol Colony Interiors where refugee try to build a seemengly norm...luforfor
This are the interiors of the Merindol Colony in 2137ad after the Climate Change Collapse and the Apocalipse Wars. Merindol is a small Colony in the Italian Alps where there are around 4000 humans. The Colony values mainly around meritocracy and selection by effort.
2. Start by getting a photo that you want to scrap. My photo is 10x15cm. Cut a
30x30cm patterned paper into half i.e. 15x30cm. Cut a piece of corrugated
board to 20x15cm. For the background I have used Canson Mixed Media
Watercolour paper. But you could use a thick white cardstock.
I cut this to 29x29cm.
3. Hand tear all sides of your patterned paper, by about 1 to 1,5cm off,
around all sides. Do the same with the corrugated board but leave the
top edge of your corrugated board straight.
4. To stick your patterned paper onto the cardstock, use strips of double
sides tape. This will help for the paper not to bend and buckle once
you apply the gesso and paints. Stick your patterned paper in the
middle of your cardstock and about 3cm down from the top edge.
5. Choose a stencil for your mixed media and get out your Acrylic Gesso
and an old credit card or spatula.
6. Use the credit card to spread a fairly even layer of gesso around the
edges of the patterned paper towards the edges of the cardstock on
the top and sides, but only about 5cm down from the bottom edge of
the patterned paper and a bit more (+-7cm), towards the right hand
side bottom.
7. Allow the gesso to dry naturally or dry off with a heat gun. Make sure
the gesso is dry before you start with the paints. Place your layout on
a plastic sheet for the watercolouring. Have your paint to hand
(Adirondack Ranger Acrylic Paint Denim Blue), a water spritzer, a
paintbrush and some dabbing up paper.
8. First spray some water over the gesso areas, so that the gesso and
paper is just wet. You will see the paper edges start to curl, but don’t
worry, they will settle down again.
9. Dab some paint with your paintbrush into the water. You don’t need
big dollops, just small amounts. Add more water with your spritzer
right into the centre of your paint dabs. You will see the paint runs
into the water. Then spritz water again, in and around the gesso
parts of your page.
10. Pick up your page and tilt it in various directions to allow the water
and paint to run into the gesso areas. If it runs to a place you don’t
want it to, just dab it up with your carlton towel or toilet paper. Keep
adding more water and paint, until you are happy that it covers the
gesso and surrounding cardstock. Allow it to dry naturally or use a
heat gun to dry it off.
11. Once the paint it dry, hand tear along the top and side edges and
then at an angle down towards the right hand side of the page. So
that you have something to the effect of the photo above. Leave some
cardstock white space around the watercolour edge, as this is the
attractive part and you don’t want to tear that off.
12. Once again I use strips of double sided tape to stick this down onto
the final background, so that if your page has buckled a bit, the strips
pull it straight. When sticking it down, pull off a middle strip to start
with, position it on the patterned background and stick. Pull off the
remaining strips one at a time from the centre out, smoothing from
the centre outwards each time.
13. Stick your watercolour feature onto the background, as explained in
the previous slide. Position it evenly in the middle. Use a paper
distresser to distress the edges of your final patterned background.
(the red written paper)
14. Use a paper distresser to distress the
edges of your final patterned
background.
15. Now use some white acrylic paint and a
paintbrush, to whiten up the edges of
the corrugated board.
16. Allow some strokes to be longer than
others, so that you get an uneven edge,
as shown above. Allow the paint to dry
or use a heat gun to dry it.
17. Now the fun begins! This is where you
now start adding your photo and
embelishments! ;-)
18. Sand the edges of your photo with some
sandpaper or a sanding block.
19. Paste your photo onto the corrugated
board. I raised my photo with some
foam to give it dimension. Do not stick
the photo right to the edges, as you
might want to still place an
embellishment underneath the edges of
your photo.
20. Add stickers and die-cuts alongside the
sides of the photo, with their edges
placed just beneath the photo. I used
some foam squares to add dimension to
my layers.
21. I matted some banner stickers on cardstock and then created
this banner, with some twine under the stickers. The stickers
are raised with foam squares. The twine is then just rolled
round 2 brads, that I altered to flatten their pins and then
stuck down with glue dots. The glue dots hold the twine in
place.
22. Add some random stamping. The chevrons and bottom right
cluster stamps are stamped with an acrylic block to give
solid images, unlike the random stamping. For the random
stamping just press the stamp with your fingers onto the
page. This does not give a solid image and is uneven, which is
exactly the look you want.
23. Add some more die-cuts or cut out elements, along with
flowers and leaves. Layer these so that some are raised and
others flat. I added my title “Travel” and also a little line of
journaling.
Voila…you have created your layout and are done! ;-)
25. Supplies List
• Teresa Collins Now and Then Collection –
Stickers, Papers, Die-Cuts
• Canson Mixed Media Watercolour Paper
• Cardstock – Bazzill – Green and Light Blue
• Stamps
1. Prima Cartographer
2. Papermania – All Aboard – Postmark
3. 7 Gypsies – Par Avion
• Flowers
1. Petaloo
2. Bazill Basics
3. Prima
• Twine
• Brads – My Minds Eye – Lost and Found 1
• Stencil – Prima
• Acrylic Gesso – Dala
• Acrylic Paint – Adirondack Ranger – Denim
Blue