Downloaded 268 times

![2 ENIS – GI 3 – 2017/2018 Mme. Amal ABID
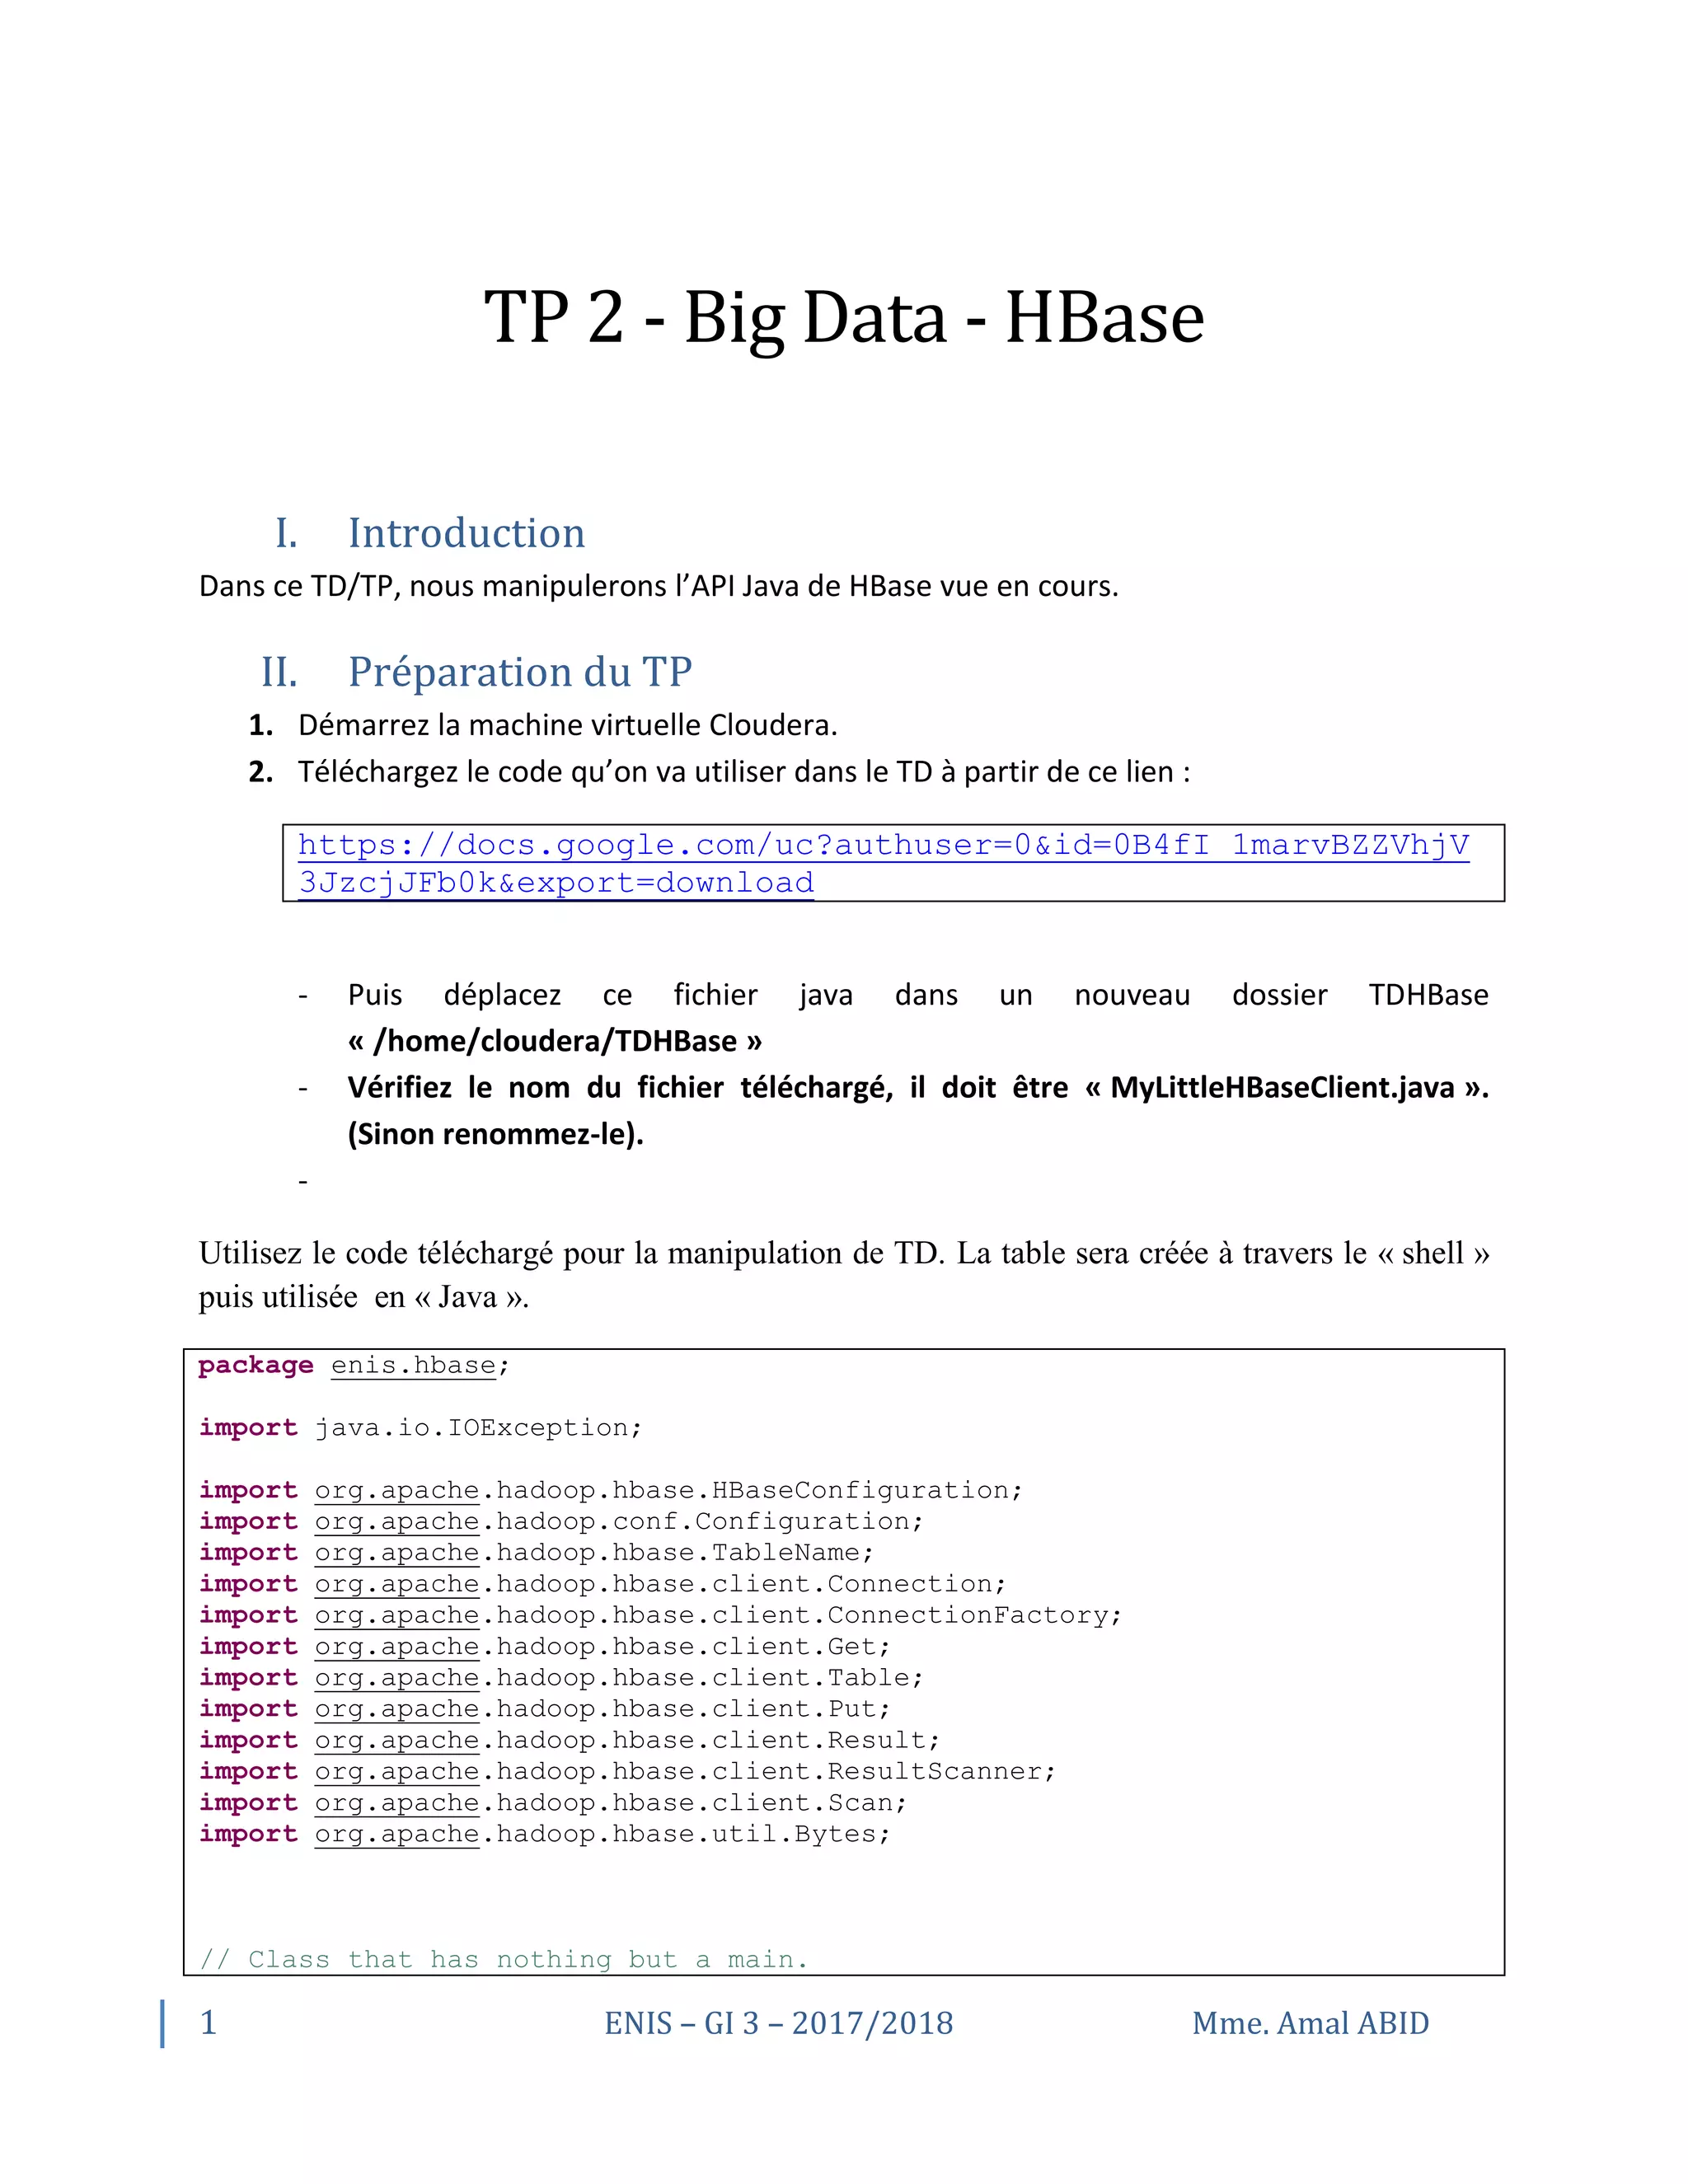
// Does a Put, Get and a Scan against an hbase table.
// The API described here is since HBase 1.0.
public class MyLittleHBaseClient {
public static void main(String[] args) throws IOException {
// You need a configuration object to tell the client where to connect.
// When you create a HBaseConfiguration, it reads in whatever you've set
// into your hbase-site.xml and in hbase-default.xml, as long as these
can
// be found on the CLASSPATH
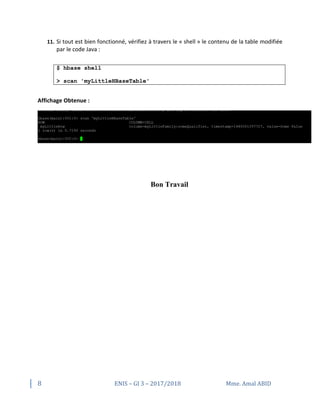
Configuration config = new Configuration();
config = HBaseConfiguration.create(config);
// Next you need a Connection to the cluster. Create one. When done with
it,
// close it. A try/finally is a good way to ensure it gets closed or use
// the jdk7 idiom, try-with-resources: see
//
https://docs.oracle.com/javase/tutorial/essential/exceptions/tryResourceClose
.html
//
// Connections are heavyweight. Create one once and keep it around. From
a Connection
// you get a Table instance to access Tables, an Admin instance to
administer the cluster,
// and RegionLocator to find where regions are out on the cluster. As
opposed to Connections,
// Table, Admin and RegionLocator instances are lightweight; create as
you need them and then
// close when done.
//
Connection connection = ConnectionFactory.createConnection(config);
try {
// The below instantiates a Table object that connects you to the
"myLittleHBaseTable" table
// (TableName.valueOf turns String into a TableName instance).
// When done with it, close it (Should start a try/finally after this
creation so it gets
// closed for sure the jdk7 idiom, try-with-resources: see
//
https://docs.oracle.com/javase/tutorial/essential/exceptions/tryResourceClose
.html)
Table table =
connection.getTable(TableName.valueOf("myLittleHBaseTable"));
try {
// To add to a row, use Put. A Put constructor takes the name of the
row
// you want to insert into as a byte array. In HBase, the Bytes
class has
// utility for converting all kinds of java types to byte arrays. In
the
// below, we are converting the String "myLittleRow" into a byte
array to
// use as a row key for our update. Once you have a Put instance, you
can
// adorn it by setting the names of columns you want to update on the](https://image.slidesharecdn.com/tp2bigdata-hbase-171106120550/85/TP2-Big-Data-HBase-2-320.jpg)
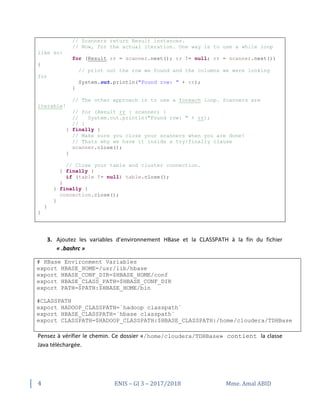
![3 ENIS – GI 3 – 2017/2018 Mme. Amal ABID
row,
// the timestamp to use in your update, etc. If no timestamp, the
server
// applies current time to the edits.
Put p = new Put(Bytes.toBytes("myLittleRow"));
// To set the value you'd like to update in the row 'myLittleRow',
specify
// the column family, column qualifier, and value of the table cell
you'd
// like to update. The column family must already exist in your
table
// schema. The qualifier can be anything. All must be specified as
byte
// arrays as hbase is all about byte arrays. Lets pretend the table
// 'myLittleHBaseTable' was created with a family 'myLittleFamily'.
p.addColumn(Bytes.toBytes("myLittleFamily"),
Bytes.toBytes("someQualifier"),
Bytes.toBytes("Some Value"));
// Once you've adorned your Put instance with all the updates you
want to
// make, to commit it do the following (The HTable#put method takes
the
// Put instance you've been building and pushes the changes you made
into
// hbase)
table.put(p);
// Now, to retrieve the data we just wrote. The values that come back
are
// Result instances. Generally, a Result is an object that will
package up
// the hbase return into the form you find most palatable.
Get g = new Get(Bytes.toBytes("myLittleRow"));
Result r = table.get(g);
byte [] value = r.getValue(Bytes.toBytes("myLittleFamily"),
Bytes.toBytes("someQualifier"));
// If we convert the value bytes, we should get back 'Some Value',
the
// value we inserted at this location.
String valueStr = Bytes.toString(value);
System.out.println("GET: " + valueStr);
// Sometimes, you won't know the row you're looking for. In this
case, you
// use a Scanner. This will give you cursor-like interface to the
contents
// of the table. To set up a Scanner, do like you did above making a
Put
// and a Get, create a Scan. Adorn it with column names, etc.
Scan s = new Scan();
s.addColumn(Bytes.toBytes("myLittleFamily"),
Bytes.toBytes("someQualifier"));
ResultScanner scanner = table.getScanner(s);
try {](https://image.slidesharecdn.com/tp2bigdata-hbase-171106120550/85/TP2-Big-Data-HBase-3-320.jpg)
![5 ENIS – GI 3 – 2017/2018 Mme. Amal ABID
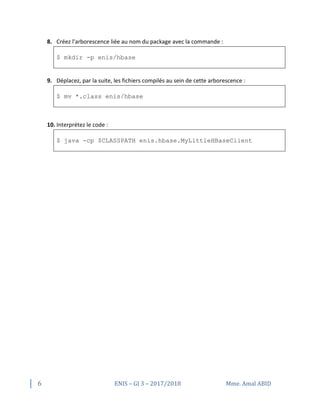
Après modification du fichier « .bashrc », et pour que le système prenne en compte cette
modification, redémarrez la machine : [sudo reboot] ou bien recharger le fichier ~/.bashrc :
[source ~/.bashrc].
4. Démarrez les services de HBase avec les commandes suivantes :
$ sudo service hbase-master restart
$ sudo service hbase-regionserver restart
III. Manipulation de l’exemple
5. Créez une table en utilisant le « shell » :
$ hbase shell
> create 'myLittleHBaseTable', 'myLittleFamily'
0 row(s) in 2.1110 seconds
=> Hbase::Table - myLittleHBaseTable
hbase(main):002:0> list
TABLE
myLittleHBaseTable
test
2 row(s) in 0.1510 seconds
=> ["myLittleHBaseTable", "test"]
6. Changez le répertoire courant :
$ cd TDHBase
7. Compilez le code de notre exemple :
$ javac -cp $CLASSPATH MyLittleHBaseClient.java](https://image.slidesharecdn.com/tp2bigdata-hbase-171106120550/85/TP2-Big-Data-HBase-5-320.jpg)

This document provides instructions for a hands-on exercise with HBase using the Java API. It outlines the steps to set up the environment, including downloading necessary files, modifying configuration files, and restarting services. Additionally, it explains how to create an HBase table, compile, and run a Java client that performs data operations on the table.


