Download as PDF, PPTX


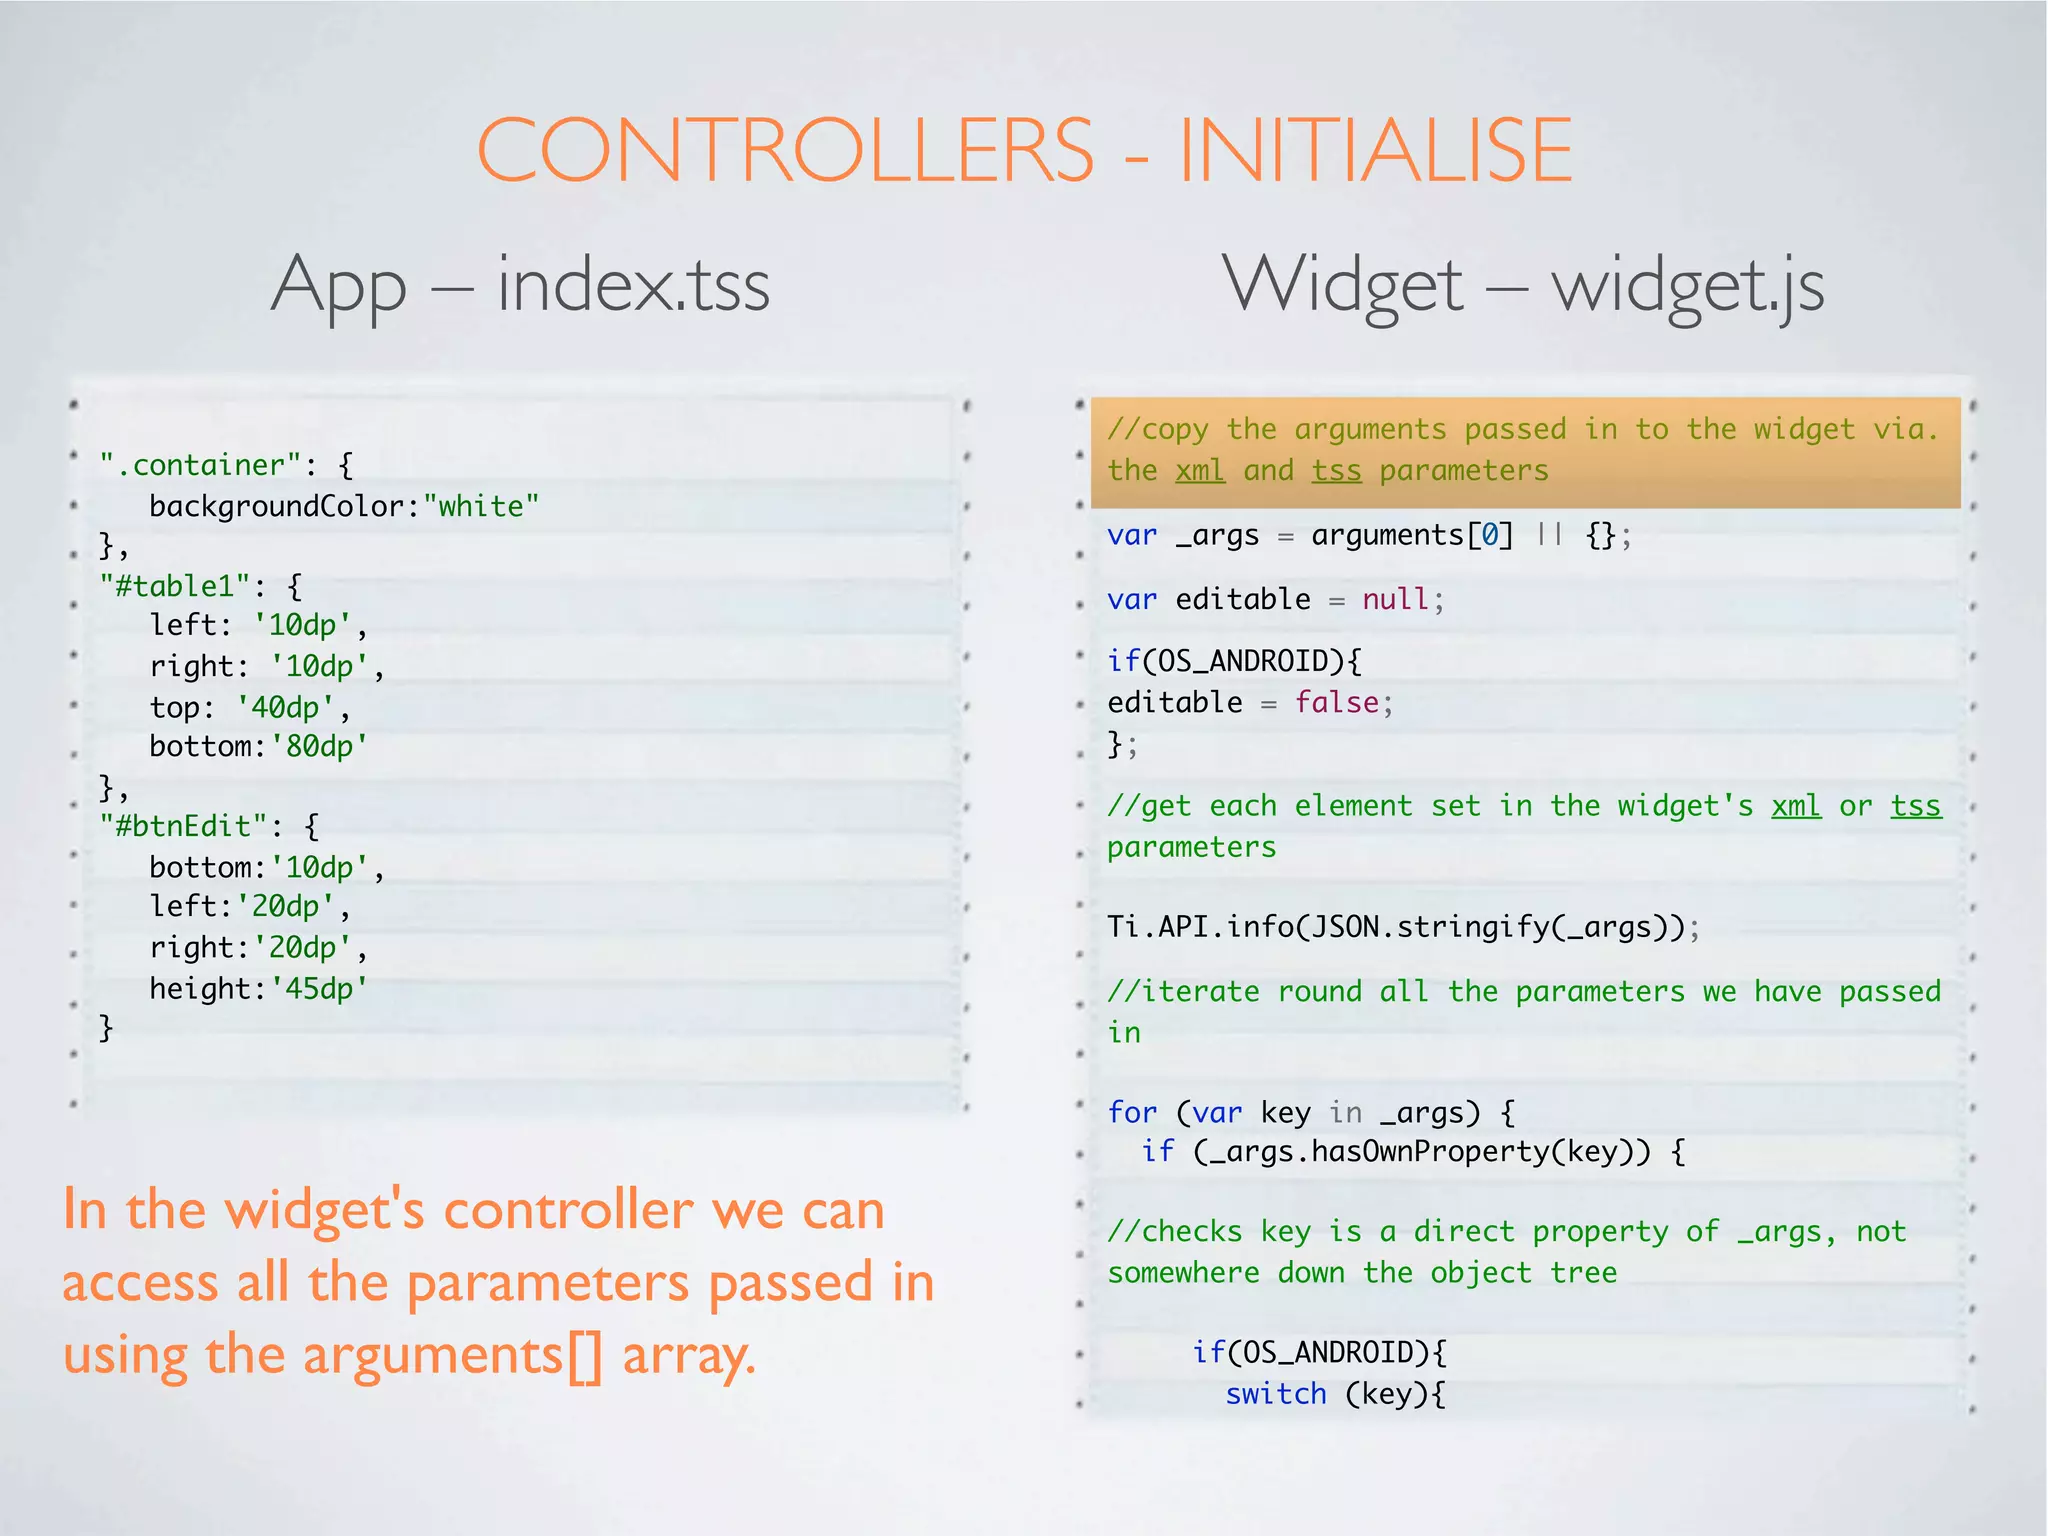
![CONTROLLERS - INITIALISE
App – index.tss Widget – widget.js
//copy the arguments passed in to the widget via.
".container": { the xml and tss parameters
backgroundColor:"white"
}, var _args = arguments[0] || {};
"#table1": { var editable = null;
left: '10dp',
right: '10dp', if(OS_ANDROID){
top: '40dp', editable = false;
bottom:'80dp' };
},
//get each element set in the widget's xml or tss
"#btnEdit": {
parameters
bottom:'10dp',
left:'20dp',
Ti.API.info(JSON.stringify(_args));
right:'20dp',
height:'45dp' //iterate round all the parameters we have passed
} in
for (var key in _args) {
if (_args.hasOwnProperty(key)) {
In the widget's controller we can //checks key is a direct property of _args, not
access all the parameters passed in somewhere down the object tree
using the arguments[] array. if(OS_ANDROID){
switch (key){](https://image.slidesharecdn.com/ticonfeu-130218045708-phpapp02/75/Creating-Alloy-Widgets-18-2048.jpg)
![CONTROLLERS - INITIALISE
App – index.tss Widget – widget.js
//copy the arguments passed in to the widget via.
".container": { the xml and tss parameters
backgroundColor:"white"
}, var _args = arguments[0] || {};
"#table1": { var editable = null;
left: '10dp',
right: '10dp', if(OS_ANDROID){
top: '40dp', editable = false;
bottom:'80dp' };
},
//get each element set in the widget's xml or tss
"#btnEdit": {
parameters
bottom:'10dp',
left:'20dp',
Ti.API.info(JSON.stringify(_args));
right:'20dp',
height:'45dp' //iterate round all the parameters we have passed
} in
for (var key in _args) {
if (_args.hasOwnProperty(key)) {
In the widget's controller we can //checks key is a direct property of _args, not
access all the parameters passed in somewhere down the object tree
using the arguments[] array. if(OS_ANDROID){
switch (key){](https://image.slidesharecdn.com/ticonfeu-130218045708-phpapp02/75/Creating-Alloy-Widgets-19-2048.jpg)
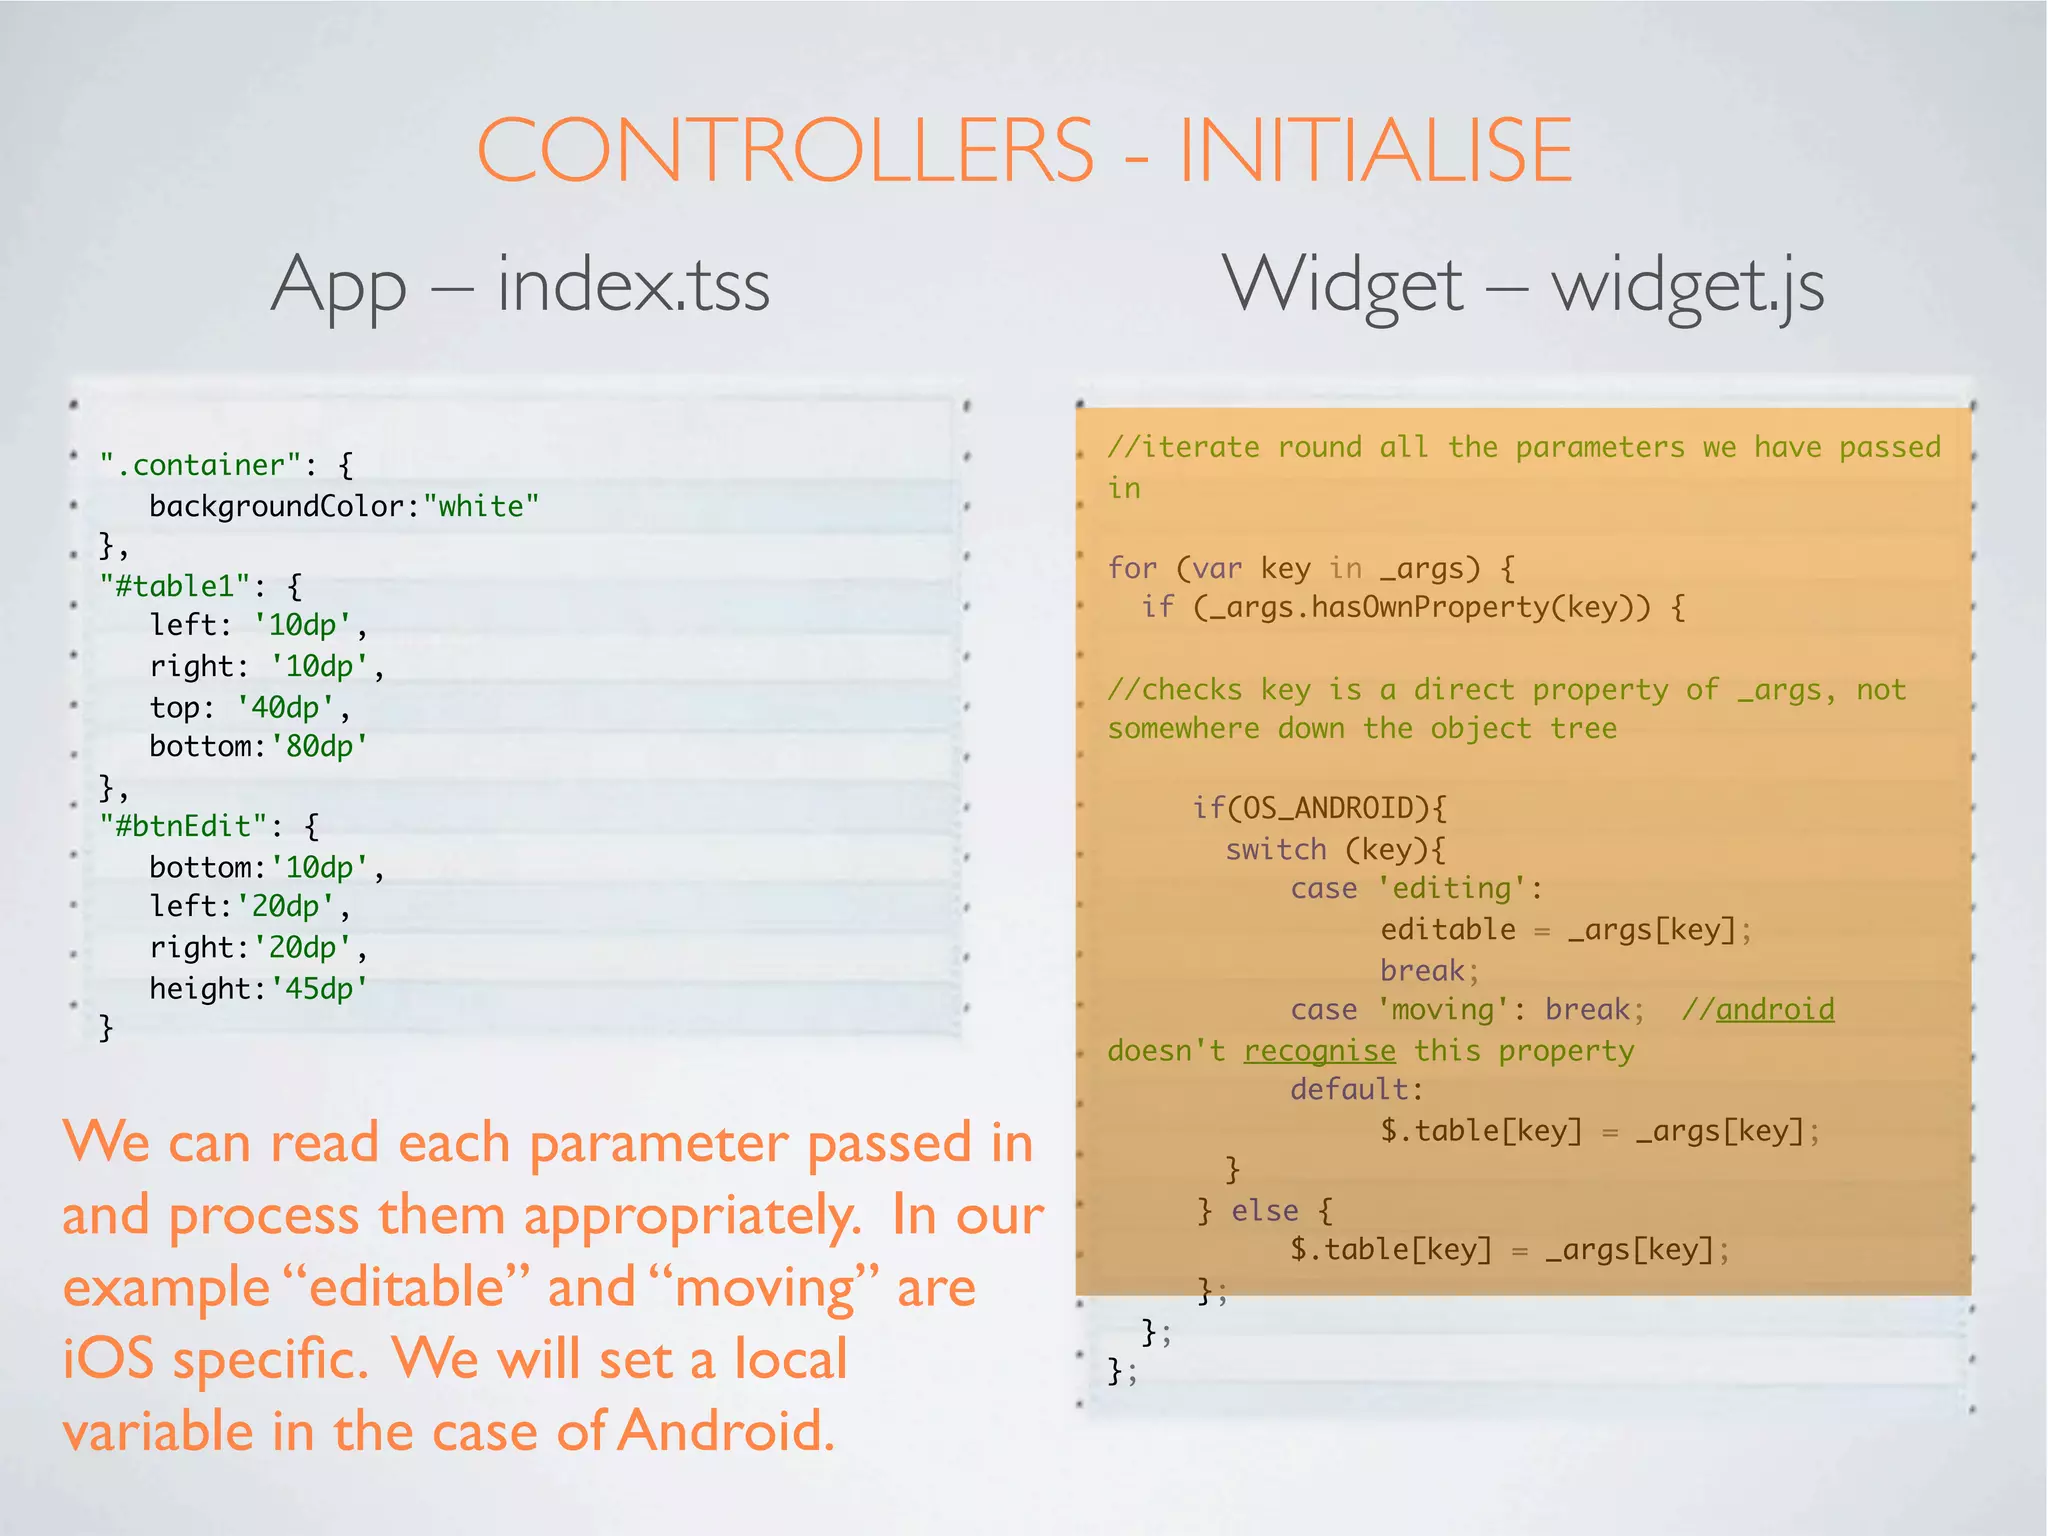
![CONTROLLERS - INITIALISE
App – index.tss Widget – widget.js
//iterate round all the parameters we have passed
".container": {
in
backgroundColor:"white"
},
for (var key in _args) {
"#table1": {
if (_args.hasOwnProperty(key)) {
left: '10dp',
right: '10dp',
//checks key is a direct property of _args, not
top: '40dp',
somewhere down the object tree
bottom:'80dp'
},
if(OS_ANDROID){
"#btnEdit": {
switch (key){
bottom:'10dp',
case 'editing':
left:'20dp',
editable = _args[key];
right:'20dp',
break;
height:'45dp'
case 'moving': break; //android
}
doesn't recognise this property
default:
We can read each parameter passed in
}
$.table[key] = _args[key];
and process them appropriately. In our
} else {
$.table[key] = _args[key];
example “editable” and “moving” are };
};
iOS specific. We will set a local };
variable in the case of Android.](https://image.slidesharecdn.com/ticonfeu-130218045708-phpapp02/75/Creating-Alloy-Widgets-20-2048.jpg)
![CONTROLLERS - INITIALISE
App – index.tss Widget – widget.js
//iterate round all the parameters we have passed
".container": {
in
backgroundColor:"white"
},
for (var key in _args) {
"#table1": {
if (_args.hasOwnProperty(key)) {
left: '10dp',
right: '10dp',
//checks key is a direct property of _args, not
top: '40dp',
somewhere down the object tree
bottom:'80dp'
},
if(OS_ANDROID){
"#btnEdit": {
switch (key){
bottom:'10dp',
case 'editing':
left:'20dp',
editable = _args[key];
right:'20dp',
break;
height:'45dp'
case 'moving': break; //android
}
doesn't recognise this property
default:
We can read each parameter passed in
}
$.table[key] = _args[key];
and process them appropriately. In our
} else {
$.table[key] = _args[key];
example “editable” and “moving” are };
};
iOS specific. We will set a local };
variable in the case of Android.](https://image.slidesharecdn.com/ticonfeu-130218045708-phpapp02/75/Creating-Alloy-Widgets-21-2048.jpg)
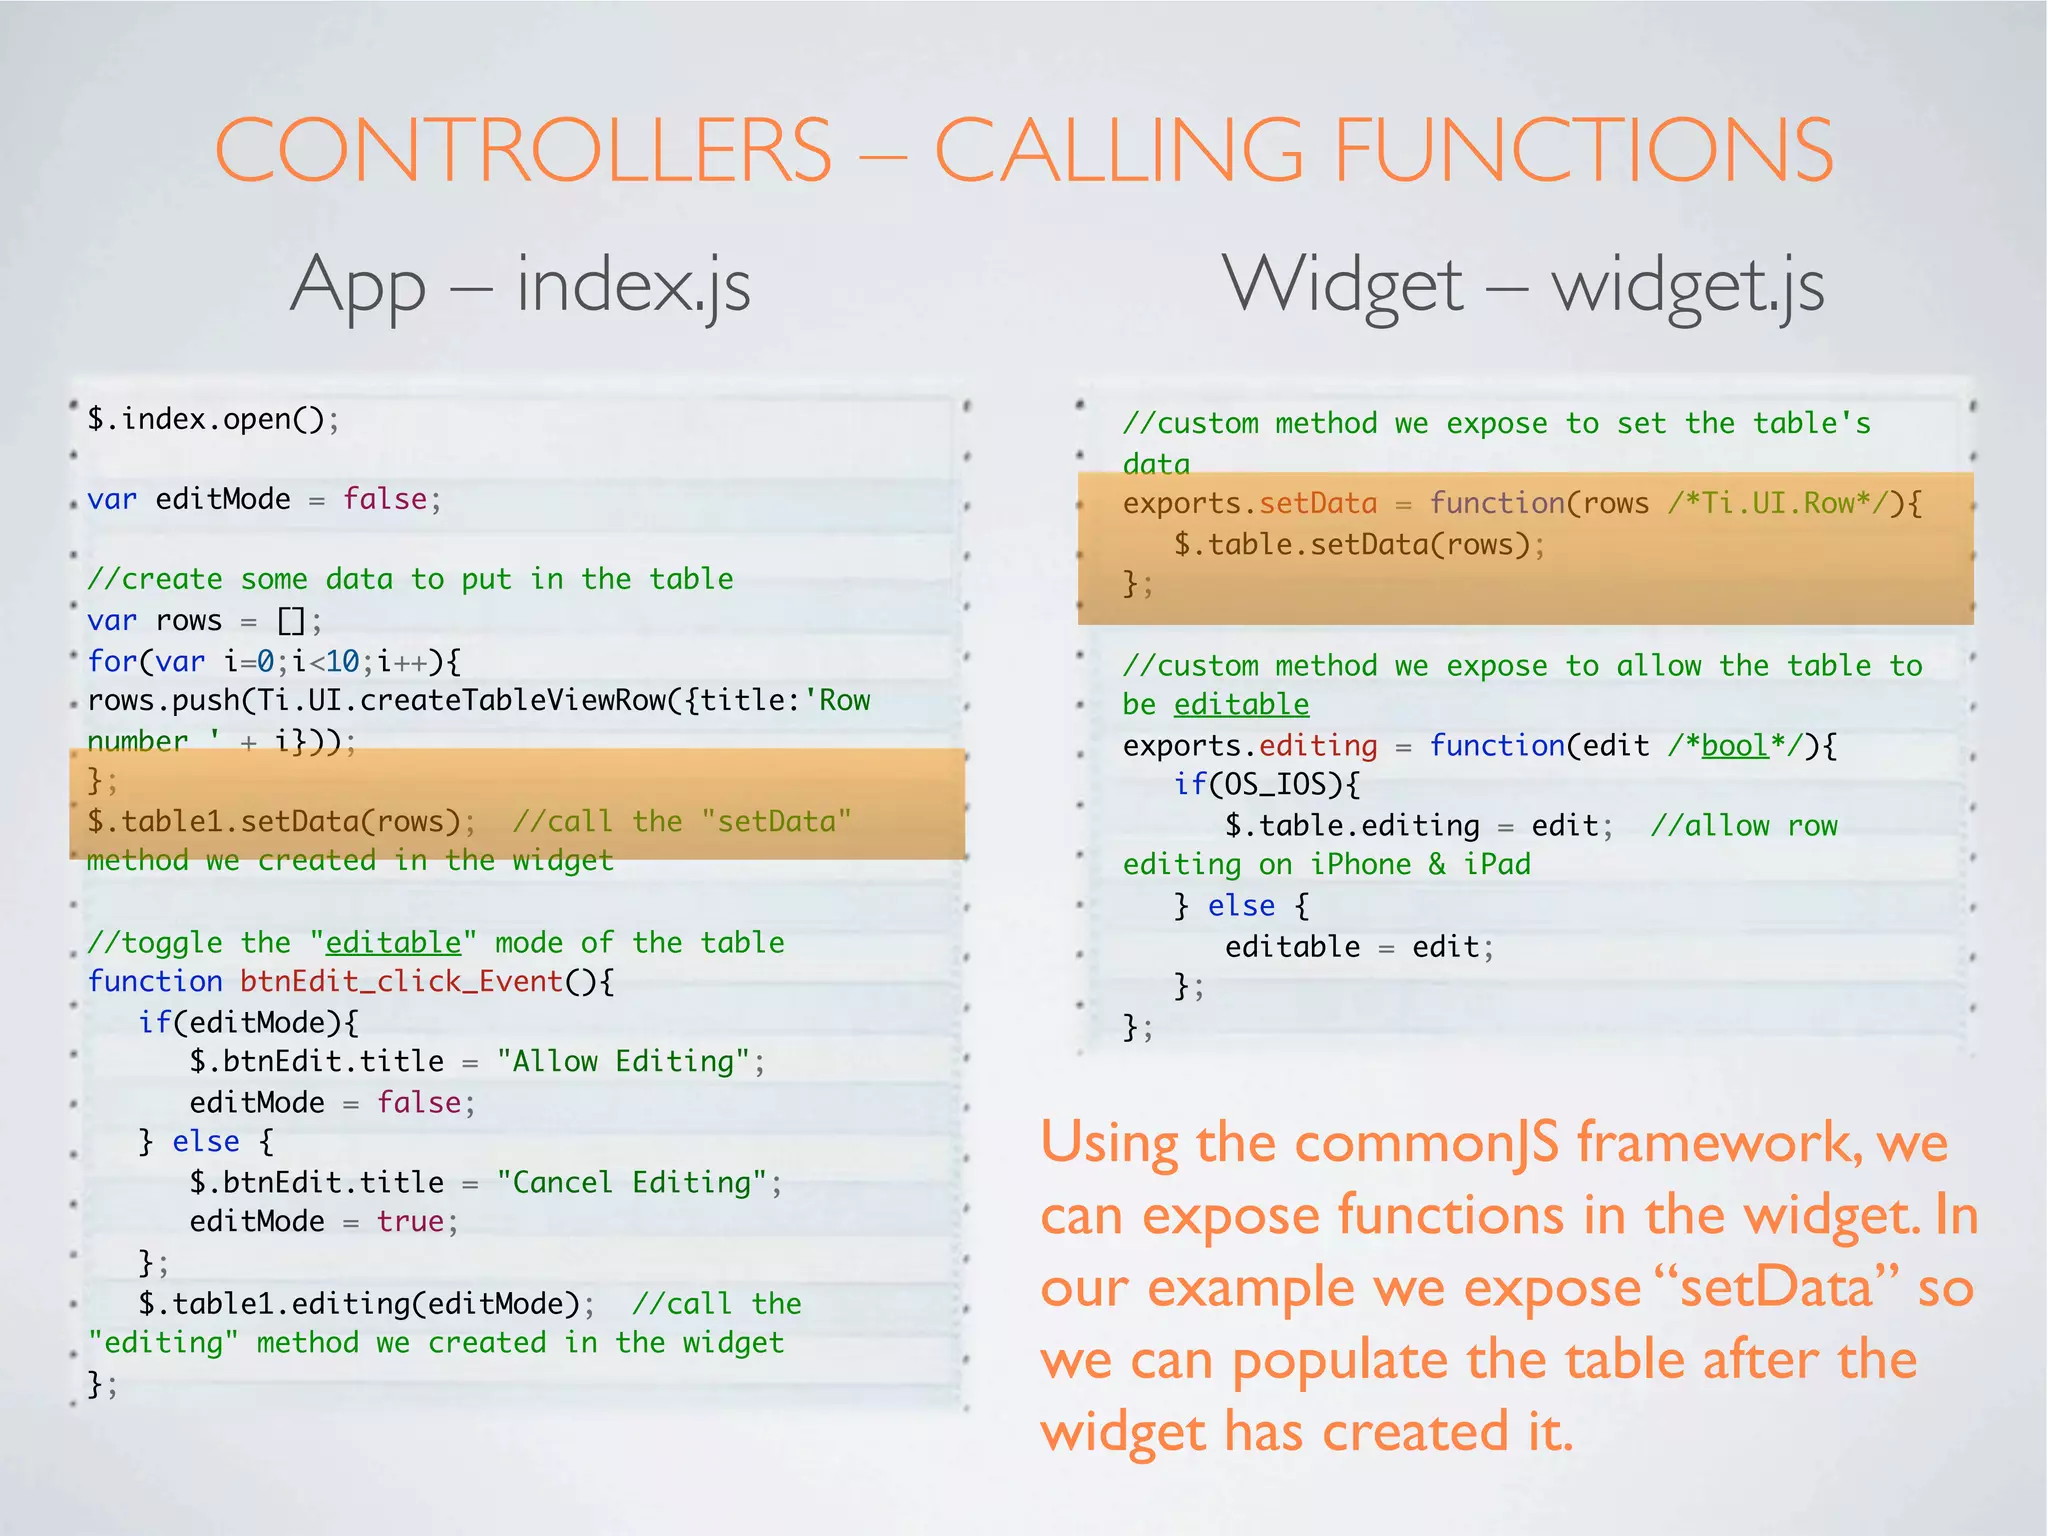
![CONTROLLERS – CALLING FUNCTIONS
App – index.js Widget – widget.js
$.index.open(); //custom method we expose to set the table's
data
var editMode = false; exports.setData = function(rows /*Ti.UI.Row*/){
$.table.setData(rows);
//create some data to put in the table };
var rows = [];
for(var i=0;i<10;i++){ //custom method we expose to allow the table to
rows.push(Ti.UI.createTableViewRow({title:'Row be editable
number ' + i})); exports.editing = function(edit /*bool*/){
}; if(OS_IOS){
$.table1.setData(rows); //call the "setData" $.table.editing = edit; //allow row
method we created in the widget editing on iPhone & iPad
} else {
//toggle the "editable" mode of the table editable = edit;
function btnEdit_click_Event(){ };
if(editMode){ };
$.btnEdit.title = "Allow Editing";
editMode = false;
} else { Using the commonJS framework, we
$.btnEdit.title = "Cancel Editing";
editMode = true; can expose functions in the widget. In
};
$.table1.editing(editMode); //call the our example we expose “setData” so
"editing" method we created in the widget
};
we can populate the table after the
widget has created it.](https://image.slidesharecdn.com/ticonfeu-130218045708-phpapp02/75/Creating-Alloy-Widgets-22-2048.jpg)
![CONTROLLERS – CALLING FUNCTIONS
App – index.js Widget – widget.js
$.index.open(); //custom method we expose to set the table's
data
var editMode = false; exports.setData = function(rows /*Ti.UI.Row*/){
$.table.setData(rows);
//create some data to put in the table };
var rows = [];
for(var i=0;i<10;i++){ //custom method we expose to allow the table to
rows.push(Ti.UI.createTableViewRow({title:'Row be editable
number ' + i})); exports.editing = function(edit /*bool*/){
}; if(OS_IOS){
$.table1.setData(rows); //call the "setData" $.table.editing = edit; //allow row
method we created in the widget editing on iPhone & iPad
} else {
//toggle the "editable" mode of the table editable = edit;
function btnEdit_click_Event(){ };
if(editMode){ };
$.btnEdit.title = "Allow Editing";
editMode = false;
} else { Using the commonJS framework, we
$.btnEdit.title = "Cancel Editing";
editMode = true; can expose functions in the widget. In
};
$.table1.editing(editMode); //call the our example we expose “setData” so
"editing" method we created in the widget
};
we can populate the table after the
widget has created it.](https://image.slidesharecdn.com/ticonfeu-130218045708-phpapp02/75/Creating-Alloy-Widgets-23-2048.jpg)
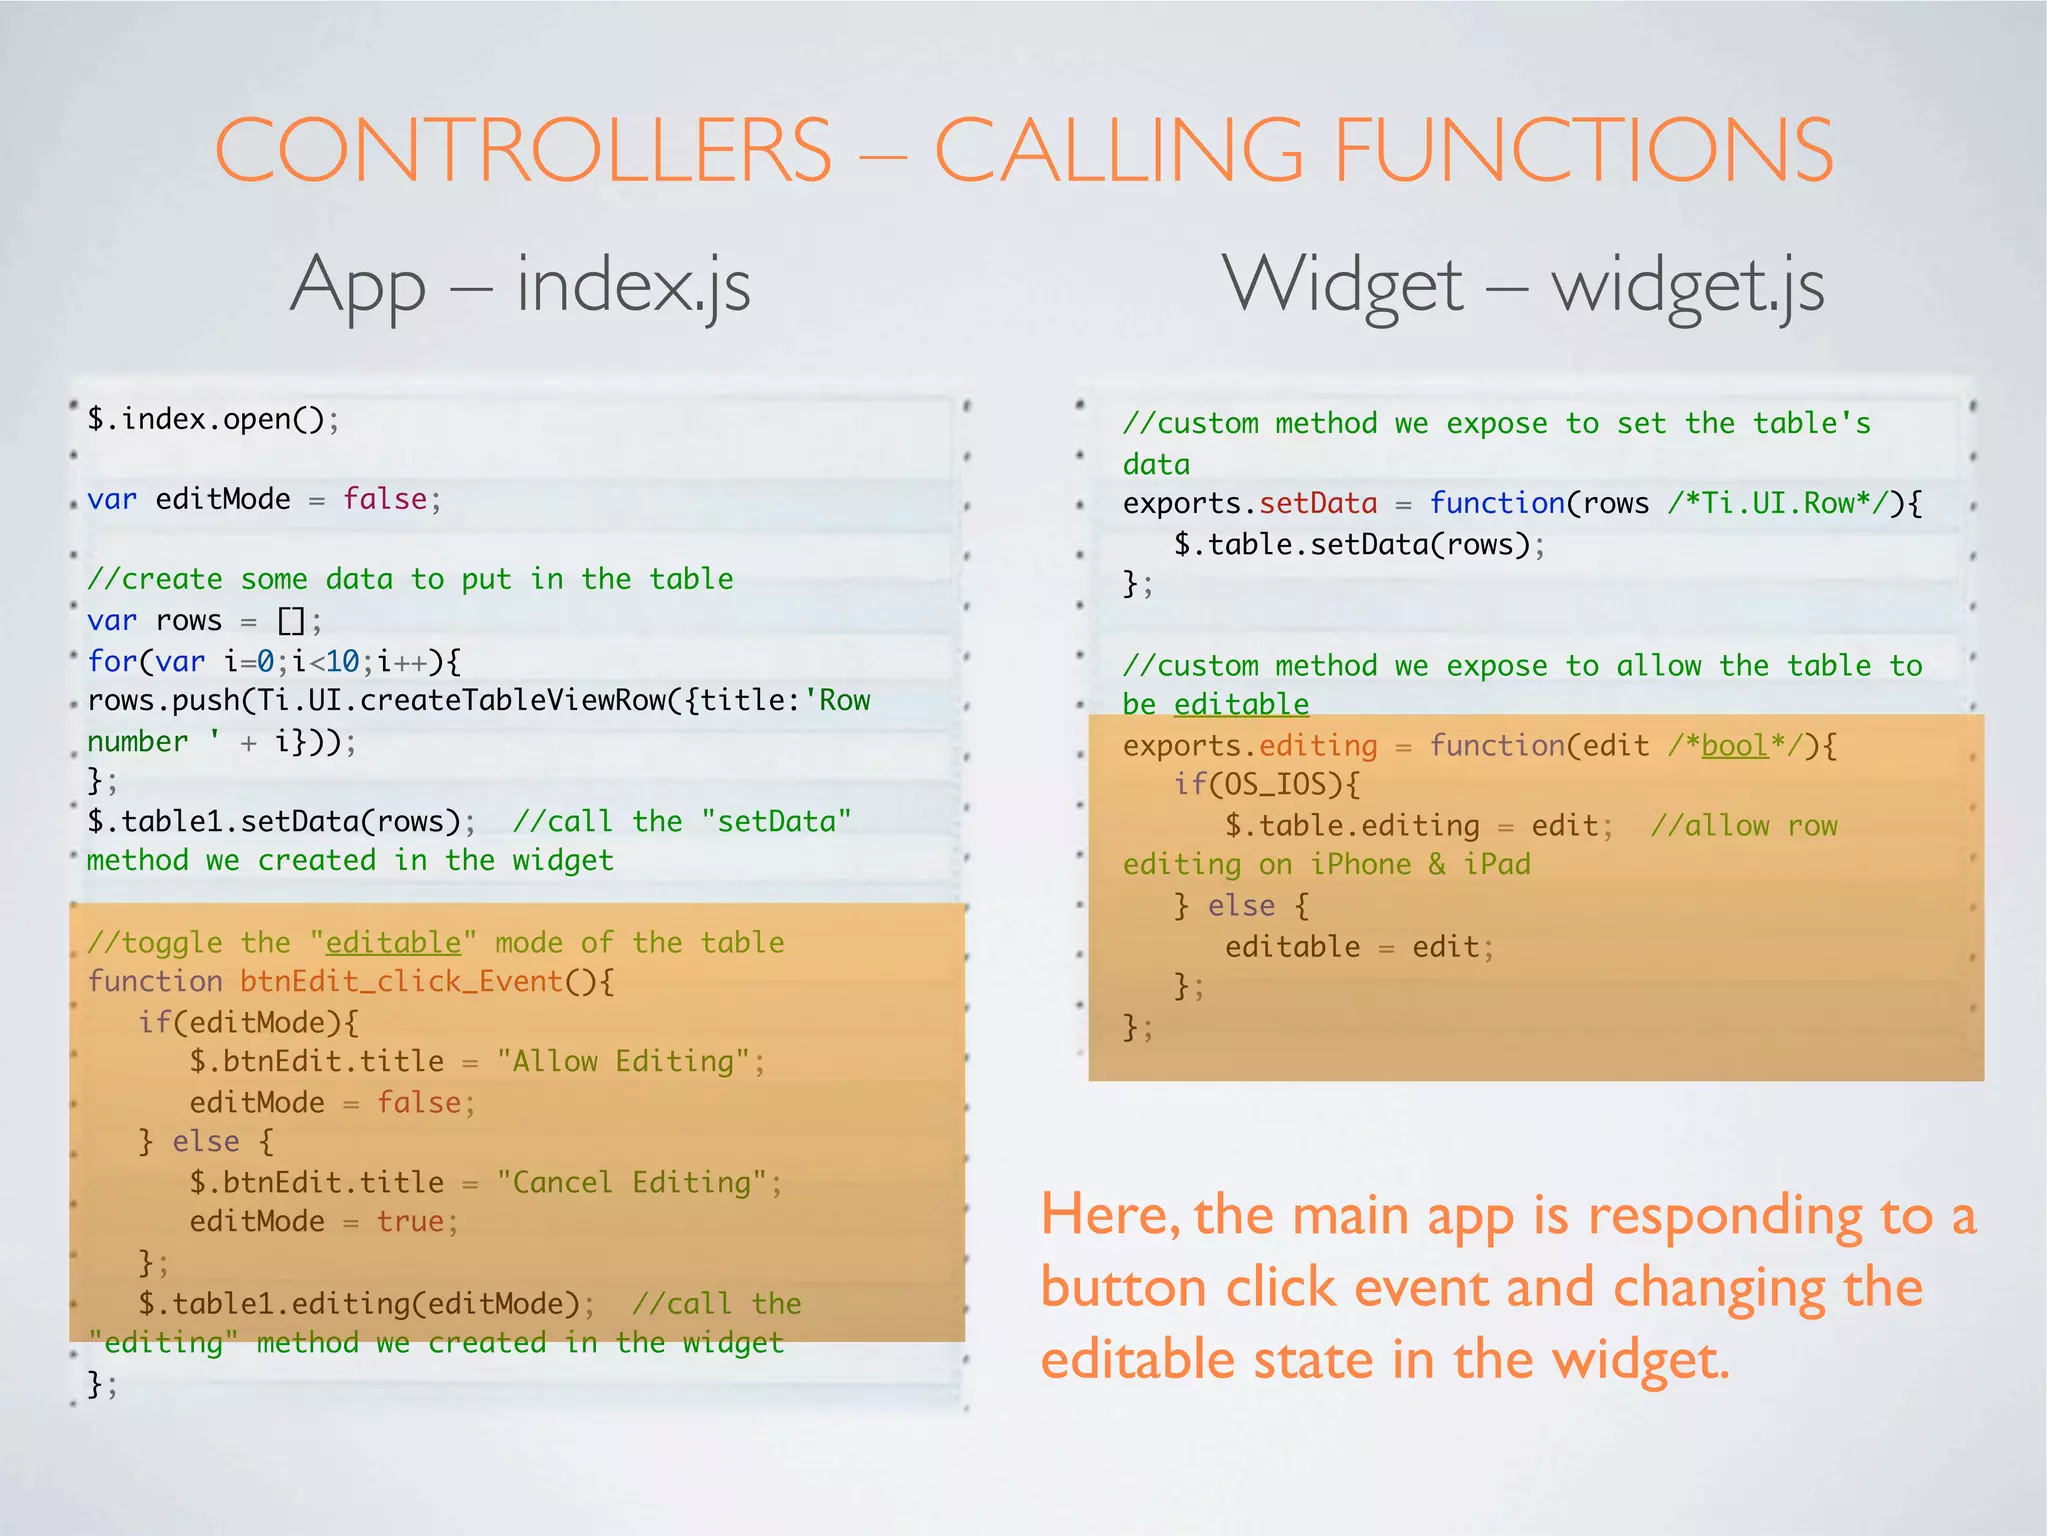
![CONTROLLERS – CALLING FUNCTIONS
App – index.js Widget – widget.js
$.index.open(); //custom method we expose to set the table's
data
var editMode = false; exports.setData = function(rows /*Ti.UI.Row*/){
$.table.setData(rows);
//create some data to put in the table };
var rows = [];
for(var i=0;i<10;i++){ //custom method we expose to allow the table to
rows.push(Ti.UI.createTableViewRow({title:'Row be editable
number ' + i})); exports.editing = function(edit /*bool*/){
}; if(OS_IOS){
$.table1.setData(rows); //call the "setData" $.table.editing = edit; //allow row
method we created in the widget editing on iPhone & iPad
} else {
//toggle the "editable" mode of the table editable = edit;
function btnEdit_click_Event(){ };
if(editMode){ };
$.btnEdit.title = "Allow Editing";
editMode = false;
} else {
$.btnEdit.title = "Cancel Editing";
editMode = true; Here, the main app is responding to a
};
$.table1.editing(editMode); //call the button click event and changing the
"editing" method we created in the widget
};
editable state in the widget.](https://image.slidesharecdn.com/ticonfeu-130218045708-phpapp02/75/Creating-Alloy-Widgets-24-2048.jpg)
![CONTROLLERS – CALLING FUNCTIONS
App – index.js Widget – widget.js
$.index.open(); //custom method we expose to set the table's
data
var editMode = false; exports.setData = function(rows /*Ti.UI.Row*/){
$.table.setData(rows);
//create some data to put in the table };
var rows = [];
for(var i=0;i<10;i++){ //custom method we expose to allow the table to
rows.push(Ti.UI.createTableViewRow({title:'Row be editable
number ' + i})); exports.editing = function(edit /*bool*/){
}; if(OS_IOS){
$.table1.setData(rows); //call the "setData" $.table.editing = edit; //allow row
method we created in the widget editing on iPhone & iPad
} else {
//toggle the "editable" mode of the table editable = edit;
function btnEdit_click_Event(){ };
if(editMode){ };
$.btnEdit.title = "Allow Editing";
editMode = false;
} else {
$.btnEdit.title = "Cancel Editing";
editMode = true; Here, the main app is responding to a
};
$.table1.editing(editMode); //call the button click event and changing the
"editing" method we created in the widget
};
editable state in the widget.](https://image.slidesharecdn.com/ticonfeu-130218045708-phpapp02/75/Creating-Alloy-Widgets-25-2048.jpg)


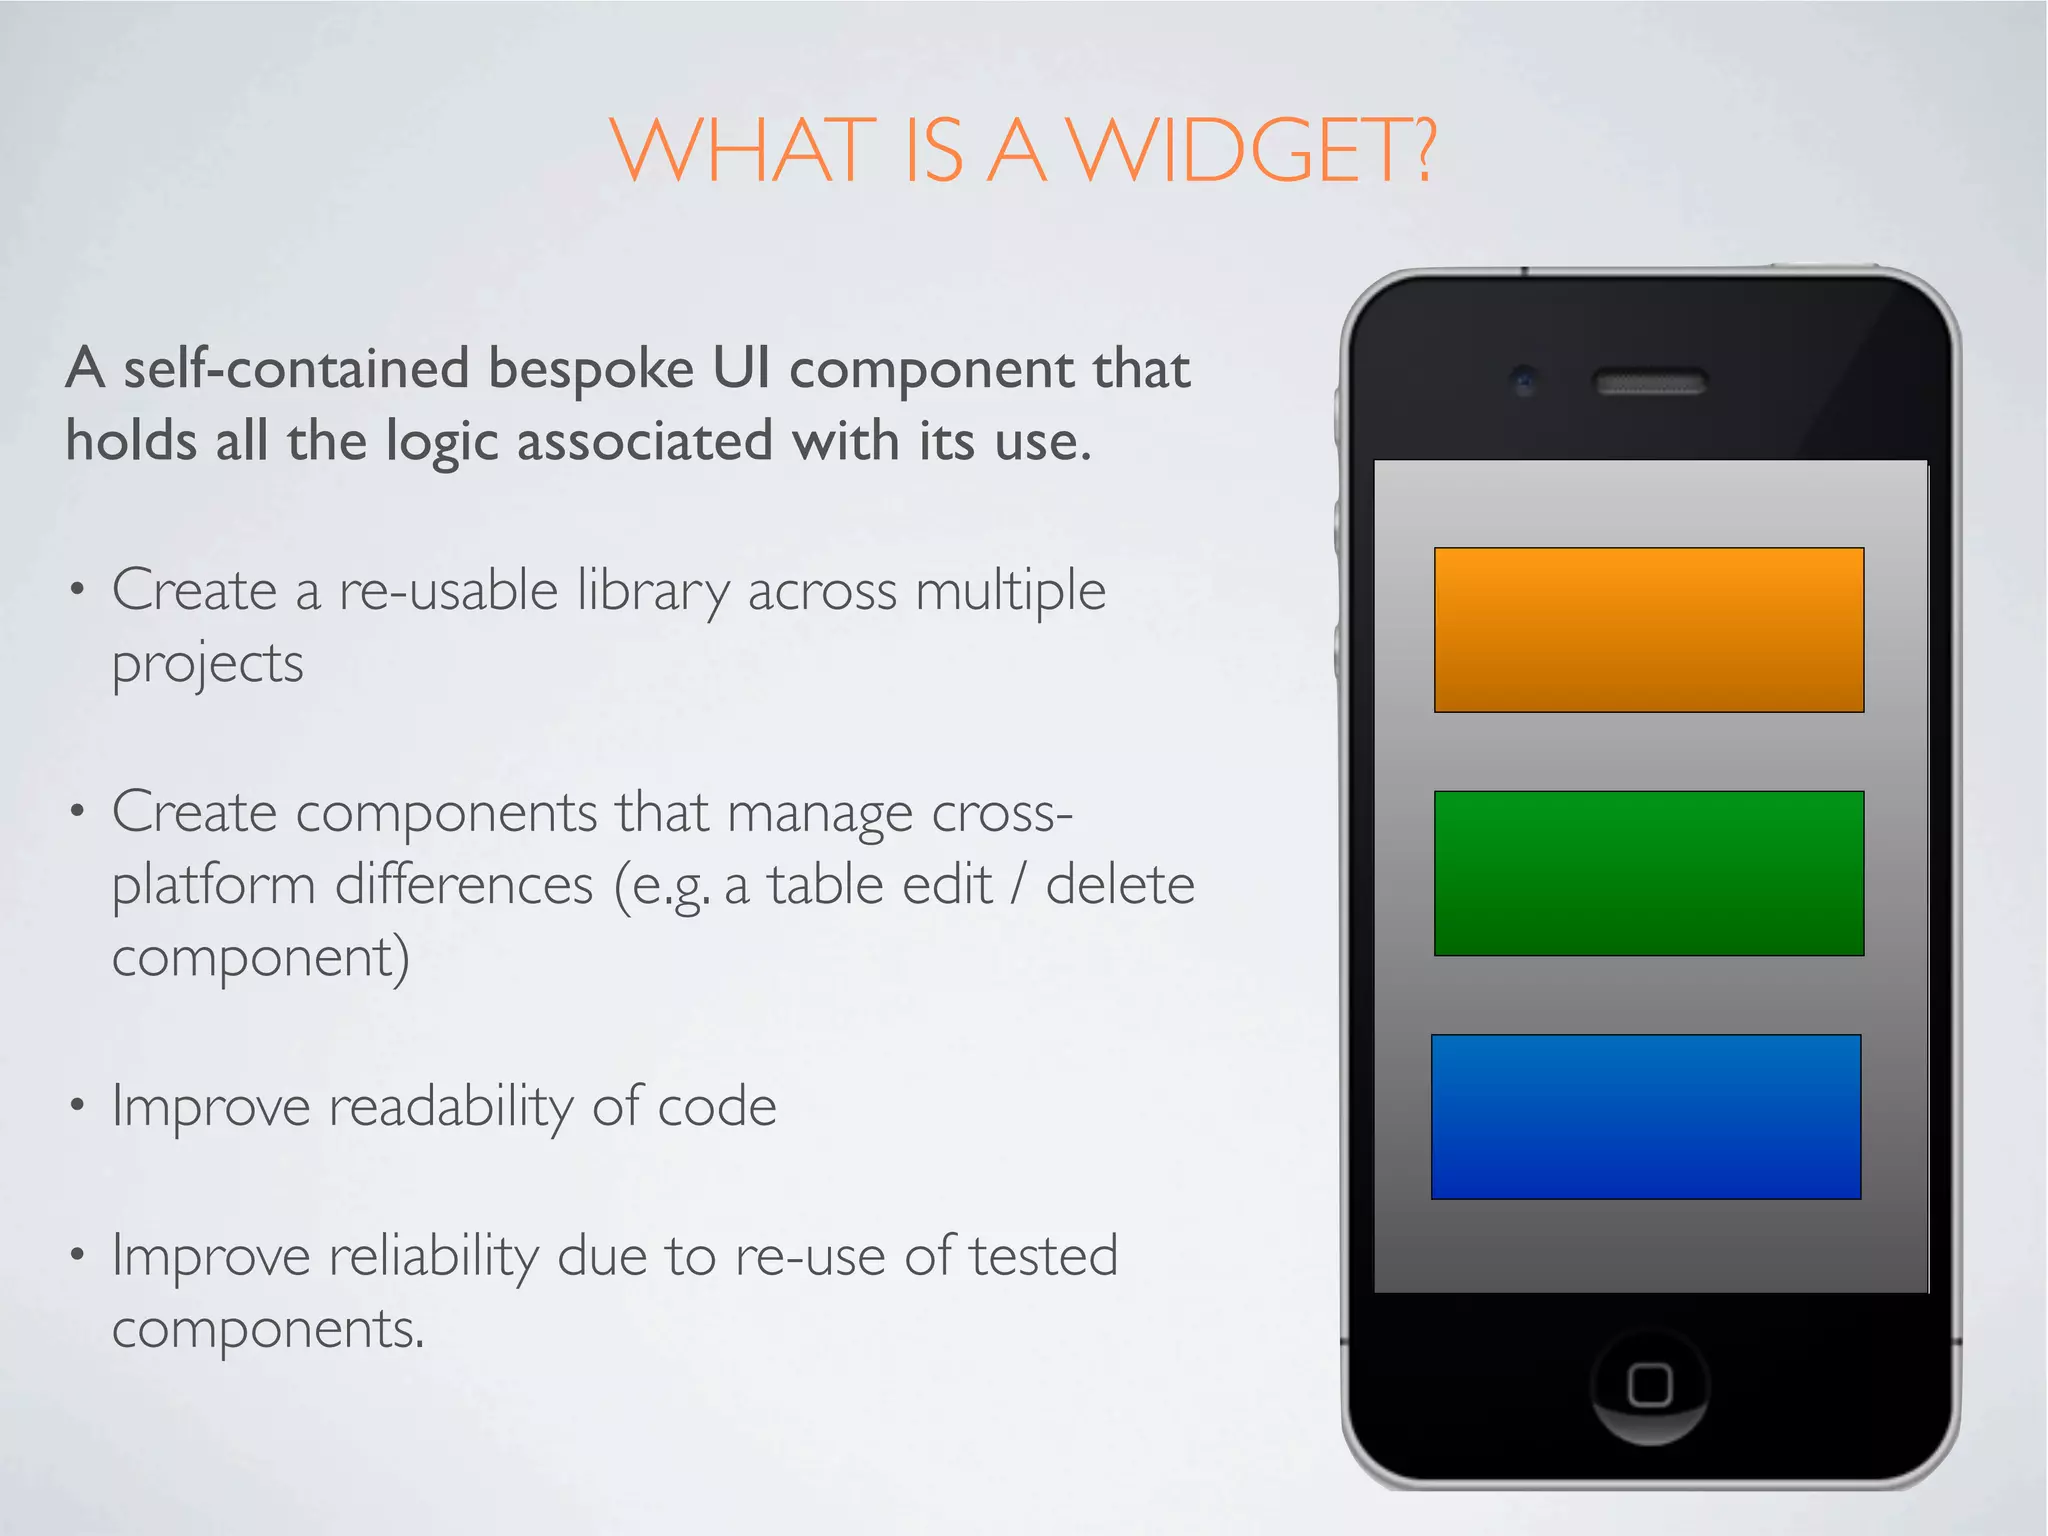
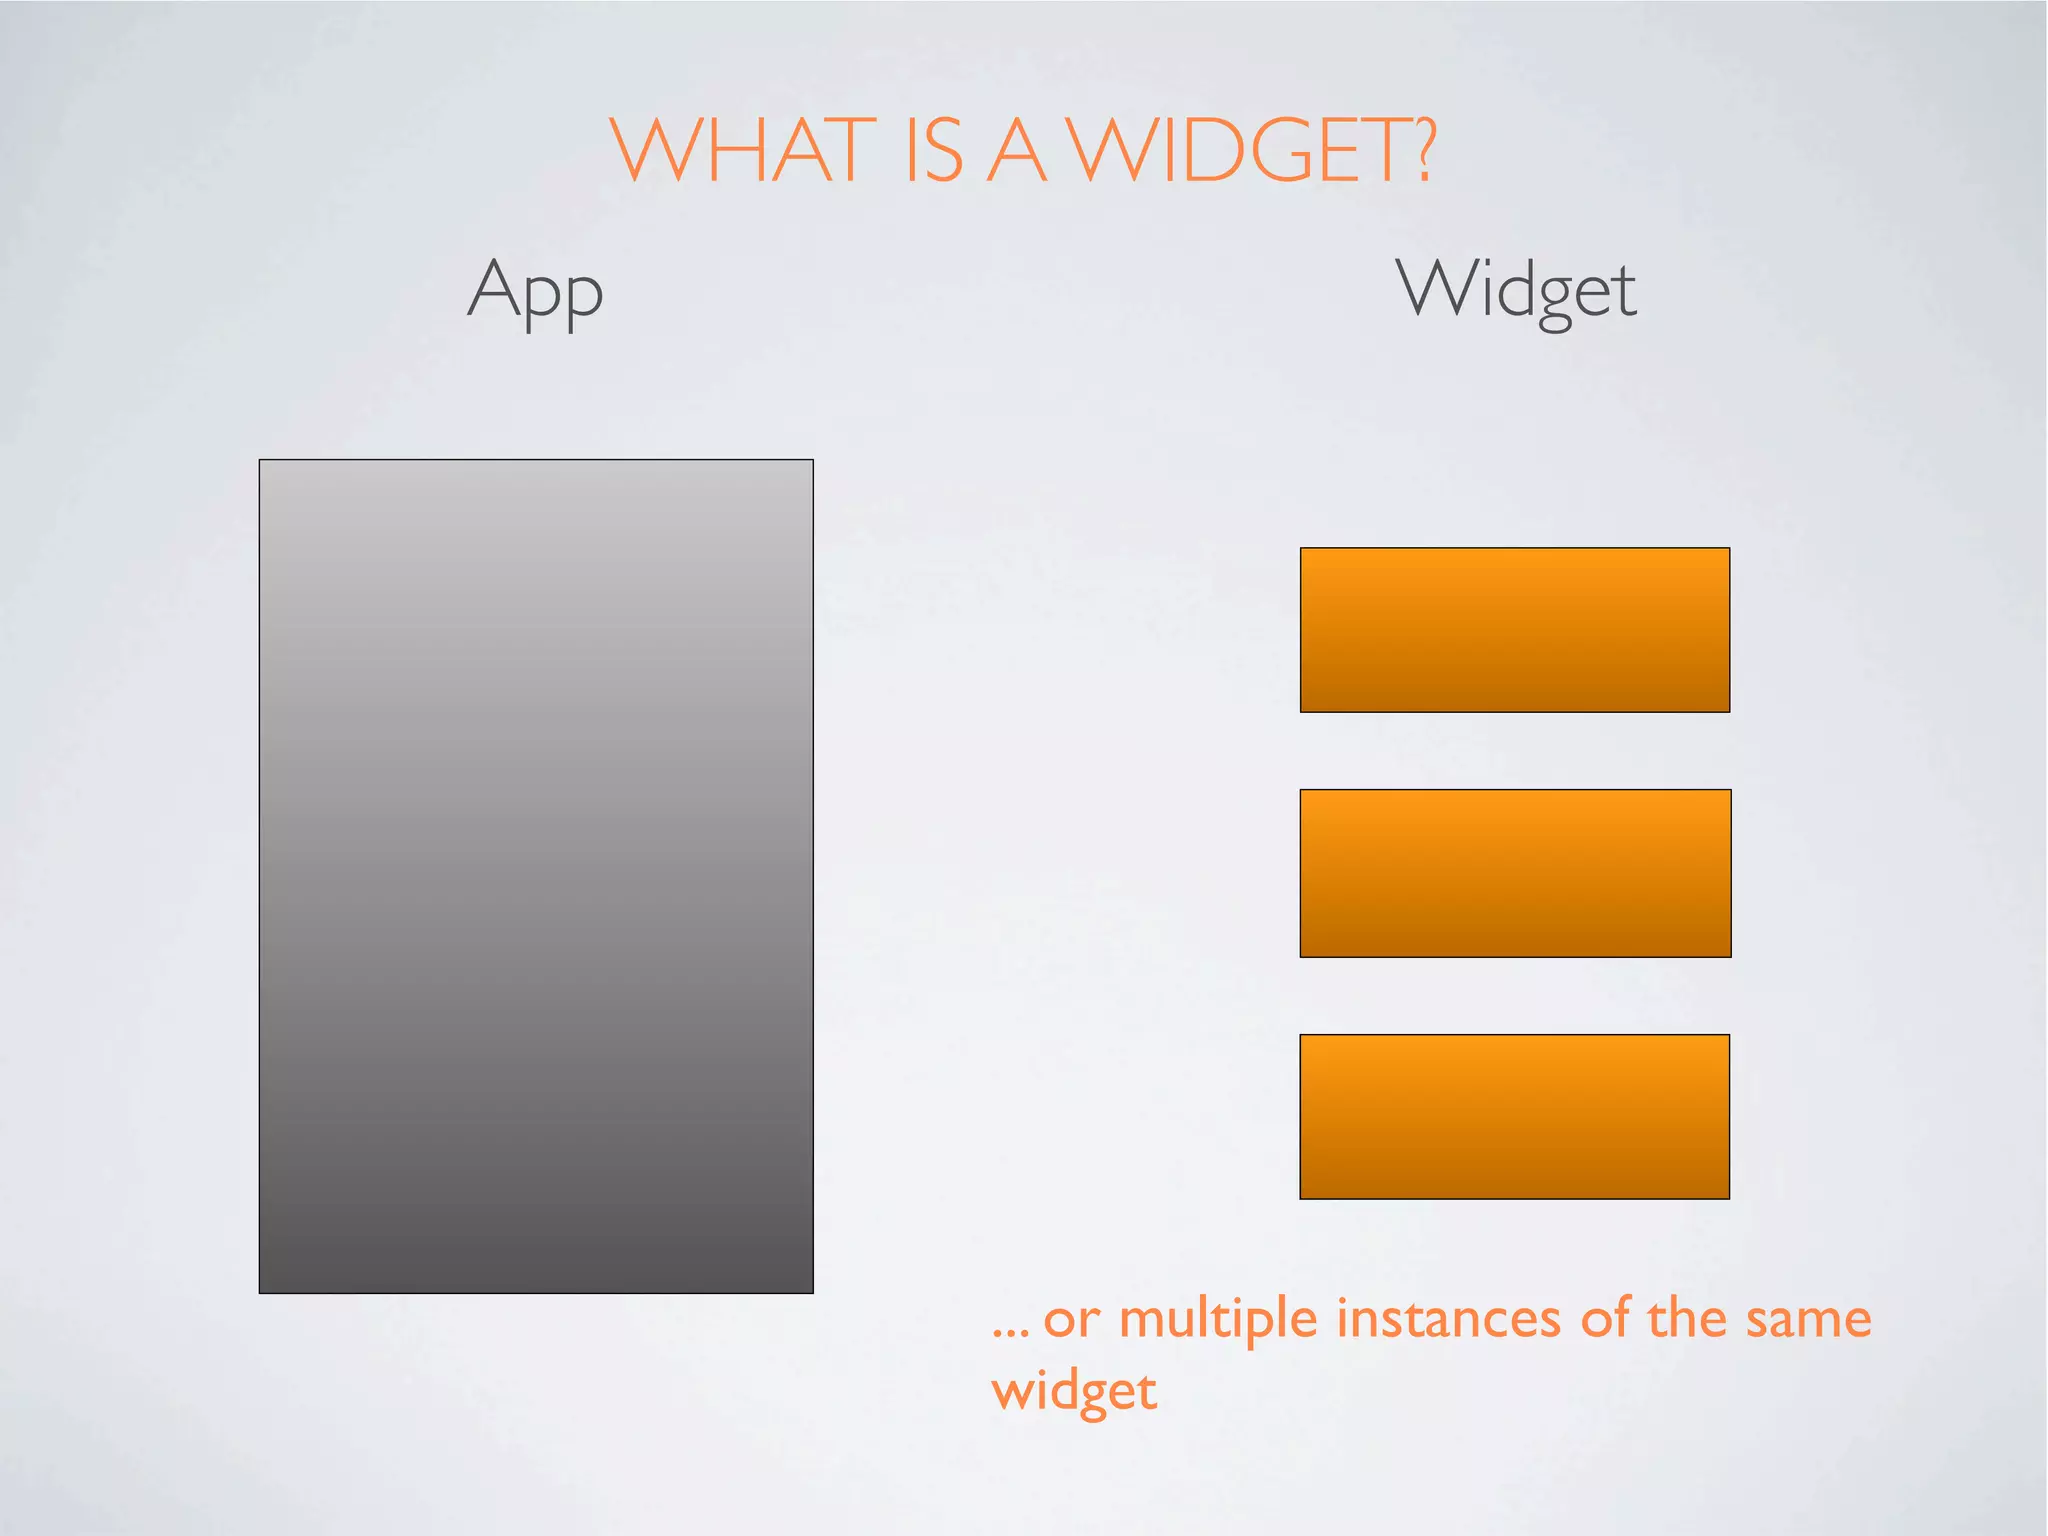
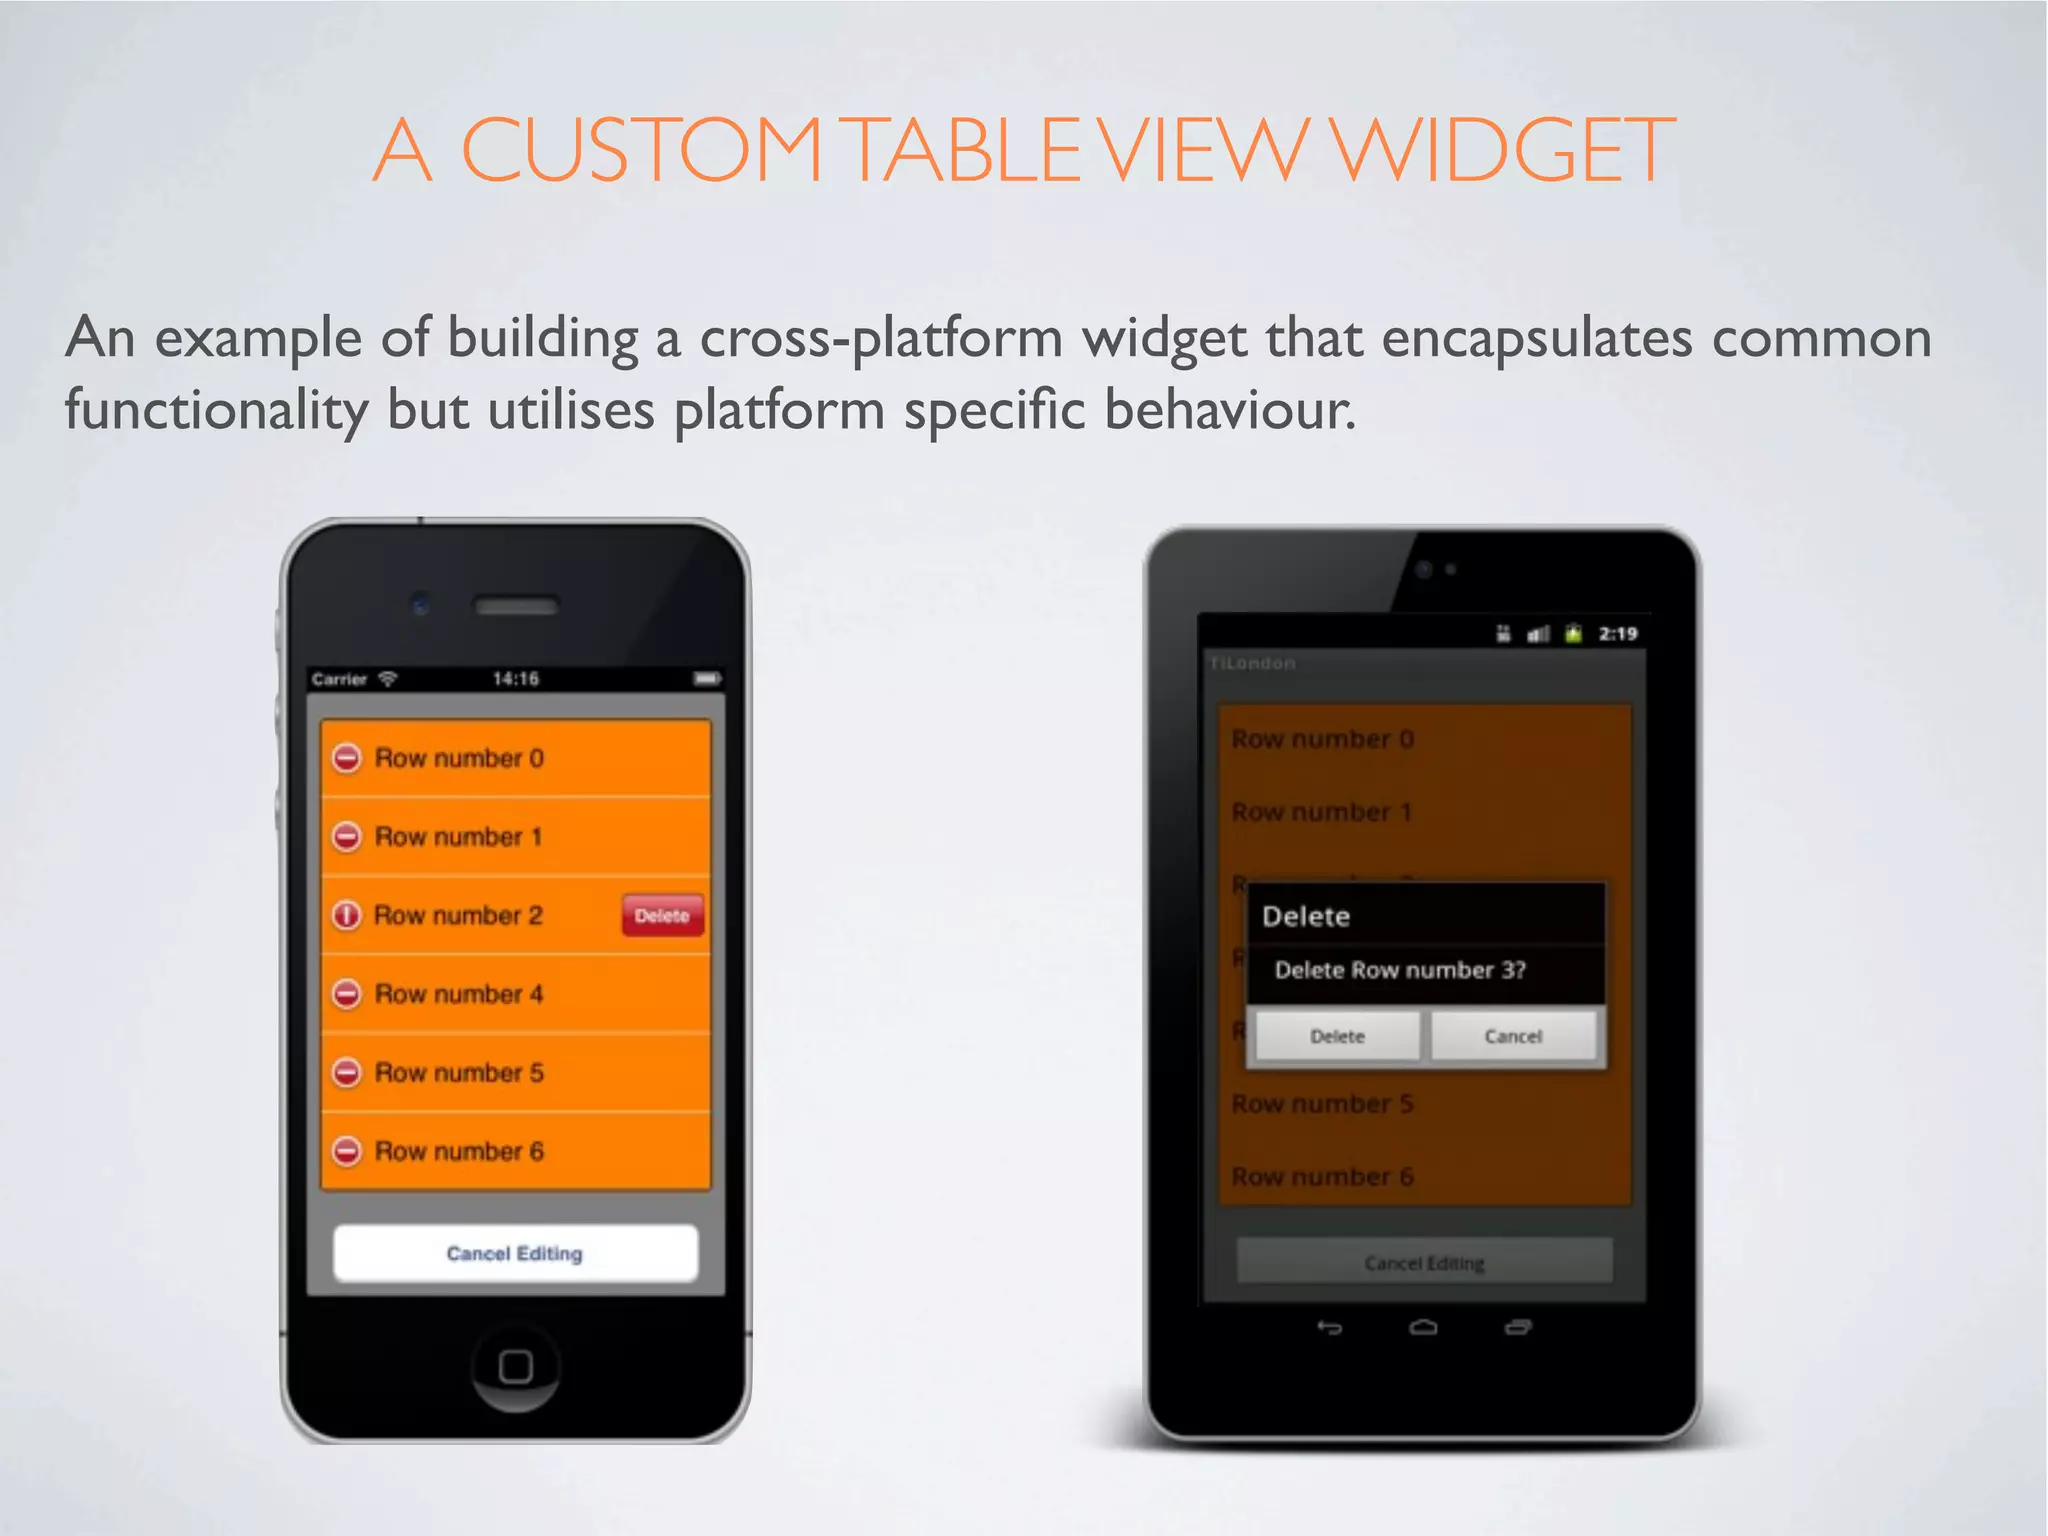
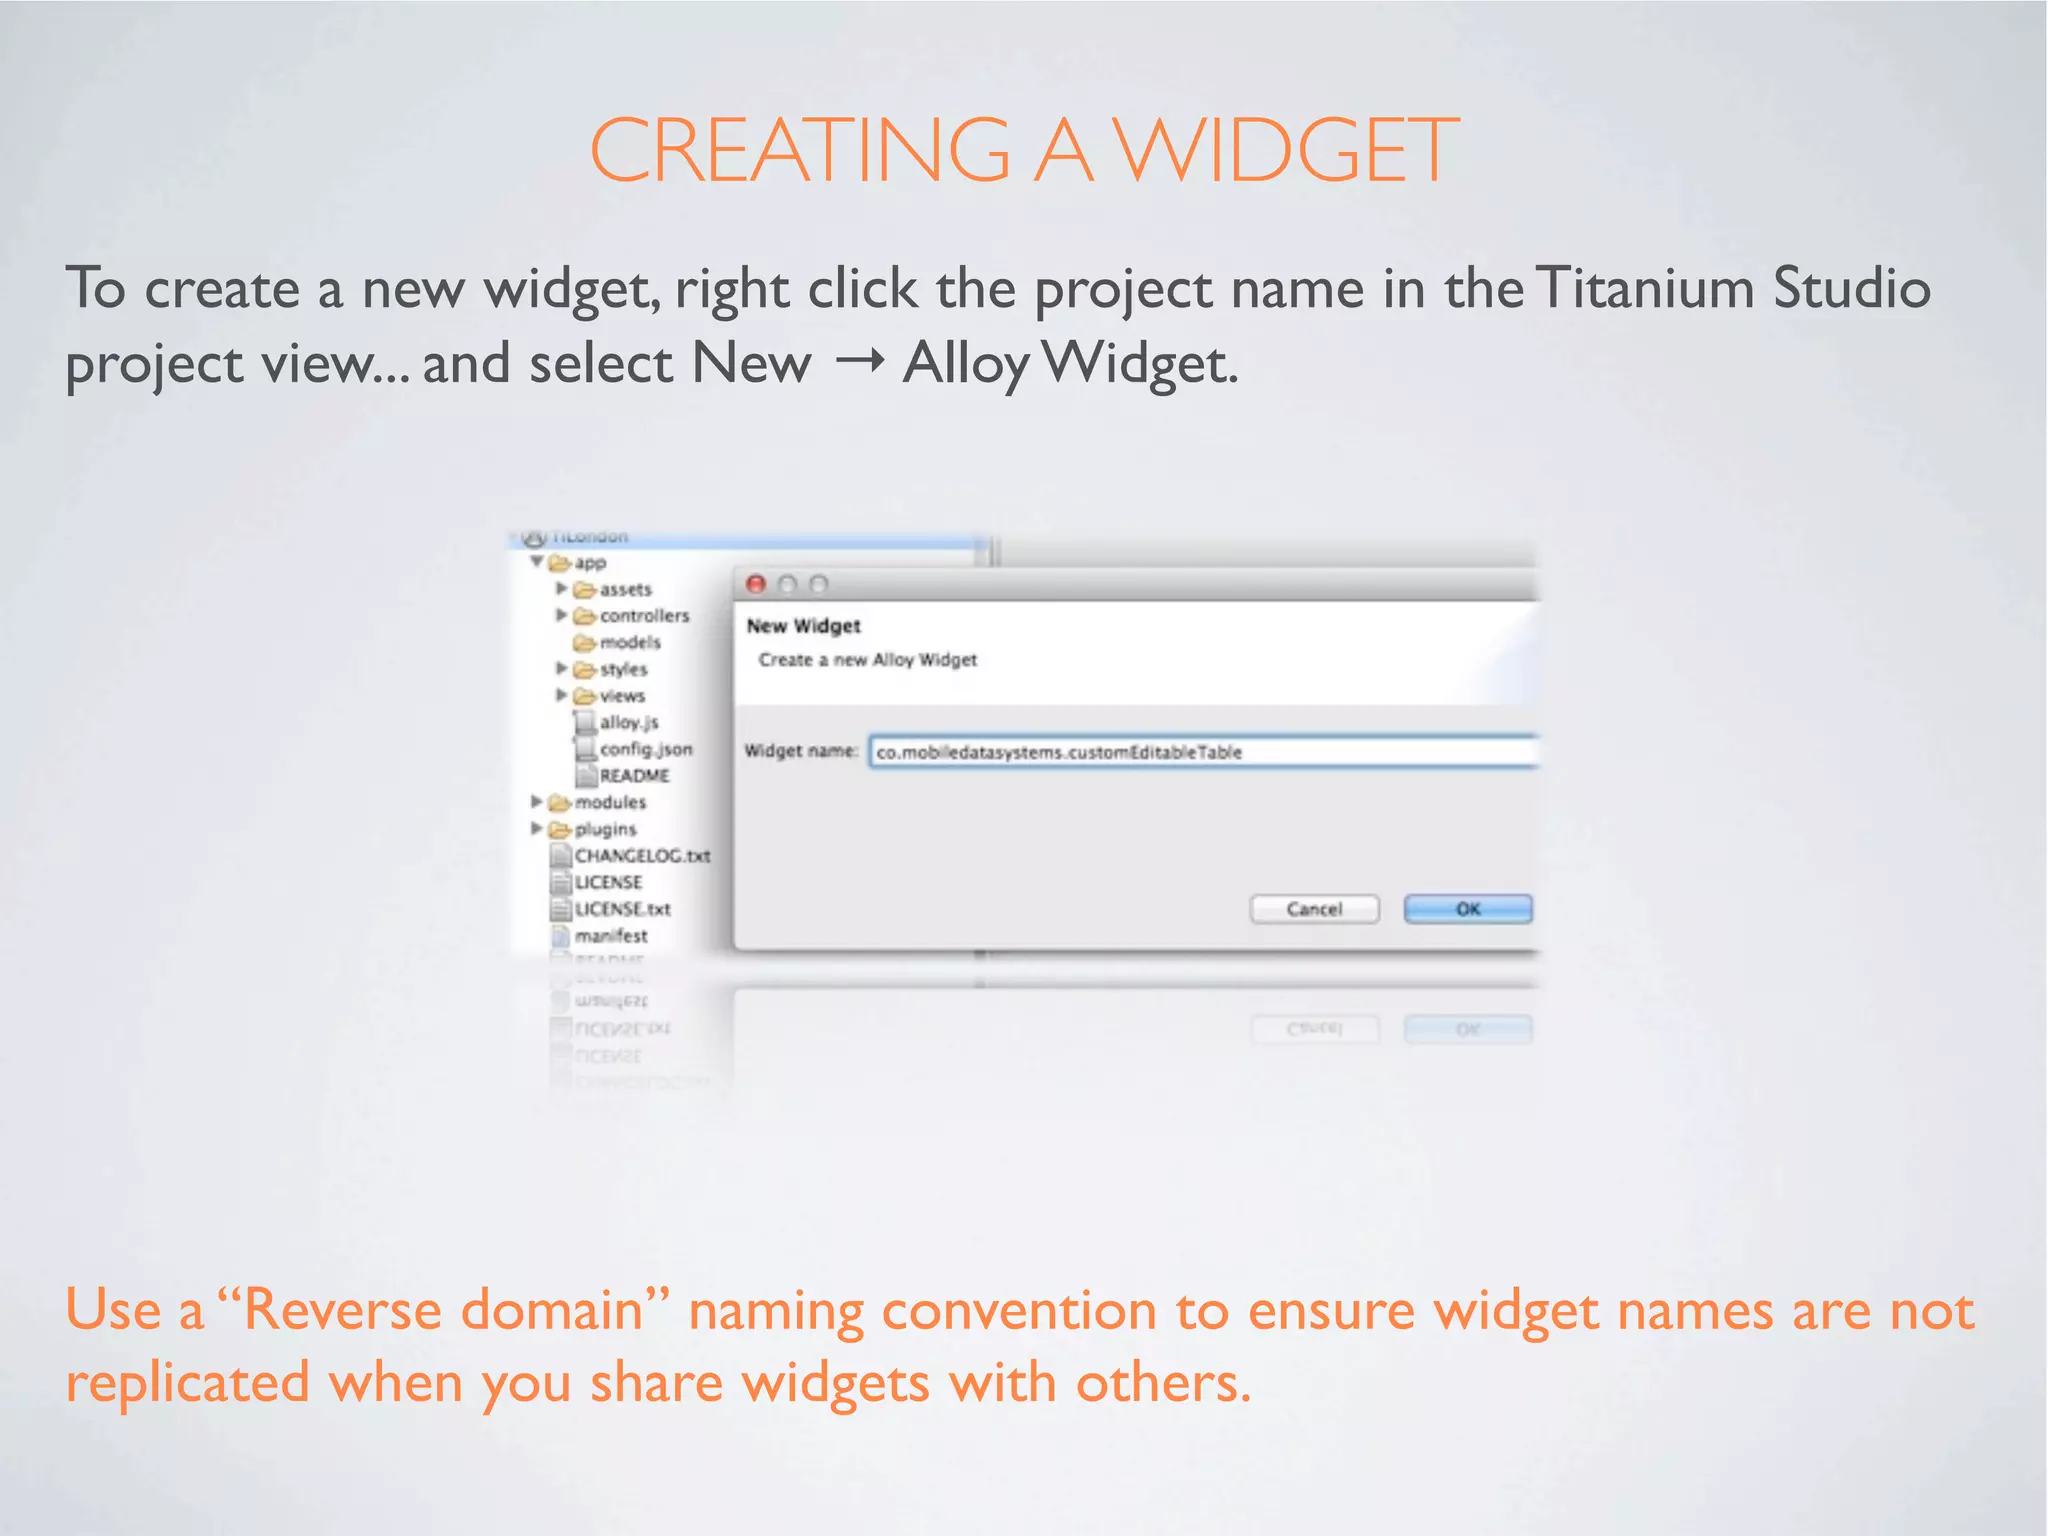
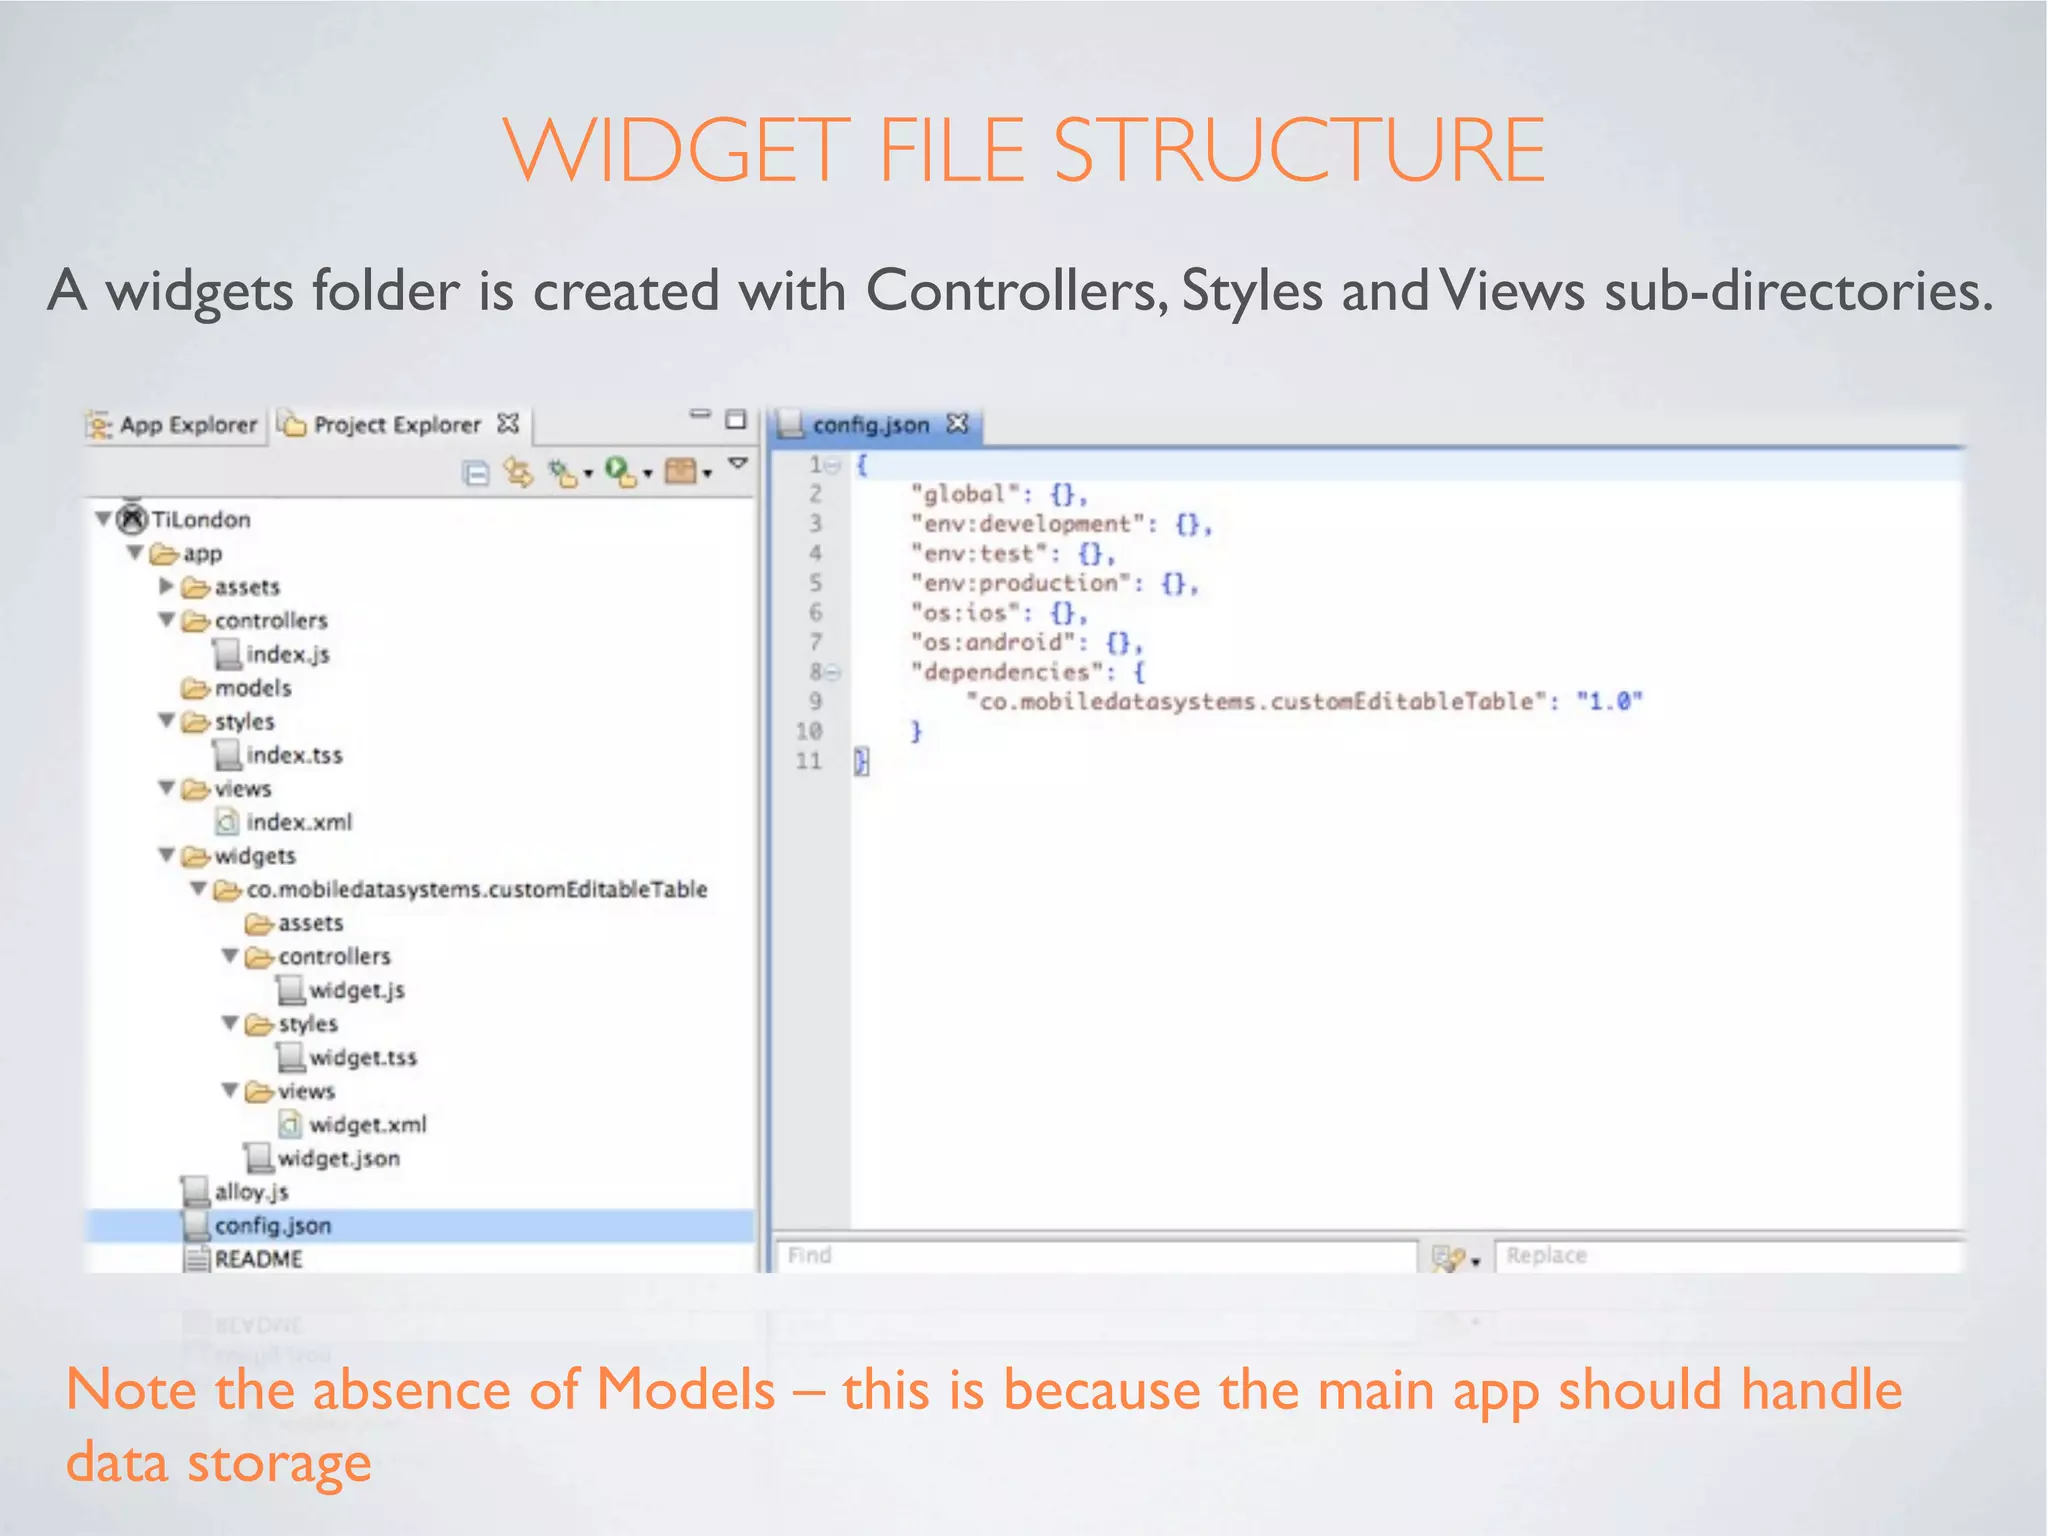
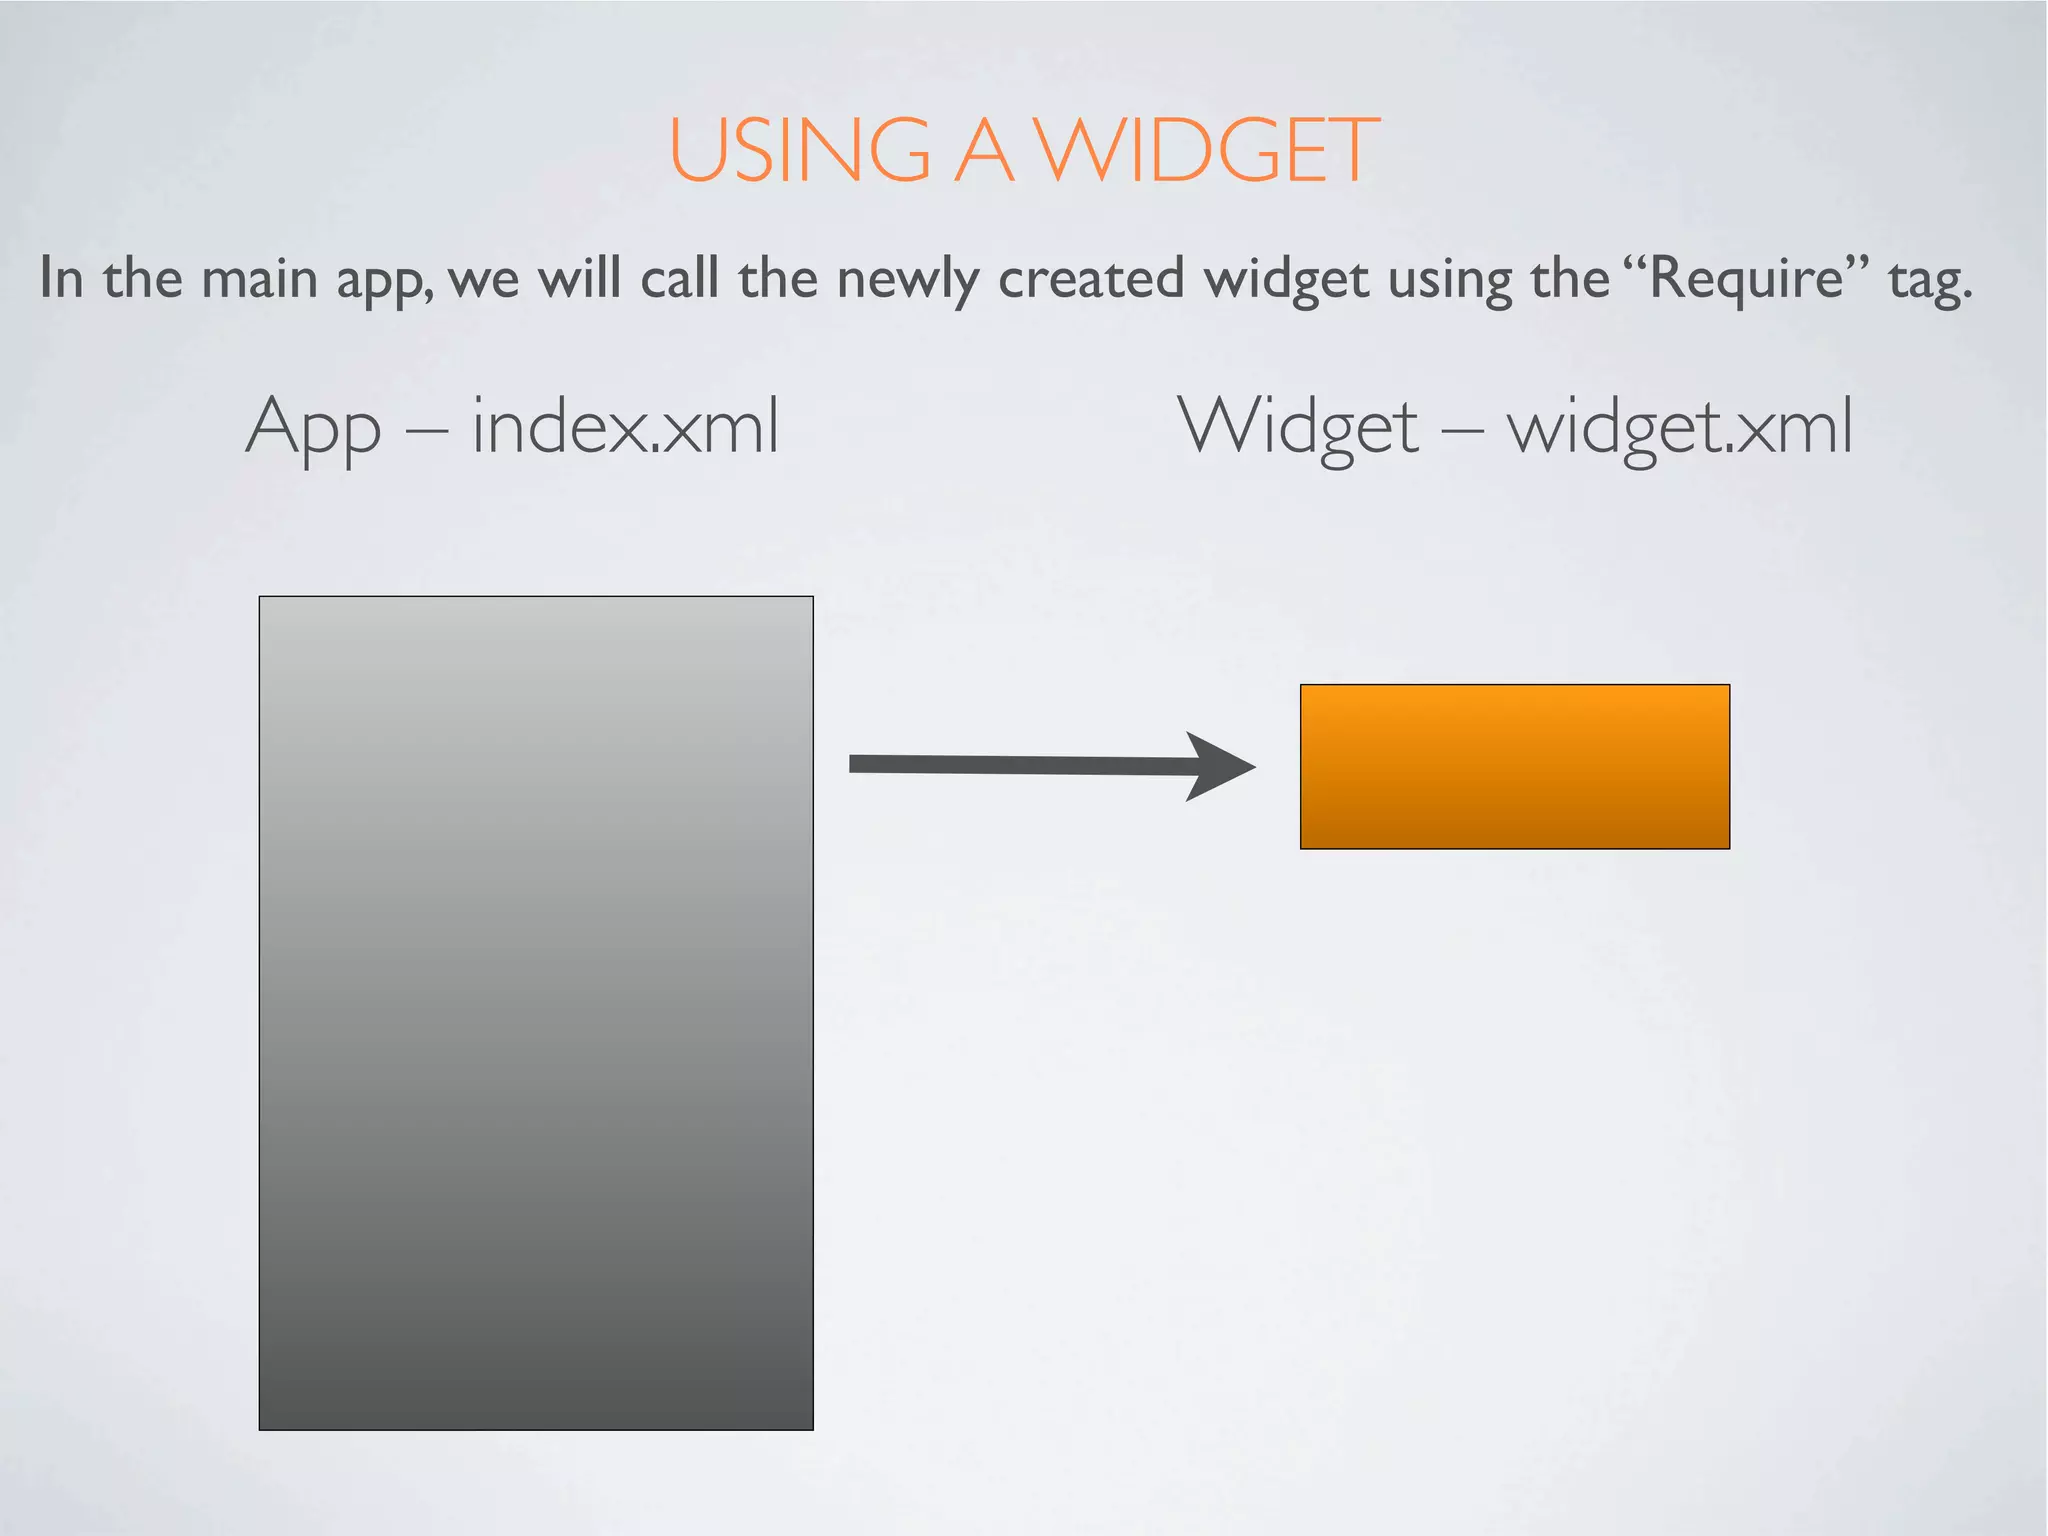
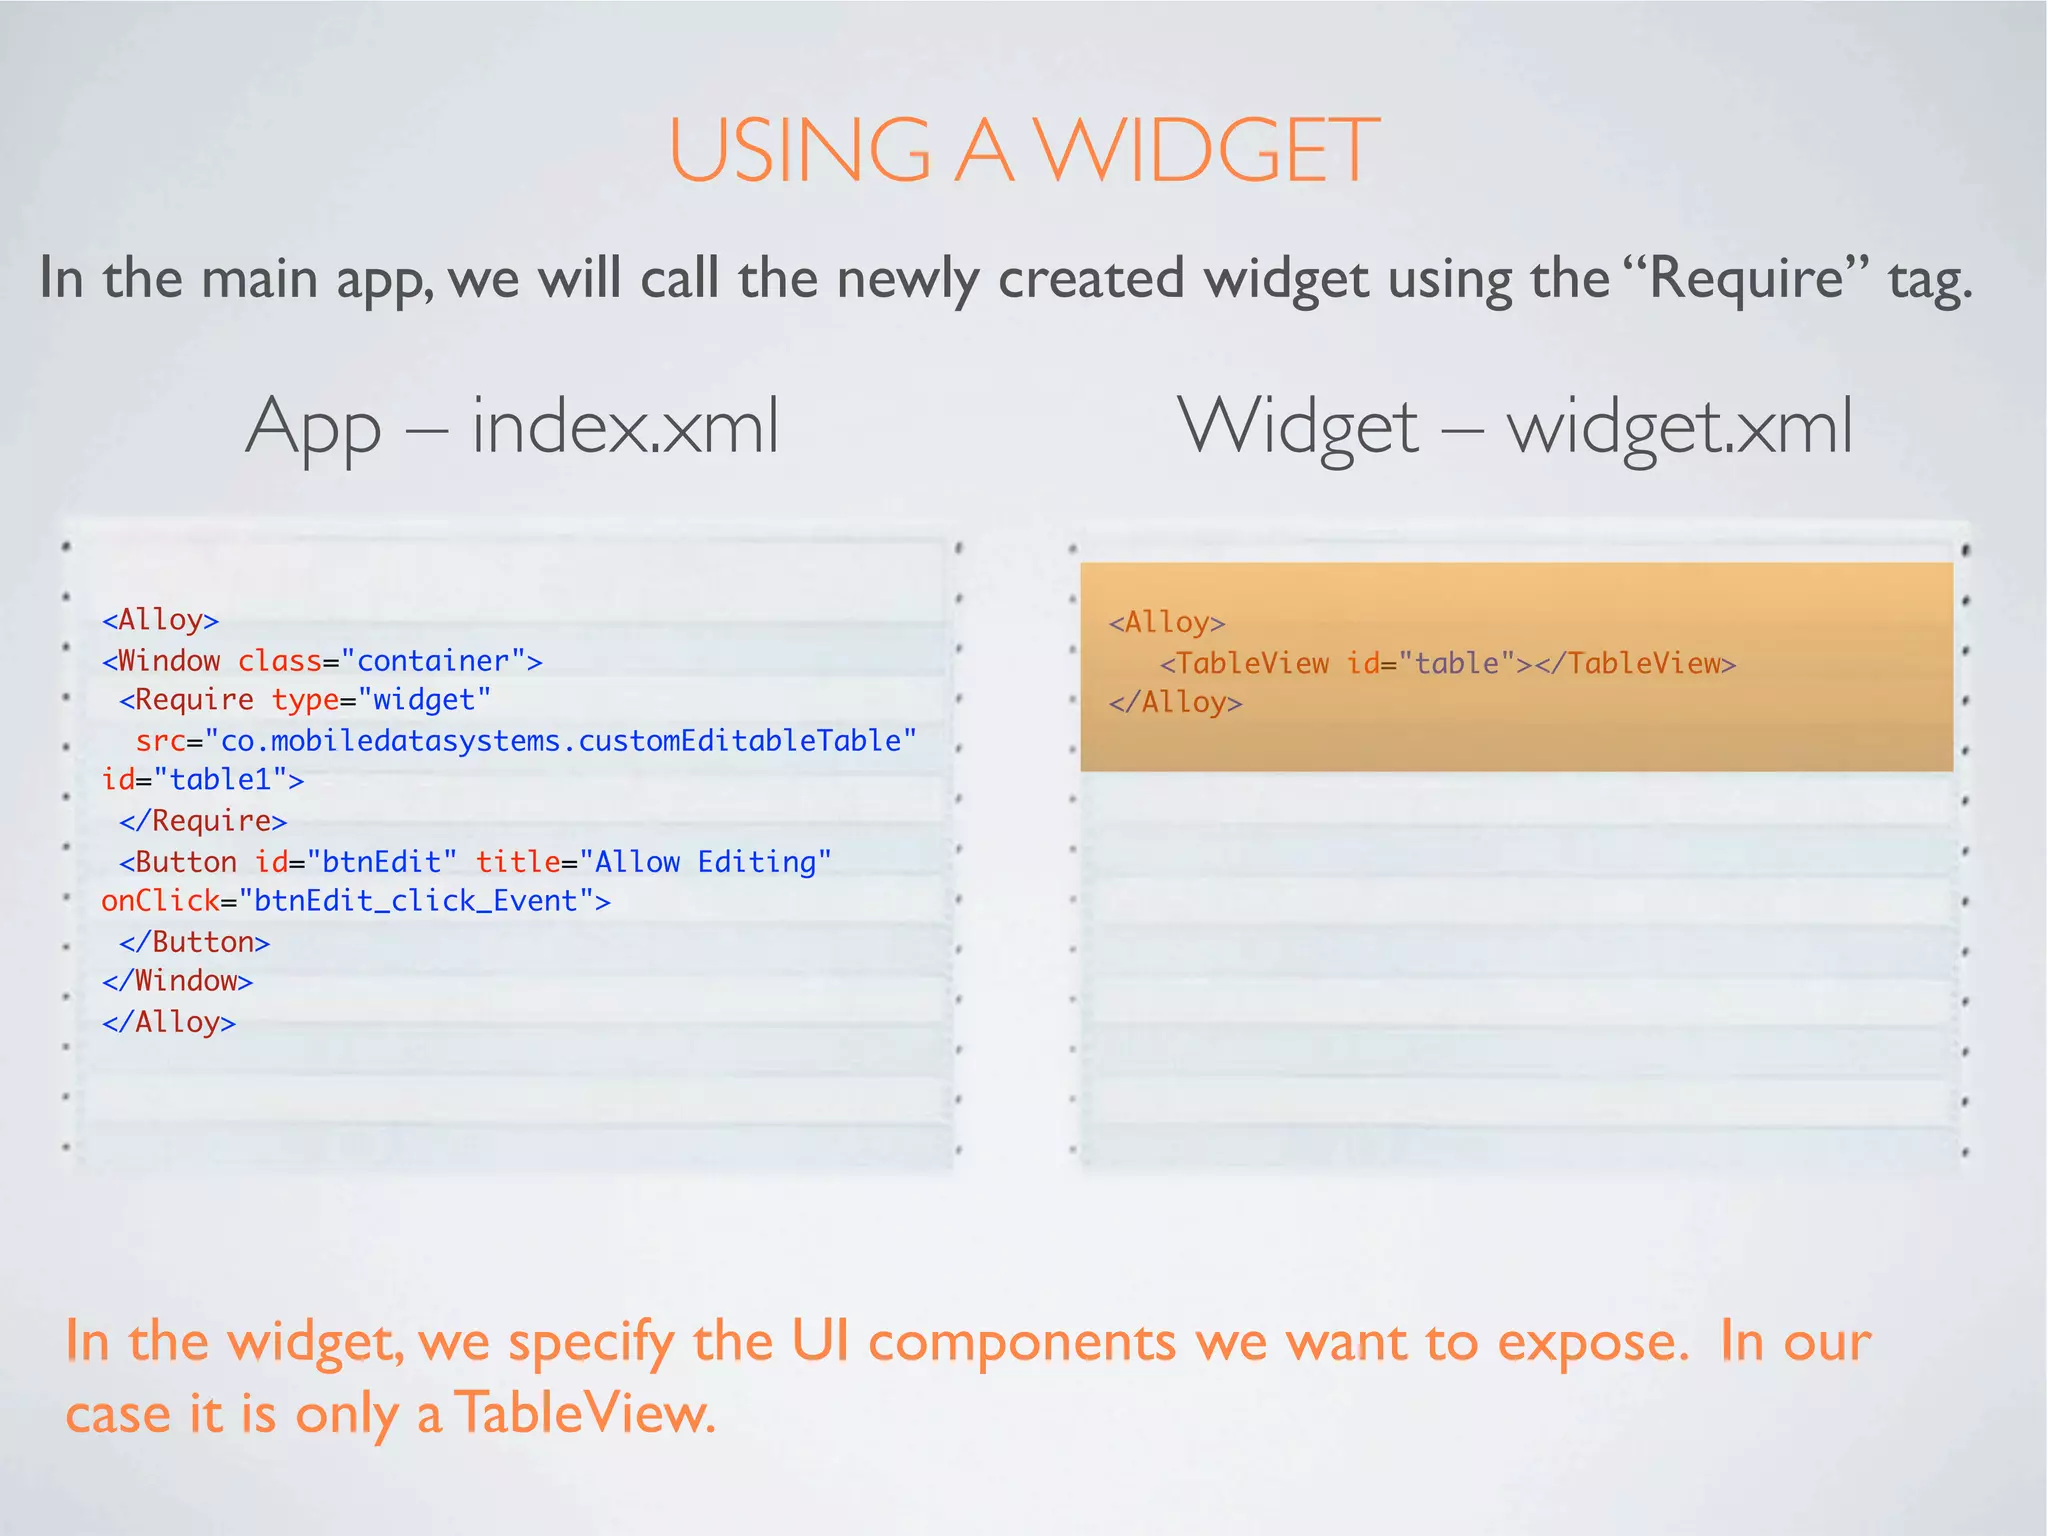
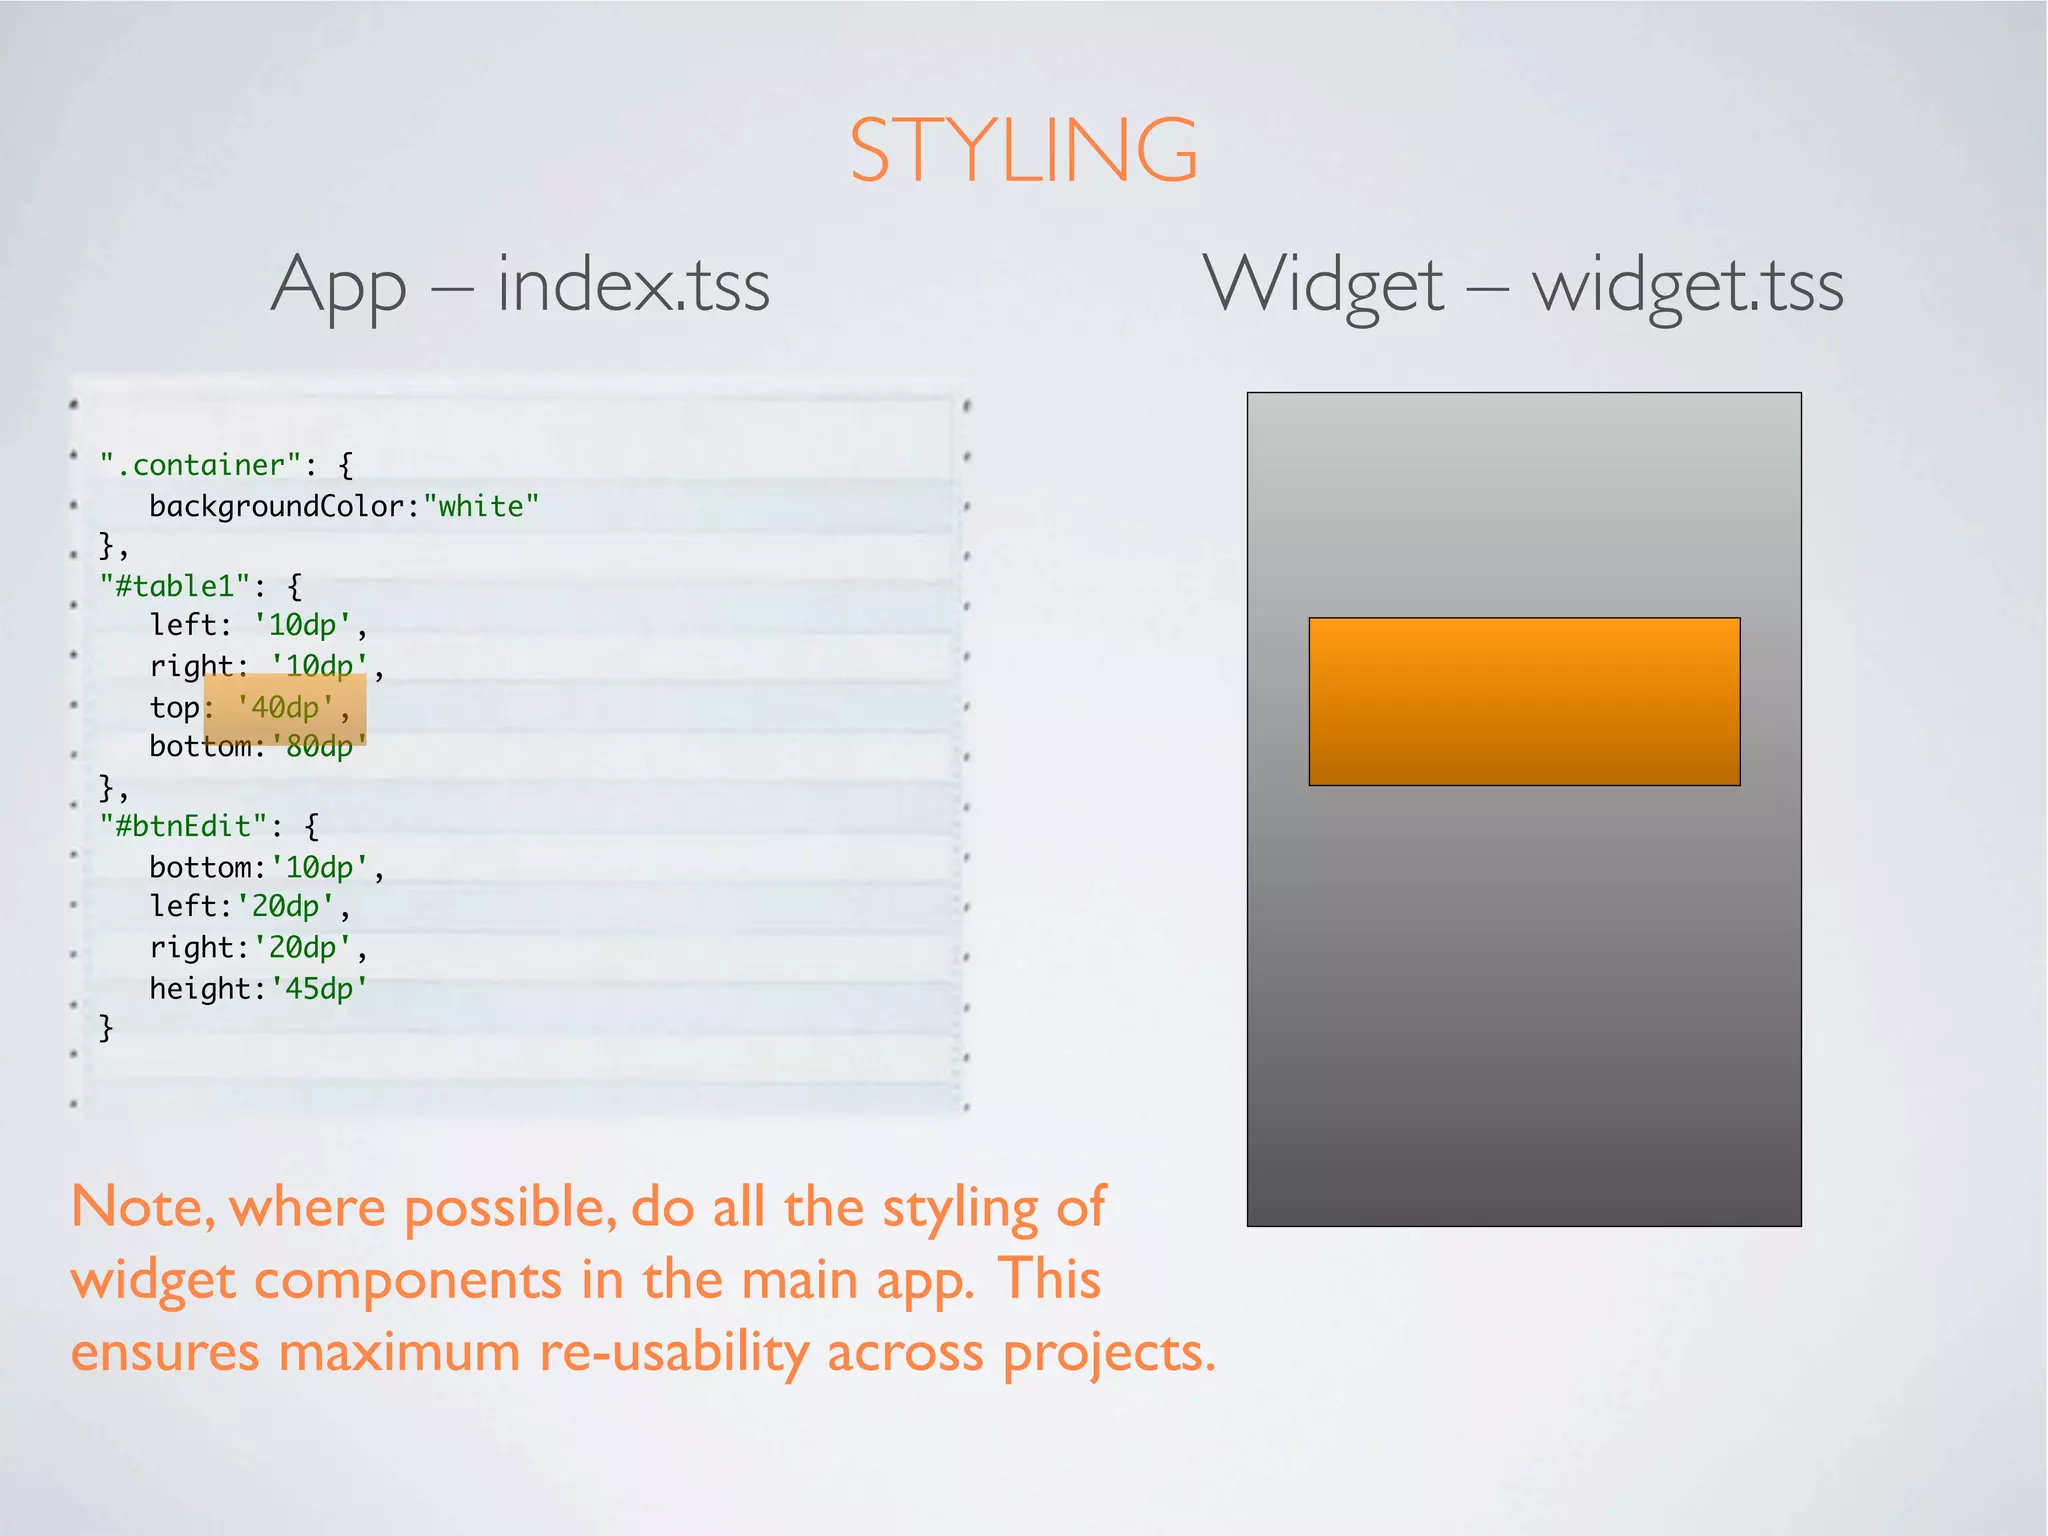
The document discusses Alloy Widgets, which are self-contained UI components that encapsulate logic and can be reused across projects. It provides an example of creating a custom table view widget that manages cross-platform differences. The widget file structure is described, and it is shown how widgets can be used in a main app via the Require tag, passing parameters that can be accessed in the widget controller. Styling of widget elements is recommended to be done in the main app for reusability.


![[Android] Basic Widgets and Containers](https://cdn.slidesharecdn.com/ss_thumbnails/trainingandroidlesson2-130304082650-phpapp02-thumbnail.jpg?width=640&height=640&fit=bounds)


