British Forces:
what the 1st Battalion
of the
Suffolk Regiment
did on D-Day
6th June 1939
These troops were from the 1st Battalion of the Suffolk
Regiment. Their battalion was in action on D-Day, when
they invaded Normandy in France, to fight Germany.
REAL-TIME PHOTO
Like other regiments in
the British Army, the
troops from the
Suffolks could be
identified by items on
their uniforms.
Red and Yellow were the
regimental colours.
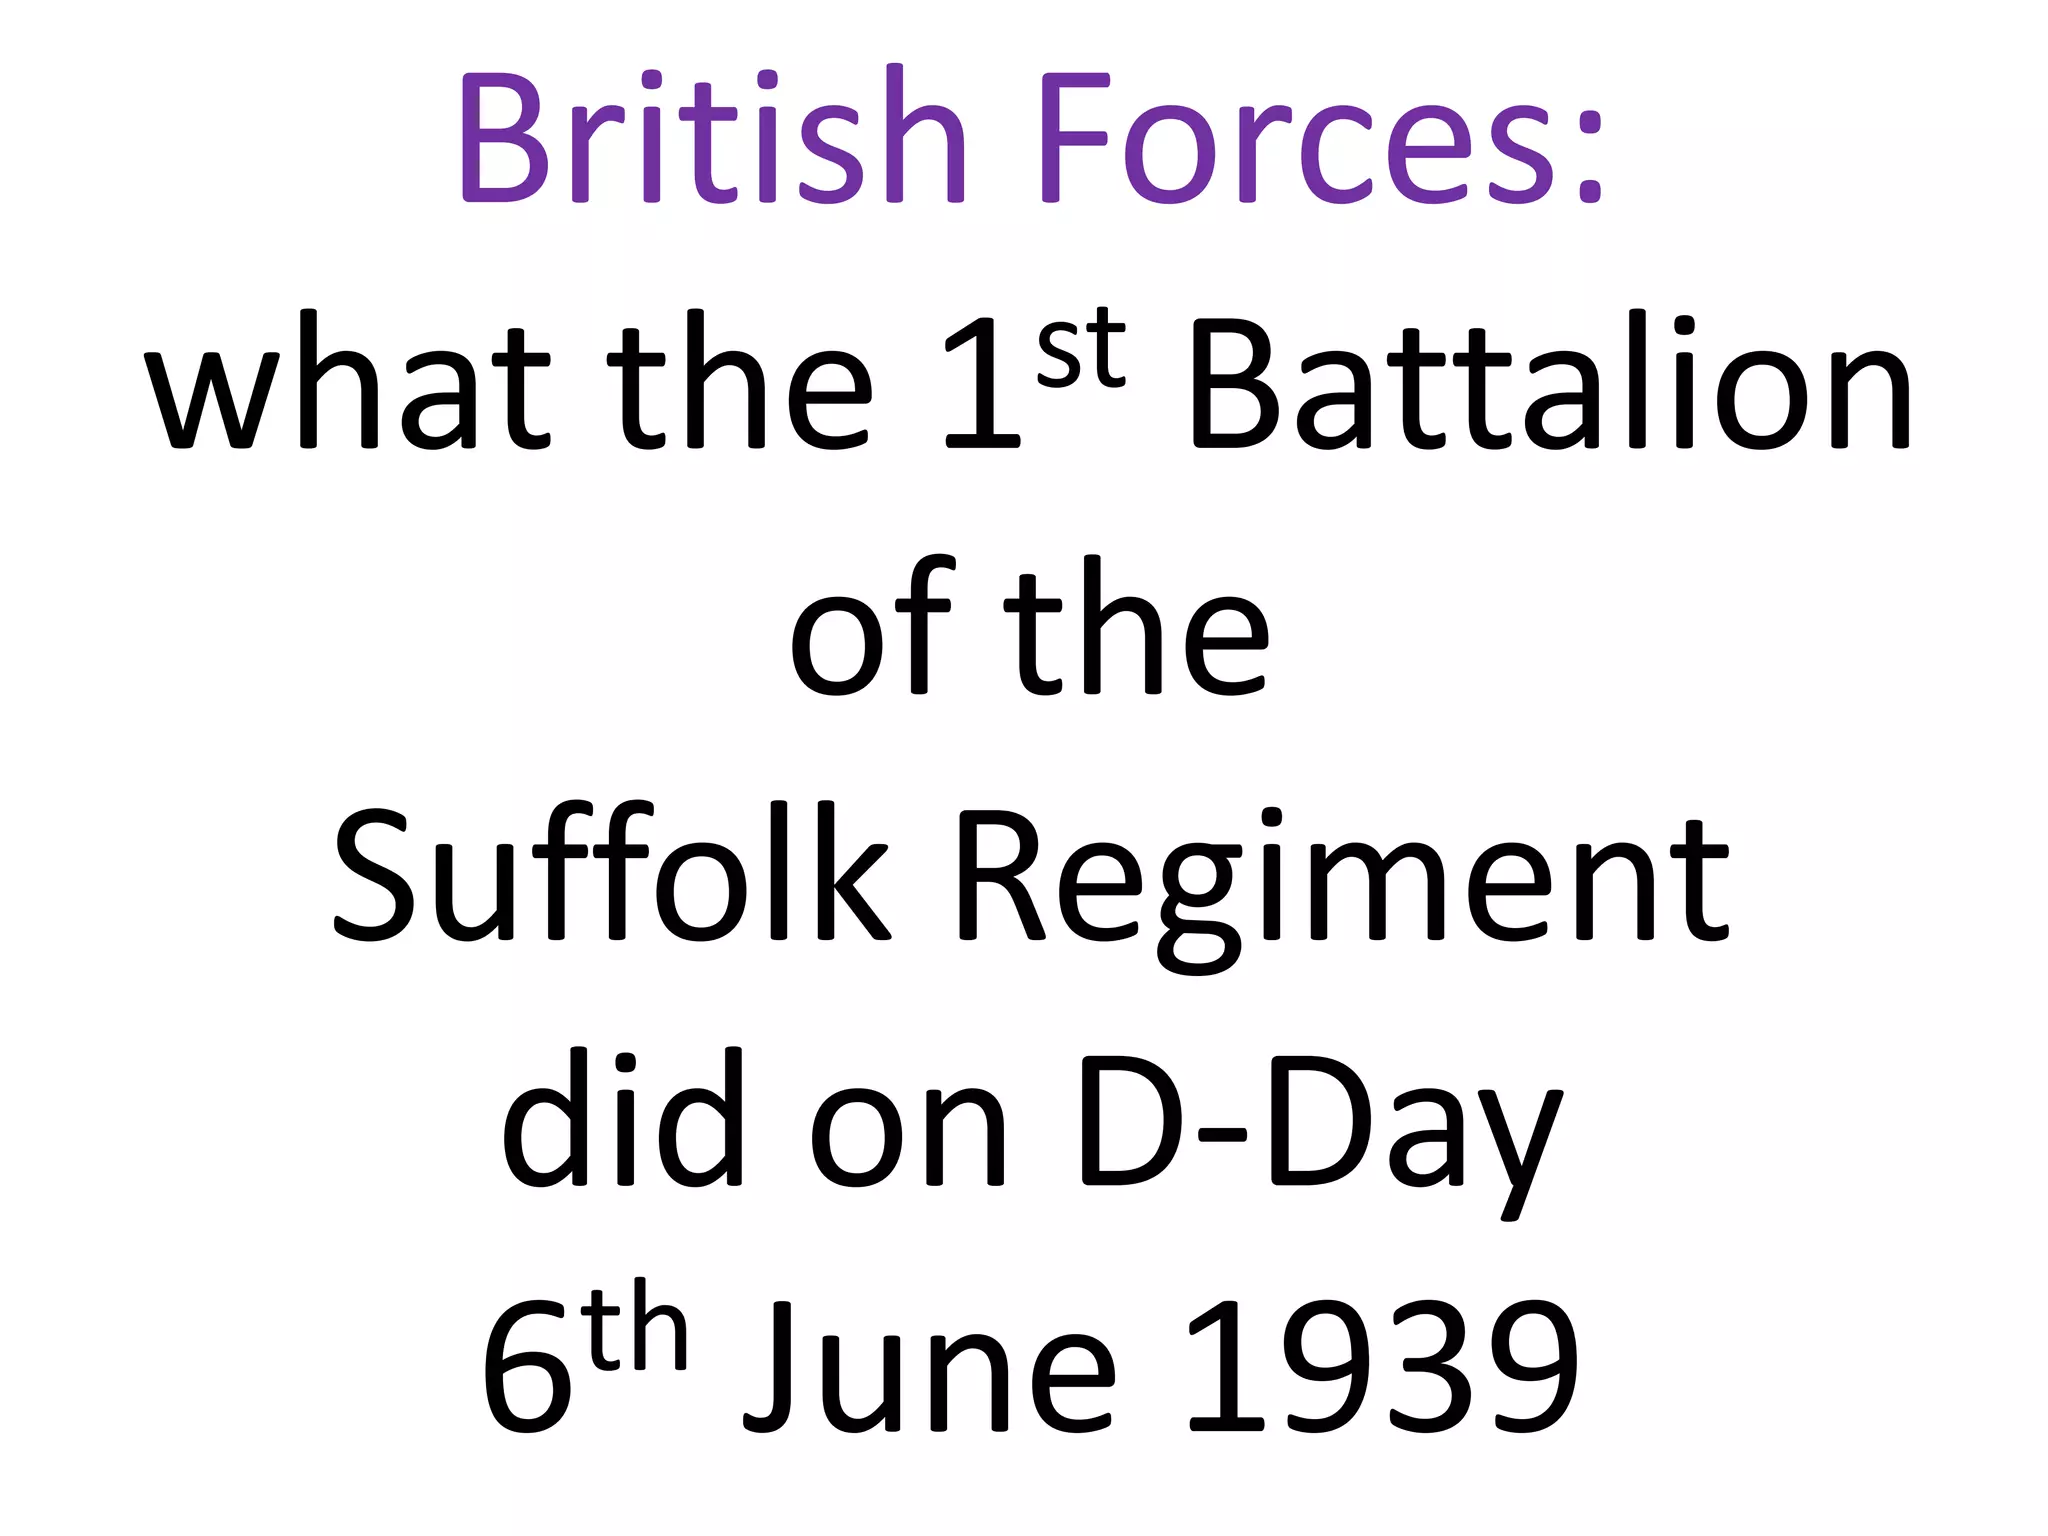
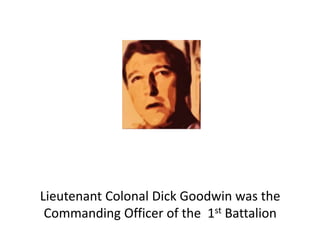
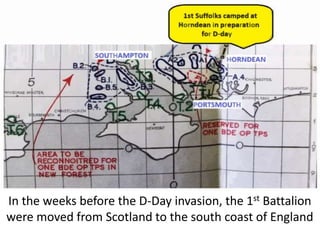
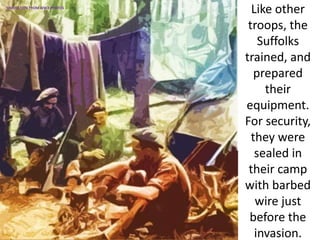
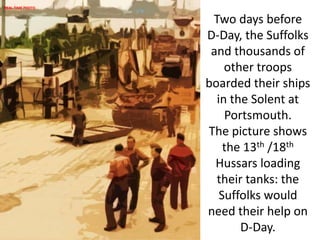
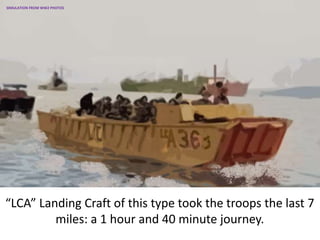
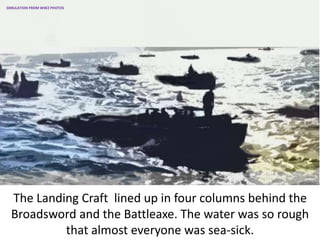
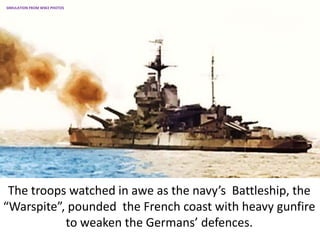
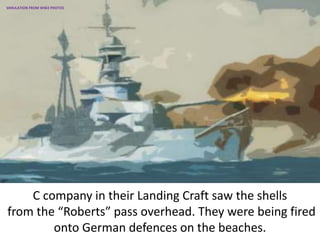
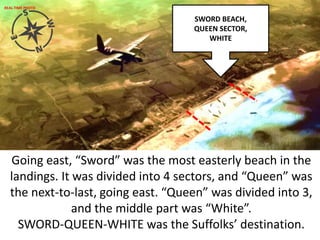
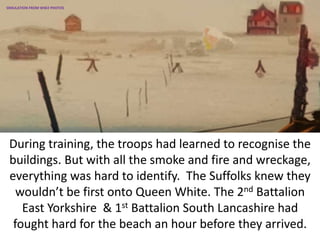
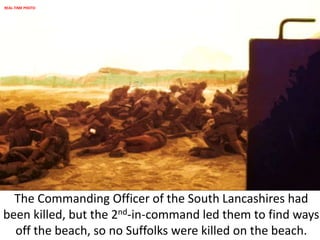
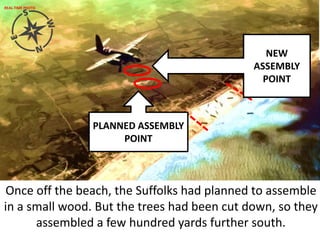
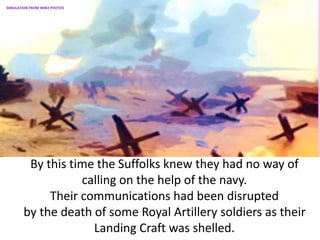
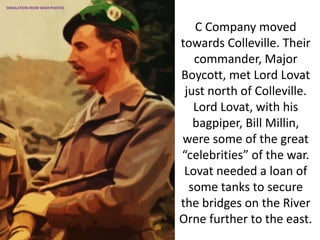
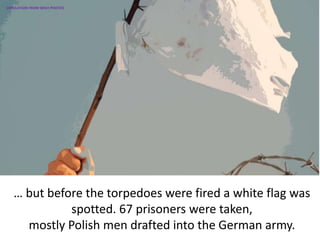
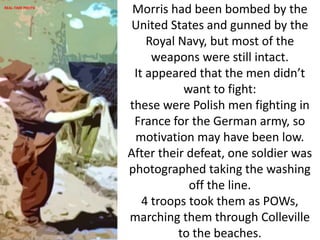
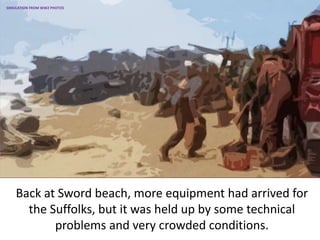
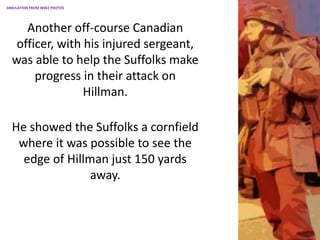
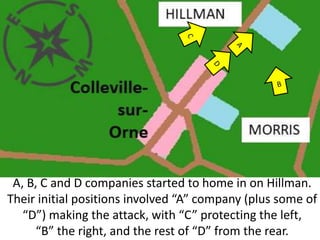
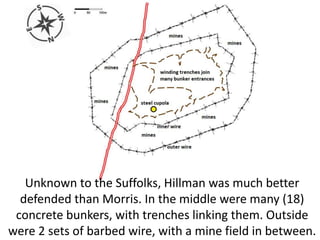
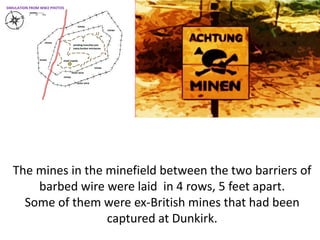
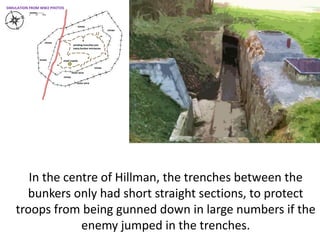
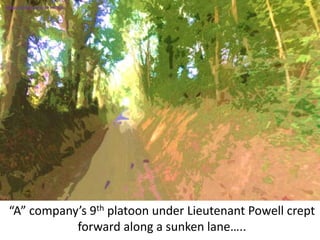
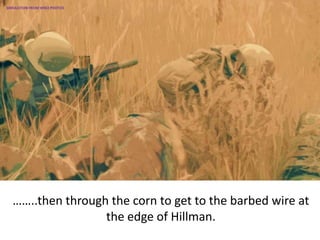
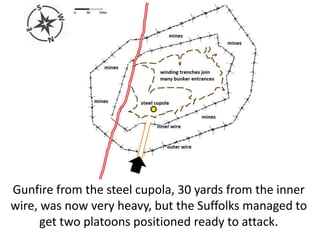
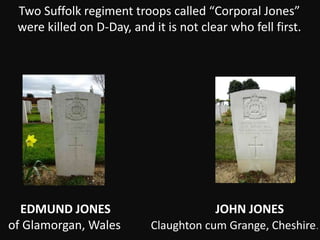
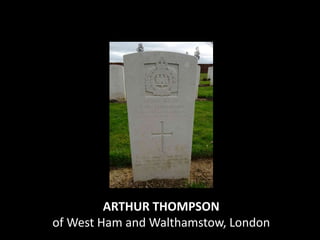
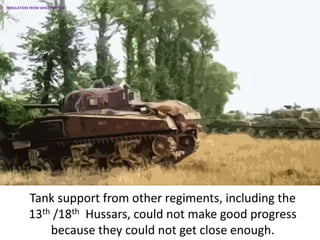
The 1st Battalion of the Suffolk Regiment was split into
4 companies: A, B, C, and D.
Each company had between 100 and 200 men.
Lieutenant Colonal Dick Goodwin was the
Commanding Officer of the 1st Battalion
In the weeks before the D-Day invasion, the 1st Battalion
were moved from Scotland to the south coast of England
Like thousands of other troops from Britain, the USA,
Canada and other allied countries, the Suffolks lived in
camps in the south of England from April till June.
SIMULATION FROM WW2 PHOTOS
Long lines of tanks ready for the invasion
were visible from the Suffolks’ camp in Horndean.
They were hidden from German aircraft by trees.
SIMULATION FROM WW2 PHOTOS
Like other
troops, the
Suffolks
trained, and
prepared
their
equipment.
For security,
they were
sealed in
their camp
with barbed
wire just
before the
invasion.
SIMULATION FROM WW2 PHOTOS
Two days before
D-Day, the Suffolks
and thousands of
other troops
boarded their ships
in the Solent at
Portsmouth.
The picture shows
the 13th /18th
Hussars loading
their tanks: the
Suffolks would
need their help on
D-Day.
REAL-TIME PHOTO
A and C companies of the 1st Battalion
boarded the Empire Broadsword. The sea was rough.
SIMULATION FROM WW2 PHOTOS
B and D companies of the 1st Battalion
boarded the Empire Battleaxe.
SIMULATION FROM WW2 PHOTOS
Troops on the Empire Battleaxe posed for a picture.
Some troops blackened their faces for camouflage, and
shaved a “V” for victory into their hairstyles.
REAL-TIME PHOTO
Broadsword and Battleaxe first sailed to an area south of
the Isle of Wight, where a massive allied fleet gathered.
The area was nicknamed “Piccadilly Circus”.
REAL-TIME PHOTO
When night fell on 5th June, thousands of allied aircraft
flew overhead to France to drop paratroopers, and bomb
the Germans’ guns and defences on the Normandy coast.
REAL-TIME PHOTO
At daybreak, Suffolk troops saw an allied destroyer,
the “Svenner” sunk by a German torpedo. Most of the
Norwegian crew were rescued, but several drowned.
REAL-TIME PHOTO
At 5 o’clock on
6th June, each
platoon climbed
into a Landing
Craft. This was
later jerkily
lowered from
the ship into the
water so the
troops could sail
to the shallow
sandy beaches.
SIMULATION FROM WW2 PHOTOS
“LCA” Landing Craft of this type took the troops the last 7
miles: a 1 hour and 40 minute journey.
SIMULATION FROM WW2 PHOTOS
The Landing Craft lined up in four columns behind the
Broadsword and the Battleaxe. The water was so rough
that almost everyone was sea-sick.
SIMULATION FROM WW2 PHOTOS
The troops watched in awe as the navy’s Battleship, the
“Warspite”, pounded the French coast with heavy gunfire
to weaken the Germans’ defences.
SIMULATION FROM WW2 PHOTOS
C company in their Landing Craft saw the shells
from the “Roberts” pass overhead. They were being fired
onto German defences on the beaches.
SIMULATION FROM WW2 PHOTOS
Going east, “Sword” was the most easterly beach in the
landings. It was divided into 4 sectors, and “Queen” was
the next-to-last, going east. “Queen” was divided into 3,
and the middle part was “White”.
SWORD-QUEEN-WHITE was the Suffolks’ destination.
SWORD BEACH,
QUEEN SECTOR,
WHITE
REAL-TIME PHOTO
During training, the troops had learned to recognise the
buildings. But with all the smoke and fire and wreckage,
everything was hard to identify. The Suffolks knew they
wouldn’t be first onto Queen White. The 2nd Battalion
East Yorkshire & 1st Battalion South Lancashire had
fought hard for the beach an hour before they arrived.
SIMULATION FROM WW2 PHOTOS
At 8:30 a.m. the troops stepped off the Landing craft up
to their waists, rescuing anyone who stepped into deeper
water. They were being fired on from the right, and their
Landing Crafts were shelled.
SIMULATION FROM WW2 PHOTOS
The Commanding Officer of the South Lancashires had
been killed, but the 2nd-in-command led them to find ways
off the beach, so no Suffolks were killed on the beach.
REAL-TIME PHOTO
PLANNED ASSEMBLY
POINT
NEW
ASSEMBLY
POINT
Once off the beach, the Suffolks had planned to assemble
in a small wood. But the trees had been cut down, so they
assembled a few hundred yards further south.
REAL-TIME PHOTO
Companies A, B and C gathered at the new assembly point
in an orchard, with most of company D joining later.
The Commanding Officer clarified the next steps:
C company will move to Colleville-Sur-Orne, with tank
support from the 13th /18th Hussars .
D company will move through orchards to a German
defence codenamed “Morris”.
SIMULATION FROM WW2 PHOTOS
The Suffolks’ plan was
to knock out German
defences codenamed
“Morris” and “Hillman”.
They would need to
clear up any German
defences in the streets
of Colleville-sur-Orne
too.
MORRIS
HILLMAN
ASSEMBLY
ORCHARD
Colleville-
sur-
Orne
Hermanville
QUEEN
WHITE
The United States Air Force based in Suffolk had been
trying to bomb “Morris” and “Hillman”.
Six “Flying Fortresses” from Rougham headed for
Hillman, but they were too high, and dropped no bombs.
Six “Flying Fortresses” from Rattlesden dropped
72 bombs on Morris.
SIMULATION FROM WW2 PHOTOS
The Suffolks and the 13th /18th Hussars were
not the only troops in the
orchard assembly point.
Platoons from other regiments were nearby.
Some lost Canadian paratroopers,
who had been dropped off-course during the
night, joined the Suffolks for part of the day.
They linked with D company.
SIMULATION FROM WW2 PHOTOS
By this time the Suffolks knew they had no way of
calling on the help of the navy.
Their communications had been disrupted
by the death of some Royal Artillery soldiers as their
Landing Craft was shelled.
SIMULATION FROM WW2 PHOTOS
C Company moved
towards Colleville. Their
commander, Major
Boycott, met Lord Lovat
just north of Colleville.
Lord Lovat, with his
bagpiper, Bill Millin,
were some of the great
“celebrities” of the war.
Lovat needed a loan of
some tanks to secure
the bridges on the River
Orne further to the east.
SIMULATION FROM WW2 PHOTOS
Lovat’s commandos moved
off, but a shell landed
amongst them.
One of the dead,
ROBERT ONG, was wearing a
Suffolk regiment badge,
making him the first
“Suffolks” soldier to die on
D-day, even though he was
no longer fighting with the
Suffolk Regiment.
SIMULATION FROM WW2 PHOTOS
Before 10 o’clock in the morning,
C company moved into Colleville-sur-Orne.
SIMULATION FROM WW2 PHOTOS
They passed the church. They were unaware that two
Germans were hiding in the tower.
SIMULATION FROM WW2 PHOTOS
They took up position on the 1st floor of the mairie (town
hall). The mayor left his shelter and brought a bottle of
Calvados, and information about German positions.
SIMULATION FROM WW2 PHOTOS
The next job for the 1st Suffolks was “Morris”,
a 4-gun German defence just to the west of Colleville.
No firing had been reported.
SIMULATION FROM WW2 PHOTOS
Morris contained four 10cm, Czech-built
Howitzer guns, which fired shells.
SIMULATION FROM WW2 PHOTOS
B company moved from the orchards into Colleville
behind C company, then set off to the right in the
direction of “Morris” to break through the surrounding
barbed wire with long pole-like explosives; “Bangalore
torpedoes”. They set the torpedoes in position …..
SIMULATION FROM WW2 PHOTOS
… but before the torpedoes were fired a white flag was
spotted. 67 prisoners were taken,
mostly Polish men drafted into the German army.
SIMULATION FROM WW2 PHOTOS
Morris had been bombed by the
United States and gunned by the
Royal Navy, but most of the
weapons were still intact.
It appeared that the men didn’t
want to fight:
these were Polish men fighting in
France for the German army, so
motivation may have been low.
After their defeat, one soldier was
photographed taking the washing
off the line.
4 troops took them as POWs,
marching them through Colleville
to the beaches.
REAL-TIME PHOTO
The next objective was
“Hillman”.
“A” company were the main
attackers. They had moved
through east of Collville, to
stay clear of “Morris”.
Just south of Colleville ,
9th Platoon of “A” company
were shelled.
Several were wounded;
regimental signaller
FREDERICK MONK
of Bury St Edmunds was
killed.
MORRIS
HILLMAN
ASSEMBLY
ORCHARD
Colleville-
sur-
Orne
Hermanville
QUEEN
WHITE
FREDERICK MONK
of Bury St Edmunds
Back at Sword beach, more equipment had arrived for
the Suffolks, but it was held up by some technical
problems and very crowded conditions.
SIMULATION FROM WW2 PHOTOS
Another off-course Canadian
officer, with his injured sergeant,
was able to help the Suffolks make
progress in their attack on
Hillman.
He showed the Suffolks a cornfield
where it was possible to see the
edge of Hillman just 150 yards
away.
SIMULATION FROM WW2 PHOTOS
A, B, C and D companies started to home in on Hillman.
Their initial positions involved “A” company (plus some of
“D”) making the attack, with “C” protecting the left,
“B” the right, and the rest of “D” from the rear.
Unknown to the Suffolks, Hillman was much better
defended than Morris. In the middle were many (18)
concrete bunkers, with trenches linking them. Outside
were 2 sets of barbed wire, with a mine field in between.
The mines in the minefield between the two barriers of
barbed wire were laid in 4 rows, 5 feet apart.
Some of them were ex-British mines that had been
captured at Dunkirk.
SIMULATION FROM WW2 PHOTOS
In the centre of Hillman, the trenches between the
bunkers only had short straight sections, to protect
troops from being gunned down in large numbers if the
enemy jumped in the trenches.
SIMULATION FROM WW2 PHOTOS
The bunkers in the centre were deep underground,
some with many rooms. The plan of the bunker shown
was one of three large bunkers.
One of the bunkers had a thick steel bomb-proof roof
over the gun position, known as a cupola.
CUPOLA
SIMULATION FROM WW2 PHOTOS
At 10 past 1, Captain Ryley of “A” company gave the order
for the available guns to fire on Hillman for 5 minutes.
This was to damage Hillman, but also to provide cover for
troops to move forward.
SIMULATION FROM WW2 PHOTOS
“A” company’s 9th platoon under Lieutenant Powell crept
forward along a sunken lane…..
SIMULATION FROM WW2 PHOTOS
……..then through the corn to get to the barbed wire at
the edge of Hillman.
SIMULATION FROM WW2 PHOTOS
Bangalore torpedoes were used to blow a gap in the
outer barbed wire defences. Next, a path through the
minefield to an inner set of barbed wire was marked with
tape. A 2nd set of Bangalore torpedoes were placed.
SIMULATION FROM WW2 PHOTOS
The 2nd set of Bangalore torpedoes failed to go off.
D company’s Lieutenant Mike Russell, in charge of their
11th platoon, took action.
Lieutenant Russell crawled through the mine-field under
fire, but protected by smoke, to try again to set
the torpedoes off and make a breach in the inner layer of
barbed wire.
SIMULATION FROM WW2 PHOTOS
He succeeded. Lieutenant Mike Russell was later
awarded the “Croix de Guerre” for bravery.
Now the Suffolks had a clear but narrow corridor into the
centre of Hillman, where there were trenches and
underground bunkers. Gunfire was intense, but they
didn’t know how many Germans were there.
SIMULATION FROM WW2 PHOTOS
Croix de Guerre
Lieutenant Mike Russell
of Warwick
Gunfire from the steel cupola, 30 yards from the inner
wire, was now very heavy, but the Suffolks managed to
get two platoons positioned ready to attack.
CORPORAL JONES from the 8th section of Lieutenant
Powell’s assault 9th platoon moved forward, and was
immediately killed by gun fire.
SIMULATION FROM WW2 PHOTOS
Two Suffolk regiment troops called “Corporal Jones”
were killed on D-Day, and it is not clear who fell first.
EDMUND JONES JOHN JONES
of Glamorgan, Wales Claughton cum Grange, Cheshire.
The troops tried to overrun Hillman. They jumped into
the enemy trenches but could move no further since the
Germans shut themselves into their concrete bunkers
with steel doors.
SIMULATION FROM WW2 PHOTOS
The troops were pinned down. They couldn’t attack
further, and they couldn’t easily go back to the breach in
the wires because of the heavy machine gun fire.
SIMULATION FROM WW2 PHOTOS
The next platoon to arrive found it hard to get through
the breach in the inner wire. Four troops made it
through, and took some prisoners. But they couldn’t
make progress, and needed to go back for more support.
Lieutenant Powell made it back through
the breach, but CAPTAIN RYLEY, LIEUTENANT TOOLEY,
and CORPORAL STARES were killed. Lieutenant Powell’s
contribution won him a Military Cross.
SIMULATION FROM WW2 PHOTOS
GEFFREY RILEY
of Wirral, Cheshire
TREVOR TOOLEY
of Luton, Bedfordshire
FREDERICK STARES
of West Ham, London
Military Cross
Lieutenant John Powell,
Leicester
Stretcher bearers got the wounded back through the
breach under cover of smoke, but those killed in action
were left in the centre of Hillman until the battle was over.
SIMULATION FROM WW2 PHOTOS
A new plan was needed. To win over Hillman, it was
necessary to get tanks into the centre. Hillman’s anti-tank
guns were only sometimes effective, so tanks seemed an
obvious solution. A wider path through the minefield was
needed to get the tanks through.
In the meantime, machine gun casualties were still
occurring near the breach. ARTHUR THOMPSON was
killed when machine gun fire severed his leg.
SIMULATION FROM WW2 PHOTOS
ARTHUR THOMPSON
of West Ham and Walthamstow, London
Tank support from other regiments, including the
13th /18th Hussars, could not make good progress
because they could not get close enough.
SIMULATION FROM WW2 PHOTOS
The Commanding Officer, Dick Goodwin, called for help
from the Royal Engineers to widen the path through the
minefield so that tanks could get closer to Hillman.
They crawled into the minefield and blew up a path
through the mines with gelignite.
SIMULATION FROM WW2 PHOTOS
The 76th Field Regiment of the Royal Artillery bombarded
Hillman again for 5 minutes, then the tanks advanced
with Suffolk troops behind, who fanned out and jumped
into shell holes for cover.
SIMULATION FROM WW2 PHOTOS
The steel cupola, from which the Suffolks were being fired
on, still stood strong even when fired on by tanks at close
range. The firing from this structured meant that the
Suffolks were still pinned down. A German surrendered
but was shot: no-one knew which side shot him.
SIMULATION FROM WW2 PHOTOS
Private “Tich” Hunter leaped out of his shell-hole firing
his Bren gun from the hip. He was only 20 yards from the
cupola, but he kept shooting at the aperture until there
was no response from the gunner in the cupola. Then he
jumped into a German trench, pursued by a German
soldier who was shot at by one of the Suffolks. For his
bravery, he was awarded a Distinguished Conduct Medal,
which is a medal just below the Victoria Cross.
SIMULATION FROM WW2 PHOTOS
Private James “Tich” Hunter,
London
Distinguished Conduct Medal
Private James Hunter,
London
Tich Hunter’s actions completely turned the tide, and the
Suffolks gained control of Hillman.
Grenades were dropped down ventilation shafts, and
some prisoners were taken as they left their
underground locations.
SIMULATION FROM WW2 PHOTOS
“Beehive” charges were used on top of bunkers to
destroy defences on the other side of Hillman.
SIMULATION FROM WW2 PHOTOS
There was a memorable
moment when the squadron
commander of the 13th /18th
Hussars became annoyed
about losing his tank.
It fell into the officer’s
latrine at Hillman.
The 13th /18th Hussars
withdrew from Hillman at
about 7:30 p.m. to tackle a
threat from German tanks in
the west. At 8:00 p.m. firing
stopped, and the Suffolks
moved on.
SIMULATION FROM WW2 PHOTOS
Up in the sky, many allied aircraft dropped colour-coded
supplies for the troops by parachute. This was greeted
enthusiastically and raised the morale of the Suffolks.
SIMULATION FROM WW2 PHOTOS
Unknown to the Suffolks, who had taken about 50
prisoners at Hillman, many more
Germans were still deep underground.
Hillman was in fact the headquarters of the 736th
Grenadier Regiment, commanded by Oberst Krug.
However, knowing that the British were in large numbers
on the surface of Hillman, the Germans who had taken up
a position to the west began shelling the area.
Three men were injured when a truck was hit.
SIMULATION FROM WW2 PHOTOS
Command Sergeant Major Franklin led D Company to the
south to a farm where they intended to dig in for the night.
They killed two German snipers in the corn on the way. There
was movement in the farmhouse window. The 17th Platoon
of D Company were ordered to clear the house.
SIMULATION FROM WW2 PHOTOS
Firing their Bren guns, they ran across the field to the
house, but the Germans start to leave their trenches with
their hands up and 50 were taken prisoner.
The D Company Commanding Officer, Major Philip Papillon,
ordered his men to move away from the farmhouse site.
It was a wise move because the Germans mortared the
empty farmhouse for over an hour.
SIMULATION FROM WW2 PHOTOS
Before midnight,
the Suffolks had
dug into their trenches for the night,
south of Hillman, near the Periers Ridge.
Some remained at Hillman.
Private
KENNETH
GOWER
of Greenford,
Middlesex
These men also died fighting for the Suffolks on
6th June 1944:
Lance Corporal
RONALD
ROSOMAN
of Hackney,
London
Private
WILLIAM
McCORMACK
of Birmingham,
Warwickshire
Private K Gower
Corporal E Jones
Corporal J Jones
Private W McCormack
Private F Monk
Lance Corporal R Rosoman
Captain RG Ryley
Corporal F Stares
Private A Thompson
Lieutenant TJF Tooley
List of Suffolks fatalities on 6th June 1944:
At midnight, deep below Hillman,
the German Commander Oberst
Ludwig Krug made a phone call to
another division near Caen, south of
Hillman:
"The enemy are on top of my
bunker. I have no means of resisting
them and no means of
communicating with them. What
shall I do?"
His request for help was turned
down:
"I can give you no more orders. You
must make your own decision now.
Goodbye".
SIMULATION FROM WW2 PHOTOS
So at 6:45 a.m. Kommandeur
Oberst Krug, an Austrian described
as “sensible” by the British,
realised the futility of continuing.
He dressed in his smartest uniform
with polished boots, packed two
suitcases and made his surrender
with two other officers and 70
other German soldiers. The
prisoners were taken by Suffolks
who were at Hillman burying the
dead, and they were escorted
through Colleville-sur-Orne to the
beach. Krug surrendered maps and
documents.
In Colleville, some shots were fired
from the church tower. But now
there were large numbers of
British troops in the area with
guns and tanks.
A tank gun fired a round through
the tower and made a large hole
in one side.
Two Germans covered with dust
surrendered shortly afterwards.
The surrender at Hillman and at
the church tower completed the
work started on D-day, and the
Suffolks moved south.
REAL-TIME PHOTO
Thanks to the
“Friends of the
Suffolk Regiment”
who recorded the 1st
Battalion’s actions as a
Twitter feed on
6th June2019

Suffolk 1st battalion on D-Day

  • 1.
    British Forces: what the1st Battalion of the Suffolk Regiment did on D-Day 6th June 1939
  • 2.
    These troops werefrom the 1st Battalion of the Suffolk Regiment. Their battalion was in action on D-Day, when they invaded Normandy in France, to fight Germany. REAL-TIME PHOTO
  • 3.
    Like other regimentsin the British Army, the troops from the Suffolks could be identified by items on their uniforms. Red and Yellow were the regimental colours.
  • 4.
    The 1st Battalionof the Suffolk Regiment was split into 4 companies: A, B, C, and D. Each company had between 100 and 200 men.
  • 5.
    Lieutenant Colonal DickGoodwin was the Commanding Officer of the 1st Battalion
  • 6.
    In the weeksbefore the D-Day invasion, the 1st Battalion were moved from Scotland to the south coast of England
  • 7.
    Like thousands ofother troops from Britain, the USA, Canada and other allied countries, the Suffolks lived in camps in the south of England from April till June. SIMULATION FROM WW2 PHOTOS
  • 8.
    Long lines oftanks ready for the invasion were visible from the Suffolks’ camp in Horndean. They were hidden from German aircraft by trees. SIMULATION FROM WW2 PHOTOS
  • 9.
    Like other troops, the Suffolks trained,and prepared their equipment. For security, they were sealed in their camp with barbed wire just before the invasion. SIMULATION FROM WW2 PHOTOS
  • 10.
    Two days before D-Day,the Suffolks and thousands of other troops boarded their ships in the Solent at Portsmouth. The picture shows the 13th /18th Hussars loading their tanks: the Suffolks would need their help on D-Day. REAL-TIME PHOTO
  • 11.
    A and Ccompanies of the 1st Battalion boarded the Empire Broadsword. The sea was rough. SIMULATION FROM WW2 PHOTOS
  • 12.
    B and Dcompanies of the 1st Battalion boarded the Empire Battleaxe. SIMULATION FROM WW2 PHOTOS
  • 13.
    Troops on theEmpire Battleaxe posed for a picture. Some troops blackened their faces for camouflage, and shaved a “V” for victory into their hairstyles. REAL-TIME PHOTO
  • 14.
    Broadsword and Battleaxefirst sailed to an area south of the Isle of Wight, where a massive allied fleet gathered. The area was nicknamed “Piccadilly Circus”. REAL-TIME PHOTO
  • 15.
    When night fellon 5th June, thousands of allied aircraft flew overhead to France to drop paratroopers, and bomb the Germans’ guns and defences on the Normandy coast. REAL-TIME PHOTO
  • 16.
    At daybreak, Suffolktroops saw an allied destroyer, the “Svenner” sunk by a German torpedo. Most of the Norwegian crew were rescued, but several drowned. REAL-TIME PHOTO
  • 17.
    At 5 o’clockon 6th June, each platoon climbed into a Landing Craft. This was later jerkily lowered from the ship into the water so the troops could sail to the shallow sandy beaches. SIMULATION FROM WW2 PHOTOS
  • 18.
    “LCA” Landing Craftof this type took the troops the last 7 miles: a 1 hour and 40 minute journey. SIMULATION FROM WW2 PHOTOS
  • 19.
    The Landing Craftlined up in four columns behind the Broadsword and the Battleaxe. The water was so rough that almost everyone was sea-sick. SIMULATION FROM WW2 PHOTOS
  • 20.
    The troops watchedin awe as the navy’s Battleship, the “Warspite”, pounded the French coast with heavy gunfire to weaken the Germans’ defences. SIMULATION FROM WW2 PHOTOS
  • 21.
    C company intheir Landing Craft saw the shells from the “Roberts” pass overhead. They were being fired onto German defences on the beaches. SIMULATION FROM WW2 PHOTOS
  • 22.
    Going east, “Sword”was the most easterly beach in the landings. It was divided into 4 sectors, and “Queen” was the next-to-last, going east. “Queen” was divided into 3, and the middle part was “White”. SWORD-QUEEN-WHITE was the Suffolks’ destination. SWORD BEACH, QUEEN SECTOR, WHITE REAL-TIME PHOTO
  • 23.
    During training, thetroops had learned to recognise the buildings. But with all the smoke and fire and wreckage, everything was hard to identify. The Suffolks knew they wouldn’t be first onto Queen White. The 2nd Battalion East Yorkshire & 1st Battalion South Lancashire had fought hard for the beach an hour before they arrived. SIMULATION FROM WW2 PHOTOS
  • 24.
    At 8:30 a.m.the troops stepped off the Landing craft up to their waists, rescuing anyone who stepped into deeper water. They were being fired on from the right, and their Landing Crafts were shelled. SIMULATION FROM WW2 PHOTOS
  • 25.
    The Commanding Officerof the South Lancashires had been killed, but the 2nd-in-command led them to find ways off the beach, so no Suffolks were killed on the beach. REAL-TIME PHOTO
  • 26.
    PLANNED ASSEMBLY POINT NEW ASSEMBLY POINT Once offthe beach, the Suffolks had planned to assemble in a small wood. But the trees had been cut down, so they assembled a few hundred yards further south. REAL-TIME PHOTO
  • 27.
    Companies A, Band C gathered at the new assembly point in an orchard, with most of company D joining later. The Commanding Officer clarified the next steps: C company will move to Colleville-Sur-Orne, with tank support from the 13th /18th Hussars . D company will move through orchards to a German defence codenamed “Morris”. SIMULATION FROM WW2 PHOTOS
  • 28.
    The Suffolks’ planwas to knock out German defences codenamed “Morris” and “Hillman”. They would need to clear up any German defences in the streets of Colleville-sur-Orne too. MORRIS HILLMAN ASSEMBLY ORCHARD Colleville- sur- Orne Hermanville QUEEN WHITE
  • 29.
    The United StatesAir Force based in Suffolk had been trying to bomb “Morris” and “Hillman”. Six “Flying Fortresses” from Rougham headed for Hillman, but they were too high, and dropped no bombs. Six “Flying Fortresses” from Rattlesden dropped 72 bombs on Morris. SIMULATION FROM WW2 PHOTOS
  • 30.
    The Suffolks andthe 13th /18th Hussars were not the only troops in the orchard assembly point. Platoons from other regiments were nearby. Some lost Canadian paratroopers, who had been dropped off-course during the night, joined the Suffolks for part of the day. They linked with D company. SIMULATION FROM WW2 PHOTOS
  • 31.
    By this timethe Suffolks knew they had no way of calling on the help of the navy. Their communications had been disrupted by the death of some Royal Artillery soldiers as their Landing Craft was shelled. SIMULATION FROM WW2 PHOTOS
  • 32.
    C Company moved towardsColleville. Their commander, Major Boycott, met Lord Lovat just north of Colleville. Lord Lovat, with his bagpiper, Bill Millin, were some of the great “celebrities” of the war. Lovat needed a loan of some tanks to secure the bridges on the River Orne further to the east. SIMULATION FROM WW2 PHOTOS
  • 33.
    Lovat’s commandos moved off,but a shell landed amongst them. One of the dead, ROBERT ONG, was wearing a Suffolk regiment badge, making him the first “Suffolks” soldier to die on D-day, even though he was no longer fighting with the Suffolk Regiment. SIMULATION FROM WW2 PHOTOS
  • 34.
    Before 10 o’clockin the morning, C company moved into Colleville-sur-Orne. SIMULATION FROM WW2 PHOTOS
  • 35.
    They passed thechurch. They were unaware that two Germans were hiding in the tower. SIMULATION FROM WW2 PHOTOS
  • 36.
    They took upposition on the 1st floor of the mairie (town hall). The mayor left his shelter and brought a bottle of Calvados, and information about German positions. SIMULATION FROM WW2 PHOTOS
  • 37.
    The next jobfor the 1st Suffolks was “Morris”, a 4-gun German defence just to the west of Colleville. No firing had been reported. SIMULATION FROM WW2 PHOTOS
  • 38.
    Morris contained four10cm, Czech-built Howitzer guns, which fired shells. SIMULATION FROM WW2 PHOTOS
  • 39.
    B company movedfrom the orchards into Colleville behind C company, then set off to the right in the direction of “Morris” to break through the surrounding barbed wire with long pole-like explosives; “Bangalore torpedoes”. They set the torpedoes in position ….. SIMULATION FROM WW2 PHOTOS
  • 40.
    … but beforethe torpedoes were fired a white flag was spotted. 67 prisoners were taken, mostly Polish men drafted into the German army. SIMULATION FROM WW2 PHOTOS
  • 41.
    Morris had beenbombed by the United States and gunned by the Royal Navy, but most of the weapons were still intact. It appeared that the men didn’t want to fight: these were Polish men fighting in France for the German army, so motivation may have been low. After their defeat, one soldier was photographed taking the washing off the line. 4 troops took them as POWs, marching them through Colleville to the beaches. REAL-TIME PHOTO
  • 42.
    The next objectivewas “Hillman”. “A” company were the main attackers. They had moved through east of Collville, to stay clear of “Morris”. Just south of Colleville , 9th Platoon of “A” company were shelled. Several were wounded; regimental signaller FREDERICK MONK of Bury St Edmunds was killed. MORRIS HILLMAN ASSEMBLY ORCHARD Colleville- sur- Orne Hermanville QUEEN WHITE
  • 43.
  • 44.
    Back at Swordbeach, more equipment had arrived for the Suffolks, but it was held up by some technical problems and very crowded conditions. SIMULATION FROM WW2 PHOTOS
  • 45.
    Another off-course Canadian officer,with his injured sergeant, was able to help the Suffolks make progress in their attack on Hillman. He showed the Suffolks a cornfield where it was possible to see the edge of Hillman just 150 yards away. SIMULATION FROM WW2 PHOTOS
  • 46.
    A, B, Cand D companies started to home in on Hillman. Their initial positions involved “A” company (plus some of “D”) making the attack, with “C” protecting the left, “B” the right, and the rest of “D” from the rear.
  • 47.
    Unknown to theSuffolks, Hillman was much better defended than Morris. In the middle were many (18) concrete bunkers, with trenches linking them. Outside were 2 sets of barbed wire, with a mine field in between.
  • 48.
    The mines inthe minefield between the two barriers of barbed wire were laid in 4 rows, 5 feet apart. Some of them were ex-British mines that had been captured at Dunkirk. SIMULATION FROM WW2 PHOTOS
  • 49.
    In the centreof Hillman, the trenches between the bunkers only had short straight sections, to protect troops from being gunned down in large numbers if the enemy jumped in the trenches. SIMULATION FROM WW2 PHOTOS
  • 50.
    The bunkers inthe centre were deep underground, some with many rooms. The plan of the bunker shown was one of three large bunkers.
  • 51.
    One of thebunkers had a thick steel bomb-proof roof over the gun position, known as a cupola. CUPOLA SIMULATION FROM WW2 PHOTOS
  • 52.
    At 10 past1, Captain Ryley of “A” company gave the order for the available guns to fire on Hillman for 5 minutes. This was to damage Hillman, but also to provide cover for troops to move forward. SIMULATION FROM WW2 PHOTOS
  • 53.
    “A” company’s 9thplatoon under Lieutenant Powell crept forward along a sunken lane….. SIMULATION FROM WW2 PHOTOS
  • 54.
    ……..then through thecorn to get to the barbed wire at the edge of Hillman. SIMULATION FROM WW2 PHOTOS
  • 55.
    Bangalore torpedoes wereused to blow a gap in the outer barbed wire defences. Next, a path through the minefield to an inner set of barbed wire was marked with tape. A 2nd set of Bangalore torpedoes were placed. SIMULATION FROM WW2 PHOTOS
  • 56.
    The 2nd setof Bangalore torpedoes failed to go off. D company’s Lieutenant Mike Russell, in charge of their 11th platoon, took action. Lieutenant Russell crawled through the mine-field under fire, but protected by smoke, to try again to set the torpedoes off and make a breach in the inner layer of barbed wire. SIMULATION FROM WW2 PHOTOS
  • 57.
    He succeeded. LieutenantMike Russell was later awarded the “Croix de Guerre” for bravery. Now the Suffolks had a clear but narrow corridor into the centre of Hillman, where there were trenches and underground bunkers. Gunfire was intense, but they didn’t know how many Germans were there. SIMULATION FROM WW2 PHOTOS
  • 58.
    Croix de Guerre LieutenantMike Russell of Warwick
  • 59.
    Gunfire from thesteel cupola, 30 yards from the inner wire, was now very heavy, but the Suffolks managed to get two platoons positioned ready to attack.
  • 60.
    CORPORAL JONES fromthe 8th section of Lieutenant Powell’s assault 9th platoon moved forward, and was immediately killed by gun fire. SIMULATION FROM WW2 PHOTOS
  • 61.
    Two Suffolk regimenttroops called “Corporal Jones” were killed on D-Day, and it is not clear who fell first. EDMUND JONES JOHN JONES of Glamorgan, Wales Claughton cum Grange, Cheshire.
  • 62.
    The troops triedto overrun Hillman. They jumped into the enemy trenches but could move no further since the Germans shut themselves into their concrete bunkers with steel doors. SIMULATION FROM WW2 PHOTOS
  • 63.
    The troops werepinned down. They couldn’t attack further, and they couldn’t easily go back to the breach in the wires because of the heavy machine gun fire. SIMULATION FROM WW2 PHOTOS
  • 64.
    The next platoonto arrive found it hard to get through the breach in the inner wire. Four troops made it through, and took some prisoners. But they couldn’t make progress, and needed to go back for more support. Lieutenant Powell made it back through the breach, but CAPTAIN RYLEY, LIEUTENANT TOOLEY, and CORPORAL STARES were killed. Lieutenant Powell’s contribution won him a Military Cross. SIMULATION FROM WW2 PHOTOS
  • 65.
  • 66.
  • 67.
  • 68.
  • 69.
    Stretcher bearers gotthe wounded back through the breach under cover of smoke, but those killed in action were left in the centre of Hillman until the battle was over. SIMULATION FROM WW2 PHOTOS
  • 70.
    A new planwas needed. To win over Hillman, it was necessary to get tanks into the centre. Hillman’s anti-tank guns were only sometimes effective, so tanks seemed an obvious solution. A wider path through the minefield was needed to get the tanks through. In the meantime, machine gun casualties were still occurring near the breach. ARTHUR THOMPSON was killed when machine gun fire severed his leg. SIMULATION FROM WW2 PHOTOS
  • 71.
    ARTHUR THOMPSON of WestHam and Walthamstow, London
  • 72.
    Tank support fromother regiments, including the 13th /18th Hussars, could not make good progress because they could not get close enough. SIMULATION FROM WW2 PHOTOS
  • 73.
    The Commanding Officer,Dick Goodwin, called for help from the Royal Engineers to widen the path through the minefield so that tanks could get closer to Hillman. They crawled into the minefield and blew up a path through the mines with gelignite. SIMULATION FROM WW2 PHOTOS
  • 74.
    The 76th FieldRegiment of the Royal Artillery bombarded Hillman again for 5 minutes, then the tanks advanced with Suffolk troops behind, who fanned out and jumped into shell holes for cover. SIMULATION FROM WW2 PHOTOS
  • 75.
    The steel cupola,from which the Suffolks were being fired on, still stood strong even when fired on by tanks at close range. The firing from this structured meant that the Suffolks were still pinned down. A German surrendered but was shot: no-one knew which side shot him. SIMULATION FROM WW2 PHOTOS
  • 76.
    Private “Tich” Hunterleaped out of his shell-hole firing his Bren gun from the hip. He was only 20 yards from the cupola, but he kept shooting at the aperture until there was no response from the gunner in the cupola. Then he jumped into a German trench, pursued by a German soldier who was shot at by one of the Suffolks. For his bravery, he was awarded a Distinguished Conduct Medal, which is a medal just below the Victoria Cross. SIMULATION FROM WW2 PHOTOS
  • 77.
  • 78.
  • 79.
    Tich Hunter’s actionscompletely turned the tide, and the Suffolks gained control of Hillman. Grenades were dropped down ventilation shafts, and some prisoners were taken as they left their underground locations. SIMULATION FROM WW2 PHOTOS
  • 80.
    “Beehive” charges wereused on top of bunkers to destroy defences on the other side of Hillman. SIMULATION FROM WW2 PHOTOS
  • 81.
    There was amemorable moment when the squadron commander of the 13th /18th Hussars became annoyed about losing his tank. It fell into the officer’s latrine at Hillman. The 13th /18th Hussars withdrew from Hillman at about 7:30 p.m. to tackle a threat from German tanks in the west. At 8:00 p.m. firing stopped, and the Suffolks moved on. SIMULATION FROM WW2 PHOTOS
  • 82.
    Up in thesky, many allied aircraft dropped colour-coded supplies for the troops by parachute. This was greeted enthusiastically and raised the morale of the Suffolks. SIMULATION FROM WW2 PHOTOS
  • 83.
    Unknown to theSuffolks, who had taken about 50 prisoners at Hillman, many more Germans were still deep underground. Hillman was in fact the headquarters of the 736th Grenadier Regiment, commanded by Oberst Krug. However, knowing that the British were in large numbers on the surface of Hillman, the Germans who had taken up a position to the west began shelling the area. Three men were injured when a truck was hit. SIMULATION FROM WW2 PHOTOS
  • 84.
    Command Sergeant MajorFranklin led D Company to the south to a farm where they intended to dig in for the night. They killed two German snipers in the corn on the way. There was movement in the farmhouse window. The 17th Platoon of D Company were ordered to clear the house. SIMULATION FROM WW2 PHOTOS
  • 85.
    Firing their Brenguns, they ran across the field to the house, but the Germans start to leave their trenches with their hands up and 50 were taken prisoner. The D Company Commanding Officer, Major Philip Papillon, ordered his men to move away from the farmhouse site. It was a wise move because the Germans mortared the empty farmhouse for over an hour. SIMULATION FROM WW2 PHOTOS
  • 86.
    Before midnight, the Suffolkshad dug into their trenches for the night, south of Hillman, near the Periers Ridge. Some remained at Hillman.
  • 87.
    Private KENNETH GOWER of Greenford, Middlesex These menalso died fighting for the Suffolks on 6th June 1944: Lance Corporal RONALD ROSOMAN of Hackney, London Private WILLIAM McCORMACK of Birmingham, Warwickshire
  • 88.
    Private K Gower CorporalE Jones Corporal J Jones Private W McCormack Private F Monk Lance Corporal R Rosoman Captain RG Ryley Corporal F Stares Private A Thompson Lieutenant TJF Tooley List of Suffolks fatalities on 6th June 1944:
  • 89.
    At midnight, deepbelow Hillman, the German Commander Oberst Ludwig Krug made a phone call to another division near Caen, south of Hillman: "The enemy are on top of my bunker. I have no means of resisting them and no means of communicating with them. What shall I do?" His request for help was turned down: "I can give you no more orders. You must make your own decision now. Goodbye". SIMULATION FROM WW2 PHOTOS
  • 90.
    So at 6:45a.m. Kommandeur Oberst Krug, an Austrian described as “sensible” by the British, realised the futility of continuing. He dressed in his smartest uniform with polished boots, packed two suitcases and made his surrender with two other officers and 70 other German soldiers. The prisoners were taken by Suffolks who were at Hillman burying the dead, and they were escorted through Colleville-sur-Orne to the beach. Krug surrendered maps and documents.
  • 91.
    In Colleville, someshots were fired from the church tower. But now there were large numbers of British troops in the area with guns and tanks. A tank gun fired a round through the tower and made a large hole in one side. Two Germans covered with dust surrendered shortly afterwards. The surrender at Hillman and at the church tower completed the work started on D-day, and the Suffolks moved south. REAL-TIME PHOTO
  • 92.
    Thanks to the “Friendsof the Suffolk Regiment” who recorded the 1st Battalion’s actions as a Twitter feed on 6th June2019