왜 웹표준인가?
1. 웹 표준을 지키면 좀 더 많은 사람에게 정보전달을 할 수 있다.
2. 웹 표준을 지키면 크로스 브라우징이 가능하다.
3. 데이터와 디자인을 분리하면 디자인 수정이 쉽다.
4. 검색결과에 상당한 영향을 미친다.
5. 서버 부하를 덜어 주게 되어 비용 절감의 효과
http://monoeyes.com/523
7.
…현실은
웹 접근성을
향상하려면?
JavaScript를배워야 하나?
RIA는 또 뭐래?
Markup은 할 수록
어렵다…
문서
작성의
압박
양보다는 질 높은 코딩!
7개의 브라우저 테스트로
인한 야근의 압박
디자인과 개발의 의도에 맞게!
이슈를 최소화 하기
누가!!!! 인라인으로
스타일 지정했어!
8.
이러한 이유로…
1.HTML을 의미에 맞게 작성할 수 있다.
2. 디자인을 보다 정교하게 제어할 수 있다.
3. 브라우저 관련 이슈 발생 시 수정이 쉽다.
4. 자바스크립트와 연동이 쉽다.
9.
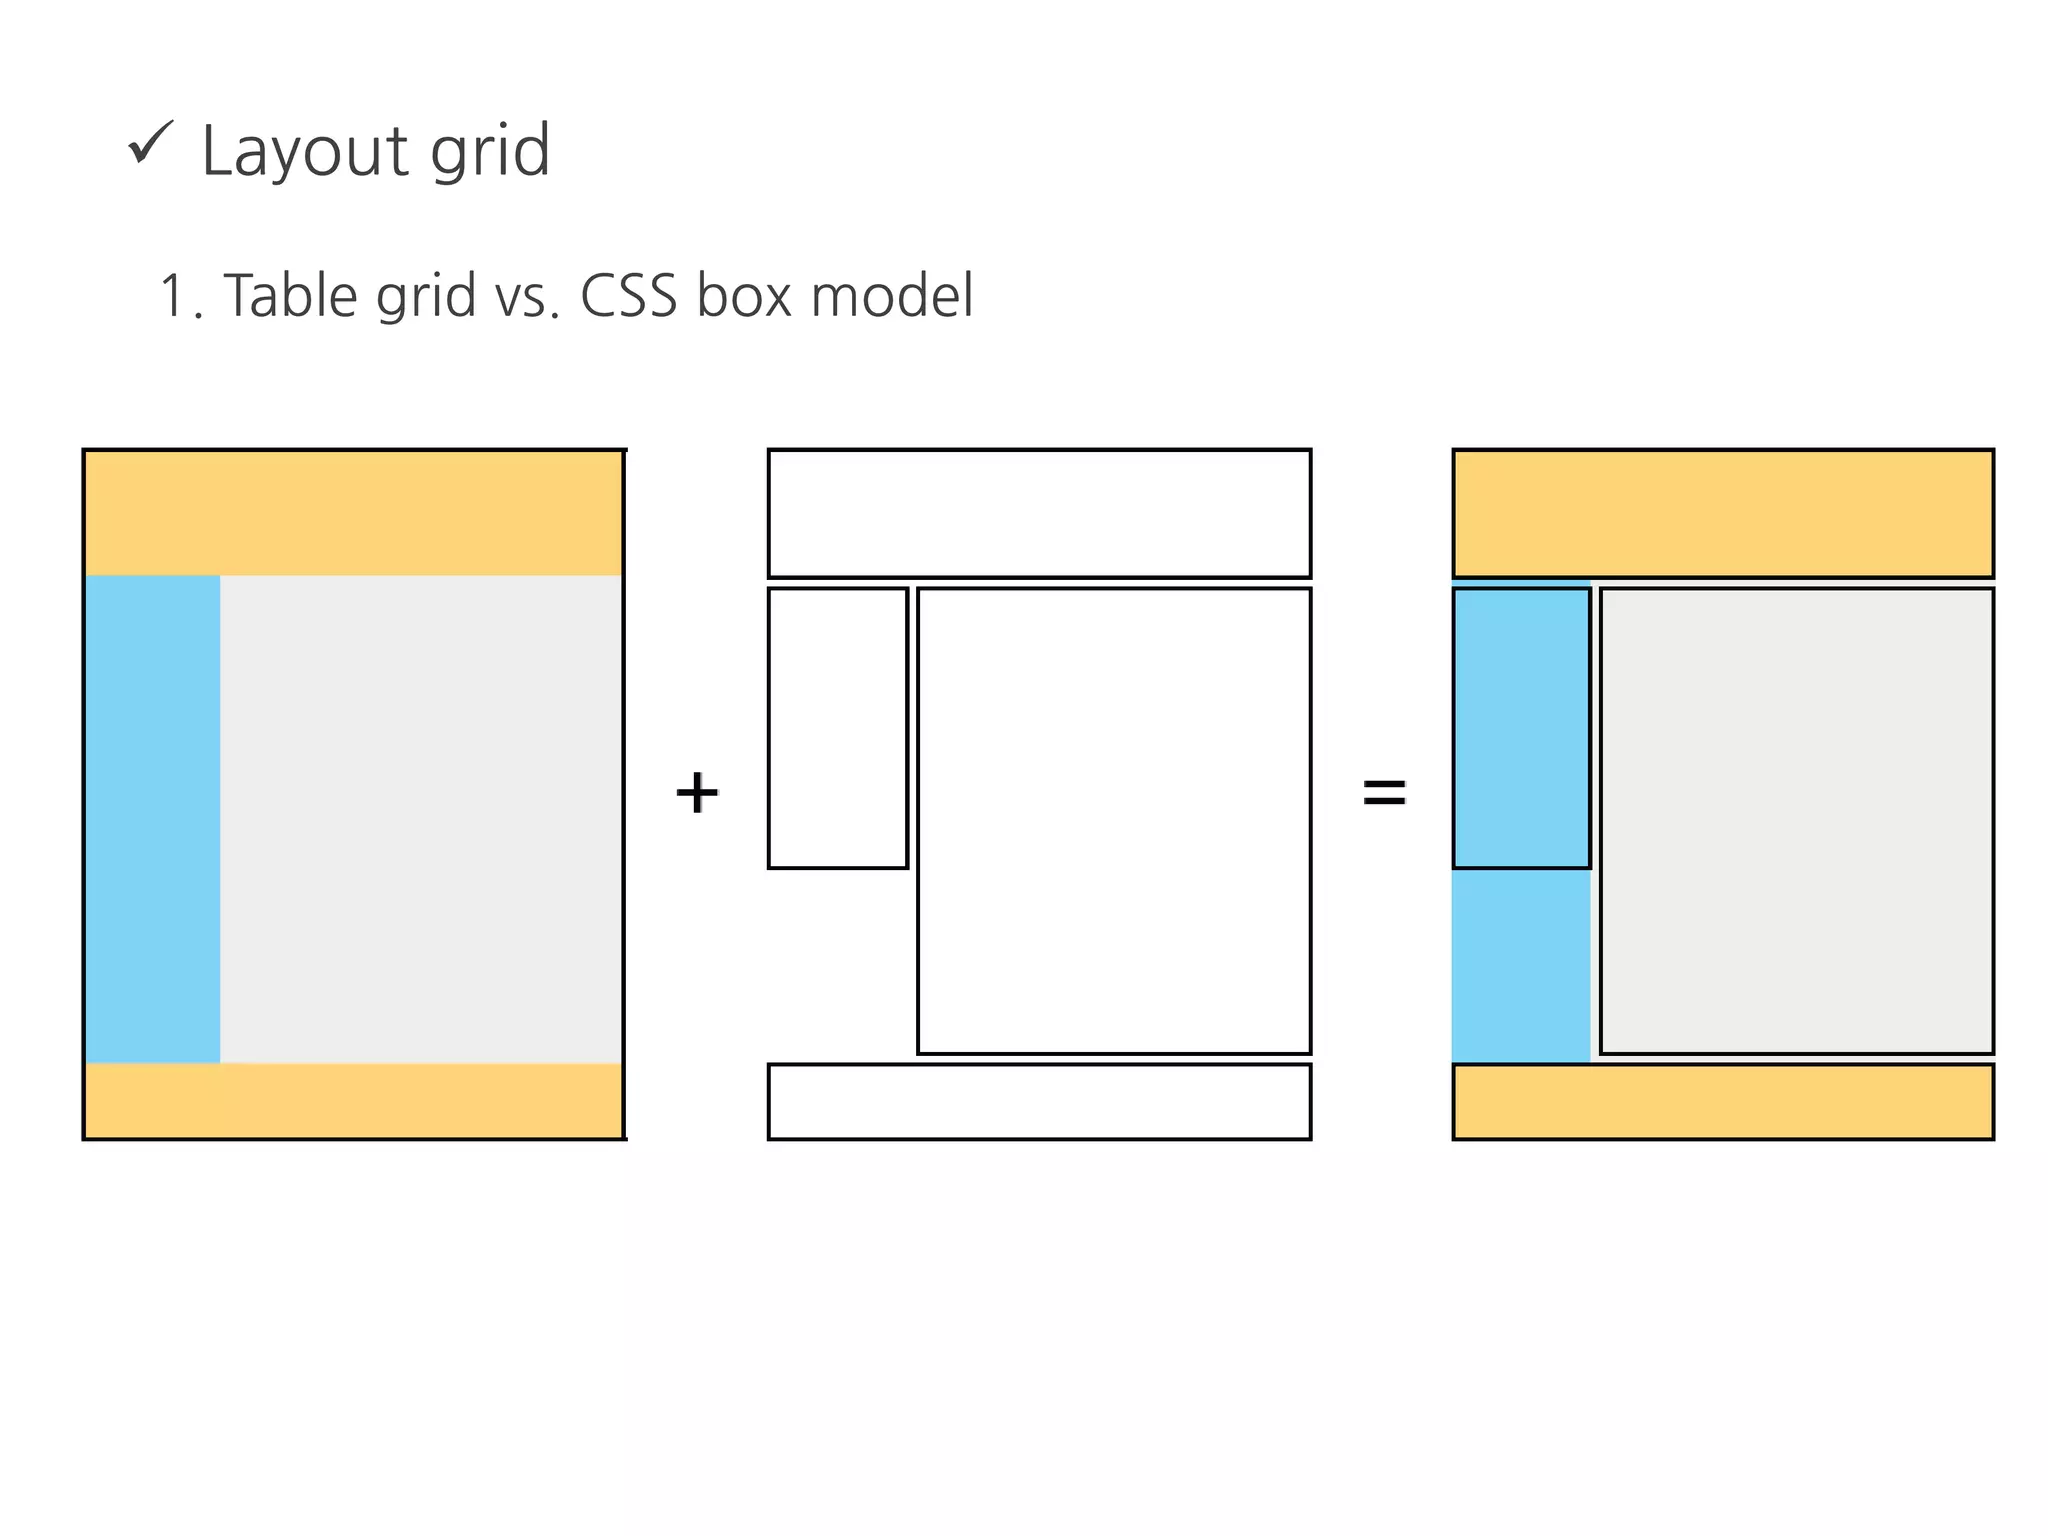
마크업 개발프로세스
1. 환경분석과 시스템배치
2. 구조적 설계 (HTML Design)
3. 스타일시트 설계 (CSS Design)
4. 스크립트 개발 (Script Development)
5. 테스트, 유효성 검사 (Test And Validation Check)
6. 웹 접근성 검사
7. 문서화
http://www.clearboth.org/markup_dev_7level/
마크업 개발프로세스
5. 테스트, 유효성 검사 (Test And Validation Check)
- firefox : Html Validator https://addons.mozilla.org/ko/firefox/addon/html-validator/
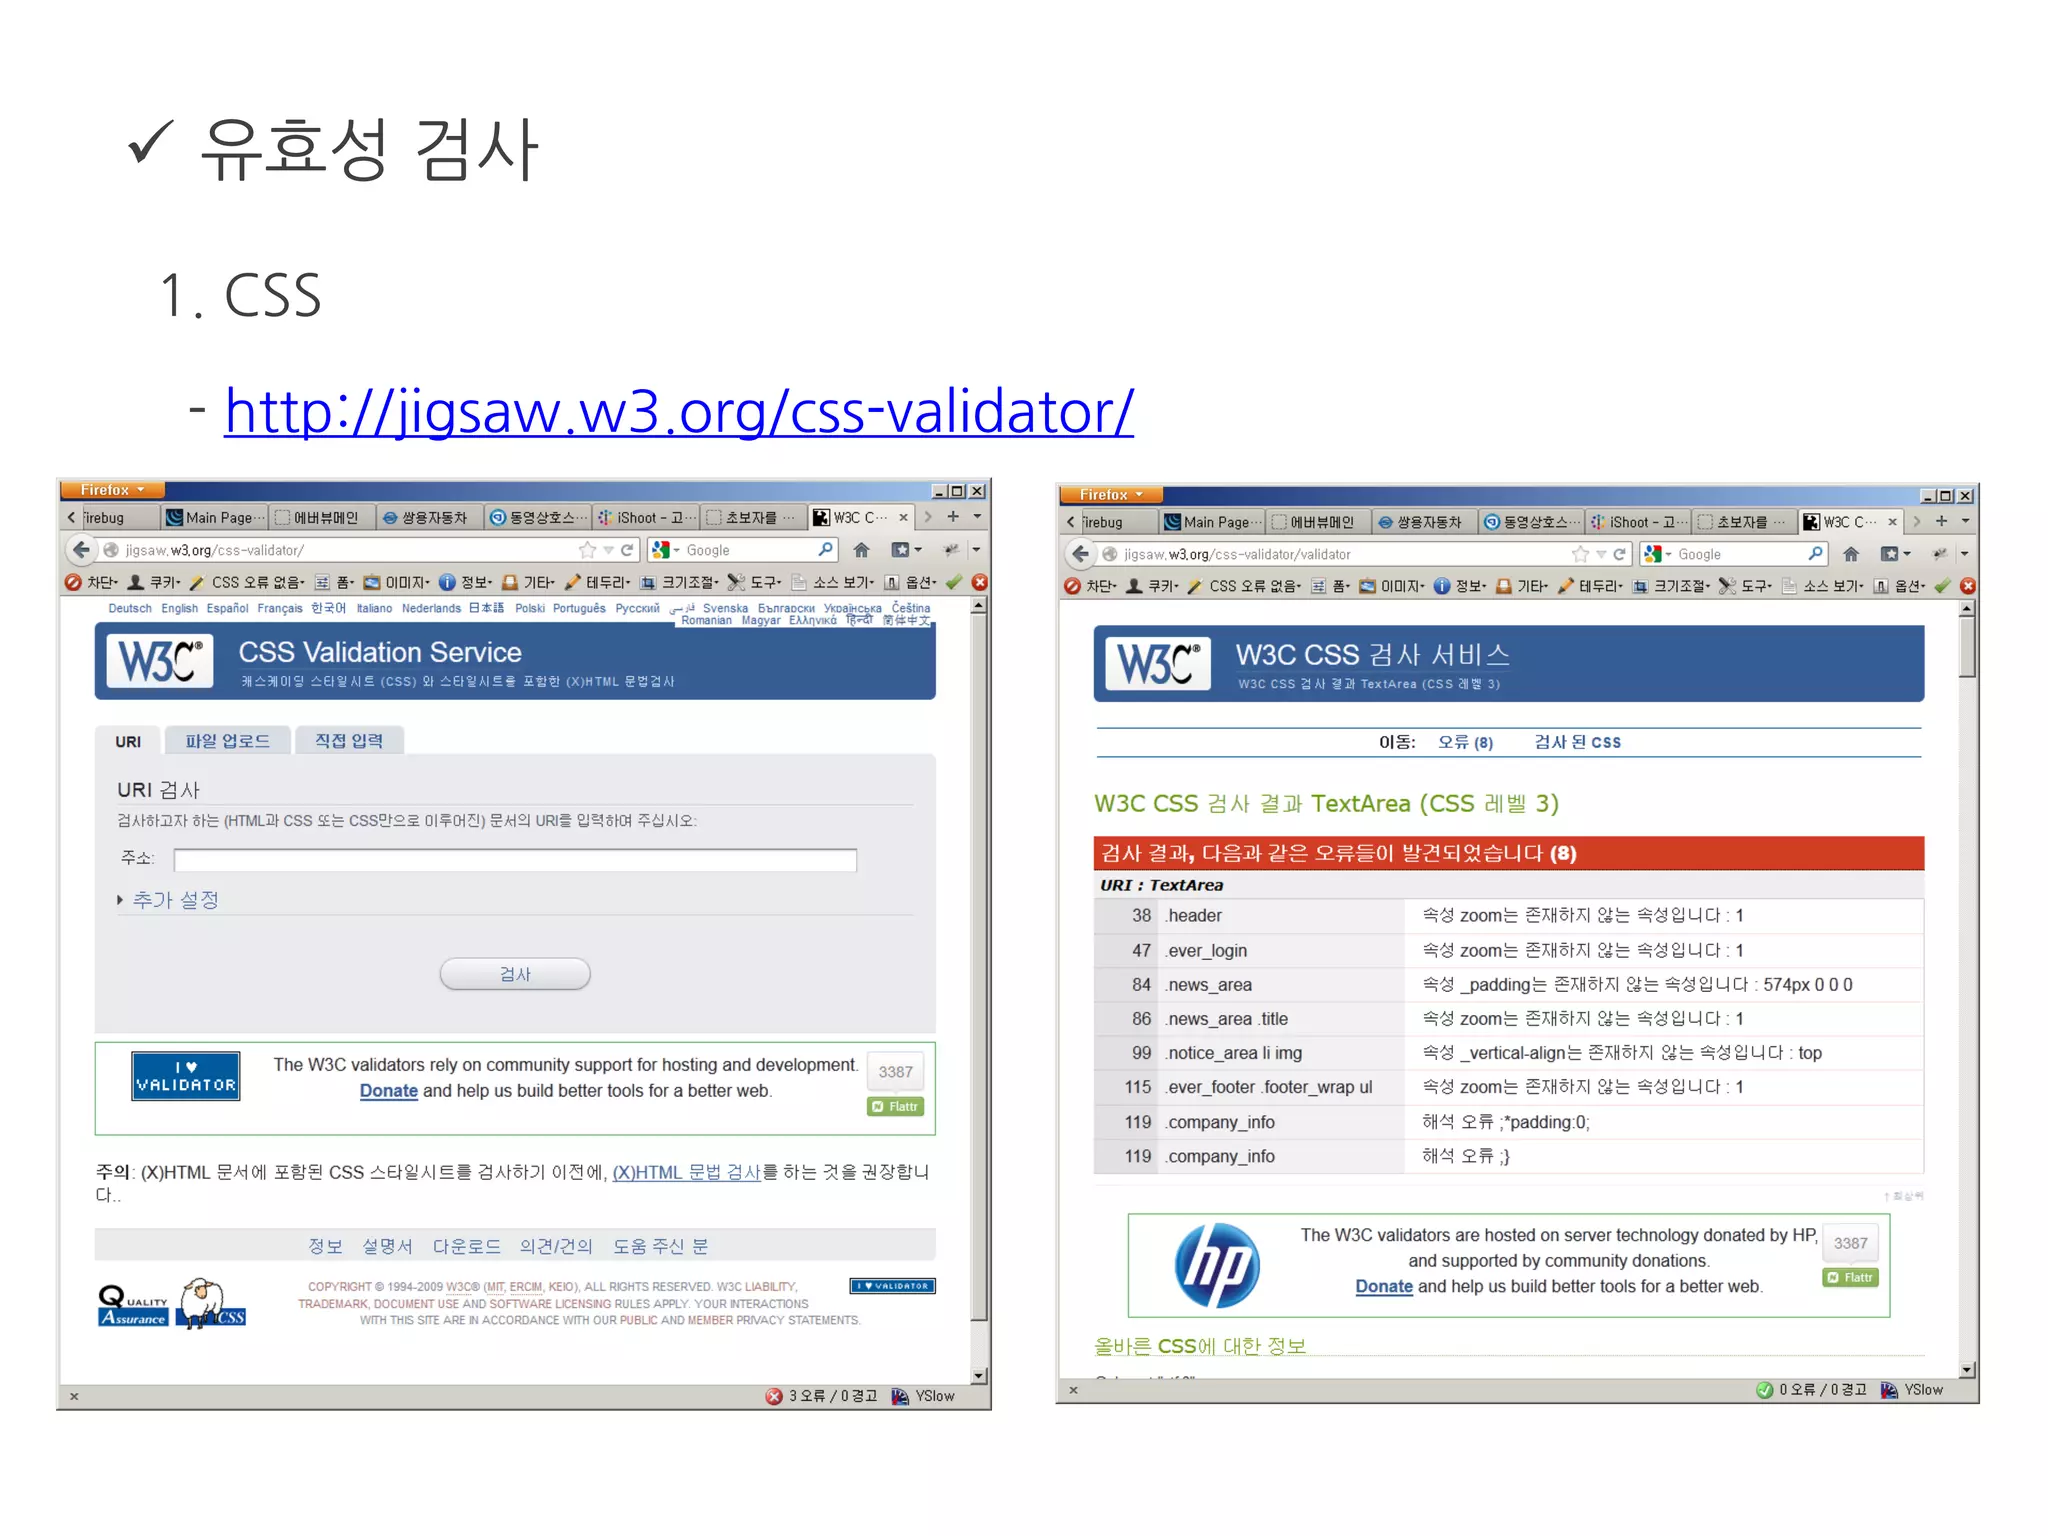
- HTML : http://validator.w3.org/
- CSS : http://jigsaw.w3.org/css-validator/
6. 웹 접근성 검사
- 웹 접근성을 고려한 콘텐츠 제작 기법 2.0
- KADO-WAH 3.0
7. 문서화
- 1단계를 기초 가이드
- 2~6단계에서 발생하는 이슈리스트 정리
- 사이트가 오픈되면 유효성 검사, 웹접근성 검사 결과를 문서화
마크업 언어
1.HTML 과 XHTML
- eXtensible HyperText Markup Language
- XHTML = HTML + XML
- xml 문법 기준을 따름
- 태그나 속성 등은 html을 따름
17.
마크업 언어
2.Syntax
- 태그의 중첩을 엄격하게 지킨다.
http://www.w3.org/TR/xhtml1/diffs.html
<p>웹 표준을 생각할 때에는 <em>사용자의 다양성을 이해하는 것이 무엇보다도 중요합니다.</p></em> (X)
<p>웹 표준을 생각할 때에는 <em>사용자의 다양성을 이해하는 것이 무엇보다도 중요합니다. </em></p> (O)
<p>문단을 나눌 때에는 p태그를 사용합니다.</p>
<p>p태그를 사용할때에는 닫는 태그를 생략하는 경우가 있는데 잘못된 경우 입니다. (X)
<p>문단을 나눌 때에는 p태그를 사용합니다.</p>
<p>p태그를 사용할때에는 닫는 태그를 생략하는 경우가 있는데 잘못된 경우 입니다. </p> (O)
18.
마크업 언어
2.Syntax
- 단독으로 사용되는 태그도 닫기 표기를 해야 한다.
- 속성의 값에 따옴표를 사용해야 한다.
http://www.w3.org/TR/xhtml1/diffs.html
줄 바꿈을 표하기 위해서는 <br> 태그를 사용합니다. <br> (X)
줄 바꿈을 표하기 위해서는 <br> 태그를 사용합니다. <br /> (O)
<table cellspacing=0 cellpadding=0 border=0> (X)
<table cellspacing="0" cellpadding="0" border="0"> (O)
19.
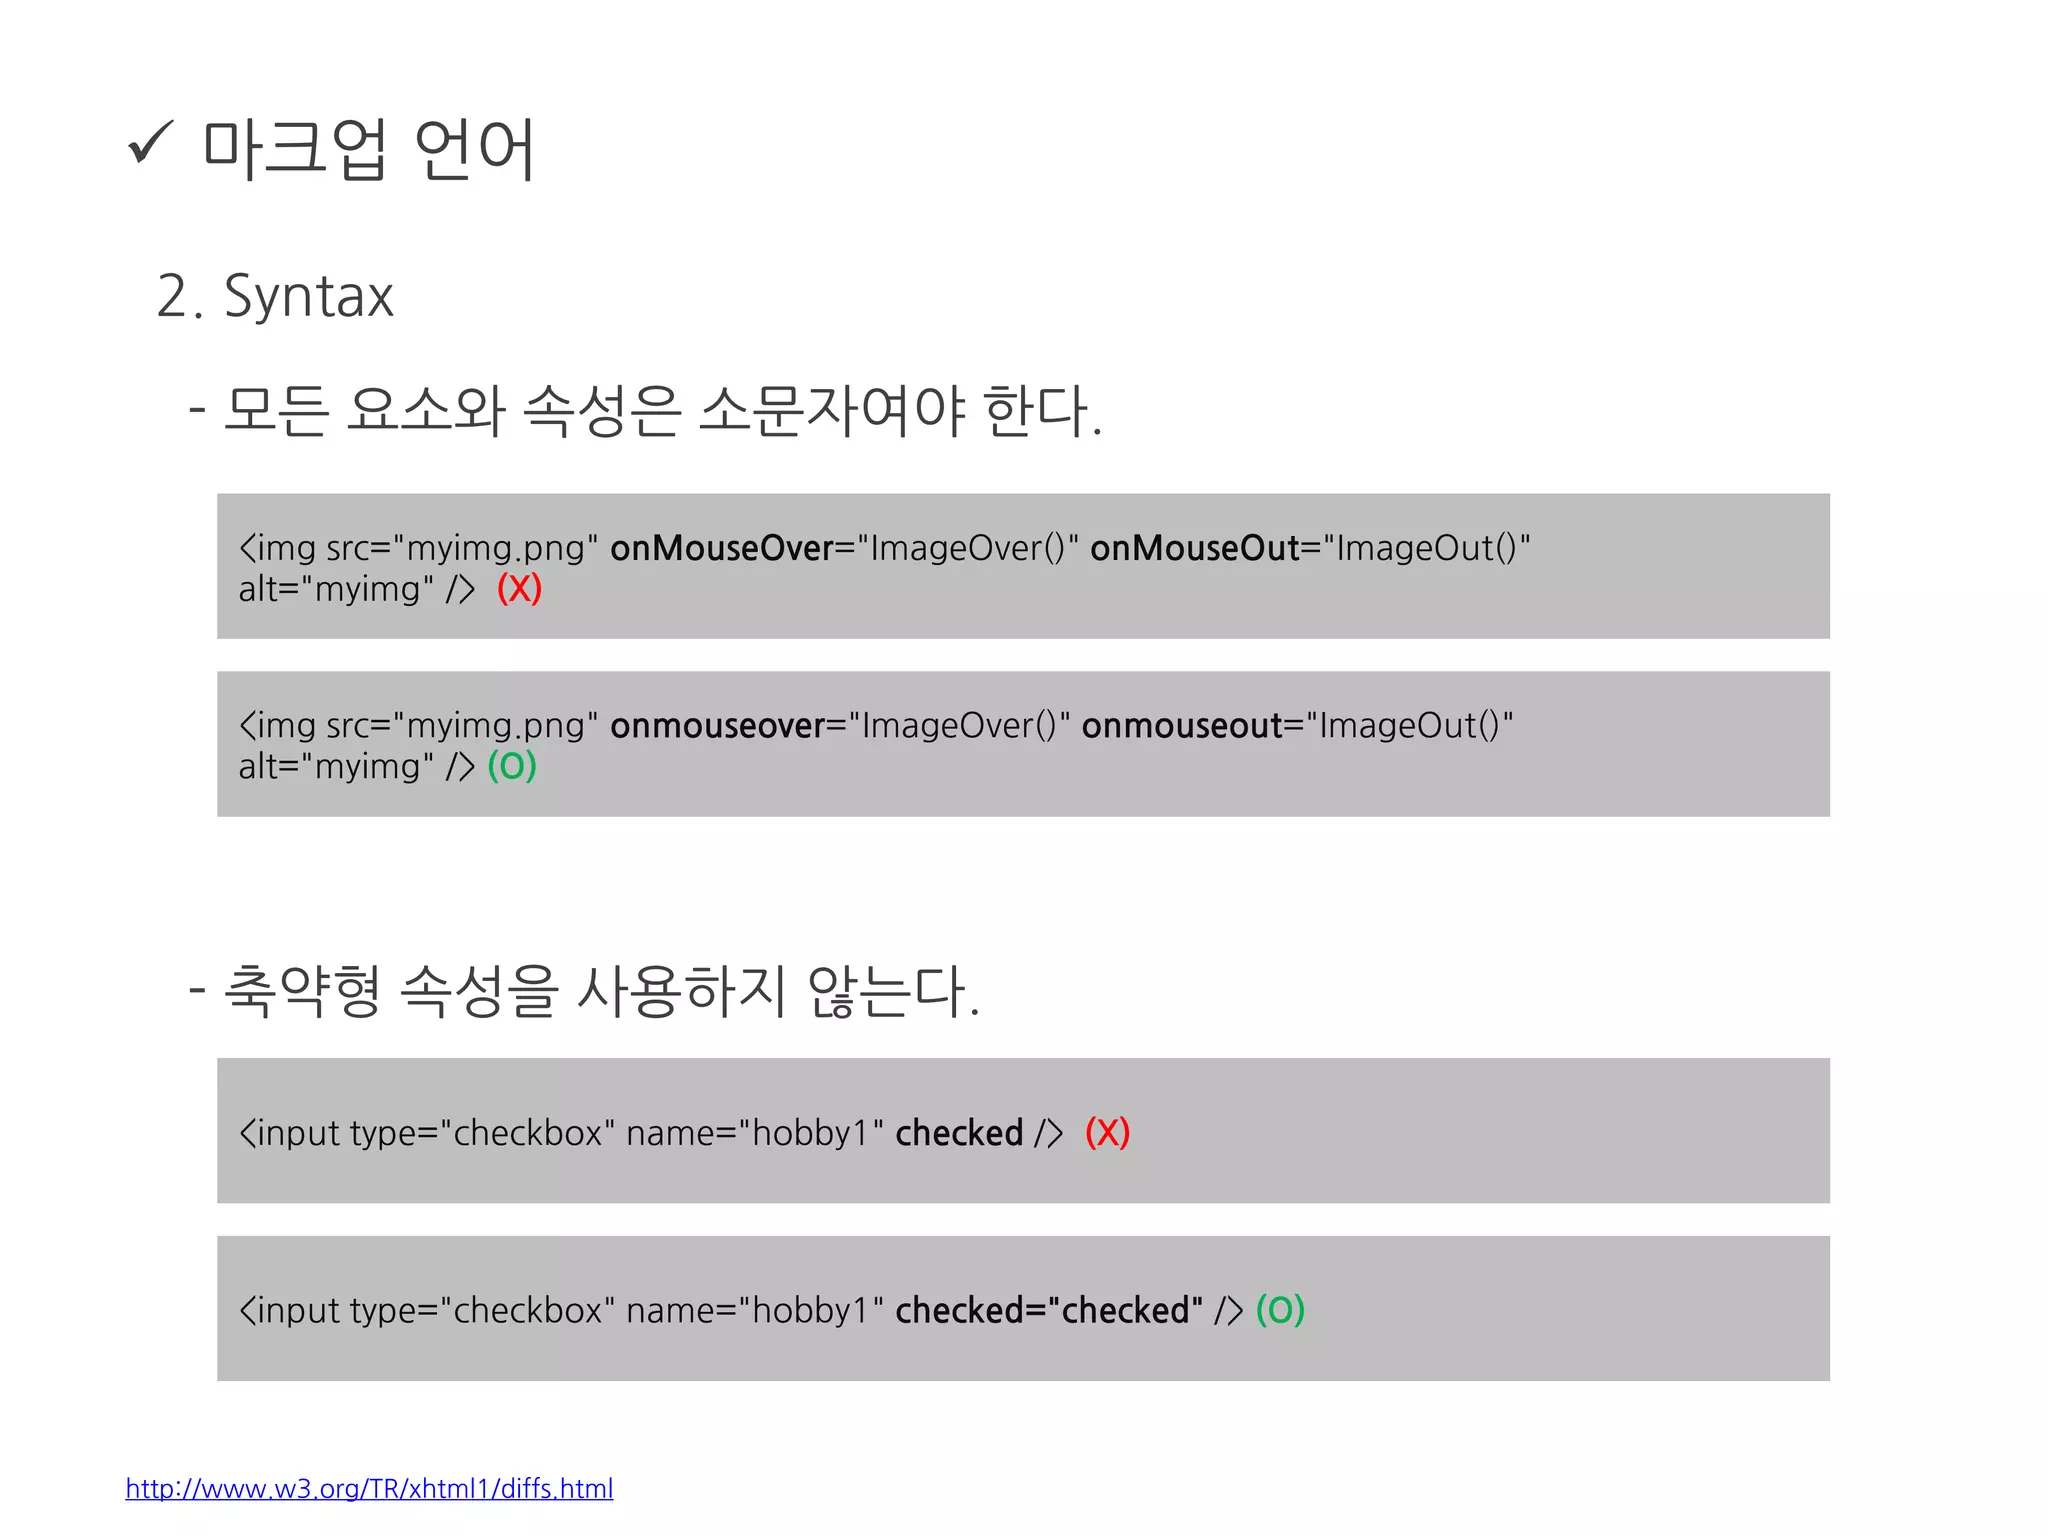
마크업 언어
2.Syntax
- 모든 요소와 속성은 소문자여야 한다.
- 축약형 속성을 사용하지 않는다.
http://www.w3.org/TR/xhtml1/diffs.html
<img src="myimg.png" onMouseOver="ImageOver()" onMouseOut="ImageOut()"
alt="myimg" /> (X)
<img src="myimg.png" onmouseover="ImageOver()" onmouseout="ImageOut()"
alt="myimg" /> (O)
<input type="checkbox" name="hobby1" checked /> (X)
<input type="checkbox" name="hobby1" checked="checked" /> (O)
20.
마크업 언어
2.Syntax
- 숫자 뒤의 단위를 생략할 수 없다 (0은 제외).
- 스크립트와 스타일은 CDATA로 표기한다.
http://www.w3.org/TR/xhtml1/diffs.html
#id {margin:0 0 6 0;} (X)
#id {margin:0 0 6px 0;} (O)
<script type="text/javascript">
//<![CDATA[
if (a > b && a < 0) { // wrong : if (a > b && a < 0) {
return true;
} else {
return false;
}
//]]>
</script>
21.
마크업 언어
2.Syntax
- HTML Entities
http://www.w3.org/TR/xhtml1/diffs.html
<a href="board_list.php?id=free&page=1&keyword=html"> (X)
<a href="board_list.php?id=free&page=1&keyword=html"> (O)
< <
> >
& &
“ "
22.
마크업 언어
3.Document Structure
- 기본 HTML 구조
<!DOCTYPE html PUBLIC "-//W3C//DTD XHTML 1.1//EN"
"http://www.w3.org/TR/xhtml11/DTD/xhtml11.dtd">
<html xmlns="http://www.w3.org/1999/xhtml" xml:lang="ko">
<head>
<meta http-equiv="Content-Type" content="text/html; charset=utf-8" />
<title>기본 XHTML 문서 구조</title>
</head>
<body>
<p>기본 XHTML 문서 구조입니다.</p>
</body>
</html>
23.
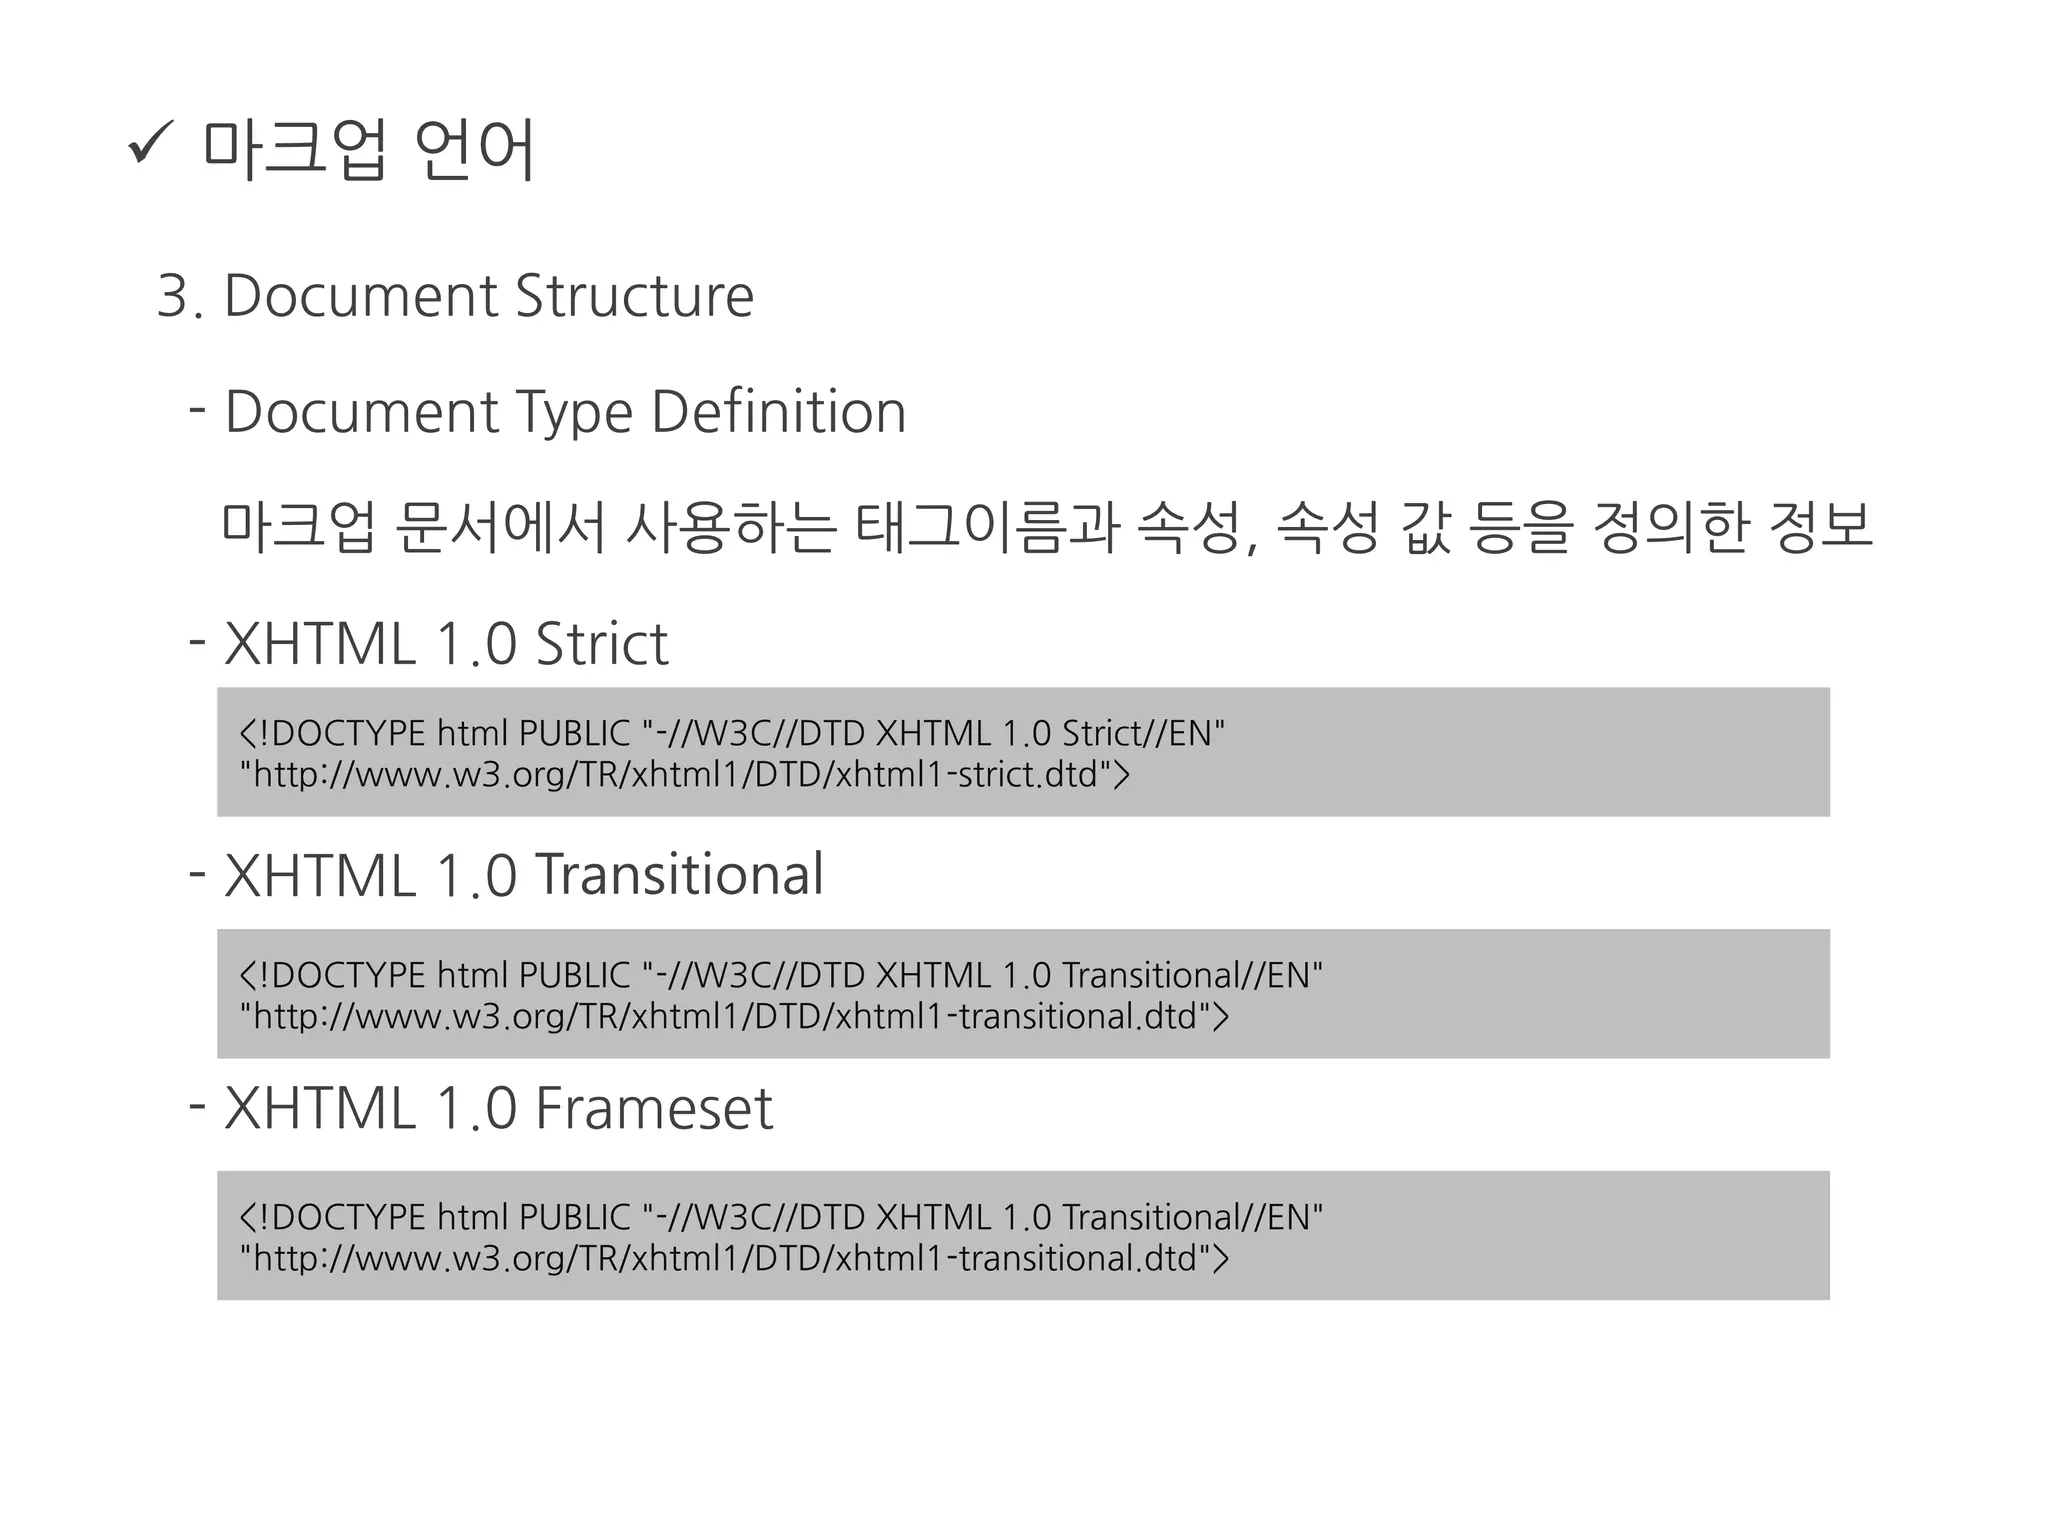
마크업 언어
3.Document Structure
- Document Type Definition
마크업 문서에서 사용하는 태그이름과 속성, 속성 값 등을 정의한 정보
- XHTML 1.0 Strict
- XHTML 1.0 Transitional
- XHTML 1.0 Frameset
<!DOCTYPE html PUBLIC "-//W3C//DTD XHTML 1.0 Strict//EN"
"http://www.w3.org/TR/xhtml1/DTD/xhtml1-strict.dtd">
<!DOCTYPE html PUBLIC "-//W3C//DTD XHTML 1.0 Transitional//EN"
"http://www.w3.org/TR/xhtml1/DTD/xhtml1-transitional.dtd">
<!DOCTYPE html PUBLIC "-//W3C//DTD XHTML 1.0 Transitional//EN"
"http://www.w3.org/TR/xhtml1/DTD/xhtml1-transitional.dtd">
24.
마크업 언어
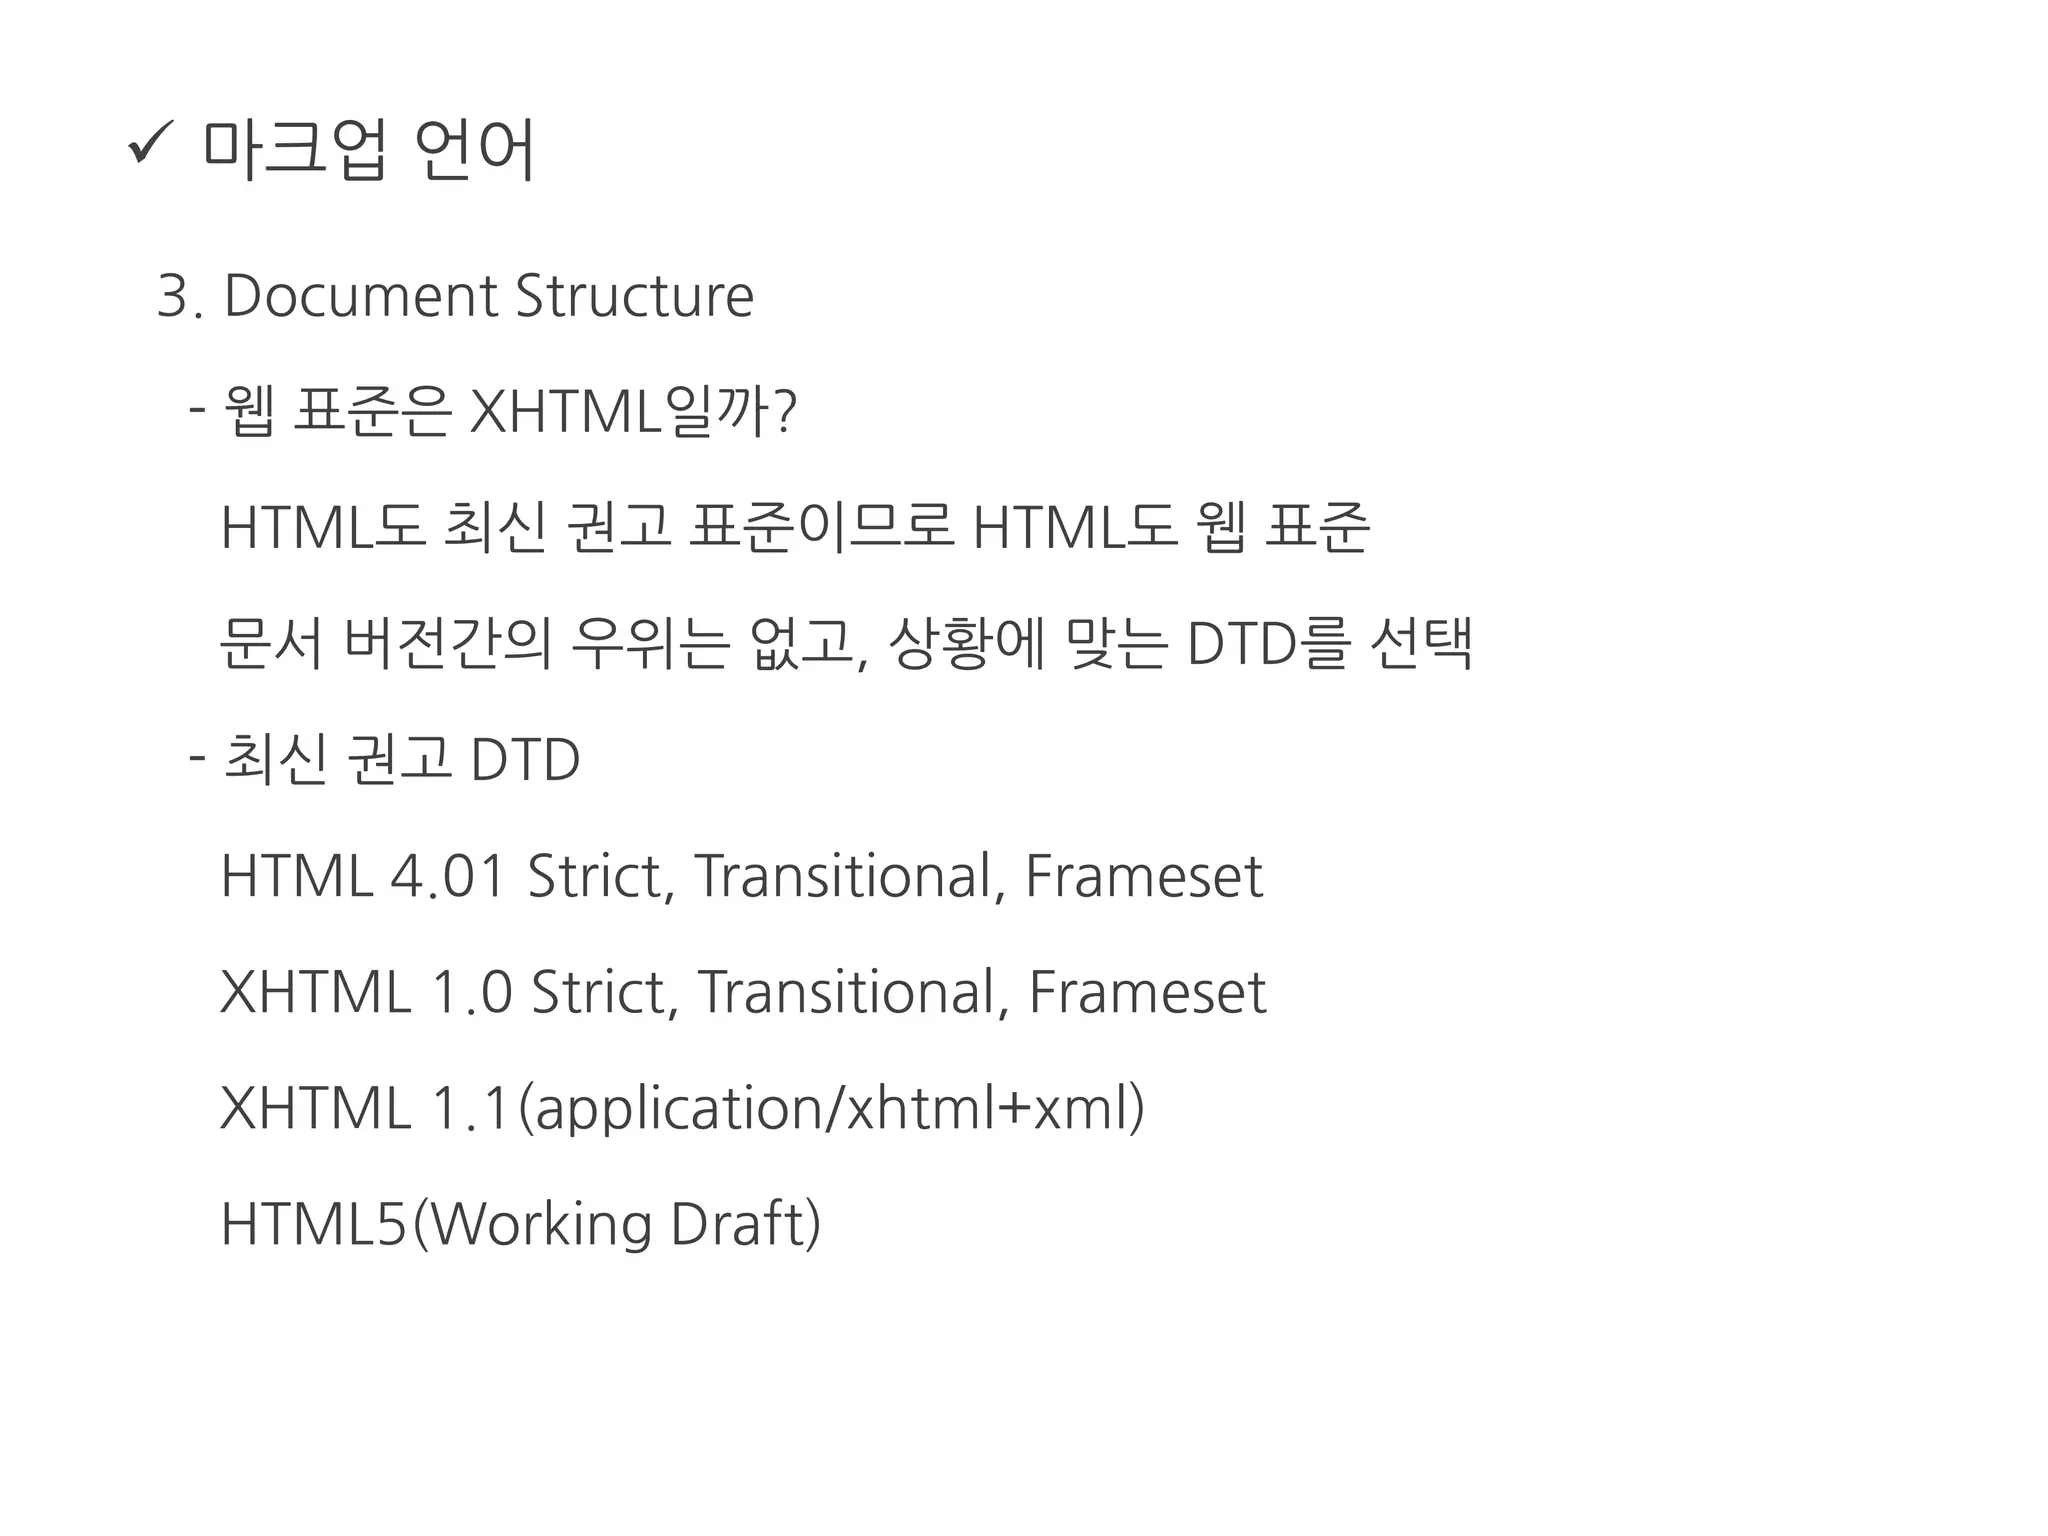
3.Document Structure
- 웹 표준은 XHTML일까?
HTML도 최신 권고 표준이므로 HTML도 웹 표준
문서 버전간의 우위는 없고, 상황에 맞는 DTD를 선택
- 최신 권고 DTD
HTML 4.01 Strict, Transitional, Frameset
XHTML 1.0 Strict, Transitional, Frameset
XHTML 1.1(application/xhtml+xml)
HTML5(Working Draft)
25.
마크업 언어
3.Document Structure
- Head & Body
* head : 문서의 정보를 나타내는 요소
title : 문서의 제목을 나타내는 요소
* body : 문서의 내용을 담고 있는 요소
id, class : 지시자, 연결자 역할
div, span : id, class와 함께 문서의 구조를 기술한다.
h1~ h6 : 내용 단위의 주제 (제목)을 기술한다.
26.
마크업 언어
3.Document Structure
- Head & Body
* 하나의 문서에는 하나의 h1 만 존재해야 하나?
HTML 권고안에는 h1 개수에 대한 언급은 없음.
보통의 웹 페이지는 하나의 주제를 가지고 있기 때문에 하나, 또는
2~3개의 h1이 존재하는 것이 적절함.
* 헤딩의 단계는 순차적이어야 한다.
h1, h2, h1은 맞음
h1, h3, h1은 h2가 건너 뛰어졌으므로 좋지 않은 구성
27.
마크업 언어
3.Document Structure
- Include shared code
* 사이트 전반적으로 공통적으로 사용되는 파일을 공용파일로 분리
* 매 페이지마다 바뀌는 부분
페이지 콘텐츠, Head안의 style, script 선언
* 매 페이지마다 바뀌지 않는 부분
DTD, Head 안의 공용 파일 인클루드, 페이지 레이아웃
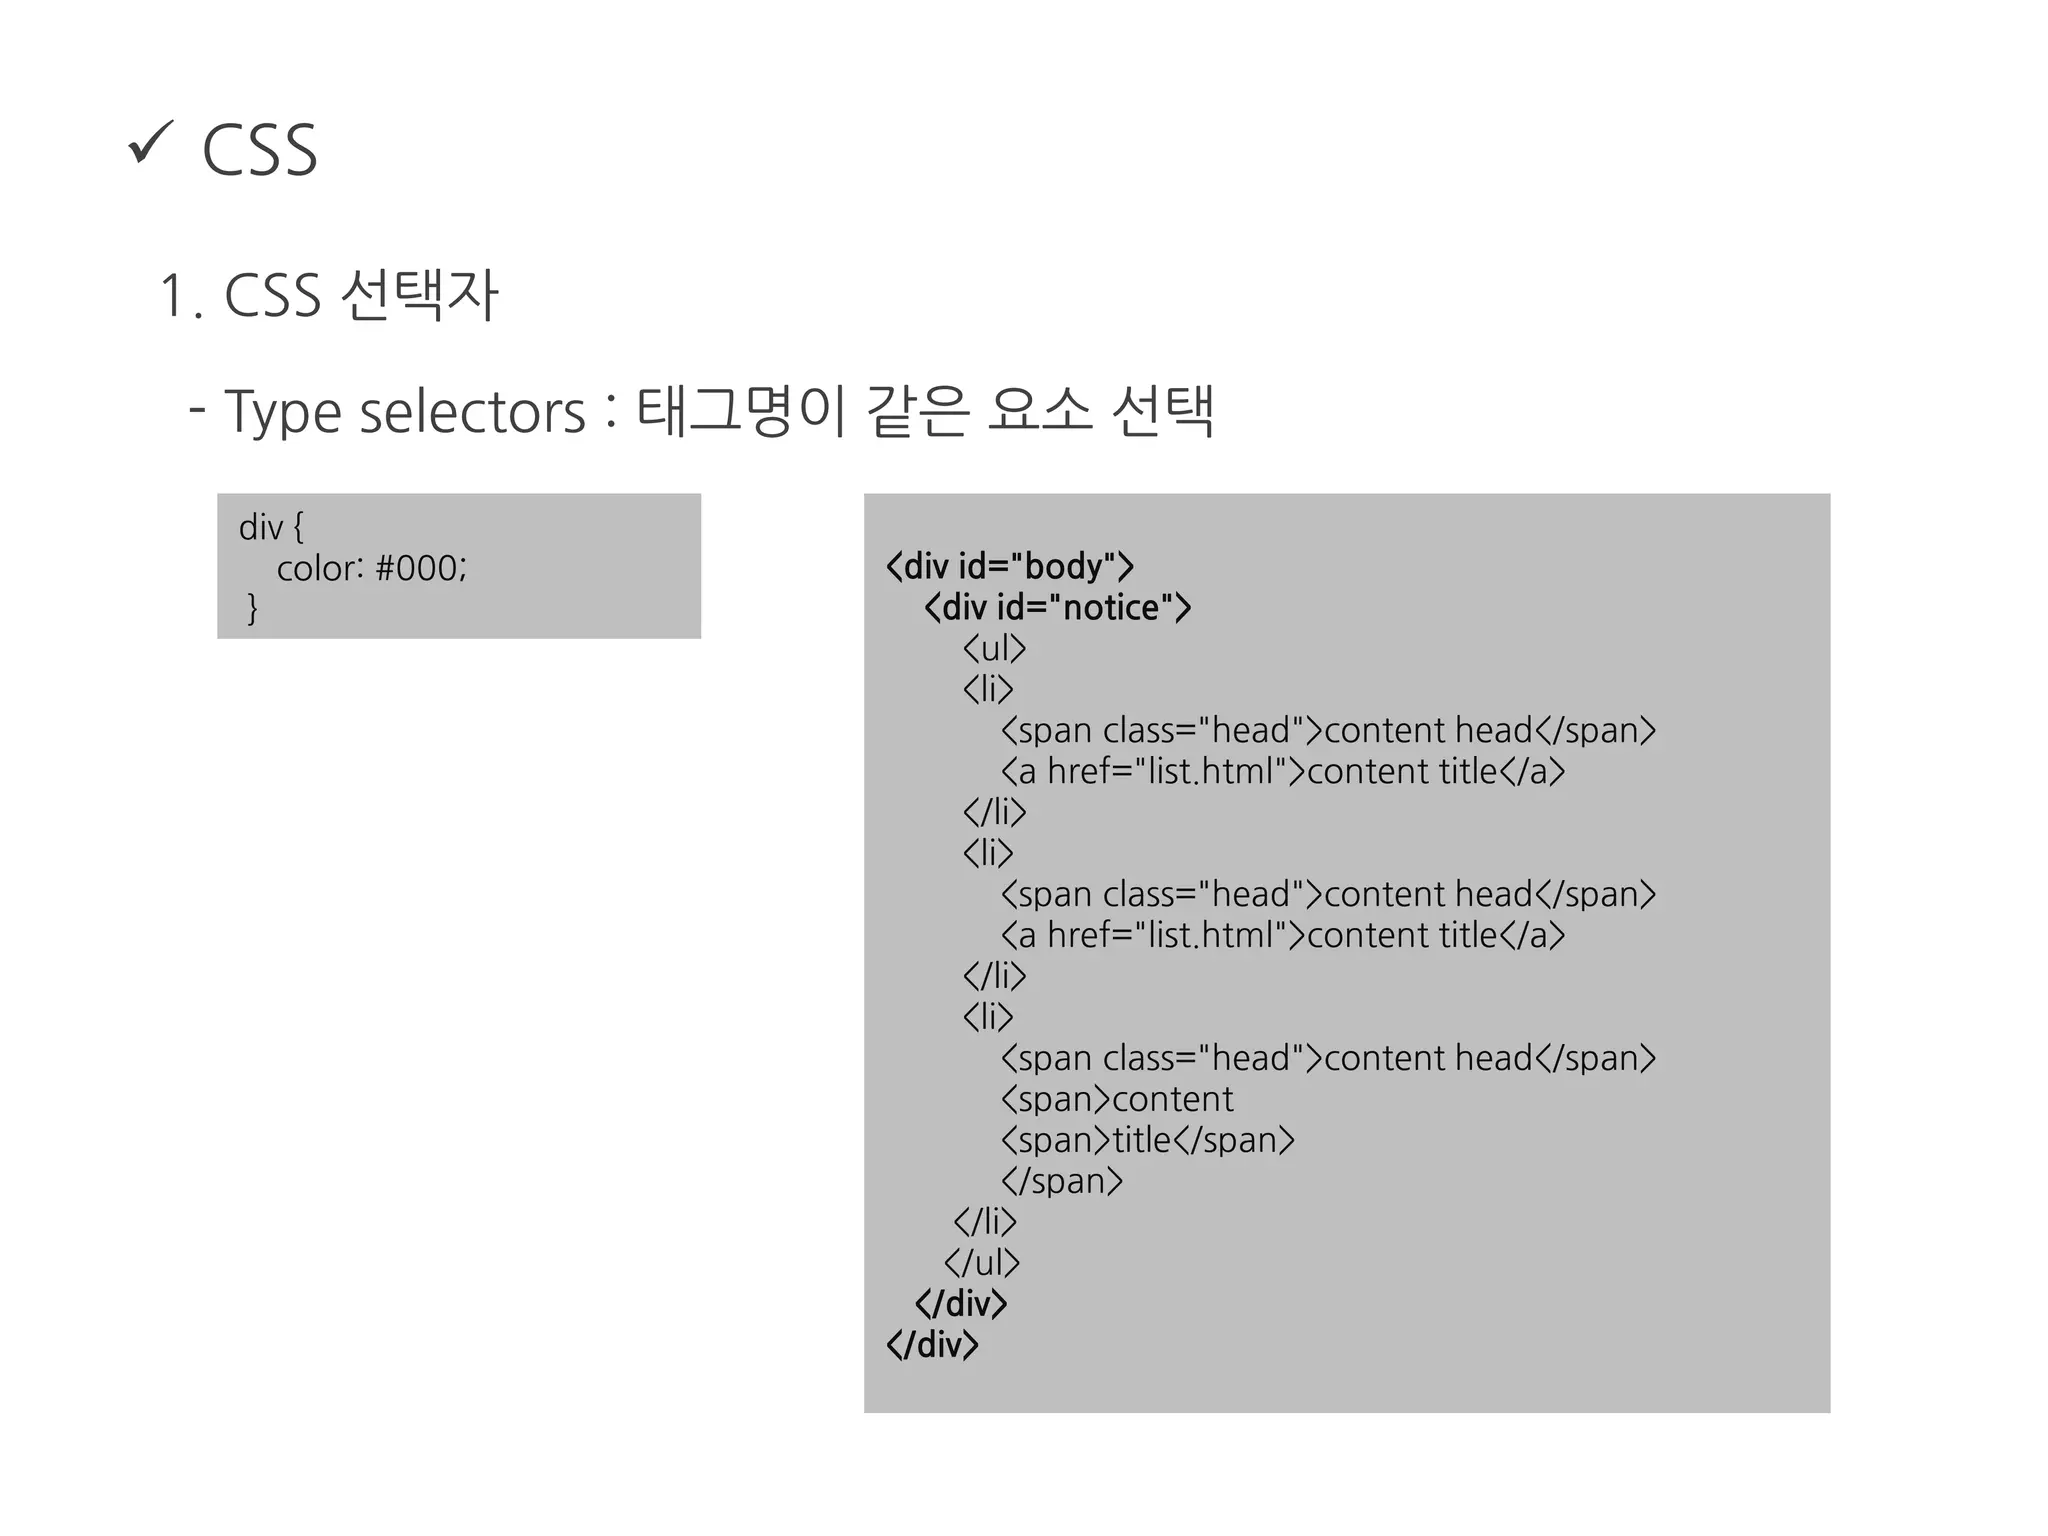
CSS
1. CSS선택자
- Adjacent selectors : 인접한 요소 선택, IE6 지원 안함.
a:link {
color: #000;
}
<h3>heading</h3>
<p>This is a paragraph.</p>
<p>This is a paragraph.</p>
<p>This is a paragraph.</p>
<p>This is a paragraph.</p>
<h3>heading</h3>
<p>This is a paragraph.</p>
<p>This is a paragraph.</p>
<p>This is a paragraph.</p>
<p>This is a paragraph.</p>
<h3>heading</h3>
<p>This is a paragraph.</p>
<p>This is a paragraph.</p>
CSS
1. CSS선택자
- :first-line pseudo element : 첫 번째 줄 선택
p:first-line {
color: #000;
}
<p>Littering a dark and dreary road lay the past relics
of browser-specific tags, incompatible DOMs, and broken
CSS support.</p>
<p>Today, we must clear the mind of past practices. Web
enlightenment has been achieved thanks to the tireless
efforts of folk like the W3C, WaSP and the major browser
creators.</p>
<p>The css Zen Garden invites you to relax and meditate
on the important lessons of the masters. Begin to see
with clarity. Learn to use the (yet to be) time-honored
techniques in new and invigorating fashion. Become one
with the web.</p>
41.
CSS
1. CSS선택자
- :first-letter pseudo element : 첫 번째 글자 선택
p:first-letter {
color: #000;
}
<p>Littering a dark and dreary road lay the past relics
of browser-specific tags, incompatible DOMs, and broken
CSS support.</p>
<p>Today, we must clear the mind of past practices. Web
enlightenment has been achieved thanks to the tireless
efforts of folk like the W3C, WaSP and the major browser
creators.</p>
<p>The css Zen Garden invites you to relax and meditate
on the important lessons of the masters. Begin to see
with clarity. Learn to use the (yet to be) time-honored
techniques in new and invigorating fashion. Become one
with the web.</p>
42.
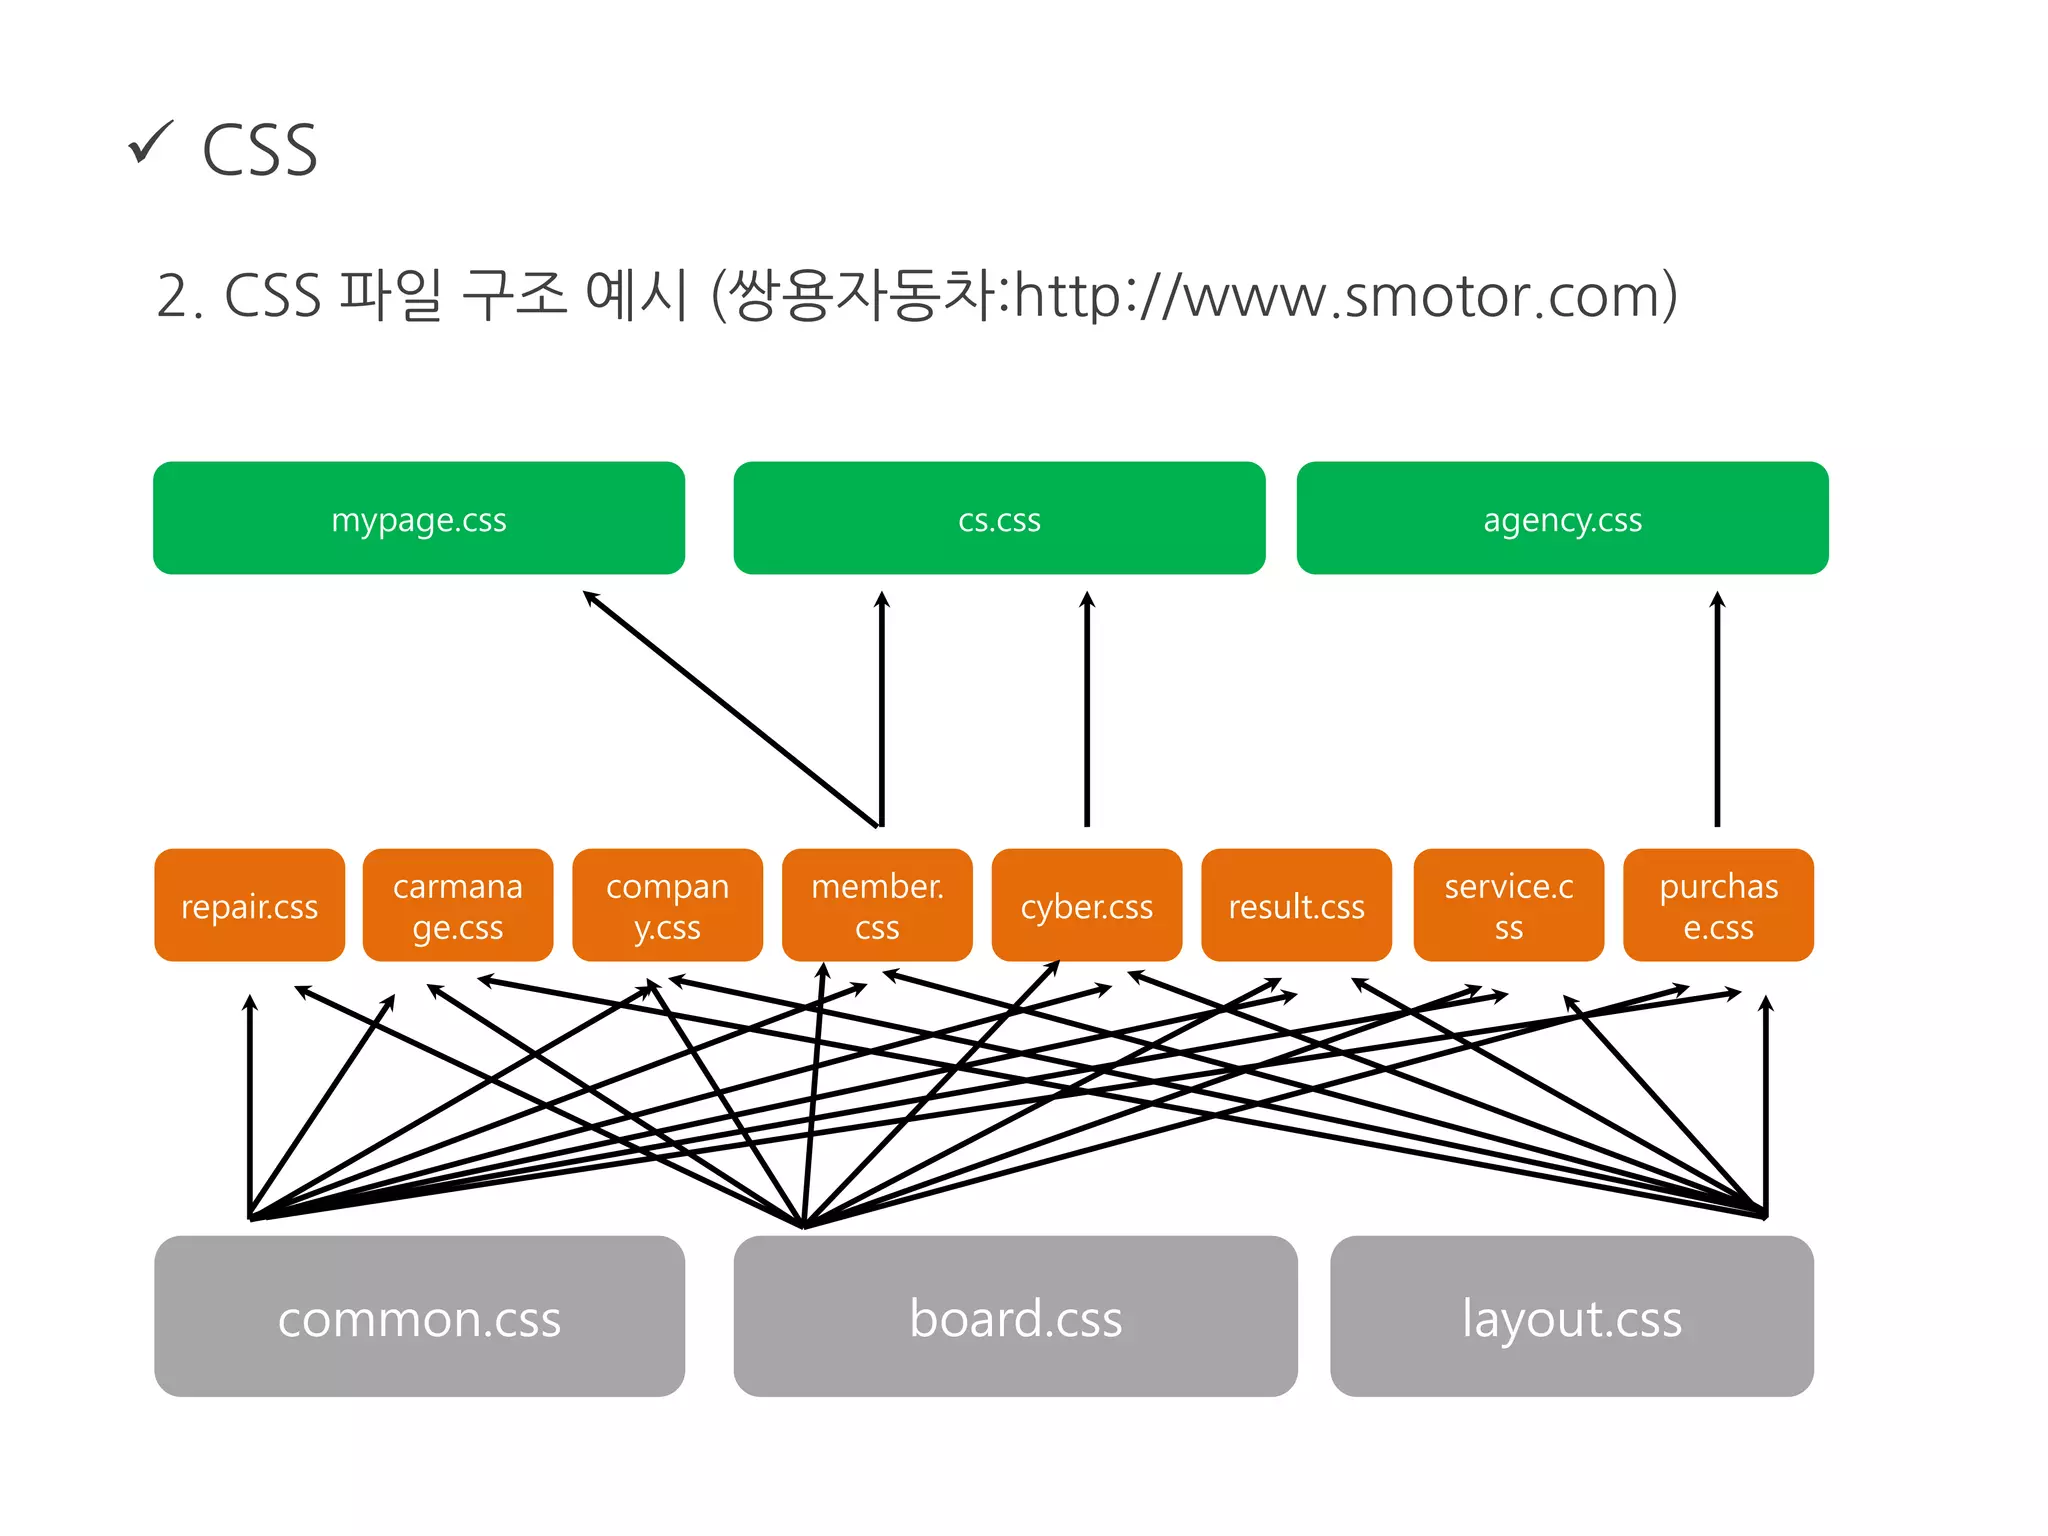
CSS
2. CSS파일 구조
- 파일의 용도를 파악할 수 있는 파일명
연번은 지양하고 섹션 이름이나 디자인 모듈로 구분
- 선언된 CSS 룰의 위치를 파악할 수 있는 순서를 사용
페이지 순서와 HTML 코드 안에서의 순서를 따름
- 충돌을 피하기 위해 캐스캐이드 순서를 고려
43.
CSS
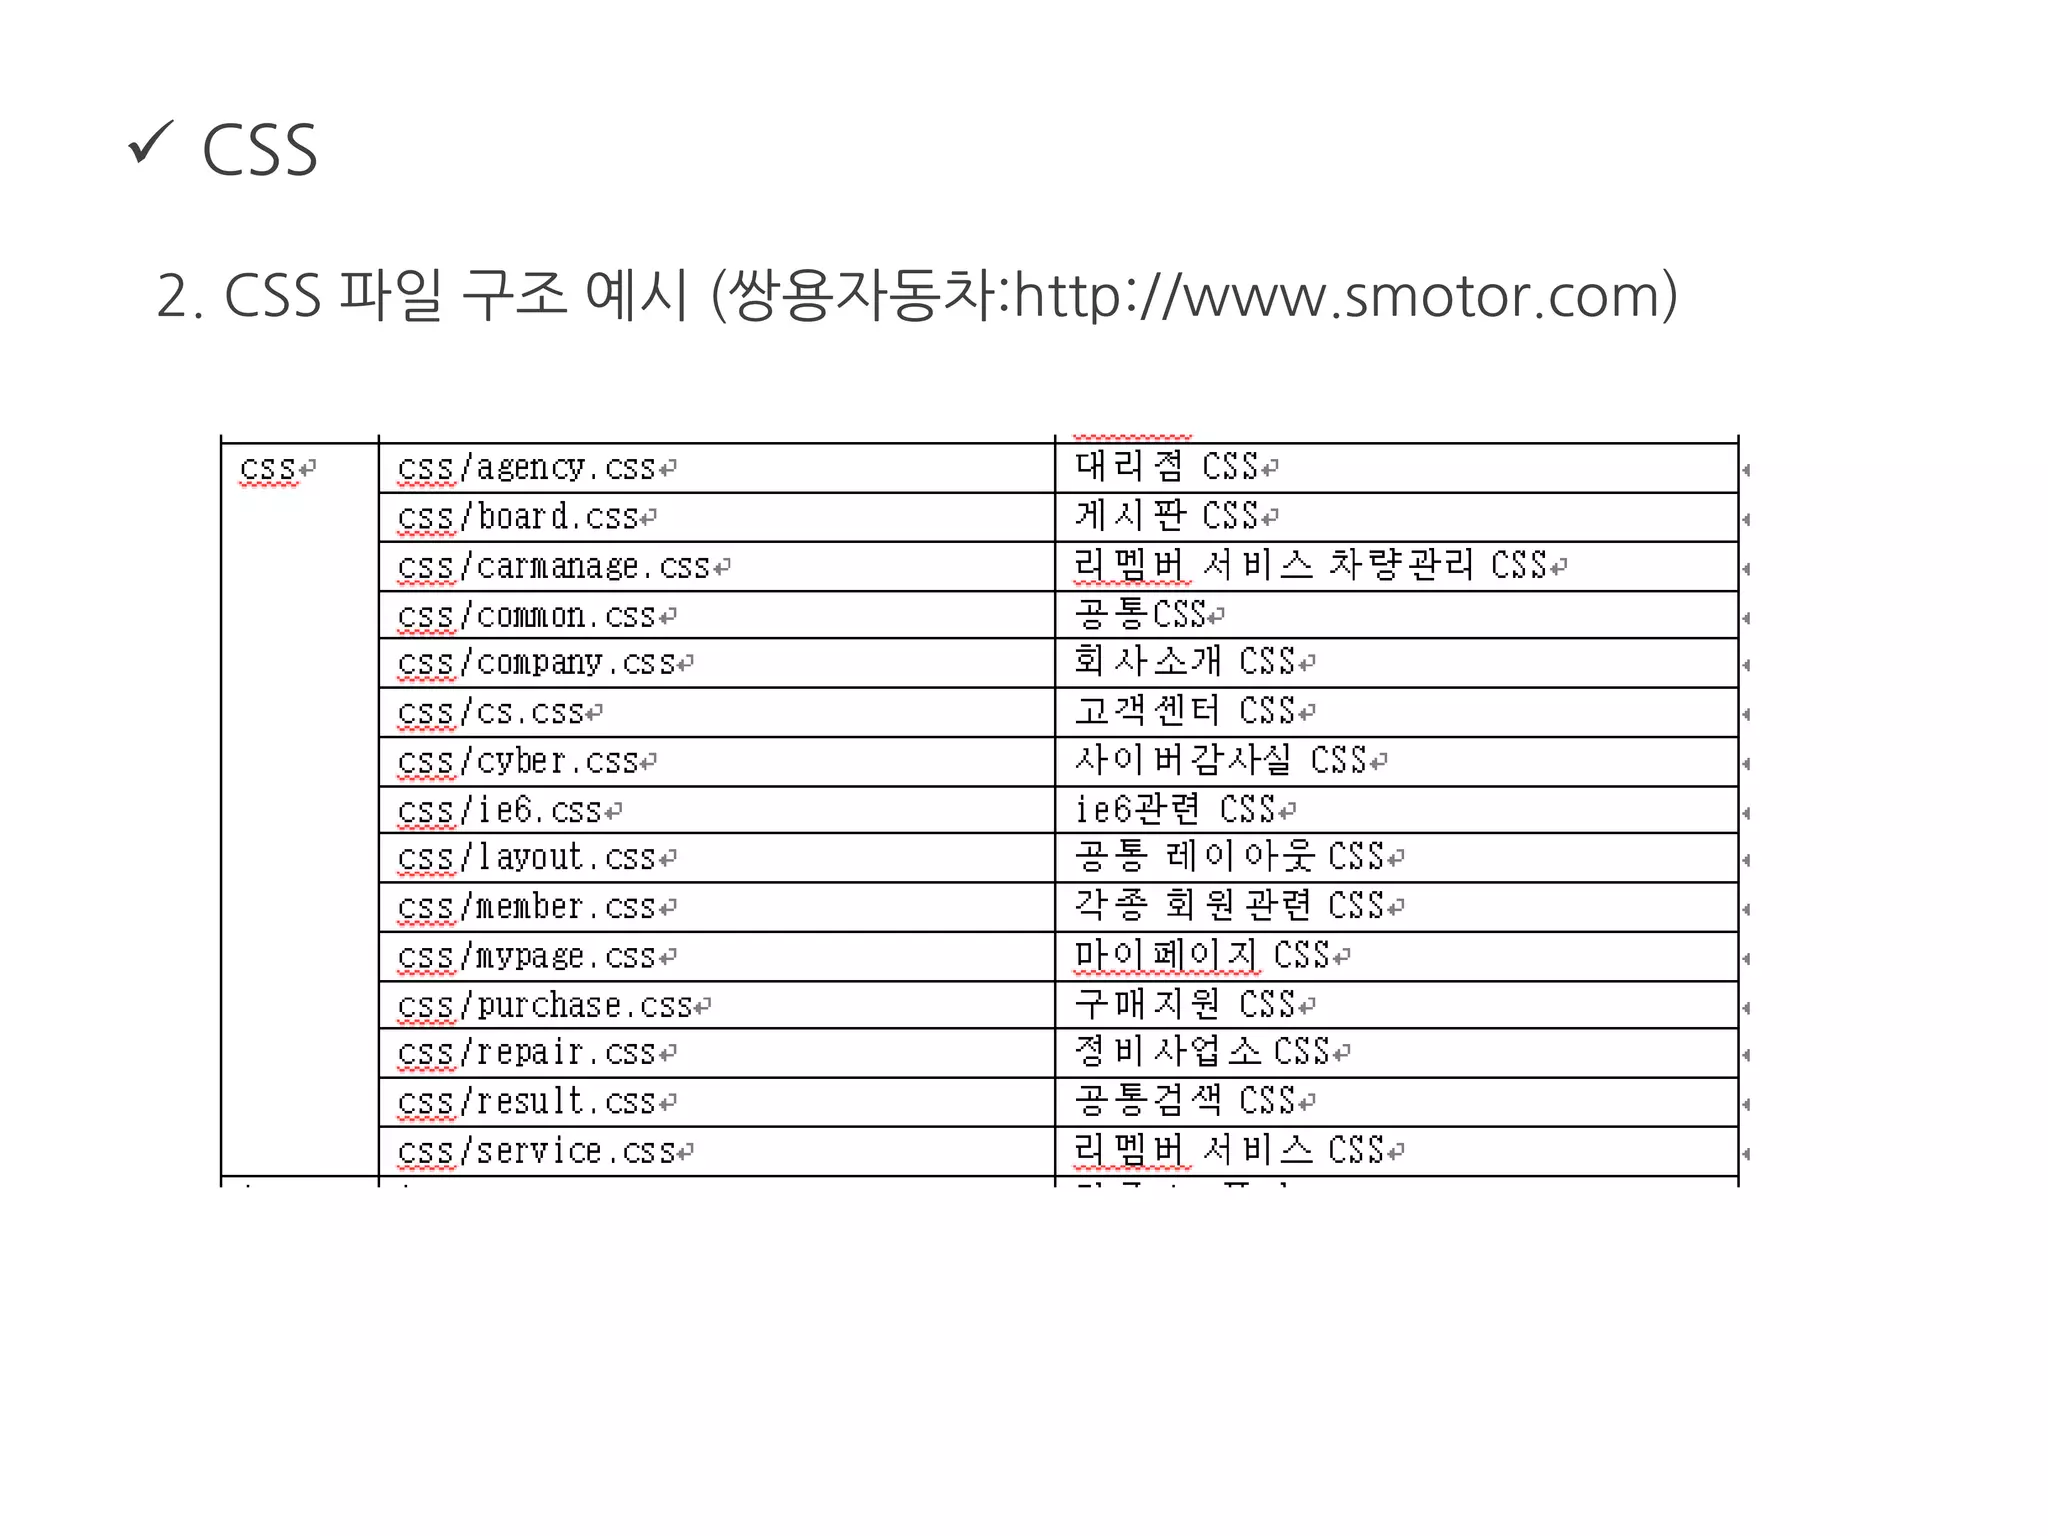
2. CSS파일 구조 예시 (쌍용자동차:http://www.smotor.com)
CSS
3. 우선순위
-a, b, c, d 순으로 우선순위 결정
style attribute : a
ID attribute : b
other attribute, pseudo-class : c
element name, pseudo-element : d
* {} /* a=0 b=0 c=0 d=0 -> specificity = 0,0,0,0 */
li {} /* a=0 b=0 c=0 d=1 -> specificity = 0,0,0,1 */
li:first-line {} /* a=0 b=0 c=0 d=2 -> specificity = 0,0,0,2 */
ul li {} /* a=0 b=0 c=0 d=2 -> specificity = 0,0,0,2 */
ul ol+li {} /* a=0 b=0 c=0 d=3 -> specificity = 0,0,0,3 */
h1 + *[rel=up]{} /* a=0 b=0 c=1 d=1 -> specificity = 0,0,1,1 */
ul ol li.red {} /* a=0 b=0 c=1 d=3 -> specificity = 0,0,1,3 */
li.red.level {} /* a=0 b=0 c=2 d=1 -> specificity = 0,0,2,1 */
#x34y {} /* a=0 b=1 c=0 d=0 -> specificity = 0,1,0,0 */
style="" /* a=1 b=0 c=0 d=0 -> specificity = 1,0,0,0 */
46.
CSS
3. 우선순위
-ID selector + descendant selector
* ID selector와 descendant selector를 결합하여 충돌을 최소화
* ID selector는 웹 페이지의 가장 특징적인 모듈,
예를 들어 header, footer, sidebar 등을 정의
각 콘텐츠 별로 ID를 부여하여 충돌을 피할 수 있다.
* class는 공유되는 모듈이나 페이지 안에서 공유되는 요소에 부여
* 디자인 모듈에서 사용하는 ID와 서식 모듈에서 사용하는
ID를 사전 협의를 거쳐 충돌을 피해야 한다.
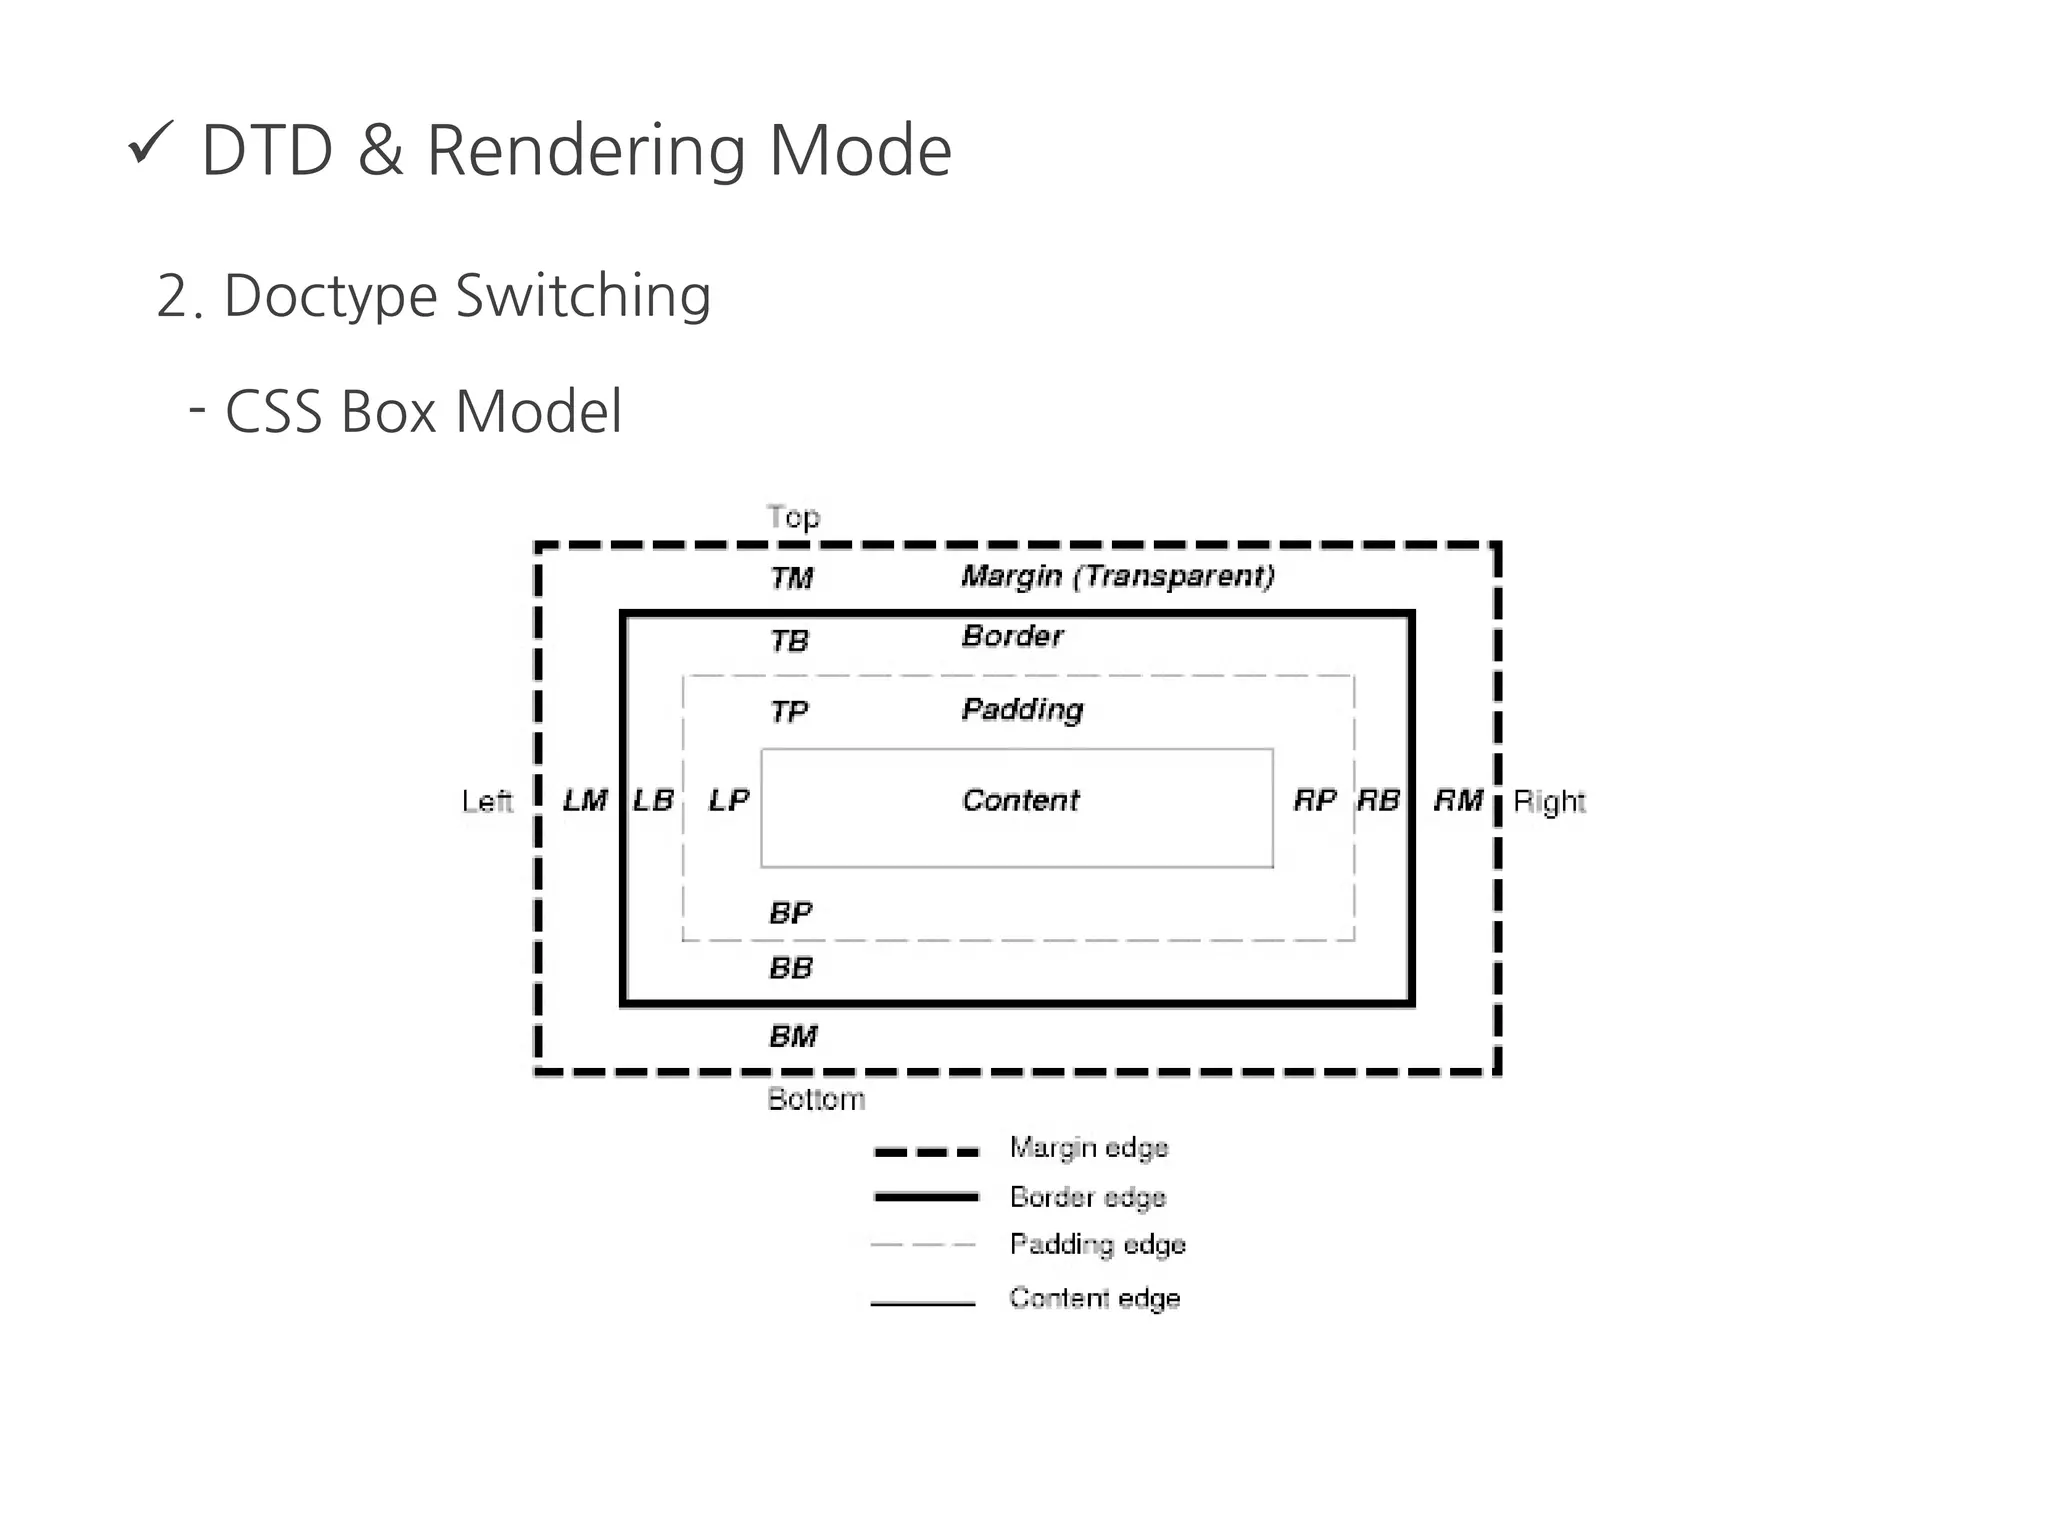
DTD &Rendering Mode
1. DTD (Document Type Definition)
- 마크업 문서에 사용되는 요소와 속성을 정의한 문서
예) HTML 4.01 Strict DTD : http://www.w3.org/TR/html4/strict.dtd
- 모든 마크업 문서의 상단에 DTD를 선언함
예) HTML 4.01
예) XHTML 1.1
<!DOCTYPE html PUBLIC "-//W3C//DTD HTML 4.01//EN" "http://
www.w3.org/TR/html4/strict.dtd">
<html lang="en">
<head>
<!DOCTYPE html PUBLIC "-//W3C//DTD XHTML 1.1//EN" "http://
www.w3.org/TR/xhtml11/DTD/xhtml11.dtd">
<html xmlns="http://www.w3.org/1999/xhtml" xml:lang="ko">
<head>
49.
DTD &Rendering Mode
1. DTD (Document Type Definition)
- DTD를 붙였는데도 비 표준으로 인식하는 경우
예) DTD가 아래와 같은 경우
예) DTD 위에 뭔가 넣었을 경우
<!DOCTYPE HTML PUBLIC "-//W3C//DTD HTML 4.01 Transitional//EN">
<script>
function fn_moveHtml(page){
var html = page;
if(html == ""){
alert("완성되지 않은 메뉴입니다.");
return;
}
location.href = page;
}
</script>
<!DOCTYPE html PUBLIC "-//W3C//DTD XHTML 1.1//EN" "http://
www.w3.org/TR/xhtml11/DTD/xhtml11.dtd">
50.
DTD &Rendering Mode
2. Doctype Switching
- 브라우저들은 표준의 준수와 하위 호환성 유지 사이의 차이를
극복하기 위해 여러 개의 랜더링 모드 (Standards mode,
Almost Standards mode, Quirks mode)를 가지고 있다.
- 랜더링 모드는 DTD 선언에 의해서 달라짐
- IE의 경우 랜더링 모드간의 차이가 매우 크기 때문에 주의
Float &Clear
1. Float
- IE Floating 3-pixel jog
* 텍스트를 플로트 시키지 않을 경우 IE6에서 원인을 알 수 없는
3 픽셀 여백이 생긴다
57.
Float &Clear
1. Float
- Float layout
* 원래 float의 목적은 이미지나 작은 박스를 정렬 하는 것이었지만
레이아웃 구성용으로도 많이 쓰인다.
* 브라우저 호환성이 비교적 좋고 낮은 버전의 브라우저에서도 잘 지원된다.
58.
Float &Clear
1. Float
- Float layout : wrapper의 width를 고정
float:
left
float:left float:
left
float:
left
float:left float:
left
59.
Float &Clear
2. Clear
- 플로트 된 요소의 다음에서 플로트의 효과를 없애는 역할을 하는 속성.
clear : left 좌측 플로트 효과를 없앰
clear:right 우측 플로트 효과를 없앰
clear:both 좌측과 우측 플로트 효과를 없앰
60.
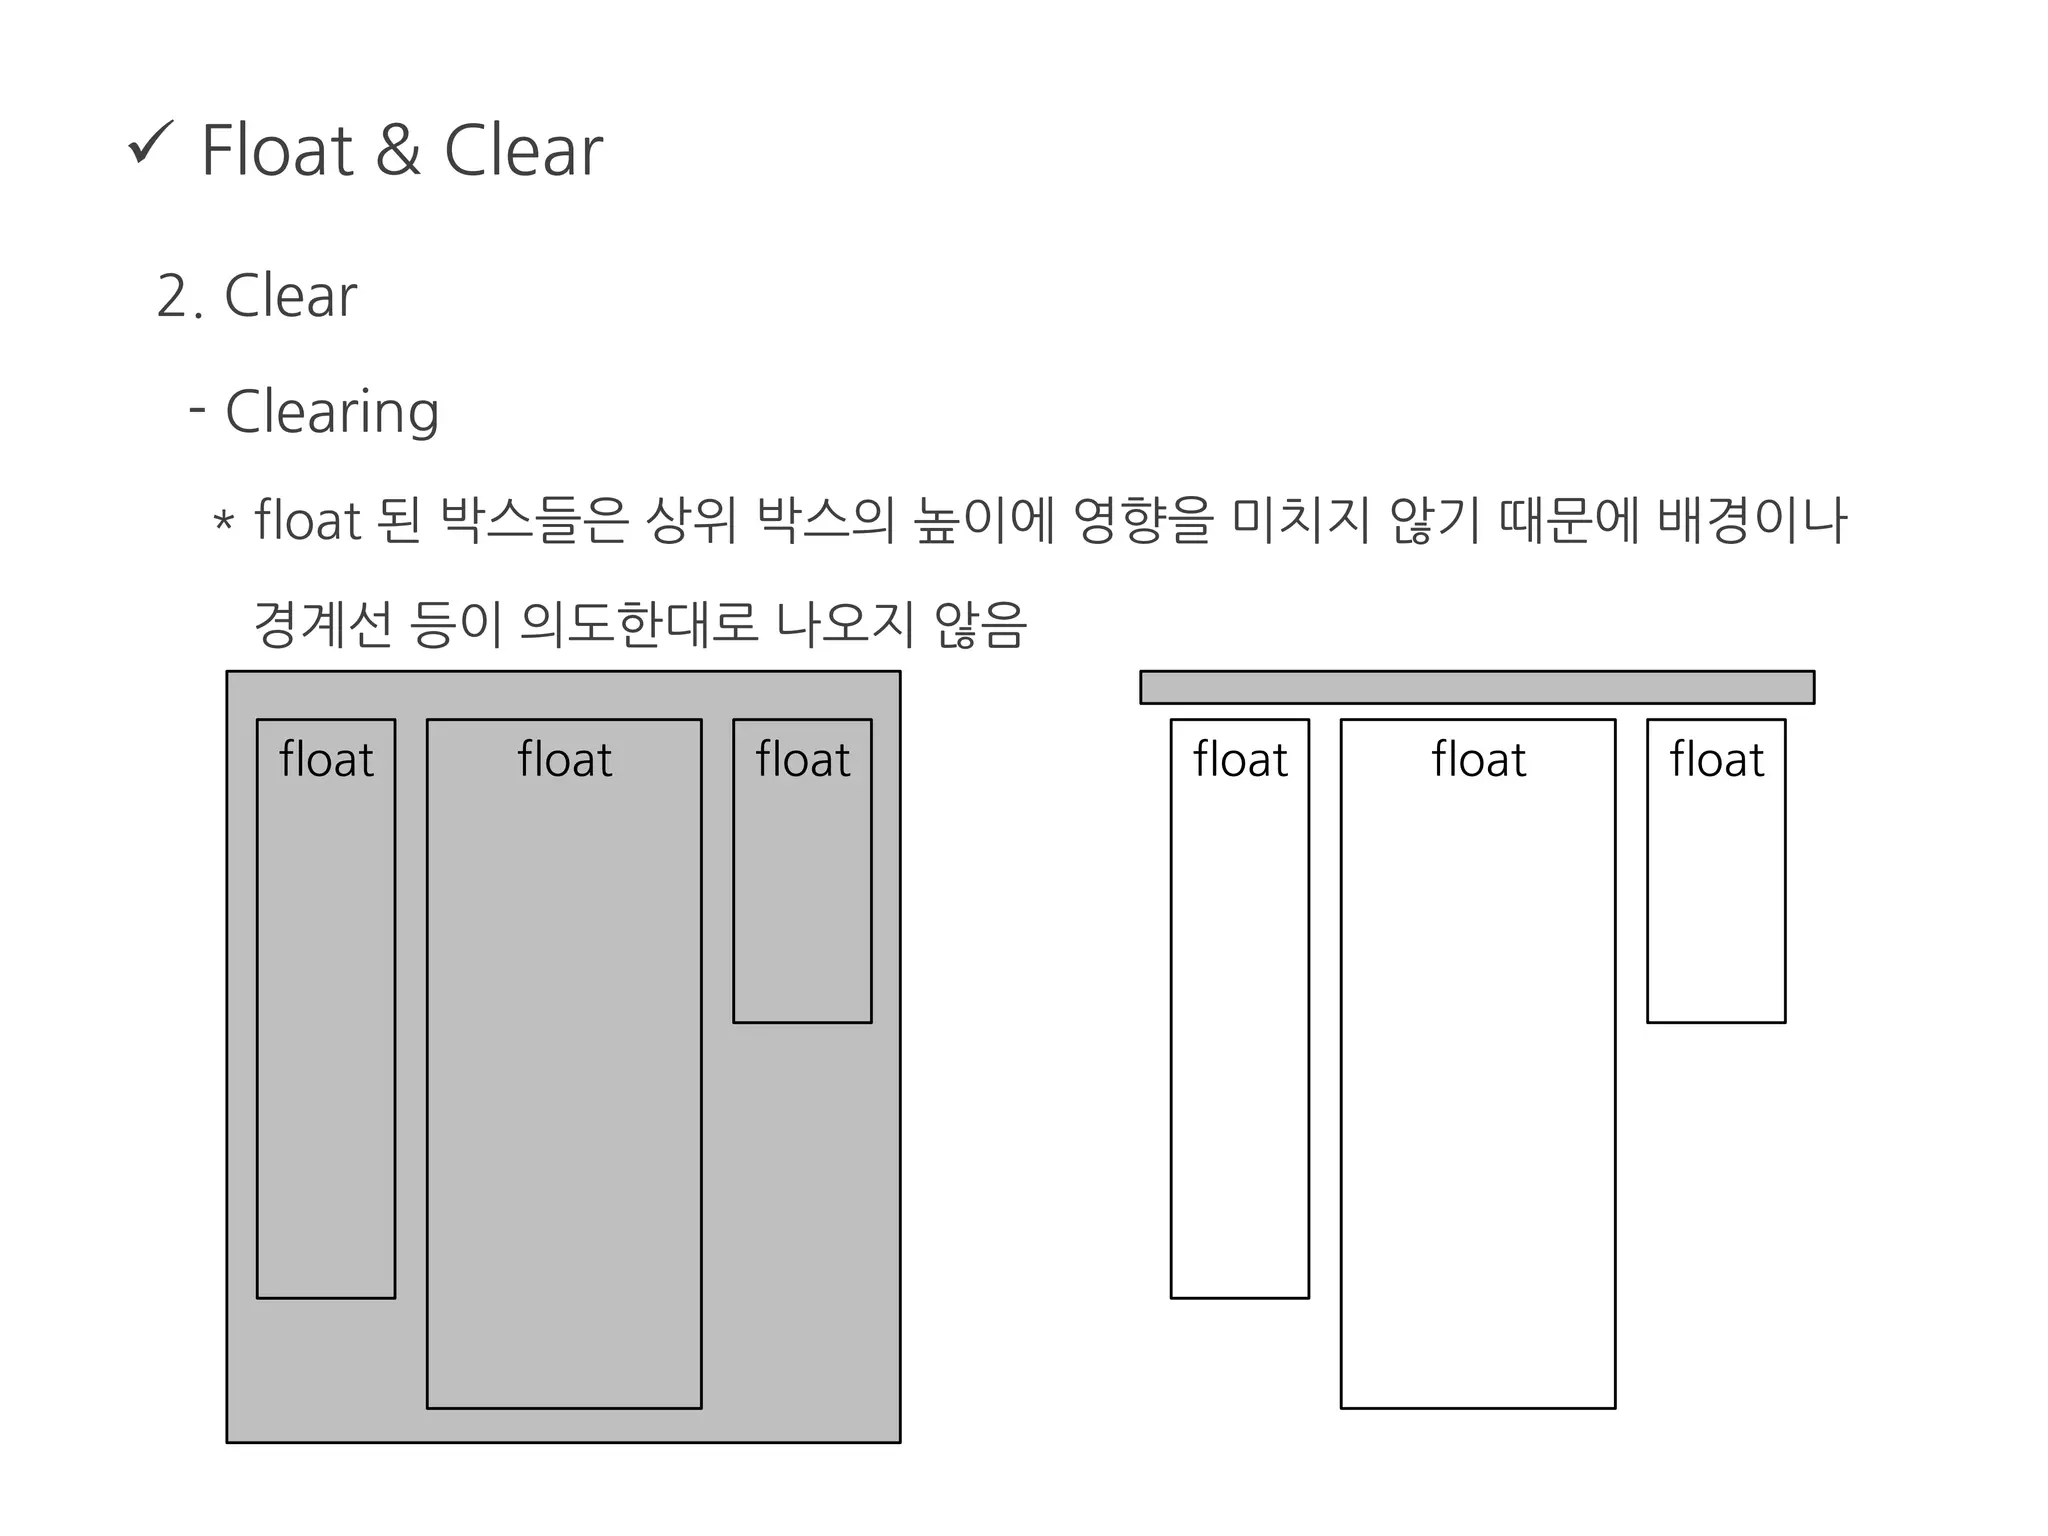
Float &Clear
2. Clear
- Clearing
* float 된 박스들은 상위 박스의 높이에 영향을 미치지 않기 때문에 배경이나
경계선 등이 의도한대로 나오지 않음
float float float float float float
61.
Float &Clear
2. Clear
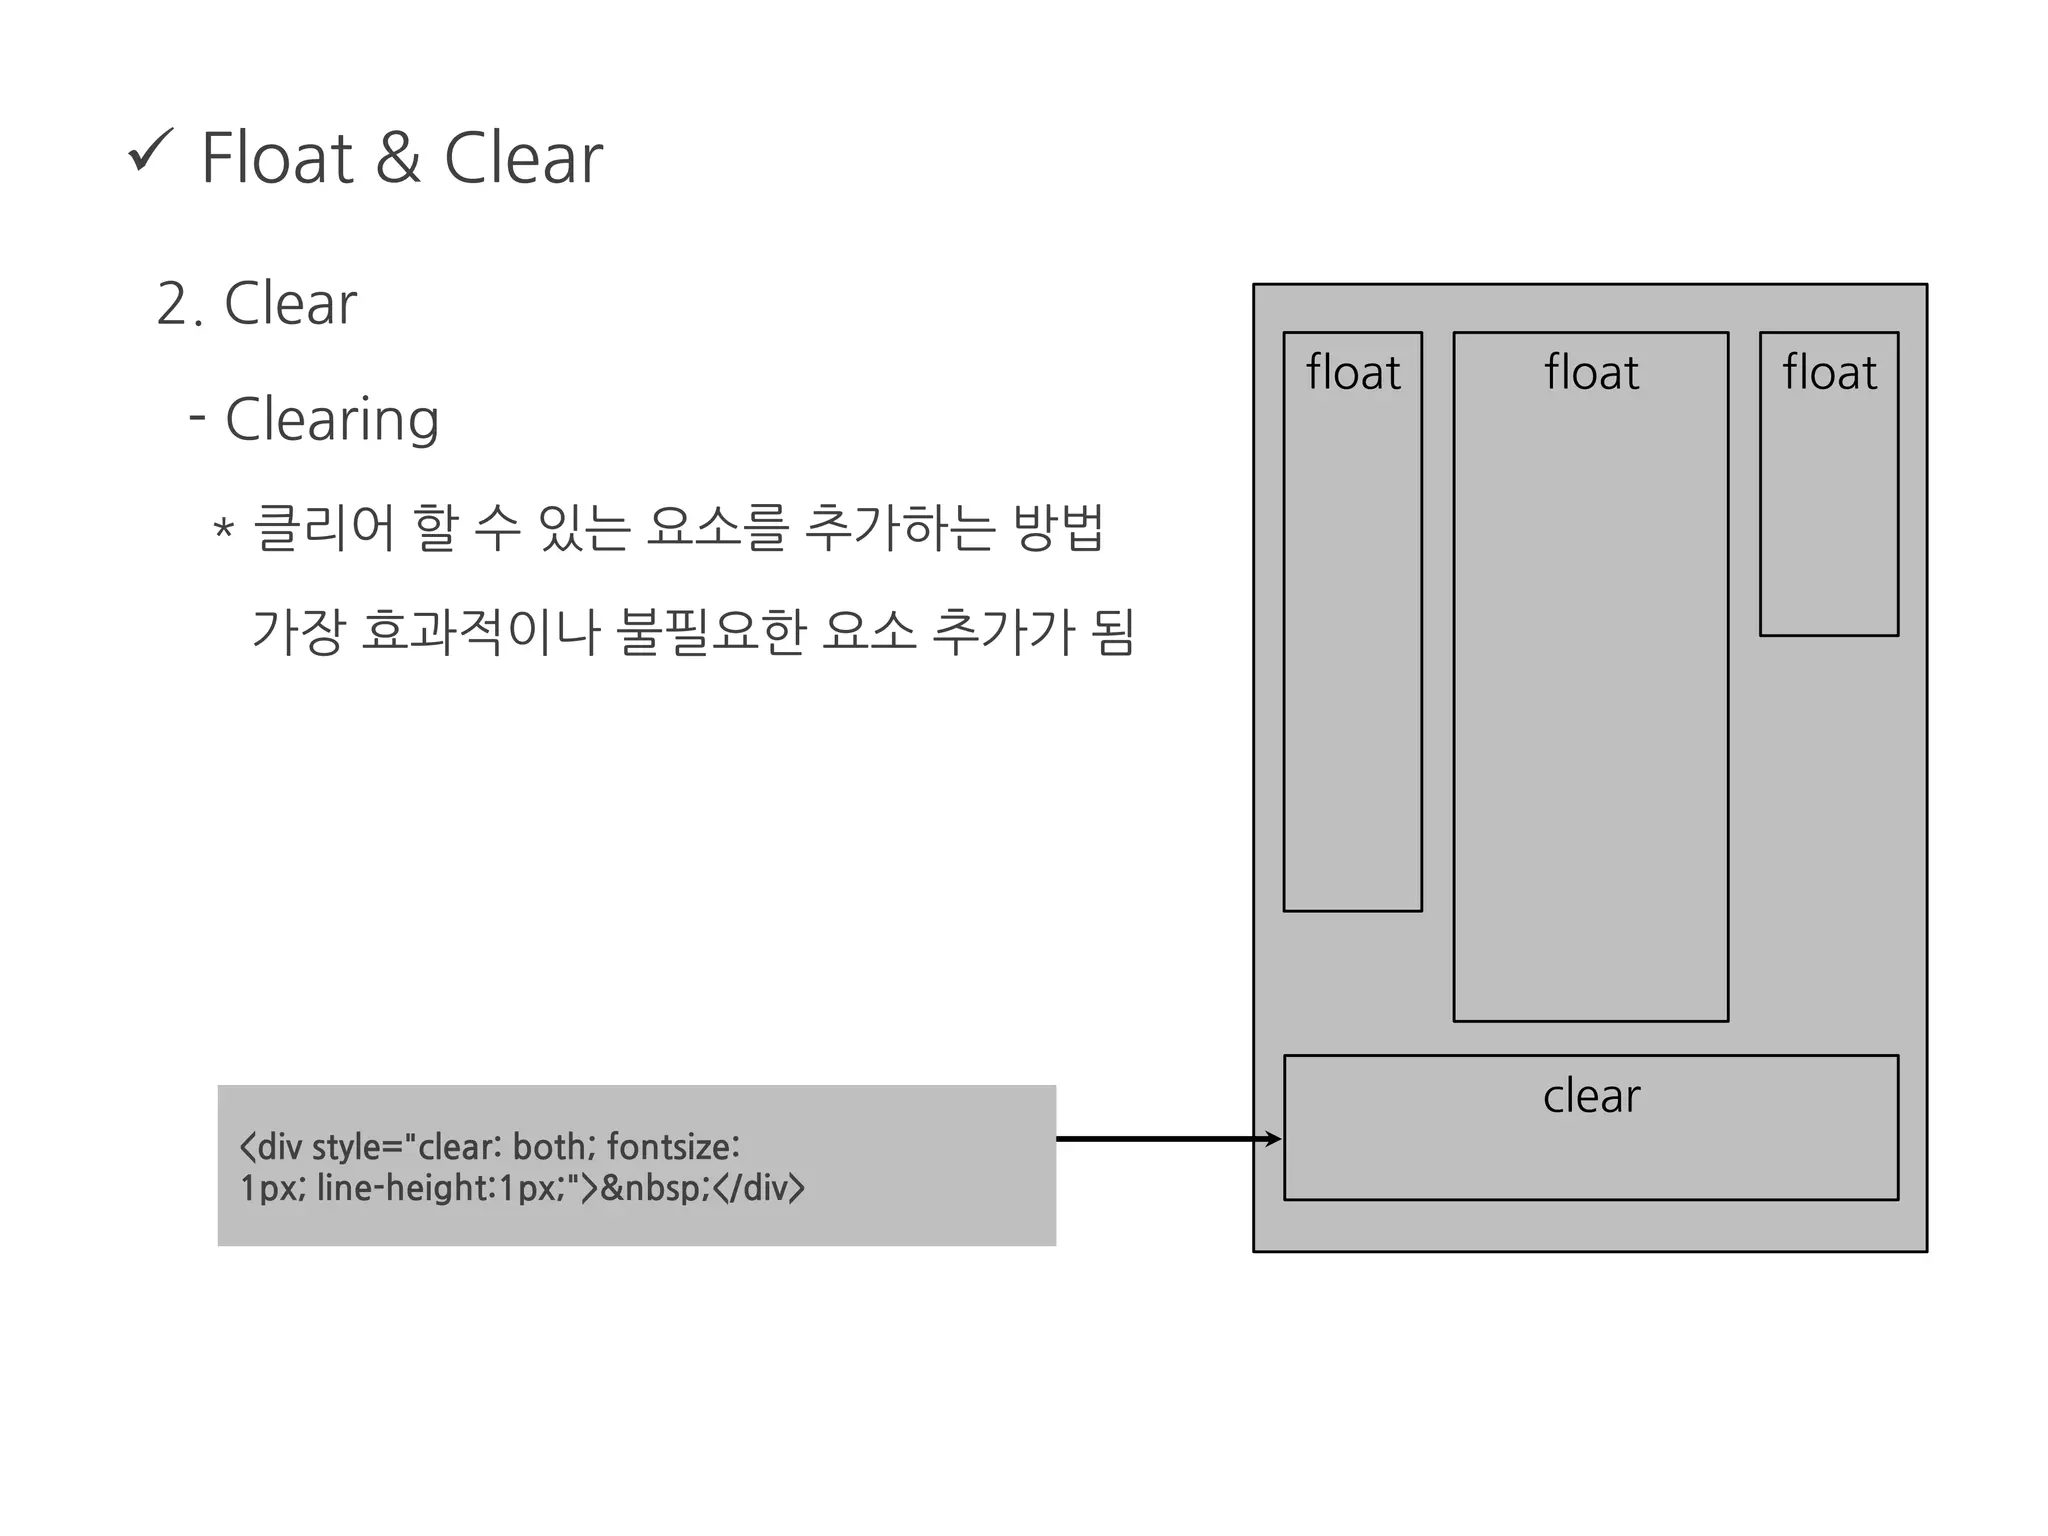
- Clearing
* 클리어 할 수 있는 요소를 추가하는 방법
가장 효과적이나 불필요한 요소 추가가 됨
float float float
clear
<div style="clear: both; fontsize:
1px; line-height:1px;"> </div>
62.
Float &Clear
2. Clear
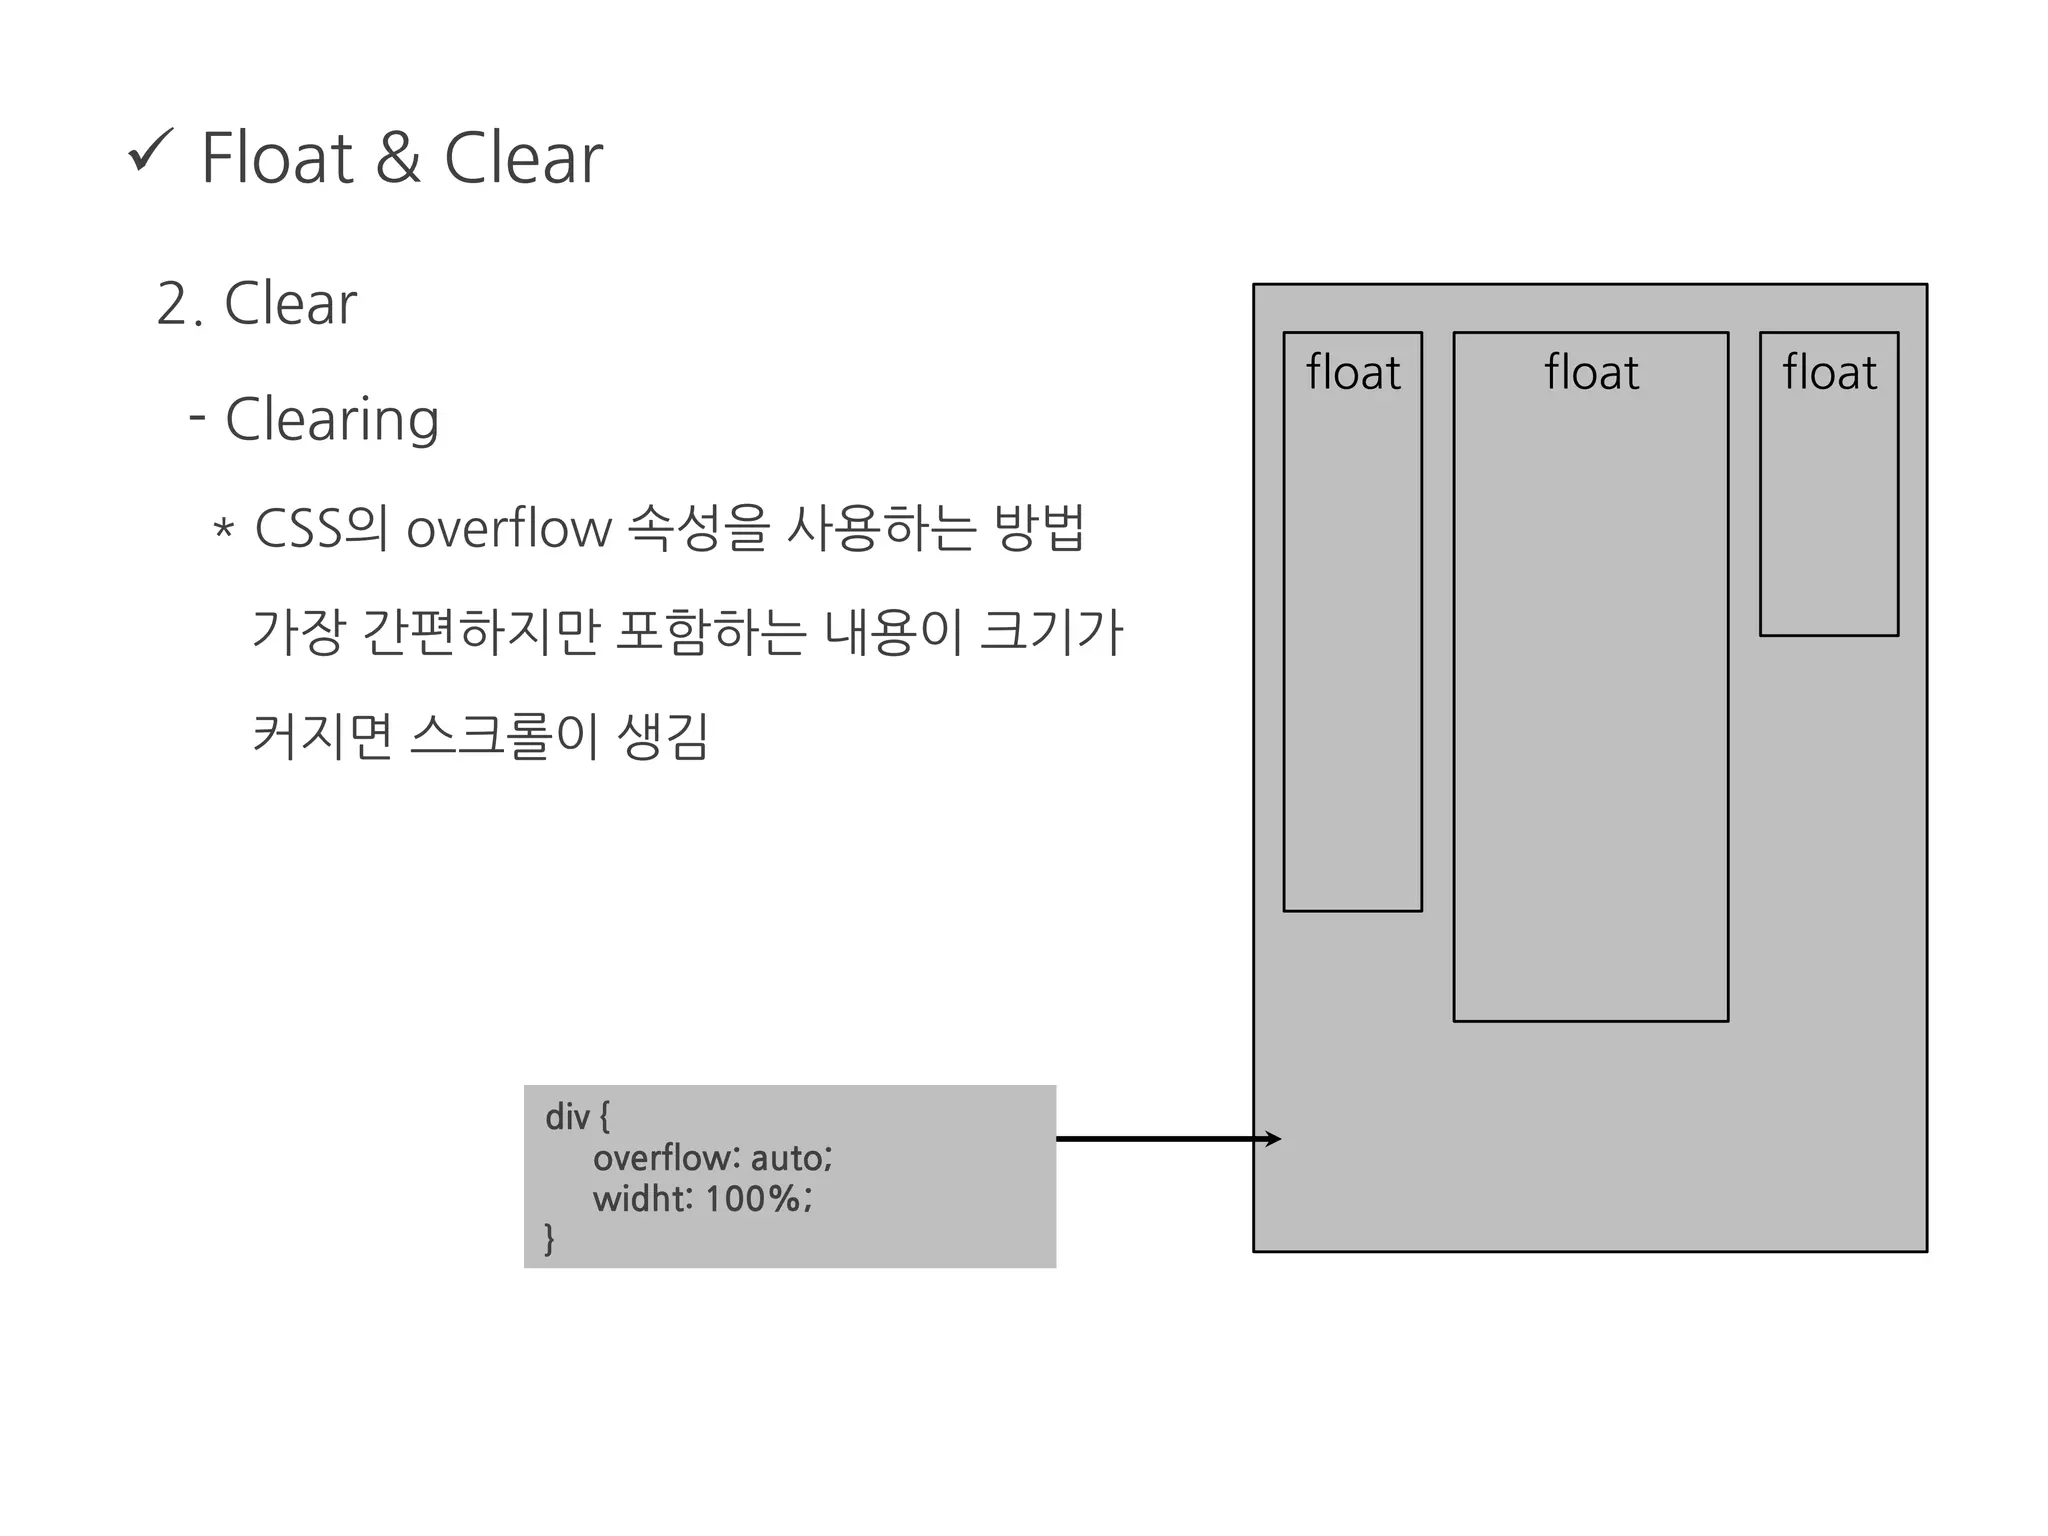
- Clearing
* CSS의 overflow 속성을 사용하는 방법
가장 간편하지만 포함하는 내용이 크기가
커지면 스크롤이 생김
float float float
div {
overflow: auto;
widht: 100%;
}
63.
Float &Clear
2. Clear
- Clearing
* CSS의 content 속성을 사용하는 방법
CSS 만으로 제어가 되기 때문에 의미상
좋은 방법이다. (IE는 hack을 사용)
float float float
content: " ";
.clearfix:after {
content: "";
display: block;
height: 0;
clear: both;
visibility: hidden;
}
* html .clearfix {height: 1%;}
64.
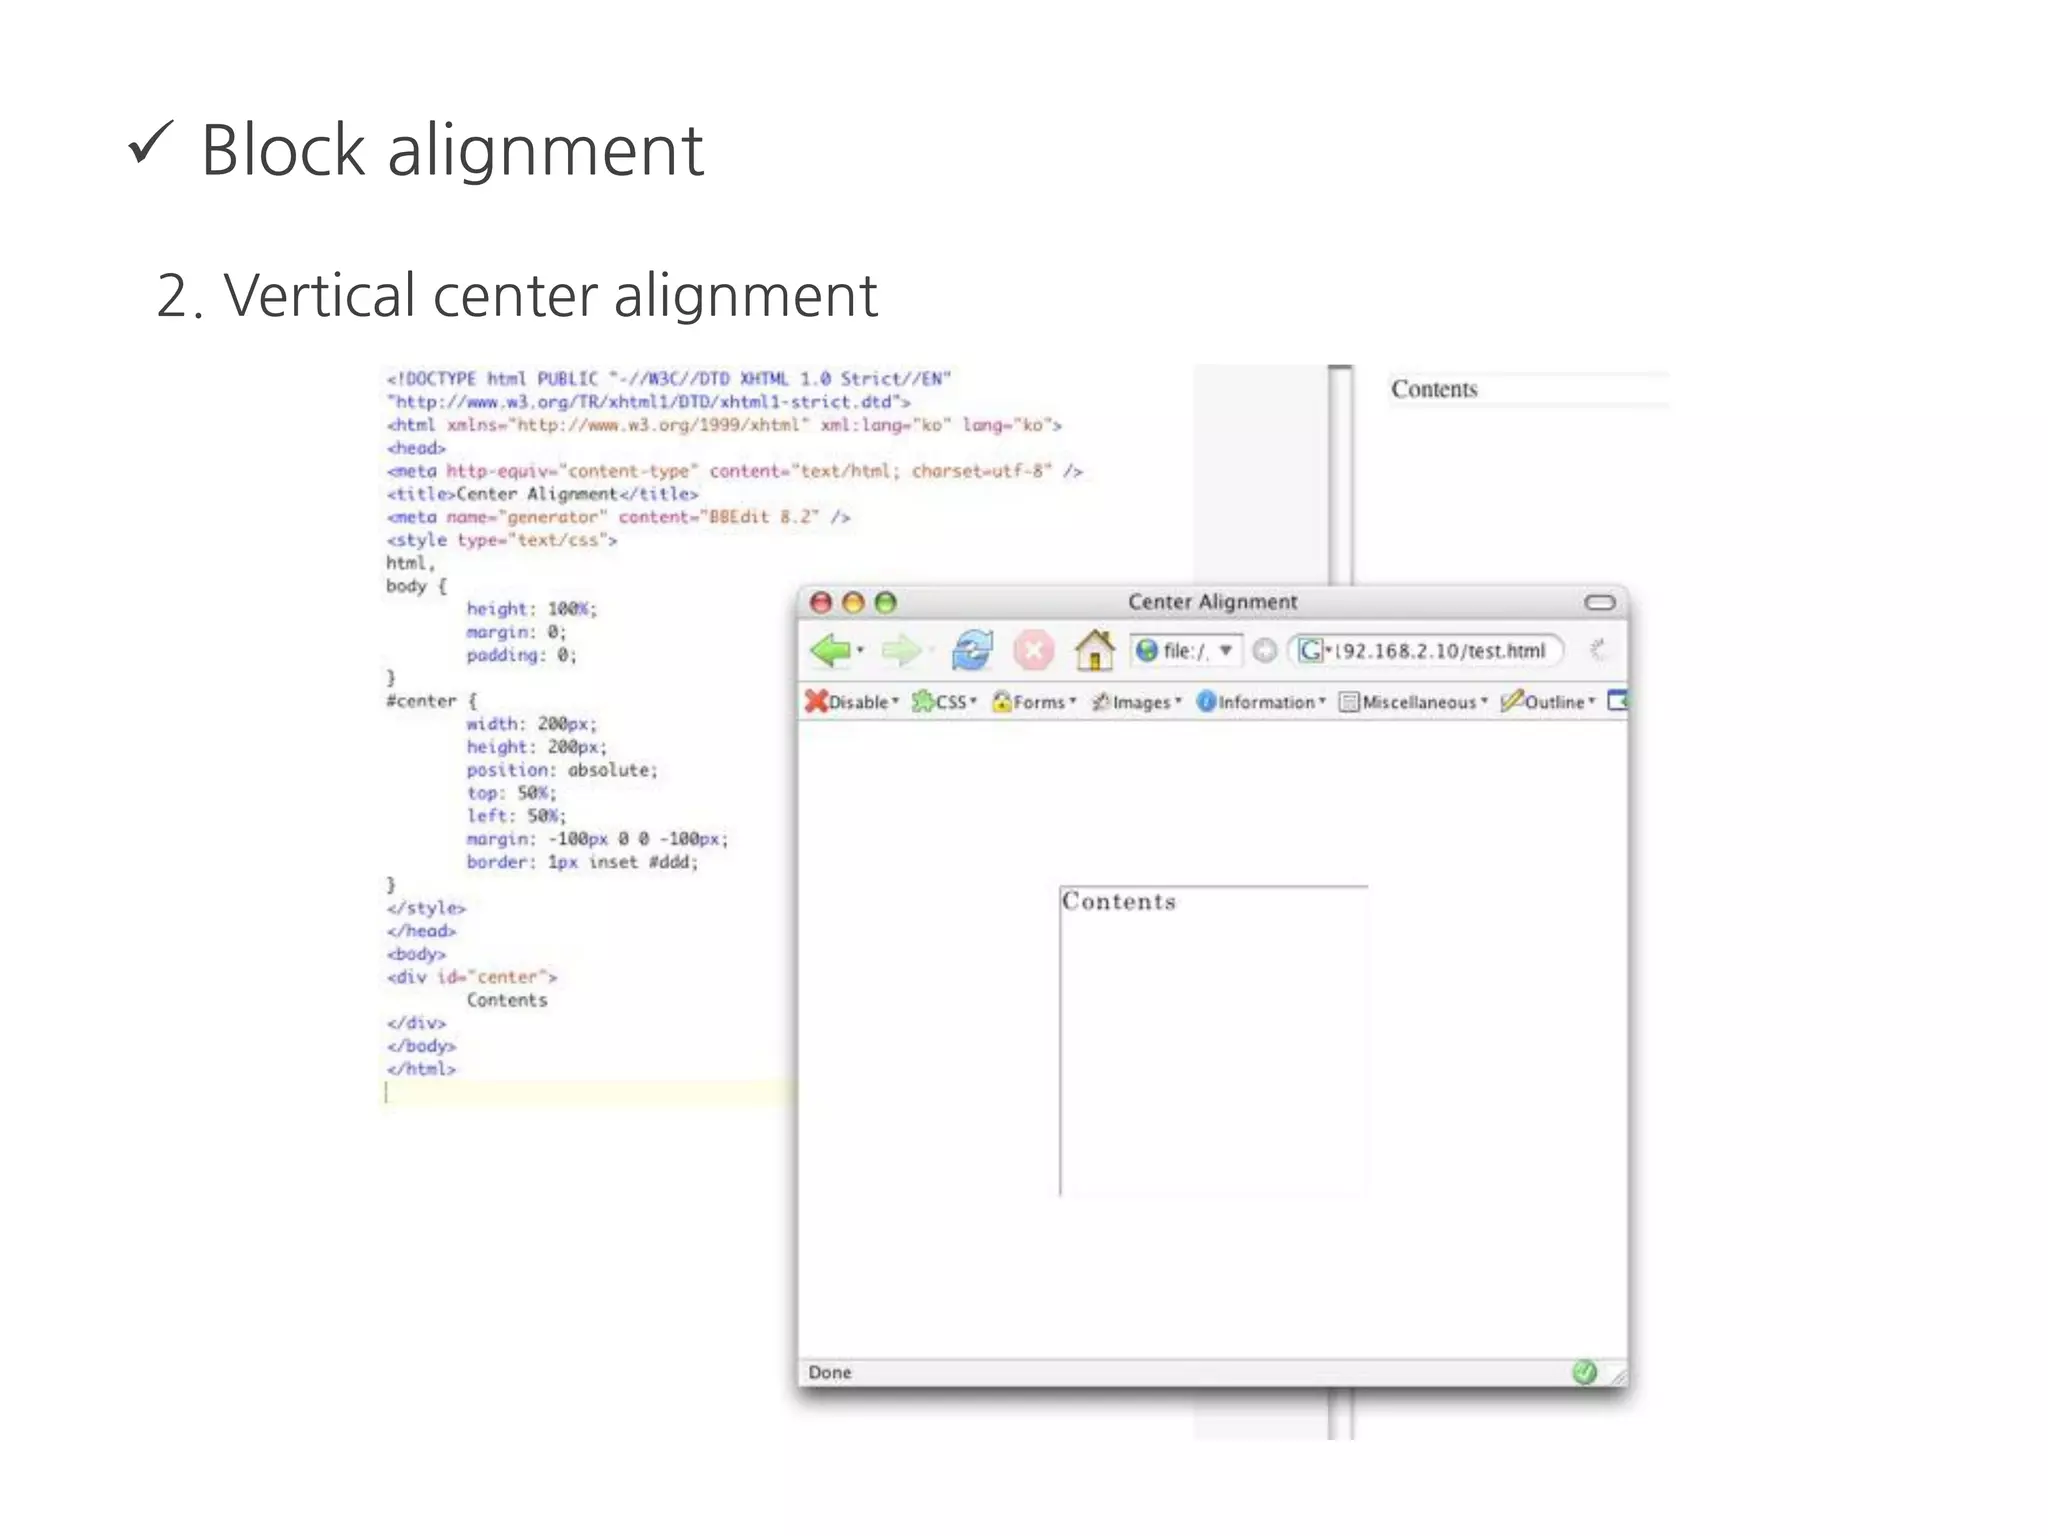
Position
1. Position
-기준점으로 부터 element의 위치를 지정
- 픽셀 단위로 자유롭게 위치 지정 가능
- 코드의 위치와 상관없이 자유롭게 위치 지정 가능
- Static : 기본값, 보통의 블록들이 이 값을 가지고 있음.
- relative : static과 같지만 기준점을 지정할 수 있다.
- absolute : 공간을 차지하지 않으며 기준점에 의해 위치가 지정
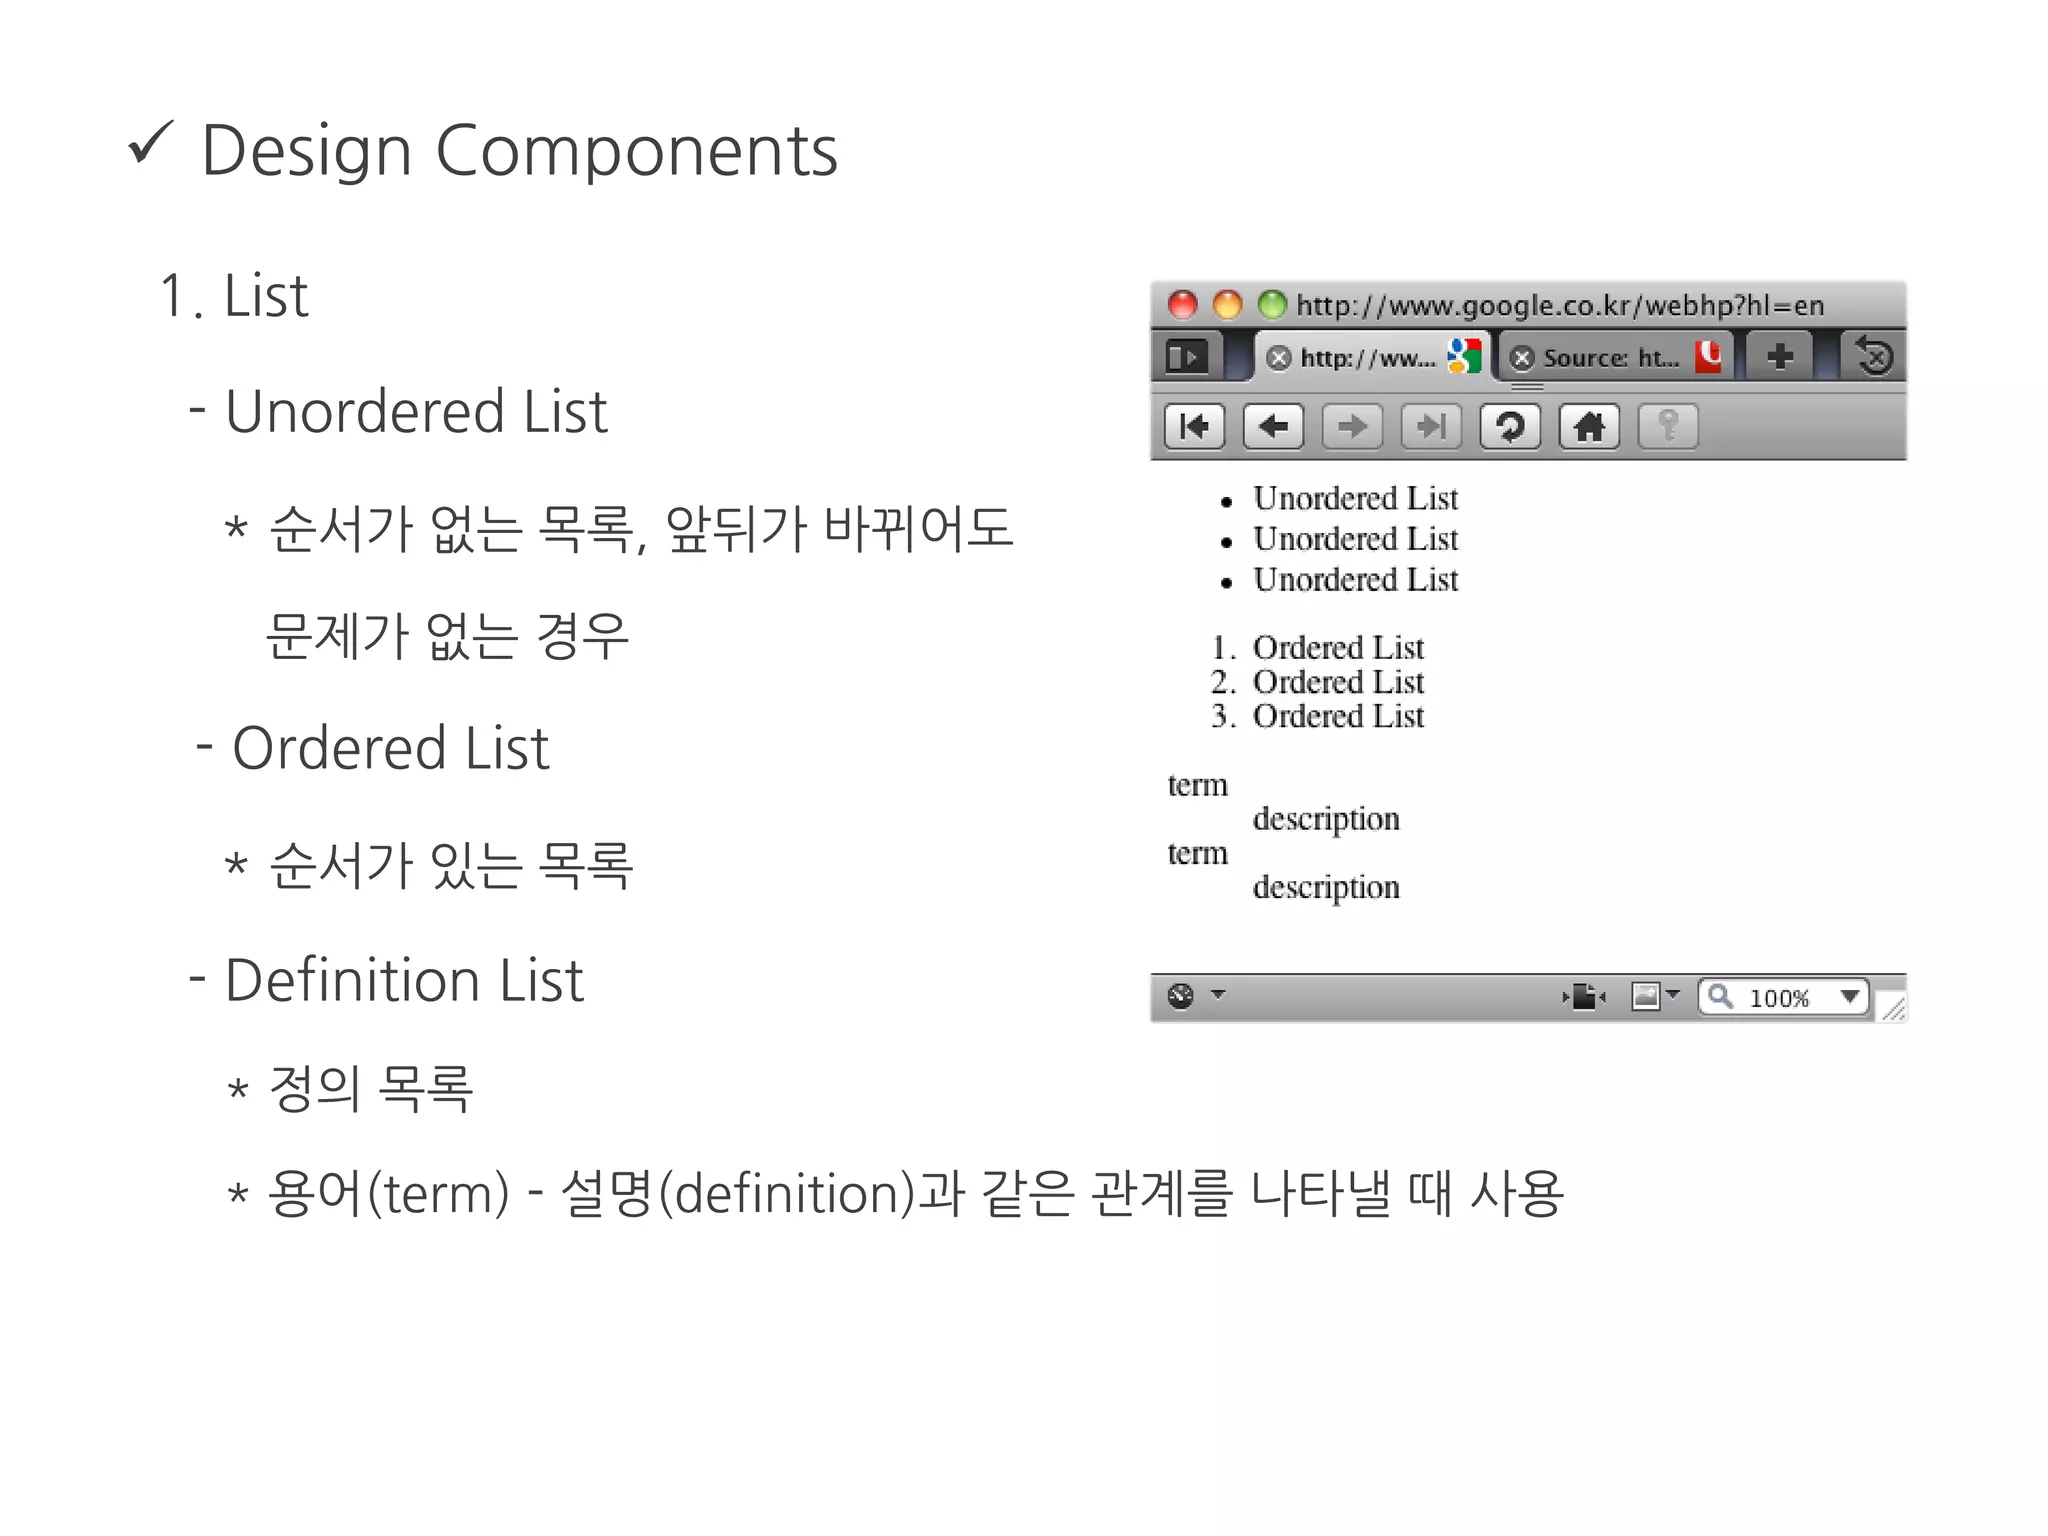
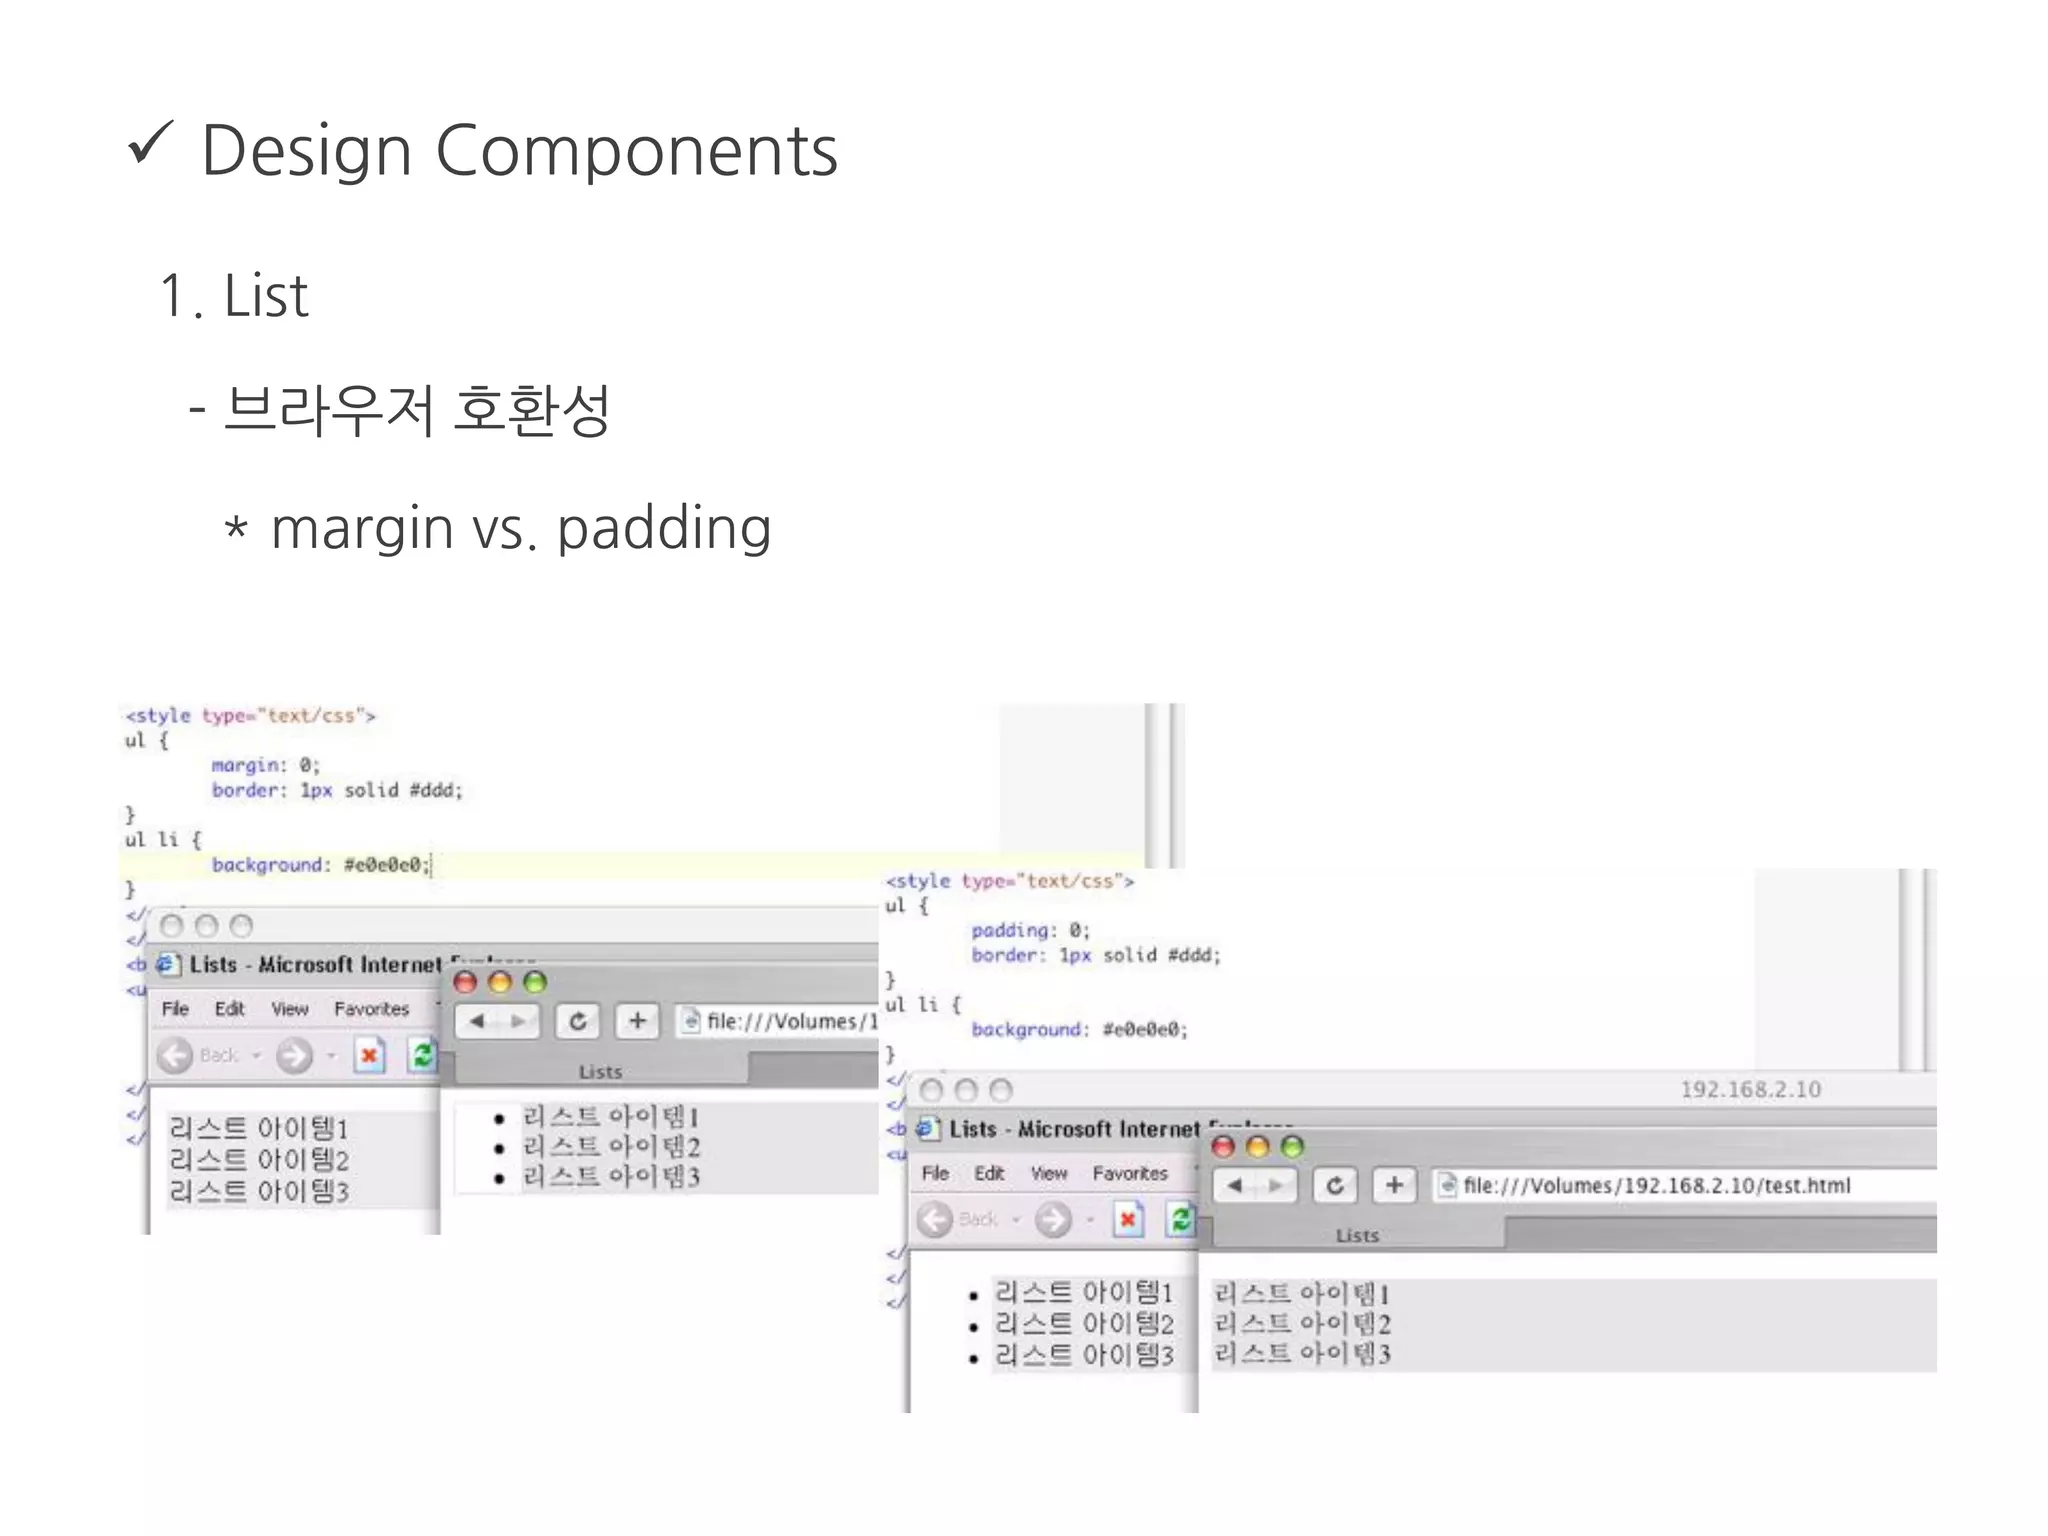
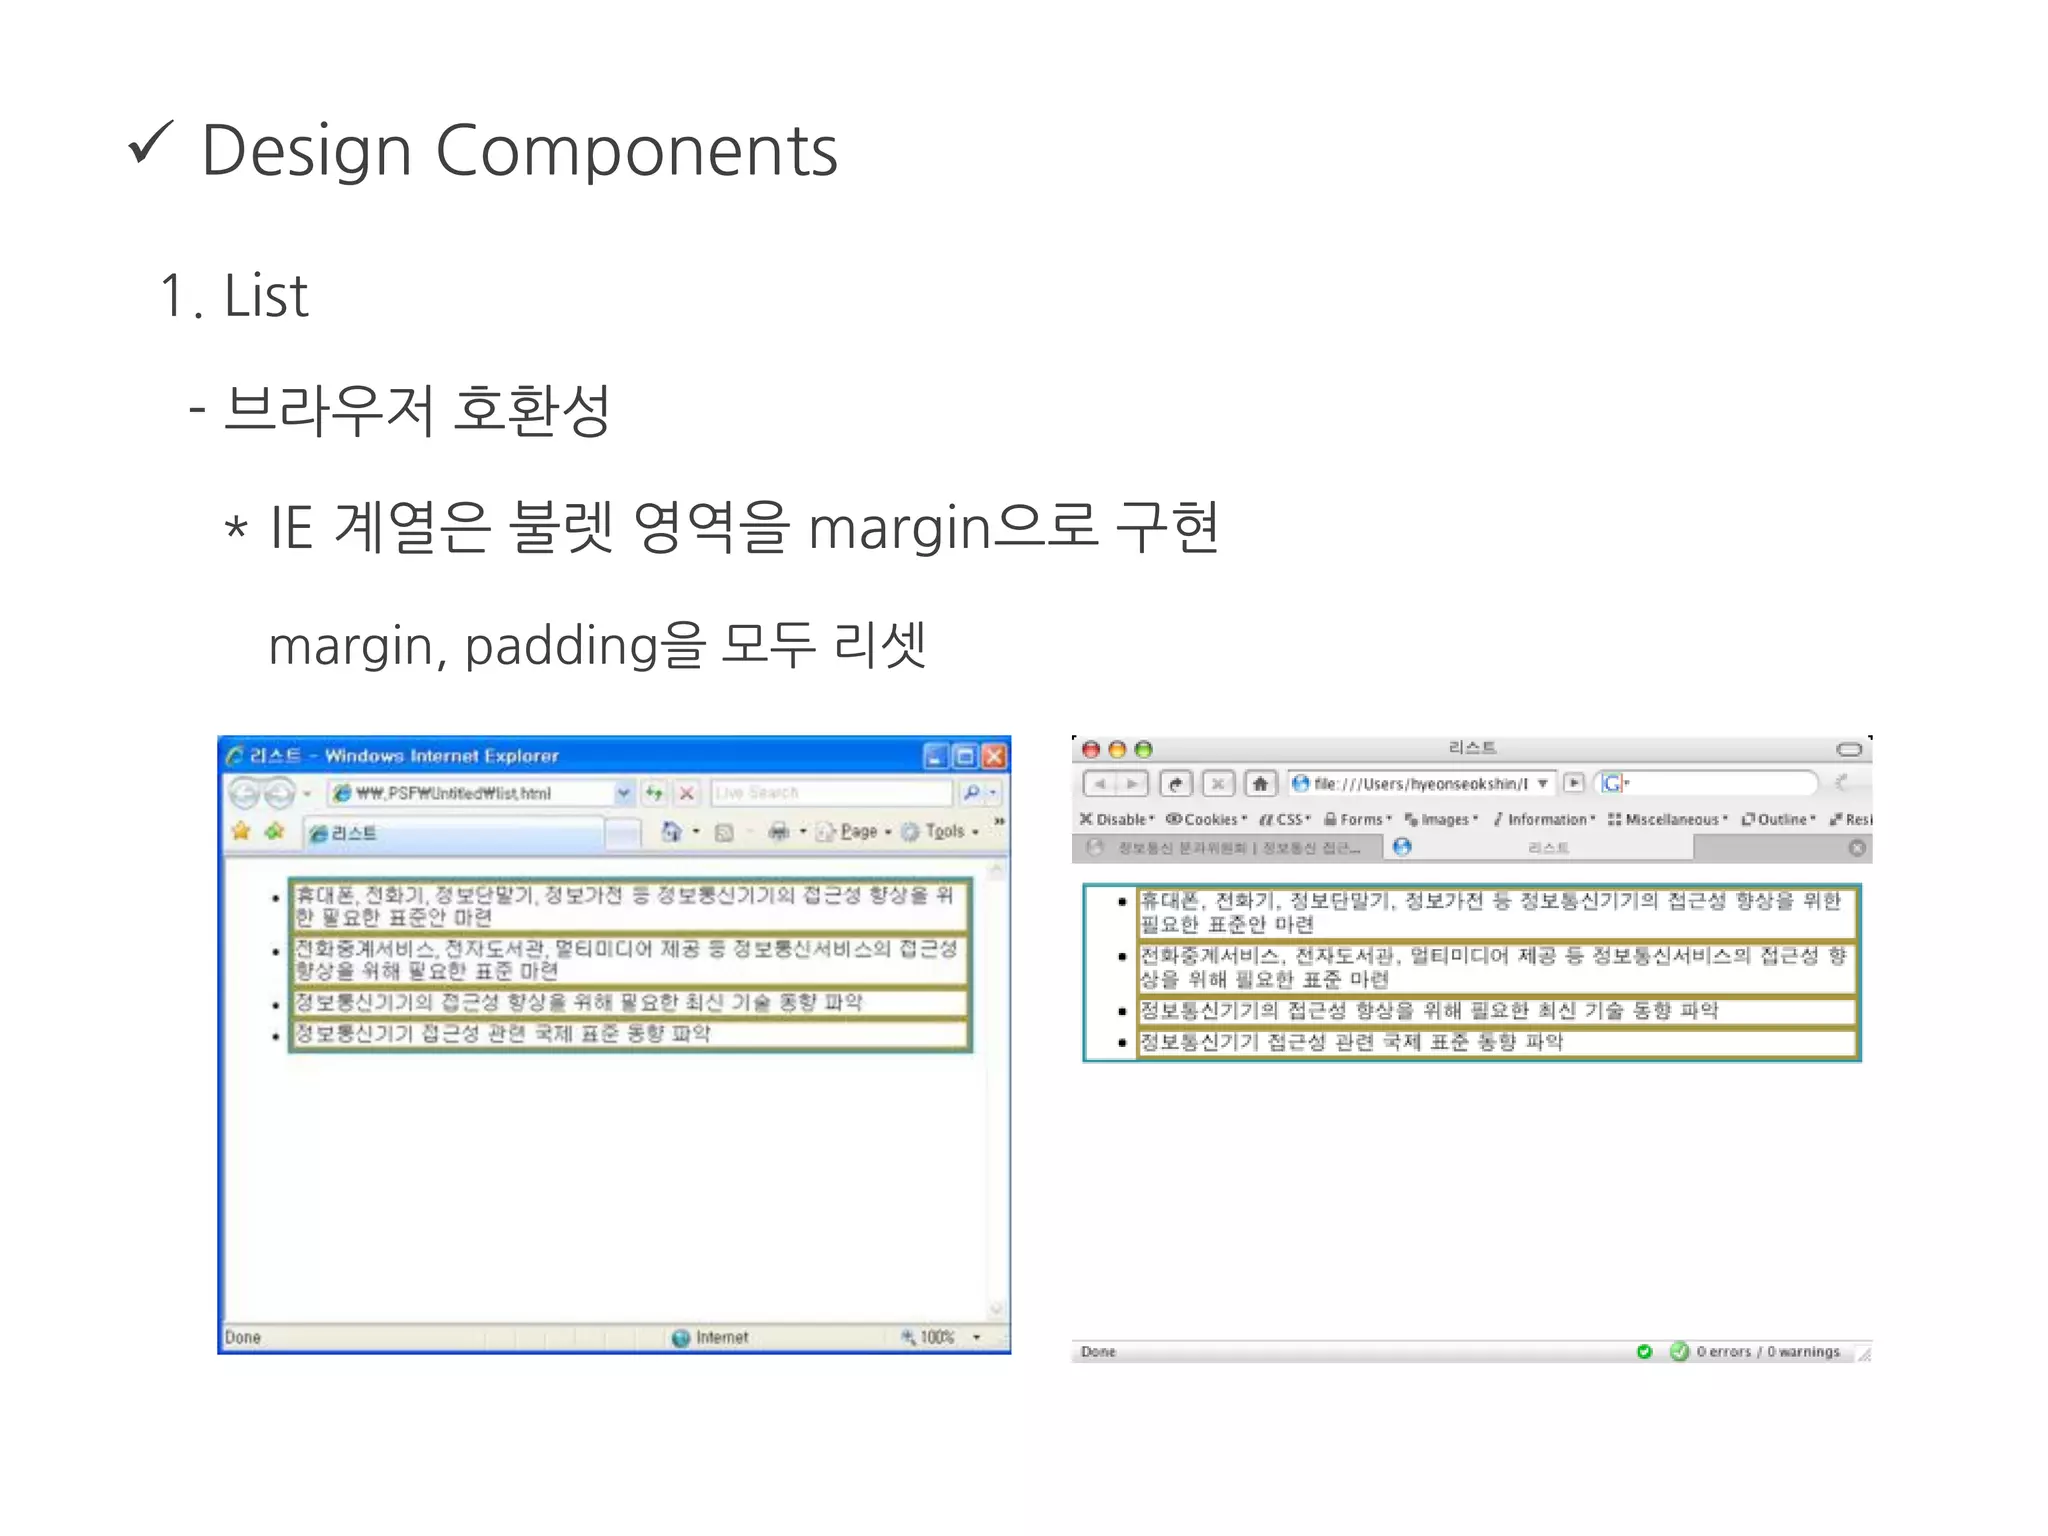
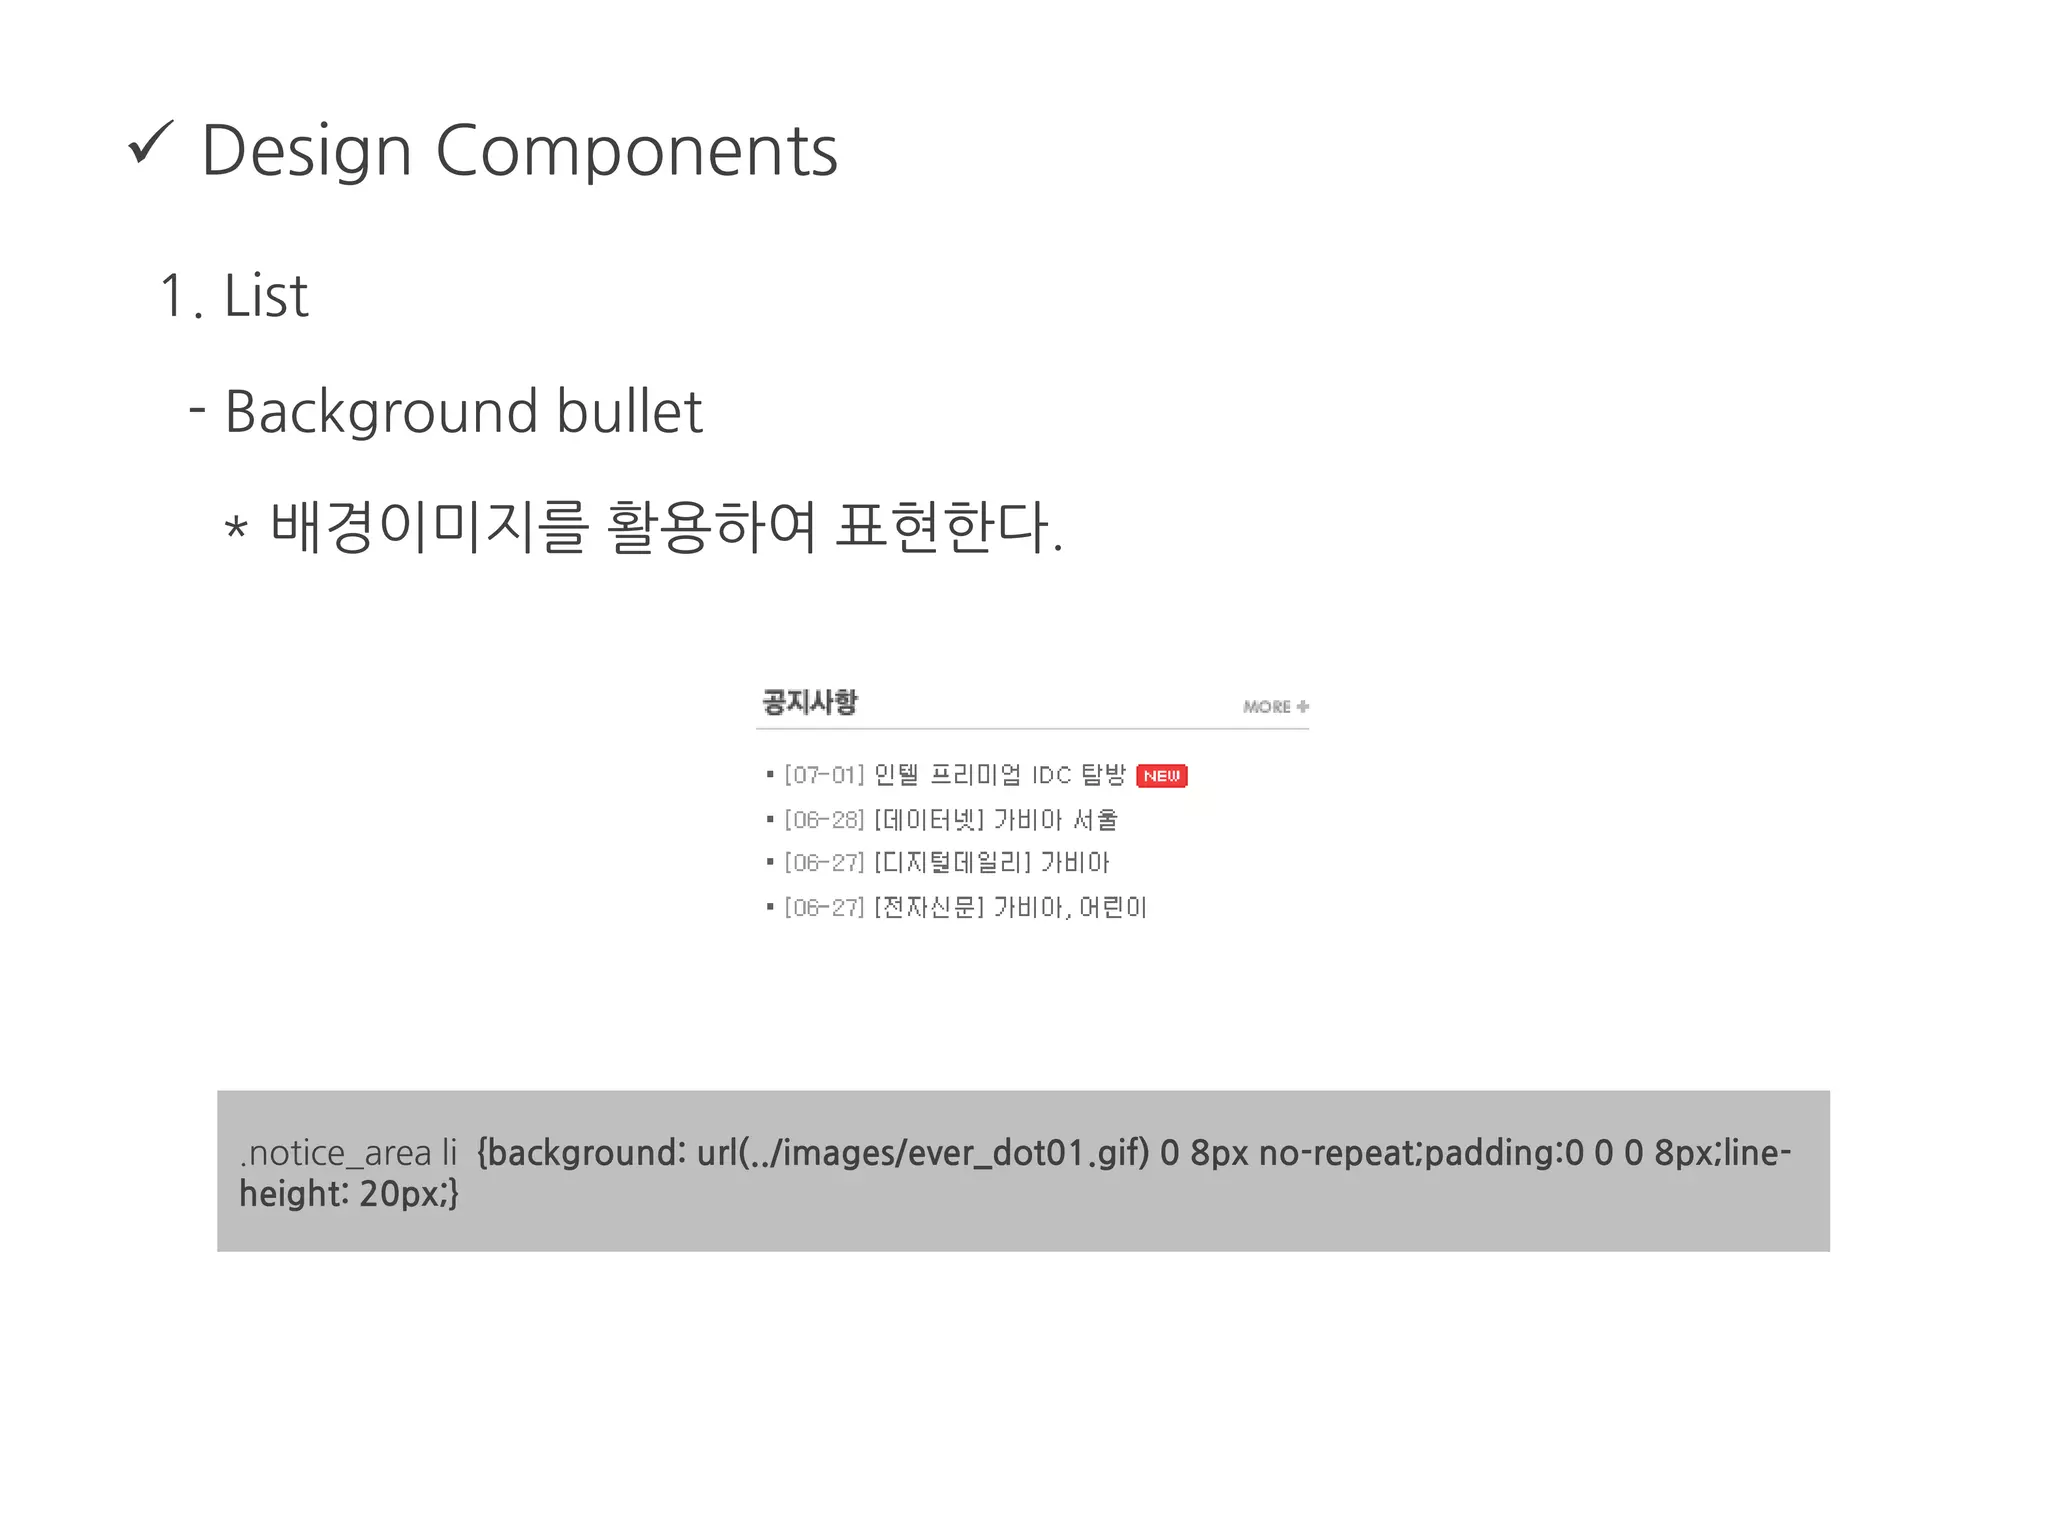
Design Components
1.List
- Unordered List
* 순서가 없는 목록, 앞뒤가 바뀌어도
문제가 없는 경우
- Ordered List
* 순서가 있는 목록
- Definition List
* 정의 목록
* 용어(term) - 설명(definition)과 같은 관계를 나타낼 때 사용
72.
Design Components
1.List
- 잘못 사용된 List
* 서로 다른 종류의 항목을 같은 수준의 li로 묶으면 안됨.
<td>를 <li>로 바꾼 것 같은 구현
페이지 전체를 하나의 <li>로 묶은 경우
게시판 리스트를 <ul>이나 <ol>로 표현한 경우
* <dt>와 <dd>의 관계가 의미에 맞아야 함.
<dt>나 <dd>가 없거나 서로 연관이 없는 경우
<dd>가 <dt>보다 위에 나오는 경우
서식을 <dl>로 표현한 경우
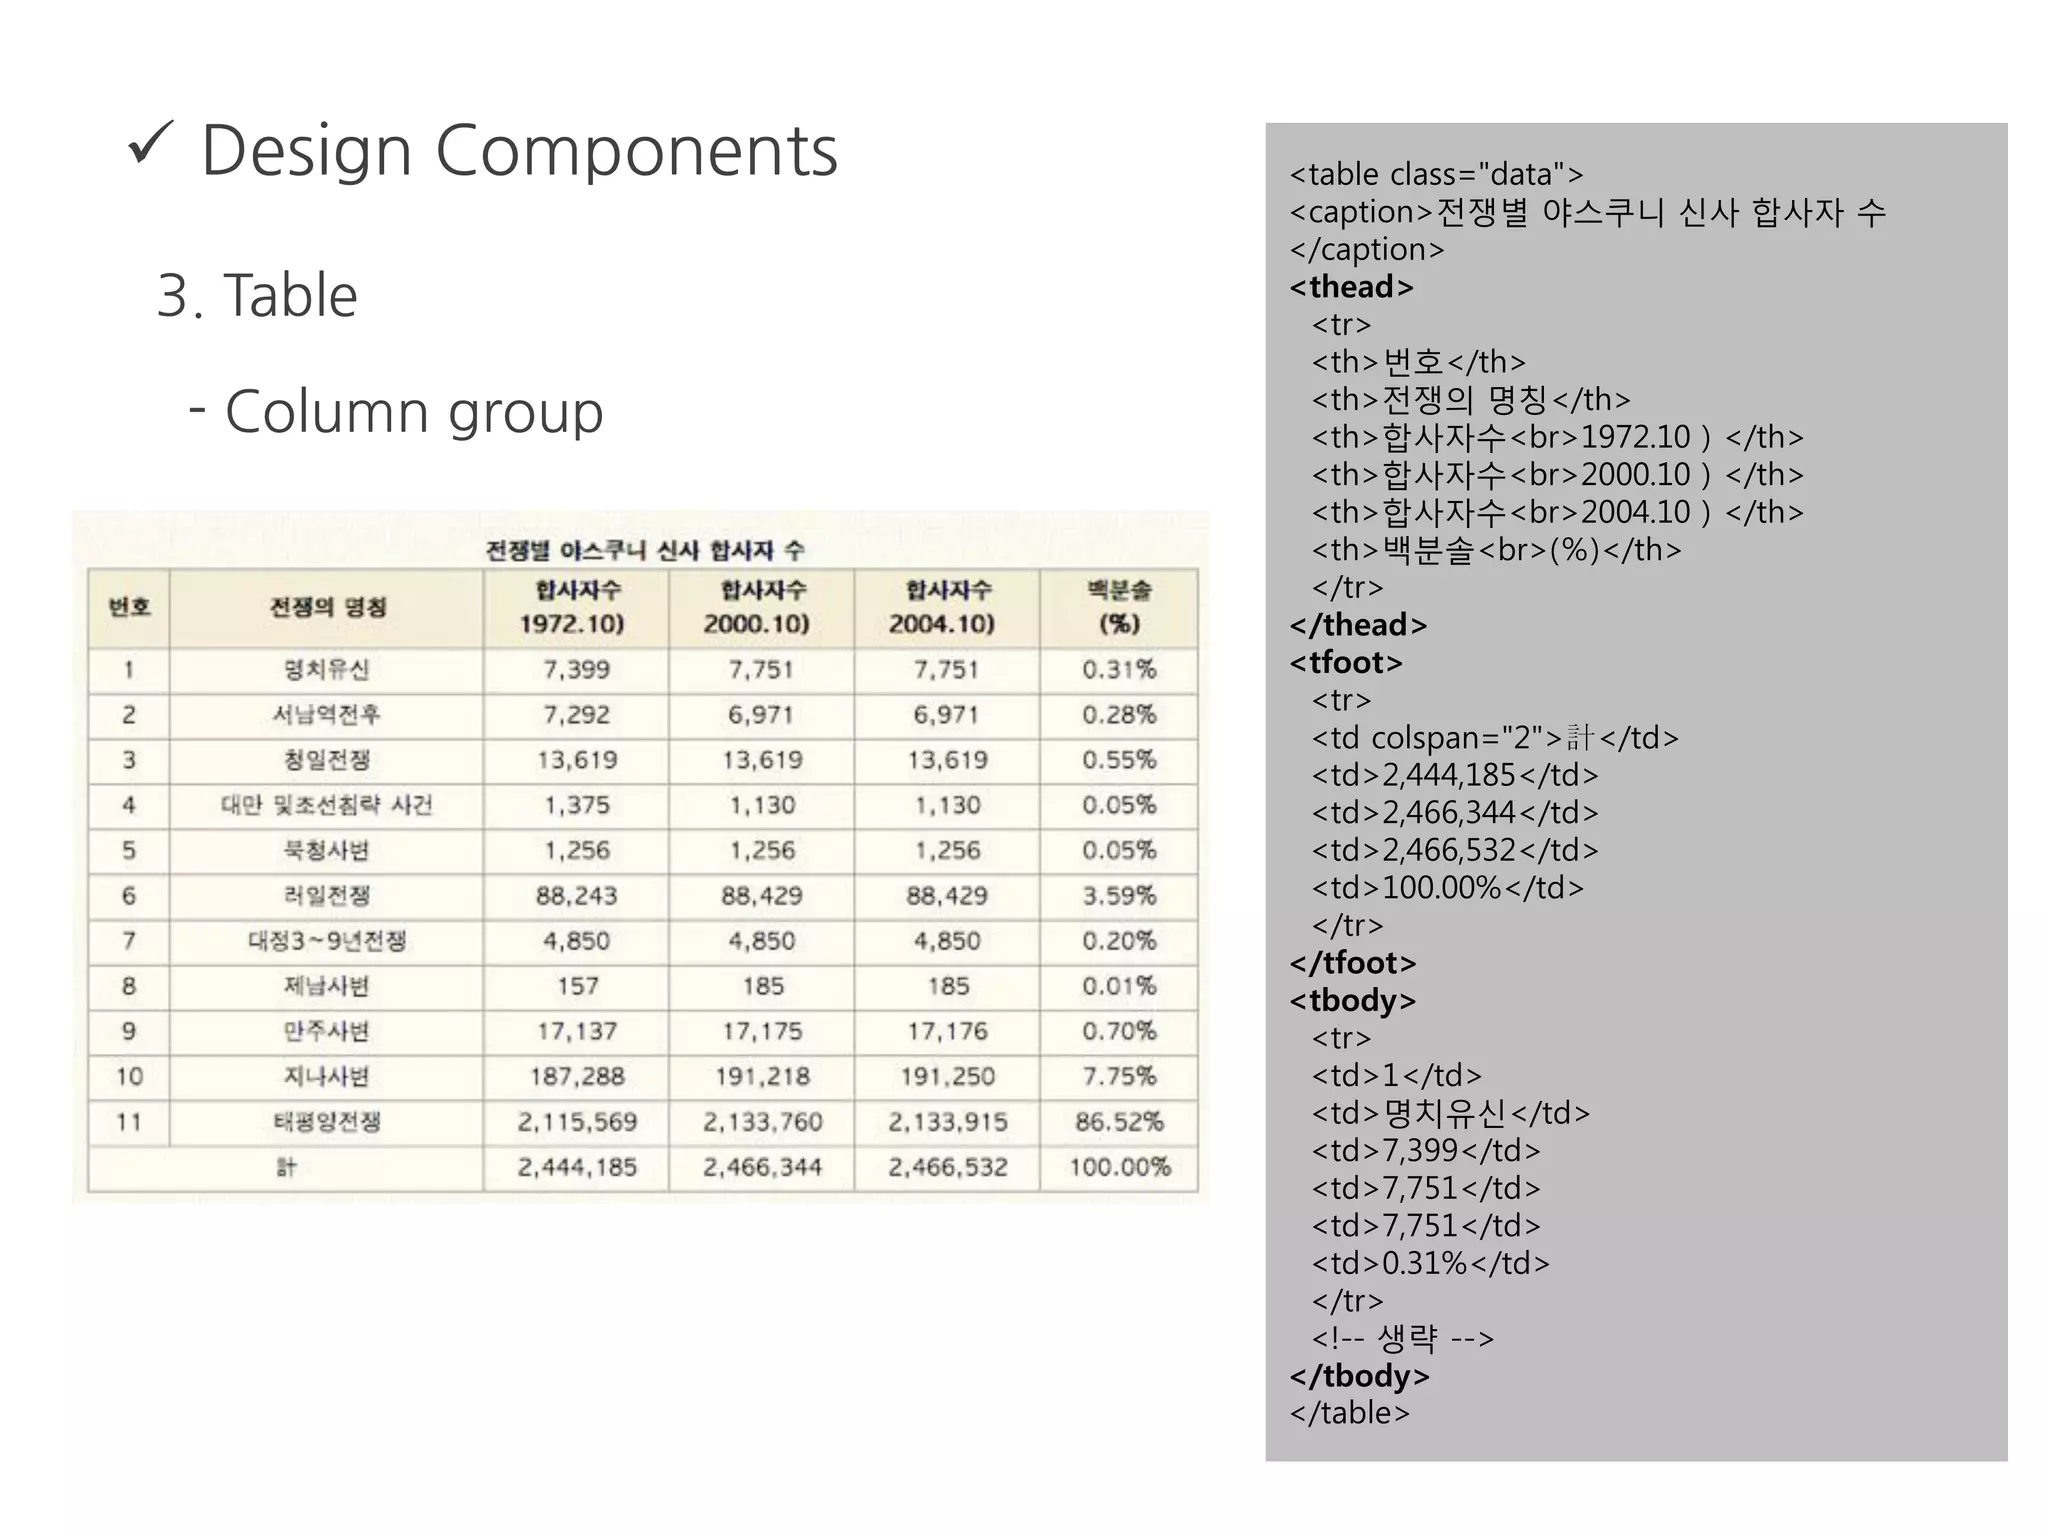
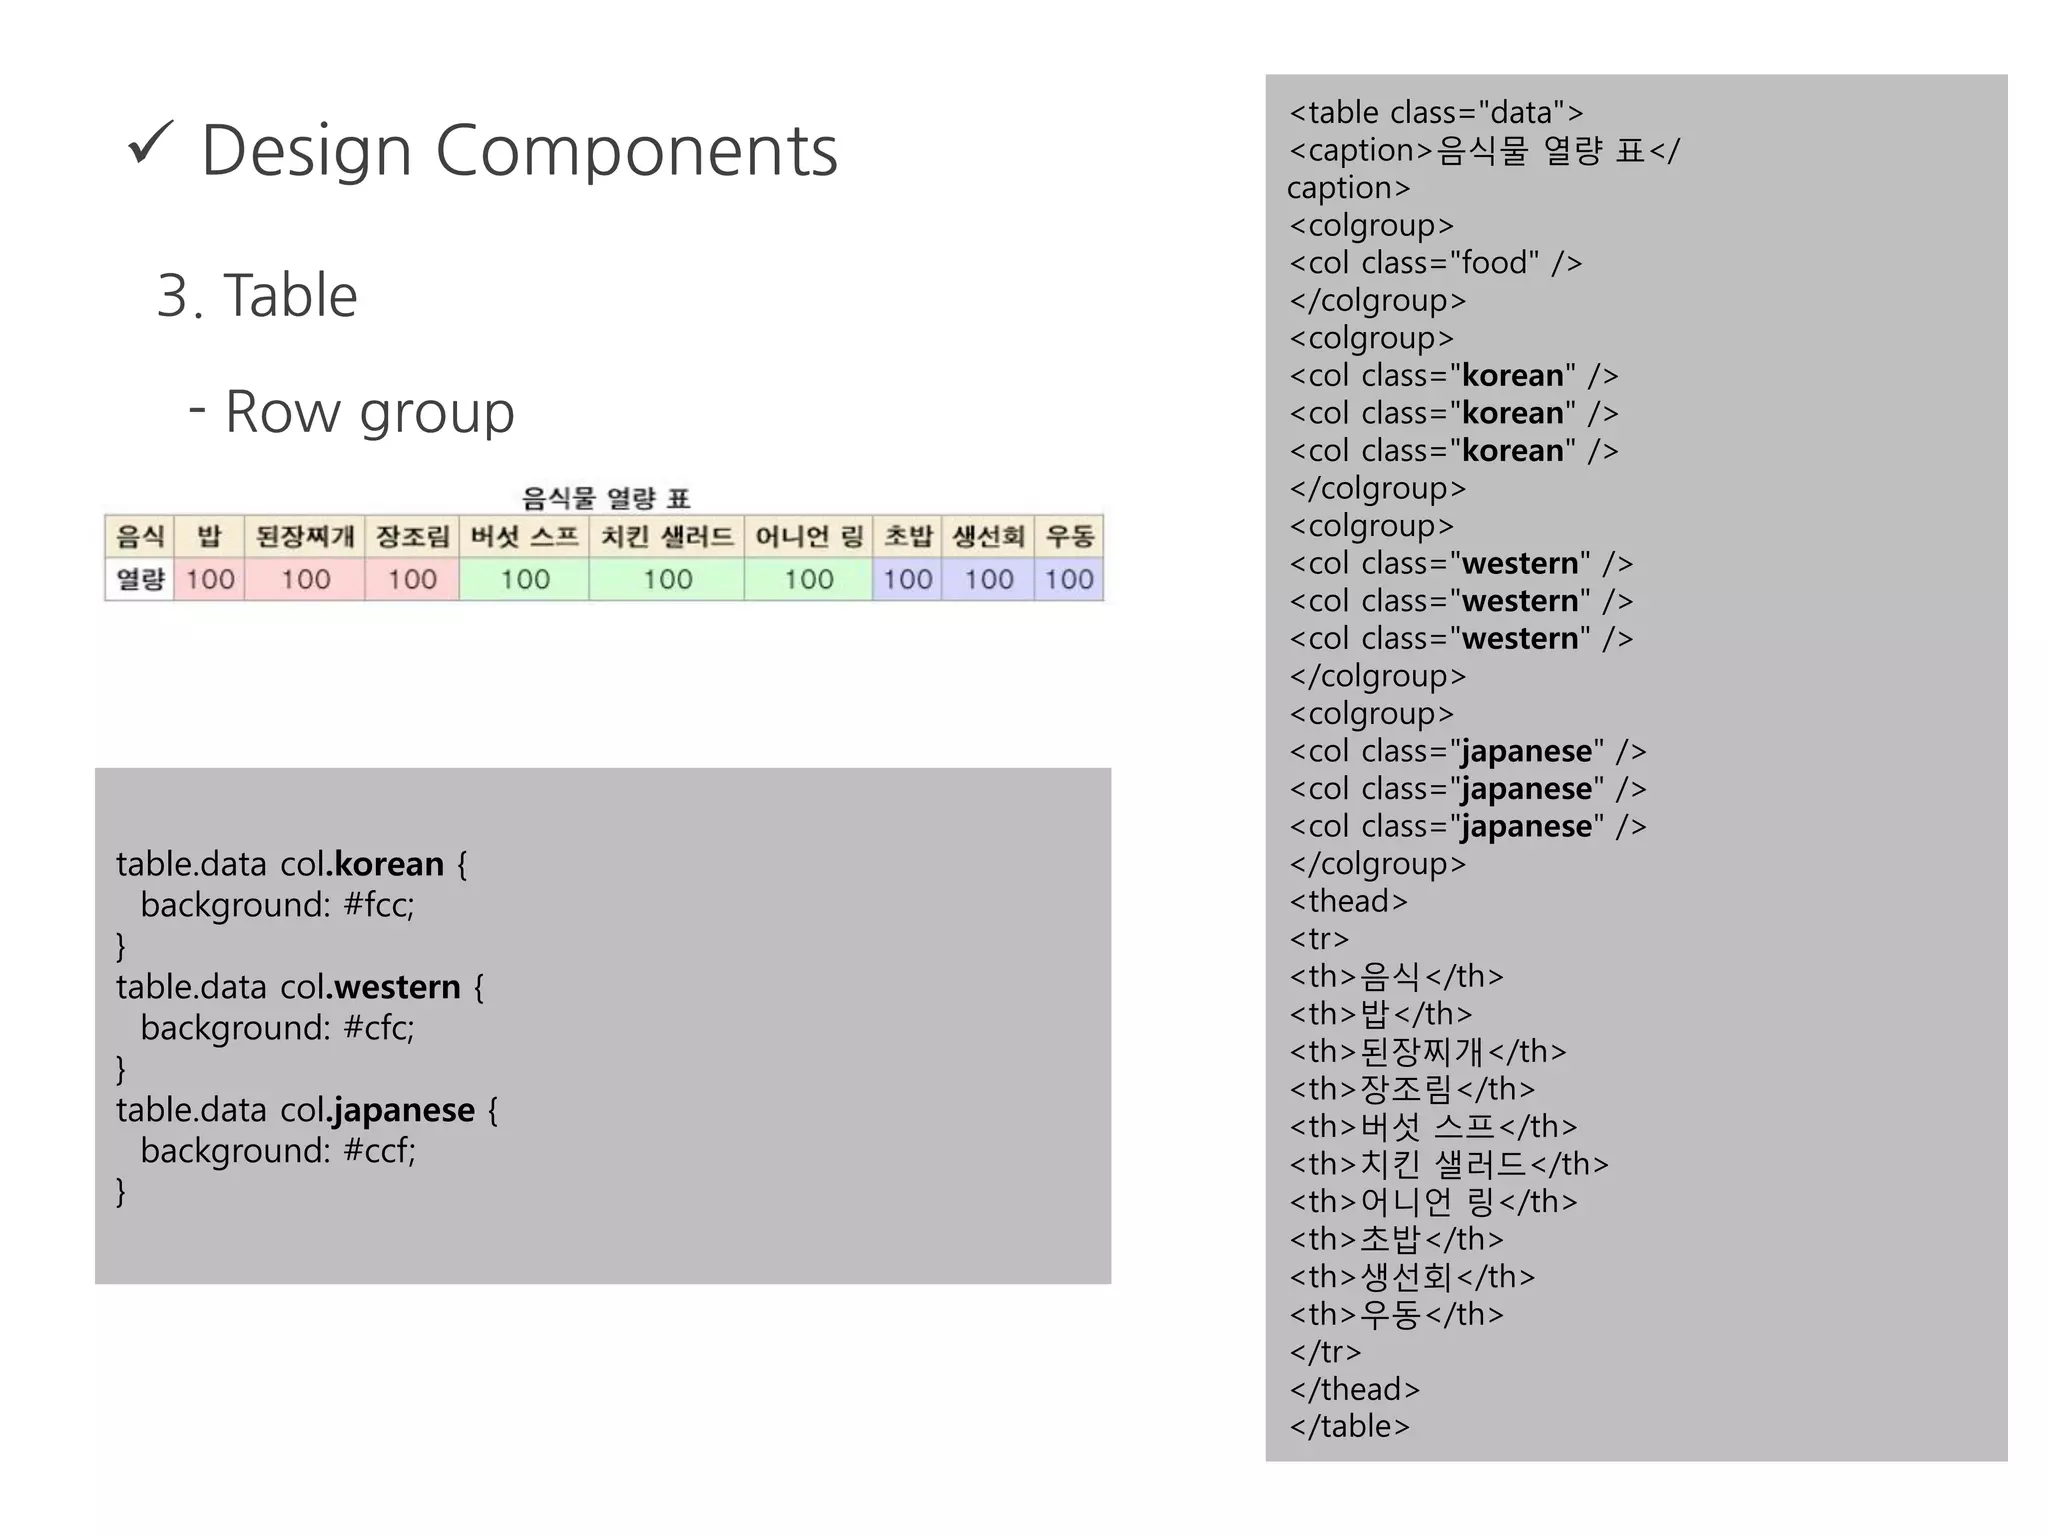
Design Components
3.Table
- table-layout: fixed
* table width calculation algorithm을 거치지 않고
테이블 레이아웃을 고정하여 랜더링 속도를 향상
* 테이블의 첫번째 행의 너비를 기준으로 각 셀의 너비를 고정
하여 디자인이 틀어지지 않게 한다.
* 첫번째 행에 colspan을 사용했을 경우 <col>을 이용하여 너비를
지정할 수 있다.
Design Components
5.Form
- Grouping
* <fieldset>, <legend>
폼 컨트롤 들을 서로 묶어주는 역할
하나의 <fieldset>에는 하나의 <legend>가 필요
브라우저 간의 랜더링 차이로 사용에 주의 필요
87.
Design Components
5.Form
- Label
* 레이블과 서식을 연결
* 명시적 연결
* 암시적 연결
<label for="user-id">아이디</label>
<input type="text" id="user-id" />
<label>
아이디
<input type="text" />
</label>
88.
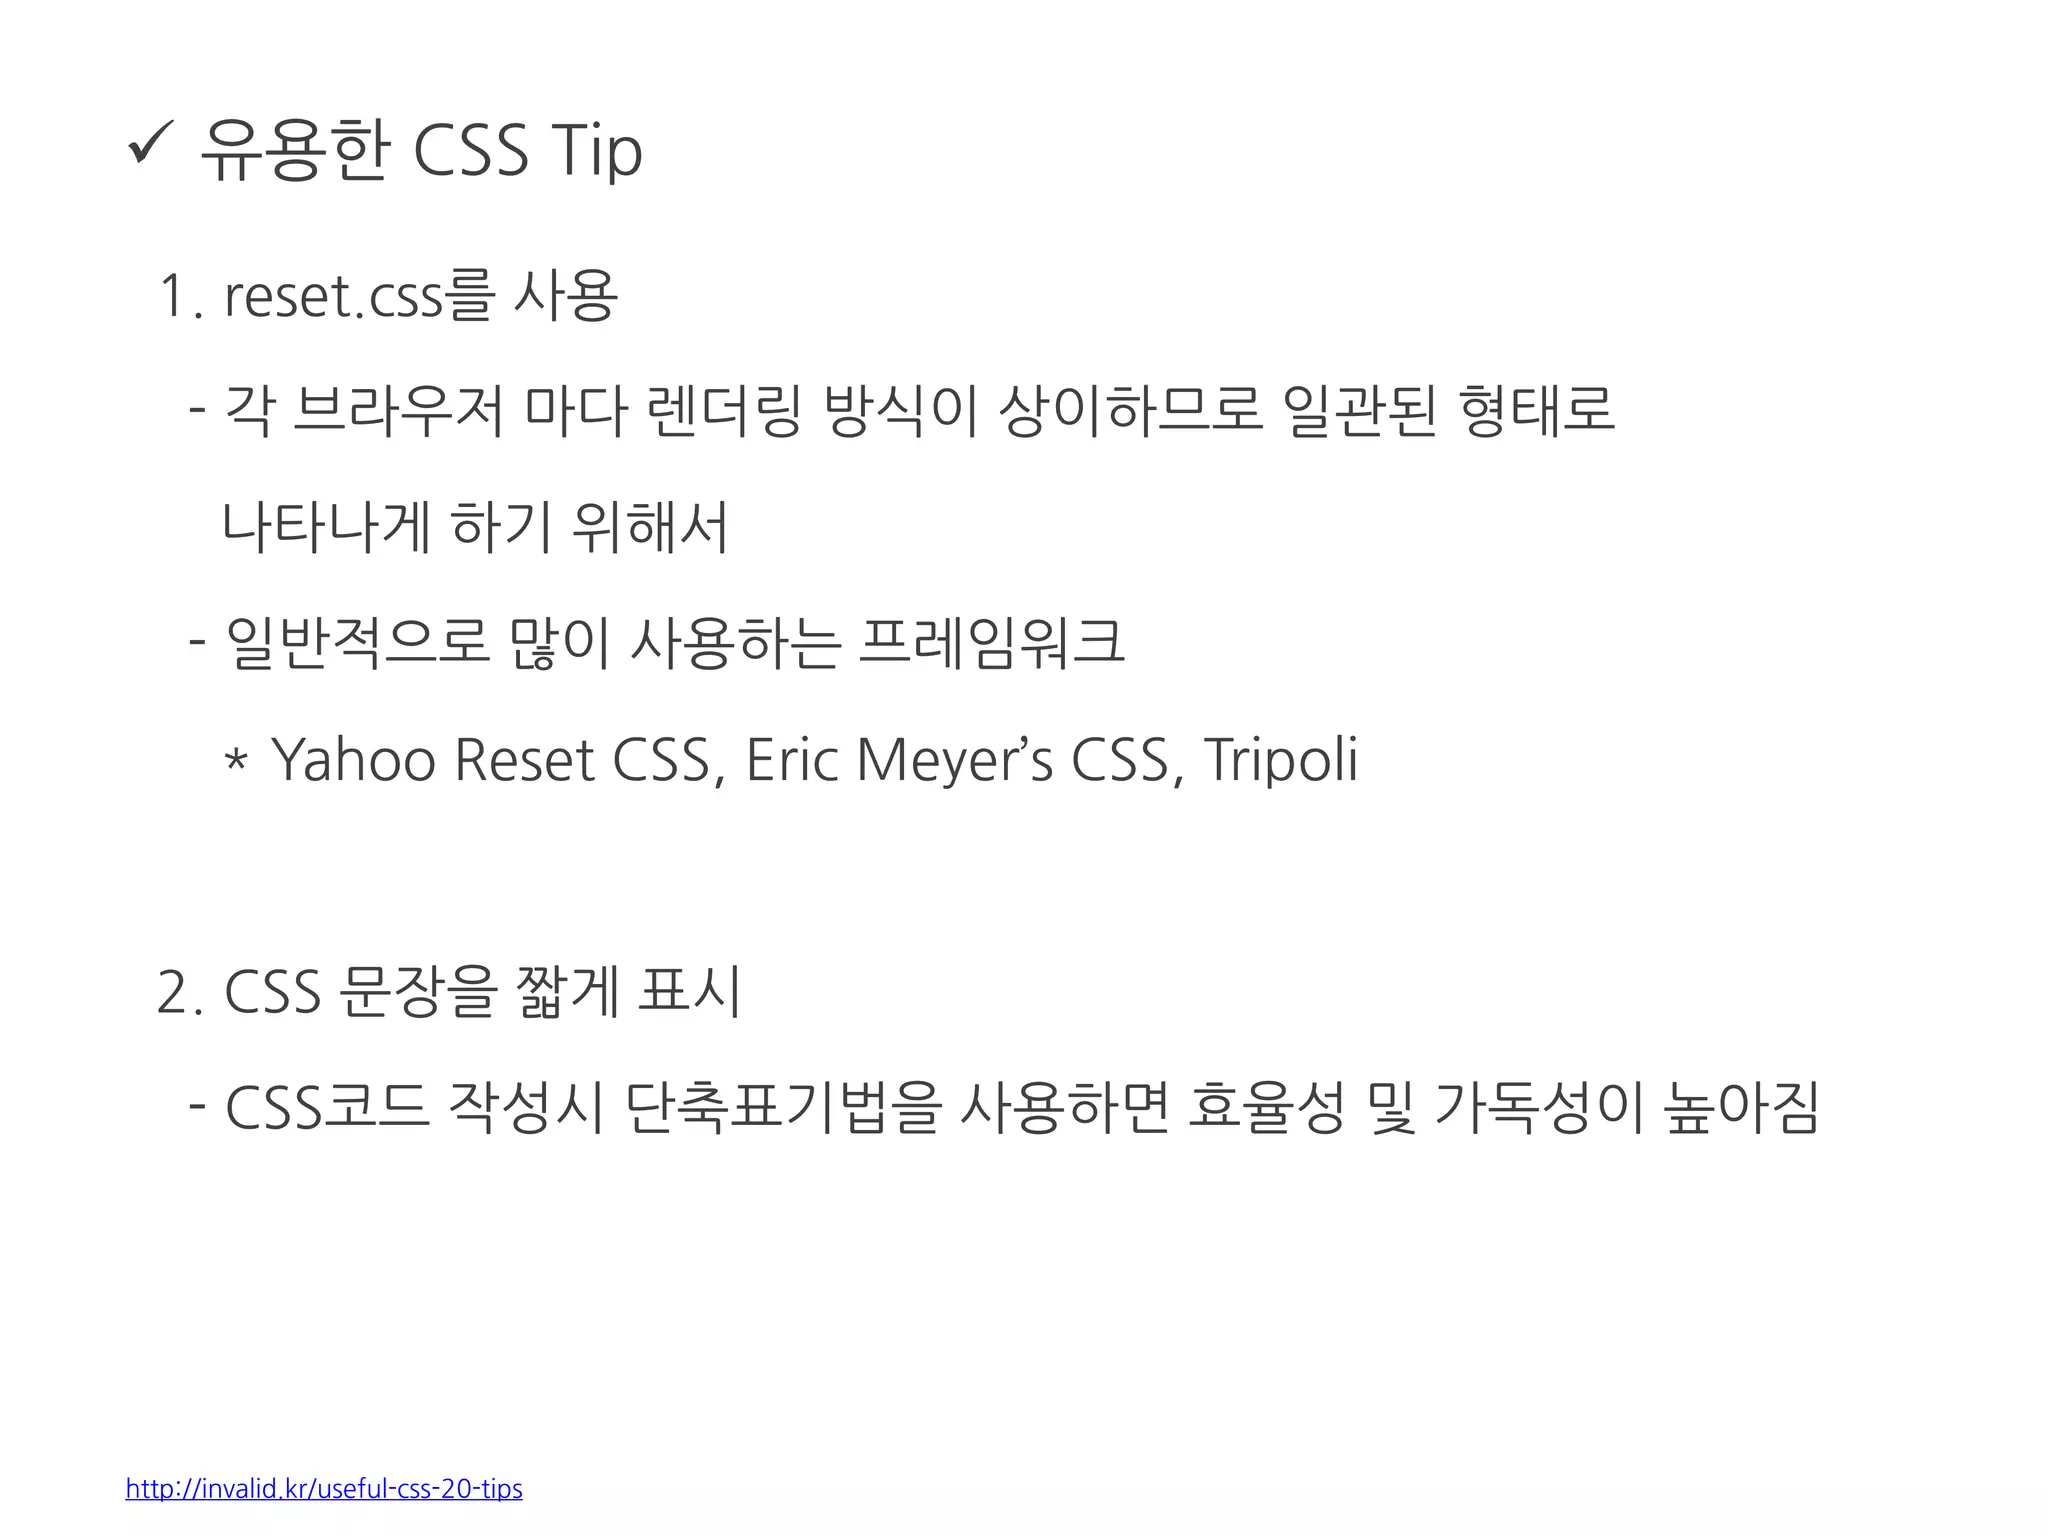
유용한 CSSTip
1. reset.css를 사용
- 각 브라우저 마다 렌더링 방식이 상이하므로 일관된 형태로
나타나게 하기 위해서
- 일반적으로 많이 사용하는 프레임워크
* Yahoo Reset CSS, Eric Meyer’s CSS, Tripoli
2. CSS 문장을 짧게 표시
- CSS코드 작성시 단축표기법을 사용하면 효율성 및 가독성이 높아짐
http://invalid.kr/useful-css-20-tips
89.
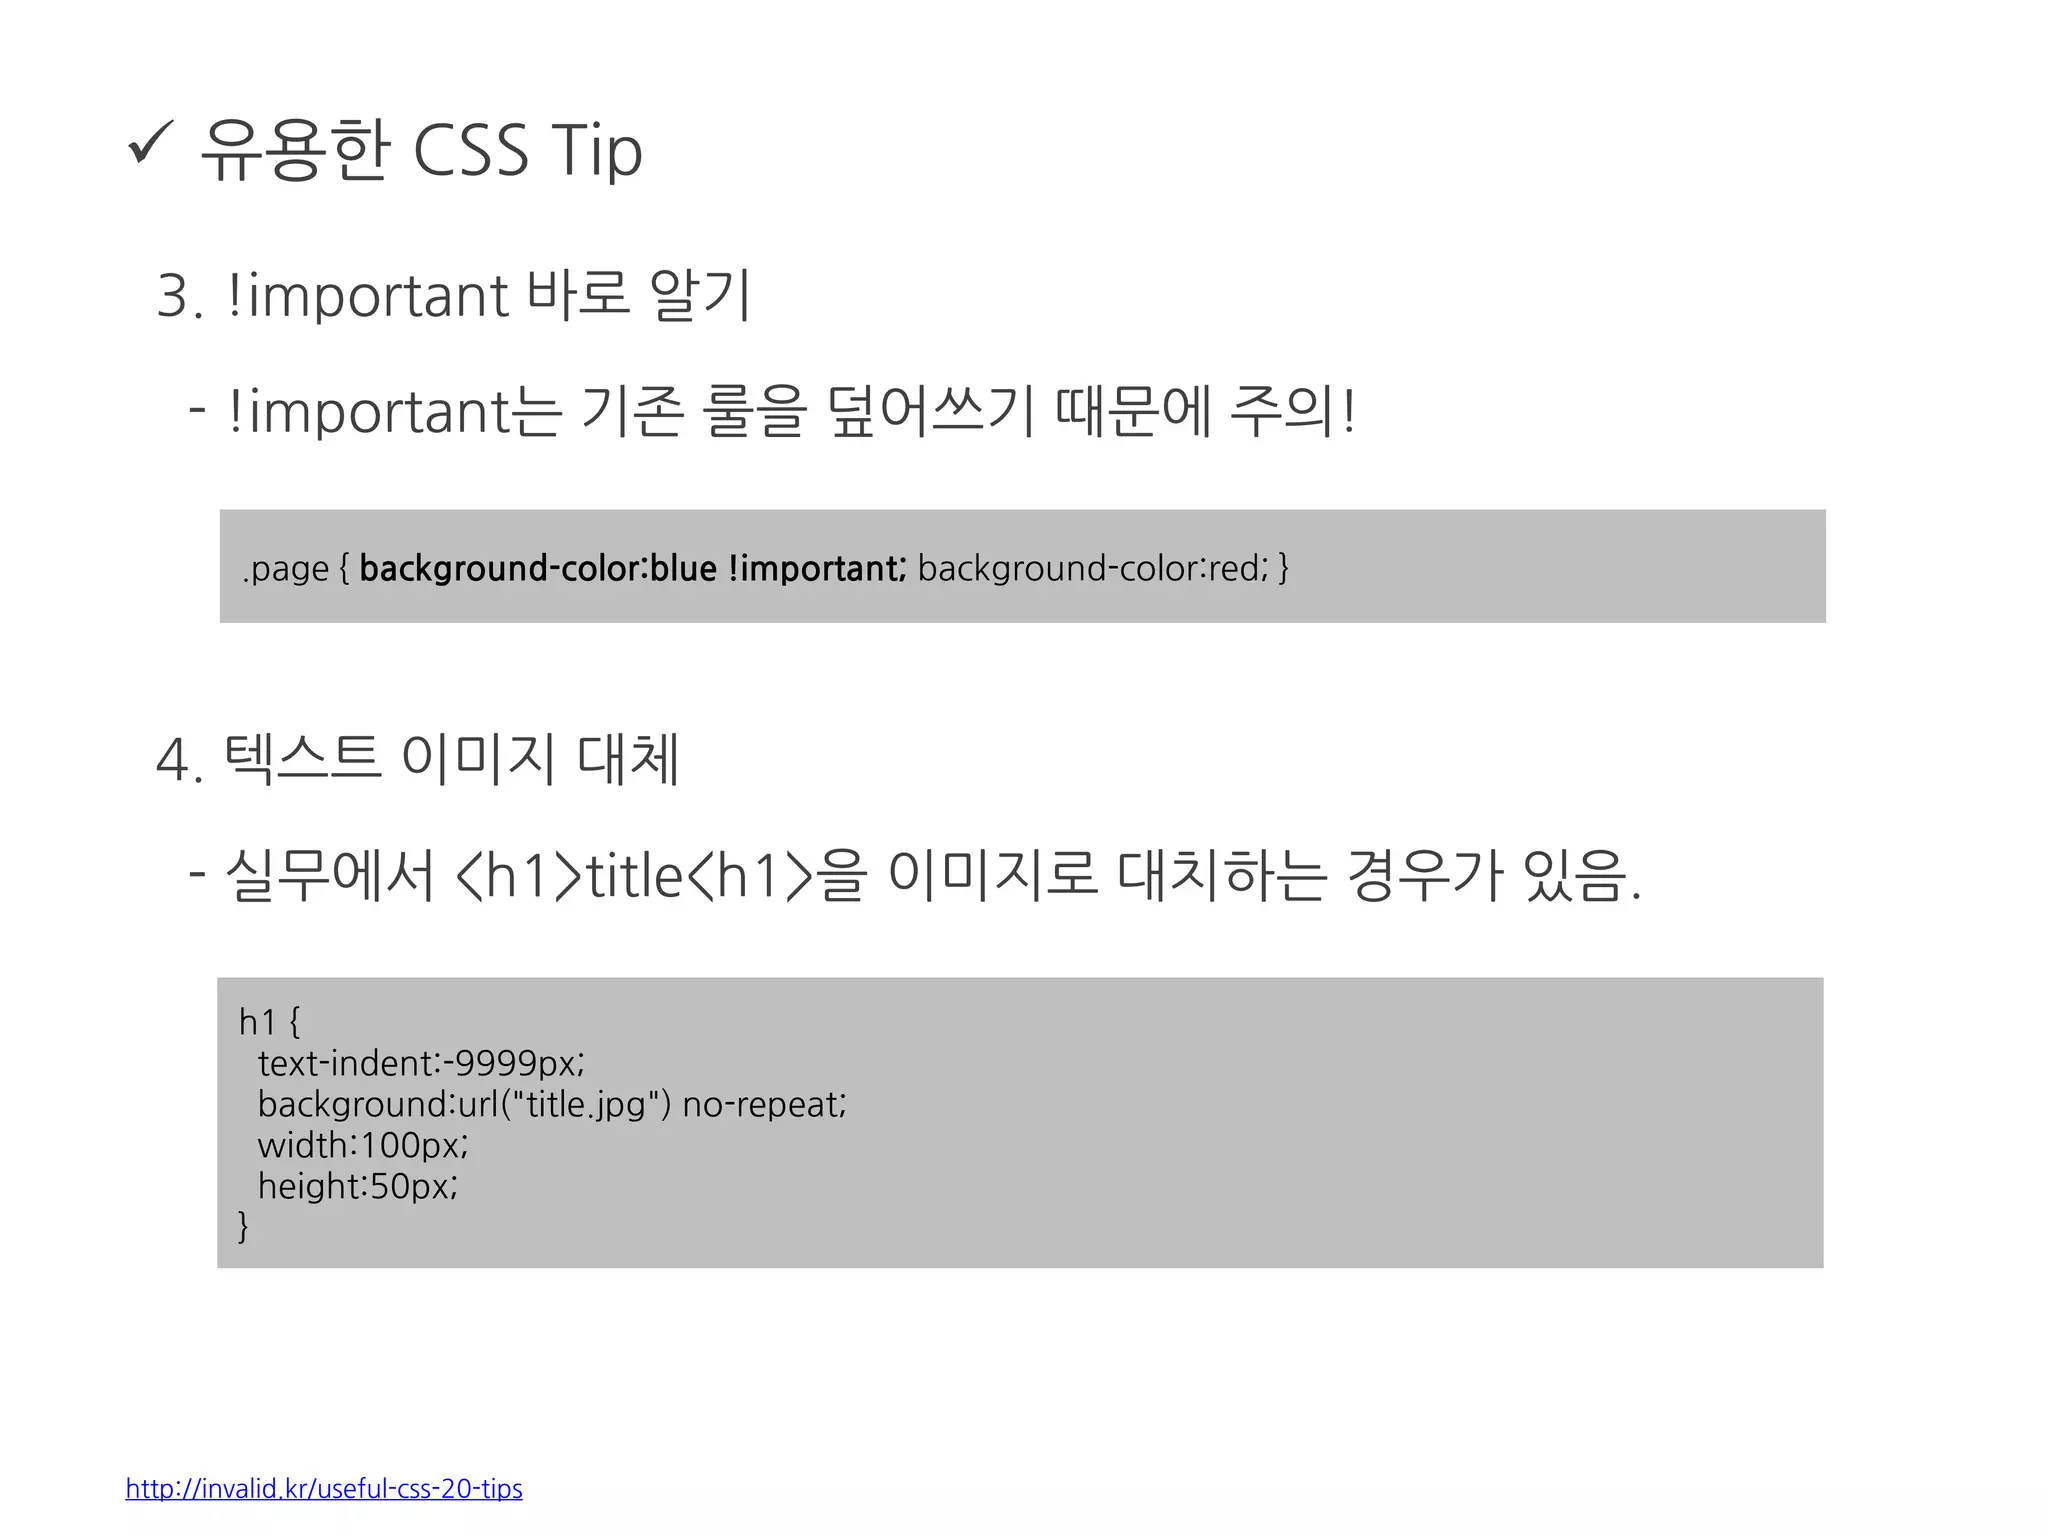
유용한 CSSTip
3. !important 바로 알기
- !important는 기존 룰을 덮어쓰기 때문에 주의!
4. 텍스트 이미지 대체
- 실무에서 <h1>title<h1>을 이미지로 대치하는 경우가 있음.
http://invalid.kr/useful-css-20-tips
.page { background-color:blue !important; background-color:red; }
h1 {
text-indent:-9999px;
background:url("title.jpg") no-repeat;
width:100px;
height:50px;
}
90.
유용한 CSSTip
5. CSS @import vs <link>
- @import : CSS 문서에서 다른 CSS문서를 부르는 방법
- <link> : HTML문서 내에서 CSS 문서를 부르는 방법
- IE6~7브라우저에서는 @import명령을 사용하면 사용자의 체감 성능을
떨어뜨림.
http://invalid.kr/useful-css-20-tips
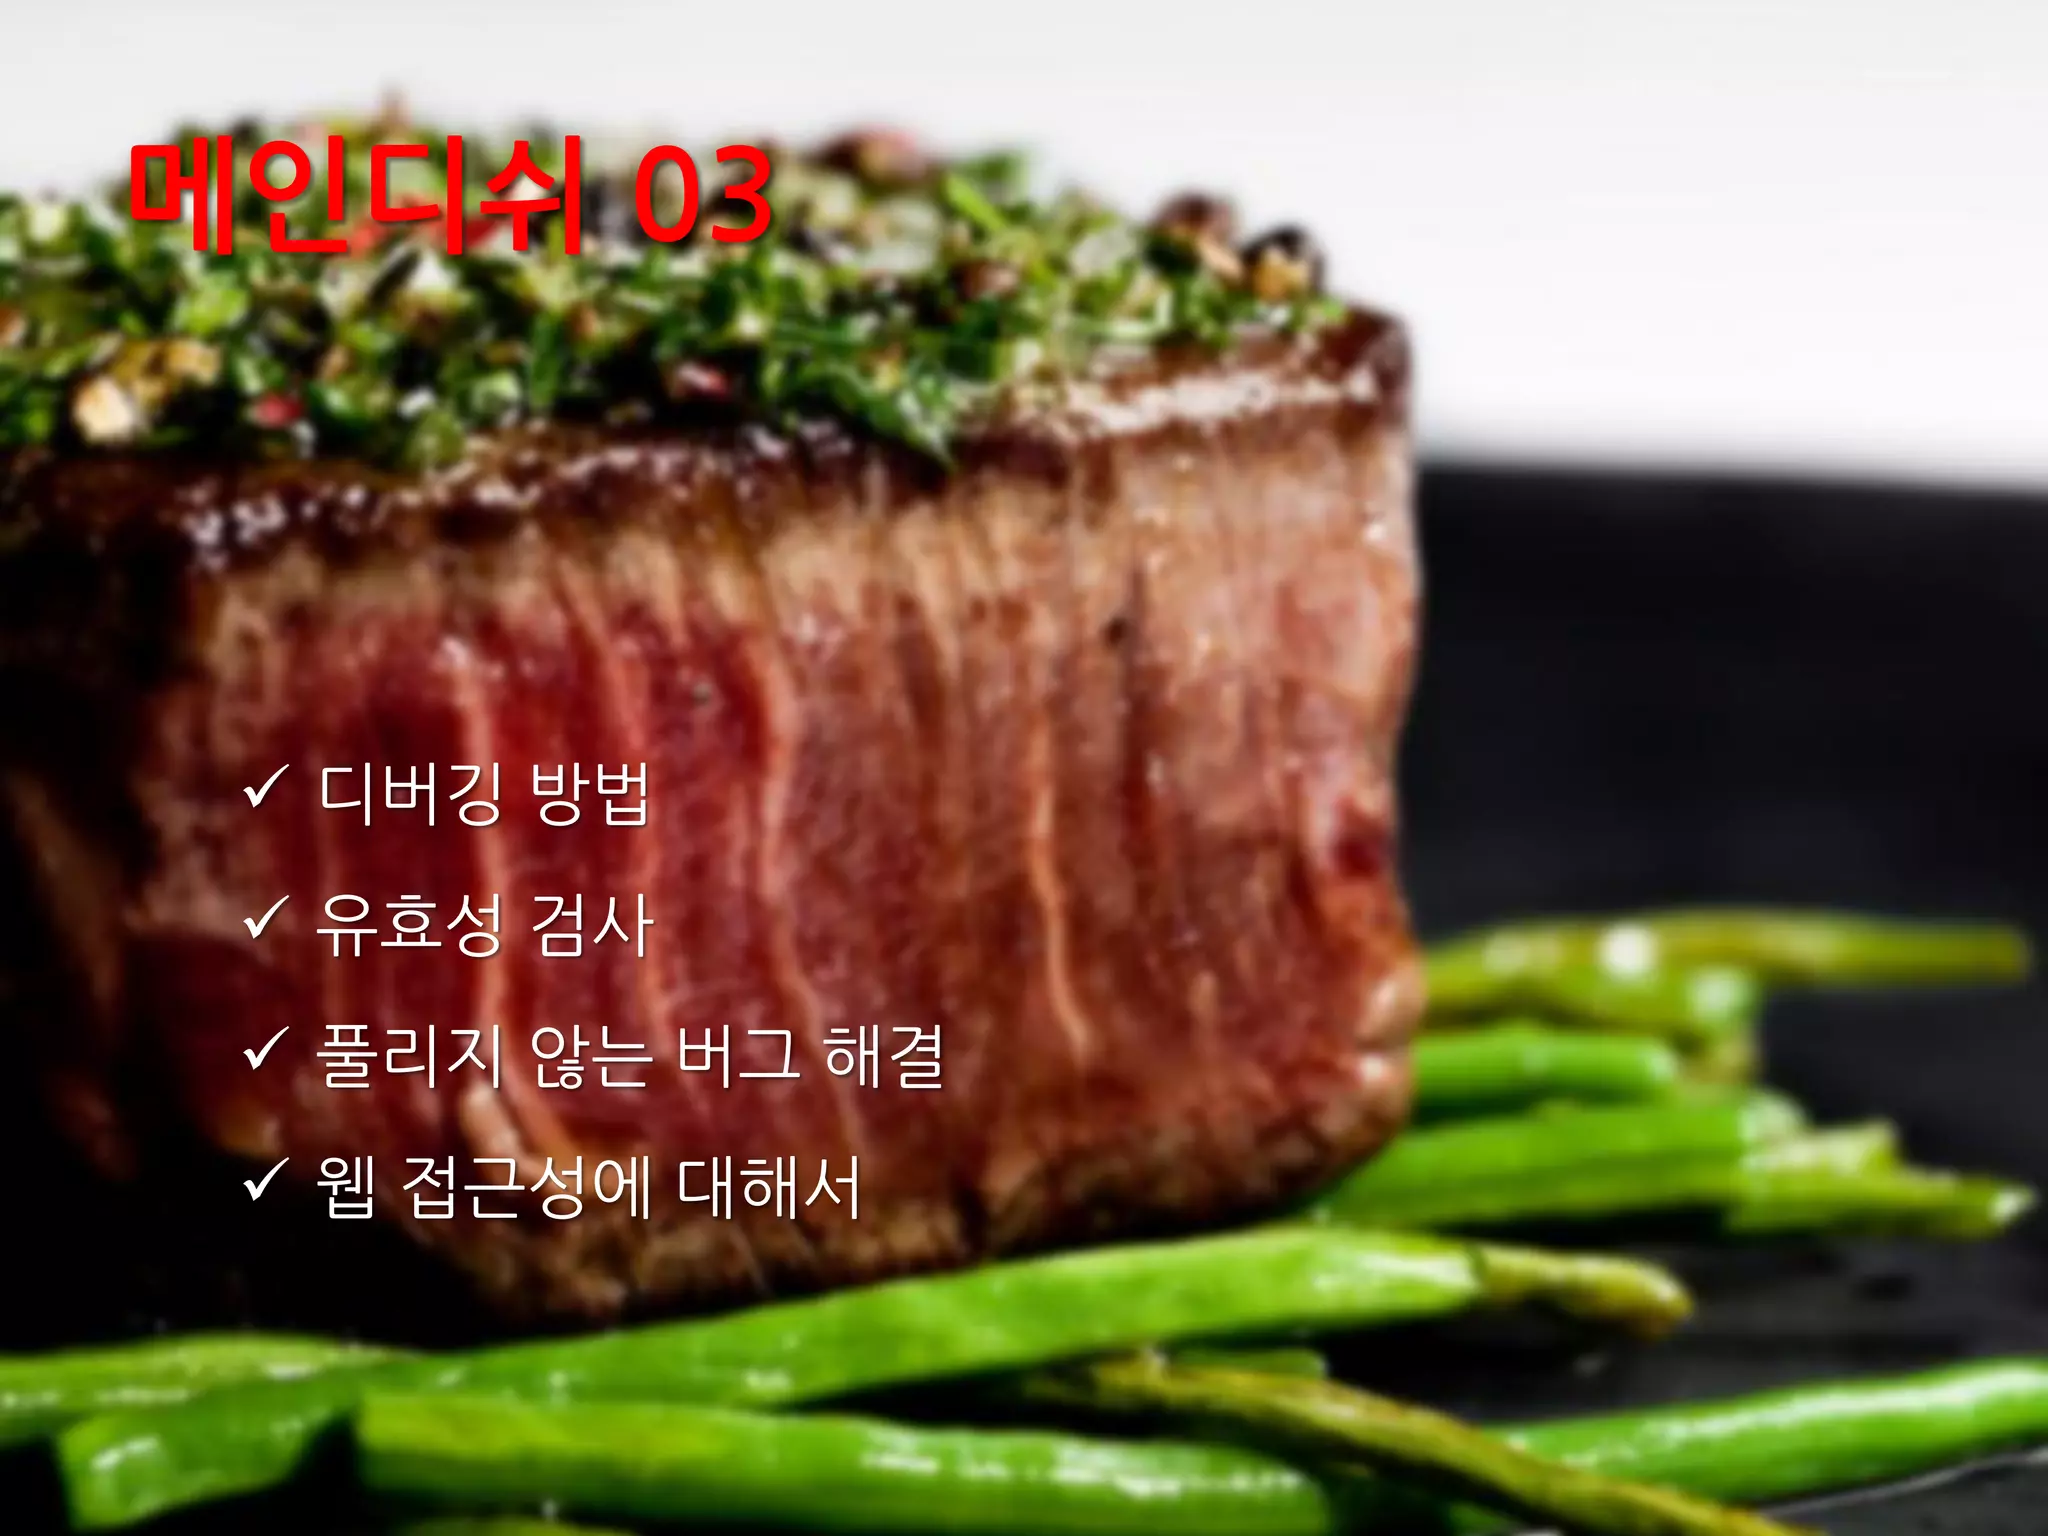
메인디쉬 03
디버깅방법
유효성 검사
풀리지 않는 버그 해결
웹 접근성에 대해서
93.
디버깅 방법
1.Browser compatibility
- 브라우저 버그
표준을 100% 구현한 브라우저는 없다.
표준에 모든 상황이 기술되어 있지 않다.
브라우저 제작사들의 해석에 차이가 있다.
- 비표준 코드 사용
특정 브라우저에서만 작동되는 코드를 사용한다.
브라우저 호환성을 확보하기 위해서 validation은 매우 중요하다.
94.
디버깅 방법
1.Browser compatibility
- 버그가 발생하는 부분을 최소화 한다.
코드 최소화(minimize)를 통해 버그 범위를 좁힌다.
- 분석툴을 통해 원인을 파악한다.
분석툴에서 브라우저별로 해석된 코드를 확인 할 수 있다.
- 버그를 회피하고 다른 방법으로 구현한다.
CSS 핵(hack) 사용을 최소화 한다.
95.
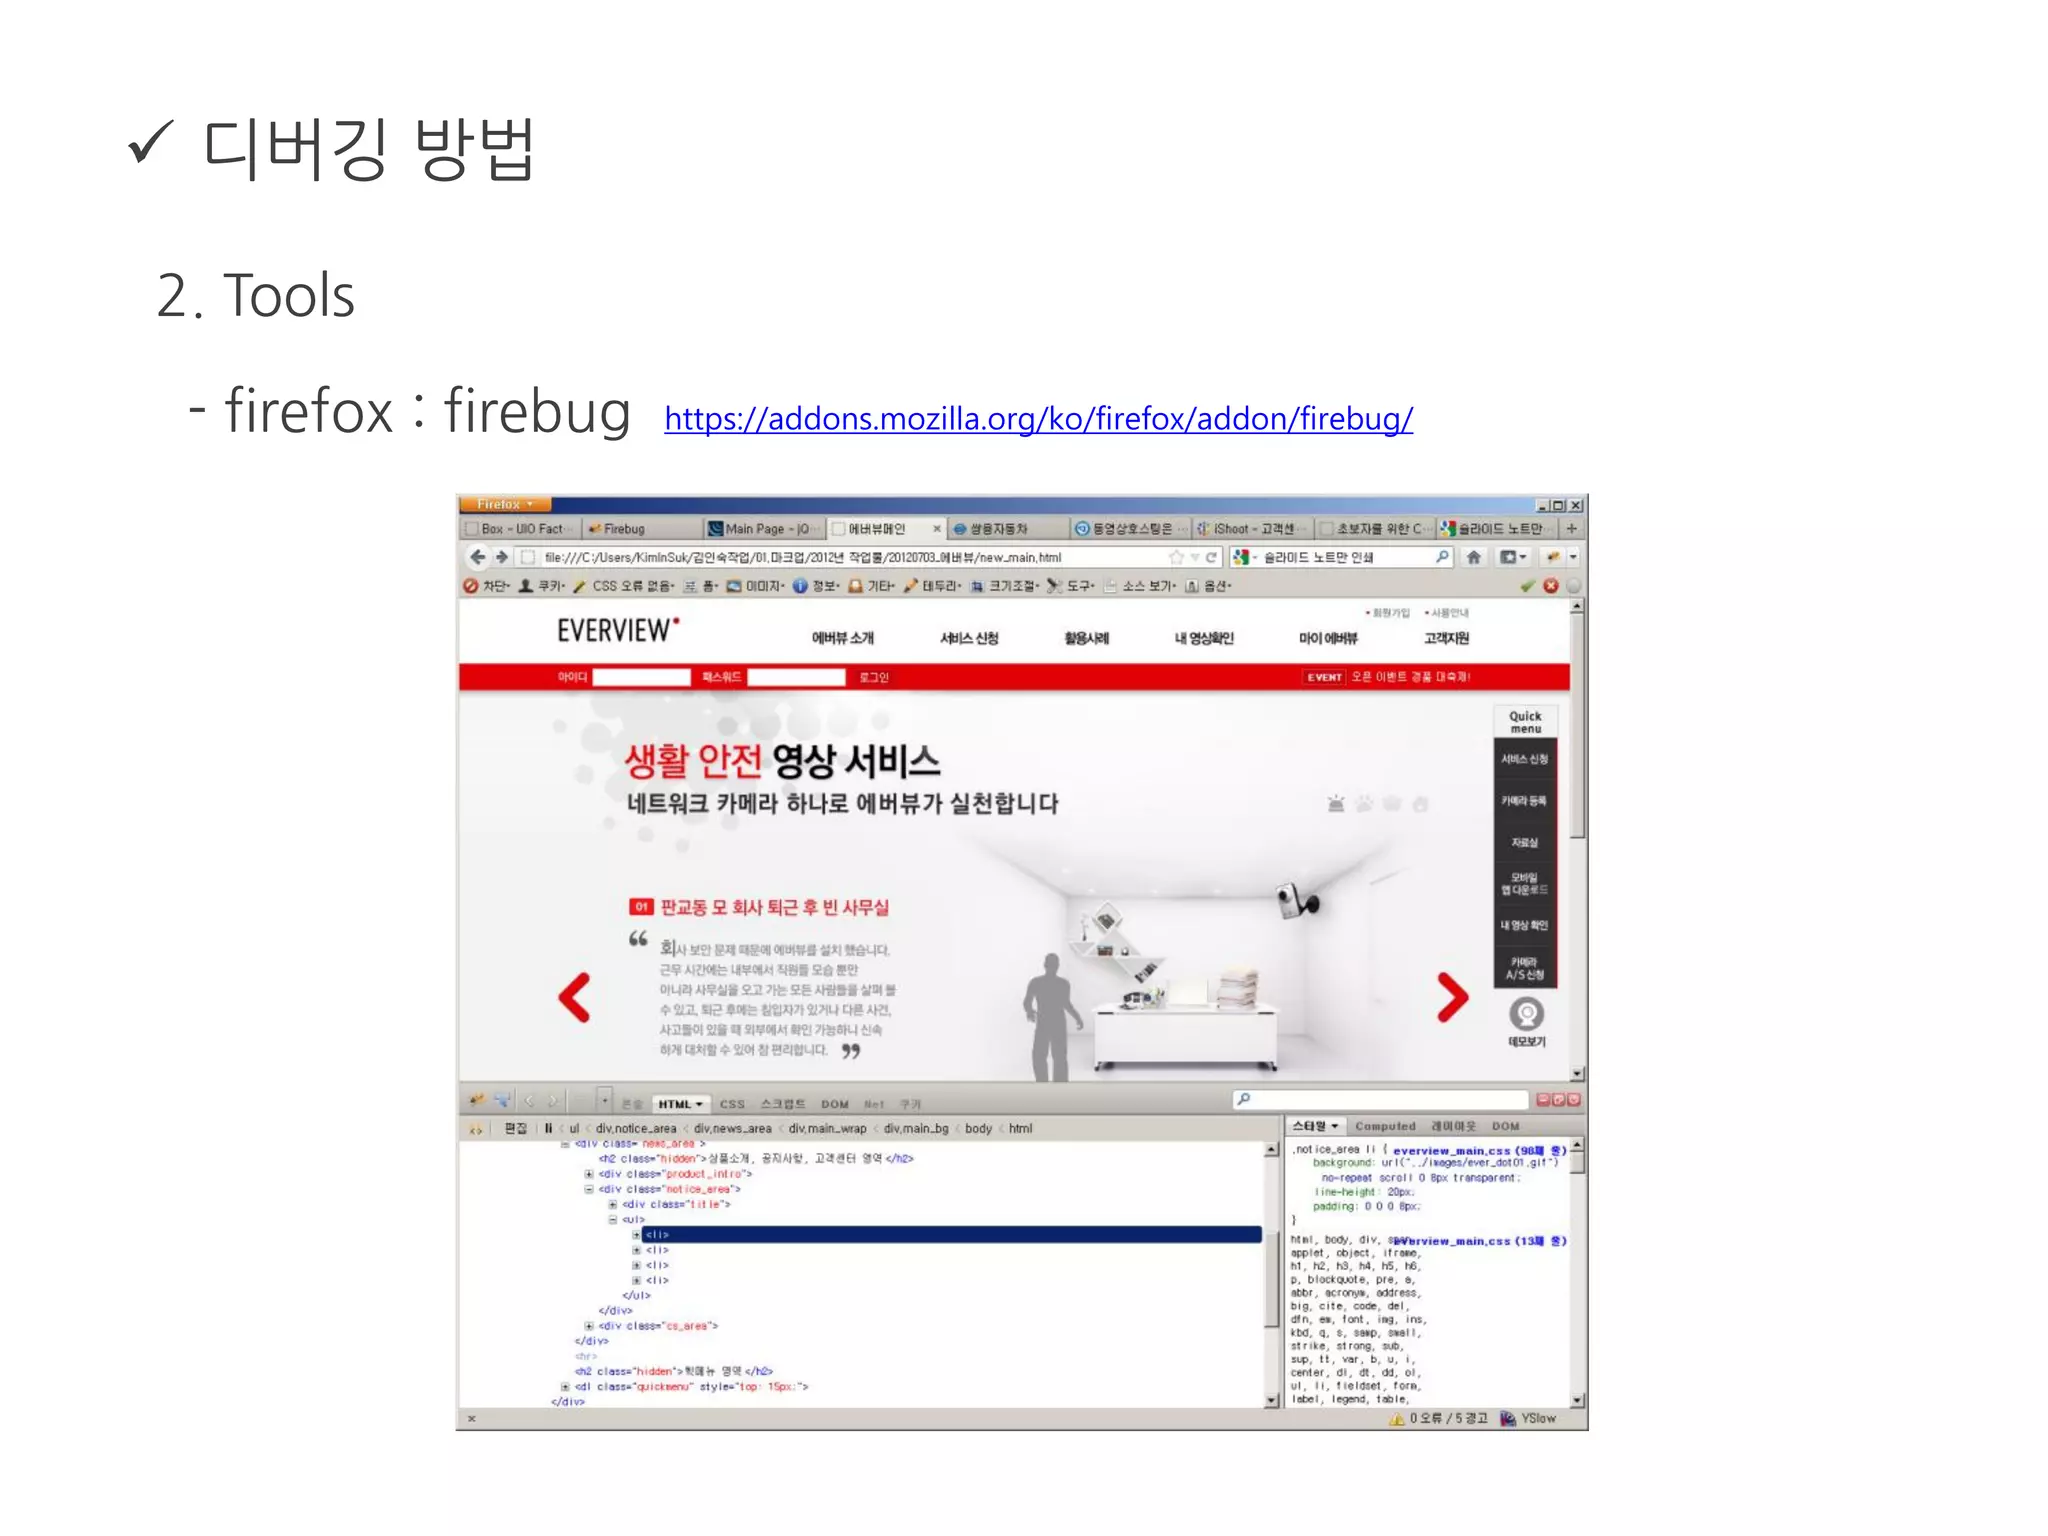
디버깅 방법
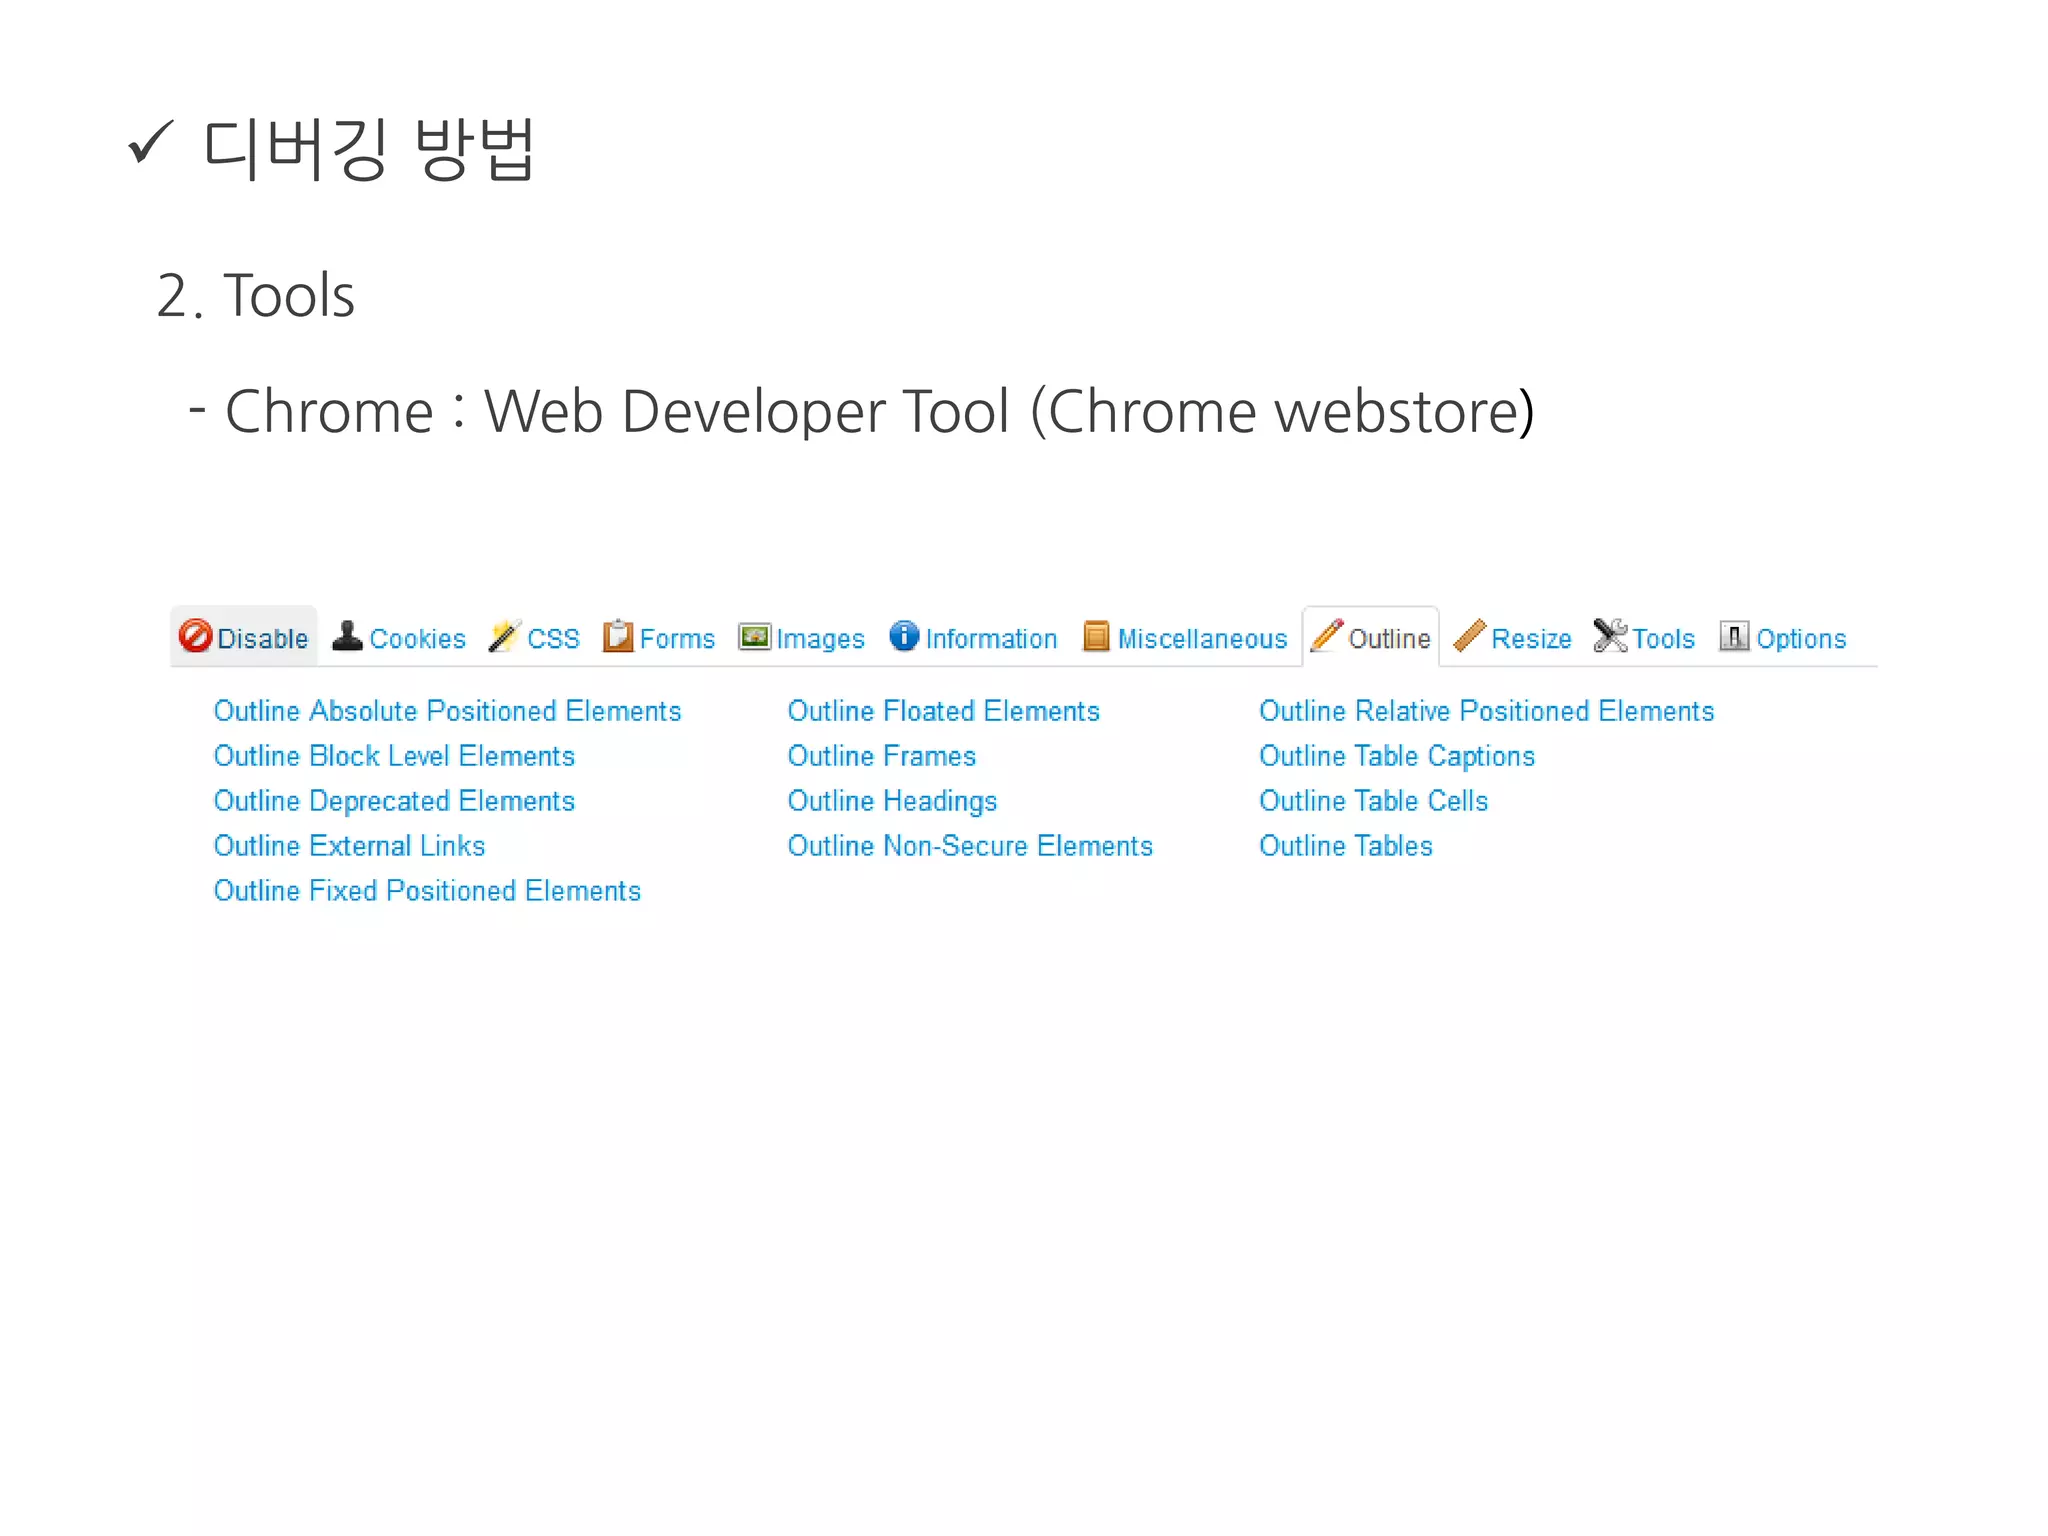
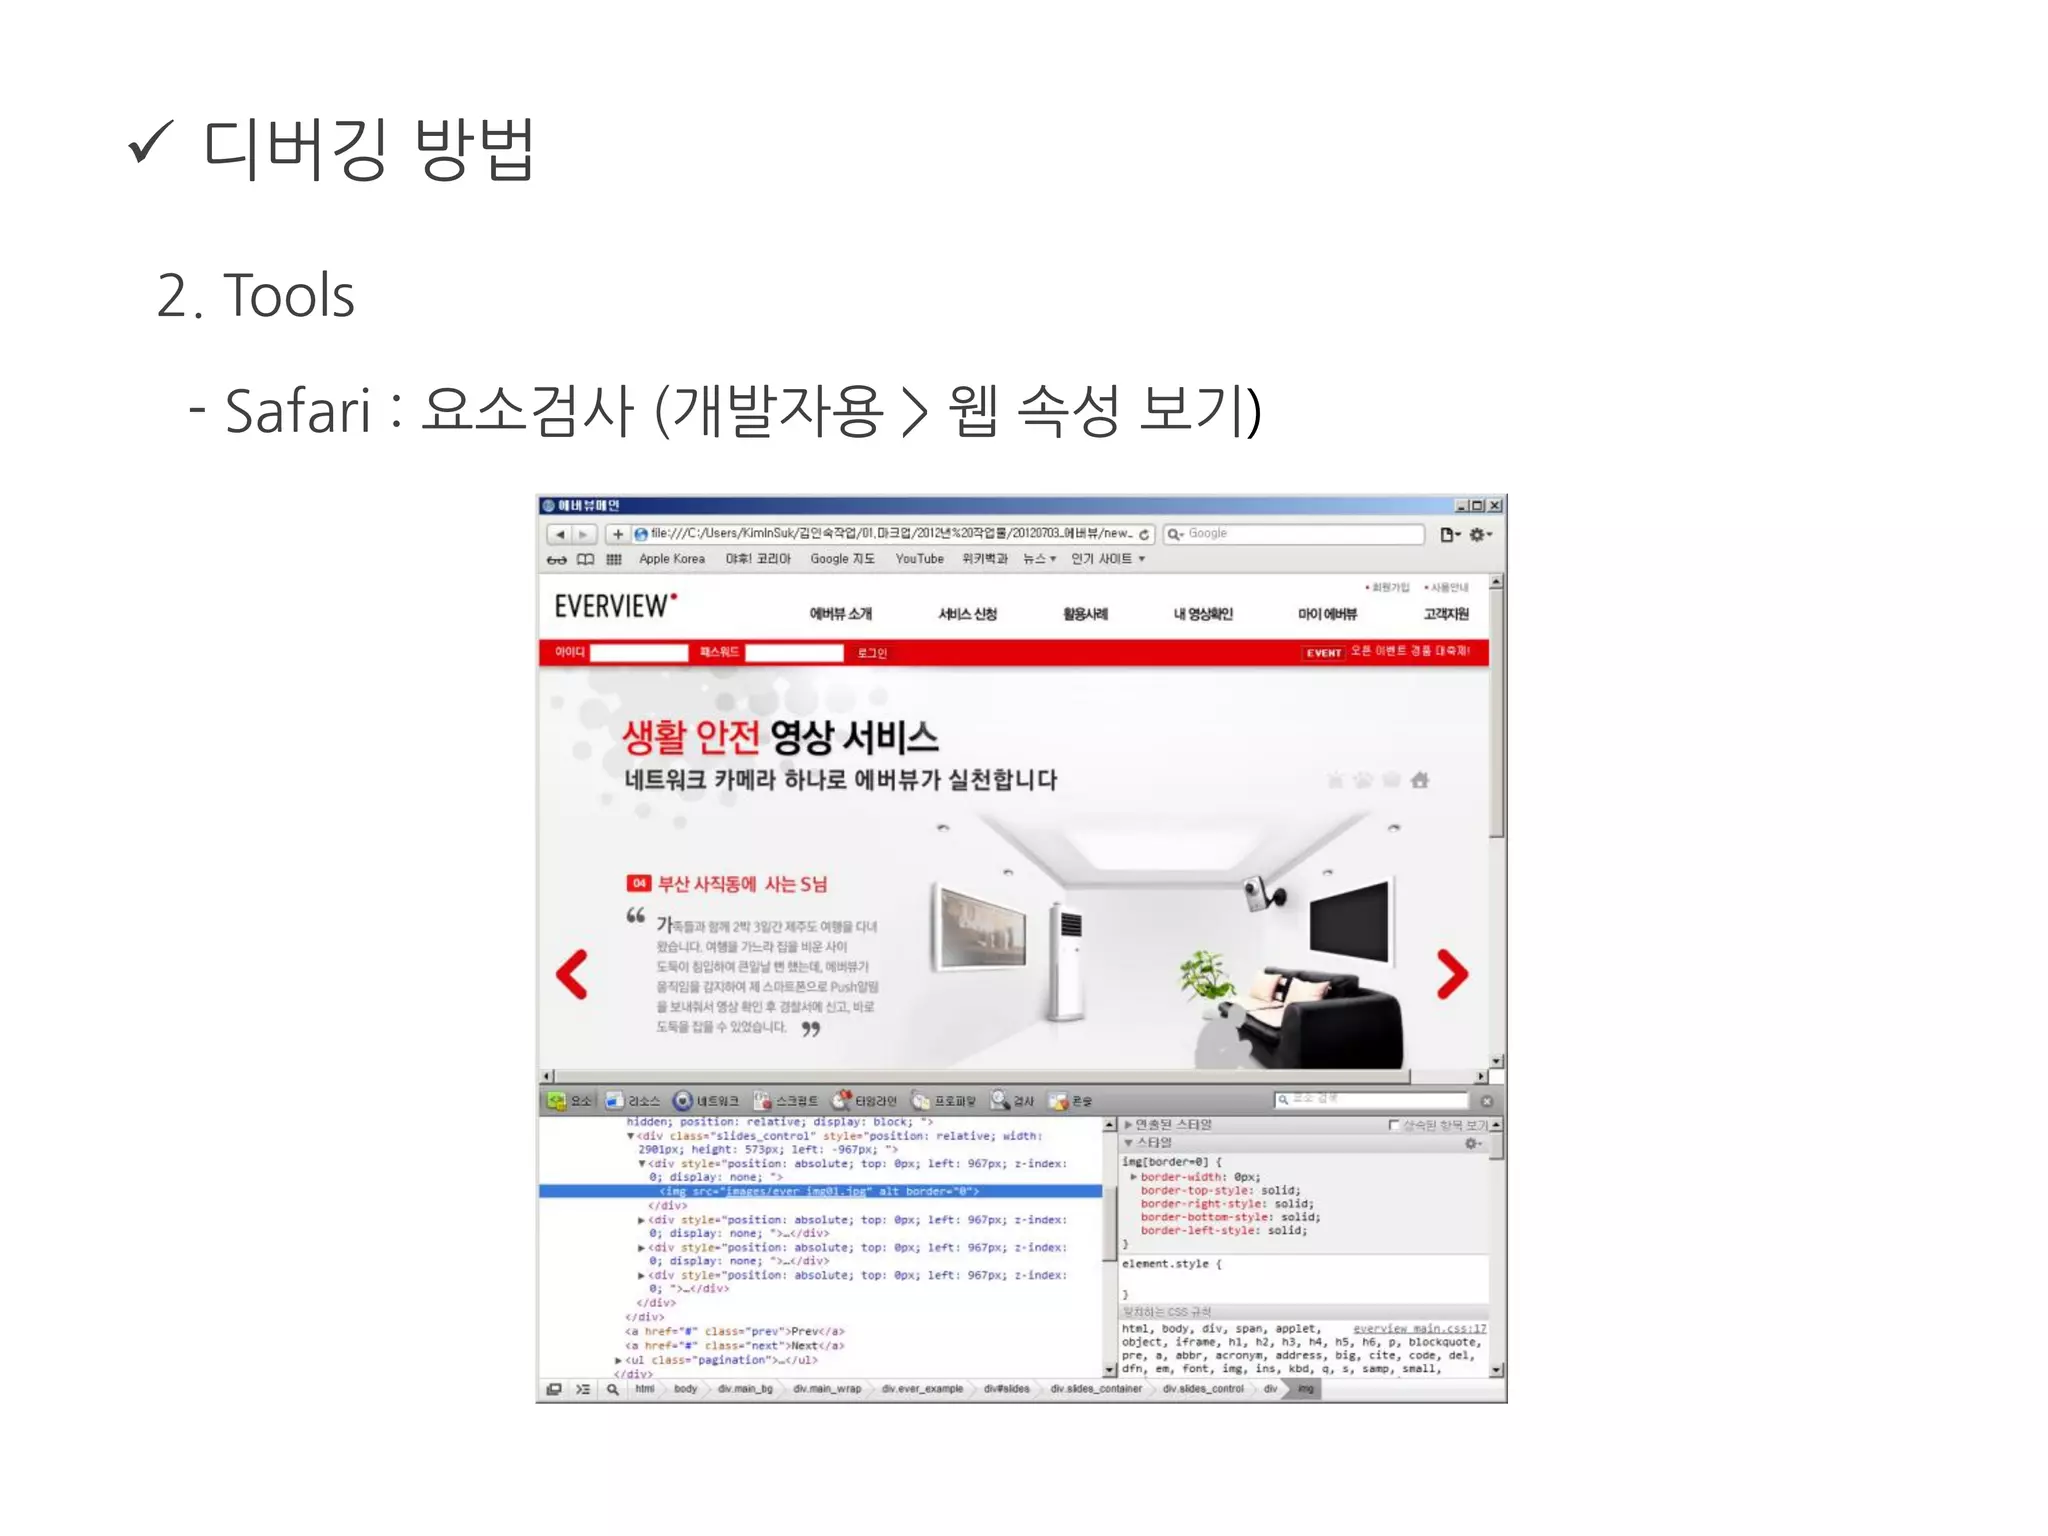
2.Tools
- firefox : firebug https://addons.mozilla.org/ko/firefox/addon/firebug/
96.
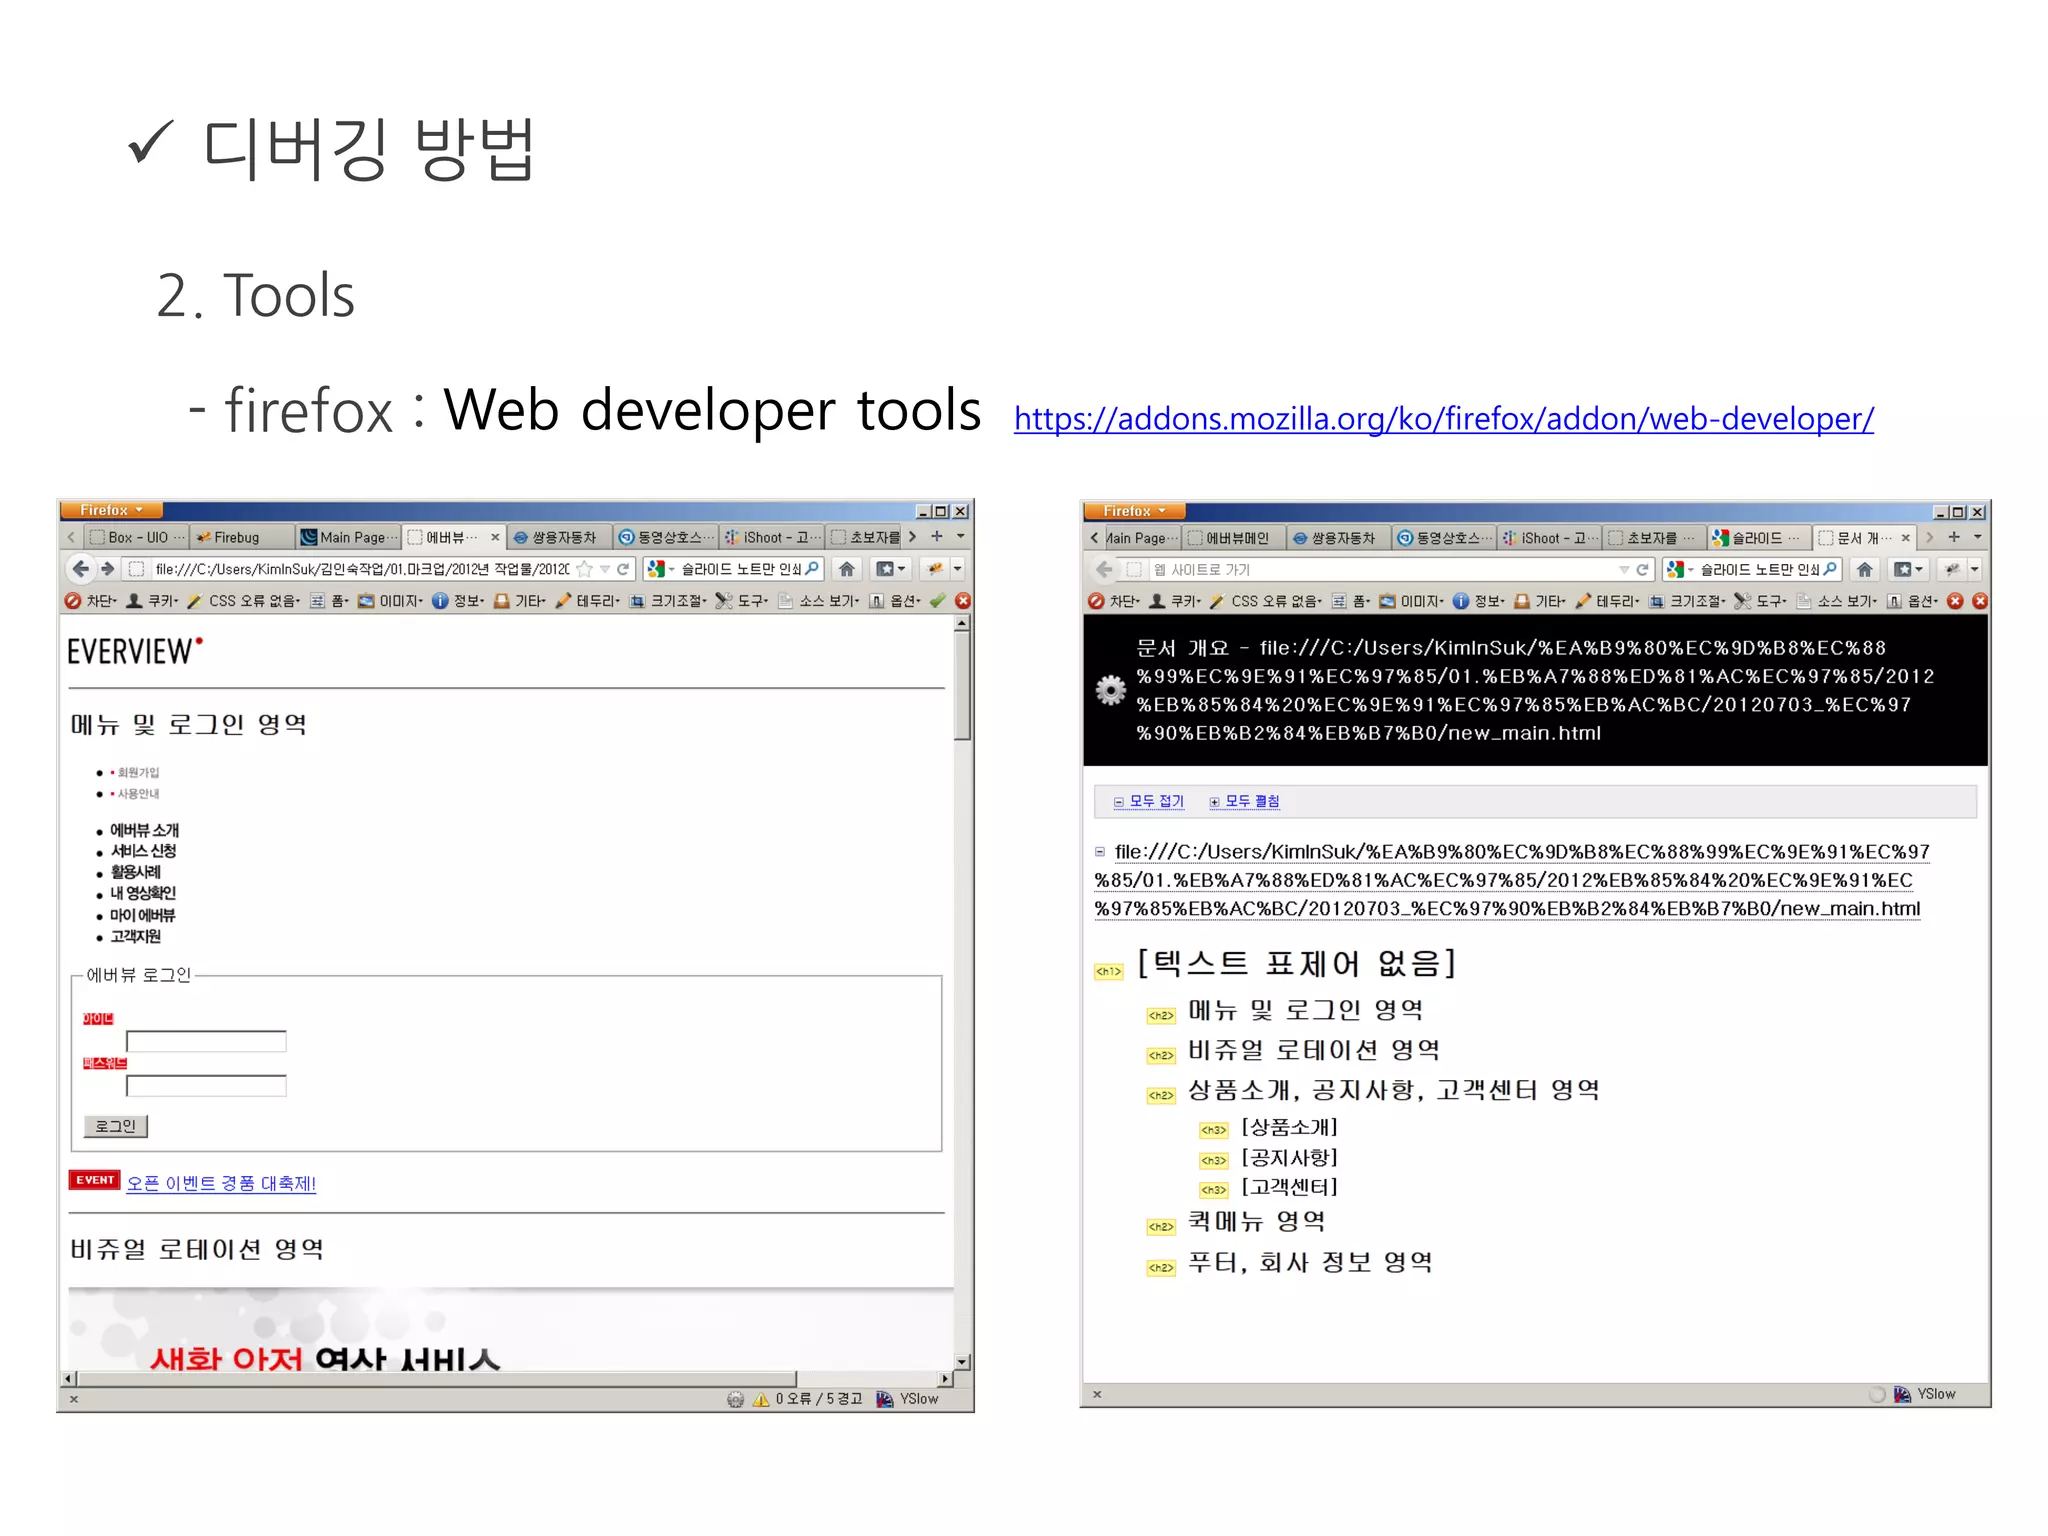
디버깅 방법
2.Tools
- firefox : Web developer tools https://addons.mozilla.org/ko/firefox/addon/web-developer/
97.
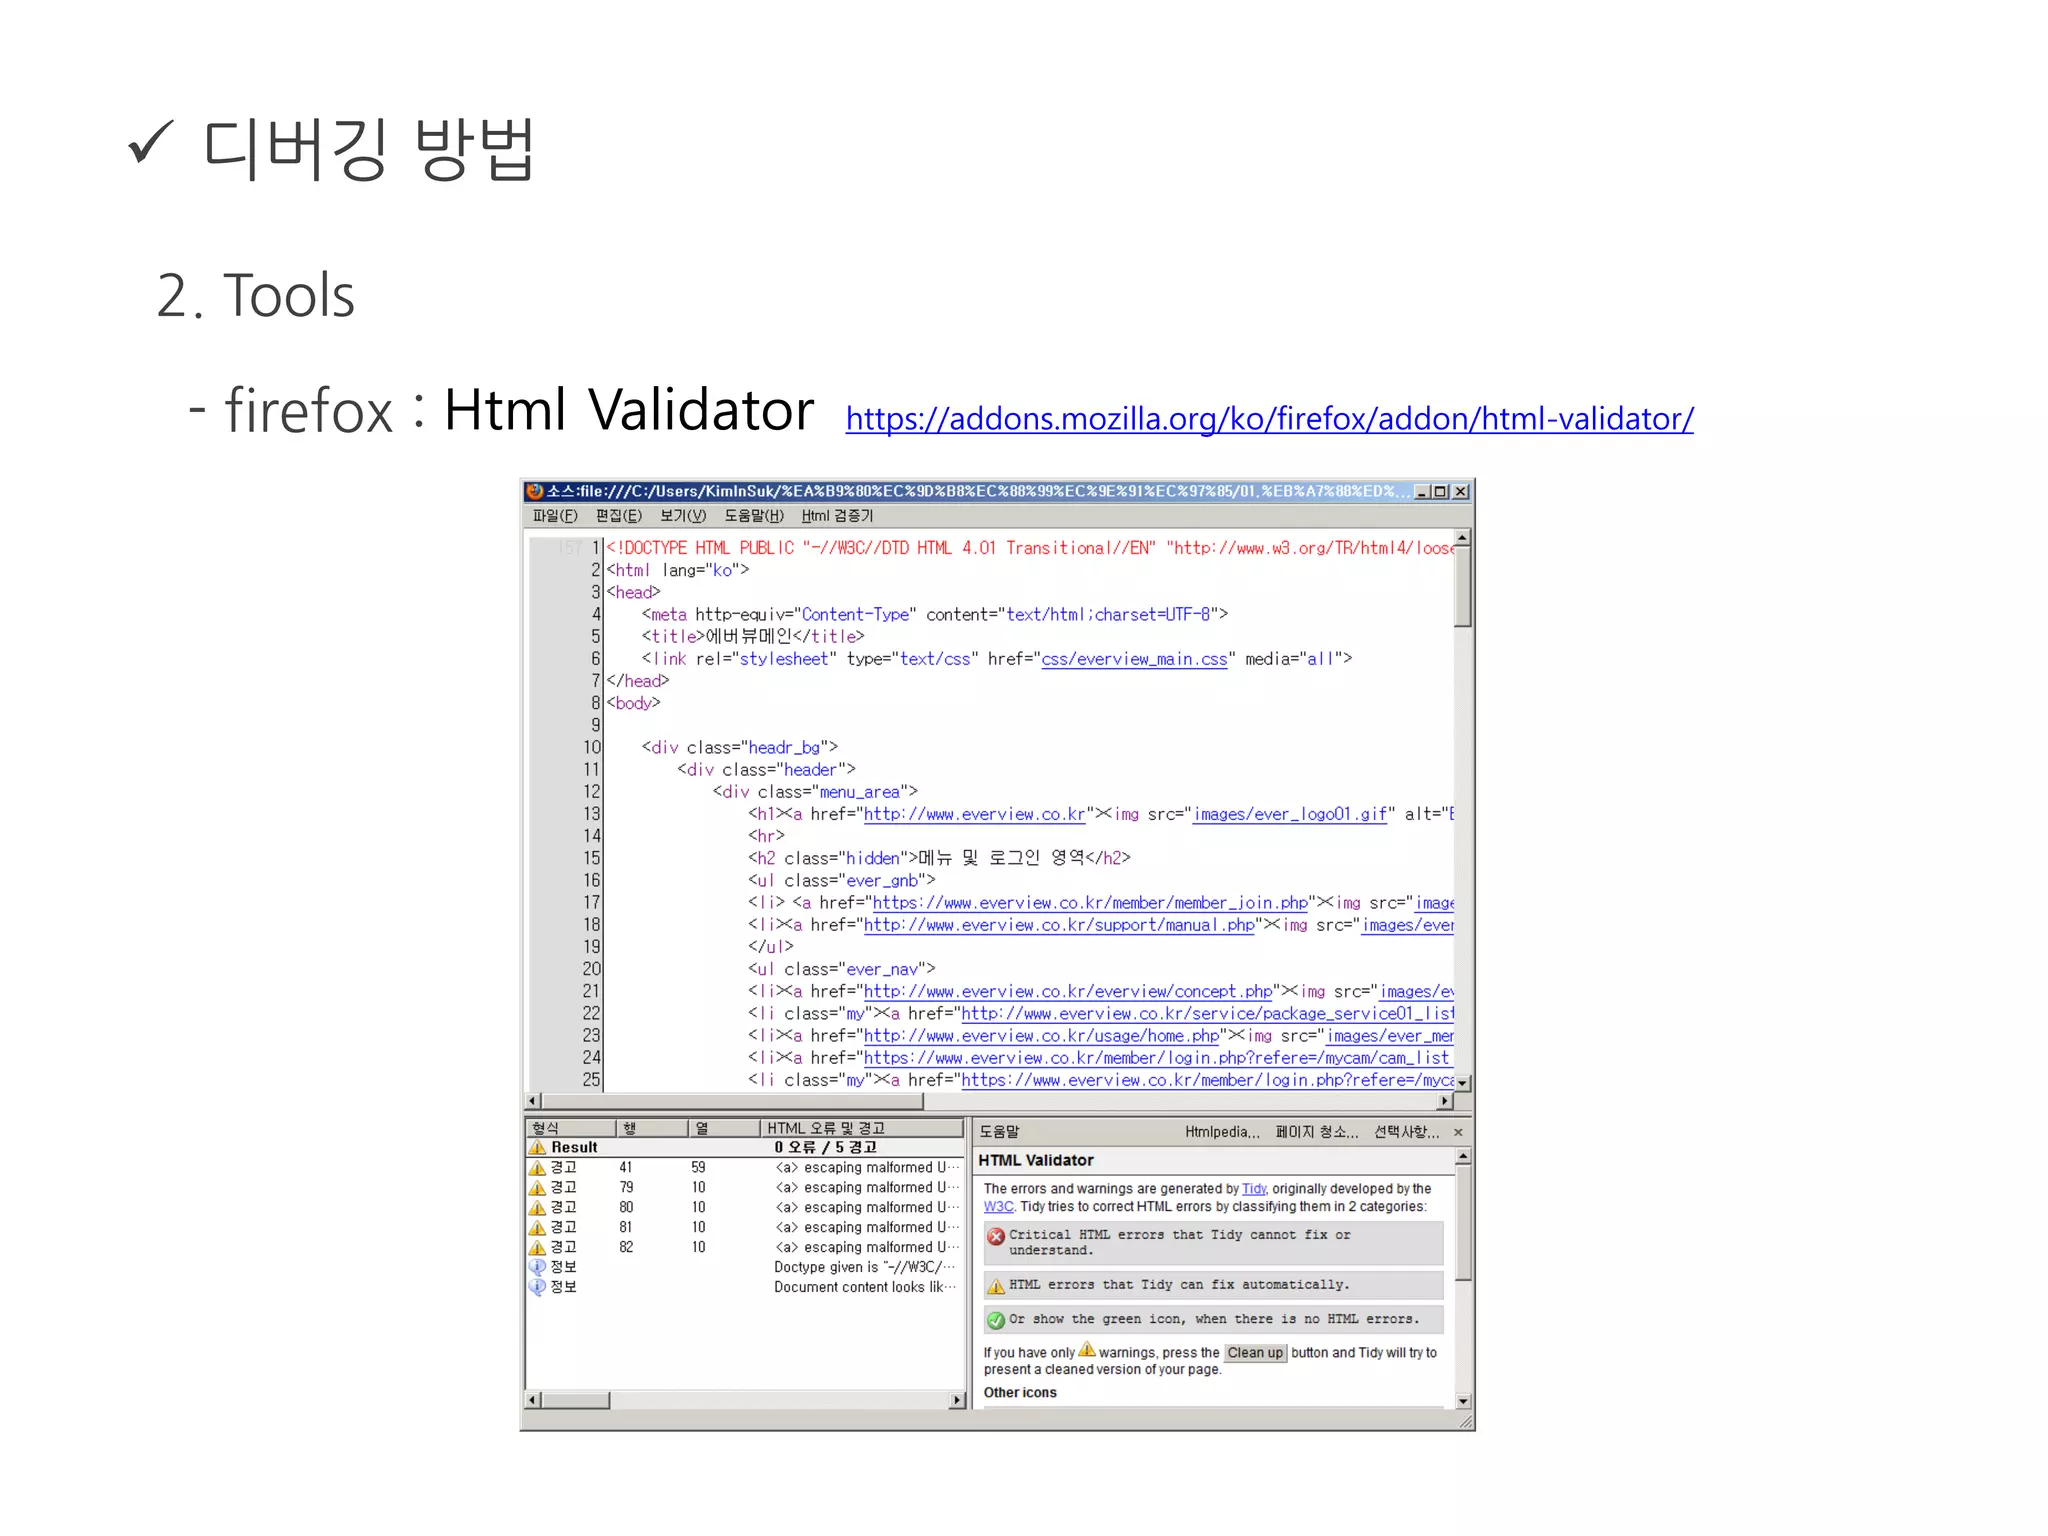
디버깅 방법
2.Tools
- firefox : Html Validator https://addons.mozilla.org/ko/firefox/addon/html-validator/
디버깅 방법
3.CSS Hack
- 왜 CSS핵을 사용할까?
* 브라우저 버그, 표준의 구현정도 차이 때문에
* 브라우저 별로 특화된 코드를 사용해야 하기 때문에
웹 표준에서 말하는 단일 코드로 다양한 브라우저를 호환시키는
개념에 완전히 배치된다
* 반드시 필요한 부분에만 사용
* IE 조건부 주석(conditional comment)도 피하는게 좋음.
106.
디버깅 방법
3.CSS Hack
- CSS 핵을 피하는 방법
* 현존하는 웹 브라우저 종류 : http://goo.gl/OEz8n
* 대상 브라우저 선정
호환성을 유지해야 하는 브라우저 범위 선정
* 기본 브라우저 선정
가장 표준을 잘 지키는 브라우저와 표준을 지키지 않는 브라우저
제작과 테스트를 병행
107.
디버깅 방법
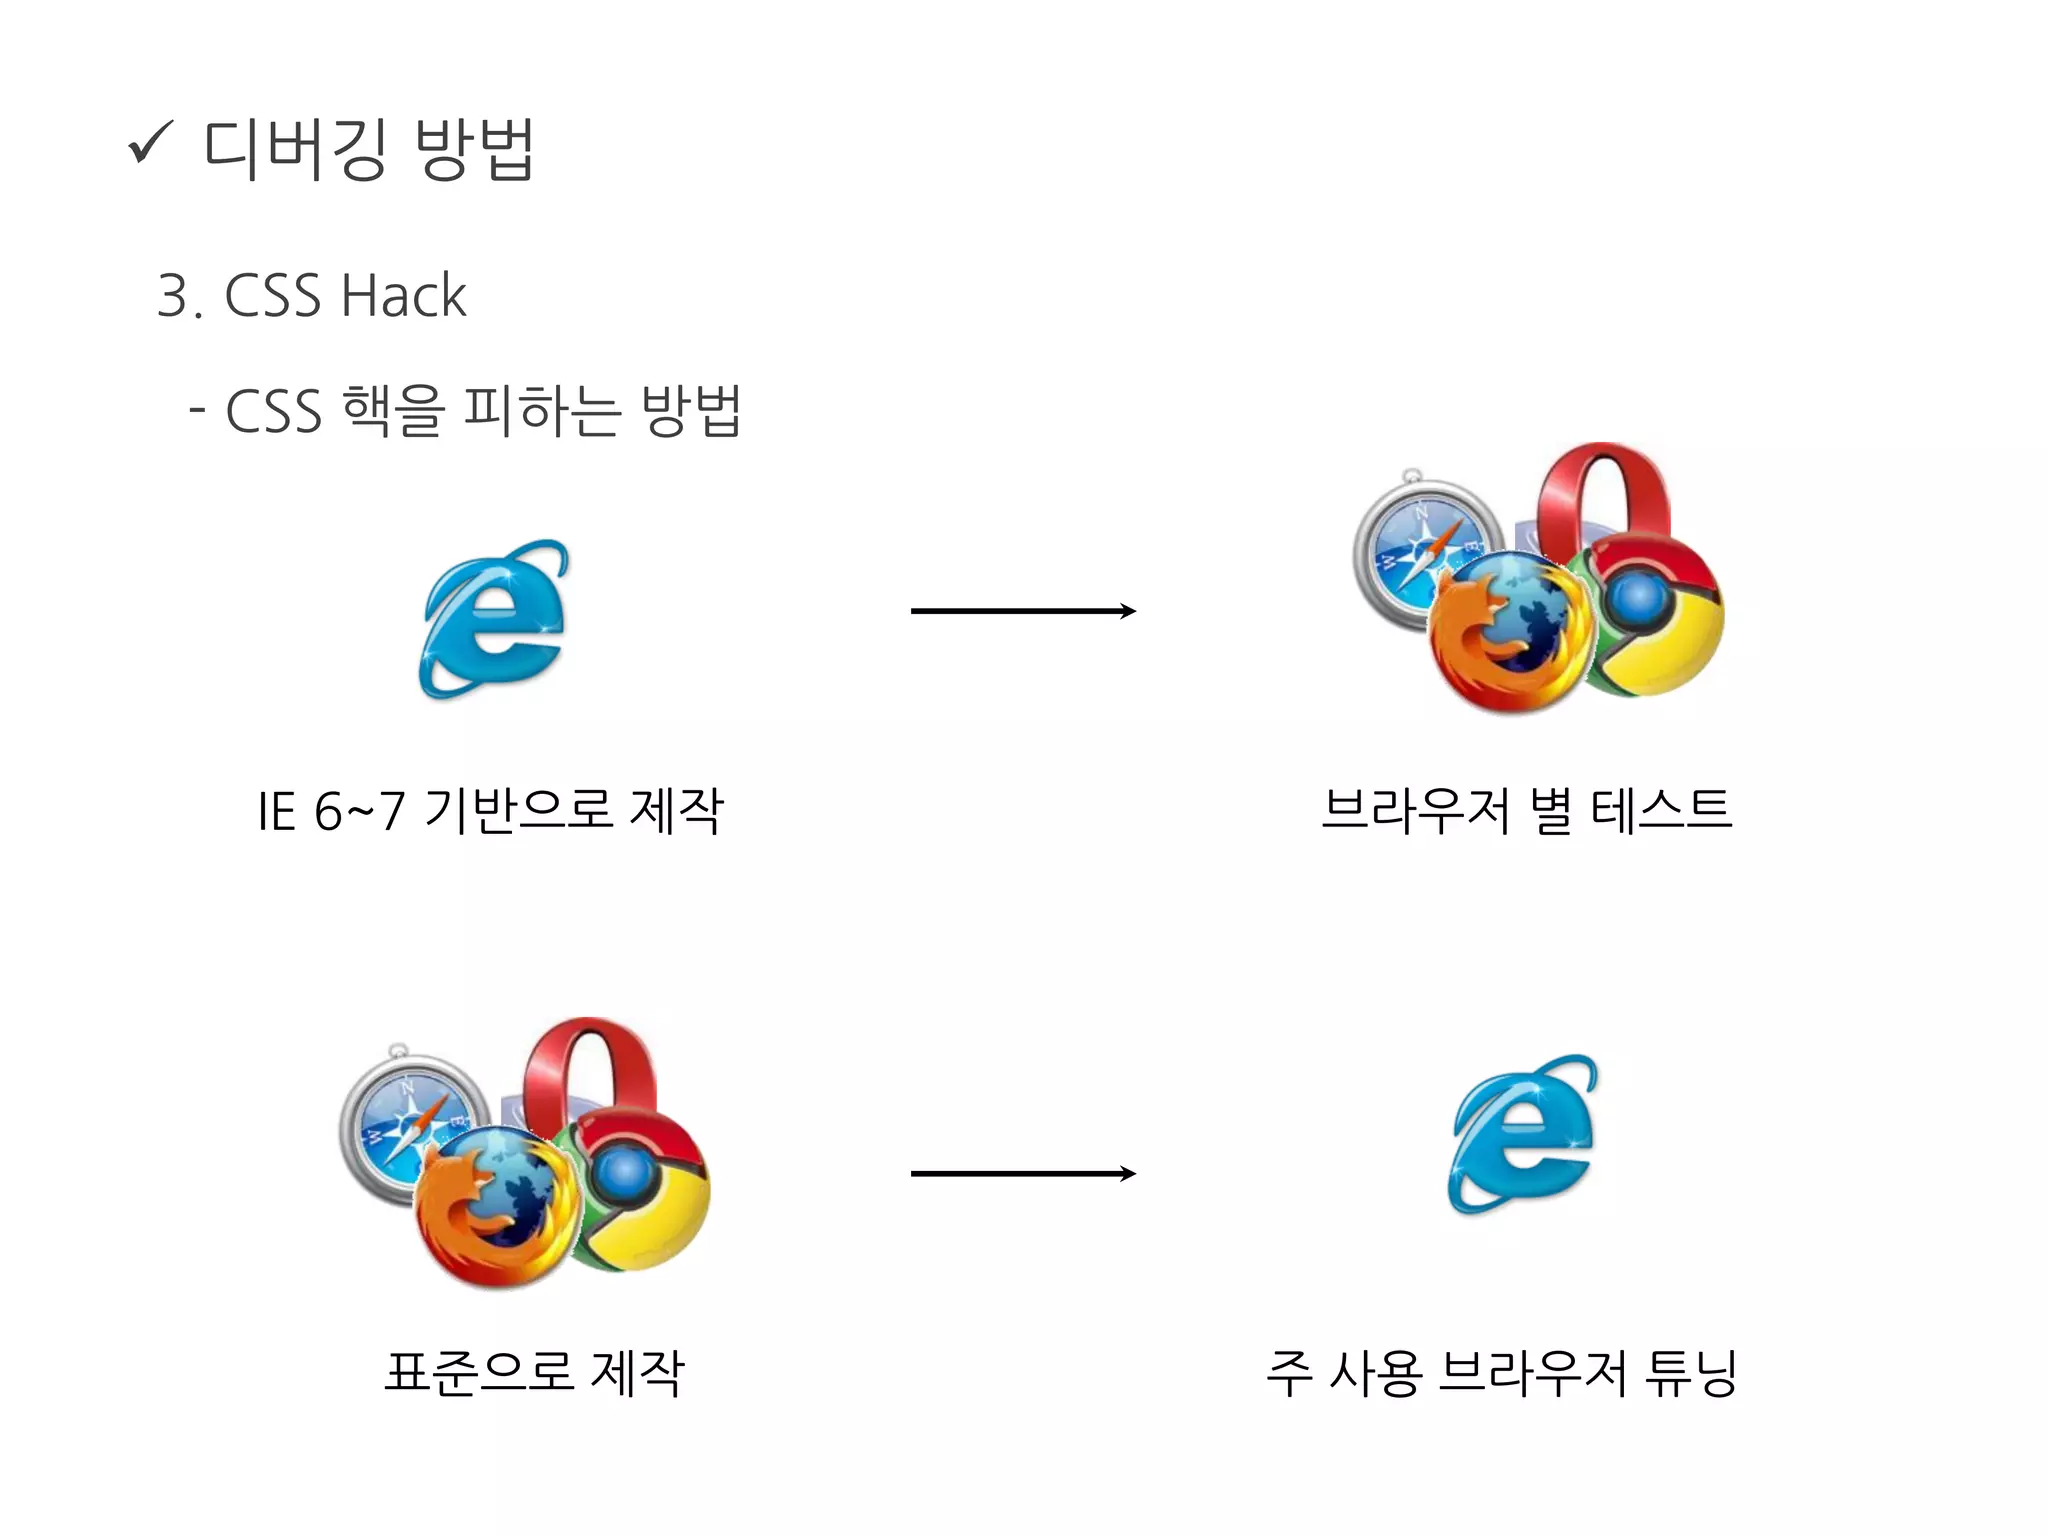
3.CSS Hack
- CSS 핵을 피하는 방법
IE 6~7 기반으로 제작 브라우저 별 테스트
표준으로 제작 주 사용 브라우저 튜닝
웹 접근성에대해서
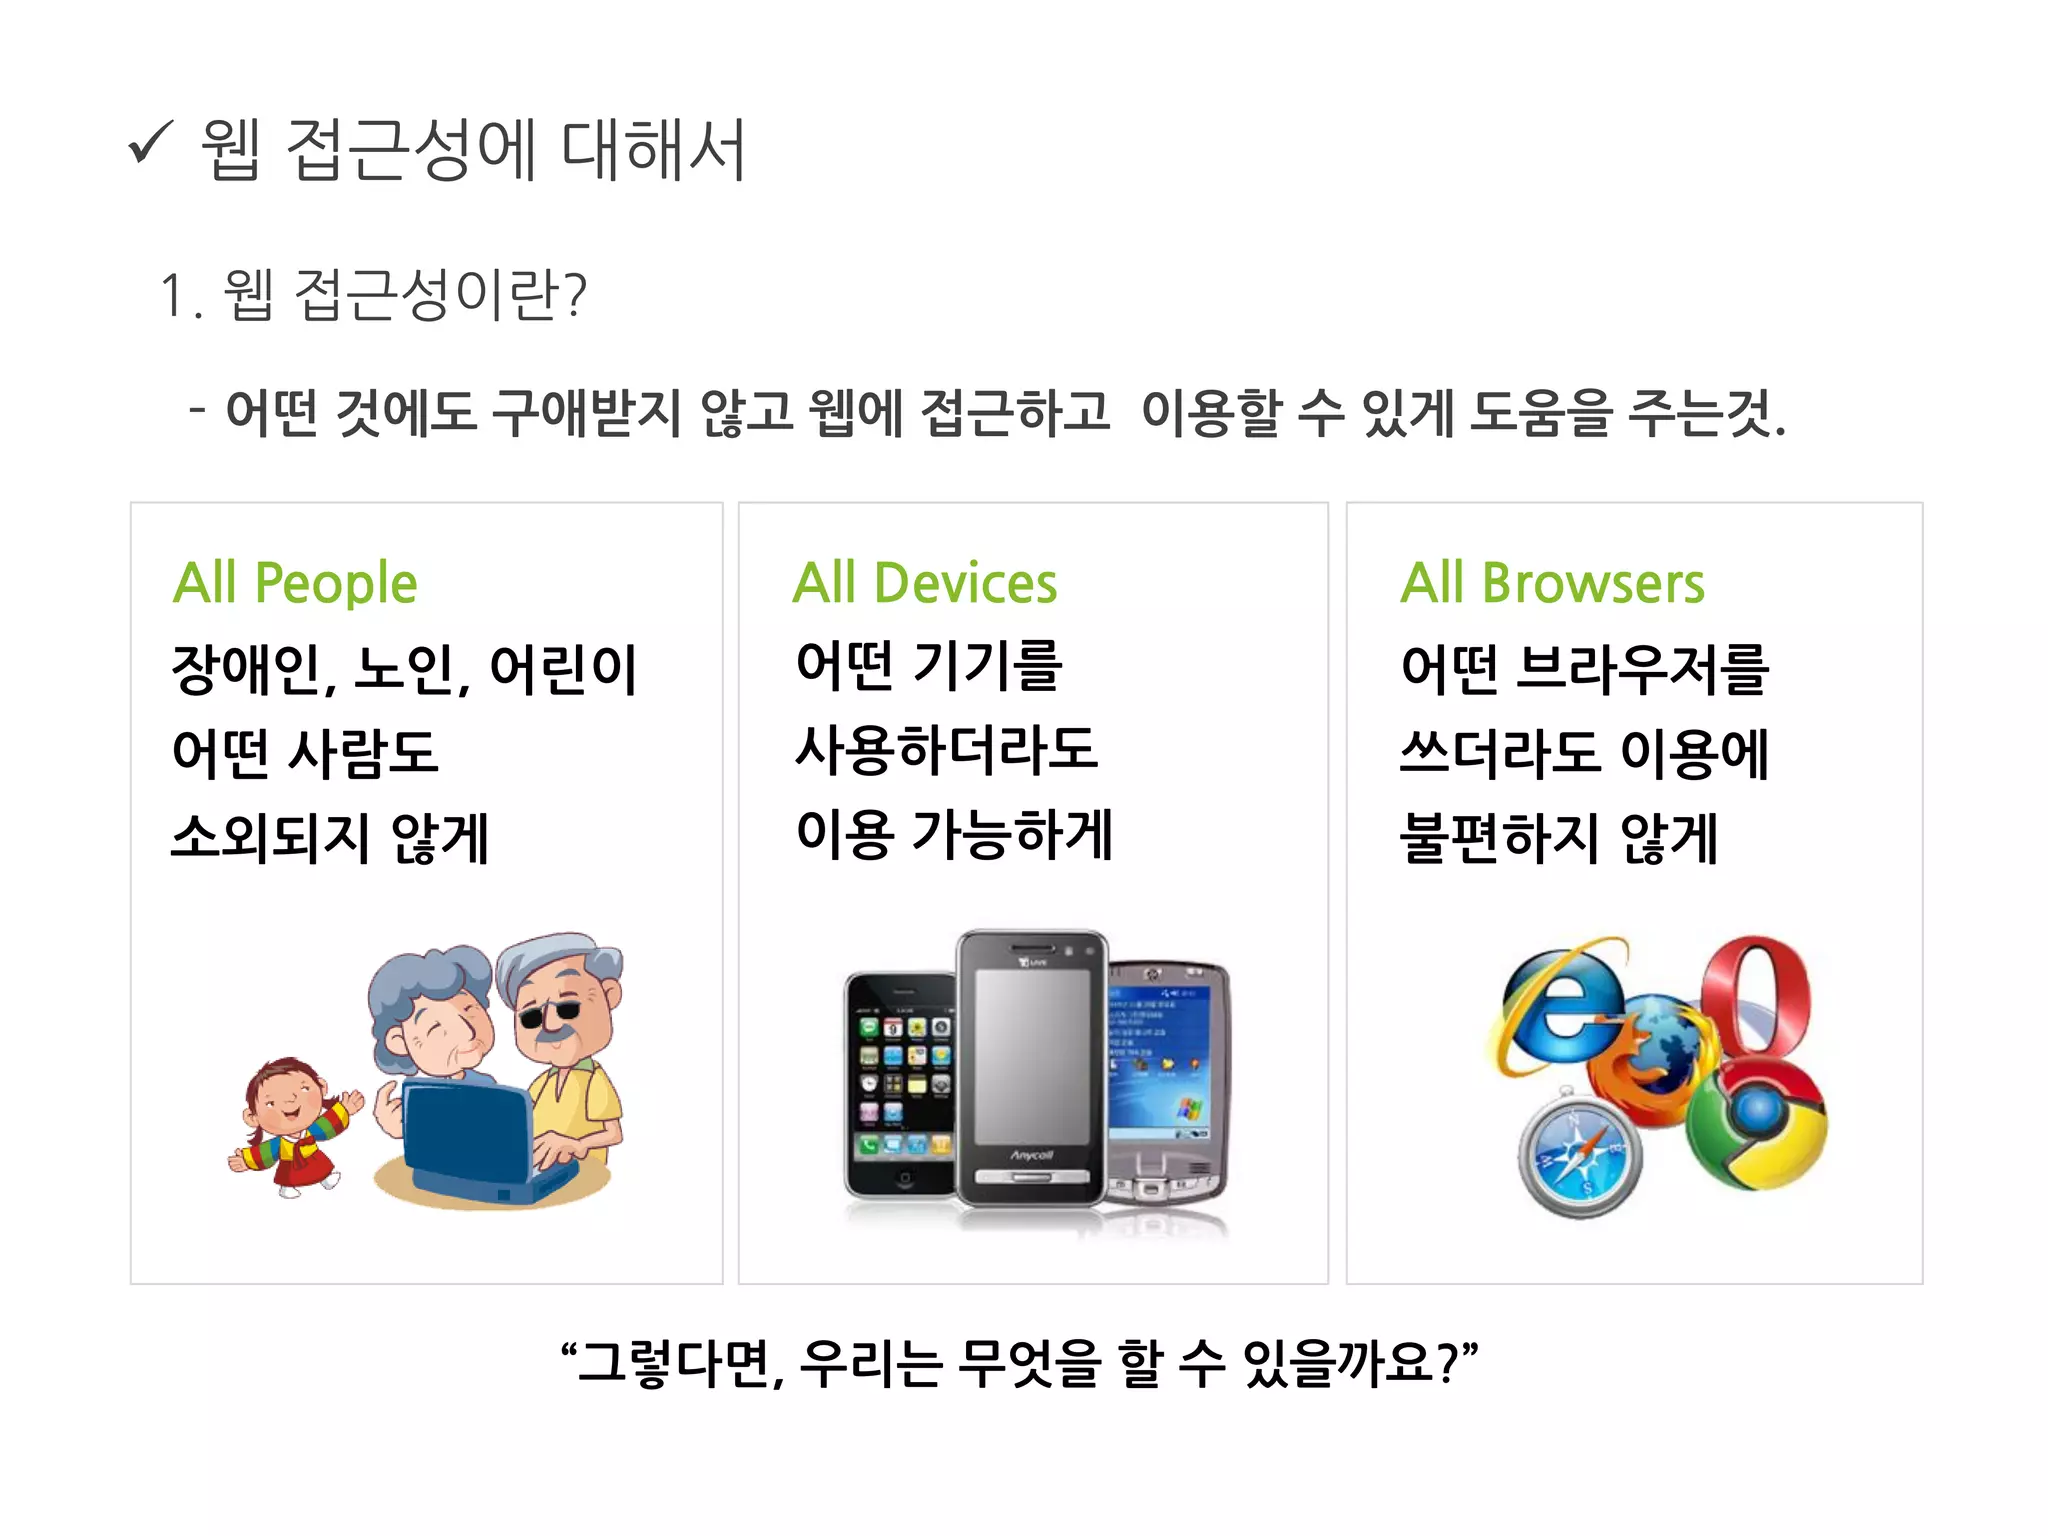
1. 웹 접근성이란?
- 어떤 것에도 구애받지 않고 웹에 접근하고 이용할 수 있게 도움을 주는것.
어떤 기기를
사용하더라도
이용 가능하게
어떤 브라우저를
쓰더라도 이용에
불편하지 않게
장애인, 노인, 어린이
어떤 사람도
소외되지 않게
“그렇다면, 우리는 무엇을 할 수 있을까요?”
All People All Devices All Browsers
113.
웹 접근성에대해서
2. 웹 접근성 준수의 필요성
- 장애인, 고령자 등을 포함한 웹 이용자의 확대
- 장애인 차별 금지법 적용
- 디자인 및 설계 등에 대한 효율성을 제고, 비용절감 효과
- 공공기관 및 기업의 이미지 제고와 이윤을 창출하기 위해
- 검색엔진최적화에 따른 검색결과 최 상단 노출
114.
웹 접근성에대해서
3. 웹 접근성에 대한 몇 가지 오해들
- 크로스 브라우징 하나면 웹 접근성 끝?
- 장애인의 접근성을 위해 장애인용 웹 사이트 별도 제작이 필요하다?
- 스크린리더를 사용하면 텍스트가 아닌 이미지나 플래시는 못 읽는다?
- 웹 접근성 향상하는 것은 엄청난 노력과 시간이 든다?
- 웹 접근성을 준수해서 사이트를 완성하면 그게 끝이다?
- 웹 접근성 준수 평가 기준은 지극히 주관적이다?
115.
웹 접근성에대해서
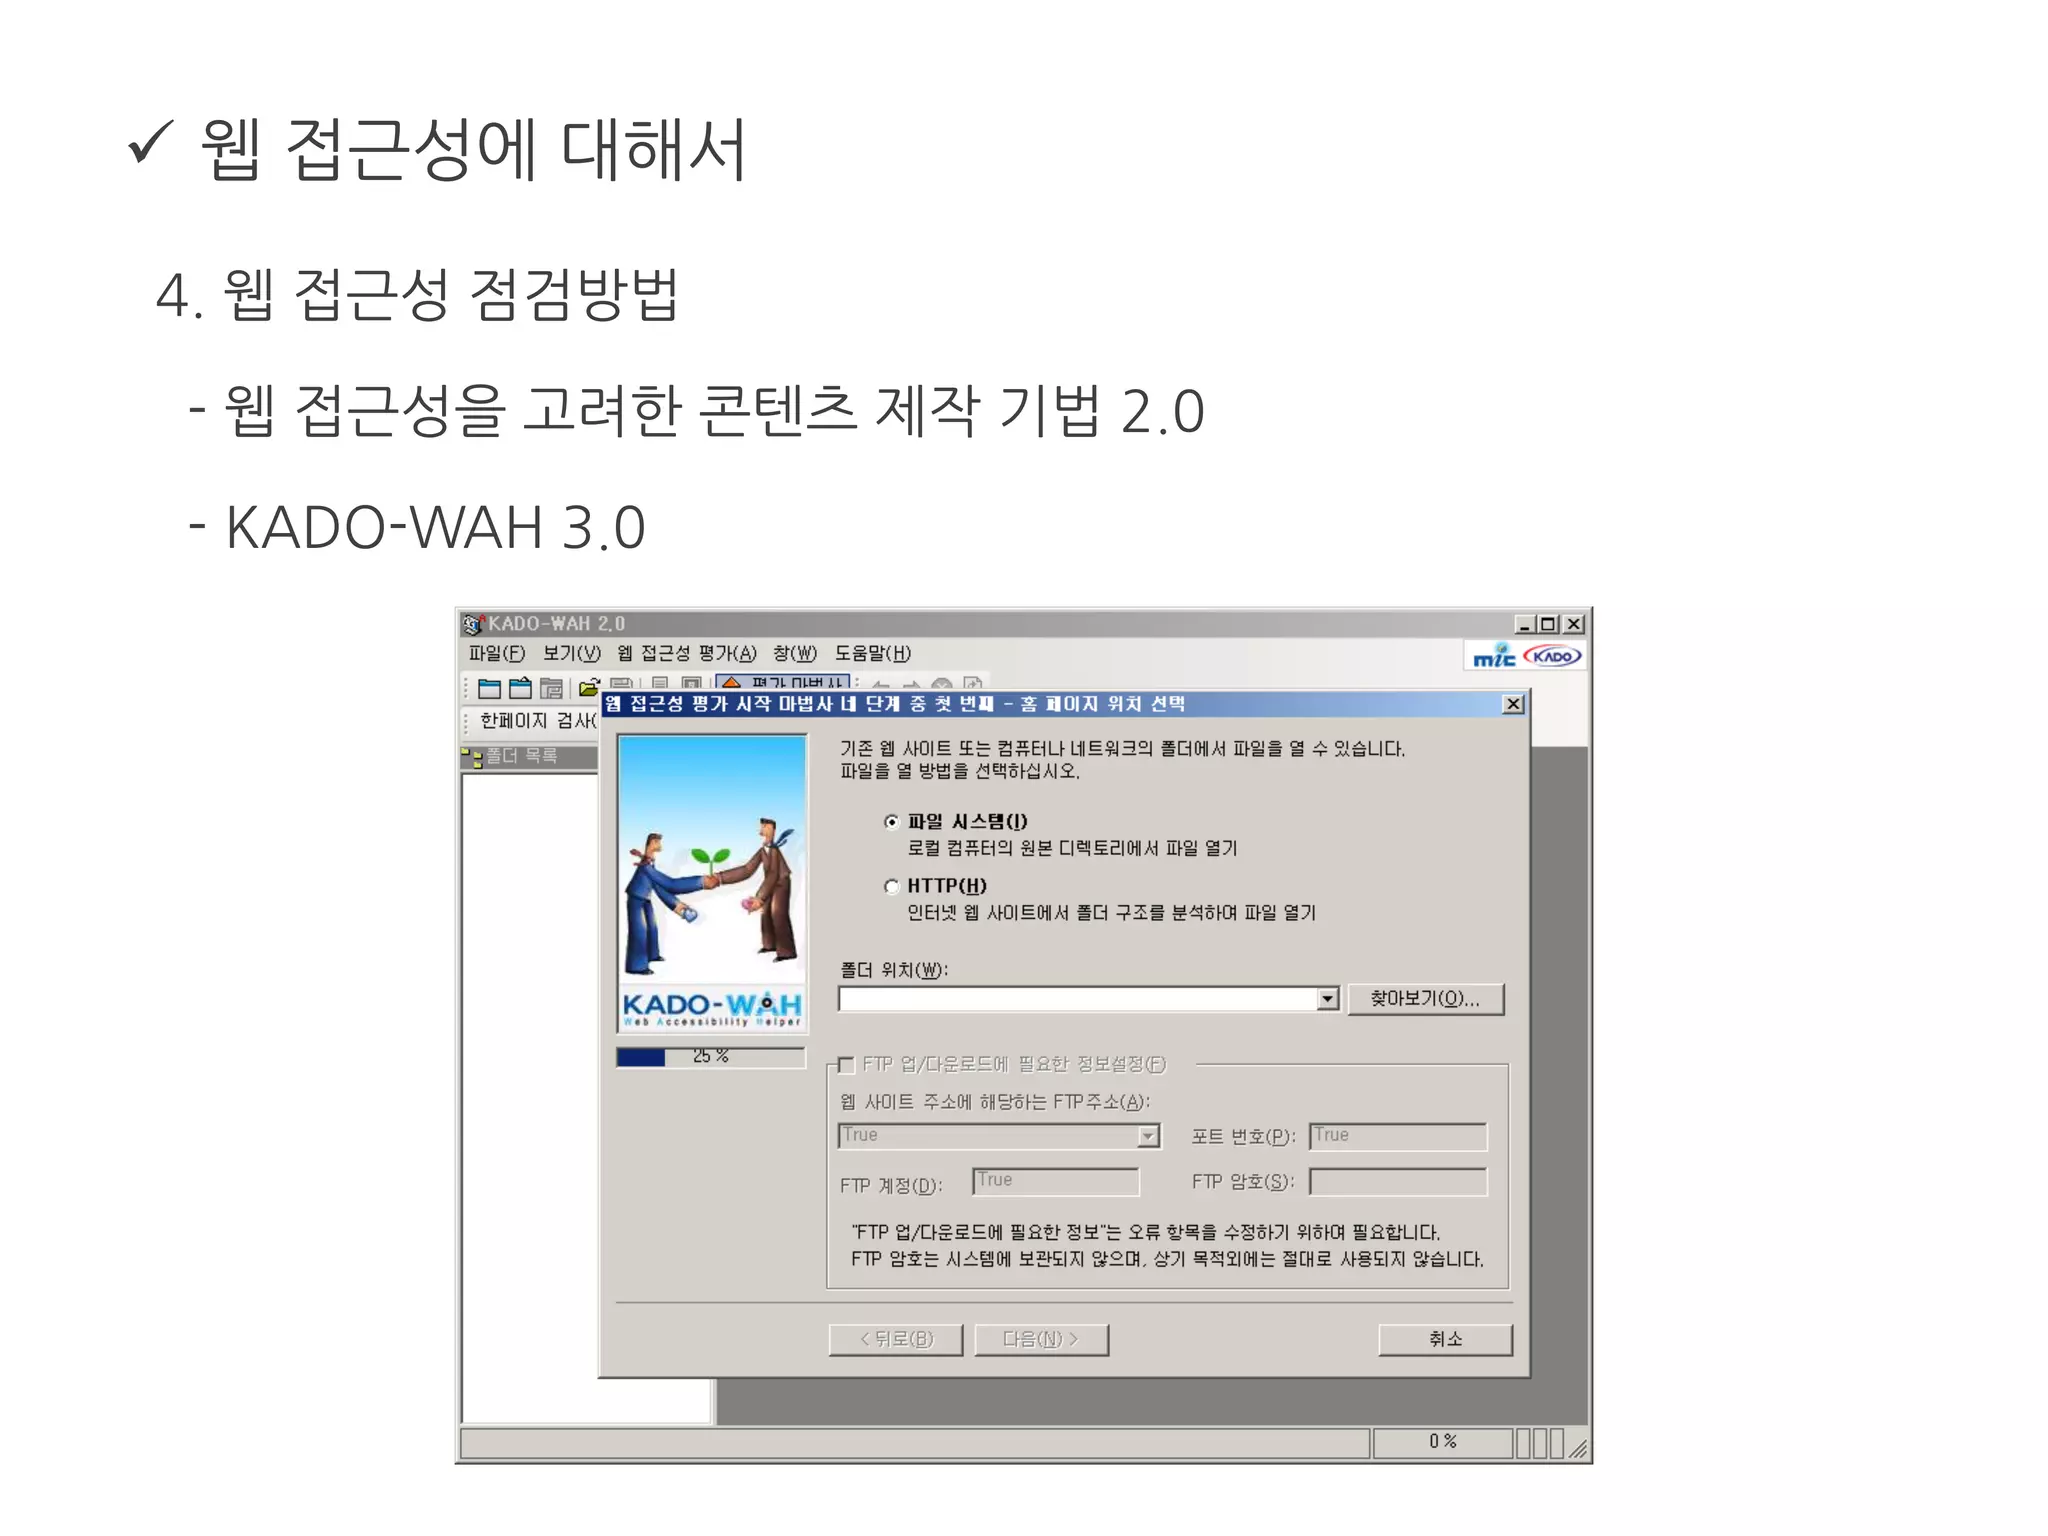
4. 웹 접근성 점검방법
- 웹 접근성을 고려한 콘텐츠 제작 기법 2.0
- KADO-WAH 3.0
이메일 마크업
1.아웃룩에서 지원하지 않는 목록
- no support for background images (HTML or CSS)
- no support for forms
- no support for Flash, or other plugins
- no support for CSS floats
- no support for replacing bullets with images in unordered lists
- no support for CSS positioning
- no support for animated GIFs
118.
이메일 마크업
2.가이드라인
- 레이아웃 관련
* DTD를 붙이지 않는다.
* 1px의 라인은 인라인 스타일로 넣는다.
* 레이아웃은 테이블로 잡는다.
되도록이면 각 셀 마다 너비를 지정하고, 너비는 비율로 적지 않는다.
여백이나 패딩보다 중첩테이블을 이용한다.
본문 배경 색은 폭 100%의 테이블을 이용한다.
테이블 셀에 불필요한 공백은 피한다.
http://www.campaignmonitor.com/resources/will-it-work/guidelines/
119.
이메일 마크업
2.가이드라인
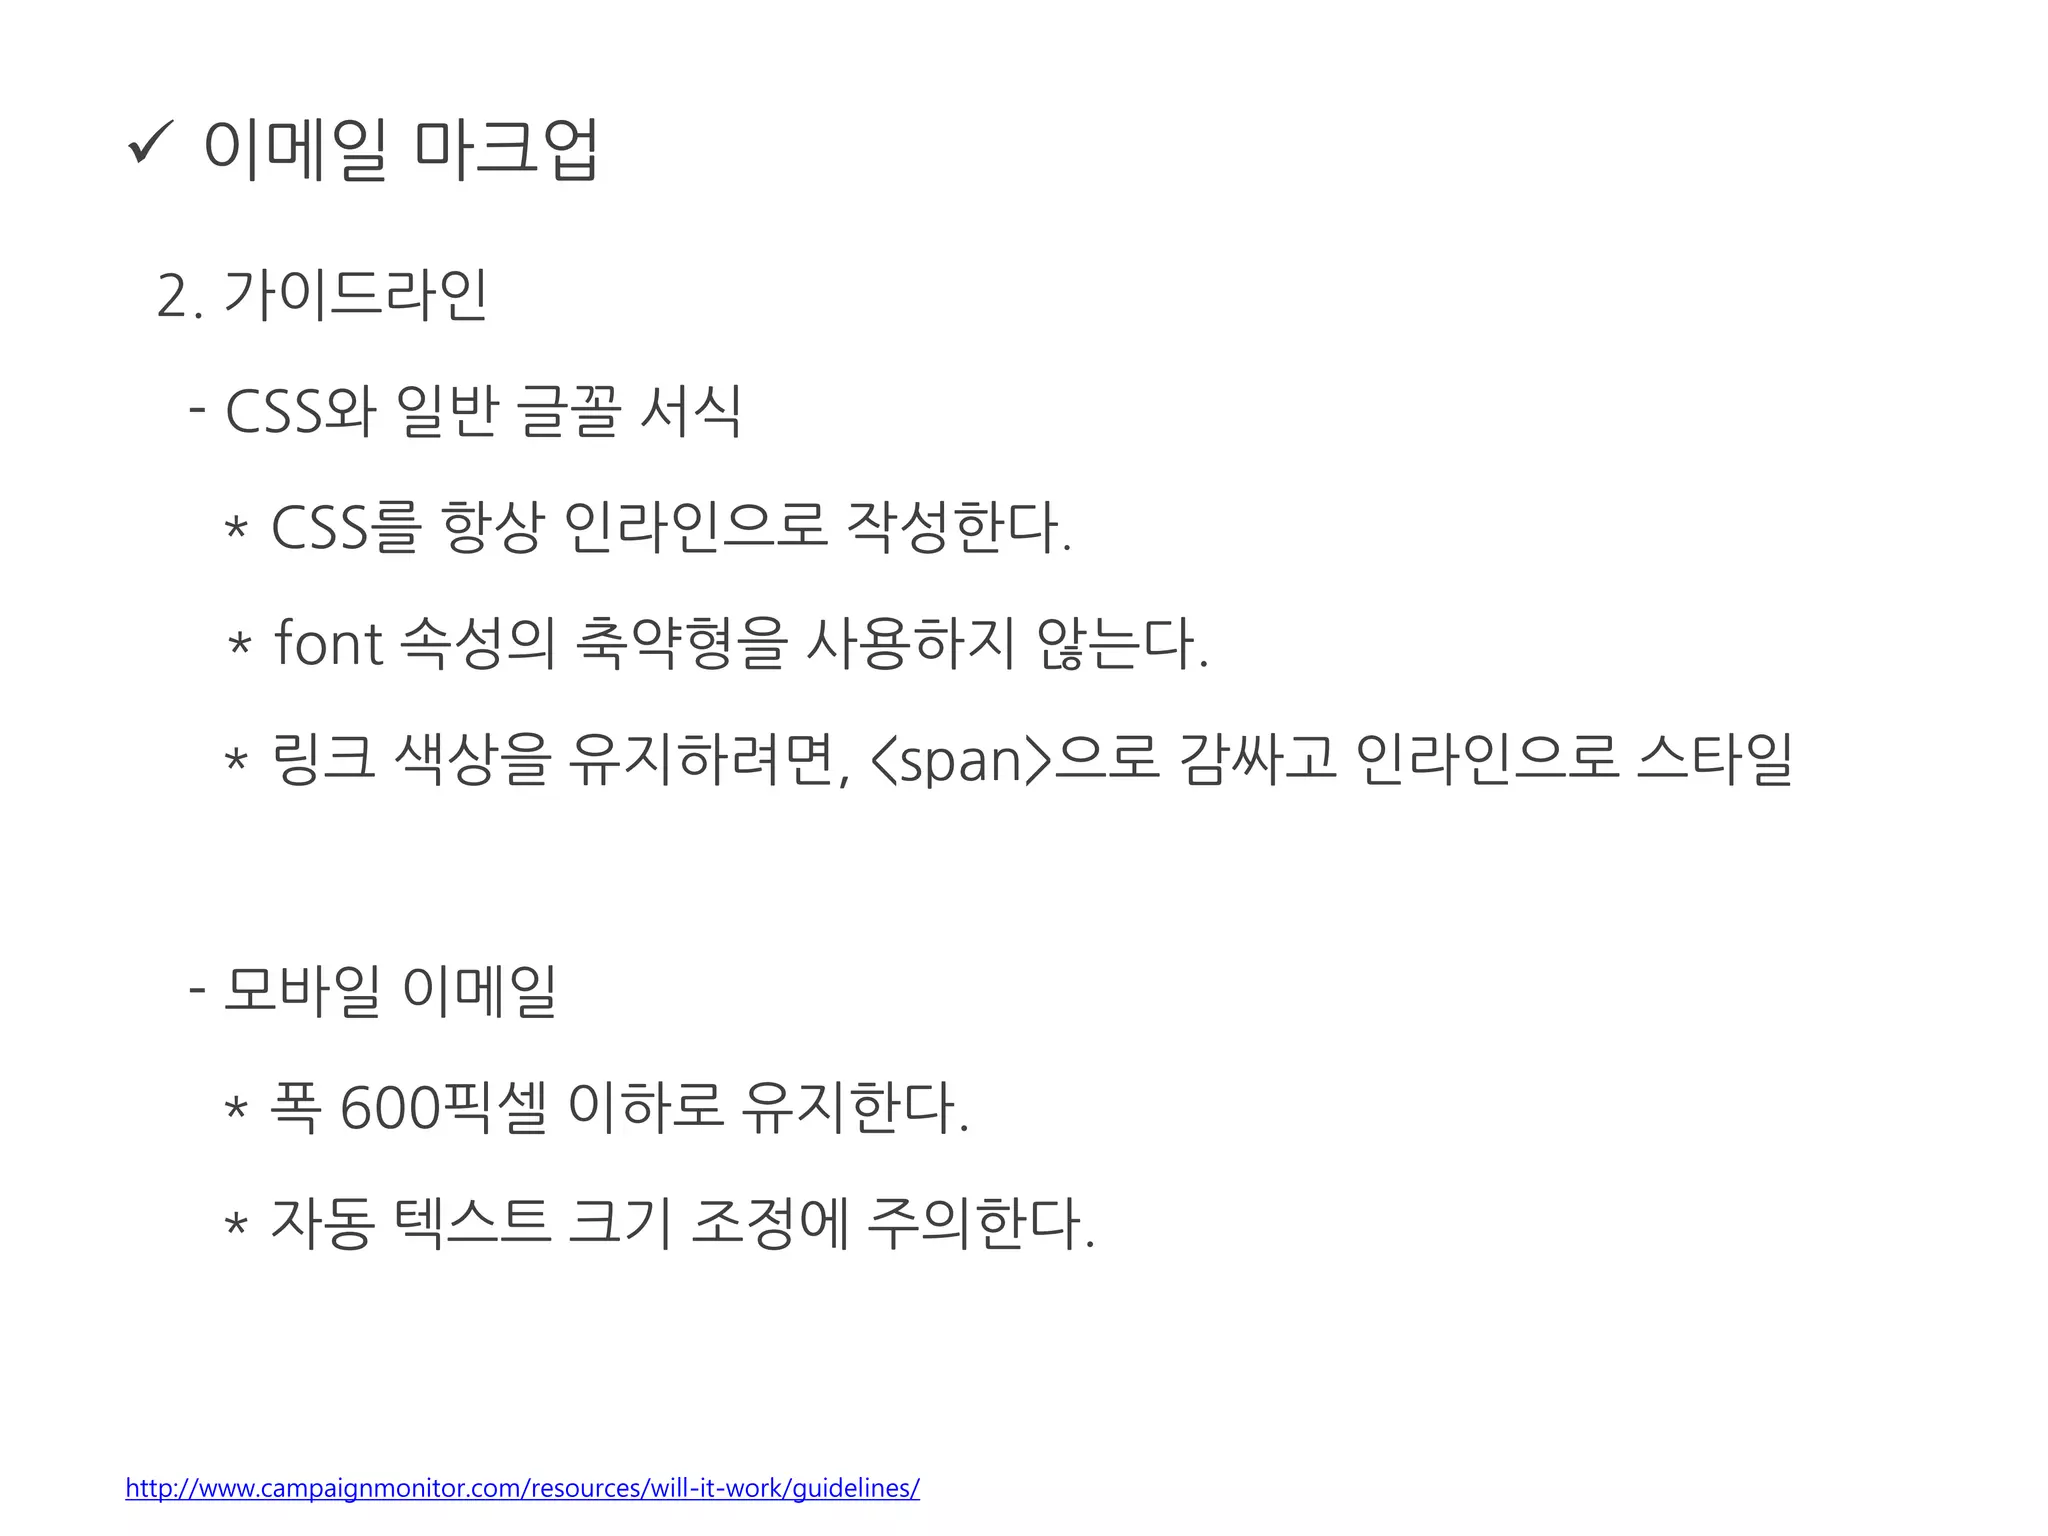
- CSS와 일반 글꼴 서식
* CSS를 항상 인라인으로 작성한다.
* font 속성의 축약형을 사용하지 않는다.
* 링크 색상을 유지하려면, <span>으로 감싸고 인라인으로 스타일
- 모바일 이메일
* 폭 600픽셀 이하로 유지한다.
* 자동 텍스트 크기 조정에 주의한다.
http://www.campaignmonitor.com/resources/will-it-work/guidelines/
120.
이메일 마크업
2.가이드라인
- HTML 이메일의 이미지
* 빈 1px 이미지는 피한다.
* 항상 이미지 크기를 포함한다.
* PNGs를 피한다.
* 배경이미지에 대한 대체 색상 제공
* 이미지에 대체 텍스트 (alt)를 넣는다. (gmail)
* 이미지에 display:block 속성을 설정한다. (hotmail)
* 이미지 정렬은 align을 이용한다.
http://www.campaignmonitor.com/resources/will-it-work/guidelines/
121.
HTML5
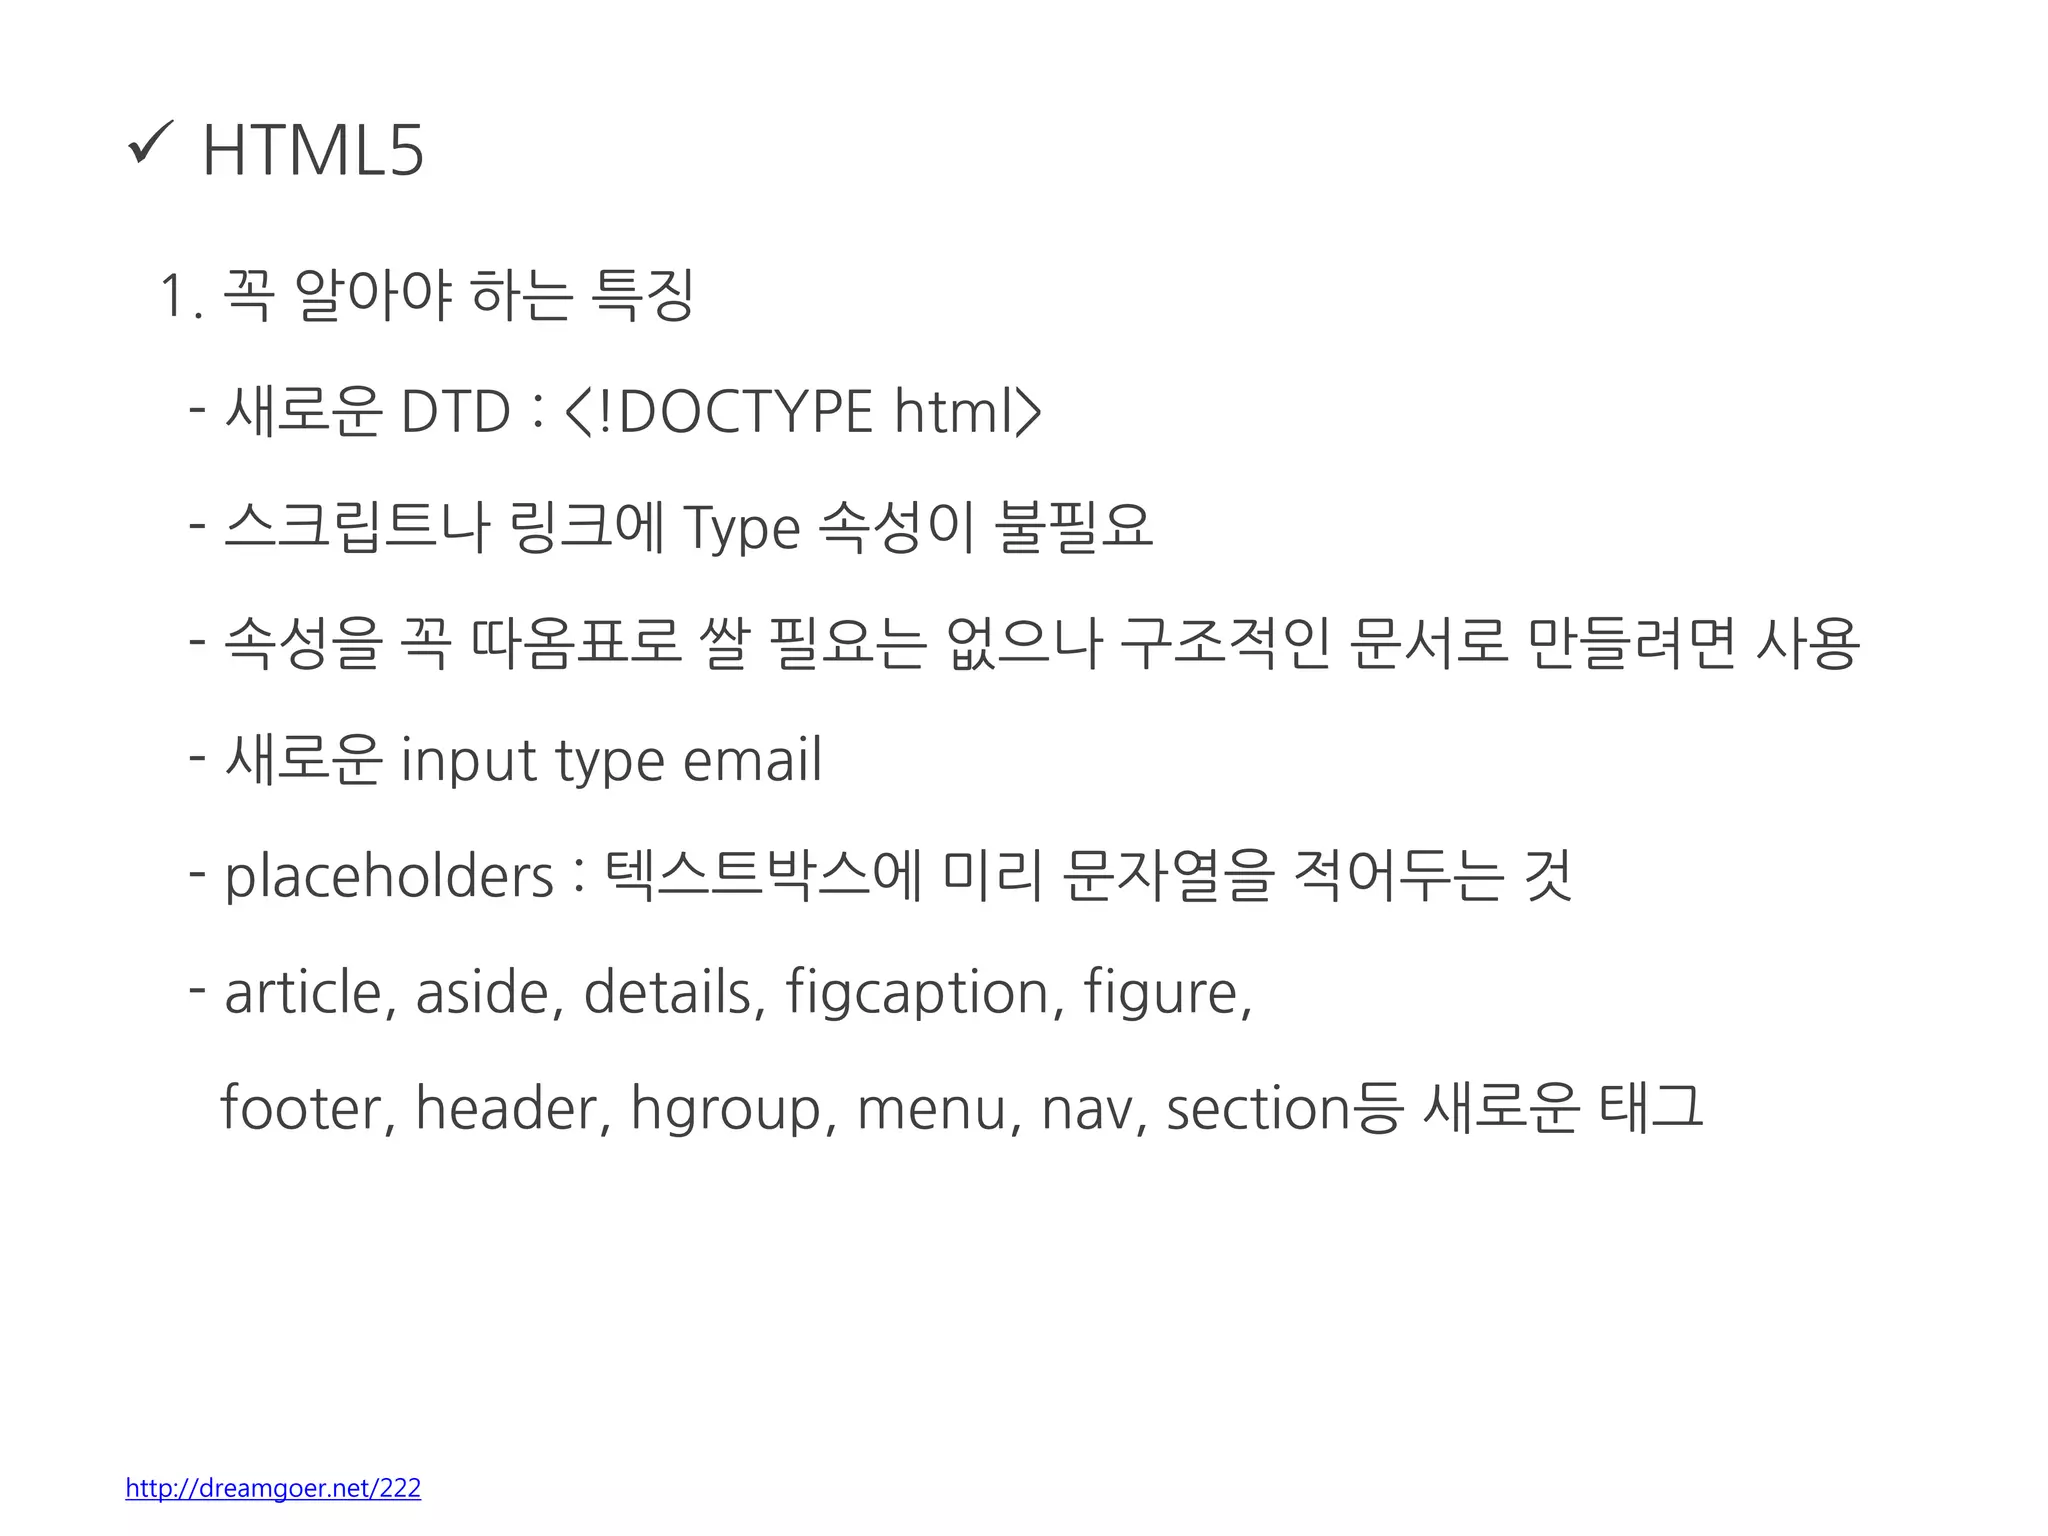
1. 꼭알아야 하는 특징
- 새로운 DTD : <!DOCTYPE html>
- 스크립트나 링크에 Type 속성이 불필요
- 속성을 꼭 따옴표로 쌀 필요는 없으나 구조적인 문서로 만들려면 사용
- 새로운 input type email
- placeholders : 텍스트박스에 미리 문자열을 적어두는 것
- article, aside, details, figcaption, figure,
footer, header, hgroup, menu, nav, section등 새로운 태그
http://dreamgoer.net/222
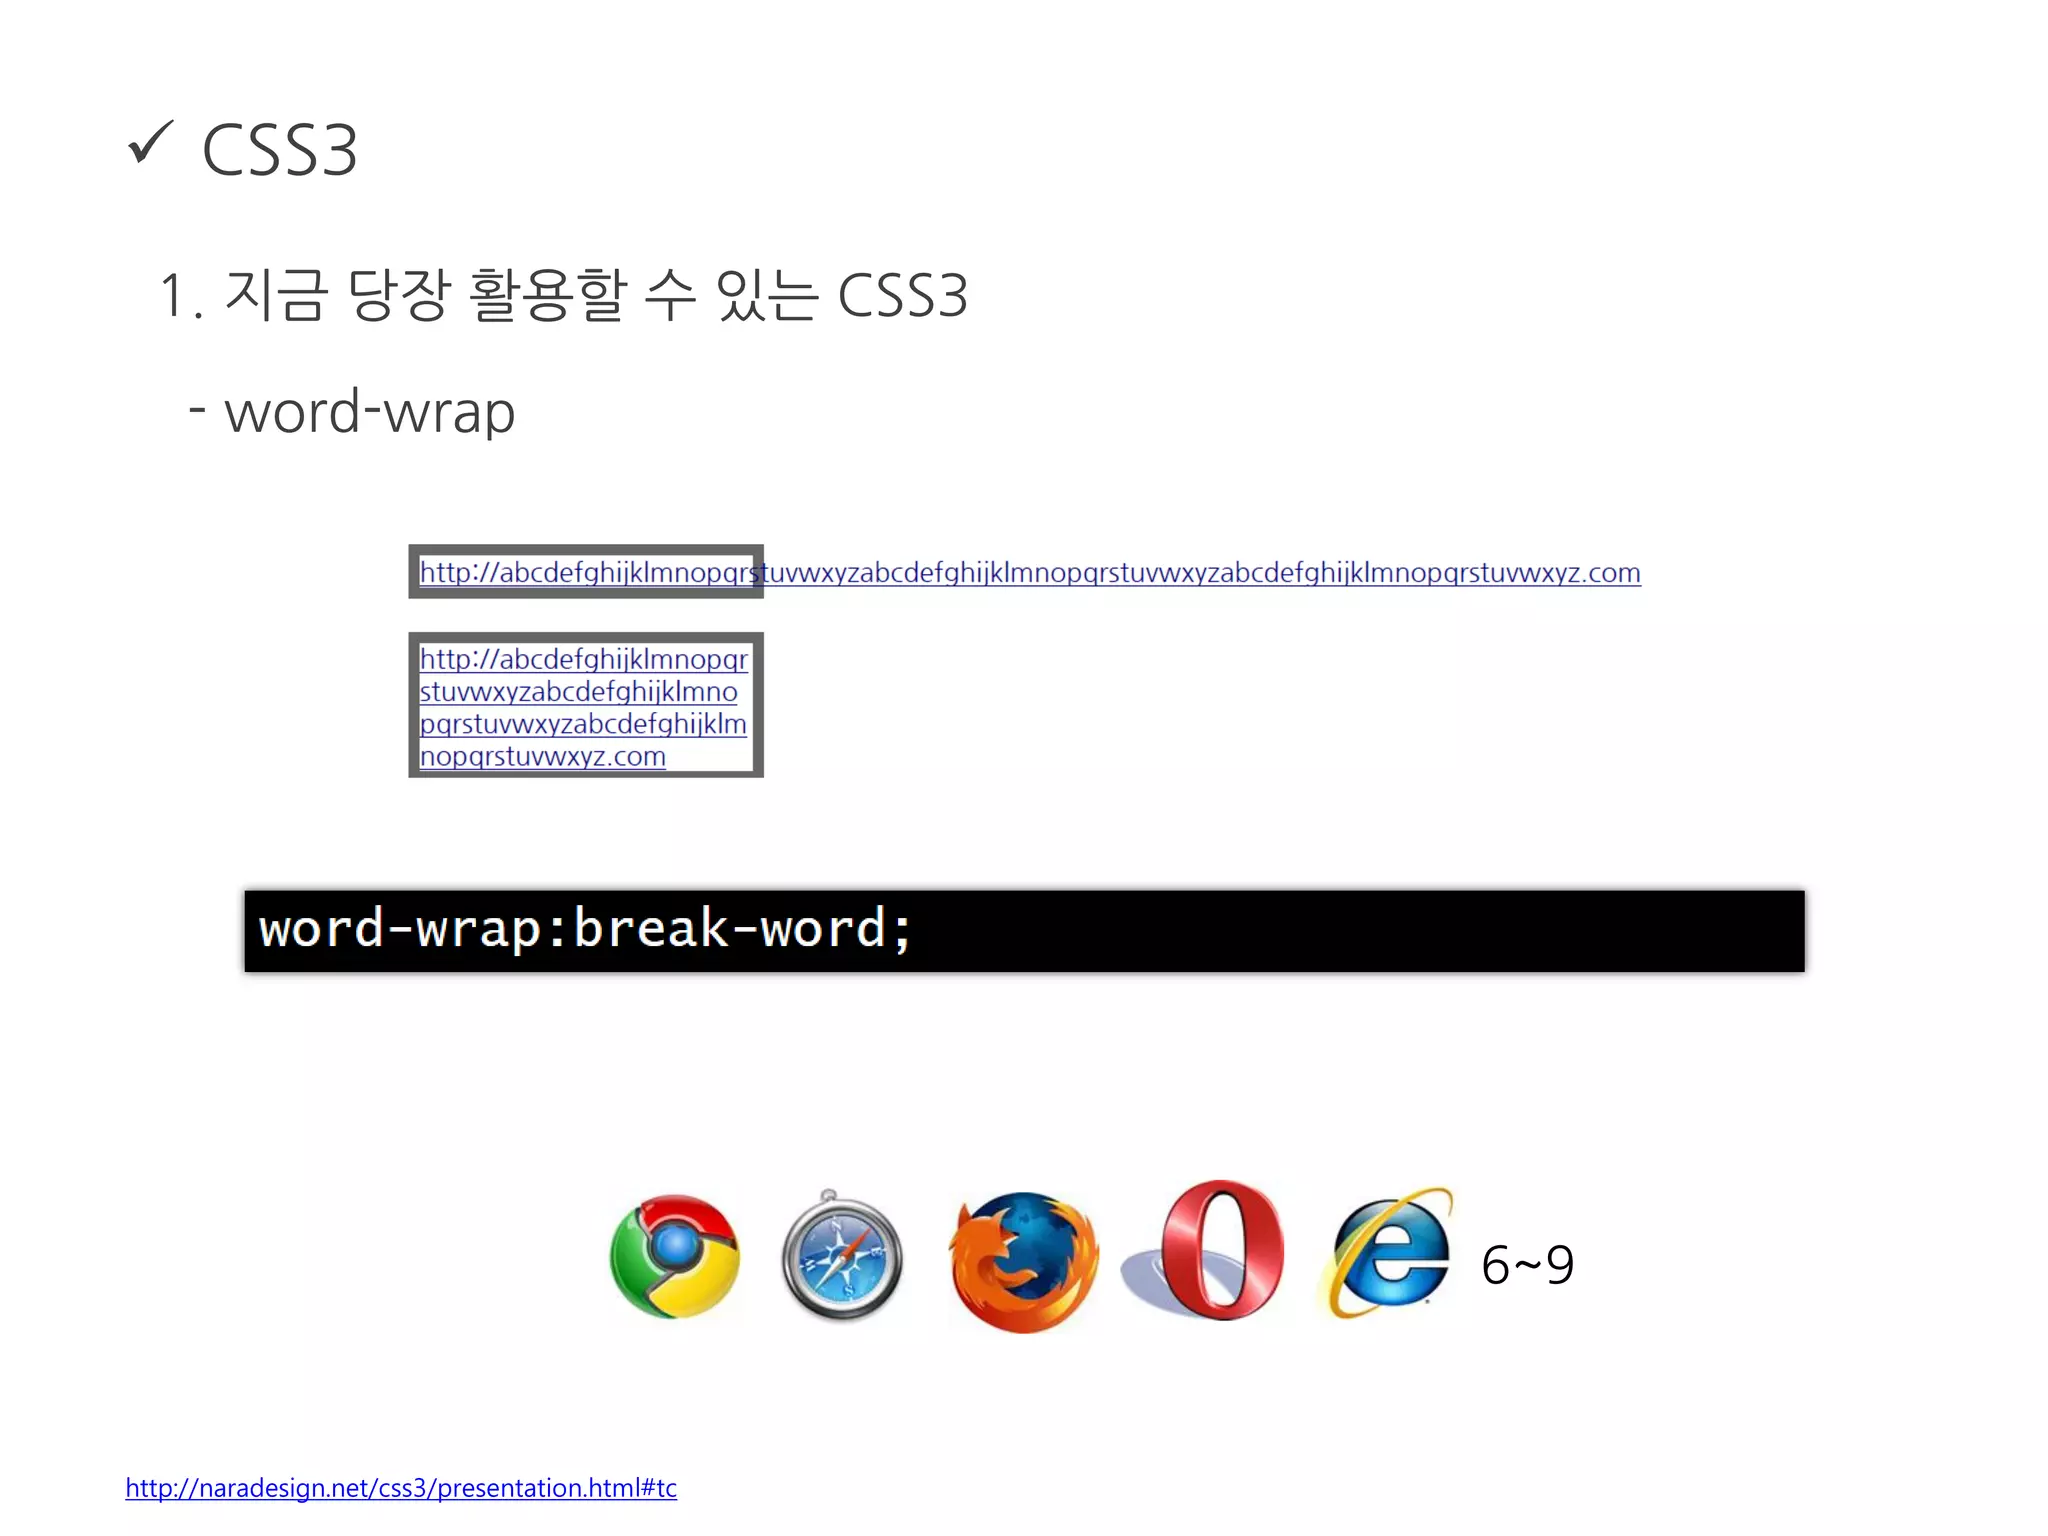
CSS3
1. 지금당장 활용할 수 있는 CSS3
- text-shadow
http://naradesign.net/css3/presentation.html#tc
6~9
124.
CSS3
1. 지금당장 활용할 수 있는 CSS3
- word-wrap
http://naradesign.net/css3/presentation.html#tc
6~9
125.
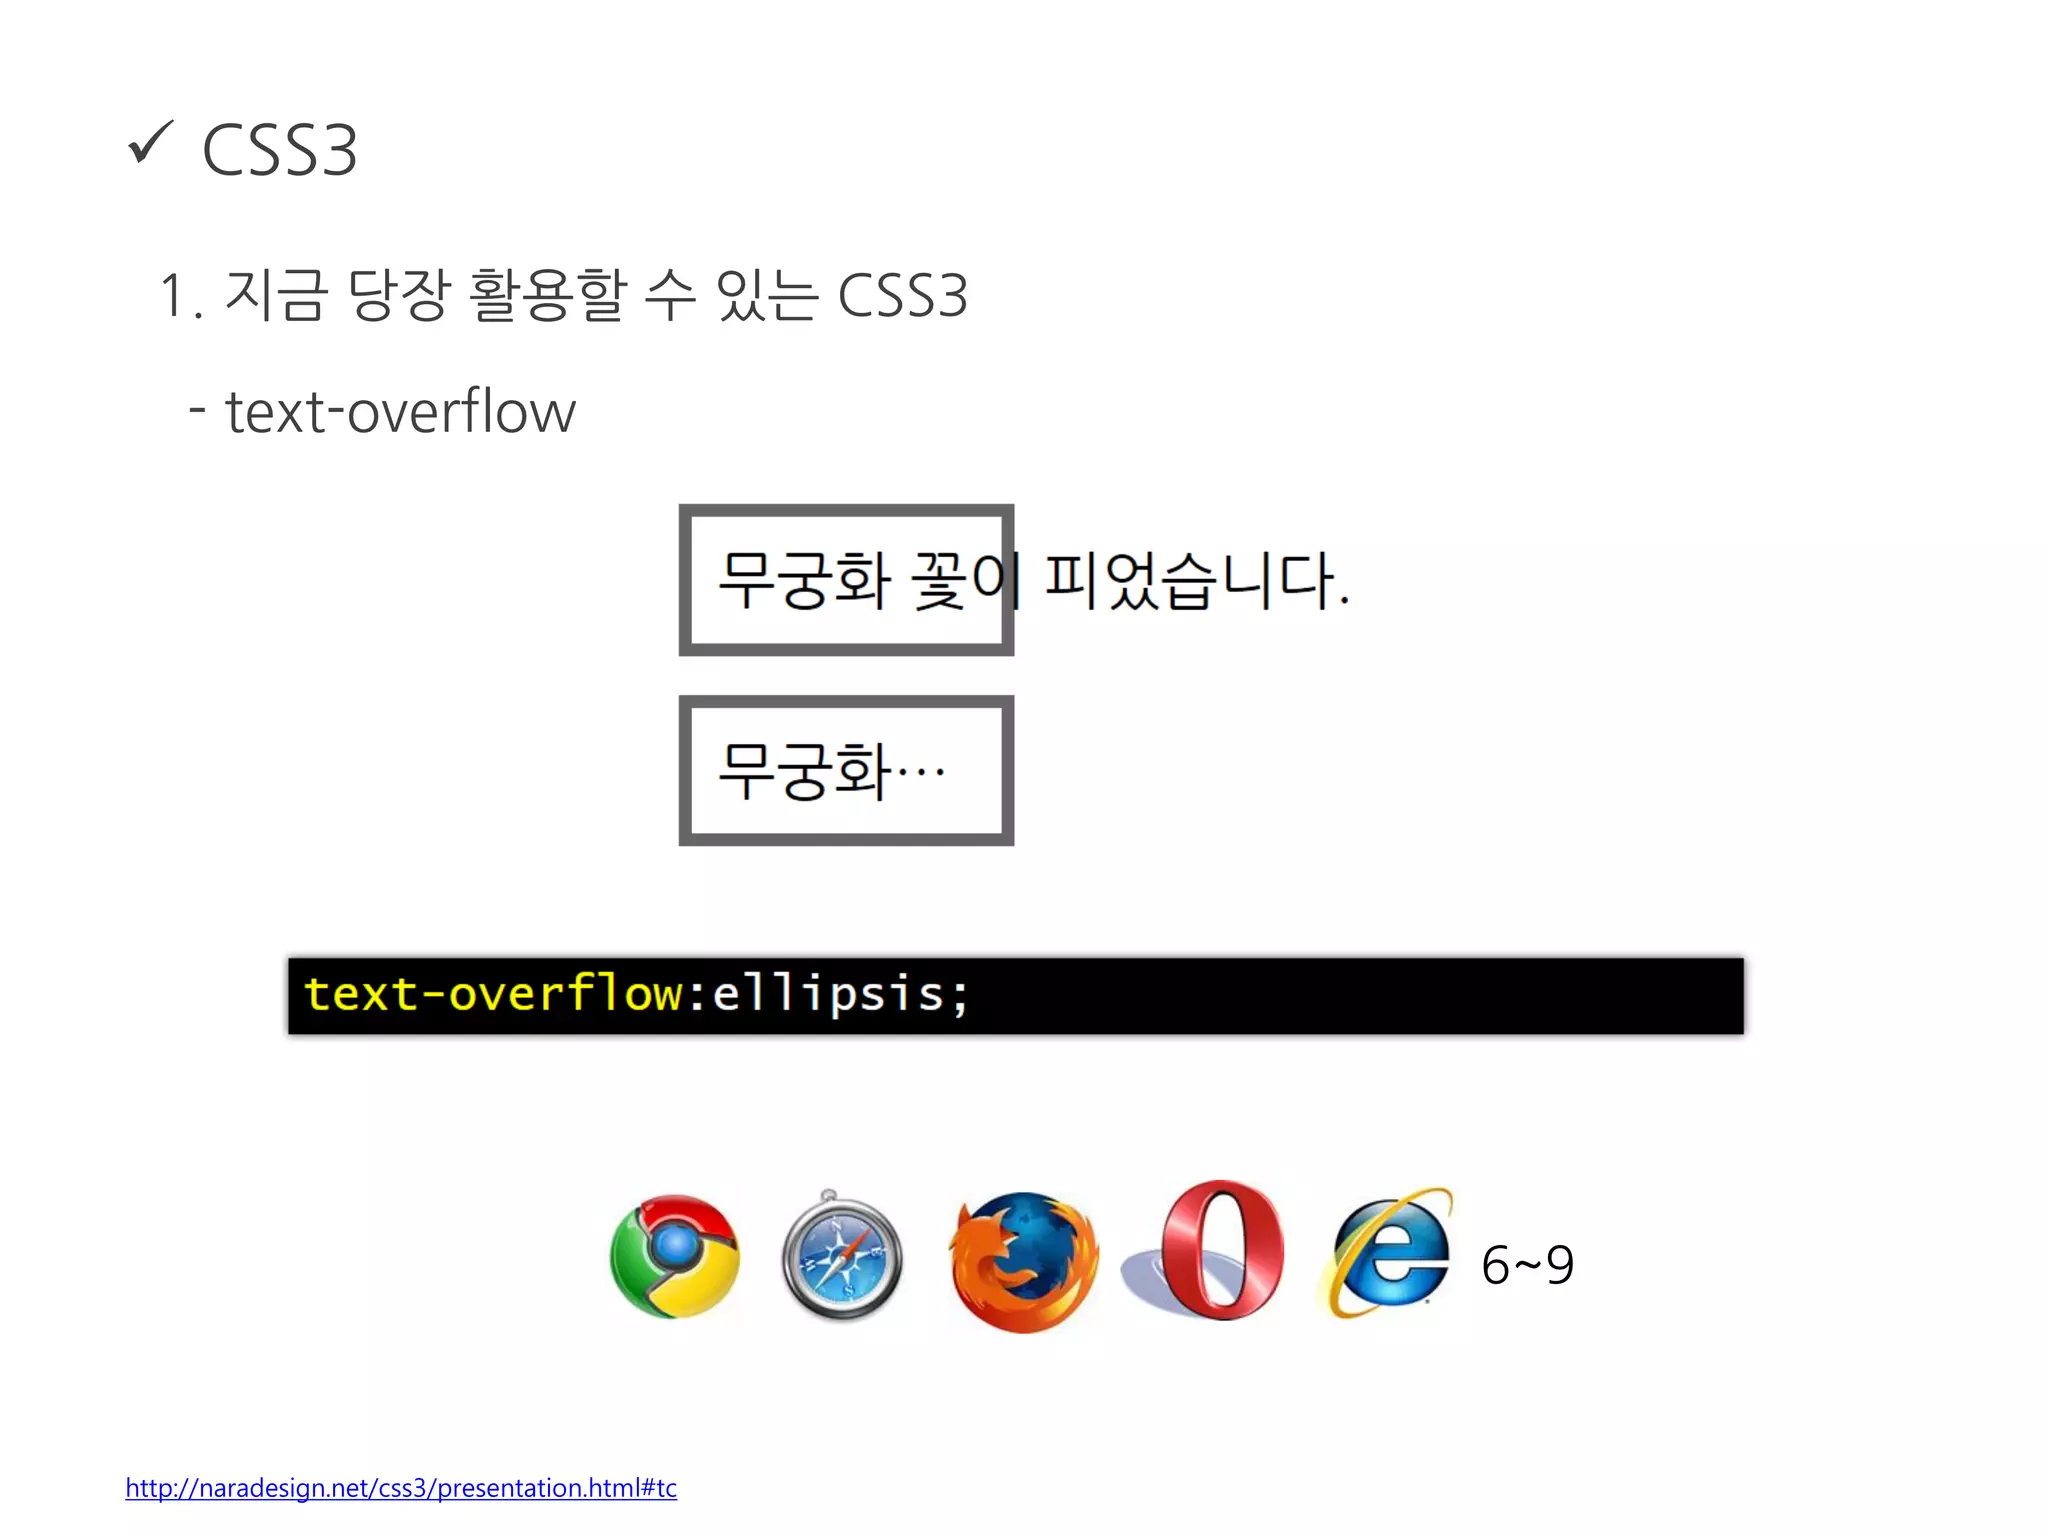
CSS3
1. 지금당장 활용할 수 있는 CSS3
- text-overflow
http://naradesign.net/css3/presentation.html#tc
6~9
126.
CSS3
1. 지금당장 활용할 수 있는 CSS3
- @font-face
http://naradesign.net/css3/presentation.html#tc
6~9
127.
CSS3
1. 지금당장 활용할 수 있는 CSS3
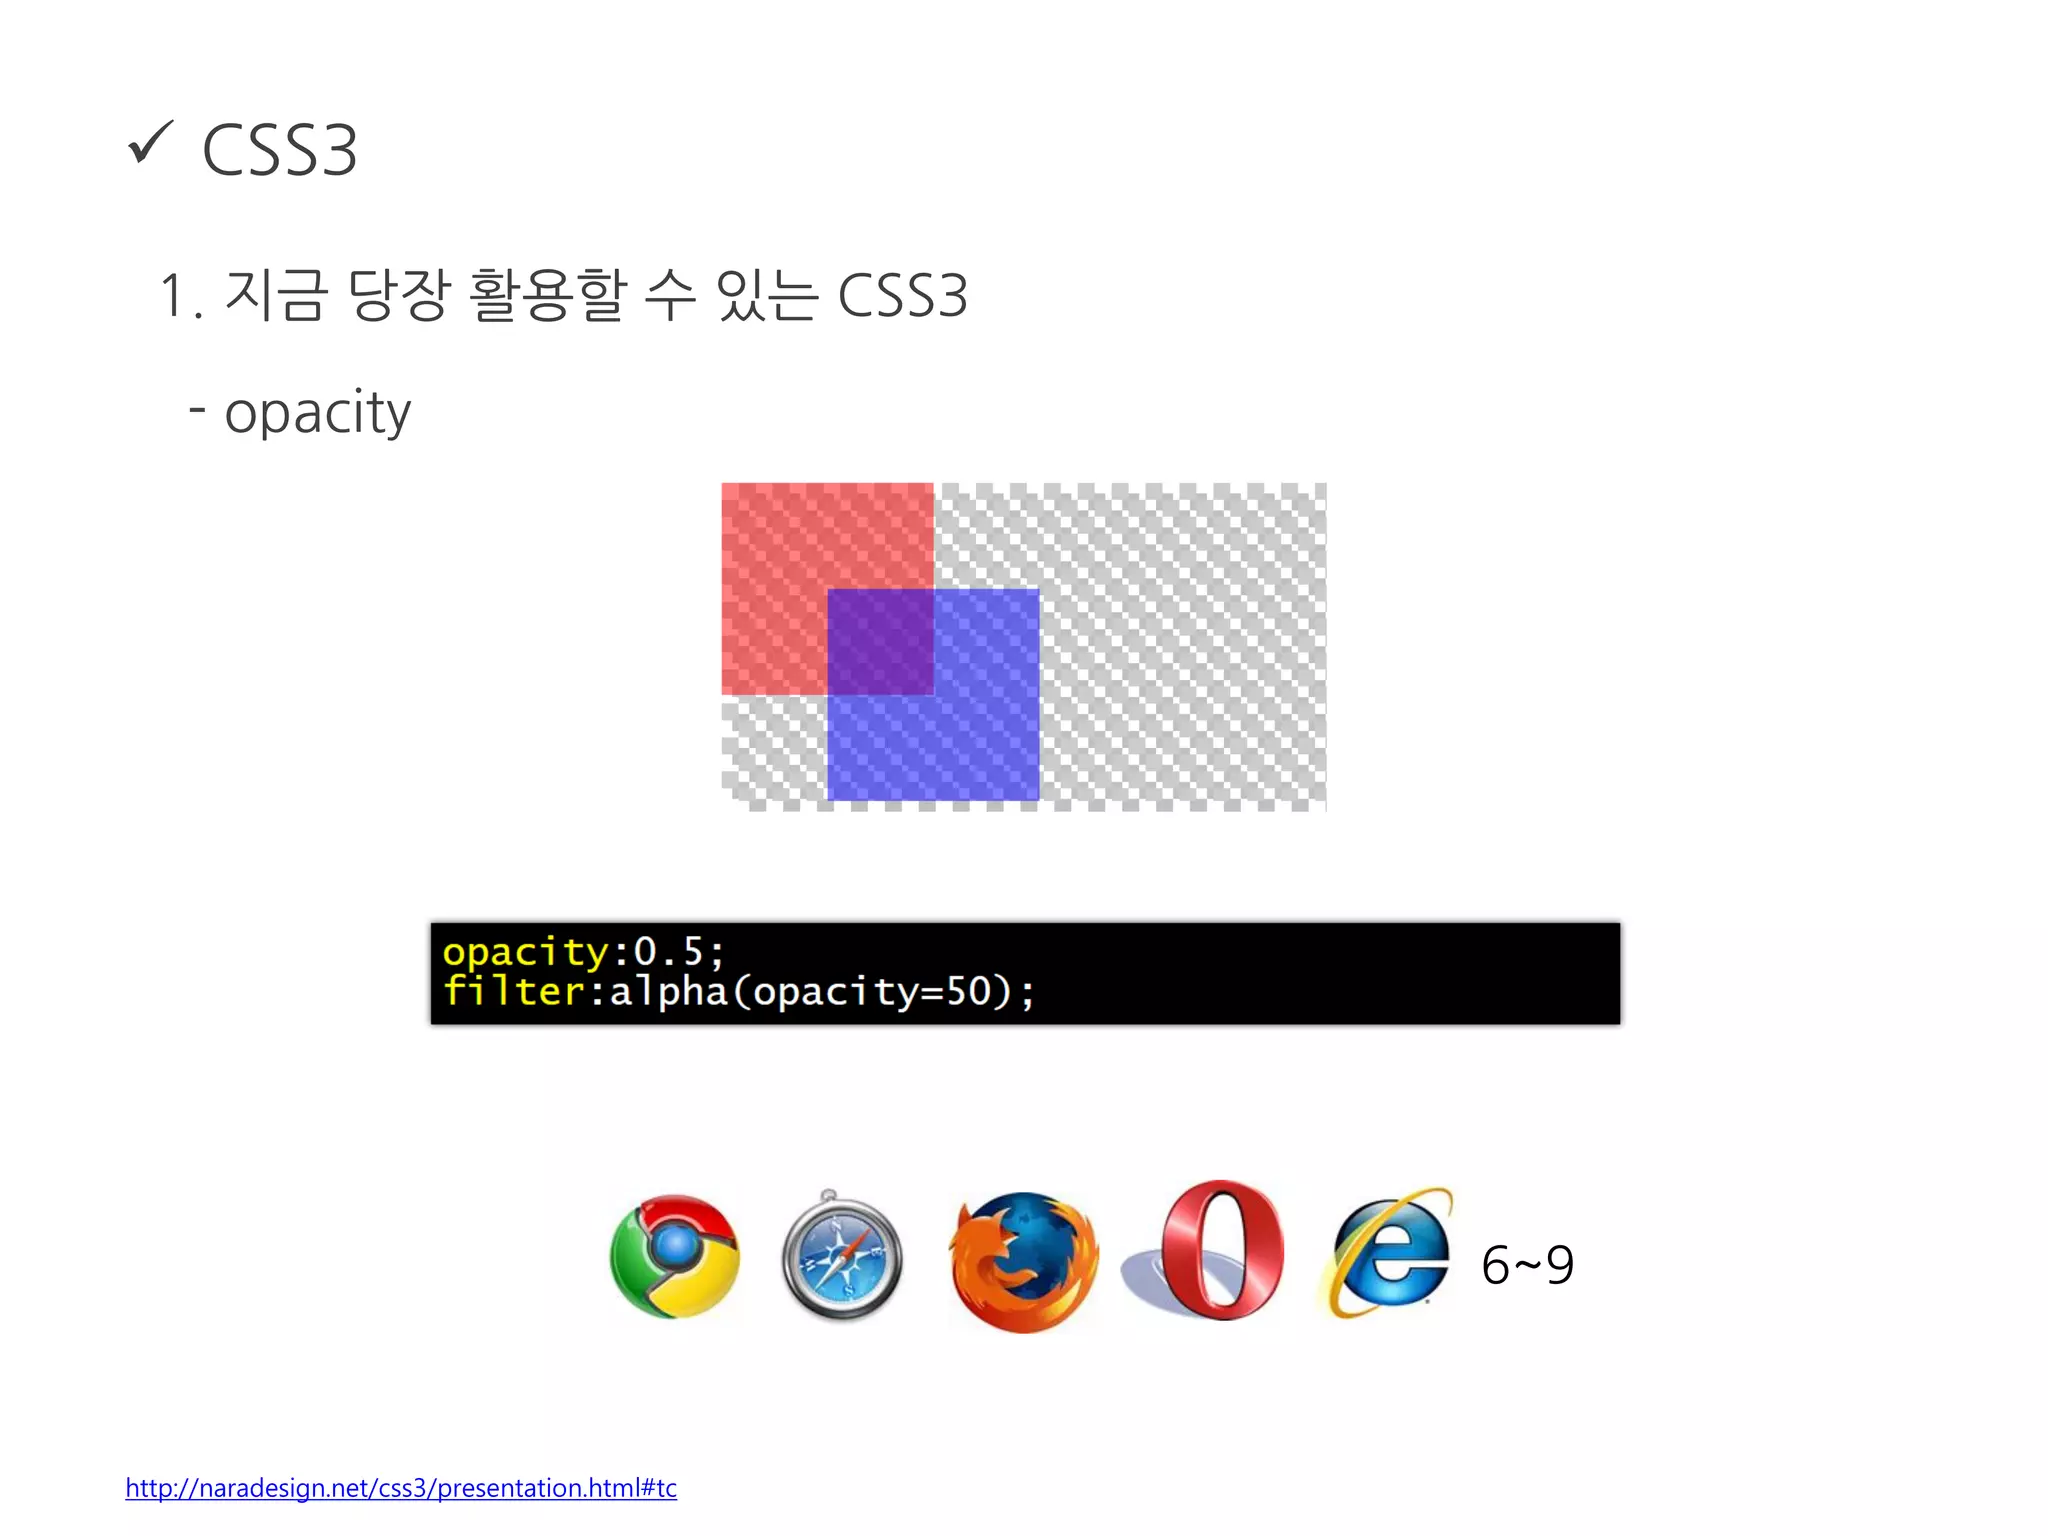
- opacity
http://naradesign.net/css3/presentation.html#tc
6~9
128.
CSS3
1. 지금당장 활용할 수 있는 CSS3
- box-shadow
http://naradesign.net/css3/presentation.html#tc
6~9
129.
CSS3
1. 지금당장 활용할 수 있는 CSS3
- border-radius
http://naradesign.net/css3/presentation.html#tc
9
130.
CSS3
1. 지금당장 활용할 수 있는 CSS3
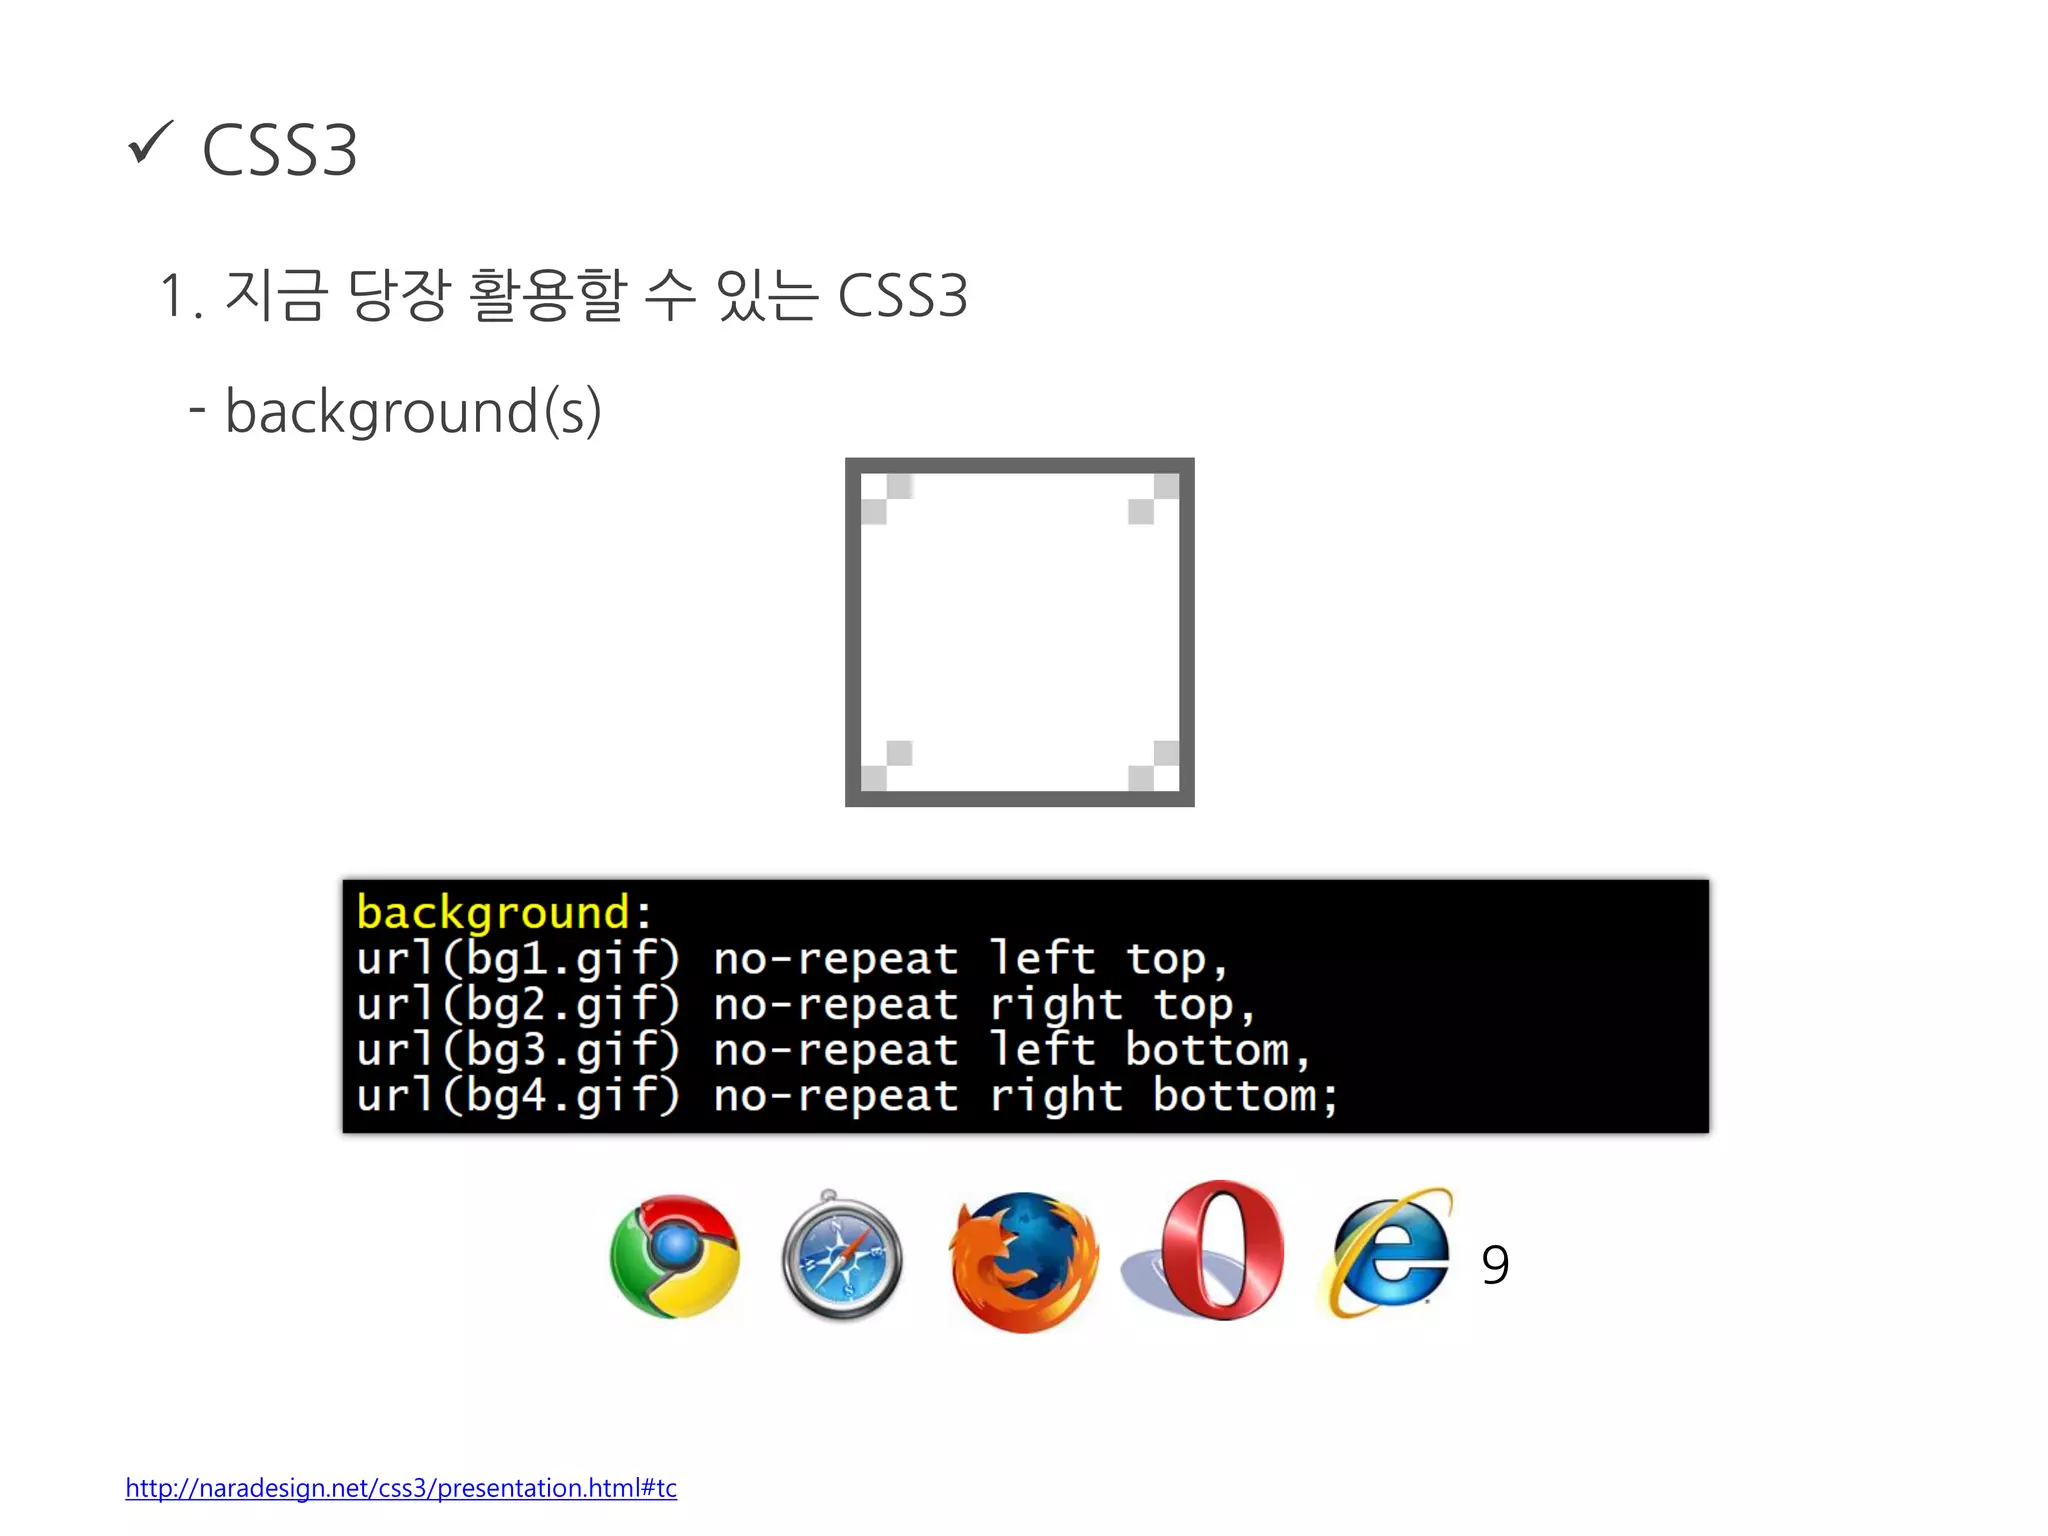
- background(s)
http://naradesign.net/css3/presentation.html#tc
9
131.
CSS3
1. 지금당장 활용할 수 있는 CSS3
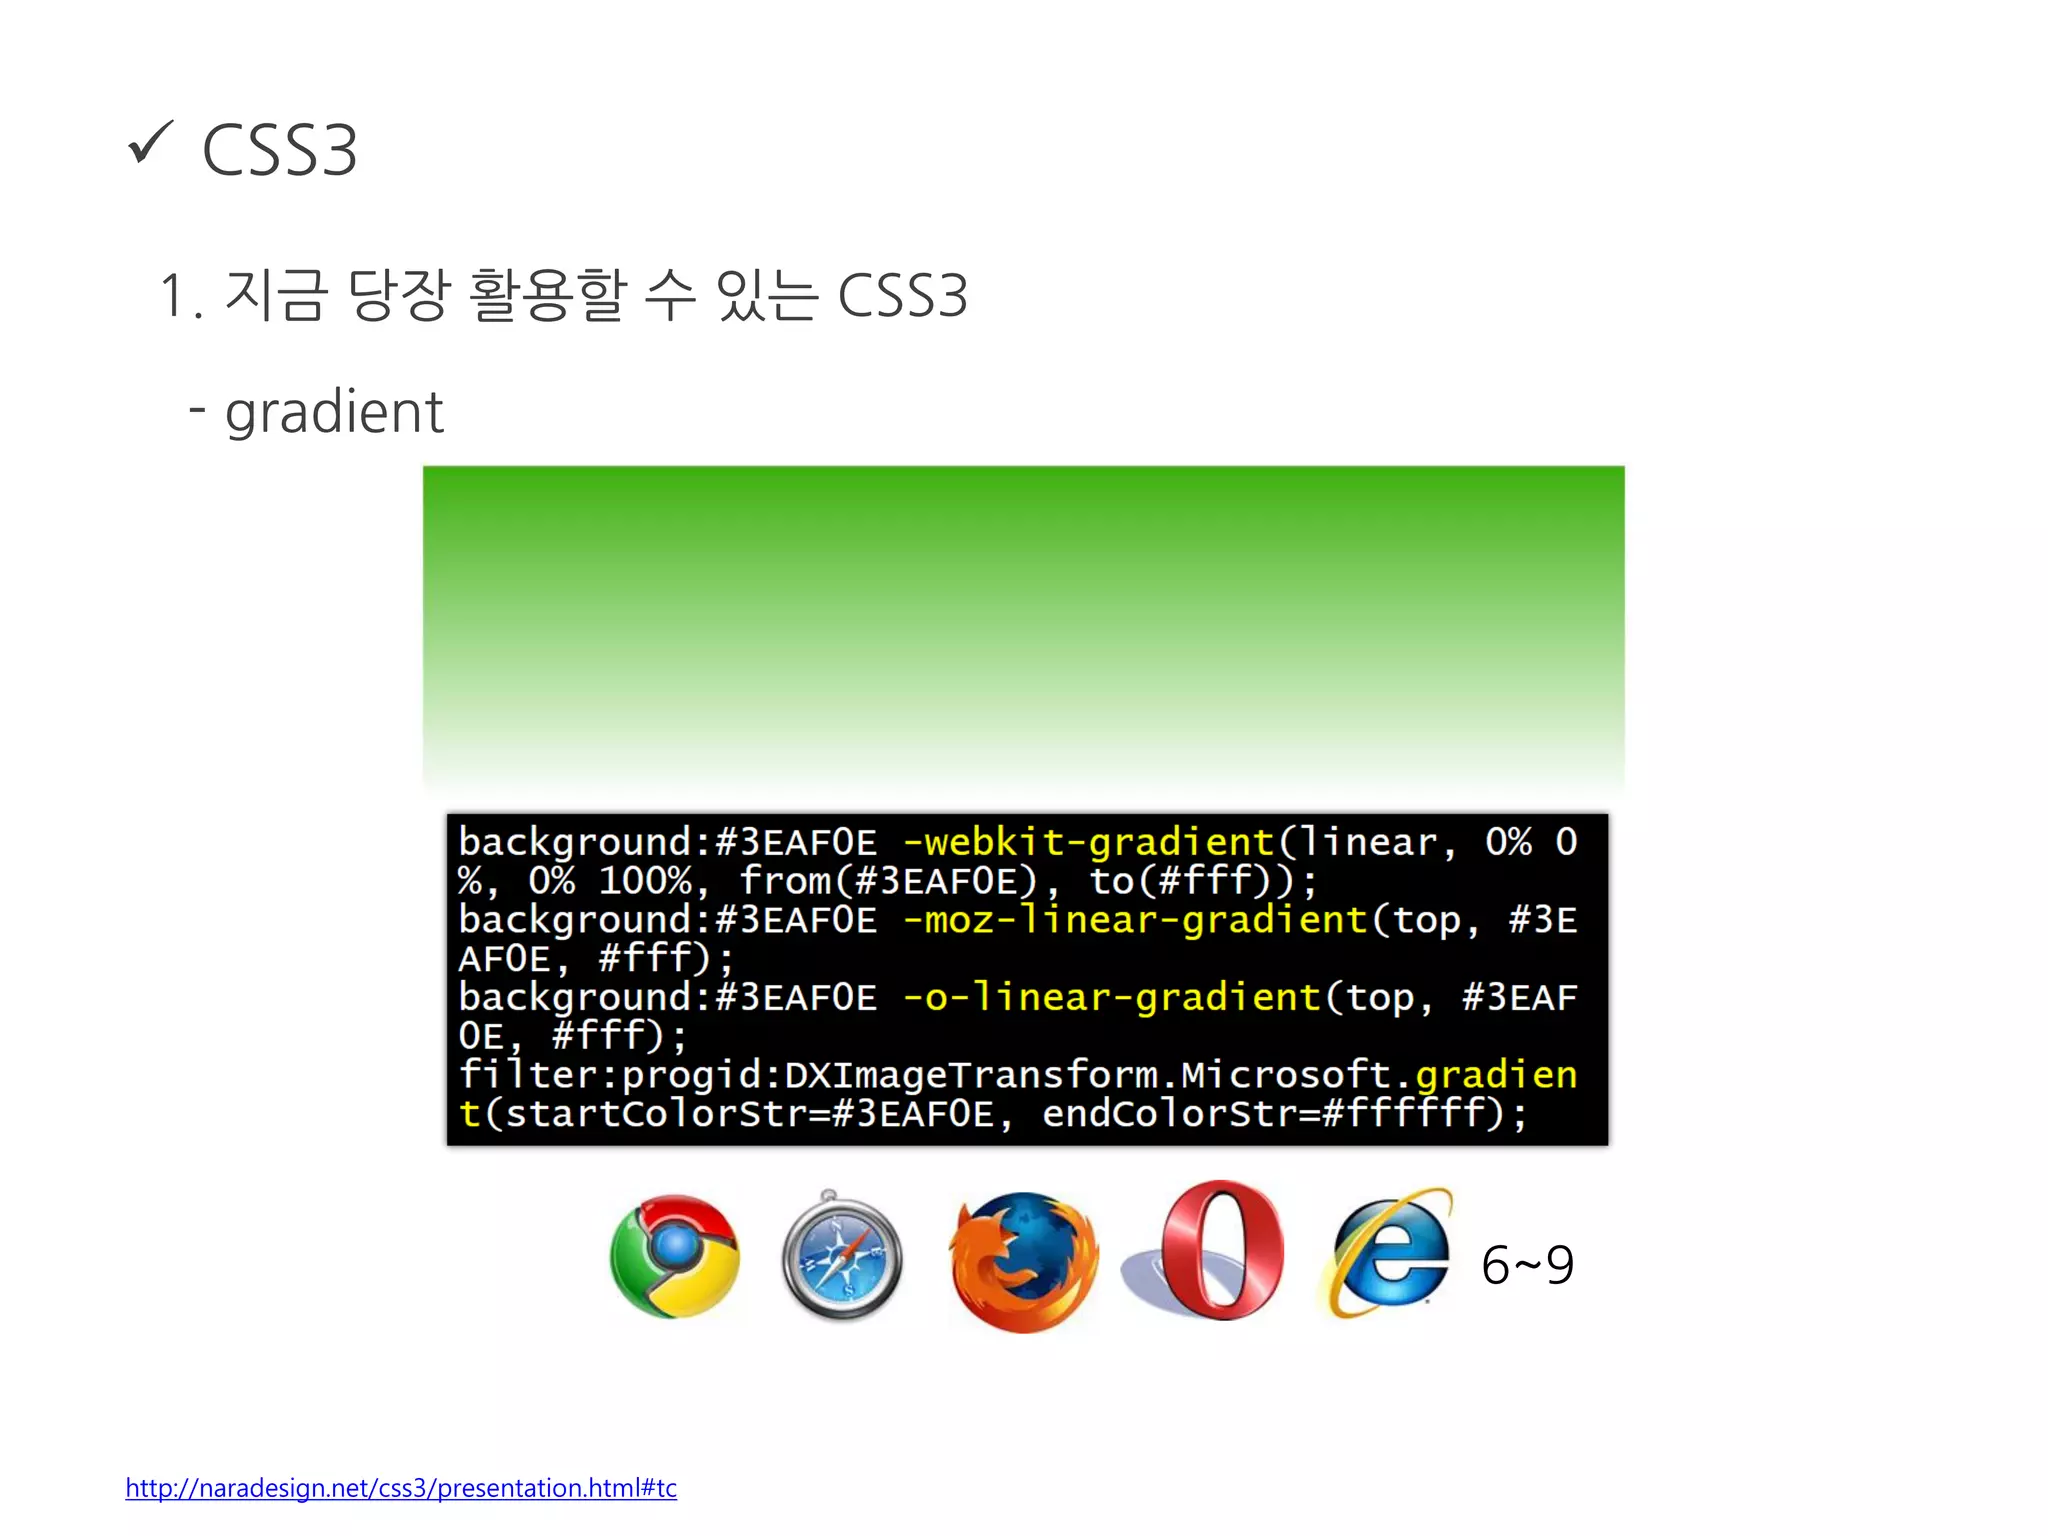
- gradient
http://naradesign.net/css3/presentation.html#tc
6~9
132.
CSS3
1. 지금당장 활용할 수 있는 CSS3
- transform
http://naradesign.net/css3/presentation.html#tc
6~9
133.
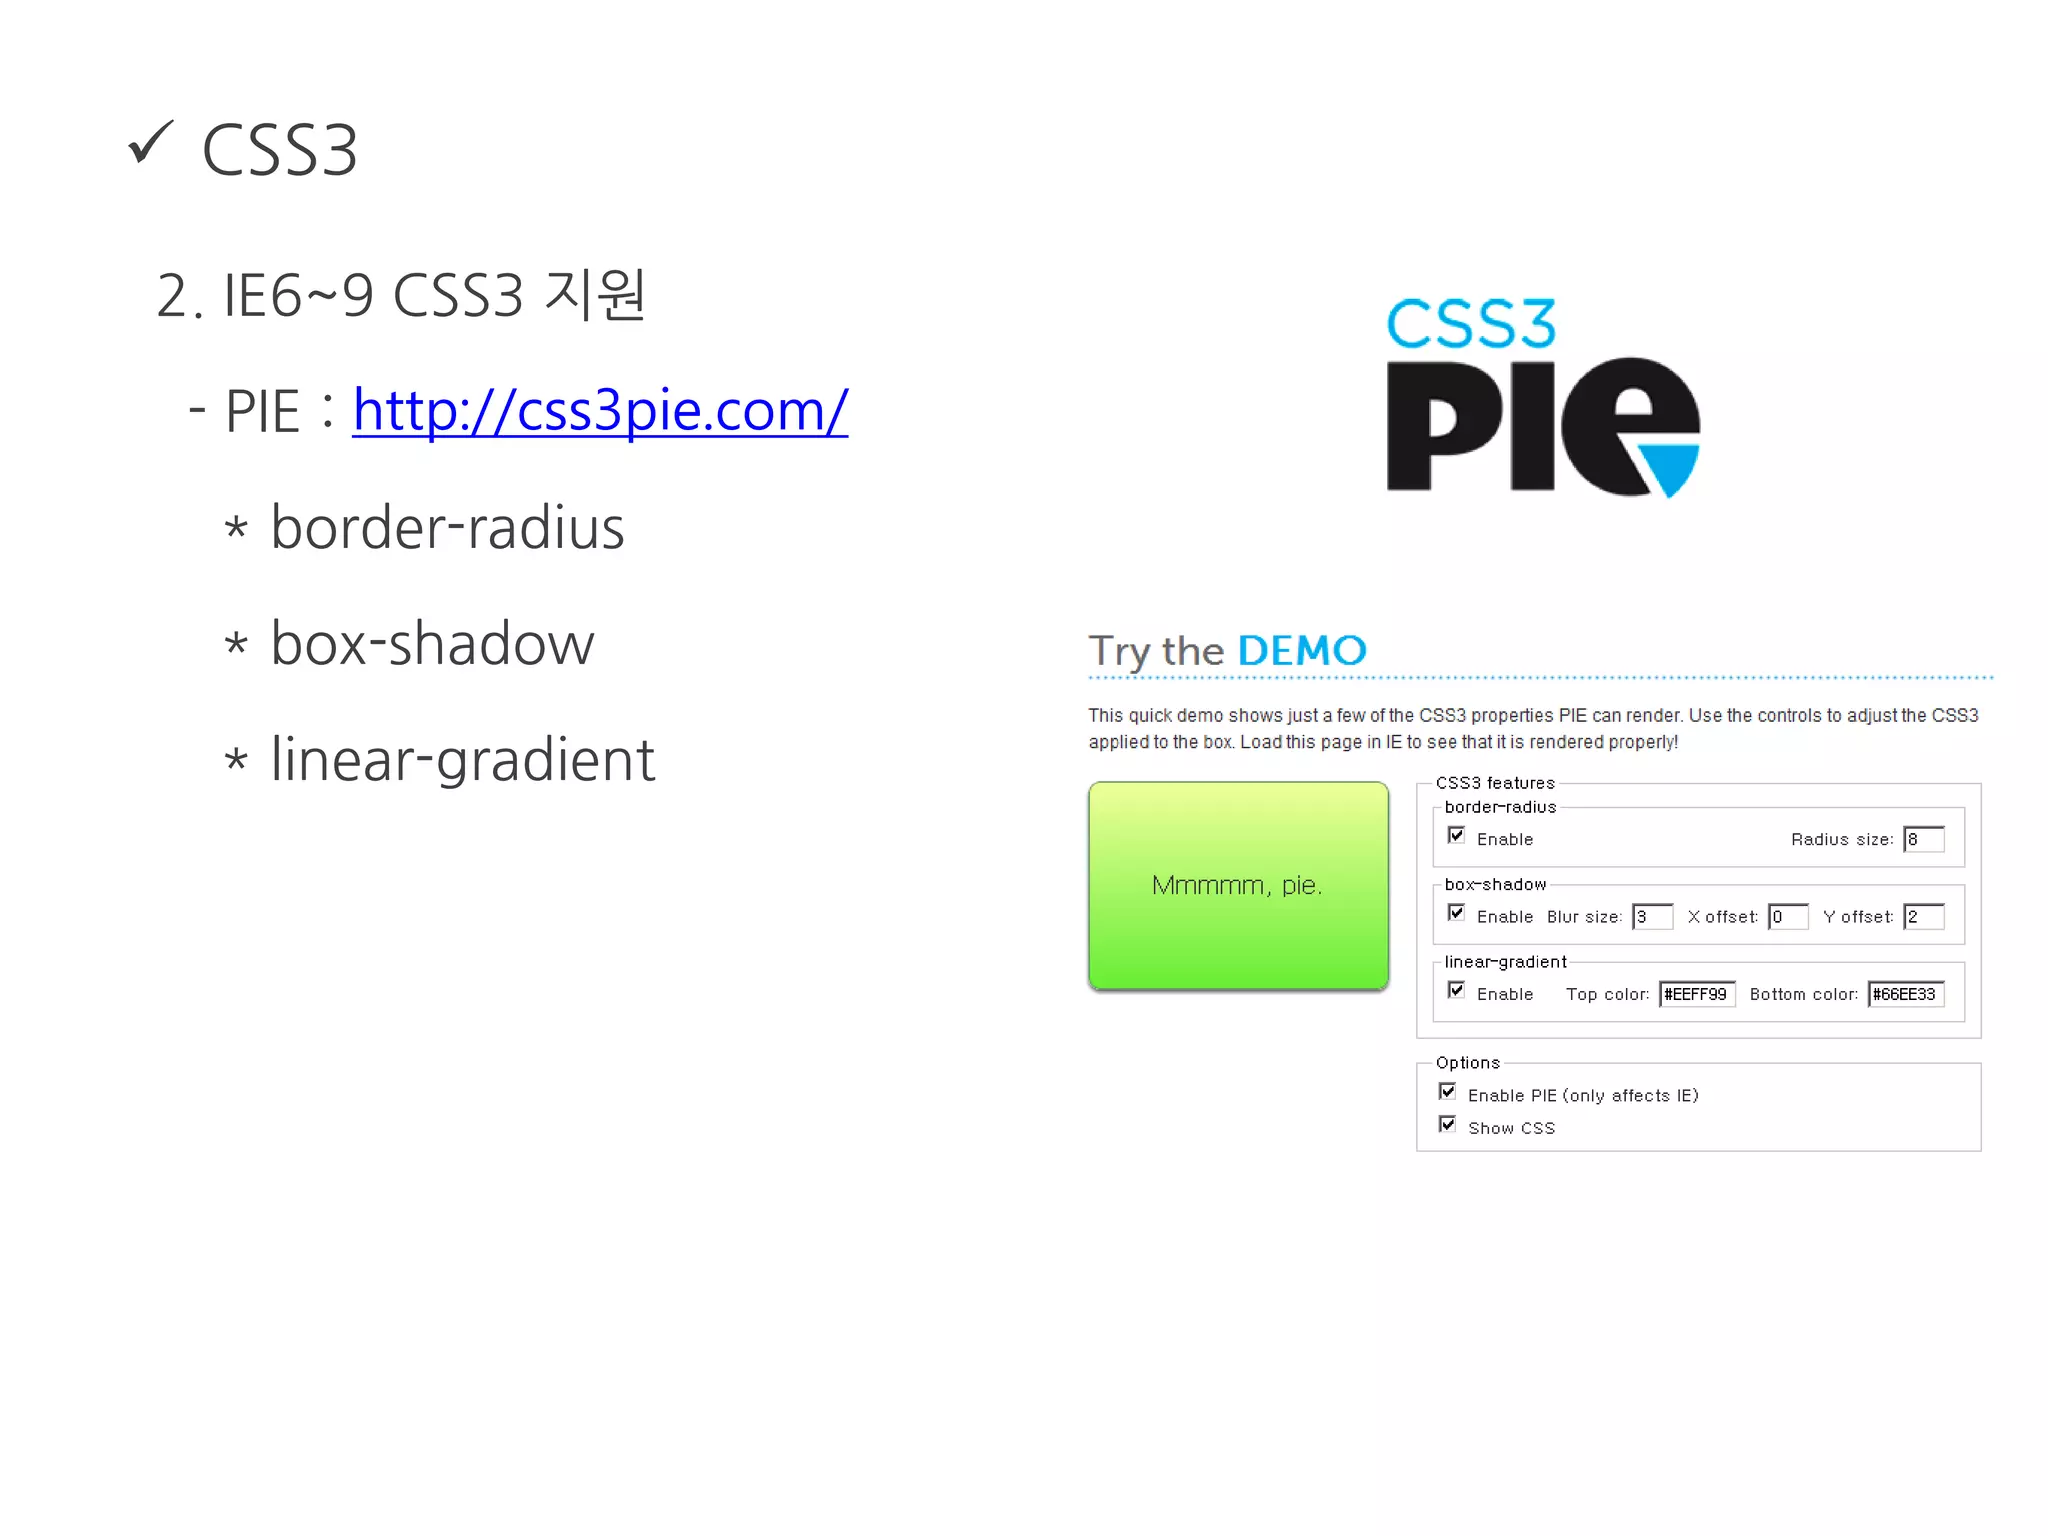
CSS3
2. IE6~9CSS3 지원
- PIE : http://css3pie.com/
* border-radius
* box-shadow
* linear-gradient
134.
모바일 환경에서마크업
1. html5, CSS3 사용
2. viewpot 지정
3. 해상도 별 대응
- 안드로이드 : viewport내 dpi 지정, 이미지 사이즈/1.5로 적음.
- 아이폰 : 이미지를 2배 크기로 만든 후 사이즈와 위치를 ½로 배치
4. em 단위 활용
5. 미디어 쿼리 활용
코딩을 빠르게해주는 몇 가지 방법
http://code.google.com/p/zen-coding/
138.
여러 디바이스대응
1. 반응형 웹 디자인
2. 미디어 쿼리
- 디바이스 별 미디어 쿼리 정리 : http://firejune.com/1633
- 미디어 쿼리 상세 설명 : http://mydeute.com/txp/article/631
139.
유용한 사이트및 추천도서
1. CSS Design Korea : http://cssdesign.kr/forum/
2. 웹 접근성 연구소 : http://www.wah.or.kr/
3. 클리어보스 : http://www.clearboth.org/
4. 유니버설 디자인을 위한 실전 UI 개발 가이드 :
http://naradesign.net/open_content/lecture/wp/#section0
5. 웹 표준 교과서, 다카히로 마시코 저, 디지털미디어리서치
6. 실전 HTML5 가이드 (PDF) http://webstandards.or.kr/html5/
7. 웹 표준 완전정복 세트, 댄 씨더홈, 앤디버드 외 저, 에이콘출판사
8. 웹 디자인 2.0 고급 CSS, 앤디 클락 저, 에이콘출판사
140.
참고자료
1. WebStandards & CSS Design 저자 : 신현석
2. 하나로드림 웹 접근성 교육자료
3. 웹 접근성을 고려한 콘텐츠 제작 기법 v2.0


![ 마크업 언어
2. Syntax
- 숫자 뒤의 단위를 생략할 수 없다 (0은 제외).
- 스크립트와 스타일은 CDATA로 표기한다.
http://www.w3.org/TR/xhtml1/diffs.html
#id {margin:0 0 6 0;} (X)
#id {margin:0 0 6px 0;} (O)
<script type="text/javascript">
//<![CDATA[
if (a > b && a < 0) { // wrong : if (a > b && a < 0) {
return true;
} else {
return false;
}
//]]>
</script>](https://image.slidesharecdn.com/20120719-190917152607/75/slide-20-2048.jpg)


![ CSS
1. CSS 선택자
- Attribute selectors : 속성으로 요소 선택, IE6 지원 안함.
input[type=text] {
border: 1px solid #ccc;
}
<input type="text">
<input type="password">
<input type="radio">
<input type="radio">
<input type="radio">
<input type="checkbox">
<input type="checkbox">
<input type="checkbox">
<input type="text">
<input type="text">](https://image.slidesharecdn.com/20120719-190917152607/75/slide-37-2048.jpg)


![ CSS
3. 우선순위
- a, b, c, d 순으로 우선순위 결정
style attribute : a
ID attribute : b
other attribute, pseudo-class : c
element name, pseudo-element : d
* {} /* a=0 b=0 c=0 d=0 -> specificity = 0,0,0,0 */
li {} /* a=0 b=0 c=0 d=1 -> specificity = 0,0,0,1 */
li:first-line {} /* a=0 b=0 c=0 d=2 -> specificity = 0,0,0,2 */
ul li {} /* a=0 b=0 c=0 d=2 -> specificity = 0,0,0,2 */
ul ol+li {} /* a=0 b=0 c=0 d=3 -> specificity = 0,0,0,3 */
h1 + *[rel=up]{} /* a=0 b=0 c=1 d=1 -> specificity = 0,0,1,1 */
ul ol li.red {} /* a=0 b=0 c=1 d=3 -> specificity = 0,0,1,3 */
li.red.level {} /* a=0 b=0 c=2 d=1 -> specificity = 0,0,2,1 */
#x34y {} /* a=0 b=1 c=0 d=0 -> specificity = 0,1,0,0 */
style="" /* a=1 b=0 c=0 d=0 -> specificity = 1,0,0,0 */](https://image.slidesharecdn.com/20120719-190917152607/75/slide-45-2048.jpg)


![ HTML5
2. IE와 HTML5
- 새로운 element를 기본으로 inline으로 인식해버림
- element로 인식시켜주기.
http://dreamgoer.net/222
header, footer, article, section, nav, menu, hgroup { display: block;}
document.createElement("article");
document.createElement("footer");
document.createElement("header");
document.createElement("hgroup");
document.createElement("nav");
document.createElement("menu");
<!--[if IE]>
<script src="http://html5shim.googlecode.com/svn/trunk/html5.js"></script>
<![endif]-->](https://image.slidesharecdn.com/20120719-190917152607/75/slide-122-2048.jpg)


![[2014널리세미나] 시맨틱한 HTML5 마크업 구조 설계, 어떻게 할까?](https://cdn.slidesharecdn.com/ss_thumbnails/08-140827030216-phpapp02-thumbnail.jpg?width=640&height=640&fit=bounds)


![[전파교육] css day 2014](https://cdn.slidesharecdn.com/ss_thumbnails/cssday2014-140806031358-phpapp01-thumbnail.jpg?width=640&height=640&fit=bounds)


![2011웹표준[02] html소개 및 마크업](https://cdn.slidesharecdn.com/ss_thumbnails/201102html-111215014139-phpapp02-thumbnail.jpg?width=640&height=640&fit=bounds)


