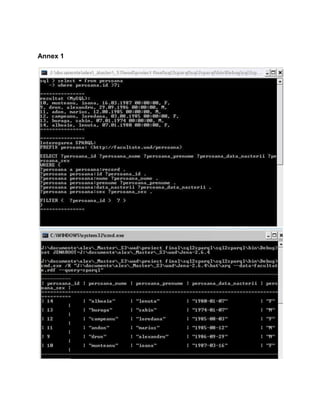
1. The document describes an application that transforms SQL queries into equivalent SPARQL queries to run on an RDF representation of a database.
2. It explains how the SQL database tables are transformed into RDF format, with each table becoming an RDF namespace and records becoming RDF triples.
3. The application works by parsing the SQL query, running it on the database, and then generating a SPARQL query with the necessary prefixes, type declarations, select fields, and filters to give the same results when run on the RDF data.

![2.1 SQL2SPARQL – application short description
The „sql2sparql‟ application transforms sql queries that are entered by the user,
into sparql queries that will give the same result over the rdf transformation of the
database (by following some rules listed under).
The application is a console application that takes an input from the user
representing a sql query, runs the query over „facultate‟ mysql database and shows the
results, and then converts the query to sparql, that is ran over the rdf file using jena.
2.2 Transforming sql database tables into rdf format.
There are some rules that we used when transforming the sql database tables
into rdf format. One of them (needed by the application to convert from sql queries to
sparql queries) is to write in a file, for every table, a line with the following format:
tableName[http://rdfTableNamespace]=fieldName1;fieldName2;…
As example for the table „persoana‟ with the fields: id, nume, prenume, data_nasterii,
sex; the file should contain the following line:
persoana[http://facultate.wad/persoana]=id;nume;prenume;data_nasterii;sex;
(The rdf would contain in this case a declaration of the namespace
xmlns:persoana=http://facultate.wad/persoana).
This could have also been declared in the rdf file in the following record:
<persoana:prototype>
<persoana:id></persoana:id>
<persoana:nume></persoana:nume>
<persoana:prenume></persoana:prenume>
<persoana:data_nasterii></persoana:data_nasterii>
<persoana:sex></persoana:sex>
</persoana:prototype>
but parsing a smaller file would be more efficient and easier.
Each record from the table will appear in the rdf file as: <tableName:record>, and
its values will contain the fields values as <tableName:tableField>. If the field type is of
int value, then this will also be declared in the rdf record (required for conditioning
where/filter).
For example, the following record from persoana (from the sql database):](https://image.slidesharecdn.com/sql2sparql-110124081242-phpapp01/85/SQL2SPARQL-5-320.jpg)
![+----+---------------+---------------+-------------------+-----+
| id | nume | prenume | data_nasterii | sex |
+----+---------------+---------------+-------------------+-----+
| 12 | campeanu | loredana | 1985-08-03 | F |
+----+---------------+---------------+-------------------+-----+
In the rdf file will look like this:
<persoana:record>
<persoana:id
rdf:datatype="http://www.w3.org/2001/XMLSchema#integer">12</persoana:id>
<persoana:nume>campeanu</persoana:nume>
<persoana:prenume>loredana</persoana:prenume>
<persoana:data_nasterii>1985-08-03</persoana:data_nasterii>
<persoana:sex>F</persoana:sex>
</persoana:record>
2.3 How does the application work?
The application takes an input from the user which represents the sql query over
the „facultate‟ database (which was also manually converted to „facultate.rdf‟ using the
rules listed above). This can be entered on multiple lines (such as in mysql console
application), and will stop reading only if „;‟ is the last non-space character on the line.
The command is then run over „facultate‟ database, and the results will be
displayed in the console. If any errors appear the application stops, since the query is
most probably invalid, and the resulting sparql query will be the same.
In order to convert the sql query to a sparql query that will work over
„facultate.rdf‟ and show the same result that the sql query returns over „facultate‟
database, the input goes to several steps.
Step 1
In the first step the sql query is parsed into a dictionary with the keys “select”,
“from”, “where” and “alias” (which is set only for nested selects). The values of the keys
are strings that contain the entire „select‟, „from‟ and respectively „where‟ clauses of the
query (except nested select where the value is a dictionary with the same keys). This is
done by splitting the entire entered query at words such as „select‟, „from‟ and „where‟.
The „where‟ key might be missing in case no „where‟ clause was entered.
e.g.: “select * from persoana where persoana.id > 10” =>
[select = “*”; from=”persoana”; where=” persoana.id > 10”];](https://image.slidesharecdn.com/sql2sparql-110124081242-phpapp01/85/SQL2SPARQL-6-320.jpg)
![Step 2
In the second step some more info is collected from the dictionary prepared in
step 1.
For the from clause, a new dictionary is created that contains the used tables and their
aliases (the dictionary keys will be the table aliases, or their name if no alias is set, and
their values will be the table names). This is done by splitting the „from‟ value into words
(the split is made after spaces as well as after „”,” and operators (such as „<‟, „>=‟, etc.),
and taking the first (table name) and last values (alias) from each group of words
separated by commas (the second word from a group might be „AS‟).
e.g.: “[from] persoana per1, persoana as per2, sex” =>
[per1=”persoana”; per2=”persoana”; sex=”sex”];
For the select clause there is also a dictionary created which contains the fields
and aliases that will appear in the final result. In this case the dictionary keys will be the
field names (e.g.: persoana.id) while the values will be the aliases (for the ease of use in
further steps). If “*” is encountered in the „select‟ clause then all the fields belonging to
the „from‟ tables will be added into the dictionary. The list of fields that belong to a table
are retrieved from the conversion file described at „Transforming sql database tables
into rdf format‟.
e.g.: “[select] *” (from=[persoana=”persoana”]) =>
[persoana.id=”persoana.id”; persoana.nume=”persoana.nume”,
persoana.prenume=”persoana.prenume”; persoana.sex=”persoana.sex”;
persoana.data_nasterii=”persoana.data_nasterii”];
For the where clause 1 list (array) and 1 dictionary are created. The list holds the
filter statements (expr1 operator expr2), while the other will hold the fields that are used
in these expressions, but which should not appear in the final result. The filter
statements can be combined by „and‟ and „or‟, which are modified to “&&” and “||” for
sparql. The filters list will have as the first element the left side expression of a filter
statement, the second will be the operator of the statement and the third will be the right
side of the statement. If there are more statements then there will be a 4 th element
which will be either “&&” or “||”, followed by at least 3 more objects composing a new
filter statement. Each „variable‟ found in expr1 or expr 2 will be formatted as
“?tableAlias_tableField”, and if the select dictionary does not include them then they‟re
added to the auxiliary fields dictionary as [tableAlias.tableField =
“?tableAlias_tablefield”];
e.g.: “[where] persoana.id > 10 and persoana.id+3<=15”
(select=[persoana.nume=persoana.nume]) =>
(filters){?persoana_id, >, 10, &&, ?persoana_id+3, <=, 15};
(auxFields)[persoana.id=?persoana_id];](https://image.slidesharecdn.com/sql2sparql-110124081242-phpapp01/85/SQL2SPARQL-7-320.jpg)
![Step 3
In the 3rd step the sparql query is prepared using the info gathered and prepared
at the previous step. The sparql query will have the form:
<prefixes>
SELECT <sparql select clause>
WHERE {
<type declarations> .
<‟select‟ fields declarations> .
<auxiliary fields declarations>
FILTER ( <filters> )
}
2.3.1<prefixes>, <type declarations>
The prefixes are created from the dictionary created at step 2 for the „from‟
clause. This is done by going through the entire dictionary and getting the table names
used in the „from‟ clause. Using the file that describes the conversion rules from the
database to rdf the namespace for that table is retrieved from the file (the file is actually
read at application startup and stored in a dictionary for further use). The prefix for a
table „t‟ with alias „a‟ will look like: “PREFIX a: <namespaceForT>”.
For every included table, a new value is also created in the type declarations:
“tableAlias a tableAlias:record”;
e.g.: (from)[persoana=persoana; s=student] =>
PREFIX persoana: <http://facultate.wad/persoana>
PREFIX s: <http://facultate.wad/student>
2.3.2 <sparql select clause>, <select fields declarations>
The sparql select clause and the type declarations are created by going
through the dictionary created at step 2 for the „select‟ clause. If the fields contained in
the dictionary contain aliases (the value of the alias does not contain “.”) then the select
clause for sparql will append the „field‟ “?alias”, otherwise it will append
“?tableAlias.fieldName”. The “field declarations” will have the form: “?tableAlias
tableAlias:tableField „field‟”.
e.g.: “SELECT * from ersoana” =>
<sparql select clause> = “?persoana_id ?persoana_nume ?persoana_prenume
?persoana_data_nasterii”
<field declarations> =
“?persoana persoana:id ?persoana_id .](https://image.slidesharecdn.com/sql2sparql-110124081242-phpapp01/85/SQL2SPARQL-8-320.jpg)
![?persoana persoana:nume ?persoana_nume .
?persoana persoana:prenume ?persoana_prenume .
?persoana persoana:data_nasterii ?persoana_data_nasterii .
?persoana persoana:sex ?persoana_sex”
2.3.3<auxiliary fields declarations>
These are constructed the same way as the <field declarations>, but from
the contents of the dictionary created at step 2 for the „where‟ clause.
2.3.4<filters>
The filters are created by simply appending the values from the list of
filters created at step 2 for the „where‟ clause, everything being prepared at that step.
e.g.: “[where] persoana.id > 10 and persoana.id+3<=15” =>
“?persoana_id > 10 && ?persoana_id+3 <= 15}”;
After the sparql query is prepared, it is written out on the console for the
user to see. The query is also written to a file (sparql), and jena is launched taking as
parameters the query file and the rdf file (facultate.rdf), showing the results of the sparql
query. Launching jena with the given parameters is done through a bat file with the
following content:
“set JENAROOT=[PATH TO JENA DIR]
cmd.exe /K "[PATH TO JENA ARQ BAT} --data=facultate.rdf --query=sparql"”.
3. Application overview
Summary
3.1 Console application
3.2 Windows Forms application
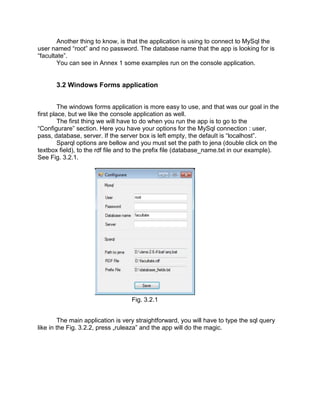
3.1 Console application
To run our example or another in accordance with our rules, you will have to
modify some files. First open with a text editor the file called “jena_facultate_test.bat”.
Set the path to your jena installation folder, to the “arq.bat” file from the bin folder in your
jena and your rdf file. You will also need to add the “tables” in the file named
“database_fields.txt”, based on our rules, if you use another example.](https://image.slidesharecdn.com/sql2sparql-110124081242-phpapp01/85/SQL2SPARQL-9-320.jpg)
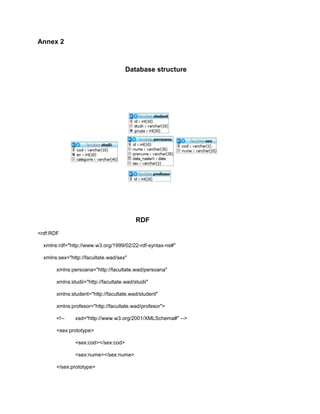
![<persoana:prototype>
<persoana:id></persoana:id>
<persoana:nume></persoana:nume>
<persoana:prenume></persoana:prenume>
<persoana:data_nasterii></persoana:data_nasterii>
<persoana:sex></persoana:sex>
</persoana:prototype>
<studii:prototype>
<studii:cod></studii:cod>
<studii:an></studii:an>
<studii:categorie></studii:categorie>
</studii:prototype>
<student:prototype>
<student:id></student:id>
<student:studii></student:studii>
<student:grupa></student:grupa>
</student:prototype>
<profesor:prototype>
<profesor:id></profesor:id>
</profesor:prototype>
Database_fields.txt – Prefixes/Conventions
sex[http://facultate.wad/sex]=cod;nume;
persoana[http://facultate.wad/persoana]=id;nume;prenume;data_nasterii;sex;
profesor[http://facultate.wad/profesor]=id;
student[http://facultate.wad/student]=id;studii;grupa;
studii[http://facultate.wad/studii]=cod;an;categorie;](https://image.slidesharecdn.com/sql2sparql-110124081242-phpapp01/85/SQL2SPARQL-17-320.jpg)