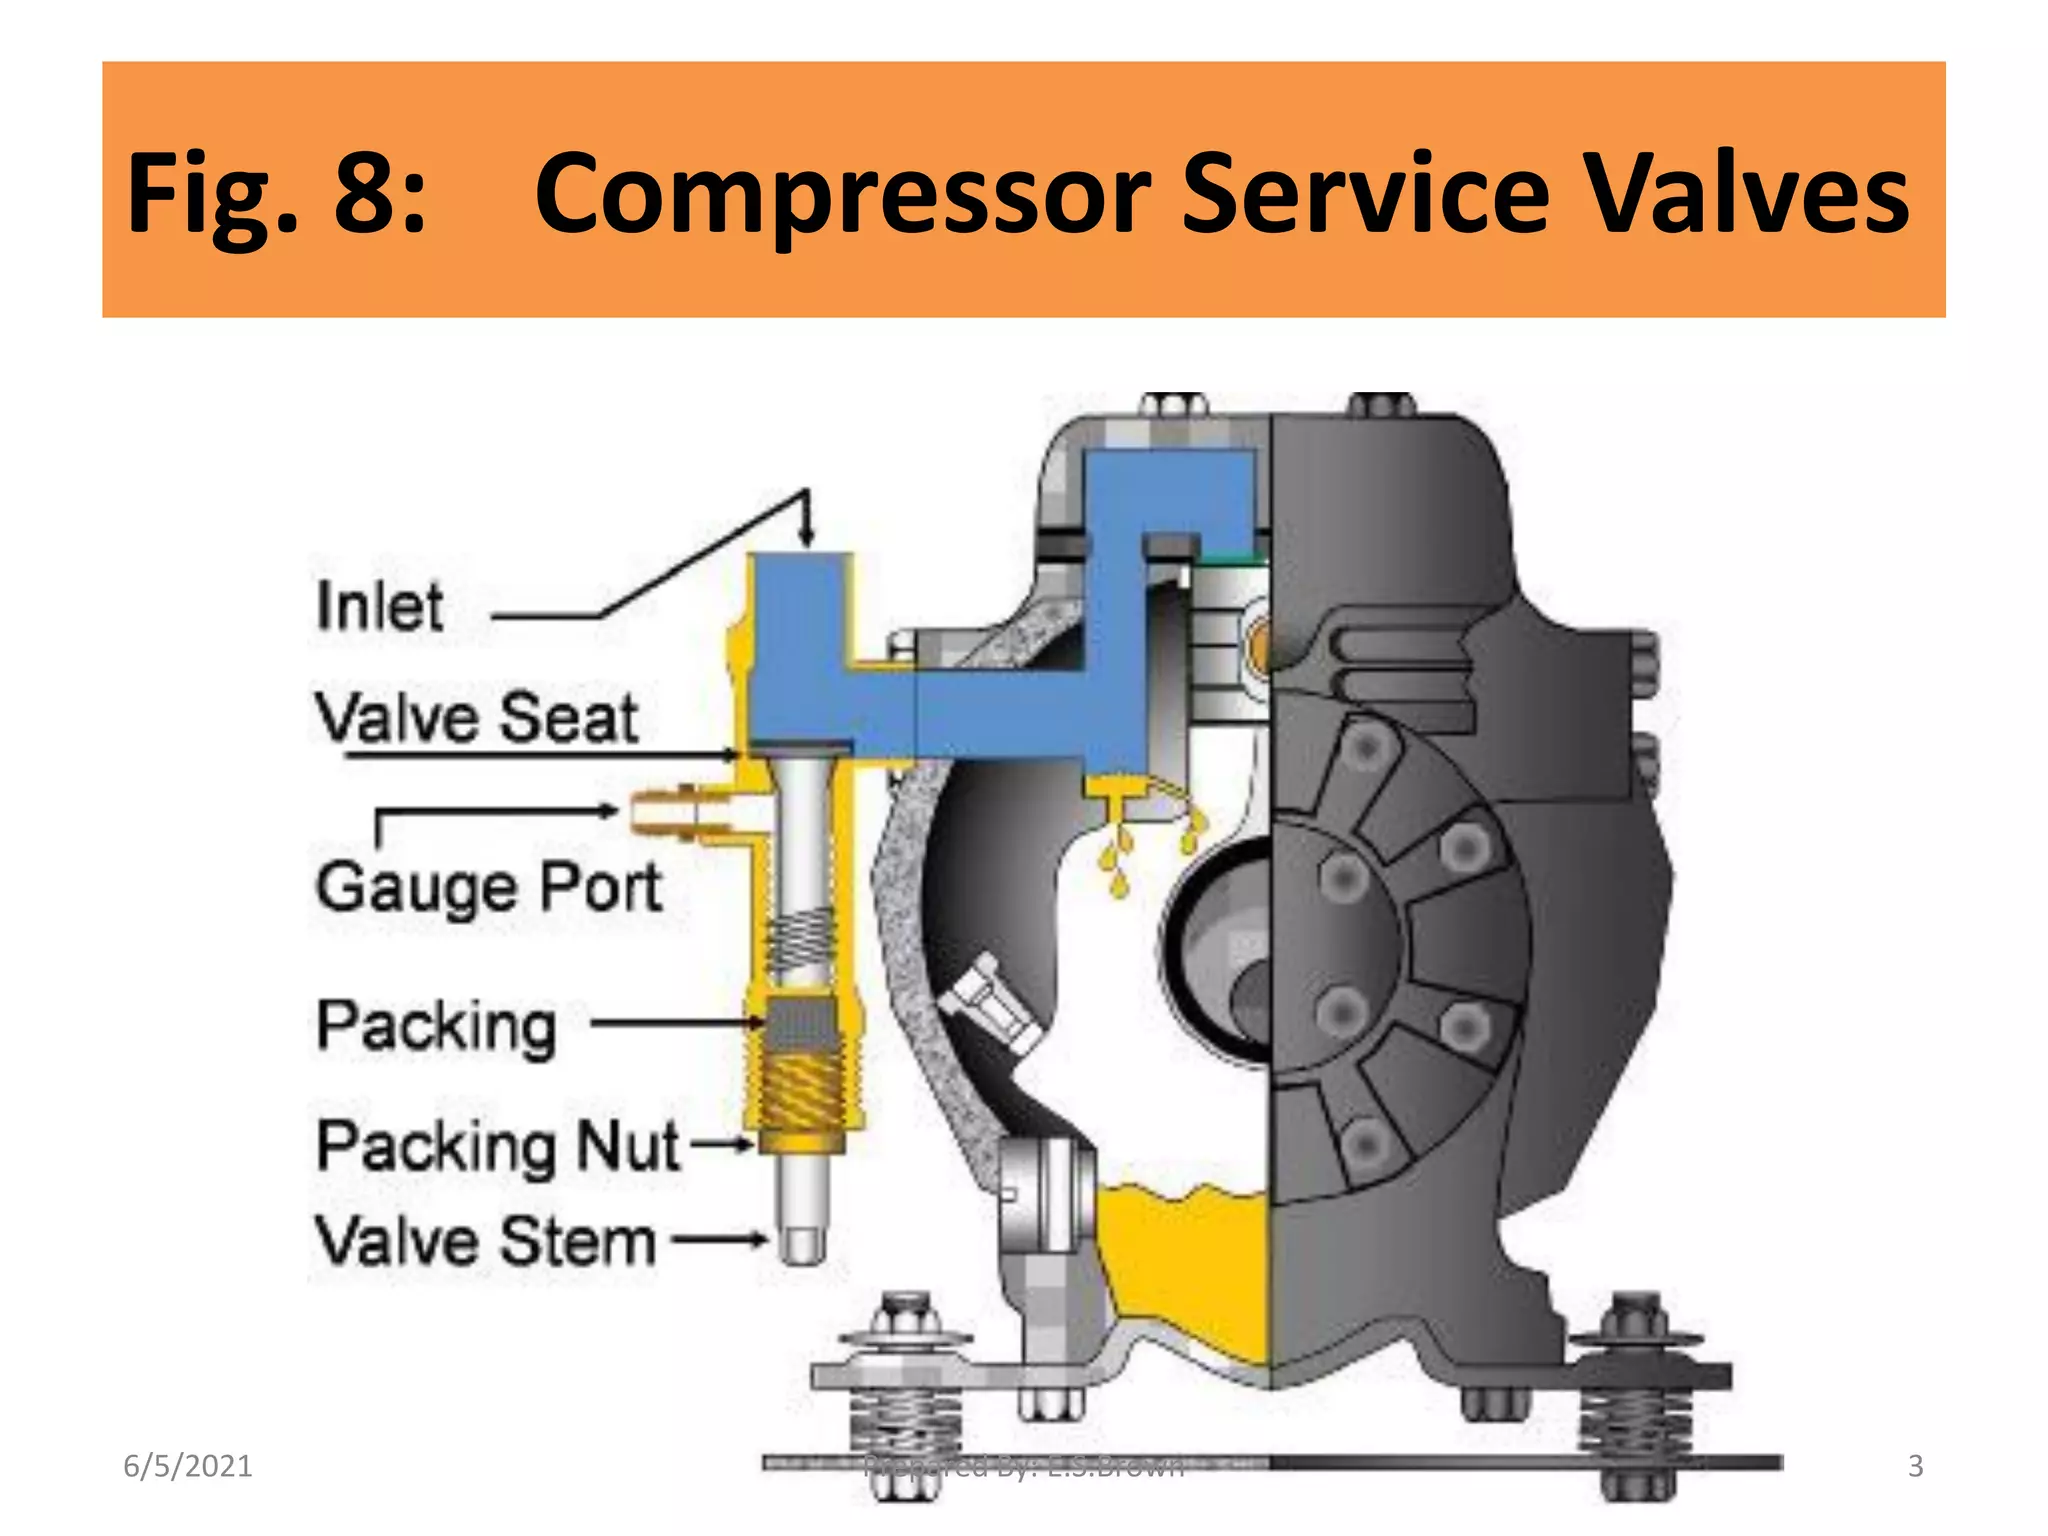
SlideShare a Scribd company logo
1 of 22
Download to read offline
REFRIGERATION
SYSTEM CONTROLS
GROUP: ACR PM
6/5/2021 Prepared By: E.S.Brown 1
SERVICE VALVES
6/5/2021 Prepared By: E.S.Brown 2
Fig. 8: Compressor Service Valves
6/5/2021 Prepared By: E.S.Brown 3
Compressor Service Valves
➢Compressor service valves are used for much
more than just checking system pressures.
➢Technicians also use compressor service valves
for checking compressor reed valves and isolating
the compressor.
➢Figure – 8 shows a larger-than-normal view of a
suction service valve for illustration purposes.
➢The position of the stem in this figure is called
back-seated, because the back of the valve stem
flange is against the seat.
6/5/2021 Prepared By: E.S.Brown 4
Service Valves Function
➢ All valves have a packing around the stem to prevent
refrigerant leaks.
➢ Some valves have a packing nut that should be
loosened a quarter turn before turning the valve stem
and then tightened afterward.
➢ The cover for the valve stem is not shown, but it is
called a dust cap. It keeps the valve stem clean.
➢ If dirt or rust collects on the valve stem, it will damage
the packing as the stem is turned in and out.
6/5/2021 Prepared By: E.S.Brown 5
Compressor inefficiency
➢One way to check for an inefficient compressor
is to front-seat the suction service valve and pull
the compressor into a vacuum.
➢A rise in crankcase pressure may be an indication
of bad reed valves inside the compressor.
➢A leaking service valve would also cause the
pressure to rise, giving a false diagnosis of leaking
reed valves.
6/5/2021 Prepared By: E.S.Brown 6
Fig.9(a): Valve is cracked or mid-seated
• In Fig.9(a), the valve is
cracked or mid-seated.
• By turning the valve
clockwise, the valve stem
• rotates inward, causing the
back of the valve flange
• to move away from its seat.
System pressure rushes
• into the area around the
stem and out the gauge
• port to the pressure gauge.
6/5/2021 Prepared By: E.S.Brown 7
Figure 6–9(b): Suction Valve Front Seated
• Fig.9(b) shows the
suction service valve
front-seated.
• The front of the valve
flange is seated, which
completely blocks off
the suction line to the
compressor.
6/5/2021 Prepared By: E.S.Brown 8
Trouble Shooting
In this position, you can perform the
following four troubleshooting procedures:
1. Check the condition of reed valves.
2. Check for high back-pressure overloading.
3. Isolate the suction side of the compressor
for oil changes.
4. Isolate both sides for valve plate inspection
and compressor replacement.
6/5/2021 Prepared By: E.S.Brown 9
Check the condition of reed valves
• Run the compressor until it pulls a vacuum in
the crankcase.
• Turn the compressor off and watch the
suction gauge.
• If the pressure starts rising, the suction valves
are leaking through or the
discharge vapour is leaking past the piston
and cylinder wall.
6/5/2021 Prepared By: E.S.Brown 10
Check for high back-pressure overloading
• Compressor overloading can occur on a
low-temperature unit during the initial start up.
• It can also happen in a freezer when it comes out
of defrost.
• In both the cases, the compressor starts, runs for
a short period, and then goes out on overload.
• The high back pressure (suction pressure) from a
warm evaporator (hot pull-down) is more than the
compressor can handle.
6/5/2021 Prepared By: E.S.Brown 11
Check for high back-pressure overloading
• By starting the compressor with the suction valve
front-seated, the compressor is starting
unloaded.
• With the compressor running, open the suction
service valve one turn at a time as you check the
compressor’s amperage.
• Stop opening when the amperage reaches the
compressor’s rated load amps (RLA), as listed on
the compressor’s electrical rating plate.
6/5/2021 Prepared By: E.S.Brown 12
Check for high back-pressure overloading
• As the box cools, the suction pressure and
amperage will fall.
• Continue opening the valve, while monitoring
RLA, until the valve is fully open.
• If the box cools down and if the compressor
cycles off on the t-stat and then restarts,
the compressor is probably going to be just
fine.
6/5/2021 Prepared By: E.S.Brown 13
Solution for Overloading
A compressor needs some help if it continues
to trip on overload when it is starting under high
suction pressure.
Solution
1. Install a crankcase pressure regulator
(CPR), or
2. Install a pressure-limiting thermal expansion
valve (TEV).
6/5/2021 Prepared By: E.S.Brown 14
Isolate suction side of compressor
for oil changes.
• If the suction valve is front-seated, all the
refrigerant in the low-pressure (LP) part of the
system is on the other side of the valve flange.
• The small amount of remaining refrigerant between
the service valve and the cylinder can be vented.
• The oil can now be changed, if the compressor is a
semi-hermetic.
6/5/2021 Prepared By: E.S.Brown 15
Isolate for valve plate inspection and
compressor replacement.
Fig. 10 – Isolated Compressor
6/5/2021 Prepared By: E.S.Brown 16
Isolated compressor
• In Fig. 10:
1. The suction service is front seated.
2. If the discharge service valve is also front
seated.
3. The pressure in the head is bled off.
4. The compressor is completely isolated from
both sides of the system.
6/5/2021 Prepared By: E.S.Brown 17
• Safety note:
• Never run the compressor with the discharge
service valve front-seated.
• It will immediately blow the valve plate
gasket.
• Or worse, it could pump dangerously high
pressure into your gauge hose if it is
connected to the service valve.
6/5/2021 Prepared By: E.S.Brown 18
• Safety note:
➢Make sure all the pressure is bled off the
compressor before unbolting the
compressor head.
➢It only takes a few pounds of pressure to blow
the head into the air.
6/5/2021 Prepared By: E.S.Brown 19
Compressor Replacement
1. Unbolt the service valves from the compressor.
2. Remove the old compressor.
3. Set the new compressor in place.
4. Re-bolt the service valves.
5. Pull a vacuum on the new compressor.
6. Back-seat the service valves.
7. You’re ready to start it up.
6/5/2021 Prepared By: E.S.Brown 20
Review Questions
(1) State the procedures for isolating a
compressor for:
a. Valve plate inspection
b. Compressor replacement
(2) What safety precautions should be followed
when isolating or replacing a compressor?
6/5/2021 Prepared By: E.S.Brown 21
END
6/5/2021 Prepared By: E.S.Brown 22

More Related Content

Similar to Refrigeration System Controls - Service Valves.pdf

Hyster c007 (h7.00 12.50 hp7.00-9.00 b europe) forklift service repair manual
Hyster c007 (h7.00 12.50 hp7.00-9.00 b europe) forklift service repair manualHyster c007 (h7.00 12.50 hp7.00-9.00 b europe) forklift service repair manual
Hyster c007 (h7.00 12.50 hp7.00-9.00 b europe) forklift service repair manual
fujsefkksekfm
 

Similar to Refrigeration System Controls - Service Valves.pdf (20)

Hyster b214 (h500 hd ec) forklift service repair manual
Hyster b214 (h500 hd ec) forklift service repair manualHyster b214 (h500 hd ec) forklift service repair manual
Hyster b214 (h500 hd ec) forklift service repair manual
 
Hyster b214 (h450 hds ec) forklift service repair manual
Hyster b214 (h450 hds ec) forklift service repair manualHyster b214 (h450 hds ec) forklift service repair manual
Hyster b214 (h450 hds ec) forklift service repair manual
 
Hyster b214 (h450 hds ec) forklift service repair manual
Hyster b214 (h450 hds ec) forklift service repair manualHyster b214 (h450 hds ec) forklift service repair manual
Hyster b214 (h450 hds ec) forklift service repair manual
 
Hyster b214 (h500 hd ec) forklift service repair manual
Hyster b214 (h500 hd ec) forklift service repair manualHyster b214 (h500 hd ec) forklift service repair manual
Hyster b214 (h500 hd ec) forklift service repair manual
 
Hyster e004 (s3.50 xm) forklift service repair manual
Hyster e004 (s3.50 xm) forklift service repair manualHyster e004 (s3.50 xm) forklift service repair manual
Hyster e004 (s3.50 xm) forklift service repair manual
 
Hyster e004 (s4.00 xm) forklift service repair manual
Hyster e004 (s4.00 xm) forklift service repair manualHyster e004 (s4.00 xm) forklift service repair manual
Hyster e004 (s4.00 xm) forklift service repair manual
 
Hyster e004 (s4.00 xm) forklift service repair manual
Hyster e004 (s4.00 xm) forklift service repair manualHyster e004 (s4.00 xm) forklift service repair manual
Hyster e004 (s4.00 xm) forklift service repair manual
 
Hyster e004 (s5.50 xm) forklift service repair manual
Hyster e004 (s5.50 xm) forklift service repair manualHyster e004 (s5.50 xm) forklift service repair manual
Hyster e004 (s5.50 xm) forklift service repair manual
 
Hyster e004 (s4.50 xm) forklift service repair manual
Hyster e004 (s4.50 xm) forklift service repair manualHyster e004 (s4.50 xm) forklift service repair manual
Hyster e004 (s4.50 xm) forklift service repair manual
 
Hyster e004 (s4.50 xm) forklift service repair manual
Hyster e004 (s4.50 xm) forklift service repair manualHyster e004 (s4.50 xm) forklift service repair manual
Hyster e004 (s4.50 xm) forklift service repair manual
 
Hyster c007 (h7.00 12.50 hp7.00-9.00 b europe) forklift service repair manual
Hyster c007 (h7.00 12.50 hp7.00-9.00 b europe) forklift service repair manualHyster c007 (h7.00 12.50 hp7.00-9.00 b europe) forklift service repair manual
Hyster c007 (h7.00 12.50 hp7.00-9.00 b europe) forklift service repair manual
 
Hyster c007 (h7.00 12.50 hp7.00-9.00 b europe) forklift service repair manual
Hyster c007 (h7.00 12.50 hp7.00-9.00 b europe) forklift service repair manualHyster c007 (h7.00 12.50 hp7.00-9.00 b europe) forklift service repair manual
Hyster c007 (h7.00 12.50 hp7.00-9.00 b europe) forklift service repair manual
 
Hyster e004 (s80 xm) forklift service repair manual
Hyster e004 (s80 xm) forklift service repair manualHyster e004 (s80 xm) forklift service repair manual
Hyster e004 (s80 xm) forklift service repair manual
 
Hyster e004 (s80 xm) forklift service repair manual
Hyster e004 (s80 xm) forklift service repair manualHyster e004 (s80 xm) forklift service repair manual
Hyster e004 (s80 xm) forklift service repair manual
 
Hyster e004 (s120 xm) forklift service repair manual
Hyster e004 (s120 xm) forklift service repair manualHyster e004 (s120 xm) forklift service repair manual
Hyster e004 (s120 xm) forklift service repair manual
 
Hyster e004 (s100 xm) forklift service repair manual
Hyster e004 (s100 xm) forklift service repair manualHyster e004 (s100 xm) forklift service repair manual
Hyster e004 (s100 xm) forklift service repair manual
 
Hyster e004 (s120 xm) forklift service repair manual
Hyster e004 (s120 xm) forklift service repair manualHyster e004 (s120 xm) forklift service repair manual
Hyster e004 (s120 xm) forklift service repair manual
 
Hyster e004 (s100 xmbcs) forklift service repair manual
Hyster e004 (s100 xmbcs) forklift service repair manualHyster e004 (s100 xmbcs) forklift service repair manual
Hyster e004 (s100 xmbcs) forklift service repair manual
 
Hyster e004 (s100 xmbcs) forklift service repair manual
Hyster e004 (s100 xmbcs) forklift service repair manualHyster e004 (s100 xmbcs) forklift service repair manual
Hyster e004 (s100 xmbcs) forklift service repair manual
 
Hyster e004 (s100 xmbcs) forklift service repair manual
Hyster e004 (s100 xmbcs) forklift service repair manualHyster e004 (s100 xmbcs) forklift service repair manual
Hyster e004 (s100 xmbcs) forklift service repair manual
 

Recently uploaded

Scouring of cotton and wool fabric with effective scouring method
Scouring of cotton and wool fabric with effective scouring methodScouring of cotton and wool fabric with effective scouring method
Scouring of cotton and wool fabric with effective scouring method
vimal412355
 
21P35A0312 Internship eccccccReport.docx
21P35A0312 Internship eccccccReport.docx21P35A0312 Internship eccccccReport.docx
21P35A0312 Internship eccccccReport.docx
rahulmanepalli02
 

Recently uploaded (20)

Ground Improvement Technique: Earth Reinforcement
Ground Improvement Technique: Earth ReinforcementGround Improvement Technique: Earth Reinforcement
Ground Improvement Technique: Earth Reinforcement
 
Convergence of Robotics and Gen AI offers excellent opportunities for Entrepr...
Convergence of Robotics and Gen AI offers excellent opportunities for Entrepr...Convergence of Robotics and Gen AI offers excellent opportunities for Entrepr...
Convergence of Robotics and Gen AI offers excellent opportunities for Entrepr...
 
Basics of Relay for Engineering Students
Basics of Relay for Engineering StudentsBasics of Relay for Engineering Students
Basics of Relay for Engineering Students
 
Dynamo Scripts for Task IDs and Space Naming.pptx
Dynamo Scripts for Task IDs and Space Naming.pptxDynamo Scripts for Task IDs and Space Naming.pptx
Dynamo Scripts for Task IDs and Space Naming.pptx
 
Introduction to Artificial Intelligence ( AI)
Introduction to Artificial Intelligence ( AI)Introduction to Artificial Intelligence ( AI)
Introduction to Artificial Intelligence ( AI)
 
Max. shear stress theory-Maximum Shear Stress Theory ​ Maximum Distortional ...
Max. shear stress theory-Maximum Shear Stress Theory ​  Maximum Distortional ...Max. shear stress theory-Maximum Shear Stress Theory ​  Maximum Distortional ...
Max. shear stress theory-Maximum Shear Stress Theory ​ Maximum Distortional ...
 
Call for Papers - Journal of Electrical Systems (JES), E-ISSN: 1112-5209, ind...
Call for Papers - Journal of Electrical Systems (JES), E-ISSN: 1112-5209, ind...Call for Papers - Journal of Electrical Systems (JES), E-ISSN: 1112-5209, ind...
Call for Papers - Journal of Electrical Systems (JES), E-ISSN: 1112-5209, ind...
 
Fundamentals of Structure in C Programming
Fundamentals of Structure in C ProgrammingFundamentals of Structure in C Programming
Fundamentals of Structure in C Programming
 
Circuit Breakers for Engineering Students
Circuit Breakers for Engineering StudentsCircuit Breakers for Engineering Students
Circuit Breakers for Engineering Students
 
Scouring of cotton and wool fabric with effective scouring method
Scouring of cotton and wool fabric with effective scouring methodScouring of cotton and wool fabric with effective scouring method
Scouring of cotton and wool fabric with effective scouring method
 
Raashid final report on Embedded Systems
Raashid final report on Embedded SystemsRaashid final report on Embedded Systems
Raashid final report on Embedded Systems
 
HOA1&2 - Module 3 - PREHISTORCI ARCHITECTURE OF KERALA.pptx
HOA1&2 - Module 3 - PREHISTORCI ARCHITECTURE OF KERALA.pptxHOA1&2 - Module 3 - PREHISTORCI ARCHITECTURE OF KERALA.pptx
HOA1&2 - Module 3 - PREHISTORCI ARCHITECTURE OF KERALA.pptx
 
Independent Solar-Powered Electric Vehicle Charging Station
Independent Solar-Powered Electric Vehicle Charging StationIndependent Solar-Powered Electric Vehicle Charging Station
Independent Solar-Powered Electric Vehicle Charging Station
 
21P35A0312 Internship eccccccReport.docx
21P35A0312 Internship eccccccReport.docx21P35A0312 Internship eccccccReport.docx
21P35A0312 Internship eccccccReport.docx
 
S1S2 B.Arch MGU - HOA1&2 Module 3 -Temple Architecture of Kerala.pptx
S1S2 B.Arch MGU - HOA1&2 Module 3 -Temple Architecture of Kerala.pptxS1S2 B.Arch MGU - HOA1&2 Module 3 -Temple Architecture of Kerala.pptx
S1S2 B.Arch MGU - HOA1&2 Module 3 -Temple Architecture of Kerala.pptx
 
Fundamentals of Internet of Things (IoT) Part-2
Fundamentals of Internet of Things (IoT) Part-2Fundamentals of Internet of Things (IoT) Part-2
Fundamentals of Internet of Things (IoT) Part-2
 
handbook on reinforce concrete and detailing
handbook on reinforce concrete and detailinghandbook on reinforce concrete and detailing
handbook on reinforce concrete and detailing
 
Danikor Product Catalog- Screw Feeder.pdf
Danikor Product Catalog- Screw Feeder.pdfDanikor Product Catalog- Screw Feeder.pdf
Danikor Product Catalog- Screw Feeder.pdf
 
Introduction-to- Metrology and Quality.pptx
Introduction-to- Metrology and Quality.pptxIntroduction-to- Metrology and Quality.pptx
Introduction-to- Metrology and Quality.pptx
 
Involute of a circle,Square, pentagon,HexagonInvolute_Engineering Drawing.pdf
Involute of a circle,Square, pentagon,HexagonInvolute_Engineering Drawing.pdfInvolute of a circle,Square, pentagon,HexagonInvolute_Engineering Drawing.pdf
Involute of a circle,Square, pentagon,HexagonInvolute_Engineering Drawing.pdf
 

Refrigeration System Controls - Service Valves.pdf

  • 1. REFRIGERATION SYSTEM CONTROLS GROUP: ACR PM 6/5/2021 Prepared By: E.S.Brown 1
  • 3. Fig. 8: Compressor Service Valves 6/5/2021 Prepared By: E.S.Brown 3
  • 4. Compressor Service Valves ➢Compressor service valves are used for much more than just checking system pressures. ➢Technicians also use compressor service valves for checking compressor reed valves and isolating the compressor. ➢Figure – 8 shows a larger-than-normal view of a suction service valve for illustration purposes. ➢The position of the stem in this figure is called back-seated, because the back of the valve stem flange is against the seat. 6/5/2021 Prepared By: E.S.Brown 4
  • 5. Service Valves Function ➢ All valves have a packing around the stem to prevent refrigerant leaks. ➢ Some valves have a packing nut that should be loosened a quarter turn before turning the valve stem and then tightened afterward. ➢ The cover for the valve stem is not shown, but it is called a dust cap. It keeps the valve stem clean. ➢ If dirt or rust collects on the valve stem, it will damage the packing as the stem is turned in and out. 6/5/2021 Prepared By: E.S.Brown 5
  • 6. Compressor inefficiency ➢One way to check for an inefficient compressor is to front-seat the suction service valve and pull the compressor into a vacuum. ➢A rise in crankcase pressure may be an indication of bad reed valves inside the compressor. ➢A leaking service valve would also cause the pressure to rise, giving a false diagnosis of leaking reed valves. 6/5/2021 Prepared By: E.S.Brown 6
  • 7. Fig.9(a): Valve is cracked or mid-seated • In Fig.9(a), the valve is cracked or mid-seated. • By turning the valve clockwise, the valve stem • rotates inward, causing the back of the valve flange • to move away from its seat. System pressure rushes • into the area around the stem and out the gauge • port to the pressure gauge. 6/5/2021 Prepared By: E.S.Brown 7
  • 8. Figure 6–9(b): Suction Valve Front Seated • Fig.9(b) shows the suction service valve front-seated. • The front of the valve flange is seated, which completely blocks off the suction line to the compressor. 6/5/2021 Prepared By: E.S.Brown 8
  • 9. Trouble Shooting In this position, you can perform the following four troubleshooting procedures: 1. Check the condition of reed valves. 2. Check for high back-pressure overloading. 3. Isolate the suction side of the compressor for oil changes. 4. Isolate both sides for valve plate inspection and compressor replacement. 6/5/2021 Prepared By: E.S.Brown 9
  • 10. Check the condition of reed valves • Run the compressor until it pulls a vacuum in the crankcase. • Turn the compressor off and watch the suction gauge. • If the pressure starts rising, the suction valves are leaking through or the discharge vapour is leaking past the piston and cylinder wall. 6/5/2021 Prepared By: E.S.Brown 10
  • 11. Check for high back-pressure overloading • Compressor overloading can occur on a low-temperature unit during the initial start up. • It can also happen in a freezer when it comes out of defrost. • In both the cases, the compressor starts, runs for a short period, and then goes out on overload. • The high back pressure (suction pressure) from a warm evaporator (hot pull-down) is more than the compressor can handle. 6/5/2021 Prepared By: E.S.Brown 11
  • 12. Check for high back-pressure overloading • By starting the compressor with the suction valve front-seated, the compressor is starting unloaded. • With the compressor running, open the suction service valve one turn at a time as you check the compressor’s amperage. • Stop opening when the amperage reaches the compressor’s rated load amps (RLA), as listed on the compressor’s electrical rating plate. 6/5/2021 Prepared By: E.S.Brown 12
  • 13. Check for high back-pressure overloading • As the box cools, the suction pressure and amperage will fall. • Continue opening the valve, while monitoring RLA, until the valve is fully open. • If the box cools down and if the compressor cycles off on the t-stat and then restarts, the compressor is probably going to be just fine. 6/5/2021 Prepared By: E.S.Brown 13
  • 14. Solution for Overloading A compressor needs some help if it continues to trip on overload when it is starting under high suction pressure. Solution 1. Install a crankcase pressure regulator (CPR), or 2. Install a pressure-limiting thermal expansion valve (TEV). 6/5/2021 Prepared By: E.S.Brown 14
  • 15. Isolate suction side of compressor for oil changes. • If the suction valve is front-seated, all the refrigerant in the low-pressure (LP) part of the system is on the other side of the valve flange. • The small amount of remaining refrigerant between the service valve and the cylinder can be vented. • The oil can now be changed, if the compressor is a semi-hermetic. 6/5/2021 Prepared By: E.S.Brown 15
  • 16. Isolate for valve plate inspection and compressor replacement. Fig. 10 – Isolated Compressor 6/5/2021 Prepared By: E.S.Brown 16
  • 17. Isolated compressor • In Fig. 10: 1. The suction service is front seated. 2. If the discharge service valve is also front seated. 3. The pressure in the head is bled off. 4. The compressor is completely isolated from both sides of the system. 6/5/2021 Prepared By: E.S.Brown 17
  • 18. • Safety note: • Never run the compressor with the discharge service valve front-seated. • It will immediately blow the valve plate gasket. • Or worse, it could pump dangerously high pressure into your gauge hose if it is connected to the service valve. 6/5/2021 Prepared By: E.S.Brown 18
  • 19. • Safety note: ➢Make sure all the pressure is bled off the compressor before unbolting the compressor head. ➢It only takes a few pounds of pressure to blow the head into the air. 6/5/2021 Prepared By: E.S.Brown 19
  • 20. Compressor Replacement 1. Unbolt the service valves from the compressor. 2. Remove the old compressor. 3. Set the new compressor in place. 4. Re-bolt the service valves. 5. Pull a vacuum on the new compressor. 6. Back-seat the service valves. 7. You’re ready to start it up. 6/5/2021 Prepared By: E.S.Brown 20
  • 21. Review Questions (1) State the procedures for isolating a compressor for: a. Valve plate inspection b. Compressor replacement (2) What safety precautions should be followed when isolating or replacing a compressor? 6/5/2021 Prepared By: E.S.Brown 21