Table of contents
Accessibility5
Add react to a website 17
Addons animation 22
Addons create fragment 29
Addons perf 31
Addons pure render mixin 34
Addons shallow compare 35
Addons shallow renderer 36
Addons test utils 38
Addons two way binding helpers 45
Addons update 48
Addons 51
Cdn links 53
Code splitting 54
Codebase overview 59
Components and props 63
Composition vs inheritance 68
Conditional rendering 72
Context 77
Create a new react app 83
Cross origin errors 86
Design principles 88
Error boundaries 94
Error decoder 99
Faq ajax 100
Faq build 103
Faq functions 104
Faq internals 111
Faq state 112
Faq structure 115
Faq styling 117
Faq versioning 118
Forms 121
Forwarding refs 127
react
2
3.
Fragments 130
Getting started133
Handling events 137
Hello world 140
Higher order components 142
Hooks custom 150
Hooks effect 155
Hooks faq 166
Hooks intro 186
Hooks overview 191
Hooks reference 197
Hooks rules 213
Hooks state 216
How to contribute 222
Implementation notes 227
Integrating with other libraries 245
Introducing jsx 254
Jsx in depth 258
Legacy context 267
Legacy event pooling 272
Lifting state up 273
Lists and keys 280
Optimizing performance 285
Portals 294
React without es6 297
React without jsx 301
Reconciliation 302
Reference dom elements 306
Reference events 311
Reference glossary 319
Reference javascript environment requirements 324
Reference profiler 325
Reference pure render mixin 328
Reference react component 330
Reference react dom client 345
Reference react dom server 347
REACT Docs - 日本語
3
4.
Reference react dom352
Reference react 357
Reference test renderer 366
Refs and the dom 372
Release channels 378
Render props 381
Rendering elements 387
State and lifecycle 389
Static type checking 397
Strict mode 404
Testing environments 410
Testing recipes 412
Testing 423
Thinking in react 424
Typechecking with proptypes 429
Uncontrolled components 434
Web components 436
react
4
5.
アクセシビリティ
なぜアクセシビリティが必要なのか?
Web アクセシビリティ(a11y とも呼ばれます)とは、誰にでも使えるようウェブサイトを設計・構築することです。ユ
ーザ補助技術がウェブページを解釈できるようにするためには、サイトでアクセシビリティをサポートする必要がありま
す。
Reactはアクセシビリティを備えたウェブサイトの構築を全面的にサポートしており、大抵は標準の HTML の技術が用い
られます。
標準およびガイドライン
WCAG
Web Content Accessibility Guidelines はアクセシビリティを備えたウェブサイトを構築するためのガイドラインを提供
しています。
以下の WCAG のチェックリストはその概要を示します。
WCAG checklist from Wuhcag
WCAG checklist from WebAIM
Checklist from The A11Y Project
WAI-ARIA
Web Accessibility Initiative - Accessible Rich Internet Applications には十分なアクセシビリティを持つ
JavaScript ウィジェットの構築テクニックが含まれています。
補足として、JSX ではすべての aria-* で始まる HTML 属性がサポートされています。React においてほとんどの
DOM プロパティと属性がキャメルケースである一方で、これらの属性は純粋な HTML と同じようにハイフンケース(ケ
バブケースやリスプケースなどとも言われる)である必要があります。
セマンティックな HTML
セマンティック(意味論的)な HTML はウェブアプリケーションにおけるアクセシビリティの基礎となります。ウェブサ
イト内の情報の意味を明確にするための多様な HTML 要素を使うことにより、大抵の場合は少ない手間でアクセシビリテ
ィを手に入れられます。
<input
type="text"
aria-label={labelText}
aria-required="true"
onChange={onchangeHandler}
value={inputValue}
name="name"
/>
アクセシビリティ
5
6.
MDN HTML 要素リファレンス
ときおり、Reactコードを動くようにするために JSX に <div> を追加すると、HTML のセマンティックが崩れることが
あります。とりわけ、リスト ( <ol> , <ul> , <dl> ) や <table> タグと組み合わせるときに問題になります。そんなとき
は複数の要素をグループ化するために React フラグメントを使う方がよいでしょう。
具体例です。
項目の集合をフラグメントの配列に変換することができますし、他の任意の要素でも同様です。
もし、フラグメントタグに props を渡す必要がなく、かつ使用しているツールがサポートしているのであれば、省略記法
が使えます。
import React, { Fragment } from 'react';
function ListItem({ item }) {
return (
<Fragment>
<dt>{item.term}</dt>
<dd>{item.description}</dd>
</Fragment>
);
}
function Glossary(props) {
return (
<dl>
{props.items.map(item => (
<ListItem item={item} key={item.id} />
))}
</dl>
);
}
function Glossary(props) {
return (
<dl>
{props.items.map(item => (
// Fragments should also have a `key` prop when mapping collections
<Fragment key={item.id}>
<dt>{item.term}</dt>
<dd>{item.description}</dd>
</Fragment>
))}
</dl>
);
}
function ListItem({ item }) {
return (
<>
<dt>{item.term}</dt>
<dd>{item.description}</dd>
</>
);
}
react
6
7.
より詳細な情報はフラグメントドキュメントにあります。
アクセシブルなフォーム
ラベル付け
<input> や <textarea>のような各 HTML フォームコントロールには、アクセシブルな形でのラベル付けが必要です。
スクリーンリーダに公開される、説明的なラベルを提供する必要があります。
以下の資料にはその方法が示されています:
W3C による要素にラベルを付ける方法の解説
WebAIM による要素にラベルを付ける方法の解説
The Paciello Group によるアクセシブルな名前についての解説
React でこれらの標準的な HTML の実践知識を直接使用できますが、JSX では for 属性は htmlFor として記述される
ことに注意してください。
ユーザへのエラー通知
すべてのユーザがエラーの起きた状況を理解できる必要があります。以下のリンクはどのようにエラーテキストをユーザ
と同じくスクリーンリーダにも公開するかを解説しています。
W3C によるユーザへの通知方法の例示
WebAIM によるフォームバリデーションの解説
フォーカス制御
あなたのウェブアプリケーションが完全にキーボードだけで操作できることを確かめてください:
WebAIM によるキーボードアクセシビリティの解説
キーボードフォーカスとフォーカス時のアウトライン
(輪郭線)
キーボードフォーカスは DOM の中でキーボードからの入力を受け付けるために選択されている要素を示します。フォー
カスを輪郭線で示した以下の画像のような例を、様々な場所で見かけることができます:
例えば outline: 0 のようにしてこのアウトラインを CSS で削除できますが、これは他の実装でフォーカス線を置き換
える場合にのみ行うようにしてください。
<label htmlFor="namedInput">Name:</label>
<input id="namedInput" type="text" name="name"/>
アクセシビリティ
7
8.
目的のコンテンツまで飛べる仕組み
キーボードによる操作を補助して高速化するために、あなたのアプリケーションのナビゲーション(メニューや目次)部
分をユーザが読み飛ばせるような仕組みを提供しましょう。
スキップリンク ("skiplink") やスキップナビゲーションリンク("skip navigation link") とは、ユーザがキーボードでペ
ージを操作する場合にのみ出現する、隠れたナビゲーションリンクです。これらのリンクはページ内アンカーといくらか
のスタイルを用いて、とても簡単に実装できます:
WebAIM - Skip Navigation Links
<main> や <aside> のようなランドマーク要素とロール属性も活用してページの領域を区切り、補助技術を使うユーザが
素早くこれらのセクションに移動できるようにしてください。
アクセシビリティを強化する、これらの要素の使い方についての詳細は以下を読んでください:
Accessible Landmarks
プログラムによりフォーカスを管理する
React アプリケーションは実行されている間、継続的に HTML の DOM を変更するため、時にキーボードフォーカスが失
われたり、予期しない要素にセットされたりすることがあります。これを修正するためには、プログラムによってキーボ
ードフォーカスを正しい位置に移動させる必要があります。例えばモーダルウィンドウを閉じた後には、モーダルを開い
たボタンにキーボードフォーカスを戻すことなどです。
MDN のウェブドキュメントには、キーボードで移動可能な JavaScript ウィジェット の作り方が解説されています。
React でフォーカスをセットするには、DOM 要素への Ref が使えます。
これを使って、まずコンポーネントクラスの JSX 要素に ref を作成します:
これで必要な場合にはコンポーネントのほかの場所からその要素にフォーカスすることができます。
class CustomTextInput extends React.Component {
constructor(props) {
super(props);
// Create a ref to store the textInput DOM element
this.textInput = React.createRef();
}
render() {
// Use the `ref` callback to store a reference to the text input DOM
// element in an instance field (for example, this.textInput).
return (
<input
type="text"
ref={this.textInput}
/>
);
}
}
react
8
9.
ときおり、親コンポーネントは子コンポーネント内の要素にフォーカスをセットする必要があります。これは、親の ref
を子の DOMノードに転送する特別なプロパティを通して親コンポーネントに DOM の ref を公開することで可能になり
ます。
コンポーネントを拡張するのに高階コンポーネント (HOC) を使う場合は、React の forwardRef 関数を用いて、関数に
囲われたコンポーネントに ref をフォワーディング (forwarding) する ことをおすすめします。もし、サードパーティの
高階コンポーネントが ref フォワーディングを実装していないときでも、上記のパターンはフォールバックとして使えま
す。
良いフォーカス管理の例は react-aria-modal です。これは完全にアクセシブルなモーダルウィンドウの比較的珍しい例
です。このライブラリは、最初のフォーカスをキャンセルボタンに設定し(これは、キーボードを使っているユーザがう
っかり次のアクションに移ってしまうのを防ぎます)
、モーダルの中でキーボードフォーカスが閉じているだけでなく、最
初にモーダルを開いた要素にフォーカスを戻してもくれます。
補足:
これはとても重要なアクセシビリティ機能ですが、慎重に使用されるべきテクニックでもあります。このテクニッ
クはキーボードフォーカスの流れが妨げられた場合の修正に使用し、ユーザがアプリケーションをどのように使い
たいかを試したり予測するのに使わないでください。
focus() {
// Explicitly focus the text input using the raw DOM API
// Note: we're accessing "current" to get the DOM node
this.textInput.current.focus();
}
function CustomTextInput(props) {
return (
<div>
<input ref={props.inputRef} />
</div>
);
}
class Parent extends React.Component {
constructor(props) {
super(props);
this.inputElement = React.createRef();
}
render() {
return (
<CustomTextInput inputRef={this.inputElement} />
);
}
}
// Now you can set focus when required.
this.inputElement.current.focus();
アクセシビリティ
9
これはマウスのようなポインタデバイスでは問題なく機能しますが、キーボード単体で操作しようとした場合、タブキー
によって次の要素に移動しても window オブジェクトはclick イベントを受け取らないため、うまく機能しません。一
部のユーザはあなたのアプリを利用できなくなってしまうでしょう。
これと同じ機能は onBlur と onFocus のような適切なイベントハンドラを代わりに用いることで実現できます。
<button onClick={this.onClickHandler}>Select an option</button>
{this.state.isOpen && (
<ul>
<li>Option 1</li>
<li>Option 2</li>
<li>Option 3</li>
</ul>
)}
</div>
);
}
}
class BlurExample extends React.Component {
constructor(props) {
super(props);
this.state = { isOpen: false };
this.timeOutId = null;
this.onClickHandler = this.onClickHandler.bind(this);
this.onBlurHandler = this.onBlurHandler.bind(this);
this.onFocusHandler = this.onFocusHandler.bind(this);
}
onClickHandler() {
this.setState(currentState => ({
isOpen: !currentState.isOpen
}));
}
// We close the popover on the next tick by using setTimeout.
// This is necessary because we need to first check if
// another child of the element has received focus as
// the blur event fires prior to the new focus event.
onBlurHandler() {
this.timeOutId = setTimeout(() => {
this.setState({
isOpen: false
});
アクセシビリティ
11
12.
上記のコードは、ポインタデバイスを使うユーザとキーボードを使うユーザの双方にこの機能を公開します。さらに、
aria-* props を加えるとスクリーンリーダを使うユーザもサポートできます。話を簡単にするため、ポップアップの選
択肢を矢印キー で操作できるようにするキーボードイベントは実装していません。
これはポインタデバイスとマウスイベントだけに依存するとキーボードを使うユーザにとって機能が損なわれてしまう数
多くの具体例のうちのひとつです。つねにキーボードによるテストをすれば、キーボードに対応するイベントを使うこと
で解決できる問題領域をすばやく発見できるでしょう。
});
}
// If a child receives focus, do not close the popover.
onFocusHandler() {
clearTimeout(this.timeOutId);
}
render() {
// React assists us by bubbling the blur and
// focus events to the parent.
return (
<div onBlur={this.onBlurHandler}
onFocus={this.onFocusHandler}>
<button onClick={this.onClickHandler}
aria-haspopup="true"
aria-expanded={this.state.isOpen}>
Select an option
</button>
{this.state.isOpen && (
<ul>
<li>Option 1</li>
<li>Option 2</li>
<li>Option 3</li>
</ul>
)}
</div>
);
}
}
react
12
13.
より複雑なウィジェット
ユーザ体験がより複雑であるほど、よりアクセシビリティが損なわれるということがあってはいけません。できるだけ
HTML に近くなるようコーディングすればアクセシビリティを最も簡単に達成できますが、一方でかなり複雑なウィジェ
ットでもアクセシビリティを保ってコーディングすることができます。
ここでは ARIAのロール や ARIA のステートとプロパティについての知識も必要となります。これらは JSX で完全にサ
ポートされている HTML 属性が詰まったツールボックスであり、十分にアクセシブルで高機能な React コンポーネント
の構築を可能にしてくれます。
それぞれの種類のウィジェットはそれぞれ特定のデザインパターンを持っており、ユーザやユーザエージェントはそれら
が特定の方法で機能することを期待します:
WAI-ARIA Authoring Practices - Design Patterns and Widgets
Heydon Pickering - ARIA Examples
Inclusive Components
その他に考慮すべきポイント
言語設定
ページテキストで使用する自然言語を明示して、読み上げソフトが適切な音声設定を選ぶために利用できるようにしてく
ださい:
WebAIM - Document Language
ドキュメントの title の設定
ドキュメントの <title> は、ユーザが現在いるページのコンテキストを認識していられるように、そのページのコンテン
ツを正しく説明するものにしてください:
WCAG - Understanding the Document Title Requirement
React では React Document Title Component を使用することで title を設定できます。
色のコントラスト
あなたのウェブサイトにある全ての読めるテキストが、色弱のユーザにも最大限読めるように配慮した色のコントラスト
があることを確認してください:
WCAG - Understanding the Color Contrast Requirement
Everything About Color Contrast And Why You Should Rethink It
A11yProject - What is Color Contrast
適切な色の組み合わせをウェブサイト内の全てのケースについて手作業で行うのは面倒になりがちなので、代わりにアク
セシブルなカラーパレット全体を Colorable で計算することができます。
以下に述べる aXe および WAVE ツールのどちらも同じように色のコントラストのテストを備えておりコントラストの違
反を報告してくれます。
アクセシビリティ
13
The Accessibility Engineもしくは aXe は、aXe-core により構築されたアクセシビリティを検査するブラウザ拡張機
能です。
@axe-core/react モジュールを使用して、開発時やデバッグ時にこれらによるアクセシビリティの検査結果を直接コンソ
ールへ出力させることもできます。
WebAIM WAVE
Web Accessibility Evaluation Tool はアクセシビリティに関する別のブラウザ拡張機能です。
アクセシビリティ検査ツールとアクセシビリティツリー
アクセシビリティツリー (The Accessibility Tree) は、スクリーンリーダのような補助技術に公開されるべきすべての要
素についてアクセス可能なオブジェクトを含んだ DOM ツリーのサブセットです。
一部のブラウザではアクセシビリティツリー内の各要素のアクセシビリティに関する情報を簡単に見ることができます:
Using the Accessibility Inspector in Firefox
Using the Accessibility Inspector in Chrome
Using the Accessibility Inspector in OS X Safari
スクリーンリーダ
アクセシビリティのテストの一環として、スクリーンリーダによるテストを行うべきです。
ブラウザとスクリーンリーダの相性に注意してください。選択したスクリーンリーダに最適なブラウザでアプリケーショ
ンのテストをすることをおすすめします。
よく使われるスクリーンリーダ
NVDA と FireFox
NonVisual Desktop Access または NVDA は広く利用されているオープンソースの Windows 向けスクリーンリーダー
です。
NVDA を最大限に活用する方法は以下のガイドを参照してください:
WebAIM - Using NVDA to Evaluate Web Accessibility
Deque - NVDA Keyboard Shortcuts
VoiceOver と Safari
VoiceOver は Apple 社製品に統合されたスクリーンリーダです。
VoiceOver を有効化して使用する方法は以下のガイドを参照してください:
WebAIM - Using VoiceOver to Evaluate Web Accessibility
Deque - VoiceOver for OS X Keyboard Shortcuts
Deque - VoiceOver for iOS Shortcuts
アクセシビリティ
15
16.
JAWS と InternetExplorer
Job Access With Speech もしくは JAWS は、Windows 上での使用例が豊富なスクリーンリーダです。
JAWS を最大限に活用する方法は以下のガイドを参照してください:
WebAIM - Using JAWS to Evaluate Web Accessibility
Deque - JAWS Keyboard Shortcuts
他のスクリーンリーダ
ChromeVox と Google Chrome
ChromeVox は Chromebook に統合されたスクリーンリーダで、Google Chrome では拡張機能として利用可能です。
ChromeVox を最大限に活用する方法は以下のガイドを参照してください:
Google Chromebook Help - Use the Built-in Screen Reader
ChromeVox Classic Keyboard Shortcuts Reference
react
16
Animation Add-Ons
Note:
ReactTransitionGroup andReactCSSTransitionGroup have been moved to the react-transition-group
package that is maintained by the community. Its 1.x branch is completely API-compatible with the
existing addons. Please file bugs and feature requests in the new repository.
The ReactTransitionGroup add-on component is a low-level API for animation, and ReactCSSTransitionGroup
is an add-on component for easily implementing basic CSS animations and transitions.
High-level API: ReactCSSTransitionGroup
ReactCSSTransitionGroup is a high-level API based on ReactTransitionGroup and is an easy way to perform
CSS transitions and animations when a React component enters or leaves the DOM. It's inspired by the
excellent ng-animate library.
Importing
import ReactCSSTransitionGroup from 'react-transition-group'; // ES6
var ReactCSSTransitionGroup = require('react-transition-group'); // ES5 with npm
class TodoList extends React.Component {
constructor(props) {
super(props);
this.state = {items: ['hello', 'world', 'click', 'me']};
this.handleAdd = this.handleAdd.bind(this);
}
handleAdd() {
const newItems = this.state.items.concat([
prompt('Enter some text')
]);
this.setState({items: newItems});
}
handleRemove(i) {
let newItems = this.state.items.slice();
newItems.splice(i, 1);
this.setState({items: newItems});
}
render() {
const items = this.state.items.map((item, i) => (
<div key={i} onClick={() => this.handleRemove(i)}>
{item}
</div>
));
return (
<div>
react
22
23.
Note:
You must providethe key attribute for all children of ReactCSSTransitionGroup , even when only
rendering a single item. This is how React will determine which children have entered, left, or stayed.
In this component, when a new item is added to ReactCSSTransitionGroup it will get the example-enter CSS
class and the example-enter-active CSS class added in the next tick. This is a convention based on the
transitionName prop.
You can use these classes to trigger a CSS animation or transition. For example, try adding this CSS and
adding a new list item:
You'll notice that animation durations need to be specified in both the CSS and the render method; this tells
React when to remove the animation classes from the element and -- if it's leaving -- when to remove the
element from the DOM.
Animate Initial Mounting
ReactCSSTransitionGroup provides the optional prop transitionAppear , to add an extra transition phase at
the initial mount of the component. There is generally no transition phase at the initial mount as the default
value of transitionAppear is false . The following is an example which passes the prop transitionAppear
with the value true .
<button onClick={this.handleAdd}>Add Item</button>
<ReactCSSTransitionGroup
transitionName="example"
transitionEnterTimeout={500}
transitionLeaveTimeout={300}>
{items}
</ReactCSSTransitionGroup>
</div>
);
}
}
.example-enter {
opacity: 0.01;
}
.example-enter.example-enter-active {
opacity: 1;
transition: opacity 500ms ease-in;
}
.example-leave {
opacity: 1;
}
.example-leave.example-leave-active {
opacity: 0.01;
transition: opacity 300ms ease-in;
}
Animation Add-Ons
23
24.
During the initialmount ReactCSSTransitionGroup will get the example-appear CSS class and the example-
appear-active CSS class added in the next tick.
At the initial mount, all children of the ReactCSSTransitionGroup will appear but not enter . However, all
children later added to an existing ReactCSSTransitionGroup will enter but not appear .
Note:
The prop transitionAppear was added to ReactCSSTransitionGroup in version 0.13 . To maintain
backwards compatibility, the default value is set to false .
However, the default values of transitionEnter and transitionLeave are true so you must specify tra
nsitionEnterTimeout and transitionLeaveTimeout by default. If you don't need either enter or leave
animations, pass transitionEnter={false} or transitionLeave={false} .
Custom Classes
It is also possible to use custom class names for each of the steps in your transitions. Instead of passing a
string into transitionName you can pass an object containing either the enter and leave class names, or an
object containing the enter , enter-active , leave-active , and leave class names. If only the enter and
leave classes are provided, the enter-active and leave-active classes will be determined by appending '-
active' to the end of the class name. Here are two examples using custom classes:
render() {
return (
<ReactCSSTransitionGroup
transitionName="example"
transitionAppear={true}
transitionAppearTimeout={500}
transitionEnter={false}
transitionLeave={false}>
<h1>Fading at Initial Mount</h1>
</ReactCSSTransitionGroup>
);
}
.example-appear {
opacity: 0.01;
}
.example-appear.example-appear-active {
opacity: 1;
transition: opacity .5s ease-in;
}
// ...
<ReactCSSTransitionGroup
transitionName={ {
enter: 'enter',
enterActive: 'enterActive',
leave: 'leave',
leaveActive: 'leaveActive',
react
24
25.
Animation Group MustBe Mounted To Work
In order for it to apply transitions to its children, the ReactCSSTransitionGroup must already be mounted in
the DOM or the prop transitionAppear must be set to true .
The example below would not work, because the ReactCSSTransitionGroup is being mounted along with the
new item, instead of the new item being mounted within it. Compare this to the Getting Started section
above to see the difference.
Animating One or Zero Items
In the example above, we rendered a list of items into ReactCSSTransitionGroup . However, the children of
ReactCSSTransitionGroup can also be one or zero items. This makes it possible to animate a single element
entering or leaving. Similarly, you can animate a new element replacing the current element. For example,
we can implement a simple image carousel like this:
appear: 'appear',
appearActive: 'appearActive'
} }>
{item}
</ReactCSSTransitionGroup>
<ReactCSSTransitionGroup
transitionName={ {
enter: 'enter',
leave: 'leave',
appear: 'appear'
} }>
{item2}
</ReactCSSTransitionGroup>
// ...
render() {
const items = this.state.items.map((item, i) => (
<div key={item} onClick={() => this.handleRemove(i)}>
<ReactCSSTransitionGroup transitionName="example">
{item}
</ReactCSSTransitionGroup>
</div>
));
return (
<div>
<button onClick={this.handleAdd}>Add Item</button>
{items}
</div>
);
}
import ReactCSSTransitionGroup from 'react-transition-group';
function ImageCarousel(props) {
return (
<div>
<ReactCSSTransitionGroup
transitionName="carousel"
transitionEnterTimeout={300}
Animation Add-Ons
25
26.
Disabling Animations
You candisable animating enter or leave animations if you want. For example, sometimes you may want
an enter animation and no leave animation, but ReactCSSTransitionGroup waits for an animation to
complete before removing your DOM node. You can add transitionEnter={false} or transitionLeave={false}
props to ReactCSSTransitionGroup to disable these animations.
Note:
When using ReactCSSTransitionGroup , there's no way for your components to be notified when a
transition has ended or to perform any more complex logic around animation. If you want more fine-
grained control, you can use the lower-level ReactTransitionGroup API which provides the hooks you
need to do custom transitions.
Low-level API: ReactTransitionGroup
Importing
ReactTransitionGroup is the basis for animations. When children are declaratively added or removed from it
(as in the example above), special lifecycle methods are called on them.
componentWillAppear()
componentDidAppear()
componentWillEnter()
componentDidEnter()
componentWillLeave()
componentDidLeave()
Rendering a Different Component
ReactTransitionGroup renders as a span by default. You can change this behavior by providing a component
prop. For example, here's how you would render a <ul> :
transitionLeaveTimeout={300}>
<img src={props.imageSrc} key={props.imageSrc} />
</ReactCSSTransitionGroup>
</div>
);
}
import ReactTransitionGroup from 'react-addons-transition-group' // ES6
var ReactTransitionGroup = require('react-addons-transition-group') // ES5 with npm
<ReactTransitionGroup component="ul">
{/* ... */}
</ReactTransitionGroup>
react
26
27.
Any additional, user-defined,properties will become properties of the rendered component. For example,
here's how you would render a <ul> with CSS class:
Every DOM component that React can render is available for use. However, component does not need to be a
DOM component. It can be any React component you want; even ones you've written yourself! Just write
component={List} and your component will receive this.props.children .
Rendering a Single Child
People often use ReactTransitionGroup to animate mounting and unmounting of a single child such as a
collapsible panel. Normally ReactTransitionGroup wraps all its children in a span (or a custom component as
described above). This is because any React component has to return a single root element, and
ReactTransitionGroup is no exception to this rule.
However if you only need to render a single child inside ReactTransitionGroup , you can completely avoid
wrapping it in a <span> or any other DOM component. To do this, create a custom component that renders
the first child passed to it directly:
Now you can specify FirstChild as the component prop in <ReactTransitionGroup> props and avoid any
wrappers in the result DOM:
This only works when you are animating a single child in and out, such as a collapsible panel. This approach
wouldn't work when animating multiple children or replacing the single child with another child, such as an
image carousel. For an image carousel, while the current image is animating out, another image will
animate in, so <ReactTransitionGroup> needs to give them a common DOM parent. You can't avoid the
wrapper for multiple children, but you can customize the wrapper with the component prop as described
above.
Reference
componentWillAppear() {#componentwillappear}
<ReactTransitionGroup component="ul" className="animated-list">
{/* ... */}
</ReactTransitionGroup>
function FirstChild(props) {
const childrenArray = React.Children.toArray(props.children);
return childrenArray[0] || null;
}
<ReactTransitionGroup component={FirstChild}>
{someCondition ? <MyComponent /> : null}
</ReactTransitionGroup>
componentWillAppear(callback)
Animation Add-Ons
27
28.
This is calledat the same time as componentDidMount() for components that are initially mounted in a
TransitionGroup . It will block other animations from occurring until callback is called. It is only called on
the initial render of a TransitionGroup .
componentDidAppear() {#componentdidappear}
This is called after the callback function that was passed to componentWillAppear is called.
componentWillEnter() {#componentwillenter}
This is called at the same time as componentDidMount() for components added to an existing
TransitionGroup . It will block other animations from occurring until callback is called. It will not be called
on the initial render of a TransitionGroup .
componentDidEnter() {#componentdidenter}
This is called after the callback function that was passed to componentWillEnter() is called.
componentWillLeave() {#componentwillleave}
This is called when the child has been removed from the ReactTransitionGroup . Though the child has been
removed, ReactTransitionGroup will keep it in the DOM until callback is called.
componentDidLeave() {#componentdidleave}
This is called when the willLeave callback is called (at the same time as componentWillUnmount() ).
componentDidAppear()
componentWillEnter(callback)
componentDidEnter()
componentWillLeave(callback)
componentDidLeave()
react
28
29.
Keyed Fragments
Note:
React.addons entrypoint is deprecated as of React v15.5. We now have first class support for
fragments which you can read about here.
Importing
Overview
In most cases, you can use the key prop to specify keys on the elements you're returning from render .
However, this breaks down in one situation: if you have two sets of children that you need to reorder,
there's no way to put a key on each set without adding a wrapper element.
That is, if you have a component such as:
The children will unmount and remount as you change the swapped prop because there aren't any keys
marked on the two sets of children.
To solve this problem, you can use the createFragment add-on to give keys to the sets of children.
Array<ReactNode> createFragment(object children) {#arrayreactnode-createfragmentobject-children}
Instead of creating arrays, we write:
import createFragment from 'react-addons-create-fragment'; // ES6
var createFragment = require('react-addons-create-fragment'); // ES5 with npm
function Swapper(props) {
let children;
if (props.swapped) {
children = [props.rightChildren, props.leftChildren];
} else {
children = [props.leftChildren, props.rightChildren];
}
return <div>{children}</div>;
}
import createFragment from 'react-addons-create-fragment';
function Swapper(props) {
let children;
if (props.swapped) {
children = createFragment({
right: props.rightChildren,
left: props.leftChildren
});
} else {
Keyed Fragments
29
30.
The keys ofthe passed object (that is, left and right ) are used as keys for the entire set of children, and
the order of the object's keys is used to determine the order of the rendered children. With this change, the
two sets of children will be properly reordered in the DOM without unmounting.
The return value of createFragment should be treated as an opaque object; you can use the React.Children
helpers to loop through a fragment but should not access it directly. Note also that we're relying on the
JavaScript engine preserving object enumeration order here, which is not guaranteed by the spec but is
implemented by all major browsers and VMs for objects with non-numeric keys.
children = createFragment({
left: props.leftChildren,
right: props.rightChildren
});
}
return <div>{children}</div>;
}
react
30
31.
Performance Tools
Note:
As ofReact 16, react-addons-perf is not supported. Please use your browser's profiling tools to get
insight into which components re-render.
Importing
Overview
React is usually quite fast out of the box. However, in situations where you need to squeeze every ounce of
performance out of your app, it provides a shouldComponentUpdate() method where you can add
optimization hints to React's diff algorithm.
In addition to giving you an overview of your app's overall performance, Perf is a profiling tool that tells
you exactly where you need to put these methods.
See these articles for an introduction to React performance tooling:
"How to Benchmark React Components"
"Performance Engineering with React"
"A Deep Dive into React Perf Debugging"
Development vs. Production Builds
If you're benchmarking or seeing performance problems in your React apps, make sure you're testing with
the minified production build. The development build includes extra warnings that are helpful when building
your apps, but it is slower due to the extra bookkeeping it does.
However, the perf tools described on this page only work when using the development build of React.
Therefore, the profiler only serves to indicate the relatively expensive parts of your app.
Using Perf
The Perf object can be used with React in development mode only. You should not include this bundle
when building your app for production.
Getting Measurements
start()
stop()
import Perf from 'react-addons-perf'; // ES6
var Perf = require('react-addons-perf'); // ES5 with npm
Performance Tools
31
32.
getLastMeasurements()
Printing Results
The followingmethods use the measurements returned by Perf.getLastMeasurements() to pretty-print the
result.
printInclusive()
printExclusive()
printWasted()
printOperations()
printDOM()
Reference
start() {#start}
stop() {#stop}
Start/stop the measurement. The React operations in-between are recorded for analyses below. Operations
that took an insignificant amount of time are ignored.
After stopping, you will need Perf.getLastMeasurements() to get the measurements.
getLastMeasurements() {#getlastmeasurements}
Get the opaque data structure describing measurements from the last start-stop session. You can save it
and pass it to the other print methods in Perf to analyze past measurements.
Note
Don't rely on the exact format of the return value because it may change in minor releases. We will
update the documentation if the return value format becomes a supported part of the public API.
printInclusive() {#printinclusive}
Perf.start()
// ...
Perf.stop()
Perf.getLastMeasurements()
Perf.printInclusive(measurements)
react
32
33.
Prints the overalltime taken. When no arguments are passed, printInclusive defaults to all the
measurements from the last recording. This prints a nicely formatted table in the console, like so:
printExclusive() {#printexclusive}
"Exclusive" times don't include the times taken to mount the components: processing props, calling
componentWillMount and componentDidMount , etc.
printWasted() {#printwasted}
The most useful part of the profiler.
"Wasted" time is spent on components that didn't actually render anything, e.g. the render stayed the
same, so the DOM wasn't touched.
printOperations() {#printoperations}
Prints the underlying DOM manipulations, e.g. "set innerHTML" and "remove".
printDOM() {#printdom}
This method has been renamed to printOperations() . Currently printDOM() still exists as an alias but it
prints a deprecation warning and will eventually be removed.
Perf.printExclusive(measurements)
Perf.printWasted(measurements)
Perf.printOperations(measurements)
Perf.printDOM(measurements)
Performance Tools
33
34.
PureRenderMixin
Note:
PureRenderMixin is alegacy add-on. Use React.PureComponent instead.
Importing
Overview
If your React component's render function renders the same result given the same props and state, you can
use this mixin for a performance boost in some cases.
Example:
Under the hood, the mixin implements shouldComponentUpdate, in which it compares the current props
and state with the next ones and returns false if the equalities pass.
Note:
This only shallowly compares the objects. If these contain complex data structures, it may produce
false-negatives for deeper differences. Only mix into components which have simple props and state,
or use forceUpdate() when you know deep data structures have changed. Or, consider using
immutable objects to facilitate fast comparisons of nested data.
Furthermore, shouldComponentUpdate skips updates for the whole component subtree. Make sure all the
children components are also "pure".
import PureRenderMixin from 'react-addons-pure-render-mixin'; // ES6
var PureRenderMixin = require('react-addons-pure-render-mixin'); // ES5 with npm
const createReactClass = require('create-react-class');
createReactClass({
mixins: [PureRenderMixin],
render: function() {
return <div className={this.props.className}>foo</div>;
}
});
react
34
35.
Shallow Compare
Note:
shallowCompare isa legacy add-on. Use React.memo or React.PureComponent instead.
Importing
Overview
Before React.PureComponent was introduced, shallowCompare was commonly used to achieve the same
functionality as PureRenderMixin while using ES6 classes with React.
If your React component's render function is "pure" (in other words, it renders the same result given the
same props and state), you can use this helper function for a performance boost in some cases.
Example:
shallowCompare performs a shallow equality check on the current props and nextProps objects as well as
the current state and nextState objects.
It does this by iterating on the keys of the objects being compared and returning true when the values of a
key in each object are not strictly equal.
shallowCompare returns true if the shallow comparison for props or state fails and therefore the component
should update.
shallowCompare returns false if the shallow comparison for props and state both pass and therefore the
component does not need to update.
import shallowCompare from 'react-addons-shallow-compare'; // ES6
var shallowCompare = require('react-addons-shallow-compare'); // ES5 with npm
export class SampleComponent extends React.Component {
shouldComponentUpdate(nextProps, nextState) {
return shallowCompare(this, nextProps, nextState);
}
render() {
return <div className={this.props.className}>foo</div>;
}
}
Shallow Compare
35
36.
Shallow Renderer
インポート
概要
React の単体テストを実装するとき、ShallowRenderer が役立つでしょう。浅いレンダー (shallow rendering) を使
用すると、インスタンス化またはレンダーされていない子コンポーネントの振る舞いを心配することなく、
「1 階層深く」
レンダーしてレンダーメソッドが返すものを assert できます。これに DOM は必要ありません。
たとえば、以下のコンポーネントがある場合:
以下のように assert できます:
浅いレンダーによるテストには現在いくつかの制限があります。すなわち ref をサポートしていません。
補足:
また Enzyme の Shallow Rendering API をチェックすることをお勧めします。それは同じ機能上でより良くより
高いレベルの API を提供します。
import ShallowRenderer from 'react-test-renderer/shallow'; // ES6
var ShallowRenderer = require('react-test-renderer/shallow'); // ES5 with npm
function MyComponent() {
return (
<div>
<span className="heading">Title</span>
<Subcomponent foo="bar" />
</div>
);
}
import ShallowRenderer from 'react-test-renderer/shallow';
// in your test:
const renderer = new ShallowRenderer();
renderer.render(<MyComponent />);
const result = renderer.getRenderOutput();
expect(result.type).toBe('div');
expect(result.props.children).toEqual([
<span className="heading">Title</span>,
<Subcomponent foo="bar" />
]);
react
36
Two-way Binding Helpers
Note:
LinkedStateMixinis deprecated as of React v15. The recommendation is to explicitly set the value and
change handler, instead of using LinkedStateMixin .
Importing
Overview
LinkedStateMixin is an easy way to express two-way binding with React.
In React, data flows one way: from owner to child. We think that this makes your app's code easier to
understand. You can think of it as "one-way data binding."
However, there are lots of applications that require you to read some data and flow it back into your
program. For example, when developing forms, you'll often want to update some React state when you
receive user input. Or perhaps you want to perform layout in JavaScript and react to changes in some DOM
element size.
In React, you would implement this by listening to a "change" event, read from your data source (usually
the DOM) and call setState() on one of your components. "Closing the data flow loop" explicitly leads to
more understandable and easier-to-maintain programs. See our forms documentation for more information.
Two-way binding -- implicitly enforcing that some value in the DOM is always consistent with some React
state -- is concise and supports a wide variety of applications. We've provided LinkedStateMixin : syntactic
sugar for setting up the common data flow loop pattern described above, or "linking" some data source to
React state .
Note:
LinkedStateMixin is just a thin wrapper and convention around the onChange / setState() pattern. It
doesn't fundamentally change how data flows in your React application.
LinkedStateMixin: Before and After
Here's a simple form example without using LinkedStateMixin :
import LinkedStateMixin from 'react-addons-linked-state-mixin'; // ES6
var LinkedStateMixin = require('react-addons-linked-state-mixin'); // ES5 with npm
Two-way Binding Helpers
45
46.
This works reallywell and it's very clear how data is flowing, however, with a lot of form fields it could get a
bit verbose. Let's use LinkedStateMixin to save us some typing:
LinkedStateMixin adds a method to your React component called linkState() . linkState() returns a
valueLink object which contains the current value of the React state and a callback to change it.
valueLink objects can be passed up and down the tree as props, so it's easy (and explicit) to set up two-
way binding between a component deep in the hierarchy and state that lives higher in the hierarchy.
Note that checkboxes have a special behavior regarding their value attribute, which is the value that will be
sent on form submit if the checkbox is checked (defaults to on ). The value attribute is not updated when
the checkbox is checked or unchecked. For checkboxes, you should use checkedLink instead of valueLink :
Under the Hood
There are two sides to LinkedStateMixin : the place where you create the valueLink instance and the place
where you use it. To prove how simple LinkedStateMixin is, let's rewrite each side separately to be more
explicit.
valueLink Without LinkedStateMixin
var createReactClass = require('create-react-class');
var NoLink = createReactClass({
getInitialState: function() {
return {message: 'Hello!'};
},
handleChange: function(event) {
this.setState({message: event.target.value});
},
render: function() {
var message = this.state.message;
return <input type="text" value={message} onChange={this.handleChange} />;
}
});
var createReactClass = require('create-react-class');
var WithLink = createReactClass({
mixins: [LinkedStateMixin],
getInitialState: function() {
return {message: 'Hello!'};
},
render: function() {
return <input type="text" valueLink={this.linkState('message')} />;
}
});
<input type="checkbox" checkedLink={this.linkState('booleanValue')} />
var createReactClass = require('create-react-class');
var WithoutMixin = createReactClass({
getInitialState: function() {
return {message: 'Hello!'};
react
46
47.
As you cansee, valueLink objects are very simple objects that just have a value and requestChange prop.
And LinkedStateMixin is similarly simple: it just populates those fields with a value from this.state and a
callback that calls this.setState() .
LinkedStateMixin Without valueLink
The valueLink prop is also quite simple. It simply handles the onChange event and calls
this.props.valueLink.requestChange() and also uses this.props.valueLink.value instead of this.props.value .
That's it!
},
handleChange: function(newValue) {
this.setState({message: newValue});
},
render: function() {
var valueLink = {
value: this.state.message,
requestChange: this.handleChange
};
return <input type="text" valueLink={valueLink} />;
}
});
var LinkedStateMixin = require('react-addons-linked-state-mixin');
var createReactClass = require('create-react-class');
var WithoutLink = createReactClass({
mixins: [LinkedStateMixin],
getInitialState: function() {
return {message: 'Hello!'};
},
render: function() {
var valueLink = this.linkState('message');
var handleChange = function(e) {
valueLink.requestChange(e.target.value);
};
return <input type="text" value={valueLink.value} onChange={handleChange} />;
}
});
Two-way Binding Helpers
47
48.
Immutability Helpers
Note:
update isa legacy add-on. Use immutability-helper instead.
Importing
Overview
React lets you use whatever style of data management you want, including mutation. However, if you can
use immutable data in performance-critical parts of your application it's easy to implement a fast
shouldComponentUpdate() method to significantly speed up your app.
Dealing with immutable data in JavaScript is more difficult than in languages designed for it, like Clojure.
However, we've provided a simple immutability helper, update() , that makes dealing with this type of data
much easier, without fundamentally changing how your data is represented. You can also take a look at
Facebook's Immutable-js and the Advanced Performance section for more detail on Immutable-js.
The Main Idea
If you mutate data like this:
You have no way of determining which data has changed since the previous copy has been overwritten.
Instead, you need to create a new copy of myData and change only the parts of it that need to be changed.
Then you can compare the old copy of myData with the new one in shouldComponentUpdate() using triple-
equals:
Unfortunately, deep copies are expensive, and sometimes impossible. You can alleviate this by only copying
objects that need to be changed and by reusing the objects that haven't changed. Unfortunately, in today's
JavaScript this can be cumbersome:
import update from 'react-addons-update'; // ES6
var update = require('react-addons-update'); // ES5 with npm
myData.x.y.z = 7;
// or...
myData.a.b.push(9);
const newData = deepCopy(myData);
newData.x.y.z = 7;
newData.a.b.push(9);
const newData = extend(myData, {
x: extend(myData.x, {
y: extend(myData.x.y, {z: 7}),
react
48
49.
While this isfairly performant (since it only makes a shallow copy of log n objects and reuses the rest), it's
a big pain to write. Look at all the repetition! This is not only annoying, but also provides a large surface
area for bugs.
update() {#update}
update() provides simple syntactic sugar around this pattern to make writing this code easier. This code
becomes:
While the syntax takes a little getting used to (though it's inspired by MongoDB's query language) there's
no redundancy, it's statically analyzable and it's not much more typing than the mutative version.
The $ -prefixed keys are called commands. The data structure they are "mutating" is called the target.
Available Commands
{$push: array} push() all the items in array on the target.
{$unshift: array} unshift() all the items in array on the target.
{$splice: array of arrays} for each item in arrays call splice() on the target with the parameters
provided by the item.
{$set: any} replace the target entirely.
{$merge: object} merge the keys of object with the target.
{$apply: function} passes in the current value to the function and updates it with the new returned
value.
Examples
Simple push
initialArray is still [1, 2, 3] .
Nested collections
}),
a: extend(myData.a, {b: myData.a.b.concat(9)})
});
import update from 'react-addons-update';
const newData = update(myData, {
x: {y: {z: {$set: 7}}},
a: {b: {$push: [9]}}
});
const initialArray = [1, 2, 3];
const newArray = update(initialArray, {$push: [4]}); // => [1, 2, 3, 4]
const collection = [1, 2, {a: [12, 17, 15]}];
const newCollection = update(collection, {2: {a: {$splice: [[1, 1, 13, 14]]}}});
// => [1, 2, {a: [12, 13, 14, 15]}]
Immutability Helpers
49
50.
This accesses collection's index 2 , key a , and does a splice of one item starting from index 1 (to
remove 17 ) while inserting 13 and 14 .
Updating a value based on its current one
(Shallow) Merge
const obj = {a: 5, b: 3};
const newObj = update(obj, {b: {$apply: function(x) {return x * 2;}}});
// => {a: 5, b: 6}
// This is equivalent, but gets verbose for deeply nested collections:
const newObj2 = update(obj, {b: {$set: obj.b * 2}});
const obj = {a: 5, b: 3};
const newObj = update(obj, {$merge: {b: 6, c: 7}}); // => {a: 5, b: 6, c: 7}
react
50
51.
Add-Ons
Note:
React.addons entry pointis deprecated as of React v15.5. The add-ons have moved to separate
modules, and some of them have been deprecated.
The React add-ons are a collection of useful utility modules for building React apps. These should be
considered experimental and tend to change more often than the core.
createFragment , to create a set of externally-keyed children.
The add-ons below are in the development (unminified) version of React only:
Perf , a performance profiling tool for finding optimization opportunities.
ReactTestUtils , simple helpers for writing test cases.
Legacy Add-ons
The add-ons below are considered legacy and their use is discouraged. They will keep working in observable
future, but there is no further development.
PureRenderMixin . Use React.PureComponent instead.
shallowCompare , a helper function that performs a shallow comparison for props and state in a
component to decide if a component should update. We recommend using React.PureComponent instead.
update . Use kolodny/immutability-helper instead.
ReactDOMFactories , pre-configured DOM factories to make React easier to use without JSX.
Deprecated Add-ons
LinkedStateMixin has been deprecated.
TransitionGroup and CSSTransitionGroup have been deprecated in favor of their drop-in replacements.
Using React with Add-ons
You can install the add-ons individually from npm (e.g. npm install react-addons-create-fragment ) and
import them:
When using React 15 or earlier from a CDN, you can use react-with-addons.js instead of react.js :
import createFragment from 'react-addons-create-fragment'; // ES6
var createFragment = require('react-addons-create-fragment'); // ES5 with npm
<script src="https://unpkg.com/react@15/dist/react-with-addons.js"></script>
Add-Ons
51
52.
The add-ons willbe available via the React.addons global (e.g. React.addons.TestUtils ).
react
52
Cross-origin Errors
Note:
The followingsection applies only to the development mode of React. Error handling in production
mode is done with regular try/catch statements.
In development mode, React uses a global error event handler to preserve the "pause on exceptions"
behavior of browser DevTools. It also logs errors to the developer console.
If an error is thrown from a different origin the browser will mask its details and React will not be able to log
the original error message. This is a security precaution taken by browsers to avoid leaking sensitive
information.
You can simplify the development/debugging process by ensuring that errors are thrown with a same-origin
policy. Below are some common causes of cross-origin errors and ways to address them.
CDN
When loading React (or other libraries that might throw errors) from a CDN, add the crossorigin attribute
to your <script> tags:
Also ensure the CDN responds with the Access-Control-Allow-Origin: * HTTP header:
Access-Control-Allow-Origin: *
Webpack
Source maps
Some JavaScript bundlers may wrap the application code with eval statements in development. (For
example Webpack will do this if devtool is set to any value containing the word "eval".) This may cause
errors to be treated as cross-origin.
If you use Webpack, we recommend using the cheap-module-source-map setting in development to avoid this
problem.
<script crossorigin src="..."></script>
react
86
87.
Code splitting
If yourapplication is split into multiple bundles, these bundles may be loaded using JSONP. This may cause
errors thrown in the code of these bundles to be treated as cross-origin.
To resolve this, use the crossOriginLoading setting in development to add the crossorigin attribute to the
<script> tags generated for the JSONP requests.
Cross-origin Errors
87
Error Decoder
In theminified production build of React, we avoid sending down full error messages in order to reduce the
number of bytes sent over the wire.
We highly recommend using the development build locally when debugging your app since it tracks
additional debug info and provides helpful warnings about potential problems in your apps, but if you
encounter an exception while using the production build, this page will reassemble the original text of the
error.
Error Decoder
99
大規模なアプリケーションにおいては、DataSource を購読して setStateを呼び出すという同様のパターンが何度も発
生することが想像できるでしょう。1 つの場所にロジックを定義し、多数のコンポーネントを横断してロジックを共有可
能にするような抽象化が欲しいところです。このような場合には高階コンポーネントが有効です。
コンポーネントを作成するような関数を書いて、DataSource からデータを受け取る、CommentList や BlogPost のよう
なコンポーネントを作り出せます。その関数は引数の 1 つとして子コンポーネントを受け取り、その子コンポーネントは
購読したデータを props の一部として受け取ります。この関数を withSubscription と呼ぶことにしましょう。
1 つ目の引数はラップされるコンポーネントです。2 つ目の引数は、与えられた DataSource と現在の props をもとに、
関心のあるデータを取り出します。
CommentListWithSubscription と BlogPostWithSubscription が描画されると、 CommentList と BlogPost は
DataSource から取得した最新データを data プロパティとして受け取ります:
const CommentListWithSubscription = withSubscription(
CommentList,
(DataSource) => DataSource.getComments()
);
const BlogPostWithSubscription = withSubscription(
BlogPost,
(DataSource, props) => DataSource.getBlogPost(props.id)
);
// This function takes a component...
function withSubscription(WrappedComponent, selectData) {
// ...and returns another component...
return class extends React.Component {
constructor(props) {
super(props);
this.handleChange = this.handleChange.bind(this);
this.state = {
data: selectData(DataSource, props)
};
}
componentDidMount() {
// ... that takes care of the subscription...
DataSource.addChangeListener(this.handleChange);
}
componentWillUnmount() {
DataSource.removeChangeListener(this.handleChange);
}
handleChange() {
this.setState({
data: selectData(DataSource, this.props)
});
}
render() {
// ... and renders the wrapped component with the fresh data!
// Notice that we pass through any additional props
return <WrappedComponent data={this.state.data} {...this.props} />;
}
};
}
react
144
145.
HOC は入力のコンポーネントを改変したり、振る舞いをコピーするのに継承を利用したりしません。むしろ HOCは元の
コンポーネントをコンテナコンポーネント内にラップすることで組み合わせるのです。HOC は副作用のない純関数です。
それだけです! ラップされたコンポーネントはコンテナの props のすべてに加えて新規のプロパティである data を受
け取り、出力の描画に使用します。外側にある HOC は渡すデータが使われる方法や理由には関心がありませんし、ラッ
プされたコンポーネントの側はデータがどこからやって来たのかには関心を持ちません。
withSubscription は通常の関数なので、引数を好きなだけ増やしたり減らしたりできます。例えば、data プロパティ
の名前を変更可能にして、HOC をラップされるコンポーネントから更に分離させることもできるでしょう。もしくは
shouldComponentUpdate を設定する引数を受け取ったり、データソースを設定する引数を受け取りたいこともあるかもし
れません。HOC ではコンポーネントがどのように定義されるかを完全に管理できるため、上述のことは全て実現できま
す。
コンポーネントのように、withSubscription とラップされるコンポーネントの間の契約は完全に props に基づいていま
す。これにより同じ props をラップされるコンポーネントに与える限りは、ある HOC を他の HOC と簡単に交換できま
す。このことは例えばデータ取得ライブラリを変更する場合に便利でしょう。
元のコンポーネントを変更するのではなく、
コンポジションを使うこと
HOC の中でコンポーネントのプロトタイプを変更したり、あるいは何にせよコンポーネントに変更を加えたりしたくなる
誘惑に負けてはいけません。
このコードにはいくつかの問題があります。1 つは入力のコンポーネントを改変されたコンポーネントとは別に再利用で
きなくなってしまうことです。さらに悪いことに、もしこの EnhancedComponent に別の HOC を適用し、それが同様に
componentDidUpdate に変更を加えるものであった場合、最初の HOC が加えた機能は上書きされてしまいます! またこ
の HOC はライフサイクルメソッドを持たない関数コンポーネントには機能しません。
コンポーネントの改変を行うような HOC は不完全な抽象化です。つまり、利用する側は他の HOC との競合を避けるた
め、どのように実装されているかを知っておく必要があるのです。
改変を行う代わりに、HOC はコンテナコンポーネントで入力されたコンポーネントをラップすることによるコンポジショ
ンを使用するべきです:
function logProps(InputComponent) {
InputComponent.prototype.componentDidUpdate = function(prevProps) {
console.log('Current props: ', this.props);
console.log('Previous props: ', prevProps);
};
// The fact that we're returning the original input is a hint that it has
// been mutated.
return InputComponent;
}
// EnhancedComponent will log whenever props are received
const EnhancedComponent = logProps(InputComponent);
function logProps(WrappedComponent) {
return class extends React.Component {
componentDidUpdate(prevProps) {
console.log('Current props: ', this.props);
console.log('Previous props: ', prevProps);
}
高階 (Higher-Order) コンポーネント
145
146.
この HOC は改変を行うバージョンと同等の機能を持ちつつ、衝突の可能性を回避しています。クラス型と関数コンポー
ネントのどちらでも同様にうまく動作します。そして純関数なので、自分自身を含めた他のHOC と組み合わせることが
できます。
おそらく HOC とコンテナコンポーネントと呼ばれるパターンの類似性に気づいたでしょう。コンテナコンポーネントは
高レベルと低レベルの関心事の責任を分離する戦略の一部です。コンテナはデータ購読や state を管理してコンポーネン
トに props を渡し、渡された側のコンポーネントは UI の描画などの事柄を取り扱います。HOC はコンテナをその実装
の一部として使用します。HOC をパラメータ化されたコンテナコンポーネントの定義であると考えることができます。
規則:自身に関係のない props はラップされるコンポーネントにその
まま渡すこと
HOC はコンポーネントに機能を追加するものです。その props にもとづく契約は大きく変更すべきではありません。
HOC の返り値のコンポーネントはラップされたコンポーネントと似たようなインターフェースを持つことが期待されま
す。
HOC はその特定の関心とは関係のない props はラップされる関数に渡すべきです。大抵の HOC はこのような描画メソ
ッドを持ちます:
この決まり事により、HOC が可能な限り柔軟で再利用しやすいものになります。
規則:組み立てやすさを最大限保つこと
すべての HOC が同じ見た目になるわけではありません。引数としてラップされるコンポーネント 1 つだけを受け取るこ
とがあります。
render() {
// Wraps the input component in a container, without mutating it. Good!
return <WrappedComponent {...this.props} />;
}
}
}
render() {
// Filter out extra props that are specific to this HOC and shouldn't be
// passed through
const { extraProp, ...passThroughProps } = this.props;
// Inject props into the wrapped component. These are usually state values or
// instance methods.
const injectedProp = someStateOrInstanceMethod;
// Pass props to wrapped component
return (
<WrappedComponent
injectedProp={injectedProp}
{...passThroughProps}
/>
);
}
const NavbarWithRouter = withRouter(Navbar);
react
146
147.
通常、HOC は追加の引数を受け取ります。この Relayからの例では、config オブジェクトがコンポーネントのデータ依
存を指定するために使われています:
もっとも一般的な HOC の型シグネチャはこのようなものです:
これは何なのでしょう?! バラバラにしてみると、何が起こっているのかを理解しやすくなります。
言い換えれば、connect は高階コンポーネントを返す高階関数なのです!
この形式は分かりにくかったり不要なものに思えるかもしれませんが、便利な性質を持っています。connect 関数によっ
て返されるもののような単一引数の HOC は、Component => Component という型シグネチャを持ちます。入力の型と出
力の型が同じ関数は一緒に組み合わせるのが大変簡単なのです。
(この性質を使えば、connect や他の機能追加方式の HOC をデコレータ(提唱中の JavaScript の実験的機能)で使用
することも可能になります)
compose ユーティリティ関数は lodash(lodash.flowRight として)
、Redux、そして Ramda といった多くのサードパ
ーティ製ライブラリから提供されています。
規則:デバッグしやすくするため表示名をラップすること
HOC により作成されたコンテナコンポーネントは他のあらゆるコンポーネントと同様、React Developer Tools に表示
されます。デバッグを容易にするため、HOC の結果だと分かるよう表示名を選んでください。
最も一般的な手法は、ラップされるコンポーネントの表示名をラップすることです。つまり高階コンポーネントが
withSubscription と名付けられ、ラップされるコンポーネントの表示名が CommentList である場合、
WithSubscription(CommentList) という表示名を使用しましょう:
const CommentWithRelay = Relay.createContainer(Comment, config);
// React Redux's `connect`
const ConnectedComment = connect(commentSelector, commentActions)(CommentList);
// connect is a function that returns another function
const enhance = connect(commentListSelector, commentListActions);
// The returned function is a HOC, which returns a component that is connected
// to the Redux store
const ConnectedComment = enhance(CommentList);
// Instead of doing this...
const EnhancedComponent = withRouter(connect(commentSelector)(WrappedComponent))
// ... you can use a function composition utility
// compose(f, g, h) is the same as (...args) => f(g(h(...args)))
const enhance = compose(
// These are both single-argument HOCs
withRouter,
connect(commentSelector)
)
const EnhancedComponent = enhance(WrappedComponent)
高階 (Higher-Order) コンポーネント
147
148.
注意事項
高階コンポーネントには、あなたが React を始めて間もないならすぐには分からないような、いくつかの注意事項があり
ます。
renderメソッド内部で HOC を使用しないこと
React の差分アルゴリズム(Reconciliation と呼ばれる)は、既存のサブツリーを更新すべきかそれを破棄して新しいも
のをマウントすべきかを決定する際に、コンポーネントの型が同一かどうかの情報を利用します。render メソッドから
返されるコンポーネントが以前の描画から返されたコンポーネントと(=== で検証して)同一だった場合、React はサブ
ツリーを新しいツリーとの差分を取りながら再帰的に更新します。コンポーネントが同一でなければ、以前のサブツリー
は完全にアンマウントされます。
通常このことを考慮する必要はありません。ですが HOC に関しては考えるべきことです。このことが、render メソッド
中でコンポーネントに HOC を適用してはいけないということを意味しているからです:
ここでの問題はパフォーマンスだけではありません。コンポーネントの再マウントによりコンポーネントとその子要素全
ての state が失われるのです。
こうするのではなく、結果としてのコンポーネントが 1 回だけつくられるようにするため、コンポーネント定義の外で
HOC を適用してください。そうすれば、レンダー間でその同一性が保たれるようになるでしょう。何にせよ、通常の場合
これが望ましい実装になります。
HOC を動的に適用する必要があるような稀なケースでも、コンポーネントのライフサイクルメソッドやコンストラクタの
中で行うようにしましょう。
静的メソッドは必ずコピーすること
React のコンポーネントで静的メソッドを定義することは便利であることがあります。例えば、Relay のコンテナは
GraphQL fragment のコンポジションを容易に実現するため、getFragment という静的メソッドを公開しています。
しかし、HOC をコンポーネントに適用すると、元のコンポーネントはコンテナコンポーネントにラップされます。つまり
新しいコンポーネントは元のコンポーネントの静的メソッドを 1 つも持っていないということになってしまいます。
function withSubscription(WrappedComponent) {
class WithSubscription extends React.Component {/* ... */}
WithSubscription.displayName = `WithSubscription(${getDisplayName(WrappedComponent)})`;
return WithSubscription;
}
function getDisplayName(WrappedComponent) {
return WrappedComponent.displayName || WrappedComponent.name || 'Component';
}
render() {
// A new version of EnhancedComponent is created on every render
// EnhancedComponent1 !== EnhancedComponent2
const EnhancedComponent = enhance(MyComponent);
// That causes the entire subtree to unmount/remount each time!
return <EnhancedComponent />;
}
react
148
149.
この問題を解決するために、コンテナコンポーネントを返す前にメソッドをコピーすることができます。
しかし、この方法ではどのメソッドがコピーされる必要があるのか正確に知っておく必要があります。hoist-non-react-
statics を使用することで、全ての非 Reactの静的メソッドを自動的にコピーできます:
もう 1 つの解決策となりうる方法はコンポーネント自身とは分離して静的メソッドをエクスポートすることです。
ref 属性は渡されない
高階コンポーネントの通例としては、すべての props はラップされたコンポーネントに渡されますが、ref に関してはそ
うではありません。これは ref 属性が(key と同様)実際のプロパティではなく、React によって特別に処理されてい
るものだからです。HOC から出力されたコンポーネントの要素に ref 属性を追加する場合、ref 属性はラップされた内側
のコンポーネントではなく、最も外側のコンテナコンポーネントを参照します。
この問題の解決方法は(React 16.3 で導入された)React.forwardRef API を使うことです。詳しくは ref のフォワー
ディングの章をご覧ください。
// Define a static method
WrappedComponent.staticMethod = function() {/*...*/}
// Now apply a HOC
const EnhancedComponent = enhance(WrappedComponent);
// The enhanced component has no static method
typeof EnhancedComponent.staticMethod === 'undefined' // true
function enhance(WrappedComponent) {
class Enhance extends React.Component {/*...*/}
// Must know exactly which method(s) to copy :(
Enhance.staticMethod = WrappedComponent.staticMethod;
return Enhance;
}
import hoistNonReactStatic from 'hoist-non-react-statics';
function enhance(WrappedComponent) {
class Enhance extends React.Component {/*...*/}
hoistNonReactStatic(Enhance, WrappedComponent);
return Enhance;
}
// Instead of...
MyComponent.someFunction = someFunction;
export default MyComponent;
// ...export the method separately...
export { someFunction };
// ...and in the consuming module, import both
import MyComponent, { someFunction } from './MyComponent.js';
高階 (Higher-Order) コンポーネント
149
次のページまで飛ばして独自のフックを書く方法について学んでも構いません。このページの続きの部分ではこれらのル
ールの背後にある根拠について述べていきます。
解説
既に学んだ通り、ひとつのコンポーネント内で複数の state や副作用を使うことができます。
ではReact は、どの useState の呼び出しがどの state に対応するのか、どうやって知るのでしょうか? その答えは
「React はフックが呼ばれる順番に依存している」です。我々の例が動作するのは、フックの呼び出しの順序が毎回のレ
ンダーごとに同じだからです。
フックへの呼び出しの順番がレンダー間で変わらない限り、React はそれらのフックにローカル state を割り当てること
ができます。ですがフックの呼び出しを条件分岐内(例えば persistForm 副作用の内部で)で行ったらどうなるでしょう
か?
function Form() {
// 1. Use the name state variable
const [name, setName] = useState('Mary');
// 2. Use an effect for persisting the form
useEffect(function persistForm() {
localStorage.setItem('formData', name);
});
// 3. Use the surname state variable
const [surname, setSurname] = useState('Poppins');
// 4. Use an effect for updating the title
useEffect(function updateTitle() {
document.title = name + ' ' + surname;
});
// ...
}
// ---------
// First render
// ---------
useState('Mary') // 1. Initialize the name state variable with 'Mary'
useEffect(persistForm) // 2. Add an effect for persisting the form
useState('Poppins') // 3. Initialize the surname state variable with 'Poppins'
useEffect(updateTitle) // 4. Add an effect for updating the title
// ----------
// Second render
// ----------
useState('Mary') // 1. Read the name state variable (argument is ignored)
useEffect(persistForm) // 2. Replace the effect for persisting the form
useState('Poppins') // 3. Read the surname state variable (argument is ignored)
useEffect(updateTitle) // 4. Replace the effect for updating the title
// ...
// 🔴 We're breaking the first rule by using a Hook in a condition
if (name !== '') {
useEffect(function persistForm() {
react
214
215.
name !== ''という条件は初回のレンダー時には true なので、フックは実行されます。しかし次回のレンダー時にはユ
ーザがフォームをクリアしているかもしれず、その場合にこの条件は false になります。するとレンダー途中でこのフッ
クがスキップされるため、フックの呼ばれる順番が変わってしまいます。
React は 2 つ目の useState の呼び出しに対して何を返せばいいのか分からなくなります。React は 2 つめのフックの
呼び出しは前回レンダー時と同様に persistForm に対応するものだと期待しているのですが、それが成り立たなくなって
います。この部分より先では、スキップされたもの以降のすべてのフックがひとつずつずれているため、バグを引き起こ
します。
これがフックを呼び出すのがトップレベルのみでなければならない理由です。条件付きで副作用を走らせたい場合は、そ
の条件をフックの内部に入れることができます:
上記の lint ルールを使えばこの問題について心配する必要はない、ということに注意してください。しかしフックがなぜ
このように動作するのか、このルールがどんな問題を防いでいるのかについて学びました。
次のステップ
ついに自分独自のフックの書き方について学ぶ準備ができました! カスタムフックを使えば React から提供されるフッ
クを組み合わせて自分独自の抽象化を作り出し、複数の異なるコンポーネント間で state を使う共通のロジックを再利用
することができるようになります。
localStorage.setItem('formData', name);
});
}
useState('Mary') // 1. Read the name state variable (argument is ignored)
// useEffect(persistForm) // 🔴 This Hook was skipped!
useState('Poppins') // 🔴 2 (but was 3). Fail to read the surname state variable
useEffect(updateTitle) // 🔴 3 (but was 4). Fail to replace the effect
useEffect(function persistForm() {
// 👍 We're not breaking the first rule anymore
if (name !== '') {
localStorage.setItem('formData', name);
}
});
フックのルール
215
このプロセスは再帰的です。App は <Greeting/> へとレンダーされるかもしれませんし、Greeting は <Button />
にレンダーされるかもしれない、といったように続いていきます。リコンサイラはそれぞれのコンポーネントが何にレン
ダーされるかを学習しながら、ユーザ定義コンポーネントを再帰的に「掘り下げて」いきます。
この処理の流れは擬似コードで想像することができます:
補足:
これは全くの擬似コードです。本物の実装に近いものではありません。また、いつ再帰を止めるか検討していない
ため、このコードはスタックオーバーフローを引き起こします。
function isClass(type) {
// React.Component subclasses have this flag
return (
Boolean(type.prototype) &&
Boolean(type.prototype.isReactComponent)
);
}
// This function takes a React element (e.g. <App />)
// and returns a DOM or Native node representing the mounted tree.
function mount(element) {
var type = element.type;
var props = element.props;
// We will determine the rendered element
// by either running the type as function
// or creating an instance and calling render().
var renderedElement;
if (isClass(type)) {
// Component class
var publicInstance = new type(props);
// Set the props
publicInstance.props = props;
// Call the lifecycle if necessary
if (publicInstance.componentWillMount) {
publicInstance.componentWillMount();
}
// Get the rendered element by calling render()
renderedElement = publicInstance.render();
} else {
// Component function
renderedElement = type(props);
}
// This process is recursive because a component may
// return an element with a type of another component.
return mount(renderedElement);
// Note: this implementation is incomplete and recurses infinitely!
// It only handles elements like <App /> or <Button />.
// It doesn't handle elements like <div /> or <p /> yet.
}
var rootEl = document.getElementById('root');
var node = mount(<App />);
rootEl.appendChild(node);
react
228
229.
上記の例でいくつかの鍵となるアイデアをおさらいしましょう:
React 要素とはコンポーネントの型(例えば App)と props を表すプレーンなオブジェクトである。
ユーザ定義コンポーネント(例えば App )はクラスであっても関数であってもよいが、それらは全て要素へと「レン
ダーされる」
。
「マウント」とは、最上位の React 要素(例えば <App /> )を受け取り、DOM もしくはネイティブなツリーを構築
する再帰的な処理である。
host要素のマウント
このようにして要素ができても、それを使って画面に何か表示しなければ意味がありません。
ユーザ定義 ("composite") コンポーネントに加え、React 要素はプラットフォームに固有な ("host") コンポーネントも
表すことができます。例えば、Button は render メソッドから <div /> を返すことが考えられます。
もし要素の type プロパティが文字列なら、私たちはいま host 要素を扱っていることになります:
host 要素に関連付けられているユーザ定義のコードはありません。
リコンサイラは host 要素を見つけると、レンダラに host 要素のマウントを任せます。例えば、React DOM は DOM ノ
ードを生成します。
host 要素に子要素がある場合、リコンサイラは前節で述べたものと同じアルゴリズムに従い、子要素を再帰的にマウント
します。子要素が(<div><hr /></div> のような)host なのか、
(<div><Button /></div> のような)composite なの
か、もしくはその両方が含まれているかに関わらず、再帰的な処理が実行されます。
子コンポーネントにより生成された DOM ノードは親の DOM ノードに追加され、それが再帰的に行われることで、完全
な DOM 構造が組み立てられます。
補足:
リコンサイラそのものは DOM と結合していません。マウントの結果自体(時にソースコードでは "mount
image" とも呼ばれます)はレンダラに依存し、それは(React DOM なら)DOM ノード であったり、
(React
DOM Server なら)文字列であったり、
(React Native なら)ネイティブのビューを表す数字であったりします。
前出のコードを host 要素も扱えるように拡張するとすれば、以下のようなものになるでしょう:
console.log(<div />);
// { type: 'div', props: {} }
function isClass(type) {
// React.Component subclasses have this flag
return (
Boolean(type.prototype) &&
Boolean(type.prototype.isReactComponent)
);
}
// This function only handles elements with a composite type.
// For example, it handles <App /> and <Button />, but not a <div />.
実装に関するメモ
229
230.
function mountComposite(element) {
vartype = element.type;
var props = element.props;
var renderedElement;
if (isClass(type)) {
// Component class
var publicInstance = new type(props);
// Set the props
publicInstance.props = props;
// Call the lifecycle if necessary
if (publicInstance.componentWillMount) {
publicInstance.componentWillMount();
}
renderedElement = publicInstance.render();
} else if (typeof type === 'function') {
// Component function
renderedElement = type(props);
}
// This is recursive but we'll eventually reach the bottom of recursion when
// the element is host (e.g. <div />) rather than composite (e.g. <App />):
return mount(renderedElement);
}
// This function only handles elements with a host type.
// For example, it handles <div /> and <p /> but not an <App />.
function mountHost(element) {
var type = element.type;
var props = element.props;
var children = props.children || [];
if (!Array.isArray(children)) {
children = [children];
}
children = children.filter(Boolean);
// This block of code shouldn't be in the reconciler.
// Different renderers might initialize nodes differently.
// For example, React Native would create iOS or Android views.
var node = document.createElement(type);
Object.keys(props).forEach(propName => {
if (propName !== 'children') {
node.setAttribute(propName, props[propName]);
}
});
// Mount the children
children.forEach(childElement => {
// Children may be host (e.g. <div />) or composite (e.g. <Button />).
// We will also mount them recursively:
var childNode = mount(childElement);
// This line of code is also renderer-specific.
// It would be different depending on the renderer:
node.appendChild(childNode);
});
// Return the DOM node as mount result.
// This is where the recursion ends.
return node;
}
react
230
231.
このコードは動作しますが、それでもまだ現実のリコンサイラの実装方法からは隔たりがあります。ここにあるべき鍵と
なる要素は、更新に対応することです。
内部インスタンスの導入
React の鍵となる機能は、あらゆるものを再描画できることであり、その際に DOMを再生成したり、state をリセット
したりしないことです:
しかし、前節で実装したコードは最初のツリーをマウントする方法しか知りません。前節のコードは、全ての
publicInstance や、どの DOM node がどのコンポーネントに対応しているかなど、必要な全情報を保有しているわけ
ではないので、更新を実行することができません。
stack リコンサイラのコードベースでは、この問題を mount() 関数をメソッドとしてクラスに置くことで解決していま
す。しかしこのアプローチには欠点があるため、進行中のリコンサイラの書き直し作業では、反対の方向に進んでいます。
それでも現時点では、この方式で動作しています。
別々の mountHost と mountComposite 関数の代わりに、2 つのクラスを作成します: DOMComponent と
CompositeComponent です。
両方のクラスが element を受け入れるコンストラクタと、マウントされたノードを返す mount() メソッドを持ちます。
最上位の mount() 関数を、正しいクラスをインスタンス化するファクトリに置き換えます:
まず、CompositeComponent の実装から考えてみましょう:
function mount(element) {
var type = element.type;
if (typeof type === 'function') {
// User-defined components
return mountComposite(element);
} else if (typeof type === 'string') {
// Platform-specific components
return mountHost(element);
}
}
var rootEl = document.getElementById('root');
var node = mount(<App />);
rootEl.appendChild(node);
root.render(<App />);
// Should reuse the existing DOM:
root.render(<App />);
function instantiateComponent(element) {
var type = element.type;
if (typeof type === 'function') {
// User-defined components
return new CompositeComponent(element);
} else if (typeof type === 'string') {
// Platform-specific components
return new DOMComponent(element);
}
}
実装に関するメモ
231
232.
以前の mountComposite() の実装と大きな違いはありませんが、更新時に使用するthis.currentElement 、
this.renderedComponent や、this.publicInstance のような情報を保存できるようになりました。
CompositeComponent のインスタンスは、ユーザが指定する element.type のインスタンスとは同一ではないことに注意
してください。CompositeComponent はリコンサイラの実装の詳細であり、ユーザには決して公開されません。ユーザ定
義クラスとは element.type から読み込むものであり、CompositeComponent がそのインスタンスを作成するのです。
混乱を避けるために、CompositeComponent と DOMComponent のインスタンスを「内部インスタンス」と呼ぶことにしま
す。内部インスタンスは、長期間利用されるデータとそれらを関連付けられるようにするために存在します。それらの存
在はレンダラとリコンサイラのみが認識しています。
class CompositeComponent {
constructor(element) {
this.currentElement = element;
this.renderedComponent = null;
this.publicInstance = null;
}
getPublicInstance() {
// For composite components, expose the class instance.
return this.publicInstance;
}
mount() {
var element = this.currentElement;
var type = element.type;
var props = element.props;
var publicInstance;
var renderedElement;
if (isClass(type)) {
// Component class
publicInstance = new type(props);
// Set the props
publicInstance.props = props;
// Call the lifecycle if necessary
if (publicInstance.componentWillMount) {
publicInstance.componentWillMount();
}
renderedElement = publicInstance.render();
} else if (typeof type === 'function') {
// Component function
publicInstance = null;
renderedElement = type(props);
}
// Save the public instance
this.publicInstance = publicInstance;
// Instantiate the child internal instance according to the element.
// It would be a DOMComponent for <div /> or <p />,
// and a CompositeComponent for <App /> or <Button />:
var renderedComponent = instantiateComponent(renderedElement);
this.renderedComponent = renderedComponent;
// Mount the rendered output
return renderedComponent.mount();
}
}
react
232
233.
一方、ユーザ定義クラスのインスタンスは「公開インスタンス」と呼ぶことにします。公開インスタンスは、独自コンポ
ーネントの render() やその他のメソッド内でthis として現れるものです。
mountHost() 関数は、DOMComponent クラスの mount() メソッドとしてリファクタリングされ、こちらも見慣れたもの
になります:
mountHost() からリファクタリングした後の主な違いは、this.node と this.renderedChildren を内部の DOM コン
ポーネントインスタンスに関連付け続けていることです。これらは、将来的に非破壊的な更新を適用する際にも使用しま
す。
class DOMComponent {
constructor(element) {
this.currentElement = element;
this.renderedChildren = [];
this.node = null;
}
getPublicInstance() {
// For DOM components, only expose the DOM node.
return this.node;
}
mount() {
var element = this.currentElement;
var type = element.type;
var props = element.props;
var children = props.children || [];
if (!Array.isArray(children)) {
children = [children];
}
// Create and save the node
var node = document.createElement(type);
this.node = node;
// Set the attributes
Object.keys(props).forEach(propName => {
if (propName !== 'children') {
node.setAttribute(propName, props[propName]);
}
});
// Create and save the contained children.
// Each of them can be a DOMComponent or a CompositeComponent,
// depending on whether the element type is a string or a function.
var renderedChildren = children.map(instantiateComponent);
this.renderedChildren = renderedChildren;
// Collect DOM nodes they return on mount
var childNodes = renderedChildren.map(child => child.mount());
childNodes.forEach(childNode => node.appendChild(childNode));
// Return the DOM node as mount result
return node;
}
}
実装に関するメモ
233
このリファクタリングを完了するため、完全なツリーをコンテナノードとパブリックインスタンスにマウントする関数を
導入することにします。
アンマウント
これで、子内部インスタンスと DOM ノードを持った内部インスタンスができ、そこにアンマウントを実装できるように
なります。composite要素では、アンマウントはライフサイクルメソッドを呼び出し、再帰的な処理を行います。
function mountTree(element, containerNode) {
// Create the top-level internal instance
var rootComponent = instantiateComponent(element);
// Mount the top-level component into the container
var node = rootComponent.mount();
containerNode.appendChild(node);
// Return the public instance it provides
var publicInstance = rootComponent.getPublicInstance();
return publicInstance;
}
var rootEl = document.getElementById('root');
mountTree(<App />, rootEl);
class CompositeComponent {
// ...
unmount() {
// Call the lifecycle method if necessary
var publicInstance = this.publicInstance;
if (publicInstance) {
if (publicInstance.componentWillUnmount) {
publicInstance.componentWillUnmount();
}
}
実装に関するメモ
235
236.
DOMComponent では、アンマウントは子要素それぞれにアンマウントするように伝えます:
実際には、DOM コンポーネントをアンマウントすると、イベントリスナの削除とキャッシュのクリアも行われますが、こ
れらの詳細は省略します。
これでReactDOM.unmountComponentAtNode() と同様の unmountTree(containerNode) という新規の最上位関数を追加す
ることができます:
これが動作するよう、DOM ノードから内部ルートインスタンスを読み込む必要があります。mountTree() を変更して、
ルート DOM ノードに _internalInstance プロパティを追加します。mountTree() に既存の全てのツリーを破棄するよ
うにも伝えて、複数回 mountTree() を呼び出せるようにします:
// Unmount the single rendered component
var renderedComponent = this.renderedComponent;
renderedComponent.unmount();
}
}
class DOMComponent {
// ...
unmount() {
// Unmount all the children
var renderedChildren = this.renderedChildren;
renderedChildren.forEach(child => child.unmount());
}
}
function unmountTree(containerNode) {
// Read the internal instance from a DOM node:
// (This doesn't work yet, we will need to change mountTree() to store it.)
var node = containerNode.firstChild;
var rootComponent = node._internalInstance;
// Unmount the tree and clear the container
rootComponent.unmount();
containerNode.innerHTML = '';
}
function mountTree(element, containerNode) {
// Destroy any existing tree
if (containerNode.firstChild) {
unmountTree(containerNode);
}
// Create the top-level internal instance
var rootComponent = instantiateComponent(element);
// Mount the top-level component into the container
var node = rootComponent.mount();
containerNode.appendChild(node);
// Save a reference to the internal instance
node._internalInstance = rootComponent;
// Return the public instance it provides
react
236
続いて、レンダーされた要素の type を見てみましょう。もし最後のレンダー以降、typeが変更されていなければ、こ
れより下のコンポーネントもその場で更新されれば良いということになります。
例えばコンポーネントが最初に <Button color="red" /> を返し、2 回目に <Button color="blue" /> を返したなら、
対応する内部インスタンスに次の要素を receive() するよう伝えるだけでよいのです:
ただし、レンダーされた次の要素が前のものと異なる type である場合、内部インスタンスの更新はできません。
<button> が <input> に「なる」ことはできないのです。
代わりに、既存の内部インスタンスをアンマウントし、レンダーされた要素の型に対応する新たな内部インスタンスをマ
ウントします。例えば、前に <button /> をレンダーしていたコンポーネントが <input /> をレンダーした場合には、
この処理が発生します:
receive(nextElement) {
var prevProps = this.currentElement.props;
var publicInstance = this.publicInstance;
var prevRenderedComponent = this.renderedComponent;
var prevRenderedElement = prevRenderedComponent.currentElement;
// Update *own* element
this.currentElement = nextElement;
var type = nextElement.type;
var nextProps = nextElement.props;
// Figure out what the next render() output is
var nextRenderedElement;
if (isClass(type)) {
// Component class
// Call the lifecycle if necessary
if (publicInstance.componentWillUpdate) {
publicInstance.componentWillUpdate(nextProps);
}
// Update the props
publicInstance.props = nextProps;
// Re-render
nextRenderedElement = publicInstance.render();
} else if (typeof type === 'function') {
// Component function
nextRenderedElement = type(nextProps);
}
// ...
// ...
// If the rendered element type has not changed,
// reuse the existing component instance and exit.
if (prevRenderedElement.type === nextRenderedElement.type) {
prevRenderedComponent.receive(nextRenderedElement);
return;
}
// ...
// ...
// If we reached this point, we need to unmount the previously
// mounted component, mount the new one, and swap their nodes.
react
238
239.
まとめると、composite コンポーネントは新たな要素を受け取った際に、レンダーされた内部インスタンスに更新を委任
するか、もしくは内部インスタンスをアンマウントしてそこに新しいものをマウントする、ということになります。
もう 1つ、コンポーネントが要素を受け取らずに再マウントする状況があります。それは要素の key が変更された時で
す。既に複雑なチュートリアルがさらに複雑になってしまうので、このドキュメントでは key の取り扱いについては言及
しません。
プラットフォーム固有のノードを配置して更新時に置換できるよう、getHostNode() と呼ばれるメソッドを内部インスタ
ンスに追加する必要があったことに注意してください。その実装は両方のクラスで簡単にできます:
host コンポーネントの更新
DOMComponent のような host コンポーネントの実装では、異なった更新を行います。要素を受け取る際、背後のプラッ
トフォーム固有のビューを更新する必要があるのです。React DOM の場合、これは DOM 属性の更新を意味します:
// Find the old node because it will need to be replaced
var prevNode = prevRenderedComponent.getHostNode();
// Unmount the old child and mount a new child
prevRenderedComponent.unmount();
var nextRenderedComponent = instantiateComponent(nextRenderedElement);
var nextNode = nextRenderedComponent.mount();
// Replace the reference to the child
this.renderedComponent = nextRenderedComponent;
// Replace the old node with the new one
// Note: this is renderer-specific code and
// ideally should live outside of CompositeComponent:
prevNode.parentNode.replaceChild(nextNode, prevNode);
}
}
class CompositeComponent {
// ...
getHostNode() {
// Ask the rendered component to provide it.
// This will recursively drill down any composites.
return this.renderedComponent.getHostNode();
}
}
class DOMComponent {
// ...
getHostNode() {
return this.node;
}
}
class DOMComponent {
// ...
receive(nextElement) {
var node = this.node;
var prevElement = this.currentElement;
var prevProps = prevElement.props;
実装に関するメモ
239
240.
そして、host コンポーネントは子コンポーネントを更新する必要があります。composite コンポーネントと異なり、
hostコンポーネントは 1 つ以上の子コンポーネントを保有している可能性があります。
この簡素化した例では内部インスタンスの配列を用い、受け取った type と以前の type が一致するかによって、内部イ
ンスタンスを更新もしくは置換しながら、配列をイテレートしています。実際のリコンサイラでは処理時に要素の key を
考慮して、要素の挿入と削除に加えて移動を追跡しますが、そのロジックは省略しています。
リストの子要素への DOM 操作は、バッチで実行できるようまとめておきます:
var nextProps = nextElement.props;
this.currentElement = nextElement;
// Remove old attributes.
Object.keys(prevProps).forEach(propName => {
if (propName !== 'children' && !nextProps.hasOwnProperty(propName)) {
node.removeAttribute(propName);
}
});
// Set next attributes.
Object.keys(nextProps).forEach(propName => {
if (propName !== 'children') {
node.setAttribute(propName, nextProps[propName]);
}
});
// ...
// ...
// These are arrays of React elements:
var prevChildren = prevProps.children || [];
if (!Array.isArray(prevChildren)) {
prevChildren = [prevChildren];
}
var nextChildren = nextProps.children || [];
if (!Array.isArray(nextChildren)) {
nextChildren = [nextChildren];
}
// These are arrays of internal instances:
var prevRenderedChildren = this.renderedChildren;
var nextRenderedChildren = [];
// As we iterate over children, we will add operations to the array.
var operationQueue = [];
// Note: the section below is extremely simplified!
// It doesn't handle reorders, children with holes, or keys.
// It only exists to illustrate the overall flow, not the specifics.
for (var i = 0; i < nextChildren.length; i++) {
// Try to get an existing internal instance for this child
var prevChild = prevRenderedChildren[i];
// If there is no internal instance under this index,
// a child has been appended to the end. Create a new
// internal instance, mount it, and use its node.
if (!prevChild) {
var nextChild = instantiateComponent(nextChildren[i]);
var node = nextChild.mount();
react
240
241.
最後のステップとして、DOM 操作を実行します。ここでも、実際のリコンサイラのコードは要素の移動を扱わなければい
けないので、より複雑になります:
// Recordthat we need to append a node
operationQueue.push({type: 'ADD', node});
nextRenderedChildren.push(nextChild);
continue;
}
// We can only update the instance if its element's type matches.
// For example, <Button size="small" /> can be updated to
// <Button size="large" /> but not to an <App />.
var canUpdate = prevChildren[i].type === nextChildren[i].type;
// If we can't update an existing instance, we have to unmount it
// and mount a new one instead of it.
if (!canUpdate) {
var prevNode = prevChild.getHostNode();
prevChild.unmount();
var nextChild = instantiateComponent(nextChildren[i]);
var nextNode = nextChild.mount();
// Record that we need to swap the nodes
operationQueue.push({type: 'REPLACE', prevNode, nextNode});
nextRenderedChildren.push(nextChild);
continue;
}
// If we can update an existing internal instance,
// just let it receive the next element and handle its own update.
prevChild.receive(nextChildren[i]);
nextRenderedChildren.push(prevChild);
}
// Finally, unmount any children that don't exist:
for (var j = nextChildren.length; j < prevChildren.length; j++) {
var prevChild = prevRenderedChildren[j];
var node = prevChild.getHostNode();
prevChild.unmount();
// Record that we need to remove the node
operationQueue.push({type: 'REMOVE', node});
}
// Point the list of rendered children to the updated version.
this.renderedChildren = nextRenderedChildren;
// ...
// ...
// Process the operation queue.
while (operationQueue.length > 0) {
var operation = operationQueue.shift();
switch (operation.type) {
case 'ADD':
this.node.appendChild(operation.node);
break;
case 'REPLACE':
this.node.replaceChild(operation.nextNode, operation.prevNode);
実装に関するメモ
241
242.
host コンポーネントの更新については以上です。
最上位コンポーネントの更新
ここまでで CompositeComponentと DOMComponent の両方ともが receive(nextElement) メソッドを実装しているので、
要素の type が前回と同じだった場合は最上位の mountTree() 関数がそれを使えるよう、この関数を書き換えることがで
きます:
これで、同じ型で mountTree() を 2 回呼び出しても、破壊的な変更にはなりません:
以上の処理が React 内部での動作の仕組みの基本です。
このドキュメントで除外したもの
このドキュメントは、実際のコードベースよりもシンプルなものになっています。ここでは言及しなかった重要なポイン
トがいくつかあります:
コンポーネントは null をレンダーでき、リコンサイラは配列やレンダーされた出力における「空スロット」部分を扱
うことができます。
break;
case 'REMOVE':
this.node.removeChild(operation.node);
break;
}
}
}
}
function mountTree(element, containerNode) {
// Check for an existing tree
if (containerNode.firstChild) {
var prevNode = containerNode.firstChild;
var prevRootComponent = prevNode._internalInstance;
var prevElement = prevRootComponent.currentElement;
// If we can, reuse the existing root component
if (prevElement.type === element.type) {
prevRootComponent.receive(element);
return;
}
// Otherwise, unmount the existing tree
unmountTree(containerNode);
}
// ...
}
var rootEl = document.getElementById('root');
mountTree(<App />, rootEl);
// Reuses the existing DOM:
mountTree(<App />, rootEl);
react
242
Legacy Context
Note:
The legacycontext API will be removed in a future major version. Use the new context API introduced
with version 16.3. The legacy API will continue working for all 16.x releases.
How To Use Context
This section documents a legacy API. See the new API.
Suppose you have a structure like:
In this example, we manually thread through a color prop in order to style the Button and Message
components appropriately. Using context, we can pass this through the tree automatically:
class Button extends React.Component {
render() {
return (
<button style={{background: this.props.color}}>
{this.props.children}
</button>
);
}
}
class Message extends React.Component {
render() {
return (
<div>
{this.props.text} <Button color={this.props.color}>Delete</Button>
</div>
);
}
}
class MessageList extends React.Component {
render() {
const color = "purple";
const children = this.props.messages.map((message) =>
<Message text={message.text} color={color} />
);
return <div>{children}</div>;
}
}
import PropTypes from 'prop-types';
class Button extends React.Component {
Legacy Context
267
268.
By adding childContextTypesand getChildContext to MessageList (the context provider), React passes the
information down automatically and any component in the subtree (in this case, Button ) can access it by
defining contextTypes .
If contextTypes is not defined, then context will be an empty object.
Note:
React.PropTypes has moved into a different package since React v15.5. Please use the prop-types
library instead to define contextTypes .
We provide a codemod script to automate the conversion.
render() {
return (
<button style={{background: this.context.color}}>
{this.props.children}
</button>
);
}
}
Button.contextTypes = {
color: PropTypes.string
};
class Message extends React.Component {
render() {
return (
<div>
{this.props.text} <Button>Delete</Button>
</div>
);
}
}
class MessageList extends React.Component {
getChildContext() {
return {color: "purple"};
}
render() {
const children = this.props.messages.map((message) =>
<Message text={message.text} />
);
return <div>{children}</div>;
}
}
MessageList.childContextTypes = {
color: PropTypes.string
};
react
268
269.
Parent-Child Coupling
This sectiondocuments a legacy API. See the new API.
Context can also let you build an API where parents and children communicate. For example, one library
that works this way is React Router V4:
By passing down some information from the Router component, each Link and Route can communicate
back to the containing Router .
Before you build components with an API similar to this, consider if there are cleaner alternatives. For
example, you can pass entire React components as props if you'd like to.
Referencing Context in Lifecycle Methods
This section documents a legacy API. See the new API.
If contextTypes is defined within a component, the following lifecycle methods will receive an additional
parameter, the context object:
constructor(props, context)
componentWillReceiveProps(nextProps, nextContext)
shouldComponentUpdate(nextProps, nextState, nextContext)
componentWillUpdate(nextProps, nextState, nextContext)
Note:
import { BrowserRouter as Router, Route, Link } from 'react-router-dom';
const BasicExample = () => (
<Router>
<div>
<ul>
<li><Link to="/">Home</Link></li>
<li><Link to="/about">About</Link></li>
<li><Link to="/topics">Topics</Link></li>
</ul>
<hr />
<Route exact path="/" component={Home} />
<Route path="/about" component={About} />
<Route path="/topics" component={Topics} />
</div>
</Router>
);
Legacy Context
269
270.
As of React16, componentDidUpdate no longer receives prevContext .
Referencing Context in Function Components
This section documents a legacy API. See the new API.
Function components are also able to reference context if contextTypes is defined as a property of the
function. The following code shows a Button component written as a function component.
Updating Context
This section documents a legacy API. See the new API.
Don't do it.
React has an API to update context, but it is fundamentally broken and you should not use it.
The getChildContext function will be called when the state or props changes. In order to update data in the
context, trigger a local state update with this.setState . This will trigger a new context and changes will be
received by the children.
import PropTypes from 'prop-types';
const Button = ({children}, context) =>
<button style={{background: context.color}}>
{children}
</button>;
Button.contextTypes = {color: PropTypes.string};
import PropTypes from 'prop-types';
class MediaQuery extends React.Component {
constructor(props) {
super(props);
this.state = {type:'desktop'};
}
getChildContext() {
return {type: this.state.type};
}
componentDidMount() {
const checkMediaQuery = () => {
const type = window.matchMedia("(min-width: 1025px)").matches ? 'desktop' : 'mobile';
if (type !== this.state.type) {
this.setState({type});
}
};
react
270
271.
The problem is,if a context value provided by component changes, descendants that use that value won't
update if an intermediate parent returns false from shouldComponentUpdate . This is totally out of control of
the components using context, so there's basically no way to reliably update the context. This blog post has
a good explanation of why this is a problem and how you might get around it.
window.addEventListener('resize', checkMediaQuery);
checkMediaQuery();
}
render() {
return this.props.children;
}
}
MediaQuery.childContextTypes = {
type: PropTypes.string
};
Legacy Context
271
272.
イベントプーリング
補足
このページの内容は React 16以前および React Native にのみ関連します。
ウェブで使う React 17 ではイベントプーリングは使用されていません。
React 17 におけるこの変更についての詳細はこちら。
SyntheticEvent オブジェクトはプールされます。つまり SyntheticEvent はイベントハンドラが呼び出された後に再利
用され、すべてのプロパティが null にセットされます。例えば、以下は動作しません:
イベントハンドラが実行された後にオブジェクトのプロパティにアクセスする必要がある場合は、e.persist() を呼ぶ必
要があります:
function handleChange(e) {
// This won't work because the event object gets reused.
setTimeout(() => {
console.log(e.target.value); // Too late!
}, 100);
}
function handleChange(e) {
// Prevents React from resetting its properties:
e.persist();
setTimeout(() => {
console.log(e.target.value); // Works
}, 100);
}
react
272
273.
state のリフトアップ
しばしば、いくつかのコンポーネントが同一の変化するデータを反映する必要がある場合があります。そんなときは最も
近い共通の祖先コンポーネントへ共有されている stateをリフトアップすることを推奨します。これを、実際にはどのよ
うに行うかを見てみましょう。
この章では、与えられた温度で水が沸騰するかどうかを計算する温度計算ソフトを作成します。
BoilingVerdict というコンポーネントから始めましょう。これは温度を celsius という props として受け取り、水が
沸騰するのに十分な温度かどうかを表示します。
次に Calculator と呼ばれるコンポーネントを作成します。温度を入力するための <input> 要素をレンダーし、入力さ
れた値を this.state.temperature に保持します。
加えて、現在の入力値を判定する BoilingVerdict もレンダーします。
Try it on CodePen
function BoilingVerdict(props) {
if (props.celsius >= 100) {
return <p>The water would boil.</p>;
}
return <p>The water would not boil.</p>;
}
class Calculator extends React.Component {
constructor(props) {
super(props);
this.handleChange = this.handleChange.bind(this);
this.state = {temperature: ''};
}
handleChange(e) {
this.setState({temperature: e.target.value});
}
render() {
const temperature = this.state.temperature;
return (
<fieldset>
<legend>Enter temperature in Celsius:</legend>
<input
value={temperature}
onChange={this.handleChange} />
<BoilingVerdict
celsius={parseFloat(temperature)} />
</fieldset>
);
}
}
state のリフトアップ
273
キーボードイベント
イベント名:
プロパティ:
key プロパティは DOMLevel 3 Events spec に記載されている任意の値を取ることができます。
フォーカスイベント
イベント名:
これらのフォーカスイベントは、フォーム要素だけでなくすべての React DOM 要素で動作します。
プロパティ:
onFocus
onFocus イベントは要素(あるいはその内部の別の要素)がフォーカスを受け取った時に呼び出されます。例えば、ユー
ザがテキスト入力をクリックした際に呼び出されます。
onKeyDown onKeyPress onKeyUp
boolean altKey
number charCode
boolean ctrlKey
boolean getModifierState(key)
string key
number keyCode
string locale
number location
boolean metaKey
boolean repeat
boolean shiftKey
number which
onFocus onBlur
DOMEventTarget relatedTarget
function Example() {
return (
<input
onFocus={(e) => {
console.log('Focused on input');
}}
placeholder="onFocus is triggered when you click this input."
/>
)
}
合成イベント (SyntheticEvent)
313
314.
onBlur
onBlur イベントハンドラは要素(あるいはその内部の別の要素)からフォーカスが外れた場合に呼び出されます。例え
ば、ユーザが既にフォーカスされているテキスト入力の外側でクリックした場合に呼び出されます。
フォーカスが当たった・外れたことの検出
currentTarget とrelatedTarget を用いることで、フォーカスが当たった・外れた際のイベントが親要素の外側で起こ
ったかどうかを判定できます。以下のコピー・ペーストで使えるデモでは、子要素のどれかへのフォーカス、要素自身へ
のフォーカス、サブツリー全体から出入りするフォーカスを、それぞれどのように検出するかを示しています。
function Example() {
return (
<input
onBlur={(e) => {
console.log('Triggered because this input lost focus');
}}
placeholder="onBlur is triggered when you click this input and then you click outside o
/>
)
}
function Example() {
return (
<div
tabIndex={1}
onFocus={(e) => {
if (e.currentTarget === e.target) {
console.log('focused self');
} else {
console.log('focused child', e.target);
}
if (!e.currentTarget.contains(e.relatedTarget)) {
// Not triggered when swapping focus between children
console.log('focus entered self');
}
}}
onBlur={(e) => {
if (e.currentTarget === e.target) {
console.log('unfocused self');
} else {
console.log('unfocused child', e.target);
}
if (!e.currentTarget.contains(e.relatedTarget)) {
// Not triggered when swapping focus between children
console.log('focus left self');
}
}}
>
<input id="1" />
<input id="2" />
</div>
);
}
react
314
補足
Profiler は軽いコンポーネントですが、必要な時にのみ利用すべきです。使うごとにアプリケーションに多少の
CPU およびメモリオーバーヘッドが生じます。
onRenderコールバック
Profiler には props として onRender 関数を渡す必要があります。 プロファイリングされているツリー内のコンポー
ネントが更新を「コミット」した際に、React がこの関数を毎回呼び出します。 この関数は、レンダー内容とかかった時
間に関する情報を引数として受け取ります。
それぞれを詳細に見てみましょう:
コミットが起きた Profiler の id プロパティ。 複数のプロファイラを使用している場合にどのツリーにコミットが起
きたのかを区別するのに使うことができます。
phase: "mount" | "update" - ツリーが初回マウントされたのか、props や state、フックの変更によって再レンダ
ーされたのかを区別します。
actualDuration: number - 現在の更新で Profiler とその子孫のレンダーに要した時間。 これが(React.memo 、
useMemo 、shouldComponentUpdate などの)メモ化をどれだけうまく有効に使えているかの指標となります。 理想的
には、子孫要素は特定の props が変化した場合にのみ再レンダーされるため、初回マウント時以降にこの値は大幅に
小さくなるはずです。
baseDuration: number - Profiler ツリー内のそれぞれのコンポーネントの直近の render 時間。 この値を使って
最悪の場合のレンダーコスト(初回マウント時や、メモ化の一切ないツリーの場合)を見積もることができます。
startTime: number - 現在の更新のレンダーを React が開始した時刻に対応するタイムスタンプ。
<Panel {...props}>
<Profiler id="Content" onRender={callback}>
<Content {...props} />
</Profiler>
<Profiler id="PreviewPane" onRender={callback}>
<PreviewPane {...props} />
</Profiler>
</Panel>
</Profiler>
</App>
);
function onRenderCallback(
id, // the "id" prop of the Profiler tree that has just committed
phase, // either "mount" (if the tree just mounted) or "update" (if it re-rendered)
actualDuration, // time spent rendering the committed update
baseDuration, // estimated time to render the entire subtree without memoization
startTime, // when React began rendering this update
commitTime, // when React committed this update
interactions // the Set of interactions belonging to this update
) {
// Aggregate or log render timings...
}
react
326
327.
commitTime: number -現在の更新を React がコミットした時刻に対応するタイムスタンプ。 必要に応じてグルー
プ化できるよう、1 コミット内のすべてのプロファイラ間でこの値は共有されます。
interactions: Set - 更新がスケジュールされた(render や setState の呼び出しなどにより)際に trace された
"interaction" の Set。
補足
更新の原因を特定するために interaction を利用可能ですが、trace 用の API は依然実験的です。
fb.me/react-interaction-tracing に詳細があります。
プロファイラ API
327
328.
PureRenderMixin
Note
The PureRenderMixin mixinpredates React.PureComponent . This reference doc is provided for legacy
purposes, and you should consider using React.PureComponent instead.
If your React component's render function renders the same result given the same props and state, you can
use this mixin for a performance boost in some cases.
Example:
Example using ES6 class syntax:
Under the hood, the mixin implements shouldComponentUpdate, in which it compares the current props
and state with the next ones and returns false if the equalities pass.
Note:
This only shallowly compares the objects. If these contain complex data structures, it may produce
false-negatives for deeper differences. Only mix into components which have simple props and state,
or use forceUpdate() when you know deep data structures have changed. Or, consider using
immutable objects to facilitate fast comparisons of nested data.
var PureRenderMixin = require('react-addons-pure-render-mixin');
var createReactClass = require('create-react-class');
createReactClass({
mixins: [PureRenderMixin],
render: function() {
return <div className={this.props.className}>foo</div>;
}
});
import PureRenderMixin from 'react-addons-pure-render-mixin';
class FooComponent extends React.Component {
constructor(props) {
super(props);
this.shouldComponentUpdate = PureRenderMixin.shouldComponentUpdate.bind(this);
}
render() {
return <div className={this.props.className}>foo</div>;
}
}
react
328
ReactDOMServer
ReactDOMServer オブジェクトはコンポーネントを静的なマークアップとして変換できるようにします。これは、一般的
に Nodeサーバで使われます。
概要
以下のメソッドは Node.js の Stream 環境でのみ動作します:
renderToPipeableStream()
renderToNodeStream() (非推奨)
renderToStaticNodeStream()
以下のメソッドは Web Stream の環境(ブラウザ、Deno やいくつかのモダンなエッジランタイム)でのみ動作しま
す:
renderToReadableStream()
以下のメソッドはストリームをサポートしない環境でも動作します:
renderToString()
renderToStaticMarkup()
リファレンス
renderToPipeableStream() {#rendertopipeablestream}
React 要素を初期状態の HTML に変換します。出力をパイプするための pipe(res) メソッドとリクエストを中止するた
めの abort() メソッドを持ったストリームを返します。サスペンスや、HTML をストリーミングして「遅れてやってく
る」コンテンツのブロックをインライン <script> タグで埋めるための機能を完全にサポートしています。詳細はこちら。
このようにサーバでレンダーされたマークアップを有するノードに対して ReactDOM.hydrateRoot() をコールすると、
React はマークアップを保持してイベントハンドラだけをアタッチしますので、非常によい初回ロード体験が実現できま
す。
// ES modules
import * as ReactDOMServer from 'react-dom/server';
// CommonJS
var ReactDOMServer = require('react-dom/server');
ReactDOMServer.renderToPipeableStream(element, options)
let didError = false;
const stream = renderToPipeableStream(
<App />,
{
onShellReady() {
// The content above all Suspense boundaries is ready.
// If something errored before we started streaming, we set the error code appropriatel
ReactDOMServer
347
348.
オプションの全リストを参照。
補足:
これは Node.js 専用のAPI です。Deno やモダンなエッジランタイムのような Web Stream の環境では、代わり
に renderToReadableStream を使用してください。
renderToReadableStream() {#rendertoreadablestream}
React 要素を初期状態の HTML にストリーミングします。Readable Stream として resolve する Promise を返しま
す。サスペンスと HTML ストリーミングを完全にサポートします。詳細はこちら。
このようにサーバでレンダーされたマークアップを有するノードに対して ReactDOM.hydrateRoot() をコールすると、
React はマークアップを保持してイベントハンドラだけをアタッチしますので、非常によい初回ロード体験が実現できま
す。
res.statusCode = didError ? 500 : 200;
res.setHeader('Content-type', 'text/html');
stream.pipe(res);
},
onShellError(error) {
// Something errored before we could complete the shell so we emit an alternative shell
res.statusCode = 500;
res.send(
'<!doctype html><p>Loading...</p><script src="clientrender.js"></script>'
);
},
onAllReady() {
// If you don't want streaming, use this instead of onShellReady.
// This will fire after the entire page content is ready.
// You can use this for crawlers or static generation.
// res.statusCode = didError ? 500 : 200;
// res.setHeader('Content-type', 'text/html');
// stream.pipe(res);
},
onError(err) {
didError = true;
console.error(err);
},
}
);
ReactDOMServer.renderToReadableStream(element, options);
let controller = new AbortController();
let didError = false;
try {
let stream = await renderToReadableStream(
<html>
<body>Success</body>
</html>,
{
react
348
349.
オプションの全リストを参照。
補足:
この API はWeb Streams に依存しています。Node.js では代わりに renderToPipeableStream を使用してくだ
さい。
renderToNodeStream()
(非推奨)
React 要素を初期状態の HTML にストリーミングします。HTML 文字列を出力する Node.js の 読み取りストリーム を
返します。このストリームからの HTML 出力は ReactDOMServer.renderToString が返すものと全く同じです。このメソ
ッドを使ってサーバで HTML を生成し、初回リクエスト時にマークアップを送信することで、ページロードを高速化し、
SEO 目的でサーチエンジンがクロールできるようになります。
このようにサーバでレンダーされたマークアップを有するノードに対して ReactDOM.hydrateRoot() をコールすると、
React はマークアップを保持してイベントハンドラだけをアタッチしますので、非常によい初回ロード体験が実現できま
す。
補足:
この API はサーバ専用です。ブラウザでは利用できません。
signal: controller.signal,
onError(error) {
didError = true;
console.error(error);
}
}
);
// This is to wait for all Suspense boundaries to be ready. You can uncomment
// this line if you want to buffer the entire HTML instead of streaming it.
// You can use this for crawlers or static generation:
// await stream.allReady;
return new Response(stream, {
status: didError ? 500 : 200,
headers: {'Content-Type': 'text/html'},
});
} catch (error) {
return new Response(
'<!doctype html><p>Loading...</p><script src="clientrender.js"></script>',
{
status: 500,
headers: {'Content-Type': 'text/html'},
}
);
}
ReactDOMServer.renderToNodeStream(element)
ReactDOMServer
349
350.
このメソッドが返すストリームは UTF-8 でエンコードされたバイトストリームを返します。別の方式でエンコード
されたストリームが必要な場合、テキストのトランスコーディングのために変換ストリームを提供しているiconv-
lite のようなプロジェクトを参照してください。
renderToStaticNodeStream() {#rendertostaticnodestream}
React が内部的に使用する data-reactroot のような追加の DOM 属性を作成しないことを除いて、
renderToNodeStream と同様の動作をします。このメソッドは React を単純な静的サイトジェネレータとして使用したい
場合に便利で、追加の属性を省略することでバイト数を削減できます。
このストリームによる HTML 出力は ReactDOMServer.renderToStaticMarkup が返すものと全く同じです。
マークアップをインタラクティブなものにするために、クライアントで React を導入しようとしている場合は、このメソ
ッドを使用しないでください。代わりに、サーバで renderToNodeStream を、そしてクライアントで
ReactDOM.hydrateRoot() を使用してください。
補足:
この API はサーバ専用です。ブラウザでは利用できません。
このメソッドが返すストリームは UTF-8 でエンコードされたバイトストリームを返します。別の方式でエンコード
されたストリームが必要な場合、テキストのトランスコーディングのために変換ストリームを提供している iconv-
lite のようなプロジェクトを参照してください。
renderToString() {#rendertostring}
React 要素を初期状態の HTML に変換します。React は HTML 文字列を返します。このメソッドを使ってサーバで
HTML を生成し、初回リクエスト時にマークアップを送信することで、ページロードを高速化し、SEO 目的でサーチエン
ジンがクロールできるようになります。
このようにサーバでレンダーされたマークアップを有するノードに対して ReactDOM.hydrateRoot() をコールすると、
React はマークアップを保持してイベントハンドラだけをアタッチしますので、非常によい初回ロード体験が実現できま
す。
補足
この API は Suspense を部分的にしかサポートしておらず、ストリーミングが行えません。
ReactDOMServer.renderToStaticNodeStream(element)
ReactDOMServer.renderToString(element)
react
350
この例では、<MouseTracker> がレンダーされるたびに <Mouserender> プロパティの値として新しい関数が生成される
ので、<Mouse> が React.PureComponent を継承している効果がそもそもなくなってしまいます!
この問題を回避するため、レンダープロップをインスタンスメソッドとして次のように定義することもできます。
props を静的に定義できない場合(たとえば、コンポーネントの props や state をクロージャで囲む場合など)
、
<Mouse> は代わりに React.Component を継承すべきです。
class Mouse extends React.PureComponent {
// Same implementation as above...
}
class MouseTracker extends React.Component {
render() {
return (
<div>
<h1>Move the mouse around!</h1>
{/*
This is bad! The value of the `render` prop will
be different on each render.
*/}
<Mouse render={mouse => (
<Cat mouse={mouse} />
)}/>
</div>
);
}
}
class MouseTracker extends React.Component {
// Defined as an instance method, `this.renderTheCat` always
// refers to *same* function when we use it in render
renderTheCat(mouse) {
return <Cat mouse={mouse} />;
}
render() {
return (
<div>
<h1>Move the mouse around!</h1>
<Mouse render={this.renderTheCat} />
</div>
);
}
}
react
386
387.
要素のレンダー
要素とは React アプリケーションの最小単位の構成ブロックです。
要素は画面上に表示したいものの説明書きです:
ブラウザのDOM 要素とは異なり、React 要素はプレーンなオブジェクトであり、安価に作成できます。React DOM が
React 要素に合致するように DOM を更新する作業を担当します。
補足:
要素のことを、より広く知られている概念である "コンポーネント" と混同する人もいるかもしれません。コンポー
ネントについては次の章で説明します。要素とはコンポーネントを "構成する" ものです。次に進む前にこの章を読
んでいくことをお勧めします。
要素を DOM として描画する
HTML ファイルの中に <div> 要素があったとしましょう:
この中にあるもの全てが React DOM によって管理されることになるので、"ルート" DOM ノードと呼ぶことにしましょ
う。
React だけで構築されたアプリケーションは、通常ルート DOM ノードをひとつだけ持ちます。既存のアプリに React を
統合しようとしている場合は、独立したルート DOM ノードを好きなだけ持つことができます。
React 要素をルート DOM ノードにレンダーするには、まず ReactDOM.createRoot() に DOM 要素を渡し、
root.render() に React 要素を渡します:
embed:rendering-elements/render-an-element.js
Try it on CodePen
このコードはページに "Hello, world" を表示します。
レンダーされた要素の更新
React 要素はイミュータブルです。一度要素を作成すると、その子要素もしくは属性を変更することはできません。要素
は映画の中のひとつのフレームのようなものであり、それは特定のある時点の UI を表します。
今のところ我々が学んだ UI を更新する唯一の方法は、新しい要素を作成して root.render() に渡すことだけです。
以下の秒刻みで動く時計の例について考えます:
const element = <h1>Hello, world</h1>;
<div id="root"></div>
要素のレンダー
387
388.
embed:rendering-elements/update-rendered-element.js
Try it onCodePen
上記のコードでは setInterval() のコールバックから root.render() を毎秒呼び出しています。
補足:
実際には大抵の React アプリケーションは root.render() を一度しか呼び出しません。次の章では上記のような
コードをどのように state 付きコンポーネントへとカプセル化するのかを学びます。
トピックはお互いを基礎として構成されているため、読み飛ばさないことをお勧めします。
React は必要な箇所のみを更新する
React DOM は要素とその子要素を以前のものと比較し、DOM を望ましい状態へと変えるのに必要なだけの DOM の更新
を行います。
このことは、最後の例をブラウザツールで調査すれば確認できます:
DOM inspector showing granular updates
毎秒ごとに UI ツリー全体を表す要素を作成しているにも関わらず、内容が変更されたテキストノードのみが React DOM
により更新されます。
私達の経験上、時間の経過によりどのように UI が変更されるかを考えるよりも、任意の時点において UI がどのように見
えるべきかを考えることで、あらゆる類のバグを排除することができます。
react
388
389.
state とライフサイクル
このページでは Reactコンポーネントにおける state とライフサイクルについての導入を行います。詳細なコンポーネン
トの API リファレンスはこちらにあります。
以前の章のひとつにあった秒刻みの時計の例を考えてみましょう。要素のレンダーの章にて、UI を更新するための方法を
ひとつだけ学びました。それはレンダーされた出力を更新するために root.render() を呼び出す、というものでした。
Try it on CodePen
このセクションでは、この Clock コンポーネントを真に再利用可能かつカプセル化されたものにする方法を学びます。コ
ンポーネントが自身でタイマーをセットアップし、自身を毎秒更新するようにします。
時計の見た目をカプセル化するところから始めてみましょう:
Try it on CodePen
しかし上記のコードは重要な要件を満たしていません:Clock がタイマーを設定して UI を毎秒ごとに更新するという処
理は、Clock の内部実装の詳細 (implementation detail) であるべきだということです。
理想的には以下のコードを一度だけ記述して、Clock に自身を更新させたいのです:
const root = ReactDOM.createRoot(document.getElementById('root'));
function tick() {
const element = (
<div>
<h1>Hello, world!</h1>
<h2>It is {new Date().toLocaleTimeString()}.</h2>
</div>
);
root.render(element);
}
setInterval(tick, 1000);
const root = ReactDOM.createRoot(document.getElementById('root'));
function Clock(props) {
return (
<div>
<h1>Hello, world!</h1>
<h2>It is {props.date.toLocaleTimeString()}.</h2>
</div>
);
}
function tick() {
root.render(<Clock date={new Date()} />);
}
setInterval(tick, 1000);
root.render(<Clock />);
state とライフサイクル
389
390.
これを実装するには、Clock コンポーネントに "ステート(state)" を追加する必要があります。
state は props に似ていますが、コンポーネントによって完全に管理されるプライベートなものです。
関数をクラスに変換する
以下の 5 ステップで、Clock のような関数コンポーネントをクラスに変換することができます。
1. React.Component を継承する同名の ES6 クラスを作成する。
2. render() と呼ばれる空のメソッドを 1 つ追加する。
3. 関数の中身を render() メソッドに移動する。
4. render() 内の props を this.props に書き換える。
5. 空になった関数の宣言部分を削除する。
Try it on CodePen
これで、Clock は関数ではなくクラスとして定義されるようになりました。
render メソッドは更新が発生した際に毎回呼ばれますが、同一の DOM ノード内で <Clock /> をレンダーしている限
り、Clock クラスのインスタンスは 1 つだけ使われます。このことにより、ローカル state やライフサイクルメソッド
といった追加の機能が利用できるようになります。
クラスにローカルな state を追加する
以下の 3 ステップで date を props から state に移します:
1. render() メソッド内の this.props.date を this.state.date に書き換える:
class Clock extends React.Component {
render() {
return (
<div>
<h1>Hello, world!</h1>
<h2>It is {this.props.date.toLocaleTimeString()}.</h2>
</div>
);
}
}
class Clock extends React.Component {
render() {
return (
<div>
<h1>Hello, world!</h1>
<h2>It is {this.state.date.toLocaleTimeString()}.</h2>
</div>
);
}
}
react
390
391.
2. this.state の初期状態を設定するクラスコンストラクタを追加する:
親クラスのコンストラクタへのprops の渡し方に注目してください:
クラスのコンポーネントは常に props を引数として親クラスのコンストラクタを呼び出す必要があります。
3. <Clock /> 要素から date プロパティを削除する:
タイマーのコードはコンポーネント自身に後で追加しなおします。
結果は以下のようになります:
Try it on CodePen
次に、Clock が自分でタイマーを設定し、毎秒ごとに自分を更新するようにします。
class Clock extends React.Component {
constructor(props) {
super(props);
this.state = {date: new Date()};
}
render() {
return (
<div>
<h1>Hello, world!</h1>
<h2>It is {this.state.date.toLocaleTimeString()}.</h2>
</div>
);
}
}
constructor(props) {
super(props);
this.state = {date: new Date()};
}
root.render(<Clock />);
class Clock extends React.Component {
constructor(props) {
super(props);
this.state = {date: new Date()};
}
render() {
return (
<div>
<h1>Hello, world!</h1>
<h2>It is {this.state.date.toLocaleTimeString()}.</h2>
</div>
);
}
}
const root = ReactDOM.createRoot(document.getElementById('root'));
root.render(<Clock />);
state とライフサイクル
391
チェックボックスの値
フィルタ済みの商品のリスト
それぞれについて見ていき、どれが state になりうるのかを考えてみます。各データについて、3つの質問をしてみまし
ょう。
1. 親から props を通じて与えられたデータでしょうか? もしそうなら、それは state ではありません
2. 時間経過で変化しないままでいるデータでしょうか? もしそうなら、それは state ではありません
3. コンポーネント内にある他の props や state を使って算出可能なデータでしょうか? もしそうなら、それは state で
はありません
元となる商品のリストは props から渡されるので、これは state ではありません。検索文字列とチェックボックスは時間
の経過の中で変化し、また、算出することもできないため、state だと思われます。最後に、フィルタ済みの商品のリス
トは state ではありません。何故ならば、元となる商品のリストと検索文字列とチェックボックスの値を組み合わせるこ
とで、フィルタ済みの商品のリストを算出することが可能だからです。
というわけで、state と呼べるのは次の 2 つです。
ユーザが入力した検索文字列
チェックボックスの値
Step 4: state をどこに配置するべきなのかを明確にする
class ProductCategoryRow extends React.Component {
render() {
const category = this.props.category;
return (
<tr>
<th colSpan="2">
{category}
</th>
</tr>
);
}
}
class ProductRow extends React.Component {
render() {
const product = this.props.product;
const name = product.stocked ?
product.name :
<span style={{color: 'red'}}>
{product.name}
</span>;
return (
<tr>
<td>{name}</td>
<td>{product.price}</td>
</tr>
);
}
Resources
HTML CSS Babel
E D I T O N
Result
View Compiled
React の流儀
427
428.
いいですね。state を FilterableProductTableの中に配置することが決まりました。では早速、インスタンス変数とし
て this.state = {filterText: '', inStockOnly: false} を FilterableProductTable の constructor に追加して、
初期状態をアプリに反映しましょう。その次は、 filterText と inStockOnly を ProductTable と SearchBar に
props として渡します。最後に、これらの props を使って ProductTable のフィルタ処理を行い、SearchBar のフォー
ムにも値を埋めます。
これで、このアプリがどんな振る舞いをするのか見られるようになってきました。filterText に "ball" と入力した状
態でアプリを更新すると、データの表が正しく更新されたことが確認できるはずです。
Step 5: 逆方向のデータフローを追加する
class ProductCategoryRow extends
React.Component {
render() {
const category =
this.props.category;
return (
<tr>
<th colSpan="2">
{category}
</th>
</tr>
);
}
}
class ProductRow extends
React.Component {
render() {
const product =
this.props.product;
const name = product.stocked ?
product.name :
<span style={{color: 'red'}}>
{product.name}
</span>;
return (
<tr>
Search...
Only show products in stock
Name Price
Sporting Goods
Football $49.99
Baseball $9.99
Basketball $29.99
Electronics
iPod Touch $99.99
iPhone 5 $399.99
Nexus 7 $199.99
Resources
HTML CSS Babel
E D I T O N
Result
View Compiled 1× 0.5× 0.25× Rerun
ここまでで、props と state が階層構造を流れ落ちていく関数として、正しく描画を行うアプリを作ることができまし
た。それでは、別の方向のデータフローもサポートしてみましょう。階層構造の奥深くにあるフォームのコンポーネント
が、FilterableProductTable にある state を更新できるようにするのです。
React ではデータフローが明示的になりプログラムの動作が理解しやすくなりますが、従来の双方向データバインディン
グよりも少しタイプ量が増えてはしまいます。
試しに、ひとつ前 (step 4) のバージョンのサンプルで文字を打ち込んだり、チェックボックスを切り替えてみると、
React がその入力を無視することがわかります。これは意図的な挙動で、 input の value props が、常に
FilterableProductTable から渡された state と同じ値になるようにセットしてあるのです。
react
428
429.
PropTypes を用いた型チェック
注意:
React.PropTypes はReact v15.5 において別パッケージに移動しました。代わりに prop-types ライブラリを利
用するようにしてください。
コードを自動で変換するための codemod スクリプトを提供しています。
アプリケーションが成長するにつれて、型チェックによって多くの不具合を見つけられるようになります。アプリケーシ
ョンによっては、Flow もしくは TypeScript のような JavaScript 拡張を使ってアプリケーション全体の型チェックを行
うことができるでしょう。しかしそれらを使用せずとも、React は組み込みの型チェック機能を備えています。コンポー
ネントの props に型チェックを行うために、特別な propTypes プロパティを割当てることができます。
この例ではクラスコンポーネントを使っていますが、同様の機能は関数コンポーネントや React.memo および
React.forwardRef で作ったコンポーネントでも使用できます。
PropTypes は受け取ったデータが有効かどうかを確認するために使用できる種々のバリデーターをエクスポートしていま
す。上記の例では、PropTypes.string を使用しています。無効な値がプロパティに与えられた場合、JavaScript のコン
ソールに警告文が出力されます。パフォーマンス上の理由から、propTypes のチェックは開発モードでのみ行われます。
PropTypes
PropTypes によって提供されている様々なバリデーターの実例を紹介します。
import PropTypes from 'prop-types';
class Greeting extends React.Component {
render() {
return (
<h1>Hello, {this.props.name}</h1>
);
}
}
Greeting.propTypes = {
name: PropTypes.string
};
import PropTypes from 'prop-types';
MyComponent.propTypes = {
// You can declare that a prop is a specific JS type. By default, these
// are all optional.
optionalArray: PropTypes.array,
optionalBool: PropTypes.bool,
optionalFunc: PropTypes.func,
optionalNumber: PropTypes.number,
optionalObject: PropTypes.object,
optionalString: PropTypes.string,
PropTypes を用いた型チェック
429
430.
optionalSymbol: PropTypes.symbol,
// Anythingthat can be rendered: numbers, strings, elements or an array
// (or fragment) containing these types.
optionalNode: PropTypes.node,
// A React element.
optionalElement: PropTypes.element,
// A React element type (ie. MyComponent).
optionalElementType: PropTypes.elementType,
// You can also declare that a prop is an instance of a class. This uses
// JS's instanceof operator.
optionalMessage: PropTypes.instanceOf(Message),
// You can ensure that your prop is limited to specific values by treating
// it as an enum.
optionalEnum: PropTypes.oneOf(['News', 'Photos']),
// An object that could be one of many types
optionalUnion: PropTypes.oneOfType([
PropTypes.string,
PropTypes.number,
PropTypes.instanceOf(Message)
]),
// An array of a certain type
optionalArrayOf: PropTypes.arrayOf(PropTypes.number),
// An object with property values of a certain type
optionalObjectOf: PropTypes.objectOf(PropTypes.number),
// An object taking on a particular shape
optionalObjectWithShape: PropTypes.shape({
color: PropTypes.string,
fontSize: PropTypes.number
}),
// An object with warnings on extra properties
optionalObjectWithStrictShape: PropTypes.exact({
name: PropTypes.string,
quantity: PropTypes.number
}),
// You can chain any of the above with `isRequired` to make sure a warning
// is shown if the prop isn't provided.
requiredFunc: PropTypes.func.isRequired,
// A required value of any data type
requiredAny: PropTypes.any.isRequired,
// You can also specify a custom validator. It should return an Error
// object if the validation fails. Don't `console.warn` or throw, as this
// won't work inside `oneOfType`.
customProp: function(props, propName, componentName) {
if (!/matchme/.test(props[propName])) {
return new Error(
'Invalid prop `' + propName + '` supplied to' +
' `' + componentName + '`. Validation failed.'
);
}
react
430
431.
単一の子要素を要求する
PropTypes.element を使うことで、コンポーネントに単一の子要素しか渡せないことを指定することができます。
props のデフォルト値
defaultPropsというプロパティを割り当てることで、props に値が渡されなかった際のデフォルト値を定義することが
できます。
},
// You can also supply a custom validator to `arrayOf` and `objectOf`.
// It should return an Error object if the validation fails. The validator
// will be called for each key in the array or object. The first two
// arguments of the validator are the array or object itself, and the
// current item's key.
customArrayProp: PropTypes.arrayOf(function(propValue, key, componentName, location, propFul
if (!/matchme/.test(propValue[key])) {
return new Error(
'Invalid prop `' + propFullName + '` supplied to' +
' `' + componentName + '`. Validation failed.'
);
}
})
};
import PropTypes from 'prop-types';
class MyComponent extends React.Component {
render() {
// This must be exactly one element or it will warn.
const children = this.props.children;
return (
<div>
{children}
</div>
);
}
}
MyComponent.propTypes = {
children: PropTypes.element.isRequired
};
class Greeting extends React.Component {
render() {
return (
<h1>Hello, {this.props.name}</h1>
);
}
}
// Specifies the default values for props:
Greeting.defaultProps = {
name: 'Stranger'
};
PropTypes を用いた型チェック
431
Colophon
This book iscreated by using the following sources:
React - 日本語
GitHub source: reactjs/ja.reactjs.org/content
Created: 2022-11-10
Bash v5.2.2
Vivliostyle, https://vivliostyle.org/
By: @shinokada
GitHub repo: https://github.com/shinokada/js-framwork-docs
react
438


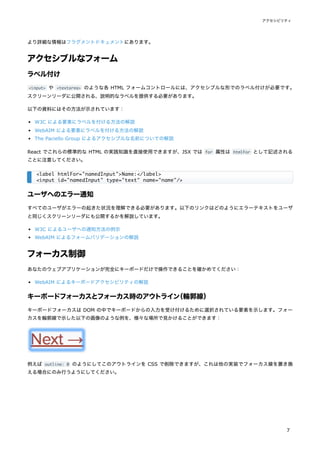
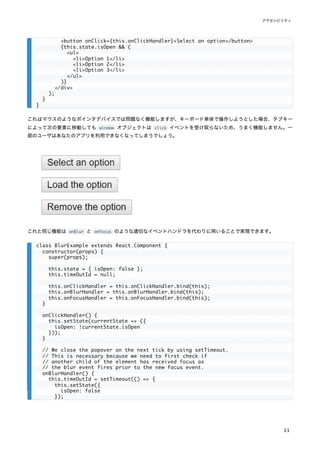
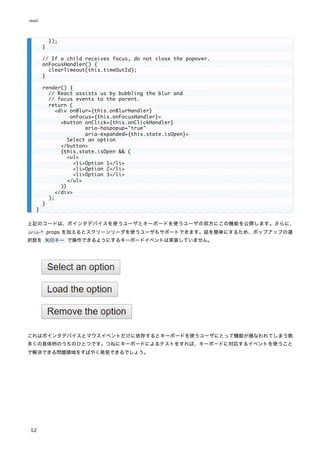

![コントラストをチェックする能力を拡張したい場合は、以下のツールが利用できます:
WebAIM - Color Contrast Checker
The Paciello Group - Color Contrast Analyzer
開発とテストのツール
アクセシブルなウェブアプリケーションの作成を支援するために利用できる様々なツールがあります。
キーボード
最も簡単で最も重要なチェックのうちのひとつは、ウェブサイト全体がキーボード単体であまねく探索でき、使えるかど
うかのテストです。これは以下の手順でチェックできます。
1. マウスを外します。
2. Tab と Shift+Tab を使ってブラウズします。
3. 要素を起動するのに Enter を使用します。
4. 必要に応じて、キーボードの矢印キーを使ってメニューやドロップダウンリストなどの要素を操作します。
開発支援
アクセシビリティ機能には JSX のコード内で直接チェックできるものもあります。JSX に対応した IDE では、ARIA ロ
ールやステートやプロパティに対する intellisense によるチェックが既に提供されていることが多いでしょう。他にも以
下のツールを使うこともできます:
eslint-plugin-jsx-a11y
ESLint の eslint-plugin-jsx-a11y プラグインはあなたの JSX コードのアクセシビリティに対して、AST による lint の
フィードバックを提供します。多くの IDE はコード解析とソースコードのウィンドウに直接そのフィードバックを統合で
きるようになっています。
Create React App はこのプラグインを備えており、一部のルールを有効化しています。もし、より多くのアクセシビリ
ティルールを有効化したいときは、プロジェクトルートに .eslintrc ファイルを作成し、以下の内容を書き込んでくださ
い:
ブラウザでアクセシビリティをテストする
ブラウザからウェブページのアクセシビリティを検査できるツールは沢山あります。それらのツールはあなたが作成した
HTML の技術的なアクセシビリティしかチェックできないため、ここで言及した他のアクセシビリティ確認法と組み合わ
せて使用してください。
aXe, aXe-core and react-axe
Deque System はアプリケーションの自動化された E2E アクセシビリティテストを行う aXe-core を提供しています。
このモジュールは Selenium に統合できます。
{
"extends": ["react-app", "plugin:jsx-a11y/recommended"],
"plugins": ["jsx-a11y"]
}
react
14](https://image.slidesharecdn.com/react-ja-221110111411-b356a3b5/85/react-ja-pdf-14-320.jpg)


![Animation Add-Ons
Note:
ReactTransitionGroup and ReactCSSTransitionGroup have been moved to the react-transition-group
package that is maintained by the community. Its 1.x branch is completely API-compatible with the
existing addons. Please file bugs and feature requests in the new repository.
The ReactTransitionGroup add-on component is a low-level API for animation, and ReactCSSTransitionGroup
is an add-on component for easily implementing basic CSS animations and transitions.
High-level API: ReactCSSTransitionGroup
ReactCSSTransitionGroup is a high-level API based on ReactTransitionGroup and is an easy way to perform
CSS transitions and animations when a React component enters or leaves the DOM. It's inspired by the
excellent ng-animate library.
Importing
import ReactCSSTransitionGroup from 'react-transition-group'; // ES6
var ReactCSSTransitionGroup = require('react-transition-group'); // ES5 with npm
class TodoList extends React.Component {
constructor(props) {
super(props);
this.state = {items: ['hello', 'world', 'click', 'me']};
this.handleAdd = this.handleAdd.bind(this);
}
handleAdd() {
const newItems = this.state.items.concat([
prompt('Enter some text')
]);
this.setState({items: newItems});
}
handleRemove(i) {
let newItems = this.state.items.slice();
newItems.splice(i, 1);
this.setState({items: newItems});
}
render() {
const items = this.state.items.map((item, i) => (
<div key={i} onClick={() => this.handleRemove(i)}>
{item}
</div>
));
return (
<div>
react
22](https://image.slidesharecdn.com/react-ja-221110111411-b356a3b5/85/react-ja-pdf-22-320.jpg)
![Any additional, user-defined, properties will become properties of the rendered component. For example,
here's how you would render a <ul> with CSS class:
Every DOM component that React can render is available for use. However, component does not need to be a
DOM component. It can be any React component you want; even ones you've written yourself! Just write
component={List} and your component will receive this.props.children .
Rendering a Single Child
People often use ReactTransitionGroup to animate mounting and unmounting of a single child such as a
collapsible panel. Normally ReactTransitionGroup wraps all its children in a span (or a custom component as
described above). This is because any React component has to return a single root element, and
ReactTransitionGroup is no exception to this rule.
However if you only need to render a single child inside ReactTransitionGroup , you can completely avoid
wrapping it in a <span> or any other DOM component. To do this, create a custom component that renders
the first child passed to it directly:
Now you can specify FirstChild as the component prop in <ReactTransitionGroup> props and avoid any
wrappers in the result DOM:
This only works when you are animating a single child in and out, such as a collapsible panel. This approach
wouldn't work when animating multiple children or replacing the single child with another child, such as an
image carousel. For an image carousel, while the current image is animating out, another image will
animate in, so <ReactTransitionGroup> needs to give them a common DOM parent. You can't avoid the
wrapper for multiple children, but you can customize the wrapper with the component prop as described
above.
Reference
componentWillAppear() {#componentwillappear}
<ReactTransitionGroup component="ul" className="animated-list">
{/* ... */}
</ReactTransitionGroup>
function FirstChild(props) {
const childrenArray = React.Children.toArray(props.children);
return childrenArray[0] || null;
}
<ReactTransitionGroup component={FirstChild}>
{someCondition ? <MyComponent /> : null}
</ReactTransitionGroup>
componentWillAppear(callback)
Animation Add-Ons
27](https://image.slidesharecdn.com/react-ja-221110111411-b356a3b5/85/react-ja-pdf-27-320.jpg)

![Keyed Fragments
Note:
React.addons entry point is deprecated as of React v15.5. We now have first class support for
fragments which you can read about here.
Importing
Overview
In most cases, you can use the key prop to specify keys on the elements you're returning from render .
However, this breaks down in one situation: if you have two sets of children that you need to reorder,
there's no way to put a key on each set without adding a wrapper element.
That is, if you have a component such as:
The children will unmount and remount as you change the swapped prop because there aren't any keys
marked on the two sets of children.
To solve this problem, you can use the createFragment add-on to give keys to the sets of children.
Array<ReactNode> createFragment(object children) {#arrayreactnode-createfragmentobject-children}
Instead of creating arrays, we write:
import createFragment from 'react-addons-create-fragment'; // ES6
var createFragment = require('react-addons-create-fragment'); // ES5 with npm
function Swapper(props) {
let children;
if (props.swapped) {
children = [props.rightChildren, props.leftChildren];
} else {
children = [props.leftChildren, props.rightChildren];
}
return <div>{children}</div>;
}
import createFragment from 'react-addons-create-fragment';
function Swapper(props) {
let children;
if (props.swapped) {
children = createFragment({
right: props.rightChildren,
left: props.leftChildren
});
} else {
Keyed Fragments
29](https://image.slidesharecdn.com/react-ja-221110111411-b356a3b5/85/react-ja-pdf-29-320.jpg)
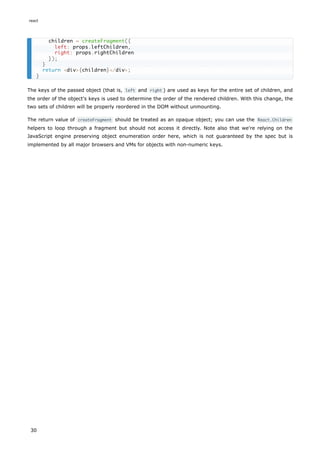
![PureRenderMixin
Note:
PureRenderMixin is a legacy add-on. Use React.PureComponent instead.
Importing
Overview
If your React component's render function renders the same result given the same props and state, you can
use this mixin for a performance boost in some cases.
Example:
Under the hood, the mixin implements shouldComponentUpdate, in which it compares the current props
and state with the next ones and returns false if the equalities pass.
Note:
This only shallowly compares the objects. If these contain complex data structures, it may produce
false-negatives for deeper differences. Only mix into components which have simple props and state,
or use forceUpdate() when you know deep data structures have changed. Or, consider using
immutable objects to facilitate fast comparisons of nested data.
Furthermore, shouldComponentUpdate skips updates for the whole component subtree. Make sure all the
children components are also "pure".
import PureRenderMixin from 'react-addons-pure-render-mixin'; // ES6
var PureRenderMixin = require('react-addons-pure-render-mixin'); // ES5 with npm
const createReactClass = require('create-react-class');
createReactClass({
mixins: [PureRenderMixin],
render: function() {
return <div className={this.props.className}>foo</div>;
}
});
react
34](https://image.slidesharecdn.com/react-ja-221110111411-b356a3b5/85/react-ja-pdf-34-320.jpg)

![Shallow Renderer
インポート
概要
React の単体テストを実装するとき、Shallow Renderer が役立つでしょう。浅いレンダー (shallow rendering) を使
用すると、インスタンス化またはレンダーされていない子コンポーネントの振る舞いを心配することなく、
「1 階層深く」
レンダーしてレンダーメソッドが返すものを assert できます。これに DOM は必要ありません。
たとえば、以下のコンポーネントがある場合:
以下のように assert できます:
浅いレンダーによるテストには現在いくつかの制限があります。すなわち ref をサポートしていません。
補足:
また Enzyme の Shallow Rendering API をチェックすることをお勧めします。それは同じ機能上でより良くより
高いレベルの API を提供します。
import ShallowRenderer from 'react-test-renderer/shallow'; // ES6
var ShallowRenderer = require('react-test-renderer/shallow'); // ES5 with npm
function MyComponent() {
return (
<div>
<span className="heading">Title</span>
<Subcomponent foo="bar" />
</div>
);
}
import ShallowRenderer from 'react-test-renderer/shallow';
// in your test:
const renderer = new ShallowRenderer();
renderer.render(<MyComponent />);
const result = renderer.getRenderOutput();
expect(result.type).toBe('div');
expect(result.props.children).toEqual([
<span className="heading">Title</span>,
<Subcomponent foo="bar" />
]);
react
36](https://image.slidesharecdn.com/react-ja-221110111411-b356a3b5/85/react-ja-pdf-36-320.jpg)


![DOM イベントのディスパッチは、DOM コンテナが document に追加されたときだけ動作することを忘れないでくだ
さい。React Testing Library のようなヘルパーを使えばボイラープレートのコードを減らせます。
recipes ドキュメントには act() がどのように動作するのかについて例や使用法を交えた詳しい解説があります。
mockComponent() {#mockcomponent}
モック化されたコンポーネントモジュールをこのメソッドに渡すことで、ダミーの React コンポーネントとして使用でき
るようになる便利なメソッドを追加することができます。通常のレンダーの代わりに、コンポーネントは、与えられた子
要素を含んだシンプルな <div> (もしくは mockTagName が与えられていれば他のタグ)になります。
補足:
mockComponent() はレガシーな API です。その代わりとして jest.mock() の使用をおすすめします。
isElement() {#iselement}
element が任意の React 要素である場合 true を返します。
document.body.appendChild(container);
});
afterEach(() => {
document.body.removeChild(container);
container = null;
});
it('can render and update a counter', () => {
// Test first render and componentDidMount
act(() => {
ReactDOM.createRoot(container).render(<Counter />);
});
const button = container.querySelector('button');
const label = container.querySelector('p');
expect(label.textContent).toBe('You clicked 0 times');
expect(document.title).toBe('You clicked 0 times');
// Test second render and componentDidUpdate
act(() => {
button.dispatchEvent(new MouseEvent('click', {bubbles: true}));
});
expect(label.textContent).toBe('You clicked 1 times');
expect(document.title).toBe('You clicked 1 times');
});
mockComponent(
componentClass,
[mockTagName]
)
isElement(element)
react
40](https://image.slidesharecdn.com/react-ja-221110111411-b356a3b5/85/react-ja-pdf-40-320.jpg)


![findRenderedComponentWithType() {#findrenderedcomponentwithtype}
scryRenderedComponentsWithType() と同様のメソッドですが、このメソッドは結果が 1 つだけであることを期待してお
り、その 1 つの結果を返すか、一致するものが 1 つでなかった場合には例外を返します。
renderIntoDocument() {#renderintodocument}
React 要素をドキュメントから切り離された DOM ノードにレンダーします。この関数を実行するには DOM が必要で
す。これは以下のコードと実質的に等価です:
補足:
React をインポートする前に window , window.document および window.document.createElement をグローバル
スコープに持っている必要があります。そうでなければ React は DOM にアクセスできないものと判断し setSta
te のようなメソッドが動作しなくなります。
その他のユーティリティ
Simulate {#simulate}
省略可能な eventData イベントデータを使って DOM ノード上のイベントディスパッチをシミュレートします。
Simulate は React が理解している全てのイベントそれぞれに対応するメソッドを持っています。
要素をクリックする
入力フィールドの値を変更して ENTER キーを押す
findRenderedComponentWithType(
tree,
componentClass
)
renderIntoDocument(element)
const domContainer = document.createElement('div');
ReactDOM.createRoot(domContainer).render(element);
Simulate.{eventName}(
element,
[eventData]
)
// <button ref={(node) => this.button = node}>...</button>
const node = this.button;
ReactTestUtils.Simulate.click(node);
テストユーティリティ
43](https://image.slidesharecdn.com/react-ja-221110111411-b356a3b5/85/react-ja-pdf-43-320.jpg)


![This works really well and it's very clear how data is flowing, however, with a lot of form fields it could get a
bit verbose. Let's use LinkedStateMixin to save us some typing:
LinkedStateMixin adds a method to your React component called linkState() . linkState() returns a
valueLink object which contains the current value of the React state and a callback to change it.
valueLink objects can be passed up and down the tree as props, so it's easy (and explicit) to set up two-
way binding between a component deep in the hierarchy and state that lives higher in the hierarchy.
Note that checkboxes have a special behavior regarding their value attribute, which is the value that will be
sent on form submit if the checkbox is checked (defaults to on ). The value attribute is not updated when
the checkbox is checked or unchecked. For checkboxes, you should use checkedLink instead of valueLink :
Under the Hood
There are two sides to LinkedStateMixin : the place where you create the valueLink instance and the place
where you use it. To prove how simple LinkedStateMixin is, let's rewrite each side separately to be more
explicit.
valueLink Without LinkedStateMixin
var createReactClass = require('create-react-class');
var NoLink = createReactClass({
getInitialState: function() {
return {message: 'Hello!'};
},
handleChange: function(event) {
this.setState({message: event.target.value});
},
render: function() {
var message = this.state.message;
return <input type="text" value={message} onChange={this.handleChange} />;
}
});
var createReactClass = require('create-react-class');
var WithLink = createReactClass({
mixins: [LinkedStateMixin],
getInitialState: function() {
return {message: 'Hello!'};
},
render: function() {
return <input type="text" valueLink={this.linkState('message')} />;
}
});
<input type="checkbox" checkedLink={this.linkState('booleanValue')} />
var createReactClass = require('create-react-class');
var WithoutMixin = createReactClass({
getInitialState: function() {
return {message: 'Hello!'};
react
46](https://image.slidesharecdn.com/react-ja-221110111411-b356a3b5/85/react-ja-pdf-46-320.jpg)
![As you can see, valueLink objects are very simple objects that just have a value and requestChange prop.
And LinkedStateMixin is similarly simple: it just populates those fields with a value from this.state and a
callback that calls this.setState() .
LinkedStateMixin Without valueLink
The valueLink prop is also quite simple. It simply handles the onChange event and calls
this.props.valueLink.requestChange() and also uses this.props.valueLink.value instead of this.props.value .
That's it!
},
handleChange: function(newValue) {
this.setState({message: newValue});
},
render: function() {
var valueLink = {
value: this.state.message,
requestChange: this.handleChange
};
return <input type="text" valueLink={valueLink} />;
}
});
var LinkedStateMixin = require('react-addons-linked-state-mixin');
var createReactClass = require('create-react-class');
var WithoutLink = createReactClass({
mixins: [LinkedStateMixin],
getInitialState: function() {
return {message: 'Hello!'};
},
render: function() {
var valueLink = this.linkState('message');
var handleChange = function(e) {
valueLink.requestChange(e.target.value);
};
return <input type="text" value={valueLink.value} onChange={handleChange} />;
}
});
Two-way Binding Helpers
47](https://image.slidesharecdn.com/react-ja-221110111411-b356a3b5/85/react-ja-pdf-47-320.jpg)
![While this is fairly performant (since it only makes a shallow copy of log n objects and reuses the rest), it's
a big pain to write. Look at all the repetition! This is not only annoying, but also provides a large surface
area for bugs.
update() {#update}
update() provides simple syntactic sugar around this pattern to make writing this code easier. This code
becomes:
While the syntax takes a little getting used to (though it's inspired by MongoDB's query language) there's
no redundancy, it's statically analyzable and it's not much more typing than the mutative version.
The $ -prefixed keys are called commands. The data structure they are "mutating" is called the target.
Available Commands
{$push: array} push() all the items in array on the target.
{$unshift: array} unshift() all the items in array on the target.
{$splice: array of arrays} for each item in arrays call splice() on the target with the parameters
provided by the item.
{$set: any} replace the target entirely.
{$merge: object} merge the keys of object with the target.
{$apply: function} passes in the current value to the function and updates it with the new returned
value.
Examples
Simple push
initialArray is still [1, 2, 3] .
Nested collections
}),
a: extend(myData.a, {b: myData.a.b.concat(9)})
});
import update from 'react-addons-update';
const newData = update(myData, {
x: {y: {z: {$set: 7}}},
a: {b: {$push: [9]}}
});
const initialArray = [1, 2, 3];
const newArray = update(initialArray, {$push: [4]}); // => [1, 2, 3, 4]
const collection = [1, 2, {a: [12, 17, 15]}];
const newCollection = update(collection, {2: {a: {$splice: [[1, 1, 13, 14]]}}});
// => [1, 2, {a: [12, 13, 14, 15]}]
Immutability Helpers
49](https://image.slidesharecdn.com/react-ja-221110111411-b356a3b5/85/react-ja-pdf-49-320.jpg)


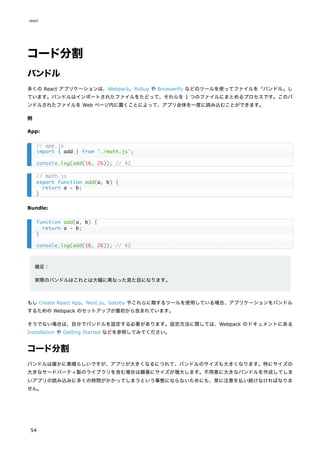
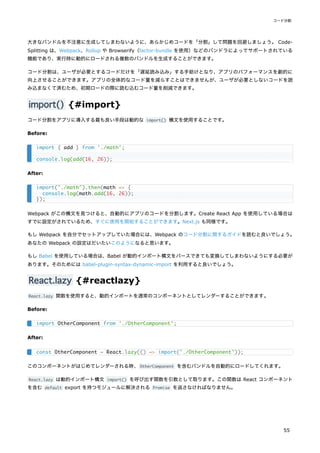
![遅延コンポーネントは、Suspense コンポーネント内でレンダーされる必要があります。これによって、遅延コンポーネ
ントのローディングの待機中にフォールバック用のコンテンツ(ローディングインジケータなど)を表示できます。
fallback プロパティはコンポーネントがロードされるのを待っている間に表示したいあらゆる React 要素を受け取りま
す。Suspense コンポーネントは遅延コンポーネントより上位のどこにでも配置することができます。また、複数の遅延
コンポーネントを単一の Suspense コンポーネントでラップすることもできます。
フォールバックを避ける
既にユーザに表示されているものも含むあらゆるコンポーネントは、レンダーの結果としてサスペンドする可能性があり
ます。画面に表示される内容の一貫性を保つため、既に表示されているコンポーネントがサスペンドした場合、React は
ツリーを直近の <Suspense> バウンダリまで非表示にする必要があります。しかしユーザの観点からはこれは不親切です。
このタブ切り替えの例で考えてみましょう:
import React, { Suspense } from 'react';
const OtherComponent = React.lazy(() => import('./OtherComponent'));
function MyComponent() {
return (
<div>
<Suspense fallback={<div>Loading...</div>}>
<OtherComponent />
</Suspense>
</div>
);
}
import React, { Suspense } from 'react';
const OtherComponent = React.lazy(() => import('./OtherComponent'));
const AnotherComponent = React.lazy(() => import('./AnotherComponent'));
function MyComponent() {
return (
<div>
<Suspense fallback={<div>Loading...</div>}>
<section>
<OtherComponent />
<AnotherComponent />
</section>
</Suspense>
</div>
);
}
import React, { Suspense } from 'react';
import Tabs from './Tabs';
import Glimmer from './Glimmer';
const Comments = React.lazy(() => import('./Comments'));
const Photos = React.lazy(() => import('./Photos'));
function MyComponent() {
const [tab, setTab] = React.useState('photos');
react
56](https://image.slidesharecdn.com/react-ja-221110111411-b356a3b5/85/react-ja-pdf-56-320.jpg)
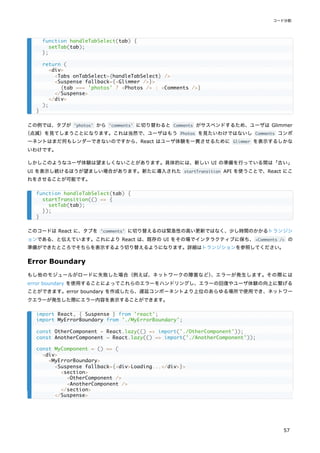
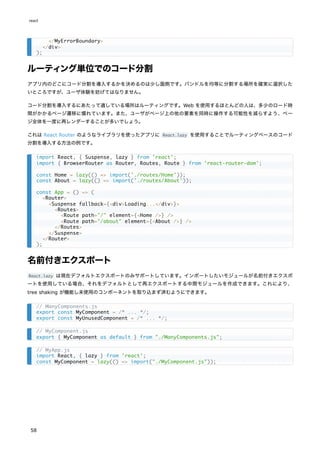
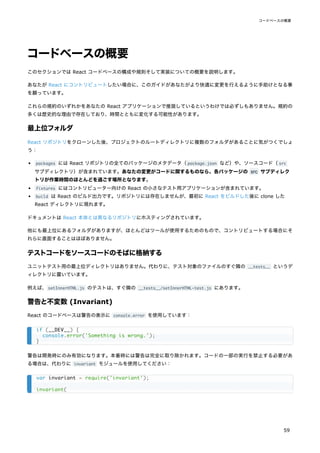


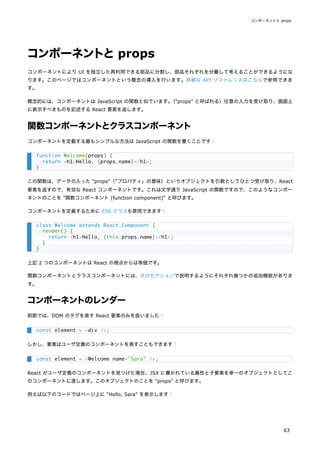

![論理 && 演算子によるインライン If
中括弧で囲むことで、JSX に式を埋め込むことができます。これには JavaScript の論理 && 演算子も含まれます。これ
は条件に応じて要素を含めたいというときに便利です。
Try it on CodePen
これが動作するのは、JavaScript では true && expression は必ず expression と評価され、false && expression は
必ず false と評価されるからです。
従って、条件部分が true であれば、&& の後に書かれた要素が出力に現れます。もし false であれば、React はそれ
を無視して飛ばします。
falsy な値を返した場合、&& の後の要素の評価はスキップされますが、falsy な値そのものは返されるということに注意
してください。以下の例では <div>0</div> がレンダーメソッドから返されます。
条件演算子によるインライン If-Else
条件的に要素をレンダーするもうひとつの方法は JavaScript の condition ? true : false 条件演算子を利用すること
です。
以下の例では条件演算子を用いて、条件に応じてテキストの小さなブロックをレンダーします。
function Mailbox(props) {
const unreadMessages = props.unreadMessages;
return (
<div>
<h1>Hello!</h1>
{unreadMessages.length > 0 &&
<h2>
You have {unreadMessages.length} unread messages.
</h2>
}
</div>
);
}
const messages = ['React', 'Re: React', 'Re:Re: React'];
const root = ReactDOM.createRoot(document.getElementById('root'));
root.render(<Mailbox unreadMessages={messages} />);
render() {
const count = 0;
return (
<div>
{count && <h1>Messages: {count}</h1>}
</div>
);
}
render() {
const isLoggedIn = this.state.isLoggedIn;
return (
<div>
The user is <b>{isLoggedIn ? 'currently' : 'not'}</b> logged in.
react
74](https://image.slidesharecdn.com/react-ja-221110111411-b356a3b5/85/react-ja-pdf-74-320.jpg)


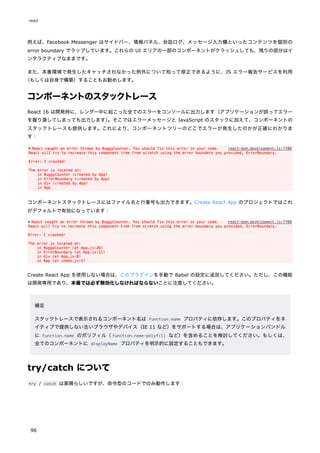
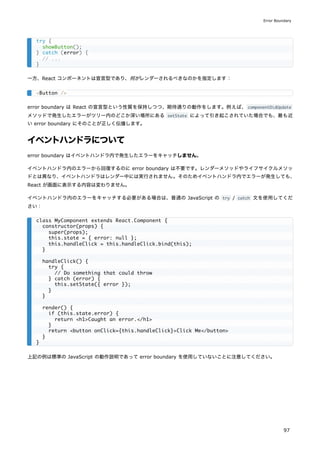


![AJAX とAPI
AJAX コールをする方法は?
任意の AJAX ライブラリを React と共に利用可能です。人気のあるものとしては、Axios、jQuery AJAX、ブラウザ組み
込みの window.fetch などがあります。
コンポーネントのどのライフサイクルで AJAX コールすべきか?
AJAX コールによるデータ取得は componentDidMount のライフサイクルメソッドで行うべきです。データ取得後に
setState でコンポーネントを更新できるようにするためです。
例:ローカル state に AJAX の通信結果をセットする
下記のコンポーネントは、componentDidMount で AJAX コールして得られたデータをローカルコンポーネントの state
に流し込んでいます。
このサンプル API が返す JSON オブジェクトはこのようになります:
{
"items": [
{ "id": 1, "name": "Apples", "price": "$2" },
{ "id": 2, "name": "Peaches", "price": "$5" }
]
}
class MyComponent extends React.Component {
constructor(props) {
super(props);
this.state = {
error: null,
isLoaded: false,
items: []
};
}
componentDidMount() {
fetch("https://api.example.com/items")
.then(res => res.json())
.then(
(result) => {
this.setState({
isLoaded: true,
items: result.items
});
},
// 補足:コンポーネント内のバグによる例外を隠蔽しないためにも
// catch()ブロックの代わりにここでエラーハンドリングすることが重要です
(error) => {
this.setState({
isLoaded: true,
error
});
}
)
react
100](https://image.slidesharecdn.com/react-ja-221110111411-b356a3b5/85/react-ja-pdf-100-320.jpg)
![こちらがフックによる同等版です:
}
render() {
const { error, isLoaded, items } = this.state;
if (error) {
return <div>Error: {error.message}</div>;
} else if (!isLoaded) {
return <div>Loading...</div>;
} else {
return (
<ul>
{items.map(item => (
<li key={item.id}>
{item.name} {item.price}
</li>
))}
</ul>
);
}
}
}
function MyComponent() {
const [error, setError] = useState(null);
const [isLoaded, setIsLoaded] = useState(false);
const [items, setItems] = useState([]);
// Note: the empty deps array [] means
// this useEffect will run once
// similar to componentDidMount()
useEffect(() => {
fetch("https://api.example.com/items")
.then(res => res.json())
.then(
(result) => {
setIsLoaded(true);
setItems(result);
},
// Note: it's important to handle errors here
// instead of a catch() block so that we don't swallow
// exceptions from actual bugs in components.
(error) => {
setIsLoaded(true);
setError(error);
}
)
}, [])
if (error) {
return <div>Error: {error.message}</div>;
} else if (!isLoaded) {
return <div>Loading...</div>;
} else {
return (
<ul>
{items.map(item => (
<li key={item.id}>
{item.name} {item.price}
</li>
AJAX と API
101](https://image.slidesharecdn.com/react-ja-221110111411-b356a3b5/85/react-ja-pdf-101-320.jpg)

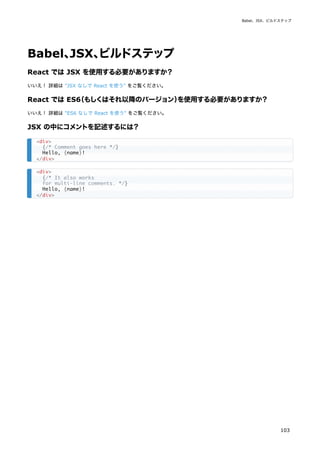

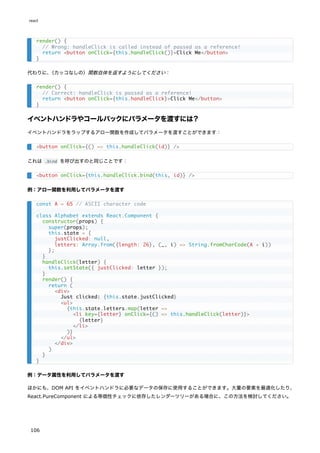
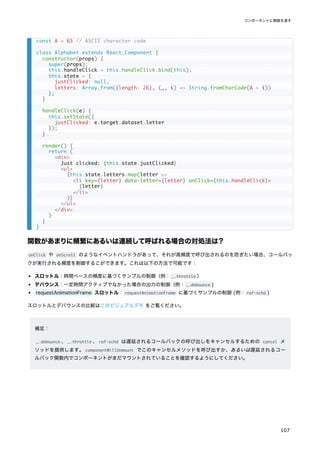
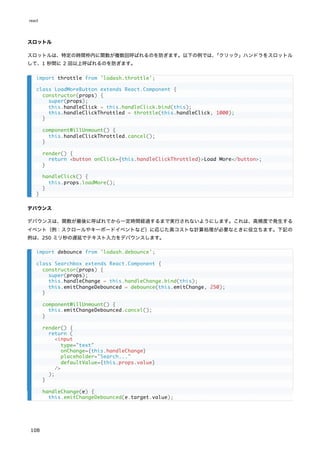
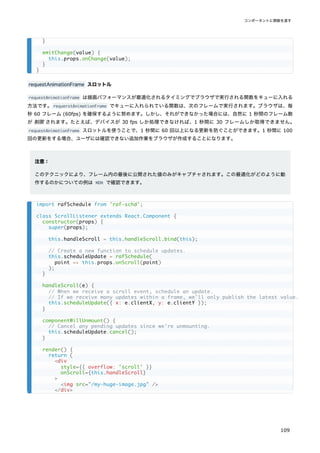


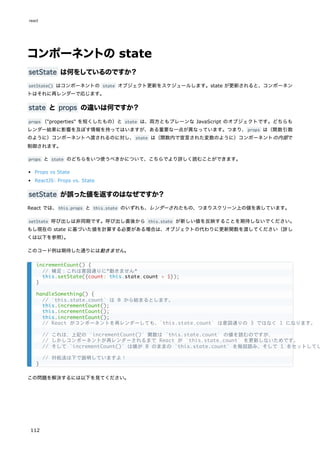
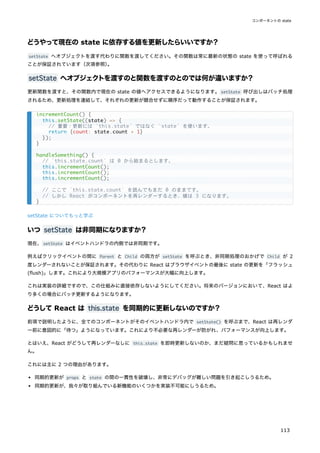

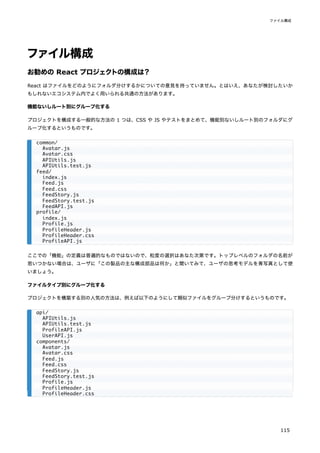

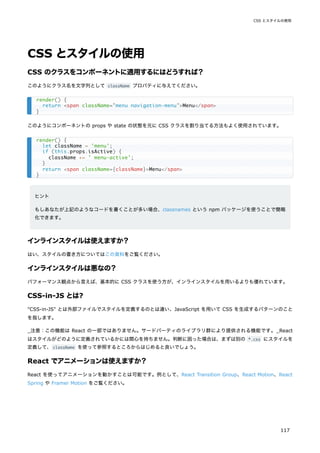


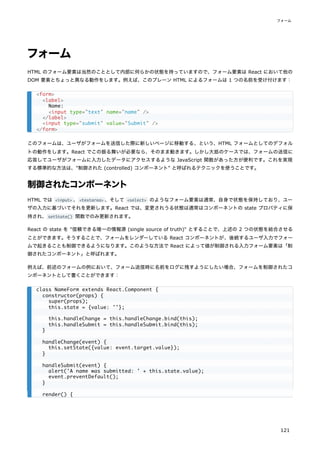

![Try it on CodePen
全体的に見て <input type="text"> 、<textarea> 、そして <select> が非常に似た動作をするようになっています。こ
れらはすべて、制御されたコンポーネントを実装する時に使うことができる value 属性を受け取ります。
補足
value 属性に配列を渡すことで、select タグ内の複数のオプションを選択することができます:
##file input タグ {#the-file-input-tag}
HTML では、<input type="file"> によってユーザにデバイス内の 1 つ以上のファイルを選ばせて、それをサーバにア
ップロードしたり File API を使って JavaScript で操作したりすることができます。
この値は読み取り専用ですので、これは非制御コンポーネントになります。このドキュメントの後の方で、他の非制御コ
ンポーネントと併せて説明しています。
複数の入力の処理
複数の制御された input 要素を処理する必要がある場合、それぞれの入力要素に name 属性を追加すれば、ハンドラ関
数に event.target.name に基づいて処理を選択させるようにできます。
例えば:
</select>
</label>
<input type="submit" value="Submit" />
</form>
);
}
}
<select multiple={true} value={['B', 'C']}>
<input type="file" />
class Reservation extends React.Component {
constructor(props) {
super(props);
this.state = {
isGoing: true,
numberOfGuests: 2
};
this.handleInputChange = this.handleInputChange.bind(this);
}
handleInputChange(event) {
const target = event.target;
const value = target.type === 'checkbox' ? target.checked : target.value;
const name = target.name;
react
124](https://image.slidesharecdn.com/react-ja-221110111411-b356a3b5/85/react-ja-pdf-124-320.jpg)
![Try it on CodePen
渡された入力名に対応する state のキーを更新するのに用いた ES6 の computed property name 構文の使い方に注意
してください:
これは以下の ES5 のコードと同等です:
また、setState() は自動的に部分的な state を現在の state にマージするので、変更された部分のみで呼び出せば大丈
夫です。
制御された入力におけるnull 値
制御されたコンポーネントで value プロパティに値を指定することで、変更させたくない場合にユーザが値を変更できな
いようになります。もしも value を指定したのに入力フィールドが依然変更可能であるという場合は、value を誤って
undefined もしくは null に設定してしまったのかもしれません。
以下のコードでこれを示しています(入力フィールドは最初はロックされていますが、短い遅延の後に編集可能になりま
す)
。
this.setState({
[name]: value
});
}
render() {
return (
<form>
<label>
Is going:
<input
name="isGoing"
type="checkbox"
checked={this.state.isGoing}
onChange={this.handleInputChange} />
</label>
<br />
<label>
Number of guests:
<input
name="numberOfGuests"
type="number"
value={this.state.numberOfGuests}
onChange={this.handleInputChange} />
</label>
</form>
);
}
}
this.setState({
[name]: value
});
var partialState = {};
partialState[name] = value;
this.setState(partialState);
フォーム
125](https://image.slidesharecdn.com/react-ja-221110111411-b356a3b5/85/react-ja-pdf-125-320.jpg)


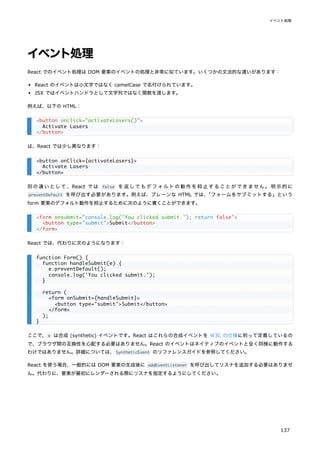


![独自フックの作成
フック (hook) は React 16.8 で追加された新機能です。state などの React の機能を、クラスを書かずに使えるように
なります。
自分独自のフックを作成することで、コンポーネントからロジックを抽出して再利用可能な関数を作ることが可能です。
以下のコンポーネントは副作用フックの使い方について学んだ際に見たチャットアプリのコンポーネントであり、フレン
ドがオンラインかオフラインかを示すメッセージを表示します。
さて、このチャットアプリには連絡先リストもあって、そこではオンラインのユーザを緑色で表示したいとしましょう。
新しい FriendListItem コンポーネントに似たようなロジックをコピーペーストしても構いませんが、それは理想的では
ないでしょう:
import React, { useState, useEffect } from 'react';
function FriendStatus(props) {
const [isOnline, setIsOnline] = useState(null);
useEffect(() => {
function handleStatusChange(status) {
setIsOnline(status.isOnline);
}
ChatAPI.subscribeToFriendStatus(props.friend.id, handleStatusChange);
return () => {
ChatAPI.unsubscribeFromFriendStatus(props.friend.id, handleStatusChange);
};
});
if (isOnline === null) {
return 'Loading...';
}
return isOnline ? 'Online' : 'Offline';
}
import React, { useState, useEffect } from 'react';
function FriendListItem(props) {
const [isOnline, setIsOnline] = useState(null);
useEffect(() => {
function handleStatusChange(status) {
setIsOnline(status.isOnline);
}
ChatAPI.subscribeToFriendStatus(props.friend.id, handleStatusChange);
return () => {
ChatAPI.unsubscribeFromFriendStatus(props.friend.id, handleStatusChange);
};
});
return (
<li style={{ color: isOnline ? 'green' : 'black' }}>
{props.friend.name}
react
150](https://image.slidesharecdn.com/react-ja-221110111411-b356a3b5/85/react-ja-pdf-150-320.jpg)
![代わりに、このロジックを FriendStatus と FriendListItem 間で共有したいと思います。
これまで React には、ステートを有するロジックをコンポーネント間で共有するための人気の手法が 2 つありました。
レンダープロップと高階コンポーネントです。ツリーに新しいコンポーネントを加える必要なしに、フックが同じ問題を
どのように解決するのかを見ていきましょう。
カスタムフックの抽出
2 つの JavaScript の関数間でロジックを共有したい場合、それを別の関数に抽出します。コンポーネントもフックも関
数ですので、同じ方法が使えます!
カスタムフックとは、名前が " use " で始まり、ほかのフックを呼び出せる JavaScript の関数のことです。例えば、以
下の useFriendStatus が我々の最初のカスタムフックの例です:
新しいことは何もありません。ロジックは上記のコンポーネントからコピーしてきただけです。コンポーネントのときと
同様に、他のフックを呼ぶときはカスタムフックのトップレベルで無条件に呼び出していることを確認してください。
React のコンポーネントと違い、カスタムフックは特定のシグネチャを持つ必要はありません。何を引数として受け取り、
そして(必要なら)何を返すのか、といったことは自分で決めることができます。別の言い方をすると、普通の関数と同
じだということです。一目でフックのルールが適用されるものだと分かるようにするために、名前は use で始めるべきで
す。
この useFriendStatus の目的はフレンドのステータスを購読するというものです。ですので friendID を引数として持
ち、そのフレンドがオンラインかどうかを返します。
</li>
);
}
import { useState, useEffect } from 'react';
function useFriendStatus(friendID) {
const [isOnline, setIsOnline] = useState(null);
useEffect(() => {
function handleStatusChange(status) {
setIsOnline(status.isOnline);
}
ChatAPI.subscribeToFriendStatus(friendID, handleStatusChange);
return () => {
ChatAPI.unsubscribeFromFriendStatus(friendID, handleStatusChange);
};
});
return isOnline;
}
function useFriendStatus(friendID) {
const [isOnline, setIsOnline] = useState(null);
// ...
独自フックの作成
151](https://image.slidesharecdn.com/react-ja-221110111411-b356a3b5/85/react-ja-pdf-151-320.jpg)
![これを例示するため、我々のチャットの例で、別のコンポーネントを使うことにしましょう。これはチャットの受信者を
選ぶ画面であり、現在選択中のフレンドがオンラインかどうかを表示します。
現在選択中のフレンド ID を recipientID という state 変数に保持し、<select> ピッカー内で別のフレンドが選択さ
れるごとにそれを更新します。
useState フックは recipientID という state 変数の最新の値を返しますので、それを useFriendStatus カスタムフッ
クに引数として渡すことができます。
これにより現在選択中のフレンドがオンラインかどうかが分かります。別のフレンドを選択して recipientID 変数が更新
された場合、useFriendStatus フックはこれまで選択されていたフレンドを購読解除して、新しく選択されたフレンドの
ステータスを購読開始します。
useYourImagination() {#useyourimagination}
カスタムフックにより、これまでの React コンポーネントでは不可能であった、ロジック共有に関する柔軟性が得られま
す。フォーム操作、アニメーション、宣言的データ購読、タイマー、さらには我々が思いついたことのない多様なユース
ケースに対するカスタムフックを記述することが可能です。何より、作ったカスタムフックは React の組み込み機能と同
じくらい簡単に使えるようになるのです。
あまり焦って抽象化を加えないようにしましょう。関数コンポーネントがやれることが増えたので、平均的な関数コンポ
ーネントはこれまでより長いものになるでしょう。それは普通のことですので、いますぐカスタムフックに分割しないと
いけないとは考えないでください。一方で、カスタムフックをどこで使えば複雑なロジックをシンプルなインターフェー
スに置き換えたり、ごちゃっとしたコンポーネントを整理したりできるのか、考え始めることをお勧めします。
const friendList = [
];
function ChatRecipientPicker() {
const [recipientID, setRecipientID] = useState(1);
const isRecipientOnline = useFriendStatus(recipientID);
return (
<>
<Circle color={isRecipientOnline ? 'green' : 'red'} />
<select
value={recipientID}
onChange={e => setRecipientID(Number(e.target.value))}
>
{friendList.map(friend => (
<option key={friend.id} value={friend.id}>
{friend.name}
</option>
))}
</select>
</>
);
}
const [recipientID, setRecipientID] = useState(1);
const isRecipientOnline = useFriendStatus(recipientID);
独自フックの作成
153](https://image.slidesharecdn.com/react-ja-221110111411-b356a3b5/85/react-ja-pdf-153-320.jpg)
![一例として、その場しのぎで多くのローカル state が含まれるようになった複雑なコンポーネントをお持ちかもしれませ
ん。useState を使っても更新ロジックの集中化が簡単になるわけではありませんので、それを Redux のリデューサ
(reducer) で書きたくなることがあるでしょう:
リデューサは単独でのテストが非常にやりやすく、複雑な更新ロジックを表現する場合でもスケールします。必要に応じ
て後でより小さなリデューサに分割することも可能です。しかし、React のローカル state による手軽さの方が好ましい
場合もあるでしょうし、他のライブラリをインストールしたくない場合もあるでしょう。
そこで、useReducer というフックを書いて、コンポーネントのローカル state をリデューサで管理できるとしたらどう
でしょうか? 簡略版では以下のようなものになるでしょう:
これをコンポーネント内で使うことができ、リデューサを活用してステート管理ができるようになります:
ローカルステートをリデューサで管理したいという要求はとてもよくあるので、React にその機能を含めてあります。フ
ック API リファレンスで他の組み込みフックと共に解説しています。
function todosReducer(state, action) {
switch (action.type) {
case 'add':
return [...state, {
text: action.text,
completed: false
}];
// ... other actions ...
default:
return state;
}
}
function useReducer(reducer, initialState) {
const [state, setState] = useState(initialState);
function dispatch(action) {
const nextState = reducer(state, action);
setState(nextState);
}
return [state, dispatch];
}
function Todos() {
const [todos, dispatch] = useReducer(todosReducer, []);
function handleAddClick(text) {
dispatch({ type: 'add', text });
}
// ...
}
react
154](https://image.slidesharecdn.com/react-ja-221110111411-b356a3b5/85/react-ja-pdf-154-320.jpg)
![副作用フックの利用法
フック (hook) は React 16.8 で追加された新機能です。state などの React の機能を、クラスを書かずに使えるように
なります。
副作用 (effect) フック により、関数コンポーネント内で副作用を実行することができるようになります:
このスニペットは 1 つ前のページのカウンターの例に基づいていますが、新しい機能をひとつ加えてあります。クリック
回数を含んだカスタムのメッセージをドキュメントのタイトルにセットしているのです。
データの取得、購読 (subscription) の設定、あるいは React コンポーネント内の DOM の手動での変更、といったもの
はすべて副作用の例です。これらを "副作用 (side-effect)"(あるいは単に "作用 (effect)")と呼ぶことに慣れているか
どうかはともかくとしても、これらのようなことをコンポーネントの中で行ったことはあるでしょう。
ヒント
React のライフサイクルに馴染みがある場合は、useEffect フックを componentDidMount と componentDidUpda
te と componentWillUnmount がまとまったものだと考えることができます。
React コンポーネントにおける副作用には 2 種類あります。クリーンアップコードを必要としない副作用と、必要とする
副作用です。これらの違いについて詳しく見ていきましょう。
import React, { useState, useEffect } from 'react';
function Example() {
const [count, setCount] = useState(0);
// Similar to componentDidMount and componentDidUpdate:
useEffect(() => {
// Update the document title using the browser API
document.title = `You clicked ${count} times`;
});
return (
<div>
<p>You clicked {count} times</p>
<button onClick={() => setCount(count + 1)}>
Click me
</button>
</div>
);
}
副作用フックの利用法
155](https://image.slidesharecdn.com/react-ja-221110111411-b356a3b5/85/react-ja-pdf-155-320.jpg)
![フックを使った例
以下の例は既にこのページの最初で見たものですが、改めて詳しく見ていきましょう。
useEffect は何をやっているのか? このフックを使うことで、レンダー後に何かの処理をしないといけない、というこ
とを React に伝えます。React はあなたが渡した関数を覚えており(これを「副作用(関数)
」と呼ぶこととします)
、
DOM の更新の後にそれを呼び出します。この副作用の場合はドキュメントのタイトルをセットしていますが、データを取
得したりその他何らかの命令型の API を呼び出したりすることも可能です。
useEffect がコンポーネント内で呼ばれるのはなぜか? コンポーネント内で useEffect を記述することで、副作用内か
ら state である count (や任意の props)にアクセスできるようになります。それらは既に関数スコープ内に存在する
ので、参照するための特別な API は必要ありません。フックは JavaScript のクロージャを活用しており、JavaScript で
解決できることに対して React 特有の API を導入することはしません。
useEffect は毎回のレンダー後に呼ばれるのか? その通りです! デフォルトでは、副作用関数は初回のレンダー時およ
び毎回の更新時に呼び出されます。あとでカスタマイズする方法について説明します。
「マウント」と「更新」という観点
で考えるのではなく、
「レンダーの後」に副作用は起こる、というように考える方が簡単かもしれません。React は、副作
用が実行される時点では DOM が正しく更新され終わっていることを保証します。
詳しい説明
副作用について学んだので、以下の行の意味はお分かりかと思います。
import React, { useState, useEffect } from 'react';
function Example() {
const [count, setCount] = useState(0);
useEffect(() => {
document.title = `You clicked ${count} times`;
});
return (
<div>
<p>You clicked {count} times</p>
<button onClick={() => setCount(count + 1)}>
Click me
</button>
</div>
);
}
function Example() {
const [count, setCount] = useState(0);
useEffect(() => {
document.title = `You clicked ${count} times`;
});
}
副作用フックの利用法
157](https://image.slidesharecdn.com/react-ja-221110111411-b356a3b5/85/react-ja-pdf-157-320.jpg)
![ここで、componentDidMount と componentWillUnmount とがお互いに鏡のように対応していないといけないことに注意し
てください。ライフサイクルメソッドを使うと、2 つのメソッドに書かれているコードが概念上は同一の副作用に関連し
ているとしても、それらを分割して書かないといけません。
補足
目ざとい読者なら、この例が完全に正しいものであるためには componentDidUpdate も必要だと気付くかもしれま
せん。今のところは気にしないでおきますが、このページの後に出てくる節で改めて説明します。
フックを使った例
このコンポーネントをフックを使ってどのように書けるのか見ていきましょう。
クリーンアップ用の別の副作用が必要だとお考えかもしれません。しかし購読を開始するコードと解除するコードとは密
に関連しているため、useEffect はそれらを一緒に書けるようにデザインされています。あなたの副作用が関数を返した
場合、React はクリーンアップのタイミングが来たらそれを実行するのです。
this.props.friend.id,
this.handleStatusChange
);
}
handleStatusChange(status) {
this.setState({
isOnline: status.isOnline
});
}
render() {
if (this.state.isOnline === null) {
return 'Loading...';
}
return this.state.isOnline ? 'Online' : 'Offline';
}
}
import React, { useState, useEffect } from 'react';
function FriendStatus(props) {
const [isOnline, setIsOnline] = useState(null);
useEffect(() => {
function handleStatusChange(status) {
setIsOnline(status.isOnline);
}
ChatAPI.subscribeToFriendStatus(props.friend.id, handleStatusChange);
// Specify how to clean up after this effect:
return function cleanup() {
ChatAPI.unsubscribeFromFriendStatus(props.friend.id, handleStatusChange);
};
});
if (isOnline === null) {
return 'Loading...';
副作用フックの利用法
159](https://image.slidesharecdn.com/react-ja-221110111411-b356a3b5/85/react-ja-pdf-159-320.jpg)
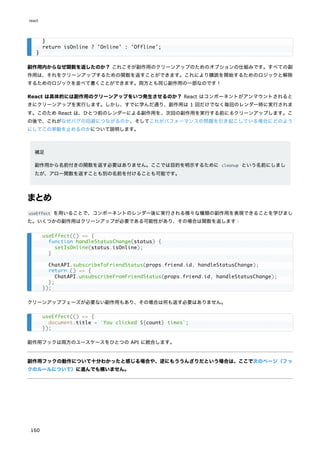
![副作用を使う場合のヒント
このページの残りの部分では、経験のある React 利用者が興味を持つかもしれない useEffect の深い概念について説明
します。今すぐ読み進める必要があるとは思わないでください。副作用フックについて詳細が知りたくなったらいつでも
このページに戻ってくればいいのです。
ヒント:関心を分離するために複数の副作用を使う
フックを導入する動機のページで述べた問題のひとつは、しばしばそれぞれのライフサイクルメソッドに関連のないロジ
ックが含まれ、一方で関連するロジックが複数のメソッドに分割されてしまう、ということです。以下に示すのは、これ
までの例で挙げたカウンタとフレンド状態インジケータとを組み合わせたコンポーネントです。
ここで、document.title を設定するためのロジックが componentDidMount と componentDidUpdate に分離してしまっ
ていることに注意してください。データ購読のためのロジックもやはり componentDidMount と componentWillUnmount
とに分離しています。そして componentDidMount には両方の仕事のためのコードが含まれています。
ではフックはどのようにこの問題を解決するのでしょうか? ステートフックを複数回呼べるのと同様の方法で、副作用を
複数回利用することができます。このため、互いに関係のないロジックは別の副作用に分離することが可能です。
class FriendStatusWithCounter extends React.Component {
constructor(props) {
super(props);
this.state = { count: 0, isOnline: null };
this.handleStatusChange = this.handleStatusChange.bind(this);
}
componentDidMount() {
document.title = `You clicked ${this.state.count} times`;
ChatAPI.subscribeToFriendStatus(
this.props.friend.id,
this.handleStatusChange
);
}
componentDidUpdate() {
document.title = `You clicked ${this.state.count} times`;
}
componentWillUnmount() {
ChatAPI.unsubscribeFromFriendStatus(
this.props.friend.id,
this.handleStatusChange
);
}
handleStatusChange(status) {
this.setState({
isOnline: status.isOnline
});
}
// ...
function FriendStatusWithCounter(props) {
const [count, setCount] = useState(0);
useEffect(() => {
document.title = `You clicked ${count} times`;
副作用フックの利用法
161](https://image.slidesharecdn.com/react-ja-221110111411-b356a3b5/85/react-ja-pdf-161-320.jpg)
![フックを使うことで、ライフサイクルのメソッド名に基づくのではなく、実際に何をやっているのかに基づいてコードを
分割できます。React はコンポーネントで利用されているすべての副作用を、指定されている順番で適用していきます。
解説:なぜ副作用は毎回の更新ごとに実行されるのか
クラスに慣れていれば、なぜクリーンアップフェーズは、アンマウント時の 1 度だけではなく再レンダー時に毎回発生す
るのか、と不思議に思っているかもしれません。実践的な例で、この設計によりなぜバグの少ないコンポーネントが作れ
るようになるのか見てみましょう。
このページの前の部分で、フレンドがオンラインかどうかを表示する FriendStatus コンポーネントの例を示しました。
このクラスでは this.props の中にある friend.id を参照して、コンポーネントがマウントした後にフレンドのステー
タスを購読し、アンマウント時には購読を解除します:
ですがコンポーネントが表示されている最中に friend プロパティが変わったらどうなるのでしょうか? このコンポーネ
ントは間違ったフレンドのオンラインステータスを表示し続けてしまいます。これはバグです。しかも誤ったフレンド ID
を使って購読解除を呼び出してしまうため、アンマウント時にメモリリークやクラッシュを引き起こしてしまうでしょう。
クラスコンポーネントの場合は、このようなケースに対処するために componentDidUpdate を加える必要がありました。
});
const [isOnline, setIsOnline] = useState(null);
useEffect(() => {
function handleStatusChange(status) {
setIsOnline(status.isOnline);
}
ChatAPI.subscribeToFriendStatus(props.friend.id, handleStatusChange);
return () => {
ChatAPI.unsubscribeFromFriendStatus(props.friend.id, handleStatusChange);
};
});
// ...
}
componentDidMount() {
ChatAPI.subscribeToFriendStatus(
this.props.friend.id,
this.handleStatusChange
);
}
componentWillUnmount() {
ChatAPI.unsubscribeFromFriendStatus(
this.props.friend.id,
this.handleStatusChange
);
}
componentDidMount() {
ChatAPI.subscribeToFriendStatus(
this.props.friend.id,
this.handleStatusChange
);
}
react
162](https://image.slidesharecdn.com/react-ja-221110111411-b356a3b5/85/react-ja-pdf-162-320.jpg)
![ヒント:副作用のスキップによるパフォーマンス改善
いくつかの場合では、副作用のクリーンアップと適用とをレンダーごとに毎回行うことはパフォーマンスの問題を引き起
こす可能性があります。クラスコンポーネントの場合、この問題は componentDidUpdate の内部で prevProps や
prevState と比較するコードを加えることで解決できました。
これはよくある要求なので、useEffect フックの API にはこの動作が組み込まれています。再レンダー間で特定の値が
変わっていない場合には副作用の適用をスキップするよう、React に伝えることができるのです。そのためには、
useEffect のオプションの第 2 引数として配列を渡してください。
上記の例では、第 2 引数として [count] を渡しています。どういう意味でしょうか? もし count が 5 で、次回のコ
ンポーネントのレンダー時にも count がまだ 5 であった場合、React は前回のレンダー時に覚えておいた [5] と今回
のレンダーの [5] とを比較します。配列内のすべての要素が同一 ( 5 === 5 ) ですので、React は副作用をスキップしま
す。これが最適化です。
再レンダー時に count が 6 に変更されている場合、前回レンダー時に覚えておいた [5] と今回のレンダー時の [6]
という配列とを比較します。今回は 5 !== 6 ですので React は副作用を再適用します。配列内に複数の要素がある場合、
React は配列内の要素のうちひとつでも変わっている場合に副作用を再実行します。
クリーンアップフェーズがある副作用でも同様に動作します:
将来的には、ビルド時の変換で第 2 引数を自動で加えられるようになるかもしれません。
補足
この最適化を利用する場合、時間の経過とともに変化し副作用によって利用される、コンポーネントスコープの値
(props や state など)がすべて配列に含まれていることを確認してください。さもないとあなたのコードは以前
のレンダー時の古い値を参照してしまうことになります。その他の最適化のオプションについてはフック API リフ
ァレンスで説明しています。
componentDidUpdate(prevProps, prevState) {
if (prevState.count !== this.state.count) {
document.title = `You clicked ${this.state.count} times`;
}
}
useEffect(() => {
document.title = `You clicked ${count} times`;
}, [count]); // Only re-run the effect if count changes
useEffect(() => {
function handleStatusChange(status) {
setIsOnline(status.isOnline);
}
ChatAPI.subscribeToFriendStatus(props.friend.id, handleStatusChange);
return () => {
ChatAPI.unsubscribeFromFriendStatus(props.friend.id, handleStatusChange);
};
}, [props.friend.id]); // Only re-subscribe if props.friend.id changes
react
164](https://image.slidesharecdn.com/react-ja-221110111411-b356a3b5/85/react-ja-pdf-164-320.jpg)
![もしも副作用とそのクリーンアップを 1 度だけ(マウント時とアンマウント時にのみ)実行したいという場合、空
の配列 ( [] ) を第 2 引数として渡すことができます。こうすることで、あなたの副作用は props や state の値の
いずれにも依存していないため再実行する必要が一切ない、ということを React に伝えることができます。これは
特別なケースとして処理されているわけではなく、依存配列を普通に処理すればそうなるというだけの話です。
空の配列 ( [] ) を渡した場合、副作用内では props と state の値は常にその初期値のままになります。[] を渡
すことはおなじみの componentDidMount と componentWillUnmount による概念と似ているように感じるでしょう
が、通常はこちらやこちらのように、副作用を過度に再実行しないためのよりよい解決方法があります。また useE
ffect はブラウザが描画し終えた後まで遅延されますので、追加の作業をしてもそれほど問題にならないというこ
ともお忘れなく。
eslint-plugin-react-hooks パッケージの exhaustive-deps ルールを有効にすることをお勧めします。これは依
存の配列が正しく記述されていない場合に警告し、修正を提案します。
次のステップ
おめでとうございます! 長いページでしたが、最終的に副作用に関するほとんどの疑問が解決していることを望みます。
これでステートフックと副作用フックの両方を学んだので、それらを組み合わせてやれることがたくさんあります。クラ
スコンポーネントにおけるほとんどのユースケースがカバーされていますが、足りない部分については他のフックが役立
つかもしれません。
また、動機のところで述べた問題をフックがどのように解決するのかについてもわかり始めてきたでしょう。副作用のク
リーンアップがどのようにして componentDidUpdate と componentWillUnmount との間でのコードの重複を防ぎ、関係し
たコードを並べて書くことができるようにし、バグの少ないコードを記述できるようにするのかを見てきました。また目
的別に副作用を分割する方法も学びましたが、これはクラスでは全く不可能なことでした。
この時点で、一体フックがどのように動作しているのか疑問に感じているかもしれません。useState のそれぞれの呼び
出しがどの state 変数に対応しているのかを、React はどのようにして知るのでしょうか? 更新のたびに、前回と今回の
副作用とを React はどのように対応付けるのでしょうか? 次のページではフックのルールについて学びます -- このルー
ルはフックが動作するために必須のものです。
副作用フックの利用法
165](https://image.slidesharecdn.com/react-ja-221110111411-b356a3b5/85/react-ja-pdf-165-320.jpg)
![フックに関するよくある質問
フック (hook) は React 16.8 で追加された新機能です。state などの React の機能を、クラスを書かずに使えるように
なります。
このページではフックに関するよくある質問にいくつかお答えします。
導入の指針
フックが使える React のバージョンはどれですか?
クラスコンポーネントを全部書き換える必要があるのですか?
クラスではできず、フックでできるようになることは何ですか?
これまでの React の知識はどの程度使えますか?
フック、クラスのいずれを使うべきですか、あるいはその両方でしょうか?
フックはクラスのユースケースのすべてをカバーしていますか?
フックはレンダープロップや高階コンポーネントを置き換えるものですか?
Redux の connect() や React Router といった人気の API はフックによりどうなりますか?
フックは静的型付けと組み合わせてうまく動きますか?
フックを使ったコンポーネントはどのようにテストするのですか?
Lint ルールは具体的に何を強制するのですか?
クラスからフックへ
個々のライフサイクルメソッドはフックとどのように対応するのですか?
フックでデータの取得をどのように行うのですか?
インスタンス変数のようなものはありますか?
state 変数は 1 つにすべきですか、たくさん使うべきですか?
コンポーネントの更新のときだけ副作用を実行することは可能ですか?
前回の props や state はどうすれば取得できますか?
関数内で古い props や state が見えているのはなぜですか?
どうすれば getDerivedStateFromProps を実装できますか?
forceUpdate のようなものはありますか?
関数コンポーネントへの ref を作ることは可能ですか?
DOM ノードの位置やサイズの測定はどのように行うのですか?
const [thing, setThing] = useState() というのはどういう意味ですか?
パフォーマンス最適化
更新時に副作用をスキップすることはできますか?
依存の配列から関数を省略しても大丈夫ですか?
副作用の依存リストが頻繁に変わりすぎる場合はどうすればよいですか?
どうすれば shouldComponentUpdate を実装できますか?
計算結果のメモ化はどのように行うのですか?
計算量の大きいオブジェクトの作成を遅延する方法はありますか?
レンダー内で関数を作るせいでフックは遅くなるのではないですか?
どうすれば複数のコールバックを深く受け渡すのを回避できますか?
useCallback からの頻繁に変わる値を読み出す方法は?
react
166](https://image.slidesharecdn.com/react-ja-221110111411-b356a3b5/85/react-ja-pdf-166-320.jpg)

![テストのレシピ集にコピー・ペーストで使えるたくさんの例が掲載されています。
例えばこのようなカウンタコンポーネントがあるとしましょう:
これを React DOM を使ってテストします。ブラウザでの挙動と確実に合致させるため、これをレンダーしたり更新した
りするコードを ReactTestUtils.act() でラップします:
act() を呼び出すと内部の副作用も処理されます。
function Example() {
const [count, setCount] = useState(0);
useEffect(() => {
document.title = `You clicked ${count} times`;
});
return (
<div>
<p>You clicked {count} times</p>
<button onClick={() => setCount(count + 1)}>
Click me
</button>
</div>
);
}
import React from 'react';
import ReactDOM from 'react-dom/client';
import { act } from 'react-dom/test-utils';
import Counter from './Counter';
let container;
beforeEach(() => {
container = document.createElement('div');
document.body.appendChild(container);
});
afterEach(() => {
document.body.removeChild(container);
container = null;
});
it('can render and update a counter', () => {
// Test first render and effect
act(() => {
ReactDOM.createRoot(container).render(<Counter />);
});
const button = container.querySelector('button');
const label = container.querySelector('p');
expect(label.textContent).toBe('You clicked 0 times');
expect(document.title).toBe('You clicked 0 times');
// Test second render and effect
act(() => {
button.dispatchEvent(new MouseEvent('click', {bubbles: true}));
});
expect(label.textContent).toBe('You clicked 1 times');
expect(document.title).toBe('You clicked 1 times');
});
フックに関するよくある質問
169](https://image.slidesharecdn.com/react-ja-221110111411-b356a3b5/85/react-ja-pdf-169-320.jpg)
![インスタンス変数のようなものはありますか?
はい! useRef() フックは DOM への参照を保持するためだけにあるのではありません。"ref" オブジェクトは汎用のコ
ンテナであり、その current プロパティの値は書き換え可能かつどのような値でも保持することができますので、クラス
のインスタンス変数と同様に利用できます。
例えば useEffect 内から "ref" オブジェクトを書き換えることができます。
単にインターバルをセットしたいだけであれば(id はこの副作用内でローカルでよいので)この ref は必要ないところ
ですが、もしもイベントハンドラ内でインターバルをクリアしたい場合には便利です:
概念的には、ref はクラスにおけるインスタンス変数と似たものだと考えることができます。遅延初期化をしたい場合を除
き、レンダーの最中に ref を書き換えることはしないでください。その代わり、通常 ref はイベントハンドラや副作用内
でだけ書き換えるようにしましょう。
state 変数は 1 つにすべきですか、
たくさん使うべきですか?
これまでクラスを使っていたなら、useState() を 1 回だけ呼んで、1 つのオブジェクト内にすべての state を入れたく
なるかもしれません。そうしたければそのようにすることもできます。以下はマウスの動作を追跡するコンポーネントの
例です。位置やサイズの情報を 1 つのローカル state に保持しています。
ここで例えば、ユーザがマウスを動かしたときに left と top を変更したいとしましょう。この際、これらのフィール
ドを古い state に手動でマージしないといけないことに注意してください:
function Timer() {
const intervalRef = useRef();
useEffect(() => {
const id = setInterval(() => {
// ...
});
intervalRef.current = id;
return () => {
clearInterval(intervalRef.current);
};
});
// ...
}
// ...
function handleCancelClick() {
clearInterval(intervalRef.current);
}
// ...
function Box() {
const [state, setState] = useState({ left: 0, top: 0, width: 100, height: 100 });
// ...
}
// ...
useEffect(() => {
function handleWindowMouseMove(e) {
フックに関するよくある質問
171](https://image.slidesharecdn.com/react-ja-221110111411-b356a3b5/85/react-ja-pdf-171-320.jpg)
![これは state 変数を更新する時には変数の値が置換されるからです。これは更新されるフィールドがオブジェクトにマー
ジされるというクラスでの this.setState の挙動とは異なります。
自動マージがないとつらい場合は、useLegacyState のようなカスタムフックを書いてオブジェクト型の state の更新を
マージするようにすることはできます。しかし、我々は代わりに、どの値が一緒に更新されやすいのかに基づいて、
state を複数の state 変数に分割することをお勧めします。
例えば、コンポーネントの state を position と size という複数のオブジェクトに分割して、マージを行わなくても
position を常に新たな値で置換するようにできるでしょう。
互いに独立した state 変数を分割することには別の利点もあります。そうすることで後からそのロジックをカスタムフッ
クに抽出しやすくなるのです。例えば:
position の state 変数に対する useState の呼び出しとそれに関連する副作用を、それらのコードを変えずにカスタム
フックに移行できたことに注意してください。もしすべての state が単一のオブジェクトに入っていたら、抽出するのは
もっと困難だったでしょう。
すべての state を 1 つの useState 呼び出しに含めても動作しますし、フィールドごとに別に useState を持たせるこ
とでも動作はします。しかしこれらの両極端の間でうまくバランスを取り、少数の独立した state 変数に関連する state
をグループ化することで、コンポーネントは最も読みやすくなります。state のロジックが複雑になった場合は、それを
リデューサで管理するか、カスタムフックを書くことをお勧めします。
// Spreading "...state" ensures we don't "lose" width and height
setState(state => ({ ...state, left: e.pageX, top: e.pageY }));
}
// Note: this implementation is a bit simplified
window.addEventListener('mousemove', handleWindowMouseMove);
return () => window.removeEventListener('mousemove', handleWindowMouseMove);
}, []);
// ...
function Box() {
const [position, setPosition] = useState({ left: 0, top: 0 });
const [size, setSize] = useState({ width: 100, height: 100 });
useEffect(() => {
function handleWindowMouseMove(e) {
setPosition({ left: e.pageX, top: e.pageY });
}
// ...
function Box() {
const position = useWindowPosition();
const [size, setSize] = useState({ width: 100, height: 100 });
// ...
}
function useWindowPosition() {
const [position, setPosition] = useState({ left: 0, top: 0 });
useEffect(() => {
// ...
}, []);
return position;
}
react
172](https://image.slidesharecdn.com/react-ja-221110111411-b356a3b5/85/react-ja-pdf-172-320.jpg)
![コンポーネントの更新のときだけ副作用を実行することは可能ですか?
これは稀なユースケースです。必要であれば、変更可能な ref を使って、初回レンダー中なのか更新中なのかに対応する
真偽値を手動で保持し、副作用内でその値を参照するようにすることができます(このようなことを何度もやる場合は、
そのためのカスタムフックを書くことができます)
。
前回の props や state はどうすれば取得できますか?
前回の props や state が欲しくなるというケースは 2 つあります。
ひとつは、前回の props を副作用のクリーンアップに使用したいという場合です。例えば、userId プロパティに基づい
てソケットを購読する副作用を書いている場合などです。userId プロパティが変化した場合、ひとつ前の useId の購読
を解除して次のものを購読したくなるでしょう。ですがこれを実現するのに、特別なことをする必要はありません:
上記の例では、userId が 3 から 4 に変わった場合、ChatAPI.unsubscribeFromSocket(3) が最初に走り、その後に
ChatAPI.subscribeToSocket(4) が走ります。クリーンアップ関数は「前回」の userId をクロージャとしてキャプチャ
していますので、前回の値を取得する必要はありません。
別の場面では、props や他の state の変更に基づいて state を調整したいということがあるかもしれません。これはめ
ったに必要なものではありませんし、通常はコードに重複した冗長な state があるというサインです。しかしこれが必要
な稀なパターンでは、前の state や props を state に保存してレンダー中に更新することができます。
これまで usePrevious というカスタムフックを使うことを提案していましたが、ほとんどのユースケースは上記の 2 つ
のパターンのいずれかに当てはまることがわかりました。もしもこのユースケースが当てはまらない場合は、値を ref に
保持し、必要に応じて手作業でアップデートすることができます。レンダー中に ref を読み出したり変更したりするとコ
ンポーネントの挙動を予想・理解するのが難しくなるため、避けるようにしてください。
関数内で古い props や state が見えているのはなぜですか?
イベントハンドラにせよ副作用関数にせよ、コンポーネント内に書かれた関数からは、その関数が作成された時の props
や state が「見え」ます。以下のような例を考えてみましょう:
useEffect(() => {
ChatAPI.subscribeToSocket(props.userId);
return () => ChatAPI.unsubscribeFromSocket(props.userId);
}, [props.userId]);
function Example() {
const [count, setCount] = useState(0);
function handleAlertClick() {
setTimeout(() => {
alert('You clicked on: ' + count);
}, 3000);
}
return (
<div>
<p>You clicked {count} times</p>
<button onClick={() => setCount(count + 1)}>
Click me
</button>
<button onClick={handleAlertClick}>
フックに関するよくある質問
173](https://image.slidesharecdn.com/react-ja-221110111411-b356a3b5/85/react-ja-pdf-173-320.jpg)
![最初に "Show alert" ボタンをクリックして、次にカウンタを増加させた場合、アラートダイアログに表示されるのは
"Show alert" ボタンをクリックした時点での count 変数の値になります。これにより props や state が変わらない
ことを前提として書かれたコードによるバグが防止できます。
非同期的に実行されるコールバック内で、意図的に state の最新の値を読み出したいという場合は、その値を ref 内に保
持して、それを書き換えたり読み出したりすることができます。
最後に、古い props や state が見えている場合に考えられる他の理由は、
「依存の配列」による最適化を使った際に正し
く依存する値の全部を指定しなかった、というものです。例えば副作用フックの第 2 引数に [] を指定したにも関わらず
副作用内で someProps を読み出しているという場合、副作用関数内では someProps の初期値がずっと見え続けることに
なります。解決方法は依存配列自体を削除するか、配列の中身を修正することです。関数の扱い方、および依存する値の
変化を誤って無視することなく副作用の実行回数を減らすためのよくある手法についてもご覧ください。
補足
exhaustive-deps という ESLint のルールを eslint-plugin-react-hooks パッケージの一部として提供していま
す。依存配列が正しく指定されていない場合に警告し、修正を提案します。
どうすれば getDerivedStateFromProps を実装できますか?
おそらくそのようなものは必要ないのですが、これが本当に必要になる稀なケースでは(例えば <Transition> コンポー
ネントを実装するときなど)
、レンダーの最中に state を更新することができます。React は最初のレンダーの終了直後
に更新された state を使ってコンポーネントを再実行しますので、計算量は高くなりません。
以下の例では、row プロパティの前回の値を state 変数に格納し後で比較できるようにしています:
これは最初は奇妙に見えるかもしれませんが、これまでも概念的には getDerivedStateFromProps はレンダー中に更新を
行うというのがまさに目的でした。
Show alert
</button>
</div>
);
}
function ScrollView({row}) {
const [isScrollingDown, setIsScrollingDown] = useState(false);
const [prevRow, setPrevRow] = useState(null);
if (row !== prevRow) {
// Row changed since last render. Update isScrollingDown.
setIsScrollingDown(prevRow !== null && row > prevRow);
setPrevRow(row);
}
return `Scrolling down: ${isScrollingDown}`;
}
react
174](https://image.slidesharecdn.com/react-ja-221110111411-b356a3b5/85/react-ja-pdf-174-320.jpg)
![forceUpdate のようなものはありますか?
useState フックと useReducer フックのいずれも、前回と今回で値が同じである場合は更新を回避します。適当な場所
で state を変化させた後に setState を呼び出しても再レンダーは発生しません。
通常、React でローカル state を直接変更すべきではありません。しかし避難ハッチとして、カウンターを使って state
が変化していない場合でも再レンダーを強制することが可能です。
可能であればこのパターンは避けるようにしてください。
関数コンポーネントへの ref を作ることは可能ですか?
このようなことをする必要はあまりないはずですが、命令型のメソッドを親コンポーネントに公開するために
useImperativeHandle フックを利用することができます。
DOM ノードの位置やサイズの測定はどのように行うのですか?
DOM ノードの位置やサイズを測定するための基本的な方法として、コールバック形式の ref が利用できます。React は
ref が異なるノードに割り当てられるたびにコールバックを呼び出します。こちらの小さなデモをご覧ください。
この例で useRef を使わなかったのは、オブジェクト型の ref には現在値が変わった時にそれを通知する機能がないため
です。コールバック ref を使うことで、子コンポーネントが測定されたノードを(例えばクリックに応じて)後から表示
する場合でも、親コンポーネントの側でその変更について通知を受け取り、測定値を反映させることができます。
useCallback の依存値の配列として [] を渡したことに注意してください。これにより我々の ref コールバックが再レ
ンダーごとに変化しないことが保証され、React が不必要にその関数を呼ばないで済みます。
この例では、レンダーされている <h1> はどの再レンダー間でも同じように存在するため、コールバック ref はコンポー
ネントのマウント時とアンマウント時にのみ呼び出されます。コンポーネントのリサイズが発生した際に毎回通知を受け
取りたい場合は、ResizeObserver や、これを使って作成されているサードパーティのフックの利用を検討してください。
const [ignored, forceUpdate] = useReducer(x => x + 1, 0);
function handleClick() {
forceUpdate();
}
function MeasureExample() {
const [height, setHeight] = useState(0);
const measuredRef = useCallback(node => {
if (node !== null) {
setHeight(node.getBoundingClientRect().height);
}
}, []);
return (
<>
<h1 ref={measuredRef}>Hello, world</h1>
<h2>The above header is {Math.round(height)}px tall</h2>
</>
);
}
フックに関するよくある質問
175](https://image.slidesharecdn.com/react-ja-221110111411-b356a3b5/85/react-ja-pdf-175-320.jpg)
![お望みであれば再利用可能なフックとしてこのロジックを抽出できます。
const [thing, setThing] = useState() というのはどういう意味ですか?
この構文に馴染みがない場合はステートフックのドキュメント内の説明をご覧ください。
パフォーマンス最適化
更新時に副作用をスキップすることはできますか?
はい。条件付きで副作用を実行するを参照してください。これがデフォルトの動作になっていないのは、更新時の対応を
忘れることがバグの元になるからです。
依存の配列から関数を省略しても大丈夫ですか?
いいえ、一般的には省略できません。
副作用関数の外側にある関数内でどの props や state が使われているのか覚えておくのは大変です。ですので副作用関数
内で使われる関数は副作用関数内で宣言するのがよいでしょう。そうすればコンポーネントスコープ内のどの値に副作用
が依存しているのかを把握するのは容易です。
function MeasureExample() {
const [rect, ref] = useClientRect();
return (
<>
<h1 ref={ref}>Hello, world</h1>
{rect !== null &&
<h2>The above header is {Math.round(rect.height)}px tall</h2>
}
</>
);
}
function useClientRect() {
const [rect, setRect] = useState(null);
const ref = useCallback(node => {
if (node !== null) {
setRect(node.getBoundingClientRect());
}
}, []);
return [rect, ref];
}
function Example({ someProp }) {
function doSomething() {
console.log(someProp);
}
useEffect(() => {
doSomething();
}, []); // 🔴 This is not safe (it calls `doSomething` which uses `someProp`)
}
function Example({ someProp }) {
useEffect(() => {
function doSomething() {
react
176](https://image.slidesharecdn.com/react-ja-221110111411-b356a3b5/85/react-ja-pdf-176-320.jpg)
![このようにした後で、やはりコンポーネントスコープ内のどの値も使用していないのであれば、[] を指定することは安
全です:
ユースケースによっては、以下に述べるような選択肢もあります。
補足
eslint-plugin-react-hooks パッケージの一部として exhaustive-deps という ESLint のルールを提供していま
す。更新の一貫性が保たれていないコンポーネントを見つけるのに役立ちます。
これがなぜ重要なのか説明します。
useEffect 、useLayoutEffect 、useMemo 、useCallback あるいは useImperativeHandle の最後の引数として依存する
値のリストを渡す場合、コールバック内部で使われ React のデータの流れに関わる値が、すべて含まれている必要があり
ます。すなわち props や state およびそれらより派生するあらゆるものです。
関数を依存のリストから安全に省略できるのは、その関数(あるいはその関数から呼ばれる関数)が props、state ない
しそれらから派生する値のいずれも含んでいない場合のみです。以下の例にはバグがあります。
推奨される修正方法は、この関数を副作用内に移動することです。これにより、副作用がどの props や state を利用して
いるのか把握しやすくなり、それらが指定されていることを保証しやすくなります。
console.log(someProp);
}
doSomething();
}, [someProp]); // ✅ OK (our effect only uses `someProp`)
}
useEffect(() => {
function doSomething() {
console.log('hello');
}
doSomething();
}, []); // ✅ OK in this example because we don't use *any* values from component scope
function ProductPage({ productId }) {
const [product, setProduct] = useState(null);
async function fetchProduct() {
const response = await fetch('http://myapi/product/' + productId); // Uses productId prop
const json = await response.json();
setProduct(json);
}
useEffect(() => {
fetchProduct();
}, []); // 🔴 Invalid because `fetchProduct` uses `productId`
// ...
}
フックに関するよくある質問
177](https://image.slidesharecdn.com/react-ja-221110111411-b356a3b5/85/react-ja-pdf-177-320.jpg)
![これにより、要らなくなったレスポンスに対して副作用内でローカル変数を使って対処することも可能になります。
副作用内に関数を移動したことで、依存リスト内にこの関数を含めないでよくなりました。
ヒント
フックでデータを取得する方法についてこちらの小さなデモおよびこちらの記事をご覧ください。
何らかの理由で副作用内に関数を移動できないという場合、他にとりうる選択肢がいくつかあります。
そのコンポーネントの外部にその関数を移動できないか考えましょう。その場合、関数は props や state を参照して
いないことが保証されるので、依存のリストに含まずに済むようになります。
使おうとしている関数が純粋な計算のみを行い、レンダー中に呼んで構わないものであるなら、その関数を代わりに副
作用の外部で呼ぶようにして、副作用中ではその返り値に依存するようにします。
最終手段として、関数を依存リストに加えつつ、useCallback を使ってその定義をラップすることが可能です。これ
により、関数自体の依存が変わらない限り関数も変化しないことを保証できます。
function ProductPage({ productId }) {
const [product, setProduct] = useState(null);
useEffect(() => {
// By moving this function inside the effect, we can clearly see the values it uses.
async function fetchProduct() {
const response = await fetch('http://myapi/product/' + productId);
const json = await response.json();
setProduct(json);
}
fetchProduct();
}, [productId]); // ✅ Valid because our effect only uses productId
// ...
}
useEffect(() => {
let ignore = false;
async function fetchProduct() {
const response = await fetch('http://myapi/product/' + productId);
const json = await response.json();
if (!ignore) setProduct(json);
}
fetchProduct();
return () => { ignore = true };
}, [productId]);
function ProductPage({ productId }) {
// ✅ Wrap with useCallback to avoid change on every render
const fetchProduct = useCallback(() => {
// ... Does something with productId ...
}, [productId]); // ✅ All useCallback dependencies are specified
return <ProductDetails fetchProduct={fetchProduct} />;
}
react
178](https://image.slidesharecdn.com/react-ja-221110111411-b356a3b5/85/react-ja-pdf-178-320.jpg)
![上記の例では関数を依存リストに含める必要があることに注意してください。これにより ProductPage の productId プ
ロパティが変化した場合に自動的に ProductDetail コンポーネント内でデータの再取得が発生するようになります。
副作用の依存リストが頻繁に変わりすぎる場合はどうすればよいですか?
しばしば、ある副作用がとても頻繁に変化する state を利用しないといけない場合があります。依存のリストからその
state を省略したくなるかもしれませんが、通常それはバグになります。
依存のリストが空であるということ ( [] ) は、コンポーネントのマウント時に副作用が一度のみ実行され、毎回の再レン
ダー時には実行されないということを意味します。ここでの問題は、副作用コールバックが実行された時点で count の値
が 0 に設定されたクロージャを作成したため、setInterval 内のコールバックで count の値が変わらなくなってしま
う、ということです。毎秒ごとにこのコールバックは setCount(0 + 1) を呼び出すので、カウントは 1 のまま変わらな
くなってしまいます。
依存のリストとして [count] を指定すればバグは起きなくなりますが、その場合値が変化するたびにタイマーがリセット
されることになります。事実上それぞれの setInterval は一度しか実行されずに(setTimeout のように)クリアされて
しまうのです。これは望ましい動作ではありません。これを修正するため、setState 関数形式による更新を利用するこ
とができます。これにより state の現在値を参照せずに state がどのように更新されるべきかを指定できます。
(setCount 関数については同一性が保たれることが保証されているので、省略して構いません)
function ProductDetails({ fetchProduct }) {
useEffect(() => {
fetchProduct();
}, [fetchProduct]); // ✅ All useEffect dependencies are specified
// ...
}
function Counter() {
const [count, setCount] = useState(0);
useEffect(() => {
const id = setInterval(() => {
setCount(count + 1); // This effect depends on the `count` state
}, 1000);
return () => clearInterval(id);
}, []); // 🔴 Bug: `count` is not specified as a dependency
return <h1>{count}</h1>;
}
function Counter() {
const [count, setCount] = useState(0);
useEffect(() => {
const id = setInterval(() => {
setCount(c => c + 1); // ✅ This doesn't depend on `count` variable outside
}, 1000);
return () => clearInterval(id);
}, []); // ✅ Our effect doesn't use any variables in the component scope
return <h1>{count}</h1>;
}
フックに関するよくある質問
179](https://image.slidesharecdn.com/react-ja-221110111411-b356a3b5/85/react-ja-pdf-179-320.jpg)
![これで、setInterval のコールバックは 1 秒に 1 回実行されますが、内部の setCount は count の最新の値(この例
では c )を参照できるようになります。
より複雑なケース(ある state が別の state に依存している場合など)においては、state 更新のロジックを
useReducer フックを使って副作用の外部に移動することを考慮してください。こちらの記事にこのやり方についての例
があります。useReducer から返される dispatch 関数は常に同一性が保たれます。これはリデューサ (reducer) 関数
がコンポーネント内で宣言されており props を読み出している場合でも同様です。
最終手段として、クラスにおける this のようなものが欲しい場合は、ref を使ってミュータブルな値を保持させること
ができます。そうすればその値を読み書き可能です。例えば:
ミュータブルな値に依存することでコンポーネントの挙動が予測しづらくなるため、これは代替手段が思いつかない場合
にのみ利用してください。うまくフックに移行できないパターンがあった場合は動作するコード例を添えて issue を作成
していただければお手伝いします。
どうすれば shouldComponentUpdate を実装できますか?
関数コンポーネントを React.memo でラップして props を浅く比較するようにしてください。
これがフックになっていないのは、フックと違って組み合わせ可能ではないからです。React.memo は PureComponent の
同等物ですが、props のみを比較するという違いがあります(新旧の props を受け取るカスタムの比較関数を 2 つめの
引数として加えることができます。その関数が true を返した場合はコンポーネントの更新はスキップされます)
。
React.memo は state を比較しませんが、これは比較可能な単一の state オブジェクトが存在しないからです。しかし子
コンポーネント側も純粋にしておくことや、useMemo を使って個々のコンポーネントを最適化することが可能です。
計算結果のメモ化はどのように行うのですか?
useMemo フックを使うと、前の計算結果を「記憶」しておくことで、複数のレンダー間で計算結果をキャッシュすること
ができます。
function Example(props) {
// Keep latest props in a ref.
const latestProps = useRef(props);
useEffect(() => {
latestProps.current = props;
});
useEffect(() => {
function tick() {
// Read latest props at any time
console.log(latestProps.current);
}
const id = setInterval(tick, 1000);
return () => clearInterval(id);
}, []); // This effect never re-runs
}
const Button = React.memo((props) => {
// your component
});
react
180](https://image.slidesharecdn.com/react-ja-221110111411-b356a3b5/85/react-ja-pdf-180-320.jpg)
![このコードは computeExpensiveValue(a, b) を呼び出します。しかし依存である [a, b] の組み合わせが前回の値と変
わっていない場合は、useMemo はこの関数の 2 回目の呼び出しをスキップし、単に前回返したのと同じ値を返します。
useMemo に渡した関数はレンダー中に実行されるということを覚えておいてください。レンダー中に通常やらないような
ことをやらないようにしましょう。例えば副作用は useMemo ではなく useEffect の仕事です。
useMemo はパフォーマンス最適化のために使うものであり、意味上の保証があるものだと考えないでください。将来的
に React は、例えば画面外のコンポーネント用のメモリを解放する、などの理由で、メモ化された値を「忘れる」ように
する可能性があります。useMemo なしでも動作するコードを書き、パフォーマンス最適化のために useMemo を加えるよ
うにしましょう(値が絶対に再計算されてはいけないというような稀なケースでは、ref の遅延初期化を行うことができま
す)
。
便利なことに、useMemo は子コンポーネントの計算量の高い再レンダーをスキップするのにも使えます:
フック呼び出しはループ内に配置できないため、このアプローチはループ内では動作しないことに注意してください。た
だしリストのアイテムの部分を別のコンポーネントに抽出してその中で useMemo を呼び出すことは可能です。
計算量の大きいオブジェクトの作成を遅延する方法はありますか?
useMemo を使えば同じ値に依存している高価な計算の結果をメモ化することができます。しかしこれはあくまでヒントと
して使われるものであり、計算が再実行されないということを保証しません。しかし時にはオブジェクトが一度しか作ら
れないことを保証したい場合があります。
まずよくあるユースケースは state の初期値を作成することが高価な場合です。
次回以降のレンダーでは無視される初期 state を毎回作成しなおすことを防ぐため、useState に関数を渡すことができ
ます。
const memoizedValue = useMemo(() => computeExpensiveValue(a, b), [a, b]);
function Parent({ a, b }) {
// Only re-rendered if `a` changes:
const child1 = useMemo(() => <Child1 a={a} />, [a]);
// Only re-rendered if `b` changes:
const child2 = useMemo(() => <Child2 b={b} />, [b]);
return (
<>
{child1}
{child2}
</>
)
}
function Table(props) {
// ⚠️ createRows() is called on every render
const [rows, setRows] = useState(createRows(props.count));
// ...
}
function Table(props) {
// ✅ createRows() is only called once
const [rows, setRows] = useState(() => createRows(props.count));
// ...
}
フックに関するよくある質問
181](https://image.slidesharecdn.com/react-ja-221110111411-b356a3b5/85/react-ja-pdf-181-320.jpg)
![useMemo フックを使うことで個々の子コンポーネントをいつ更新するのかを制御しやすくなるため、コンポーネント
が純粋である必要性は低くなっています
最後に、以下で説明されているように、useReducer フックを使えば、複数のコールバックを深い階層に受け渡してい
く必要があまりなくなります
どうすれば複数のコールバックを深く受け渡すのを回避できますか?
我々が見たところ、ほとんどの人はコンポーネントツリーの各階層で手作業でコールバックを受け渡ししていく作業が好
きではありません。それはより明示的ではありますが、面倒な『配管工事』をしている気分になることがあります。
大きなコンポーネントツリーにおいて我々がお勧めする代替手段は、useReducer で dispatch 関数を作って、それをコ
ンテクスト経由で下の階層に渡す、というものです。
TodosApp ツリーの中にいるあらゆる子コンポーネントはこの dispatch 関数を使うことができ、上位にいる TodosApp
にアクションを伝えることができます。
これは(複数のコールバックを何度も受け渡しする必要がないので)メンテナンスの観点から便利だ、というだけではな
く、コールバックにまつわる問題をすべて回避できます。深い更新においてはこのように dispatch を渡すのがお勧めの
パターンです。
// Will not change unless `a` or `b` changes
const memoizedCallback = useCallback(() => {
doSomething(a, b);
}, [a, b]);
const TodosDispatch = React.createContext(null);
function TodosApp() {
// Note: `dispatch` won't change between re-renders
const [todos, dispatch] = useReducer(todosReducer);
return (
<TodosDispatch.Provider value={dispatch}>
<DeepTree todos={todos} />
</TodosDispatch.Provider>
);
}
function DeepChild(props) {
// If we want to perform an action, we can get dispatch from context.
const dispatch = useContext(TodosDispatch);
function handleClick() {
dispatch({ type: 'add', text: 'hello' });
}
return (
<button onClick={handleClick}>Add todo</button>
);
}
フックに関するよくある質問
183](https://image.slidesharecdn.com/react-ja-221110111411-b356a3b5/85/react-ja-pdf-183-320.jpg)
![アプリケーションの state については、props として渡していくか(より明示的)
、あるいはコンテクスト経由で渡すか
(深い更新ではより便利)を選ぶ余地が依然あります。もしもコンテクストを使って state も渡すことにする場合は、2 つ
の別のコンテクストのタイプを使ってください -- dispatch のコンテクストは決して変わらないため、dispatch だけを
使うコンポーネントは(アプリケーションの state も必要でない限り)再レンダーする必要がなくなります。
useCallback からの頻繁に変わる値を読み出す方法は?
補足
我々は個別のコールバックを props として渡すのではなく、コンテクスト経由で dispatch を渡すことを推奨し
ています。以下のアプローチは網羅性と避難ハッチの目的で掲載しているものです。
稀なケースですが、コールバックを useCallback でメモ化しているにも関わらず、内部関数を何度も再作成しないといけ
ないためメモ化がうまく働かない、ということがあります。あなたがメモ化しようとしている関数がレンダー最中には使
われないイベントハンドラなのであれば、インスタンス変数としての ref を使って最後に使われた値を手動で保持してお
くことができます。
これはやや複雑なパターンですが、このような避難ハッチ的最適化は必要であれば可能だということです。カスタムフッ
クに抽出すれば多少は読みやすくなります:
function Form() {
const [text, updateText] = useState('');
const textRef = useRef();
useEffect(() => {
textRef.current = text; // Write it to the ref
});
const handleSubmit = useCallback(() => {
const currentText = textRef.current; // Read it from the ref
alert(currentText);
}, [textRef]); // Don't recreate handleSubmit like [text] would do
return (
<>
<input value={text} onChange={e => updateText(e.target.value)} />
<ExpensiveTree onSubmit={handleSubmit} />
</>
);
}
function Form() {
const [text, updateText] = useState('');
// Will be memoized even if `text` changes:
const handleSubmit = useEventCallback(() => {
alert(text);
}, [text]);
return (
<>
<input value={text} onChange={e => updateText(e.target.value)} />
<ExpensiveTree onSubmit={handleSubmit} />
</>
react
184](https://image.slidesharecdn.com/react-ja-221110111411-b356a3b5/85/react-ja-pdf-184-320.jpg)
![いずれにせよ、このパターンは薦められず、網羅性のために示しているに過ぎません。代わりにコールバックを深く受け
渡していくことを回避するのが望ましいパターンです。
内部の仕組み
React はフック呼び出しとコンポーネントとをどのように関連付けているのですか?
React は現在どのコンポーネントがレンダー中なのかを把握しています。フックのルールのお陰で、フックは React のコ
ンポーネント内(あるいはそれらから呼び出されるカスタムフック内)でのみ呼び出されるということが分かっています。
それぞれのコンポーネントに関連付けられる形で、React 内に「メモリーセル」のリストが存在しています。それらは単
に何らかのデータを保存できる JavaScript のオブジェクトです。あなたが useState() のようなフックを呼ぶと、フッ
クは現在のセルの値を読み出し(あるいは初回レンダー時はセル内容を初期化し)
、ポインタを次に進めます。これが複数
の useState() の呼び出しが個別のローカル state を得る仕組みです。
フックの先行技術にはどのようなものがありますか?
フックは複数の異なった出典からのアイディアを総合したものです:
react-future リポジトリにおける関数型 API の古い実験。
Ryan Florence の Reactions Component を含む、React コミュニティのレンダープロップ API に関する実験。
Dominic Gannaway によって提案された、レンダープロップの糖衣構文としての adopt keyword。
DisplayScript のステート変数とステートセル。
ReasonReact の Reducer components。
Rx の Subscriptions。
Multicore OCaml の Algebraic effects。
フックは Sebastian Markbåge が最初のデザインを作り、Andrew Clark、Sophie Alpert、Dominic Gannaway およ
びその他の React チームのメンバーが洗練させました。
);
}
function useEventCallback(fn, dependencies) {
const ref = useRef(() => {
throw new Error('Cannot call an event handler while rendering.');
});
useEffect(() => {
ref.current = fn;
}, [fn, ...dependencies]);
return useCallback(() => {
const fn = ref.current;
return fn();
}, [ref]);
}
フックに関するよくある質問
185](https://image.slidesharecdn.com/react-ja-221110111411-b356a3b5/85/react-ja-pdf-185-320.jpg)
![フックの導入
フック (hook) は React 16.8 で追加された新機能です。state などの React の機能を、クラスを書かずに使えるように
なります。
この useState という関数が、これから説明する最初のフック (Hook) です。これは単なるチラ見せですので、まだ意味
が分からなくても問題ありません!
次のページからフックについて学び始めることができます。このページの残りの部分では、我々がなぜ React にフックの
仕組みを加えることにしたのか、そして素晴らしいアプリケーションを作るためにどのように便利なのかについて説明し
ていきます。
補足
React 16.8.0 がフックをサポートする最初のバージョンです。アップグレードの際は、React DOM を含むすべて
のパッケージの更新を忘れないようにしてください。React Native は React Native 0.59 リリース以降でフック
をサポートします。
import React, { useState } from 'react';
function Example() {
// Declare a new state variable, which we'll call "count"
const [count, setCount] = useState(0);
return (
<div>
<p>You clicked {count} times</p>
<button onClick={() => setCount(count + 1)}>
Click me
</button>
</div>
);
}
react
186](https://image.slidesharecdn.com/react-ja-221110111411-b356a3b5/85/react-ja-pdf-186-320.jpg)


![フック早わかり
フック (hook) は React 16.8 で追加された新機能です。state などの React の機能を、クラスを書かずに使えるように
なります。
フックには後方互換性があります。このページでは React 経験者向けにフックの概要を述べていきます。このページはか
なり端折った概要となっています。困ったときには以下のような黄色のボックスを参照してください。
詳しくは
React にフックを導入する動機については動機を参照してください。
↑↑↑ それぞれの節の終わりに上のような黄色いボックスがあります。より詳しい説明へのリンクとなっています。
📌 ステートフック
この例ではカウンターを表示します。ボタンをクリックすると、カウンターの値が増えます:
この例の useState が フック(この単語の意味するところはすぐ後で説明します)です。関数コンポーネントの中でロー
カルな state を使うために呼び出しています。この state は以降の再レンダーの間も React によって保持されます。
useState は現在の state の値と、それを更新するための関数とをペアにして返します。この関数はイベントハンドラや
その他の場所から呼び出すことができます。クラスコンポーネントにおける this.setState と似ていますが、新しい
state が古いものとマージされないという違いがあります(useState と this.state の違いについてはステートフック
の利用法で例を挙げて説明します)
。
useState の唯一の引数は state の初期値です。上記の例では、カウンターがゼロからスタートするので 0 を渡してい
ます。this.state と違い、state はオブジェクトである必要はないことに注意してください(オブジェクトにしたい場
合はそうすることも可能です)
。引数として渡された state の初期値は最初のレンダー時にのみ使用されます。
複数の state 変数の宣言
1 つのコンポーネント内で 2 回以上ステートフックを使うことができます:
import React, { useState } from 'react';
function Example() {
// Declare a new state variable, which we'll call "count"
const [count, setCount] = useState(0);
return (
<div>
<p>You clicked {count} times</p>
<button onClick={() => setCount(count + 1)}>
Click me
</button>
</div>
);
}
フック早わかり
191](https://image.slidesharecdn.com/react-ja-221110111411-b356a3b5/85/react-ja-pdf-191-320.jpg)
![配列の分割代入構文を使うことで、useState を呼び出して宣言した state 変数に、異なる名前をつけることができます。
これらの名前自体は useState の API の一部ではありません。その代わりに、React は useState を何度も呼び出す場
合は、それらが全てのレンダー間で同じ順番で呼び出されるものと仮定します。この後で、どうしてこれが上手く動作し、
どのような場合に便利なのか改めて説明します。
要するにフックとは?
フックとは、関数コンポーネントに state やライフサイクルといった React の機能を "接続する (hook into)" ための関
数です。フックは React をクラスなしに使うための機能ですので、クラス内では機能しません。今すぐに既存のコンポー
ネントを書き換えることはお勧めしませんが、新しく書くコンポーネントで使いたければフックを利用し始めることがで
きます。
React は useState のような幾つかのビルトインのフックを提供します。異なるコンポーネント間でステートフルな振る
舞いを共有するために自分自身のフックを作成することもできます。まずは組み込みのフックから見ていきましょう。
詳しくは
ステートフックについてはこちらのページを参照してください:ステートフックの利用法.
⚡️ 副作用フック
これまでに React コンポーネントの内部から、外部データの取得や購読 (subscription)、あるいは手動での DOM 更新
を行ったことがおありでしょう。これらの操作は他のコンポーネントに影響することがあり、またレンダーの最中に実行
することができないので、われわれはこのような操作を "副作用 (side-effects)"、あるいは省略して "作用 (effects)" と
呼んでいます。
useEffect は副作用のためのフックであり、関数コンポーネント内で副作用を実行することを可能にします。クラスコン
ポーネントにおける componentDidMount , componentDidUpdate および componentWillUnmount と同様の目的で使うもの
ですが、1 つの API に統合されています(これらのメソッドと useEffect との違いについては副作用フックの利用法で
例を挙げて説明します)
。
例えば、このコンポーネントは React が DOM を更新した後で、HTML ドキュメントのタイトルを設定します。
function ExampleWithManyStates() {
// Declare multiple state variables!
const [age, setAge] = useState(42);
const [fruit, setFruit] = useState('banana');
const [todos, setTodos] = useState([{ text: 'Learn Hooks' }]);
// ...
}
import React, { useState, useEffect } from 'react';
function Example() {
const [count, setCount] = useState(0);
// Similar to componentDidMount and componentDidUpdate:
useEffect(() => {
// Update the document title using the browser API
document.title = `You clicked ${count} times`;
react
192](https://image.slidesharecdn.com/react-ja-221110111411-b356a3b5/85/react-ja-pdf-192-320.jpg)
![useEffect を呼ぶことで、DOM への更新を反映した後にあなたが定義する「副作用関数」を実行するように React に指
示します。副作用はコンポーネント内で宣言されるので、props や state にアクセスすることが可能です。デフォルトで
は初回のレンダーも含む毎回のレンダー時にこの副作用関数が呼び出されます(クラスにおけるライフサイクルメソッド
との比較は副作用フックの利用法で詳しく述べます)
。
副作用は自分を「クリーンアップ」するためのコードを、オプションとして関数を返すことで指定できます。例えば、以
下のコンポーネントでは副作用を利用して、フレンドのオンラインステータスを購読し、またクリーンアップとして購読
の解除を行っています。
この例では、コンポーネントがアンマウントされる時や再レンダーによって副作用が再実行される時に ChatAPI の購読解
除を行っています(必要なら、ChatAPI に渡すための props.friend.id が変わっていない場合には毎回購読しなおす処
理をスキップする方法があります)
。
useState の場合と同様、1 つのコンポーネント内で 2 つ以上の副作用を使用することが可能です。
});
return (
<div>
<p>You clicked {count} times</p>
<button onClick={() => setCount(count + 1)}>
Click me
</button>
</div>
);
}
import React, { useState, useEffect } from 'react';
function FriendStatus(props) {
const [isOnline, setIsOnline] = useState(null);
function handleStatusChange(status) {
setIsOnline(status.isOnline);
}
useEffect(() => {
ChatAPI.subscribeToFriendStatus(props.friend.id, handleStatusChange);
return () => {
ChatAPI.unsubscribeFromFriendStatus(props.friend.id, handleStatusChange);
};
});
if (isOnline === null) {
return 'Loading...';
}
return isOnline ? 'Online' : 'Offline';
}
function FriendStatusWithCounter(props) {
const [count, setCount] = useState(0);
useEffect(() => {
document.title = `You clicked ${count} times`;
});
const [isOnline, setIsOnline] = useState(null);
フック早わかり
193](https://image.slidesharecdn.com/react-ja-221110111411-b356a3b5/85/react-ja-pdf-193-320.jpg)

![まず、このロジックを useFriendStatus というカスタムフックへと抽出します。
これは friendID を引数として受け取り、フレンドがオンラインかどうかを返します。
これで両方のコンポーネントからこのロジックが使えます:
それぞれのコンポーネントの state は完全に独立しています。フックは state を用いたロジックを再利用するものであっ
て、state そのものを再利用するものではありません。実のところ、フックのそれぞれの呼び出しが独立した state を持
っていますので、全く同じカスタムフックを 1 つのコンポーネント内で 2 回呼び出すことも可能です。
カスタムフックは、機能というよりはむしろ慣習のようなものです。関数の名前が " use " から始まって、その関数が他の
フックを呼び出しているなら、それをカスタムフックと言うことにする、ということです。この useSomething という命
名規約によって、我々の linter プラグインはフックを利用しているコードのバグを見つけることができます。
カスタムフックは、フォーム管理や、アニメーションや、宣言的なデータソースの購読や、タイマーや、あるいはおそら
く我々が考えたこともない様々なユースケースに利用可能です。React のコミュニティがどのようなカスタムフックを思
いつくのか楽しみにしています。
import React, { useState, useEffect } from 'react';
function useFriendStatus(friendID) {
const [isOnline, setIsOnline] = useState(null);
function handleStatusChange(status) {
setIsOnline(status.isOnline);
}
useEffect(() => {
ChatAPI.subscribeToFriendStatus(friendID, handleStatusChange);
return () => {
ChatAPI.unsubscribeFromFriendStatus(friendID, handleStatusChange);
};
});
return isOnline;
}
function FriendStatus(props) {
const isOnline = useFriendStatus(props.friend.id);
if (isOnline === null) {
return 'Loading...';
}
return isOnline ? 'Online' : 'Offline';
}
function FriendListItem(props) {
const isOnline = useFriendStatus(props.friend.id);
return (
<li style={{ color: isOnline ? 'green' : 'black' }}>
{props.friend.name}
</li>
);
}
フック早わかり
195](https://image.slidesharecdn.com/react-ja-221110111411-b356a3b5/85/react-ja-pdf-195-320.jpg)
![詳しくは
カスタムフックについての詳しい情報は独自フックの作成を参照してください。
🔌 その他のフック
その他にもいくつか、使用頻度は低いものの便利なフックが存在しています。例えば、useContext を使えば React のコ
ンテクストをコンポーネントのネストなしに利用できるようになります:
また useReducer を使えば複雑なコンポーネントのローカル state をリデューサ (reducer) を用いて管理できるように
なります:
詳しくは
全てのビルトインフックについての詳細はフック API リファレンスを参照してください。
次のステップ
かなり駆け足の説明でしたね! まだよく分からないことがあった場合や、より詳しく学びたいと思った場合は、ステート
フックから始まるこの先のページに進んでください。
フック API リファレンスとよくある質問も参照してください。
最後になりましたが、フックの紹介ページもお忘れなく! そこではなぜ我々がフックを導入することにしたのか、またア
プリ全体を書き換えずにクラスと併用してどのようにフックを使っていくのか、について説明しています。
function Example() {
const locale = useContext(LocaleContext);
const theme = useContext(ThemeContext);
// ...
}
function Todos() {
const [todos, dispatch] = useReducer(todosReducer);
// ...
react
196](https://image.slidesharecdn.com/react-ja-221110111411-b356a3b5/85/react-ja-pdf-196-320.jpg)
![フックAPI リファレンス
フック (hook) は React 16.8 で追加された新機能です。state などの React の機能を、クラスを書かずに使えるように
なります。
このページでは React 組み込みのフックについて説明します。
フックが初めての方は、先に概要ページを確認してください。よくある質問にも有用な情報が掲載されています。
基本のフック
useState
useEffect
useContext
追加のフック
useReducer
useCallback
useMemo
useRef
useImperativeHandle
useLayoutEffect
useDebugValue
useDeferredValue
useTransition
useId
ライブラリ製作者用フック
useSyncExternalStore
useInsertionEffect
基本のフック
useState {#usestate}
ステートフルな値と、それを更新するための関数を返します。
初回のレンダー時に返される state は第 1 引数として渡された値 ( initialState ) と等しくなります。
setState 関数は state を更新するために使用します。新しい state の値を受け取り、コンポーネントの再レンダーをス
ケジューリングします。
後続の再レンダー時には、useState から返される 1 番目の値は常に、更新を適用した後の最新版の state になります。
const [state, setState] = useState(initialState);
setState(newState);
フック API リファレンス
197](https://image.slidesharecdn.com/react-ja-221110111411-b356a3b5/85/react-ja-pdf-197-320.jpg)
![補足
React は再レンダー間で setState 関数の同一性が保たれ、変化しないことを保証します。従って useEffect や
useCallback の依存リストにはこの関数を含めないでも構いません。
関数型の更新
新しい state が前の state に基づいて計算される場合は、setState に関数を渡すことができます。この関数は前回の
state の値を受け取り、更新された値を返します。以下は、setState の両方の形式を用いたカウンタコンポーネントの
例です。
"+" と "-" のボタンは、更新後の値が更新前の値に基づいて計算されるため、関数形式を使っています。"Reset" ボタン
は常にカウントを初期値に戻すので、通常の形式を使っています。
この更新用関数が現在の state と全く同じ値を返す場合は、後続する再レンダーは完全にスキップされます。
補足
クラスコンポーネントの setState メソッドとは異なり、useState は自動的な更新オブジェクトのマージを行い
ません。この動作は関数型の更新形式をスプレッド構文と併用することで再現可能です:
別の選択肢としては useReducer があり、これは複数階層の値を含んだ state オブジェクトを管理する場合にはよ
り適しています。
state の遅延初期化
initialState 引数は初回レンダー時に使われる state 値です。後続のレンダー時にはその値は無視されます。もし初期
state が高価な計算をして求める値である場合は、代わりに関数を渡すことができます。この関数は初回のレンダー時に
のみ実行されます。
function Counter({initialCount}) {
const [count, setCount] = useState(initialCount);
return (
<>
Count: {count}
<button onClick={() => setCount(initialCount)}>Reset</button>
<button onClick={() => setCount(prevCount => prevCount - 1)}>-</button>
<button onClick={() => setCount(prevCount => prevCount + 1)}>+</button>
</>
);
}
const [state, setState] = useState({});
setState(prevState => {
// Object.assign would also work
return {...prevState, ...updatedValues};
});
react
198](https://image.slidesharecdn.com/react-ja-221110111411-b356a3b5/85/react-ja-pdf-198-320.jpg)
![state 更新の回避
現在値と同じ値で更新を行った場合、React は子のレンダーや副作用の実行を回避して処理を終了します(React は
Object.is による比較アルゴリズムを使用します)
。
更新の回避が起きる前に React により該当のコンポーネント自体はレンダーされるかもしれない、ということに注意して
ください。ツリーのそれ以上「深く」にまで処理は及ばないためこれは問題ではないはずです。もしレンダー中にコスト
の高い計算を行っている場合は useMemo を使った最適化が可能です。
state 更新のバッチ処理
React はパフォーマンス改善のため、複数の state 更新を 1 回の再レンダーにまとめることがあります。通常、これによ
りパフォーマンスが改善しますが、あなたのアプリケーションの挙動には影響がないはずです。
React 18 より前では、React のイベントハンドラ内部で起きた更新のみがまとめて処理されていました。React 18 から
は、バッチ処理はすべての更新でデフォルトで有効になります。ただし React はユーザが引き起こした複数の異なるイベ
ント(例えばボタンの 2 回のクリック)に伴う更新をまとめることはありません。これにより論理的な誤りを防ぐことが
できます。
DOM への更新が同期的に適用されるよう強制しないといけないという稀な状況においては、flushSync で更新をラップ
することができます。ただしこれはパフォーマンスに悪影響を及ぼしますので必要な場合にのみ利用するようにしてくだ
さい。
useEffect {#useeffect}
副作用を有する可能性のある命令型のコードを受け付けます。
DOM の書き換え、データの購読、タイマー、ロギング、あるいはその他の副作用を、関数コンポーネントの本体(React
のレンダーフェーズ)で書くことはできません。それを行うと UI にまつわるややこしいバグや非整合性を引き起こしま
す。
代わりに useEffect を使ってください。useEffect に渡された関数はレンダーの結果が画面に反映された後に動作しま
す。副作用とは React の純粋に関数的な世界から命令型の世界への避難ハッチであると考えてください。
デフォルトでは副作用関数はレンダーが終了した後に毎回動作しますが、特定の値が変化した時のみ動作させるようにす
ることもできます。
エフェクトのクリーンアップ
副作用はしばしば、コンポーネントが画面から消える場合にクリーンアップする必要があるようなリソース(例えば購読
やタイマー ID など)を作成します。これを実現するために、useEffect に渡す関数はクリーンアップ用関数を返すこと
ができます。例えば、データ購読を作成する場合は以下のようになります。
const [state, setState] = useState(() => {
const initialState = someExpensiveComputation(props);
return initialState;
});
useEffect(didUpdate);
フック API リファレンス
199](https://image.slidesharecdn.com/react-ja-221110111411-b356a3b5/85/react-ja-pdf-199-320.jpg)

![これを実装するためには、useEffect の第 2 引数として、この副作用が依存している値の配列を渡します。変更後の例は
以下のようになります。
これで、データの購読は props.source が変更された場合にのみ再作成されるようになります。
補足
この最適化を利用する場合、時間の経過とともに変化し副作用によって利用される、コンポーネントスコープの値
(props や state など)がすべて配列に含まれていることを確認してください。さもないとあなたのコードは以前
のレンダー時の古い値を参照してしまうことになります。関数の扱い方とこの配列の値が頻繁に変わる場合の対処
法も参照してください。
もしも副作用とそのクリーンアップを 1 度だけ(マウント時とアンマウント時にのみ)実行したいという場合、空
の配列 ( [] ) を第 2 引数として渡すことができます。こうすることで、あなたの副作用は props や state の値の
いずれにも依存していないため再実行する必要が一切ない、ということを React に伝えることができます。これは
特別なケースとして処理されているわけではなく、入力配列を普通に処理すればそうなるというだけの話です。
空の配列 ( [] ) を渡した場合、副作用内では props と state の値は常にその初期値のままになります。[] を渡
すことはおなじみの componentDidMount と componentWillUnmount による概念と似ているように感じるでしょう
が、通常はこちらやこちらのように、副作用を過度に再実行しないためのよりよい解決方法があります。また useE
ffect はブラウザが描画し終えた後まで遅延されますので、追加の作業をしてもそれほど問題にならないというこ
ともお忘れなく。
eslint-plugin-react-hooks パッケージの exhaustive-deps ルールを有効にすることをお勧めします。これは依
存の配列が正しく記述されていない場合に警告し、修正を提案します。
依存の配列は副作用関数に引数として渡されるわけではありません。しかし概念としては、この記法は副作用関数の引数
が何なのかを表現しています。副作用関数の内部で参照されているすべての値は入力の配列内にも現れるべきです。将来
的には、コンパイラが発達すればこの配列を自動で作成することも可能であるはずです。
useContext {#usecontext}
コンテクストオブジェクト(React.createContext からの戻り値)を受け取り、そのコンテクストの現在値を返します。
コンテクストの現在値は、ツリー内でこのフックを呼んだコンポーネントの直近にある <MyContext.Provider> の value
の値によって決定されます。
useEffect(
() => {
const subscription = props.source.subscribe();
return () => {
subscription.unsubscribe();
};
},
[props.source],
);
const value = useContext(MyContext);
フック API リファレンス
201](https://image.slidesharecdn.com/react-ja-221110111411-b356a3b5/85/react-ja-pdf-201-320.jpg)
![この例はコンテクストのガイドをフック用に変更したものです。コンテクストをいつどのように使うべきかについては同
記事を参照してください。
追加のフック
以下のフックは前節で説明した基本のフックの変種であったり、特定の稀なケースでのみ必要となったりするものです。
最初から無理に学ぼうとしなくて構いません。
useReducer {#usereducer}
useState の代替品です。(state, action) => newState という型のリデューサ (reducer) を受け取り、現在の state
を dispatch メソッドとペアにして返します(もし Redux に馴染みがあれば、これがどう動作するのかはご存じでしょ
う)
。
通常、useReducer が useState より好ましいのは、複数の値にまたがる複雑な state ロジックがある場合や、前の
state に基づいて次の state を決める必要がある場合です。また、 useReducer を使えばコールバックの代わりに
dispatch を下位コンポーネントに渡せるようになるため、複数階層にまたがって更新を発生させるようなコンポーネン
トではパフォーマンスの最適化にもなります。
以下は useState の部分で挙げたカウンタの例を、リデューサを使うよう書き換えたものです。
return (
<button style={{ background: theme.background, color: theme.foreground }}>
I am styled by theme context!
</button>
);
}
const [state, dispatch] = useReducer(reducer, initialArg, init);
const initialState = {count: 0};
function reducer(state, action) {
switch (action.type) {
case 'increment':
return {count: state.count + 1};
case 'decrement':
return {count: state.count - 1};
default:
throw new Error();
}
}
function Counter() {
const [state, dispatch] = useReducer(reducer, initialState);
return (
<>
Count: {state.count}
<button onClick={() => dispatch({type: 'decrement'})}>-</button>
<button onClick={() => dispatch({type: 'increment'})}>+</button>
</>
);
}
フック API リファレンス
203](https://image.slidesharecdn.com/react-ja-221110111411-b356a3b5/85/react-ja-pdf-203-320.jpg)
![補足
React は再レンダー間で dispatch 関数の同一性が保たれ、変化しないことを保証します。従って useEffect や
useCallback の依存リストにはこの関数を含めないでも構いません。
初期 state の指定
useReducer の初期化の方法には 2 種類あります。ユースケースによりどちらかを選択してください。最も単純な方法は
第 2 引数として初期 state を渡すものです。
補足
React では、リデューサの引数で state = initialState のようにして初期値を示すという、Redux で普及した
慣習を使用しません。初期値は props に依存している可能性があるため、フックの呼び出し部分で指定します。強
いこだわりがある場合は useReducer(reducer, undefined, reducer) という呼び出し方で Redux の振る舞いを再
現できますが、お勧めはしません。
遅延初期化
初期 state の作成を遅延させることもできます。そのためには init 関数を第 3 引数として渡してください。初期 state
が init(initialArg) に設定されます。
これにより初期 state の計算をリデューサの外部に抽出することができます。これはアクションに応じて state をリセッ
トしたい場合にも便利です。
const [state, dispatch] = useReducer(
reducer,
{count: initialCount}
);
function init(initialCount) {
return {count: initialCount};
}
function reducer(state, action) {
switch (action.type) {
case 'increment':
return {count: state.count + 1};
case 'decrement':
return {count: state.count - 1};
case 'reset':
return init(action.payload);
default:
throw new Error();
}
}
function Counter({initialCount}) {
const [state, dispatch] = useReducer(reducer, initialCount, init);
return (
<>
react
204](https://image.slidesharecdn.com/react-ja-221110111411-b356a3b5/85/react-ja-pdf-204-320.jpg)
![dispatch による更新の回避
このフックから state の現在値として同じ値を返した場合、React は子のレンダーや副作用の実行を回避して処理を終了
します(React は Object.is による比較アルゴリズム を使用します)
。
更新の回避が起きる前に React により該当のコンポーネント自体はレンダーされるかもしれない、ということに注意して
ください。ツリーのそれ以上「深く」にまで処理は及ばないためこれは問題ではないはずです。もしレンダー中にコスト
の高い計算を行っている場合は useMemo を使った最適化が可能です。
useCallback {#usecallback}
メモ化されたコールバックを返します。
インラインのコールバックとそれが依存している値の配列を渡してください。useCallback はそのコールバックをメモ化
したものを返し、その関数は依存配列の要素のいずれかが変化した場合にのみ変化します。これは、不必要なレンダーを
避けるために(例えば shouldComponentUpdate などを使って)参照の同一性を見るよう最適化されたコンポーネントにコ
ールバックを渡す場合に便利です。
useCallback(fn, deps) は useMemo(() => fn, deps) と等価です。
補足
依存する値の配列はコールバックに引数として渡されるわけではありません。しかし概念としては、この記法はコ
ールバックの引数が何なのかを表現しています。コールバックの内部で参照されているすべての値は依存の配列内
にも現れるべきです。将来的には、コンパイラが発達すればこの配列を自動で作成することも可能であるはずです。
eslint-plugin-react-hooks パッケージの exhaustive-deps ルールを有効にすることをお勧めします。これは依
存の配列が正しく記述されていない場合に警告し、修正を提案します。
useMemo {#usememo}
Count: {state.count}
<button
onClick={() => dispatch({type: 'reset', payload: initialCount})}>
Reset
</button>
<button onClick={() => dispatch({type: 'decrement'})}>-</button>
<button onClick={() => dispatch({type: 'increment'})}>+</button>
</>
);
}
const memoizedCallback = useCallback(
() => {
doSomething(a, b);
},
[a, b],
);
const memoizedValue = useMemo(() => computeExpensiveValue(a, b), [a, b]);
フック API リファレンス
205](https://image.slidesharecdn.com/react-ja-221110111411-b356a3b5/85/react-ja-pdf-205-320.jpg)
![まずは ref のことを DOM にアクセスする手段として理解しているかもしれません。<div ref={myRef} /> のようにして
React に ref オブジェクトを渡した場合、React は DOM ノードに変更があるたびに .current プロパティをその DOM
ノードに設定します。
しかしながら useRef() は ref 属性で使うだけではなく、より便利に使えます。これはクラスでインスタンス変数を使
うのと同様にして、あらゆる書き換え可能な値を保持しておくのに便利です。
これは useRef() がプレーンな JavaScript オブジェクトを作成するからです。 useRef() を使うことと自分で
{current: ...} というオブジェクトを作成することとの唯一の違いとは、useRef は毎回のレンダーで同じ ref オブジ
ェクトを返す、ということです。
useRef は中身が変更になってもそのことを通知しないということを覚えておいてください。.current プロパティを書
き換えても再レンダーは発生しません。DOM ノードを ref に割り当てたり割り当てを解除したりする際に何らかのコー
ドを走らせたいという場合は、コールバック ref を代わりに使用してください。
useImperativeHandle {#useimperativehandle}
useImperativeHandle は ref が使われた時に親コンポーネントに渡されるインスタンス値をカスタマイズするのに使い
ます。いつもの話ですが、ref を使った手続き的なコードはほとんどの場合に避けるべきです。useImperativeHandle は
forwardRef と組み合わせて使います:
この例では、<FancyInput ref={inputRef} /> をレンダーする親コンポーネントは inputRef.current.focus() を呼べる
ようになります。
useLayoutEffect {#uselayouteffect}
この関数のシグネチャは useEffect と同一ですが、DOM の変更があった後で同期的に副作用が呼び出されます。これは
DOM からレイアウトを読み出して同期的に再描画を行う場合に使ってください。useLayoutEffect の内部でスケジュー
ルされた更新はブラウザによって描画される前のタイミングで同期的に処理されます。
可能な場合は画面の更新がブロックするのを避けるため、標準の useEffect を優先して使ってください。
ヒント
クラスコンポーネントからコードを移行している場合、useLayoutEffect は componentDidMount や componentDi
dUpdate と同じフェーズで実行されるということに注意してください。しかしまず useEffect で始めてみて、そ
れで問題が発生する場合にのみ useLayoutEffect を試すことをお勧めします。
useImperativeHandle(ref, createHandle, [deps])
function FancyInput(props, ref) {
const inputRef = useRef();
useImperativeHandle(ref, () => ({
focus: () => {
inputRef.current.focus();
}
}));
return <input ref={inputRef} ... />;
}
FancyInput = forwardRef(FancyInput);
フック API リファレンス
207](https://image.slidesharecdn.com/react-ja-221110111411-b356a3b5/85/react-ja-pdf-207-320.jpg)
![サーバレンダリングを使用している場合は、useLayoutEffect と useEffect のどちらも JavaScript がダウンロ
ードされるまでは実行できないということを覚えておいてください。サーバでレンダーされるコンポーネントに us
eLayoutEffect が含まれている場合に React が警告を発生するのは、これが理由です。これを修正するには、その
ロジックを useEffect に移動する(初回レンダーで必要がないロジックである場合)か、クライアントでレンダー
されるまでコンポーネントの表示を遅らせる(useLayoutEffect が実行されるまで該当 HTML が正しく表示でき
ない場合)ようにしてください。
サーバでレンダーされる HTML からレイアウト副作用を必要とするコンポーネントを除外したい場合は、それを s
howChild && <Child /> のようにして条件付きでレンダーするようにして、表示を useEffect(() => { setShowChi
ld(true); }, []) のようにして遅延させてください。これにより、JavaScript コードが注入される前に壊れた見
た目の UI が表示されないようになります。
useDebugValue {#usedebugvalue}
useDebugValue を使って React DevTools でカスタムフックのラベルを表示することができます。
例えば "独自フックの作成" で説明した useFriendStatus を例にします:
ヒント
すべてのカスタムフックにデバッグ用の値を加えるのはお勧めしません。これが最も有用なのは共有ライブラリ内
のカスタムフックです。
デバッグ用の値のフォーマットを遅延させる
値を表示用にフォーマットすることが高価な処理である場合があります。また、フックが実際に DevTools でインスペク
トされない場合はフォーマット自体が不要な処理です。
このため useDebugValue はオプションの第 2 引数としてフォーマット用関数を受け付けます。この関数はフックがイン
スペクトされている場合にのみ呼び出されます。この関数はデバッグ値を引数として受け取り、フォーマット済みの表示
用の値を返します。
例えば Date 型の値を返すカスタムフックでは、以下のようなフォーマッタ関数を渡すことで、不必要に toDateString
を呼び出すのを避けることができます。
useDebugValue(value)
function useFriendStatus(friendID) {
const [isOnline, setIsOnline] = useState(null);
// ...
// Show a label in DevTools next to this Hook
// e.g. "FriendStatus: Online"
useDebugValue(isOnline ? 'Online' : 'Offline');
return isOnline;
}
react
208](https://image.slidesharecdn.com/react-ja-221110111411-b356a3b5/85/react-ja-pdf-208-320.jpg)
![useDeferredValue {#usedeferredvalue}
useDeferredValue は値を受け取りその値のコピーを返しますが、返り値はより緊急性の高い更新がある場合に遅延され
うるようになっています。現在のレンダーがユーザ入力のような緊急性の高い更新である場合には、React は前回と同じ
値を返し、新しい値でのレンダーは緊急性の高いレンダーが完了した後に行うようにします。
このフックはデバウンス (debounce) やスロットル (throttle) を使って更新を遅延するためにユーザ側で作成されてきた
フックと似ています。useDeferredValue を使う利点は、
(常に何らかの固定の時間待つのではなく)他の作業が終わった
時点ですぐに React が更新を処理できるという点と、startTransition と同様に値を遅延させることで既存のコンテン
ツがふいにフォールバックに隠されてしまわないよう待機できるという点です。
遅延可能な子コンポーネントのメモ化
useDeferredValue が遅延させるのは渡された値のみです。緊急性の高い更新の最終に子コンポーネントが再レンダーさ
れるのを防ぎたい場合、そのコンポーネントで React.memo か React.useMemo を使ってメモ化を行う必要があります:
子をメモ化することで、query が変わった場合ではなく deferredQuery が変わった場合にのみ再レンダーすると React
に伝えることができます。この注意事項は useDeferredValue に特有のものではなく、デバウンスやスロットルを使う似
たようなフックで使われるものと同じパターンです。
useTransition {#usetransition}
トランジションの実行中状態を表す状態値と、トランジションを開始するための関数を返します。
startTransition に渡されたコールバック内の更新はトランジションとしてマークされます:
useDebugValue(date, date => date.toDateString());
const deferredValue = useDeferredValue(value);
function Typeahead() {
const query = useSearchQuery('');
const deferredQuery = useDeferredValue(query);
// Memoizing tells React to only re-render when deferredQuery changes,
// not when query changes.
const suggestions = useMemo(() =>
<SearchSuggestions query={deferredQuery} />,
[deferredQuery]
);
return (
<>
<SearchInput query={query} />
<Suspense fallback="Loading results...">
{suggestions}
</Suspense>
</>
);
}
const [isPending, startTransition] = useTransition();
フック API リファレンス
209](https://image.slidesharecdn.com/react-ja-221110111411-b356a3b5/85/react-ja-pdf-209-320.jpg)
![isPending はトランジションがアクティブかどうかを表しており、ユーザに保留中状態を表示するのに使えます:
補足:
トランジション内での更新はクリックのような緊急性の高い更新がある場合は遅延されることがあります。
トランジション内での更新によってコンテンツが再サスペンドした場合でもフォールバックは表示されません。こ
れにより更新後のデータをレンダーしている最中に、ユーザが現在のコンテンツを操作しつづけられるようになり
ます。
useId {#useid}
useId はハイドレーション時の不整合を防ぎつつサーバとクライアント間で安定な一意 ID を作成するためのフックで
す。
補足
useId はリスト内の key を作成するのに使うためのものではありません。key はあなたのデータから作成される
べきです。
基本的な例として、id をそれを必要としている要素に直接渡せます:
startTransition(() => {
setCount(count + 1);
})
function App() {
const [isPending, startTransition] = useTransition();
const [count, setCount] = useState(0);
function handleClick() {
startTransition(() => {
setCount(c => c + 1);
})
}
return (
<div>
{isPending && <Spinner />}
<button onClick={handleClick}>{count}</button>
</div>
);
}
const id = useId();
function Checkbox() {
const id = useId();
return (
<>
<label htmlFor={id}>Do you like React?</label>
<input id={id} type="checkbox" name="react"/>
react
210](https://image.slidesharecdn.com/react-ja-221110111411-b356a3b5/85/react-ja-pdf-210-320.jpg)
![同じコンポーネントで複数の ID を使う場合は、同じ id に接尾辞を付けてください:
補足:
useId は : というトークンを含む文字列を生成します。これによりトークンが一意であることが保証しやすくな
りますが、CSS セレクタや querySelectorAll のような API では使用できません。
useId は複数のルートがあるアプリで衝突が起きないよう、identifierPrefix をサポートしています。設定する
場合は hydrateRoot と ReactDOMServer のドキュメントを参照してください。
ライブラリ用フック
以下のフックは React モデルと深く結合するライブラリの製作者向けであり、アプリケーションコードでは通常使われま
せん。
useSyncExternalStore {#usesyncexternalstore}
useSyncExternalStore は、選択的ハイドレーションやタイムスライスなどの並行レンダリング機能と互換性を持ちつつ
外部データソースから読み出しやデータの購読を行うために推奨されるフックです。
このメソッドは 3 つの引数を受け取り、ストアの値を返します:
subscribe : ストアに変更があった場合に呼び出されるコールバックを登録するための関数。
getSnapshot : 現在のストアの値を返す関数。
getServerSnapshot : サーバレンダリング時にスナップショットを返すための関数。
最も基本的な例では、ストア全体を単純に購読します:
</>
);
};
function NameFields() {
const id = useId();
return (
<div>
<label htmlFor={id + '-firstName'}>First Name</label>
<div>
<input id={id + '-firstName'} type="text" />
</div>
<label htmlFor={id + '-lastName'}>Last Name</label>
<div>
<input id={id + '-lastName'} type="text" />
</div>
</div>
);
}
const state = useSyncExternalStore(subscribe, getSnapshot[, getServerSnapshot]);
const state = useSyncExternalStore(store.subscribe, store.getSnapshot);
フック API リファレンス
211](https://image.slidesharecdn.com/react-ja-221110111411-b356a3b5/85/react-ja-pdf-211-320.jpg)
![フックのルール
フック (hook) は React 16.8 で追加された新機能です。state などの React の機能を、クラスを書かずに使えるように
なります。
フックは JavaScript の関数ですが、それらを使う際には以下の 2 つのルールに従う必要があります。我々は自動的にこ
のルールを強制するための linter プラグイン を提供しています。
フックを呼び出すのはトップレベルのみ
フックをループや条件分岐、あるいはネストされた関数内で呼び出してはいけません。代わりに、あなたの React の関数
のトップレベルでのみ、あらゆる早期 return 文よりも前の場所で呼び出してください。これを守ることで、コンポーネ
ントがレンダーされる際に毎回同じ順番で呼び出されるということが保証されます。これが、複数回 useState や
useEffect が呼び出された場合でも React がフックの状態を正しく保持するための仕組みです(興味がある場合はペー
ジ下部で詳しく説明しています)
。
フックを呼び出すのは React の関数内のみ
フックを通常の JavaScript 関数から呼び出さないでください。代わりに以下のようにします。
✅ React の関数コンポーネント内から呼び出す。
✅ カスタムフック内(次のページで説明します)から呼び出す。
このルールを守ることで、コンポーネント内のすべての state を使うロジックがソースコードから間違いなく参照可能に
なります。
ESLint プラグイン
これらの 2 つのルールを強制できる eslint-plugin-react-hooks という ESLint のプラグインをリリースしました。試
したい場合はあなたのプロジェクトに以下のようにして加えることができます。
このプラグインは Create React App ではデフォルトで含まれています。
npm install eslint-plugin-react-hooks --save-dev
// Your ESLint configuration
{
"plugins": [
// ...
"react-hooks"
],
"rules": {
// ...
"react-hooks/rules-of-hooks": "error", // Checks rules of Hooks
"react-hooks/exhaustive-deps": "warn" // Checks effect dependencies
}
}
フックのルール
213](https://image.slidesharecdn.com/react-ja-221110111411-b356a3b5/85/react-ja-pdf-213-320.jpg)
![次のページまで飛ばして独自のフックを書く方法について学んでも構いません。このページの続きの部分ではこれらのル
ールの背後にある根拠について述べていきます。
解説
既に学んだ通り、ひとつのコンポーネント内で複数の state や副作用を使うことができます。
では React は、どの useState の呼び出しがどの state に対応するのか、どうやって知るのでしょうか? その答えは
「React はフックが呼ばれる順番に依存している」です。我々の例が動作するのは、フックの呼び出しの順序が毎回のレ
ンダーごとに同じだからです。
フックへの呼び出しの順番がレンダー間で変わらない限り、React はそれらのフックにローカル state を割り当てること
ができます。ですがフックの呼び出しを条件分岐内(例えば persistForm 副作用の内部で)で行ったらどうなるでしょう
か?
function Form() {
// 1. Use the name state variable
const [name, setName] = useState('Mary');
// 2. Use an effect for persisting the form
useEffect(function persistForm() {
localStorage.setItem('formData', name);
});
// 3. Use the surname state variable
const [surname, setSurname] = useState('Poppins');
// 4. Use an effect for updating the title
useEffect(function updateTitle() {
document.title = name + ' ' + surname;
});
// ...
}
// ---------
// First render
// ---------
useState('Mary') // 1. Initialize the name state variable with 'Mary'
useEffect(persistForm) // 2. Add an effect for persisting the form
useState('Poppins') // 3. Initialize the surname state variable with 'Poppins'
useEffect(updateTitle) // 4. Add an effect for updating the title
// ----------
// Second render
// ----------
useState('Mary') // 1. Read the name state variable (argument is ignored)
useEffect(persistForm) // 2. Replace the effect for persisting the form
useState('Poppins') // 3. Read the surname state variable (argument is ignored)
useEffect(updateTitle) // 4. Replace the effect for updating the title
// ...
// 🔴 We're breaking the first rule by using a Hook in a condition
if (name !== '') {
useEffect(function persistForm() {
react
214](https://image.slidesharecdn.com/react-ja-221110111411-b356a3b5/85/react-ja-pdf-214-320.jpg)
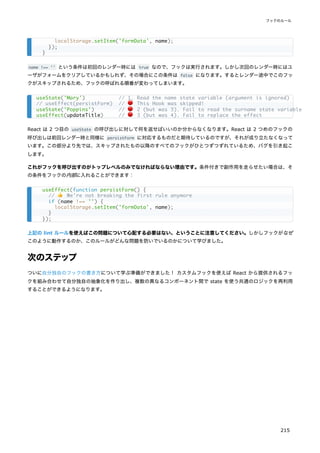
![ステートフックの利用法
フック (hook) は React 16.8 で追加された新機能です。state などの React の機能を、クラスを書かずに使えるように
なります。
フックの導入のページで以下の例を挙げてフックの紹介を行いました:
このコードをクラスによる等価版と比較しながらフックについて学び始めましょう。
クラスによる同等の例
以前 React でクラスを使っていたなら、このコードに馴染みがあるでしょう。
state は { count: 0 } から始まり、ユーザがボタンをクリックした時に this.setState() を呼ぶことで state.count
をインクリメントします。このページの全体にわたってこのクラスからの例が出てきます。
import React, { useState } from 'react';
function Example() {
// Declare a new state variable, which we'll call "count"
const [count, setCount] = useState(0);
return (
<div>
<p>You clicked {count} times</p>
<button onClick={() => setCount(count + 1)}>
Click me
</button>
</div>
);
}
class Example extends React.Component {
constructor(props) {
super(props);
this.state = {
count: 0
};
}
render() {
return (
<div>
<p>You clicked {this.state.count} times</p>
<button onClick={() => this.setState({ count: this.state.count + 1 })}>
Click me
</button>
</div>
);
}
}
react
216](https://image.slidesharecdn.com/react-ja-221110111411-b356a3b5/85/react-ja-pdf-216-320.jpg)

![コンポーネント内のどこでフックが使えてどこで使えないかに関する特別なルールがあります。これについてはフ
ックのルールで学びます。
state 変数の宣言
クラスでは、コンストラクタ内で this.state を { count: 0 } にセットするという方法で、state である count を 0
へと初期化します。
関数コンポーネントには this は存在しませんので、this.state を読み書きすることはできません。その代わりに、コ
ンポーネントの内部で直接 useState フックを使いましょう。
useState を呼ぶと何が起きるの? これにより『state 変数』が宣言されます。我々の例では変数を count と名付けま
したが、banana でも何でも好きな名前にすることができます。これが関数コールの間で値を『保持』しておくための方
法です ― useState は、クラスにおいて this.state が提供するのと全く同じ機能を実現するための新しい方法です。
通常、関数が終了すると変数は『消えて』しまいますが、state 変数は React によって保持されます。
引数として useState に何を渡すのか? useState() フックの唯一の引数は state の初期値です。クラスの場合とは異
なり、state はオブジェクトである必要はありません。数字や文字列が欲しいだけであればそれらを保持することができ
ます。我々の例ではユーザがクリックした回数に対応する数字が欲しいだけですので、0 を state 変数の初期値として渡
します(もし違う値を保持したい場合は useState() を 2 回呼ぶことになります)
。
useState は何を返すのか? 現在の state と、それを更新するための関数とを、ペアにして返します。これが const
[count, setCount] = useState() という書き方をした理由です。これはクラスにおける this.state.count と
this.setState に似ていますが、それをペアとして手に入れる点が異なります。もしもここで使った構文になじみがない
場合は、このページの下部で改めて説明します。
useState が何をやるのかが分かったので、最初の例の意味がより分かりやすくなりました:
class Example extends React.Component {
constructor(props) {
super(props);
this.state = {
count: 0
};
}
import React, { useState } from 'react';
function Example() {
// Declare a new state variable, which we'll call "count"
const [count, setCount] = useState(0);
import React, { useState } from 'react';
function Example() {
// Declare a new state variable, which we'll call "count"
const [count, setCount] = useState(0);
react
218](https://image.slidesharecdn.com/react-ja-221110111411-b356a3b5/85/react-ja-pdf-218-320.jpg)
![count という名前の state 変数を宣言しており、それを 0 にセットします。再レンダー間で React はその変数の現在
値を記憶しており、最新の値を関数に渡します。現在の count の値を更新したい場合は、setCount を呼ぶことができま
す。
補足
どうして createState ではなく useState という名前なのか気になるでしょうか?
state が「作成」されるのはコンポーネントの初回レンダー時だけですので、createState という名前はあまり正
確ではありません。次回以降のレンダー時には、useState からは既存の state の現在値を受け取ります。毎回作
成していたのではそもそも「状態」になりませんね。また、フックの名前が常に use から始まることには理由があ
ります。フックのルールで改めて説明します。
state の読み出し
クラス内で現在のカウント値を表示したい場合、this.state.count を読み出します:
関数内では、直接 count を使うことができます:
state の更新
クラスでは、this.setState() を呼ぶことで count ステートを更新します:
関数内では、すでに setCount と count を変数として受け取っていますので、this は必要ありません:
まとめ
ではこれまで学んだことを 1 行ずつまとめて、理解を確認しましょう。
<p>You clicked {this.state.count} times</p>
<p>You clicked {count} times</p>
<button onClick={() => this.setState({ count: this.state.count + 1 })}>
Click me
</button>
<button onClick={() => setCount(count + 1)}>
Click me
</button>
1: import React, { useState } from 'react';
2:
3: function Example() {
4: const [count, setCount] = useState(0);
5:
6: return (
7: <div>
8: <p>You clicked {count} times</p>
ステートフックの利用法
219](https://image.slidesharecdn.com/react-ja-221110111411-b356a3b5/85/react-ja-pdf-219-320.jpg)
![1 行目: useState フックを React からインポートします。これにより関数コンポーネント内でローカル state が使
えるようにになります。
4 行目: Example コンポーネント内で useState フックを呼び出すことで新しい state 変数を宣言します。2 つの
値のペアが返されるので、それらに名前を与えます。ボタンのクリック回数を保持するための変数ですので count と
名付けましょう。useState 唯一の引数として 0 を渡すことで、変数をゼロへと初期化します。返り値の 2 つ目はそ
れ自体が関数です。これにより count を更新するので、setCount という名前にします。
9 行目: ユーザがクリックした時に、新しい値で setCount を呼びます。React は Example コンポーネントを再レ
ンダーし、その際には新たな count の値を渡します。
最初は飲み込むのに時間がかかるかもしれません。急がないようにしましょう! 途中で分からなくなった場合は上記のコ
ードを最初から最後まで読み直してください。一旦クラスで state がどう動くのかを「忘れて」新鮮な目でこのコードを
見るようにすれば、必ず理解できるようになるはずです。
ヒント:この角カッコの意味は?
state 変数を宣言するときのこの角カッコに気付かれたでしょうか:
左辺に書かれている名前は、React の API の一部ではありません。state 変数には好きな名前を付けることができます:
この JavaScript の構文は "分割代入 (destructuring)" と呼ばれています。これが意味するところは、 fruit と
setFruit という名前の 2 つの変数を作って、 useState から返される値のうち 1 つ目を fruit に、2 つ目を
setFruit に代入する、ということです。これは以下のコードと等価です:
useState で state 変数を宣言する際、ペア、つまり 2 つの要素を含んだ配列が返されます。1 つ目の要素は state の現
在の値、2 つ目の要素はそれを更新するための関数です。これらには特定の意味があるので、アクセスするのに [0] や
[1] を使うのではちょっと分かりづらくなります。だから代わりに分割代入を使うというわけです。
補足
React に対して this のようなものを一切渡していないので、どのようにコンポーネントと useState の呼び出し
の対応を知るのか不思議に思うかもしれません。FAQ セクションで、この質問およびその他の疑問についてお答え
しています。
9: <button onClick={() => setCount(count + 1)}>
10: Click me
11: </button>
12: </div>
13: );
14: }
const [count, setCount] = useState(0);
const [fruit, setFruit] = useState('banana');
var fruitStateVariable = useState('banana'); // Returns a pair
var fruit = fruitStateVariable[0]; // First item in a pair
var setFruit = fruitStateVariable[1]; // Second item in a pair
react
220](https://image.slidesharecdn.com/react-ja-221110111411-b356a3b5/85/react-ja-pdf-220-320.jpg)
![ヒント:複数の state 変数を使う
state 変数の宣言を [something, setSomething] のペアの形で行うのが便利であるもうひとつの理由は、state 変数を複
数使いたくなった場合にそれらに異なる名前をつけることができるからです:
上記の例では、ローカル変数として age 、fruit 、todos があり、それぞれを個別に更新することができます。
たくさんの state 変数を使う必要はありません。state 変数はオブジェクトや配列も何ら問題なく保持できますので、関
連する値をいっしょにまとめておくこともできます。しかしクラスでの this.setState とは異なり、state 変数の更新
は、マージではなく必ず古い値を置換します。
独立した state 変数を分割する際の推奨事項については FAQ で詳しく述べています。
次のステップ
このページでは React によって提供されるフックのうちのひとつである useState について学びました。これからは「ス
テートフック」という名前でも呼ぶことにします。ステートフックによって、React の歴史上はじめて、React の関数コ
ンポーネントにローカル state を加えることができます!
またフックが一体何なのかについても少々学びました。フックとは関数コンポーネント内から React の機能に「接続する
(hook into)」ための関数のことです。フックの名前は必ず use から始まり、他にもまだ説明していない様々なフックが
あります。
それでは次のフックである useEffect について学びましょう。これらはクラスにおけるライフサイクルメソッドと似て
おり、コンポーネント内で副作用を実行することができるようにするものです。
function ExampleWithManyStates() {
// Declare multiple state variables!
const [age, setAge] = useState(42);
const [fruit, setFruit] = useState('banana');
const [todos, setTodos] = useState([{ text: 'Learn Hooks' }]);
function handleOrangeClick() {
// Similar to this.setState({ fruit: 'orange' })
setFruit('orange');
}
ステートフックの利用法
221](https://image.slidesharecdn.com/react-ja-221110111411-b356a3b5/85/react-ja-pdf-221-320.jpg)


![function mountComposite(element) {
var type = element.type;
var props = element.props;
var renderedElement;
if (isClass(type)) {
// Component class
var publicInstance = new type(props);
// Set the props
publicInstance.props = props;
// Call the lifecycle if necessary
if (publicInstance.componentWillMount) {
publicInstance.componentWillMount();
}
renderedElement = publicInstance.render();
} else if (typeof type === 'function') {
// Component function
renderedElement = type(props);
}
// This is recursive but we'll eventually reach the bottom of recursion when
// the element is host (e.g. <div />) rather than composite (e.g. <App />):
return mount(renderedElement);
}
// This function only handles elements with a host type.
// For example, it handles <div /> and <p /> but not an <App />.
function mountHost(element) {
var type = element.type;
var props = element.props;
var children = props.children || [];
if (!Array.isArray(children)) {
children = [children];
}
children = children.filter(Boolean);
// This block of code shouldn't be in the reconciler.
// Different renderers might initialize nodes differently.
// For example, React Native would create iOS or Android views.
var node = document.createElement(type);
Object.keys(props).forEach(propName => {
if (propName !== 'children') {
node.setAttribute(propName, props[propName]);
}
});
// Mount the children
children.forEach(childElement => {
// Children may be host (e.g. <div />) or composite (e.g. <Button />).
// We will also mount them recursively:
var childNode = mount(childElement);
// This line of code is also renderer-specific.
// It would be different depending on the renderer:
node.appendChild(childNode);
});
// Return the DOM node as mount result.
// This is where the recursion ends.
return node;
}
react
230](https://image.slidesharecdn.com/react-ja-221110111411-b356a3b5/85/react-ja-pdf-230-320.jpg)
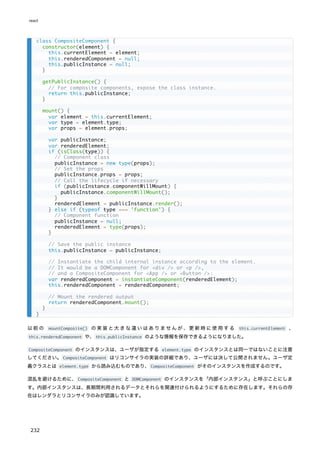
![一方、ユーザ定義クラスのインスタンスは「公開インスタンス」と呼ぶことにします。公開インスタンスは、独自コンポ
ーネントの render() やその他のメソッド内で this として現れるものです。
mountHost() 関数は、DOMComponent クラスの mount() メソッドとしてリファクタリングされ、こちらも見慣れたもの
になります:
mountHost() からリファクタリングした後の主な違いは、this.node と this.renderedChildren を内部の DOM コン
ポーネントインスタンスに関連付け続けていることです。これらは、将来的に非破壊的な更新を適用する際にも使用しま
す。
class DOMComponent {
constructor(element) {
this.currentElement = element;
this.renderedChildren = [];
this.node = null;
}
getPublicInstance() {
// For DOM components, only expose the DOM node.
return this.node;
}
mount() {
var element = this.currentElement;
var type = element.type;
var props = element.props;
var children = props.children || [];
if (!Array.isArray(children)) {
children = [children];
}
// Create and save the node
var node = document.createElement(type);
this.node = node;
// Set the attributes
Object.keys(props).forEach(propName => {
if (propName !== 'children') {
node.setAttribute(propName, props[propName]);
}
});
// Create and save the contained children.
// Each of them can be a DOMComponent or a CompositeComponent,
// depending on whether the element type is a string or a function.
var renderedChildren = children.map(instantiateComponent);
this.renderedChildren = renderedChildren;
// Collect DOM nodes they return on mount
var childNodes = renderedChildren.map(child => child.mount());
childNodes.forEach(childNode => node.appendChild(childNode));
// Return the DOM node as mount result
return node;
}
}
実装に関するメモ
233](https://image.slidesharecdn.com/react-ja-221110111411-b356a3b5/85/react-ja-pdf-233-320.jpg)
![結果として、それが composite であれ host であれ、内部インスタンスはそれぞれの子内部インスタンスを指すようにな
ります。<App> 関数コンポーネントが <Button> コンポーネントをレンダーし、<Button> クラスが <div> をレンダー
する場合、視覚的にわかりやすくすると、内部インスタンスのツリーはこのようになります:
DOM の中では、<div> しか見えません。しかしながら、内部インスタンスのツリーは composite の内部インスタンスと
host の内部インスタンスの両方を保有しています。
composite 内部インスタンスは以下のものを格納する必要があります:
現在の要素。
要素の型がクラスの場合、公開インスタンス。
単独の、レンダーされた内部インスタンス。これは DOMComponent か CompositeComponent のいずれかにあたります。
host 内部インスタンスは以下のものを格納する必要があります:
現在の要素。
DOM ノード。
すべての子内部インタスタンス。各インスタンスは、DOMComponent または CompositeComponent のいずれかになりま
す。
より複雑なアプリケーションにおいて、内部インスタンスのツリーがどのような構造になるのか想像しづらい場合は、
React DevTools が host インスタンスを灰色に、composite インスタンスを紫色にハイライトしてくれるので、内部イ
ンスタンスのツリーにかなり近いものを得ることができます:
[object CompositeComponent] {
currentElement: <App />,
publicInstance: null,
renderedComponent: [object CompositeComponent] {
currentElement: <Button />,
publicInstance: [object Button],
renderedComponent: [object DOMComponent] {
currentElement: <div />,
node: [object HTMLDivElement],
renderedChildren: []
}
}
}
react
234](https://image.slidesharecdn.com/react-ja-221110111411-b356a3b5/85/react-ja-pdf-234-320.jpg)
![そして、host コンポーネントは子コンポーネントを更新する必要があります。composite コンポーネントと異なり、
host コンポーネントは 1 つ以上の子コンポーネントを保有している可能性があります。
この簡素化した例では内部インスタンスの配列を用い、受け取った type と以前の type が一致するかによって、内部イ
ンスタンスを更新もしくは置換しながら、配列をイテレートしています。実際のリコンサイラでは処理時に要素の key を
考慮して、要素の挿入と削除に加えて移動を追跡しますが、そのロジックは省略しています。
リストの子要素への DOM 操作は、バッチで実行できるようまとめておきます:
var nextProps = nextElement.props;
this.currentElement = nextElement;
// Remove old attributes.
Object.keys(prevProps).forEach(propName => {
if (propName !== 'children' && !nextProps.hasOwnProperty(propName)) {
node.removeAttribute(propName);
}
});
// Set next attributes.
Object.keys(nextProps).forEach(propName => {
if (propName !== 'children') {
node.setAttribute(propName, nextProps[propName]);
}
});
// ...
// ...
// These are arrays of React elements:
var prevChildren = prevProps.children || [];
if (!Array.isArray(prevChildren)) {
prevChildren = [prevChildren];
}
var nextChildren = nextProps.children || [];
if (!Array.isArray(nextChildren)) {
nextChildren = [nextChildren];
}
// These are arrays of internal instances:
var prevRenderedChildren = this.renderedChildren;
var nextRenderedChildren = [];
// As we iterate over children, we will add operations to the array.
var operationQueue = [];
// Note: the section below is extremely simplified!
// It doesn't handle reorders, children with holes, or keys.
// It only exists to illustrate the overall flow, not the specifics.
for (var i = 0; i < nextChildren.length; i++) {
// Try to get an existing internal instance for this child
var prevChild = prevRenderedChildren[i];
// If there is no internal instance under this index,
// a child has been appended to the end. Create a new
// internal instance, mount it, and use its node.
if (!prevChild) {
var nextChild = instantiateComponent(nextChildren[i]);
var node = nextChild.mount();
react
240](https://image.slidesharecdn.com/react-ja-221110111411-b356a3b5/85/react-ja-pdf-240-320.jpg)
![最後のステップとして、DOM 操作を実行します。ここでも、実際のリコンサイラのコードは要素の移動を扱わなければい
けないので、より複雑になります:
// Record that we need to append a node
operationQueue.push({type: 'ADD', node});
nextRenderedChildren.push(nextChild);
continue;
}
// We can only update the instance if its element's type matches.
// For example, <Button size="small" /> can be updated to
// <Button size="large" /> but not to an <App />.
var canUpdate = prevChildren[i].type === nextChildren[i].type;
// If we can't update an existing instance, we have to unmount it
// and mount a new one instead of it.
if (!canUpdate) {
var prevNode = prevChild.getHostNode();
prevChild.unmount();
var nextChild = instantiateComponent(nextChildren[i]);
var nextNode = nextChild.mount();
// Record that we need to swap the nodes
operationQueue.push({type: 'REPLACE', prevNode, nextNode});
nextRenderedChildren.push(nextChild);
continue;
}
// If we can update an existing internal instance,
// just let it receive the next element and handle its own update.
prevChild.receive(nextChildren[i]);
nextRenderedChildren.push(prevChild);
}
// Finally, unmount any children that don't exist:
for (var j = nextChildren.length; j < prevChildren.length; j++) {
var prevChild = prevRenderedChildren[j];
var node = prevChild.getHostNode();
prevChild.unmount();
// Record that we need to remove the node
operationQueue.push({type: 'REMOVE', node});
}
// Point the list of rendered children to the updated version.
this.renderedChildren = nextRenderedChildren;
// ...
// ...
// Process the operation queue.
while (operationQueue.length > 0) {
var operation = operationQueue.shift();
switch (operation.type) {
case 'ADD':
this.node.appendChild(operation.node);
break;
case 'REPLACE':
this.node.replaceChild(operation.nextNode, operation.prevNode);
実装に関するメモ
241](https://image.slidesharecdn.com/react-ja-221110111411-b356a3b5/85/react-ja-pdf-241-320.jpg)


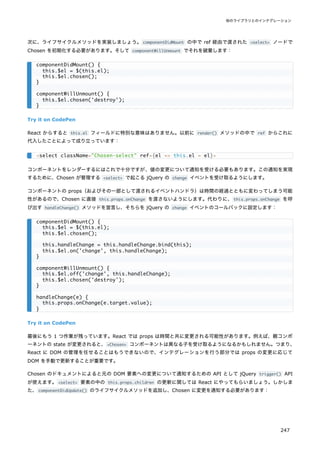
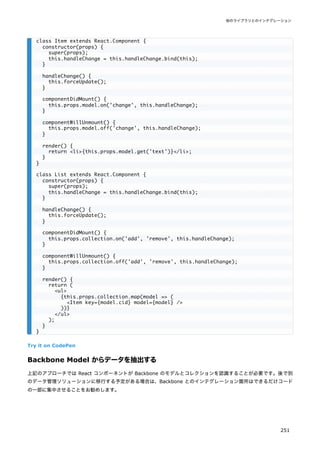
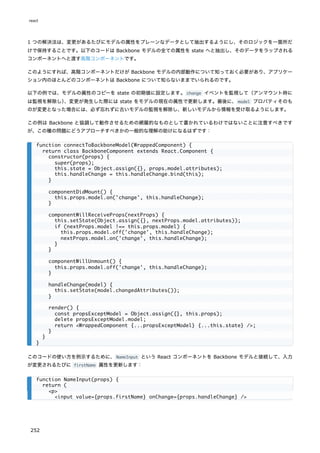
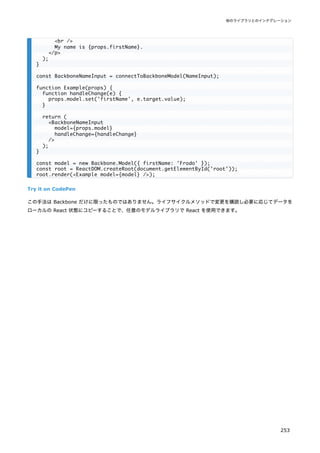


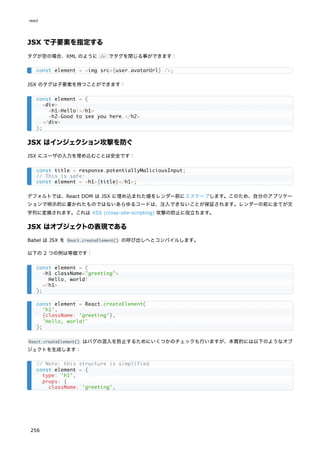

![実行時に型を選択する
一般的な式を React の要素の型として使用することはできません。どうしても一般的な式を使って要素の型を示したいの
であれば、まずその式を大文字から始まる変数に代入してから利用しましょう。これはプロパティの値に応じて異なるコ
ンポーネントを表示し分けたいような場合によくあるケースです。
大文字から始まる変数に型を代入することで、上のコードをきちんと動作するようにしてみましょう。
JSX におけるprops
JSX で props を指定するやり方はいくつかあります。
プロパティとしての JavaScript 式
任意の JavaScript 式は {} で囲むことによって props として渡すことができます。例として次の JSX を見てみましょ
う。
import React from 'react';
// 正しい例。コンポーネントなので大文字からはじまっています。
function Hello(props) {
// 正しい例。div は HTML タグなので、<div> と書くのは正解です。
return <div>Hello {props.toWhat}</div>;
}
function HelloWorld() {
// 正しい例。大文字ではじまっているため、React は <Hello /> がコンポーネントだと認識できます。
return <Hello toWhat="World" />;
}
import React from 'react';
import { PhotoStory, VideoStory } from './stories';
const components = {
photo: PhotoStory,
video: VideoStory
};
function Story(props) {
// 間違った例。式は JSX の型に指定できません。
return <components[props.storyType] story={props.story} />;
}
import React from 'react';
import { PhotoStory, VideoStory } from './stories';
const components = {
photo: PhotoStory,
video: VideoStory
};
function Story(props) {
// 正しい例。大文字で始まる変数は JSX の型に指定できます。
const SpecificStory = components[props.storyType];
return <SpecificStory story={props.story} />;
}
react
260](https://image.slidesharecdn.com/react-ja-221110111411-b356a3b5/85/react-ja-pdf-260-320.jpg)

![子要素としての JavaScript 式
任意の JavaScript の式は {} で囲むことによって子要素として渡すことができます。そのため以下の JSX の式はまった
く等しいものとなります。
これは長さの決まっていない JSX 式のリストを表示したいような場合に特に便利に使うことができます。次の例は HTML
の表を表示します。
JavaScript の式は異なる型の子要素と併用することができるため、テンプレートリテラルの代わりに次のような書き方を
することもできます。
子要素としての関数
JSX タグに挟まれた JavaScript 式は、通常は文字列や React 要素、あるいはこれらのリストとして評価されます。しか
し、他のあらゆる props と同様に props.children にも任意のデータを渡すことができ、そのデータとは必ずしも
React がレンダーできるものに限りません。例えば独自コンポーネントに props.children を通してコールバックを定義
することもできるのです。
<li key="C">Third item</li>,
];
}
<MyComponent>foo</MyComponent>
<MyComponent>{'foo'}</MyComponent>
function Item(props) {
return <li>{props.message}</li>;
}
function TodoList() {
const todos = ['finish doc', 'submit pr', 'nag dan to review'];
return (
<ul>
{todos.map((message) => <Item key={message} message={message} />)}
</ul>
);
}
function Hello(props) {
return <div>Hello {props.addressee}!</div>;
}
// numTimes の数だけ子要素のコールバックを呼び出し、コンポーネントを繰り返し作成する
function Repeat(props) {
let items = [];
for (let i = 0; i < props.numTimes; i++) {
items.push(props.children(i));
}
return <div>{items}</div>;
}
function ListOfTenThings() {
return (
<Repeat numTimes={10}>
react
264](https://image.slidesharecdn.com/react-ja-221110111411-b356a3b5/85/react-ja-pdf-264-320.jpg)

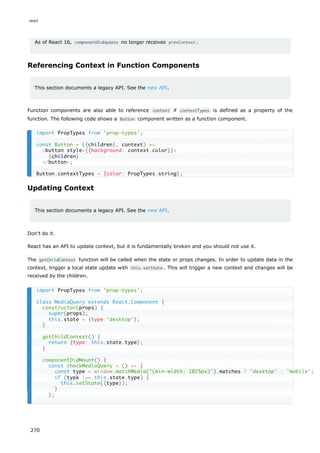
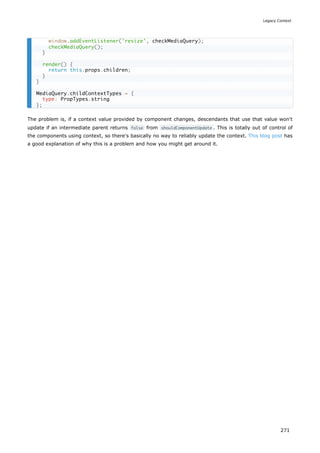
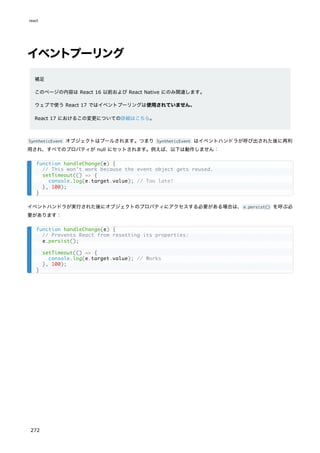
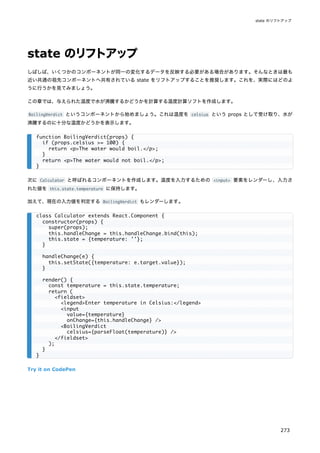
![2 つ目の入力を追加する
新しい要件は、摂氏の入力に加えて、華氏の入力もできるようにして、それらを同期させておくことです。
Calculator から TemperatureInput コンポーネントを抽出するところから始めましょう。props として、"c" もしく
は "f" の値をとる scale を新しく追加します:
これで Calculator を 2 つの別個の温度入力フィールドをレンダーするように変更することができます:
Try it on CodePen
2 つの入力フィールドが用意できました。しかし、片方に温度を入力しても、もう片方は更新されません。これは要件を
満たしていません: 2 つの入力フィールドを同期させたいのです。
Calculator から BoilingVerdict を表示することもできません。Calculator は TemperatureInput の中に隠されてい
る現在の温度を知らないのです。
const scaleNames = {
c: 'Celsius',
f: 'Fahrenheit'
};
class TemperatureInput extends React.Component {
constructor(props) {
super(props);
this.handleChange = this.handleChange.bind(this);
this.state = {temperature: ''};
}
handleChange(e) {
this.setState({temperature: e.target.value});
}
render() {
const temperature = this.state.temperature;
const scale = this.props.scale;
return (
<fieldset>
<legend>Enter temperature in {scaleNames[scale]}:</legend>
<input value={temperature}
onChange={this.handleChange} />
</fieldset>
);
}
}
class Calculator extends React.Component {
render() {
return (
<div>
<TemperatureInput scale="c" />
<TemperatureInput scale="f" />
</div>
);
}
}
react
274](https://image.slidesharecdn.com/react-ja-221110111411-b356a3b5/85/react-ja-pdf-274-320.jpg)
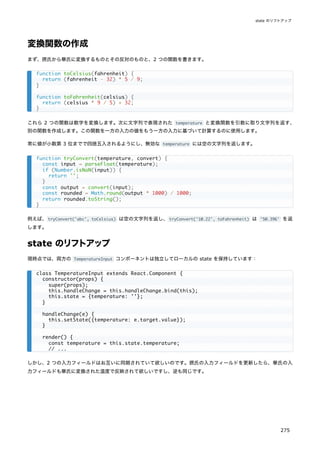
![では Calculator コンポーネントの番です。
現時点での入力の temperature と scale を、このコンポーネントのローカルな state に保存することにします。これ
は入力コンポーネントから "リフトアップ" したものであり、両方にとっての "信頼出来る情報源" として振る舞うことに
なります。これは、両方の入力コンポーネントをレンダーするために必要となる最小のデータの形です。
例えば、摂氏側の入力に 37 と打ち込こむと、Calculator コンポーネントの state は以下のようになります:
その後に華氏の入力フィールドを 212 に変更すると、Calculator の state は以下のようになります:
両方の入力を保存することもできましたが、それは不必要だと分かります。最後に変更された値とそれが示す単位を保存
すれば十分なのです。現時点での temperature と scale の 2 つさえあれば、もう一方の値は推測することができます。
同じ state から値が算出されるので、2 つの入力コンポーネントは常に同期します。
class TemperatureInput extends React.Component {
constructor(props) {
super(props);
this.handleChange = this.handleChange.bind(this);
}
handleChange(e) {
this.props.onTemperatureChange(e.target.value);
}
render() {
const temperature = this.props.temperature;
const scale = this.props.scale;
return (
<fieldset>
<legend>Enter temperature in {scaleNames[scale]}:</legend>
<input value={temperature}
onChange={this.handleChange} />
</fieldset>
);
}
}
{
temperature: '37',
scale: 'c'
}
{
temperature: '212',
scale: 'f'
}
class Calculator extends React.Component {
constructor(props) {
super(props);
this.handleCelsiusChange = this.handleCelsiusChange.bind(this);
this.handleFahrenheitChange = this.handleFahrenheitChange.bind(this);
this.state = {temperature: '', scale: 'c'};
}
handleCelsiusChange(temperature) {
this.setState({scale: 'c', temperature});
state のリフトアップ
277](https://image.slidesharecdn.com/react-ja-221110111411-b356a3b5/85/react-ja-pdf-277-320.jpg)

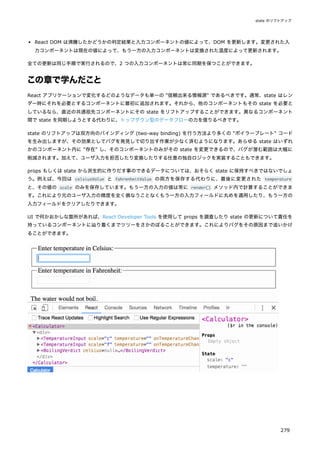
![リストとkey
まず、JavaScript でリストを変換する方法についておさらいしましょう。
以下のコードでは、map() 関数を用い、numbers という配列を受け取って中身の値を 2 倍しています。map() 関数が返
す新しい配列を変数 doubled に格納し、ログに出力します:
このコードはコンソールに [2, 4, 6, 8, 10] と出力します。
React では配列を要素のリストに変換することが、ほぼこれと同様のものです。
複数のコンポーネントをレンダーする
要素の集合を作成し中括弧 {} で囲むことで JSX に含めることができます。
以下では、JavaScript の map() 関数を利用して、numbers という配列に対して反復処理を行っています。それぞれの整
数に対して <li> 要素を返しています。最後に、結果として得られる要素の配列を listItems に格納しています:
そして、listItems という配列全体を <ul> 要素の内側に含めます:
Try it on CodePen
このコードは、1 から 5 までの数字の箇条書きのリストを表示します。
基本的なリストコンポーネント
通常、リストは何らかのコンポーネントの内部でレンダーしたいと思うでしょう。
前の例をリファクタリングして、numbers という配列を受け取って要素のリストを出力するコンポーネントを作ることが
できます。
const numbers = [1, 2, 3, 4, 5];
const doubled = numbers.map((number) => number * 2);
console.log(doubled);
const numbers = [1, 2, 3, 4, 5];
const listItems = numbers.map((number) =>
<li>{number}</li>
);
<ul>{listItems}</ul>
function NumberList(props) {
const numbers = props.numbers;
const listItems = numbers.map((number) =>
<li>{number}</li>
);
return (
<ul>{listItems}</ul>
);
}
react
280](https://image.slidesharecdn.com/react-ja-221110111411-b356a3b5/85/react-ja-pdf-280-320.jpg)
![このコードを実行すると、
「リスト項目には key を与えるべきだ」という警告を受け取るでしょう。"key" とは特別な文
字列の属性であり、要素のリストを作成する際に含めておく必要があるものです。なぜ key が重要なのか、次の節で説明
します。
numbers.map() 内のリスト項目に key を割り当てて、key が見つからないという問題を修正しましょう。
Try it on CodePen
Key
Key は、どの要素が変更、追加もしくは削除されたのかを React が識別するのに役立ちます。配列内の項目に安定した識
別性を与えるため、それぞれの項目に key を与えるべきです。
兄弟間でその項目を一意に特定できるような文字列を key として選ぶのが最良の方法です。多くの場合、あなたのデータ
内にある ID を key として使うことになるでしょう:
レンダーされる要素に安定した ID がない場合、最終手段として項目のインデックスを使うことができます:
const numbers = [1, 2, 3, 4, 5];
const root = ReactDOM.createRoot(document.getElementById('root'));
root.render(<NumberList numbers={numbers} />);
function NumberList(props) {
const numbers = props.numbers;
const listItems = numbers.map((number) =>
<li key={number.toString()}>
{number}
</li>
);
return (
<ul>{listItems}</ul>
);
}
const numbers = [1, 2, 3, 4, 5];
const listItems = numbers.map((number) =>
<li key={number.toString()}>
{number}
</li>
);
const todoItems = todos.map((todo) =>
<li key={todo.id}>
{todo.text}
</li>
);
const todoItems = todos.map((todo, index) =>
// Only do this if items have no stable IDs
<li key={index}>
{todo.text}
</li>
);
リストと key
281](https://image.slidesharecdn.com/react-ja-221110111411-b356a3b5/85/react-ja-pdf-281-320.jpg)
![Try it on CodePen
基本ルールとしては、map() 呼び出しの中に現れる要素に key が必要です。
key は兄弟要素の中で一意であればよい
配列内で使われる key はその兄弟要素の中で一意である必要があります。しかしグローバルに一意である必要はありませ
ん。2 つの異なる配列を作る場合は、同一の key が使われても構いません:
Try it on CodePen
key は React へのヒントとして使われますが、あなたが書くコンポーネントには渡されません。同じ値をコンポーネント
の中でも必要としている場合は、別の名前の prop として明示的に渡してください:
上記の例では、Post コンポーネントは props.id を読み取ることができますが、props.key は読み取れません。
map() を JSX に埋め込む
上記の例では listItems 変数を別途宣言して、それを JSX に含めました:
function Blog(props) {
const sidebar = (
<ul>
{props.posts.map((post) =>
<li key={post.id}>
{post.title}
</li>
)}
</ul>
);
const content = props.posts.map((post) =>
<div key={post.id}>
<h3>{post.title}</h3>
<p>{post.content}</p>
</div>
);
return (
<div>
{sidebar}
<hr />
{content}
</div>
);
}
const posts = [
];
const root = ReactDOM.createRoot(document.getElementById('root'));
root.render(<Blog posts={posts} />);
const content = posts.map((post) =>
<Post
key={post.id}
id={post.id}
title={post.title} />
);
リストと key
283](https://image.slidesharecdn.com/react-ja-221110111411-b356a3b5/85/react-ja-pdf-283-320.jpg)
![最後に結果として出力されたものを、名前の圧縮のために terser にパイプします(理由を読む)
。
以下に例を示します。
これが必要なのは本番用ビルドだけであることに留意してください。React の有用な警告文が隠されたり、ビルド速度が
大幅に遅くなったりしますので、開発用ではこれらのプラグインを適用しないでください。
Rollup
Rollup で最も効率のよい本番用ビルドを行うには、いくつかのプラグインを以下のようにインストールします。
本番用ビルドを作成するには、以下のプラグインを追加してください(順番は重要です)
。
replace プラグインは正しいビルド用の環境変数が確実に設定されるようにします。
commonjs プラグインは Rollup で CommonJS をサポートできるようにします。
terser プラグインは出力された最終的なバンドルを圧縮し、mangle(訳注:変数名や識別子を短縮)します。
設定例の全体はこの gist を参照してください。
これらが必要なのは本番用ビルドだけであることに留意してください。React の有用な警告表示が隠されたり、ビルド速
度が大幅に遅くなったりしますので、開発用では terser プラグインもしくは replace プラグインを 'production' と
いう値で適用しないでください。
webpack
補足:
Create React App を利用している場合は、Create React App についての前述の説明に従ってください。
このセクションは直接 webpack の設定を行いたい人向けです。
browserify ./index.js
-g [ envify --NODE_ENV production ]
-g uglifyify
| terser --compress --mangle > ./bundle.js
# If you use npm
npm install --save-dev rollup-plugin-commonjs rollup-plugin-replace rollup-plugin-terser
# If you use Yarn
yarn add --dev rollup-plugin-commonjs rollup-plugin-replace rollup-plugin-terser
plugins: [
// ...
require('rollup-plugin-replace')({
'process.env.NODE_ENV': JSON.stringify('production')
}),
require('rollup-plugin-commonjs')(),
require('rollup-plugin-terser')(),
// ...
]
パフォーマンス最適化
287](https://image.slidesharecdn.com/react-ja-221110111411-b356a3b5/85/react-ja-pdf-287-320.jpg)
![Webpack v4 以降では本番 (production) モードでコードの minify を自動で行います。
より詳細な説明については webpack のドキュメントを参照ください。
これらが必要なのは本番用ビルドだけであることに留意してください。React の有用な警告文が隠されたり、ビルド速度
が大幅に遅くなったりしますので、開発時には TerserPlugin を適用しないでください。
DevTools プロファイラを使用したコンポーネントのプロファイリン
グ
react-dom 16.5 以降と react-native 0.57 以降では、開発モードにおける強化されたプロファイリング機能を React
DevTools プロファイラにて提供しています。 このプロファイラの概要はブログ記事 "Introducing the React Profiler"
で説明されています。 チュートリアル動画も YouTube で閲覧できます。
React DevTools をまだインストールしていない場合は、以下で見つけることができます。
Chrome ブラウザ拡張
Firefox ブラウザ拡張
スタンドアロンの Node パッケージ
補足
本番ビルド版 react-dom のプロファイリング可能なバンドルとして react-dom/profiling が利用可能です。 こ
のバンドルの使い方の詳細については、fb.me/react-profiling を参照してください。
補足
React 17 より前のバージョンでは、標準の User Timing API を用いて Chrome のパフォーマンスタブでコンポ
ーネントのプロファイリングが行われていました。 これについての概要は Ben Schwarz によるこの記事を参照し
てください。
長いリストの仮想化
アプリケーションが長いデータのリスト(数百〜数千行)をレンダーする場合は、
「ウィンドウイング」として知られるテ
クニックを使うことをおすすめします。このテクニックでは、ある瞬間ごとにはリストの小さな部分集合のみを描画する
ことで、生成する DOM ノードの数およびコンポーネントの再描画にかかる時間を大幅に削減することができます。
const TerserPlugin = require('terser-webpack-plugin');
module.exports = {
mode: 'production',
optimization: {
minimizer: [new TerserPlugin({ /* additional options here */ })],
},
};
react
288](https://image.slidesharecdn.com/react-ja-221110111411-b356a3b5/85/react-ja-pdf-288-320.jpg)

![このコードは、shouldComponentUpdate は props.color または state.count の変化の有無を単にチェックしているだ
けです。これらの値が変化していなければコンポーネントは更新されません。コンポーネントがもっと複雑な場合は、
props と state のすべてのフィールドに対して「浅い比較」をするという同種のパターンでコンポーネント更新の必要
性を決定できます。このパターンはとても一般的なので、React はこのロジックのためのヘルパーを用意しており、
React.PureComponent から継承するだけで使用できます。なので以下のコードで前述のコードと同じことをよりシンプル
に実装できます。
ほとんどの場合、自分で shouldComponentUpdate を記述する代わりに React.PureComponent を使うことができます。も
っとも、浅い比較を行うだけですので、浅い比較では検出できない形で props や state がミューテート(mutate; 書き
換え)されている可能性がある場合には使えません。
この事はより複雑なデータ構造の場合には問題となります。例えば、カンマ区切りで単語をレンダーする ListOfWords コ
ンポーネントと、ボタンをクリックしてリストに単語を追加できる親コンポーネント WordAdder が必要だとして、以下の
コードは正しく動作しません。
Count: {this.state.count}
</button>
);
}
}
class CounterButton extends React.PureComponent {
constructor(props) {
super(props);
this.state = {count: 1};
}
render() {
return (
<button
color={this.props.color}
onClick={() => this.setState(state => ({count: state.count + 1}))}>
Count: {this.state.count}
</button>
);
}
}
class ListOfWords extends React.PureComponent {
render() {
return <div>{this.props.words.join(',')}</div>;
}
}
class WordAdder extends React.Component {
constructor(props) {
super(props);
this.state = {
words: ['marklar']
};
this.handleClick = this.handleClick.bind(this);
}
handleClick() {
// This section is bad style and causes a bug
const words = this.state.words;
パフォーマンス最適化
291](https://image.slidesharecdn.com/react-ja-221110111411-b356a3b5/85/react-ja-pdf-291-320.jpg)
![問題は PureComponent が this.props.words の古い値と新しい値を単純に比較していることにあります。上記のコード
では WordAdder の handleClick メソッド内で words 配列の内容をミューテートしてしまうので、this.props.words
の新旧の値は、たとえ配列内の実際の単語が変更されていたとしても、比較の結果同じだとみなしてしまうのです。その
ため ListOfWords はレンダーすべき新しい単語が追加されているにも関わらず、更新されません。
データを変更しないことの効果
この問題を避ける最も単純な方法は、props や state として使用する値のミューテートを避けることです。例えば、上記
の handleClick メソッドは concat を使って以下のように書き換えることができます:
ES6 はこれをより簡潔に実装できる配列のスプレッド構文をサポートしています。Create React App を使用していれ
ば、この構文はデフォルトで利用できます。
同様に、オブジェクトについてもミューテートするコードをしないように書き換えることができます。例えば、colormap
というオブジェクトがあり、colormap.right を 'blue' に更新する関数が必要だとしましょう。以下のように書くこと
も可能ですが、
この処理を、元オブジェクトをミューテートせずに実装するために、Object.assign を使用できます。
words.push('marklar');
this.setState({words: words});
}
render() {
return (
<div>
<button onClick={this.handleClick} />
<ListOfWords words={this.state.words} />
</div>
);
}
}
handleClick() {
this.setState(state => ({
words: state.words.concat(['marklar'])
}));
}
handleClick() {
this.setState(state => ({
words: [...state.words, 'marklar'],
}));
};
function updateColorMap(colormap) {
colormap.right = 'blue';
}
function updateColorMap(colormap) {
return Object.assign({}, colormap, {right: 'blue'});
}
react
292](https://image.slidesharecdn.com/react-ja-221110111411-b356a3b5/85/react-ja-pdf-292-320.jpg)

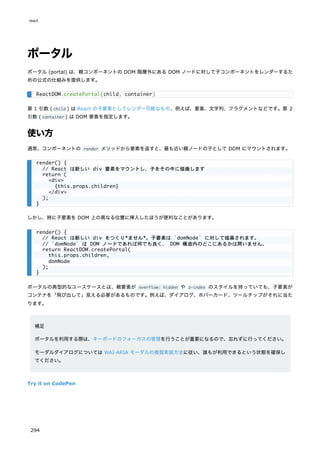
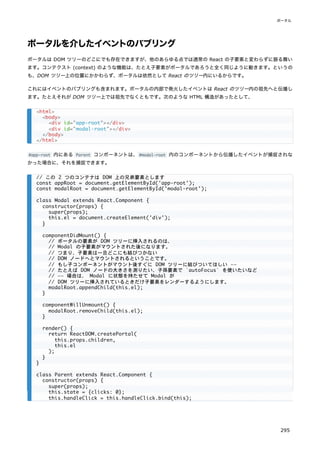
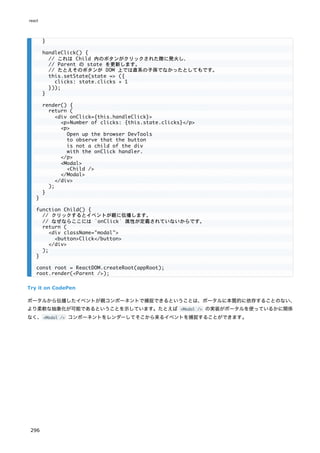
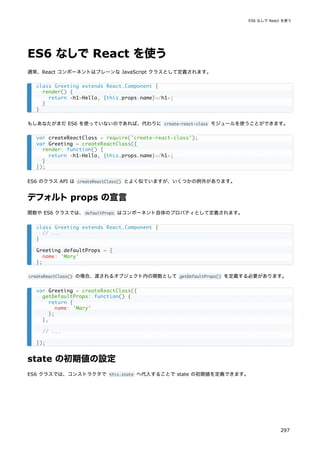
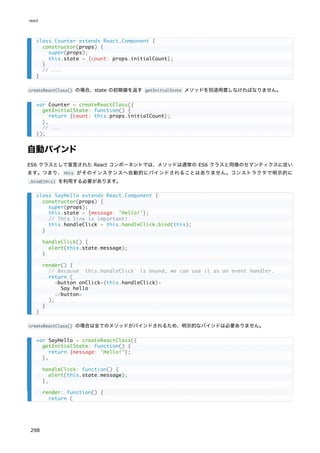
![時には同じ機能が全く異なるコンポーネント間で共有されることがあります。これは横断的関心事 (cross-cutting
concerns) と呼ばれることがあります。createReactClass であれば、横断的関心事のためにレガシーな mixins 機能を
使うことができます。
よくある利用例のひとつは、一定時間ごとに自分自身を更新するコンポーネントです。setInterval() を使うのは簡単で
すが、その場合はメモリ節約のため、コンポーネントが不要になった際にキャンセルすることが重要です。React はライ
フサイクルメソッドを提供しており、コンポーネントが生成、破棄されるときに知らせてくれます。次のようなシンプル
なミックスインを作ってみましょう。このミックスインのメソッドは簡単な setInterval() 機能を提供し、コンポーネン
トが破棄されるタイミングで自動的にクリーンアップされます。
コンポーネントが複数のミックスインを使っており、いくつかのミックスインが同じライフサイクルメソッドを定義して
いる場合(例:コンポーネント破棄時に複数のミックスインがクリーンアップ処理をする)
、全てのライフサイクルメソッ
ドが呼ばれることが保証されています。ミックスインで定義されているメソッドはミックスインとして列挙された順に実
行され、そのあとにコンポーネントのメソッドが呼ばれます。
var SetIntervalMixin = {
componentWillMount: function() {
this.intervals = [];
},
setInterval: function() {
this.intervals.push(setInterval.apply(null, arguments));
},
componentWillUnmount: function() {
this.intervals.forEach(clearInterval);
}
};
var createReactClass = require('create-react-class');
var TickTock = createReactClass({
mixins: [SetIntervalMixin], // Use the mixin
getInitialState: function() {
return {seconds: 0};
},
componentDidMount: function() {
this.setInterval(this.tick, 1000); // Call a method on the mixin
},
tick: function() {
this.setState({seconds: this.state.seconds + 1});
},
render: function() {
return (
<p>
React has been running for {this.state.seconds} seconds.
</p>
);
}
});
const root = ReactDOM.createRoot(document.getElementById('example'));
root.render(<TickTock />);
react
300](https://image.slidesharecdn.com/react-ja-221110111411-b356a3b5/85/react-ja-pdf-300-320.jpg)

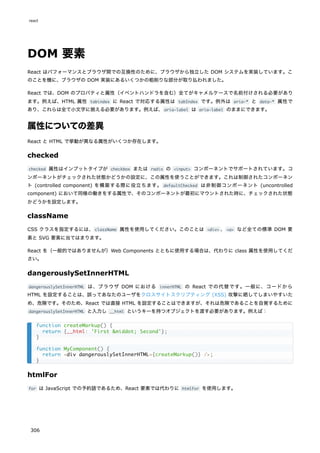
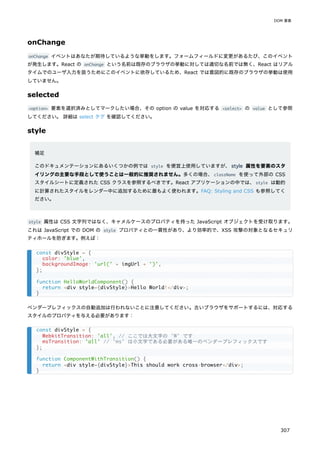
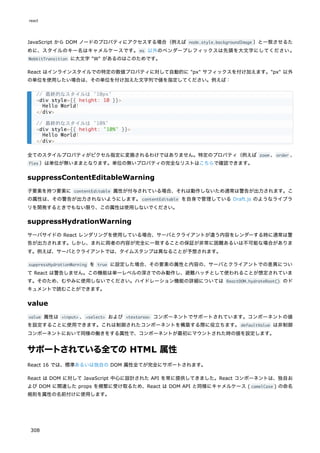


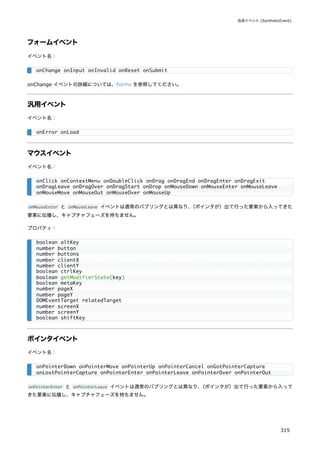


![PureRenderMixin
Note
The PureRenderMixin mixin predates React.PureComponent . This reference doc is provided for legacy
purposes, and you should consider using React.PureComponent instead.
If your React component's render function renders the same result given the same props and state, you can
use this mixin for a performance boost in some cases.
Example:
Example using ES6 class syntax:
Under the hood, the mixin implements shouldComponentUpdate, in which it compares the current props
and state with the next ones and returns false if the equalities pass.
Note:
This only shallowly compares the objects. If these contain complex data structures, it may produce
false-negatives for deeper differences. Only mix into components which have simple props and state,
or use forceUpdate() when you know deep data structures have changed. Or, consider using
immutable objects to facilitate fast comparisons of nested data.
var PureRenderMixin = require('react-addons-pure-render-mixin');
var createReactClass = require('create-react-class');
createReactClass({
mixins: [PureRenderMixin],
render: function() {
return <div className={this.props.className}>foo</div>;
}
});
import PureRenderMixin from 'react-addons-pure-render-mixin';
class FooComponent extends React.Component {
constructor(props) {
super(props);
this.shouldComponentUpdate = PureRenderMixin.shouldComponentUpdate.bind(this);
}
render() {
return <div className={this.props.className}>foo</div>;
}
}
react
328](https://image.slidesharecdn.com/react-ja-221110111411-b356a3b5/85/react-ja-pdf-328-320.jpg)


![shouldComponentUpdate() が false を返した場合、UNSAFE_componentWillUpdate() は呼び出されません。
他の API
上記のライフサイクルメソッド(React が呼び出すもの)とは異なり、以下のメソッドはあなたがコンポーネントから呼
び出すことができるメソッドです。
それは setState() と forceUpdate() の 2 つだけです。
setState() {#setstate}
setState() はコンポーネントの state への変更をエンキューし、このコンポーネントとその子を更新された state で再
レンダーする必要があることを React に伝えます。これは、イベントハンドラとサーバの応答に応じてユーザインターフ
ェイスを更新するために使用する主な方法です。
setState() は、コンポーネントを更新するための即時のコマンドではなく、要求として考えてください。パフォーマン
スをよくするために、React はそれを遅らせて、単一パスで複数のコンポーネントを更新することがあります。DOM の
更新が同期的に適用される必要がある稀なケースにおいては、更新を flushSync でラップすることができますが、これを
使うとパフォーマンスが低下する可能性があります。
setState() は常にコンポーネントを直ちに更新するわけではありません。それはバッチ式に更新するか後で更新を延期
するかもしれません。これは setState() を呼び出した直後に this.state を読み取ることが潜在的な危険になります。
代わりに、componentDidUpdate または setState コールバック(setState(updater, callback) )を使用してくださ
い。どちらも更新が適用された後に起動することが保証されています。前の state に基づいて state を設定する必要があ
る場合は、下記の updater 引数についてお読みください。
shouldComponentUpdate() が false を返さない限り、setState() は常に再レンダーされます。ミュータブルなオブジ
ェクトが使用されていて、条件付きでレンダーを行うためのロジックを shouldComponentUpdate() に実装できない場合、
新しい state が前の state と異なるときにのみ setState() を呼び出すと、不要な再レンダーを回避できます。
最初の引数の updater 関数は次のようなシグネチャです。
state は、変更が適用されているときのコンポーネントの state への参照です。直接変更するべきではありません。代わ
りに、state と props からの入力に基づいて新しいオブジェクトを構築することによって変更を表現する必要がありま
す。たとえば、props.step によって state の値を増加したいとします。
updater 関数が受け取る state と props の両方が最新のものであることが保証されています。アップデータの出力は
state と浅くマージされています。
setState(updater[, callback])
(state, props) => stateChange
this.setState((state, props) => {
return {counter: state.counter + props.step};
});
React.Component
341](https://image.slidesharecdn.com/react-ja-221110111411-b356a3b5/85/react-ja-pdf-341-320.jpg)
![setState() の 2 番目のパラメータは、setState が完了してコンポーネントが再レンダーされると実行される省略可能
なコールバック関数です。通常、そのようなロジックには代わりに componentDidUpdate() を使用することをおすすめし
ます。
関数の代わりに、オブジェクトを setState() の最初の引数として渡すこともできます。
これは、たとえば、ショッピングカートの商品数を調整するために、stateChange の新しい state への浅いマージを実行
します。
この形式の setState() も非同期であり、同じサイクル中の複数の呼び出しをまとめてバッチ処理することができます。
たとえば、同じサイクルで品目数量を複数回増やそうとすると、次のようになります。
後続の呼び出しは、同じサイクル内の前の呼び出しの値を上書きするため、数量は 1 回だけ増分されます。次の state が
現在の state に依存する場合は、代わりに updater 関数の形式を使用することをおすすめします。
詳しくは以下を参照してください。
state と ライフサイクル
詳細: setState() はいつ、なぜバッチ処理されるのですか?
詳細: this.state が直ちに更新されないのはなぜですか?
forceUpdate() {#forceupdate}
デフォルトでは、コンポーネントの state や props が変わると、コンポーネントは再レンダーされます。render() メソ
ッドが他のデータに依存している場合は、forceUpdate() を呼び出してコンポーネントの再レンダーが必要であることを
React に伝えることができます。
forceUpdate() を呼び出すと、shouldComponentUpdate() をスキップして、コンポーネントに対して render() が呼び
出されます。これにより、それぞれの子の shouldComponentUpdate() メソッドを含む、子コンポーネントの通常のライフ
サイクルメソッドがトリガーされます。マークアップが変更された場合にのみ React は DOM を更新します。
setState(stateChange[, callback])
this.setState({quantity: 2})
Object.assign(
previousState,
{quantity: state.quantity + 1},
{quantity: state.quantity + 1},
...
)
this.setState((state) => {
return {quantity: state.quantity + 1};
});
component.forceUpdate(callback)
react
342](https://image.slidesharecdn.com/react-ja-221110111411-b356a3b5/85/react-ja-pdf-342-320.jpg)

![ReactDOMClient
react-dom/client パッケージはクライアント側でアプリを初期化する際に使うクライアント専用メソッドを提供してい
ます。ほとんどのコンポーネントではこのモジュールを使う必要はありません。
npm で ES5 を使っている場合、以下のように書けます:
概要
クライアント環境では以下のメソッドが利用可能です:
createRoot()
hydrateRoot()
ブラウザサポート
React はすべてのモダンブラウザをサポートしていますが、古いバージョンを使う場合はいくつかのポリフィルが必要で
す。
補足
React は ES5 メソッドやマイクロタスクをサポートしていない Internet Explorer のような古いブラウザをサポ
ートしていません。ページ内に es5-shim や es5-sham のようなポリフィルが含まれている場合、古いブラウザ
でもアプリケーションが動作することがありますが、この手段を選択するかどうかは自己責任で判断してください。
リファレンス
createRoot() {#createroot}
渡された container に対する React ルートを作成してそれを返します。root の render を使って DOM 内部に React
要素をレンダーできます:
createRoot は 2 つのオプションを受け取ります:
onRecoverableError : React が自動的にエラーから復帰した際に呼ばれるオプションのコールバック。
import * as ReactDOM from 'react-dom/client';
var ReactDOM = require('react-dom/client');
createRoot(container[, options]);
const root = createRoot(container);
root.render(element);
ReactDOMClient
345](https://image.slidesharecdn.com/react-ja-221110111411-b356a3b5/85/react-ja-pdf-345-320.jpg)
![identifierPrefix : React.useId によって ID が生成される際に React が使うオプションのプリフィクス。同じペー
ジに複数のルートがある場合に競合を避けるために有用です。サーバ側で使うプリフィクスと同一である必要がありま
す。
ルートは unmount でアンマウントすることができます:
補足:
createRoot() は渡されたコンテナノードの中身を管理します。コンテナ内部にある既存のあらゆる DOM 要素は
render がコールされた時点で置き換えられます。後続のコールでは React の DOM 差分アルゴリズムを使って効
率的な更新を行います。
createRoot() はコンテナノードを変更しません(コンテナの子要素のみ変更します)
。既存の子要素を上書きせず
にコンポーネントを既存の DOM ノードに挿入することが可能な場合があります。
createRoot() を使ってサーバでレンダーされたコンテナにハイドレーションを行うことはできません。代わりに
hydrateRoot() を使ってください。
hydrateRoot() {#hydrateroot}
createRoot() と同様ですが、ReactDOMServer により HTML コンテンツが描画されたコンテナをクライアントで再利用
する(ハイドレーション)ために使用されます。React は既存のマークアップにイベントリスナをアタッチしようとしま
す。
hydrateRoot は 2 つのオプションを受け取ります:
onRecoverableError : React が自動的にエラーから復帰した際に呼ばれるオプションのコールバック。
identifierPrefix : React.useId によって ID が生成される際に React が使うオプションのプリフィクス。同じペー
ジに複数のルートがある場合に競合を避けるために有用です。サーバ側で使うプリフィクスと同一である必要がありま
す。
補足
React はレンダーされる内容が、サーバ・クライアント間で同一であることを期待します。React はテキストコン
テンツの差異を修復することは可能ですが、その不一致はバグとして扱い、修正すべきです。開発用モードでは、
React はハイドレーション時に起きる両者のレンダーの不一致について警告します。不一致がある場合に属性の差
異が修復されるという保証はありません。これはパフォーマンス上の理由から重要です。なぜなら、ほとんどのア
プリケーションにおいて不一致が発生するということは稀であり、全てのマークアップを検証することは許容不可
能なほど高コストになるためです。
root.unmount();
hydrateRoot(container, element[, options])
react
346](https://image.slidesharecdn.com/react-ja-221110111411-b356a3b5/85/react-ja-pdf-346-320.jpg)


![React は ES5 メソッドやマイクロタスクをサポートしていない Internet Explorer のような古いブラウザをサポ
ートしていません。ページ内に es5-shim や es5-sham のようなポリフィルが含まれている場合、古いブラウザ
でもアプリケーションが動作することがありますが、この手段を選択するかどうかは自己責任で判断してください。
リファレンス
createPortal() {#createportal}
ポータルを作成します。ポータルは DOM コンポーネントの階層の外側に存在している DOM ノードに対して子要素をレ
ンダーする方法を提供します。
flushSync() {#flushsync}
渡されたコールバック内の更新をすべて同期的に処理するよう強制します。これにより DOM が即座に更新されることが
保証されます。
補足:
flushSync はパフォーマンスを有意に低下させうるものです。慎重に使ってください。
flushSync によって保留中のサスペンスバウンダリは強制的に fallback 状態を表示するようになります。
flushSync は return する前に保留中の副作用も実行し、その内部にあるあらゆる更新を同期的に適用します。
flushSync はコールバック内の更新を適用するのに必要であれば渡されたコールバック外の更新も処理する可能性
があります。例えば、クリックによって引き起こされた保留中の更新が既に存在する場合、React はコールバック
内の更新を処理する前に先にそれらを処理します。
レガシーメソッドのリファレンス
render() {#render}
補足:
createPortal(child, container)
flushSync(callback)
// Force this state update to be synchronous.
flushSync(() => {
setCount(count + 1);
});
// By this point, DOM is updated.
render(element, container[, callback])
ReactDOM
353](https://image.slidesharecdn.com/react-ja-221110111411-b356a3b5/85/react-ja-pdf-353-320.jpg)
![render は React 18 で createRoot に置き換わりました。詳細は createRoot を参照してください。
渡された container の DOM に React 要素をレンダーし、コンポーネントへの参照(ステートレスコンポーネントの場
合は null)を返します。
React 要素がすでに container にレンダーされている場合は更新を行い、最新の React 要素を反映するために必要な
DOM のみを変更します。
オプションのコールバックが渡されている場合は、コンポーネントがレンダーまたは更新された後に実行されます。
補足:
render() は与えられたコンテナの内容を制御します。コンテナ内部のあらゆる既存の DOM 要素は、最初に呼び
出された時に置き換えられます。後続する呼び出しでは効率的な更新のために React の DOM 差分アルゴリズムを
使用します。
render() はコンテナノードを変更しません(コンテナの子要素のみ変更します)
。既存の子要素を上書きせずにコ
ンポーネントを既存の DOM ノードに挿入することが可能な場合があります。
render() は現時点ではルートの ReactComponent インスタンスへの参照を返します。 しかし、この戻り値を使用
する方法は古く、将来のバージョンの React では一部のケースで非同期にコンポーネントをレンダーするようにな
る可能性があるため、使用は避けるべきです。 ルートの ReactComponent インスタンスへの参照が必要な場合は、
ルート要素にコールバック形式の ref を追加することを推奨します。
サーバで描画されたコンテナをクライアントで再利用するために ReactDOM.render() を使用することは非推奨とな
っています。代わりに hydrateRoot() を使用してください。
hydrate() {#hydrate}
Note:
hydrate は React 18 で hydrateRoot に置き換わりました。詳細は hydrateRoot を参照してください。
render() と同様ですが、ReactDOMServer により HTML コンテンツが描画されたコンテナをクライアントで再利用する
(ハイドレーション)ために使用されます。React は既存のマークアップにイベントリスナをアタッチしようとします。
React はレンダーされる内容が、サーバ・クライアント間で同一であることを期待します。React はテキストコンテンツ
の差異を修復することは可能ですが、その不一致はバグとして扱い、修正すべきです。開発用モードでは、React は両者
のレンダーの不一致について警告します。不一致がある場合に属性の差異が修復されるという保証はありません。これは
パフォーマンス上の理由から重要です。なぜなら、ほとんどのアプリケーションにおいて不一致が発生するということは
稀であり、全てのマークアップを検証することは許容不可能なほど高コストになるためです。
hydrate(element, container[, callback])
react
354](https://image.slidesharecdn.com/react-ja-221110111411-b356a3b5/85/react-ja-pdf-354-320.jpg)


![もしあるコンポーネントが同じ props を与えられたときに同じ結果をレンダーするなら、結果を記憶してパフォーマンス
を向上させるためにそれを React.memo でラップすることができます。つまり、React はコンポーネントのレンダーをス
キップし、最後のレンダー結果を再利用します。
React.memo は props の変更のみをチェックします。React.memo でラップしているあなたのコンポーネントがその実装
内で useState 、useReducer や useContext フックを使っている場合、state やコンテクストの変化に応じた再レンダ
ーは発生します。
デフォルトでは props オブジェクト内の複雑なオブジェクトは浅い比較のみが行われます。比較を制御したい場合は 2
番目の引数でカスタム比較関数を指定できます。
これはパフォーマンス最適化のためだけの方法です。バグを引き起こす可能性があるため、レンダーを「抑止する」ため
に使用しないでください。
注意
クラスコンポーネントの shouldComponentUpdate() とは異なり、この areEqual 関数は props が等しいときに
true を返し、props が等しくないときに false を返します。これは shouldComponentUpdate とは逆です。
createElement() {#createelement}
与えられた型の新しい React 要素を作成して返します。type 引数はタグ名の文字列('div' や 'span' など)
、React
component 型(クラスもしくは関数)
、React fragment 型のいずれかです。
JSX で書かれたコードは React.createElement() を用いるコードに変換されます。JSX を使っていれば通常
React.createElement() を直接呼び出すことはありません。詳しくは JSX なしで React を使うを参照してください。
function MyComponent(props) {
/* render using props */
}
function areEqual(prevProps, nextProps) {
/*
nextProps を render に渡した結果が
prevProps を render に渡した結果となるときに true を返し
それ以外のときに false を返す
*/
}
export default React.memo(MyComponent, areEqual);
React.createElement(
type,
[props],
[...children]
)
react
360](https://image.slidesharecdn.com/react-ja-221110111411-b356a3b5/85/react-ja-pdf-360-320.jpg)
![cloneElement() {#cloneelement}
element から新しい React 要素を複製して返します。config には新しく使う props や key や ref を指定します。
結果の要素は元の要素の props に新しい props が浅くマージされたものになります。新しい子要素は既存の子要素を置
き換えます。config 内で key や ref が指定されていない場合、元の要素の key や ref が保持されます。
React.cloneElement() は以下のコードとほぼ同等です:
ただし、ref も保持されます。つまり ref のある子要素を受け取っても、間違って元の React 要素から ref を盗むこ
とはありません。新しい要素にも同じ ref が追加されます。新しい ref や key が存在する場合古いものを置き換えま
す。
この API は非推奨の React.addons.cloneWithProps() の代替として導入されました。
createFactory() {#createfactory}
与えられた型の React 要素を生成する関数を返します。React.createElement() と同様に、type 引数はタグ名の文字列
('div' や 'span' など)
、React コンポーネント型(クラスもしくは関数)
、React フラグメント型のいずれかです。
このヘルパーはレガシーだと考えられているため、代わりに JSX か React.createElement() を直接使用することをおす
すめします。
JSX を使っていれば通常 React.createFactory() を直接呼び出すことはありません。詳しくは JSX なしで React を使
うを参照してください。
isValidElement() {#isvalidelement}
オブジェクトが React 要素であることを確認します。true または false を返します。
React.Children {#reactchildren}
React.Children はデータ構造が非公開の this.props.children を扱うためのユーティリティを提供します。
React.Children.map {#reactchildrenmap}
React.cloneElement(
element,
[config],
[...children]
)
<element.type {...element.props} {...props}>{children}</element.type>
React.createFactory(type)
React.isValidElement(object)
React.Children.map(children, function[(thisArg)])
React の最上位 API
361](https://image.slidesharecdn.com/react-ja-221110111411-b356a3b5/85/react-ja-pdf-361-320.jpg)
![this を thisArg に設定して、children 内に含まれるすべての直下の子要素に対して関数を呼び出します。children
が配列の場合は走査され、配列の各要素に対して関数が呼び出されます。children が null または undefined の場合
はこのメソッドは配列ではなく null または undefined を返します。
補足
children が Fragment の場合、それは 1 つの子要素として扱われ、走査されません。
React.Children.forEach {#reactchildrenforeach}
React.Children.map() と似ていますが、配列を返しません。
React.Children.count {#reactchildrencount}
children に含まれるコンポーネントの総数を返します。これは map または forEach に渡したコールバックが呼ばれる
回数と同じです。
React.Children.only {#reactchildrenonly}
children が 1 つの子要素しか持たないことを確認し、結果を返します。そうでない場合、このメソッドはエラーを投げ
ます。
補足:
React.Children.map() の返り値は React 要素ではなく配列なため、React.Children.only() はそれを受け付け
ません。
React.Children.toArray {#reactchildrentoarray}
データ構造が非公開の children を平坦な配列として返し、それぞれの要素に key を割り当てます。レンダーメソッド内
で子の集合を操作したい場合、特に this.props.children を渡す前に並べ替えたりスライスしたい場合に便利です。
補足:
React.Children.forEach(children, function[(thisArg)])
React.Children.count(children)
React.Children.only(children)
React.Children.toArray(children)
react
362](https://image.slidesharecdn.com/react-ja-221110111411-b356a3b5/85/react-ja-pdf-362-320.jpg)


![Test Renderer
インポート
概要
このパッケージは、DOM やネイティブのモバイル環境に依存せずに React コンポーネントをピュアな JavaScript オブ
ジェクトにレンダーすることができる React レンダラを提供します。
本質的にこのパッケージは、ブラウザや jsdom を利用しなくても、React DOM や React Native コンポーネントがレン
ダーする(DOM ツリーに似た)ビューの階層構造のスナップショットを容易に取得できるようにするためのものです。
例:
JSON ツリーを自動的にファイルに保存し、変更が起こったかをテストで確認するには、Jest のスナップショットテスト
機能が利用できます。詳細について知る
出力を走査して特定のノードを検索し、それらに対してアサーションを行うこともできます。
import TestRenderer from 'react-test-renderer'; // ES6
const TestRenderer = require('react-test-renderer'); // ES5 with npm
import TestRenderer from 'react-test-renderer';
function Link(props) {
return <a href={props.page}>{props.children}</a>;
}
const testRenderer = TestRenderer.create(
<Link page="https://www.facebook.com/">Facebook</Link>
);
console.log(testRenderer.toJSON());
// { type: 'a',
// props: { href: 'https://www.facebook.com/' },
// children: [ 'Facebook' ] }
import TestRenderer from 'react-test-renderer';
function MyComponent() {
return (
<div>
<SubComponent foo="bar" />
<p className="my">Hello</p>
</div>
)
}
function SubComponent() {
return (
<p className="sub">Sub</p>
);
}
react
366](https://image.slidesharecdn.com/react-ja-221110111411-b356a3b5/85/react-ja-pdf-366-320.jpg)
![TestRenderer
TestRenderer.create()
TestRenderer.act()
TestRenderer instance
testRenderer.toJSON()
testRenderer.toTree()
testRenderer.update()
testRenderer.unmount()
testRenderer.getInstance()
testRenderer.root
TestInstance
testInstance.find()
testInstance.findByType()
testInstance.findByProps()
testInstance.findAll()
testInstance.findAllByType()
testInstance.findAllByProps()
testInstance.instance
testInstance.type
testInstance.props
testInstance.parent
testInstance.children
リファレンス
TestRenderer.create() {#testrenderercreate}
渡された React 要素から TestRenderer インスタンスを作成します。実際の DOM は使用しませんが、コンポーネント
を完全な形でメモリにレンダーするので、アサーションを行うことができます。返り値は TestRenderer のインスタンス
となります。
TestRenderer.act() {#testrendereract}
const testRenderer = TestRenderer.create(<MyComponent />);
const testInstance = testRenderer.root;
expect(testInstance.findByType(SubComponent).props.foo).toBe('bar');
expect(testInstance.findByProps({className: "sub"}).children).toEqual(['Sub']);
TestRenderer.create(element, options);
TestRenderer.act(callback);
Test Renderer
367](https://image.slidesharecdn.com/react-ja-221110111411-b356a3b5/85/react-ja-pdf-367-320.jpg)
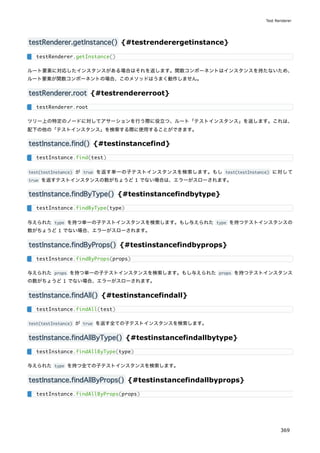
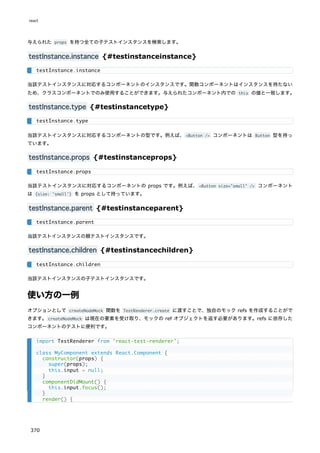

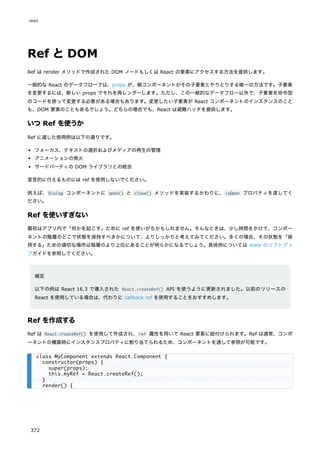
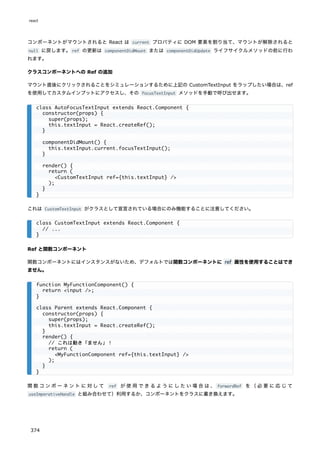
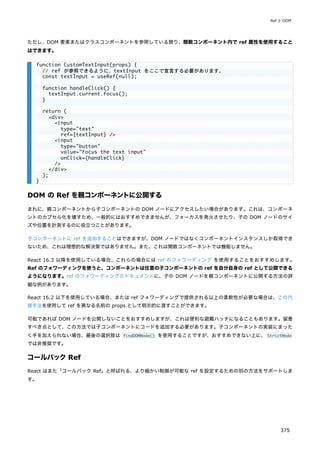
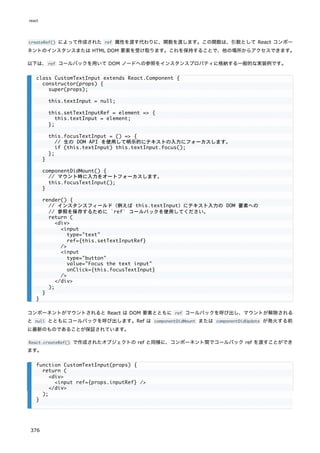
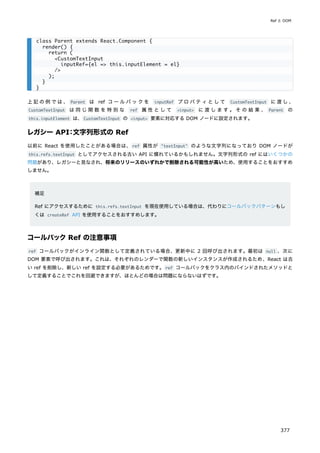


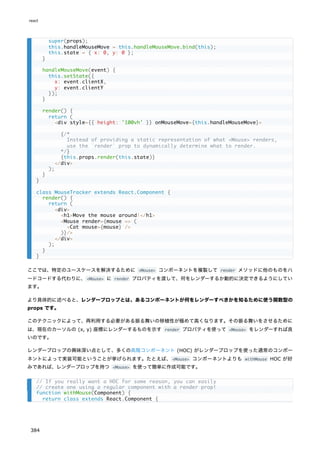


![上記のコードではアロー関数を使いましたが、通常の関数でも動作します:
state の更新はマージされる
setState() を呼び出した場合、React は与えられたオブジェクトを現在の state にマージします。
例えば、あなたの state はいくつかの独立した変数を含んでいるかもしれません:
その場合、別々の setState() 呼び出しで、それらの変数を独立して更新することができます:
マージは浅く (shallow) 行われるので、this.setState({comments}) は this.state.posts をそのまま残しますが、
this.state.comments を完全に置き換えます。
データは下方向に伝わる
親コンポーネントであれ子コンポーネントであれ、特定の他のコンポーネントがステートフルかステートレスかを知るこ
とはできませんし、特定のコンポーネントの定義が関数型かクラス型かを気にするべきではありません。
これが、state はローカルのものである、ないしはカプセル化されている、と言われる理由です。state を所有してセット
するコンポーネント自身以外からはその state にアクセスすることができません。
// Correct
this.setState((state, props) => ({
counter: state.counter + props.increment
}));
// Correct
this.setState(function(state, props) {
return {
counter: state.counter + props.increment
};
});
constructor(props) {
super(props);
this.state = {
posts: [],
comments: []
};
}
componentDidMount() {
fetchPosts().then(response => {
this.setState({
posts: response.posts
});
});
fetchComments().then(response => {
this.setState({
comments: response.comments
});
});
}
state とライフサイクル
395](https://image.slidesharecdn.com/react-ja-221110111411-b356a3b5/85/react-ja-pdf-395-320.jpg)

![これであなたのコードで Flow の型定義が使えるようになります。
補足:
Flow を使うためには必ず react のプリセットが必要というわけではありません。ただ、よく組み合わせて使われ
ています。Flow はそのままでも JSX のシンタックスを認識できます。
他のビルド設定
もし、Create React App も Babel も使用していない場合、flow-remove-types を使って Flow の型定義を剥がすこと
ができます。
Flow の実行
もし、今までの手順を踏んでいる場合、以下のコマンドで Flow が実行されます。
npm を使っている場合:
以下のようなメッセージが表示されます。
Flow の型定義の追記
Flow の初期設定では、以下のコメントが含まれているファイルのみ型チェックを行います。
上記コメントは基本的にファイルの頭に記載します。あなたのプロジェクトのいくつかのファイルに足してみて、yarn
flow や npm run flow を実行して Flow が何か問題を検知するかどうかを確認してみましょう。
Flow の型チェックを、コメントが含まれているかにかかわらず全てのファイルに対してかける設定も存在します。これは
既存のプロジェクトに対してかけると確認箇所が大量に出てしまいますが、新規プロジェクトの立ち上げで全てのファイ
ルに型を入れたい場合は合理的な選択でしょう。
これで準備は整いました! Flow についてより深く知りたい場合には以下の資料が役立つでしょう。
Flow Documentation: Type Annotations
Flow Documentation: Editors
Flow Documentation: React
"react"
]
}
yarn flow
npm run flow
No errors!
✨ Done in 0.17s.
// @flow
静的型チェック
399](https://image.slidesharecdn.com/react-ja-221110111411-b356a3b5/85/react-ja-pdf-399-320.jpg)


![データの取得
あなたのテスト内で本物の API を呼ぶかわりに、リクエストをモック化してダミーのデータを返すようにできます。デー
タ取得をモック化して「フェイク」のデータを使うことで、バックエンドが利用できないせいでテストが不確実にならず
に済み、テストの動作が高速になります。とはいえ、テストの一部については、アプリケーション全体が協調して動作し
ているかを確認できる "end-to-end" のフレームワークを利用して実行したいかもしれません。
// hello.test.js
import React from "react";
import { render, unmountComponentAtNode } from "react-dom";
import { act } from "react-dom/test-utils";
import Hello from "./hello";
let container = null;
beforeEach(() => {
// setup a DOM element as a render target
container = document.createElement("div");
document.body.appendChild(container);
});
afterEach(() => {
// cleanup on exiting
unmountComponentAtNode(container);
container.remove();
container = null;
});
it("renders with or without a name", () => {
act(() => {
render(<Hello />, container);
});
expect(container.textContent).toBe("Hey, stranger");
act(() => {
render(<Hello name="Jenny" />, container);
});
expect(container.textContent).toBe("Hello, Jenny!");
act(() => {
render(<Hello name="Margaret" />, container);
});
expect(container.textContent).toBe("Hello, Margaret!");
});
// user.js
import React, { useState, useEffect } from "react";
export default function User(props) {
const [user, setUser] = useState(null);
async function fetchUserData(id) {
const response = await fetch("/" + id);
setUser(await response.json());
}
useEffect(() => {
fetchUserData(props.id);
react
414](https://image.slidesharecdn.com/react-ja-221110111411-b356a3b5/85/react-ja-pdf-414-320.jpg)
![このコンポーネントに対するテストは以下のように書けます:
}, [props.id]);
if (!user) {
return "loading...";
}
return (
<details>
<summary>{user.name}</summary>
<strong>{user.age}</strong> years old
<br />
lives in {user.address}
</details>
);
}
// user.test.js
import React from "react";
import { render, unmountComponentAtNode } from "react-dom";
import { act } from "react-dom/test-utils";
import User from "./user";
let container = null;
beforeEach(() => {
// setup a DOM element as a render target
container = document.createElement("div");
document.body.appendChild(container);
});
afterEach(() => {
// cleanup on exiting
unmountComponentAtNode(container);
container.remove();
container = null;
});
it("renders user data", async () => {
const fakeUser = {
name: "Joni Baez",
age: "32",
address: "123, Charming Avenue"
};
jest.spyOn(global, "fetch").mockImplementation(() =>
Promise.resolve({
json: () => Promise.resolve(fakeUser)
})
);
// Use the asynchronous version of act to apply resolved promises
await act(async () => {
render(<User id="123" />, container);
});
expect(container.querySelector("summary").textContent).toBe(fakeUser.name);
expect(container.querySelector("strong").textContent).toBe(fakeUser.age);
expect(container.textContent).toContain(fakeUser.address);
テストのレシピ集
415](https://image.slidesharecdn.com/react-ja-221110111411-b356a3b5/85/react-ja-pdf-415-320.jpg)
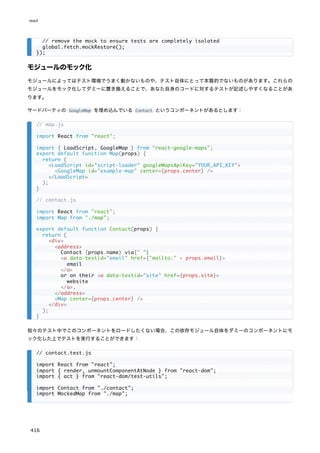
![イベント
DOM 要素に対して本物の DOM イベントをディスパッチし、その結果に対してアサーションを行うことをお勧めします。
以下の Toggle コンポーネントを考えてみましょう:
jest.mock("./map", () => {
return function DummyMap(props) {
return (
<div data-testid="map">
{props.center.lat}:{props.center.long}
</div>
);
};
});
let container = null;
beforeEach(() => {
// setup a DOM element as a render target
container = document.createElement("div");
document.body.appendChild(container);
});
afterEach(() => {
// cleanup on exiting
unmountComponentAtNode(container);
container.remove();
container = null;
});
it("should render contact information", () => {
const center = { lat: 0, long: 0 };
act(() => {
render(
<Contact
name="Joni Baez"
email="test@example.com"
site="http://test.com"
center={center}
/>,
container
);
});
expect(
container.querySelector("[data-testid='email']").getAttribute("href")
).toEqual("mailto:test@example.com");
expect(
container.querySelector('[data-testid="site"]').getAttribute("href")
).toEqual("http://test.com");
expect(container.querySelector('[data-testid="map"]').textContent).toEqual(
"0:0"
);
});
// toggle.js
import React, { useState } from "react";
export default function Toggle(props) {
テストのレシピ集
417](https://image.slidesharecdn.com/react-ja-221110111411-b356a3b5/85/react-ja-pdf-417-320.jpg)
![これに対するテストは以下のように書けます:
const [state, setState] = useState(false);
return (
<button
onClick={() => {
setState(previousState => !previousState);
props.onChange(!state);
}}
data-testid="toggle"
>
{state === true ? "Turn off" : "Turn on"}
</button>
);
}
// toggle.test.js
import React from "react";
import { render, unmountComponentAtNode } from "react-dom";
import { act } from "react-dom/test-utils";
import Toggle from "./toggle";
let container = null;
beforeEach(() => {
// setup a DOM element as a render target
container = document.createElement("div");
document.body.appendChild(container);
});
afterEach(() => {
// cleanup on exiting
unmountComponentAtNode(container);
container.remove();
container = null;
});
it("changes value when clicked", () => {
const onChange = jest.fn();
act(() => {
render(<Toggle onChange={onChange} />, container);
});
// get a hold of the button element, and trigger some clicks on it
const button = document.querySelector("[data-testid=toggle]");
expect(button.innerHTML).toBe("Turn on");
act(() => {
button.dispatchEvent(new MouseEvent("click", { bubbles: true }));
});
expect(onChange).toHaveBeenCalledTimes(1);
expect(button.innerHTML).toBe("Turn off");
act(() => {
for (let i = 0; i < 5; i++) {
button.dispatchEvent(new MouseEvent("click", { bubbles: true }));
}
});
react
418](https://image.slidesharecdn.com/react-ja-221110111411-b356a3b5/85/react-ja-pdf-418-320.jpg)
![その他の DOM イベントやそれらのプロパティは MDN で解説されています。React のリスナにイベントが到達するよう
に、作成するそれぞれのイベントに対して { bubbles: true } を指定する必要があることに気を付けてください。React
ではイベントは自動的にルート要素にデリゲートする形で処理されるためです。
補足:
React Testing Library にはイベントを発火するためのより簡便なヘルパがあります。
タイマー
あなたのコードでは、未来に行う作業をスケジュールするために setTimeout のようなタイマーベースの関数を使ってい
るかもしれません。以下の例では、選択肢のパネルを表示してどれかが選択されるまで待ちますが、5 秒以内に選択が起
きなければタイムアウトするようになっています。
このコンポーネントに対するテストは、Jest のタイマーモックを活用し、可能性のある状態のそれぞれをテストする、と
いうやりかたで書くことができます。
expect(onChange).toHaveBeenCalledTimes(6);
expect(button.innerHTML).toBe("Turn on");
});
// card.js
import React, { useEffect } from "react";
export default function Card(props) {
useEffect(() => {
const timeoutID = setTimeout(() => {
props.onSelect(null);
}, 5000);
return () => {
clearTimeout(timeoutID);
};
}, [props.onSelect]);
return [1, 2, 3, 4].map(choice => (
<button
key={choice}
data-testid={choice}
onClick={() => props.onSelect(choice)}
>
{choice}
</button>
));
}
// card.test.js
import React from "react";
import { render, unmountComponentAtNode } from "react-dom";
import { act } from "react-dom/test-utils";
import Card from "./card";
テストのレシピ集
419](https://image.slidesharecdn.com/react-ja-221110111411-b356a3b5/85/react-ja-pdf-419-320.jpg)
![フェイクタイマーは一部のテストでのみ使うようにすることができます。上記の例では、jest.useFakeTimers() を呼ぶ
ことでフェイクタイマーを有効化しています。これによる主な利点は、実行されるまで実際に 5 秒待つ必要がないという
ことと、テストのためだけにコンポーネントのコードをより複雑にする必要がない、ということです。
スナップショットテスト
Jest のようなフレームワークでは、toMatchSnapshot / toMatchInlineSnapshot を使ってデータの「スナップショット」
を保存することができます。これを使うことで、レンダーされたコンポーネントの出力を「セーブ」しておき、変更がス
ナップショットへの変更として明示的にコミットされるよう保証できます。
以下の例では、コンポーネントをレンダーし、作成された HTML を pretty パッケージで整形し、インラインスナップシ
ョットとして保存します:
act(() => {
container
.querySelector("[data-testid='2']")
.dispatchEvent(new MouseEvent("click", { bubbles: true }));
});
expect(onSelect).toHaveBeenCalledWith(2);
});
// hello.test.js, again
import React from "react";
import { render, unmountComponentAtNode } from "react-dom";
import { act } from "react-dom/test-utils";
import pretty from "pretty";
import Hello from "./hello";
let container = null;
beforeEach(() => {
// setup a DOM element as a render target
container = document.createElement("div");
document.body.appendChild(container);
});
afterEach(() => {
// cleanup on exiting
unmountComponentAtNode(container);
container.remove();
container = null;
});
it("should render a greeting", () => {
act(() => {
render(<Hello />, container);
});
expect(
pretty(container.innerHTML)
).toMatchInlineSnapshot(); /* ... gets filled automatically by jest ... */
act(() => {
render(<Hello name="Jenny" />, container);
});
テストのレシピ集
421](https://image.slidesharecdn.com/react-ja-221110111411-b356a3b5/85/react-ja-pdf-421-320.jpg)

![React の流儀
'blog/2013/11/05/thinking-in-react.html'
'docs/thinking-in-react-zh-CN.html'
巨大で軽快な Web アプリを開発する場合に、React は最高の手段であると、私たちは考えています。Facebook や
Instagram といった私たちのサービスにおいても、とてもよくスケールしています。
React のすばらしい特長がいくつもありますが、あなたがどんなアプリを作ろうかと考えたことが、そのままアプリの作
り方になる、というのはそのひとつです。本ドキュメントでは、検索可能な商品データ表を React で作っていく様子をお
見せしましょう。
モックから始めよう
すでに、JSON API が実装済みで、デザイナーからもデザインモックがもらえているとしましょう。モックは次のような
見た目だったとします。
デザインモック
また、JSON API は次のようなデータを返してくるとしましょう。
Step 1: UI をコンポーネントの階層構造に落とし込む
まず最初に行うのは、モックを形作っている各コンポーネント(構成要素)を四角で囲んで、それぞれに名前をつけてい
くことです。もしあなたがデザイナーと一緒に仕事をしている場合は、彼らがすでにこれに相当する作業を終えている可
能性がありますので、話をしに行きましょう。彼らが Photoshop でレイヤ名にしていた名前が、最終的にはあなたの
React コンポーネントの名前になりうるのです!
しかし、どうやって単一のコンポーネントに括るべき範囲を見つけられるのでしょうか。ちょうど、新しい関数やオブジ
ェクトをいつ作るのかを決めるときと、同じ手法が使えます。このような手法のひとつに、単一責任の原則 (single
responsibility principle) があり、これはすなわち、ひとつのコンポーネントは理想的にはひとつのことだけをするべき
だということです。将来、コンポーネントが肥大化してしまった場合には、小さなコンポーネントに分割するべきです。
[
];
react
424](https://image.slidesharecdn.com/react-ja-221110111411-b356a3b5/85/react-ja-pdf-424-320.jpg)
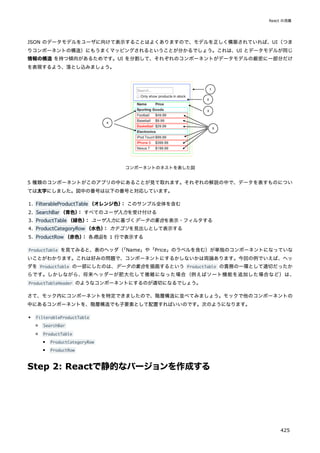

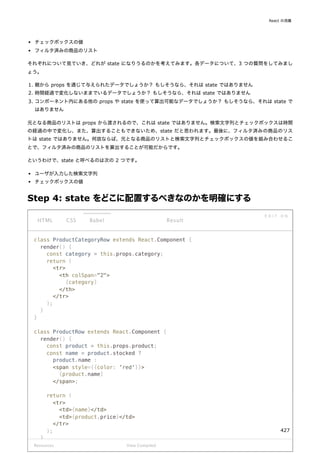
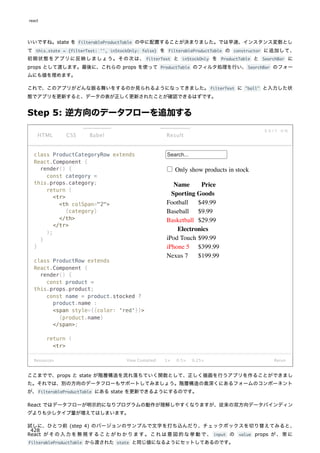
![optionalSymbol: PropTypes.symbol,
// Anything that can be rendered: numbers, strings, elements or an array
// (or fragment) containing these types.
optionalNode: PropTypes.node,
// A React element.
optionalElement: PropTypes.element,
// A React element type (ie. MyComponent).
optionalElementType: PropTypes.elementType,
// You can also declare that a prop is an instance of a class. This uses
// JS's instanceof operator.
optionalMessage: PropTypes.instanceOf(Message),
// You can ensure that your prop is limited to specific values by treating
// it as an enum.
optionalEnum: PropTypes.oneOf(['News', 'Photos']),
// An object that could be one of many types
optionalUnion: PropTypes.oneOfType([
PropTypes.string,
PropTypes.number,
PropTypes.instanceOf(Message)
]),
// An array of a certain type
optionalArrayOf: PropTypes.arrayOf(PropTypes.number),
// An object with property values of a certain type
optionalObjectOf: PropTypes.objectOf(PropTypes.number),
// An object taking on a particular shape
optionalObjectWithShape: PropTypes.shape({
color: PropTypes.string,
fontSize: PropTypes.number
}),
// An object with warnings on extra properties
optionalObjectWithStrictShape: PropTypes.exact({
name: PropTypes.string,
quantity: PropTypes.number
}),
// You can chain any of the above with `isRequired` to make sure a warning
// is shown if the prop isn't provided.
requiredFunc: PropTypes.func.isRequired,
// A required value of any data type
requiredAny: PropTypes.any.isRequired,
// You can also specify a custom validator. It should return an Error
// object if the validation fails. Don't `console.warn` or throw, as this
// won't work inside `oneOfType`.
customProp: function(props, propName, componentName) {
if (!/matchme/.test(props[propName])) {
return new Error(
'Invalid prop `' + propName + '` supplied to' +
' `' + componentName + '`. Validation failed.'
);
}
react
430](https://image.slidesharecdn.com/react-ja-221110111411-b356a3b5/85/react-ja-pdf-430-320.jpg)
![単一の子要素を要求する
PropTypes.element を使うことで、コンポーネントに単一の子要素しか渡せないことを指定することができます。
props のデフォルト値
defaultProps というプロパティを割り当てることで、props に値が渡されなかった際のデフォルト値を定義することが
できます。
},
// You can also supply a custom validator to `arrayOf` and `objectOf`.
// It should return an Error object if the validation fails. The validator
// will be called for each key in the array or object. The first two
// arguments of the validator are the array or object itself, and the
// current item's key.
customArrayProp: PropTypes.arrayOf(function(propValue, key, componentName, location, propFul
if (!/matchme/.test(propValue[key])) {
return new Error(
'Invalid prop `' + propFullName + '` supplied to' +
' `' + componentName + '`. Validation failed.'
);
}
})
};
import PropTypes from 'prop-types';
class MyComponent extends React.Component {
render() {
// This must be exactly one element or it will warn.
const children = this.props.children;
return (
<div>
{children}
</div>
);
}
}
MyComponent.propTypes = {
children: PropTypes.element.isRequired
};
class Greeting extends React.Component {
render() {
return (
<h1>Hello, {this.props.name}</h1>
);
}
}
// Specifies the default values for props:
Greeting.defaultProps = {
name: 'Stranger'
};
PropTypes を用いた型チェック
431](https://image.slidesharecdn.com/react-ja-221110111411-b356a3b5/85/react-ja-pdf-431-320.jpg)