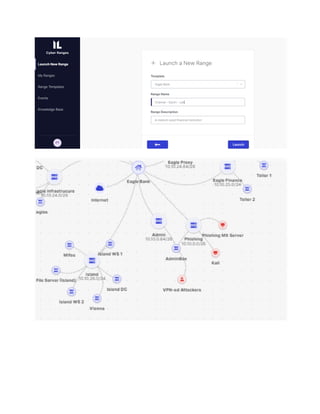
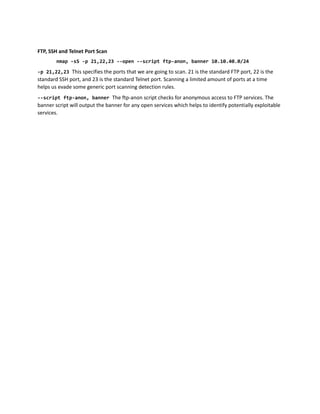
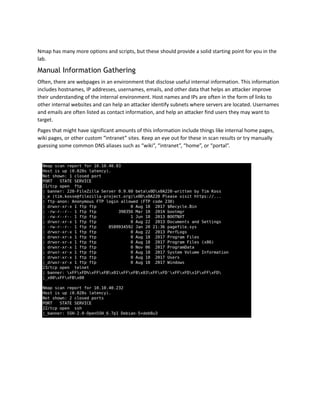
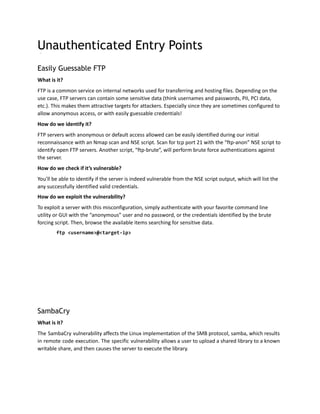
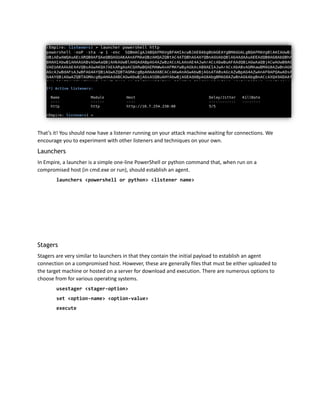
SlideShare a Scribd company logo
Purple Teaming Workshop
SACON 2022
Lab Manual
Contents
Introduction 3
Features 3
Purpose 4
Prerequisites and Useful Tools 5
Prerequisite Knowledge 5
Tools 5
How to Connect 7
Methodology Overview 8
Vulnerability Scan vs Pentest (vs Real Attacker) 8
Attack Chain 8
Preparing for a Penetration Test 9
Virtual Machine Updates and Sanitization 9
Host Machine Configuration 9
Reconnaissance and Vulnerability Discovery 10
Initial Enumeration 10
Scanning 11
Manual Information Gathering 14
Unauthenticated Entry Points 15
Easily Guessable FTP 15
SambaCry 15
Missing Windows Patches 18
Phishing 20
Command and Control Infrastructure 24
Following topic will covered as part of Part 2 of the workshop
Privilege Escalation 28
Finding Credentials on a Compromised System 29
Lateral Movement 37
Active Directory 42
Searching for Target Information 56
Introduction
Welcome to your Workshop Lab environment! We’re excited to host this environment and have a lot of
great content in store for you. What follows in this manual is a description of the lab, the tools and
knowledge you’ll need to set yourself up for success, and a technical walkthrough that will teach you the
skills necessary to perform a complete network penetration test and more.
Features
This lab network has been designed to mirror a legitimate corporate network as closely as possible.
Based on our experience conducting internal pentests over the years, we’ve included core features that
help to provide a true representation of the real world.
Windows Active Directory
All Demo environments feature a configured Active Directory (AD) with at least two domains. Larger
labs may have a more sophisticated AD setup that allows an experienced penetration tester to take
advantage of subtle misconfigurations such as domain trust issues. In every lab, AD is used extensively
to manage privilege across the environment. As in the real world, understanding and abusing Active
Directory is a key component of completing a pentest of your lab.
User Simulation
Real networks have active users, and so does your lab! As part of creating this simulated network, we’ve
developed a PowerShell based tool that will simulate common user behaviors including accessing file
shares, browsing the internet, and opening emails. This means you have additional attack vectors at your
disposal. You can even conduct a full phishing campaign in your lab and use the access obtained to
further compromise the network.
Technical Vulnerabilities
Every network we’ve ever encountered, big or small, contains at least a few technical vulnerabilities or
misconfigurations. There are several intentionally vulnerable systems configured throughout your lab
network which will allow you to obtain an initial “foothold” by successfully exploiting the vulnerability.
Network “Trophies”
It’s important to demonstrate the impact of a network compromise. In real world engagements, we
typically attempt to gain access to critical business data (PII, PCI, HIPAA, etc.) to show the consequences
of the vulnerabilities we identify. So, our labs contain examples of sensitive data that you can access to
practice “trophy hunting” and proving your impact.
Endpoint Visibility
Corporate networks often have various detection and alerting mechanisms in place. Your lab is deployed
with Splunk to provide endpoint visibility. This allows blue teamers and red teamers alike to learn what
malicious traffic looks like, and how to detect it (or evade detection).
In addition to the core features above, your lab has a few more notable characteristics. First, the entire
lab is hosted in the cloud on Amazon’s AWS. This ensures reliability and accessibility from anywhere. In
addition, your lab network can only be accessed through a certificate-based VPN which was distributed
along with this lab manual. Another advantage of hosting the lab infrastructure in AWS manifests itself in
our ability to quickly change various configurations across the network. This allows us to easily change
how “difficult” the lab is and to simulate more mature organizations with additional network
segmentation and defensive controls.
Purpose
There are numerous use cases for your lab, and probably more that we haven’t yet considered. We built
your lab with the three following primary use cases in mind:
Pentest / Red Team Training
The main goal of your lab is to help you develop the skills necessary to perform a network penetration
test or red team engagement in the real world, on a live production network. This includes learning how
to identify vulnerabilities, exploit them, and use the access obtained to further compromise the
network. In addition to the lab physically mirroring a corporate network, the methodology used
throughout this manual also mirrors industry standard practices for performing these types of
engagements. After completing this lab, you should have acquired the technical skills and high-level
knowledge to add value to any internal penetration test or red team you participate in.
Pentest / Red Team Technique Development and Practice
This lab also serves as a valuable platform for developing new tradecraft, testing exploits in a safe
environment, and practicing skills you already have. Because of the realistic nature of the lab, and our
ability to customize it to your specific needs, your lab is a powerful tool for any type of penetration
testing or red team activity that you might not want to perform for the first time on a production
network.
Blue Team Lens
Learn what red team activity looks like in a modern detection tool. With the deployment of Splunk
agents across much of the environment, your lab will track events triggered by various testing activities.
Visibility into events triggered by malicious activities helps us to become stealthier and invent new
techniques to bypass detection. Basic alerting also helps to ensure that you are avoiding particularly
risky behavior such as password spraying.
Prerequisites and Useful Tools
While there are no absolute pre-requisites for learning in the lab, there are some fundamental skills that
will speed your progress. To get the most out of your experience, we recommend the following:
Prerequisite Knowledge
A Working Knowledge of Networking Concepts
Your lab simulates a corporate network, so some basic networking skills will go a long way in
understanding various aspects of the penetration testing process. Among the important concepts to be
familiar with are:
TCP/IP: https://technet.microsoft.com/en-us/library/cc786128(v=ws.10).aspx
DNS: https://technet.microsoft.com/en-us/library/cc772774(v=ws.10).aspx
Network Segmentation / Firewalls: https://technet.microsoft.com/en-us/library/cc700820.aspx
An Understanding of Windows Active Directory
A majority of the privilege escalation scenarios encountered in corporate environments involve abusing
Active Directory. Understanding AD and how it manages privilege in a Windows environment is crucial
for effective security testing. We strongly encourage some research into Windows Active Directory if you
have not worked with AD groups or privileges prior to this lab.
Familiarity with the Windows and Linux Operating Systems
A lot of post exploitation activity involves interacting directly through the command line, or a command
and control channel with a similar feel. Knowing your way around the Windows and Linux filesystems, as
well as some comfortability using cmd.exe and bash, will smooth your pentesting experience.
Windows Command Line Reference: https://ss64.com/nt/
PowerShell Reference: https://ss64.com/ps/
Linux Bash Reference: https://ss64.com/bash/
Tools
Kali Linux
Kali is a Linux distribution optimized for penetration testing with an assortment of red team tools
installed and configured to make malicious activities easier (e.g. you log in as root). While there are
certainly other hacking focused distros out there, Kali is by far the most popular and will be used for
examples throughout this lab.
Download: https://www.kali.org/downloads/
Documentation: https://docs.kali.org/
Nmap
Nmap is a scanning tool which can identify open ports and running services, and even identify and
exploit vulnerabilities. It is great for enumerating targets on a network, as well as checking for common
vulnerabilities. It is included in Kali Linux and available through the repositories of most Linux
distributions.
Documentation: https://nmap.org/book/man.html
PowerSploit
PowerSploit is a PowerShell toolset with features for all phases of the pentesting process from
reconnaissance to exfiltration. Some of the more popular scripts that you will use in the lab are
PowerView (in the Recon module) and PowerUp (in the Privesc module).
Download: https://github.com/PowerShellMafia/PowerSploit
Mimikatz
Mimikatz is best known for being able dump Windows credentials from memory. It also contains
functions for manipulating tokens, exporting certificates, and controlling services, among others.
Mimikatz is included in most post-exploitation frameworks such as PowerShell Empire which the
examples in this guide will use.
Download: https://github.com/gentilkiwi/mimikatz/releases
Unofficial Guide: https://adsecurity.org/?page_id=1821
Command and Control Channels
Command and control (C2) channels provide remote control over a compromised system. The
communication is typically described as ‘bind’, where the compromised host listens for commands from
the server, or ‘reverse’, where the compromised host calls out to the server which responds with
commands. Reverse communication is usually preferable because it is far more likely that the
compromised host can reach out past any firewalls to the attacker’s server than the other way around.
Here are just a few of the many different options for C2 software. These provide a C2 channel as well as a
post-exploitation framework with numerous functions built in and the ability to create and import new
functionality.
Metasploit’s Meterpreter
Metasploit Framework is a platform for penetration testing which includes a multitude of features from
scanning to exploitation. It also includes an agent, “Meterpreter”, with a C2 channel to communicate
over. Meterpreter’s network communication is well understood and likely to be detected in monitored
environments, so use with caution.
Guide: https://www.offensive-security.com/metasploit-unleashed/
Documentation: https://metasploit.help.rapid7.com/docs/installing-the-metasploit-framework
Cobalt Strike’s Beacon
Cobalt Strike provides a post-exploitation agent with advanced C2 channel communication. Malleable C2
profiles allow you to customize how your C2 traffic looks on the network so you can emulate existing
threat actors or legitimate website traffic. Cobalt Strike provides an easy to use graphical interface and
has a multitude of built in functionality. It’s our favorite command and control tool but commands a
premium price.
Documentation: https://www.cobaltstrike.com/support
PowerShell Empire Agents
The examples in this lab manual are going to use PowerShell Empire wherever post-exploitation tools
and C2 channels are required. Empire is a pure PowerShell agent, though it does not require
powershell.exe for an agent to run. It features adaptable network communication, encrypted
communication, and an easy to use framework.
Documentation: https://www.powershellempire.com/?page_id=83
Download: https://github.com/EmpireProject/Empire
How to Connect
Connecting to the lab is simple! Along with the lab materials, you should have also received a
connection packet including an OpenVPN configuration file.
Linux
If you’re running a Linux based testing VM like Kali, connecting to the lab is as simple as installing
OpenVPN and resolvconf (included in most Linux repo’s) then running OpenVPN to connect with the
provided configuration file:
sudo apt-get install openvpn resolvconf
sudo openvpn <linux_client.ovpn>
Windows
If you’d like to connect a Windows system to the lab, you’ll need the OpenVPN client for Windows
(https://openvpn.net/index.php/open-source/downloads.html). Once installed, put your config file in
the ‘config’ directory under your OpenVPN install location (probably C:Program FilesOpenVPNconfig).
Then open the GUI, right click on the OpenVPN task bar icon, and select ‘Connect’. More detailed GUI
instructions can be found here: https://community.openvpn.net/openvpn/wiki/OpenVPN-GUI
After successfully connecting, you should see an additional network adapter with a 10.9.254.0/24 IP
address.
Methodology Overview
This lab manual attempts to follow an industry standard methodology for penetration testing. Here we
provide an overview of this methodology and its various components.
Vulnerability Scan vs Pentest (vs Real Attacker)
It’s important to define what we mean by penetration test, and to differentiate that from a vulnerability
scan and from an attack simulation (or real attacker). A penetration test aims to identify vulnerabilities
and weaknesses in an environment that an attacker could use to gain unauthorized access to resources,
and to prove the impact that these weaknesses could have. To do this, a penetration tester will go
through the steps of an attack from reconnaissance to accessing sensitive resources and data. However,
they are not focused on remaining undetected, or taking the shortest possible path to a target resource;
things that a real attacker or attack simulation would likely aim to do.
A vulnerability scan simply aims to identify the technical vulnerabilities in an environment but does not
go through the act of exploiting any weaknesses or proving impact.
Attack Chain
The “attack chain” consists of the various individual steps taken during a penetration test. These steps
are largely agreed upon throughout the industry, however there are various groupings and granularities
implemented across organizations. For the purposed of this lab, we’ll assume the following four phases
of the attack chain.
Reconnaissance and Vulnerability Discovery
This phase of the attack chain uses discovery and scanning methods to better understand the
environment and identify potentially vulnerable systems and services.
Exploitation: Establishing a Foothold
During exploitation, potential vulnerabilities identified in the previous phase are technically exploited,
giving the attacker some level of access on the network.
Privilege Escalation and Lateral Movement
In this phase of the attack chain, an attacker furthers their access in the environment by compromising
additional systems and using various techniques to gain higher privileges on the network.
Data Exfiltration
Sensitive data is extracted from the environment to the attackers control, demonstrating the impact of
the penetration test.
Preparing for a Penetration Test
Proper preparation before any penetration test is a key factor in success. Below we outline the steps we
generally take before an engagement and suggest you do the same before diving into the lab
environment.
Virtual Machine Updates and Sanitization
The first step we take when preparing for an engagement is to ensure that all our tools and testing
machines are up to date. With Kali, this includes tools and scripts that came prepackaged with the OS as
well as any additional tools we’ve added. Also, we ensure that our testing virtual machines (VMs) are
clean of any prior client data (if you’re in the consulting business).
Software Updates
In general, most of the tools in Kali will be updated automatically with system updates. However, some
may need to be manually updated. Be sure to run any update scripts or functions within these tools
before starting any penetration testing. In addition, we always update our testing image.
apt-get update && apt-get upgrade
Sanitizing Client Data
Especially if you are a consultant, you may have performed a previous penetration test or red team
engagement with your testing VM. This means there is a good chance some client specific data was
exfiltrated to your system. If you find yourself on a client network, with different client data sitting on
your VM, this is NOT good. It could even land you in some legal trouble. To avoid this uncomfortable
situation, we take the following steps:
Create a “Clean” Snapshot – On a version of your testing VM which has never touched a client network,
preferably a fresh Kali image, perform all the necessary software and system updates. Create a snapshot
of this updated and clean virtual machine.
Revert to “Clean” Snapshot – Anytime you are about to go on an engagement, be sure to revert to the
latest “clean” snapshot of your testing VM.
Update Tools – Unless you reverted to a clean image you have just created, you’ll want to make sure all
your tools are up to date. Reperform the software update steps described above.
These steps should guarantee the VM used for testing has no leftover client data from previous tests.
Host Machine Configuration
In most scenarios, your host machine will not be used except in a supporting capacity. In addition, your
host probably has some configuration info that may give you away to defenders if leaked on the network
(company hostname, unusual network traffic, etc.). For this reason, we always prefer to keep our hosts
completely off the network we’re assessing. When physically plugging in to a network, you can
accomplish this by disabling the ethernet adapter on your host machine. Leaving the VM adapters
enabled will allow you to still bridge your testing virtual machines to the ethernet and establish a
network connection.
Setup Workshop Lab using Snaplabs Environment
Following screenshots will guide you to setup the workshop lab using Snaplabs environment.
Setup Wazuh to monitor Network activity
Please view Demo Video
Reconnaissance and Vulnerability
Discovery
At the beginning of most penetration tests, you plug into the corporate network and begin the
assessment with no privileges. This portion of the manual will walk you through this scenario and define
a methodology for establishing access and obtaining domain accounts.
Initial Enumeration
The first step after plugging in (or in this case, establishing a VPN connection) is to check your IP
configuration. You’ll want to make sure you have an internal IP address like the highlighted network
adapter configuration below. You’ll notice we have a “tun0” adapter. This happens due to the VPN
connection creating an additional interface. Plugging into an ethernet jack should configure the “eth0”
adapter (if DHCP is enabled).
Now that you’ve successfully obtained an IP address, you’ll want to identify some systems on the
network. An easy starting point is to perform some network sniffing, or query for DNS and Domain
Controllers.
By viewing the /etc/resolv.conf settings, we can see any DNS or Domain settings pushed to our system
through DHCP when we obtained an IP address.
Take note of the domain and DNS server IP addresses in your favorite note taking tool (OneNote is our
go-to). Now that we know the domain, we can query for Domain Controllers as well. A simple nslookup
can accomplish this for us:
nslookup -q=SRV _ldap._tcp.<fully qualified domain name>
Note these domain controllers as well, we’ll be targeting them later! At this point we’ve identified a
subnet of the lab which clearly contains some important servers (10.10.93.0/24). From here we could
start to do some port scanning to identify other systems or services, but we can do some additional
enumeration before we take that step.
Scanning
Now that we’ve identified a few systems in the environment we can make some good guesses about
where we are likely to find more systems. We’ll start by using Nmap to scan the subnet identified from
the domain controllers and DNS server.
When using Nmap, there are many things we can do to keep our scans relatively stealthy. Let’s walk
through some sample commands to check out a few of the options.
Web Port Scan
nmap -sS -p 80,443,8080 --open --script http-title --script-args
'http.useragent="Mozilla/5.0 (Windows NT 6.3; Trident/7.0; rv:11.0) like
Gecko"' 10.10.40.0/24
-sS This specifies a SYN scan where Nmap will send a SYN packet and listen for a SYN-ACK packet in
response. If there is a response, Nmap will send a RST packet to close the connection without
performing a full TCP handshake. If you’re running as root in Kali, this is the default scan type. This may
not be the case on other operating systems or when scanning as a non-root user.
-p 80,443,8080 This specifies the ports that we are going to scan. 80 and 443 are the default HTTP
and HTTPS ports respectively, while 8080 is a common port for other HTTP applications and admin
interfaces. Scanning a limited amount of ports at a time helps us evade some generic port scanning
detection rules.
--open This specifies that we only want open ports to be returned in the results.
--script http-title Here we specify a script to run on open ports that will output the title of
webpages. These scripts can be found in /usr/share/nmap/scripts/ if you want to check them out.
--script-args 'http.useragent="Mozilla/5.0 (Windows NT 6.3; Trident/7.0; rv:11.0)
like Gecko"' This specifies a user agent string to use with the script. Nmap’s default user agent string
says that it is Nmap, so that is an easy way to get caught. Here we pretend to be Internet Explorer.
10.10.40.0/24 Lastly, this is the range we are going to scan! Keeping this to one subnet at a time will
increase the chances of your scans staying under the radar.
Database Port Scan
nmap -sS -p 1433,3306 --open --script ms-sql-info,
ms-sql-empty-password, mysql-info, mysql-empty-password 10.10.40.0/24
-p 1433,3306 This specifies the ports that we are going to scan. 1433 is the default port for an MSSQL
database, and 3306 is the default port for a MySQL database. Scanning a limited amount of ports at a
time helps us evade some generic port scanning detection rules.
--script ms-sql-info, ms-sql-empty-password, mysql-info, mysql-empty-password These
scripts will retrieve information about databases on open ports, and check for empty passwords.
FTP, SSH and Telnet Port Scan
nmap -sS -p 21,22,23 --open --script ftp-anon, banner 10.10.40.0/24
-p 21,22,23 This specifies the ports that we are going to scan. 21 is the standard FTP port, 22 is the
standard SSH port, and 23 is the standard Telnet port. Scanning a limited amount of ports at a time
helps us evade some generic port scanning detection rules.
--script ftp-anon, banner The ftp-anon script checks for anonymous access to FTP services. The
banner script will output the banner for any open services which helps to identify potentially exploitable
services.
Nmap has many more options and scripts, but these should provide a solid starting point for you in the
lab.
Manual Information Gathering
Often, there are webpages in an environment that disclose useful internal information. This information
includes hostnames, IP addresses, usernames, emails, and other data that helps an attacker improve
their understanding of the internal environment. Host names and IPs are often in the form of links to
other internal websites and can help an attacker identify subnets where servers are located. Usernames
and emails are often listed as contact information, and help an attacker find users they may want to
target.
Pages that might have significant amounts of this information include things like internal home pages,
wiki pages, or other custom “intranet” sites. Keep an eye out for these in scan results or try manually
guessing some common DNS aliases such as “wiki”, “intranet”, “home”, or “portal”.
Unauthenticated Entry Points
Easily Guessable FTP
What is it?
FTP is a common service on internal networks used for transferring and hosting files. Depending on the
use case, FTP servers can contain some sensitive data (think usernames and passwords, PII, PCI data,
etc.). This makes them attractive targets for attackers. Especially since they are sometimes configured to
allow anonymous access, or with easily guessable credentials!
How do we identify it?
FTP servers with anonymous or default access allowed can be easily identified during our initial
reconnaissance with an Nmap scan and NSE script. Scan for tcp port 21 with the “ftp-anon” NSE script to
identify open FTP servers. Another script, “ftp-brute”, will perform brute force authentications against
the server.
How do we check if it’s vulnerable?
You’ll be able to identify if the server is indeed vulnerable from the NSE script output, which will list the
any successfully identified valid credentials.
How do we exploit the vulnerability?
To exploit a server with this misconfiguration, simply authenticate with your favorite command line
utility or GUI with the “anonymous” user and no password, or the credentials identified by the brute
forcing script. Then, browse the available items searching for sensitive data.
ftp <username>@<target-ip>
SambaCry
What is it?
The SambaCry vulnerability affects the Linux implementation of the SMB protocol, samba, which results
in remote code execution. The specific vulnerability allows a user to upload a shared library to a known
writable share, and then causes the server to execute the library.
How do we identify it?
The first step in identifying a SambaCry is to identify SMB ports open on Linux servers. This can be
accomplished with Nmap by scanning for port 445 and performing operating system detection with the
-O flag.
How do we check if it’s vulnerable?
There are a couple of conditions that must exist for any identified Linux systems running a samba service
to be vulnerable. First, there must be a writable share at a known location. The server must also not
have had the workaround for this vulnerability applied – if “nt pipe support = no” is configured than the
service will not be vulnerable. Finally, you must be able to execute uploaded files by creating a named
pipe to the file location.
You can check for all of these conditions with a helpful Nmap NSE script, smb-vuln-cve-2017-7494.
How do we exploit the vulnerability?
After positively identifying a vulnerable system, we can use Metasploit to exploit the system and gain an
interactive shell.
use exploit/linux/samba/is_known_pipename
Be sure to set the required options, then run the module!
Missing Windows Patches
What is it?
Microsoft frequently issues security patches to fix identified vulnerabilities in the Windows operating
system. Occasionally, these vulnerabilities are quite severe and result in unauthenticated code
execution. There are a few classic examples of these types of vulnerabilities that are commonly used
during penetration testing to gain remote cote execution and an initial foothold.
MS08-067: Vulnerability in Server service could allow remote code execution.
MS10-061: Vulnerability in Print Spooler Service could allow remote code execution.
MS17-010: Vulnerability in SMB protocol could allow remote code execution.
Due to large organizations having complex patch management procedures, sometimes critical patches
for these types of security issues go unapplied. This makes unpatched Windows systems especially juicy
targets for attackers.
How do we identify it?
Most of the critical vulnerabilities affecting the Windows operating system what result in remote code
execution have reliable methods of identification. In general, performing generic port scanning to
identify the OS version of potential target systems can give a clue as to whether they might be
vulnerable to a specific exploit.
For example, older Windows XP systems are commonly not patched for MS08-067. Identifying XP in an
environment often means you have found a trivial way to gain access to the Windows domain.
How do we check if it’s vulnerable?
You can often identify if a Windows system is vulnerable to a particular missing patch with scanners like
Nmap and Metasploit. Nmap has a number of SMB vulnerability checking NSE scripts which come in
handy for identifying vulnerable servers.
How do we exploit the vulnerability?
Once you identify a system as vulnerable, you’ll want to exploit it. Metasploit is a great first stop to
check for modules which exploit vulnerabilities you may have identified. For instance, Metasploit has a
module to exploit MS17-010 on certain OS versions and architectures.
It’s great when there are “point and click” utilities to exploit these vulnerabilities, but often times you’ll
need to do a little digging to find the right exploit code or walkthroughs. For example, you’ll notice that
only a couple exploit targets are supported by the previous Metasploit module. This is where some
Google searching and a lot of persistence pays off!
Command and Control Infrastructure
Command and Control (C2) channels are an integral part of the penetration testing process. It will be
helpful to become familiar with your chosen C2 platform before starting the lab. In our examples, we’ll
rely heavily on PowerShell Empire. Assuming you have already connected to the lab, we can set up some
listeners and prepare our C2 infrastructure for use in the lab.
Firstly, you’ll need to pull down Empire from its GitHub repository if you haven’t already. Run the
“./setup/install.sh” file to install, and then “./empire” to start!
Listeners
An Empire listener is an open channel on your attacking system that “listens” for connections from
compromised hosts. In general, they can use many different methods for transferring data. We’ll use the
HTTP listener in our labs. Configuring a listener is simple:
uselistener http
set Host <attacker-vpn-ip>:<port(80)>
execute
That’s it! You should now have a listener running on your attack machine waiting for connections. We
encourage you to experiment with other listeners and techniques on your own.
Launchers
In Empire, a launcher is a simple one-line PowerShell or python command that, when run on a
compromised host (in cmd.exe or run), should establish an agent.
launchers <powershell or python> <listener name>
Stagers
Stagers are very similar to launchers in that they contain the initial payload to establish an agent
connection on a compromised host. However, these are generally files that must be either uploaded to
the target machine or hosted on a server for download and execution. There are numerous options to
choose from for various operating systems.
usestager <stager-option>
set <option-name> <option-value>
execute
Agents
These are the running processes on compromised hosts which reach out to our attacking machine to
check in for commands. They are established with the stagers and launchers we just configured and
provide operating system command access on the system. Simply run your launcher on a target host
(we’ll go over how later) and interact with the agent to view your options.
An example of running a simple shell command, “whoami”.
At this point, your Command and Control infrastructure should be ready to accept agent connections on
systems that you compromise in the lab. Let’s get started

More Related Content

Similar to Purple Teaming With Adversary Emulation.pdf

An Introduction to Prometheus (GrafanaCon 2016)
An Introduction to Prometheus (GrafanaCon 2016)An Introduction to Prometheus (GrafanaCon 2016)
An Introduction to Prometheus (GrafanaCon 2016)
Brian Brazil
 
theVIVI-AD-Security-Workshop_AfricaHackon2019.pdf
theVIVI-AD-Security-Workshop_AfricaHackon2019.pdftheVIVI-AD-Security-Workshop_AfricaHackon2019.pdf
theVIVI-AD-Security-Workshop_AfricaHackon2019.pdf
Gabriel Mathenge
 
Kali linux useful tools
Kali linux useful toolsKali linux useful tools
Kali linux useful tools
milad mahdavi
 
Product! - The road to production deployment
Product! - The road to production deploymentProduct! - The road to production deployment
Product! - The road to production deployment
Filippo Zanella
 
Exploit Frameworks
Exploit FrameworksExploit Frameworks
Exploit Frameworks
phanleson
 
From Duke of DevOps to Queen of Chaos - Api days 2018
From Duke of DevOps to Queen of Chaos - Api days 2018From Duke of DevOps to Queen of Chaos - Api days 2018
From Duke of DevOps to Queen of Chaos - Api days 2018
Christophe Rochefolle
 
Introduction to penetration testing
Introduction to penetration testingIntroduction to penetration testing
Introduction to penetration testing
Nezar Alazzabi
 
Eliz seminar
Eliz seminar Eliz seminar
Eliz seminar
henelpj
 
Ceh v8 labs module 05 system hacking
Ceh v8 labs module 05 system hackingCeh v8 labs module 05 system hacking
Ceh v8 labs module 05 system hacking
Asep Sopyan
 
How to measure your security response readiness?
How to measure your security response readiness?How to measure your security response readiness?
How to measure your security response readiness?
Tomasz Jakubowski
 
Fine line between performance and security
Fine line between performance and securityFine line between performance and security
Fine line between performance and security
Almudena Vivanco
 
The DevOps paradigm - the evolution of IT professionals and opensource toolkit
The DevOps paradigm - the evolution of IT professionals and opensource toolkitThe DevOps paradigm - the evolution of IT professionals and opensource toolkit
The DevOps paradigm - the evolution of IT professionals and opensource toolkit
Marco Ferrigno
 
The DevOps Paradigm
The DevOps ParadigmThe DevOps Paradigm
The DevOps Paradigm
NaLUG
 
Devops interview questions 1 www.bigclasses.com
Devops interview questions  1  www.bigclasses.comDevops interview questions  1  www.bigclasses.com
Devops interview questions 1 www.bigclasses.com
bigclasses.com
 
Cyber security course in kerala | C|PENT | Blitz Academy
Cyber security course in kerala | C|PENT | Blitz AcademyCyber security course in kerala | C|PENT | Blitz Academy
Cyber security course in kerala | C|PENT | Blitz Academy
amallblitz0
 
Cyber security course in kerala | C|PENT | Blitz Academy
Cyber security course in kerala | C|PENT | Blitz AcademyCyber security course in kerala | C|PENT | Blitz Academy
Cyber security course in kerala | C|PENT | Blitz Academy
ananthakrishnansblit
 
BSidesJXN 2017 - Improving Vulnerability Management
BSidesJXN 2017 - Improving Vulnerability ManagementBSidesJXN 2017 - Improving Vulnerability Management
BSidesJXN 2017 - Improving Vulnerability Management
Andrew McNicol
 
Hol 1940-01-net pdf-en
Hol 1940-01-net pdf-enHol 1940-01-net pdf-en
Hol 1940-01-net pdf-en
dborsan
 
Top 10 Software to Detect & Prevent Security Vulnerabilities from BlackHat US...
Top 10 Software to Detect & Prevent Security Vulnerabilities from BlackHat US...Top 10 Software to Detect & Prevent Security Vulnerabilities from BlackHat US...
Top 10 Software to Detect & Prevent Security Vulnerabilities from BlackHat US...
Mobodexter
 
Don't Drop the SOAP: Real World Web Service Testing for Web Hackers
Don't Drop the SOAP: Real World Web Service Testing for Web Hackers Don't Drop the SOAP: Real World Web Service Testing for Web Hackers
Don't Drop the SOAP: Real World Web Service Testing for Web Hackers
Tom Eston
 

Similar to Purple Teaming With Adversary Emulation.pdf (20)

An Introduction to Prometheus (GrafanaCon 2016)
An Introduction to Prometheus (GrafanaCon 2016)An Introduction to Prometheus (GrafanaCon 2016)
An Introduction to Prometheus (GrafanaCon 2016)
 
theVIVI-AD-Security-Workshop_AfricaHackon2019.pdf
theVIVI-AD-Security-Workshop_AfricaHackon2019.pdftheVIVI-AD-Security-Workshop_AfricaHackon2019.pdf
theVIVI-AD-Security-Workshop_AfricaHackon2019.pdf
 
Kali linux useful tools
Kali linux useful toolsKali linux useful tools
Kali linux useful tools
 
Product! - The road to production deployment
Product! - The road to production deploymentProduct! - The road to production deployment
Product! - The road to production deployment
 
Exploit Frameworks
Exploit FrameworksExploit Frameworks
Exploit Frameworks
 
From Duke of DevOps to Queen of Chaos - Api days 2018
From Duke of DevOps to Queen of Chaos - Api days 2018From Duke of DevOps to Queen of Chaos - Api days 2018
From Duke of DevOps to Queen of Chaos - Api days 2018
 
Introduction to penetration testing
Introduction to penetration testingIntroduction to penetration testing
Introduction to penetration testing
 
Eliz seminar
Eliz seminar Eliz seminar
Eliz seminar
 
Ceh v8 labs module 05 system hacking
Ceh v8 labs module 05 system hackingCeh v8 labs module 05 system hacking
Ceh v8 labs module 05 system hacking
 
How to measure your security response readiness?
How to measure your security response readiness?How to measure your security response readiness?
How to measure your security response readiness?
 
Fine line between performance and security
Fine line between performance and securityFine line between performance and security
Fine line between performance and security
 
The DevOps paradigm - the evolution of IT professionals and opensource toolkit
The DevOps paradigm - the evolution of IT professionals and opensource toolkitThe DevOps paradigm - the evolution of IT professionals and opensource toolkit
The DevOps paradigm - the evolution of IT professionals and opensource toolkit
 
The DevOps Paradigm
The DevOps ParadigmThe DevOps Paradigm
The DevOps Paradigm
 
Devops interview questions 1 www.bigclasses.com
Devops interview questions  1  www.bigclasses.comDevops interview questions  1  www.bigclasses.com
Devops interview questions 1 www.bigclasses.com
 
Cyber security course in kerala | C|PENT | Blitz Academy
Cyber security course in kerala | C|PENT | Blitz AcademyCyber security course in kerala | C|PENT | Blitz Academy
Cyber security course in kerala | C|PENT | Blitz Academy
 
Cyber security course in kerala | C|PENT | Blitz Academy
Cyber security course in kerala | C|PENT | Blitz AcademyCyber security course in kerala | C|PENT | Blitz Academy
Cyber security course in kerala | C|PENT | Blitz Academy
 
BSidesJXN 2017 - Improving Vulnerability Management
BSidesJXN 2017 - Improving Vulnerability ManagementBSidesJXN 2017 - Improving Vulnerability Management
BSidesJXN 2017 - Improving Vulnerability Management
 
Hol 1940-01-net pdf-en
Hol 1940-01-net pdf-enHol 1940-01-net pdf-en
Hol 1940-01-net pdf-en
 
Top 10 Software to Detect & Prevent Security Vulnerabilities from BlackHat US...
Top 10 Software to Detect & Prevent Security Vulnerabilities from BlackHat US...Top 10 Software to Detect & Prevent Security Vulnerabilities from BlackHat US...
Top 10 Software to Detect & Prevent Security Vulnerabilities from BlackHat US...
 
Don't Drop the SOAP: Real World Web Service Testing for Web Hackers
Don't Drop the SOAP: Real World Web Service Testing for Web Hackers Don't Drop the SOAP: Real World Web Service Testing for Web Hackers
Don't Drop the SOAP: Real World Web Service Testing for Web Hackers
 

Recently uploaded

Fueling AI with Great Data with Airbyte Webinar
Fueling AI with Great Data with Airbyte WebinarFueling AI with Great Data with Airbyte Webinar
Fueling AI with Great Data with Airbyte Webinar
Zilliz
 
System Design Case Study: Building a Scalable E-Commerce Platform - Hiike
System Design Case Study: Building a Scalable E-Commerce Platform - HiikeSystem Design Case Study: Building a Scalable E-Commerce Platform - Hiike
System Design Case Study: Building a Scalable E-Commerce Platform - Hiike
Hiike
 
Energy Efficient Video Encoding for Cloud and Edge Computing Instances
Energy Efficient Video Encoding for Cloud and Edge Computing InstancesEnergy Efficient Video Encoding for Cloud and Edge Computing Instances
Energy Efficient Video Encoding for Cloud and Edge Computing Instances
Alpen-Adria-UniversitÀt
 
Recommendation System using RAG Architecture
Recommendation System using RAG ArchitectureRecommendation System using RAG Architecture
Recommendation System using RAG Architecture
fredae14
 
Finale of the Year: Apply for Next One!
Finale of the Year: Apply for Next One!Finale of the Year: Apply for Next One!
Finale of the Year: Apply for Next One!
GDSC PJATK
 
TrustArc Webinar - 2024 Global Privacy Survey
TrustArc Webinar - 2024 Global Privacy SurveyTrustArc Webinar - 2024 Global Privacy Survey
TrustArc Webinar - 2024 Global Privacy Survey
TrustArc
 
Deep Dive: Getting Funded with Jason Jason Lemkin Founder & CEO @ SaaStr
Deep Dive: Getting Funded with Jason Jason Lemkin Founder & CEO @ SaaStrDeep Dive: Getting Funded with Jason Jason Lemkin Founder & CEO @ SaaStr
Deep Dive: Getting Funded with Jason Jason Lemkin Founder & CEO @ SaaStr
saastr
 
Trusted Execution Environment for Decentralized Process Mining
Trusted Execution Environment for Decentralized Process MiningTrusted Execution Environment for Decentralized Process Mining
Trusted Execution Environment for Decentralized Process Mining
LucaBarbaro3
 
Unlock the Future of Search with MongoDB Atlas_ Vector Search Unleashed.pdf
Unlock the Future of Search with MongoDB Atlas_ Vector Search Unleashed.pdfUnlock the Future of Search with MongoDB Atlas_ Vector Search Unleashed.pdf
Unlock the Future of Search with MongoDB Atlas_ Vector Search Unleashed.pdf
Malak Abu Hammad
 
Nunit vs XUnit vs MSTest Differences Between These Unit Testing Frameworks.pdf
Nunit vs XUnit vs MSTest Differences Between These Unit Testing Frameworks.pdfNunit vs XUnit vs MSTest Differences Between These Unit Testing Frameworks.pdf
Nunit vs XUnit vs MSTest Differences Between These Unit Testing Frameworks.pdf
flufftailshop
 
Letter and Document Automation for Bonterra Impact Management (fka Social Sol...
Letter and Document Automation for Bonterra Impact Management (fka Social Sol...Letter and Document Automation for Bonterra Impact Management (fka Social Sol...
Letter and Document Automation for Bonterra Impact Management (fka Social Sol...
Jeffrey Haguewood
 
Ocean lotus Threat actors project by John Sitima 2024 (1).pptx
Ocean lotus Threat actors project by John Sitima 2024 (1).pptxOcean lotus Threat actors project by John Sitima 2024 (1).pptx
Ocean lotus Threat actors project by John Sitima 2024 (1).pptx
SitimaJohn
 
Operating System Used by Users in day-to-day life.pptx
Operating System Used by Users in day-to-day life.pptxOperating System Used by Users in day-to-day life.pptx
Operating System Used by Users in day-to-day life.pptx
Pravash Chandra Das
 
Generating privacy-protected synthetic data using Secludy and Milvus
Generating privacy-protected synthetic data using Secludy and MilvusGenerating privacy-protected synthetic data using Secludy and Milvus
Generating privacy-protected synthetic data using Secludy and Milvus
Zilliz
 
HCL Notes and Domino License Cost Reduction in the World of DLAU
HCL Notes and Domino License Cost Reduction in the World of DLAUHCL Notes and Domino License Cost Reduction in the World of DLAU
HCL Notes and Domino License Cost Reduction in the World of DLAU
panagenda
 
Presentation of the OECD Artificial Intelligence Review of Germany
Presentation of the OECD Artificial Intelligence Review of GermanyPresentation of the OECD Artificial Intelligence Review of Germany
Presentation of the OECD Artificial Intelligence Review of Germany
innovationoecd
 
Artificial Intelligence for XMLDevelopment
Artificial Intelligence for XMLDevelopmentArtificial Intelligence for XMLDevelopment
Artificial Intelligence for XMLDevelopment
Octavian Nadolu
 
leewayhertz.com-AI in predictive maintenance Use cases technologies benefits ...
leewayhertz.com-AI in predictive maintenance Use cases technologies benefits ...leewayhertz.com-AI in predictive maintenance Use cases technologies benefits ...
leewayhertz.com-AI in predictive maintenance Use cases technologies benefits ...
alexjohnson7307
 
AWS Cloud Cost Optimization Presentation.pptx
AWS Cloud Cost Optimization Presentation.pptxAWS Cloud Cost Optimization Presentation.pptx
AWS Cloud Cost Optimization Presentation.pptx
HarisZaheer8
 
Introduction of Cybersecurity with OSS at Code Europe 2024
Introduction of Cybersecurity with OSS  at Code Europe 2024Introduction of Cybersecurity with OSS  at Code Europe 2024
Introduction of Cybersecurity with OSS at Code Europe 2024
Hiroshi SHIBATA
 

Recently uploaded (20)

Fueling AI with Great Data with Airbyte Webinar
Fueling AI with Great Data with Airbyte WebinarFueling AI with Great Data with Airbyte Webinar
Fueling AI with Great Data with Airbyte Webinar
 
System Design Case Study: Building a Scalable E-Commerce Platform - Hiike
System Design Case Study: Building a Scalable E-Commerce Platform - HiikeSystem Design Case Study: Building a Scalable E-Commerce Platform - Hiike
System Design Case Study: Building a Scalable E-Commerce Platform - Hiike
 
Energy Efficient Video Encoding for Cloud and Edge Computing Instances
Energy Efficient Video Encoding for Cloud and Edge Computing InstancesEnergy Efficient Video Encoding for Cloud and Edge Computing Instances
Energy Efficient Video Encoding for Cloud and Edge Computing Instances
 
Recommendation System using RAG Architecture
Recommendation System using RAG ArchitectureRecommendation System using RAG Architecture
Recommendation System using RAG Architecture
 
Finale of the Year: Apply for Next One!
Finale of the Year: Apply for Next One!Finale of the Year: Apply for Next One!
Finale of the Year: Apply for Next One!
 
TrustArc Webinar - 2024 Global Privacy Survey
TrustArc Webinar - 2024 Global Privacy SurveyTrustArc Webinar - 2024 Global Privacy Survey
TrustArc Webinar - 2024 Global Privacy Survey
 
Deep Dive: Getting Funded with Jason Jason Lemkin Founder & CEO @ SaaStr
Deep Dive: Getting Funded with Jason Jason Lemkin Founder & CEO @ SaaStrDeep Dive: Getting Funded with Jason Jason Lemkin Founder & CEO @ SaaStr
Deep Dive: Getting Funded with Jason Jason Lemkin Founder & CEO @ SaaStr
 
Trusted Execution Environment for Decentralized Process Mining
Trusted Execution Environment for Decentralized Process MiningTrusted Execution Environment for Decentralized Process Mining
Trusted Execution Environment for Decentralized Process Mining
 
Unlock the Future of Search with MongoDB Atlas_ Vector Search Unleashed.pdf
Unlock the Future of Search with MongoDB Atlas_ Vector Search Unleashed.pdfUnlock the Future of Search with MongoDB Atlas_ Vector Search Unleashed.pdf
Unlock the Future of Search with MongoDB Atlas_ Vector Search Unleashed.pdf
 
Nunit vs XUnit vs MSTest Differences Between These Unit Testing Frameworks.pdf
Nunit vs XUnit vs MSTest Differences Between These Unit Testing Frameworks.pdfNunit vs XUnit vs MSTest Differences Between These Unit Testing Frameworks.pdf
Nunit vs XUnit vs MSTest Differences Between These Unit Testing Frameworks.pdf
 
Letter and Document Automation for Bonterra Impact Management (fka Social Sol...
Letter and Document Automation for Bonterra Impact Management (fka Social Sol...Letter and Document Automation for Bonterra Impact Management (fka Social Sol...
Letter and Document Automation for Bonterra Impact Management (fka Social Sol...
 
Ocean lotus Threat actors project by John Sitima 2024 (1).pptx
Ocean lotus Threat actors project by John Sitima 2024 (1).pptxOcean lotus Threat actors project by John Sitima 2024 (1).pptx
Ocean lotus Threat actors project by John Sitima 2024 (1).pptx
 
Operating System Used by Users in day-to-day life.pptx
Operating System Used by Users in day-to-day life.pptxOperating System Used by Users in day-to-day life.pptx
Operating System Used by Users in day-to-day life.pptx
 
Generating privacy-protected synthetic data using Secludy and Milvus
Generating privacy-protected synthetic data using Secludy and MilvusGenerating privacy-protected synthetic data using Secludy and Milvus
Generating privacy-protected synthetic data using Secludy and Milvus
 
HCL Notes and Domino License Cost Reduction in the World of DLAU
HCL Notes and Domino License Cost Reduction in the World of DLAUHCL Notes and Domino License Cost Reduction in the World of DLAU
HCL Notes and Domino License Cost Reduction in the World of DLAU
 
Presentation of the OECD Artificial Intelligence Review of Germany
Presentation of the OECD Artificial Intelligence Review of GermanyPresentation of the OECD Artificial Intelligence Review of Germany
Presentation of the OECD Artificial Intelligence Review of Germany
 
Artificial Intelligence for XMLDevelopment
Artificial Intelligence for XMLDevelopmentArtificial Intelligence for XMLDevelopment
Artificial Intelligence for XMLDevelopment
 
leewayhertz.com-AI in predictive maintenance Use cases technologies benefits ...
leewayhertz.com-AI in predictive maintenance Use cases technologies benefits ...leewayhertz.com-AI in predictive maintenance Use cases technologies benefits ...
leewayhertz.com-AI in predictive maintenance Use cases technologies benefits ...
 
AWS Cloud Cost Optimization Presentation.pptx
AWS Cloud Cost Optimization Presentation.pptxAWS Cloud Cost Optimization Presentation.pptx
AWS Cloud Cost Optimization Presentation.pptx
 
Introduction of Cybersecurity with OSS at Code Europe 2024
Introduction of Cybersecurity with OSS  at Code Europe 2024Introduction of Cybersecurity with OSS  at Code Europe 2024
Introduction of Cybersecurity with OSS at Code Europe 2024
 

Purple Teaming With Adversary Emulation.pdf

  • 2. Contents Introduction 3 Features 3 Purpose 4 Prerequisites and Useful Tools 5 Prerequisite Knowledge 5 Tools 5 How to Connect 7 Methodology Overview 8 Vulnerability Scan vs Pentest (vs Real Attacker) 8 Attack Chain 8 Preparing for a Penetration Test 9 Virtual Machine Updates and Sanitization 9 Host Machine Configuration 9 Reconnaissance and Vulnerability Discovery 10 Initial Enumeration 10 Scanning 11 Manual Information Gathering 14 Unauthenticated Entry Points 15 Easily Guessable FTP 15 SambaCry 15 Missing Windows Patches 18 Phishing 20 Command and Control Infrastructure 24 Following topic will covered as part of Part 2 of the workshop Privilege Escalation 28 Finding Credentials on a Compromised System 29 Lateral Movement 37 Active Directory 42 Searching for Target Information 56
  • 3. Introduction Welcome to your Workshop Lab environment! We’re excited to host this environment and have a lot of great content in store for you. What follows in this manual is a description of the lab, the tools and knowledge you’ll need to set yourself up for success, and a technical walkthrough that will teach you the skills necessary to perform a complete network penetration test and more. Features This lab network has been designed to mirror a legitimate corporate network as closely as possible. Based on our experience conducting internal pentests over the years, we’ve included core features that help to provide a true representation of the real world. Windows Active Directory All Demo environments feature a configured Active Directory (AD) with at least two domains. Larger labs may have a more sophisticated AD setup that allows an experienced penetration tester to take advantage of subtle misconfigurations such as domain trust issues. In every lab, AD is used extensively to manage privilege across the environment. As in the real world, understanding and abusing Active Directory is a key component of completing a pentest of your lab. User Simulation Real networks have active users, and so does your lab! As part of creating this simulated network, we’ve developed a PowerShell based tool that will simulate common user behaviors including accessing file shares, browsing the internet, and opening emails. This means you have additional attack vectors at your disposal. You can even conduct a full phishing campaign in your lab and use the access obtained to further compromise the network. Technical Vulnerabilities Every network we’ve ever encountered, big or small, contains at least a few technical vulnerabilities or misconfigurations. There are several intentionally vulnerable systems configured throughout your lab network which will allow you to obtain an initial “foothold” by successfully exploiting the vulnerability. Network “Trophies” It’s important to demonstrate the impact of a network compromise. In real world engagements, we typically attempt to gain access to critical business data (PII, PCI, HIPAA, etc.) to show the consequences of the vulnerabilities we identify. So, our labs contain examples of sensitive data that you can access to practice “trophy hunting” and proving your impact. Endpoint Visibility Corporate networks often have various detection and alerting mechanisms in place. Your lab is deployed with Splunk to provide endpoint visibility. This allows blue teamers and red teamers alike to learn what malicious traffic looks like, and how to detect it (or evade detection).
  • 4. In addition to the core features above, your lab has a few more notable characteristics. First, the entire lab is hosted in the cloud on Amazon’s AWS. This ensures reliability and accessibility from anywhere. In addition, your lab network can only be accessed through a certificate-based VPN which was distributed along with this lab manual. Another advantage of hosting the lab infrastructure in AWS manifests itself in our ability to quickly change various configurations across the network. This allows us to easily change how “difficult” the lab is and to simulate more mature organizations with additional network segmentation and defensive controls. Purpose There are numerous use cases for your lab, and probably more that we haven’t yet considered. We built your lab with the three following primary use cases in mind: Pentest / Red Team Training The main goal of your lab is to help you develop the skills necessary to perform a network penetration test or red team engagement in the real world, on a live production network. This includes learning how to identify vulnerabilities, exploit them, and use the access obtained to further compromise the network. In addition to the lab physically mirroring a corporate network, the methodology used throughout this manual also mirrors industry standard practices for performing these types of engagements. After completing this lab, you should have acquired the technical skills and high-level knowledge to add value to any internal penetration test or red team you participate in. Pentest / Red Team Technique Development and Practice This lab also serves as a valuable platform for developing new tradecraft, testing exploits in a safe environment, and practicing skills you already have. Because of the realistic nature of the lab, and our ability to customize it to your specific needs, your lab is a powerful tool for any type of penetration testing or red team activity that you might not want to perform for the first time on a production network. Blue Team Lens Learn what red team activity looks like in a modern detection tool. With the deployment of Splunk agents across much of the environment, your lab will track events triggered by various testing activities. Visibility into events triggered by malicious activities helps us to become stealthier and invent new techniques to bypass detection. Basic alerting also helps to ensure that you are avoiding particularly risky behavior such as password spraying.
  • 5. Prerequisites and Useful Tools While there are no absolute pre-requisites for learning in the lab, there are some fundamental skills that will speed your progress. To get the most out of your experience, we recommend the following: Prerequisite Knowledge A Working Knowledge of Networking Concepts Your lab simulates a corporate network, so some basic networking skills will go a long way in understanding various aspects of the penetration testing process. Among the important concepts to be familiar with are: TCP/IP: https://technet.microsoft.com/en-us/library/cc786128(v=ws.10).aspx DNS: https://technet.microsoft.com/en-us/library/cc772774(v=ws.10).aspx Network Segmentation / Firewalls: https://technet.microsoft.com/en-us/library/cc700820.aspx An Understanding of Windows Active Directory A majority of the privilege escalation scenarios encountered in corporate environments involve abusing Active Directory. Understanding AD and how it manages privilege in a Windows environment is crucial for effective security testing. We strongly encourage some research into Windows Active Directory if you have not worked with AD groups or privileges prior to this lab. Familiarity with the Windows and Linux Operating Systems A lot of post exploitation activity involves interacting directly through the command line, or a command and control channel with a similar feel. Knowing your way around the Windows and Linux filesystems, as well as some comfortability using cmd.exe and bash, will smooth your pentesting experience. Windows Command Line Reference: https://ss64.com/nt/ PowerShell Reference: https://ss64.com/ps/ Linux Bash Reference: https://ss64.com/bash/ Tools Kali Linux Kali is a Linux distribution optimized for penetration testing with an assortment of red team tools installed and configured to make malicious activities easier (e.g. you log in as root). While there are certainly other hacking focused distros out there, Kali is by far the most popular and will be used for examples throughout this lab. Download: https://www.kali.org/downloads/ Documentation: https://docs.kali.org/
  • 6. Nmap Nmap is a scanning tool which can identify open ports and running services, and even identify and exploit vulnerabilities. It is great for enumerating targets on a network, as well as checking for common vulnerabilities. It is included in Kali Linux and available through the repositories of most Linux distributions. Documentation: https://nmap.org/book/man.html PowerSploit PowerSploit is a PowerShell toolset with features for all phases of the pentesting process from reconnaissance to exfiltration. Some of the more popular scripts that you will use in the lab are PowerView (in the Recon module) and PowerUp (in the Privesc module). Download: https://github.com/PowerShellMafia/PowerSploit Mimikatz Mimikatz is best known for being able dump Windows credentials from memory. It also contains functions for manipulating tokens, exporting certificates, and controlling services, among others. Mimikatz is included in most post-exploitation frameworks such as PowerShell Empire which the examples in this guide will use. Download: https://github.com/gentilkiwi/mimikatz/releases Unofficial Guide: https://adsecurity.org/?page_id=1821 Command and Control Channels Command and control (C2) channels provide remote control over a compromised system. The communication is typically described as ‘bind’, where the compromised host listens for commands from the server, or ‘reverse’, where the compromised host calls out to the server which responds with commands. Reverse communication is usually preferable because it is far more likely that the compromised host can reach out past any firewalls to the attacker’s server than the other way around. Here are just a few of the many different options for C2 software. These provide a C2 channel as well as a post-exploitation framework with numerous functions built in and the ability to create and import new functionality. Metasploit’s Meterpreter Metasploit Framework is a platform for penetration testing which includes a multitude of features from scanning to exploitation. It also includes an agent, “Meterpreter”, with a C2 channel to communicate over. Meterpreter’s network communication is well understood and likely to be detected in monitored environments, so use with caution. Guide: https://www.offensive-security.com/metasploit-unleashed/ Documentation: https://metasploit.help.rapid7.com/docs/installing-the-metasploit-framework Cobalt Strike’s Beacon
  • 7. Cobalt Strike provides a post-exploitation agent with advanced C2 channel communication. Malleable C2 profiles allow you to customize how your C2 traffic looks on the network so you can emulate existing threat actors or legitimate website traffic. Cobalt Strike provides an easy to use graphical interface and has a multitude of built in functionality. It’s our favorite command and control tool but commands a premium price. Documentation: https://www.cobaltstrike.com/support PowerShell Empire Agents The examples in this lab manual are going to use PowerShell Empire wherever post-exploitation tools and C2 channels are required. Empire is a pure PowerShell agent, though it does not require powershell.exe for an agent to run. It features adaptable network communication, encrypted communication, and an easy to use framework. Documentation: https://www.powershellempire.com/?page_id=83 Download: https://github.com/EmpireProject/Empire How to Connect Connecting to the lab is simple! Along with the lab materials, you should have also received a connection packet including an OpenVPN configuration file. Linux If you’re running a Linux based testing VM like Kali, connecting to the lab is as simple as installing OpenVPN and resolvconf (included in most Linux repo’s) then running OpenVPN to connect with the provided configuration file: sudo apt-get install openvpn resolvconf sudo openvpn <linux_client.ovpn> Windows If you’d like to connect a Windows system to the lab, you’ll need the OpenVPN client for Windows (https://openvpn.net/index.php/open-source/downloads.html). Once installed, put your config file in the ‘config’ directory under your OpenVPN install location (probably C:Program FilesOpenVPNconfig). Then open the GUI, right click on the OpenVPN task bar icon, and select ‘Connect’. More detailed GUI instructions can be found here: https://community.openvpn.net/openvpn/wiki/OpenVPN-GUI After successfully connecting, you should see an additional network adapter with a 10.9.254.0/24 IP address.
  • 8. Methodology Overview This lab manual attempts to follow an industry standard methodology for penetration testing. Here we provide an overview of this methodology and its various components. Vulnerability Scan vs Pentest (vs Real Attacker) It’s important to define what we mean by penetration test, and to differentiate that from a vulnerability scan and from an attack simulation (or real attacker). A penetration test aims to identify vulnerabilities and weaknesses in an environment that an attacker could use to gain unauthorized access to resources, and to prove the impact that these weaknesses could have. To do this, a penetration tester will go through the steps of an attack from reconnaissance to accessing sensitive resources and data. However, they are not focused on remaining undetected, or taking the shortest possible path to a target resource; things that a real attacker or attack simulation would likely aim to do. A vulnerability scan simply aims to identify the technical vulnerabilities in an environment but does not go through the act of exploiting any weaknesses or proving impact. Attack Chain The “attack chain” consists of the various individual steps taken during a penetration test. These steps are largely agreed upon throughout the industry, however there are various groupings and granularities implemented across organizations. For the purposed of this lab, we’ll assume the following four phases of the attack chain. Reconnaissance and Vulnerability Discovery This phase of the attack chain uses discovery and scanning methods to better understand the environment and identify potentially vulnerable systems and services. Exploitation: Establishing a Foothold During exploitation, potential vulnerabilities identified in the previous phase are technically exploited, giving the attacker some level of access on the network. Privilege Escalation and Lateral Movement In this phase of the attack chain, an attacker furthers their access in the environment by compromising additional systems and using various techniques to gain higher privileges on the network. Data Exfiltration Sensitive data is extracted from the environment to the attackers control, demonstrating the impact of the penetration test.
  • 9. Preparing for a Penetration Test Proper preparation before any penetration test is a key factor in success. Below we outline the steps we generally take before an engagement and suggest you do the same before diving into the lab environment. Virtual Machine Updates and Sanitization The first step we take when preparing for an engagement is to ensure that all our tools and testing machines are up to date. With Kali, this includes tools and scripts that came prepackaged with the OS as well as any additional tools we’ve added. Also, we ensure that our testing virtual machines (VMs) are clean of any prior client data (if you’re in the consulting business). Software Updates In general, most of the tools in Kali will be updated automatically with system updates. However, some may need to be manually updated. Be sure to run any update scripts or functions within these tools before starting any penetration testing. In addition, we always update our testing image. apt-get update && apt-get upgrade Sanitizing Client Data Especially if you are a consultant, you may have performed a previous penetration test or red team engagement with your testing VM. This means there is a good chance some client specific data was exfiltrated to your system. If you find yourself on a client network, with different client data sitting on your VM, this is NOT good. It could even land you in some legal trouble. To avoid this uncomfortable situation, we take the following steps: Create a “Clean” Snapshot – On a version of your testing VM which has never touched a client network, preferably a fresh Kali image, perform all the necessary software and system updates. Create a snapshot of this updated and clean virtual machine. Revert to “Clean” Snapshot – Anytime you are about to go on an engagement, be sure to revert to the latest “clean” snapshot of your testing VM. Update Tools – Unless you reverted to a clean image you have just created, you’ll want to make sure all your tools are up to date. Reperform the software update steps described above. These steps should guarantee the VM used for testing has no leftover client data from previous tests. Host Machine Configuration In most scenarios, your host machine will not be used except in a supporting capacity. In addition, your host probably has some configuration info that may give you away to defenders if leaked on the network (company hostname, unusual network traffic, etc.). For this reason, we always prefer to keep our hosts completely off the network we’re assessing. When physically plugging in to a network, you can accomplish this by disabling the ethernet adapter on your host machine. Leaving the VM adapters
  • 10. enabled will allow you to still bridge your testing virtual machines to the ethernet and establish a network connection. Setup Workshop Lab using Snaplabs Environment Following screenshots will guide you to setup the workshop lab using Snaplabs environment.
  • 11.
  • 12.
  • 13. Setup Wazuh to monitor Network activity Please view Demo Video Reconnaissance and Vulnerability Discovery At the beginning of most penetration tests, you plug into the corporate network and begin the assessment with no privileges. This portion of the manual will walk you through this scenario and define a methodology for establishing access and obtaining domain accounts. Initial Enumeration The first step after plugging in (or in this case, establishing a VPN connection) is to check your IP configuration. You’ll want to make sure you have an internal IP address like the highlighted network adapter configuration below. You’ll notice we have a “tun0” adapter. This happens due to the VPN connection creating an additional interface. Plugging into an ethernet jack should configure the “eth0” adapter (if DHCP is enabled). Now that you’ve successfully obtained an IP address, you’ll want to identify some systems on the network. An easy starting point is to perform some network sniffing, or query for DNS and Domain Controllers. By viewing the /etc/resolv.conf settings, we can see any DNS or Domain settings pushed to our system through DHCP when we obtained an IP address.
  • 14.
  • 15. Take note of the domain and DNS server IP addresses in your favorite note taking tool (OneNote is our go-to). Now that we know the domain, we can query for Domain Controllers as well. A simple nslookup can accomplish this for us: nslookup -q=SRV _ldap._tcp.<fully qualified domain name> Note these domain controllers as well, we’ll be targeting them later! At this point we’ve identified a subnet of the lab which clearly contains some important servers (10.10.93.0/24). From here we could start to do some port scanning to identify other systems or services, but we can do some additional enumeration before we take that step. Scanning Now that we’ve identified a few systems in the environment we can make some good guesses about where we are likely to find more systems. We’ll start by using Nmap to scan the subnet identified from the domain controllers and DNS server. When using Nmap, there are many things we can do to keep our scans relatively stealthy. Let’s walk through some sample commands to check out a few of the options. Web Port Scan nmap -sS -p 80,443,8080 --open --script http-title --script-args
  • 16. 'http.useragent="Mozilla/5.0 (Windows NT 6.3; Trident/7.0; rv:11.0) like Gecko"' 10.10.40.0/24
  • 17. -sS This specifies a SYN scan where Nmap will send a SYN packet and listen for a SYN-ACK packet in response. If there is a response, Nmap will send a RST packet to close the connection without performing a full TCP handshake. If you’re running as root in Kali, this is the default scan type. This may not be the case on other operating systems or when scanning as a non-root user. -p 80,443,8080 This specifies the ports that we are going to scan. 80 and 443 are the default HTTP and HTTPS ports respectively, while 8080 is a common port for other HTTP applications and admin interfaces. Scanning a limited amount of ports at a time helps us evade some generic port scanning detection rules. --open This specifies that we only want open ports to be returned in the results. --script http-title Here we specify a script to run on open ports that will output the title of webpages. These scripts can be found in /usr/share/nmap/scripts/ if you want to check them out. --script-args 'http.useragent="Mozilla/5.0 (Windows NT 6.3; Trident/7.0; rv:11.0) like Gecko"' This specifies a user agent string to use with the script. Nmap’s default user agent string says that it is Nmap, so that is an easy way to get caught. Here we pretend to be Internet Explorer. 10.10.40.0/24 Lastly, this is the range we are going to scan! Keeping this to one subnet at a time will increase the chances of your scans staying under the radar. Database Port Scan nmap -sS -p 1433,3306 --open --script ms-sql-info, ms-sql-empty-password, mysql-info, mysql-empty-password 10.10.40.0/24 -p 1433,3306 This specifies the ports that we are going to scan. 1433 is the default port for an MSSQL database, and 3306 is the default port for a MySQL database. Scanning a limited amount of ports at a time helps us evade some generic port scanning detection rules. --script ms-sql-info, ms-sql-empty-password, mysql-info, mysql-empty-password These scripts will retrieve information about databases on open ports, and check for empty passwords.
  • 18. FTP, SSH and Telnet Port Scan nmap -sS -p 21,22,23 --open --script ftp-anon, banner 10.10.40.0/24 -p 21,22,23 This specifies the ports that we are going to scan. 21 is the standard FTP port, 22 is the standard SSH port, and 23 is the standard Telnet port. Scanning a limited amount of ports at a time helps us evade some generic port scanning detection rules. --script ftp-anon, banner The ftp-anon script checks for anonymous access to FTP services. The banner script will output the banner for any open services which helps to identify potentially exploitable services.
  • 19. Nmap has many more options and scripts, but these should provide a solid starting point for you in the lab. Manual Information Gathering Often, there are webpages in an environment that disclose useful internal information. This information includes hostnames, IP addresses, usernames, emails, and other data that helps an attacker improve their understanding of the internal environment. Host names and IPs are often in the form of links to other internal websites and can help an attacker identify subnets where servers are located. Usernames and emails are often listed as contact information, and help an attacker find users they may want to target. Pages that might have significant amounts of this information include things like internal home pages, wiki pages, or other custom “intranet” sites. Keep an eye out for these in scan results or try manually guessing some common DNS aliases such as “wiki”, “intranet”, “home”, or “portal”.
  • 20. Unauthenticated Entry Points Easily Guessable FTP What is it? FTP is a common service on internal networks used for transferring and hosting files. Depending on the use case, FTP servers can contain some sensitive data (think usernames and passwords, PII, PCI data, etc.). This makes them attractive targets for attackers. Especially since they are sometimes configured to allow anonymous access, or with easily guessable credentials! How do we identify it? FTP servers with anonymous or default access allowed can be easily identified during our initial reconnaissance with an Nmap scan and NSE script. Scan for tcp port 21 with the “ftp-anon” NSE script to identify open FTP servers. Another script, “ftp-brute”, will perform brute force authentications against the server. How do we check if it’s vulnerable? You’ll be able to identify if the server is indeed vulnerable from the NSE script output, which will list the any successfully identified valid credentials. How do we exploit the vulnerability? To exploit a server with this misconfiguration, simply authenticate with your favorite command line utility or GUI with the “anonymous” user and no password, or the credentials identified by the brute forcing script. Then, browse the available items searching for sensitive data. ftp <username>@<target-ip> SambaCry What is it? The SambaCry vulnerability affects the Linux implementation of the SMB protocol, samba, which results in remote code execution. The specific vulnerability allows a user to upload a shared library to a known writable share, and then causes the server to execute the library.
  • 21. How do we identify it? The first step in identifying a SambaCry is to identify SMB ports open on Linux servers. This can be accomplished with Nmap by scanning for port 445 and performing operating system detection with the -O flag. How do we check if it’s vulnerable? There are a couple of conditions that must exist for any identified Linux systems running a samba service to be vulnerable. First, there must be a writable share at a known location. The server must also not have had the workaround for this vulnerability applied – if “nt pipe support = no” is configured than the service will not be vulnerable. Finally, you must be able to execute uploaded files by creating a named pipe to the file location. You can check for all of these conditions with a helpful Nmap NSE script, smb-vuln-cve-2017-7494.
  • 22. How do we exploit the vulnerability? After positively identifying a vulnerable system, we can use Metasploit to exploit the system and gain an interactive shell. use exploit/linux/samba/is_known_pipename
  • 23. Be sure to set the required options, then run the module! Missing Windows Patches What is it? Microsoft frequently issues security patches to fix identified vulnerabilities in the Windows operating system. Occasionally, these vulnerabilities are quite severe and result in unauthenticated code execution. There are a few classic examples of these types of vulnerabilities that are commonly used during penetration testing to gain remote cote execution and an initial foothold. MS08-067: Vulnerability in Server service could allow remote code execution. MS10-061: Vulnerability in Print Spooler Service could allow remote code execution. MS17-010: Vulnerability in SMB protocol could allow remote code execution. Due to large organizations having complex patch management procedures, sometimes critical patches for these types of security issues go unapplied. This makes unpatched Windows systems especially juicy targets for attackers. How do we identify it? Most of the critical vulnerabilities affecting the Windows operating system what result in remote code execution have reliable methods of identification. In general, performing generic port scanning to identify the OS version of potential target systems can give a clue as to whether they might be vulnerable to a specific exploit. For example, older Windows XP systems are commonly not patched for MS08-067. Identifying XP in an environment often means you have found a trivial way to gain access to the Windows domain. How do we check if it’s vulnerable? You can often identify if a Windows system is vulnerable to a particular missing patch with scanners like Nmap and Metasploit. Nmap has a number of SMB vulnerability checking NSE scripts which come in handy for identifying vulnerable servers.
  • 24. How do we exploit the vulnerability? Once you identify a system as vulnerable, you’ll want to exploit it. Metasploit is a great first stop to check for modules which exploit vulnerabilities you may have identified. For instance, Metasploit has a module to exploit MS17-010 on certain OS versions and architectures. It’s great when there are “point and click” utilities to exploit these vulnerabilities, but often times you’ll need to do a little digging to find the right exploit code or walkthroughs. For example, you’ll notice that
  • 25. only a couple exploit targets are supported by the previous Metasploit module. This is where some Google searching and a lot of persistence pays off! Command and Control Infrastructure Command and Control (C2) channels are an integral part of the penetration testing process. It will be helpful to become familiar with your chosen C2 platform before starting the lab. In our examples, we’ll rely heavily on PowerShell Empire. Assuming you have already connected to the lab, we can set up some listeners and prepare our C2 infrastructure for use in the lab. Firstly, you’ll need to pull down Empire from its GitHub repository if you haven’t already. Run the “./setup/install.sh” file to install, and then “./empire” to start! Listeners An Empire listener is an open channel on your attacking system that “listens” for connections from compromised hosts. In general, they can use many different methods for transferring data. We’ll use the HTTP listener in our labs. Configuring a listener is simple: uselistener http set Host <attacker-vpn-ip>:<port(80)> execute
  • 26. That’s it! You should now have a listener running on your attack machine waiting for connections. We encourage you to experiment with other listeners and techniques on your own. Launchers In Empire, a launcher is a simple one-line PowerShell or python command that, when run on a compromised host (in cmd.exe or run), should establish an agent. launchers <powershell or python> <listener name> Stagers Stagers are very similar to launchers in that they contain the initial payload to establish an agent connection on a compromised host. However, these are generally files that must be either uploaded to the target machine or hosted on a server for download and execution. There are numerous options to choose from for various operating systems. usestager <stager-option> set <option-name> <option-value> execute
  • 27. Agents These are the running processes on compromised hosts which reach out to our attacking machine to check in for commands. They are established with the stagers and launchers we just configured and provide operating system command access on the system. Simply run your launcher on a target host (we’ll go over how later) and interact with the agent to view your options.
  • 28. An example of running a simple shell command, “whoami”. At this point, your Command and Control infrastructure should be ready to accept agent connections on systems that you compromise in the lab. Let’s get started