Document Release Note
NoticeNo. : NA
Customer : National Health Authority, India
Project : PMJAY 2.0
Document Details
Name Version Number Description
User Manual 6.0 This document describes the
processes and steps to use the
UMP Application
Revision Details
Action Taken
(Add/Del/Change)
Previous Page Number New Page Number Revision Description
Add 1-32 1-33 Document Updated
Review By
Name of the Reviewer Review Date Description
Manu Saroch 07-06-2023 Document reviewed by Manu
Saroch, under the guidance of
Anurag Agarwal
3.
Document Revision List
Customer: National Health Authority, India
Project : PMJAY 2.0
Document Name : User Manual
Release Notice Reference (for release)
Revision Date
Version
Details
Revision Description
18 Sept 22 Version 1 Document Created
15 Nov 22 Version 2 Document Updated
26 Apr 23 Version 3 Document Updated
03 May 23 Version 4 Document Updated
09 May 23 Version 5 Document Enhanced
07 June 23 Version 6 Document Updated
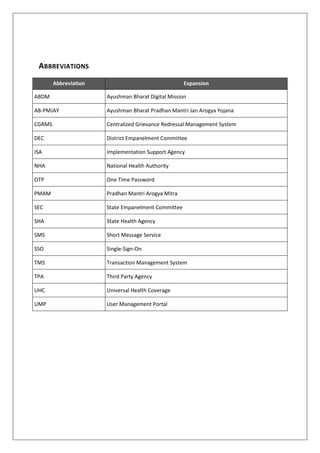
ABBREVIATIONS
Abbreviation Expansion
ABDM AyushmanBharat Digital Mission
AB-PMJAY Ayushman Bharat Pradhan Mantri Jan Arogya Yojana
CGRMS Centralized Grievance Redressal Management System
DEC District Empanelment Committee
ISA Implementation Support Agency
NHA National Health Authority
OTP One Time Password
PMAM Pradhan Mantri Arogya Mitra
SEC State Empanelment Committee
SHA State Health Agency
SMS Short Message Service
SSO Single-Sign-On
TMS Transaction Management System
TPA Third Party Agency
UHC Universal Health Coverage
UMP User Management Portal
6.
6
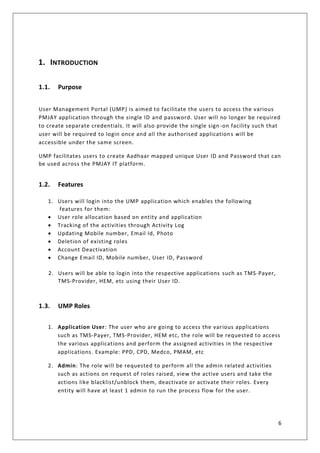
1. INTRODUCTION
1.1. Purpose
UserManagement Portal (UMP) is aimed to facilitate the users to access the various
PMJAY application through the single ID and password. User will no longer be required
to create separate credentials. It will also provide the single sign -on facility such that
user will be required to login once and all the authorised applications will be
accessible under the same screen.
UMP facilitates users to create Aadhaar mapped unique User ID and Password that can
be used across the PMJAY IT platform.
1.2. Features
1. Users will login into the UMP application which enables the following
features for them:
• User role allocation based on entity and application
• Tracking of the activities through Activity Log
• Updating Mobile number, Email Id, Photo
• Deletion of existing roles
• Account Deactivation
• Change Email ID, Mobile number, User ID, Password
2. Users will be able to login into the respective applications such as TMS-Payer,
TMS-Provider, HEM, etc using their User ID.
1.3. UMP Roles
1. Application User: The user who are going to access the various applications
such as TMS-Payer, TMS-Provider, HEM etc, the role will be requested to access
the various applications and perform the assigned activities in the respective
applications. Example: PPD, CPD, Medco, PMAM, etc
2. Admin: The role will be requested to perform all the admin related activities
such as actions on request of roles raised, view the active users and take the
actions like blacklist/unblock them, deactivate or activate their roles. Every
entity will have at least 1 admin to run the process flow for the user.
7.
7
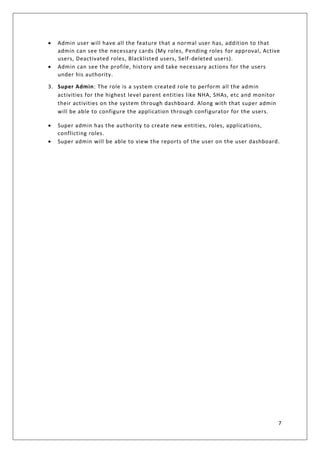
• Admin userwill have all the feature that a normal user has, addition to that
admin can see the necessary cards (My roles, Pending roles for approval, Active
users, Deactivated roles, Blacklisted users, Self-deleted users).
• Admin can see the profile, history and take necessary actions for the users
under his authority.
3. Super Admin: The role is a system created role to perform all the admin
activities for the highest level parent entities like NHA, SHAs, etc and monitor
their activities on the system through dashboard. Along with that super admin
will be able to configure the application through configurator for the users.
• Super admin has the authority to create new entities, roles, applications,
conflicting roles.
• Super admin will be able to view the reports of the user on the user dashboard.
8.
8
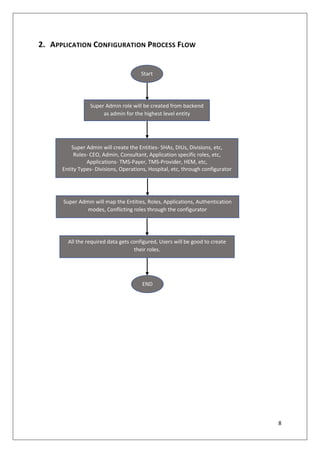
2. APPLICATION CONFIGURATIONPROCESS FLOW
Start
Super Admin role will be created from backend
as admin for the highest level entity
Super Admin will create the Entities- SHAs, DIUs, Divisions, etc,
Roles- CEO, Admin, Consultant, Application specific roles, etc,
Applications- TMS-Payer, TMS-Provider, HEM, etc,
Entity Types- Divisions, Operations, Hospital, etc, through configurator
Super Admin will map the Entities, Roles, Applications, Authentication
modes, Conflicting roles through the configurator
All the required data gets configured, Users will be good to create
their roles.
END
9.
9
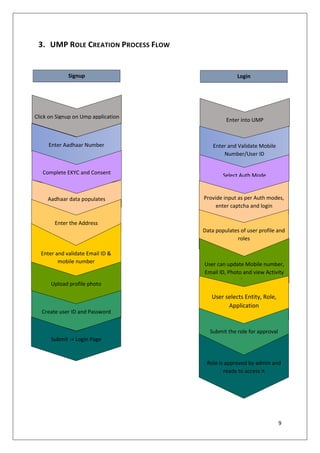
3. UMP ROLECREATION PROCESS FLOW
Click on Signup on Ump application
Aadhaar data populates
Enter Aadhaar Number
Complete EKYC and Consent
Enter the Address
Enter and validate Email ID &
mobile number
Upload profile photo
Create user ID and Password
Enter into UMP
Provide input as per Auth modes,
enter captcha and login
Enter and Validate Mobile
Number/User ID
Select Auth Mode
Data populates of user profile and
roles
User can update Mobile number,
Email ID, Photo and view Activity
log
Submit -> Login Page
Signup Login
User selects Entity, Role,
Application
Submit the role for approval
Role is approved by admin and
ready to access it
10.
10
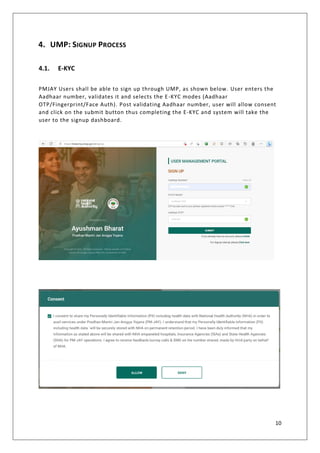
4. UMP: SIGNUPPROCESS
4.1. E-KYC
PMJAY Users shall be able to sign up through UMP, as shown below. User enters the
Aadhaar number, validates it and selects the E-KYC modes (Aadhaar
OTP/Fingerprint/Face Auth). Post validating Aadhaar number, user will allow consent
and click on the submit button thus completing the E-KYC and system will take the
user to the signup dashboard.
11.
11
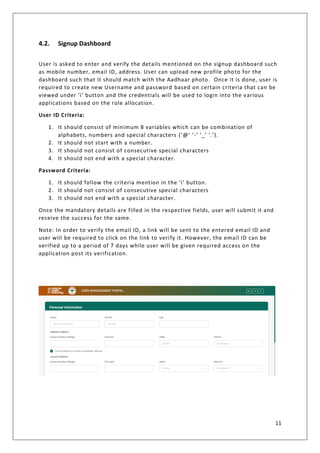
4.2. Signup Dashboard
Useris asked to enter and verify the details mentioned on the signup dashboard such
as mobile number, email ID, address. User can upload new profile photo for the
dashboard such that it should match with the Aadhaar photo. Once it is done, user is
required to create new Username and password based on certain criteria that can be
viewed under ‘i’ button and the credentials will be used to login into the various
applications based on the role allocation.
User ID Criteria:
1. It should consist of minimum 8 variables which can be combination of
alphabets, numbers and special characters (‘@’ ‘-‘ ‘_’ ‘.’).
2. It should not start with a number.
3. It should not consist of consecutive special characters
4. It should not end with a special character.
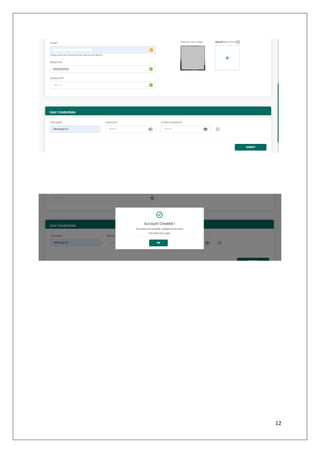
Password Criteria:
1. It should follow the criteria mention in the ‘i’ button.
2. It should not consist of consecutive special characters
3. It should not end with a special character.
Once the mandatory details are filled in the respective fields, user will submit it and
receive the success for the same.
Note: In order to verify the email ID, a link will be sent to the entered email ID and
user will be required to click on the link to verify it. However, the email ID can be
verified up to a period of 7 days while user will be given required access on the
application post its verification.
13
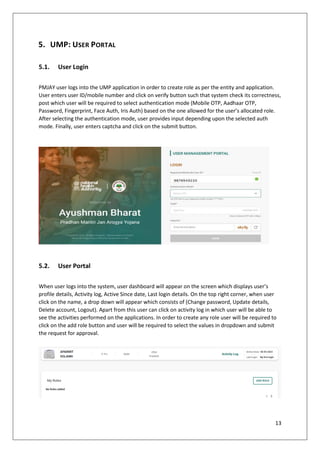
5. UMP: USERPORTAL
5.1. User Login
PMJAY user logs into the UMP application in order to create role as per the entity and application.
User enters user ID/mobile number and click on verify button such that system check its correctness,
post which user will be required to select authentication mode (Mobile OTP, Aadhaar OTP,
Password, Fingerprint, Face Auth, Iris Auth) based on the one allowed for the user’s allocated role.
After selecting the authentication mode, user provides input depending upon the selected auth
mode. Finally, user enters captcha and click on the submit button.
5.2. User Portal
When user logs into the system, user dashboard will appear on the screen which displays user’s
profile details, Activity log, Active Since date, Last login details. On the top right corner, when user
click on the name, a drop down will appear which consists of (Change password, Update details,
Delete account, Logout). Apart from this user can click on activity log in which user will be able to
see the activities performed on the applications. In order to create any role user will be required to
click on the add role button and user will be required to select the values in dropdown and submit
the request for approval.
14.
14
5.3. Activity Log
Usersclick on the activity log on the user portal, they will be able to view the activities performed by
them under this section as mentioned in the images. Here users will be able to view the details of
Login details and other activities. User will be able to view the activities by filtering them based on
the required criteria. In order to go back to the portal user is required to click on the back button at
the right bottom corner.
15.
15
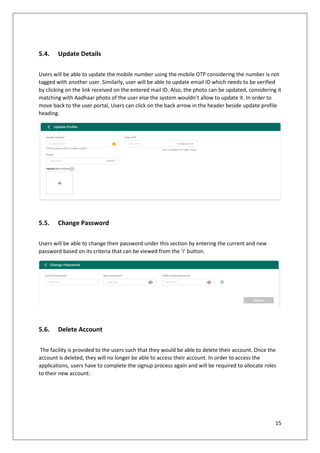
5.4. Update Details
Userswill be able to update the mobile number using the mobile OTP considering the number is not
tagged with another user. Similarly, user will be able to update email ID which needs to be verified
by clicking on the link received on the entered mail ID. Also, the photo can be updated, considering it
matching with Aadhaar photo of the user else the system wouldn’t allow to update it. In order to
move back to the user portal, Users can click on the back arrow in the header beside update profile
heading.
5.5. Change Password
Users will be able to change their password under this section by entering the current and new
password based on its criteria that can be viewed from the ‘i’ button.
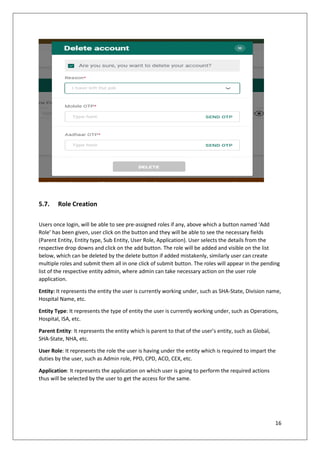
5.6. Delete Account
The facility is provided to the users such that they would be able to delete their account. Once the
account is deleted, they will no longer be able to access their account. In order to access the
applications, users have to complete the signup process again and will be required to allocate roles
to their new account.
16.
16
5.7. Role Creation
Usersonce login, will be able to see pre-assigned roles if any, above which a button named ‘Add
Role’ has been given, user click on the button and they will be able to see the necessary fields
(Parent Entity, Entity type, Sub Entity, User Role, Application). User selects the details from the
respective drop downs and click on the add button. The role will be added and visible on the list
below, which can be deleted by the delete button if added mistakenly, similarly user can create
multiple roles and submit them all in one click of submit button. The roles will appear in the pending
list of the respective entity admin, where admin can take necessary action on the user role
application.
Entity: It represents the entity the user is currently working under, such as SHA-State, Division name,
Hospital Name, etc.
Entity Type: It represents the type of entity the user is currently working under, such as Operations,
Hospital, ISA, etc.
Parent Entity: It represents the entity which is parent to that of the user’s entity, such as Global,
SHA-State, NHA, etc.
User Role: It represents the role the user is having under the entity which is required to impart the
duties by the user, such as Admin role, PPD, CPD, ACO, CEX, etc.
Application: It represents the application on which user is going to perform the required actions
thus will be selected by the user to get the access for the same.
18
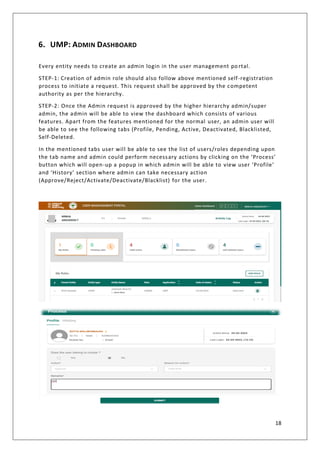
6. UMP: ADMINDASHBOARD
Every entity needs to create an admin login in the user management po rtal.
STEP-1: Creation of admin role should also follow above mentioned self-registration
process to initiate a request. This request shall be approved by the competent
authority as per the hierarchy.
STEP-2: Once the Admin request is approved by the higher hierarchy admin/super
admin, the admin will be able to view the dashboard which consists of various
features. Apart from the features mentioned for the normal user, an admin user will
be able to see the following tabs (Profile, Pending, Active, Deactivated, Blacklisted,
Self-Deleted.
In the mentioned tabs user will be able to see the list of users/roles depending upon
the tab name and admin could perform necessary actions by clicking on the ‘Process’
button which will open-up a popup in which admin will be able to view user ‘Profile’
and ‘History’ section where admin can take necessary action
(Approve/Reject/Activate/Deactivate/Blacklist) for the user.
19.
19
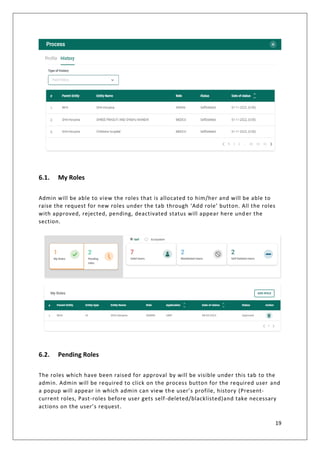
6.1. My Roles
Adminwill be able to view the roles that is allocated to him/her and will be able to
raise the request for new roles under the tab through ‘Add role’ button. All the roles
with approved, rejected, pending, deactivated status will appear here und er the
section.
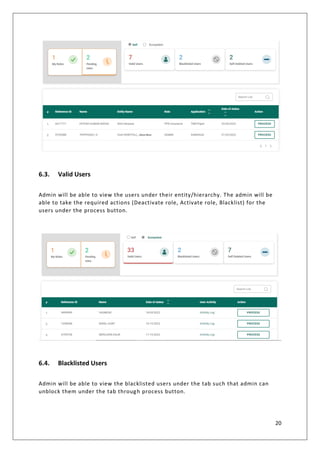
6.2. Pending Roles
The roles which have been raised for approval by will be visible under this tab to the
admin. Admin will be required to click on the process button for the required user and
a popup will appear in which admin can view the user’s profile, history (Present-
current roles, Past-roles before user gets self-deleted/blacklisted)and take necessary
actions on the user’s request.
20.
20
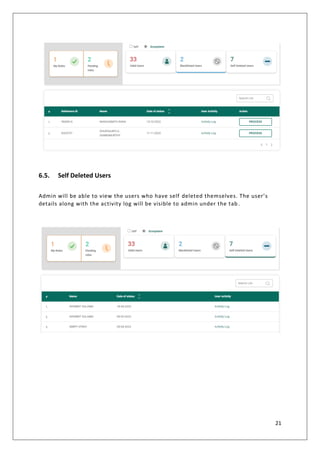
6.3. Valid Users
Adminwill be able to view the users under their entity/hierarchy. The admin will be
able to take the required actions (Deactivate role, Activate role, Blacklist) for the
users under the process button.
6.4. Blacklisted Users
Admin will be able to view the blacklisted users under the tab such that admin can
unblock them under the tab through process button.
21.
21
6.5. Self DeletedUsers
Admin will be able to view the users who have self deleted themselves. The user’s
details along with the activity log will be visible to admin under the tab .
22.
22
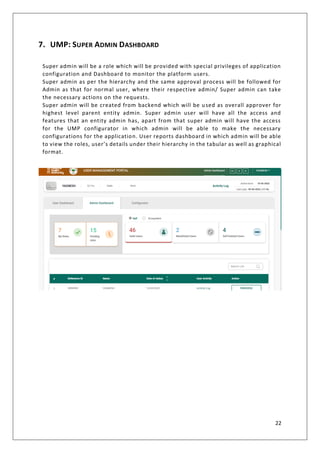
7. UMP: SUPERADMIN DASHBOARD
Super admin will be a role which will be provided with special privileges of application
configuration and Dashboard to monitor the platform users.
Super admin as per the hierarchy and the same approval process will be followed for
Admin as that for normal user, where their respective admin/ Super admin can take
the necessary actions on the requests.
Super admin will be created from backend which will be used as overall approver for
highest level parent entity admin. Super admin user will have all the access and
features that an entity admin has, apart from that super admin will have the access
for the UMP configurator in which admin will be able to make the necessary
configurations for the application. User reports dashboard in which admin will be able
to view the roles, user’s details under their hierarchy in the tabular as well as graphical
format.
23.
23
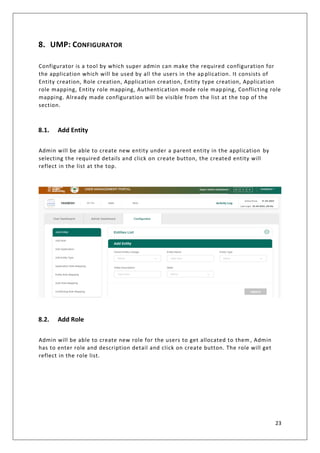
8. UMP: CONFIGURATOR
Configuratoris a tool by which super admin can make the required configuration for
the application which will be used by all the users in the application. It consists of
Entity creation, Role creation, Application creation, Entity type creation, Application
role mapping, Entity role mapping, Authentication mode role mapping, Conflicting role
mapping. Already made configuration will be visible from the list at the top of the
section.
8.1. Add Entity
Admin will be able to create new entity under a parent entity in the application by
selecting the required details and click on create button, the created entity will
reflect in the list at the top.
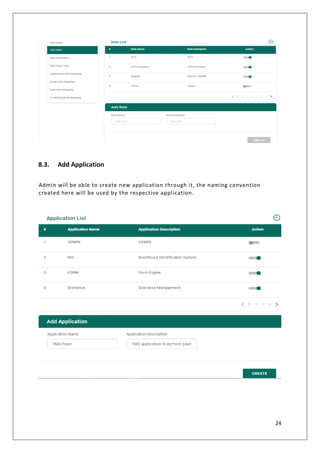
8.2. Add Role
Admin will be able to create new role for the users to get allocated to them , Admin
has to enter role and description detail and click on create button. The role will get
reflect in the role list.
24.
24
8.3. Add Application
Adminwill be able to create new application through it, the naming convention
created here will be used by the respective application.
25.
25
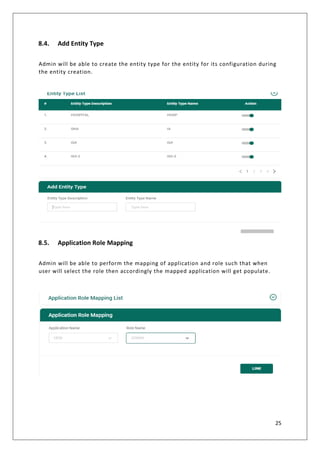
8.4. Add EntityType
Admin will be able to create the entity type for the entity for its configuration during
the entity creation.
8.5. Application Role Mapping
Admin will be able to perform the mapping of application and role such that when
user will select the role then accordingly the mapped application will get populate.
26.
26
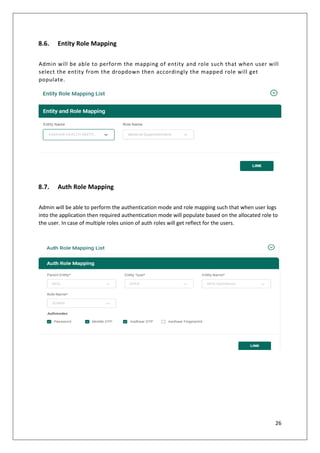
8.6. Entity RoleMapping
Admin will be able to perform the mapping of entity and role such that when user will
select the entity from the dropdown then accordingly the mapped role will get
populate.
8.7. Auth Role Mapping
Admin will be able to perform the authentication mode and role mapping such that when user logs
into the application then required authentication mode will populate based on the allocated role to
the user. In case of multiple roles union of auth roles will get reflect for the users.
27.
27
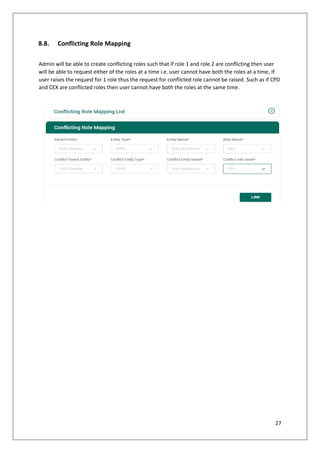
8.8. Conflicting RoleMapping
Admin will be able to create conflicting roles such that if role 1 and role 2 are conflicting then user
will be able to request either of the roles at a time i.e. user cannot have both the roles at a time, If
user raises the request for 1 role thus the request for conflicted role cannot be raised. Such as if CPD
and CEX are conflicted roles then user cannot have both the roles at the same time.
28.
28
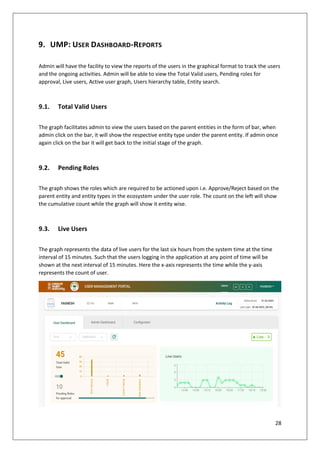
9. UMP: USERDASHBOARD-REPORTS
Admin will have the facility to view the reports of the users in the graphical format to track the users
and the ongoing activities. Admin will be able to view the Total Valid users, Pending roles for
approval, Live users, Active user graph, Users hierarchy table, Entity search.
9.1. Total Valid Users
The graph facilitates admin to view the users based on the parent entities in the form of bar, when
admin click on the bar, it will show the respective entity type under the parent entity. If admin once
again click on the bar it will get back to the initial stage of the graph.
9.2. Pending Roles
The graph shows the roles which are required to be actioned upon i.e. Approve/Reject based on the
parent entity and entity types in the ecosystem under the user role. The count on the left will show
the cumulative count while the graph will show it entity wise.
9.3. Live Users
The graph represents the data of live users for the last six hours from the system time at the time
interval of 15 minutes. Such that the users logging in the application at any point of time will be
shown at the next interval of 15 minutes. Here the x-axis represents the time while the y-axis
represents the count of user.
29.
29
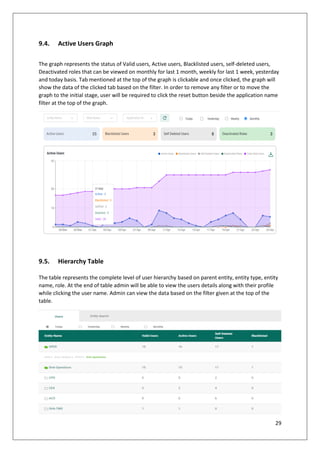
9.4. Active UsersGraph
The graph represents the status of Valid users, Active users, Blacklisted users, self-deleted users,
Deactivated roles that can be viewed on monthly for last 1 month, weekly for last 1 week, yesterday
and today basis. Tab mentioned at the top of the graph is clickable and once clicked, the graph will
show the data of the clicked tab based on the filter. In order to remove any filter or to move the
graph to the initial stage, user will be required to click the reset button beside the application name
filter at the top of the graph.
9.5. Hierarchy Table
The table represents the complete level of user hierarchy based on parent entity, entity type, entity
name, role. At the end of table admin will be able to view the users details along with their profile
while clicking the user name. Admin can view the data based on the filter given at the top of the
table.
30.
30
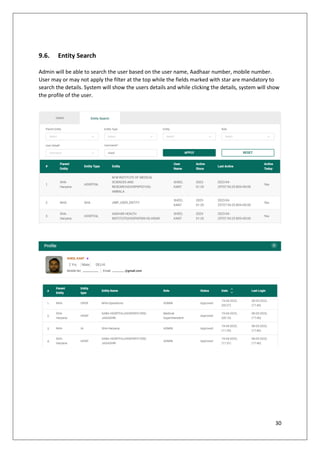
9.6. Entity Search
Adminwill be able to search the user based on the user name, Aadhaar number, mobile number.
User may or may not apply the filter at the top while the fields marked with star are mandatory to
search the details. System will show the users details and while clicking the details, system will show
the profile of the user.
31.
31
10.IMPORTANT POINTS
1) TheAdmin login should be approved by the parent entity admin/Super admin as
per the hierarchy.
2) All other users shall self-register for their respective role and there by the
request will be approved by the respective Admin.
3) Each entity needs to have “Admin Role” in the User Management Portal.
4) Super Admin logins will be created from backend.
5) Currently, all the SHA admin logins will be approved by super admin Login
6) All other entity admin within the state will be approved by SHA.
7) All the self-registration will be approved by the respective entity admin.
8) Same Aadhar number cannot be used for multiple signup.
32.
32
11. FAQ
Ques1 Whatis User Management Portal?
Ans. UMP is an application which has the following features:
• To Create users and their roles.
• To keep track of the users by viewing their activities, profile and history.
• To take necessary actions for the user by admin.
• To configure the application by super admin
Ques2 How to use UMP?
Ans. User will be required to sign-up on the portal using the Aadhaar number. Once the signup is
done, user will be required to login the application and user can perform required actions.
Ques3 How to Sign-up in UMP?
Ans. User will be required to go to signup page. Now user will be required to perform e-KYC through
Aadhaar number, once it is done user will be required to enter necessary details (Address, email ID,
mobile number, user ID, password). Once the details are submitted the signup process is considered
as completed.
Ques4 What can I do If I have forgotten my credentials?
Ans. User will be required to click on the forgot credential option on the login page, a new page will
appear where the user will be required to perform Aadhaar e-KYC and post which user will be able
to view and change the credential.
Ques5 How to reset user ID/password?
Ans. User will be required to click on the forgot credential option on the login page, a new page will
appear where the user will be required to perform Aadhaar e-KYC and post which user will be able
to view and change the credential.
Ques6 How to create role?
Ans. User will be required to login, now user will be able to view the add role on the portal (In case
of admin dashboard under My role). User will be required to click on the add role and select the
required parent entity, entity type, entity name, role, application and submit it for approval. Once
the role is approved by admin user will be able to access the roles and perform the required action.
Ques7 What is parent entity?
Ans. Parent entity could be any entity which has a child entity under it. Such as SHA-State is the
parent entity for hospital while Global/NHA is the parent entity for SHA-State.
Ques8 What is entity?
Ans. It is the body/organisation the user belongs to.
Ques9 What is entity type?
Ans. It represents the type of the entity user is working under.
Ques10 How to self-delete account?
33.
33
Ans. User willbe able to self-delete account by clicking on the name at the op right corner, a
dropdown will appear with the self-delete as an option, once user click on it, a popup will appear on
which user will be required to select the appropriate reason and generate both Aadhaar and mobile
OTP by clicking the send OTP button once user enters correct OTP and click on Delete button, the
account will get deleted.
Ques11 How to approve/reject a role?
Ans. Admin will be able to approve/reject a role from their dashboard under pending roles tab. User
will be required to click on process button and a popup will appear to view profile, history and take
the necessary action for the user.
Ques12 How to blacklist users?
Ans. Admin will be required to login on their dashboard. Under Valid Users tab, Admin will be able to
view the list of users, click on the process button for whom the action will be required to be taken
and a popup will appear to view profile, history and take necessary action for the user.
Ques13 How to activate/ deactivate a role?
Ans. Admin will be required to login on their dashboard. Under Valid Users tab, Admin will be able to
view the list of users, click on the process button for whom the action will be required to be taken
and a popup will appear to view profile, history and take necessary action for the user.
Ques14 How to unblock user?
Ans. Admin will be required to login on their dashboard. Under Blacklisted Uses tab, Admin will be
able to view the list of users, click on the process button for whom the action will be required to be
taken and a popup will appear to view profile, history and take necessary action for the user.
Ques15 What Should we do if the account gets lock due to wrong password in multiple attempts?
Ans. The account will get unlocked itself on the next day.