#3 This is a Title Slide with Picture and Logo slide ideal for including a picture and partner or product logo with a brief title, subtitle and presenter information.
To customize this slide with your own picture:
Right-click the slide area and choose Format Background from the pop-up menu. From the Fill menu, click Picture and texture fill. Under Insert from: click File. Locate your new picture and click Insert.
To Replace the LOGO on this sample slide:
Right-click the sample LOGO and choose Change Picture. Navigate to the location where the new logo is stored, select desired logo file and click on the Open button to replace the sample logo.
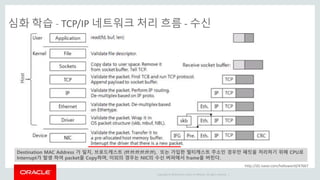
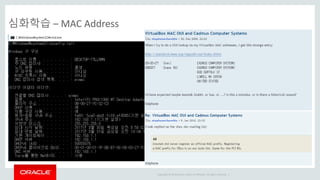
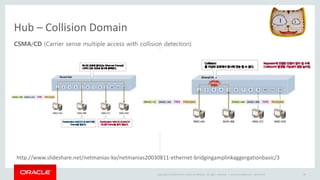
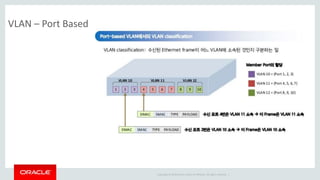
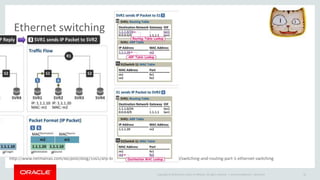
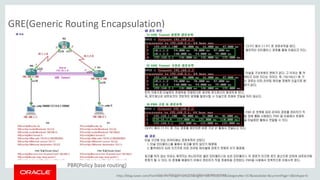
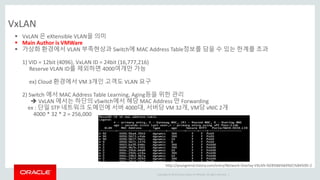
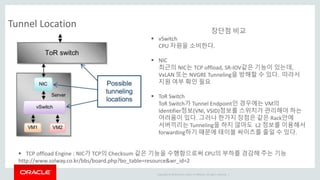
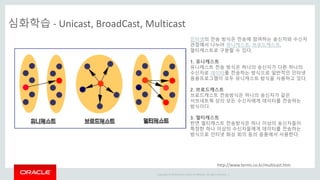
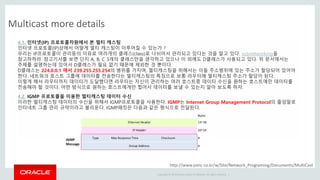
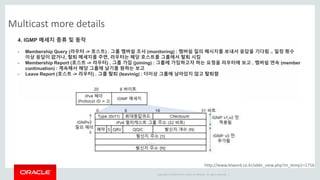
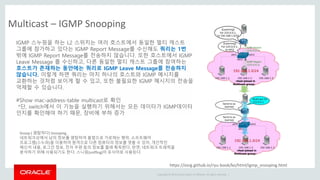
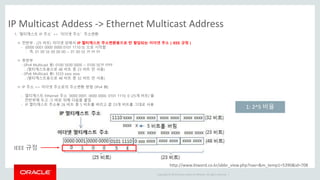
#21 수신한 패킷의 MAC Address 가 NIC와 동일하거나, 브로드캐스트 (ff:ff:ff:ff:ff:ff), 또는 가입한 멀티캐스트 주소인 경우만 패킷을 처리하기 위해 CPU로 Interrupt가 발생 하며, 이외의 경우는 수신 버퍼에서 frame을 버린다.
(It also does validation before sending the packet to the CPU: the normal Ethernet CRC check, and IP/TCP/UDP checksums if the NIC has that capability and the driver has enabled this offloading. Some NICs have a limited number of multicast subscription addresses; if this is exceeded, it will send all multicast packets to the CPU, and the OS has to discard the ones it doesn't care about.)
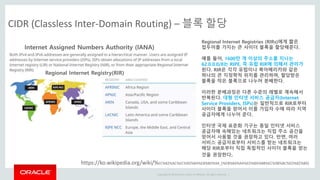
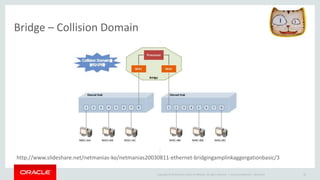
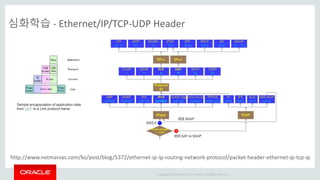
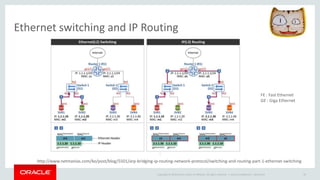
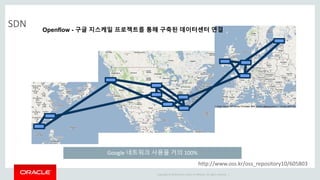
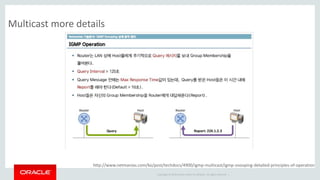
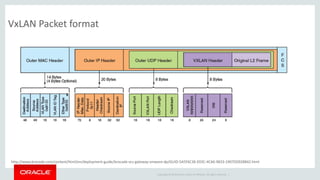
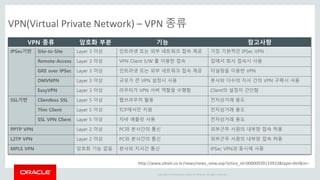
http://www.netmanias.com/ko/post/techdocs/4900/igmp-multicast/igmp-snooping-detailed-principles-of-operation
http://unix.stackexchange.com/questions/167567/does-each-network-packet-cause-an-interrupt-to-cpu
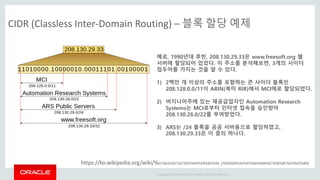
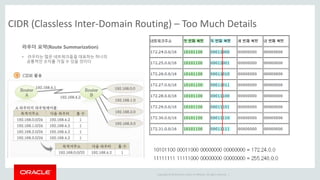
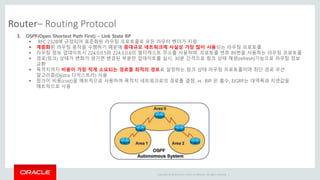
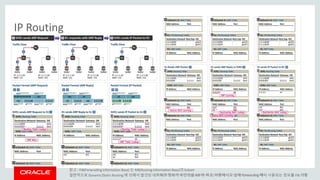
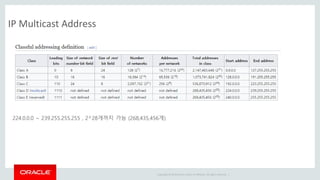
#30 예로, 1990년대 후반, 208.130.29.33은 www.freesoft.org 웹 서버에 할당되어 있었다. 이 주소를 분석해보면, 3개의 사이더 접두어를 가지는 것을 알 수 있다.
#128
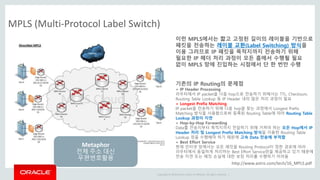
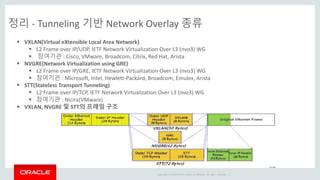
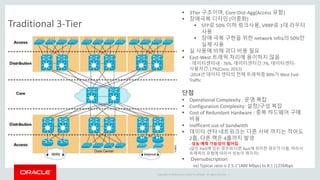
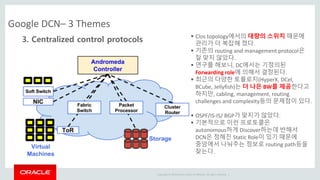
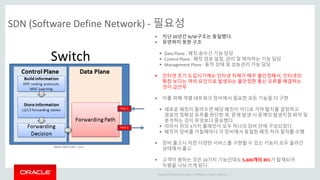
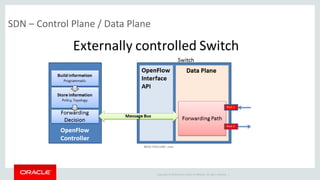
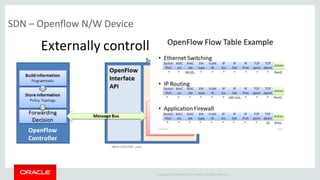
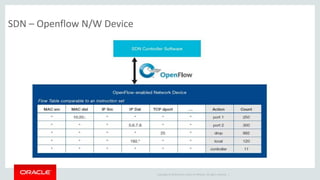
제어계층(Control Plane)과 데이터전송계층(Data Plane)을 분리
API를 활용하여 네트워크 구성요소를 프로그래밍을 통해 관리가 가능
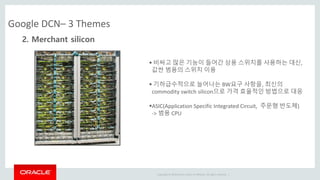
3) 일반적인 구매가 가능한 범용 하드웨어에 적용
4) 전체적인 네트워크 경로 및 구성을 사용자가 원하는 대로 구성
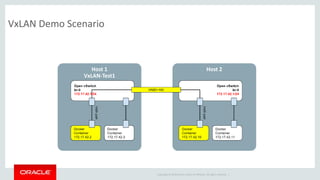
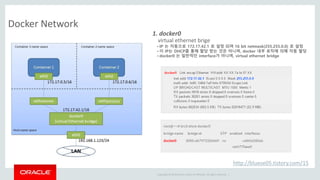
#164 docker host를 설치 한 후 host의 network interface 를 살펴 보면, docker0 라는 virtual interface가 있는 것을 볼 수 있다. 아래는 docker를 설치한 host의 interface를 확인한 정보이다. 아래와 같이 docker0 라는 interface를 확인할 수 있다.
#167 docker host를 설치 한 후 host의 network interface 를 살펴 보면, docker0 라는 virtual interface가 있는 것을 볼 수 있다. 아래는 docker를 설치한 host의 interface를 확인한 정보이다. 아래와 같이 docker0 라는 interface를 확인할 수 있다.
#169 docker host를 설치 한 후 host의 network interface 를 살펴 보면, docker0 라는 virtual interface가 있는 것을 볼 수 있다. 아래는 docker를 설치한 host의 interface를 확인한 정보이다. 아래와 같이 docker0 라는 interface를 확인할 수 있다.
#170 docker host를 설치 한 후 host의 network interface 를 살펴 보면, docker0 라는 virtual interface가 있는 것을 볼 수 있다. 아래는 docker를 설치한 host의 interface를 확인한 정보이다. 아래와 같이 docker0 라는 interface를 확인할 수 있다.
#171 docker host를 설치 한 후 host의 network interface 를 살펴 보면, docker0 라는 virtual interface가 있는 것을 볼 수 있다. 아래는 docker를 설치한 host의 interface를 확인한 정보이다. 아래와 같이 docker0 라는 interface를 확인할 수 있다.
#172 docker host를 설치 한 후 host의 network interface 를 살펴 보면, docker0 라는 virtual interface가 있는 것을 볼 수 있다. 아래는 docker를 설치한 host의 interface를 확인한 정보이다. 아래와 같이 docker0 라는 interface를 확인할 수 있다.
#173 docker host를 설치 한 후 host의 network interface 를 살펴 보면, docker0 라는 virtual interface가 있는 것을 볼 수 있다. 아래는 docker를 설치한 host의 interface를 확인한 정보이다. 아래와 같이 docker0 라는 interface를 확인할 수 있다.
#174 docker host를 설치 한 후 host의 network interface 를 살펴 보면, docker0 라는 virtual interface가 있는 것을 볼 수 있다. 아래는 docker를 설치한 host의 interface를 확인한 정보이다. 아래와 같이 docker0 라는 interface를 확인할 수 있다.
#175 docker host를 설치 한 후 host의 network interface 를 살펴 보면, docker0 라는 virtual interface가 있는 것을 볼 수 있다. 아래는 docker를 설치한 host의 interface를 확인한 정보이다. 아래와 같이 docker0 라는 interface를 확인할 수 있다.
#176 docker host를 설치 한 후 host의 network interface 를 살펴 보면, docker0 라는 virtual interface가 있는 것을 볼 수 있다. 아래는 docker를 설치한 host의 interface를 확인한 정보이다. 아래와 같이 docker0 라는 interface를 확인할 수 있다.


![[오픈소스컨설팅] ARM & OpenStack Community](https://cdn.slidesharecdn.com/ss_thumbnails/opensourceconsultingarmopenstackcommunity-210503071541-thumbnail.jpg?width=640&height=640&fit=bounds)


![[OpenStack Day in Korea] 15분만에 구축하는 오픈스택 기반 크라우드 솔루션: HP CloudSystem](https://cdn.slidesharecdn.com/ss_thumbnails/csm8-140226094036-phpapp01-thumbnail.jpg?width=640&height=640&fit=bounds)
![[OpenInfra Days Korea 2018] Day 2 - E6 - 마이크로서비스를 위한 Istio & Kubernetes [다운로드...](https://cdn.slidesharecdn.com/ss_thumbnails/e61700microserviceswithistioandkubernetesfinal-180704062831-thumbnail.jpg?width=640&height=640&fit=bounds)


![[개방형 클라우드 플랫폼 오픈세미나 오픈클라우드 Pub] 3.open shift 분석](https://cdn.slidesharecdn.com/ss_thumbnails/pub3-140818080510-phpapp02-thumbnail.jpg?width=640&height=640&fit=bounds)


![[OpenInfra Days Korea 2018] Day 2 - E5: GPU on Kubernetes](https://cdn.slidesharecdn.com/ss_thumbnails/e51610gpuonkubernetesv1-180704062436-thumbnail.jpg?width=640&height=640&fit=bounds)

![[오픈소스컨설팅]쿠버네티스를 활용한 개발환경 구축](https://cdn.slidesharecdn.com/ss_thumbnails/opensourceconsutingkubernetesv0-191010000815-thumbnail.jpg?width=640&height=640&fit=bounds)


![[OpenStack Days Korea 2016] Innovating OpenStack Network with SDN solution](https://cdn.slidesharecdn.com/ss_thumbnails/05kulcloud-160226170318-thumbnail.jpg?width=640&height=640&fit=bounds)

