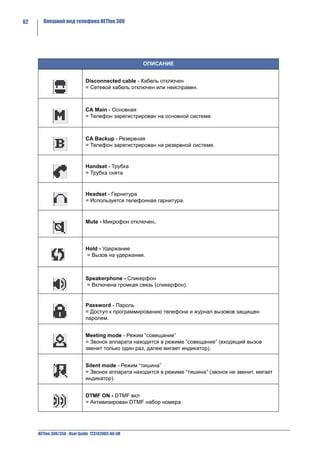
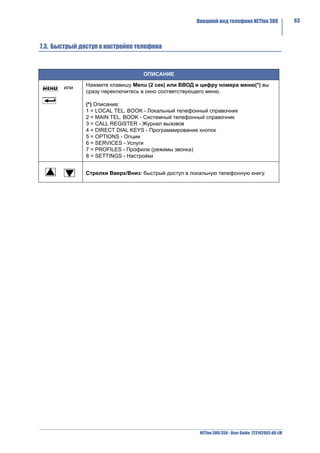
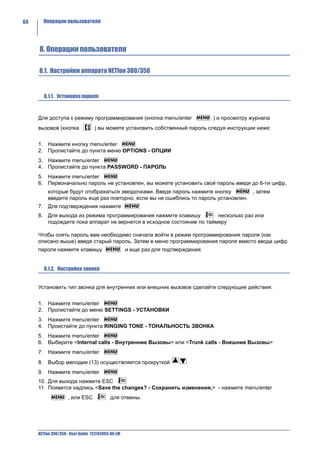
Руководство пользователя для телефонов netfon 300 и 350 охватывает их функции, настройки и операции, включая безопасность и воздействие на окружающую среду. В документе указаны основные характеристики телефонов, такие как графический дисплей и возможность подключения через Power over Ethernet. Также представлены инструкции для пользователей и системных администраторов по настройке, использованию и управлению услугами, доступными на устройстве.


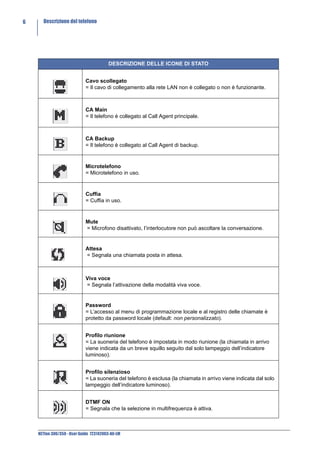
![Operazioni di utente 13
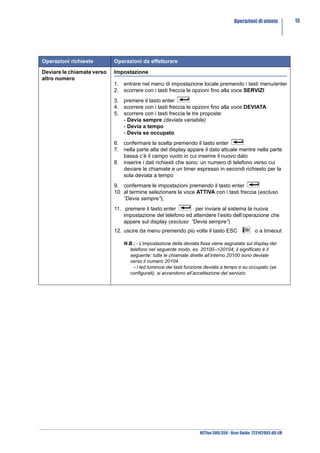
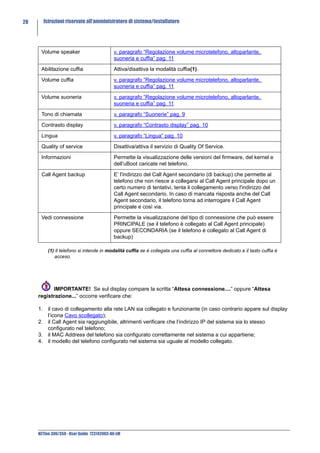
Effettuare una chiamata E’ possibile effettuare una chiamata attraverso la rubrica centralizzata del
da rubrica centrale sistema (numeri brevi[*]). I nomi in rubrica centrale possono essere
ricercati attraverso i tasti freccia oppure inserendo, tramite i tasti
alfanumerici, un nome o parte di esso seguito dal tasto enter .
Successivamente vengono visualizzati, a partire dal nome inserito, in
sequenza alfabetica tutti i nominativi memorizzati.
1. entrare nella rubrica centrale premendo i tasti menu/enter
2. scorrere con i tasti freccia le opzioni fino alla voce RUBRICA
CENTRALE
3. scorrere la rubrica con i tasti freccia
4. chiamare con il tasto enter
[*] Il telefono deve essere abilitato all’accesso alla tabella dei numeri
brevi in cui è contenuto il nominativo prescelto, accanto al nome trovato
nella rubrica centrale, nell’ultima posizione del display se compare una
“X” indica l’impossibilità di leggere il numero e di effettuare la chiamata
verso tale numero (a cura dell’amministratore di sistema).
Terminare una • riagganciare il microtelefono
conversazione oppure
• premere il tasto viva voce (se si è in modalità viva voce)
oppure
• premere il tasto ESC
oppure
• in modalità cuffia(2): premere il tasto ESC .
Rispondere ad una • sganciare il microtelefono
chiamata oppure
• premere il tasto viva voce
oppure
• in modalità cuffia(2): premere il tasto ESC
Mettere/Riprendere
1. mettere in attesa l’interlocutore premendo il tasto attesa
dall’attesa la chiamata in
corso 2. riprendere dall’attesa l’interlocutore premendo il tasto attesa
Attiva/Disattiva
microfono (mute) 1. attivare/disattivare premendo il tasto microfono .
Trasferire una chiamata
1. mettere in attesa l’interlocutore premendo il tasto attesa
in corso
2. comporre il numero dell’utente che si vuole chiamare
3. attendere la risposta e riagganciare oppure senza attendere la
risposta, riagganciare, se si è abilitati alla trasferta automatica(1).
Ripetere ultimo numero 1. premere il tasto [#] (cancelletto).
selezionato
(1) Dato di personalizzazione, da applicativo SAMBuilder (rivolgersi all’amministratore di sistema).
(2) Il telefono si intende in modalità cuffia se è collegata una cuffia al connettore dedicato e il tasto cuffia
è acceso.
NETfon 300/350 - User Guide 723142003-A0-LM](https://image.slidesharecdn.com/netfon300userguidetelefono-13111501369084-phpapp01-110720032631-phpapp01/85/Netfon-300-User-Guide-Telefono-19-320.jpg)


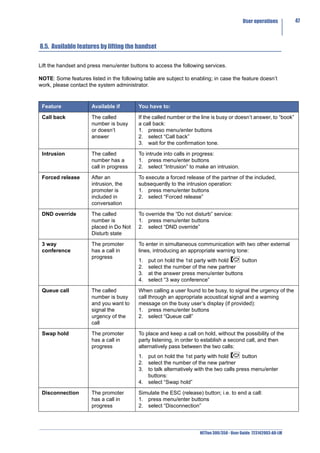
![User operations 41
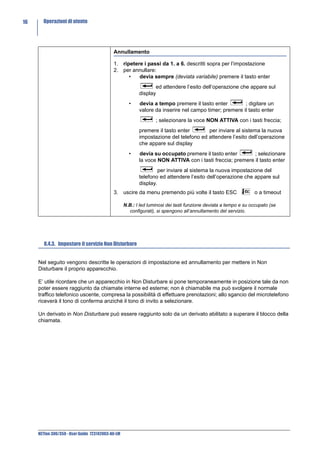
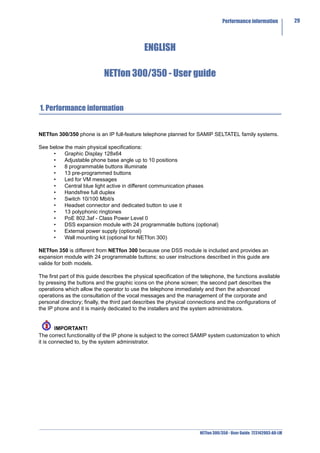
Make a phone call from It is possible to make a phone call from the address book of SAMIP
corporate directory system (speed numbers[*]). Search the names in the corporate directory
by scrolling the list with the UP and DOWN arrows button or by editing,
with the alphanumeric keys, a name or a part of it and then press enter
. Subsequently all the stored names, alphabetically ordered, are
displayed starting from the name required.
1. press menu/enter buttons to access the corporate directory
2. scroll the menu up to MAIN TEL. BOOK
3. scroll the name/number with UP and DOWN arrows
4. make the phone call by pressing enter
[*] The telephone must be enabled to access the speed numbers table
which contains the name to call; if near the name there is an “X”, it
indicates that the number cannot be read and the call cannot be made
(up to the system administrator).
End a phone call • return the handset to its cradle.
or
• from automatic handsfree mode press speakerphone
or
• press ESC
or
• from headset mode(2): press ESC .
Answer a phone call • lift the handset
or
• press speakerphone
or
• from headset mode(2): press ESC
Hold and resume the call
1. put the call on hold with hold button
2. resume the call from hold with hold button.
Enable/Disable
microphone (mute) 1. enable and desable the feature with button.
Transfer the phone call in
1. put on hold the call in progress with hold button
progress
2. dial the number of the extension to call
3. wait for the answer and hang up or without waiting for the answer,
hang up, only if the telephone is enabled to automatic transfer (1).
Redial last number 1. press pound [#].
(1) It is a SAMBuilder customation data from (contact your system administrator).
(2) The headset mode means that a headset is connected to the headset connector and the headset
button is lit.
NETfon 300/350 - User Guide 723142003-A0-LM](https://image.slidesharecdn.com/netfon300userguidetelefono-13111501369084-phpapp01-110720032631-phpapp01/85/Netfon-300-User-Guide-Telefono-47-320.jpg)
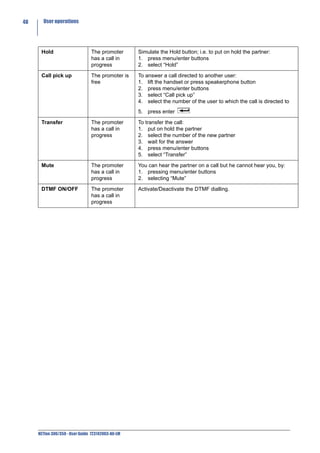


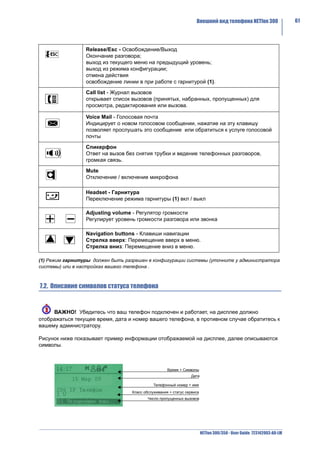
![68 Операции пользователя
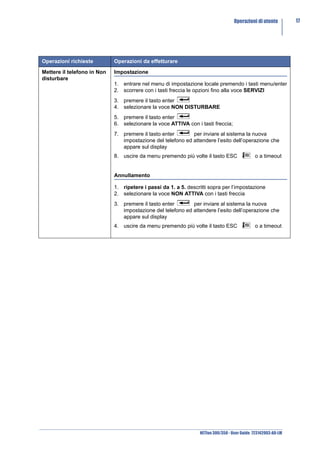
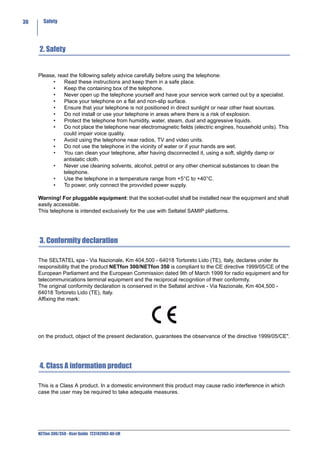
Сделать звонок из Вы можете сделать звонок из общего телефонного справочника
системного системы SAMIP (см также скоростной набор[*]). Поиск необходимого
телефонного номера по имени осуществляется пролистыванием списка имен с
справочника помощью кнопок ВВЕРХ / ВНИЗ или вводом первых букв имени с
клавиатуры аппарата и нажатием на кнопку menu/enter .
Последовательность всех имен, которые начинаются с этой буквы,
будут отображены в алфавитном порядке на дисплее вашего
телефона.
1. Нажмите кнопку menu/enter
2. Пролистайте до меню MAIN TEL. BOOK - Сист. Справочник
3. Нажмите кнопку menu/enter для входа в справочник
4. Отыщите необходимое имя кнопками ВВЕРХ / ВНИЗ или вводом
букв.
5. Для вызова нажмите кнопку menu/enter
[*] Ваш телефон должен иметь доступ к системному скоростному
набору для просмотра и вызова номеров; если в системном
справочнике вы видите имена со значком “X”, то это означает, что
вам запрещено набирать этот номер (проконсультируйтесь у
администратора системы).
Завершение • Положите трубку на рычаг телефона.
телефонного вызова или
• Нажмите кнопку спикерфона , если вы разговаривали по
спикерфону,
или
• Нажмите кнопку ESC
или
• При работе с гарнитурой (2): нажмите ESC .
Ответ на звонок • Снимите трубку
или
• Нажмите кнопку спикерфона
или
• При работе с гарнитурой (2): нажмите ESC
Удержание вызова и 1. Для постановки на удержание во время разговора нажмите
снятие с удержания кнопку
2. Для снятия с удержания нажмите кнопку .
Включить / отключить 1. Включение / Отключение микрофона осуществляется нажатием
микрофон (mute) на запрограммированную кнопку “Microphone”, уточните у
администратора системы.
Перевод вызова в 1. Во время разговора нажмите кнопку удержания
процессе разговора 2. Наберите номер, на который вы хотите перевести разговор
3. Дождитесь ответа абонентом или без ожидания ответа положите
трубку.
4. Если вы ошиблись в наборе или номер не отвечает, вы можете
снять предыдущий разговор с удержания нажав кнопку и
повторить операцию перевода
Данная операция возможна если вашему телефону разрешена
функция автоматического перевода вызова(1).
NETfon 300/350 - User Guide 723142003-A0-LM](https://image.slidesharecdn.com/netfon300userguidetelefono-13111501369084-phpapp01-110720032631-phpapp01/85/Netfon-300-User-Guide-Telefono-74-320.jpg)
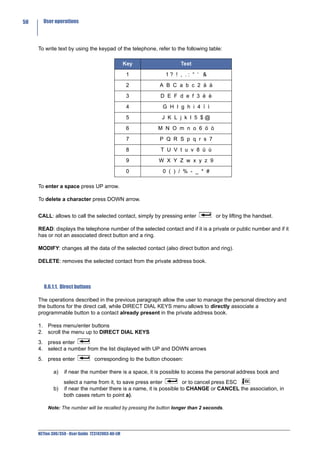
![Операции пользователя 69
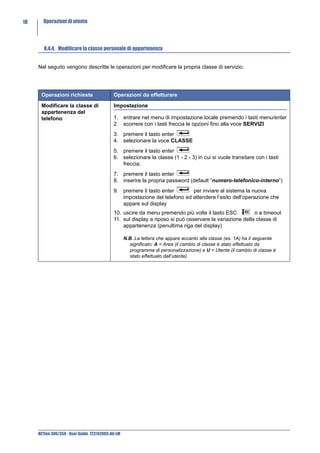
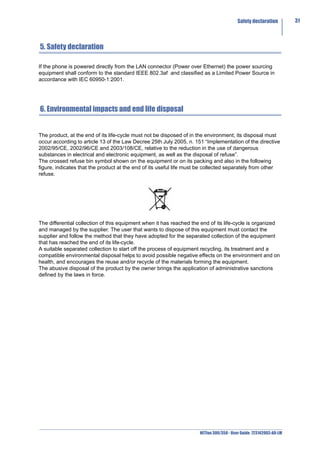
Набор последнего 1. Нажмите кнопку [#].
номера
(1) Зависит от конфигурации системы (уточните у администратора АТС).
(2) Режим гарнитуры означает, что данный режим установлен для вашего телефонного
аппарата в конфигурации системы (уточните у администратора АТС) или
запрограммирован в настройках вашего аппарата
8.3. Прослушивание голосовых сообщений
Если вам поступило голосовое сообщение, то на аппарате будет мигать индикатор Voice Mail -
Голосовая Почта . Для прослушивания сообщений нажмите эту кнопку и следуйте
голосовым подсказкам.
8.4. Возможные функции при положенной трубке
8.4.1. Набор блоком
Услуга позволяет пользователю набрать номер и затем дать команду для установления
соединения, нажав клавишу ввода (номер в линию уходит одним блоком, актуально для вызовов
по линиям ISDN или IP). После набора номера данная услуга не активна.
Для: Сделайте:
Набор блоком
1. нажмите клавишу menu/enter
2. пролистайте до меню SERVICES - УСЛУГИ
3. нажмите клавишу menu/enter
4. выберите пункт ENBLOCK CALL - Набор блоком
5. нажмите клавишу menu/enter
6. Введите телефонный номер для вызова, при наборе номера вы
можете удалять введенные цифры клавишей “Стрелка вниз”.
Для городских номеров перед номером введите код доступа к
городским линиям
7. Установление соединения осуществляется снятием трубки или
нажатием на клавишу menu/enter (только в режиме
автоматического спикерфона).
8. Для отмены нажмите клавишу ESC или дождитесь когда
сработает таймер.
NETfon 300/350 - User Guide 723142003-A0-LM](https://image.slidesharecdn.com/netfon300userguidetelefono-13111501369084-phpapp01-110720032631-phpapp01/85/Netfon-300-User-Guide-Telefono-75-320.jpg)