Il documento descrive un corso base per iOS, focalizzandosi su aspetti come la persistenza dei dati, l'interfacciamento con servizi web e l'utilizzo di MapKit. Viene fornito un dettagliato approfondimento su SQLite per la gestione dei dati e su come leggere dati dalla rete. Infine, il documento affronta il debugging, il testing delle app e le modalità di distribuzione su App Store e in modo ad-hoc.

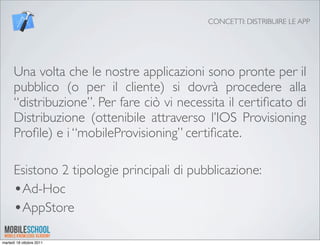
![DATI PERSISTENTI: IMPOSTAZIONI APPLICAZIONE
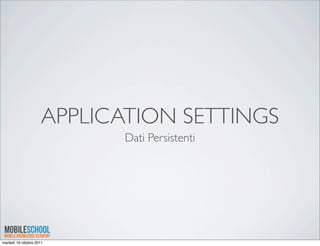
Una volta impostato il Settings.bundle e il
root.plist.
Si potrà accedere ai dati conservati con il
seguente snippet:
NSUserDefaults *defaults =
[NSUserDefaults standardUserDefaults];
[self setShouldPlaySounds:
[defaults boolForKey:@"miaPreferenza"]];
martedì 18 ottobre 2011](https://image.slidesharecdn.com/mobileschooliphone2-111017201640-phpapp01/85/MS_corso-base-iOS-iPhone_partII-6-320.jpg)


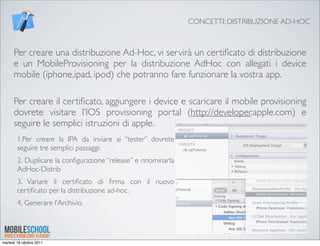
![DATI PERSISTENTI: SQLLITE
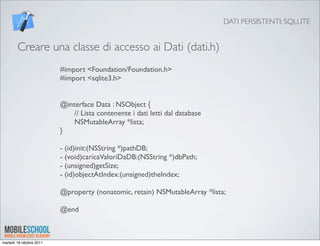
Creare una classe di accesso ai Dati (dati.m)
#import "Data.h"
static sqlite3 *database = nil;
@implementation Data
@synthesize lista;
// Inizializziamo l'oggetto della classe Data
- (id)init:(NSString *)pathDB{
// carichiamo i valori dal database
[self caricaValoriDaDB:pathDB];
return self;
}
+(void)finalizeStatements {
if(database)
sqlite3_close(database);
}
-(void)dealloc {
[lista release];
[super dealloc];
}
//..implementazione metodi di lettura...
@end
martedì 18 ottobre 2011](https://image.slidesharecdn.com/mobileschooliphone2-111017201640-phpapp01/85/MS_corso-base-iOS-iPhone_partII-10-320.jpg)
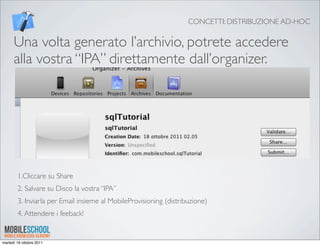
![DATI PERSISTENTI: SQLLITE
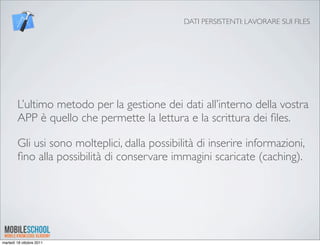
Creare una classe di accesso ai Dati (dati.m)
- (void)caricaValoriDaDB:(NSString *)dbPath {
NSLog(@"path: %@",dbPath);
// lista temporanea
NSMutableArray *listaTemp = [[NSMutableArray alloc] init];
// Oggetto che contiene i vari elementi
NSMutableDictionary *dictionary;
NSMutableString *idPersona;//id della persona
NSMutableString *nome;//nome della persona
NSMutableString *cognome;//cognome della persona
if (sqlite3_open([dbPath UTF8String], &database) == SQLITE_OK) {
// query che ricava i valori
const char *sql = "select ID, Nome, Cognome from PERSONA";
sqlite3_stmt *selectstmt;
if(sqlite3_prepare_v2(database, sql, -1, &selectstmt, NULL) == SQLITE_OK) {
while(sqlite3_step(selectstmt) == SQLITE_ROW) {
// ricaviamo i valori letti dalla query
idPersona = [NSString stringWithUTF8String:(char *)sqlite3_column_text(selectstmt, 0)];
nome = [NSString stringWithUTF8String:(char *)sqlite3_column_text(selectstmt, 1)];
cognome = [NSString stringWithUTF8String:(char *)sqlite3_column_text(selectstmt, 2)];
// inseriamo tutti i valori letti in un unico oggetto
dictionary = [[NSMutableDictionary alloc] initWithObjectsAndKeys:idPersona, @"id", nome, @"nome", cognome, @"cognome", nil];
[listaTemp addObject:dictionary];
[dictionary release];
}
}
self.lista = listaTemp;
[listaTemp release];
}
else
sqlite3_close(database);
NSLog(@"tutto ok");
}
martedì 18 ottobre 2011](https://image.slidesharecdn.com/mobileschooliphone2-111017201640-phpapp01/85/MS_corso-base-iOS-iPhone_partII-11-320.jpg)
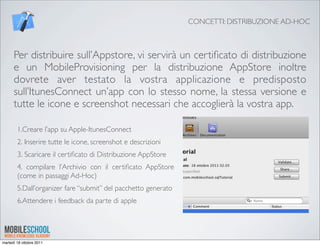
![DATI PERSISTENTI: SQLLITE
E ora accediamo ai nostri dati da una qualsiasi classe
dell’Applicazione:
//leggiamo il path del database
! NSString *defaultDBPath = [[[NSBundle mainBundle] resourcePath]
stringByAppendingPathComponent:@"persone.sqlite"];
!
! //creiamo la lista degli autori
! dataList = [[Data alloc] init:defaultDBPath];
martedì 18 ottobre 2011](https://image.slidesharecdn.com/mobileschooliphone2-111017201640-phpapp01/85/MS_corso-base-iOS-iPhone_partII-12-320.jpg)

![DATI PERSISTENTI: LAVORARE SUI FILES
Salvare un NSArray in un file:
NSArray *paths = NSSearchPathForDirectoriesInDomains(NSDocumentDirectory,
NSUserDomainMask, YES);
NSString *documentsDirectory = [paths objectAtIndex:0];
NSString *filePath = [documentsDirectory stringByAppendingPathComponent:FILE_NAME];
[myArray writeToFile:filePath atomically:TRUE];
Leggere un NSArray da un file:
NSArray *paths = NSSearchPathForDirectoriesInDomains(NSDocumentDirectory,
NSUserDomainMask, YES);
NSString *documentsDirectory = [paths objectAtIndex:0];
NSString *filePath = [documentsDirectory stringByAppendingPathComponent:FILE_NAME];
myArray = [NSArray arrayWithContentsOfFile:filePath];
martedì 18 ottobre 2011](https://image.slidesharecdn.com/mobileschooliphone2-111017201640-phpapp01/85/MS_corso-base-iOS-iPhone_partII-15-320.jpg)
![DATI PERSISTENTI: LAVORARE SUI FILES
Verificare se il file Esiste e salvare un immagine:
if(![[NSFileManager defaultManager] fileExistsAtPath: uniquePath])
{
NSData *data = [[NSData alloc] initWithContentsOfURL: ImageURL];
UIImage *image = [[UIImage alloc] initWithData: data];
image = [self roundCorners: image];
if([ImageURLString rangeOfString: @".png" options:
NSCaseInsensitiveSearch].location != NSNotFound)
{
[UIImagePNGRepresentation(image) writeToFile: uniquePath atomically: YES];
}
else if(
[ImageURLString rangeOfString: @".jpg" options:
NSCaseInsensitiveSearch].location != NSNotFound ||
[ImageURLString rangeOfString: @".jpeg" options:
NSCaseInsensitiveSearch].location != NSNotFound
)
{
[UIImageJPEGRepresentation(image, 100) writeToFile: uniquePath atomically:
YES];
}
}
martedì 18 ottobre 2011](https://image.slidesharecdn.com/mobileschooliphone2-111017201640-phpapp01/85/MS_corso-base-iOS-iPhone_partII-16-320.jpg)
![DATI PERSISTENTI: LAVORARE SUI FILES
Leggere un immagine da un file:
- (UIImage *) getCachedImage: (NSString *) ImageURLString
{
NSString *filename = [[something unique, perhaps the image name]];
NSString *uniquePath = [TMP stringByAppendingPathComponent: filename];
UIImage *image;
if([[NSFileManager defaultManager] fileExistsAtPath: uniquePath])
{
image = [UIImage imageWithContentsOfFile: uniquePath]; // this is the cached
image
}
else
{
[self cacheImage: ImageURLString];
image = [UIImage imageWithContentsOfFile: uniquePath];
}
return image;
}
martedì 18 ottobre 2011](https://image.slidesharecdn.com/mobileschooliphone2-111017201640-phpapp01/85/MS_corso-base-iOS-iPhone_partII-17-320.jpg)

![LEGGERE DATI DALLA RETE
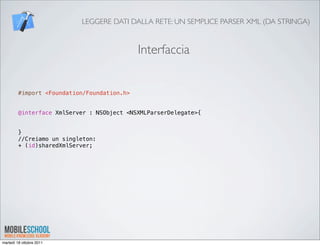
Il massimo delle potenzialità un’app le raggiunge quanto può
connettersi al web ed acquisire dati direttamente da servizi
esterni come per esempio attraverso i file XML.
Esistono vari framework per ottenere dati dal web (es
ASIHTTPREQUEST) ma la più semplice prevede l’utilizzo di
questo snippet:
NSURL *URL=[[NSURL alloc] initWithString:stringForURL];
NSString *results =
[[NSString alloc] initWithContentsOfURL :URL];
e l’utilizzo di una classe “parser” che prepari un elenco di dati
da un NSString contenente XML
martedì 18 ottobre 2011](https://image.slidesharecdn.com/mobileschooliphone2-111017201640-phpapp01/85/MS_corso-base-iOS-iPhone_partII-19-320.jpg)
![LEGGERE DATI DALLA RETE
Implementazione
#import <Foundation/Foundation.h>
#import <Foundation/NSXMLParser.h>
- (void)parserDidStartDocument:(NSXMLParser *)parser{!
! NSLog(@"found file and started parsing");
}
- (id)parseXMLFileForString:(NSString *)xmlString
{
!
! NSData *rssXmlData = [rssXmlString dataUsingEncoding: NSUTF8StringEncoding];!
NSXMLParser *rssParser = [[NSXMLParser alloc] initWithData:MYDATA];
[rssParser setDelegate:self];
! [rssParser setShouldProcessNamespaces:NO];
! [rssParser setShouldReportNamespacePrefixes:NO];
! [rssParser setShouldResolveExternalEntities:NO];
! [rssParser parse];
! [rssParser release];
}
- (void)parser:(NSXMLParser *)parser didStartElement:(NSString *)elementName namespaceURI:(NSString *)namespaceURI
qualifiedName:(NSString *)qName attributes:(NSDictionary *)attributeDict{!! !
NSLog(@"found this element: %@", elementName);
}
- (void)parser:(NSXMLParser *)parser didEndElement:(NSString *)elementName namespaceURI:(NSString *)namespaceURI
qualifiedName:(NSString *)qName{
}
- (void)parser:(NSXMLParser *)parser foundCharacters:(NSString *)string{
}
- (void)parser:(NSXMLParser *)parser parseErrorOccurred:(NSError *)parseError {
! NSString * errorString = [NSString stringWithFormat:@"Unable parse XML error number:%i )", [parseError code]];
! NSLog(@"Errore Analisi XML: %@,", errorString, [parseError description]);!
}
martedì 18 ottobre 2011](https://image.slidesharecdn.com/mobileschooliphone2-111017201640-phpapp01/85/MS_corso-base-iOS-iPhone_partII-21-320.jpg)

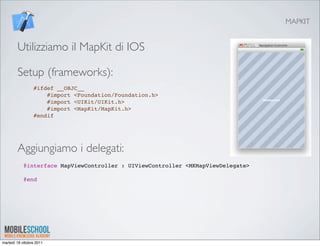
![MAPKIT
Inseriamo la Mappa nella nostra View:
- (void)loadView {
self.title = @"Mappa";
MKMapView *map= [[[MKMapView alloc] init] autorelease];
map.delegate = self;
map.showsUserLocation = YES;
self.view = map;
}
Zoommiamo sulla posizione dell’utente
- (void)mapView:(MKMapView *)mapView didAddAnnotationViews:(NSArray *)views {
for (MKAnnotationView *annotationView in views) {
if (annotationView.annotation == mapView.userLocation) {
MKCoordinateSpan span = MKCoordinateSpanMake(0.3, 0.3);
MKCoordinateRegion region = MKCoordinateRegionMake
(mapView.userLocation.coordinate, span);
[mapView setRegion:region animated:YES];
}
}
}
martedì 18 ottobre 2011](https://image.slidesharecdn.com/mobileschooliphone2-111017201640-phpapp01/85/MS_corso-base-iOS-iPhone_partII-24-320.jpg)
![MAPKIT
Aggiungere pushpin - la classe Annotation
@interface MobileSchoolAnnotation : NSObject <MKAnnotation> {
" CLLocationCoordinate2D coordinate;
}
@end
#import "MobileSchoolAnnotation.h"
@implementation MobileSchoolAnnotation
- (id)init {
coordinate.longitude = -122.084095;
coordinate.latitude = 37.422006;
return [super init];
}
@synthesize coordinate;
- (NSString *)title {
return @"MobileSchool";
}
- (NSString *)subtitle {
return @"Corso IOS!";
}
@end
martedì 18 ottobre 2011](https://image.slidesharecdn.com/mobileschooliphone2-111017201640-phpapp01/85/MS_corso-base-iOS-iPhone_partII-25-320.jpg)
![MAPKIT
Aggiungere i pushpin alla nostra Mappa
[map addAnnotation:[[[MobileSchoolAnnotation alloc] init]
autorelease]];
Usare i delegati per personalizzare il click sui pushpin:
- (MKAnnotationView *)mapView:(MKMapView *)mapView viewForAnnotation:(id )annotation {
if (annotation == mapView.userLocation) {
return nil;
}
MKPinAnnotationView *pinView =
[[[MKPinAnnotationView alloc] initWithAnnotation:annotation reuseIdentifier:@"Pin"] autorelease];
pinView.pinColor = MKPinAnnotationColorPurple;
pinView.canShowCallout = YES;
pinView.rightCalloutAccessoryView = [UIButton buttonWithType:UIButtonTypeDetailDisclosure];
pinView.animatesDrop = YES;
return pinView;
}
- (void)mapView:(MKMapView *)mapView annotationView:(MKAnnotationView *)view calloutAccessoryControlTapped:
(UIControl *)control {
" [self.navigationController pushViewController:[[[UIViewController alloc] init] autorelease] animated:YES];
}
martedì 18 ottobre 2011](https://image.slidesharecdn.com/mobileschooliphone2-111017201640-phpapp01/85/MS_corso-base-iOS-iPhone_partII-26-320.jpg)
![MAPKIT TIPS
Creare viste personalizzate per i nostri PushPin
- (MKAnnotationView *)mapView:(MKMapView *)mapView viewForAnnotation:(id
<MKAnnotation>)annotation {
if (annotation == mapView.userLocation) {
return nil;
}
MKAnnotationView *annotationView = [[[MKAnnotationView alloc]
initWithAnnotation:annotation reuseIdentifier:@"Pin"] autorelease];
annotationView.image = [UIImage imageNamed:@"google.png"];
annotationView.canShowCallout = YES;
annotationView.rightCalloutAccessoryView = [UIButton
buttonWithType:UIButtonTypeDetailDisclosure];
return annotationView;
}
martedì 18 ottobre 2011](https://image.slidesharecdn.com/mobileschooliphone2-111017201640-phpapp01/85/MS_corso-base-iOS-iPhone_partII-27-320.jpg)


![[Objective-C] - Introduzione](https://cdn.slidesharecdn.com/ss_thumbnails/001-objcintro-090927034535-phpapp02-thumbnail.jpg?width=640&height=640&fit=bounds)


![[Objective-C] - 02 Properties e Costruttori](https://cdn.slidesharecdn.com/ss_thumbnails/002-objcpropertiesecostruttori-091014132456-phpapp01-thumbnail.jpg?width=640&height=640&fit=bounds)


