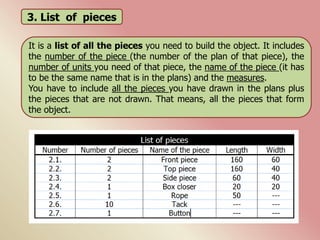
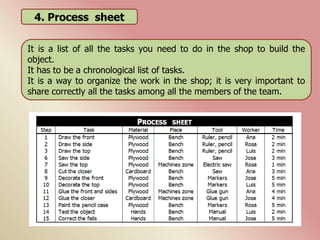
What is Technology?
The design process
Sixth step: pre-project
Each group has to do a pre-project (one pre-project per team).
You have to organize all the tasks so that all the members work the same. The
coordinator has to arrange the meetings so as to divide the work and he/she is
the person in charge of the work.
Pre-project (index)
1. Report.
1.1. Solutions.
1.2. Multi-criteria analysis.
2. Plans.
2.1. Plan of the object.
2.2. Plan of the pieces.
3. List of pieces.
4. Process sheet.
5. Shop safety plan.
6. Coordinator report
Fourth step: possible solutions
Solution – Description
1. Say what it is.
2. Size width x depth x height in
mm.
3. Shape.
4. Materials used and why you
chose them.
5. Joints (glue, nails, screws, …)
and why you chose them.
6. Mechanism (elements and how
it works).
7. Electric circuit (elements and
how it works).
8. Decoration .
Idea 1 - Name
You have to describe each possible solution
Add a sketch of your solution
Fifth step: select the best solution
Select the best possible solution using the
Multi-criteria analysis
Criteria I 1 I 2 I 3 I 4 I 5
Resistant 5 3 2 3 1
Beautiful 3 4 2 3 4
Correct design 3 4 3 3 5
Cheap 3 5 3 2 4
Available materials 3 5 5 4 3
Original 3 3 3 4 2
Not difficult 2 4 3 4 5
TOTAL POINTS 22 36 21 23 24
Solution 1 - Name Solution 2 - Name
Pre-project: report
1.1. Solutions.
• 4 or 5 solutions proposed by the team (each student one solution).
• Before doing it you have to collect information.
• Each solution has to have a description: size, materials, joints,
circuits, …
• Each solution has to include a sketch drawn with ruler and with the
measures.
1.2. Add the multi-criteria analysis
2. Plans
2.1. Plan of the object
Plans must include.
• Frame: 2 cm on the left and half centimeter on the other
three borders.
• Text block: with all the important information such as name
of the drawing, scale, name of the high school, name of the
author, …
• Drawing: use the ruler.
• Measures: following the rules we studied in class.
•Number of the plan: the plan of the object is the Number
1. If you do two plans of the object you have to use the
numbers 1.1., 1.2. For instance the views and a detailed plan.
• The plans of the pieces are the numbers 2.1., 2.2., 2.3., … to
distinguish them from the plan of the object.
In the following slides you have some examples of plans.
Pay attention to:
• The frame and the text block.
• Draw this text block in your plans.
• Use always de RULER or the COMPUTER.
• Add always the measures following the rules we studied
in class.
You just need to draw the pieces that you are going to build
in the shop. For instance, if you are going to use some nails
you don´t need to draw them because you buy them, you
don´t build them.
Example of plans
3. List of pieces
It is a list of all the pieces you need to build the object. It includes
the number of the piece (the number of the plan of that piece), the
number of units you need of that piece, the name of the piece (it has
to be the same name that is in the plans) and the measures.
You have to include all the pieces you have drawn in the plans plus
the pieces that are not drawn. That means, all the pieces that form
the object.
4. Process sheet
It is a list of all the tasks you need to do in the shop to build the
object.
It has to be a chronological list of tasks.
It is a way to organize the work in the shop; it is very important to
share correctly all the tasks among all the members of the team.
5. Shop safety plan
It is a list of all the safety measures you are going to take in the shop
in order not to have an accident.
You have to think about all the accidents you could have and the way
to avoid them.
6. Coordinator report
In this report you have to explain:
• How the team worked.
• Difficulties you met.
• Problems you had.
• Participation of each member in the team.
• Improvements you think could be made.
Some tips about the work
Pay attention to the layout and accuracy of the work. This includes:
• Follow the index shown in the sixth step.
• The cover has to include all this information: number of the
group, name and surname of all the members of the team and
responsibility, course, term, academic year, name of the work.
• Use DIN A4.
• Write just in one face of the sheet.
• Pay attention to the spelling.
• If it is possible use the computer.
• Use the vocabulary you have learnt in class.
1. Name of the pre-project
2. Name and surname of the members of the
team. Responsibility of each member.
3. Number of the group
4. Course
5. Academic year
6. Delivery date
7. Term
Cover
Pencil case
Group 3
Student 1. Coordinator
Student 2. R. tools
Student 3. R. materials
Student 4. R. cleanliness and secretary
1ºE
Academic year 2013/14
1 / april /2014
1st term

Moodle pre project

  • 1.
  • 2.
    Sixth step: pre-project Eachgroup has to do a pre-project (one pre-project per team). You have to organize all the tasks so that all the members work the same. The coordinator has to arrange the meetings so as to divide the work and he/she is the person in charge of the work. Pre-project (index) 1. Report. 1.1. Solutions. 1.2. Multi-criteria analysis. 2. Plans. 2.1. Plan of the object. 2.2. Plan of the pieces. 3. List of pieces. 4. Process sheet. 5. Shop safety plan. 6. Coordinator report
  • 3.
    Fourth step: possiblesolutions Solution – Description 1. Say what it is. 2. Size width x depth x height in mm. 3. Shape. 4. Materials used and why you chose them. 5. Joints (glue, nails, screws, …) and why you chose them. 6. Mechanism (elements and how it works). 7. Electric circuit (elements and how it works). 8. Decoration . Idea 1 - Name You have to describe each possible solution Add a sketch of your solution
  • 4.
    Fifth step: selectthe best solution Select the best possible solution using the Multi-criteria analysis Criteria I 1 I 2 I 3 I 4 I 5 Resistant 5 3 2 3 1 Beautiful 3 4 2 3 4 Correct design 3 4 3 3 5 Cheap 3 5 3 2 4 Available materials 3 5 5 4 3 Original 3 3 3 4 2 Not difficult 2 4 3 4 5 TOTAL POINTS 22 36 21 23 24
  • 5.
    Solution 1 -Name Solution 2 - Name Pre-project: report 1.1. Solutions. • 4 or 5 solutions proposed by the team (each student one solution). • Before doing it you have to collect information. • Each solution has to have a description: size, materials, joints, circuits, … • Each solution has to include a sketch drawn with ruler and with the measures. 1.2. Add the multi-criteria analysis
  • 6.
    2. Plans 2.1. Planof the object Plans must include. • Frame: 2 cm on the left and half centimeter on the other three borders. • Text block: with all the important information such as name of the drawing, scale, name of the high school, name of the author, … • Drawing: use the ruler. • Measures: following the rules we studied in class. •Number of the plan: the plan of the object is the Number 1. If you do two plans of the object you have to use the numbers 1.1., 1.2. For instance the views and a detailed plan. • The plans of the pieces are the numbers 2.1., 2.2., 2.3., … to distinguish them from the plan of the object.
  • 7.
    In the followingslides you have some examples of plans. Pay attention to: • The frame and the text block. • Draw this text block in your plans. • Use always de RULER or the COMPUTER. • Add always the measures following the rules we studied in class. You just need to draw the pieces that you are going to build in the shop. For instance, if you are going to use some nails you don´t need to draw them because you buy them, you don´t build them.
  • 8.
  • 11.
    3. List ofpieces It is a list of all the pieces you need to build the object. It includes the number of the piece (the number of the plan of that piece), the number of units you need of that piece, the name of the piece (it has to be the same name that is in the plans) and the measures. You have to include all the pieces you have drawn in the plans plus the pieces that are not drawn. That means, all the pieces that form the object.
  • 12.
    4. Process sheet Itis a list of all the tasks you need to do in the shop to build the object. It has to be a chronological list of tasks. It is a way to organize the work in the shop; it is very important to share correctly all the tasks among all the members of the team.
  • 13.
    5. Shop safetyplan It is a list of all the safety measures you are going to take in the shop in order not to have an accident. You have to think about all the accidents you could have and the way to avoid them.
  • 14.
    6. Coordinator report Inthis report you have to explain: • How the team worked. • Difficulties you met. • Problems you had. • Participation of each member in the team. • Improvements you think could be made.
  • 15.
    Some tips aboutthe work Pay attention to the layout and accuracy of the work. This includes: • Follow the index shown in the sixth step. • The cover has to include all this information: number of the group, name and surname of all the members of the team and responsibility, course, term, academic year, name of the work. • Use DIN A4. • Write just in one face of the sheet. • Pay attention to the spelling. • If it is possible use the computer. • Use the vocabulary you have learnt in class.
  • 16.
    1. Name ofthe pre-project 2. Name and surname of the members of the team. Responsibility of each member. 3. Number of the group 4. Course 5. Academic year 6. Delivery date 7. Term Cover Pencil case Group 3 Student 1. Coordinator Student 2. R. tools Student 3. R. materials Student 4. R. cleanliness and secretary 1ºE Academic year 2013/14 1 / april /2014 1st term

Editor's Notes

  • #3 Arrange - /arreinch/
  • #4 Width /uidz/ Height /jait/ Decoration - dekoreishan
  • #5 Select- /select/ Available – /aveilebal/
  • #7 Centimeter- /sentimiter/ Milimeter - /milimiter/
  • #13 Manual /meniual/ Process - /proses/ Zone - /zoun/
  • #14 Cambiar” not to play” por “do not play” “wear gloves”, “keep cleanliness” Hold - /jould/ Gloves - /glavs/ Separately - /sepretli/
  • #16 Layout /leiaut/ related to margins, allination, … Accuracy /ekiurasi/ Components /kompounents/ Cover - /caver/ Responsibility - /risponsebiliti/ Vocabulary - /vokebiulari/