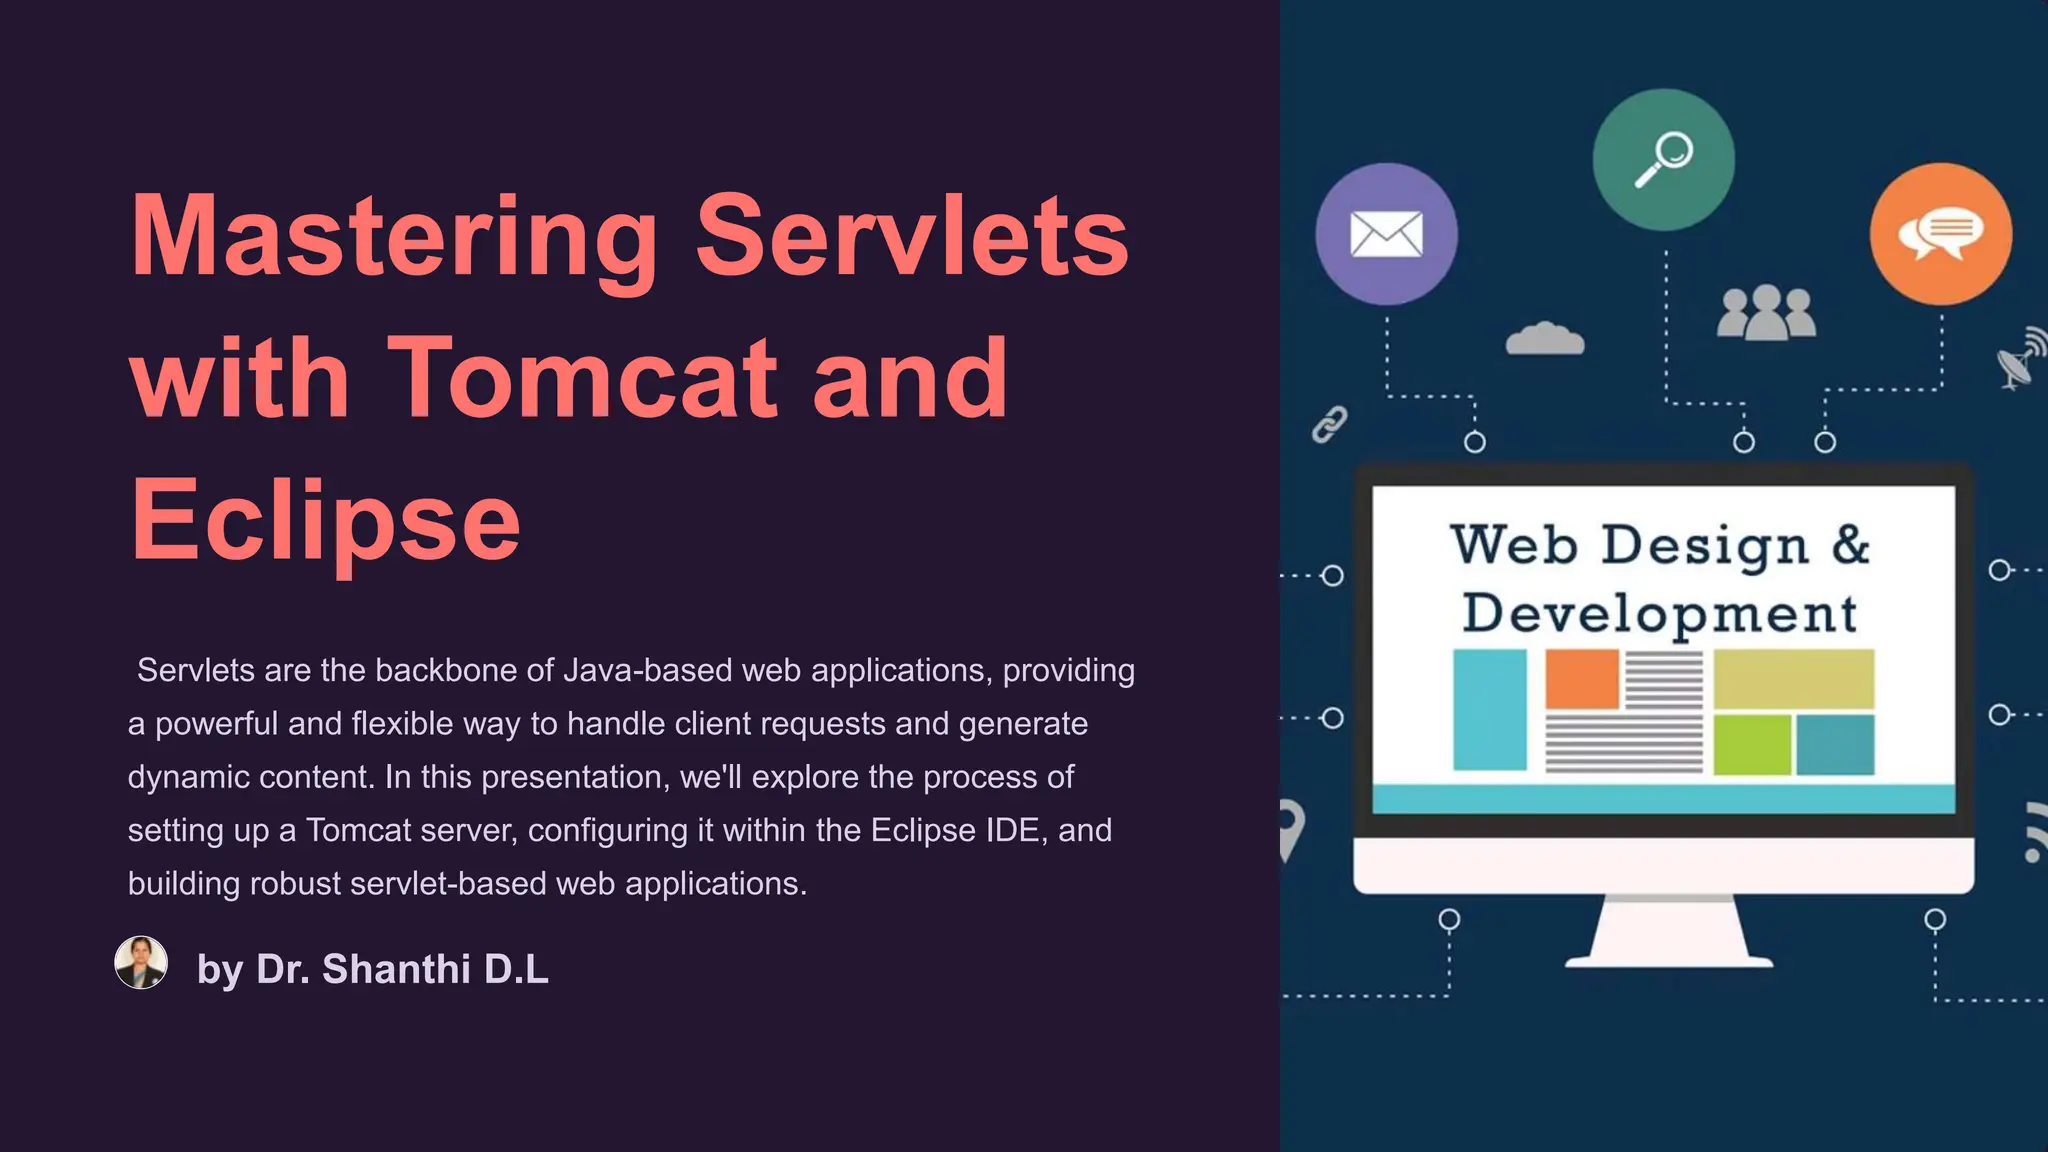
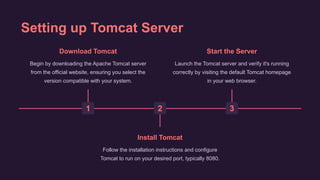
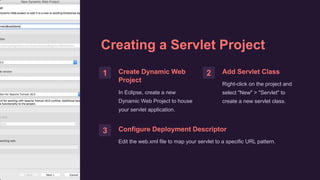
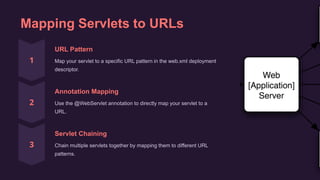
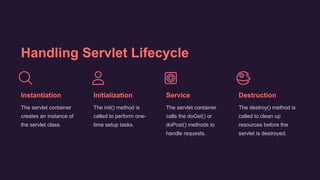
Mastering Servlets
with Tomcat and
Eclipse
Servlets are the backbone of Java-based web applications, providing
a powerful and flexible way to handle client requests and generate
dynamic content. In this presentation, we'll explore the process of
setting up a Tomcat server, configuring it within the Eclipse IDE, and
building robust servlet-based web applications.
by Dr. Shanthi D.L
Setting up Tomcat Server
1
Download Tomcat
Begin by downloading the Apache Tomcat server
from the official website, ensuring you select the
version compatible with your system.
2
Install Tomcat
Follow the installation instructions and configure
Tomcat to run on your desired port, typically 8080.
3
Start the Server
Launch the Tomcat server and verify it's running
correctly by visiting the default Tomcat homepage
in your web browser.
Configuring Tomcat in Eclipse IDE
Add Tomcat Server
In Eclipse, navigate to the
Servers view and add a new
Tomcat server instance, pointing
it to the Tomcat installation
directory.
Associate Projects
Right-click on the Tomcat server
and select "Add and Remove" to
associate your servlet projects
with the server.
Start and Stop Server
Use the Servers view to start,
stop, and manage the Tomcat
server from within the Eclipse
IDE.
Creating a Servlet Project
1 Create Dynamic Web
Project
In Eclipse, create a new
Dynamic Web Project to house
your servlet application.
2 Add Servlet Class
Right-click on the project and
select "New" > "Servlet" to
create a new servlet class.
3 Configure Deployment Descriptor
Edit the web.xml file to map your servlet to a specific URL pattern.
Implementing Servlet Methods
doGet()
Handles HTTP GET requests, allowing you to
retrieve data and generate dynamic content.
doPost()
Handles HTTP POST requests, enabling you to
process form data and update server-side
resources.
init() and destroy()
Initialize and clean up servlet resources during the
servlet lifecycle.
getServletConfig() and
getServletContext()
Provide access to servlet configuration and context
information.
Mapping Servlets to URLs
URL Pattern
Map your servlet to a specific URL pattern in the web.xml deployment
descriptor.
Annotation Mapping
Use the @WebServlet annotation to directly map your servlet to a
URL.
Servlet Chaining
Chain multiple servlets together by mapping them to different URL
patterns.
Handling Servlet Lifecycle
Instantiation
The servlet container
creates an instance of
the servlet class.
Initialization
The init() method is
called to perform one-
time setup tasks.
Service
The servlet container
calls the doGet() or
doPost() methods to
handle requests.
Destruction
The destroy() method is
called to clean up
resources before the
servlet is destroyed.
Deploying and Testing Servlets
Deployment Package your servlet application as a WAR file and
deploy it to the Tomcat server.
Testing Access your servlet by visiting the appropriate URL
in your web browser.
Debugging Use the Eclipse debugger to step through your
servlet code and identify any issues.
Monitoring Check the Tomcat logs to view servlet output and
troubleshoot any runtime errors.

Mastering-Servlets-with-Tomcat-and-Eclipse.pptx

  • 1.
    Mastering Servlets with Tomcatand Eclipse Servlets are the backbone of Java-based web applications, providing a powerful and flexible way to handle client requests and generate dynamic content. In this presentation, we'll explore the process of setting up a Tomcat server, configuring it within the Eclipse IDE, and building robust servlet-based web applications. by Dr. Shanthi D.L
  • 2.
    Setting up TomcatServer 1 Download Tomcat Begin by downloading the Apache Tomcat server from the official website, ensuring you select the version compatible with your system. 2 Install Tomcat Follow the installation instructions and configure Tomcat to run on your desired port, typically 8080. 3 Start the Server Launch the Tomcat server and verify it's running correctly by visiting the default Tomcat homepage in your web browser.
  • 3.
    Configuring Tomcat inEclipse IDE Add Tomcat Server In Eclipse, navigate to the Servers view and add a new Tomcat server instance, pointing it to the Tomcat installation directory. Associate Projects Right-click on the Tomcat server and select "Add and Remove" to associate your servlet projects with the server. Start and Stop Server Use the Servers view to start, stop, and manage the Tomcat server from within the Eclipse IDE.
  • 4.
    Creating a ServletProject 1 Create Dynamic Web Project In Eclipse, create a new Dynamic Web Project to house your servlet application. 2 Add Servlet Class Right-click on the project and select "New" > "Servlet" to create a new servlet class. 3 Configure Deployment Descriptor Edit the web.xml file to map your servlet to a specific URL pattern.
  • 5.
    Implementing Servlet Methods doGet() HandlesHTTP GET requests, allowing you to retrieve data and generate dynamic content. doPost() Handles HTTP POST requests, enabling you to process form data and update server-side resources. init() and destroy() Initialize and clean up servlet resources during the servlet lifecycle. getServletConfig() and getServletContext() Provide access to servlet configuration and context information.
  • 6.
    Mapping Servlets toURLs URL Pattern Map your servlet to a specific URL pattern in the web.xml deployment descriptor. Annotation Mapping Use the @WebServlet annotation to directly map your servlet to a URL. Servlet Chaining Chain multiple servlets together by mapping them to different URL patterns.
  • 7.
    Handling Servlet Lifecycle Instantiation Theservlet container creates an instance of the servlet class. Initialization The init() method is called to perform one- time setup tasks. Service The servlet container calls the doGet() or doPost() methods to handle requests. Destruction The destroy() method is called to clean up resources before the servlet is destroyed.
  • 8.
    Deploying and TestingServlets Deployment Package your servlet application as a WAR file and deploy it to the Tomcat server. Testing Access your servlet by visiting the appropriate URL in your web browser. Debugging Use the Eclipse debugger to step through your servlet code and identify any issues. Monitoring Check the Tomcat logs to view servlet output and troubleshoot any runtime errors.