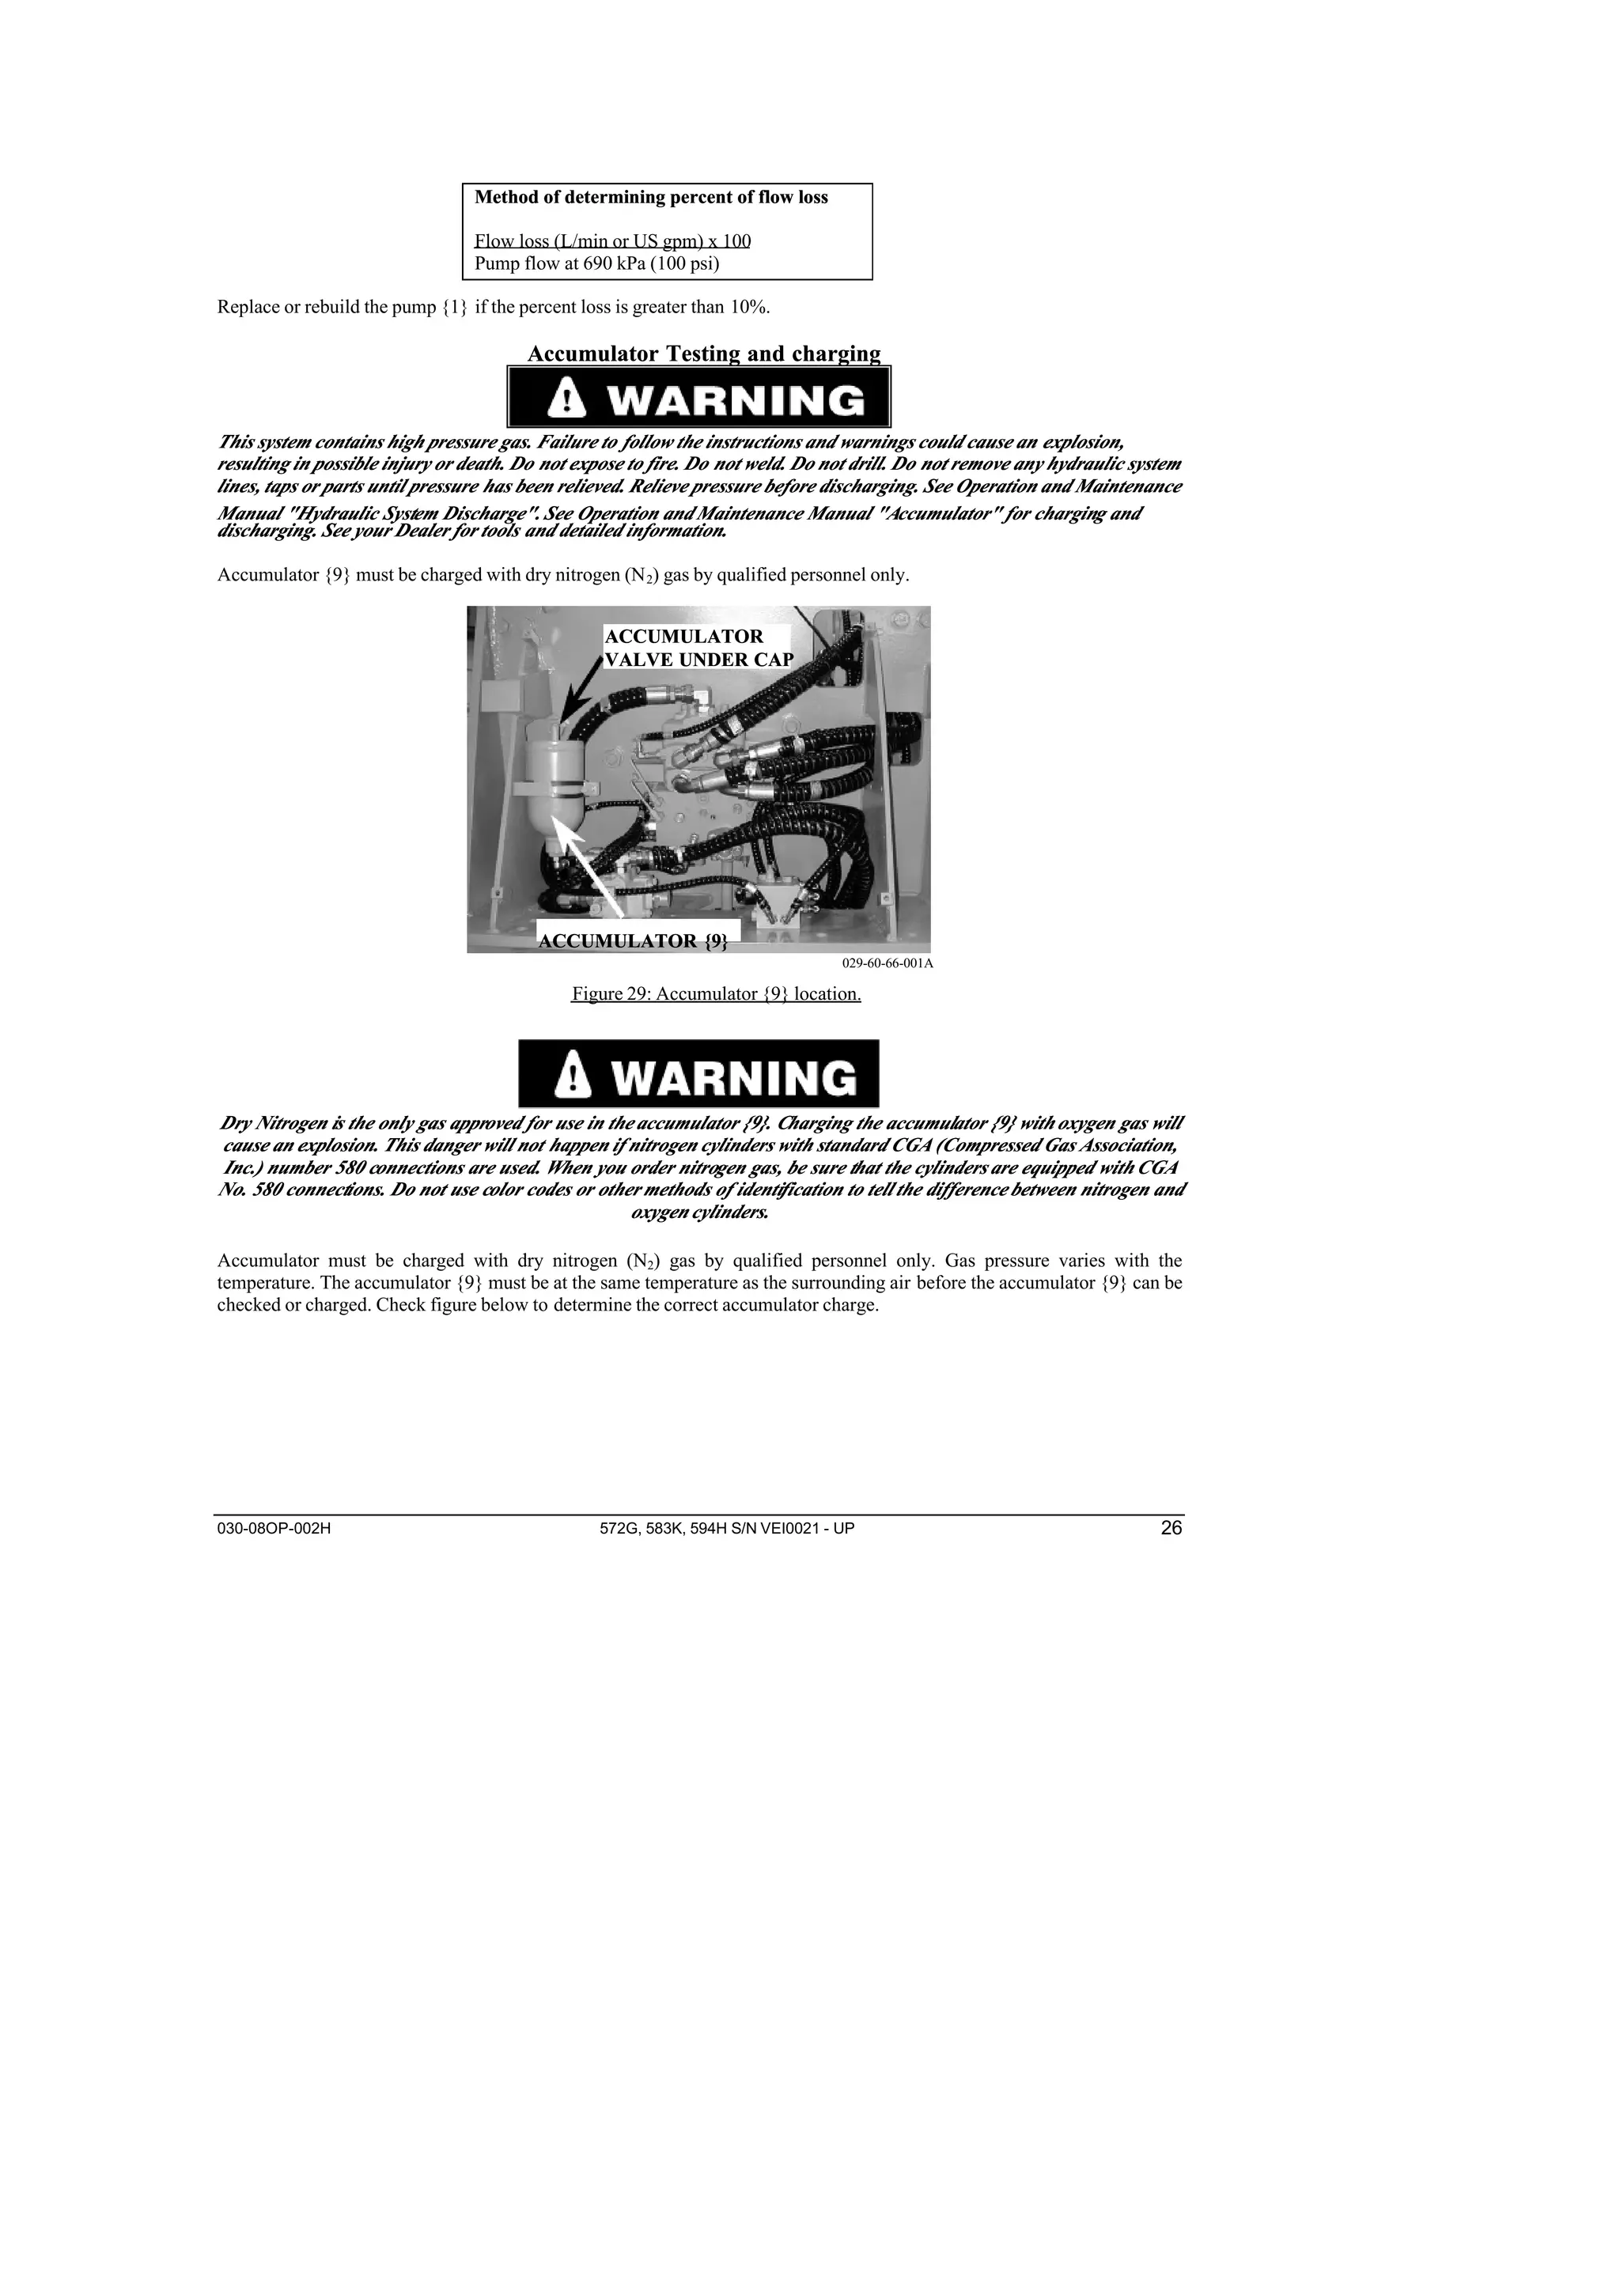
Introduction to IEEE STANDARDS and its different types.pptx
Manual de operacion side boom caterpillar
1. 2012-09
Pipelayer Wetdeck Package
for 572E/F/G, 583H/K and 594G/H
S/N VEI 572E/F/G0021–UP
S/N VEI 583H/K0021–UP
S/N VEI 594G/H0021–UP
TO BE USED WITH CATERPILLAR
572E/F/G, 583H/K and 594G/H PIPELAYER OPERATION, LUBRICATION AND MAINTENANCE GUIDES
3. 030-08OP-002H 572G, 583K, 594H S/N VEI0021 - UP i
TABLE OF CONTENTS
FOREWORD........................................................................................................................................................................... 1
MACHINE DESCRIPTION ......................................................................................................................................................... 1
SAFETY ................................................................................................................................................................................... 1
WARNING SIGNS AND LABELS................................................................................................................................................ 1
GENERAL HAZARD INFORMATION .......................................................................................................................................... 1
MACHINE PARKING ................................................................................................................................................................ 2
HIGH HYDRAULIC SYSTEM PRESSURE .................................................................................................................................... 2
Equipment Lowering with Engine Stopped........................................................................................................................ 3
Sound Information and Vibration Information.................................................................................................................. 3
Sound Level Information............................................................................................................................................... 3
Sound Performance for Machines that are Offered in European Union Countries and in Countries that Adopt the EU
Directives....................................................................................................................................................................... 3
"The European Union Physical Agents (Vibration) Directive2002/44/EC"...................................................................... 3
Guards............................................................................................................................................................................... 3
Daily Inspection................................................................................................................................................................. 3
COMPONENTS AND SPECIFICATIONS.......................................................................................................................... 4
MARK FOR EUROPEAN UNION ................................................................................................................................................ 5
STANDARD FEATURES ............................................................................................................................................................ 5
OPTIONAL FEATURES ............................................................................................................................................................. 5
CABLE DRUM CAPACITIES ..................................................................................................................................................... 6
OVERALL WEIGHT AND DIMENSION OF PIPELAYER ............................................................................................................... 6
DRAWWORKS CONTROLS................................................................................................................................................ 7
SPEED/LOCKOUT CONTROL LEVER ........................................................................................................................................ 7
HOOK CONTROL LEVER ......................................................................................................................................................... 8
BOOM CONTROL LEVER ......................................................................................................................................................... 9
BOOM STOP VALVE .............................................................................................................................................................. 10
COUNTERWEIGHT CONTROL LEVER ..................................................................................................................................... 10
HYDRAULIC OIL TEMPERATURE GAUGE .............................................................................................................................. 11
Equipment Lowering with Engine Stopped...................................................................................................................... 12
MAINTENANCE AND LUBRICATION............................................................................................................................ 13
GENERAL .............................................................................................................................................................................. 13LUBRICANT SPECIFICATIONS ................................................................................................................................................ 13
REFILL CAPACITIES .............................................................................................................................................................. 13
SERVICE INTERVALS ............................................................................................................................................................. 14
10 Hours Service Interval or Daily.................................................................................................................................. 14
50 Hours Service Interval or Weekly............................................................................................................................... 14
200 Hours Service Interval or Monthly........................................................................................................................... 14
500 Hours Service Interval or 3 Months..........................................................................................................................14
2000 Hours Service Interval or 1 Year............................................................................................................................ 14
HYDRAULIC SYSTEM OIL LEVEL CHECK .............................................................................................................................. 15
HYDRAULIC SYSTEM OIL SAMPLING .................................................................................................................................... 15
HYDRAULIC SYSTEM OIL CHANGE ....................................................................................................................................... 16
HYDRAULIC SYSTEM OIL FILTER CHANGE ........................................................................................................................... 17
OIL FILTER INSPECTION........................................................................................................................................................ 17
BOOM STOP VALVE ADJUSTMENT ........................................................................................................................................ 18
BOOM STOP ROD SPRING ASSEMBLY INSPECTION AND REPAIR ............................................................................................ 20
HOOK AND WIRE CABLE – INSPECT ..................................................................................................................................... 21
Inspect the Hook.............................................................................................................................................................. 21
Inspect Wire Cable - Boom and Hook lines..................................................................................................................... 21
ACCUMULATOR .................................................................................................................................................................... 22
LIFTING OF COMPONENTS .................................................................................................................................................... 22
TESTING ANDADJUSTING OFHYDRAULIC SYSTEM............................................................................................. 23
HYDRAULIC SYSTEM IMPLEMENTATION .............................................................................................................................. 23
HYDRAULIC SYSTEM DISCHARGE ........................................................................................................................................ 23
VISUAL CHECKS ................................................................................................................................................................... 24
PUMP EFFICIENCY CHECK .................................................................................................................................................... 25
4. 030-08OP-002H 572G, 583K, 594H S/N VEI0021 - UP ii
Test on the Machine......................................................................................................................................................... 25
ACCUMULATOR TESTING AND CHARGING ............................................................................................................................ 26
Identification of Charging Valves.................................................................................................................................... 27
Required Tools................................................................................................................................................................. 28
Accumulators with Type 1 Valve ..................................................................................................................................... 30
Discharge Procedure.................................................................................................................................................... 30
Testing and Charging Procedure for the Accumulator Precharge Pressure ................................................................. 31
Accumulators with Type 2 Valve ..................................................................................................................................... 32
Discharge Procedure.................................................................................................................................................... 33
Testing and Charging Procedure for the Accumulator Precharge Pressure ................................................................. 33
HYDRAULIC PUMP TESTING AND ADJUSTING ....................................................................................................................... 34
Margin Pressure.............................................................................................................................................................. 34
Cutoff Pressure................................................................................................................................................................ 36
MAIN CONTROL VALVE ....................................................................................................................................................... 38
Main Relief Valve............................................................................................................................................................ 38
Pressure Reducing Valve (Pilot Circuit)......................................................................................................................... 41
Load Sensing Manifold.................................................................................................................................................... 42
HOOK WINCH BRAKE MANIFOLD ......................................................................................................................................... 44
Hook Brake Release Pressure Testing and Adjusting...................................................................................................... 45
Hook Winch Counterbalance Valve................................................................................................................................. 46
BOOM-COUNTERBALANCE VALVE ....................................................................................................................................... 47
BOOM STOP VALVE ADJUSTMENT ........................................................................................................................................ 48
BOOM STOP PX-VALVE ADJUSTMENT .................................................................................................................................. 48
COUNTERWEIGHT RELIEF VALVE TESTING AND ADJUSTING ................................................................................................ 48
TROUBLESHOOTING........................................................................................................................................................ 50
PROBLEM CHECKLIST ........................................................................................................................................................... 50
APPENDIX A: PULLMASTER WINCH CORPORATION – WINCH RIGGING ANCHOR PROCEDURES ........ 54
APPENDIX B: PULLMASTER WINCHES ....................................................................................................................... 56
BOOM WINCH SERVICE INSTRUCTIONS – M30D-9-174-49-536........................................................................................... 56
HOOK WINCH SERVICE INSTRUCTIONS – M30D-9-173-49D-522......................................................................................... 65
BOOM WINCH TROUBLESHOOTING – M30D-9-174-49-536 ................................................................................................. 75
HOOK WINCH TROUBLESHOOTING – M30D-9-173-49D-522............................................................................................... 77
BOLT TORQUE CHART FOR PULLMASTER WINCHES ............................................................................................................. 80
5. 030-08OP-002H 572G, 583K, 594H S/N VEI0021 - UP 1
FOREWORD
Keep this manual with the machine in a safe, dry place where it is easily accessible, such as the toolbox.
Machine Description
The Vanguard Pipelayer Wetdeck package completely replaces the mechanical drawworks on Caterpillar 572G, 583K, and
594H pipelayers, converting them to hydraulic control. The wetdeck package does not decrease the tip characteristics of the
srcinal machine. Refer to machine’s tip chart for load capacities and restrictions.
The operator should read, understand, and follow the wetdeck operating and maintenance instructions. The operator must
follow and comply with all local pipelayer procedures, regulations, and safety precautions.
This equipment is to be operated by qualified personnel only.
The daily service/inspection procedure should be performed before start-up.
Operate all pipelayer controls with no load, until familiar with machine operation.
Note: Refer to the Caterpillar Operator’s Guide for detailed information on the specific operation of the pipelayer not
covered in this manual.
SAFETY
Certain conditions and precautions are peculiar to pipelaying operations. The following represents the minimum
considerations for safe operations.
Warning Signs and Labels
Make sure that all of the warning signs are legible. Clean or replace the warning signs if you cannot read the words. Replace
the illustrations if the illustrations are not visible. Use a cloth, water and mild soap to clean the warning signs. Do not use
solvent, gasoline, or other harsh chemicals to clean the warning signs. Do not use pressure washers to clean the warning
signs.
Replace any warning sign that is damaged, or missing. If a warning sign is attached to a part that is replaced, install a
warning sign on the replacement part.
General Hazard Information
To prevent cable from slipping off the drum, a minimum of five full-wraps of cable must remain on the winch drum at
maximum working extension of the hook or boom.
Follow pipelayer manufacture’s guidelines for wire rope inspection and replacement.
6. 030-08OP-002H 572G, 583K, 594H S/N VEI0021 - UP 2
Machine Parking
030-05-05-010B
Figure 1: Parking machine.
• Park on level surface. If necessary to park on a grade, block the machine.
• Apply the service brake to stop the machine.
• Lower any load to the ground.
• Refer to Caterpillar’s pipelayer operation manual for the specific procedures regarding brake and transmission settings,
engine shut down, and/or other implement attachments.
High Hydraulic System Pressure
029-09-09-005B
-7°C (20°F)
-1°C (30°F)
10°C (50°F)
16°C (60°F)
21°C (70°F)
4°C (40°F)
TEMPERATURE
32°C (90°F)
38°C (100°F)
43°C (110°F)
49°C (120°F)
27°C (80°F)
THE ACCUMULATOR MUST BE AT THE SAME
TEMPERATURE AS THE SURROUNDING AIR
BEFORE BEING CHECKED OR CHARGED.
USE THE CHART TO DETERMINE CORRECT
ACCUMULATOR CHARGE, ±70 kPa (10 psi):
TO AVOID PERSONAL INJURY, DO
NOT REMOVE ANY HYDRAULIC
SYSTEM LINES, TAPS OR PARTS
UNTIL PRESSURE HAS BEEN
RELIEVED.
TO RELIEVE PRESSURE:
1. STOP ENGINE.
2. MOVE THE HOOK CONTROL LEVER
FROM "HOLD" TO "RAISE" 10 TIMES.
NOTE: ACCUMULATOR CYLINDER
CHARGED WITH DRY NITROGEN (N )
GAS.
SEE YOUR DEALER FOR CHARGING
THE ACCUMULATOR.
2
030-09-001
PRESSURE
3100 kPa (450 psi)
3170 kPa (460 psi)
3240 kPa (470 psi)
3310 kPa (480 psi)
3375 kPa (490 psi)
3445 kPa (500 psi)
3515 kPa (510 psi)
3580 kPa (520 psi)
3650 kPa (530 psi)
3720 kPa (540 psi)
3790 kPa (550 psi)
Figure 2: High pressure warning decal; located on cover of counterweight valve on the right side of pipelayer.
030-09-005
THIS SYSTEM IS EQUIPPED
WITH AN ACCUMULATOR.
7. 030-08OP-002H 572G, 583K, 594H S/N VEI0021 - UP 3
The hydraulic implement system and some machine controls are "LIVE" for as long as the accumulator holds a charge,
even if the engine is not running. This pressure charge will take approximately four hours or more to bleed off.
To relieve the accumulator charge, with no load on the hook and the engine stopped, move the hook control lever from
"HOLD" to "RAISE" 10 times.
Always move the speed control lever to the "LOCKED" position before shutting off the engine or immediately after the
engine quits running to prevent unintentional load release or, after the engine is restarted, drawworks operation.
NOTE: Refer to the SAFETYSECTION of theOperator’s Guide of the specific pipelayer for additional information.
Equipment Lowering with Engine Stopped
Before lowering any equipment with the engine stopped, clear the area around the equipment of all personnel. The procedure
will cause immediate, rapid lowering of the load. Wear appropriate personal protective equipment and follow the established
procedure in the Operation and Maintenance Manual, "Equipment Lowering with Engine Stopped" in the Operation Section
of the manual.
Sound Information and Vibration Information
Sound Level Information
Hearing protection may be needed when the machine is operated with an open operator station and an open cab for extended
periods or in a noisy environment. Hearing protection may be needed when the machine is operated with a cab that is not
properly maintained, or when the doors and windows are open for extended periods or in a noisy environment. Refer to the
Caterpillar Operator’s Guide for detailed information on the specific operating requirements.
Sound Performance for Machines that are Offered in European Union Countries and in
Countries that Adopt the EU Directives
The Vanguard Pipelayer Wetdeck package completely replaces the mechanical drawworks on Caterpillar 572G, 583K, and
594H pipelayers, and as such does not affect the sound performance characteristics of the srcinal Caterpillar pipelayer.
Refer to the Caterpillar Operator’s Guide for detailed information on the specific performance characteristics if applicable.
"The European Union Physical Agents (Vibration) Directive2002/44/EC"
Refer to the Caterpillar Operator’s Guide "The European Union Physical Agents (Vibration) Directive 2002/44/EC " for
complete information concerning Whole Body Vibration Level if applicable.
Guards
There are different types of guards that are used to protect the operator.
A daily inspection of the guards is required in order to check for structures that are bent, cracked or loose. Never operate a
machine with a damaged structure.
The operator becomes exposed to a hazardous situation if the machine is used improperly or if poor operating techniques are
used. This situation can occur even though a machine is equipped with an appropriate protective guard. Follow the
established operating procedures that are recommended for your machine.
Refer to the Caterpillar Operator’s Guide for detailed information on the specific operation of the pipelayer not covered in
this manual.
Daily Inspection
Refer to the Caterpillar Operator’s Guide for detailed information on the specific daily inspection of the pipelayer.
After you inspect the machine, perform the daily maintenance that is listed in the Operation and Maintenance Manual,
"Maintenance Interval Schedule". Perform the daily maintenance before you mount the machine in order to operate the
machine.
8. 030-08OP-002H 572G, 583K, 594H S/N VEI0021 - UP 4
COMPONENTS AND SPECIFICATIONS
Note: Number shown between { } indicates the hydraulic component identification as shown on the hydraulic
schematic and on the wetdeck assembly
The wetdeck consists of the following components: winch and drive platform, drawworks operator controls, and a hydraulic
tank. An optional oil cooler is also available.
LOAD WINCH {11}
MAIN
HYDRAULIC
PUMP
BOOM WINCH {12}
PUMP DRIVE
AUXILIARY
PUMP
030-05-05-055B 030-05-63-004A
Figure 3: Winch platform. Figure 4: Operator controls {7}.
TANK {2}
AT RIGHT-
REAR OF
MACHINE
030-09-09-029A 030-05-05-010B
Figure 5: Oil tank {2}. Figure 6: Optional Oil Cooler {10}.
DRAWWOKS
CONTROLS {7}
OPTIONAL
OIL COOLER
{10} BEHIND
GRILL
9. 030-08OP-002H 572G, 583K, 594H S/N VEI0021 - UP 5
Mark for European Union
029-09-09-005B
Figure 7: Location of the CE marking plate.
This plate is positioned above the right hand guard on the main weldment.
Standard Features
• Boom and hook drawworks are driven by independent hydraulic winches.
• Oil disc brakes provide positive retention of hook and boom positions.
• Variable speed controls for both hook and boom winches allow for precise control.
• Emergency free fall function on the load line allows the operator to drop the load quickly.
• 594 H only, standard 2-speed boom motor.
Optional Features
• 2-speed boom motor (572G and 583K only; standard on 594H).
• High temperature oil cooler.
Drawworks Equipment 572G/583K/594H
Planetary Hydraulic Winches Hook Boom
Drum Diameter 254 mm (10 in) 254 mm (10 in)
Flange Diameter 457 mm (18 in) 457 mm (18 in)
Drum Length 432 mm (17 in) 432 mm (17 in)
Capacity – (19.05 mm (¾ in) rope diameter) 124m (407 ft) 124m (407 ft)
Nominal Line Speed, No Load
572G/583K/594H
Hook Speed Boom Speed
Bare Drum
Hi: 91.4 m/min (300 ft/min)
Low: 47.2 m/min (155 ft/min)
61 m/min (200 ft/min)
Optional Two-Speed Boom Motor,
Bare Drum
Hi: 91.4 m/min (300 ft/min)
Low: 47.2 m/min (155 ft/min)
Hi: 91.4 m/min (300 ft/min)
Low: 47.2 m/min (155 ft/min)
Note: Refer to the Operation And Maintenance Guide of the specific pipelayer for additional information.
10. 030-08OP-002H 572G, 583K, 594H S/N VEI0021 - UP 6
Cable Drum Capacities
Note: Refer to Caterpillar’s Operator Guide for cable specifications.
To achieve optimum performance, use the wire rope length specified in the table below.
Optimum Rope Lengths for Maximum Lift Through Normal Operating Range
572G Wire Required for the Hook Wire Required for the Boom
5.5 m (18 ft) Boom 48.8 m (160 ft) 41.1 m (135 ft)
7.3 m (24 ft) Boom 56.4 m (185 ft) 47.2 m (155 ft)
Optimum Rope Lengths for Maximum Lift Through Normal Operating Range
583K Wire Required for the Hook Wire Required for the Boom
6.1 m (20 ft) Boom 64 m (210 ft) 51.8 m (170 ft)
7.3 m (24 ft) Boom 71.6 m (235 ft) 61 m (200 ft)
Optimum Rope Lengths for Maximum Lift Through Normal Operating Range
594H Wire Required for the Hook Wire Required for the Boom
7.3 m (24 ft) Boom 93.3 m (306 ft) 57.9 m (190 ft)
8.5 m (28 ft) Boom 103 m (338 ft) 64 m (210 ft)
9.8 m (32 ft) Boom 112.8 m (370 ft) 70.1 m (230 ft)
Maximum Cable Drum Storage Capacities
Size Length
Boom Line 19 mm (¾ in) 124 m (407 ft) MAX
Load Line 19 mm (¾ in) 124 m (407 ft) MAX
Notes:
• Using rope length longer than the optimum will decrease the drawworks’ lifting capacity.
• Using rope length less than the optimum will decrease the operating envelope (load handling range of the
pipelayer).
Overall Weight and Dimension of Pipelayer
The overall weight and dimension of the pipelayer are specified in the table below.
Weight, Shipping
(approximate)
Length Height Width
572 28 576 kg (63 000 lbs) 4.93 m (16 ft 2 in) 3.35 m (11 ft) 3.38 m (11ft 1.25 in)
583 41 731 kg (92 000 lbs) 5.66 m (18 ft 7 in) 3.12 m (10 ft 3 in) 3.66 m (12 ft)
594 56 246 kg (124 000 lbs) 5.79 m (19 ft) 3.76 m (12 ft 4 in) 4.29 m (14 ft 1 in)
11. 030-08OP-002H 572G, 583K, 594H S/N VEI0021 - UP 7
DRAWWORKS CONTROLS
BOOM
CONTROL
COUNTER
WEIGHT
CONTROL
SPEED/
LOCKOUT
CONTROL
HYDRAULIC OIL
TEMPERATURE
GAUGE
CONTROL
LOCK
HOOK
CONTROL
030-05-63-006B
Figure 8: Drawworks control box {7}.
Speed/Lockout Control Lever
The position of the lever selects the load winch speed (high/low); on 594H machines, this control also selects the boom
winch speed (high/low). The control is detented, and the lever will remain in position once released. It must be physically
moved to the desired speed position.
Figure 9: Speed control positions.
A. HIGH SPEED MODE—WINCH CONTROLS UNLOCKED: Move the lever to this position to
operate the hook winch at high speed, the maximum hook winch pull is reduced; standard boom winch speed
unaffected. Note: 594H boom winch will also operate at high speed, reduced pull. 572G and 583K boom winches
with the optional two–speed boom motor will also operate at high speed, reduced pull.
B. LOCKED MODE—WINCH AND COUNTERWEIGHT CONTROLS LOCKED: To prevent
accidental actuation of the controls while not in use, move the lever to this position and flip the control lock to engage
the lever and lock it in position. In this mode, the winch and counterweight controls do not function. Always place the
control lever in the LOCKED MODE and engage the Control Lock plate whenever the machine is left unattended, or
when inadvertent control operation could result in a dangerous situation arising.
C. LOW SPEED MODE—WINCH CONTROLS UNLOCKED: Move the lever to this position to
operate the load winch at low speed, maximum hook winch pull is available; standard boom winch speed unaffected.
Note: 594H boom winch will also operate at low speed, maximum pull. 572G and 583K boom winches with the
optional two-speed boom motor will also operate at low speed, maximum pull.
12. 030-08OP-002H 572G, 583K, 594H S/N VEI0021 - UP 8
Hook Control Lever
Figure 10: Hook control positions.
A. HOLD: The lever self-centers to this position whenever it is released. In this position, the load winch brake
will set, and the hook will stop and remain at the position it is in.
B. (EMERGENCY LOWER) Free Fall:
Dropping load hazard! The free fall control remains live for several hours after the engine has been stopped. Operation
of the free fall control could cause a sudden uncontrolled drop of any supported load. Do not operate the free fall control
when personnel are near a suspended load, even with the engine stopped.
Figure 11: Free fall still live warning; located on wetdeck control box.
NOTE: The hydraulic pilot system and some machine controls, namely the hook Free Fall, are "LIVE" for as long as the
accumulator holds a charge, even if the engine is not running. This pressure charge will take approximately four hours or
more to bleed off. Refer to the operation and maintenance manual "Accumulator - Relieving Charge" to bleed off the
residual pressure if required and when safe to do so.
13. 030-08OP-002H 572G, 583K, 594H S/N VEI0021 - UP 9
Component failure! Re-engaging the free fall while the load is dropping causes shock loads which could cause
component structural failure, resulting in possible personnel injury or death.
Free Fall Operation: Move the hook control lever to this position to lower the load fast in an emergency. The load
winch’s free fall brake will release, and the hook will move down under the weight of the load. Upon activating the free fall
function the load will drop and must be allowed to fall to its end travel without re-engagement. The lever will return to the
“HOLD” position when released, the load winch’s free fall brake will set.
NOTICE
The Free Fall is used for a full release of a suspended load up to the maximum lift capacity of the hook winch. Upon
activating the free fall function the load will drop and must be allowed to fall to its end travel without re-engagement.
Note: Free Fall is only available in pipelayer high or low speed modes – winches unlocked.
C. LOWER: Move the lever to this position to lower the hook with controlled winch power. The further the lever is
pushed away from "HOLD", the faster the hook will lower. The closer the lever is toward "HOLD", the slower the
hook will lower. When the lever is released, it will return to the "HOLD" position, the load winch brake will set, and
the hook will stop and remain at the position it is in. Load winch line speed varies with engine throttle setting. Hook
control is smoothest at engine speeds faster than idle.
D. RAISE: Move the lever to this position to raise the hook. The further the lever is pulled away from "HOLD",
the faster the hook will raise. The closer the lever is toward "HOLD", the slower the hook will raise. When the lever is
released, it will return to the "HOLD” position and the hook will stop and remain at the position it is in. Load winch
line speed varies with engine throttle setting. Hook control is smoothest at engine speeds faster than idle.
Boom Control Lever
Figure 12: Boom control positions.
A. HOLD: The lever self centres to this position whenever it is released. In this position, the boom winch brake
will set, and the boom will stop and remain at the position it is in.
B. LOWER: Move the lever to this position to lower the boom. The further the lever is pushed away from
"HOLD", the faster the boom will lower. The closer the lever is toward "HOLD", the slower the boom will lower.
When the lever is released, it will return to the "HOLD" position, the boom winch brake will set, and the boom will
14. 030-08OP-002H 572G, 583K, 594H S/N VEI0021 - UP 10
stop and remain at the position it is in. Boom winch line speed varies with engine throttle setting. Boom control is
smoothest at engine speeds faster than idle.
C. RAISE: Move the lever to this position to raise the boom. The further the lever is pulled away from "HOLD",
the faster the boom will raise. The closer the lever is toward "HOLD", the slower the boom will raise. When the lever
is released, it will return to the "HOLD" position, and the boom will stop and remain at the position it is in. Boom
winch line speed varies with engine throttle setting. Boom control is smoothest at engine speeds faster than idle.
Boom Stop Valve
The Boom Stop system stops the boom winch from hauling-in when the boom is vertical, preventing
overloading of key machine components. Defeating the boom stop valve could result in serious equipment
damage, personnel injury, or even death. Its operation must be check and verified daily.
The Boom Stop valve is a safety device that is intended to automatically stop the boom winch from hauling-in when the
boom is vertical, preventing overloading of key machine components. Refer to the Operation and Maintenance manual,
Boom Stop Valve Adjustment, for correct operation and adjustment. Check its function daily.
Counterweight Control Lever
Figure 13: Counterweight control positions.
A. HOLD: The lever self centers to this position whenever it is released. In this position, the counterweight will stop and
remain at the position it is in.
B. EXTEND: Move the lever to this position to extend the counterweight. The further the lever is pushed away
from "HOLD", the faster the counterweight will extend. The closer the lever is toward "HOLD", the slower the
counterweight will extend. When the lever is released, it will return to the "HOLD" position, and the counterweight
15. 030-08OP-002H 572G, 583K, 594H S/N VEI0021 - UP 11
will stop and remain at the position it is in. Counterweight speed varies with engine throttle setting. Counterweight
control is smoothest at engine speeds faster than idle.
C. RETRACT: Move the lever to this position to retract the counterweight. The further the lever is pulled
away from "HOLD", the faster the counterweight will retract. The closer the lever is toward "HOLD", the slower the
counterweight will retract. When the lever is released, it will return to the "HOLD" position, and the counterweight
will stop and remain at the position it is in. Counterweight speed varies with engine throttle setting. Counterweight
control is smoothest at engine speeds faster than idle.
Hydraulic Oil Temperature Gauge
Figure 14: Oil Temperature Gauge.
The gauge indicates the temperature status of the drawworks’ hydraulic oil.
Type 1 Temperature Gauge:
A. Green: Normal operating temperature.
B. Red: Critical temperature, stop the machine at a convenient place. Troubleshoot and rectify the cause. Allow oil to
cool to normal range before continuing to use drawworks.
Type 2 Temperature Gauge : Maximum of 102°C (215°F) critical temperature, stop the machine at a convenient place.
Troubleshoot and rectify the cause. Allow oil to cool to normal range before continuing to use drawworks.
Note: Continuing to operate the drawworks in the red (critical temperature) range could severely damage
critical components, requiring a significant overhaul of the equipment.
030-43-63-013A 030-63-63-001
TYPE 1 TEMPERATURE GAUGE TYPE 2 TEMPERATURE
16. 030-08OP-002H 572G, 583K, 594H S/N VEI0021 - UP 12
Equipment Lowering with Engine Stopped
Figure 15: Controls for Equipment lowering with engine stopped
NOTICE
Before lowering any equipment with the engine stopped, clear the area around the equipment of all personnel. The procedure
will cause immediate, rapid lowering of the load. Refer to Operation and Maintenance Manual, "Hook Control" for complete
control function description.
If the machine does not have engine power, in order to lower the equipment follow these steps:
• Unlock the Speed/Lockout Control Lock (2) and move the Speed/Lockout Control Lever (1) to LOW SPEED
MODE—WINCH CONTROLS UNLOCKED or to HIGH SPEED MODE—WINCH CONTROLS UNLOCKED
• Move the hook control (3) to (Emergency Lower) Free Fall.
• The accumulator will provide pilot pressure that will allow the hook to be immediately lowered fast under the
weight of the load.
• Do not release the hook control to re-engage the Free Fall until the load is completely lowered.
030-05-63-006B
123
17. 030-08OP-002H 572G, 583K, 594H S/N VEI0021 - UP 13
MAINTENANCE AND LUBRICATION
Note: Number shown between { } indicates the hydraulic component identification as shown on the hydraulic
schematic and on the wetdeck assembly.
General
• Follow pipelayer manufacture's maintenance and lubrication instructions for pipelayer service as required.
• Follow pipelayer manufacture’s guidelines for wire rope inspection and replacement.
• To prevent corrosion damage to the winch interiors, if not used regularly, cycle the winches up and down several
times at least once every two weeks.
• Care must be taken to ensure that fluids are contained during performance of inspection, maintenance, testing,
adjusting, and repair of the product. Be prepared to collect the fluid with suitable containers before opening any
compartment or disassembling any component containing fluids.
• Dispose of all fluids according to local regulations and mandates.
Lubricant Specifications
Note: Refer to Caterpillar Material Safety Data Sheet (MSDS) for appropriate handling and disposal procedure of
fluid. MSDS for each particular fluid can be obtained from Caterpillar dealers or from the Caterpillar web site at
www.cat.com.
Ambient (outside) Temperatures
System Oil Viscosity Min ºC Max ºC Min ºF Max ºF
Gear Box SAE 80W90 -30 +50 -22 +122
Hydraulic system
SAE 10W -20 +40 -4 +104
SAE 0W20 -40 40 -40 104
SAE 0W30 -40 40 -40 104
SAE 5W30 -30 40 -22 104
SAE 5W40 -30 40 -22 104
SAE 10W -20 40 -4 104
SAE 30 10 50 50 122
SAE 10W30 -20 40 -4 104
SAE 15W40 -15 50 5 122
Caterpillar MTO -25 40 -13 104
TDTO-TMS
(2)
-20 50 -4 122
System Caterpillar Oil Specification Equivalent Oil Specification
Gear Box GO API GL-5
Hydraulic system 1
HYDO, DEO, TDTO, MTO 2
CG-4, CF-4, CF
Notes:
1
Use oil with appropriate viscosity depending on the ambient temperature
2
These oils should have a minimum additive of 0.09 percent (900ppm).
Refill Capacities
Refill Capacities (approximate)
System Liters US Gal. Imperial Gal.
Hydraulic system (includes tank) 208 55 45.8
Gear Box 2.4 0.63 0.53
18. 030-08OP-002H 572G, 583K, 594H S/N VEI0021 - UP 14
Service Intervals
Note: Before each consecutive interval is performed, all maintenance from the previous interval must be performed.
Perform the following servicing at EVERY interval they occur; for example, the 10 hour and 50 hour service are also
performed at the 200 hour interval, etc.
10 Hours Service Interval or Daily
• Check hydraulic oil level.
• Check and repair any hydraulic system leaks. Inspect the hoses, the seals, the fittings, and the flanges for leaks.
• Inspect the winch final drive for leaks. Repair any final drive leaks.
• Inspect covers and the guards for damage, for loose bolts, and for missing bolts.
• Check controls for proper operation of boom and hook.
• Check boom stop valve for correct function.
• Hook and Wire Cable (Boom and Hook lines) – Inspect
• Inspect the hook for any distortion, bends, twists, etc. Inspect the hook for any wear, cracks, nicks, or gouges. Refer to
American National Standard Institute ANSI/ASME B30.14, or ISO 8813.
• Check pipelayer structures and components for loose bolts, cracks, damage, etc.
50 Hours Service Interval or Weekly
• Thoroughly check boom stop system operation and adjustment, and inspect tractor’s boom stop rod and spring assembly
to ensure no rotation. Refer to the Boom stop Valve Adjustment procedure in the Maintenance and Lubrication section.
200 Hours Service Interval or Monthly
• Check oil level on gear box.
029-09-09-006A
OIL
FILLEROIL
LEVEL
030-05-05-042C
Figure 16: Gear box.
500 Hours Service Interval or 3 Months
• Change hydraulic system filter element.
• Change gear box oil (SAE 80W90).
• Analyze a hydraulic system oil sample for oil condition.
2000 Hours Service Interval or 1 Year
* Change hydraulic system oil (SAE 10W).
* Perform 500 hours service.
19. 030-08OP-002H 572G, 583K, 594H S/N VEI0021 - UP 15
Hydraulic System Oil Level Check
At operating temperature, the hydraulic tank {2} is hot and under pressure.
Hot oil and components can cause personal injury. Do not allow hot oil or components to contact skin.
Remove the filler cap only when the engine is stopped, and the filler cap is cool enough to touch with your
bare hand. Remove the filler cap slowly to relieve pressure.
FILLER
CAP
SIGHT
GAUGE
029-09-09-008A
Figure 17: Hydraulic tank {2} components.
* While the engine is at idle and counterweights fully extended, check the sight gauge. The oil level should be up to
the “FULL” mark.
* If the hydraulic system requires additional hydraulic oil, refer to the warning above. Carefully remove the filler cap
to relieve pressure. With the engine running, add oil through the tank’s filler tube.
* Clean the filler cap and inspect the seal. Replace the seal if damage or wear is evident.
* Install and tighten the filler cap.
Hydraulic System Oil Sampling
At operating temperature, the hydraulic tank {2} is hot and under pressure.
Hot oil and components can cause personal injury. Do not allow hot oil or components to contact skin.
Remove the filler cap only when the engine is stopped, and the filler cap is cool enough to touch with your
bare hand. Remove the filler cap slowly to relieve pressure.
• Operate the machine to ensure that the oil is warm and well circulated.
• Remove the hydraulic tank filler cap slowly in order to relieve any pressure.
• Using a clean oil sampling gun and a clean clear bottle, take an oil sample from the middle of the tank.
• Label the bottle with the sample date and the machine’s serial number.
• Send to a reputable lab for analysis.
Note: Ensure that the lab technician conducts the following: wear metal analysis; infrared analysis for oil condition;
tests for contamination of the oil by fuel, by water, and/or by antifreeze; conducts a particle count.
20. 030-08OP-002H 572G, 583K, 594H S/N VEI0021 - UP 16
Hydraulic System Oil Change
At operating temperature, the hydraulic tank {2} is hot and under pressure.
Hot oil and components can cause personal injury. Do not allow hot oil or components to contact skin.
Remove the filler cap only when the engine is stopped, and the filler cap is cool enough to touch with your
bare hand. Remove the filler cap slowly to relieve pressure.
Figure 18: Hydraulic tank {2} components.
• Operate the machine in order to warm the oil.
• Park the machine on level ground. Lower any loads to the ground. Extend the counterweights. Move the speed
selector to the locked position. Engage the control lock.
* Refer to the warning above. Remove the hydraulic tank filler cap slowly in order to relieve any pressure.
* Wash the filler strainer and the filler cap with clean nonflammable solvent.
* Remove the oil eco-drain plug, located under the rear of the hydraulic tank {2}.
* Attach a hose to a 1-inch NPT pipe nipple. This 1-inch NPT pipe nipple should have a length of 100mm (4 in).
* Install the pipe nipple into the eco-drain plug opening.
* Rotate the pipe nipple clockwise in order to open the internal drain valve. Allow the oil to drain into a suitable
container.
* Remove the pipe nipple. The valve for the hydraulic tank {2} will close.
* Clean the ECO-drain plug and reinstall it; torque to 68±7 Nm (50±5 lb-ft).
* Change the hydraulic system filter as per the Hydraulic System Oil Filter Change section.
* Install the filler strainer.
* Fill the hydraulic oil tank {2}; see the Lubricant Specifications section for oil type and quantity.
* Inspect the filler cap gasket. Replace the gasket if damage or wear is evident.
* Start the engine. Run the engine for a few minutes. Note: Hydraulic oil must be checked with the engine
running at idle and counterweights fully extended.
* Maintain the oil level at the “FULL” mark in the sight gauge. Adjust oil level as required.
* Install and tighten the filler cap.
* Retract counterweights.
* Stop the engine.
029-09-09-008A
030-43-60-071B
FILLER
CAP
ECO-
DRAIN
SIGHT
GAUGE
TANK {2}
AT REAR
RIGHT OF
MACHINE
RETURN
FILTERS
21. 030-08OP-002H 572G, 583K, 594H S/N VEI0021 - UP 17
Hydraulic System Oil Filter Change
At operating temperature, the hydraulic tank {2} is hot and under pressure.
Hot oil and components can cause personal injury. Do not allow hot oil or components to contact skin.
Remove the filler cap only when the engine is stopped, and the filler cap is cool enough to touch with your
bare hand. Remove the filler cap slowly to relieve pressure.
FILLER
CAP
SIGHT
GAUGE
OIL
FILTERS
029-09-09-008A 030-42-60-032A
Figure 19: Hydraulic system oil filter.
* Refer to the warning above. Slowly remove the hydraulic tank filler cap in order to relieve the system pressure.
* Remove the filter elements.
* Apply a thin coat of oil to the seal on the new filter (two (2) small oil filters – CAT# 1-4T6788, large oil filter –
CAT# 1-1R0741 and an O-ring – CAT# 5H3252).
* Install the filter element by hand. When the seal contacts the base, tighten the filter element an additional ¾ turn.
* Remove the retainer ring from the oil filler tube.
* Wash the strainer in clean nonflammable solvent.
* Inspect the seal on the filler cap. Replace the seal if damage or wear is evident.
* Install the strainer, the retainer ring, and the cap.
* While the engine is at idle and counterweights fully extended, check the oil level sight gauge.
* Maintain the oil level at the “FULL” mark in the sight gauge. Adjust oil level as necessary.
* Inspect the oil filter as outlined below.
* After inspection, dispose of filter elements in an environmentally sound manner.
Oil Filter Inspection
Figure 20: Oil filter.
OIL
FILTERS
22. 030-08OP-002H 572G, 583K, 594H S/N VEI0021 - UP 18
Use a Filter Cutter - CAT# 4C-5084, or similar to cut the filter element open. Spread apart the pleats and inspect the element
for metal and other debris. An excessive amount of debris in the filter element can indicate a possible failure.
If metals are found in the filter element, a magnet can be used to differentiate between ferrous metals and nonferrous metals.
Ferrous metals would indicate wear on steel parts and on cast iron parts. Non ferrous metals would indicate wear of the brass
or aluminum part of the hydraulics such as main bearings, pump sleeves, etc.
Small amounts of debris may be found in the filter element. This could be caused by friction and normal wear. Consult your
Caterpillar dealer in order to arrange for further analysis if an excessive amount of debris is found.
Using an oil filter element that is not recommended by Caterpillar could result in severe damage. This could result in larger
particles in unfiltered oil. These particles could enter the system and cause damage.
Boom Stop Valve Adjustment
The Boom Stop system stops the boom winch from hauling-in when the boom is vertical, preventing
overloading of key machine components. Incorrectly adjusting, or defeating the boom stop valve could result
in serious equipment damage, personal injury, or even death. Its operation must be check and verified daily.
When properly adjusted, the boom stop valve {8} stops the boom winch {12} from hauling-in when the boom is vertical,
preventing overloading of key machine components. When the boom engages the boom kick-out rod and moves the striker
to actuate the cut-out valve piston, the boom stop valve {8} unloads the PX-valve in the boom section of the main control
valve {5}. The unloaded PX-valve vents the main boom-up pressure line to tank, preventing the boom winch {12} from
hauling-in and raising the boom further, preventing damage. When the boom is in its working range, the PX-valve is closed
and any haul-in pressure is allowed to reach the boom winch {12}. Check the operation of the boom stop system daily.
BOOM
STOP
VALVE
PISTONSTRIKER
BOOM
KICK-OUT
ROD BOOM STOP
VALVE {8}
029-60-66-001A 029-05-05-009A
Figure 21: Boom stop valve {8} on platform of Pipelayer.
23. 030-08OP-002H 572G, 583K, 594H S/N VEI0021 - UP 19
NOTICE
The boom stop valve {8} is designed specifically for use with Caterpillar standard booms, as shipped with the srcinal
pipelayer machine. As many other boom types with very different physical dimensions exist, it is impossible to allow for all
types. The following procedure may not include all adjustments that are required when using non-standard Caterpillar
booms. Relocate the boom stop valve mounting plate as required to achieve the desired contact between the boom stop valve
{8} and the boom kick-out rod—as outlined below—when the boom is vertical.
• Remove the boom stop valve guard.
• Loosen the cut-out valve {8} nuts.
• Raise the boom vertical to the pipelayer. The boom kick-out rod is fully retracted (all the way in). Do not over tighten
the boom line to the point that the boom is overly stressed.
• Move the valve {8} so that its piston just contacts the boom kick-out striker.
• Move the valve an additional 9.5 mm (3/8 in) towards the boom.
• Tighten the valve {8} in position with the valve nuts.
• Test the boom stop valve {8} to see that it works properly. Lower the boom until the cut-out valve piston is free from
striker.
• Boom in slowly taking care not to over tension the boom lines when the boom goes vertical. When the boom is vertical,
the striker will move the cut-out valve piston in 9.5 mm (3/8 in), and the boom winch {12} should stop with the boom
vertica, and no increase in tension should occur once; readjust the boom stop valve as required.
• Inspect the Boom stop Rod Spring Assembly as described below, adjust and repair as necessary.
24. 030-08OP-002H 572G, 583K, 594H S/N VEI0021 - UP 20
Boom stop Rod Spring Assembly Inspection and Repair
If the tractor’s spring assembly is worn or weak, normal operating vibration may cause rotation
of the boom stop rod, and cause the wetdeck’s cut-out striker-plate to rotate. If the wetdeck’s
boom stop striker plate rotates away and out of position from the hydraulic Boom stop valve,
the operation of the hydraulic Boom stop system will be defeated The Boom stop system stops
the boom winch from hauling-in when the boom is vertical, preventing overloading of key
machine components. Defeating the boom stop valve could result in serious equipment
damage, personnel injury, or even death.
Check the tractor’s boom stop rod for wear and rotation
whenever the boom stop valve requires adjustment or
during initial set-up.
1. Remove the guard covering the boom stop
valve.
2. Ensure that the tractor’s cut-out rod assembly
(1) is in good working condition and not
overly worn, and that the rod/striker-plate
assembly (2) travels in a straight line—
approximately ± 1/8-in (3.2 mm)—over its full
stroke; repair the rod/tube assembly as
required.
3. Ensure that the striker-plate (2) is aligned
with the cut-out valve’s actuation roller.
4. The castle nut (3) on the tractor’s cut-out rod
must be tightened to provide adequate spring
compression—as per the srcinal machine
condition—to prevent the
Figure 22: Boom stop Rod Spring Assembly Inspection and Repair.
5. Cut-out rod assembly from rattling and turning during normal
machine operation; repair or replace worn tractor components
as required. Ensure that the striker plate (2) does not rotate.
6. Ensure that the hydraulic Boom stop Valve (4) is correctly
adjusted; follow the Boom stop Valve Adjustment procedure
outlined above.
7. Machine operators must be fully aware of the function of the
Boom stop system and the Speed/Lockout Control Lever (5).
Check the correct operation of the Boom stop system as part
of the daily machine safety inspection.
Figure 23: Boom stop system and the Speed/Lockout Control Lever (5).
028-30-71-023
(3) Castle nut
on cut-out rod
(594 shown,
others similar)
(2) Striker-
plate onTractor’s
cut-out rod
(4) Boom
stop valve
(1) Tractor’s
cut-out rod/tube
assembly
(1) Repair
wear on
Tractor’s
cut-out
rod/tube
assembly
(5) Drawworks
controls’
Speed/Lockout
Control Lever
with control
lock late
030-05-63-004
25. 030-08OP-002H 572G, 583K, 594H S/N VEI0021 - UP 21
Hook and Wire Cable – Inspect
Inspect the Hook
Inspect the hook frequently. The inspections should include observation of the hook during operation of the hook. A
designated person determines if the conditions that are found during the inspections constitute a hazard. The designated
person will determine if a more detailed inspection is required.
• Inspect the hook for any distortion such as bends in the hook or twists in the hook.
• Inspect the hook for any wear.
• Inspect the hook for cracks, nicks, or gouges.
• If a latch is provided, inspect the latch. Make sure that the latch engages properly. Inspect the latch for any damage.
Make sure that the latch is not malfunctioning.
• Inspect the hook assembly and the means for securing the hook assembly.
• For additional information on the proper maintenance and on the proper inspection of hooks, refer to "American
National Standard Institute ANSI/ASME B30.14".
Inspect Wire Cable - Boom and Hook lines
Make a visual inspection of all running cables that are in continuous use. Make the inspection of the running cables on a
daily basis before the machine is placed in operation. Inspect all of the cables on a monthly basis.
All inspections shall be performed by a designated person. Keep a dated report of the condition of the cable on file in a
location that is available to designated personnel. Perform a close inspection of the sections of the cable that are normally
hidden during the visual inspection and the maintenance inspection. (This includes the sections of the cable that pass over
the sheaves.) These points are the sections of the cable that are most likely to fail.
Note any deterioration that results in a notable loss of the srcinal strength. (See the conditions that are described below.)
Determine if further use of the cable will constitute a hazard.
Inspect the cable on a daily basis for the following conditions:
• Inspect the cable for a reduction in the diameter of the cable below the nominal diameter. A loss of support in the cored
wire of the cable may be caused by internal corrosion, external corrosion, or wear of the outside wires.
• Inspect the cable for broken outside wires. Check for the degree of distribution of the broken outside wires. Check for the
concentration of outside broken wires.
• Inspect the cable for worn outside wires.
• Inspect the cable for corroded wires and for broken wires at the connection on the wire cable end.
• Inspect the cable end for connections that are corroded, cracked, bent, worn, or improperly installed.
• Inspect the cable for sections that are crushed or kinked and for any loose wire strands.
Excessive wear or broken wires may occur in sections of the cable that are in contact with saddles, equalizer sheaves, or
other sheaves. Excessive wear or broken wires can also occur when cable travel is limited. Take care to inspect the ropes at
these locations.
When a machine is shutdown for a month or more, inspect all of the cables thoroughly. When a side boom machine has been
in storage for a month or more inspect all of the cables thoroughly. The inspection should be completed before the machine
is returned to operation.
The inspection should be for all types of deterioration. The inspection should be performed by a designated person or by an
authorized person. The authorized person's approval is required for further use of the cable.
A dated report on the condition of the cable should be kept on file.
Take care in the inspection of cable that is resistant to rotation.
Any new poured socket or swaged socket assembly that is used as a standing cable (guy) shall be proof tested. Test the cable
to the lift capacity of the side boom machine or to the manufacturer's recommendation.
26. 030-08OP-002H 572G, 583K, 594H S/N VEI0021 - UP 22
Never give the cable a rating that is greater than 50 percent of the wire rope's nominal strength or of the structural strand's
nominal strength.
Note: For additional information on the proper maintenance and on inspection of the cable, refer to "American National
Standards Institute ANSI/ASME B30.14" or ISO 8813.
Accumulator
Accumulator {9} must be charged with dry nitrogen (N2) gas by qualified personnel only, refer to Accumulator Testing and
Charging section.
Lifting of Components
Improper lifting can allow load to shift and cause serious injury or damage.
The main structure weighs approximately 2903 kg (6400 lb). Use proper belt slings – one around the boom winch drum and
one around hook winch drum – that can support the weight of the main structure; position in such a way that the drawworks
are properly balanced when lifted.
TWO BELT
SLINGSCRANE
HOOK
030-42-60-096A
Figure 24: Lifting of the main structure.
The hydraulic tank {2} weighs approximately 408 kg (900 lbs). Use proper chains to lift the tank {2}. Two 3/8-inch, NC, 1-
inch long eyebolts are required as lifting lugs. One eyebolt (closest to the fill port) screws directly into the tank {2}. The
other eyebolt is secured into the lifting hole, diagonally opposite the fill port, with a 3/8-inch, NC, nut and washer.
3/8” N/C
EYEBOLT
3/8” N/C
EYEBOLT
COMPLETE
WITH ONE
WASHER
AND ONE
NUT
TANK
FILL PORT
030-60-60-007B
Figure 25: Lifting of the hydraulic tank {2}.
27. 030-08OP-002H 572G, 583K, 594H S/N VEI0021 - UP 23
TESTING AND ADJUSTING OF HYDRAULIC SYSTEM
Hydraulic System Implementation
Sudden movement of the machine or release of oil under pressure can cause serious injury to persons on or near the
machine.
1. Move the machine to a smooth horizontal location. Move away from working machines and personnel. Lower any
suspended load to the ground and lower the boom to the ground.
2. Allow only one operator on the machine. Keep all other personnel away from the machine or in view of the
operator.
3. Engage the parking brake and stop the engine.
4. Move the hook control lever to the RAISE and HOLD positions several times in order to release pressure in the
hydraulic system. Refer to the High Hydraulic System Pressure section.
At operating temperature, the hydraulic tank {2} is hot and under pressure.
Hot oil and components can cause personal injury. Do not allow hot oil or components to contact skin.
Remove the filler cap only when the engine is stopped, and the filler cap is cool enough to touch with your
bare hand. Remove the filler cap slowly to relieve pressure.
Ensure that the oil temperature is cool before removing lines or components.
5. Carefully loosen the filler cap on the hydraulic tank {2} in order to release the pressure in the tank.
6. Ensure that all of the hydraulic pressure is released before any fittings, hoses or components are loosened.
7. Tighten the filler cap on the hydraulic tank {2}.
8. The pressure in the system has now been released and the lines and components can be removed.
029-09-09-005B
Figure 26: Main hydraulics guard/access panel. Located on right of machine behind counterweights.
Hydraulic System Discharge
28. 030-08OP-002H 572G, 583K, 594H S/N VEI0021 - UP 24
Pressurized fluids can cause injury or death. Before disassembling any lines, controls, or the accumulator {9}, ensure
that the pilot system hydraulic accumulator pressure is zero.
Discharge the hydraulic pilot pressure as follows:
TEST PORT
MAIN
CONTROL
VALVE {5}
030-05-05-048A
Figure 27: Location of the pressure test port for the accumulator {9} on main control valve {5}.
1. Attach a 0 to 7000kPa (0 to 1000psi) pressure gauge to the pressure test port via the quick-disconnect coupling.
This port is on the main control valve {5}.
Figure 28: Hook control positions.
2. Move the hook control lever to the raise position (D), and back to the HOLD position (A). Repeat this procedure
several times.
3. The needle on the pressure gauge should quickly drop to zero.
4. If the gauge does not show any pressure, the pilot pressure has been discharged.
During a diagnosis of the hydraulic system, remember that the correct oil flow and pressure are necessary for correct
operation. The output of the pump {1} may increase with an increase in engine speed. Oil pressure is caused by a
resistance to the output or oil flow.
Visual Checks
A visual inspection of the hydraulic system and the corresponding components is the first step in order to identify a problem.
Make the following inspections.
The boom must be raised and lowered through its full arc to test the hydraulics.
To avoid personal injury, perform this test in an area with sufficient boom clearance. Be especially aware of any
potential electrical power line contact. Ensure area is free of personnel. Prevent machine movement by applying the
parking brake, block the machine if necessary.
29. 030-08OP-002H 572G, 583K, 594H S/N VEI0021 - UP 25
Personal injury or death can result from escaping fluid under pressure. Escaping fluid under pressure, even a very small
pin-hole size leak, can penetrate body tissue and cause serious injury and possible death. If fluid is injected into your
skin, it must be treated immediately by a doctor familiar with this type of injury. Always use a board or cardboard when
checking for a leak.
Note: Remove only the appropriate guards and covers necessary to gain access to the hydraulic component to be
tested/adjusted. Replace guards/covers when access to components is no longer required, or when protection from
possible component failure is required prior to activating the system.
1. Check all of the implement oil line connections for damage or leaks.
2. Trace all of the oil lines from the implement connections to the valve connections. Check the lines and the
connections for damage or leaks.
3. Check the pump {1} and the connections for damage or leaks.
4. Trace the pump lines to the tank {2} and the valves. Check the lines and the tank {2} for damage or leaks.
5. Check the oil level in the tank {2}.
6. Use a clear bottle or a container in order to get an oil sample immediately after the machine is stopped. Check for
air bubbles in the oil sample.
7. Remove the filter element and check for particles in the filter. A magnet can be used in order to separate ferrous
material from the nonferrous particles in the filter; see Oil Filter Inspection section.
Pump Efficiency Check
This test is designed to determine if a pump is operating within the design parameters.
For any pump test, the pump flow at 690 kPa (100 psi) will be greater than the pump flow at 6900 kPa (1000 psi), for the
same pump rpm. The pump flow is measured in L/min or US gpm.
The difference between the pump flow of two operating pressures is the flow loss.
Method for determining flow loss
Pump flow at 690 kPa (100 psi)
- Pump flow at 6900 kPa (1000psi)
Flow loss
Example of determining flow loss
217.6 L/min 57.5 US gpm
-196.8 L/min or -52.0 US gpm
20.8 L/min 5.5 US gpm
Flow loss is used as a measure of pump performance. Flow loss is expressed as a percentage of pump flow.
Method of determining percent of flow loss
Flow loss (L/min or US gpm) x 100
Pump flow at 690 kPa (100 psi)
Example of determining percent of flow loss
20.8 L/min x100 = 9.5% or 5.5 US gpm x 100 = 9.5%
217.6 L/min 57.5 US gpm
If the percent of flow loss is greater than 10%, the pump performance is inadequate.
Note: The values in the examples are not set values for any specific pump or for any specific pump condition (Refer
to the Caterpillar Hydraulic specifications, RENR2028 for the pump flow of a new pump at 690 kPa (100 psi) and at
6900 kPa (1000 psi)).
Test on the Machine
Install a flow meter according to the manufacturer's instructions. Run the engine at high idle. Measure the pump flow at 690
kPa (100 psi), and at 6900 kPa (1000psi). Use these values in the following formula.
30. 030-08OP-002H 572G, 583K, 594H S/N VEI0021 - UP 26
Replace or rebuild the pump {1} if the percent loss is greater than 10%.
Accumulator Testing and charging
This system contains high pressure gas. Failure to follow the instructions and warnings could cause an explosion,
resulting in possible injury or death. Do not expose to fire. Do not weld. Do not drill. Do not remove any hydraulic system
lines, taps or parts until pressure has been relieved. Relieve pressure before discharging. See Operation and Maintenance
Manual "Hydraulic System Discharge". See Operation and Maintenance Manual "Accumulator" for charging and
discharging. See your Dealer for tools and detailed information.
Accumulator {9} must be charged with dry nitrogen (N2) gas by qualified personnel only.
029-60-66-001A
Figure 29: Accumulator {9} location.
Dry Nitrogen is the only gas approved for use in the accumulator {9}. Charging the accumulator {9} with oxygen gas will
cause an explosion. This danger will not happen if nitrogen cylinders with standard CGA (Compressed Gas Association,
Inc.) number 580 connections are used. When you order nitrogen gas, be sure that the cylinders are equipped with CGA
No. 580 connections. Do not use color codes or other methods of identification to tell the difference between nitrogen and
oxygen cylinders.
Accumulator must be charged with dry nitrogen (N2) gas by qualified personnel only. Gas pressure varies with the
temperature. The accumulator {9} must be at the same temperature as the surrounding air before the accumulator {9} can be
checked or charged. Check figure below to determine the correct accumulator charge.
Method of determining percent of flow loss
Flow loss (L/min or US gpm) x 100
Pump flow at 690 kPa (100 psi)
ACCUMULATOR {9}
ACCUMULATOR
VALVE UNDER CAP
31. 030-08OP-002H 572G, 583K, 594H S/N VEI0021 - UP 27
Figure 30: Accumulator high pressure warning and charge decal; located on main guard cover on the right-hand side of
pipelayer.
Do not use an adapter to connect the nitrogen charging equipment to a valve that can be used on oxygen cylinders or gas
cylinders. Use dry nitrogen only.
The pressure of the hydraulic oil on the accumulator {9} must be relieved before the accumulator {9} is tested or charged.
Shut off the engine and perform the procedure to discharge the accumulator {9}. See the Hydraulic System Discharge
section.
Identification of Charging Valves
Identification of the charging valve is critical for safe discharging of the accumulator. Charging valves on Vanguard
equipment include the following types:
TYPE 1: This type of valve is a standard Schrader valve. This valve is opened by depressing a spring-loaded core (1) with
the charging chuck of the nitrogen charging equipment.
32. 030-08OP-002H 572G, 583K, 594H S/N VEI0021 - UP 28
Figure 31: Type 1 accumulator discharge valve
TYPE 2: This type of valve is larger than the type 1 and has 28 mm threads (2). This valve is opened by turning a screw (3)
which is contained in the valve body.
Figure 32: Type 2 accumulator discharge valve
Required Tools
Figure 33: Type 1 Nitrogen charging apparatus
33. 030-08OP-002H 572G, 583K, 594H S/N VEI0021 - UP 29
Figure 34: Thermometer
Figure 35: Type 2 Nitrogen charging apparatus
Tools Needed
CAT Part Number Part Description Quantity
Tool = D 175-5507 Nitrogen Charging Apparatus 1
Item CONSISTS OF:
D1 8S-4600 Fitting 1
D2 8S-1506 Coupling As 1
D3 162-4147 Hose As 1
D4 8S-4599 Coupling As 1
D5 2S-5244 Fitting 1
D6 1S-8937 Needle Valve 1
D7 8T-0859 Pressure Gauge 1
34. 030-08OP-002H 572G, 583K, 594H S/N VEI0021 - UP 30
(0 to 25,000 kPa (0 to 3,600
psi))
D8 162-4146 Regulator 1
D9 7S-5106 Chuck 1
D10 1S-8938 Chuck 1
D11 1S-8941 Hose As 1
Tool = F 349-4200 Thermometer
Tool = H 9U-6740 Accumulator Charging Group
Tool = J 334-1071 Adapter
Tool = K 9U-6741 Adapter
Accumulators with Type 1 Valve
Figure 36: Type 1 Valve references
Discharge Procedure
1. Identify the correct nitrogen charging chuck.
2. Attach hose assembly (D11) to nitrogen charging chuck (D9 or D10).
3. Turn valve handle of nitrogen charging chuck (D9 or D10) all the way in the
counterclockwise direction.
Note: Turning the valve handle will ensure that nitrogen charging valve (8) will not be opened when nitrogen
charging chuck (D9 or D10) is attached.
4. Remove cap (7) from nitrogen charging valve (8).
5. Attach nitrogen charging chuck (D9 or D10) to nitrogen charging valve (8).
6. Turn valve handle of nitrogen charging chuck (D9 or D10) in the clockwise direction in
order to open nitrogen charging valve (8). Turning the valve handle will release all of the
nitrogen from the accumulator through hose assembly (D11).
Tooling (D) 175-5507 Nitrogen Charging Group
Type 1 valve:(7) Cap
(8) Nitrogen charging valve
(9) Core
35. 030-08OP-002H 572G, 583K, 594H S/N VEI0021 - UP 31
Testing and Charging Procedure for the Accumulator Precharge Pressure
Note: Test the accumulator precharge pressure when the machine is not running and all pressure has been released
from the hydraulic system. Refer to the Hydraulic System Discharge section in the Operation and Maintenance
Manual.
1. On the accumulator, remove cap (7) on nitrogen charging valve (8).
2. Identify correct nitrogen charging chuck (D9 or D10).
3. Turn the valve handle of nitrogen charging chuck (D9 or D10) all the way in the
counterclockwise direction.
4. Attach nitrogen charging chuck (D9 or D10) and hose assembly (D11) to nitrogen charging
valve (8).
5. Attach hose assembly (D11) between nitrogen charging chuck (D9 or D10) and the tee.
Install needle valve (D6) to the tee. Refer to Figure 36. Install pressure gauge (D7) in the
remaining open port on the tee.
6. Turn the valve handle for needle valve (D6) all the way in the clockwise direction.
Completely turning the valve handle will ensure the needle valve (D6) is closed.
7. Turn valve handle of nitrogen charging chuck (D9 or D10) in the clockwise direction in
order to open nitrogen charging valve (8).
8. Read pressure gauge (D7) in order to determine the charge pressure in the accumulator. If
charging is needed, attach regulator (D8) to a nitrogen tank.
9. Adjust pressure regulating screw on the regulator to obtain the correct pressure reading on
the gauge, refer to Figure 30 for the correct pressure reading based on temperature. Use
tooling (F) to determine the correct temperature.
Note: If the machine has been running for some time, the temperature of the accumulator may be different from the
ambient temperature of the outside air. Use tooling (F) to determine the current temperature of the accumulator.
10. Open needle valve (D6). Nitrogen will flow from the regulator to the accumulator. When
gauge (D7) reads the correct pressure, close needle valve (D6).
11. Allow the temperature of the accumulator to stabilize. Recheck the precharge pressure at the
stabilized temperature.
12. Once the accumulator is charged, turn the valve handle of chuck (D9 or D10)
counterclockwise completely. Remove chuck (D9 or D10). Remove the regulator from the
nitrogen tank.
36. 030-08OP-002H 572G, 583K, 594H S/N VEI0021 - UP 32
Accumulators with Type 2 Valve
Figure 37: Type 2 Valve references
Tooling (D) 175-5507 Nitrogen Charging Group
Tooling (H)
Tooling (J)
Tooling (K)
Detail of Tooling (H)
(H1) Tee handle
(H2) Manual purge valve
(H3) Cap nut
(H4) Check valve
Type 2 valve
(16) Cap
17 Screw
37. 030-08OP-002H 572G, 583K, 594H S/N VEI0021 - UP 33
Discharge Procedure
1. Turn manual purge valve (H2) in the clockwise direction to close the purge valve.
2. Remove cap (16) from charging valve. In many cases, Tooling (H) will not be able to apply
enough force to break loose vent screw (17). If necessary, use an Allen wrench to break loose
and retighten the vent screw. Turn the vent screw counterclockwise to loosen the screw.
3. Attach tooling (H) to charging valve.
4. Turn tee handle (H1) in the counterclockwise direction to open screw (17). Carefully open
manual purge valve (H2). Release pressure slowly until the gas pressure is discharged.
5. Close the manual purge valve (H2).
Testing and Charging Procedure for the Accumulator Precharge Pressure
Note: Test the accumulator precharge pressure when the machine is not running and all pressure has
been released from the hydraulic system. Refer to the Hydraulic System Discharge section in the Operation and
Maintenance Manual.
1. Before connecting tooling, close needle valve (D6). Turn the valve handle in the clockwise
direction to close the valve.
2. Assemble tooling (D), tooling (H), tooling (J), and tooling (K). Refer to Figure 37.
3. Install regulator assembly (D8) on nitrogen tank valve. Adjust the screw on regulator (D8) to set
the appropriate charge pressure. Refer to Figure 30 for the correct pressure reading based on
temperature. Use tooling (F) to determine the correct temperature.
Note: If the machine has been running for some time, the temperature of the accumulator may be different from the
ambient temperature of the outside air. Use tooling (F) to determine the current temperature of the accumulator.
4. Remove cap (16) from nitrogen charging valve. In many cases, Tooling (H) will not be able to
apply enough force to break loose vent screw (17). If necessary, use an Allen wrench to break
loose and retighten the vent screw. Turn the vent screw counterclockwise to loosen the screw.
6. Attach tooling (H) to the nitrogen charging valve. Hand tighten cap nut (H3).7. Open manual purge valve (H2). Open needle valve (D6). Allow nitrogen flow to purge air from
the lines through the purge valve. After the air is purged, close manual purge valve (H2). Close
needle valve (D6).
8. Turn tee handle (H1) a maximum of three turns in the counterclockwise direction. The gauge on
tooling (H) will show the gas precharge pressure.
8. Open the shutoff valve on the nitrogen tank. Slowly open needle valve (D6).
9. Precharge the accumulator slowly. Charging too quickly may damage the accumulator. When
the desired pressure is reached, close needle valve (D6). Close the shutoff valve on the nitrogen
tank.
10. Allow the temperature of the accumulator to stabilize, then recheck the pressure. When the
desired pressure is reached, turn tee handle (H1) to close the nitrogen charging valve.
11. Open needle valve (D6). Slowly open manual purge valve (H2) to allow pressure in the
charging equipment to purge off. When no pressure remains in the lines, close manual purge
valve (H2). Remove cap nut (H3) from the accumulator. Remove regulator (D8) from the
nitrogen tank.
38. 030-08OP-002H 572G, 583K, 594H S/N VEI0021 - UP 34
Hydraulic Pump Testing and Adjusting
Figure 38: Hydraulic pump {1} assembly.
There are two hydraulic pumps for the hydraulic system. The main hydraulic pump is a piston pump, which supplies the
drawworks. The auxiliary hydraulic pump is a gear pump, which supplies the counterweight circuit and the winch train
lubrication circuit. Auxiliary hydraulic pump is not adjustable.
Follow the procedure outlined out in the Hydraulic System Implementation section before carrying out any tests or
adjustments on the drawworks.
Note: Remove only the appropriate guards and covers necessary to gain access to the hydraulic component to be
tested/adjusted. Replace guards/covers when access to components is no longer required, or when protection from
possible component failure is required prior to activating the system.
Margin Pressure
Margin pressure is the additional pump supply pressure above the required load pressure. The pump output is always above
the pressure that is required by the system, up to the maximum pressure setting. Perform the following test in order to ensure
that the margin pressure is set correctly.
LS PORT
LOAD SENSING
MANIFOLD {4}
030-42-62-004A
Figure 39: Load sensing manifold {4}. (LS) Load sensing port.
39. 030-08OP-002H 572G, 583K, 594H S/N VEI0021 - UP 35
TP1
MAIN
CONTROL
VALVE {5}
030-05-05-048A
Figure 40: Location of Pump pressure port (TP1) on main control valve {5}.
1. Move the hook control lever several times to release pressure in the hydraulic system. Refer to the High Hydraulic
System Pressure section.
2. Extend the counterweight and remove the access panel covering the pipelayer valves.
3. Install a pressure tap in the line connected to port (LS) on the load sensing manifold {4}. Connect the low side of a
35 000 kPa (5000 psi) differential pressure gauge to the pressure tap. If a differential gauge is not available, connect
a 35 000 kPa (5000 psi) pressure gauge.
4. Connect the high side of the 35 000 kPa (5000 psi) differential pressure gauge to port (TP1) on the main control
valve {5}. If a differential gauge is not available, connect a second 35 000 kPa (5000 psi) pressure gauge.
5. Start the engine and move the throttle to HIGH IDLE position. Move the hook control lever to the LOWER
position. Record the value from the differential pressure gauge or the (LS) and (TP1) pressure gauges.
6. The differential pressure gauge gives a direct reading of the margin pressure. If two separate gauges are used,
subtract the pressure reading (LS) from the pressure reading (TP1). This is the margin pressure. The margin
pressure should be 2100 ± 700 kPa (300 ± 100 psi).
Figure 41: Main hydraulic pump. (1) Flow compensator spool.
7. If the margin pressure is not correct, adjust the flow compensator spool to the correct pressure. Loosen the lock nut
and turn the adjustment screw (1) clockwise in order to increase the pressure. Turn the screw counterclockwise inorder to decrease the pressure. The flow compensator spool is located on the main hydraulic pump, which is
beneath the guard covering the hook winch manifold and the pump. Tighten the lock nut in such a way as not to
alter the adjustment screw, once the correct setting has been made.
1
TYPE 1 TYPE 2
40. 030-08OP-002H 572G, 583K, 594H S/N VEI0021 - UP 36
Cutoff Pressure
The cutoff pressure is the highest supply pressure that is produced by the main hydraulic pump. Once this pressure is
reached, the output pressure will not rise further. Perform the following test in order to ensure that the cutoff pressure is set
correctly.
BR
030-42-60-093A 030-42-64-004A
Figure 42: Hook winch manifold – (BR) Brake release port – mounted on hook winch {11}.
TP1
MAIN
CONTROL
VALVE {5}
030-05-05-048A
Figure 43: Location of Pump pressure port (TP1) on main control valve {5}.
1. Disconnect the brake release line from the hook winch brake manifold on the hook winch {11} motor. Plug port
(BR) on the winch.
41. 030-08OP-002H 572G, 583K, 594H S/N VEI0021 - UP 37
2. Connect a 40 000 kPa (6000psi) pressure gauge to port (TP1) on the main control valve.
3. Start the engine and move the throttle to the HIGH IDLE position. Slowly move the hook control lever to the
LOWER position. Measure the pressure on the gauge at (TP1). This is the cutoff pressure for the pump. The
pressure should be 30 000 ± 700 kPa (4300 ±100 psi).
Figure 44: Main hydraulic pump. (1) Pressure compensator spool.
4. If the cutoff pressure is not correct, ensure that the main relief valve is functioning properly as outlined in the Relief
Valve section.
5. If the main relief is functioning and set correctly, but the cutoff pressure is still not correct, adjust the pressure
compensator spool to the correct pressure. Loosen the lock nut and turn the adjustment screw (1) counterclockwise
in order to decrease the pressure. Turn the adjustment screw (1) clockwise to increase the pressure. Once the correct
pressure has been achieved, tighten the lock nut, taking care not to alter the setting. The pressure compensator spool
is located on the main hydraulic pump, which is beneath the guard covering the hook winch manifold and the pump
{1}.
PUMP
GUARD
029-09-09-006A
Figure 45: Pump guard.
1
TYPE 1 TYPE 2
42. 030-08OP-002H 572G, 583K, 594H S/N VEI0021 - UP 38
Main Control Valve
Figure 46: Main control valve {5}. (1) Manifold, (2) relief valve, (3) two-way pilot control valve, (4) -way pilot control
valve, (5) pressure reducing valve, (6) check valve, (7) shuttle valve, (8) shuttle valve, (9) shuttle valve, (10) hook control
valve, (11) boom control valve, (12) return manifold, (TP1) test port (pump pressure), (TP2) test port (pilot pressure), (TP3)
test port (accumulator), (TP4) test port (valve opening pressure).
The main control valve {5} controls the operation of the hook {11} and boom {12} winches. The main control valve {5} is
located behind access panel covering the pipelayer valves. Perform the following procedures in order to ensure that the
components of the main control valve {5} are set correctly.
Note: Remove only the appropriate guards and covers necessary to gain access to the hydraulic component to be
tested/adjusted. Replace guards/covers when access to components is no longer required, or when protection from
possible component failure is required prior to activating the system.
Follow the instructions in the Hydraulic System Implementation section.
Main Relief Valve
Figure 47: Location of the main relief valve.
43. 030-08OP-002H 572G, 583K, 594H S/N VEI0021 - UP 39
The main relief valve controls the maximum system pressure. The relief valve protects the hydraulic components from
damage caused by high-pressure spikes. It is installed in the main control valve manifold {5} located behind the access
panel covering the pipelayer valves. Perform the following procedure in order to ensure that the main relief valve is set
correctly.
TYPE 1 TYPE 2
Figure 48: Main hydraulic pump.
1. Pressure compensator spool.
1. Extend the counterweights and remove the appropriate panels to gain access to the pipelayer valves and hydraulic
pump.
2. Adjust the pressure compensator spool on the main hydraulic pump by two full turns clockwise in order to raise the
cutoff pressure above the main relief pressure.
BR
030-42-60-093A 030-42-64-004A
1
44. 030-08OP-002H 572G, 583K, 594H S/N VEI0021 - UP 40
Figure 49: Hook winch brake manifold – (BR) brake release port – mounted on hook winch {11}.
3. Move the hook control lever several times, in order to release pressure in the hydraulic system. Refer to the High
Hydraulic System Pressure section.
4. Disconnect the brake release line from the hook winch brake manifold on the hook winch motor at port (BR). Plug
port (BR) on the winch {11}.
TP1
MAIN
CONTROL
VALVE {5}
030-05-05-048A
Figure 50: Location of Pump pressure port (TP1) on main control valve {5}.
5. Connect a 40 000kPa (6000psi) pressure gauge to port (TP1) on the main control valve {5}.
45. 030-08OP-002H 572G, 583K, 594H S/N VEI0021 - UP 41
Figure 51: Main relief valve. (2) Adjustment screw.
6. Start the engine and move the throttle to the HIGH IDLE position. Slowly move the hook control lever to the
LOWER position. Measure the pressure on the gauge (TP1). This is the main relief pressure setting. The pressure
should be 33 000 ± 700 kpa (4800 ± 100 psi).
7. If the main relief pressure is not correct, loosen the lock nut and adjust the pressure setting by turning the
adjustment screw (2). Turn the screw clockwise in order to increase pressure. Turn the screw counterclockwise in
order to decrease pressure. One full turn is approximately equal to 8070 kPa (1170 psi). Tighten the lock nut
without altering the setting of the adjustment screw (1), once the correct pressure has been set.
8. After the main relief pressure is set correctly, adjust the pressure compensator spool to the srcinal setting. Follow
the steps outlined in the Cutoff Pressure section.
Pressure Reducing Valve (Pilot Circuit)
MAIN
CONTROL
VALVE {5}
030-05-05-048A
Figure 52: Location of the pressure reducing valve (Pilot Circuit).
The pressure reducing valve for the pilot circuit reduces the main pump pressure to a controllable level for the pilot control
valves. The pressure reducing cartridge is installed in the main control valve manifold {5} located behind the guard covering
the pipelayer valving. Perform the following procedure to ensure that the pressure reducing valve for the pilot circuit is set
correctly.
46. 030-08OP-002H 572G, 583K, 594H S/N VEI0021 - UP 42
TP2
030-05-05-048A
Figure 53: Location of (TP2) Pilot pressure port on main control valve.
1. Connect a 10 000 kPa (1450 psi) pressure gauge to port (TP2).
2. Start the engine. Move the throttle lever to the HIGH IDLE position.
3. Move the hook control lever to the LOWER position. Read the pressure on the gauge. The pressure should be
approximately 5200 kPa (750 psi).
Figure 54: Pressure reducing valve (pilot circuit). (1) Adjustment screw.
4. If the pilot pressure is not correct, adjust the pressure setting by turning the adjustment screw (1). Turn the screw
clockwise in order to increase pressure. One full turn is approximately equal to 6000 kPa (870 psi).
Load Sensing Manifold
The load sensing manifold {4} is used in order to resolve the highest pressure that is required by either the boom or the hook
winch. This pressure signal is sent to the load sensing port on the main hydraulic pump. The pump {1} responds to supply
the required pressure plus the margin pressure. The load sensing manifold {4} is located behind the access panel covering
the pipelayer valving.
47. 030-08OP-002H 572G, 583K, 594H S/N VEI0021 - UP 43
LOAD SENSING
MANIFOLD {4}
030-05-05-048A
Figure 55: Location of load sensing manifold {4}.
Perform the following procedure to ensure that the load sensing manifold {4} is set correctly.
1. Follow the steps in the Hydraulic System Implementation section.
Figure 56: Load sensing manifold {4}.
2. Using a tee fitting, connect a 965 kPa (140 psi) pressure gauge to the hook lower pilot line (a1) at the load sensing
manifold {4}.
3. Using a tee fitting, install a 9650 kPa (1400 psi) in the load sensing line (LS) that connects the load sensing
manifold {4} to the hydraulic pump via the (LS) port.
4. Start the engine. Move the throttle to the HIGH IDLE position.
5. Slowly move the hook control lever a small distance toward the LOWER position, and check the pressure in the
load sensing line (LS). When the gauge in the load sensing line begins to register a pressure, record the pressure in
the hook lower pilot line (a1). The pressure at (a1) should be approximately 620 kPa (90 psi).
(1) -way pilot control valve,
(a1) hook lower port (pilot pressure),
(LS) load sensing port.
48. 030-08OP-002H 572G, 583K, 594H S/N VEI0021 - UP 44
Figure 57: -way pilot control valve.
6. If the pressure is not correct, adjust -way pilot control valve by turning the adjustment screw (2). Turn the screw
clockwise in order to increase pressure. Turn the screw counterclockwise in order to decrease pressure. One full
turn is approximately equal to 520 kPa (75 psi).
Hook Winch Brake Manifold
BR
030-42-60-093A 030-42-64-004A
Figure 58: Hook winch brake manifold, mounted on hook winch {11}.
(1) Manifold
(2) directional valve
(3) pressure reducing valve
(4) counterbalance valve
49. 030-08OP-002H 572G, 583K, 594H S/N VEI0021 - UP 45
The hook winch brake manifold is mounted on the hook winch motor. This valve performs two functions. First, the pressure
reducing valve (3) sets the pressure to the brake release port on the hook winch. Second, the counterbalance valve (4)
controls the back pressure in the winch motor when the hook is lowered. Perform the following procedures to ensure that the
components of the hook winch brake manifold are set correctly.
Hook Brake Release Pressure Testing and Adjusting
1. Follow the procedures in the Hydraulic System Implementation section.
2. Using a tee fitting, connect a 16 000 kPa (2300 psi) pressure gauge to port (BR) on the hook winch brake manifold.
3. Start the engine. Move the throttle control lever to the HIGH IDLE position.
4. Move the Speed/Lockout Control Lever to HIGH SPEED MODE—WINCH CONTROLS UNLOCKED (Hare).
5. Move the hook control lever fully to the LOWER position. Record the pressure on the gauge. This is the hook
brake release pressure. The pressure should be approximately 8600 kPa (1250 psi).
Figure 59: Pressure reducing valve. (5) Adjustment screw.
6. If the pressure is not correct, adjust the pressure by turning the adjustment screw (5). Turn the screw clockwise in
order to increase pressure. Turn the screw counterclockwise to decrease the pressure. One full turn is approximately
equal to 6000 kPa (870 psi).
50. 030-08OP-002H 572G, 583K, 594H S/N VEI0021 - UP 46
Hook Winch Counterbalance Valve
PRESSURE
GAUGE TEE
LOCATION
HOOK-COUNTERBALANCE
VALVE
030-42-64-009A
Figure 60: Location of pressure gauge tee, on hook winch brake manifold.
1. Follow the procedures in the Hydraulic System Implementation section.
2. Install a tee fitting at the location shown in Figure 60 and reconnect the hose line.
3. Connect a 60 000 kPa (8700 psi) pressure gauge to the tee fitting.
4. Start the engine. Move the throttle control lever to the HIGH IDLE position.
5. Move the Speed/Lockout Control Lever to HIGH SPEED MODE—WINCH CONTROLS UNLOCKED (Hare).
6. Move the hook control lever fully to the LOWER position. Record the pressure on the gauge.
7. The result should be approximately 22 800 kPa (3300 psi).
Figure 61: Counterbalance valve. (8) Adjustment screw.
8. If the counterbalance valve pressure is not set correctly, adjust the valve by turning adjustment screw (8). Turn the
screw counterclockwise to increase pressure. Turn the screw clockwise to decrease the pressure. One full turn is
approximately equal to 6900 kPa (1000 psi).
51. 030-08OP-002H 572G, 583K, 594H S/N VEI0021 - UP 47
Boom-Counterbalance Valve
029-42-65-026A
Figure 62: Location of pressure gauge tee on main control valve.
1. Follow the procedures in the Hydraulic System Implementation section.
2. Install a tee fitting at the location shown in Figure 62 and reconnect the hose line.
3. Connect a 60 000 kPa (8700 psi) pressure gauge to the tee fitting.
4. Start the engine. Move the throttle control lever to the HIGH IDLE position.
5. Move the Speed/Lockout Control Lever to HIGH SPEED MODE—WINCH CONTROLS UNLOCKED (Hare)
6. Move the boom control lever to the LOWER position. Record the pressure on the gauge.
7. The result should be approximately 14 480 kPa (2100 psi).
Figure 63: Counterbalance valve. (8) Adjustment screw.
8. If the counterbalance valve pressure is not set correctly, adjust the valve by turning adjustment screw (8). Turn the
screw counterclockwise to increase pressure. Turn the screw clockwise to decrease the pressure. One full turn is
approximately equal to 6900 kPa (1000 psi).
PRESSURE
GAUGE TEE
LOCATION
BOOM-
COUNTERBALANCE
VALVE {13}
52. 030-08OP-002H 572G, 583K, 594H S/N VEI0021 - UP 48
Boom stop Valve Adjustment
Refer to the Boom stop Valve Adjustment procedure in the Maintenance and Lubrication section.
Boom stop PX-Valve Adjustment
(PX)
030-42-62-005B
Figure 64: Boom stop PX-valve (PX) on main control valve {5}.
If the boom winch {12} pauses before hauling-in, or does not haul in, bleed the pilot line at the PX-valve (PX) on the main
control valve {5}.
Counterweight Relief Valve Testing and Adjusting
EXTEND
RETRACT
COUNTER
WEIGHT
CONTROL
HOLD
030-05-63-006B
Figure 65: Counterweight control lever.
1. Follow the procedures outlined in the Hydraulic System Implementation section.
2. Extend the counterweight.
3. Stop the engine.
4. Move the hook control lever several times, in order to release the pressure in the counterweight hydraulic circuit.
Refer to the High Hydraulic Pressure section.
53. 030-08OP-002H 572G, 583K, 594H S/N VEI0021 - UP 49
COUNTERWEIGHT
CONTROL VALE {6}
PRESSURE GAUGE
TEE LOCATION
030-42-60-086A
Figure 66: Location of counterweight pressure gauge tee.
5. Using an additional tee fitting, attach a 40 000 kPa (5800 psi) pressure gauge in the line at the tee shown in Figure
66.
6. Start the engine again and move the counterweight control lever to the EXTEND position, and fully extend the
cylinders. With the cylinders fully extended, move the counterweight control lever slightly toward the EXTEND
position. Record the pressure indicated on the gauge. This is the counterweight relief valve pressure setting. The
pressure should be approximately 12 400 kPa (1800 psi).
Figure 67: Counterweight control valve {6}. (1) Relief valve adjustment screw.
7. If the pressure is not correct, adjust the pressure by turning the relief valve adjustment screw (1) on the
counterweight relief valve {6}. Turn the screw clockwise in order to increase pressure. Turn the screw
counterclockwise in order to decrease pressure.
54. 030-08OP-002H 572G, 583K, 594H S/N VEI0021 - UP 50
Troubleshooting
Problem Checklist
1. The temperature of the oil is too hot.
2. The pump {1} makes unusual noises.
a. The implements do not move slowly.
b. Air bubbles in the oil.
3. A large amount of air in the oil.
4. Low pressure standby is too low.
5. Low pressure standby is too high.
6. Margin pressure is too low.
7. Margin pressure is too high
8. The pump discharge pressure is too high - high pressure stall.
9. The pump discharge pressure is too low - high pressure stall.
10. There is a pause before pressure is reached in all circuits.
11. Signal pressure and/or tank pressure is not at zero when all of the valves are in the Hold position.
12. The hook or the boom will not power down.
13. The hook or the boom will not reel in.
14. The boom winch {12} pauses before hauling-in, or will not haul-in.
No. 1. Problem
The temperature of the oil is too hot
Probable cause:
1. The viscosity of the oil is wrong. Refer to the Lubricant Specifications section.
2. The pump {1} is too worn.
3. There is a restriction in an oil passage.
4. The load on the system is too high.
5. Oil aeration (leak on the inlet side of the pump).
6. Low oil level in the hydraulic tank {2}.
7. The flow compensator valve is set incorrectly - margin pressure is too high.
8. The outside air temperature is too hot.
55. 030-08OP-002H 572G, 583K, 594H S/N VEI0021 - UP 51
No. 2. Problem
The pump {1} makes unusual noises.
a. The implements do not move slowly.
b. Air bubbles in the oil.
Probable cause:
1. The viscosity of the oil is wrong. Refer to the Lubricant Specifications section.
2. There is a loose connection of the oil line on the inlet side of the pump {1}. Oil aeration.
3. There is a restriction in the inlet line of a pump {1}.
4. The pump {1} is too worn.
5. Low oil level in the hydraulic tank {2}.
No. 3. Problem
A large amount of air in the oil
Probable cause:
1. A leak in the oil line between the tank {2} and the pump {1}.
2. Low oil level in the hydraulic tank {2}.
3. Leakage around the counterweight cylinder seals.
No. 4. Problem
Low pressure standby is too low.
Probable cause:
1. The flow compensator valve is set incorrectly.
2. The spring in the flow compensator valve is broken.
3. The pump {1} is not upstroking. The swashplate is blocked or the actuator spring is broken.
4. A low setting of the pressure compensator valve or a broken spring.
No. 5. Problem
Low pressure standby is too high.
Probable cause:
1. The flow compensator valve is set incorrectly.
2. Signal pressure from the implements has not bled off.
56. 030-08OP-002H 572G, 583K, 594H S/N VEI0021 - UP 52
No. 6. Problem
Margin pressure is too low.
Probable cause:
1. The flow compensator valve is set incorrectly.
2. Leak in the signal network in the load sense manifold {4}.
No. 7. Problem
Margin pressure is too high.
Probable cause:
1. The flow compensator valve is set incorrectly.
No. 8. Problem
The pump discharge pressure is too high - high pressure stall.
Probable cause:
1. The pressure compensator valve is set incorrectly.
2. The pressure compensator valve is stuck.
3. The pump {1} is not destroking. The swashplate is blocked or the actuator piston is stuck.
No. 9. Problem
The pump discharge pressure is too low - high pressure stall
Probable cause:
1. The pressure compensator valve is set incorrectly.
2. Spring in the pressure compensating valve is broken or fatigued.
3. Line relief valves are set too low.
4. The load sensing manifold {4} is leaking.
No. 10. Problem
There is a pause before pressure is reached in all circuits.
Probable cause:
1. Air in the signal network in the main control valve.
2. Dirt or debris in the oil could cause a shuttle valve to be held open momentarily.
3. The -way control valve in the load sensing manifold {4} is set incorrectly.
57. 030-08OP-002H 572G, 583K, 594H S/N VEI0021 - UP 53
No. 11. Problem
Signal pressure and/or tank pressure is not at zero when all of the valves are in the HOLD position.
Probable cause:
1. All controls are not in HOLD.
2. The load sensing manifold {4} is not vented.
No. 12. Problem
The hook or boom will not power down.
Probable cause:
1. The brake is not releasing. Perform the brake pressure test.
a. The seals on the brake piston are bad.
b. Leakage in the control valve.
2. One or both counterbalance valves are not set correctly. Perform the pressure test on the counterbalance valves
(hook-winch {11}, boom-counterbalance valve {13}).
3. The winch motor is bad.
4. The sprag clutch is bad.
5. Mechanical failure in the winch.
No. 13. Problem
The hook or boom will not reel in.
Probable cause:
1. The winch motor is bad.
2. Mechanical failure in the winch.
3. The sprag clutch is bad.
No. 14. Problem
The boom winch {12} pauses before hauling-in, or will not haul-in.
Probable cause:
1. Air trapped in line from boom stop valve {8} to PX-valve on main control valve {5}. Bleed the line at the PX-
valve.
58. 030-08OP-002H 572G, 583K, 594H S/N VEI0021 - UP 54
Appendix A: PULLMASTER Winch Corporation – Winch Rigging Anchor
procedures
To install cable anchor sub-assembly 23456 in the drawworks hook winch {11} part # 78166 (model M30D-8-173-48D-
498), follow the steps listed below (Ref: Pullmaster Drawing SI1047 – Rev A):
Step 1: Feed the 19.05 mm (¾ in) wire rope through the cable anchor slot as shown below.
Step 2: Make certain 2 to 4 threads of the capscrew (23459) are engaged in cable anchor (23436). Insert cable anchor
assembly (23456), starting with socket head capscrew, in the cable anchor slot as far as it will go and the threaded
hole in the cable anchor nearest the wire rope. Rotate the retainer (23457) so that lip of the retainer faces the top
edge of the cable anchor slot.
59. 030-08OP-002H 572G, 583K, 594H S/N VEI0021 - UP 55
Step 3: Push and hold the head of the socket head capscrew, so that the lip of the retainer (23457) rests against the edge of
the cable anchor slot. Loop the wire rope and feed the end into the slot past the cable anchor. The end of the wire rope
should be approximately 6.35 mm (¼ in) to 19.05 mm (¾ in) inside the lip of the cable anchor slot.
Step 4: Pull the wire rope until the wire rope is seated against the cable anchor. Tighten the capscrew with 41 to 47 Nm (30
to 35 lb-ft) torque.